

Page 1

Operating instructions
Radio / CD
Hamburg CD70
Phoenix CD70
Page 2

Open here
Ouvrir s.v .p.
Por favor, abrir
Fa v or abrir
2
Page 3
ENGLISH
FRANÇAIS
ESPAÑOL
2
1
3
4
5
6
PORTUGUÊS
NEDERLANDS
14
13
12
11
10
9
8
7
SVENSKA
ESPAÑOL
PORTUGUÊS
3
Page 4

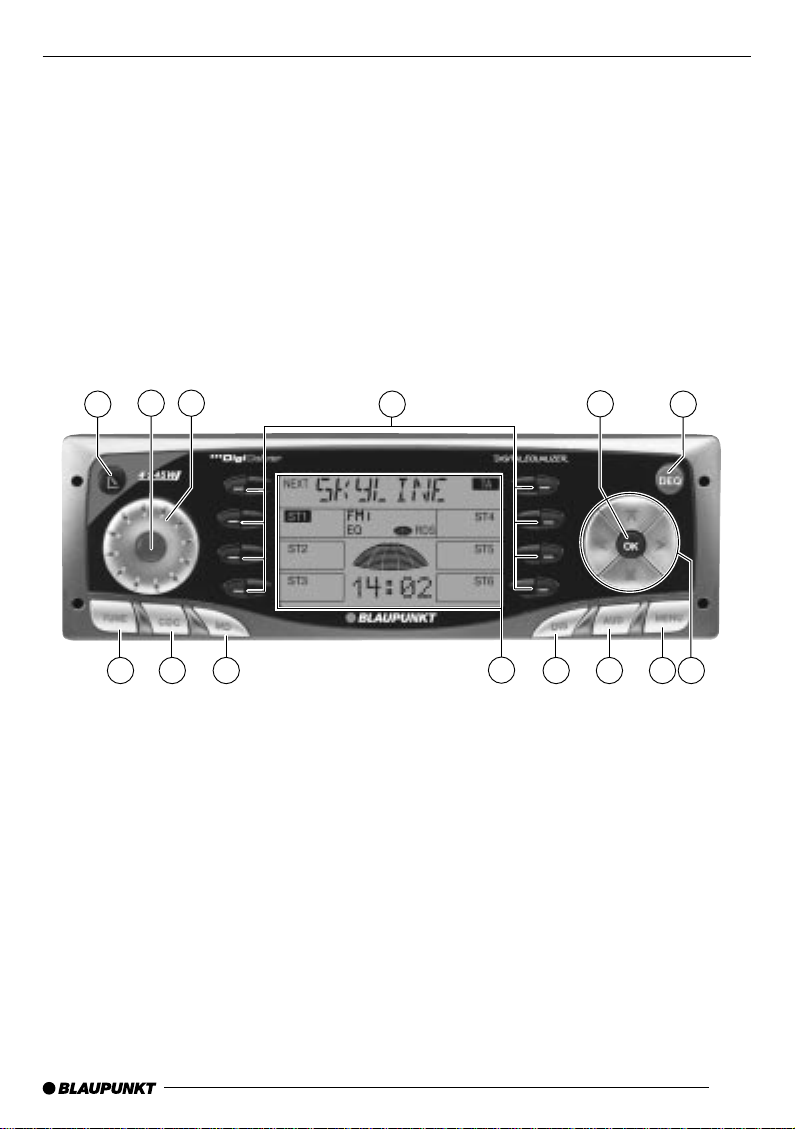
OPERATING ELEMENTS
1 button for opening the control unit
2 Button for switching the de vice on and
off and for muting the device
3 V olume control
4 Softkeys. The function of the Softk e ys
depends on the contents of the display at the time
5 OK button for confirming menu entries
and for leaving the menu
6 DEQ button for calling up the equaliz-
er menu
7 Multi-function rocker
8 MENU button, which calls up the bas-
ic settings menu
9 AUD button for adjusting bass, treble,
balance, fader and loudness
: DIS button, to change the contents of
the display
; Display
< CD button, to start playing the CD
= CDC button, to start play from the CD
changer (only if connected) or
play from an external audio source
(only if connected)
> TUNE button, to begin radio operation
Calling up the radio function menu
(only possible when the radio is
switched on)
4
Page 5

CONTENTS
Notes ............................................... 6
Road safety ............................................. 6
Fitting ...................................................... 6
Accessories............................................. 6
Guarantee ............................................... 6
International telephone information......... 6
KeyCard Theft Protection .............. 7
Inserting the KeyCard ............................. 7
Removing the KeyCard ........................... 7
Replacing KeyCards / “Training” a
second KeyCard...................................... 7
KeyCard lost or damaged........................ 8
Training a new KeyCard / Entering the
master code ............................................ 8
Visual theft protection (LED) ................... 8
Display Radio Passport Data .................. 9
Care of the KeyCard................................ 9
Switching on and off...................... 9
Adjusting the volume................... 10
Tone and volume .......................... 11
Adjusting the display................... 12
Radio Operation ........................... 13
Switching to Radio Mode ...................... 13
RDS Function........................................ 13
Tuner Alternative ................................... 13
Select Wav eband/Memory Level........... 13
Setting the station ................................. 14
Setting station search sensitivity ........... 14
Saving a station..................................... 14
Saving a station automatically
(Travelstore) .......................................... 14
Going to a pre-set station...................... 14
Scanning through stations .................... 15
Setting sample duration (Scantime) ...... 15
Program type (PTY) .............................. 15
Optimising radio reception .................... 16
Switching between stereo and mono .... 17
Changing information displayed............ 17
Setting the tuner.................................... 17
CD operation................................. 18
Starting CD operation and inserting
the CD ................................................... 18
Removing the CD.................................. 18
Selecting a track.................................... 18
Fast searching (audible)........................ 18
Random Track Replay (MIX) ................. 18
Scanning tracks (SCAN) ....................... 18
Repeating tracks (REPEAT) .................. 19
Changing the display contents .............. 19
Programming favourite CD tracks ......... 19
Naming CDs.......................................... 20
CD changer operation (optional) 21
Starting CD changer operation ............. 21
Selecting a CD ...................................... 21
Selecting a track.................................... 21
Fast searching (audible)........................ 21
Changing the display contents .............. 21
Repeat play of individual tracks or
whole CDs (REPEAT) ........................... 21
Playing tracks in random sequence
(MIX) ..................................................... 21
Sampling all tracks on all CDs (SCAN) . 22
Naming CDs.......................................... 22
Programming favourite CD tracks ......... 23
CLOCK - Time ............................... 24
Setting the time ..................................... 24
Selecting 12/24-hour clock mode.......... 24
Having the time displayed constantly
when the device is switched off............. 24
Equalizer ....................................... 25
Adjustment instructions......................... 25
Switching the equalizer on and off ........ 25
Adjusting the equalizer.......................... 25
Adjusting the sharpness of the filter ...... 25
Selecting the tone preset ...................... 25
Level meter / Spectrometer................... 26
Equalizer adjustment guide................... 26
External audio sources................ 27
Pre-amplifier / subout .................. 27
Tec hnical data .............................. 28
Installation instructions............. 109
ENGLISH
FRANÇAIS
ESPAÑOL
PORTUGUÊS
NEDERLANDS
SVENSKA
ESPAÑOL
PORTUGUÊS
5
Page 6

NOTES
Thank you for choosing a Blaupunkt product.
We hope your new de vice brings y ou a lot of
pleasure.
Note
Before you use your car radio f or the first time,
please read this guide carefully and make
yourself familiar with the device. Keep this
guide in the car for later reference.
Road safety
Road safety has the first priority. Only
make adjustments to your car radio when
the traffic conditions allow . F amiliarise yourself with the device before you start driving.
You must be able to hear audible alarms
from police vehicles, fire engines or ambulances promptly when inside the vehicle. You must therefore listen at an appropriate volume when travelling.
Fitting
If you want to fit your car radio y ourself , read
the fitting and connecting notes at the end of
the guide.
Accessories
Only use accessories approved by Blaupunkt.
Remote control
The optional RC 10, RC 10 H, and RC 08
remote controls allow you to control your car
radio’s basic functions saf ely and conveniently.
Amplifier
Any Blaupunkt amplifier can be used.
CD changer
The following Blaupunkt CD changers can be
connected:
CDC A 06, CDC A 08, CDC A 072 and IDC
A 09.
If an adapter cable is used (Blaupunkt No.
7 607 889 093) the CDC A 05 or CDC A 071
CD changers can also be connected.
Guarantee
The extent of the guarantee depends on the
statutory conditions applicable in the country
where the device was bought.
Regardless of statutory requirements, Blaupunkt offer a twelve month guar antee .
If you have any questions about your guarantee, please refer to y our authorised Blaupunkt dealer. In every case the purchase receipt constitutes the guarantee documentation.
International telephone
information
If you have any questions about the operation of the device, or if you need any other
information, please call us!
The numbers for the telephone information
are on the last page of this guide.
6
Page 7
THEFT PROTECTION
KeyCard Theft Protection
Two KeyCards are included with your car radio.
If one KeyCard is lost or damaged you can
obtain a replacement through your Blaupunkt
dealer.
If you use two KeyCards, the settings of the
first KeyCard are adopted by the first KeyCard. You can, however, store the following
functions separately:
station button allocation, bass, treble , balance
and fader settings, loudness, beep volume
and equalizer settings.
In addition to this, the most recent settings
for wav eband, station, RDS,scan time, search
sensitivity, initial volume and SHARX are
stored.
This means that the basic settings you have
selected are made as soon as the KeyCard
is inserted.
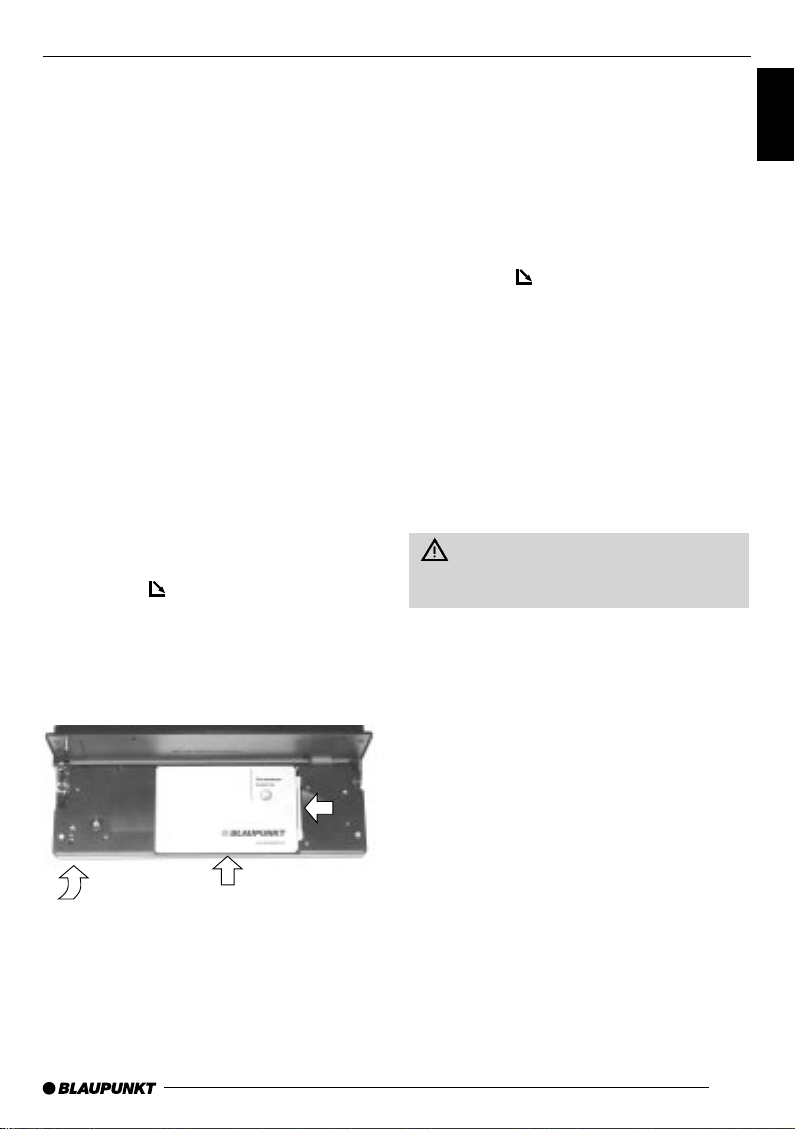
Inserting the KeyCard
➮ Press the button, 1.
The control unit opens.
➮ Insert the KeyCard, as shown in the di-
agram (arrow 1), with the contact surfaces downwards.
2
Note:
If the wrong kind of card, such as a credit card,
is inserted into the device, “Wrong KC” will
appear on the display.
Remove the incorrect card, and insert a KeyCard that is known to the device.
Removing the KeyCard
To unlock the control unit:
➮ Press the button, 1.
The control unit opens.
➮ Push the card with the holder to the
right until you feel it stop .
➮ Remove the card from the control unit.
➮ Close the control unit.
Note:
In order to prevent theft, remo ve the Ke yCard
whenever y ou leave the vehicle , and leave the
control unit opened.
For reasons of safety the control unit
must always be closed when the v ehicle is
moving.
Replacing KeyCards / “Training”
a second KeyCard
Note:
A maximum of two KeyCards can be used
per device.
If you already hav e two KeyCards for the device and you “train” a third KeyCard, the device can no longer be operated with the Ke yCard not involv ed in the training process.
ENGLISH
FRANÇAIS
ESPAÑOL
PORTUGUÊS
NEDERLANDS
SVENSKA
ESPAÑOL
3
1
➮ Gently push the KeyCard with the hold-
er in the direction of the arrow (2) until
you feel it stop.
➮ Close the control unit (arrow 3).
PORTUGUÊS
7
Page 8
THEFT PROTECTION
To “train” a new KeyCard in case of loss or
damage:
➮ Insert the first KeyCard and switch the
device on.
➮ Press the MENU button, 8.
➮ Press the or button, 7, until
“LEARN KC” appears in the display.
➮ Press the button, 7.
“CHANGE” appears in the display.
➮ Remove the first KeyCard.
➮ Insert the new KeyCard.
“LEARN OK” appears in the display.
To leave the menu:
➮ Press the MENU button, 8.
The radio can now be operated with the new
KeyCard.
KeyCard lost or damaged
If all the KeyCards belonging to a de vice are
damaged or lost, a new Ke yCard will hav e to
be “retrained” with the device’s master code.
You will find this code in the device’s Car Radio Passport.
Keep your Car Radio Passpor t in a
safe place, but never in the car itself.
The instructions for this are in the section on
“Training a new KeyCard / Entering the master code”.
Using this KeyCard, you can then “train” a
second KeyCard. Please read the section on
“Replacing / Training KeyCards”.
New KeyCards can be obtained from your
dealer.
Training a new KeyCard /
Entering the master code
If you no longer have a v alid KeyCard f or your
device, and would lik e to train a new Ke yCard:
➮ Insert the new, unknown KeyCard into
the device.
➮ Close the control unit.
➮ If necessary , switch the device off.
➮ Hold down the TUNE and ST1 buttons,
> and 4, at the same time.
➮ Switch the device on with the main but-
ton, 2.
“0000” appears in the displa y.
Enter the four-figure master code from the Car
Radio Passport as follows:
➮ Enter each of the numbers for the mas-
ter code using the
7, pressing until the desired number
appears in the display.
and buttons,
➮ To enter the next/previous digit, use the
and buttons, 7.
➮ When the master code is correctly dis-
played, press the OK b utton, 5.
If the device switches to play, the new Key-
Card has been accepted.
Visual theft protection (LED)
When the device is switched off and the K eyCard has been removed, the power button
and the CD slot illumination can be set to flash.
This is done by setting “LED” to “ON” in the
menu.
➮ Press the MENU button, 8.
➮ Press the or button, 7, until either
“LED ON” or “LED OFF” appears in the
display.
➮ Press the or button, 7, to switch
between the settings ON and OFF.
➮ Press the OK button, 5, or the MENU
button, 8, to leave the menu. The set-
tings are then saved.
8
Page 9

SWITCHING ON AND OFFTHEFT PROTECTION
Display Radio Passport Data
Using the KeyCard supplied, you can view
Radio Passport data such as device name,
type number (7 6 ...) and device number in
the display.
➮ Press the MENU button, 8.
➮ Press the or button, 7, until
“READ KC” appears in the display.
➮ Press the button, 7.
The Radio Passport data is shown on the display as scrolling text.
To leave the menu:
➮ Press the OK button, 5 or the MENU
button, 8, to leav e the men u. The settings are then saved.
Care of the KeyCard
The KeyCard can only function properly if the
contacts are free of particles. Avoid touching
the contacts with your skin.
If necessary, clean the K eyCard contacts using a lint-free cloth dipped in alcohol.
Switching on and off
There are a number of methods for s witching
the device on or off.
Switching on and off with the
button 2
➮ Press the main button, 2, to switch on.
The device switches on.
➮ To switch off, hold the main button, 2,
pressed for longer than two seconds.
The device switches off.
Switching on and off with the
vehicle ignition
If the device is correctly connected to the vehicle ignition, and has not been switched off
with the main button, 2, it is s witched on and
off along with the ignition.
You can also switch the device on when the
ignition is off.
➮ Press the main button, 2.
Note:
In order to protect the vehicle battery, the
device is automatically switched off after an
hour if the vehicle ignition is off.
ENGLISH
FRANÇAIS
ESPAÑOL
PORTUGUÊS
NEDERLANDS
SVENSKA
Switching on and off with the
KeyCard
You can also switch the device on and off by
inserting and removing the KeyCard, if the
device was not previously switched off with
the main button, 2. Read the chapter on
“KeyCard theft protection” for information
about inserting and removing the KeyCard.
ESPAÑOL
PORTUGUÊS
9
Page 10

VOLUME
Adjusting the volume
The volume can be adjusted in steps from 0
(off) to 66 (maximum).
➮ To increase the volume, turn the volume
control to the right.
➮ To reduce the volume, turn the volume
control to the left.
Adjusting the switch-on volume
The volume level of the device when it is
switched on can be adjusted.
➮ Press the MENU button, 8.
➮ Press the button, 7, as often as is
necessary for “ON VOL ” to appear in the
display.
➮ Adjust the switch-on volume with the
buttons, 7, or with the v olume
control.
If you set a volume level below “1”, “LAST
VOL” will appear in the display. This means
that whatever volume was in use before the
device was s witched off will be activated again
when the device is switched on.
Risk of serious injury!
If the level of switch-on volume is set to
maximum, the volume when switching on
can be very high.
If the volume was set to maximum
before switching off, and the value for the
switch-on volume is set to “LAST V OL ”, the
volume when switching on can be very
high.
Either case can result in serious injury to
hearing!
➮ Press the OK button, 5, or the MENU
button, 8, to leav e the men u. The settings are then saved.
Muting
Y ou can reduce the le vel of the volume (mute)
suddenly.
➮ Press the main button, 2.
“MUTE” is shown on the display.
Cancelling the mute
➮ Press the main button, 2.
or
➮ Turn the volume control, 3.
Muting during telephone
operation
If your car radio is connected to a mobile telephone, the radio is muted when the telephone
is taken “off the hook”. This requires the mobile telephone to be connected to the car radio as described in the fitting instructions.
Adjusting the volume for the
confirmation tone (beep)
With certain functions, if you hold a button
pressed for longer than two seconds, for instance in order to save a station frequency to
a station button, a confirmation tone, or beep,
is generated. The volume level of the beep
can be adjusted.
➮ Press the MENU button, 8.
➮ Press the button, 7, as often as is
necessary for “BEEP” to appear in the
display.
➮ Adjust the volume with the buttons,
7, or with the volume control. “0”
means that the beep is off, while “9” is
the maximum beep volume.
➮ Press the OK button, 5, or the MENU
button, 8, to leave the menu. The settings are then saved.
10
Page 11

TONE AND VOLUME
Tone and volume
Note:
You can make separate adjustments to the
bass, treble and loudness for each audio
source.
Adjusting the bass
➮ Press the AUD button, 9.
“BASS” appears in the display.
➮ Press the or buttons, 7, in order
to adjust the bass.
When you have finished the adjustment
➮ Press the AUD button, 9.
Adjusting the treble
➮ Press the AUD button, 9.
“BASS” appears in the display.
➮ Press the or button, 7, as often
as is necessary for “TREBLE” to appear
in the display.
➮ Press the or buttons, 7, in order
to adjust the treble.
When you have finished the adjustment
➮ Press the AUD button, 9.
Loudness
Loudness refers to a bass boost at low volume levels matching the ear’s sensitivity.
➮ Press the AUD button, 9.
“BASS” appears in the display.
➮ Press the or button, 7, as often
as is necessary for “LOUD” to appear in
the display.
➮ Press the or buttons, 7, in order
to adjust the loudness. “LOUD OFF”
means that the loudness function is inactive, while “LOUD 6” indicates the
maximum loudness boost.
When you have finished the adjustment
➮ Press the AUD button, 9.
Adjusting the left/right volume
balance
➮ In order to adjust the balance, press the
AUD button, 9.
“BASS” appears in the display.
➮ Press the or button, 7, as often
as is necessary for “BAL” to appear in
the display.
➮ Press the or buttons, 7, in order
to adjust the balance between left and
right.
When you have finished the adjustment
➮ Press the AUD button, 9.
Adjusting the front/rear volume
ratio (fader)
➮ In order to adjust the fader , press the
AUD button, 9.
“BASS” appears in the display.
➮ Press the or button, 7, as often
as is necessary for “FADER” to appear
in the display.
➮ Press the or buttons, 7, in order
to adjust the balance between front and
rear.
When you have finished the adjustment
➮ Press the AUD button, 9.
ENGLISH
FRANÇAIS
ESPAÑOL
PORTUGUÊS
NEDERLANDS
SVENSKA
ESPAÑOL
PORTUGUÊS
11
Page 12

DISPLAY
Adjusting the display
You can adjust the display to its location in
your vehicle and to your taste.
Adjusting the viewing angle
➮ Press the MENU button, 8.
➮ Press the or button, 7, as often
as is necessary for “ANGLE” to appear
in the display.
➮ Adjust the viewing angle with the
key, 7.
➮ Press the OK button, 5 or the MENU
button, 8, to leav e the men u. The settings are then saved.
Adjusting the display brightness
If your car radio has been connected as described in the fitting instructions, the display
brightness will switch with the headlights. The
display brightness can be set at separate levels for day and night in steps from 1 to 9.
Daytime display brightness
➮ Press the MENU button, 8.
➮ Press the or button, 7, as often
as is necessary for “DIM DAY” to appear
in the display.
➮ Adjust the brightness with the key,
7.
➮ Press the OK button, 5 or the MENU
button, 8, to leav e the men u. The settings are then saved.
Night-time display brightness
➮ Press the MENU button, 8.
➮ Press the or button, 7, as often
as is necessary for “DIM NGHT” to appear in the display.
➮ Adjust the brightness with the key,
7.
➮ Press the OK button, 5 or the MENU
button, 8, to leave the menu. The settings are then saved.
12
Page 13

RADIO OPERATION
Radio Operation
Switching to Radio Mode
If the car radio is in another operating mode:
➮ Press the TUNE button, >.
RDS Function
This device is equipped with an RDS radio
receiver. Some FM stations transmit a signal
in addition to the program itself containing
information such as the name of the station
and the type of program (PTY).
If RDS is activated, the station name is displayed as soon as it is receiv ed. The program
type can also be displayed if required. Read
more about this in the section on “Program
Type (PTY)”.
Switching RDS on and off
To use the RDS function:
➮ Press the TUNE button, >, when the
radio is operating.
The radio function menu is shown on the display.
➮ Press the softkey, 4, indicating “RDS”.
The RDS function is active if “RDS” is displayed with light and shade reversed. When
RDS is switched on or off, “RDS ON” or “RDS
OFF” appears briefly in the display.
To return to the basic radio menu:
➮ Press the TUNE button, >, or wait f or
eight seconds. The settings are then
saved.
Tuner Alternative
Using the TA function (Tuner Alternative), the
device automatically searches for the best frequency on which the current RDS station can
be received.
Switching TA on and off
To use the TA function:
➮ Press the softkey, 4, indicating “TA”.
The TA function is active when “TA” appears
in the display with light and shade reversed.
To deactivate the TA function:
➮ Press the softkey, 4, indicating “TA”
again.
Select Waveband/Memory Level
This radio can receive FM and AM stations.
Three memory levels are av ailable for the FM
waveband (FMI, FMII and FMT), and two
memory levels for the AM w a v eband (M and
MT).
Six stations can be stored in each memory
level.
Selecting the waveband
To switch between FM and AM:
➮ Press the TUNE button, >, when the
radio is operating.
The radio function menu is shown on the display.
➮ Press the softkey, 4, indicating “BND”
until the desired waveband is shown in
the display.
To return to the basic radio menu
➮ Press the TUNE button, >, or wait f or
eight seconds. The settings are then
saved.
Selecting memory level
To switch between the various memory levels (FMI, FMII, FMT, AM, AMT):
➮ Press the softkey, 4, indicating “NEXT”
until the desired memory level is shown
in the display.
The memory levels appear in the following
order: FM I, FM II, FMT, M (AM), MT (AMT).
ENGLISH
FRANÇAIS
ESPAÑOL
PORTUGUÊS
NEDERLANDS
SVENSKA
ESPAÑOL
PORTUGUÊS
13
Page 14

RADIO OPERATION
Setting the station
There are a number of ways to set the station.
Automatic station search
➮ Press the or button, 7.
The next station that can be received is tuned
in.
Manual station tuning
You can also tune to the station manually:
➮ Press the or button, 7.
Setting station search sensitivity
You can choose whether to search only for
stations with strong signals, or whether weak
stations should be included:
➮ Select the waveband (AM or FM) to
which the setting should apply.
➮ Press the MENU button, 8.
➮ Press the or button, 7, until “FM-
SENS” or “AM-SENS” appears in the
display.
➮ Press the button or , 7.
The current sensitivity value is shown on the
display. “SENS 6” indicates the maximum
sensitivity for the reception of distant transmitters, and “SENS 1” indicates the lowest
sensitivity.
➮ Set the desired sensitivity by pressing
or , 7.
➮ Press the OK button, 5, or the MENU
button, 8, to leav e the men u. The settings are then saved.
Saving a station
Saving a station manually
➮ Choose the desired memory level: FM I,
FM II, FMT, M or MT .
➮ Tune in the desired station as described
under “Setting the station”.
➮ Hold down the softkey, 4, indicating
the position [(“ST1” - “ST6”) where the
station is to be stored] for longer than
two seconds.
Saving a station automatically
(Travelstore)
You can also save the six strongest stations
in the area automatically. This is done in the
FMT and MT memory levels.
Note:
Any stations previously sav ed on this level will
be deleted.
To use the Travelstore function:
➮ Press the TUNE button, >, when the
radio is operating.
The radio function menu is shown on the display.
➮ Press the softkey, 4, indicating “TS”.
Storing starts. “T-STORE” appears in the display. When the procedure is complete, the
station in memory location 1 on the FMT or
MT level is pla yed.
Going to a pre-set station
➮ Select the memory level or waveband.
➮ Press the softkey, 4, indicating “ST1” -
“ST6” for the desired station.
14
Page 15

RADIO OPERATION
Scanning through stations
Scanning through available stations
(Radio SCAN)
Y ou can listen to short samples of all currently receivable stations. The length of the samples can be set, in the menu, to between 5
and 30 seconds.
Start radio SCAN
To start the radio scan:
➮ Press the TUNE button, >, when the
radio is operating.
The radio function menu is shown on the display.
➮ Press the softkey, 4, indicating “SCA”.
The scanning process starts. “SCAN” appears
briefly in the display, after which the current
station name or the frequency is displayed,
flashing.
Scan through the pre-set stations
You can listen to shor t samples from all the
stations saved on the various memory lev els
that can currently be received. The length of
the samples can be set, in the menu, to between 5 and 30 seconds.
Start pre-set SCAN
To start the pre-set scan:
➮ Press the TUNE button, >, when the
radio is operating.
The radio function menu is shown on the display.
➮ Hold down the softkey, 4, indicating
“SCA” for longer than one second.
The scanning process starts. “SCAN” appears
briefly in the display. The memory levels are
scanned one after another, and the memory
location from “ST1” to “ST6” currently being
sampled is displayed with light and shade
reversed.
Stop the SCAN, continue listening to a
station
➮ Press any button on the arrow b lock,
7.
The scanning process is stopped, and the last
station sampled continues playing.
Setting sample duration
(Scantime)
➮ Press the MENU button, 8.
➮ Press the or button, 7, until
“SCANTIME” appears in the displa y.
➮ Set the desired sampling time by press-
ing
or , 7.
➮ Press the OK button, 5, or the MENU
button, 8, to leave the menu. The settings are then saved.
Note:
The selected sample length also applies to
scanning in CD , tape cassette, MiniDisc and
CD changer mode (depending on how your
device is equipped).
Program type (PTY)
As well as the station name itself, some FM
stations also supply information about the type
of program being broadcast. This inf ormation
can be received and display ed by y our radio .
Such program types might include:
CULTURE TRAVEL JAZZ
SPORT NEWS POP
ROCK CLASSICS
Using the PTY function, you can specifically
select stations broadcasting a particular program type.
If you carry out a PTY search, but no matching station is found, the search will be continued in the background.
ENGLISH
FRANÇAIS
ESPAÑOL
PORTUGUÊS
NEDERLANDS
SVENSKA
ESPAÑOL
PORTUGUÊS
15
Page 16

RADIO OPERATION
As soon as a station of the selected type is
found, the device switches from the present
station, or out of CD , cassette tape, MiniDisc
or CD changer mode (depending on how your
radio is equipped) to the station with the selected program type.
Activating PTY
To use the PTY function:
➮ Press the TUNE button, >, when the
radio is operating.
The radio function menu is shown on the display.
➮ Press the softkey, 4, indicating “PTY”.
When PTY is switched on, the display briefly
shows the last program type that was selected. “PTY” appears in the display.
To return to the basic radio menu:
➮ Press the TUNE button, >, or wait f or
eight seconds. The settings are then
saved.
Deactivating PTY
➮ Press the TUNE button, >, when the
radio is operating.
The radio function menu is shown on the display. “PTY” appears in the display.
➮ Press the softkey, 4, indicating “PTY”.
“PTY” disappears from the displa y.
To return to the basic radio menu:
➮ Press the TUNE button, >, or wait f or
eight seconds. The settings are then
saved.
Selecting the program type and starting
the search
➮ Press the or button, 7.
The current program type is shown on the
display.
To change to a different program type:
➮ Press the or button, 7, until the
desired program type is display ed.
Or
➮ Select a saved program type by press-
ing one of the softkeys, 4, indicating
“ST1” -”ST6".
The selected program type is briefly displayed.
In order to start the search:
➮ Press the or button, 7.
The next receivable station with the selected
program type is tuned in.
Note:
If no station is found with the chosen program
type, a beep is heard and the display briefly
shows “NO PTY”. The tuner returns to the
most recently received station.
Storing program type on station buttons
➮ Select a program type with the or
button, 7.
➮ To save a program type, hold down one
of the softkeys, 4, indicating “ST1” to
“ST6”, for longer than one second.
The program type is saved at the chosen location.
Optimising radio reception
Treble cut in the presence of interference
(HICUT)
The HICUT function improves the sound
when radio reception is poor. When interference is being received, the treble is automatically cut which also reduces the level of interference.
Setting HICUT
➮ Press the MENU button, 8.
➮ Press the or button, 7, until “HI-
CUT” appears in the displa y.
➮ Press the or buttons, 7, to adjust
the HICUT function.
“NO HICUT” means that the function is inactive, while “HICUT 3” indicates the strongest
automatic reduction of treble and interference .
16
Page 17

RADIO OPERATION
➮ Press the OK button, 5 or the MENU
button, 8, to leav e the men u. The settings are then saved.
Bandwidth selection in the presence of
interference (SHARX)
The SHARX function enables you to minimize
interference from neighbouring stations.
Switch on the SHARX function when stations
are crowded.
Switching SHARX on and off
➮ Press the MENU button, 8.
➮ Press the or button, 7, until
“SHARX” appears in the display.
➮ Press the or buttons, 7, to switch
SHARX on or off.
“NO SHARX” means that the function is not
active, while “SHARX ON” means that the
bandwidth selection is operating automatically.
➮ Press the OK button, 5 or the MENU
button, 8, to leav e the men u. The settings are then saved.
Switching between stereo and
mono
When radio reception is poor, you can s witch
to mono mode. When first switched on, the
radio always pla ys in stereo . The selection of
stereo or mono is made via the menu.
➮ Press the MENU button, 8.
➮ Press the or button, 7, until
“STEREO” or “MONO” appears in the
display.
➮ Press the or button, 7, to choose
between stereo and mono.
➮ Press the OK button, 5 or the MENU
button, 8, to leav e the men u. The settings are then saved.
Changing information displayed
You can select which information is shown
on the display. The upper display line (the
headline) can display the station name, frequency or program type. The lower display
line (DOT field) can display the time or the
memory level.
Changing the headline
➮ Hold down the DIS button, :, until the
desired information is displayed, i.e . station name, frequency or program type.
Changing the DOT field
➮ Hold down the DIS button, :, f or long-
er than one second.
The display switches betw een time and memory level.
Setting the tuner
You can set the tuner for use in the USA or
Latin America.
➮ Press the MENU button, 8.
➮ Press the or button, 7, until
“TUNER” appears in the displa y.
➮ Press the or button, 7, to choose
between “USA” and “LATIN”.
➮ Press the OK button, 5 or the MENU
button, 8, to leave the menu. The settings are then saved.
ENGLISH
FRANÇAIS
ESPAÑOL
PORTUGUÊS
NEDERLANDS
SVENSKA
ESPAÑOL
PORTUGUÊS
17
Page 18

CD OPERATION
CD operation
You can play 12 cm-diameter commercial
CDs on this device.
So-called CD-Rs (“home-made” CDs) can
also usually be played. Ho w ev er, because of
the varying CD quality, Blaupunkt cannot
guarantee correct function.
Rewritable CDs (CD-RWs) cannot be pla yed!
There is a risk of damaging the CD
drive!
Neither CD singles with a diameter of 8
cm nor non-circular “shape” CDs may be
used.
No responsibility can be accepted for damage to the CD drive through the use of unsuitable CDs.
Starting CD operation and
inserting the CD
● If there is no CD in the drive
➮ press the button, 1.
The control unit opens.
➮ Insert the CD with the printed side up-
wards gently into the drive until you can
feel some resistance.
The CD is automatically drawn into the drive.
As the CD is drawn in it must neither be held
back nor supported.
➮ Close the control unit with gentle pres-
sure until you feel it latch.
The CD menu is displayed, and the CD starts
playing.
● If there is already a CD in the drive
➮ press the CD button, <.
The CD menu is displayed, and play begins
from the point where it was last interrupted.
Removing the CD
➮ Press the button, 1.
The control unit opens to the front.
➮ Press the button on the opened control
unit.
The CD is ejected.
➮ Carefully remove the CD.
Note:
If you do not remove the CD within 30 seconds it will be drawn back into the drive.
Selecting a track
➮ Press one of the buttons in the arrow
button group, 7, as often as needed
for the number of the desired trac k to
appear in the display.
If the or button, 7, is pressed once the
current track will be started again.
Fast searching (audible)
In order to search rapidly backwards or forwards
➮ hold down one of the , or but-
tons, 7, until the fast search bac kwards of forwards starts.
Random Track Replay (MIX)
➮ Press the softkey, 4, indicating “MIX”.
“MIX CD” appears briefly on the display. The
next track to be pla yed will be selected at random.
Ending MIX
➮ Press the softkey, 4, indicating “MIX”
again.
“MIX OFF” appears briefly on the display.
Scanning tracks (SCAN)
Y ou can hear a brief sample from all the tracks
on the CD .
➮ Press the softkey, 4, indicating “SCA”.
“SCAN” appears in the display. The trac ks on
the CD are played in ascending order.
Note:
The duration of the samples can be adjusted.
18
Page 19

CD OPERATION
For information on setting the sampling duration, read the paragraphs on “Adjusting the
Sample Duration” in the “Radio Operation”
section.
Stopping the SCAN to continue listening
to a track
➮ Press the softkey, 4, indicating “SCA”
again.
The track that is currently being sampled will
continue to be played.
Repeating tracks (REPEAT)
➮ Press the softkey, 4, indicating “RPT”.
The title will be repeated until RPT is deactivated.
Stopping REPEAT
➮ Press the softkey, 4, indicating “RPT”
again.
Play continues as normal.
Changing the display contents
You can choose between different display
modes during CD operation:
● Display of track number and time.
● Display of track number and play time .
● Display of CD name and track number.
➮ In order to change between the display
modes, press the DIS button, :, as of-
ten as you need for the desired inf orma-
tion to be shown on the display.
Note:
It is only possible for a CD name to be displayed if the inserted CD has been provided
with a name. Read the section on “Naming
CDs”.
Programming favourite CD tracks
Y ou can use the TPM function (Track Program
Memory) to program, save and replay your
favourite trac ks from a particular CD. Y ou can
program the tracks in any order, but they will
be played in ascending order . If favourite track
play is active, only the tracks previously programmed will be play ed from the CD that is in
the drive. Up to 30 CDs with a maximum of
40 tracks on each can be handled.
Programming favourite tracks
Proceed as follows to program y our fa vourite
tracks on a CD:
➮ Insert the CD for which you want to pro-
gram your f a vourite tracks into the CD
drive.
➮ Select your first fa v ourite track.
➮ Hold down the softkey, 4, indicating
“TPM” for longer than one second.
The track is accepted into the list of fa v ourite
tracks for this CD.
➮ Continue in the same way f or all the oth-
er fav ourite trac ks on the CD.
Switching favourite track play on and off
In order to begin playing the programmed f avourite tracks on the inserted CD, or to stop
playing only the fa vourite tracks
➮ briefly press the softkey, 4, indicating
“TPM”.
The current TPM status (“TPM ON” or “TPM
OFF”) is briefly displayed.
If favourite tr ack play is active , “TPM” appears
on the display with light and shade rev ersed.
Deleting titles from the list
In order to remove individual entries from the
programmed list of fa v ourite tr ac ks on a CD
➮ switch TPM on.
➮ Select the title that is to be deleted.
➮ Hold down the softkey, 4, indicating
“CLR” f or about two seconds.
“TRCK CLR” appears briefly on the display,
and the track has been removed from the programmed list.
ENGLISH
FRANÇAIS
ESPAÑOL
PORTUGUÊS
NEDERLANDS
SVENSKA
ESPAÑOL
PORTUGUÊS
19
Page 20

CD OPERATION
Delete the list of favourite tracks for a
CD
Y ou can delete the whole list of fa vourite tracks
for a CD . The CD whose list of fa vourite tracks
is to be deleted must be inserted.
➮ switch TPM on.
➮ Hold down the softkey, 4, indicating
“CLR” for about five seconds .
“CD CLR” appears briefly on the display, and
programming has been cleared.
Clearing all the lists of favourite titles
from the device
You can delete all the programmed lists of
favourite tracks for all CDs.
A CD for which favourite tracks are programmed must be inserted.
➮ Switch TPM on.
➮ Hold down the softkey, 4, indicating
“CLR” for about eight seconds .
“ALL CLR” appears briefly on the display , and
all programmed lists have been cleared.
Naming CDs
In order to recognise your CDs more effectively , the car r adio allows you to give individual names to up to 30 CDs. The names may
have a maximum of eight characters.
If you attempt to assign more than 30 names,
the display will show “FULL”.
Entering and changing CD names
➮ Listen to the CD that you want to name.
➮ Press the MENU button, 8.
➮ Use the / buttons, 7, to select
“CD NAME”.
➮ Press the or button, 7.
The device enters edit mode. If your chosen
CD is not yet named, eight underscores appear in the display.
The current entry location blinks.
➮ Use the / buttons, 7, to select
your character. If a location is to remain
empty, select the underscore.
➮ Use the or button, 7, to change
the input location.
➮ To save the name, press the MENU but-
ton, 8.
Deleting a CD name
➮ Listen to the CD whose name is to be
deleted.
➮ Press the MENU button, 8.
➮ Use the / buttons, 7, to select
“UPDATE”.
➮ Press the button, 7.
“CLR DISC” appears in the displa y.
➮ Hold down the OK button, 5. After four
seconds a beep is heard, and “DELETING” appears on the displa y.
➮ Release the OK button, 5.
The CD name has been deleted.
➮ Press the OK button, 5 or the MENU
button, 8, to leave the menu. The settings are then saved.
Deleting all CD names
➮ Listen to a CD .
➮ Press the MENU button, 8.
➮ Use the / buttons, 7, to select
“UPDATE”.
➮ Press the button, 7.
“CLR ALL” appears in the display.
➮ Hold down the OK button, 5. After four
seconds a beep is heard, and “DELETING” appears on the displa y.
➮ Release the OK button 5.
All CD names have been cleared.
➮ Press the OK button, 5 or the MENU
button, 8, to leave the menu. The settings are then saved.
20
Page 21

CD CHANGER OPERATION
CD changer operation
(optional)
On page 6 of this guide you can find which
CD changers can be used with this device.
You can also refer to your Blaupunkt dealer.
Note:
The operating instructions for your CD changer will provide information about handling
CDs, inserting them and operating the CD
changer.
Starting CD changer operation
➮ Press the CDC button, =.
The CD changer menu is displayed, and pla y
will continue from the point where it was last
interrupted. If the magazine is remov ed from
the CD changer and re-inserted, play will start
with the first track on the first CD detected by
the CD changer.
Selecting a CD
➮ In order to change up or down to anoth-
er CD, press the
the number of the CD you want appears
on the display.
Selecting a track
➮ In order to change up or down to anoth-
er track on the current CD, press the
or button, 7, until the n umber of the
track you want appears on the display.
If the
button, 7, is pressed once the cur-
rent track is started again.
Fast searching (audible)
In order to search rapidly backwards or forwards
➮ hold down one of the or buttons,
7, until the fast search backw ards of
forwards starts.
or button, 7, until
Changing the display contents
You can choose between different display
modes during CD changer operation:
● Display of CD number, tr ack number
and time.
● Display of CD number, tr ack number
and playing time.
● Display of CD name and track number.
➮ In order to change between the display
modes, press the DIS button, :, as often as you need for the desired information to be shown on the display.
Note:
It is only possible for a CD name to be displayed if the inserted CD has been provided
with a name. Read the section on “Naming
CDs”.
Repeat play of individual tracks or
whole CDs (REPEAT)
➮ Press the softkey, 4, indicating “RPT”.
“RPT TRCK” appears briefly on the display.
➮ In order to repeat play of the whole CD,
press the softkey, 4, indicating “RPT”
again.
“RPT DISC” appears briefly on the display.
Stopping REPEAT
In order to stop repeating either the current
track or the current CD
➮ press the softkey, 4, indicating “RPT” as
often as necessary for the “RPT OFF” to
be shown in the display.
Playing tracks in random
sequence (MIX)
In order to play the tracks on the current CD
in a random sequence
➮ press the softkey, 4, indicating “MIX”.
“MIX CD” appears briefly on the display.
ENGLISH
FRANÇAIS
ESPAÑOL
PORTUGUÊS
NEDERLANDS
SVENSKA
ESPAÑOL
PORTUGUÊS
21
Page 22
CD CHANGER OPERATION
In order to play the tracks on all the inserted
CDs in a random sequence
➮ press the softkey, 4, indicating “MIX”
again.
“MIX MAG” appears briefly on the displa y.
Note:
The CDC A 08 and the IDC A 09 will make
random selections from all the CDs and all
the tracks in the changer. All other changers
will first play through all the tracks of one CD
at random before moving on to the next CD
in the changer.
Ending MIX
➮ Press the softkey, 4, indicating “MIX”
as often as necessary for “MIX OFF” to
be shown in the display.
Sampling all tracks on all CDs
(SCAN)
In order to hear a short sample of all the tracks
on all the inserted CDs in ascending order
➮ press the softkey, 4, indicating “SCA”.
“SCAN” appears in the display.
Ending SCAN
In order to stop sampling the tracks
➮ press the softkey, 4, indicating “SCA”
again.
The track that is currently being sampled will
continue to be played.
Note:
The duration of the samples can be adjusted.
For information on setting the sampling duration, read the paragraphs on “Adjusting the
Sample Duration” in the “Radio Operation”
section.
Naming CDs
In order to recognise your CDs more effectively , the car r adio allows you to giv e individual names to up to 99 CDs. The names may
have a maximum of se ven characters.
If you attempt to assign more than 99 names,
the display will show “FULL”.
Entering and changing CD names
➮ Press the MENU button, 8.
➮ Use the / buttons, 7, to select
“CDC NAME”.
➮ Press the or button, 7.
The device is now in selection mode.
➮ Choose the CD that you want to name
with the
/ buttons, 7.
➮ Press the or button, 7.
The device enters edit mode. If your chosen
CD is not yet named, sev en underscores appear in the display.
The current entry location blinks.
➮ Use the / buttons, 7, to select
your characters. If a location is to remain empty, select the underscore.
➮ Use the or button, 7, to change
the input location.
➮ Press the OK button, 5 or the MENU
button, 8, to leave the menu. The settings are then saved.
Deleting a CD name
➮ Listen to the CD whose name is to be
deleted.
➮ Press the MENU button, 8.
➮ Use the / buttons, 7, to select
“UPDATE”.
➮ Press the button, 7.
“CD CLR” appears briefly on the display, after which the CD name is shown.
➮ Hold down the OK button, 5.
After four seconds “DELETING” appears on
the display.
➮ Release the OK button 5.
The CD name has been deleted.
➮ Press the MENU button, 8, or OK, 5.
22
Page 23

CD CHANGER OPERATION
Deleting all CD names
➮ Listen to a CD in CD changer mode.
➮ Press the MENU button, 8.
➮ Use the / buttons, 7, to select
“UPDATE”.
➮ Press the button, 7.
“CLR ALL” appears in the display.
➮ Hold down the OK button, 5.
After four seconds “DELETING” appears on
the display.
➮ Release the OK button, 5.
All CD names have been cleared.
➮ Press the OK button, 5 or the MENU
button, 8, to leav e the men u. The set-
tings are then saved.
Programming favourite CD tracks
Y ou can use the TPM function (Track Program
Memory) to program, save and replay your
favourite trac ks from a particular CD. Y ou can
program the tracks in any order, but they will
be played in ascending order . If f avourite trac k
play is active, only the tr acks previously programmed will be played from the current CD.
Up to 30 CDs with a maximum of 40 tracks
on each can be handled.
Programming favourite tracks
Proceed as follows to program y our fav ourite
tracks on a CD:
➮ Select the CD for which you want to pro-
gram your fa vourite tracks in CD chan-
ger operation.
➮ Select your first favourite track.
➮ Hold down the softkey, 4, indicating
“TPM” for longer than one second.
The track is accepted into the list of fav ourite
tracks for this CD.
➮ Continue in the same way f or all the oth-
er favourite trac ks on the CD.
Switching favourite track play on and off
In order to begin playing the programmed
fav ourite tracks on the inserted CD, or to stop
playing only the fa vourite tracks
➮ briefly press the softkey, 4, indicating
“TPM”.
The current TPM status (“TPM ON” or “TPM
OFF”) is briefly displayed.
If favourite tr ack play is active , “TPM” appears
on the display with light and shade rev ersed.
Deleting titles from the list
In order to remove individual entries from the
programmed list of fa v ourite tr ac ks on a CD
➮ switch TPM on.
➮ Select the title that is to be deleted.
➮ Hold down the softkey, 4, indicating
“CLR” f or about two seconds.
“TRCK CLR” appears briefly on the display,
and the track has been removed from the programmed list.
Deleting the list of favourite tracks for a
CD
Y ou can delete the whole list of f avourite tracks
for a CD . The CD whose list of f avourite tracks
is to be deleted must be being played.
➮ Switch TPM on.
➮ Hold down the softkey, 4, indicating
“CLR” f or about five seconds .
“CD CLR” appears briefly on the display, and
programming has been cleared.
Clearing all the lists of favourite titles
from the device
You can delete all the programmed lists of
fav ourite trac ks for all CDs.
A CD for which favourite tracks are programmed must be inserted.
➮ Switch TPM on.
➮ Hold down the softkey, 4, indicating
“CLR” f or about eight seconds .
“ALL CLR” appears briefly on the display , and
all programmed lists have been cleared.
ENGLISH
FRANÇAIS
ESPAÑOL
PORTUGUÊS
NEDERLANDS
SVENSKA
ESPAÑOL
PORTUGUÊS
23
Page 24

TIME
CLOCK - Time
Setting the time
The clock time can be automatically set by
means of the RDS signal. If you cannot receive an RDS station, or if the RDS station to
which you are listening does not support this
function, it is also possible to set the time
manually.
Having the time set automatically
➮ In order to have the time set automati-
cally, press the MENU button, 8.
➮ Press the or button, 7, as often
as is necessary for “CLK MAN” (man u-
al) to appear in the display.
If “CLK AUTO” is displayed, automatic time
setting is already active.
➮ Press the button, 7, as often as is
necessary for “CLK A UTO” to appear in
the display.
➮ Press the OK button, 5 or the MENU
button, 8, to leav e the men u. The set-
tings are then saved.
If “CLK AUTO” has been selected and a sta-
tion with the RDS time function (RDS-CT) is
received, the clock is automatically adjusted.
Setting the time manually
➮ In order to adjust the time, press the
MENU button, 8.
➮ Press the or button, 7, as often
as is necessary for “CLOCKSET” to ap-
pear in the display.
➮ Press the or button, 7.
The time is shown on the display. The hours
blink and can be adjusted.
➮ Adjust the hours with the / button,
7.
➮ When the hours have been set, press
button, 7.
the
The minutes blink.
➮ Adjust the minutes with the / but-
ton, 7.
➮ Press the OK button, 5 or the MENU
button, 8, to leave the menu. The settings are then saved.
Selecting 12/24-hour clock mode
➮ Press the MENU button, 8.
➮ Press the or button, 7, as often
as is necessary for “24 H MODE” or “12
H MODE” to appear in the display.
➮ Press the or buttons, 7, to switch
between the modes.
➮ Press the OK button, 5 or the MENU
button, 8, to leave the menu. The settings are then saved.
Having the time displayed
constantly when the device is
switched off
➮ If you want the time to be displa y ed
when the device is switched of and the
ignition is switched on, press the MENU
button 8.
➮ Press the or button, 7, as often
as is necessary for “CLK OFF” or “CLK
ON” to appear in the displa y.
➮ Press the or button, 7, to switch
between the display being ON or OFF.
➮ Press the OK button, 5 or the MENU
button, 8, to leave the menu. The settings are then saved.
24
Page 25

EQUALIZER
Equalizer
This device has a parametric digital equalizer. In this case, parametric means that in each
of the three filters, one individual frequency
can be emphasised or reduced (with a gain
of +8 to -8 dB).
The following filters are available:
● LOW EQ 32 - 200 Hz
● MID EQ 250- 1,600 Hz
● HIGH EQ 2,000 - 12,500 Hz
These filters can be set without using any
measuring instruments. It allows the sound
properties in the vehicle to be significantly
affected.
Adjustment instructions
When setting the equalizer, we recommend
you use a CD , cassette or MiniDisc (depending on your car radio) which you are familiar
with.
Before making any adjustments to the equalizer zero the tone settings and deactivate the
loudness. For more information, read the section on “Tone and volume”.
➮ Listen to a CD, tape cassette or Mini-
Disc (according to how the radio is
equipped).
➮ Compare the sound you hear with how
you feel it should be.
➮ Now consult the “Equalizer adjustment
guide” table f or “Tone impression”.
➮ Adjust the equalizer values as de-
scribed under “Action”.
Switching the equalizer on and
off
➮ To switch off the equalizer, press the
DEQ button, 6.
“LOW EQ” is sho wn on the display.
➮ To switch off the equalizer, hold down
the DEQ button, 6 until “DEQ OFF”
briefly appears.
Adjusting the equalizer
➮ Press the DEQ button, 6.
➮ Select the “LOW EQ”, “MID EQ” or
“HIGH EQ” filter with the
7.
or button,
➮ To select the frequency, press the or
button, 7.
➮ Adjust the level with the or key, 7.
➮ In order to select the next filter , first
press the OK button, 5, then the
button, 7.
or
➮ When you have completed all the set-
tings, press the DEQ button, 6.
Adjusting the sharpness of the
filter
➮ Press the DEQ button, 6.
➮ Select the adjustments for the sharp-
ness of the individual filters “LO-Q-FAC”,
“MI-Q-FAC” or “HI-Q-FAC” with the or
button, 7.
➮ To adjust the sharpness of the filter,
press the
or button, 7.
➮ In order to select the next filter , first
press the OK button, 5, then the
button, 7.
or
➮ When you have completed all the set-
tings, press the DEQ button, 6.
Selecting the tone preset
You can choose preset tone settings for the
following musical styles .
● ROCK
● DISCO
● JAZZ
● CLASSIC
● VOCAL
Settings for these styles have already been
programmed.
➮ Press the DEQ button, 6.
ENGLISH
FRANÇAIS
ESPAÑOL
PORTUGUÊS
NEDERLANDS
SVENSKA
ESPAÑOL
PORTUGUÊS
25
Page 26

EQUALIZER
➮ Select “PRESET” with the or but-
ton, 7.
➮ To select the preset tone, press the or
button, 7.
➮ Press the OK button, 5.
➮ When you have completed all the set-
tings, press the DEQ button, 6.
Level meter / Spectrometer
While you set the equalizer , the level meter in
the display gives you a symbolic indication of
volume and settings.
At other times, the lev el meter can be switched
to spectrometer display mode.
Equalizer adjustment guide
T one impression/problem
Bass too quiet
Switching the spectrometer on and off
➮ Press the MENU button, 8.
“MENU” appears in the display.
➮ Press the or button, 7, as often
as is necessary for “PEAK ON” or
“PEAK OFF” to appear in the displa y.
➮ Press the or buttons, 7, in order
to switch the spectrometer on or off.
➮ Press the OK button, 5 or the MENU
button, 8, to leave the menu. The settings are then saved.
Action
Bass boost with
Filter: “LOW EQ”
Frequency: 50 to 100 Hz
Level :+4 to +6 dB
Bass sounds muddy
Booming tone
Unpleasant pressure
Tone lacks depth,
is aggressive, no stereo eff ect.
Muffled tone
Lack of clarity
Instruments have no brightness
26
Reduce lower middle tones with
Filters: “LOW EQ”, “MID EQ”
Frequency: 125 to 400 Hz
Level : approx. -4 dB
Reduce middle tones with
Filters: “MID EQ”, “HIGH EQ”
Frequency: 1,000 to 2,500 Hz
Level : -4 to -6 dB
Boost treble tones with
Filter: “HIGH EQ”
Frequency: approx. 12,500 Hz
Level : +2 to +4 dB
Page 27

EXTERNAL AUDIO SOURCES
PRE-AMPLIFIER / SUBOUT
External audio sources
Instead of the CD-changer, you can connect
an external audio source with line output.
Such sources might be a portable CD player ,
a MiniDisc player or an MP3 player.
The AUX input must be switched on in the
menu.
You need an adapter cable to connect an external audio source. You can obtain such a
cable from your Blaupunkt dealer .
Switching the AUX input on and
off
➮ Press the MENU button, 8.
➮ Press the button, 7, as often as is
necessary for “AUX OFF” or “AUX ON”
to appear in the display.
If “AUX ON” is displayed, the input has al-
ready been switched on.
➮ Press the or buttons, 7, in order
to switch A UX on or off.
➮ Press the OK button, 5 or the MENU
button, 8, to leav e the men u. The set-
tings are then saved.
Note:
If the AUX input is switched on it can be selected with the CDC button, =.
Pre-amplifier / subout
Y ou can use the connections provided on y our
car radio to connect an external pre-amplifier
and a subwoofer.
We recommend that you use matching products from the Blaupunkt or Velocity ranges.
Switch-on delay for external preamplifiers
T o pre vent speakers from crackling when y ou
switch on the play er , y ou can set a s witch-on
delay for all amplifiers connected to the Preamp Out connection. The maximum delay is
four seconds.
➮ Press the MENU button, 8.
➮ Press the or button, 7, as often
as is necessary for “AMP DLAY” to appear in the display.
➮ Press the or buttons, 7, in order
to adjust the switch-on delay.
“DLAY OFF” means that there is no switchon delay, while “DELA Y 1” to “DELAY 4” indicate the delay time in seconds.
➮ Press the OK button, 5 or the MENU
button, 8, to leave the menu. The settings are then saved.
ENGLISH
FRANÇAIS
ESPAÑOL
PORTUGUÊS
NEDERLANDS
SVENSKA
27
ESPAÑOL
PORTUGUÊS
Page 28

TECHNICAL DATA
Technical data
Amplifier
Output power: 4 x 25 W att sine w ave
according to
DIN 45 324 at 14. 4 V
4 x 45 W att max. power
Tuner
Wav ebands:
FM : 87.5 – 107.9 MHz
AM : 530 – 1,710 kHz
FM frequency response:
30 - 15,000 Hz
CD
Frequency response:
20 - 20,000 Hz
Pre-amp Out
4 channels: 4 V / 10 kΩ
AUX input
Sensitivity: 1,2 V / 10 kΩ
Subject to technical change!
28
Page 29

Service numbers / Numéros du service après-vente /
Números de servicio / Número de serviço
Tel.: Fax:
Deutschland 0 18 05 00 02 25 0 51 21 49 40 02
Belgique / België 02.525. 54.44 02.525.54.48
France 014 010 70 07 014 010 73 20
Nederland 023 565 63 48 023 565 63 31
Great Britain 018 958 383 66 018 958 383 94
Ireland (01) 4149400 (01) 4598830
Danmark 44 89 83 60 44 89 86 44
Sverige 08 750 15 00 08 750 18 10
Norge 66 81 70 00 66 81 71 57
Suomi 094 359 91 094 359 92 36
Österreich 01 610 39 0 01 610 39 391
EÏÏ¿˜
âeská republika 026 130 04 41 026 130 05 14
USA 800-266 25 28 708-681 71 88
Singapore 006 535 054 47 006 535 053 12
Slovensko 042 175 873 212 042 175 873 229
015 762 241 015 769 473
Blaupunkt-Werke GmbH
Bosch Gruppe
09/00 TRO K7/VKD 8 622 402 515
 Loading...