

Page 1
Operating instructions
DEUTSCH
ENGLISH
FRANÇAIS
ITALIANO
NEDERLAND
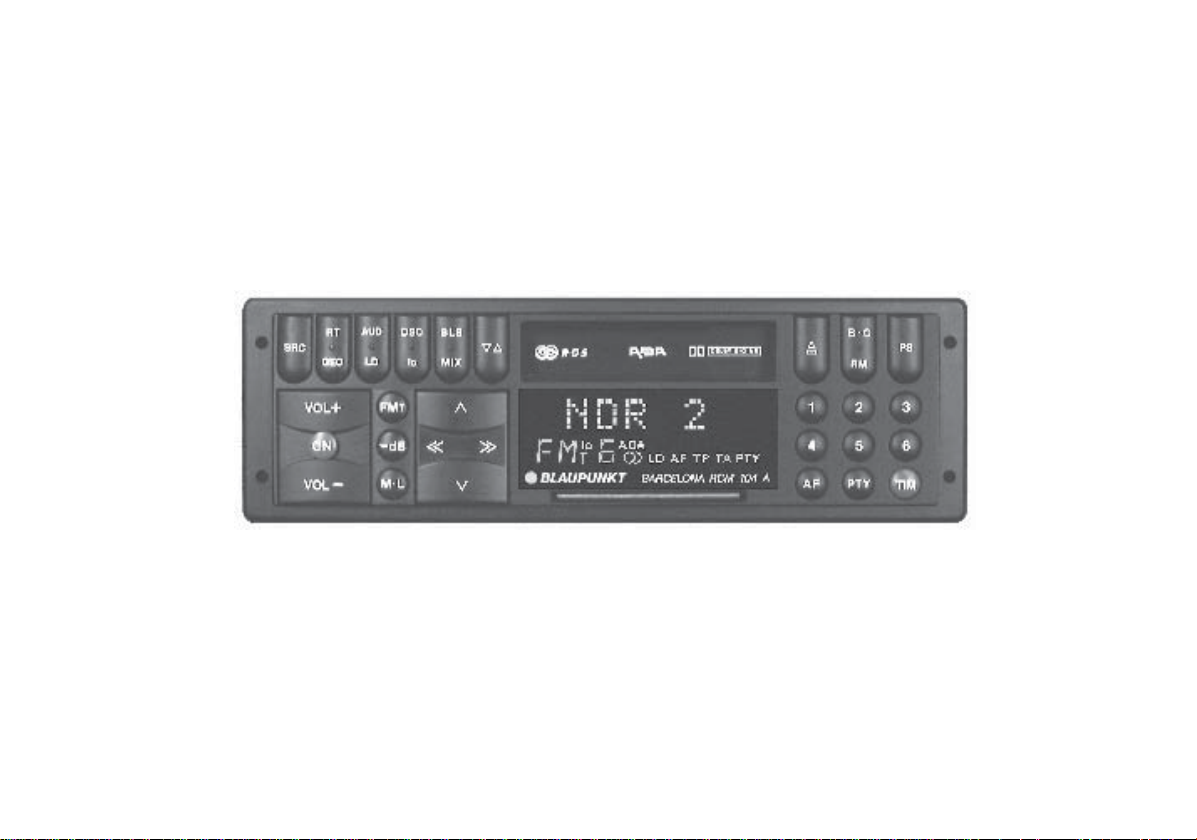
Barcelona RCM 104 A
SVENSKA
ESPAGÑOL
PORTUGUES
1
Page 2
25
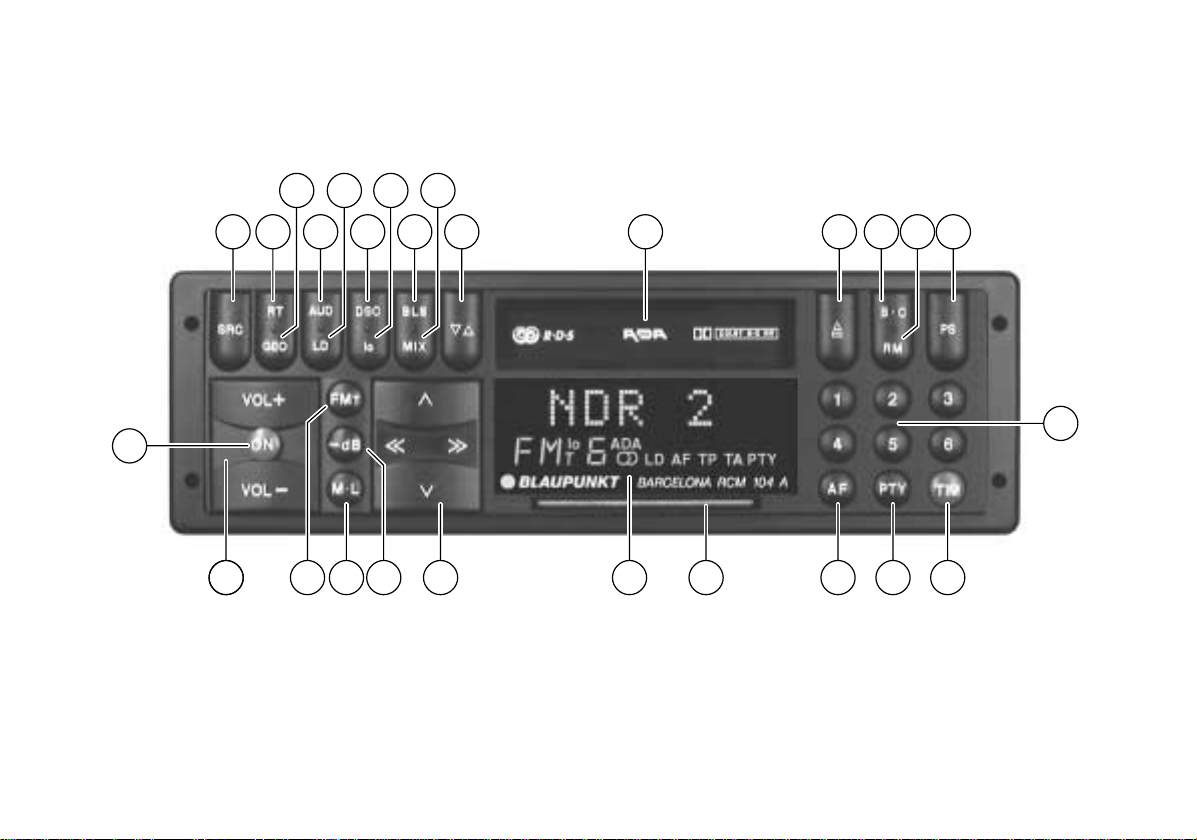
19
2123
22
242627
171820
16
15 14 13
12
1
52 3 7 8 10 11
94 6
3
Page 3

Table of contents
Quick instructions........................ 27
Important notes ............................ 31
What you really have to read ................ 31
Traffic safety ......................................... 31
Installation/connection .......................... 31
Optical indication of theft protection .. 32
KeyCard ................................................ 32
Replacing a KeyCard......................... 32
Selecting the operating mode ..... 33
Radio operation with ADA and
RDS................................................ 33
ADA....................................................... 33
RDS ...................................................... 33
AF - Alternative Frequency ................... 33
REG - Regional ..................................... 34
Selecting the waveband........................ 34
Automatic seek tuning ....................... 34
Manual seek tuning ........................... 34
Adjusting the seek tuning sensitivity ..... 34
Stereo - mono switch (FM).................... 34
Changing the memory bank (FM) ......... 35
Storing stations ..................................... 35
Storing the strongest stations auto-
matically with Travelstore...................... 35
Recalling stored stations ....................... 35
Preset scanning .................................... 35
Scanning stations with Radio Scan....... 36
PTY – Program Type ............................ 36
Station naming ...................................... 37
Reception of traffic announcements
with RDS-EON............................... 38
Traffic announcement priority on/off ..... 38
Warning beep........................................ 38
Switching the warning beep off.......... 38
Automatic seek tuning start................... 39
Adjusting the traffic message volume ... 39
Traffic Memo (TIM) ....................... 39
Warning ........................................ 39
Recalling stored traffic announce-
ments................................................. 39
TIM standby mode when the radio is
turned off ........................................... 39
Setting the time in the DSC menu: .... 40
Adjusting the TIM standby mode/
TIM time............................................. 40
Deactivating the TIM standby mode .. 40
Warning............................................ 40
RT – Radiotext ...................................... 41
Tape operation.............................. 42
Inserting a tape ..................................... 42
Removing a tape ................................... 42
Fast forward/rewind .............................. 42
Selecting titles with CPS ....................... 42
Autoreverse........................................... 42
Tape type detection .............................. 42
Scanning cassette titles with SCAN...... 43
Dolby B•C NR ....................................... 43
Skipping unrecorded tape sections with
BLS - Blank Skip ................................... 43
Listening to the radio during fast winding
with RM (Radio Monitor) ....................... 43
Care of your audio equipment............... 43
DSC programming........................ 44
CD changer control (option)........ 47
Switching the CD mode on
using SRC of the car radio .................... 47
Selecting a CD/track using the rocker
switch .................................................... 47
SCAN .................................................... 47
MIX........................................................ 47
Entering/displaying CD names.............. 48
Deleting CD names............................... 48
Survey of DSC default settings ............. 49
Appendix....................................... 49
Technical data....................................... 49
26
Page 4

Quick instructions
1 Switching on:
Press the ON button (the KeyCard has
to be inserted), the set plays with the
pre-adjusted volume.
Switching off:
Press ON for approximately 1 second.
If the set was turned on by pressing
ON, the KeyCard can be used for switching the system on and off. Please
read the information of chapter “KeyCard”.
The set may also be turned off via the
vehicle’s ignition (provided that it was
connected correspondingly). After the
ignition was switched off, a double
beep tone reminds you that you should
remove the KeyCard before leaving
your vehicle.
To operate the set when the ignition is
switched off (KeyCard is inserted), proceed as follows:
Press “ON” after the double beep tone.
The set will be turned on.
To avoid that the battery goes flat, the
system will be turned off automatically
after a playback time of one hour.
2 To change the volume:
Press VOL+/VOL-.
Each time the set is switched on, it will
play with the pre-adjusted volume (VOL
FIX). You may also change the VOL
FIX setting (see chapter “DSC programming“).
T
3 FM
Press this button to switch between the
memory banks I, II, and T (Travelstore).
As soon as this button is pressed, the
system will automatically switch to FM.
Extra function:
Store the six most powerful stations
automatically with Travelstore:
Press FM
T until seek tuning starts in
the display.
4 M•L
To change between medium wave
(MW) and long wave (LW) frequencies.
5 -dB - for instantly changing the volume.
Press the -dB button to instantly mute
the audio source. The display will then
show MUTE. Return to normal volume
by pressing either the -dB or the VOL+
button.
When pressing VOL-, the normal playback volume is identical to the -dB (muted) volume.
To program the mute volume, proceed
as follows:
• Adjust the desired volume.
• Press -dB for approximately 2 seconds (beep tone is released).
This volume will then be stored as the
mute volume.
Extra function:
Press this button to store the values set
in the DSC menu.
DEUTSCH
ENGLISH
FRANÇAIS
ITALIANO
NEDERLAND
SVENSKA
ESPAGÑOL
27
PORTUGUES
Page 5
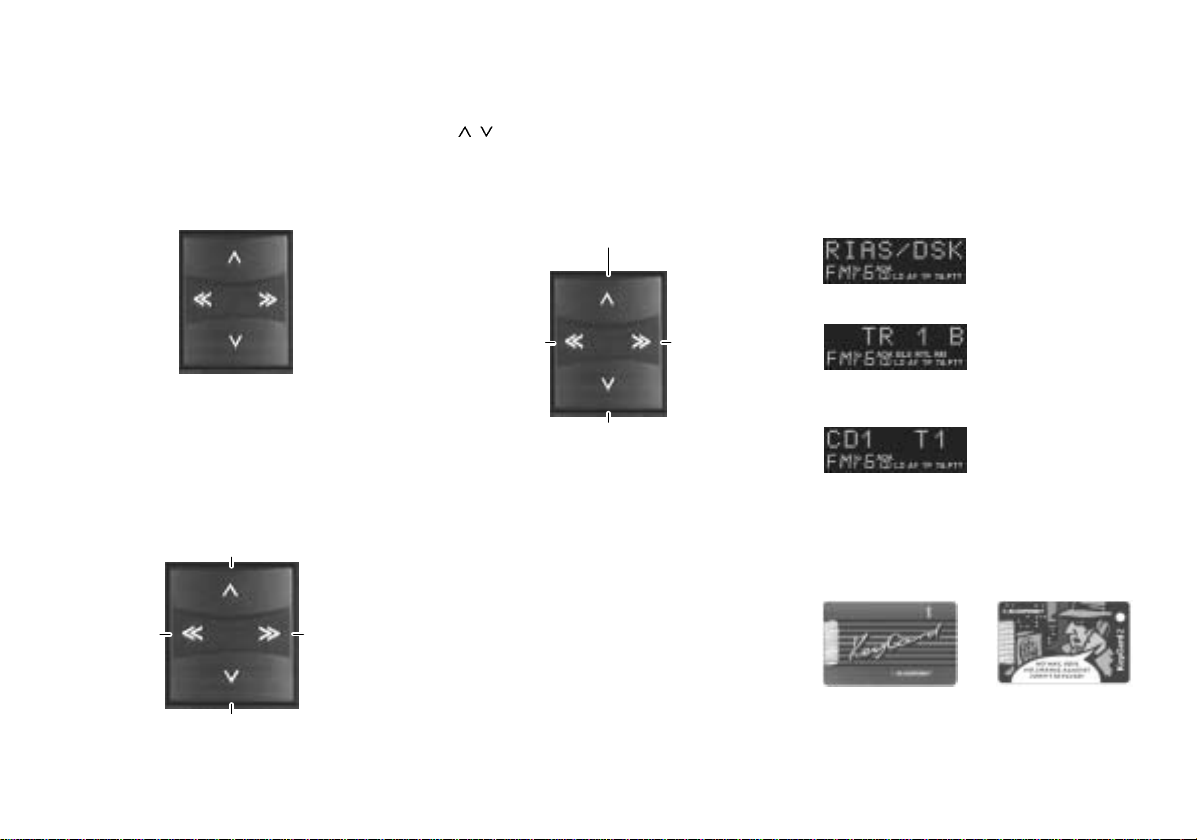
6 Rocker switch
Radio operation
To stop the function:
Press the opposite button.
/ or << >>
network, e.g. from
NDR1 to NDR4 (North
German broadcaster).
down in short
intervals
(when AF is off)
Tape operation
Fast
rewind
backwards direction
Station search
up
down
CPS
Select title in
forwards direction
CPS
Select title in
up in short
intervals
(when AF is off)
Fast
forward
Changer operation
Selecting a track (upwards): Press briefly
CUE - fast advance (audible):
Press and hold down
Select disc
(downwards)
Repeating a track: Press briefly
Selecting a track (downwards):
Briefly press twice or more
REVIEW - fast reverse (audible):
Press and hold down
Select disc
(upwards)
Extra functions:
AUD see H
GEO see I
DSC - MODE see F
Select function and
program parameter.
AF - MODE “AF” in the display
Use the << >> buttons
to scroll through the
programs of a radio
7 Display
Radio mode
Station name
(RIAS/DSK)
Waveband
Memory bank (FM I)
Cassette mode
TR 1 (track 1)
Dolby B NR
CD mode
(option)
Disc number,
title number
8 KeyCard
In order to operate the set, the KeyCard has to be inserted.
For this purpose, introduce the Key-
Card (contact area showing up) into
28
Page 6

the corresponding slot above the KeyCard tongue.
Read also the information given in the
“KeyCard” chapter.
9 AF button (alternative frequency) du-
ring RDS operation
When “AF” lights up in the display, the
system will automatically seek a frequency offering better reception of the
same RDS program.
“AF” on/off: Press the AF button briefly.
When pressing the AF button for about
2 seconds, the display will show REGON or REG-OFF (see also chapter
REG - Regional).
: PTY button (Program Type)
Activates the PTY mode. In the PTY
mode, the station buttons become program buttons, for programs such as
NEWS, SPORT, POP MUSIC,
SCIENCE, etc.
; TIM/TA
TIM (TraffIc Memo)
To play all the stored traffic announcements:
Press TIM briefly.
To activate/deactivate the priority for
traffic announcements:
Press TIM for approximately 2 seconds.
TA (Traffic Announcement)
If TA lights up in the display, the system
will only play traffic stations.
TA on/off: Press the TIM button for
approximately 2 seconds.
Note the warning under “Traffic
Memo (TIM)”.
< 1, 2, 3, 4, 5, 6 - preset buttons
You can store 6 stations on each FM
memory bank (I, II, and “T“) and
another 6 stations on MW and LW
each.
To store a station: Press button during
radio operation and hold down until the
radio comes on again.
To recall a station: Select the waveband. On FM, select the desired memory bank and press the corresponding
preset button.
= PS
Preset Scan
Press button briefly to scan the stations
stored on the preset buttons.
SCAN
For briefly playing all receivable stations or the titles during tape or changer
operation (option).
To start/stop Scan: Press PS for approx. 2 seconds.
The scan time can also be altered (see
chapter “DSC programming” - SCANTIME).
> RM (Radio Monitor)
Press this button to listen to the radio
while fast forwarding or fast rewinding
the tape.
During tape operation:
To switch RM on/off: Press RM.
When this function is activated, the
display shows “RM”.
The radio is played during fast tape run.
? B•C – Dolby B•C NR
This set allows you to play back tapes
that have been recorded with Dolby-B
NR, Dolby-C NR or without Dolby noise
reduction.
Press B•C to adjust to the type of Dolby
NR in which the tape was recorded or
to disengage Dolby NR. When Dolby is
active, the corresponding indicator “B”
or “C” will light up.
DEUTSCH
ENGLISH
FRANÇAIS
ITALIANO
NEDERLAND
SVENSKA
ESPAGÑOL
PORTUGUES
29
Page 7

@ Eject button
Press .
A Cassette loading slot
Insert tape (side A or 1 facing up, the
open side showing to the right).
B Tape side selector
Press
operation. The display shows “TR 1”
(track) or “TR 2”.
C MIX
to switch over during tape
see chapter “CD changer control”.
E lo
To change the seek tuning sensitivity.
lo lit up in the display indicates normal
seek tuning sensitivity (the system will
only pick up powerful nearby stations).
lo off indicates high seek tuning sensitivity (the system will also pick up weaker stations).
To change the seek tuning sensitivity: Press lo.
Using DSC it is possible to preset the
seek tuning sensitivity for local (“S-LO”)
and distant reception (“S-DX”). For
more information read chapter “DSC
programming”.
For more information, see chapter
“DSC programming”.
H AUD
To adjust the treble and bass frequencies using the rocker button.
Treble
+
Bass
+
Bass
D BLS (Blank Skip)
Use this function to skip blank sections
of the tape.
As soon as an unrecorded portion of
more than 15 seconds is detected during playback, the system will automatically forward the tape to the beginning
of the next title.
In this case, the display will show
“CPS-FF”.
To switch BLS on/off: Press the BLS
button.
When the function is active, “BLS” will
light up in the display.
30
F DSC (Direct Software Control)
Use the DSC function to adapt a number of programmable basic settings to
suit your listening preference. For more
information, read through chapter “DSC
programming”.
G LD (loudness)
Use this function to boost the low frequencies for more bass, especially at
low volume levels.
To switch LD on/off: Press the button.
When the loudness function is activated, the display shows “LD”.
Treble
The last setting will be automatically
stored.
If the setting remains unchanged within
8 seconds, the display will switch back
to the previous indication.
Page 8

Important notes
I GEO
To adjust the Balance (left/right) and
Fader (front/rear) settings.
Fader front
Balance
left
Fader rear
The last setting will be stored automatically.
If the setting remains unchanged within
8 seconds, the display will switch back
to be previous indication.
J RT – Radiotext
Use this function to display message
texts transmitted by an RDS station. RT
messages will only be displayed if the
ignition is switched off.
Turn on the set.
Balance
right
To switch RT on: Press RT and wait
until the message text appears on the
display.
To switch RT off: Press RT.
K SRC (source)
To select between the connected audio
sources, for example cassette, radio, or
CD changer (option).
What you really have to read
Before you operate your new car radio, please read the following information carefully.
Traffic safety
As the driver of a motor vehicle, it is your
responsibility to pay attention to the traffic
situation at all times. Never use your car radio
in a way that could distract you.
Please keep in mind that you travel a distance of 14 m per second at a speed of only
50 km/h.
Do not adjust your radio in difficult driving
conditions that demand your full attention.
Always make sure that you are still able to
hear any warning signals coming from outside of the vehicle, such as police or fire engine
sirens, so that you can react accordingly.
Installation/connection
In order to ensure that the set functions
properly it is necessary that the positive power supply line is connected to the ignition
and the permanent +12 V connector of the
car radio.
If you would like to install your new car radio
by yourself or add other audio components to
the existing ones, then please read carefully
the enclosed instructions on installation and
connection.
31
DEUTSCH
ENGLISH
FRANÇAIS
ITALIANO
NEDERLAND
SVENSKA
ESPAGÑOL
PORTUGUES
Page 9

Do not connect the loudspeaker outputs to
ground!
Use only the accessory and replacement
parts approved by Blaupunkt.
Optical indication of theft protection
When the car is stationary, you can let the
KeyCard tongue flash in order to indicate that
the set is equipped with security coding. Use
DSC to select one of two settings: LED ON or
LED OFF.
For more information, please read through
chapter “DSC programming - LED ON/OFF”.
KeyCard
The car radio can only be operated using
either KeyCard 1 or 2. Their codes are stored
in the unit.
Turn on the set and introduce the KeyCard
completely. The car radio is now ready for
operation. When inserting a wrong KeyCard,
the display will show “----”.
After approximately 10 seconds, “CARD
ERR” will appear in the display. In this case
do not make any further adjustments until
you have the corresponding KeyCard available.
Never try to pull out the KeyCard by force.
First, slightly press the card in. This releases
the KeyCard; the display shows
“LEARNING”. Now you can pull out the card.
Should the KeyCard be lost or damaged,
then please contact one of our authorised
service partners to get a new card.
The service centres are marked (
radio service centre list. In case of doubt,
please contact the central service centre in
your country for more information on the
KeyCard service centre closest to you.
Use either KeyCard (1 and 2) to individually
store the following functions as desired:
bass, treble, balance and fader settings, preset stations, loudness, TA (traffic announcement volume), SPEECH (tone control for
speech programs), BEEP volume, SCANTIME, VOLFIX.
In addition to this, the settings activated before switching the radio off, such as the
waveband, station, TA priority, loudness, AF,
CPS, Dolby B/C, RM, REG ON/OFF or seek
tuning sensitivity will also remain stored.
When you insert your KeyCard, the basic
settings you have programmed will automatically be activated.
) in the car
Replacing a KeyCard
Any KeyCard can only be replaced by a new
one with the same number (1 or 2). Should
you wish to replace KeyCard 2, for example:
• Insert KeyCard 1 and switch the radio
on.
• Slightly press the card and it will move
into the removal position. “LEARNING”
will then appear in the display.
• Remove KeyCard 1 and insert the new
KeyCard 2 while the display is still
showing LEARNING.
Now you can operate the set with the new
KeyCard 2.
You can switch the radio on only after inserting either a KeyCard 1 or 2.
32
Page 10

Selecting the operating
mode
With the SRC (source) button you can select
between the following modes:
radio,
tape,
CD changer (option), or
operation of another audio component
connected.
To select one of the operating modes, it is of
course necessary that the corresponding
system is available, i.e. the add-on component must be adequately connected and the
sound carrier (cassette, disc, changer magazine) inserted.
To switch over to the next operating mode
available,
• press the SRC button.
Radio operation with ADA and RDS
ADA
This car radio features ADA (Auto Directio-
nal Antenna).
The 2-fold ADA system developed by Blaupunkt incorporates two tuners (Codem IV
concept) and sets new standards in reception quality, which is clearly superior to other
systems.
With ADA, the set simultaneously analyses
and processes the signals furnished by two
antennas. Compared to traditional concepts,
this leads to a considerable improvement in
the radio reception quality.
Also, multipath interference effects (produced by hills or buildings) are minimised to an
extent unparalleled so far.
ADA on/off - antenna test
You can switch off ADA and test the antennas. For more information, read through
chapter “DSC programming, ADA”.
RDS (Radio Data System)
The Radio Data System offers you more
convenience when listening to FM.
More and more radio stations have begun to
broadcast additional RDS information alongside their programs.
As soon as a radio program has been identified, the station name including a regional
identifier, if applicable, will appear in the
display, for example “NDR1 NDS” (local radio program of Lower Saxony, Germany).
With RDS, the preset buttons become program buttons. Now you know exactly which
program you have tuned into and in future
you can select this program directly.
But RDS even offers you more advantages:
AF - Alternative Frequency
The AF function makes sure that the radio will
always tune into the optimum frequency for
the RDS station you are listening to.
This function is activated if “AF” lights up in
the display.
In order to switch AF on/off:
• Press the AF button briefly.
During seek tuning for the frequency offering
the best reception of the selected program,
the radio will be muted briefly.
When “SEARCH” appears in the display after
the radio has been switched on or one of the
stored frequencies retrieved, then the radio
is automatically searching for an alternative
frequency.
“SEARCH” goes out as soon as the system
has found an alternative frequency or after
the frequency band has been run through
completely.
DEUTSCH
ENGLISH
FRANÇAIS
ITALIANO
NEDERLAND
SVENSKA
ESPAGÑOL
PORTUGUES
33
Page 11

Should the reception quality of the selected
program become too bad,
• tune into another program.
REG - Regional
Certain radio programs are split up at times
into regional programs offering local information. If you are listening to one program and
move to an area where another linked regional program becomes stronger, the unit will
switch to that program. If you wish to continue
listening to the first station:
• Press the AF button for about 2 sec.
The display will show “REG ON”.
If you leave the service area of the regional
station tuned into, or if you would like to take
advantage of the full RDS service, then
switch to “REG OFF”.
• Press the AF button for about 2 sec.
until “REG OFF” is displayed.
The display will show “REG ON” or “REG
OFF” every time the radio is switched on.
Selecting the waveband
This car radio can be used in any of the three
following wavebands:
FM 87.5 - 108 MHz
MW 531 - 1602 kHz, and
LW 153 - 279 kHz
34
• Select the desired waveband by pressing the FM
To switch between MW and LW:
• press M•L.
Automatic seek tuning
• Press / . The radio will automatically
tune into the following station.
If you keep the upper or lower part of the
rocker switch
speeds up in upwards or downwards direction.
down in short
intervals
(when AF is off)
Manual seek tuning << >>
Prerequisite: AF is switched off!
• Press << or >> to change the frequency
in small steps in upwards/ downwards
direction.
If you hold down the right or left part of the
rocker switch, then the car radio will move
through the stations quickly.
T or M•L button.
/
/ depressed, seek tuning
up
up in short
intervals
(when AF is off)
down
Adjusting the seek tuning sensitivity
The set allows you to modify the seek tuning
sensitivity.
If “lo” is indicated, the radio will only pick up
strong stations (low sensitivity).
If “lo” is deactivated, the radio will also pick up
less powerful stations (higher sensitivity).
The degree of sensitivity can be separately
adjusted for both levels (see chapter “DSC
programming“).
Stereo - mono switch (FM)
If reception is poor, you may get better sound
quality if you switch to mono:
• Press lo for approximately 2 seconds.
The stereo symbol
playback.
Each time the car radio is switched on, stereo
playback is activated.
The unit will automatically switch to mono
playback under poor reception conditions.
will disappear for mono
Page 12

Changing the memory bank (FM)
You can shift between the memory banks I, II,
and “T” to store and to recall preset stations.
The selected memory bank is indicated in the
display.
• Press FM
T until the desired memory
bank lights up in the display (press repeatedly if necessary).
Storing stations
Using the preset buttons 1, 2, 3, 4, 5, 6 you
can store six stations on each FM memory
bank (I, II, T).
In the MW/LW range you can store six stations each.
• Select the waveband with the FM
M•L button.
• Select a station with the rocker switch
(either automatically
/ or manually
<< >>).
• Press the desired preset button and
hold it down. The radio will be muted
and resumes play after approximately 2
seconds.
Now the station has been stored. The activated preset button is indicated in the display.
T or
Note:
Should you tune into a station which has
already been stored, the corresponding preset button and the memory bank will start
flashing in the display for a short while, if you
have selected another memory bank.
Storing the strongest stations
automatically with Travelstore
You can use the Travelstore memory bank to
automatically store the six strongest FM stations sorted on the preset buttons according
to their signal strength. This feature is especially useful when travelling, because it will
always give you the most powerful stations at
a finger tip as you pass through the various
reception areas.
• Press FM
The radio will search for the six most powerful
FM stations and store them on the “T” memory bank (Travelstore). When this process has
been completed, the radio will tune in the
strongest station.
FM stations can also be stored manually on
the Travelstore memory bank (see “Storing
stations“).
T for approximately 2 sec.
Recalling stored stations
You can recall any stored station by pressing
the corresponding preset button.
• Press FM
T or M•L to select the wave-
band. For FM, also choose the corresponding memory bank by pressing
T until the desired bank is indicated
FM
in the display.
• Briefly press the corresponding preset
button.
Preset scanning
You can have all of the stations stored in one
waveband scanned by using the Preset Scan
function. Choose the desired SCANTIME in
the DSC menu.
• Briefly press PS.
All of the stations in that waveband will
be scanned one after another.
Depending on which memory bank has been
activated for FM, all of the stations in either I,
II or the Travelstore level will be scanned. If
a preset is not in use, it is skipped.
To stop the scan:
• Press the PS button once again.
The radio will continue to play the currently scanned station.
DEUTSCH
ENGLISH
FRANÇAIS
ITALIANO
NEDERLAND
SVENSKA
ESPAGÑOL
35
PORTUGUES
Page 13

Scanning stations with Radio
Scan
Beginning with the station currently tuned in,
you can scan the following stations. Choose
the desired SCANTIME in the DSC menu.
To activate the scan:
• Press PS for about 2 seconds.
Either the scanned frequency or the
station name starts flashing in the display. During the actual scan process,
“SCAN” is flashing.
To continue listening to a scanned station/switch the scan off:
• Briefly press PS.
If no station is selected during the scan, the
scan function will be automatically switched
off after the entire frequency band has been
passed through. The radio will revert to the
station the scan began from.
For more information, please also refer to
chapter “DSC programming - SCANTIME”.
PTY – Program Type
PTY is an RDS service offered by more and
more radio broadcasters. This feature allows
you to select FM stations in accordance with
their program type. As soon as you have
chosen the PTY of your preference, the cor-
responding stations can be selected by seek
tuning or with the scan function.
Switching PTY on/off
• Press PTY.
When the function is active, the display will
briefly show the program type selected last;
“PTY” is permanently indicated in the lower
right corner of the display.
Program types
Use << >> to let the system display the
program type selected last and to choose a
new one.
You can select stored PTYs with the preset
buttons 1 - 6. For this it is necessary that the
PTY function is activated.
The program types listed below will then be
available.
The letters printed in bold correspond to the
actual PTY indication briefly displayed.
NEWS
CURRENT AFFAIRS
INFORMATION
SPORT
EDUCATE (education)
DRAMA
CULTURE
SCIENCE
VARIED
POP MUSIC
ROCK MUSIC
M.O.R. M (middle of the road music)
LIGHT M (light classical)
CLASSICS (serious classical)
OTHER M (other music)
PTY 16 to PTY 30 are not yet assigned.
Displaying the program type
• Press << or >>.
The program type selected last will be
briefly displayed.
Selecting a program type
a) Using the preset buttons
If PTY is switched on, you can select
the program types assigned at the factory with preset buttons 1 - 6.
If you would like to store other PTYs,
read through chapter “DSC programming - PTY SET”.
• Press one of the buttons 1 - 6. The
display shows the selected program
type for three seconds.
• Press
ed: This will start seek tuning for a
station offering the specified program type.
/ while the PTY is display-
36
Page 14

b) Using the << >> rocker switch
If PTY is switched on, you can select a
program type via the << >> rocker
switch.
• Press << or >>. The PTY selected
last will be displayed for three seconds.
• During this period choose the desired program type with << (backwards) or >> (forwards direction).
• Press << or >> as many times as
required.
Tuning into a station with PTY
You may let the system find you the stations
offering the adjusted program type using the
seek tuning rocker switch or the PS (SCAN)
button.
Precondition: “PTY” must be illuminated on
the display.
• Press <<>> or PS.
Seek tuning will stop at the first station offe-
ring the desired PTY.
If you have pressed PS (SCAN), the stations
received will be scanned once until you
switch SCAN off again (press PS once
again).
PTY priority
When PTY is activated, the system will constantly search for the corresponding program
type within the station network of the received program.
If you listen to NDR2, for example, the set will
also search through the other NDR programs
to find out whether there is a program offering
the desired PTY.
During radio operation, as soon as such a
program begins the unit will switch over to
this program for the duration of the corresponding broadcast.
During tape or CD operation, the system will
release a BEEP and display the program
type in order to let you know that a program
offering the desired PTY has started.
• If you wish to listen to this program,
press SRC to switch to radio operation.
Note:
As mentioned before, the PTY function is
presently not available with all RDS stations.
Station naming
Using the ST NAME item of the DSC menu
you can enter a name with a maximum of 8
digits for all stored frequencies of memory
banks I and II.
Most of the FM stations are RDS stations, the
names of which will be shown in the display.
The displayed RDS name has priority over all
entries specified by the user. If you have
named an RDS station, this name will only be
shown briefly and be replaced by the RDS
name afterwards.
For this reason we recommend that you only
name non-RDS stations, which only show
their frequency but not the name.
All long-wave stations are provided with a
station name at the factory.
To start your entry:
• Choose a station,
• press DSC,
• select item “ST NAME” with rocker
switch
• press -dB.
The first position is flashing.
• Now select a character with rocker
switch
You have the choice between the capital
letters (A-Z), special characters and the
numbers (0-9).
/ and
/ .
37
DEUTSCH
ENGLISH
FRANÇAIS
ITALIANO
NEDERLAND
SVENSKA
ESPAGÑOL
PORTUGUES
Page 15

Reception of traffic announcements with RDS-EON
• Use the rocker switch << >> to move to
the next position and select a character.
In this way, up to 8 characters can be entered.
Once you have completed the name as desired,
• press -dB;
now the entry has been stored.
The display returns to “ST NAME”.
To name the next station:
• Select it with one of the preset buttons
(1-6); if required, change the memory
bank and/or waveband.
Then start to enter the next name.
To finish the entry,
• press DSC.
You will leave the DSC menu at the
same time.
Any name entered for a preset station will be
deleted by re-assigning it (either with a name
or frequency).
(Enhanced Other Networks)
Many FM broadcasters provide their service
area with traffic messages at regular intervals.
All traffic program stations transmit a special
telegram signal alongside their programs,
which is recognised and decoded by the car
radio.
As soon as such a signal is received, the
display shows “TP” (Traffic Program).
Other radio stations do not actually air traffic
announcements themselves, but by using
RDS-EON they make it possible to receive
the traffic announcements of another station
within the same radio network. In this case,
“TP” will light up in the display as soon as the
priority for traffic announcements is activated. The display must then show “TA”.
If a traffic announcement is broadcast, the
radio will automatically switch to the linked
traffic program for the duration of the message and return to the original program after the
end of the message.
Traffic announcement priority
on/off
Warning beep
If you leave the reception area of the traffic
program station you are currently listening to,
you will hear a warning beep after approximately 30 seconds.
This warning beep will also be released when
pressing a preset without a traffic program.
Switching the warning beep off
a) Tune to another traffic program station:
• Press the rocker switch, or
• press a preset button with a station
offering traffic information.
Alternative:
b) Switch off the priority for traffic an-
nouncements:
• Press TIM > 2 sec.
In the display, the “TA” indication
goes out.
You can reduce the beep tone volume to
the pre-selected mute volume.
• For this purpose, press -dB.
38
If the priority for traffic announcements is
activated, “TA” will appear in the display. To
switch the function on/off:
• Press the TIM button > 2 sec.
Page 16

Traffic Memo (TIM)
Automatic seek tuning start
Prerequisite:
The priority for traffic announcements is activated. If you leave the reception area of your
traffic program while listening to a tape or
disc or when having turned down the volume
completely, the car radio will automatically
tune into another traffic program station.
If no such traffic program station is found
within approximately 30 seconds, tape or
disc reproduction will be interrupted and the
system will release a warning beep. To
switch the beep off, proceed as described
above.
Adjusting the traffic message
volume
The volume of the warning beep and of the
current traffic message was pre-adjusted at
the factory. If you would like to alter the
setting, proceed as described under “DSC
programming - TA LEVEL”.
This set is equipped with a digital speech
memory, allowing up to 4 traffic messages
lasting a maximum of 4 minutes to be automatically recorded.
As soon as “TP” is displayed, the system will
record all incoming traffic announcements of
the adjusted station.
If the priority for traffic announcements is
activated (“TA” lights up in the display), the
set will also record the traffic messages of the
traffic station program within the same radio
network (see also “Reception of traffic announcements with RDS-EON”).
Depending on the length of the new traffic
bulletin, the oldest messages will be deleted.
If a message is longer than four minutes, the
system will display OVERFLOW after four
minutes of playback, and release a beep tone
to indicate that the message could only be
recorded partially.
Warning
The motor antenna could be damaged in
a car wash.
If you have installed a motor antenna, then
please take into account the corresponding
warning note at the end of this chapter.
Recalling stored traffic announcements
• Press the TIM button briefly.
The display for example shows: NDR2 (sta-
tion name or frequency), then briefly
T4 14.30 (T4 = traffic message 4, recorded
at 14:30). If four traffic messages were recorded, then “T4” always represents the most
recent announcement, which will also be
played first.
Use the
/ rocker button to switch between
T1 and T4.
Hold down the
/ rocker button to move
through the message in forwards/backwards
direction quickly.
Press << to go back to the beginning of the
currently played message.
The TIM function is switched off by either
pressing TIM or >>.
TIM standby mode when the radio is
turned off
With this system it is possible to record incoming traffic announcements automatically at
pre-determined times when the radio is turned off.
You may then recall such messages as described above.
If you press the TIM button while a traffic
announcement is being played (TA lit up in
the display), the recording will be interrupted.
DEUTSCH
ENGLISH
FRANÇAIS
ITALIANO
NEDERLAND
SVENSKA
ESPAGÑOL
39
PORTUGUES
Page 17

When pressing TIM once again, you will hear
the message text recorded until that interruption.
Setting the time in the DSC menu:
TIM needs the exact time in order to operate
precisely. The time also has to be re-adjusted
after every interruption of the power supply.
• Press DSC and the time will be displayed.
• Press << to set the hours or >> to adjust the minutes.
The corresponding value is flashing.
To change the setting,
• press the rocker button
/ .
To confirm your entry,
• press -dB or DSC.
When pressing the -dB button, you can go on
working in the DSC menu immediately.
Adjusting the TIM standby mode/TIM
time
The TIM-TIME to be set corresponds to the
planned departure time. TIM will then be
active 1.5 hours before and after this adjusted time, so that the traffic messages will be
recorded during a period of three hours.
Note: During this period, a motor antenna will
remain extracted. Please take into account
the warning note of the end of this chapter.
adjusted
start
1.5 hours
The motor antenna
will be extracted
TIM-TIME
end
1.5 hours
• Use the rocker button / to choose
TIM-TIME in the DSC menu.
• Press << or >> to call up the adjusted
time.
If TIM OFF is displayed, the TIM
function is deactivated.
• Use the rocker button
/ to set the
time.
• Use << to move to the hours or >> to
adjust the minutes.
Confirm your entry by
• pressing -dB or DSC.
The TIM-TIME is stored.
TIM will be active 1.5 hours before and after
the adjusted TIM-TIME.
Also, TIM will automatically stay on standby
for three hours after the radio was turned off.
When TIM is activated, the display will briefly
show “TIM ON” when the set is switched off.
Deactivating the TIM standby mode
• Press DSC with the radio being turned
on.
• Use the
/ rocker button to select the
item TIM TIME.
• Press -dB and switch to TIM OFF with
rocker button
/ (you find this item
between the time settings for 23:00 and
0:00).
When TIM OFF is flashing,
• press DSC or -dB.
If the motor antenna is retracted immediately
after selecting TIM OFF, you can be assured
that the TIM function is deactivated.
Note:
If the TIM function is not used for a longer
period of time, we recommend you to switch
it off in order to avoid that the battery goes
flat.
Warning
The motor antenna could be damaged in
a car wash.
If you have a motor antenna installed, it will
remain extracted after you have turned off
the radio with the TIM function being activated. The antenna may also be extracted in
the car wash when the set is turned off and
the TIM function activated.
40
Page 18

TIM is deactivated (TIM OFF), if the
motor antenna is retracted as soon as
the set is turned off.
You can now drive through a car wash
when the radio is off.
Do not switch on the radio until you have left
the car wash.
If the display shows TIM ON when switching
off the radio, then the TIM timer is activated.
The motor antenna will remain extracted.
If you are sure,
that now and while being in the car wash you
are outside the recording period around the
adjusted TIM-TIME:
adjusted
start
1.5 hours
The motor antenna
will be extracted
TIM-TIME
end
1.5 hours
• Switch off the radio and press TIM.
The display briefly shows STBY OFF.
The antenna will then remain retracted when
the radio is turned off (until the three-hour
recording period starts).
Attention:
You should by all means deactivate the
TIM timer (TIM OFF), if the adjusted recording period is soon to start.
For this purpose:
• Press DSC with the radio being activated.
• Use the
/ rocker button to select the
item TIM TIME.
• Press -dB and switch to TIM OFF with
rocker button
/ (you find this item
between the time settings for 23:00 and
0:00).
• If you now turn off the radio, the antenna will be retracted.
You can now drive into the car wash. After
you have left the car wash, you may reactivate the TIM function according to your
preference.
RT – Radiotext
Radiotext is an RDS feature used by the
broadcasters to transmit texts.
The texts can be displayed in two subsequent lines with a maximum of 64 characters
each, which are moved through the display
slowly.
Depending on the individual broadcaster,
these texts can be of a different nature, for
example brief news, program information,
commercial broadcasts, etc.
For safety reasons, the radiotext function can
only be used if the ignition is switched off.
When activating RT with the ignition being
switched on, the message “NO TEXT” will
appear in the display.
To read radiotext messages, proceed as
follows:
Park the vehicle in a suitable place and turn
off the ignition. The radio will be switched off
automatically.
• In order to re-activate the car radio,
press the ON button for about 1 second.
• Select a station and press RT.
It takes some time until the aired messages
are fully available in the system. In the meantime, the radio will display the message
“WAIT”.
Afterwards, the text will be displayed.
If the adjusted station does not provide radiotext information, the message “NO TEXT” is
displayed.
To switch off radiotext:
• Press the RT button once again.
DEUTSCH
ENGLISH
FRANÇAIS
ITALIANO
NEDERLAND
SVENSKA
ESPAGÑOL
41
PORTUGUES
Page 19

Tape operation
In order to play a tape, the car radio has to be
switched on.
The unit automatically switches to tape operation when a cassette is inserted.
Inserting a tape
• Turn on the set.
• Insert the cassette.
The cassette is automatically transported to
the playback position. The system then starts
to play back side A or 1.
During tape operation, the display shows
TR1 or TR2 (=track)
Insert cassette with side A o 1
facing up, the open side facing
to the right
Eject
cassette
Removing a tape
• Press .
The cassette will eject.
Fast forward/rewind
• Press >> to fast forward a tape (FF).
• Press << to fast rewind a tape. (FR)
CPS
Select title in
forwards direction
Fast
rewind
CPS
Select title in
backwards direction
To stop the function:
Press the opposite button.
<< >> or
/ .
Fast
forward
Selecting titles with CPS
(Cassette Program Search)
Use this function to repeat or skip cassette
titles with buttons
wards).
The system allows you to skip up to 9 titles.
(forwards) or (back-
For this purpose,
• press the rocker switch as many times
as required.
The display will show you the number of titles
to be skipped.
Correct your entry by pressing the opposite
button.
Press
For CPS operation it is necessary that there
is a blank section of at least 3 seconds
between the titles.
to stop the tape immediately.
Autoreverse
To switch sides while playing a cassette,
• press
At the end of a side the unit will automatically
switch over. The display shows “TR1” for side
1 or “TR2” for side 2.
Note:
If there is too much tension on the tape during
playback, the set may switch over by itself. In
this case check the condition of the tape.
Sometimes it helps to rewind the cassette
tape completely.
.
Tape type detection
Correct equalization is automatically selected according to the tape used.
42
Page 20

Scanning cassette titles with
SCAN
You can have the cassette titles played
briefly by using the scan func tion. If you like
a title, stop the scan to continue listening to
that track.
To start/stop the scan:
• Press PS briefly.
Choose the desired SCANTIME in the DSC
menu.
Dolby B•C NR*
Use this button to play tapes recorded with
Dolby noise reduction.
Dolby-C NR is a further development of Dolby-B NR and reduces the unwanted tape
noise even more.
Press B•C to adjust to the type of Dolby NR
in which the tape was recorded or to disengage Dolby NR. When Dolby is active, the
corresponding indicator “B” or “C” will light
up.
* Noise reduction system manufactured under license
from Dolby Laboratories. “Dolby” and the double-D
symbol are trademarks of Dolby Laboratories.
Skipping unrecorded tape sections with BLS - Blank Skip
As soon as the system detects a blank tape
section of more than 15 seconds, the cassette will automatically be fast forwarded to the
beginning of the next track.
The display will then show “CPS-FF”.
To switch BLS on/off:
• Press BLS.
If the function is active, “BLS” appears in the
display.
Listening to the radio during fast
winding with RM (Radio Monitor)
When the tape is fast forwarded or rewound
(also with CPS, SCAN, BLS), the radio is
normally muted. To listen to the radio during
fast winding:
• Press RM.
“RM” lights up in the display.
Care of your audio equipment
We recommend that you use only C-60/C-90
cassette tapes in your car radio. Store your
cassettes in a cool place away from dirt, dust
and temperatures exceeding 50 °C. During
cold weather, allow very cold cassettes to
warm up before playing them in order to
avoid uneven tape transport. Operating problems and sound distortions may occur after
approximately 100 hours of playing time and
are caused by dust particles which adhere to
the rubber roller and the audio head.
Use a cleaner cassette to remove normal dirt
build-up. For tougher cases, use a cotton
swab (Q-tip) soaked with alcohol. Do not
attempt to clean the mechanism by inserting
a hard object into the player!
DEUTSCH
ENGLISH
FRANÇAIS
ITALIANO
NEDERLAND
SVENSKA
ESPAGÑOL
43
PORTUGUES
Page 21

DSC programming
Using DSC (Direct Software Control), you
can adjust certain settings and functions for
this car radio to your own liking and then store
them.
The basic settings for this audio equipment
have been made at the factory. Please refer
to the following overview for these settings so
that you can always reset to these if desired.
If you wish to alter any of the programming,
• press button DSC.
Use the rocker switch and the -dB button to
make your selection from the following
functions and to carry out the desired adjustments. The current setting for that function
will appear in the display.
Select function
Set
value
Select function
Set
value
TIME The current time will be dis-
played, or it has to be adjusted.
Use the rocker button << >>
to select the hours or minutes (flashing), and the
/
switch to set the time. Start
with -dB. The precise time
setting is required for the
proper operation of TIM.
CDC NAME (only if changer is connec-
ted)
Use this function to name
your discs (see also CD
changer control, “Entering/
displaying CD names“)
ADA To switch the ADA system
on/off and to test the antennas.
Use the <<>> rocker switch
to activate one of the following modes: ADA OFF, ANT
1 X, ANT 2 X, ADA ON X.
The “X” stands for a number
between 0 and 9, depending
on the intensity of the antenna signal.
Test
If the antenna signal intensity between ANT(enna) 1 and
ANT 2 still varies strongly
even after having changed
the vehicle position (by
metres), you should have the
antenna furnishing the weaker signal checked.
ADA ON/OFF
Normal setting: ADA ON.
If only one antenna is connected, you should adjust
ADA OFF.
ANGLE Use one of the values -1, 0,
or +1 to adapt the individual
viewing angle.
Adjust the ANGLE so as to
provide the best view.
BAS F=R To distribute the bass level
among the front and rear
speakers between +6 dB
front and +6 dB rear.
TRE F=R To distribute the treble level
among the front and rear
speakers between +6 dB
front and +6 dB rear.
44
Page 22

BEEP This sound will confirm
functions which are completed by pressing a button for
longer than 2 seconds.
Adjust volume between 0
and 9 (0 = OFF).
BRIGHT You can adjust the display
brightness from values between 1 and 16. You can also
select one day and one night
adjustment.
Selecting the night brightness:
Switch on the vehicle’s lighting system and program the
brightness value. The audio
equipment must be connected with the vehicle lighting
for this to function properly.
COLOUR Step-by-step adjustment of
the display colour.
G................. II ................ R
green red
CDC DISP (only if changer is connec-
ted)
During CD operation, use
<<>> to select between the
following displays:
NAME the CD name specified with
CDC NAME
TIME the playback time
NUMBER the CD or track number
LED ON You can select between LED
ON and LED OFF. When
setting LED ON, the KeyCard tongue will flash for
additional optical theft protection when the set has
been switched off and the
KeyCard removed.
LOUDNESS When listening at a low level,
the loudness function will
create a more natural sound
by emphasizing the low frequency range.
LOUD 1 - low boost
LOUD 6 - strong boost
PTY LANG Use this function to select
the language for the PTY
indications in the display.
Choose between DEUTSCH
or ENGLISH.
PTY SET Use this function to change
the default allocations of the
preset buttons.
Press the preset button to be
changed. Use the rocker
switch <</>> to select the
desired program type and
press the preset button once
again.
SCANTIME Use this function to specify
the scan time for the radio or
cassette mode from between
5 and 30 seconds.
S-DX 1 Use this function to adjust
the seek tuning sensitivity for
distant reception.
DX. 1 - high sensitivity
DX. 3 - low sensitivity
DEUTSCH
ENGLISH
FRANÇAIS
ITALIANO
NEDERLAND
SVENSKA
ESPAGÑOL
45
PORTUGUES
Page 23

S-LO 1 Use this function to adjust
the seek tuning sensitivity for
local reception.
LO 1 - high sensitivity
LO 3 - low sensitivity
The seek tuning sensitivity
values can be separately
adjusted for AM and FM.
SPEECH In future many RDS broad-
casters will differentiate between music and speech
programs. Use the SPEECH
function to separately adjust
the sound settings for
speech programs.
ST NAME With this function you can
name any preset radio station with a character sequence of up to 8 digits (see
“Station naming“).
TIM TIME To adjust the TIM time.
To activate/deactivate TIM.
For more information, see
chapter “Traffic Memo (TIM),
Adjusting the TIM standby
mode).
CDC UPD (only if changer is connec-
ted)
Use this function to delete
disc names in order to get
new memory capacities for
other CD names (see also
CD changer control, “Deleting CD names“)
VOL FIX Use this function to adjust
the initial volume when the
set is switched on.
Use <<>> to adjust the desired initial volume.
TA LEVEL Use this function to adjust
the volume for the traffic
announcements and the
warning beep from between
1 and 9.
The announcement will then
be broadcast at this volume.
46
To quit the DSC mode and store the setting:
• Press DSC.
Page 24

CD changer control (option)
This car radio allows it to remote control one
of the following Blaupunkt CD changers:
CDC-A03, -F03, -A05, -F05.
Switching the CD mode on
using SRC of the car radio
Be sure that a CD magazine is inserted in the
changer. Use the SRC button to change the
audio source (radio - changer - cassette).
Press SRC until the changer functions appear in the display.
First, “CD ON” is displayed briefly, then for
example
CD1 -T1
CD = disc, T = track
CD no. Track no.
The display mode name/time or number can
be selected under CDC-DISP in the DSC
menu.
Selecting a CD/track using the
rocker switch
Selecting a track (upwards): Press briefly
CUE - fast advance (audible):
Press and hold down
Select disc
(downwards)
Repeating a track: Press briefly
Selecting a track (downwards):
Briefly press twice or more
REVIEW - fast reverse (audible):
Press and hold down
Select disc
(upwards)
The display shows the selected mode.
SCAN
Use this function for briefly sampling the CD
tracks.
To start the scan:
• Press PS on the car radio for approximately 1 sec. The tracks will be briefly
played in ascending order.
To stop the scan:
• Press PS briefly. The radio will continue
to play the title scanned last.
MIX
Use this function for playing the CD tracks at
random.
MIX CD – The tracks of the selected CD
are played at random. The following CDs are selected in numeric order. Their tracks will
also be played at random.
MIX MAG – All tracks of the CD magazine
are played at random.
MIX OFF – MIX is switched off. The tracks
are played in numeric order.
To change the MIX mode:
• Press MIX until the desired mode is
briefly shown in the display.
If MIX is on, “MIX” will appear in the lower
right corner of the display.
DEUTSCH
ENGLISH
FRANÇAIS
ITALIANO
NEDERLAND
SVENSKA
ESPAGÑOL
47
PORTUGUES
Page 25

Entering/displaying CD names
With this system you can name up to 99 CDs.
When playing a CD, the dis play will then give
you the entered name, for example
“VIVALDI”.
Precondition: NAME must be selected under
DSC - CD DISP.
To enter the name:
First, switch off the priority for traffic announcements. Otherwise the entry will be
deleted if an announcement is broadcast.
Press the TA button to switch the “TA” display off.
Be sure that at least one CD is inserted in the
CD magazine.
• Press SRC to change to CDC.
• Press DSC.
• Press the rocker switch
NAME” is displayed.
• Press the -dB button.
The first character position is flashing.
• Use the rocker switch
first letter, special character or digit
from 0-9.
• Use the rocker switch <<>> to change
to the next position and select a character.
Each name may have up to 7 characters.
/ until “CD
/ to enter the
To finish the entry:
• Press -dB. The entry is stored and you
can now select another DSC function
using the rocker switch
Alternatively:
• Press DSC. The entry is stored and the
DSC mode is automatically quit.
To store the entry/choose the next CD:
• Press -dB and select the next CD to be
named using <<>>.
• Press -dB and enter a name.
Any specified name will be deleted by reassigning it with a new CD name.
/ .
Deleting CD names
If you try to store more than 99 CD names,
“FULL” will be shown in the display. In this
case you can use DSC to delete the name of
one or more CDs in order to get new memory
capacity.
Use the CDC-UPD function to confirm all
CDs, the names of which you wish to maintain. All the other names will be deleted.
• Press DSC.
• Insert a magazine with the CDs, the
names of which you wish to maintain.
• Press
ed.
/ until “CDC UPD” is display-
• Press <<>> and “LOAD CD” is displayed.
After having read in the CDs of this magazine, “NEXT MAG” appears in the display.
• Press the EJECT button on the CD
changer and insert the next magazine.
Repeat these steps for all CDs, the names of
which you wish to maintain.
• To finish your entry, press -dB for
about 2 sec. until “UPDATING” is displayed. The updating process is completed when the display shows
“READY”.
The names of all CDs inserted in the magazine remain stored in the memory. The other
CD names have been deleted.
You can interrupt this process by pressing
DSC.
48
Page 26

Appendix
Survey of DSC default settings
TIME 00:00
ADA ON
ANGLE 0
BAS F=R
TRE F=R
BEEP 4
BRIGHT 16
COLOUR Medium position (orange)
CDC DISP NAME
LED ON
LOUDNESS 3
PTY LANG DEUTSCH
PTY SET NACHRICH (TEN)
SCANTIME 10s
S - DX 1
S - LO 1
SPEECH 0
TA LEVEL 5
TIM TIME 07:00
VOL FIX 26
Technical data
Amplifier:
Output power: 4 x 20 watts RMS acc.
to DIN 45 324
4 x 25 watts music
power acc. to
DIN 45 324
FM sensitivity: 0.7 µV at 26 dB
S/N ratio
Frequency response:
FM 35 - 16,000 Hz (-3 dB)
Tape (metal) 30 - 18,000 Hz (-3 dB)
DEUTSCH
ENGLISH
FRANÇAIS
ITALIANO
NEDERLAND
SVENSKA
ESPAGÑOL
We reserve the right to make changes!
PORTUGUES
49
Page 27

Blaupunkt-Werke GmbH
Bosch Gruppe
1/95 K7/VKD 3 D94 147 028 PM
ENGLISH
FRANÇAIS
ITALIANO
NEDERLAND
SVENSKA
ESPAGÑOL
PORTUGUES
27
 Loading...