

Blaupunkt 236/207O-GB-3B-EGPS, 236/207O-GB-3B-EGP, 236/207O-GB-3B-EGDPS, 236/207O-GB-3B-EGDP Quick Start Setup Manual
Page 1
Quick Start Set Up Guide
For information on using the TV’s features, please refer to the operating Instructions.
Model Numbers
236/207O-GB-3B-EGP
236/207O-GB-3B-EGPS
236/207O-GB-3B-EGDP
236/207O-GB-3B-EGDPS
BLA/QSG/0229
RF 75 ohm Antenna / Analog / DVB
Inputs 2 x HDMI, 1 x USB, 1 x SCART, 1 x RJ45 LAN/Ethernet,
1 x Mini Composite/Video & L/R Audio shared
for Composite/Video & Component/YPbPr,
1 x Mini Component/YPbPr
Sound Outputs 1 x 3.5mm Headphone, 1 x Digital Optical Audio Out
Speaker / Amplifi er Watts (RMS) 2 x 5 / 2 x 3
Voltage and power consumption
AC 220V~240V; 50Hz
25/40W (ecomode/max)
AC 220V~240V; 50Hz
25/50W (ecomode/max)
Dimensions including stand (mm)
560W x 386H x 140D
Net weight (Kgs) 4.1 4.3
Wall Mounting VESA 100 x 100 (mm)
Trademark
Blaupunkt
Model ID
236/207O-GB-3B-EGP
236/207O-GB-3B-EGPS
236/207O-GB-3B-EGDP
236/207O-GB-3B-EGDPS
(Models with inbuilt
DVD player)
Energy e ciency class A
Visible screen size (diagonal) 60 cm / 23.6 inches
On mode average power consumption 25.0 W
Annual energy consumption *1
37 kWh
Standby power consumption *2 <0.50 W
O mode power consumption 0 W
Screen resolution 1366 (H) x 768 (V)
*1: Energy consumption XYZ kWh per year, based on the power consumption of the television operating 4
hours per day for 365 days. The actual energy consumption will depend on how the television is used.
*2: When the TV is turned o with the remote control/standby button and no function is active.
Product che
Additional Technical Information
236/207O-GB-3B-EGP
236/207O-GB-3B-EGPS
236/207O-GB-3B-EGDP
236/207O-GB-3B-EGDPS
(Models with inbuilt
DVD player)
3 x M (4x12)
4 x ST (4x12)
Accessories
Included with this TV are the following accessories
What is included in the box
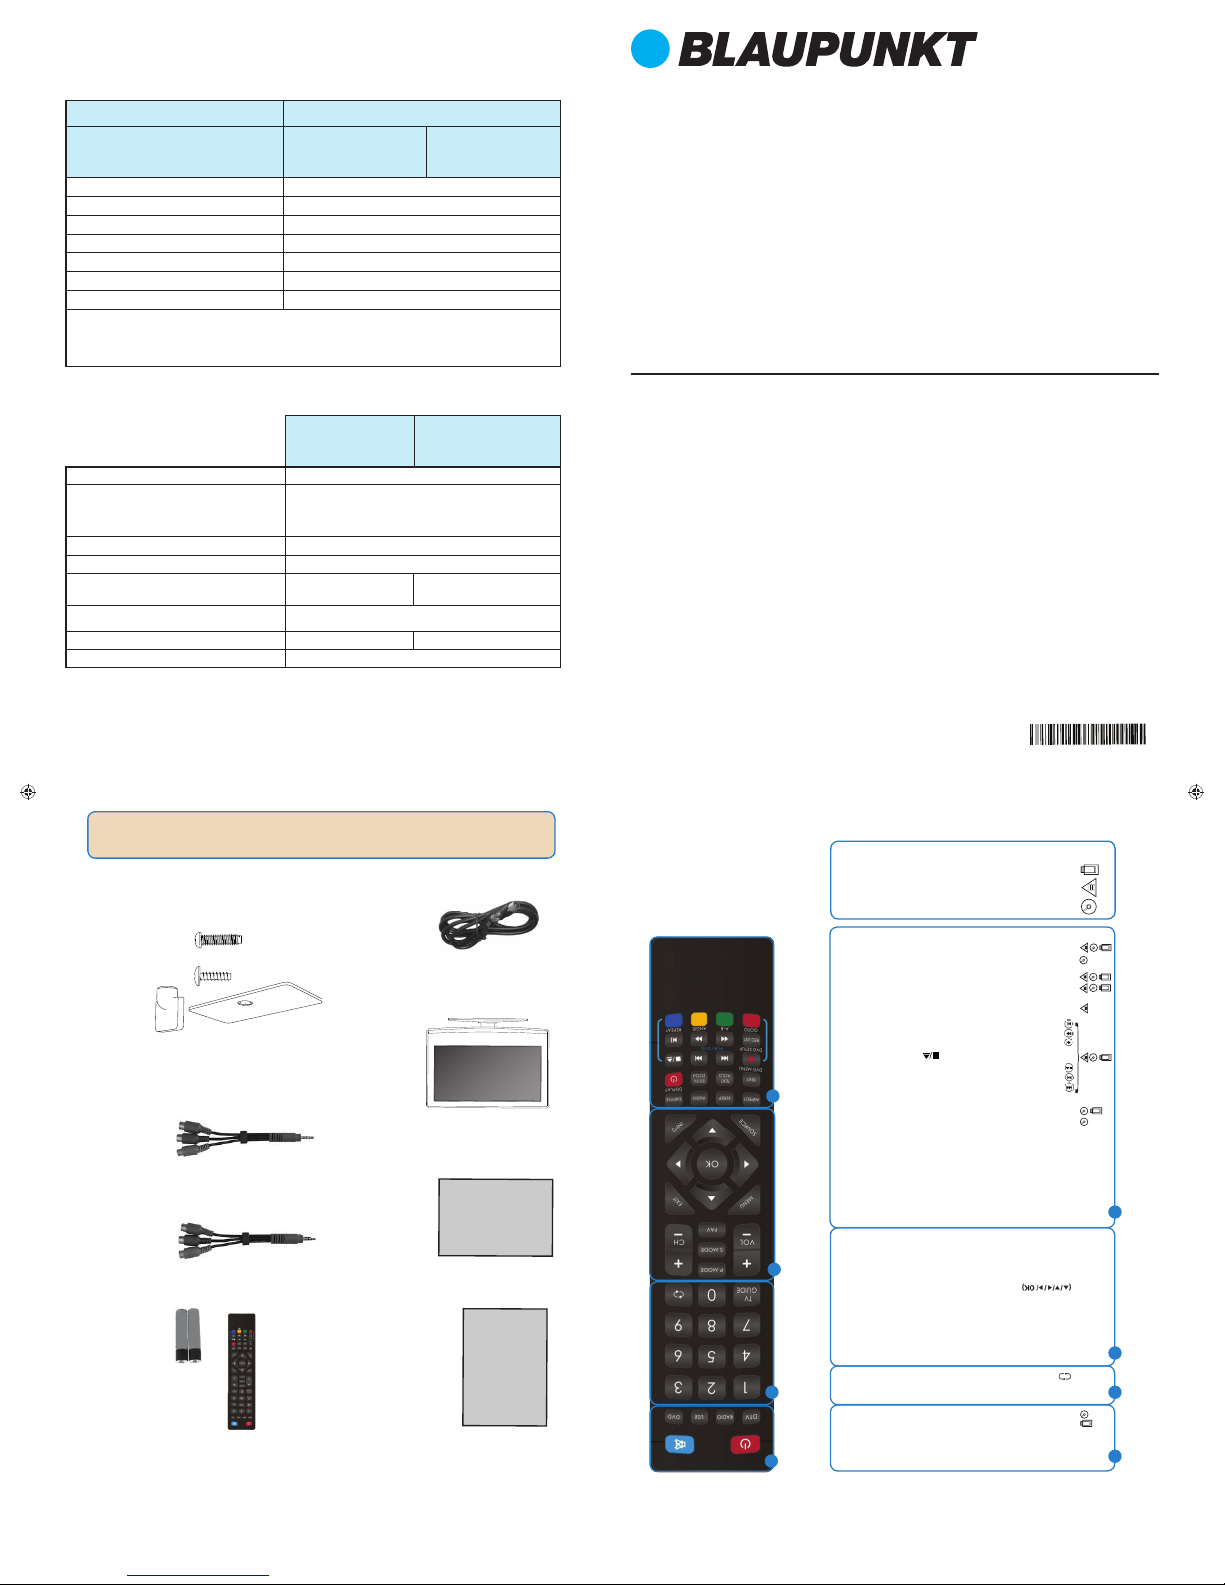
Using the remote control
Technical Speci cation
STANDBY - Switch on TV when in standby or vice versa
MUTE - Mute the sound or vice versa
DTV - Switch to Freeview source
RADIO - Switch to radio whilst in Freeview source
USB - Switch to USB source
DVD - Switch to DVD source
NUMBER BUTTONS - 0 – 9 to select a TV channel directly.
TV GUIDE - Opens the 7 Day TV Guide (Freeview mode)
- To return to the previous channel viewed
VOL (+/-) - To increase / decrease the sound level
P.MODE - Scrolls through picture mode options
S.MODE - Scrolls through sound mode options
FAV - To display favourites menu
CH (+/-) - To increase or decrease the channel being watched
MENU - To display OSD menu
EXIT - To exit all menus
- Allows you to navigate the on-screen menus
and adjust the system settings to your preference
SOURCE - To display the input/source menu
INFO - Press once for now/next channel information
Press twice for programme information about current
programme
ASPECT - To switch the screen between the different picture
formats
SLEEP - Press repeatedly to cycle through the sleep options
AUDIO - To change the audio language (if available)
SUBTITLE - To switch the dialogue at the bottom of the screen
(on/off)
TEXT - To enter/exit Text
TEXT HOLD - Teletext mode - Hold current page which is
displayed (Analogue TV)
DISPLAY - To switch off the screen when listening to radio
TEXT/DVD ZOOM - Zoom function for Teletext and DVD
DVD MENU/RECORD - Access the DVD root menu and USB
record function
- To restart the current chapter
- To advance forward to the next chapter
- To stop the playback/Eject Disc
(To EJECT the disc press/hold the
button for 4 seconds)
- To play in fast rewind mode
- To play in fast forward mode
- To play/pause
DVD SETUP/REC LIST - Opens up DVD Menu or Opens the list
of what has been previously recorded
GOTO - To go to a specifi c chapter
A-B - Press once to set point, press a second time to return
to point
ANGLE - Select different angle of DVD
REPEAT - To repeat playback
For Models with Integrated DVD players
For Models with PVR Function
For Models with USB Playback
1
4
1 x Operating Instructions
1 x Quick Start Guide
1 x TV
1 x Remote Control and 2 x AAA Batteries
Operating
Instructions
Quick Start
Guide
1 x RF Cable
1 x Stand Installation Pack
(Includes stand base, stand neck & screws)
1 x Mini Component / YPbPr
1 x Mini Composite / Video
Quick & easy guide for setting up your TV
What is included in the box
Using the remote control
Setting up the TV for the rst time - including attaching the stand
Connecting other devices to the Television
Need help setting up or using your TV?
Please contact the UK & ROI Helpline*
Telephone UK 0330 024 0802 or ROI 01443 3940
Online support at: www.umc-uk.co.uk
Email support at: service@umc-uk.co.uk
*Calls to 0330 numbers are charged at standard call rates and are included as part of any bundled minutes with your
phone provider.
Calls to the ROI number are charged at the local call rate.
The telephone opening hours are Monday to Friday 8.30am to 6pm, Saturday 9am – 5pm.
Bank Holidays - 10am to 4pm
Closed Christmas and New Years day
Please save your box/packaging as you will need this in the event of warranty/service repair or support.
We are unable to carry out warranty/service if you are unable to package it correctly. The safest way to
package your item in the event of warranty/service repair is in it’s original box/packaging.
3
2
1
2
3
4
Page 2
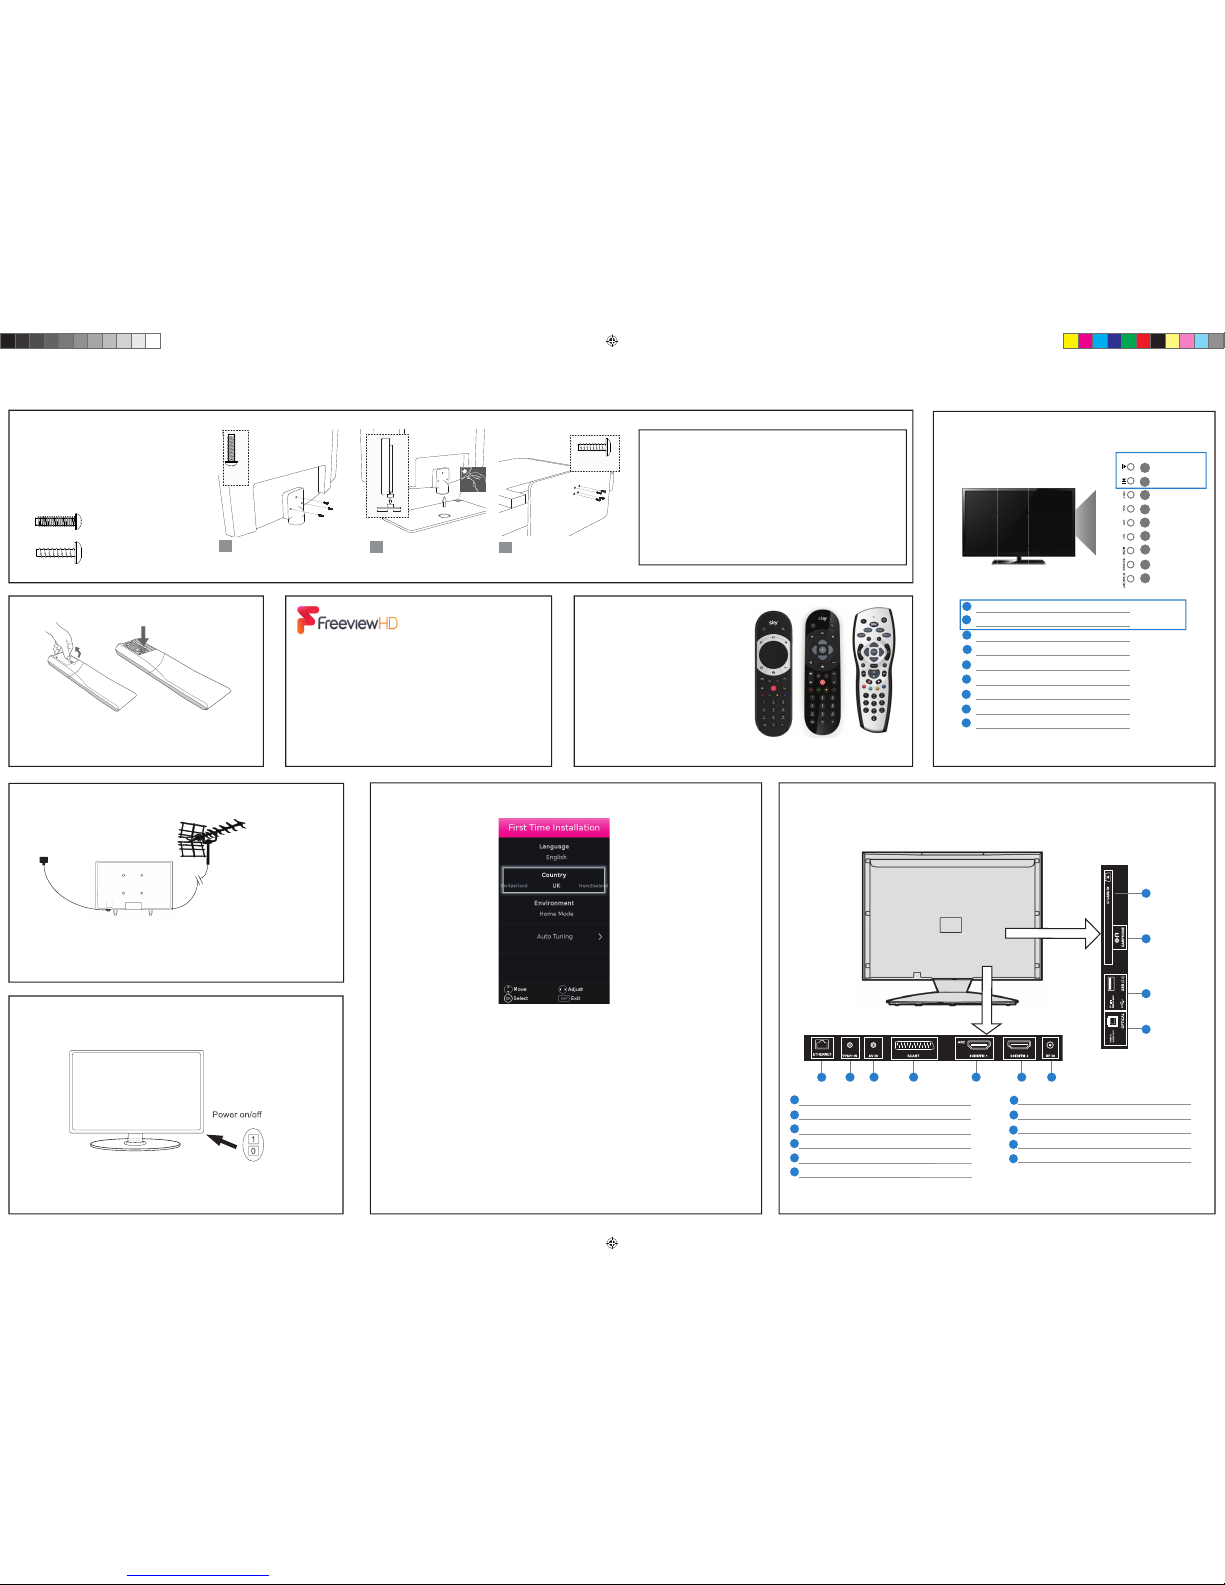
Button layout
For stand installation, there are two types of screws
provided as shown below. To complete the stand
installation you will require a cross head screw driver.
Place the TV set on a fl at and clean surface with the panel
facing downwards to avoid damage.
4 x ST (4x12)
3 x M (4x12)
3 x
M (4x12)
1 1/2
4 x ST (4x12)
1
2
3
Used for attaching the stand neck
to the TV (fi g.1)
Used for attaching the stand base
to the stand neck (fi g.3)
1
Stop/Eject Disc
Play/Pause Disc
Volume up and menu right
Volume down and menu left
Programme/Channel up and menu up
Programme/Channel down and menu down
Displays Menu/OSD
Displays the input source menu
Standby Power On/Off
1
2
3
4
5
6
7
8
9
1
2
3
4
5
6
7
8
9
For models
with built in
DVD player
Fitting the stand
Attach the stand neck to the rear of the
TV set using the 3 x M(4x12) screw.
Peel off the protective plastic cover
then attach the stand base to the neck.
Secure the base to the neck by using the
4 x ST(4X12) screws provided.
Installing batteries
Remove the battery cover from the rear of the remote
control and insert the AAA batteries which are supplied in
the accessory pack. Ensure that the polarity of the batteries
is as shown in the battery compartment. Replace the battery
cover. The remote control is ready for use.
2
Switch on the television using the power on/off switch located on the TV.
The standby light will show.
For DVD models only
For DVD models only
HELPFUL ADVICE FOR FIRST TIME STAND INSTALLATION
When securing the self-tapping screw/s into the base of the stand (on fi rst
installation) the screw/s will be naturally tight as they create a thread in the
plastic of the stand neck in order to support a TV of this size.
a) Ensure the cross head screw driver tip fi ts correctly into the head of the screw
and that it is not too big or small.
b) Screw in all screws individually and partially before tightening all of the
screws fully.
c) If they become very tight try loosening them slightly and then re-tightening
them once again as this will continue the process of creating the thread for the
screws.
Setting up the TV set for the rst time
Sky remote code
If you wish to use your Sky remote to
operate the TV’s basic functions, you will
need a Sky remote control (Revision 9 or
later) and you will need to program it with
the code 2134.
Connectivity
First Time Installation
When you fi rst turn on the TV set, you will be welcomed by the First Time Installation screen as
shown above. Once you have decided the options as described below, select Auto Tuning and
press OK on the remote control.
Language: Select your preferred on-screen display language. This will change the language
in which the menus and associated information is displayed in. When the set up has been
completed, this can be changed by selecting Menu > Settings > Language.
Country: Select the correct country in which the set will be used in. This will enable the TV to
correctly install the functions applicable in the country of use.
Environment: Use this option to select either Home or Store mode.
HOME MODE is a power saving mode which reduces the energy used by up to 25% (by
reducing the power to the LED/LCD panel).
When in STORE MODE the picture will be brighter and you can personalise the settings within
the picture settings menu (Contrast, Brightness, Colour etc).
Note: In Home Mode, the TV will switch itself to the standby mode after 4 hours in the event
that the buttons on the remote control or TV are not used.
4
5
*The LAN/Ethernet port is used only for Pay TV services and Freeview HD (Freeview services are only available in the UK). It is not intended to
be used for internet use.
A
C
D E
G
F
H
I
B
J
A
I
B
J
K
C
D
E
F
G
H
K
RF In RF/TV Aerial Input
Digital Optical Audio Digital Optical Audio Output
1 x USB USB port
EARPHONES Earphone input
CI CARD IN Common interface module Input
To receive Freeview channels, in particular Freeview HD
channels, you will need a Digital TV aerial and be in a good
Freeview coverage area. You can check coverage for your
postcode at www.freeview.co.uk.
Please note that any Freeview HD channels found during
tuning will be placed in channel positions above 100.
For example, 101 (BBC1 HD) 102 (BBC2 HD) etc.
Connecting your set
1) Connect the TV to your power socket.
2) If you wish to use the TV to receive Freeview/Saorview channels, connect the RF
input from the TV to your outdoor Digital TV aerial. If you do not wish to receive
Freeview/Saorview, skip this step.
3
Outdoor Digital
TV Aerial
1.
2.
Locating the Power Switch
ETHERNET/LAN* Network Connection
YPbPr HD input (YPbPr)
AV IN Audio/Video input
SCART SCART Input
HDMI 1 HDMI input (ARC)
HDMI 2 HDMI input
UNI - QSG - Blaupunkt - NON - SMART models - Foldout.indd 2UNI - QSG - Blaupunkt - NON - SMART models - Foldout.indd 2 15/02/2018 15:12:1715/02/2018 15:12:17
 Loading...