

Page 1

1
User´s manual
BLATA MOTARD 125 BXM
BLATA ENDURO 125 BXE
Page 2

Page 3

1
IMPORTANT INFORMATION
This motorcycle has been designed for one rider and one passenger.
The motorcycle has been designed for operation on the road
and light terrain. It is not suitable for any racing purposes, i.e.
motocross track riding.
Read through this User’s Manual carefully. Special attention
shall be paid to safety instructions highlighted with special labels. The meaning of latter is included in the section themed
“Some Facts About Safety”.
This Manual shall be considered a permanent part of the motorcycle and it should be kept with the vehicle in case of any sale,
and that be even in case of second hand vehicle.
All the data and information contained herein have been
based on the most recent product information obtained prior
to the manufacturing end procedure. BLATA, s.r.o. reserves
the right to modify this Manual anytime without any prior no-
tication or undertaking any obligations whatsoever.
The Blata, s.r.o. company shall not be held responsible for
any damages or injuries caused by failure to follow the instructions contained herein.
It is strictly prohibited to reproduce any part of this Manual,
unless granted by prior permission in writing.
Page 4

2
WELCOME
Dear customer, we are delighted that you have decided to purchase the BLATA Enduro 125 / Motard 125 motorcycle.
This Manual will introduce you to the controls of this vehicle.
Please read the Manual carefully, BEFORE YOU START YOUR
MOTORCYCLE FOR THE FIRST TIME. The Manual contains
vital caution details and instructions for vehicle control.
We would like to ask you to understand the importance of “Motorcycle Check before Operation” and the “Regular Mainte-
nance”. These activities have a signicant impact of the vehicle
safety and failure to follow the instructions increase the risk of
accident. However, if these instructions are followed, you will be
rewarded with safety and trouble-free motorcycle operation.
We also appeal to you to have any service works and complicated maintenance works done by an authorised BLATA motorcycle service centre.
This Manual will offer you sections highlighted as NOTE. This
information will advise you on correct procedures to prevent
any damage to the motorcycle, property or the environment.
We wish you a pleasant reading.
Page 5

3
SOME FACTS ABOUT SAFETY
We are concerned with the safety of yourselves as well as others
around you.
The information highlighted in this Manual will warn you about potential risks encountered by yourselves or others around you.
It is neither possible nor practical to warn you before all the risks
associated with operation and maintenance of your motorcycle.
Therefore you need to use your common sense.
For important safety information observe the safety remarks labelled with.
Refer below to the denition of these remarks:
DANGER: Failure to follow these instructions may re sult in DEATH or SERIOUS INJURIES
WARNING: Failure to follow these instructions may
result in DEATH or SERIOUS INJURIES
CAUTION: Failure to follow these instructions may re sult in PERSONAL INJURIES
This Manual contains important safety information.
Please read the Manual carefully!
Page 6

4
CONTENTS
SOME FACTS ABOUT SAFETY
MOTORCYCLE USE SAFETY
GENERAL DATA AND OPERATION
Motorcycle
Handlebars and controls
Dashboard
Dashboard unit functions
Dashboard settings
Controls
Seat
CHECK BEFORE OPERATION
Before your rst start
Engine oil
Fuel
Clutch lever
Throttle grip
Brakes
Wheels
Drive chain
Accessories and load
Lighting and controls
MOTORCYCLE OPERATION
First ride
Side stand
Starting
Ride and gear control
Braking
Riding with passenger / load
3
6 - 10
11 - 19
11 - 12
13
14
15
16
17 - 18
19
20 - 33
20
21 - 22
22 - 23
24
25 - 26
27 - 28
29 - 30
31
32
33
34 - 41
34 - 35
36
37
38 - 39
40
41
Page 7

5
CONTENTS
MAINTENANCE INSTRUCTIONS
Cleaning and conservation
Temporarily out of operation
Tools
Maintenance instructions
Maintenance safety
Maintenance plan
Fuel system
Throttle grip
Air cleaner
Crankcase ventilation
Spark plug
Engine oil
Oil cleaner insert
Idle run
Drive chain
Braking system
Headlight
Side stand
Suspension
Steering head bearings
Bulb replacement
Fuse replacement
Battery
MOTORCYCLE TECHNICAL DATA
FINAL SUMMARY
42 - 70
42 - 43
44
45
46
47
48 - 49
50
51
52 - 53
53
54
55
56
57
58 - 59
59
60
61
62 - 63
64
65 - 67
68
69 - 70
71
72
Page 8
6
MOTORCYCLE USE SAFETY
Please mind your safety and keep your motorcycle in sound
condition. You will be able to enjoy the motorcycle and its riding
properties.
It is necessary that you wear suitable protection when riding.
This Manual can provide you with many useful hints to help you
avoid potential risks.
Always wear safety helmet and suitable clothes:
Various researches and cases have proven that helmets ensure
signicant reduction of the possibility of severe head injuries.
Therefore we are warning you to use a certied motorcycle hel-
met at any time. We also recommend the use of other protective
means as eye guard, protective motorcycle boots, gloves, suitable clothes and other safety guards for riders. You shall always
wear long trousers and a jacket or special motorcycle clothing.
Please advise any of your passengers about the same.
Failure to use a protective motorcycle helmet increases the
risk of severe head injury or
death in case of accident.
Both you and your passenger
shall always wear a protective
helmet, eye protection and
other protective means.
WARNING WARNING
Page 9

7
MOTORCYCLE USE SAFETY
Be visible:
Some drivers tend to overlook riders, as these are hard to spot.
You can make yourselves better visible by wearing contrast
clothes with reexive means and ride in such manner that other
drivers can see you in reasonable time.
When turning and changing your travel direction, use turn signal lights. If you need to alert others, use the horn.
Do not overestimate your skills:
Exceeding limits is the main reason for motorcycle accidents.
Do not ever ride beyond your skill, the maximum performance
ability of your motorcycle, or excess speed in particular condi-
tions. Do not force your motorcycle into a terrain. Be familiar
with vehicle controls and operation methods before riding. If
you are unsure about the controls or riding the motorcycle, ask
your Blata dealer for advice.
The above instructions will help you avoid any unnecessary accidents or injuries.
Do not drink alcohol before ride:
Remember that alcohol, drugs, fatigue, stress and loss of concentration have serious impact on your decision making ability,
response and the ability of safe driving. Never drink alcohol before or during the ride.
Keep your motorcycle in safe condition:
To ensure a safe ride, your motorcycle shall be checked before
every ride and subject to regular maintenance as prescribed.
Any alternative spare parts or unsuitable modications and
poor maintenance may have signicant impact on your safety.
Use only genuine Blata parts.
If your motorcycle has fallen or been through an accident, ask
your Blata dealer to check the main vehicle, even though you
might be able to perform some repairs on your own.
Page 10
8
MOTORCYCLE USE SAFETY
Maximum permissible load:
Your motorcycle has been designed to carry on rider and one
passenger. When riding with a passenger, you may feel the difference when accelerating or braking. However, if your tyres
and brakes are kept in sound condition, you can benet from
the full permissible load of the vehicle as prescribed.
Every excess of the maximum permissible load or travelling with
the vehicle unbalanced may have serious impact on the vehicle
controllability, braking or stability. Therefore you shall never exceed the maximum permissible load of the motorcycle.
The load on your motorcycle determines your safety. Any time
you travel with a passenger or load, you should beware of the
following.
The maximum permissible load limits for your motorcycle are
as follows:
Motard: 162 kg (357 lbs)
Enduro: 158 kg (348 lbs)
(the value above includes the rider, the passenger, the entire
load and all accessories)
Checks to be performed when travelling with a passenger or load:
- correct ination of tyres
- xing of any items being carried
- location of heavier items towards the motorcycle centre
- distribution of load on both sides to balance the motorcycle
Any overload or unsuitable
loads may result in an accident
with personal injuries or even
death.
Obey all the maximum permis-
sible load values as listed in
this Manual.
WARNING WARNING
Page 11
9
MOTORCYCLE USE SAFETY
Accessories and modications:
Any accessories or modications for your motorcycle not certied by the Blata company may jeopardize safe operation of your
motorcycle. Please read the following information, before you de-
cide for any modications or mounting of accessories.
Accessories:
We strongly recommend the exclusive use of original Blata accessories only, certied and tested for this motorcycle model.
As the Blata company is unable to test all the other accessories,
these shall be selected, installed and used at your own risk.
Consult your Blata dealer and read the following information:
- beware to prevent any accessories limit the vehicle clearan-
ce, the angle of inclination, movement of axles or steering,
your position or their interference with control features
- beware that the electric equipment may not exceed the ca
pacity of vehicle electric system
- the motorcycle may not be coupled with any trailers or side cars; the design does not allow for such attachments
- should you be unsure about proper installation of accesso
ries, contact your BLATA motorcycle dealer
The use of any unsuitable modications or accessories may result in accident leading to serious personal injury or death.
Please read this Manual carefully to remember information
related to modications and
accessories.
WARNING WARNING
Page 12

10
MOTORCYCLE USE SAFETY
Modication:
We strongly discourage you from removal of any original equip-
ment or performance of modications of any kind. Such changes and modications may impair the controllability, stability,
braking and the overall safety of your motorcycle.
Any removals or modications of lighting, the exhaust, the
emission control system or any other systems may render your
motorcycle inoperable or unt for safe use.
Maintenance and service:
Any actions in an unauthorised service centre, imperfect maintenance operations and negligence to the necessary check
up before use may result in serious accidents, injuries or even
death.
Any service operations and complex maintenance operations
shall be dedicated to an authorised BLATA service centre
equipped with special tools and professionally trained personnel.
Page 13
11
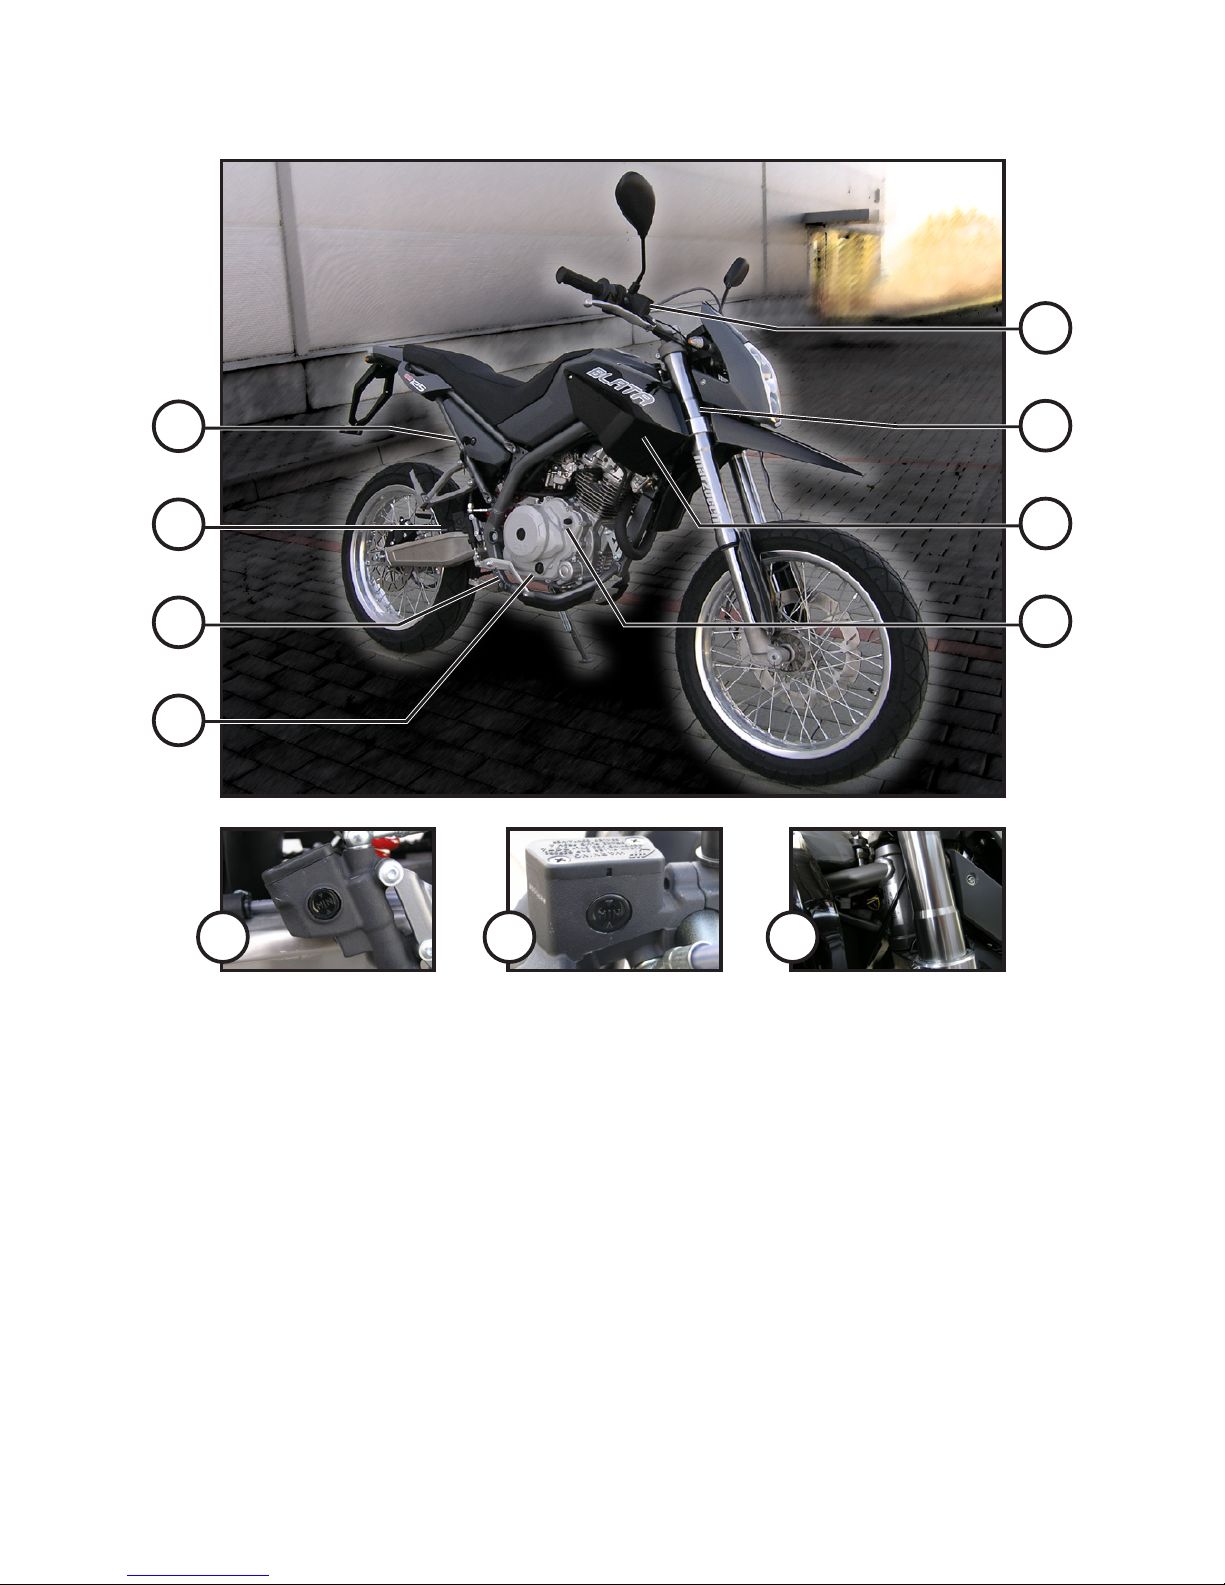
MOTORCYCLE
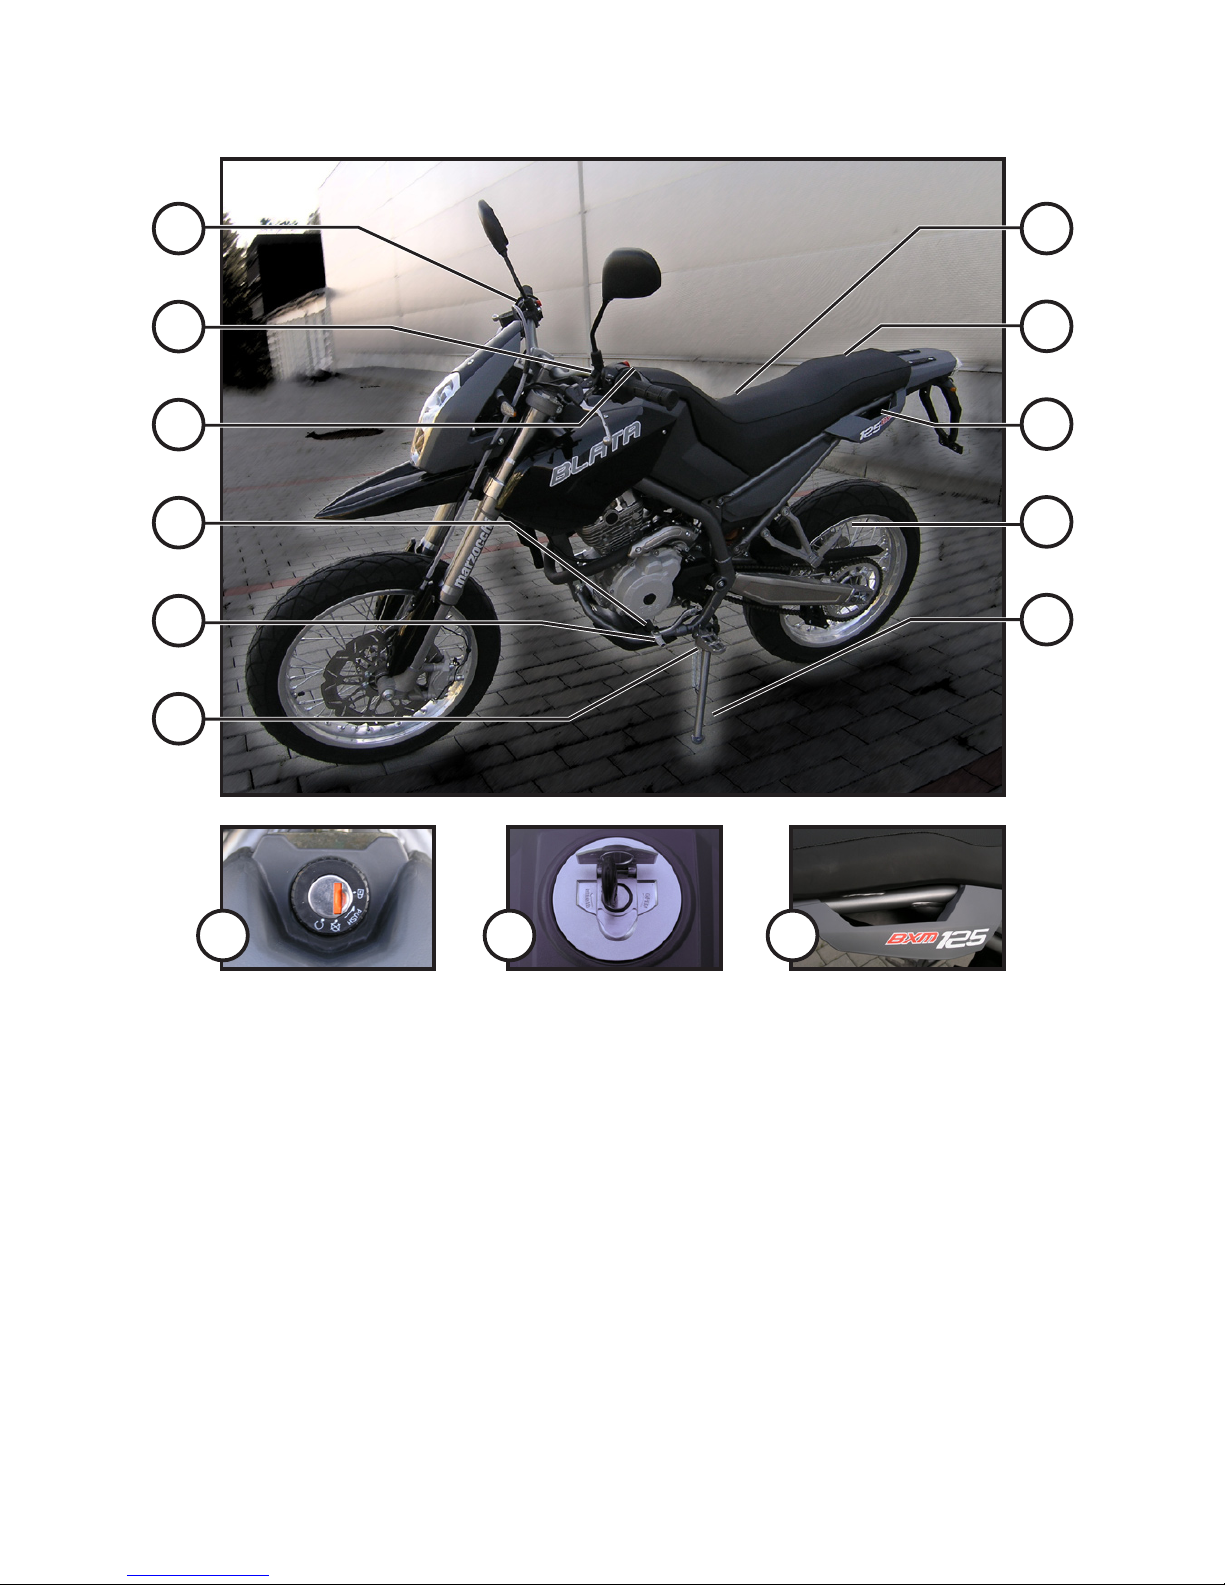
Handlebars and control features
Ignition switch box
Fuel tank cap
Engine identication number
Gear lever
Rider’s footsteps
Medical kit and manual storage compartment
Tools
Passenger’s handlebars
Passenger’s footsteps
Side stand
1.
2.
3.
4.
5.
6.
7.
8.
9.
10.
11.
2 93
1
2
3
4
5
6
7
8
9
10
11
Page 14
12
MOTORCYCLE
Rear brake uid tank
Seat lock
Rear brake pedal
Oil level check loophole (sight oil gauge)
Oil rell cap
Front brake uid reservoir
Fuses
Vehicle identication number (VIN)
12.
13.
14.
15.
16.
17.
18.
19.
12 1917
13
12
14
15
17
19
18
16
Page 15
13
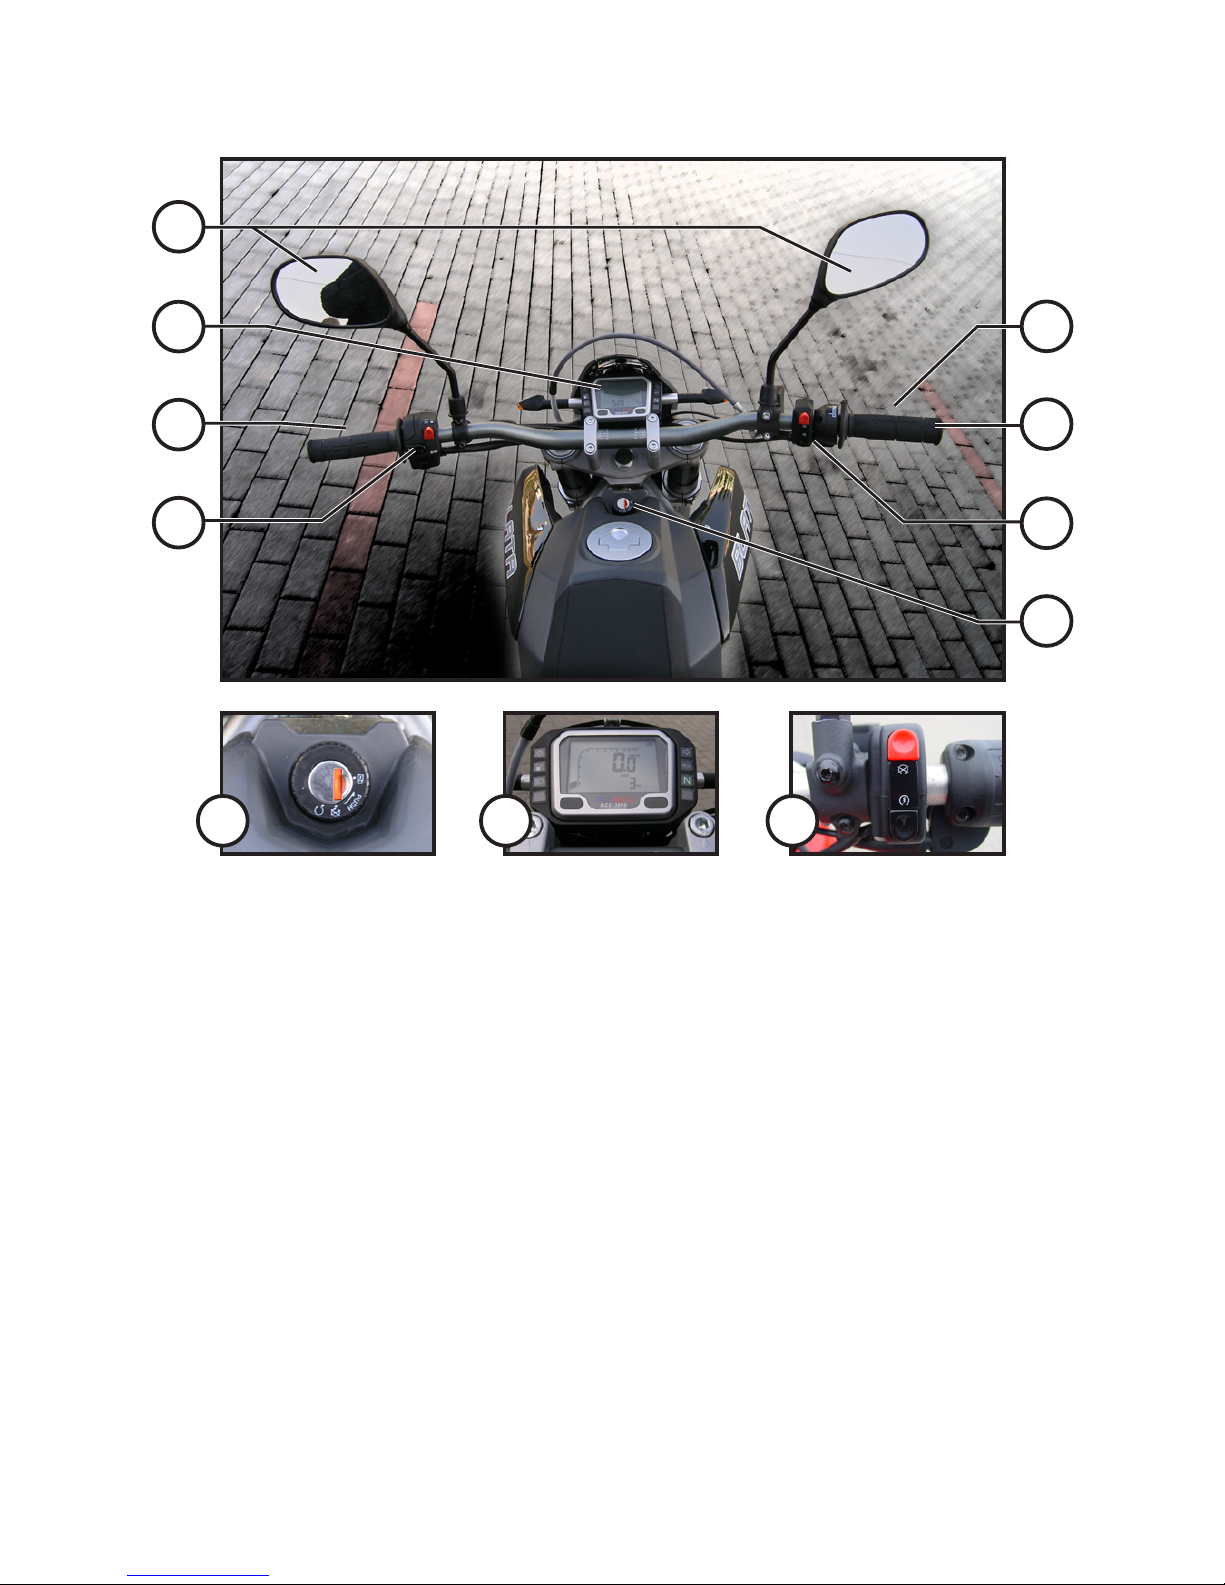
HANDLEBARS AND CONTROL FEATURES
Ignition switch box
Dashboard
Lighting controls
Starter and ignition controls
Clutch lever
Front brake lever
Throttle grip
Rear view mirrors
20.
21.
22.
23.
24.
25.
26.
27.
2120 23
27
21
24
22
25
26
23
20
Page 16
14
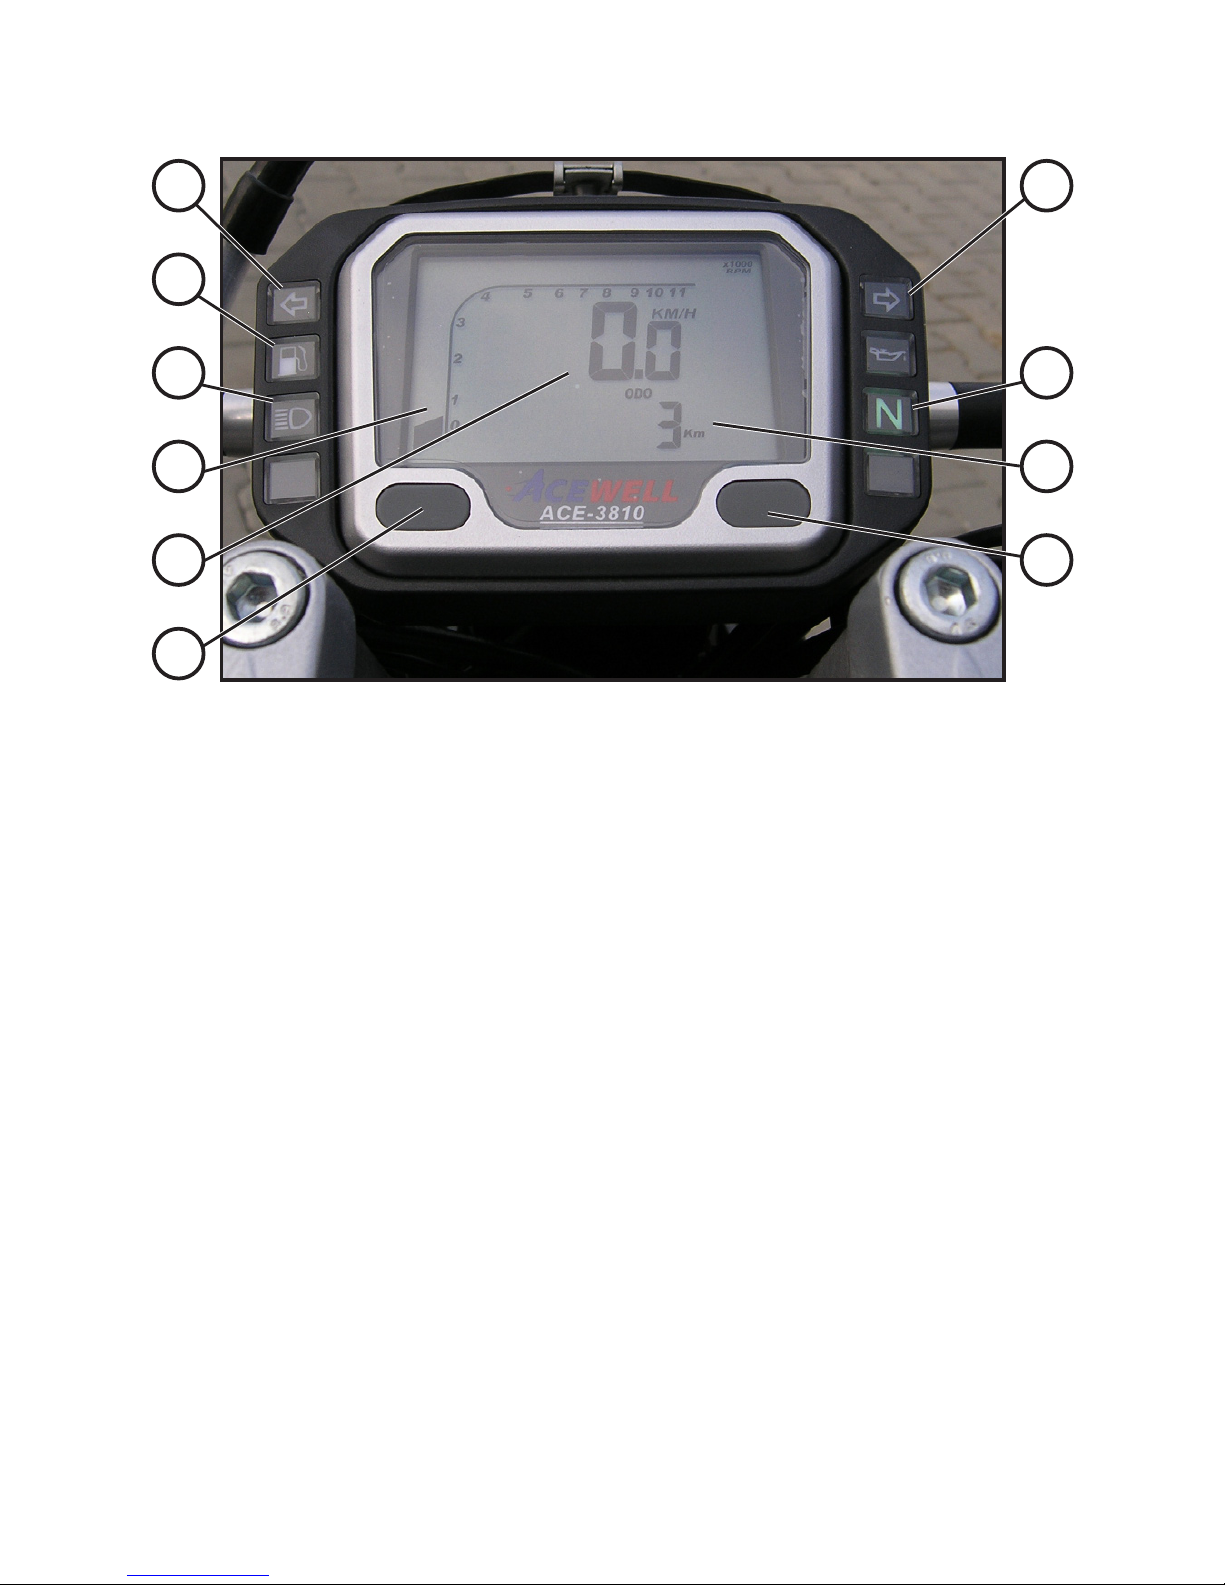
Left turn signal indicator light
Right turn signal indicator light
Warning indicator for fuel reserve
High beam control indicator
Neutral indicator
Graphic revolution indicator
Optional function (selected with the 36 button)
Speedometer
Right button - MODE
Left button – SET / RESET
When the ignition is of, the display will show clock only.
Once the ignition has been switched on, the system will allow
access to further optional functions.
28.
29.
30.
31.
32.
33.
34.
35.
36.
37.
DASHBOARD
28
30
31
33
35
37
29
32
34
36
Page 17
15
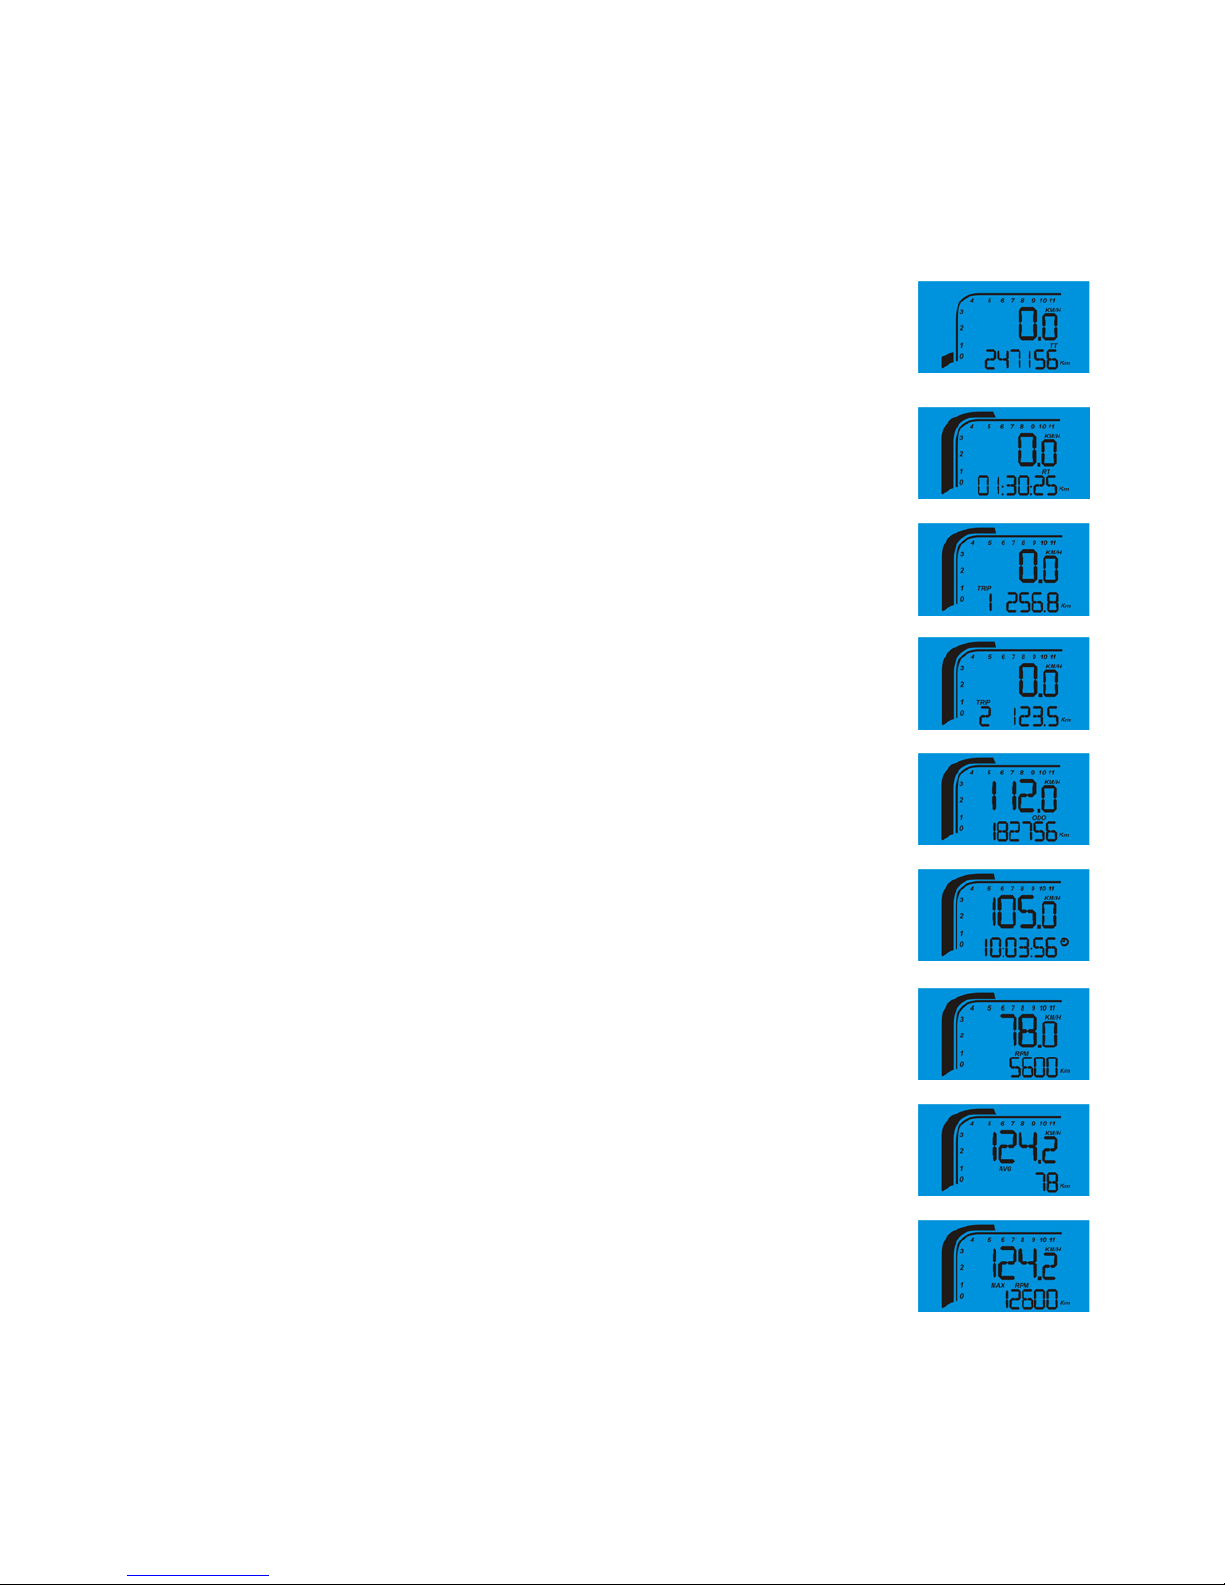
DASHBOARD FUNCTIONS
The right button (36) can be used to switch between functions
of the dashboard.
TT - displays the total operation time
- the value always is never reset
- can not be displayed when riding
RT - displays one ride duration
- can not be displayed when riding
TRIP 1 - displays distance covered within one ride
TRIP 2 - displays distance covered within one ride
ODO - displays the total mileage (odometer)
- the value always is never reset
Clock - displays time
RPM - displays the current engine revolutions in digits
AVG - displays the average speed
MAX RPM - displays the maximum speed and maximum
engine revolutions reached
- can not be displayed when riding
The values of RT, TRIP 1, TRIP 2, AVG and MAX RPM can be reset by pressing
and holding the left button (37) down for about 2 seconds.
Page 18
16
DASHBOARD SETTINGS
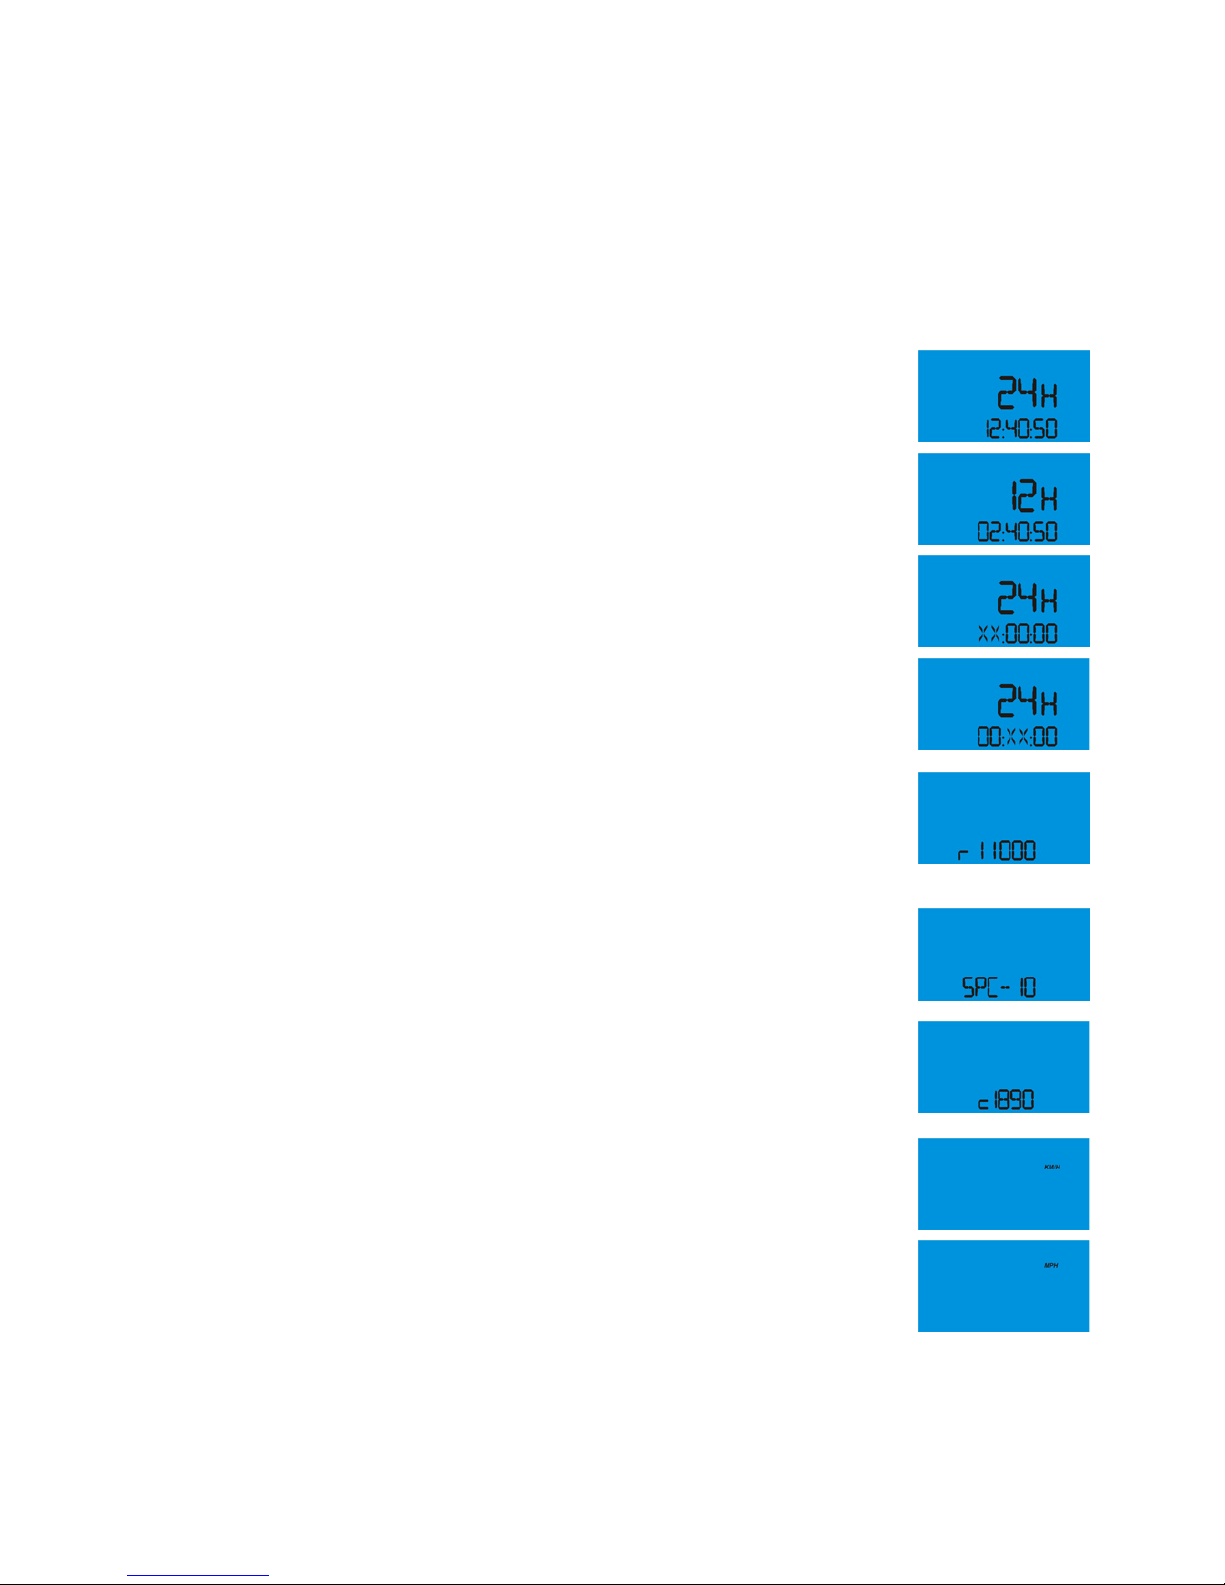
With the ignition switched on (see the following page) hold both
buttons (36 and 37) on the dashboard depressed. The left button (37) serves for setting the value and the right one (36) is
used for position shift.
I. Time settings
- setting the time format:
using the left button (37),
select between the 12h or 24 h formats;
using the right button (36), shift to the next position;
- time setting:
the button (37) sets the clock;
shift using the button (36);
use the button (37) to set minutes
II. Setting the revolutions indicator
- this option is used for setting the threshold
revolutions for gear shift with ashing indicator;
- regular value of 11.000 rpm
III. Technical constant for revolutions
- Set the SPC value - 1.0
IV. Technical constant for revolutions counter
- c1890 value for motard
- c2242 value for enduro
V. Setting the speed unit
- the button (37) can be used to switch
between KM/H or MPH (with simultaneous
change to the mileage units)
To complete the settings of dashboard switch the ignition off. This will also save
the settings made.
Page 19
17
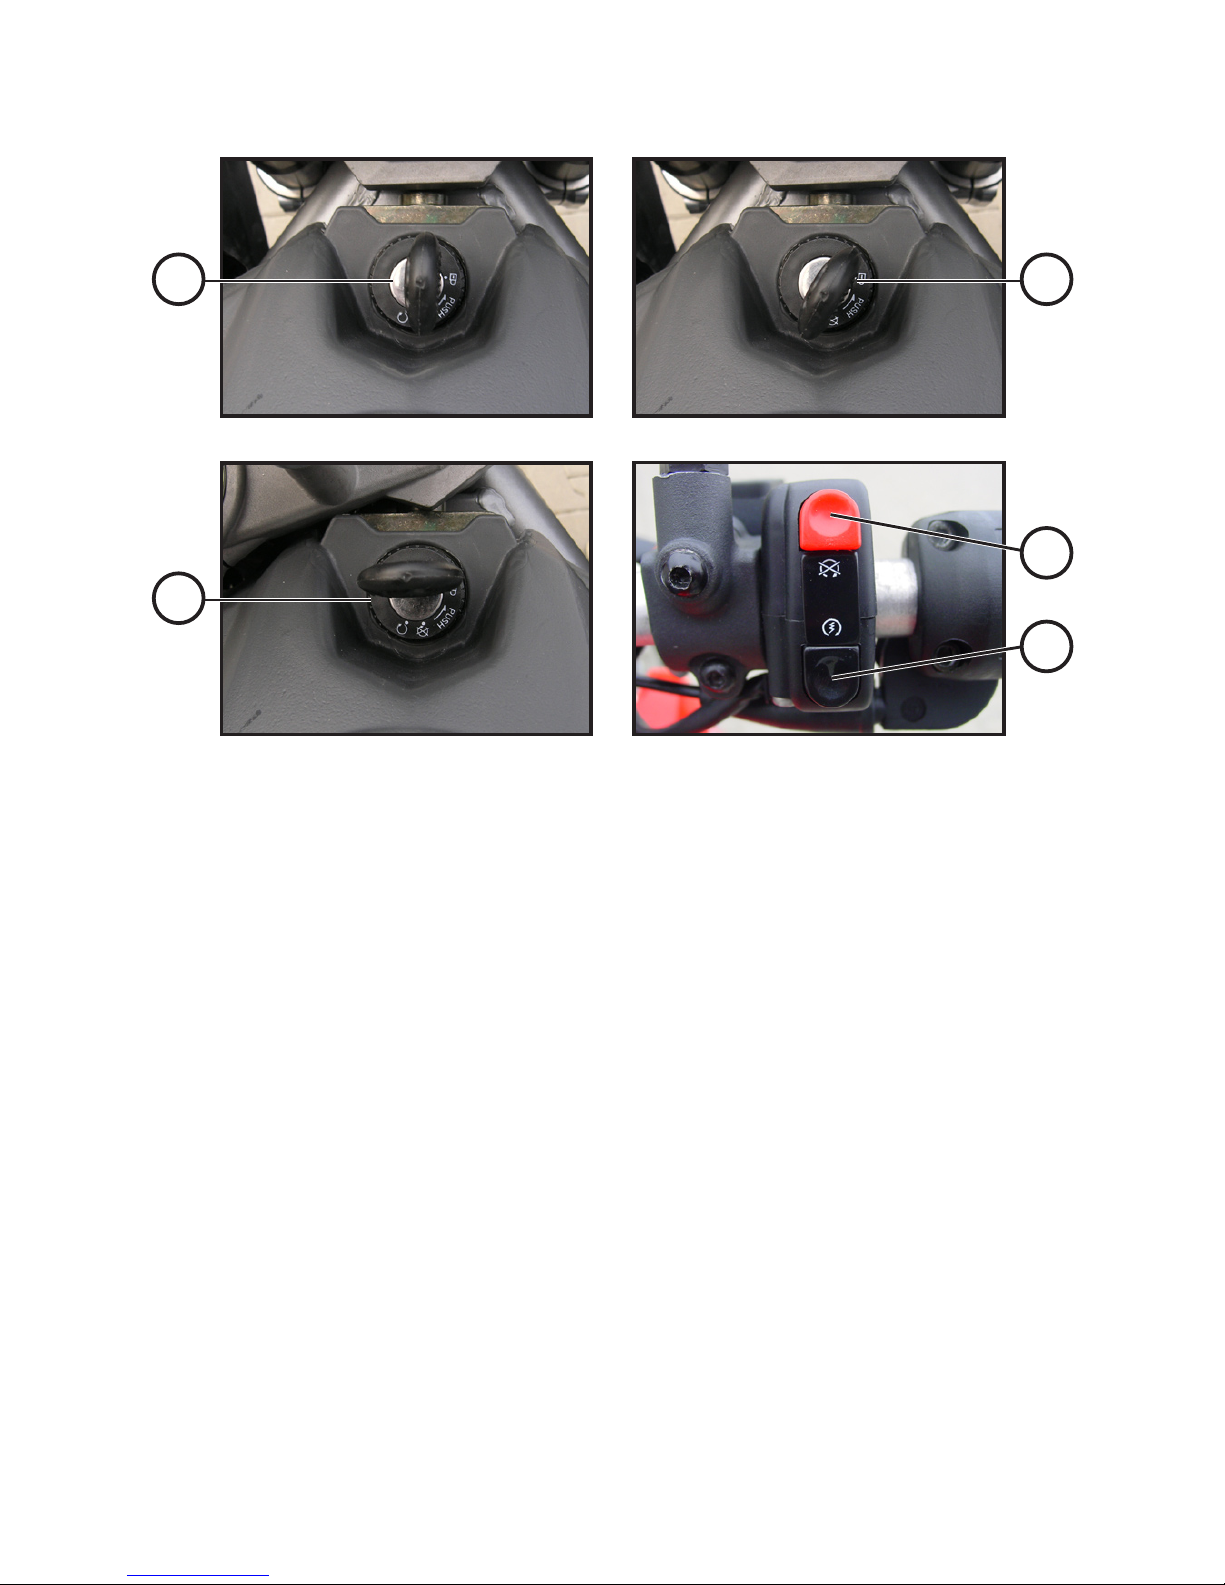
Ignition switched OFF
Ignition switched ON
This action also activates all the electrical circuits including the position lights and registration plate lights.
NOTE: Do not leave the ignition on unnecessarily as that may result in battery discharge
Handlebars lock
- turn the handlebars to the limit position,
- push the key inside switch box and release
- turn it to the lock position.
The seat lock and the fuel tank cap are controlled
using the same key as the ignition switch box.
Engine stop button
The engine shall conk when the button is held
down (approx. 1 sec)
Engine start-up button
39.
40.
41.
42.
43.
CONTROLS
40
42
43
39
41
Page 20
18
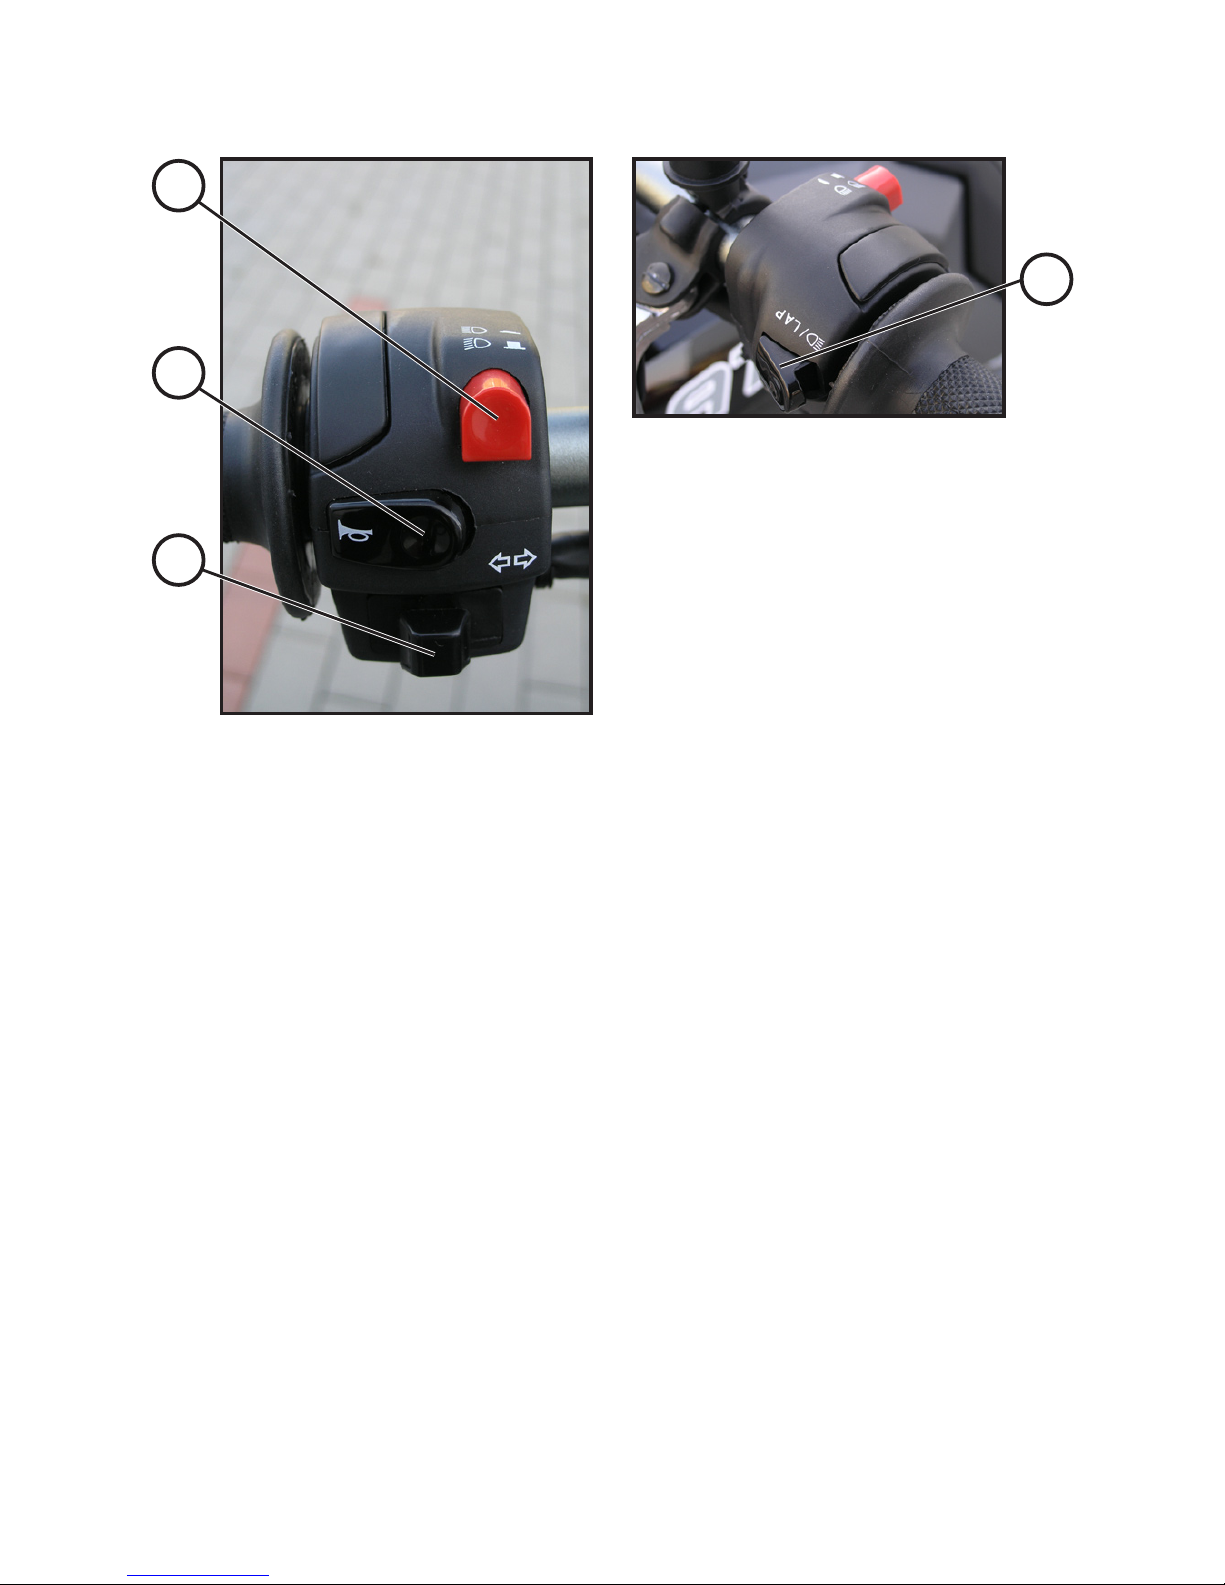
Turn signal lights switch
Shift to the left: left turn signal
Shift to the right: right turn signal
Press down in the centre position: switching off
High / low beam switch
Horn button
Headlamp asher
44.
45.
46.
47.
CONTROLS
47
45
46
44
Page 21
19
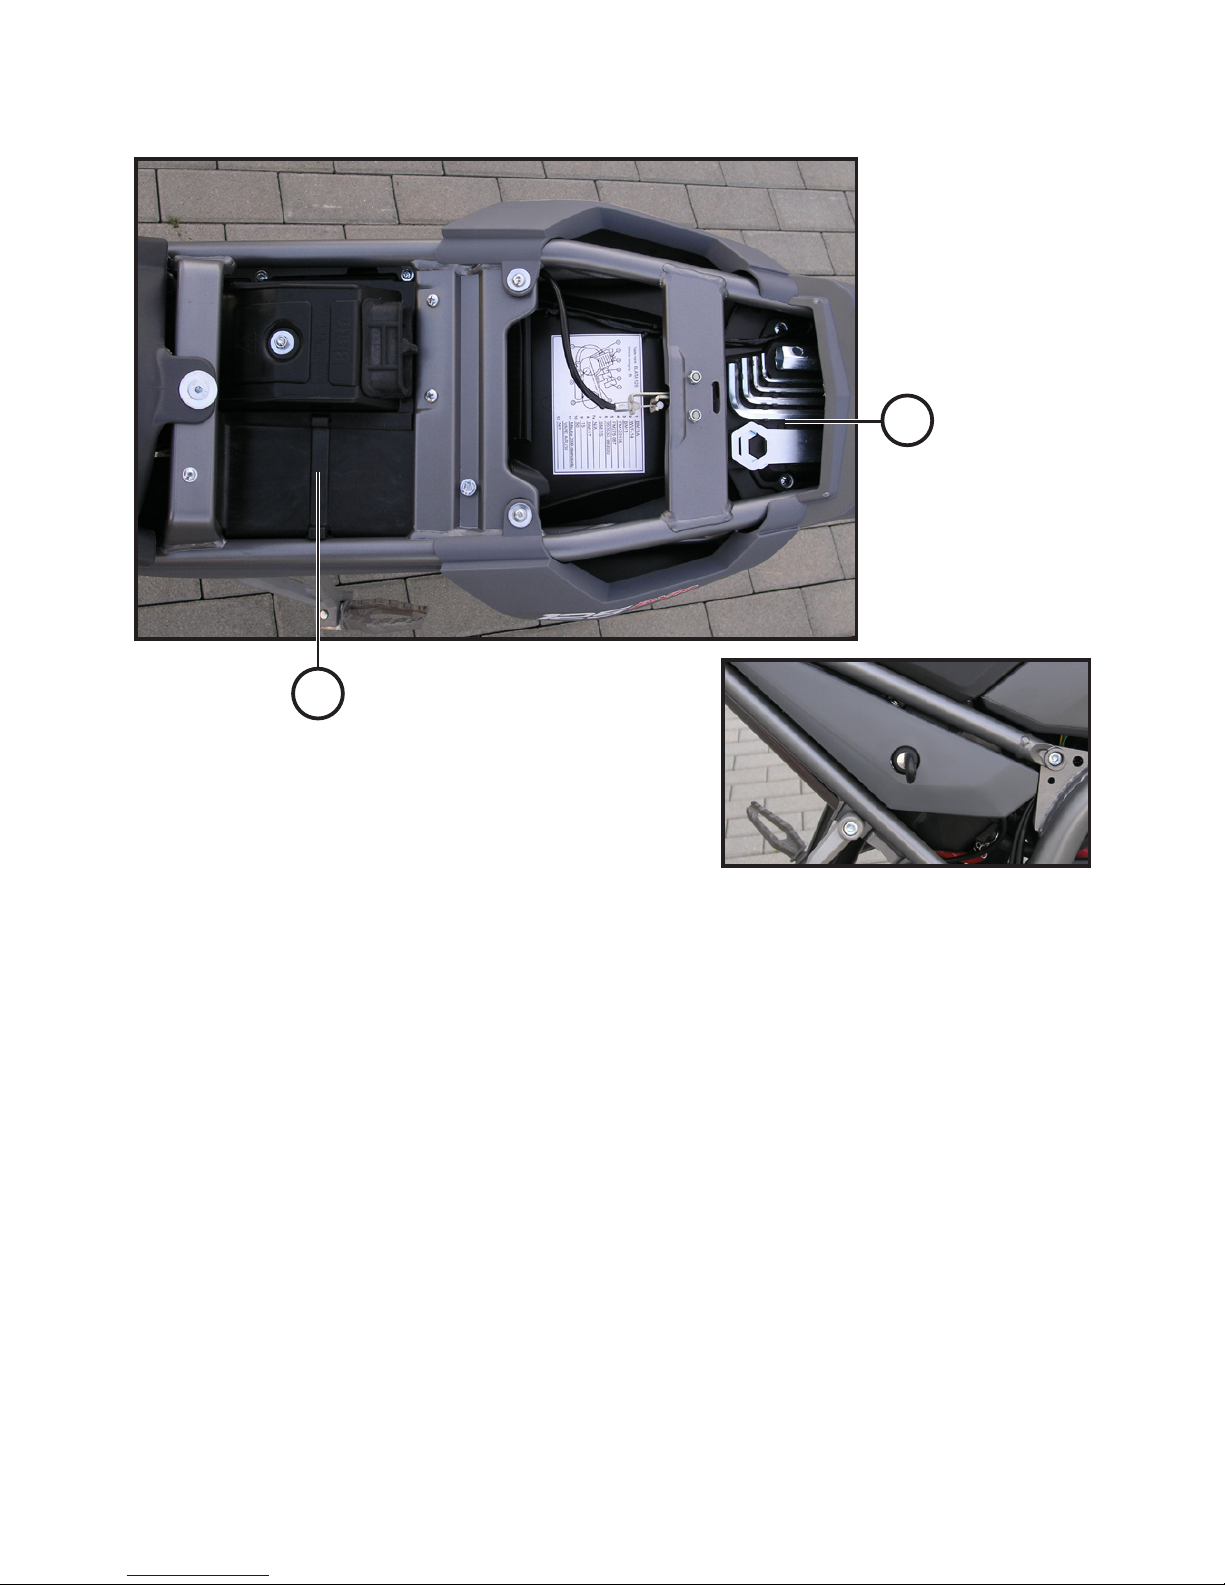
Turn the seat lock to the right, follow the diagram.
Lift the seat (approx. 10 cm; 3,9 in) and shift it rearwards.
The seat covers the compartment with the supplied tool kit (A)
and stowage space for the medical kit and Manual (B).
Install the seat following the above procedure in reversed order.
Press the rear of seat in that the lock latch engages.
Check the seat for tight t at its place.
NOTE:
Never leave your keys inside the compartment under the seat.
SEAT
B
A
Page 22
20
BEFORE YOUR FIRST START
Every ride shall be preceded by safety check following the procedure outlined below. If you encounter any problem, please
contact your Blata dealer or any Blata service centre.
You can conduct some regular maintenance operations yourselves (see the Maintenance Instructions), or have those per-
formed by experienced Blata mechanics. That will ensure your
motorcycle has been established in sound an operable condition. That is the basic prerequisite for safe operation of your
motorcycle.
Checks to be performed before every ride:
- Engine oil level
- Fuel volume
- Clutch lever play
- Throttle grip
- Brake function
- Brake uid level in both reservoirs
- Drive chain
- Wheel rims and spokes
- Condition of tyres, tyre pressure and tread depth
- Lighting and controls
- Accessories and load
In case of any ambiguities or problems contact your Blata dealer.
Any check-ups before ride shall
be performed with the ignition
switched off (unless stated otherwise by instructions).
Please conduct all the checkups before every ride and ensure removal of any problems
identied.
CAUTION WARNING
Page 23
21
ENGINE OIL
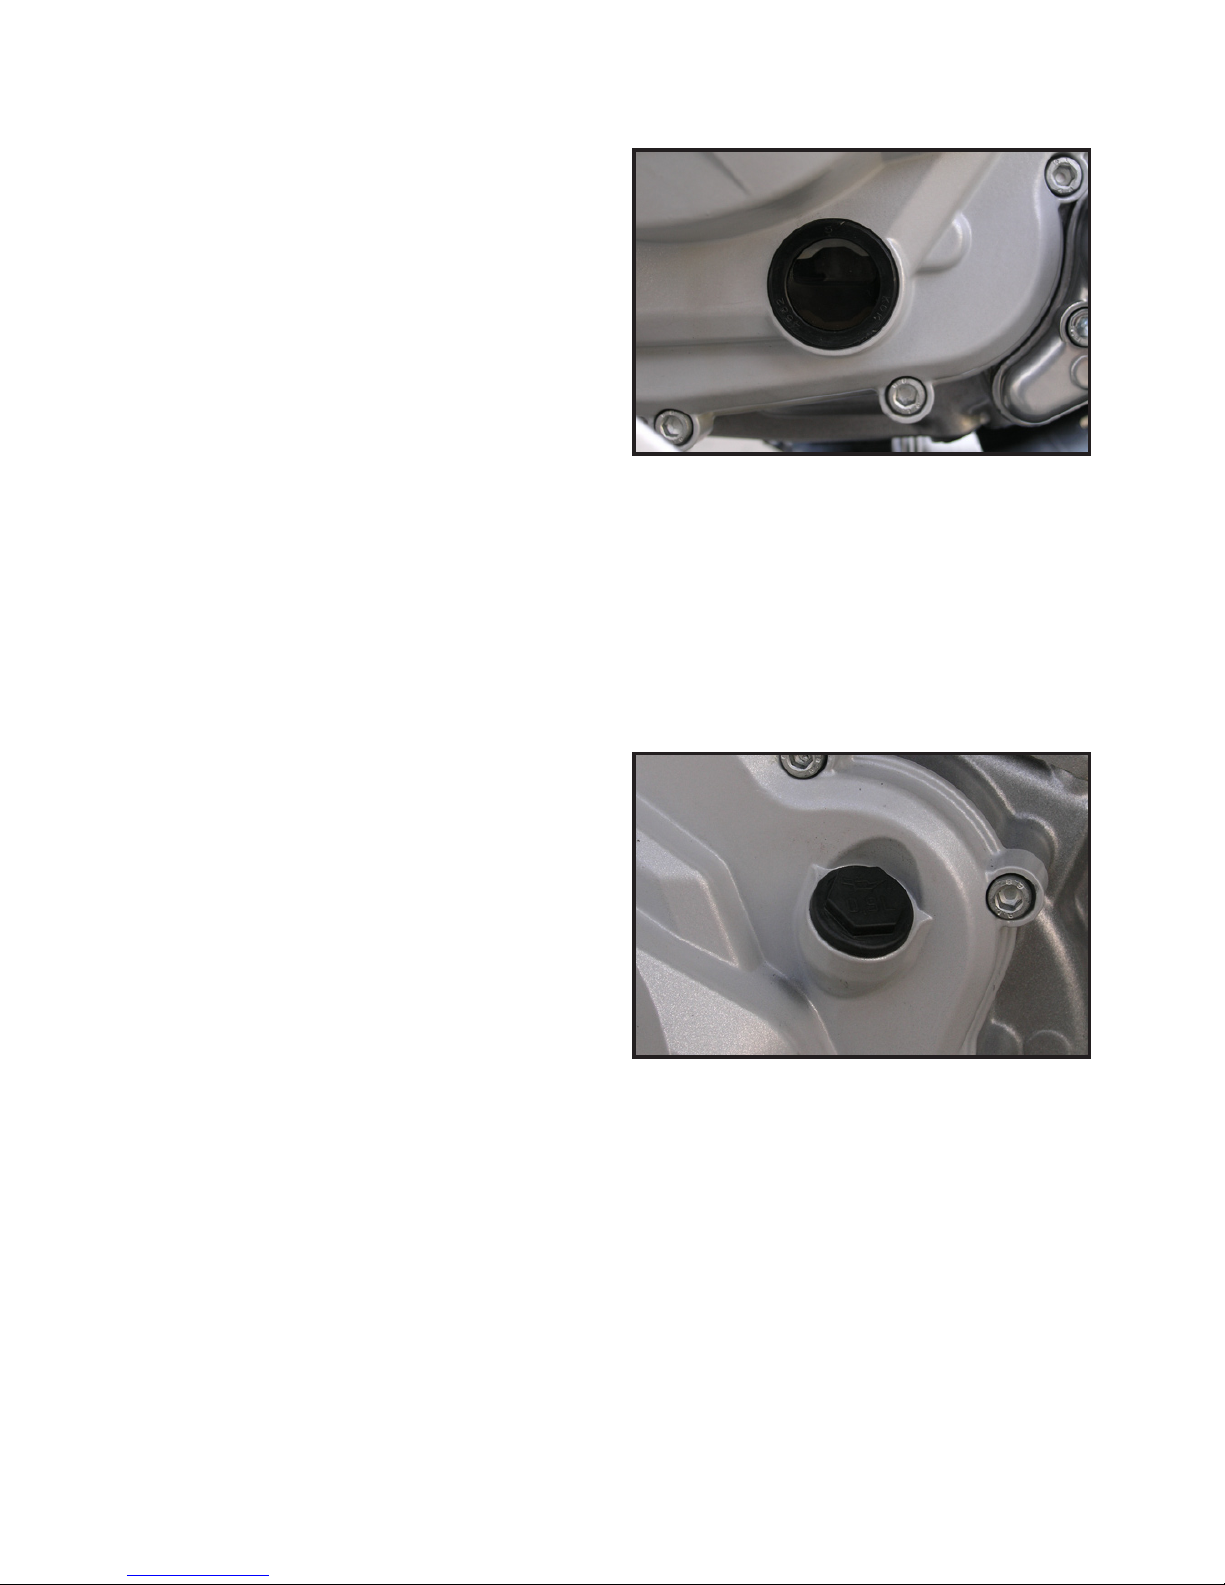
The engine oil level shall be
checked before every ride.
Set the motorcycle in vertical
position (not onto the side stand)
on a an even and straight surface. Check the oil level in the oil
level gauge (15) for proper position between the minimum and
maximum limits.
If the engine oil level is low,
use the spark plug wrench to
loosen the oil cap (16) and
add recommended engine oil.
Add such amount of engine oil
to set the level shown in the
gauge in between the maximum and minimum limits.
Re-install the oil cap (16).
NOTE:
Never exceed the maximum engine oil level as that might result
in serious engine damage!
Keep the engine oil level above the minimum at all times to
prevent serious engine damage!
Recommended engine oil: Valvoline SAE 20W-50, API SG,
JASO MA, semi-synthetic
Page 24
22
FUEL
NOTE:
Fuel shall be always lled in within open and well ventilated areas only.
Check the fuel volume before every ride, top up if required.
NOTE:
Never use lead-based fuels, which will damage the catalytic
converter.
Never use up the entire volume of fuel in the tank. Such action
may result in damages to the engine or catalytic converter.
Set the motorcycle on its side stand on an even and straight
surface and switch the ignition off.
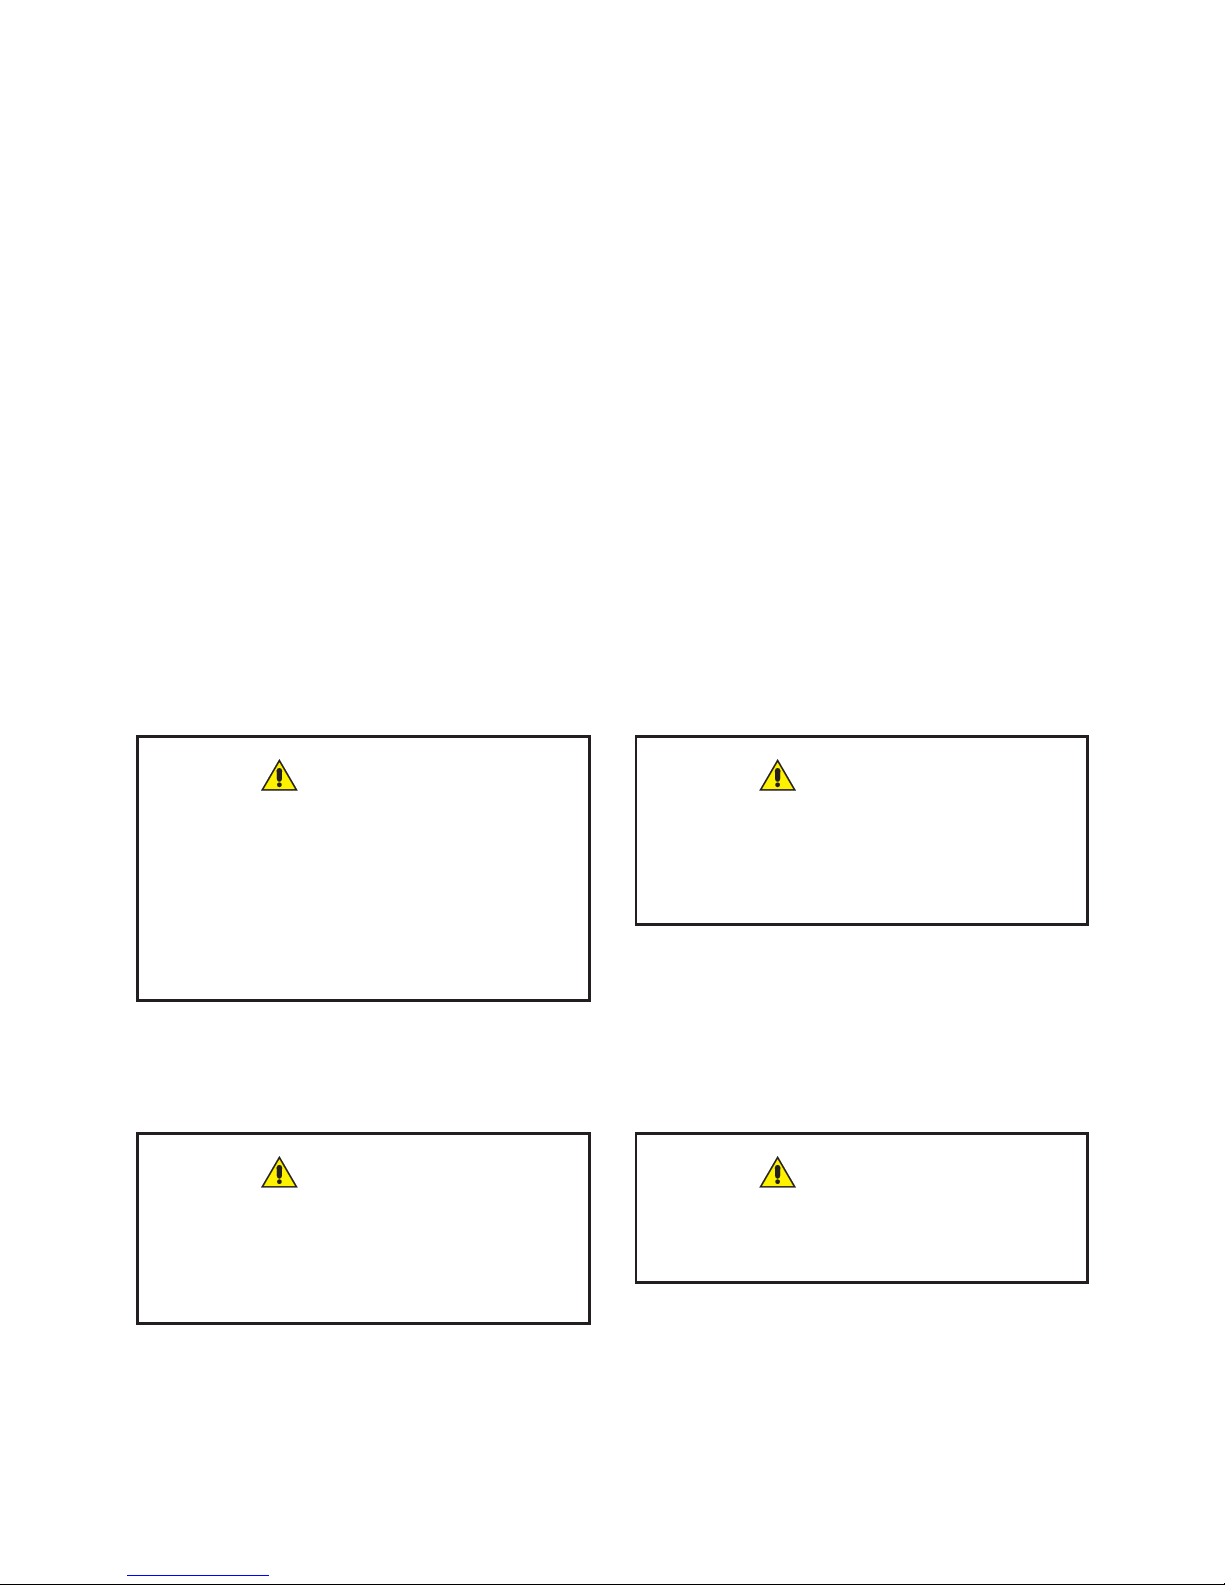
Use the key to open the fuel tank cap (3).
Top up with fuel. Use unleaded petrol with the minimum octane
rating of 95 (RON).
Close the fuel tank cap using your key once again.
Petrol is hazardous and highly
ammable in both liquid and
fume state! When fuelling the
vehicle, do not approach the
tank with open re.
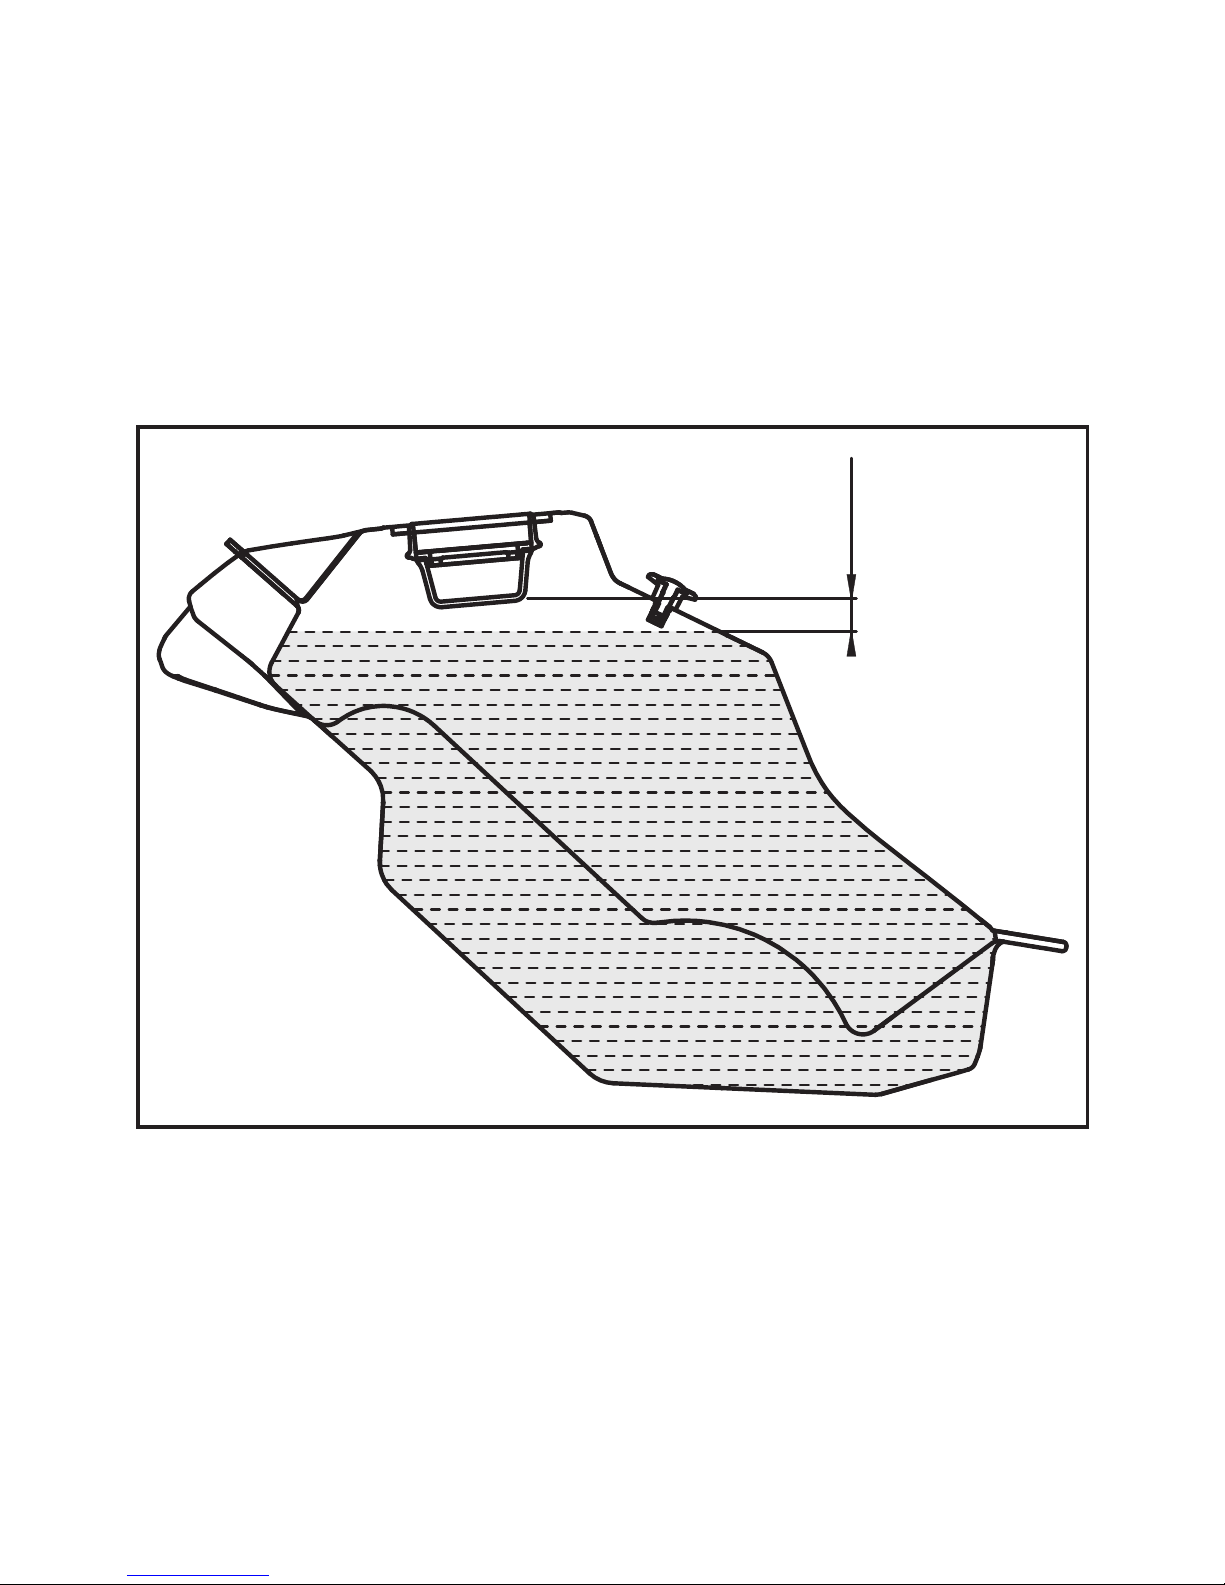
The volume of petrol will swell if
warmed up. Never ll the fuel to
the very full.
When topping up the fuel always stop the engine and switch
the ignition off.
Any petrol spillage shall be
wiped off immediately.
WARNING
WARNING
WARNING
WARNING
Page 25
23
FUEL
If the yellow fuel reserve indicator lights up, the remaining volume of
fuel in the tank will be equal to 0,6 litres.
Tank capacity: 9 litres (9,5 US qt, 7,9 lmp qt)
Fuel: unleaded petrol with the minimum octane rating of 95 (RON)
30 mm
Recomended maximum fuel level in tank.
Page 26
24
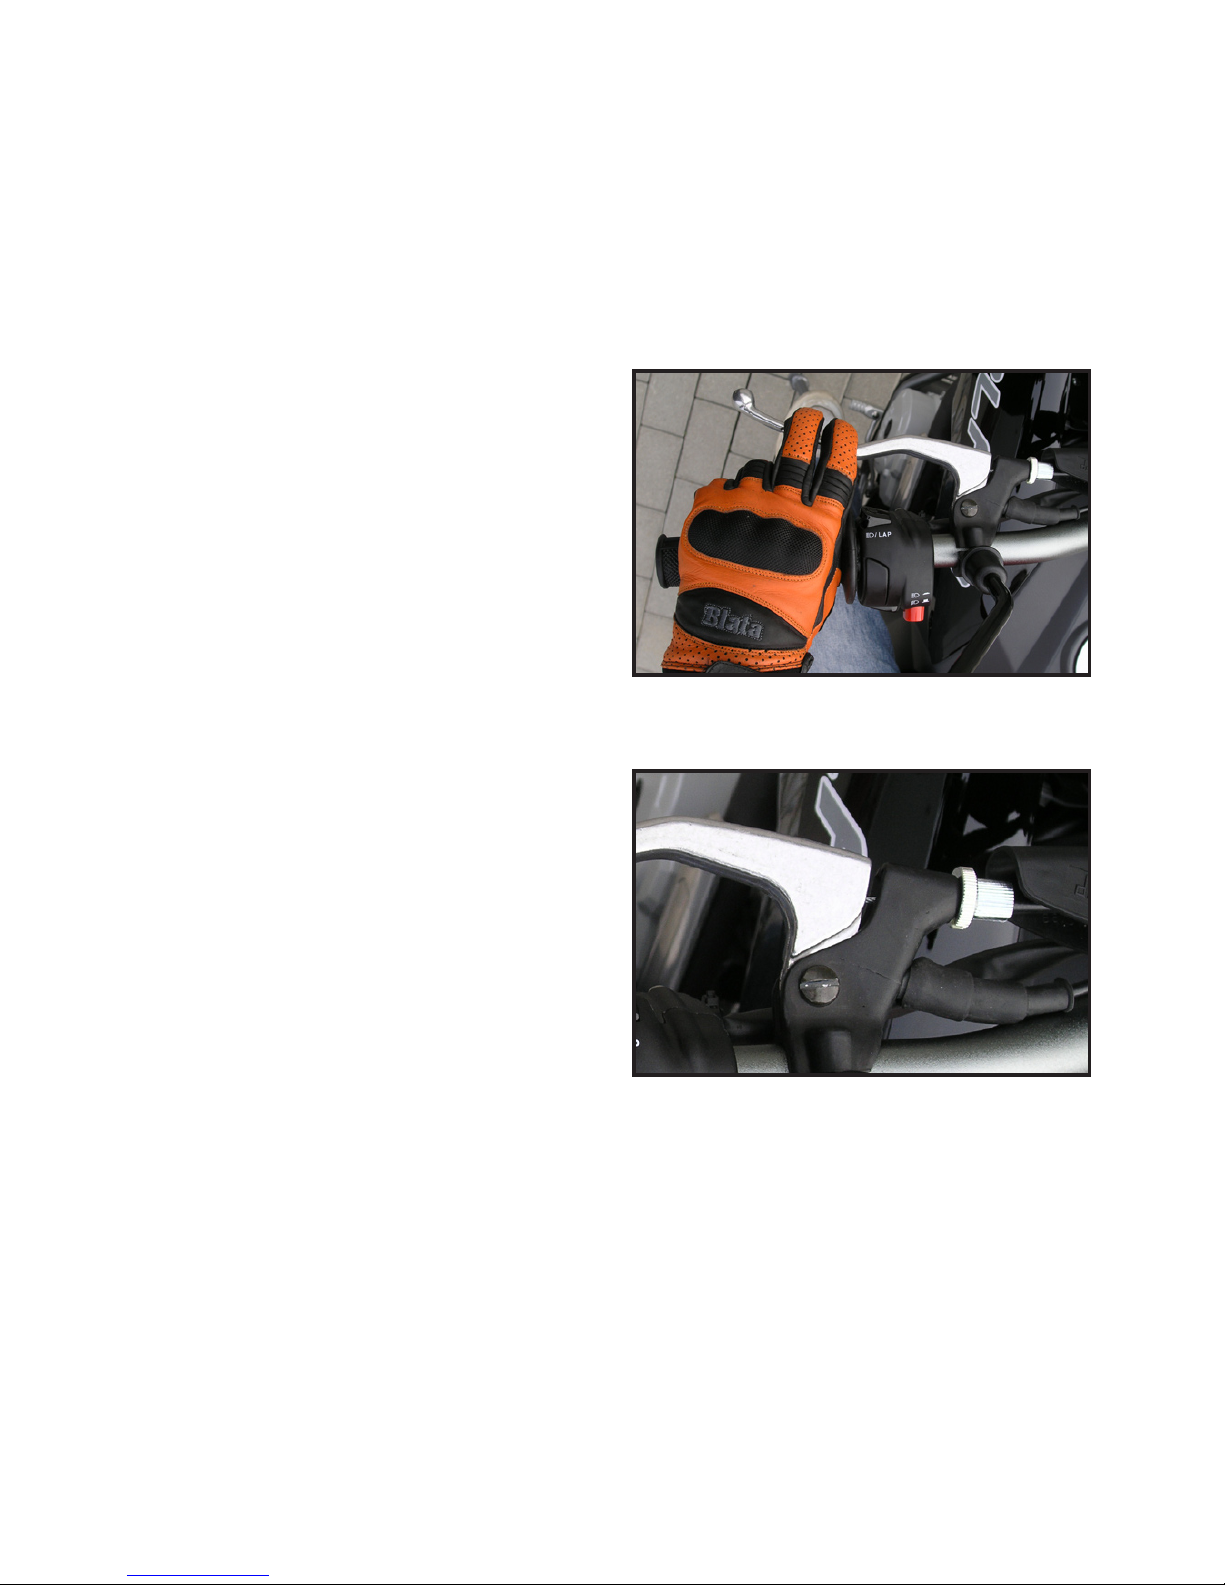
CLUTCH LEVER
Check the clutch lever play before every ride.
NOTE:
Operation of a motorcycle with unsuitable clutch lever play may
result in fast wear or damage of the clutch mechanism.
If the play of clutch lever does not t within the proper interval, adjust it.
Loosen the locking nut. Turn the
adjusting screw in order to set
the required play.
Tighten the locking nut and recheck the play of clutch lever.
Re-install the clutch lever dusters.
NOTE:
If you get beyond the working
line of the adjusting screw, the
clutch must be adjusted or
repaired by Blata authorised
service centre only.
Slide the duster of clutch lever
out. Keep pressing the clutch
lever slightly, until you feel its
resistance. Measure the clutch
lever play.
Clutch lever play: 2 mm
Page 27
25
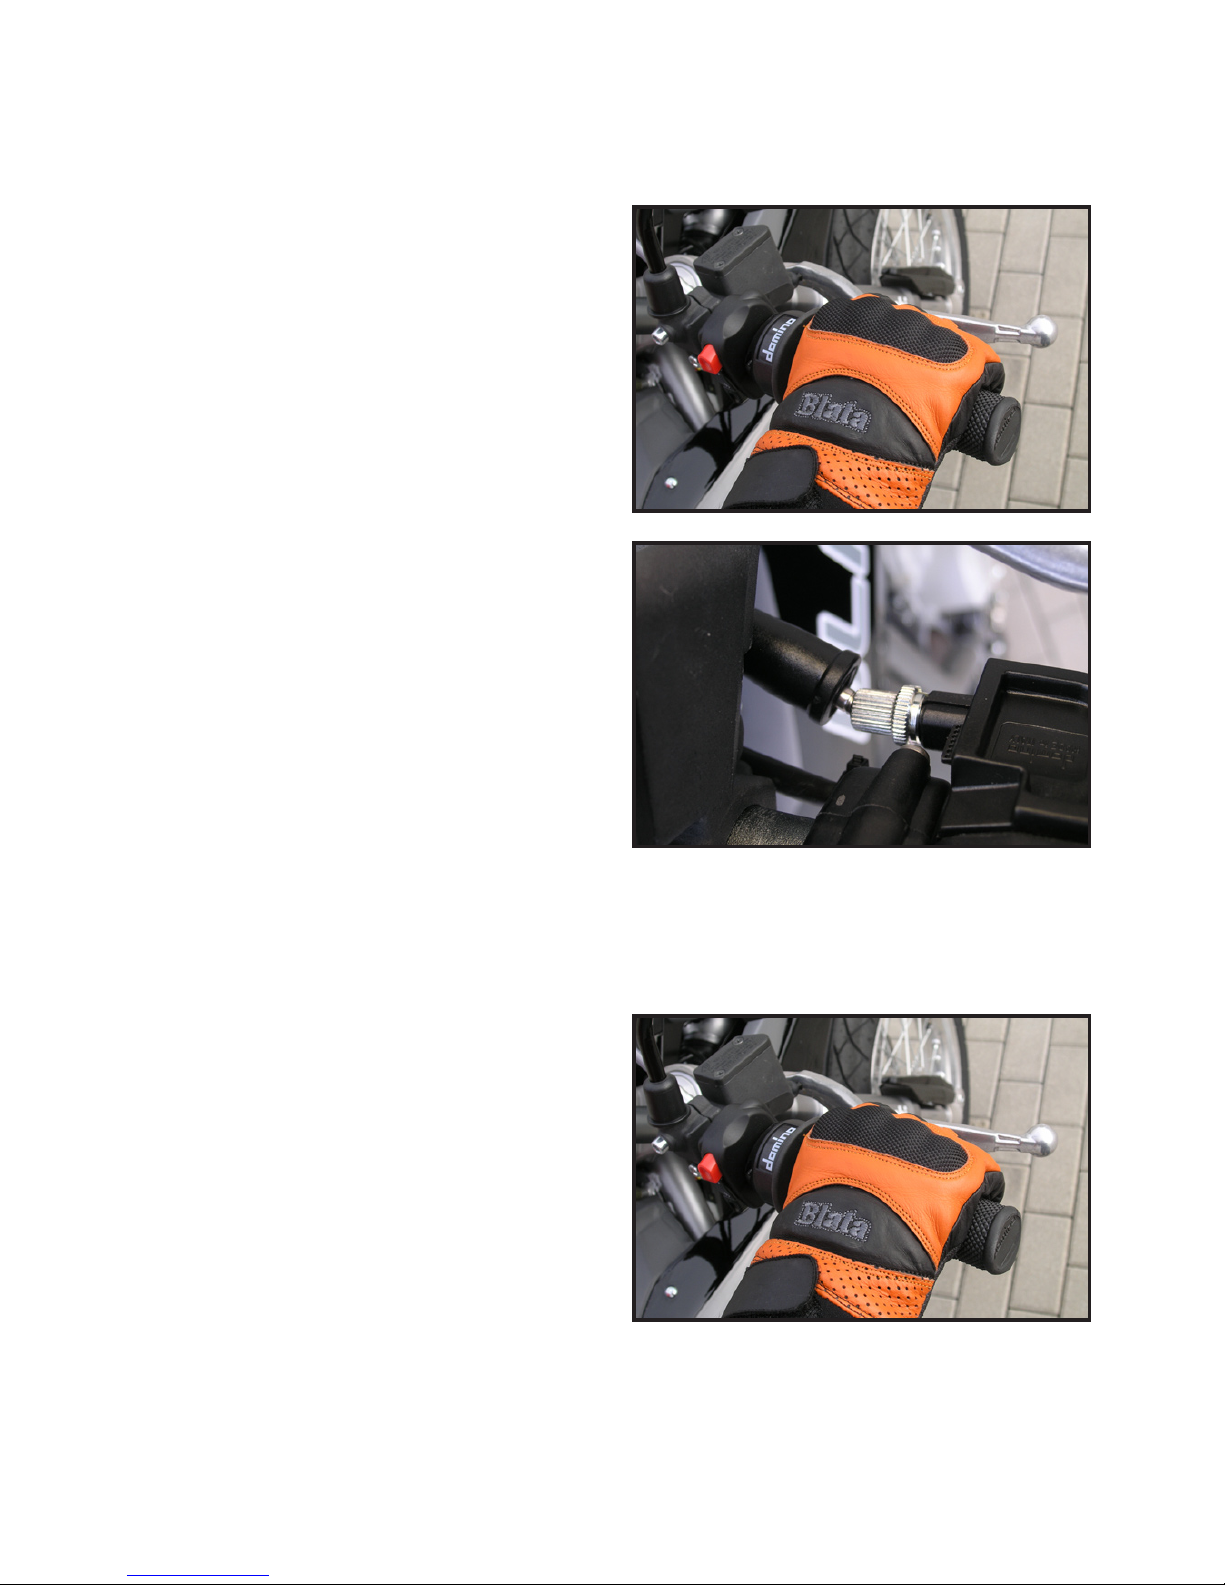
THROTTLE GRIP
Check, whether the throttle
grip revolves freely and returns into the default position
smoothly.
If the grip sticks or fails to return, slide the adjusting screw
duster off and lubricate both
ends of the throttle cable with
silicone oil and move the throttle slowly several times.
Check the play of the throttle
grip.
If this procedure renders no success, do not ride the vehicle
and ask you Blata dealer for advice.
Re-install the duster on adjusting screw.
Throttle grip play: 2 - 3 mm
Check the throttle grip for proper functioning before every ride.
Page 28
26
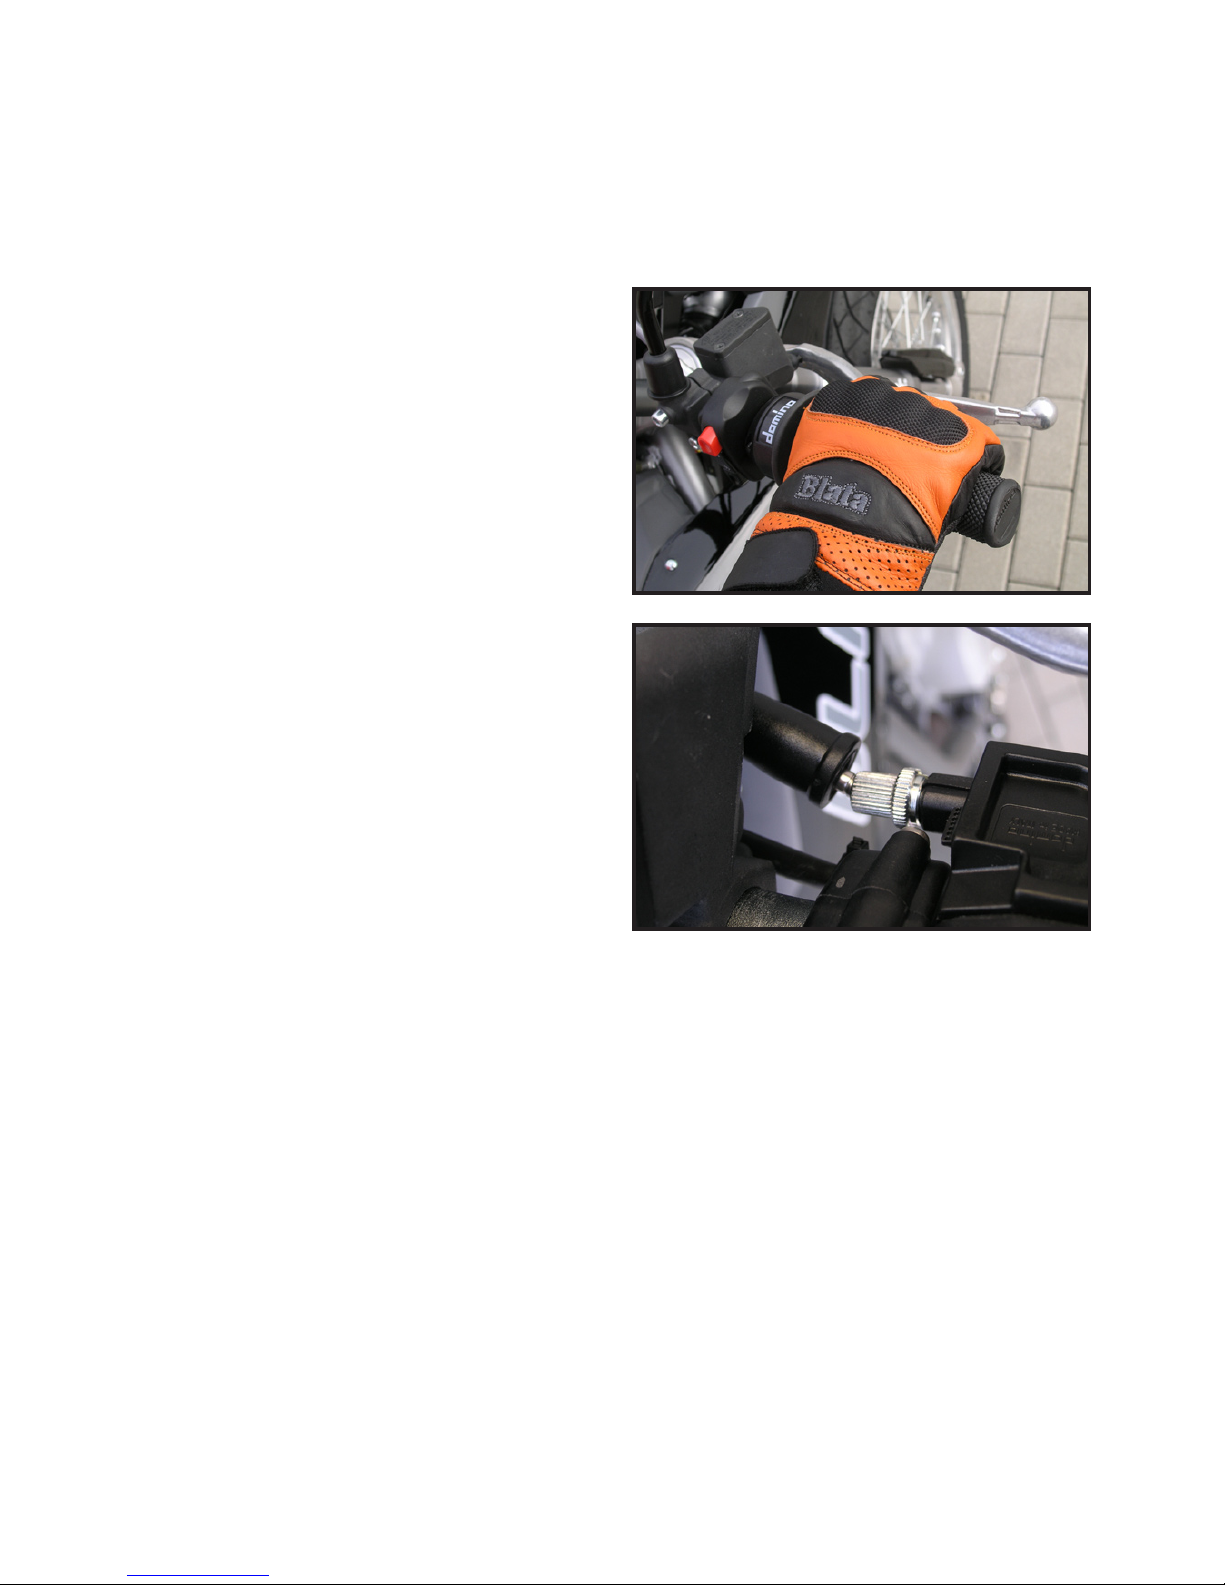
THROTTLE GRIP
If the play is too loose, adjust it. Slide the duster off the accelerator cable adjusting screw. Turn the adjusting screw to set the
play of throttle grip.
NOTE:
If you get beyond the range of adjusting screw, you shall modify
the settings on the other end of cable (page 51).
Tighten the locking nut and recheck the play of throttle grip.
Re-install the duster onto adjusting screw.
Page 29
27
BRAKES
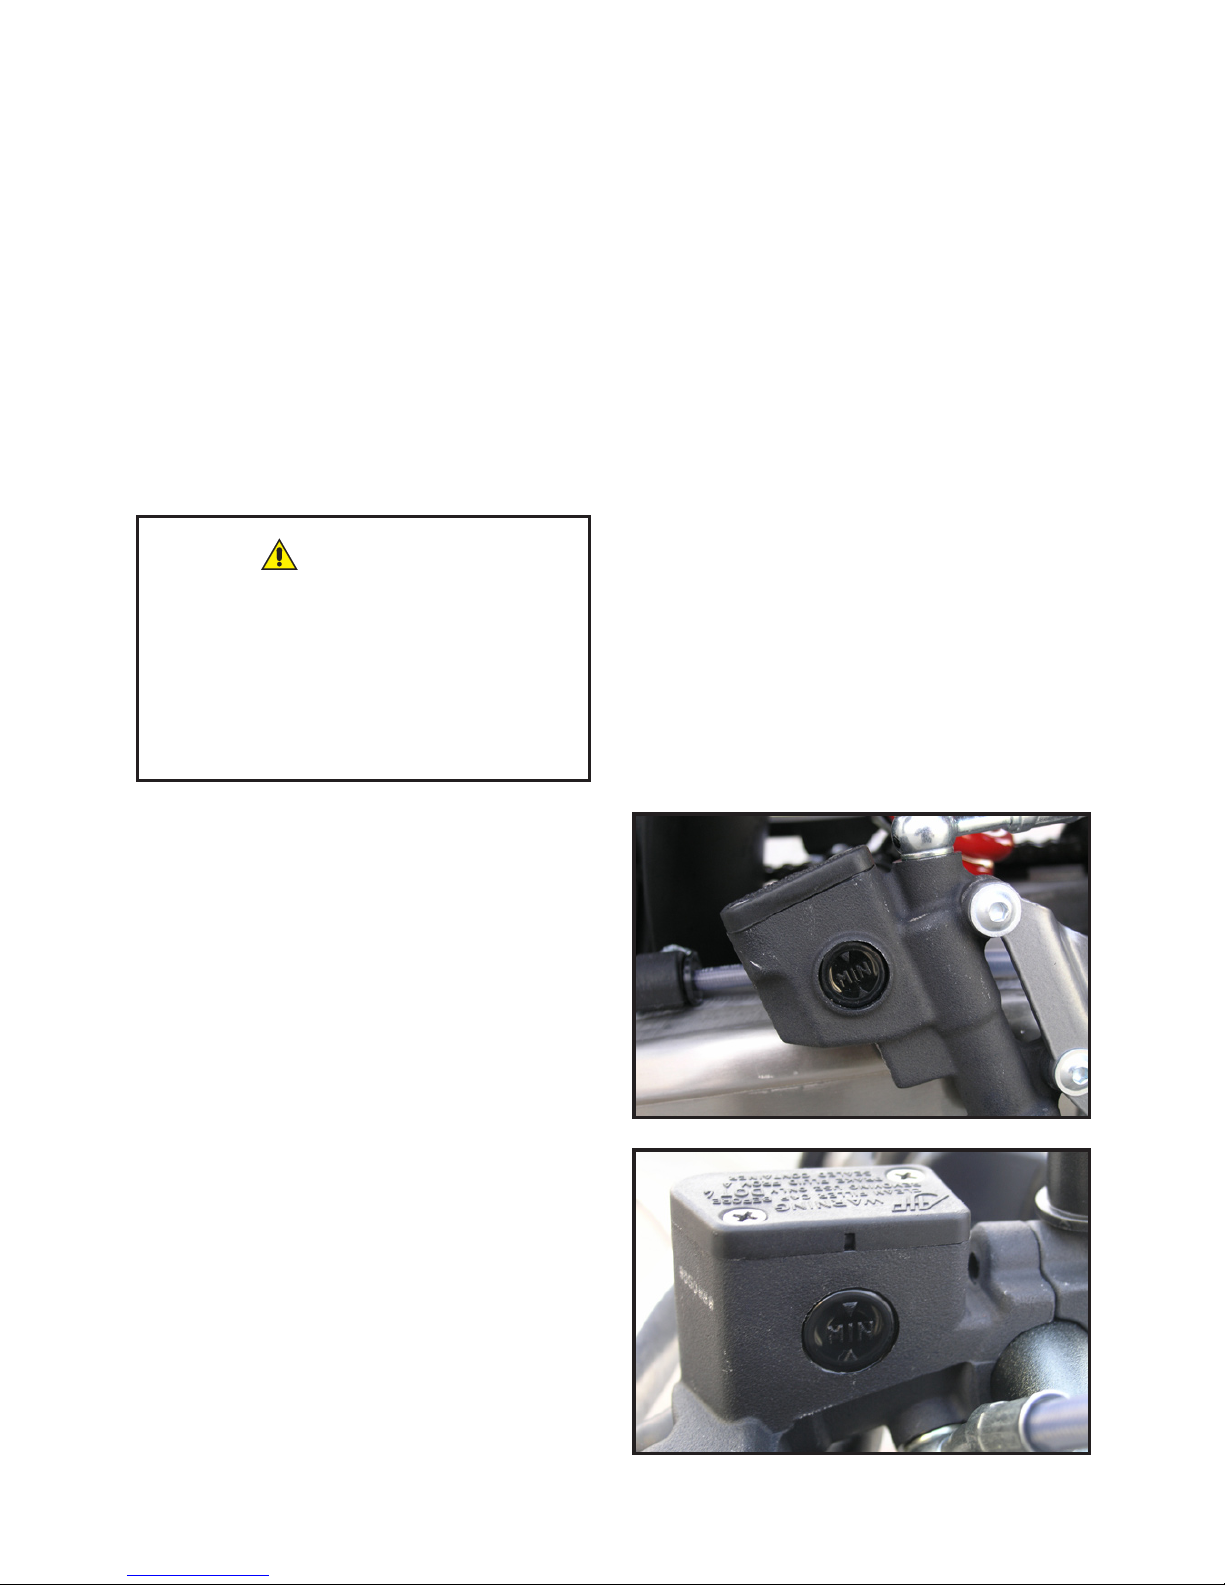
Check both the front and rear brakes for proper functioning be-
fore every ride, further checks involve the brake uid level in
reservoirs for both the front and rear brakes and thickness of
brake shoe lining on both wheels.
Check the front and rear brakes for proper functioning. If you
identify a sudden change in play, exible resistance or fading
of the brake lever or pedal, cancel your ride and ask your Blata
dealer for advice.
Set the motorcycle in vertical
position, with the handlebars
ready as for ride forward and
check the level of brake uid
in both the front and rear reservoirs.
In case the level in either of
the reservoirs is at or below
the minimum, have the brake
uid check by your Blata service centre.
If case of any doubts about the
service sensitivity of the braking
system do not use the motorcycle and ask your Blata dealer for
advice.
WARNING
Page 30
28
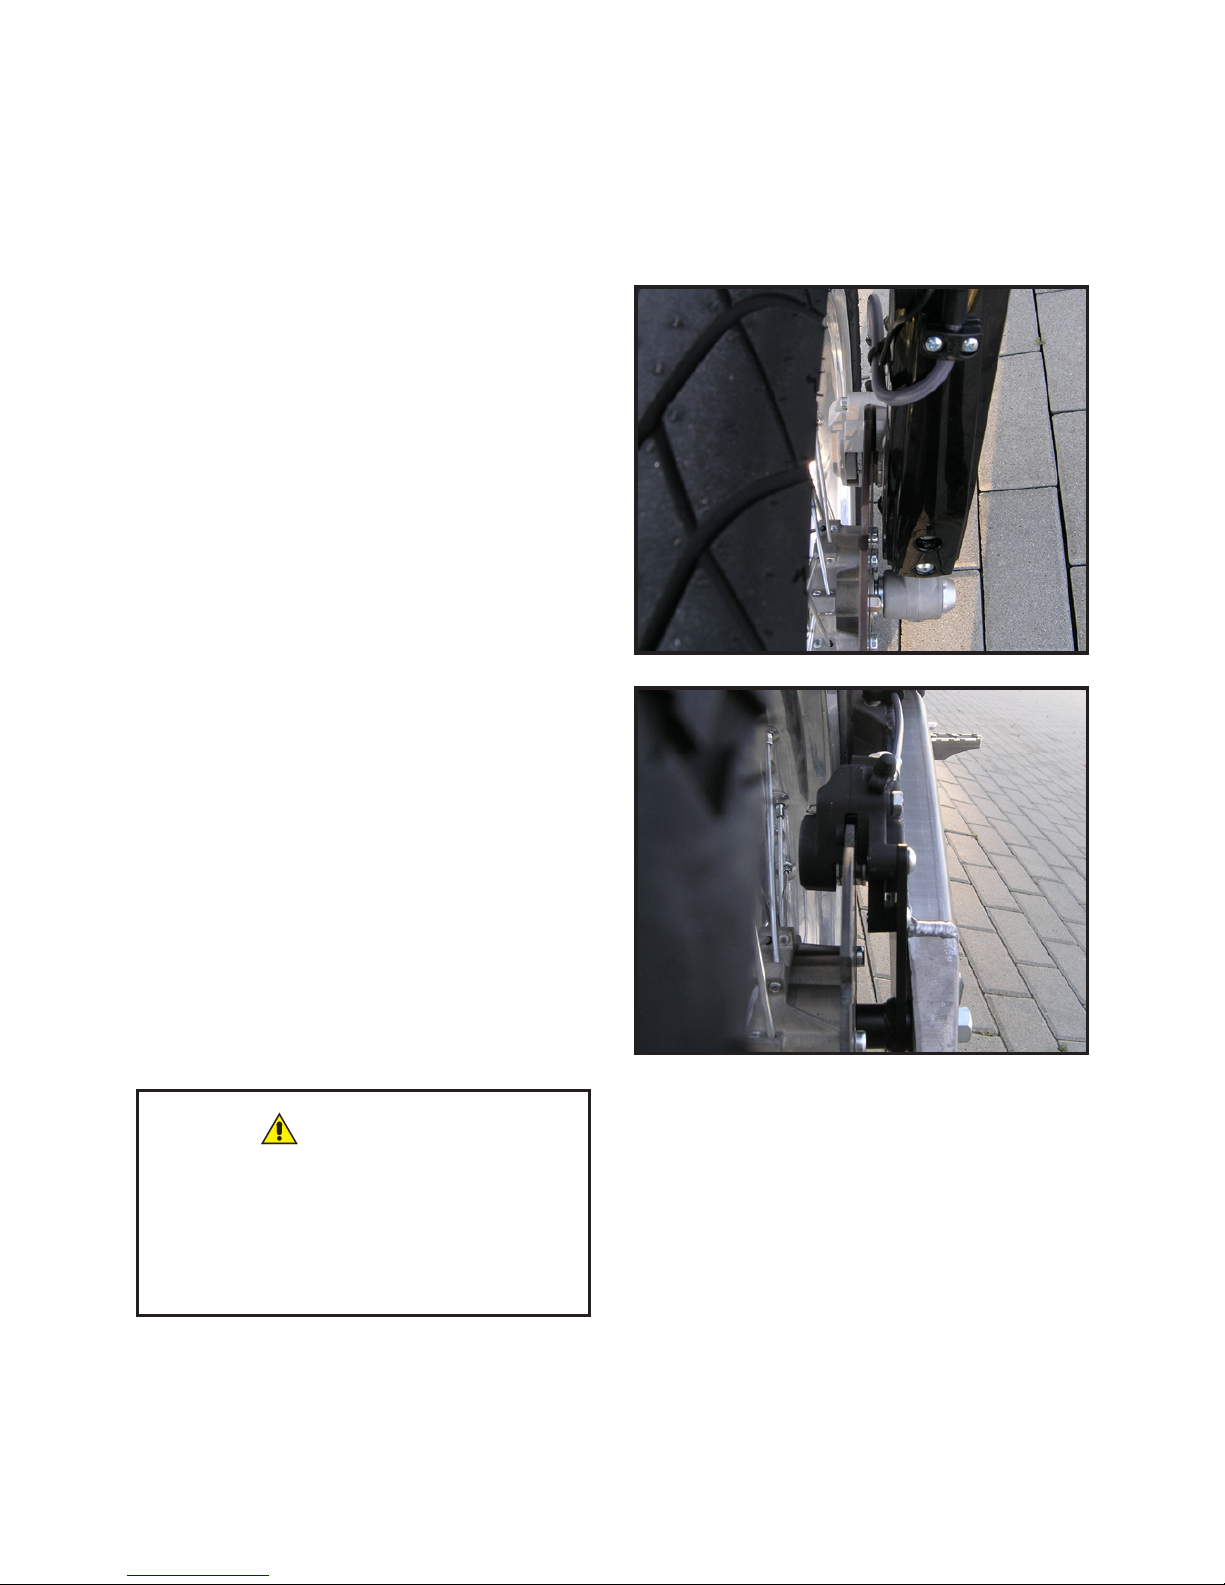
Check the brake shoe lining
thickness. It shall never be
less than the dened limit.
Thickness of brake pad lining
shall be checked visually from
the top front side, for the front
brake and from the rear, for
the rear brake.
Minimum thickness of brake
pad lining: 2 mm (0.08 in)
In case the thickness of brake shoe lining does not meet
this limit, have it replaced by
an authorised Blata service
centre.
NOTE:
The brake uid level drops due to the brake shoe lining wear.
The brake uid shall be changed at least once in two years.
Check the whole braking system for its sound condition and
possible signs of damage or leakage. In case of any defects
found seek assistance of your Blata dealer.
For your own safety, have any
works on the braking system
conducted by an authorised
Blata service.
WARNING
BRAKES
Page 31
29
WHEELS
Check the condition of rims, spokes and spoke tension before
every ride.
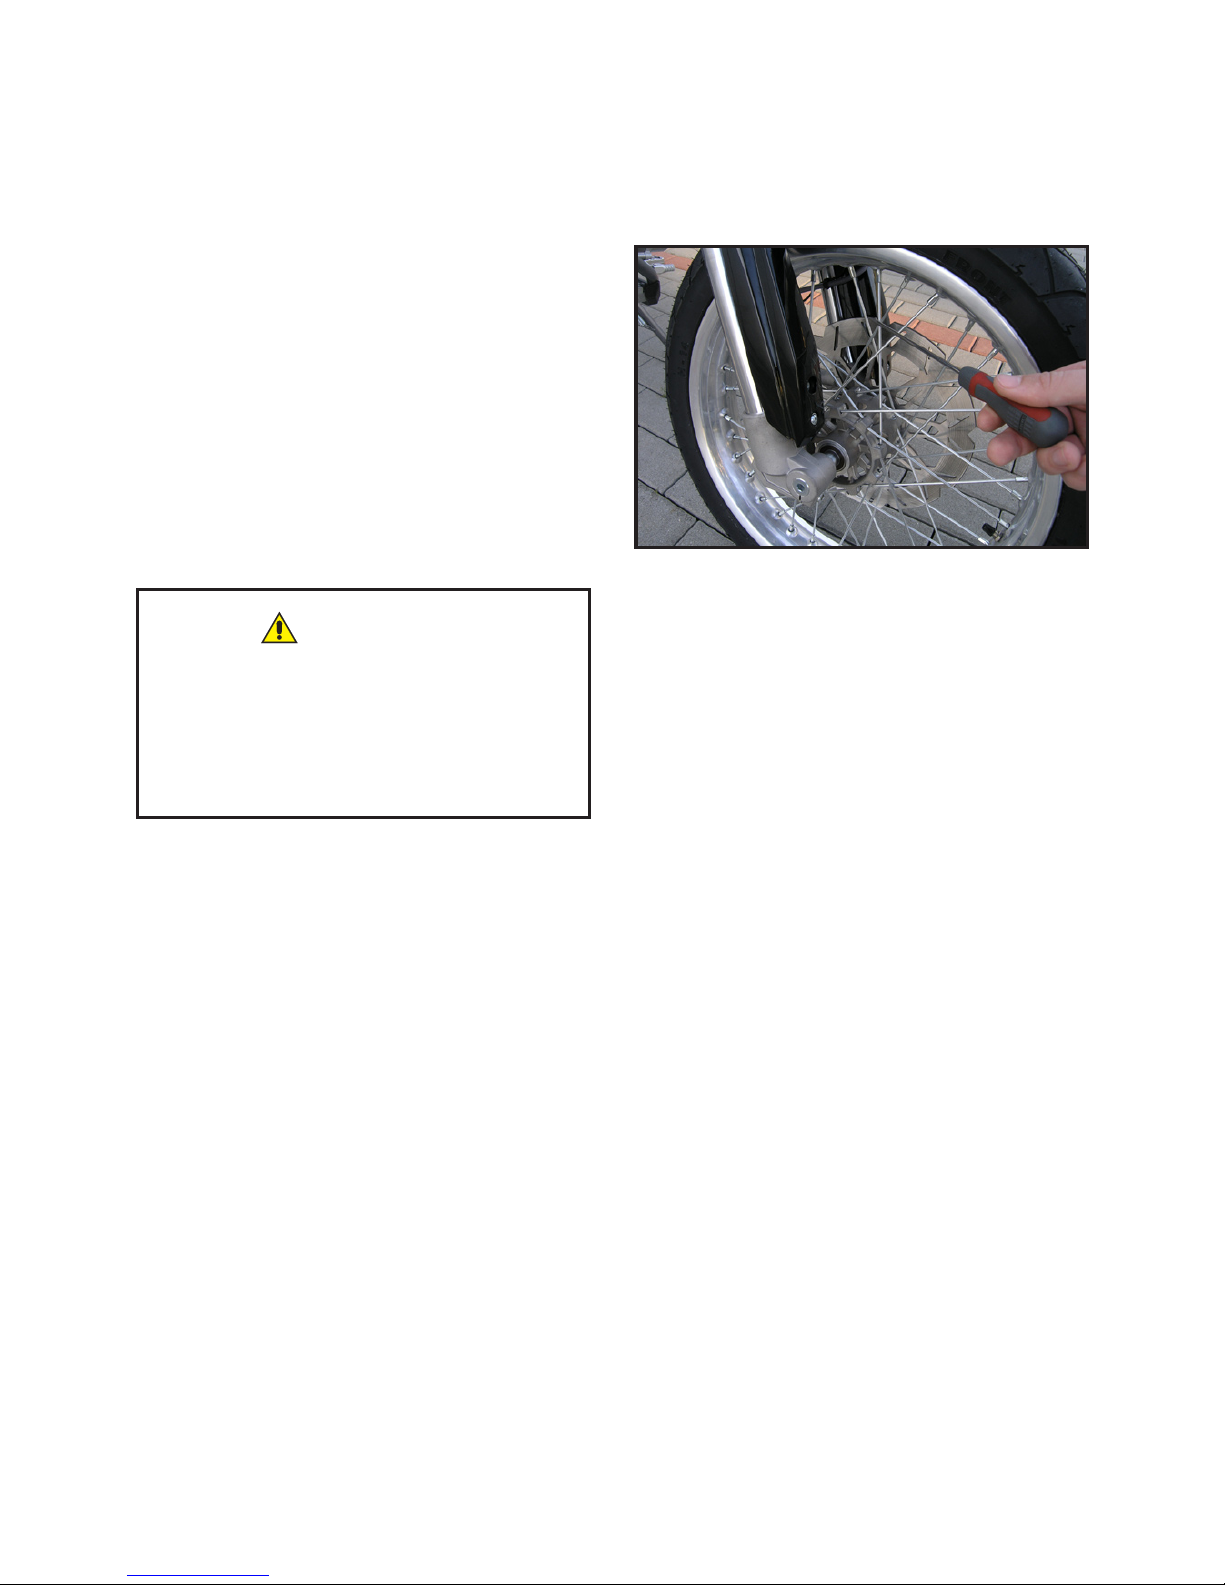
Check the rims and spokes for
possible damage or bends.
Use a screwdriver to run over
spokes slightly. In case of spoke making different sound to
others, have these adjusted
immediately.
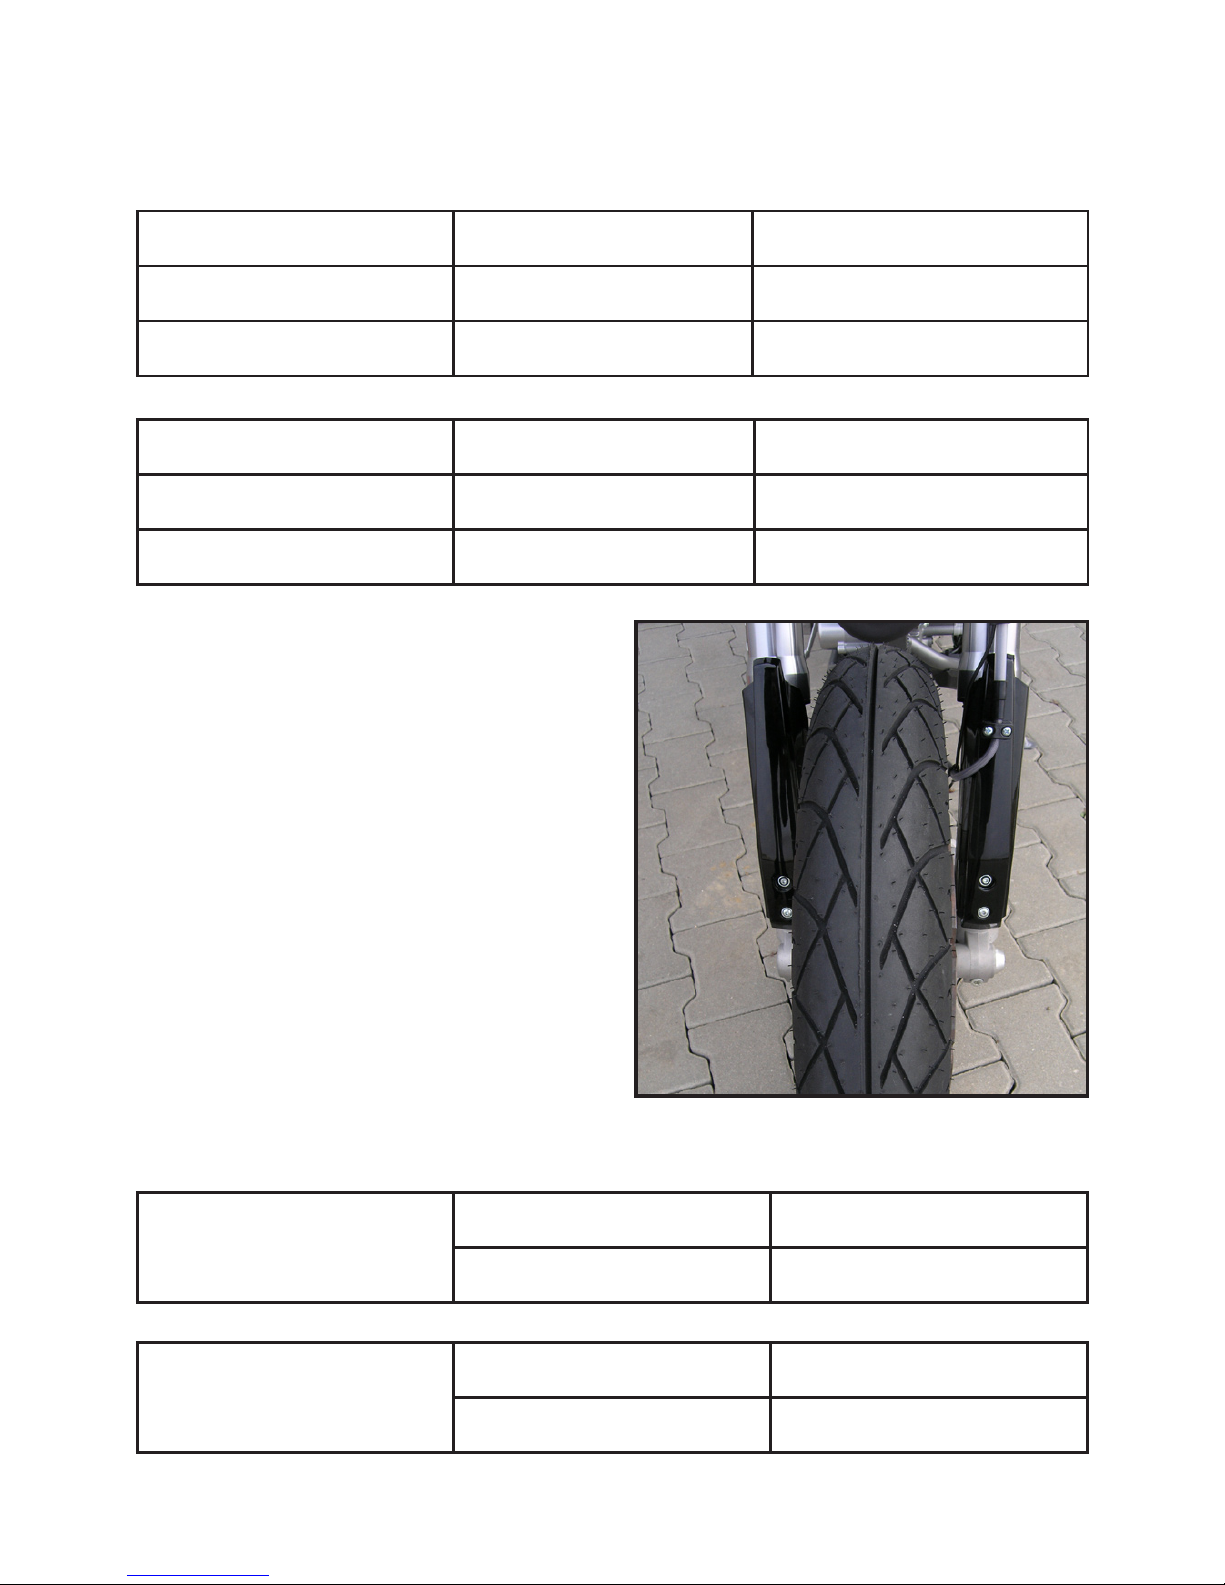
Check the tyre pressure, tread depth and tyre condition before
every ride.
Unscrew the tyre valve cap and use gauge to measure the tyre
pressure. Re-install tyre valve cap after measurement.
NOTE:
Tyre pressure measurements shall be conducted on cold tyres only. Improper tyre pressure affects the ride properties, fuel
consumption, environment and tyre life.
Adjust the tyre pressure depending on the motorcycle load.
Any damaged rims or spokes
shall be replaced immediately
and loose spokes adjusted
denitely.
WARNING
Page 32
30
WHEELS
Tyre pressure:
Motard rider only rider and passenger
front 190 kPa 210 kPa
rear 210 kPa 230 kPa
Enduro rider only rider and passenger
front 180 kPa 190 kPa
rear 190 kPa 200 kPa
Recommended tread depth:
Motard front 2 mm (0.08 in)
rear 3 mm (0.12 in)
Enduro front 3 mm (0.12 in)
rear 3 mm (0.12 in)
Tread depth shall be measured at the tyre centre. Check
whether the tread depth complies with local laws and regulations.
Page 33
31
DRIVE CHAIN
Check the condition and tension of drive chain before every ride.
NOTE:
The chain must be cleaned and lubricated after every 1.000 km
(800 miles) using a special cleaning agent and special oil designed for motorcycle drive chains. If the chain dries up within
such interval, it must be cleaned and lubricated more frequently. In case the motorcycle is operated off road or dusty or muddy environment, the lubrication procedure shall be conducted
after every such ride. Chain checks must be always done with
the motorcycle free of any load.
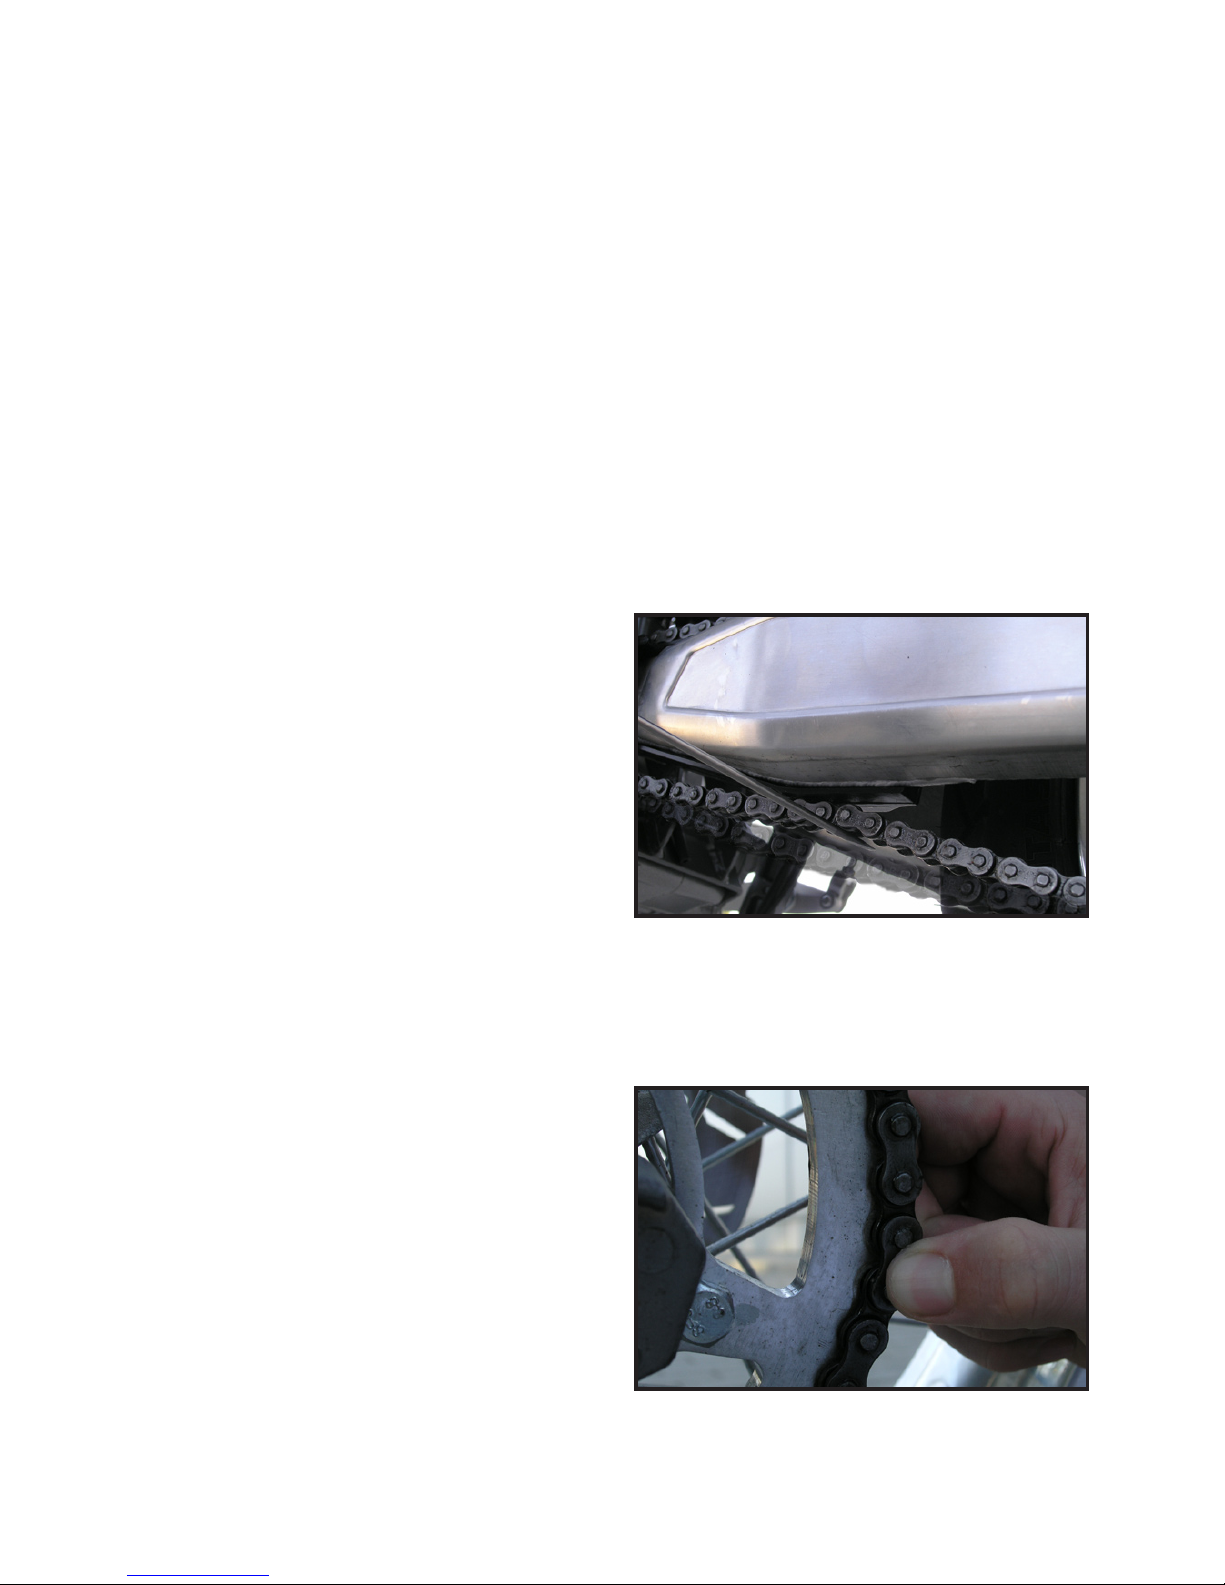
Set the motorcycle onto side
stand, switch the ignition off
and shift the transmission to
idle. Press the chain upward
and measure its slack.
Chain slack: 25 - 35 mm (1 - 1.4 in)
Adjust the chain slack, if needed
(see the Maintenance chapter)
or ask your Blata dealer for assistance.
Pull the chain at the rearmost
part of the driven sprocket. When the chain passes
through, none of the rear
sprocket teeth may remain
out of grip. If that is not so, the
chain set shall be replaced
(rear and front sprockets and
chain) by an authorised Blata
service centre.
Page 34

32
ACCESSORIES AND LOAD
NOTE:
For your own safety, use only the accessories certied or re-
commended by the Blata company.
Check the condition and xing of the load or accessories before
every ride.
Keep the load distributed evenly.
Heavy loads should be placed as low as possible.
Check, whether the load does not interfere with moving parts or
control features of your motorcycle.
Never exceed the maximum permissible load on motorcycle.
Motard: 162kg,
Enduro: 158 kg,
(including the rider, passenger, whole load and accessories)
Adjust the tyre pressure accordingly (page 30).
Page 35

33
LIGHTING AND CONTROLS
Check all the lighting and control featured before every ride.
Turn the key inside the switch box (2) to switch the ignition on.
Shift the transmition to idle.
Light up features:
- front and rear position lights
- registration plate light
- blue display backlight
- idle green control indicator (N = neutral)
Check the function of:
- turn signal lights and green turn signal indicators
- horn
- high beam and the blue control indicator of high beam
- light asher
- braking light (when the front and rear brakes are used)
start the engine:
- once the engine has been started up, low beam will be turned on
Use the ignition stop button to stop the engine.
NOTE:
In case any of the blinkers fails to ash and remains lit up con-
tinuously, it indicates defect to be repaired.
In case of failure of any of the lighting or control features on
your bike ask your Blata dealer for assistance.
NOTE:
Adjustment of headlights shall always comply with local laws
and regulations (str. 60). Ask you Blata dealer for advice.
Sit on the motorcycle and check, adjust if required, the sight in
rear mirrors.
Page 36

34
FIRST RIDE
Before you set off to your rst ride, read the following important
advice and cautions.
Before you start the engine, make sure you have completed all
the above pre-ride check-ups.
Remember that the engine needs running in. For the rst thousand kilometres, follow the instructions regarding the maximum
speed as outlined below:
1
st
gear - max. 30 km/h
2
nd
gear - max. 40 km/h
3
rd
gear - max. 55 km/h
4
th
gear - max. 70 km/h
5
th
gear - max. 80 km/h
6
th
gear - max. 90 km/h
Do not forget the rst service inspection after 1.000 km.
Remember that tyres also need some kilometres to be run-in
and provide sufcient adhesion.
New brake shoe linings must be also subject to certain
running-in, remember that the rst 200 kilometres can always
be associated with lower braking power.
The exhaust system and its proximity produce a lot of heat.
There is a risk of burns or ignition of easily combustible materials (clothes, luggage, paper, grass).
Neve r touch th e hot ex ha ust pipe
and prevent it from any contact
with combustible materials.
WARNING
Page 37
35
FIRST RIDE
The exhaust gases contain highly poisonous carbon oxide. This
gas is colourless and odourless and it may cause consciousness loss or even death when inhaled. Never let the engine run
within a closed area.
Never touch any part of the ignition system, when the engine is
running or with the ignition on. There is a risk of health or life
hazard.
To prevent damage to the catalytic converter:
- never use up all the petrol in your tank
- never push the motorcycle
- never ride at your engine threshold revolutions
- keep the maintenance intervals
- in case the engine starts misring, stop it immediately
The rst ride should be intended to become familiar with the
motorcycle during acceleration, braking and cornering.
Your rational approach and mastering the motorcycle are the
basic prerequisites for safe rides. When riding on or off the
road, respect other drivers and road users.
Follow the instructions on safe motorcycle use!
Never leave the engine running
inside a closed area.
Never touch any part of the
ignition system when the engine is running or the ignition is
switched on.
WARNING
WARNING
Page 38
36
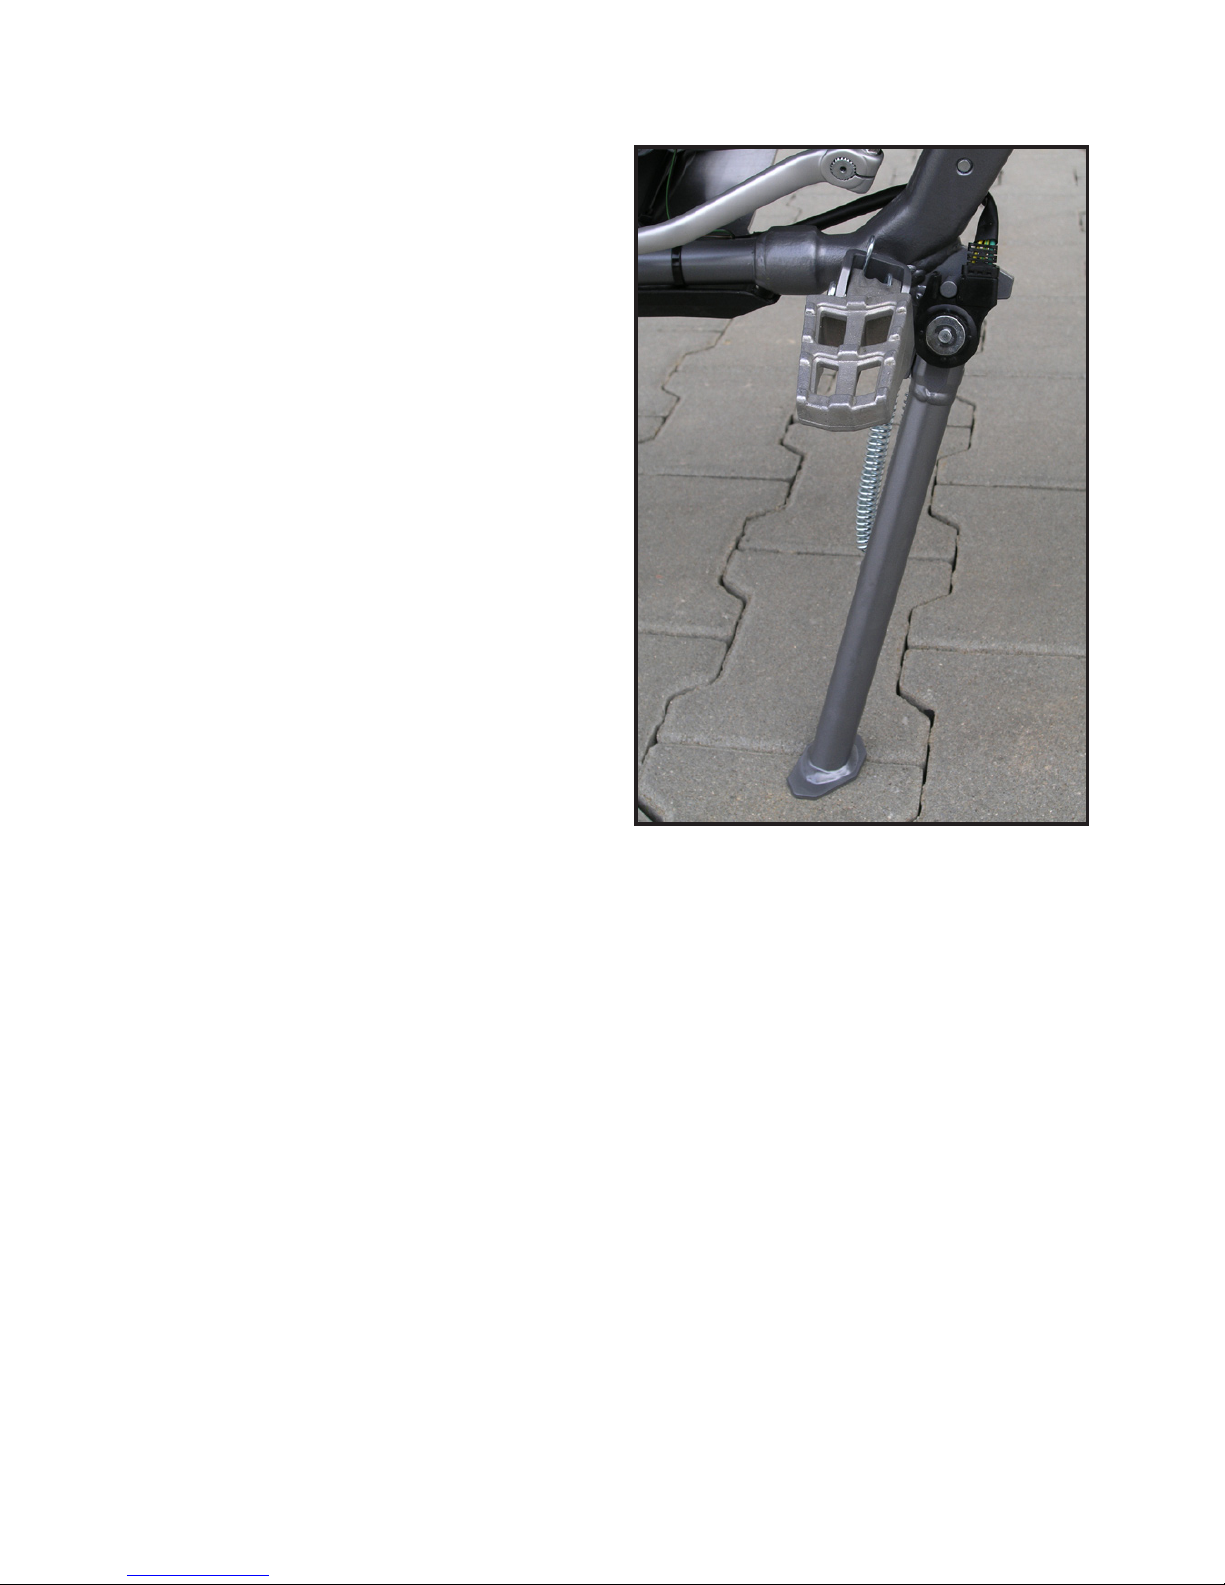
SIDE STAND
NOTE:
For the sake of your own safety, never sit on the motorcycle when parked on the
side stand. Always keep the
stand leaned onto a solid and
straight surface.
If you need to park the motorcycle in a slope, set it facing
the gradient and leave the
1st gear engaged.
Setting the motorcycle on side stand
- Switch the ignition off.
- Use our left hand to grab into the left handlebar and your right
hand to grip onto the seat.
- Deploy the side stand with your right foot.
- Tilt the motorcycle slowly to engage on the stand.
- Check the stability of motorcycle.
Lifting the motorcycle from stand
- Use our left hand to grab into the left handlebar and your right
hand to grip onto the seat.
- Set the motorcycle up straight slowly
- U s e y o u r r i g h t f o o t t o p r e s s t h e s i d e s t a n d i n t o i t s s t o w e d p o s i t i o n .
- Before riding away, check the completely locked position of
side stand.
Page 39
37
STARTING
NOTE:
When the side stand is deployed, the engine can be started, but
you cannot drive away upon gear engagement. The engine will
stop automatically. The engine can be started with neutral or
clutch depressed only.
NOTE:
Never hold the starter button depressed for longer than 5 seconds. If the engine does not start up within the above period,
wait for a while (10 seconds) before re-trying. Always depress
the clutch, when starting the engine under temperatures lower
than 0°C. Never leave the engine in idle run for long time to
prevent the risk of overheating. To avoid the risk of exposure to
toxic exhaust gases, never start your motorcycle within closed
areas.
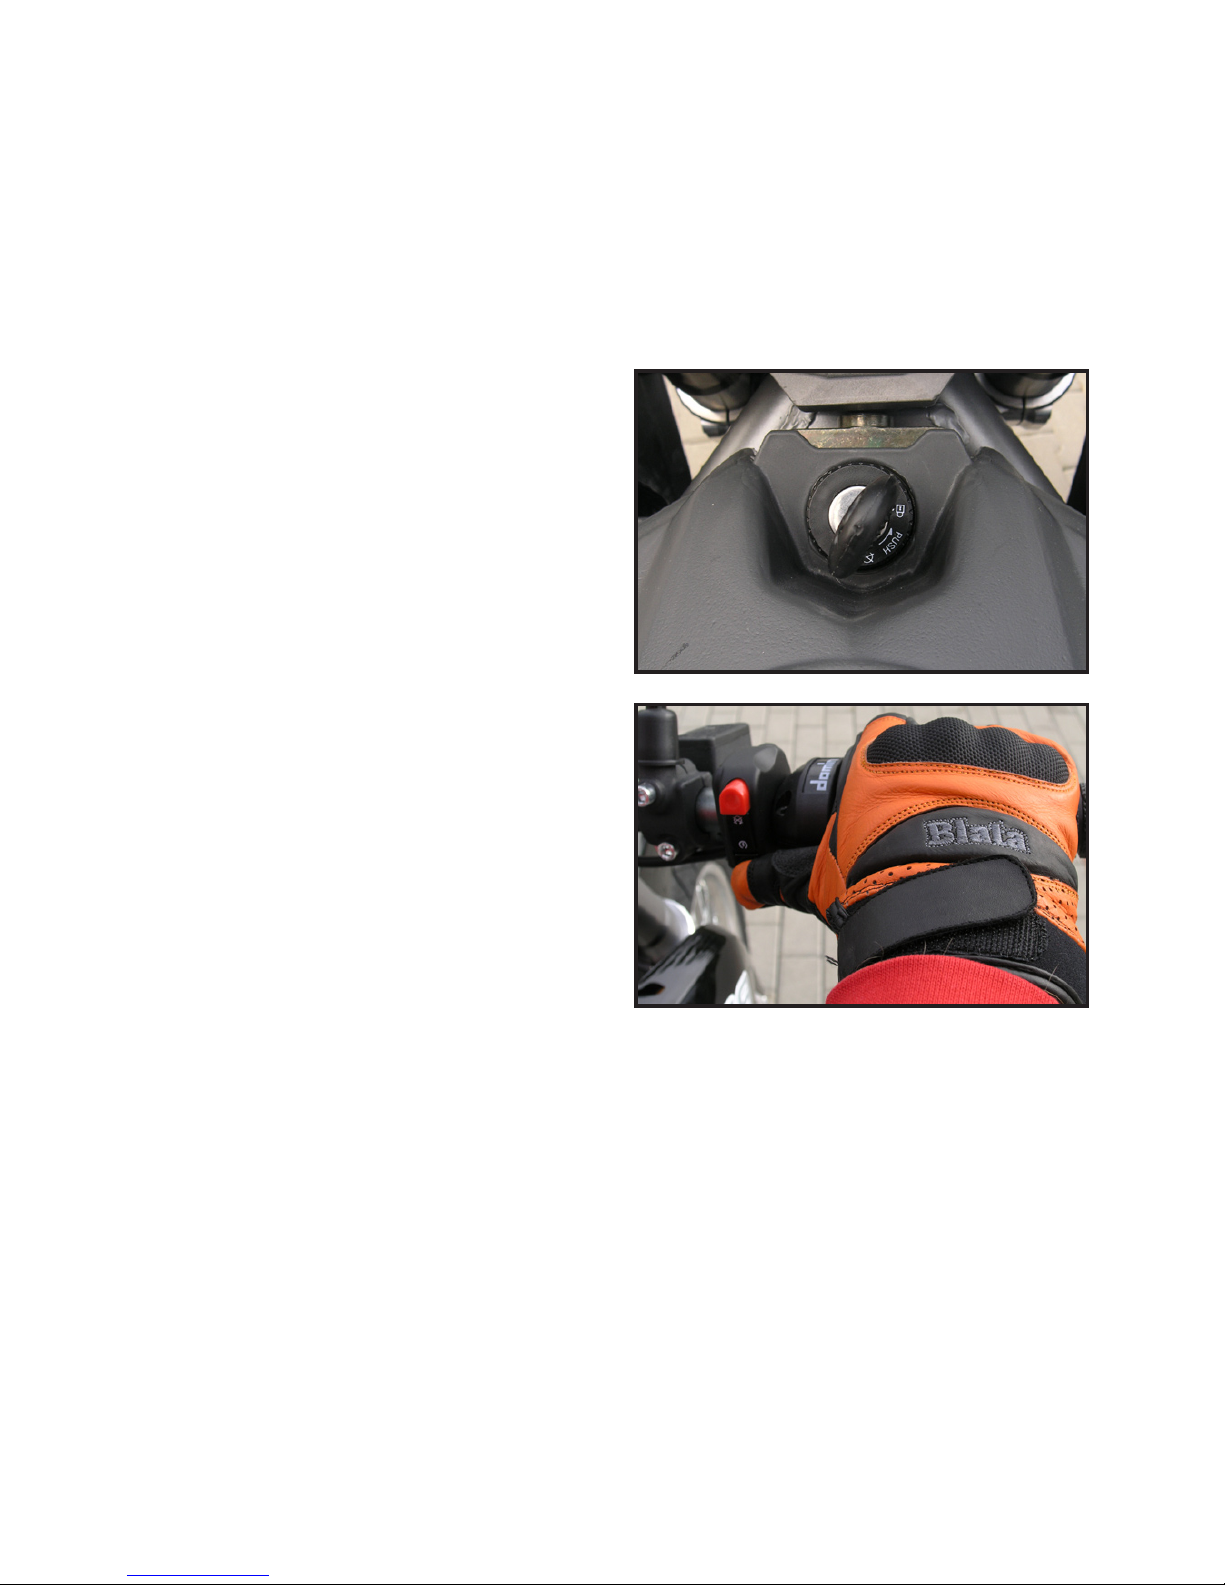
Turn the key in the switch box
to switch the ignition on.
Shift the gear lever to neutral
(the green neutral indicator will
light up). Press the starter button with simultaneous slight
pull of the throttle. The engine
will start up. Leave the starter
button immediately once the
engine has started up.
Turn the throttle grip slightly
and keep opening the throttle.
Never rev the engine too high
after start-up.
Page 40
38
RIDE AND GEAR CONTROL
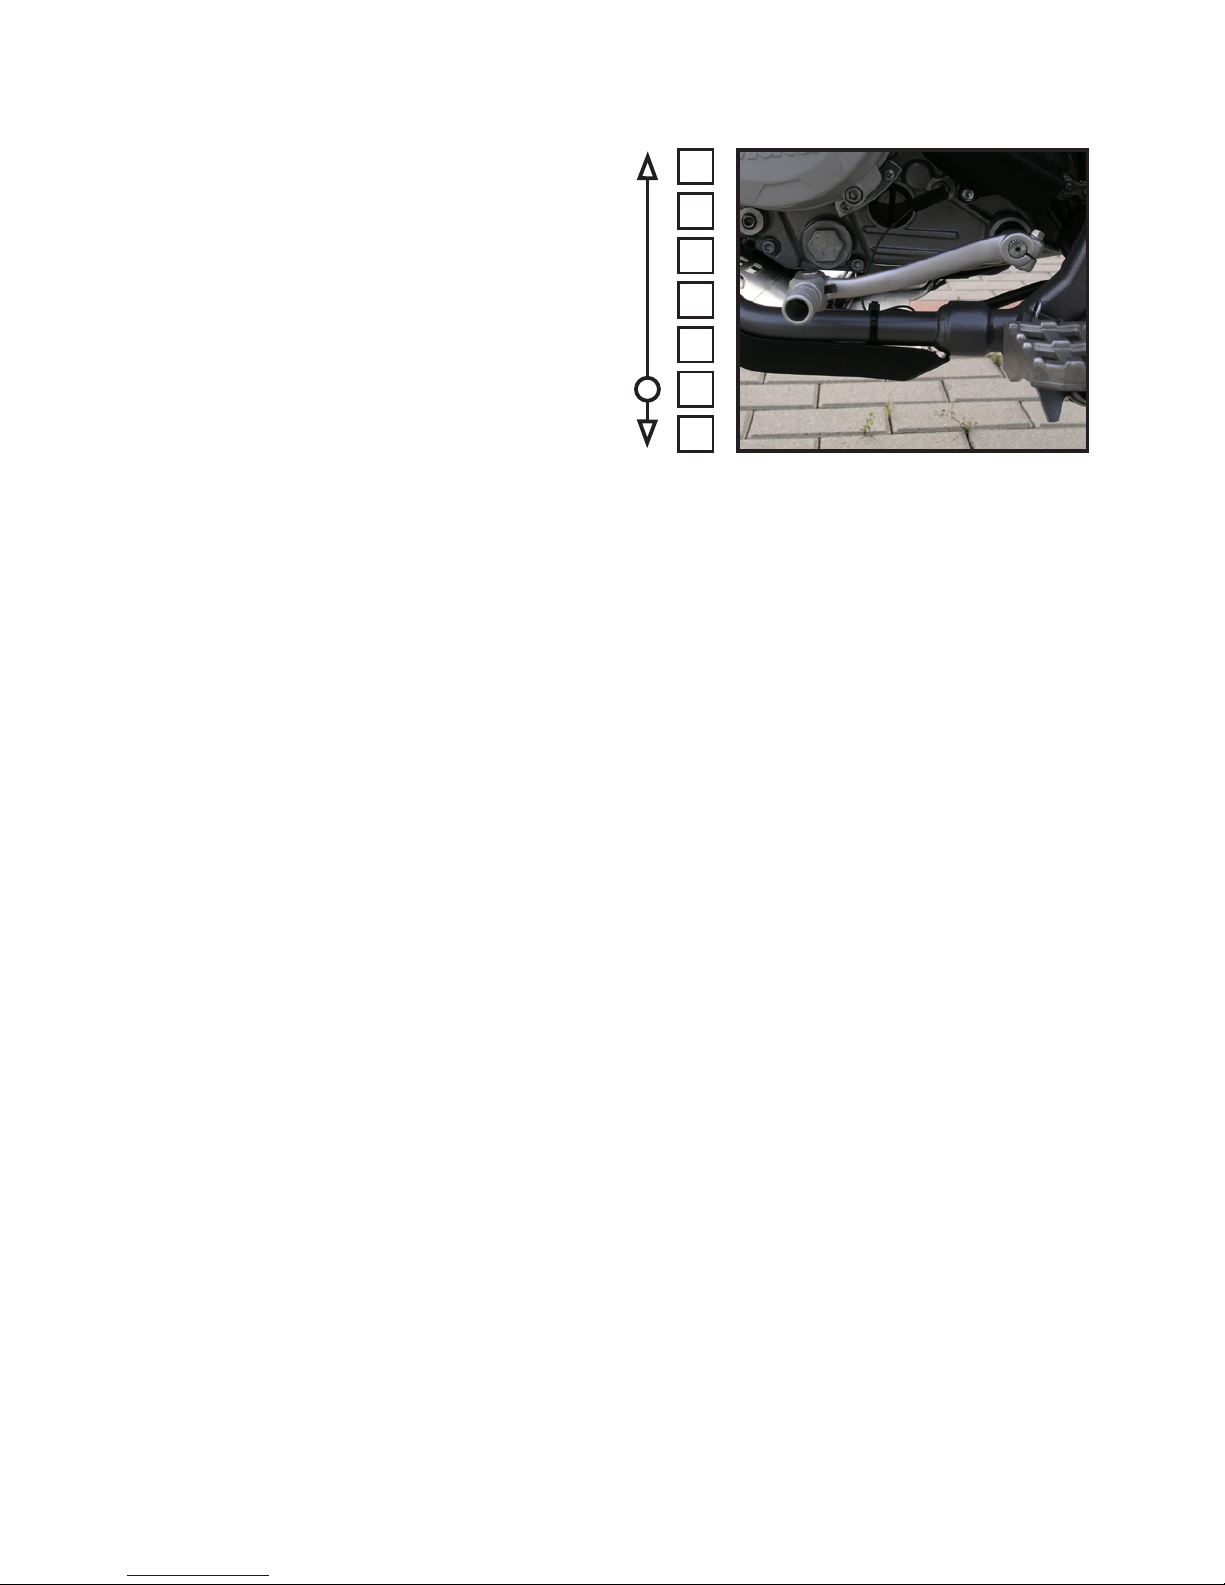
Drive away:
Press the clutch lever.
Step on the gear lever to shift it
downwards (to 1st gear).
Start returning the clutch lever
with care and increasing the engine revolutions slightly.
Once the clutch has engaged,
accelerate.
NOTE:
If the side stand is deployed, the engine with stop upon any drive
away attempt. Never let the clutch slip when shifting gears. When
gearing down, adjust the motorcycle speed rst to prevent any rapid
deceleration of the wheel resulting in skid.
Shifting to higher gears:
Decrease the throttle and depress the clutch lever. Move the
gear lever upwards to shift to the
subsequent higher gear. Return
the clutch lever with care. Once
the clutch has engaged, accelerate.
Shifting to lower gears:
Let the throttle grip loose completely and depress the clutch
lever. Move the gear lever downwards to shift to the subsequent
lower gear. Engage the cutch
with care. Once the clutch has
engaged, accelerate.
1
N
2
3
4
5
6
Page 41

39
RIDE AND GEAR CONTROL
NOTE:
Make sure you use the complete engine revolutions range once
the engine has warmed up.
The speed limiter has been set to 11.000 rpm.
Fuel volume:
If the yellow indicator lights, the remaining fuel volume equals to
the reserve only (approximately 0,6 litres). Fill the tank as soon
as possible.
Page 42

40
BRAKING
Check the brakes for proper functioning before every ride.
Regular braking shall be done using both brakes - the pedal and
the lever - simultaneously. When riding on road, give preference
to the brake lever, i.e. the front brake. On the contrary when riding off road, the pedal brake shall be used primarily.
To ensure maximum braking effect, cut the throttle and press
onto both the pedal and lever thoroughly. Before coming to a
complete standstill, depress the clutch lever in order to prevent
the engine from stopping.
Caution! Very strong braking may result in wheels locking and
subsequent skid.
If possible, decelerate and brake before entering into turns already. Braking or rapid deceleration when passing through a turn
might result in skidding and falls.
When riding in wet or rainy conditions, or riding on a slippery surface, please adapt the motorcycle usage accordingly. Braking,
rapid acceleration or sudden turning of the motorcycle might render the motorcycle uncontrollable.
If you need to keep braking, e.g. when riding down a long hill, use
the motor brake combined with both mechanical brakes for better
effect and shifting down to lower gears.
NOTE:
After washing the motorcycle, after passing through wet environment, in rainy conditions of when riding on roads sprinkled with
road salt, the brake effect might appear with a slight delay.
When riding off the road or using strongly soiled roads, the fouling on brakes might impair their immediate effect.
Brake discs and brake pads must be always free of any oil or
grease residues.
Page 43
41
RIDE WITH A PASSENGER / LOAD
Remember that when carrying a passenger or load will affect
the riding properties of your motorcycle. The difference with be
evident when accelerating, braking and passing through turns.
When carrying a passenger or load, never forget to adjust the
tyre pressure (page 30).
Never exceed the maximum permissible vehicle load.
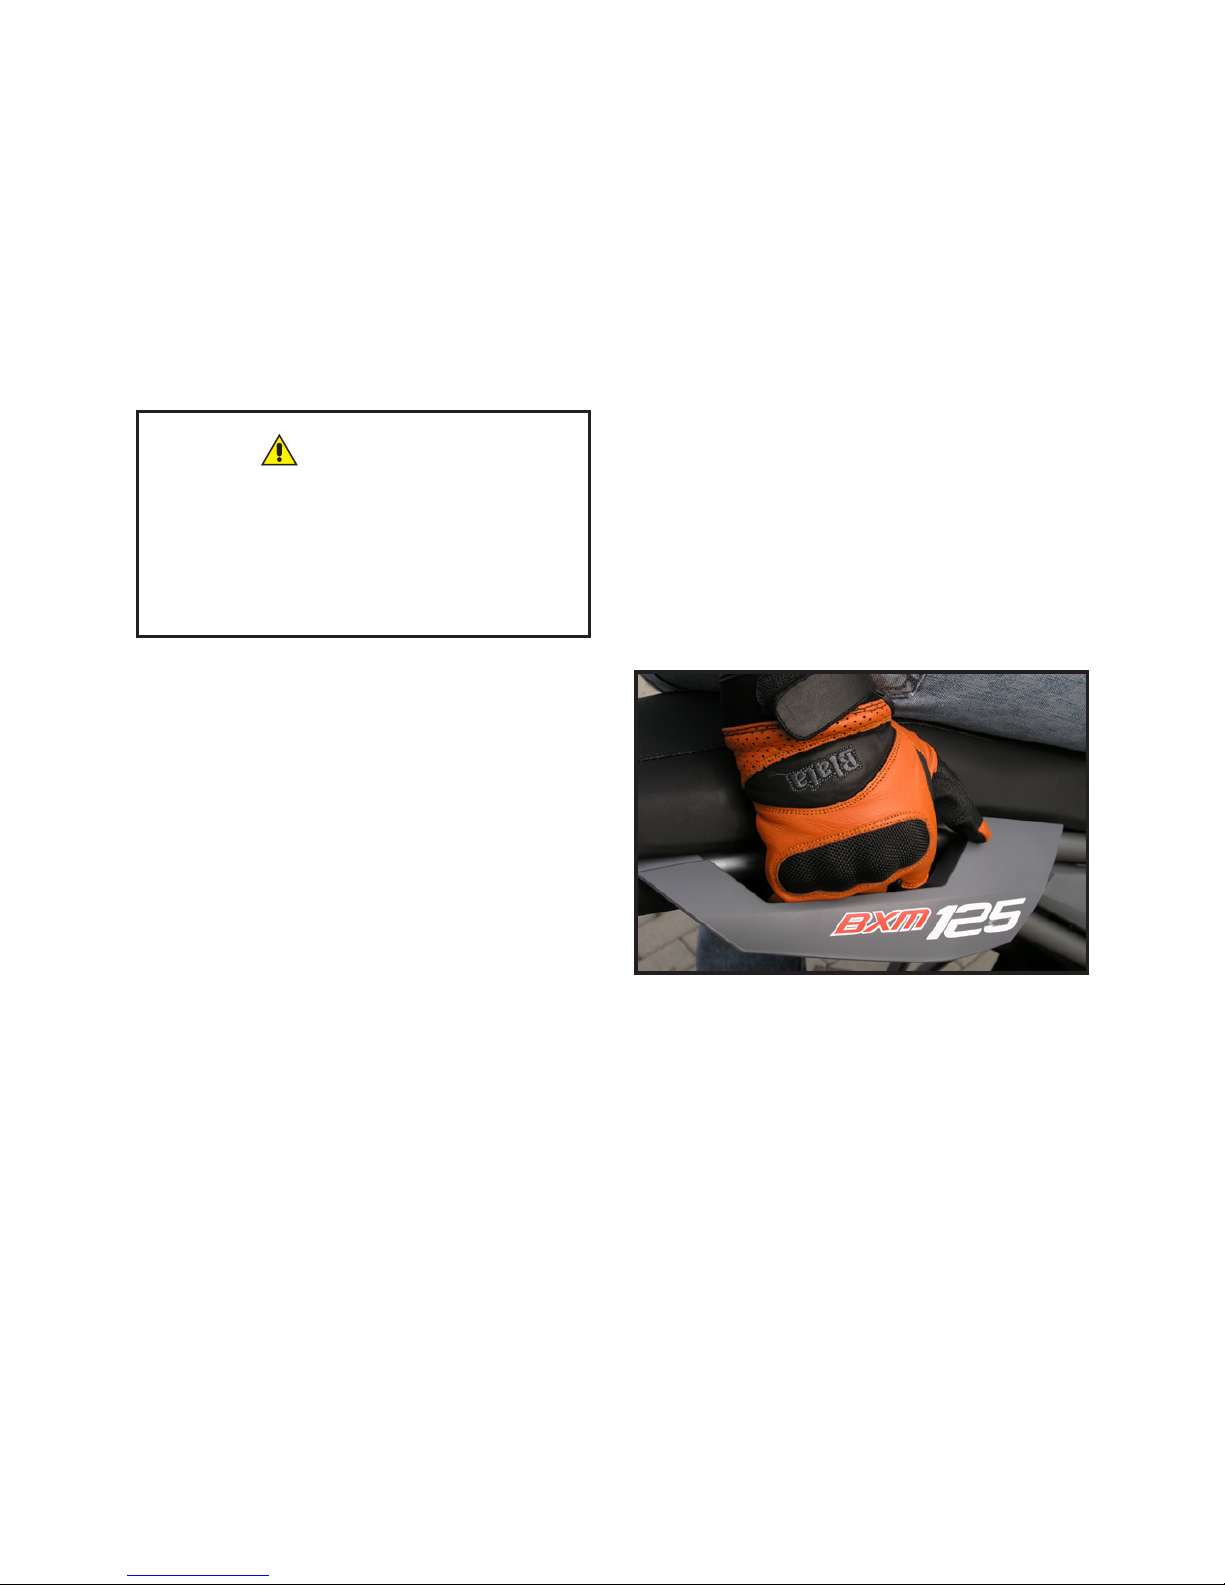
Passenger’s handlebars:
Before riding, instruct your passenger about the use of safety
helmet and suitable clothes, footwear and other equipment.
Brief your passenger on proper behaviour during the ride.
Carrying excessive loads or un-
suitable distribution of the load
may result in accidents personal injury or even death.
WARNING
Page 44

42
CLEANING AND CONSERVATION
Correct and regular cleaning and conservation treatment can
help increase the life and safety of your motorcycle.
When using the motorcycle off the road, you are recommended
to clean the vehicle and apply conservation agents after every
ride.
NOTE:
Use only cleaning agents designed for cleaning of motorcycles
or passenger cars. Never use any aggressive or penetrative
agents or solvents. Never use any steam jet or high pressure water jet apparatus (installed in regular car wash units). When cleaning the board unit and controls avoid the use of any solvents
and cleaning agents. Any tar and bug residues shall be removed
with suitable special agents only. Never use any polishing wax
or abrasive and chemical-based polishing materials on plastic
parts. Beware to avoid any water spillage into the exhaust system
and electric installation.
Page 45

43
CLEANING AND CONSERVATION
Motorcycle cleaning:
Set your motorcycle on side stand, supported with straight and
solid surface. This surface must remain solid even when soaked
up with water. Let the engine and exhaust system cool down
properly before cleaning. Rinse the motorcycle thoroughly with
cold water to remove the coarse dirt particles. Clean the wheels,
the engine block, the swing arm, bodywork parts and the frame
using a mild solution of special cleaning agent. Use a sponge or
a piece of cloth. Rinse the motorcycle with cold water again and
dry the wet surface carefully. Start the dry engine and let it run
about 2 minutes.
NOTE:
Once you have nished the washing, check brakes for proper
functioning. Their effect might be impaired temporarily.
Chain conservation:
Once the washing and drying has been nished, lubricate the
drive chain with special agent immediately, see the Regular Maintenance for details (page 58).
Road salt:
Some roads might be sprinkled with road salt based or sea salt
material. After completion of rides on such surfaces, rinse the
motorcycle with cold water immediately (lukewarm water would
boost the salt effect) and treat the metal parts using a special
wax-bases agent.
Page 46
44
TEMPORARILY OUT OF OPERATION
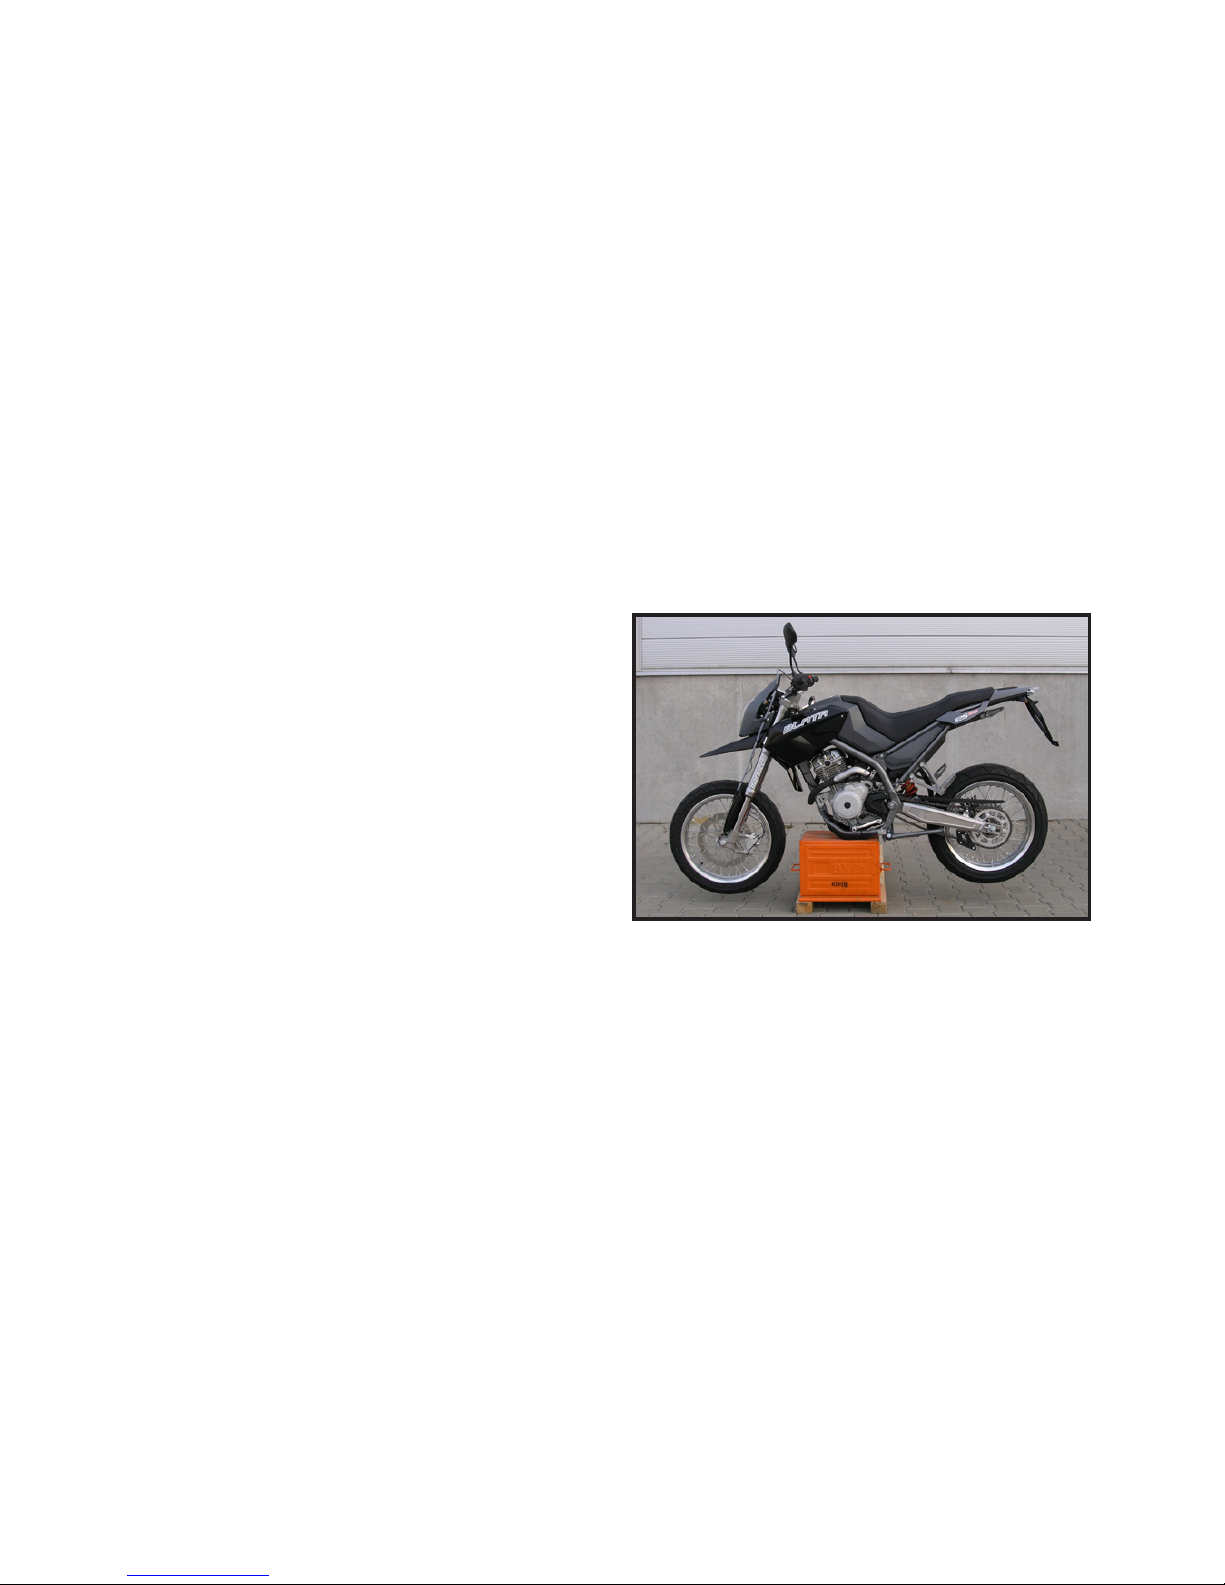
Putting the motorcycle out of operation temporarily:
Clean the motorcycle and apply conservation agents (page
42). Remove the battery (page 69). The battery shall be stored
out of low temperatures and direct sunlight. Charge the battery
at least once a month. Inate the tyres to prescribed pressure
(page 30). Put a support below the low frame cover in order
to lift the wheels from the ground and to keep the motorcycle
stable. Lubricate the drive chain (page 58). Cover the motorcycle properly. The motorcycle shall be stored in environment
with stable ambient temperature and low humidity. Never park
the motorcycle in direct sunlight.
Resuming the operation:
Clean the motorcycle (page 42). Lubricate the drive chain (page
58). Install the fully charged battery (page 71). Treat the battery
terminals with special grease. Check the tyre pressure and adjust it, if necessary (page 30). Perform all the preride activities
as prescribed (page 20). Test the motorcycle by a careful ride
off trafc.
NOTE:
Before you put the motorcycle
out of operation, we recommend to change the oil and oil
cleaner insert. Alternatively,
you can also combine the activities required by putting the
motorcycle out/into operation
with regular service inspection by an authorised Blata service centre.
Page 47
45
TOOLS
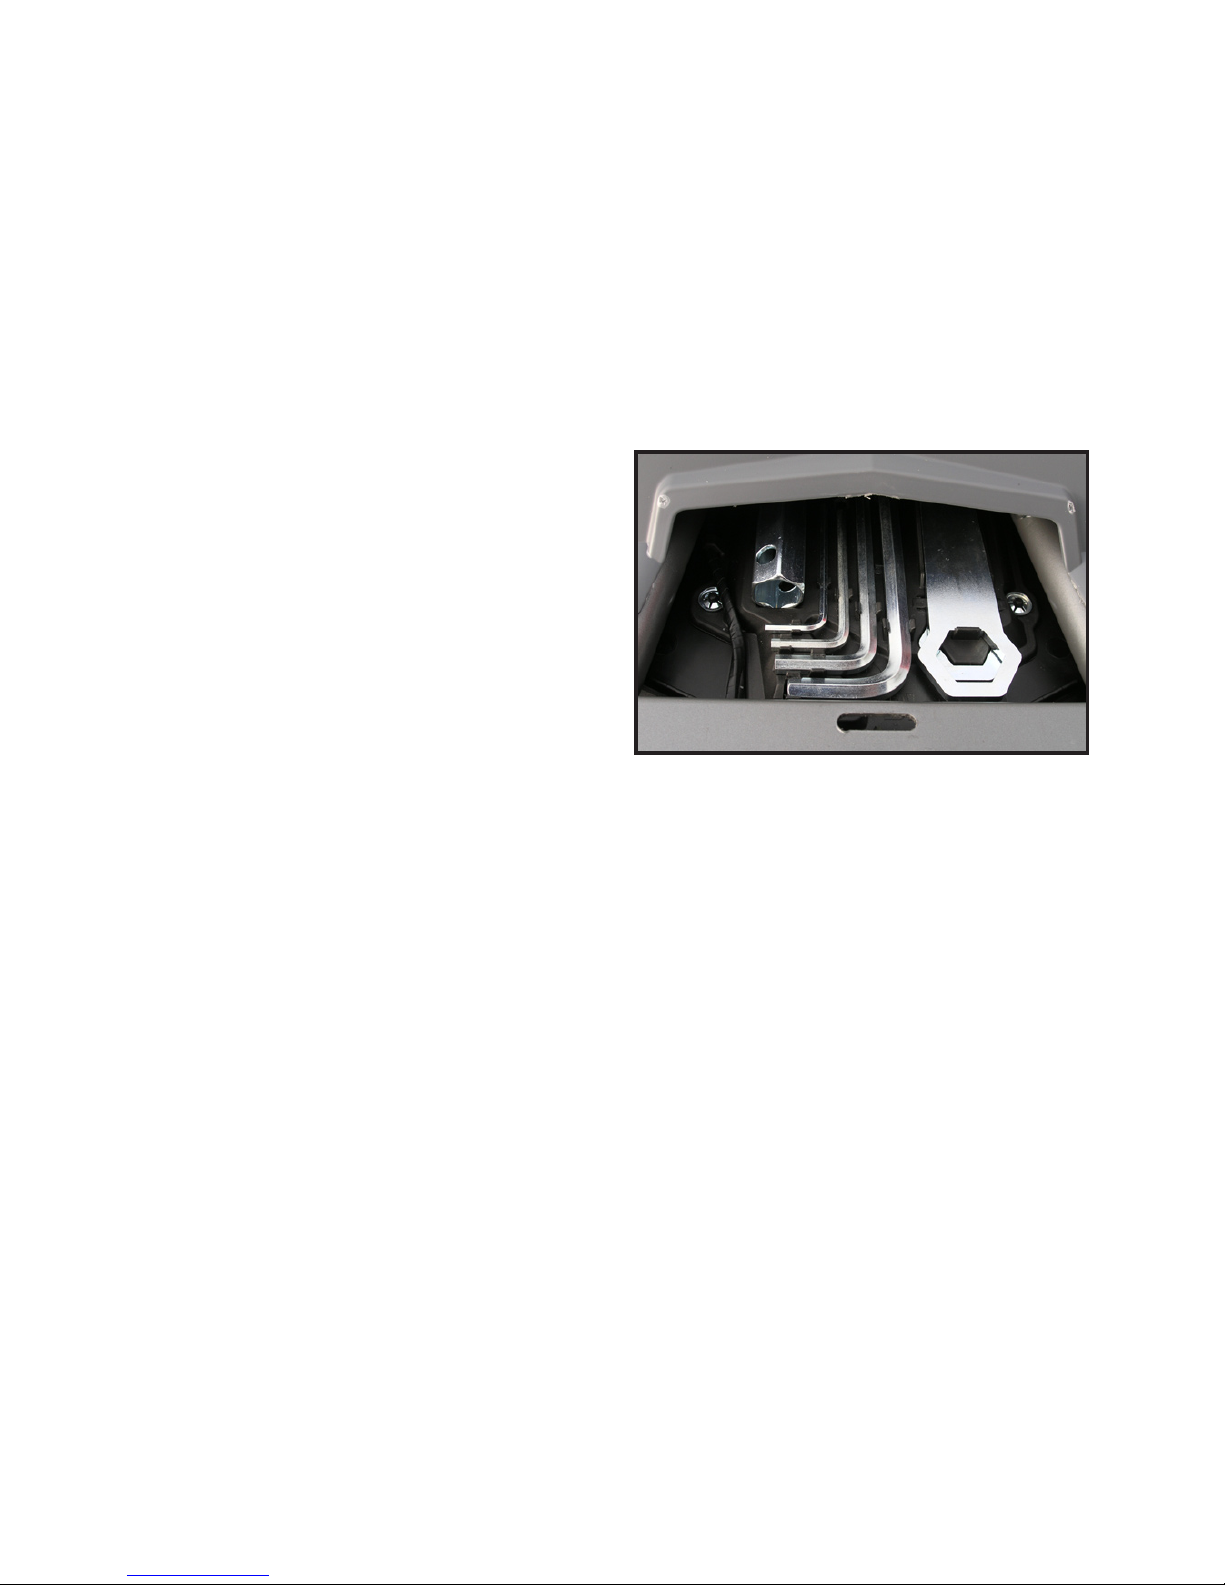
The compartment situated below the rear of motorcycle seat
can be used for stowage of the tool kit provided.
This tool kit shall be used for basic adjustments and emergency
repair of your motorcycle.
To ensure thorough and proper maintenance and service, use
suitable workshop tools only.
The tool kit supplied compris-
es the following:
- 13 and 19 mm spanner
- 13 and 22 mm spanner
- 8 mm Allen key
- 6 mm Allen key
- 4 mm Allen key
- 3 mm Allen key
- 16 mm spark plug socket
wrench
Page 48

46
MAINTENANCE INSTRUCTIONS
Regular maintenance and checks before ride are the essential
prerequisites for safe and operable condition of your motorcycle.
We recommend that the service and maintenance activities be
performed by your Blata service centre equipped with the tools
and experienced well-trained personnel as required.
Any regular maintenance conducted within the warranty period
shall be performed by an authorised Blata service centre only
and the completion shall be recorded in vehicle log book. Failure
to follow these procedures will void the warranty.
When using the motorcycle mostly off the road, in dusty, muddy
or wet environment, consult your Blata dealer for the option of
more frequent service inspections and reduction of the regular
maintenance intervals.
If you decide to perform the regular maintenance and general
care of the vehicle independently, following the instructions in
this chapter, make sure you possess the technical facilities,
knowledge and skills necessary. Remember that any service or
maintenance activities performed besides an authorised Blata
service will render your warranty void!
Regular maintenance activities, which require special equipment
or special training, have not been included in this Manual. These
shall be performed by an authorised Blata service centre only.
Use original Blata spare parts supplied or recommended by the
Blata company. You shall also use only lubricants or their equivalents as recommended by the Blata company. Any use of unsuitable parts or lubricants might damage your motorcycle.
Before any repairs or disassembly of engine components, remove any dirt, mud or junk from the vehicle.
When conducting motorcycle repairs, use metric tools only. Metric bolts, nuts and threads can never be mistaken for the inch
ones (USA, GB).
When performing installation or assembly activities, always use new
gasket, O-rings, cotter pins, self-locking nuts and lock washers only.
Once you have completed the assembly, check all the parts for
proper installation and operation.
Page 49
47
MAINTENANCE SAFETY
Any works on the motorcycle shall be conducted in compliance
with instructions contained in this Manual and relevant safety warnings. The description of procedures contained in this chapter has
been based on the assumption you poses the basic technical skills
as well as the essential knowledge of workshop safety.
The Manual cannot cover all the risks related to the operation and
maintenance of the motorcycle. You shall be governed by the common sense in many cases. First of all, you should never over-estimate your skills with respect to particular tasks.
Before you start with any work, stop the engine and set the motorcycle into stable servicing stand on straight surface.
Caution! The vehicle exhaust contains toxic carbon gases, which
might cause loss of consciousness resulting in death. The engine
shall be started within open areas only or closed premises provided
with proper ventilation only.
Before conducting any work, let the engine cool down properly to
prevent any burns or ignition caused by hot components.
Never start the engine, unless directed to do so by relevant instructions, to avoid the risk of injury by moving parts.
Never use the motorcycle with any of its parts dismantled.
If your motorcycle has fallen down or suffered an accident, ask your
Blata dealer for inspection of the main motorcycle parts even though you are capable to perform some repairs independently.
Always remember that you Blata dealer or authorised service
centre possesses better know ledge of your veh icle a s well as professional equipment and facilities for service or maintenance.
Any failure to perform the maintenance or inspection of the vehicle properly might result in accidents with subsequent lethal
injuries or even death.
Any failure to follow the instructions contained in this chapter
and obey the safety warnings
provided might result in serious
personal injuries or even death.
WARNING WARNING
Page 50

48
MAINTENANCE PLAN
Pre-ride checks shall be performed in every stage of the maintenance plan.
I: inspection, cleaning, adjustment, lubrication and replacement
where necessary
C: cleaning. R: replacement. A: adjustment. L: lubrication.
The items below require mechanical knowledge. Certain items
(especially those labelled with * and **) may require higher level
of technical prociency and tools. Those shall be consulted with
your BLATA dealer.
* To be repaired by an authorised BLATA dealer, unless the
vehicle owner possesses proper tools and service informati
on and mechanical prociency required.
** For the sake of personal safety, these activities shall be per formed by an authorised BLATA dealer only.
NOTES:
1. With higher mileage covered, these activities shall be repea-
ted within regular intervals dened in this Manual.
2. When using the motorcycle in unusually wet or dusty envi ronment, perform repairs more frequently.
3. When operating the motorcycle in rainy conditions or at full
throttle for long periods, perform cleaning more frequently.
4. To be replaced in 2-year intervals. This replacement requires
mechanical skills.
5. To be replaced every 3 years or after completion of 24.000 km
(15.000 miles). This replacement requires mechanical skills.
Page 51
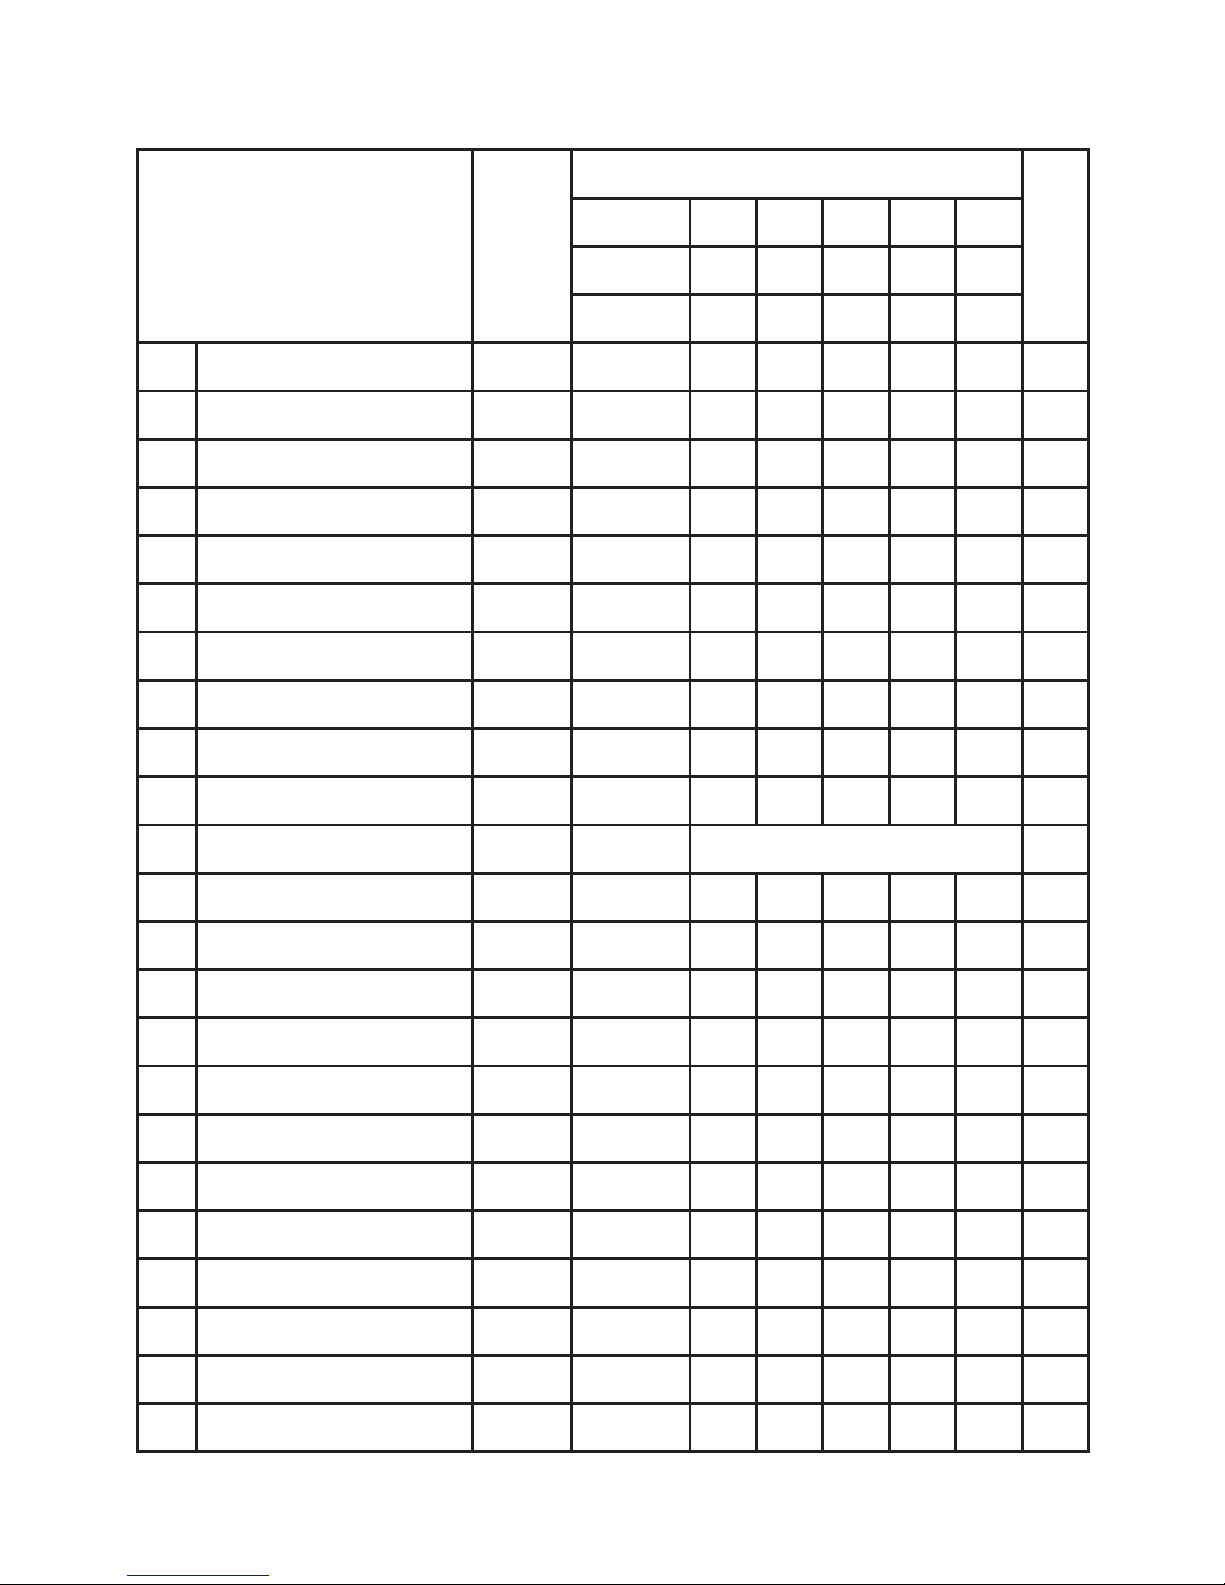
49
MAINTENANCE PLAN
Frequency
Item
Whatever the
sooner
alternative
Odometer reading (note 1)
p.
x 1000 km 1 4 8 12
16
x 1000 mi 0,6 2,5 5 7, 5
10
months 6 12 18
24
* Fuel system I I I I
* Throttle grip I I I I
* Air cleaner Note 2 C C C C
Crankcase ventilation Note 3 C C C C
Spark plug I R R
** Valve clearance I I I
Engine oil R R R R R
** Oil cleaner liner R R R R R
* Carburettor and idle run I I I I I
* Second. air system Note 5 I
Drive chain after every 1.000 km (600 mil): I,L
** Brake uid Note 4 I I I I
Brake pads I I I I
Brake system I I I I I
* Brake light switch I I I I
* Headlight I I I I
Clutch system I I I I
** Clutch discs I
Side stand I I I I
* Suspension I I I I
Wheels, tyres I I I I
** Steering head bearings I I
* Bolts, nuts, clips I I I
Page 52
50
FUEL SYSTEM
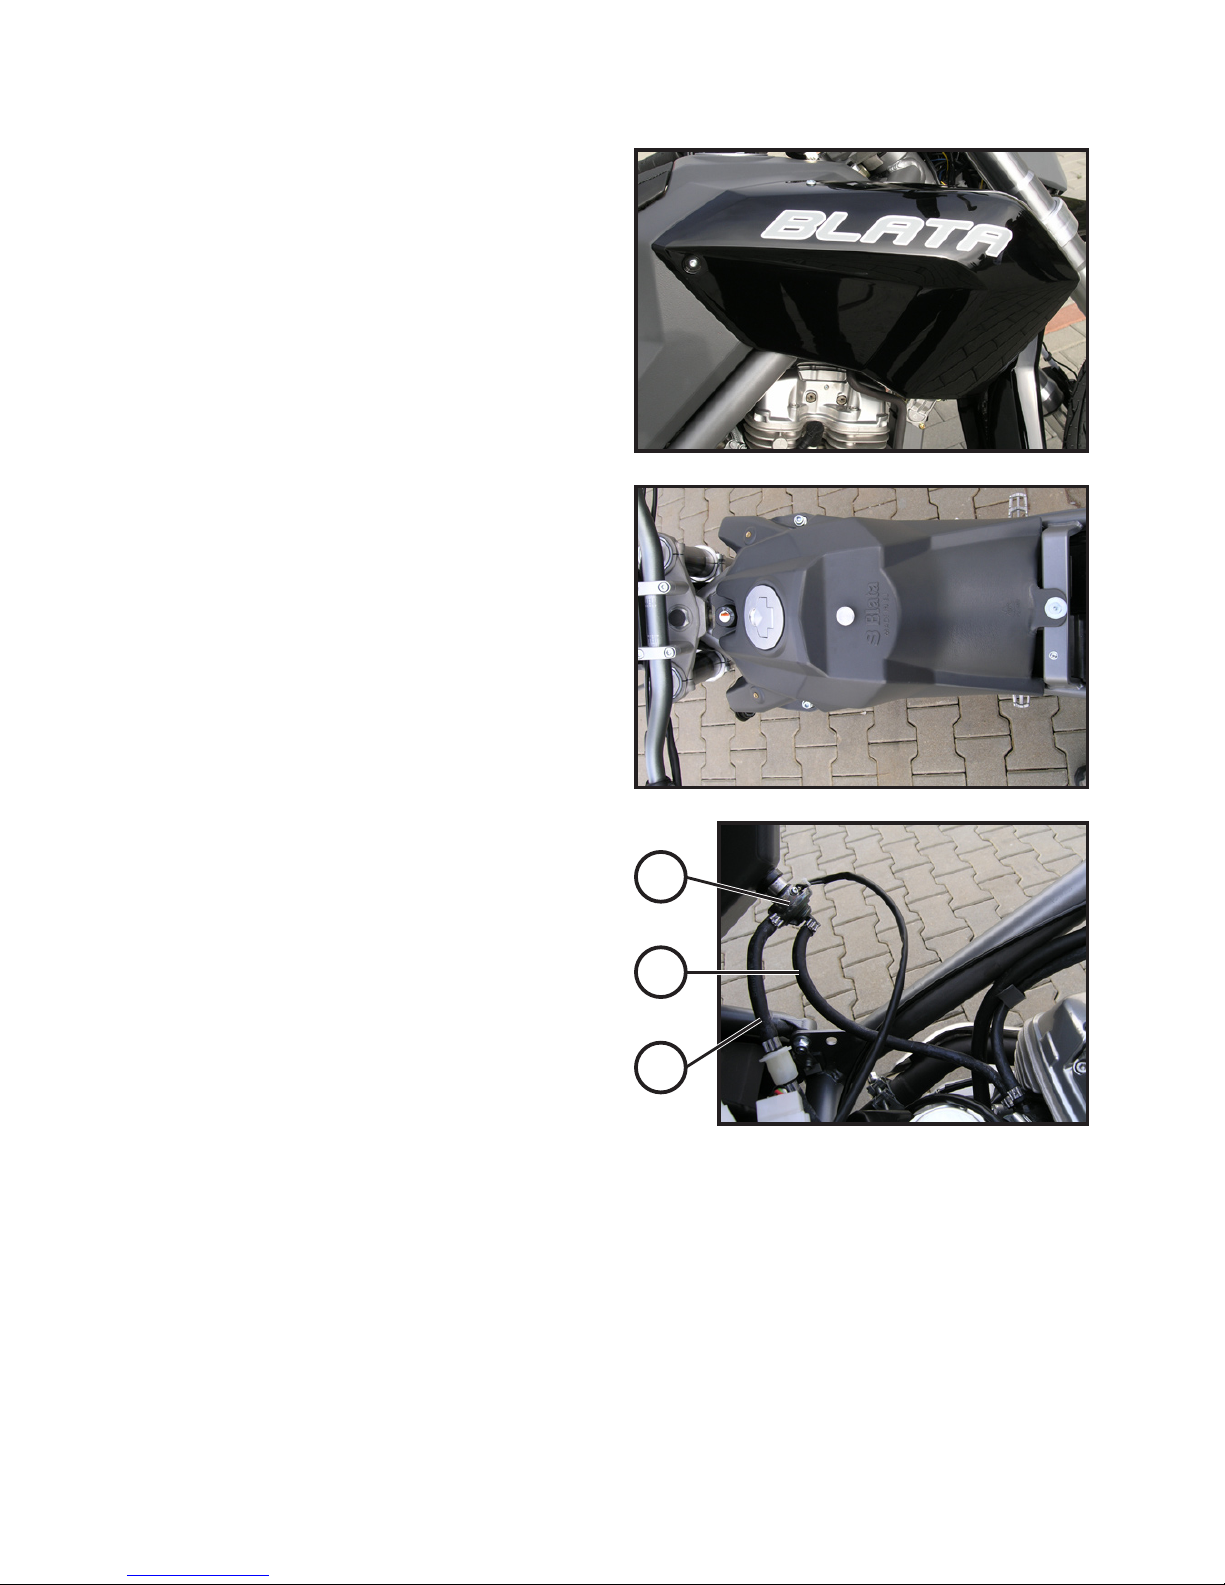
Remove the seat.
Unscrew the 3 bolts from the
front left and right tank covers
and remove these covers.
Unscrew the 3 xing bolts on
the fuel tank and lift the tank up
slightly.
Check all the fuel, vacuum and
pneumatic tubes for possible
deterioration, damage or leaks.
(A) Automatic vacuum valve
(B) Vacuum tube
(C) Fuel tube
If you nd any of the parts out of order or showing signs of leakage, have it replaced at an authorised Blata service.
Re-t the fuel tank to its initial position and tighten it using the
3 bolts provided. Beware to conduct the installation without any
damage or strangulation of pipes.
Fit the left and right fuel tank covers. When tightening the bolts,
always obey the prescribed torque.
Tightening torque: 1.5 Nm (1.11lbf.ft)
A
B
C
Page 53
51
ACCELERATOR GRIP
Check the operation and play of the throttle grip (page 26).
Set the play of accelerator grip (page 26).
Re-check the accelerator grip and perform its ne adjustment, if
required (page 26).
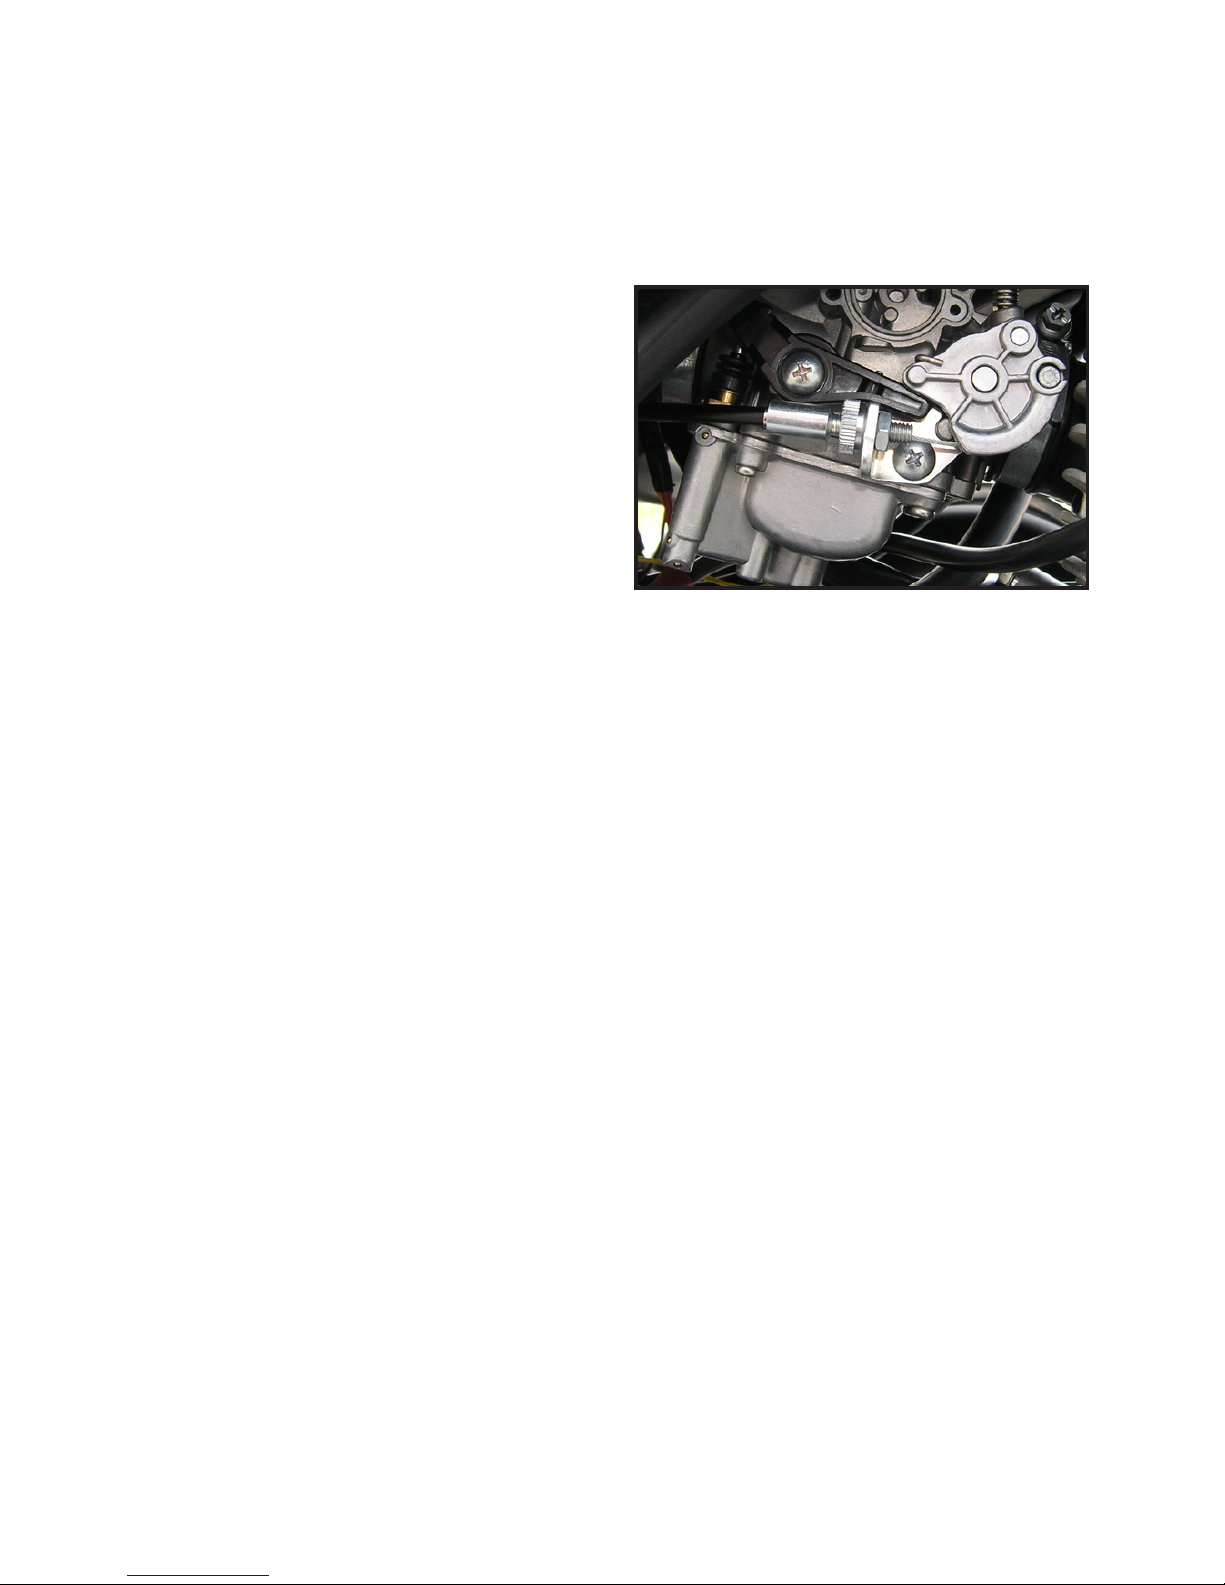
For coarse adjustment use the
bottom part of cable at the carburettor. Loosen the locking
nut and turn the adjusting nut
to set the play of the throttle.
Tighten the locking nut after
adjustment completion.
Page 54
52
AIR CLEANER
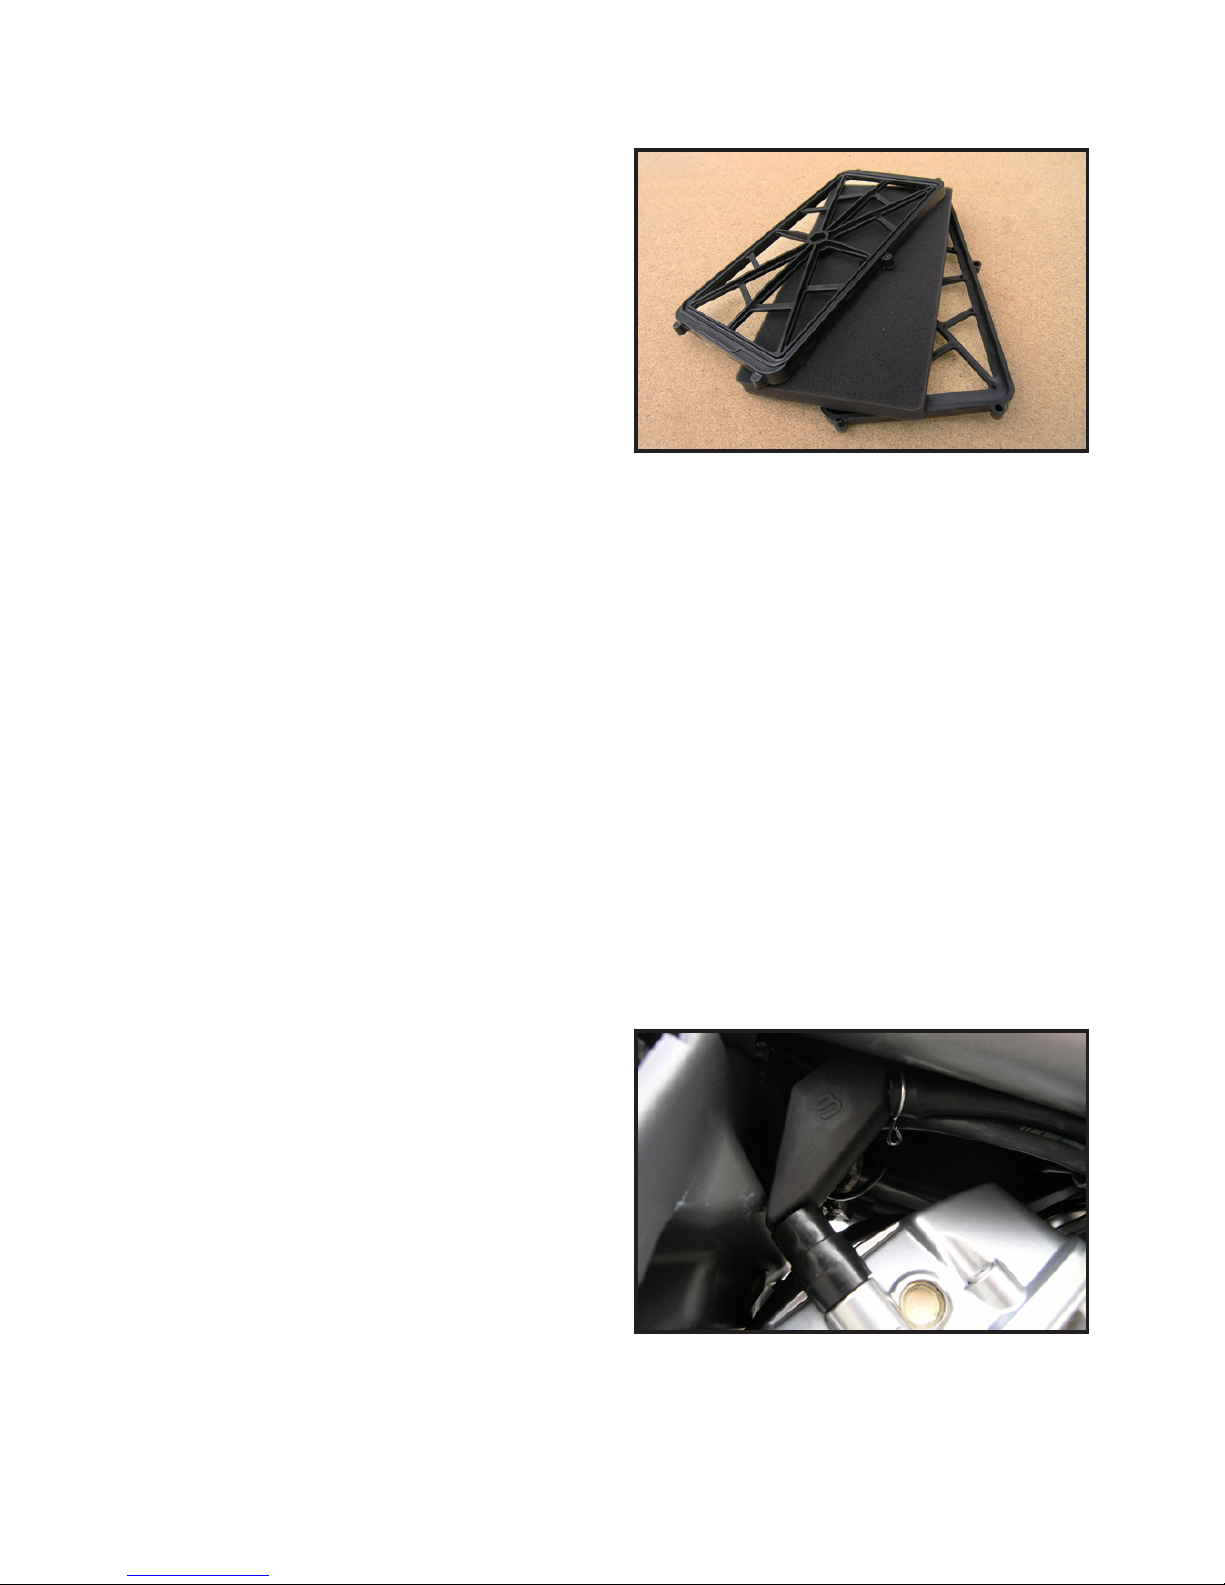
The air cleaner shall be treated and cleaned in regular intervals.
If you ride in wet or dusty environment ver y often, clean this component more frequently.
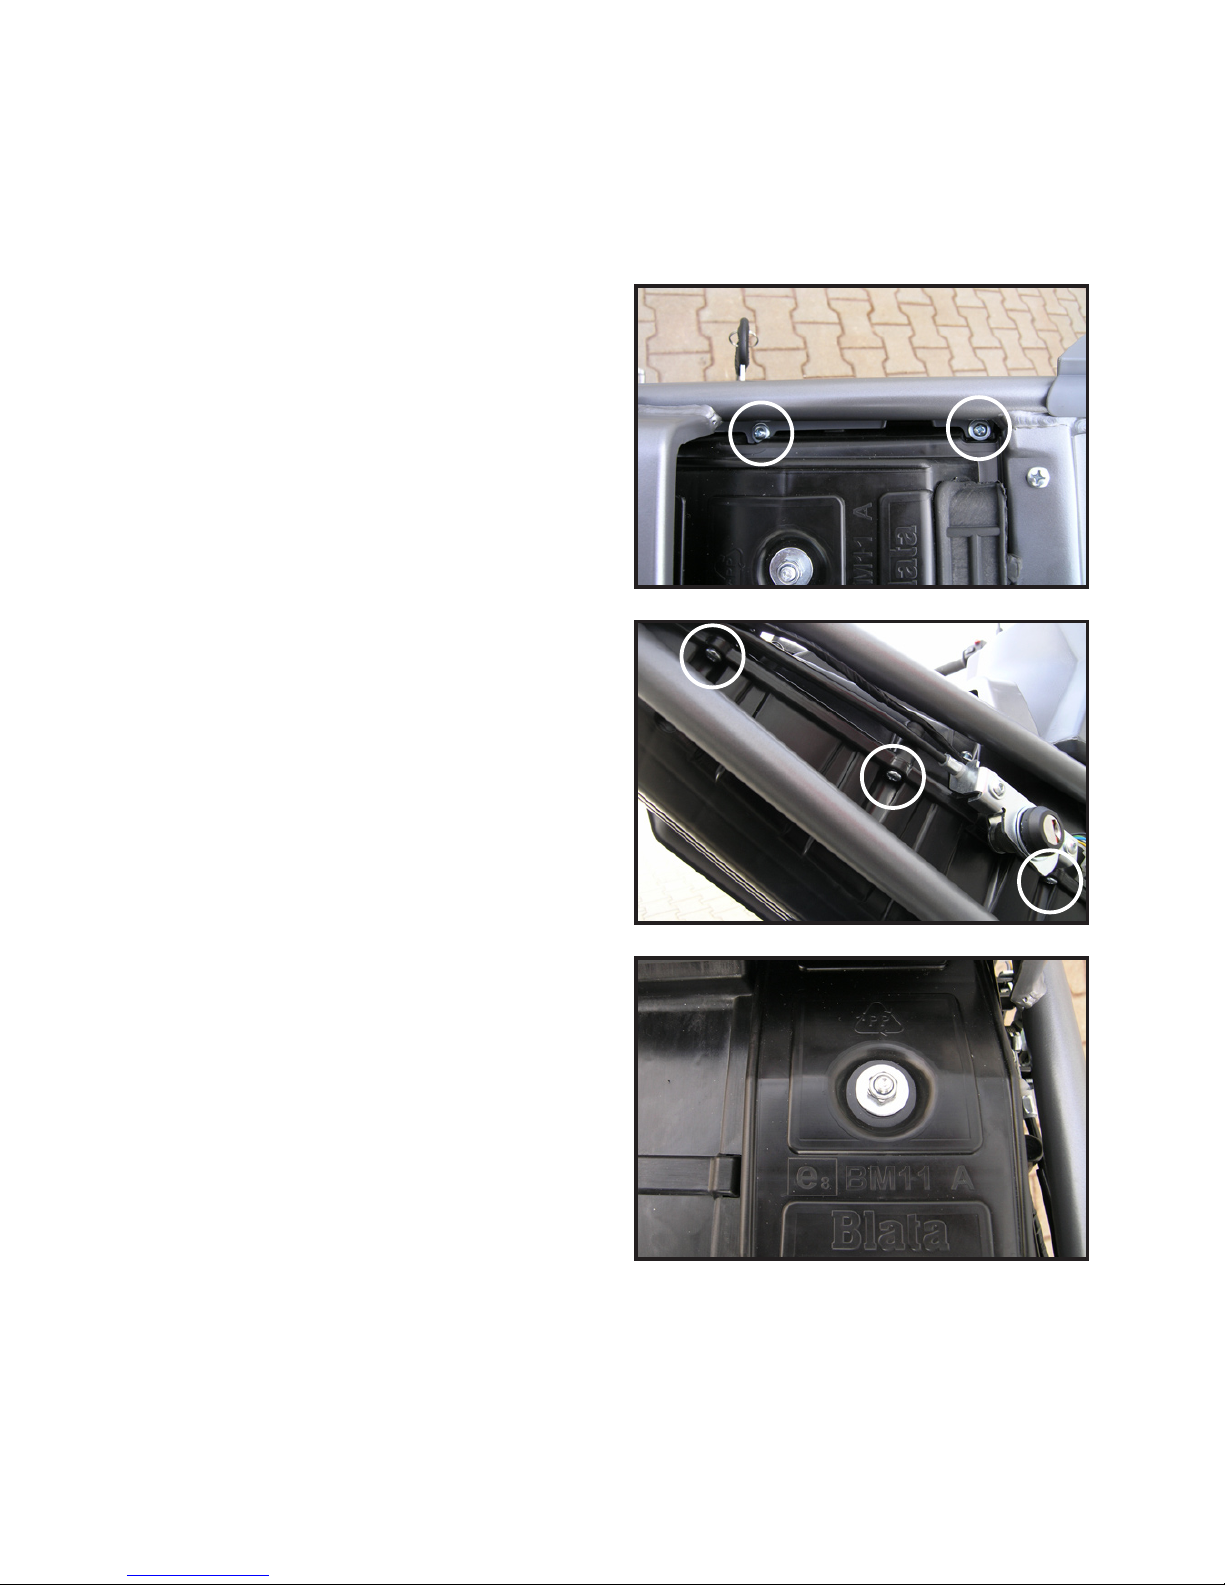
Remove the seat (page 19).
Loosen the 2 screws on under
seat cover. Tilt the cover open
and remove it.
Unscrew the 6 screws along
the air cleaner housing perimeter and detach the case bottom.
Unscrew the cleaner xing nut
and remove the frame containing air cleaner.
Page 55
53
AIR CLEANER
CRANKCASE VENTILATION
Loosen the nut and open the
frame to remove the foam air
lter.
Use the foam lter cleaner to
wash the air cleaner thoroughly. Use compressor to blow
onto the air cleaner and let it
dry out. Do not twist or pull the
lter when drying.
Apply the foam lter impregnating oil to treat the lter.
Any damaged air lter shall be
replaced.
Follow the same procedure in
reverse order to re-install the
lter.
The service shall be performed more frequently on motorcycles
operated in wet environment or at full throttle.
Disconnect the oil trap from
the bleeding pipe and the cylinder head cover.
Clean the oil trap using compressed air.
Never disassemble the oil
trap.
Connect the oil trap to the cylinder head cover and to the
engine bleeding hose.
Page 56
54
SPARK PLUG
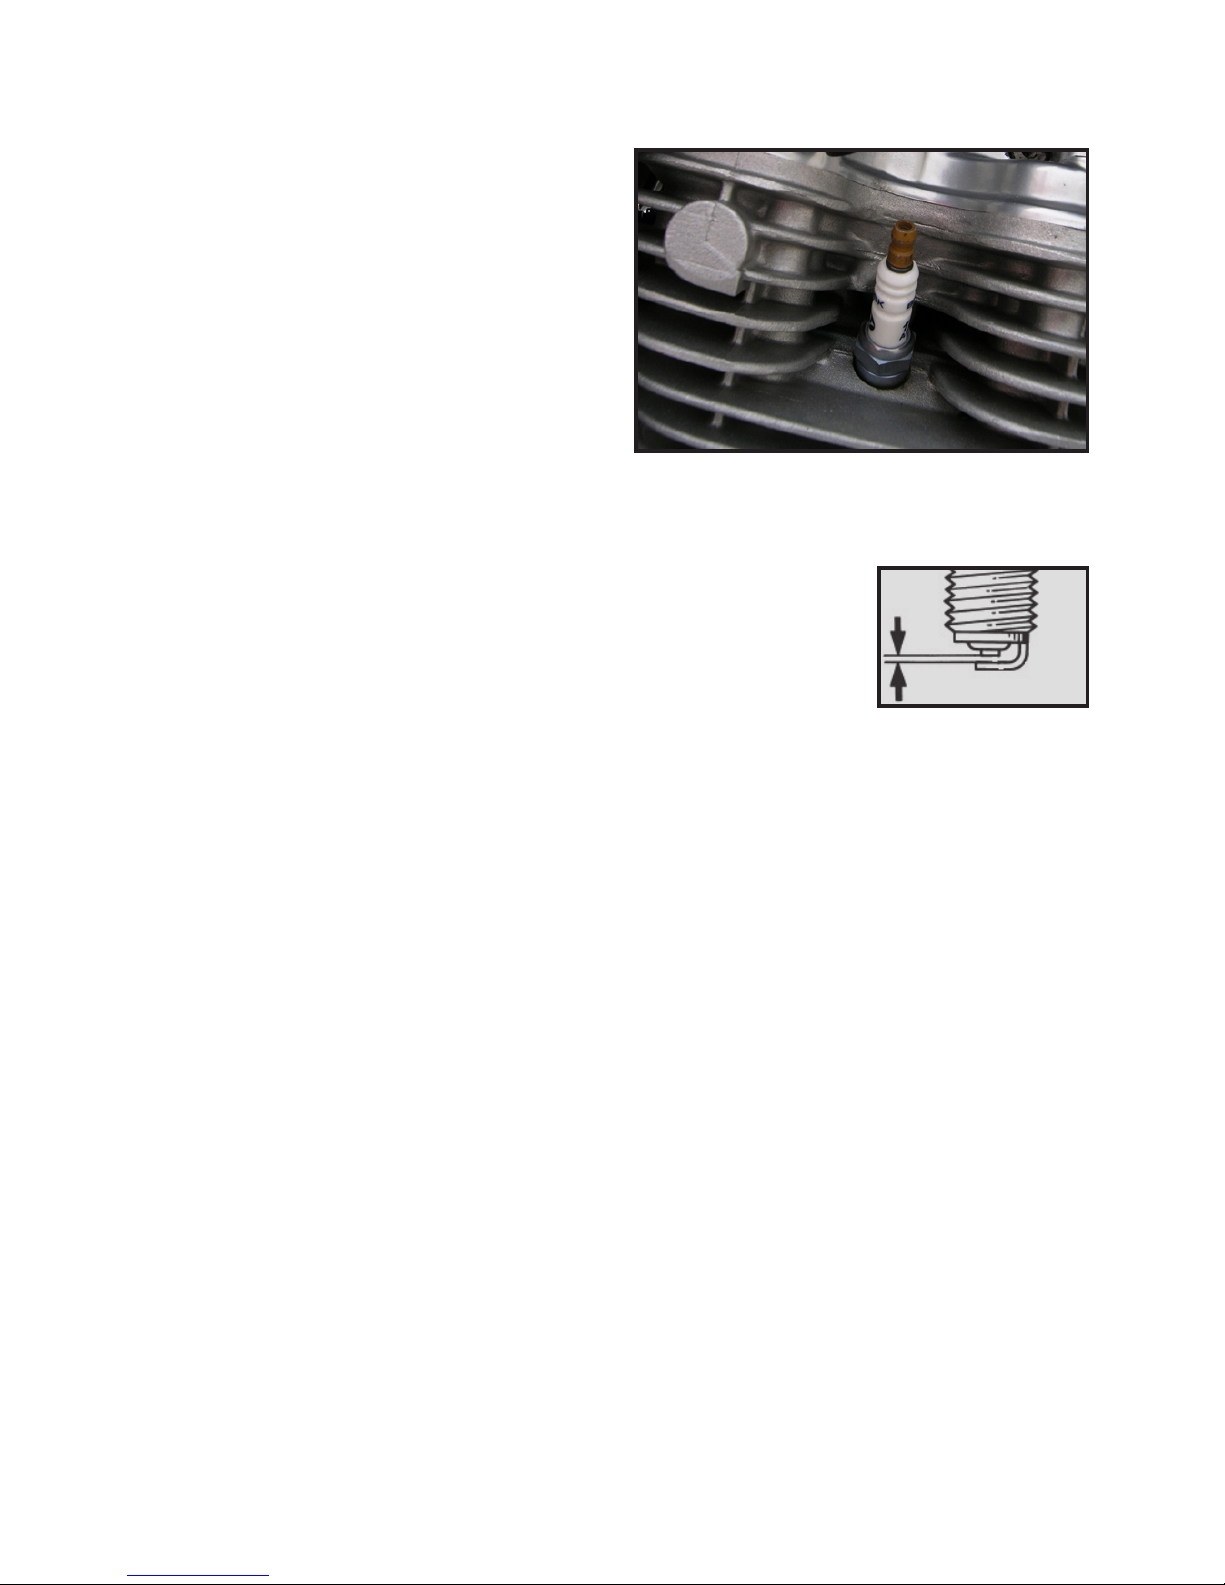
Disconnect the spark plug cap.
Clean the spark plug vicinity,
e.g. use compressed air. Unscrew the spark plug using the
socket wrench provided.
The spark plug shall be checked or replaced as indicated in
the Maintenance Plan (page
49).
Check the following:
- Insulator damage
- Electrode wear
- Ignition contact color
(good condition if dark to light brown; very light colour indi-
c ate s ig niti on s yst em f ailures or p oo r f uel mixtu re; we t or blac k
electrode indicates too rich fuel mixture or engine damage)
- Spark plug gap, adjust it, if required
Spark plug gap: 0,7 ± 0,05 mm
In case of electrode wear, aggregated fouling or of service inter-
val expiration replace the spark plug with a new one. (check the
spark gap)
Spark plug: BRISK AR14YS
Screw the new spark plug in manually, then use the socket
wrench to tighten it to the prescribed torque.
Tightening torque: 10 - 12 N.m (7.4 - 8.9 lbf.ft)
Connect the spark plug cap.
NOTE:
Any excessive tightening of the spark plug might result in engine
damage.
Page 57
55
ENGINE OIL
Check the level of engine oil (page 21).
Engine oil change:
The engine oil changes must be performed in accordance with
the Maintenance Plan (page 49). Let the engine warm up and
then wait for 2-3 minutes.
Install new O-ring on oil drain screw and screw it in.
Tightening torque: 20 - 23 N.m (14.8 - 18 lbf.ft)
Use the oil lling opening to add some oil in order to keep its level
approximately half way the gauge.
Recommended engine oil: Valvoline SAE 20W-50, API SG
Oil capacity: approx. 0.9 l (1.0 USqt, 0.8 lmp qt)
Insert the oil lling cap.
Check the oil level and the engine for possible leakages.
Install the frame and engine guard cover.
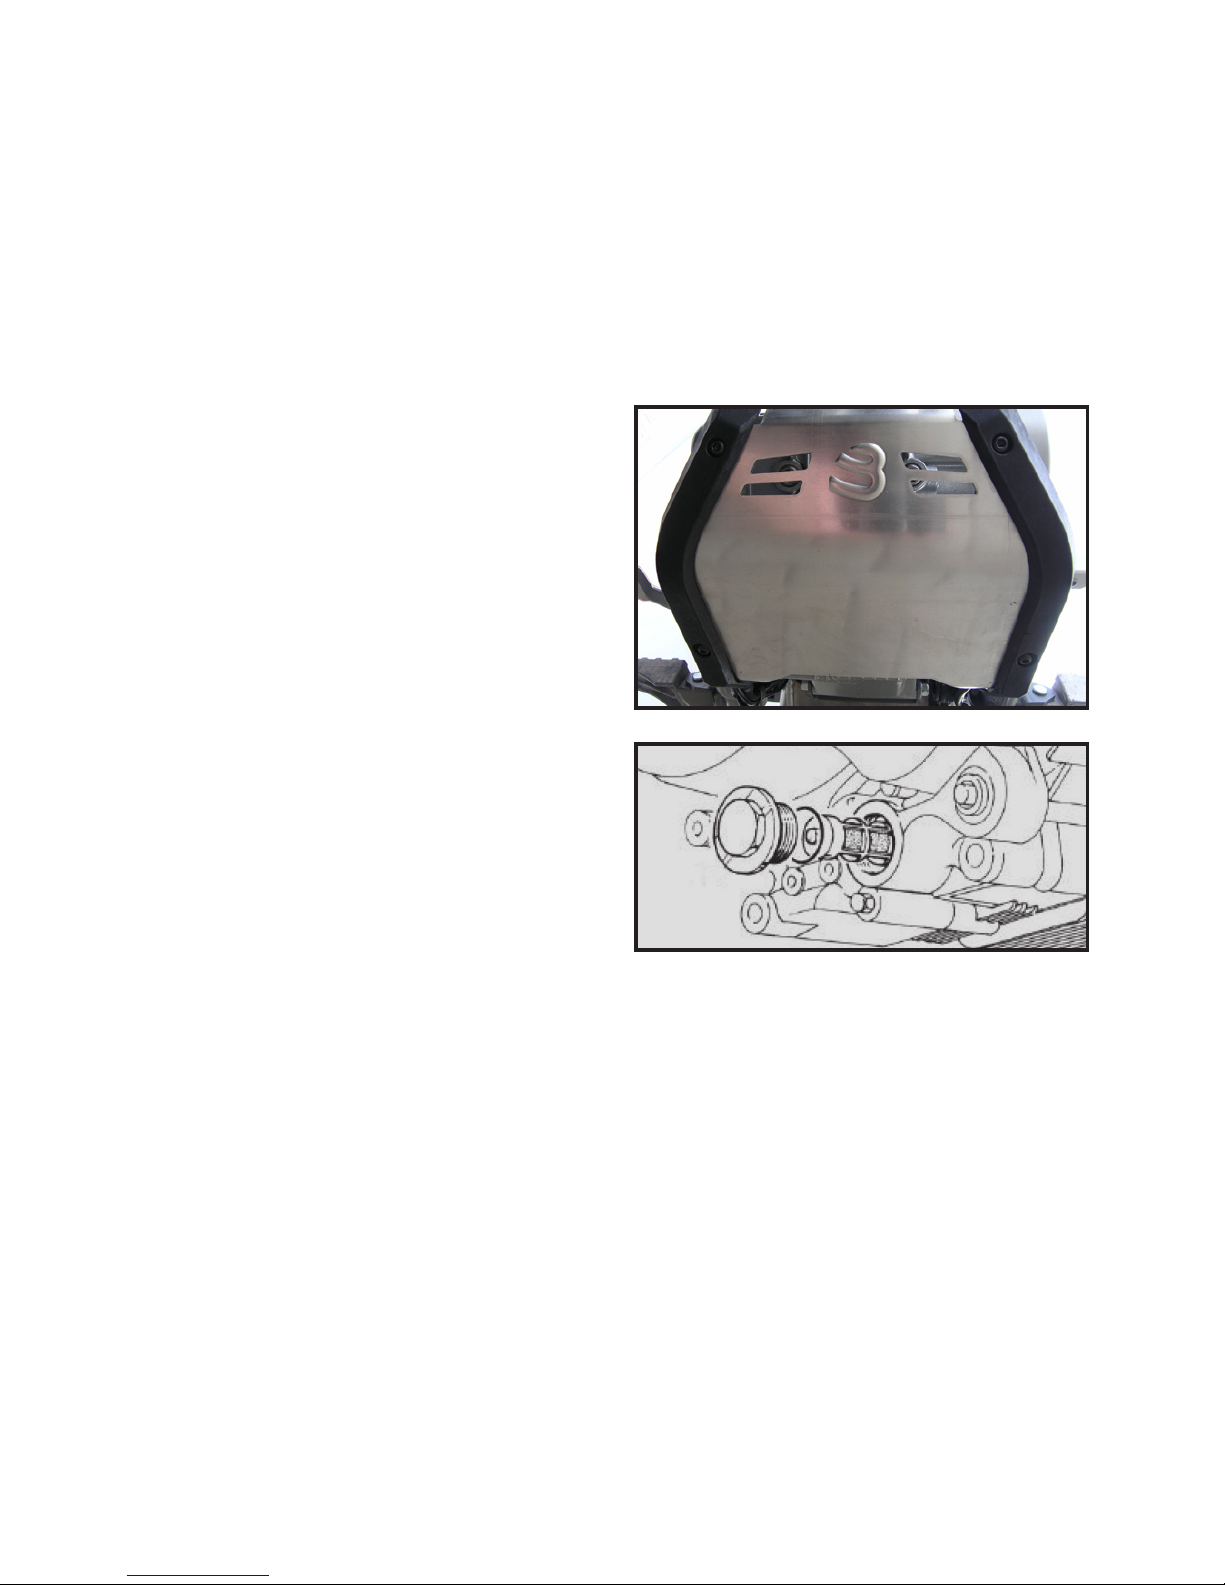
Unscrew the 4 bolts in the engine bottom cover and remove
this cover.
Place the waste oil container
below the crankcase. Unscrew
the oil lling cap. Unscrew the
oil drain screw and let all the oil
drain out. Remove the strainer
from the oil drain opening, clean it thoroughly and re-install
it into its initial position in the
crankcase.
Replace the oil lter (page 55).
Page 58
56
OIL CLEANER INSERT
The oil cleaner replacement must be performed in accordance
with the Maintenance Plan (page 49), the best way to perform is
concurrently with engine oil change.
Drain the oil (page 55).
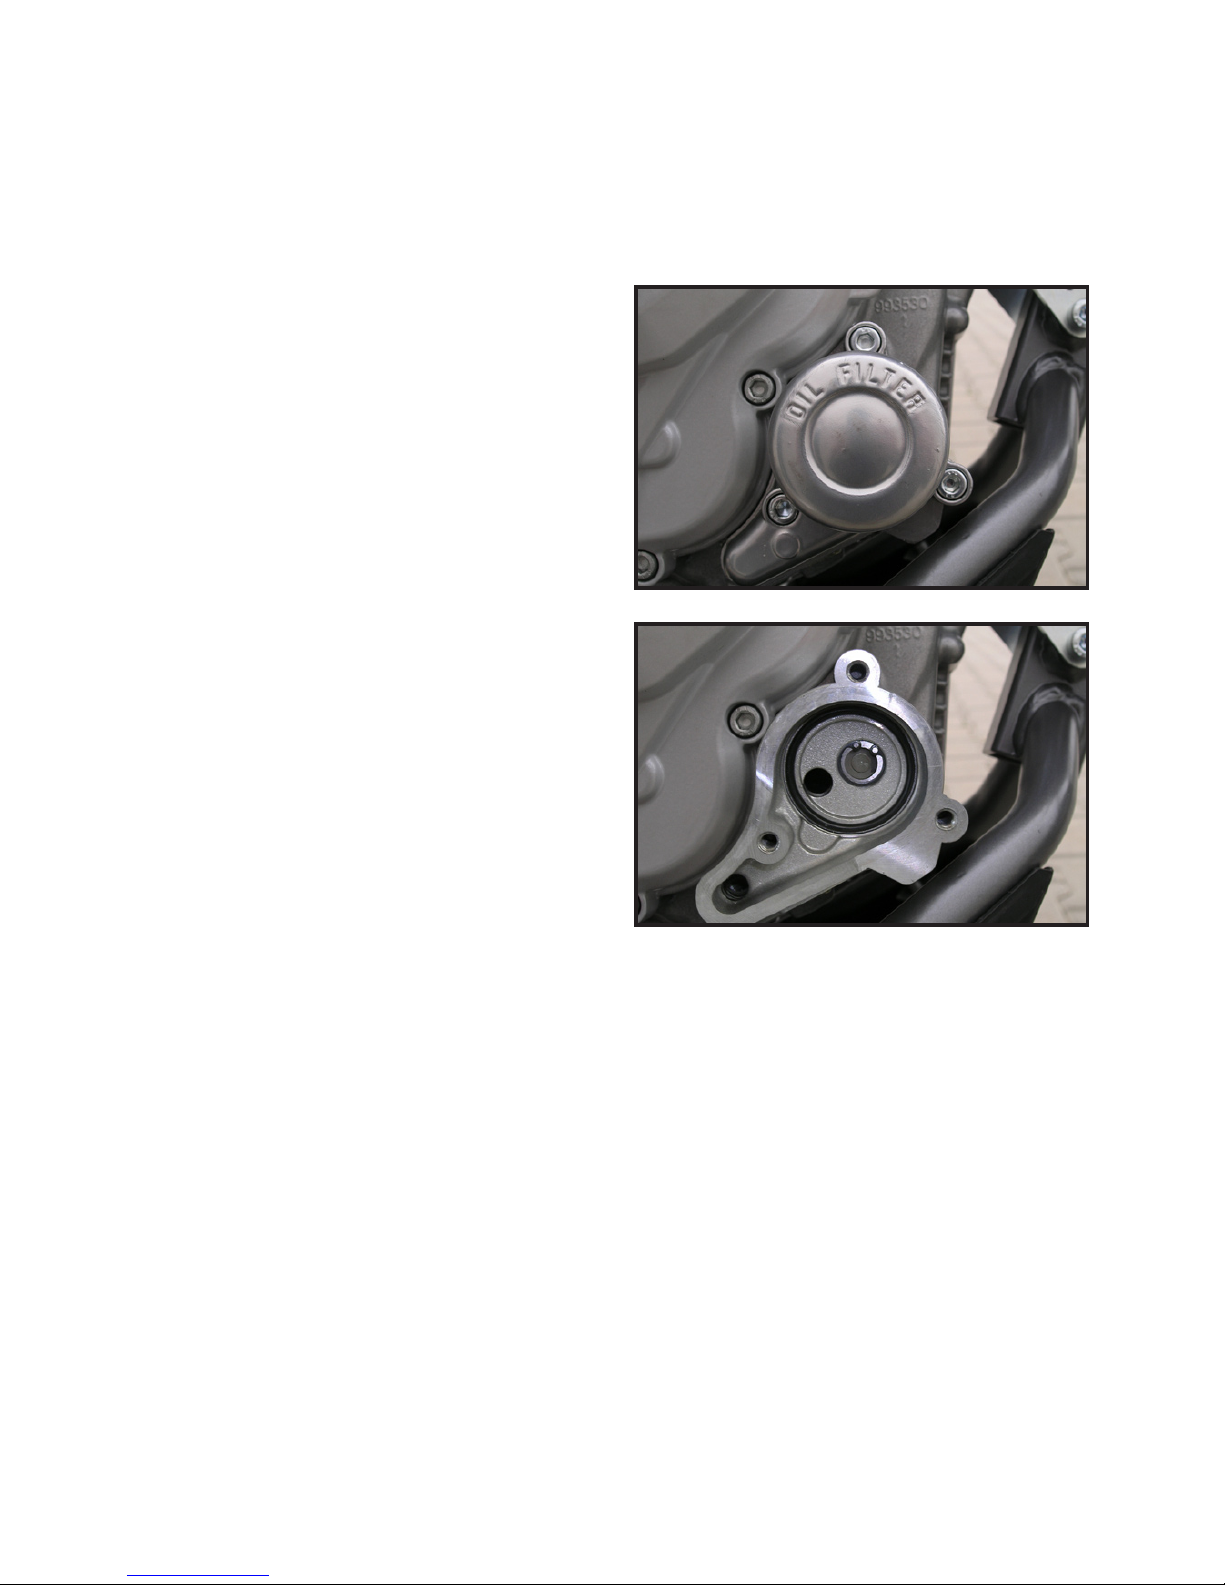
Unscrew the 3 bolts on the oil
cleaner cover and remove it.
Replace the oil lter.
Replace the engine block seal
with a new one.
Fit the cleaner cover with a
new O-ring and a install a new
oil lter.
Install the cover with new oil
lter into the crankcase and
tighten it using the 3 bolts. Beware of proper position of the
oil lter, when assembling the
unit.
Bolts shall be tightened to the prescribed torque.
Tightening torque: 10 - 12 N.m (7.4 - 9 lbf.ft)
After lling the engine with recommended oil (page 21) check the
block for possible leakage.
Page 59
57
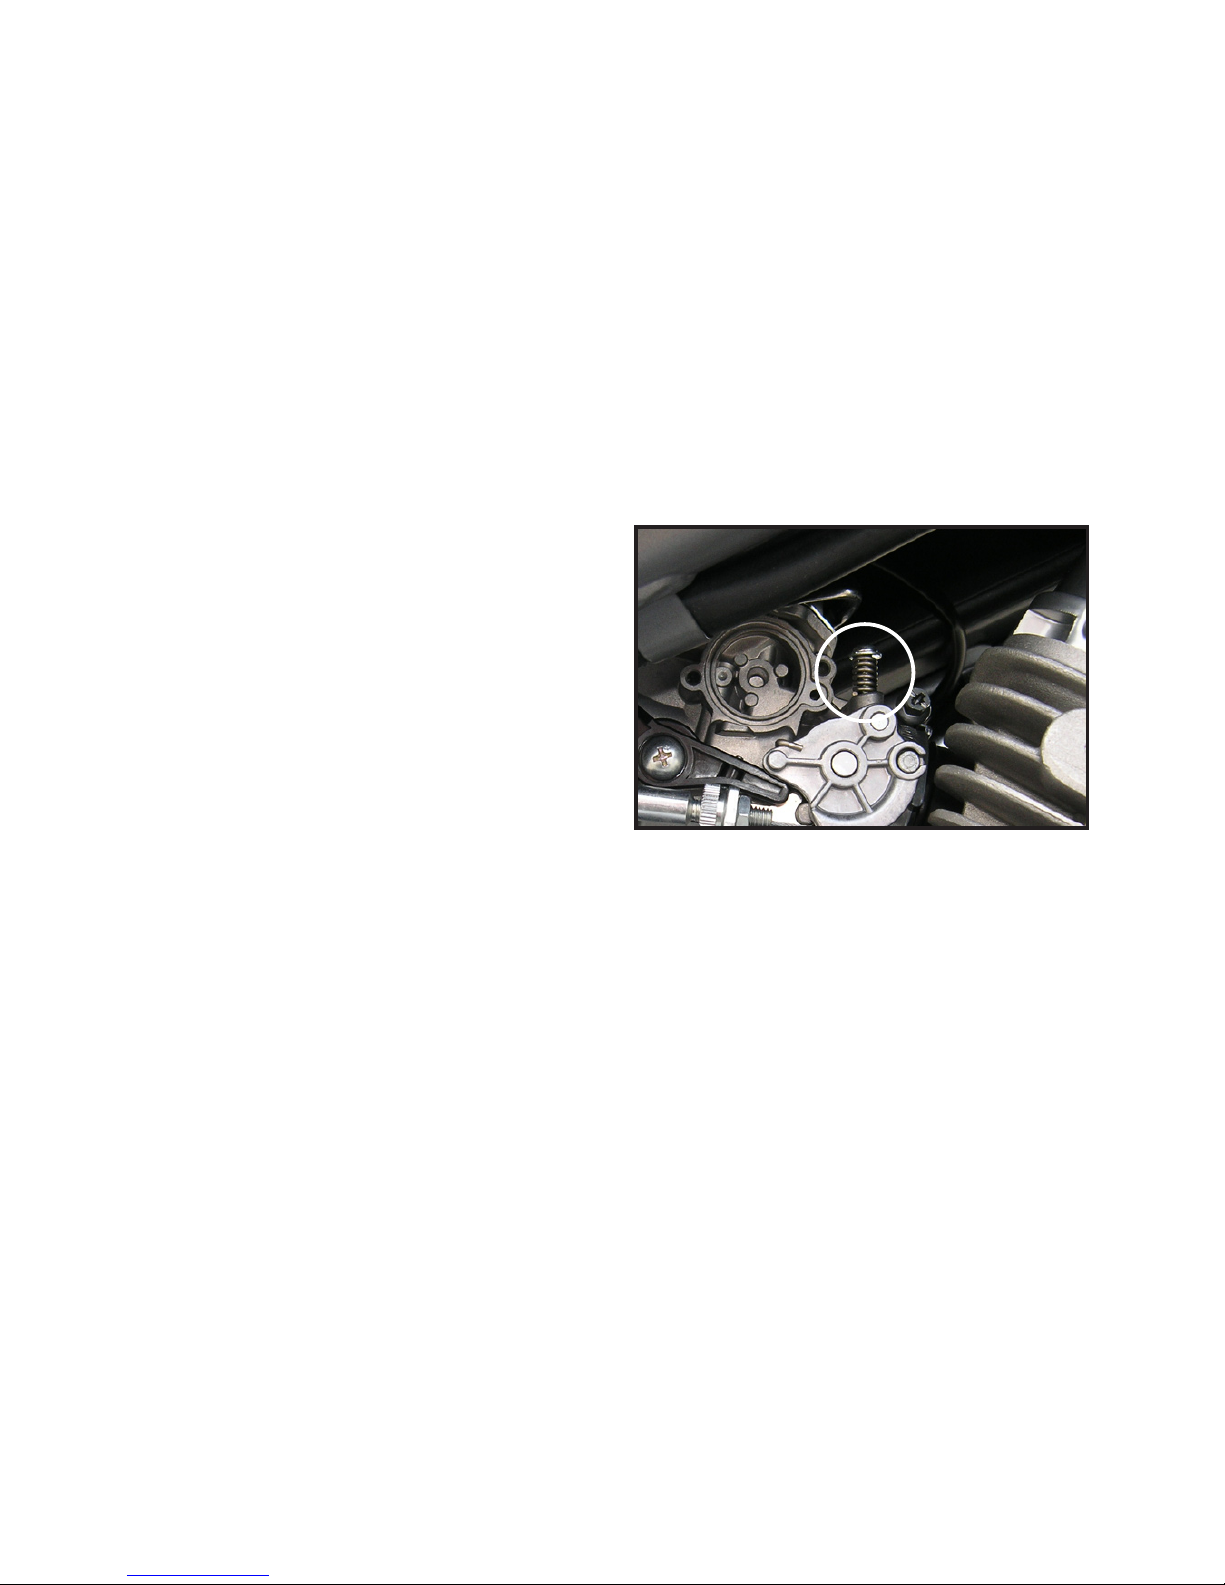
IDLE RUN
Checks and adjustment of idle run shall be performed after every engine maintenance procedure and in accordance with the
Maintenance Plan (page 49).
Once the idle run has been adjusted properly, the engine shall be
warmed up to its service temperature (for approx. 10 minutes)
Check the engine idle run.
Idle run: 1.600 ± 100 min-1 (r.p.m.)
NOTE:
If you do not succeed in adjusting the idle run revolutions or if
these are irregular, contact an authorised Blata service centre.
In case the engine requires
further adjustment, set the
idle run using the throttle stop
screw.
Open the choke valve 2 - 3
times and re-check the idle run
revolutions.
Page 60
58
DRIVE CHAIN
Cleaning and lubrication:
The chain must be subject to cleaning and lubrication every at
least 1.000 km (800 miles) using a special cleaning agent and
special oil designed for motorcycle drive chains. If the chain dries
up within the interval, perform the cleaning and lubrication more
frequently.
If the motorcycle is operated off the road or in dusty and muddy
environment, the chain shall be cleaned and lubricated after every
such ride. Check the chain slack (page 31) and adjust it, if required.
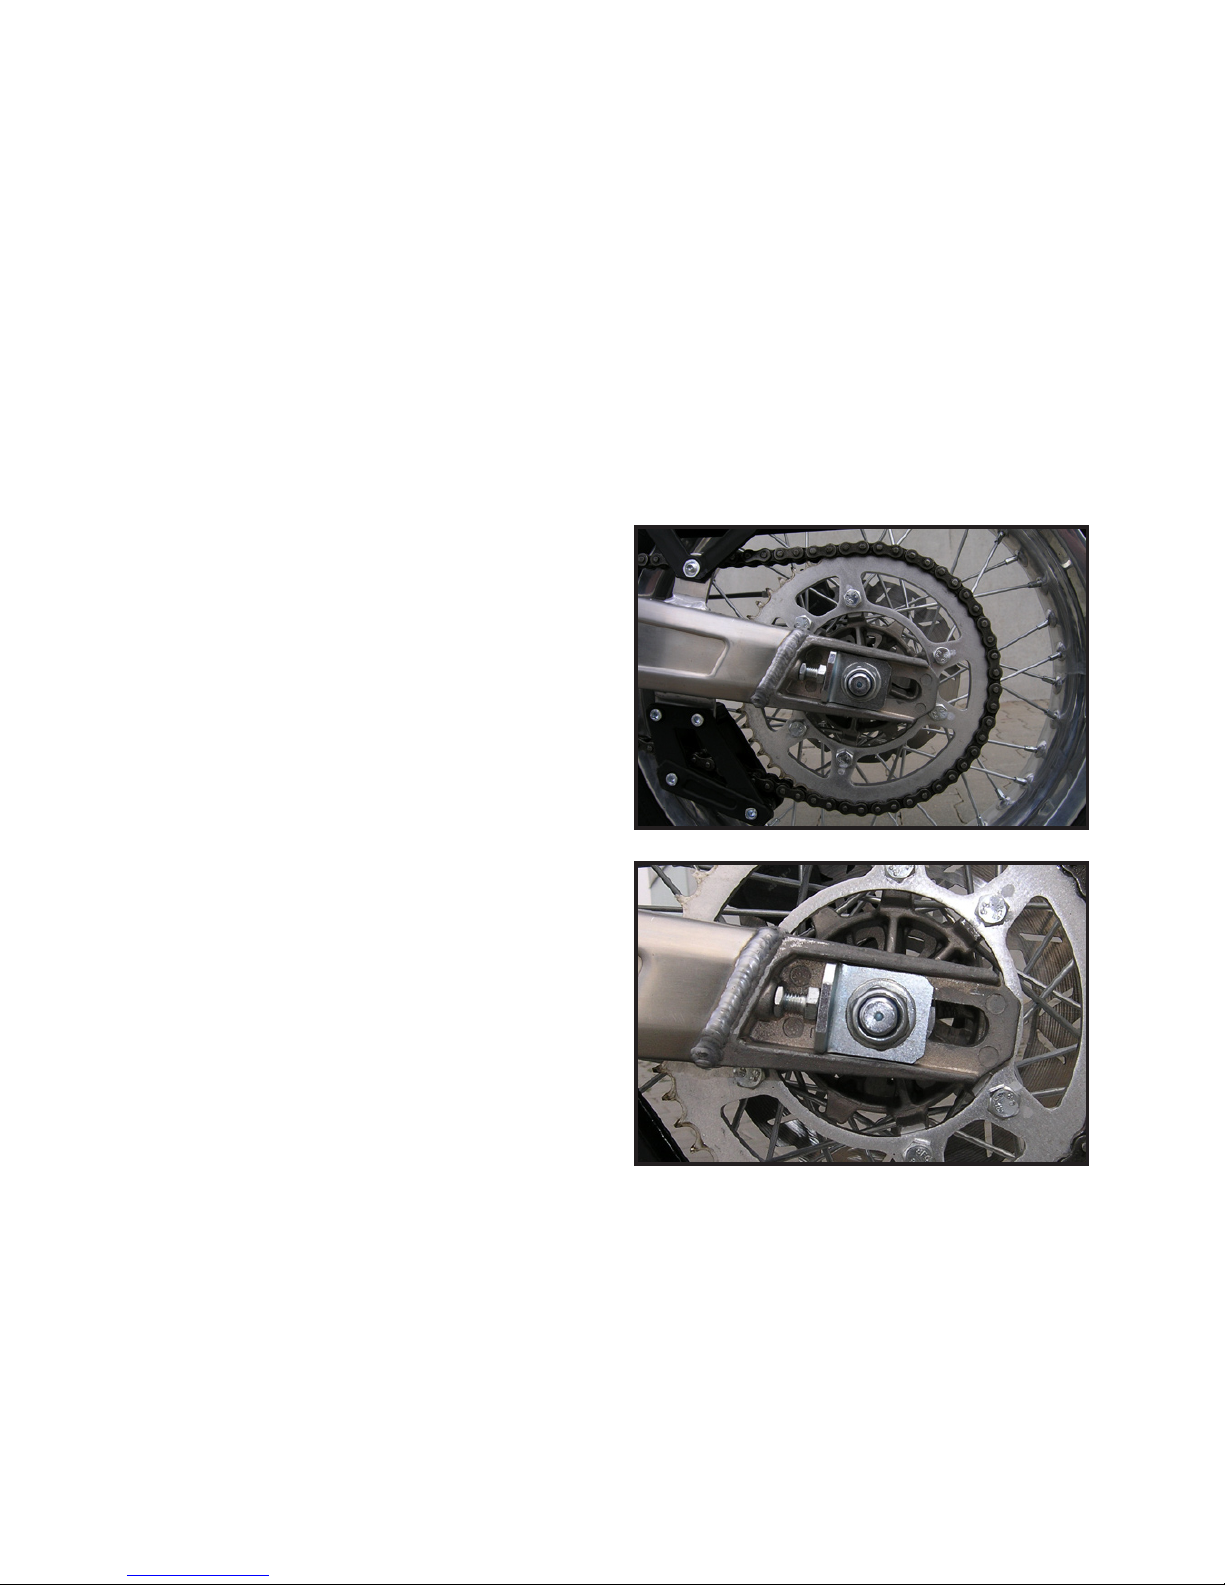
Chain slack adjustment:
Loosen the rear axle nut.
Loosen locking nuts on both sides of the swing arm and turn
both adjustment screws until
you have achieved the correct
drive chain slack.
Make sure you obser ve the markings on both sides of the swing
arm to set the rear axle perpendicular to the swing arm.
Tighten the new self-locking nut on the rear axle to the prescribed torque.
Tightening torque: 65 Nm ( 48 lbf.ft )
Tighten both locking nuts.
Check the drive chain for proper slack (page 31) and check the
rear wheel for free rotation.
Page 61

59
DRIVE CHAIN
BRAKING SYSTEM
If the chain slack is too high, have the whole chain kit replaced
(drive chain, front and rear sprockets) by an authorised Blata
service centre. Check both sprockets and chain for possible
damages or excessive wear. In case of any deciencies observed have the whole chain kit replaced (drive chain, front and
rear sprockets) by an authorised Blata service centre. Check all
the bolts in sprockets for loose items. In case of any loose bolt
seek an authorised Blata service immediately.
For your own safety, we recommend have the braking system
serviced and maintained by an authorised Blata service centre.
Check the brake uid level before every ride and change the uid
at least once in two years.
If the brake uid level is very low, or if the uid has been used for
a very long period, have the uid topped up or even changed by
an authorised Blata service centre.
Check the brake uid level (page 27).
Check the thickness of brake shoe lining (page 28).
Check the braking system (page 59).
Depress the brake lever or pedal and check, whether the brake
light turns on at the moment of brake engagement. If that is not
the case, have this defect removed by an authorised Blata service centre.
Page 62
60
HEADLIGHT
NOTE:
Both the high and low beam cast by the main headlight can be
adjusted independently. The adjustment procedure is identical
for either beam. Set the main headlight to comply with the valid
local laws and regulations.
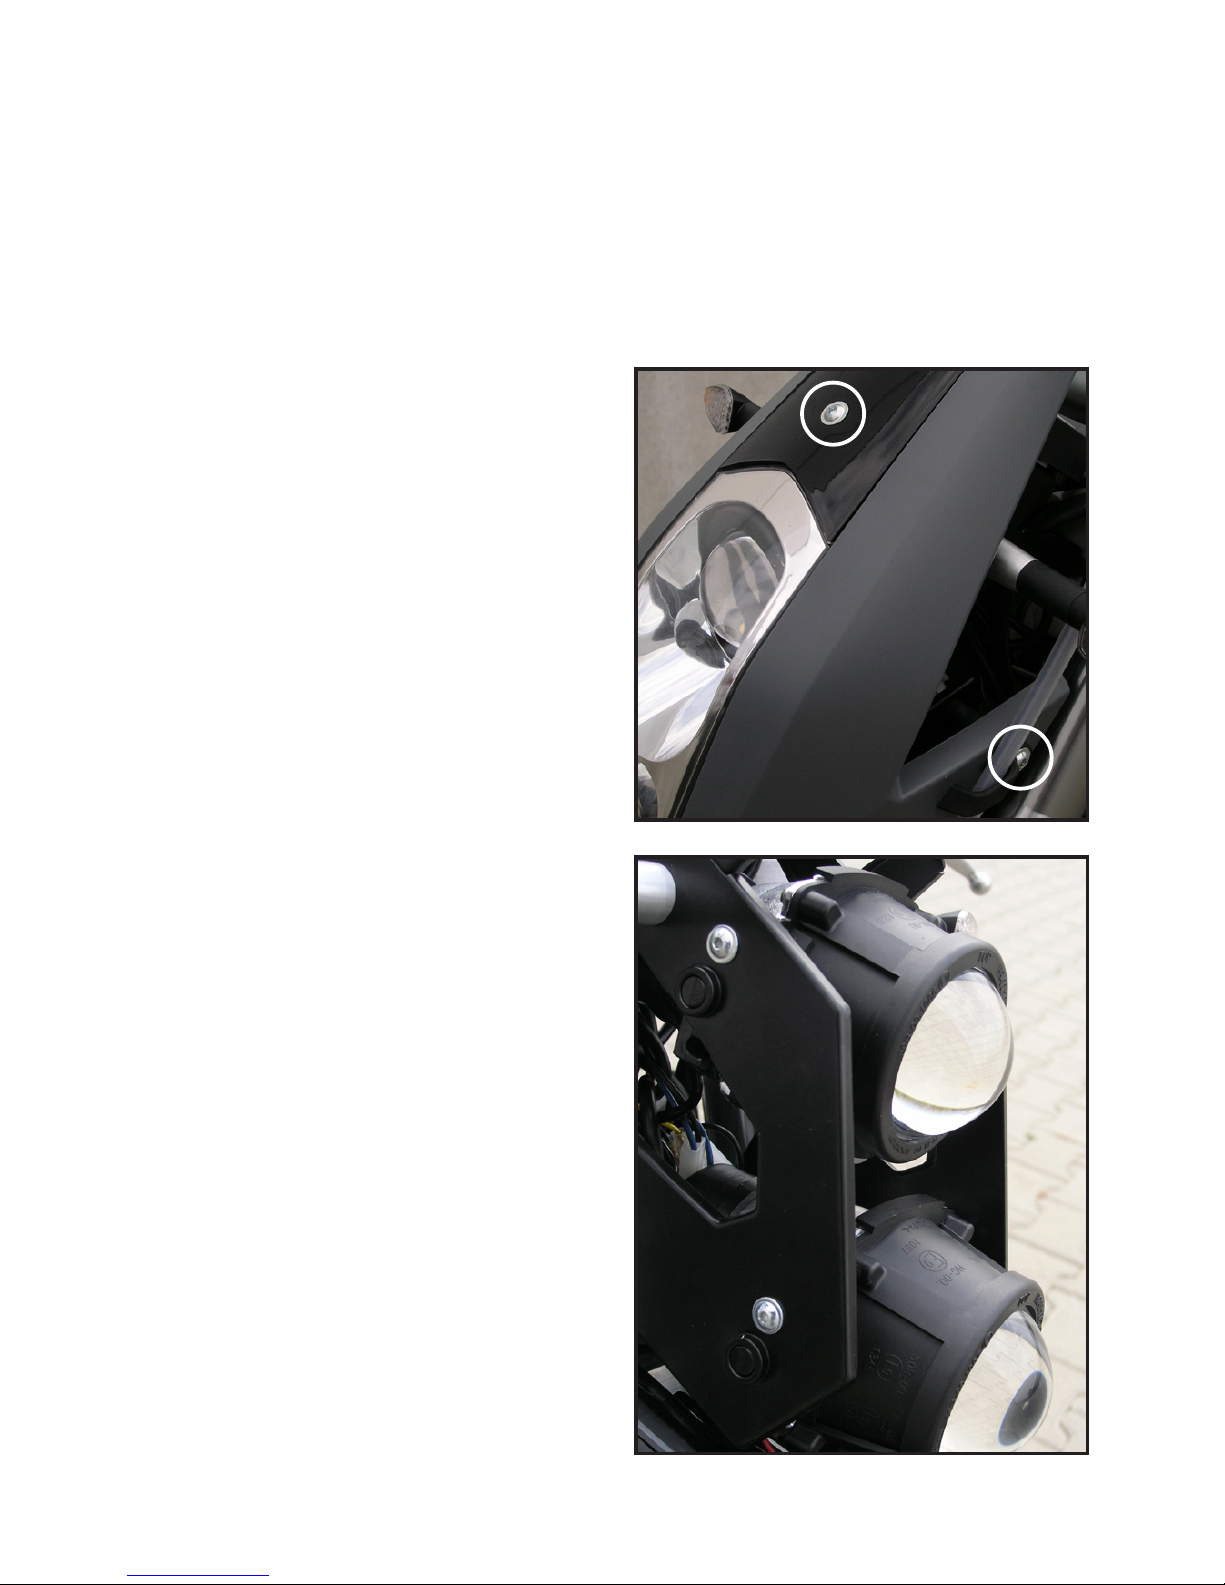
Set the motorcycle in vertical
position on a at surface.
Unscrew the 3 xings bolt on
the front headlight cover. Remove the cover and disconnect
the position light terminal.
Loosen bolts on both sides of
the headlight and set the light
body into suitable position.
Tighten the bolts on both sides
of headlight to ensure its correct position.
Check the headlight for correct
adjustment.
Page 63
61
HEADLIGHT
SIDE STAND
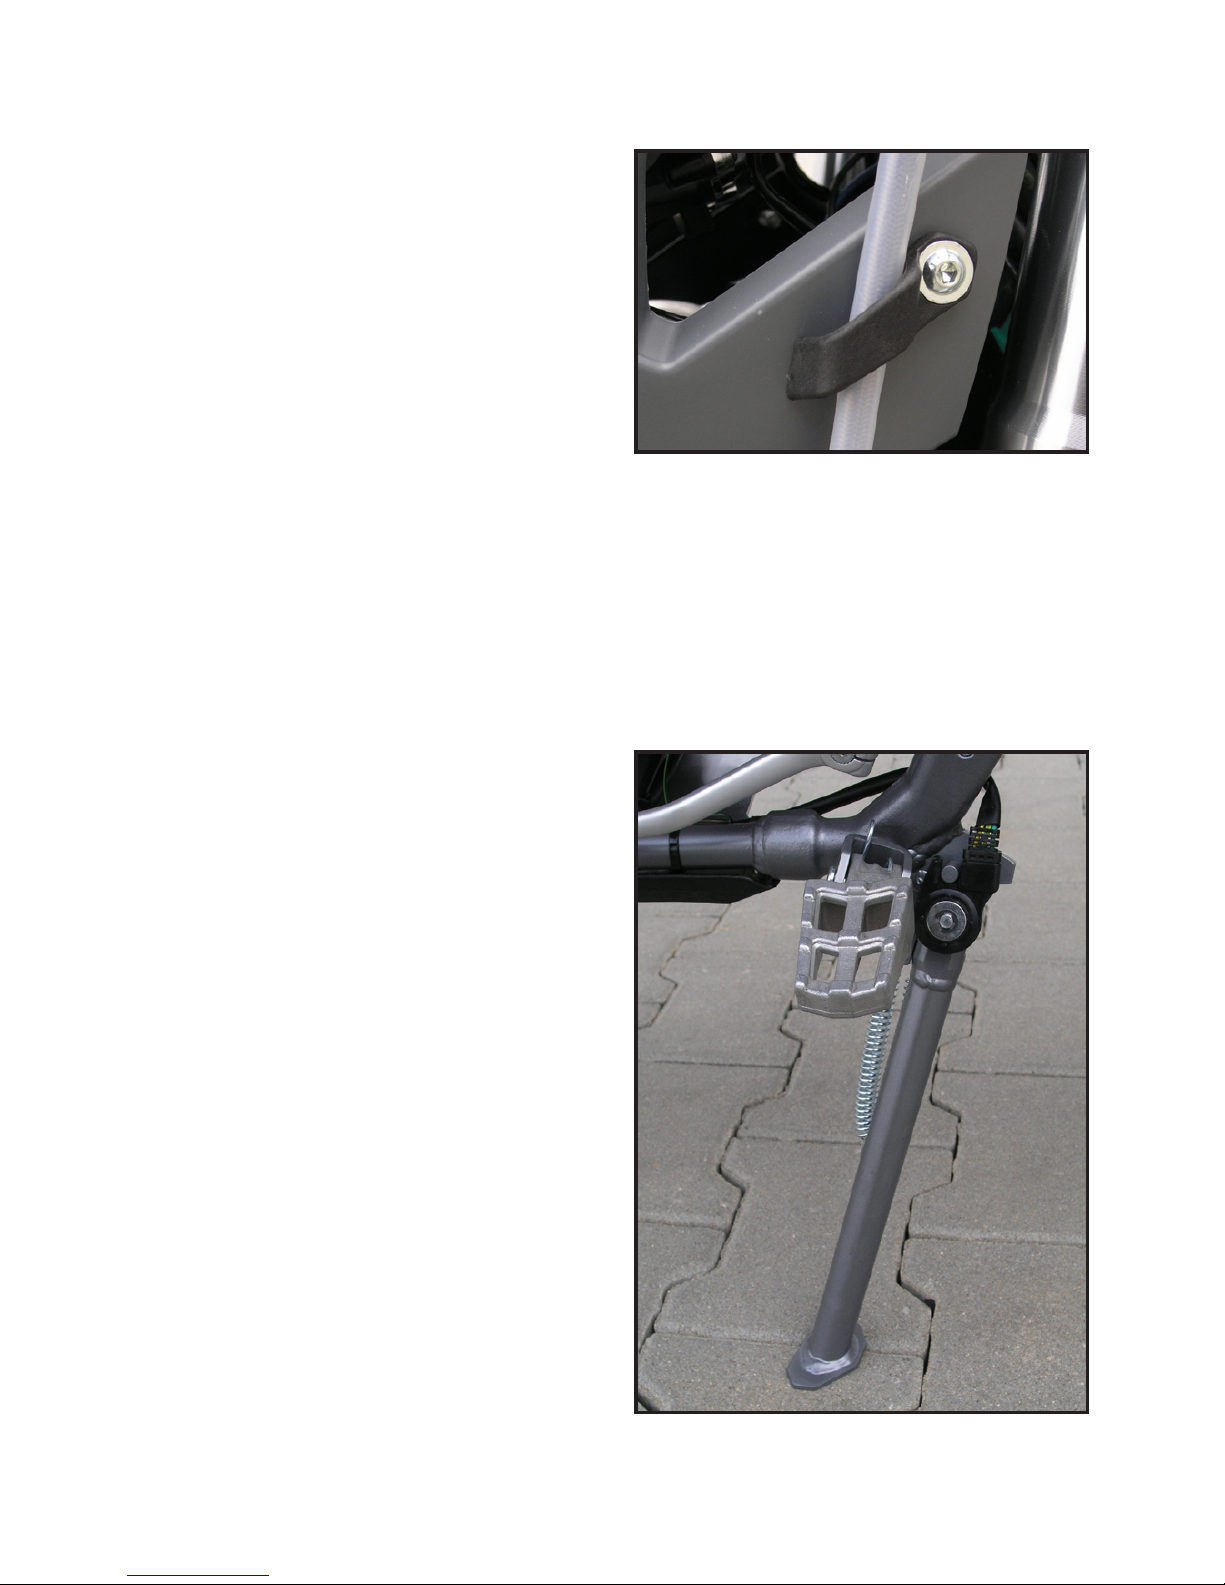
Fit the fron t he adl ight cover and
secure it with 3 bolts provided.
Insert droppers between the
headlight bracket and cover on
2 bolts distance. Hook the bra-
ke uid pipe into the bracket on
the left hand side.
Support the motorcycle set onto a at surface.
Check the side stand springs for possible damage and loss of
tension. Check the stand mechanism for its smooth operation
and lubricate the stand pivot, if required.
Check the ignition disconnecti-
on system on the side stand:
Sit on the motorcycle and lift
the side stand.
Start the engine, with gearbox
set to idle, then shift to any gear
with the clutch depressed.
Tilt the side stand all the way
down and try to ride away.
With the side stand fully deployed, the engine is supposed
to stop.
If the engine does not stops,
the system has encountered a
problem, which requires repair
by an authorised Blata service
centre.
Page 64
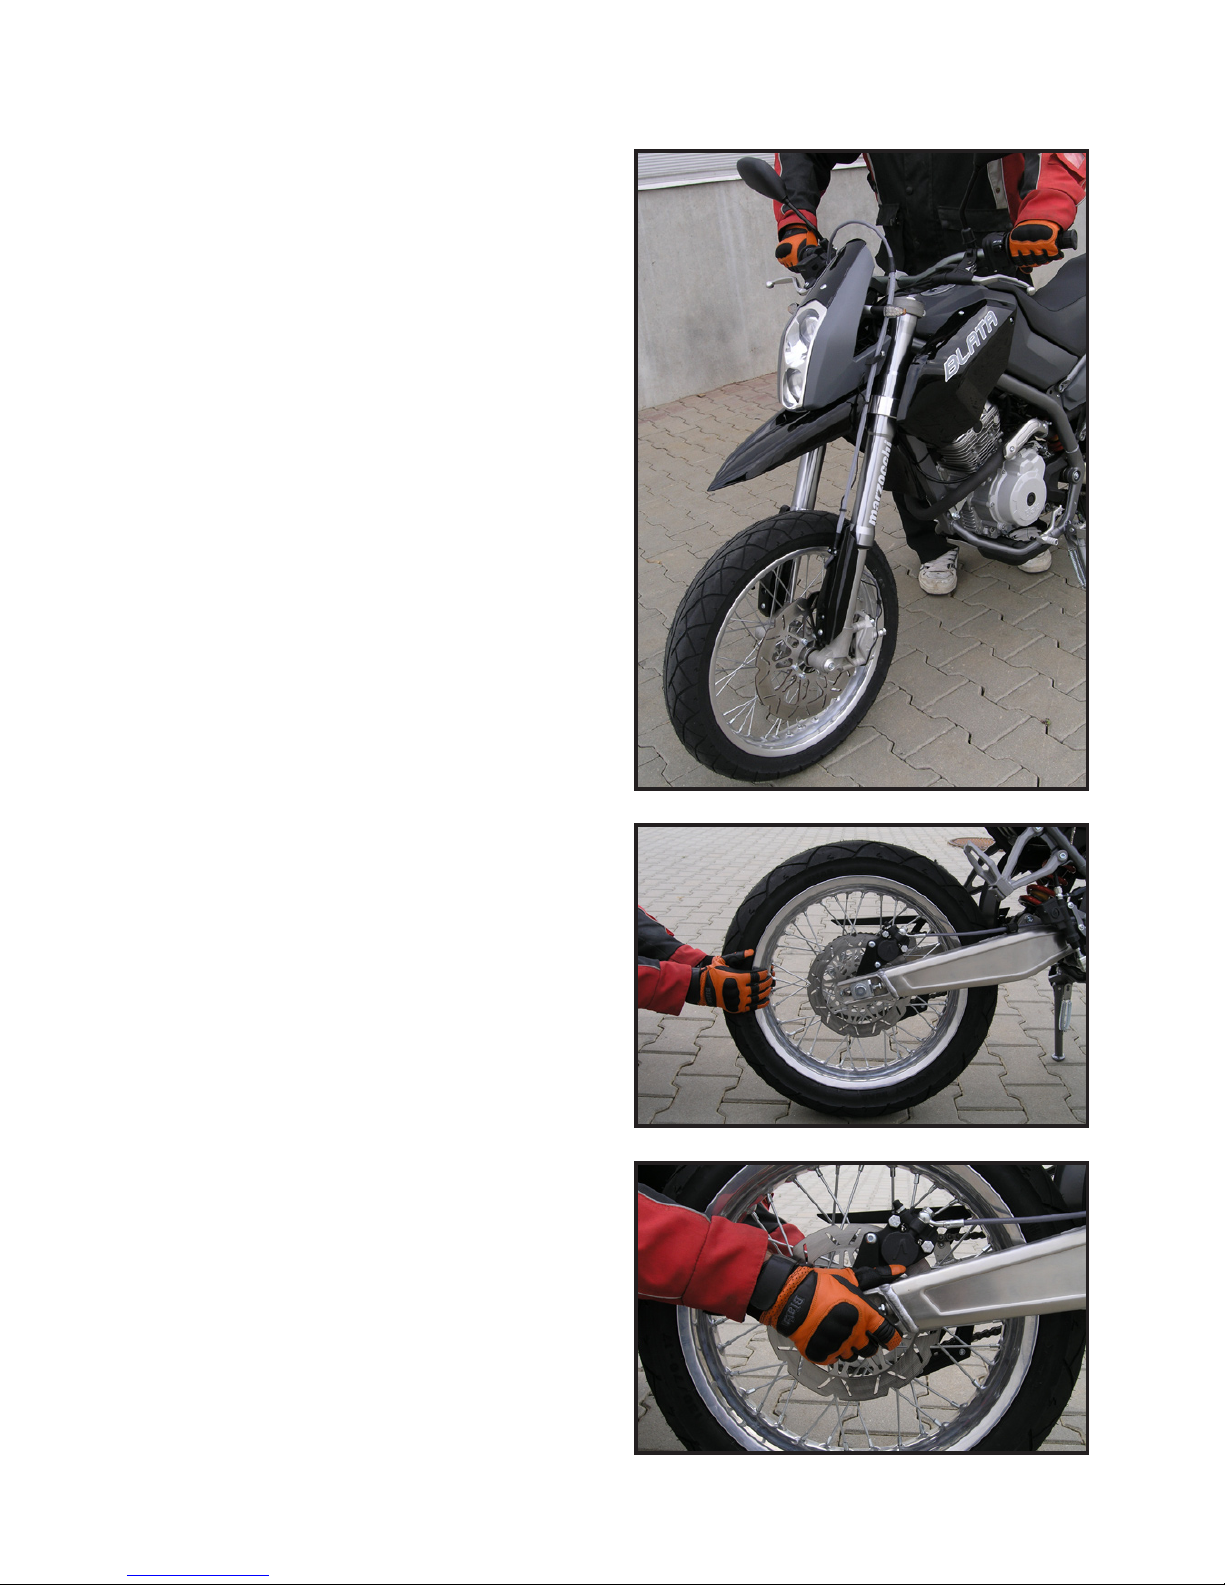
62
SUSPENSION
We recommend you leave the
assessment of suspension,
shock absorbers and bearings
to an authorised Blata service
centre.
Front suspension check:
Check the front fork operation.
Press the front brake and push
the front fork down several
times.
Check the whole suspension
mechanism for possible leakag-
es, damages or loose xation.
Rear suspension check:
Support the motorcycle and
lift its rear wheel above the
ground.
Grab the swinging fork and force the rear wheel from side to
side in order to check the rear
wheel bearings for possible
wear.
Check the swinging fork attachment for possible wear.
Move the rear wheel from side
to side and forth and back.
Page 65
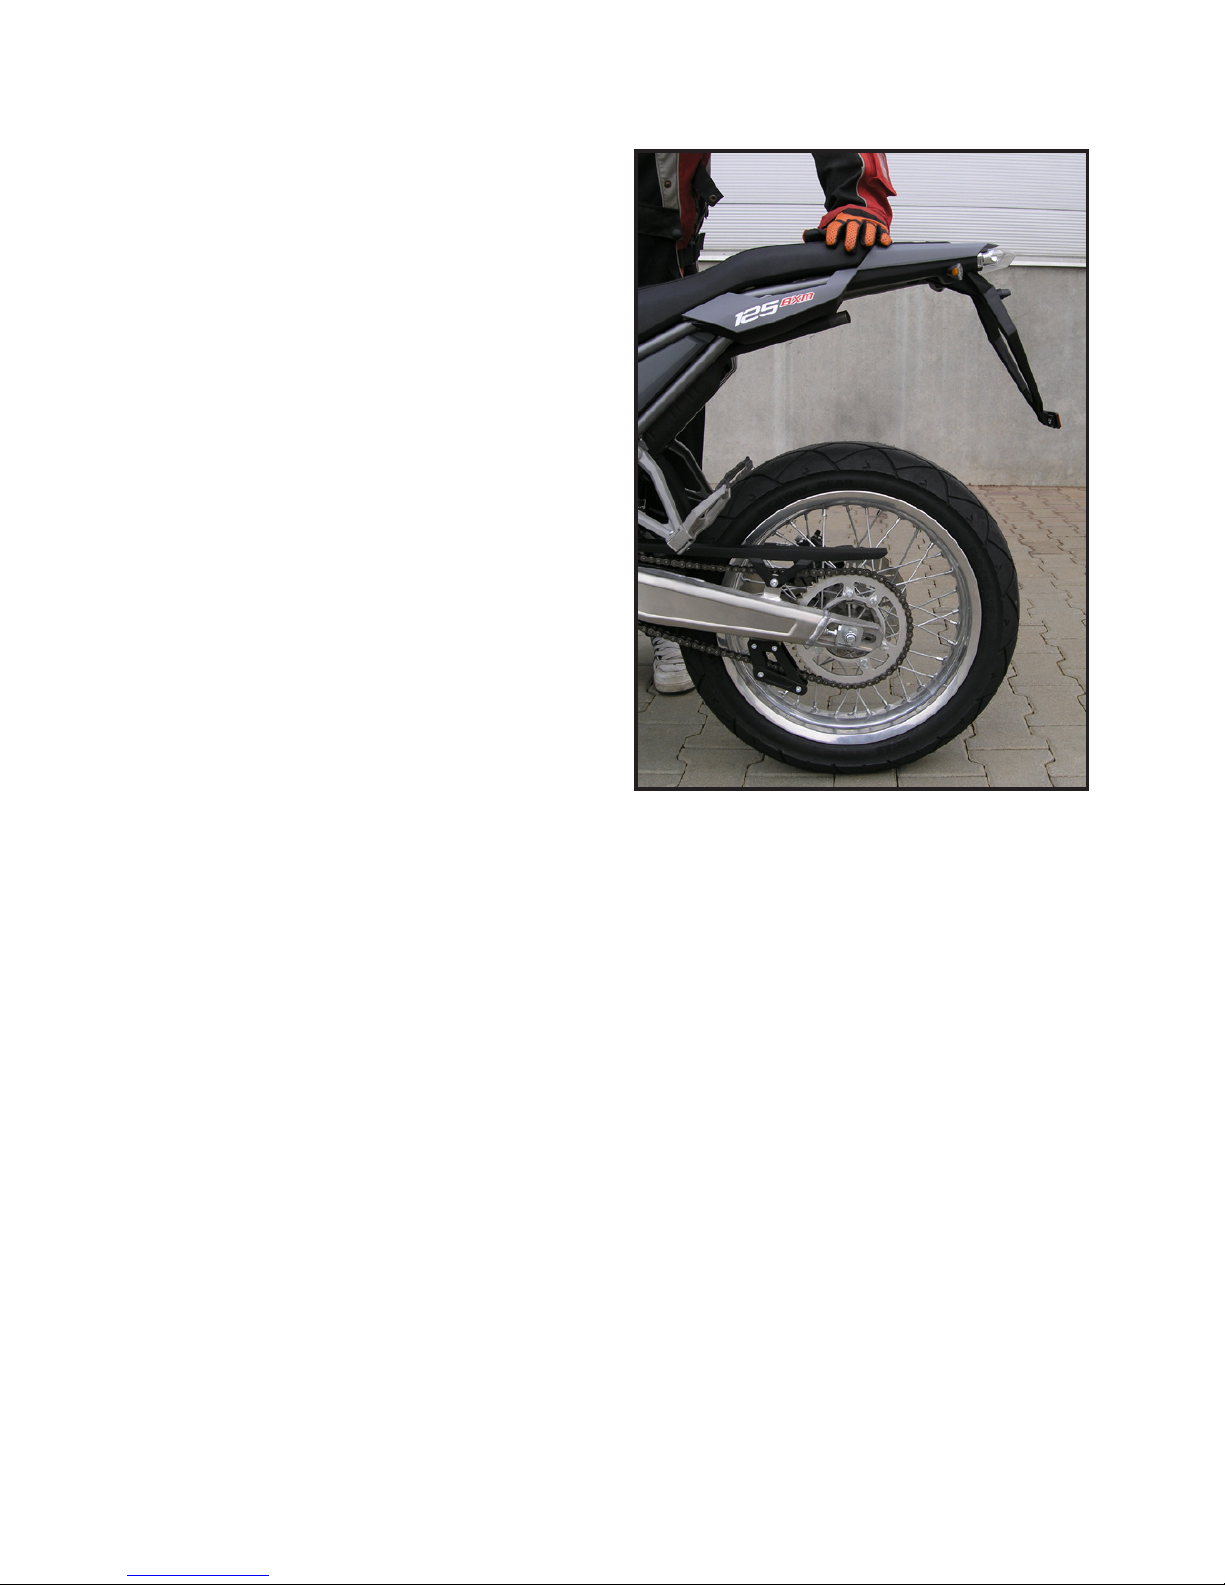
63
SUSPENSION
Check the rear shock absorber operation:
Press the motorcycle rear
downwards several times as
shown in the image.
Check the whole shock absorber assembly for possible
signs of leakage, damage or
loose xation.
If your inspection reveals and defects, do not resume the motorcycle operation and seek an authorised Blata service.
Page 66
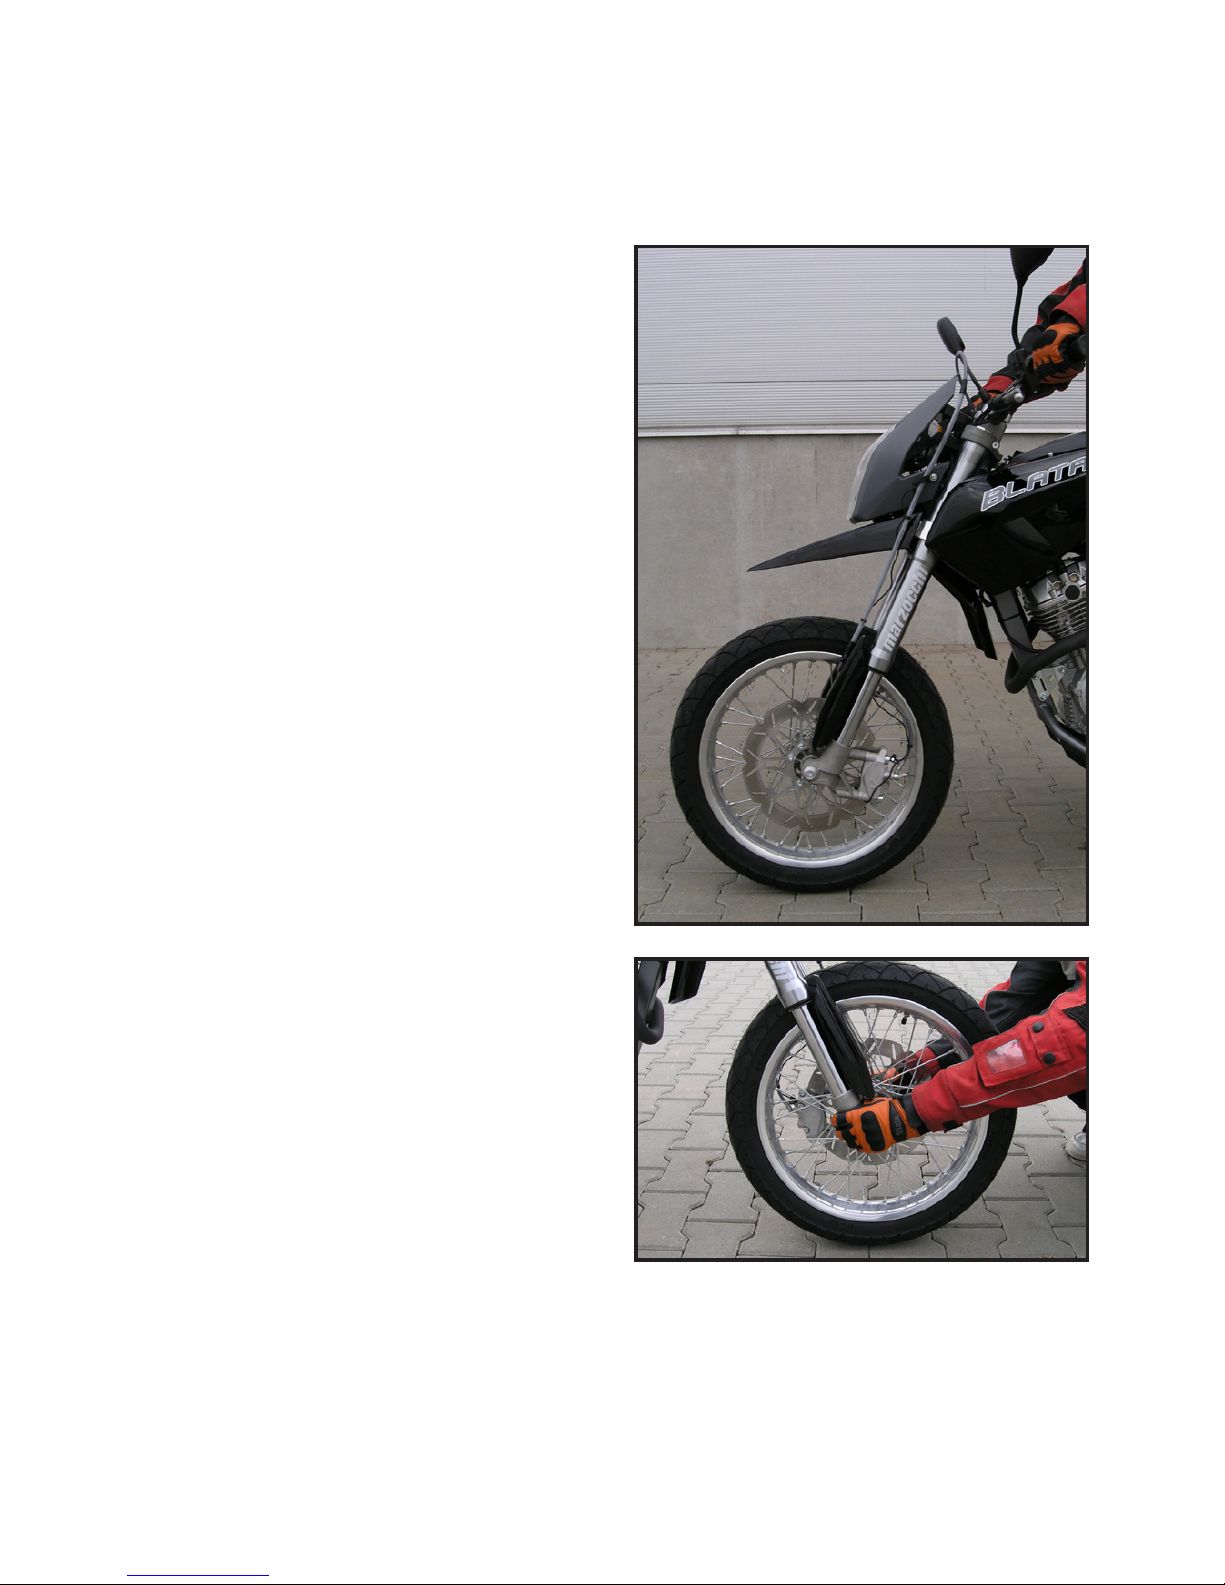
64
STEERING HEAD BEARINGS
Check, whether the control
cables and electric installation
do not impair the free operation of the steering handlebar.
Support the motorcycle and lift
the rear wheel above ground.
Check the free movement of
handlebars from side to side.
The handlebars may not move
with hindrance, irregularly or
vertically.
Grab the bottom part of front
fork and move it forward and
backwards.
Check the steering stem for vertical movement.
If your inspection reveals and defects, do not resume the motorcycle operation and seek an authorised Blata service centre.
Leave the assessment of the steering head bearings to an authorised Blata service centre.
Page 67
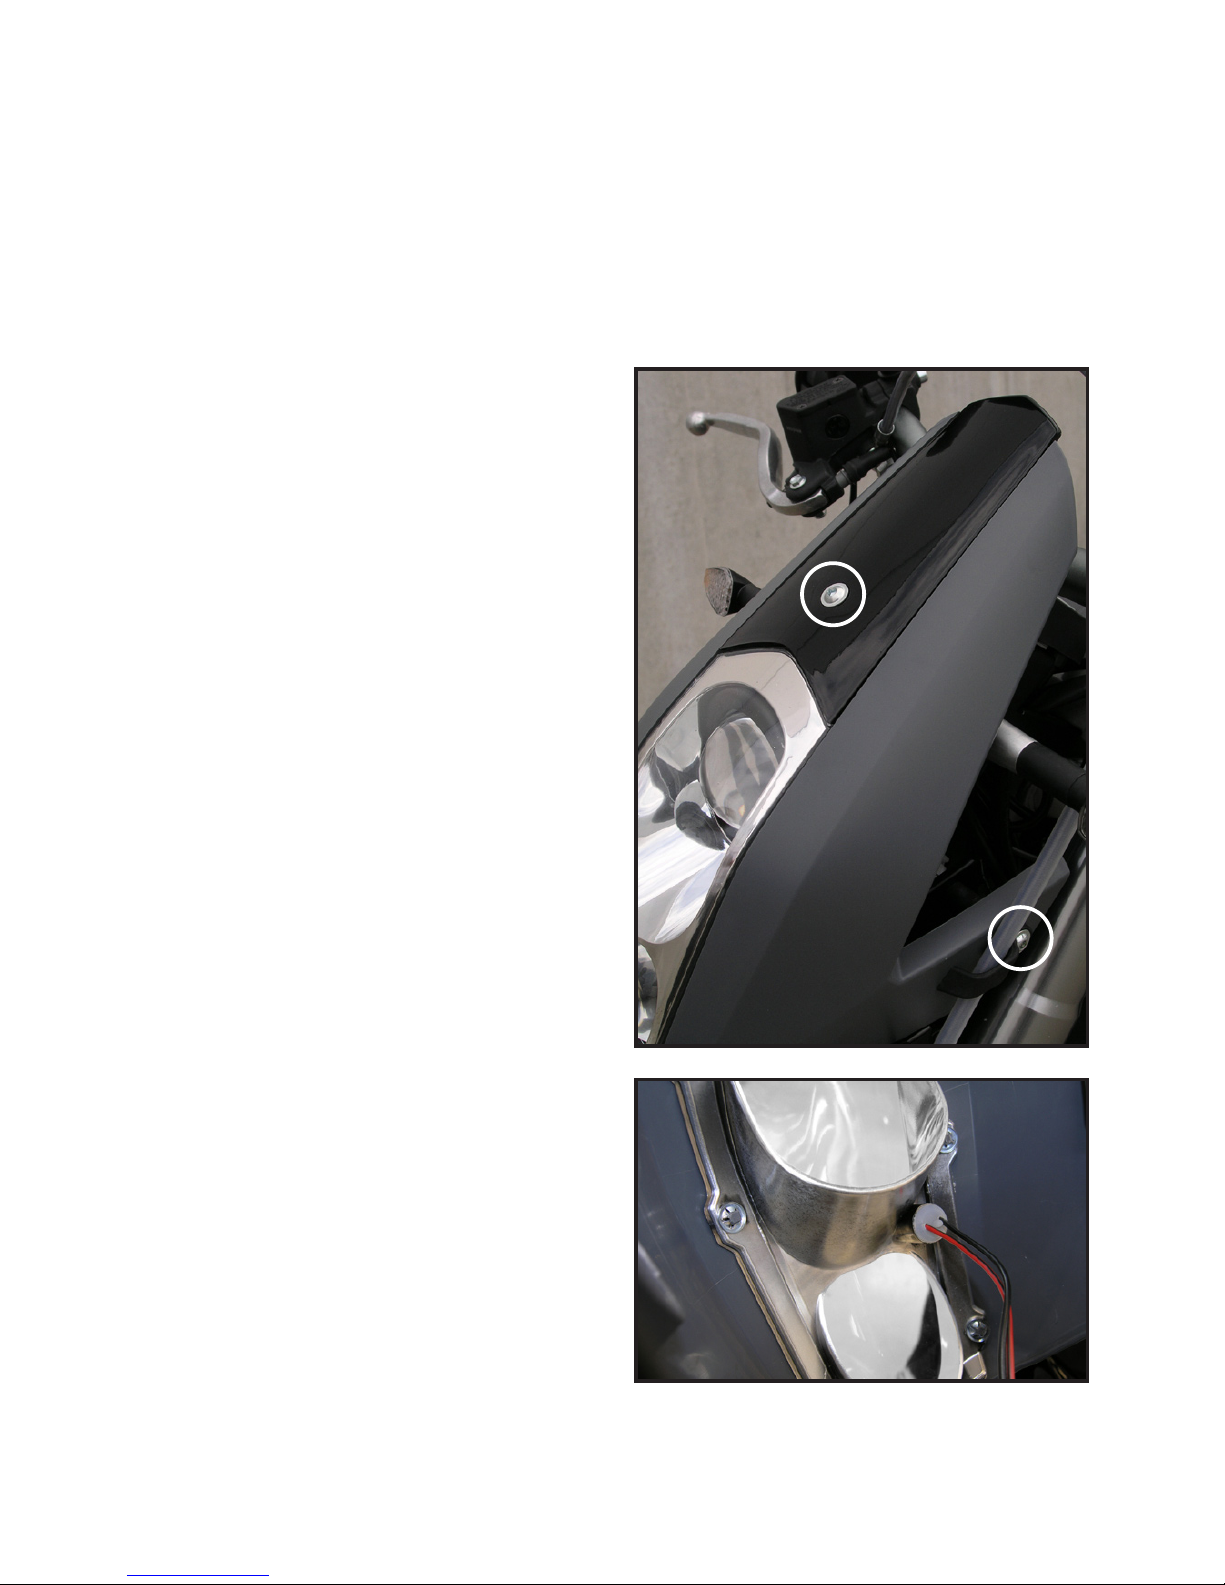
65
BULB REPLACEMENT
NOTE:
The ignition shall be switched off before bulb replacement.
Never touch the globe glass with bare ngers. Use a dry and
clean cloth to do so.
We recommend you keep spare bulbs with you at all times.
Remove the 3 bolts on front
headlight cover, remove it and
disconnect the position light terminal.
Position light:
Remove the position light bulb
out of the front headlight cover
and shift it out of its base.
Bulb: 12V 5W
Push the new bulb into its base
and insert it into the headlight
cover.
Page 68
66
BULB REPLACEMENT
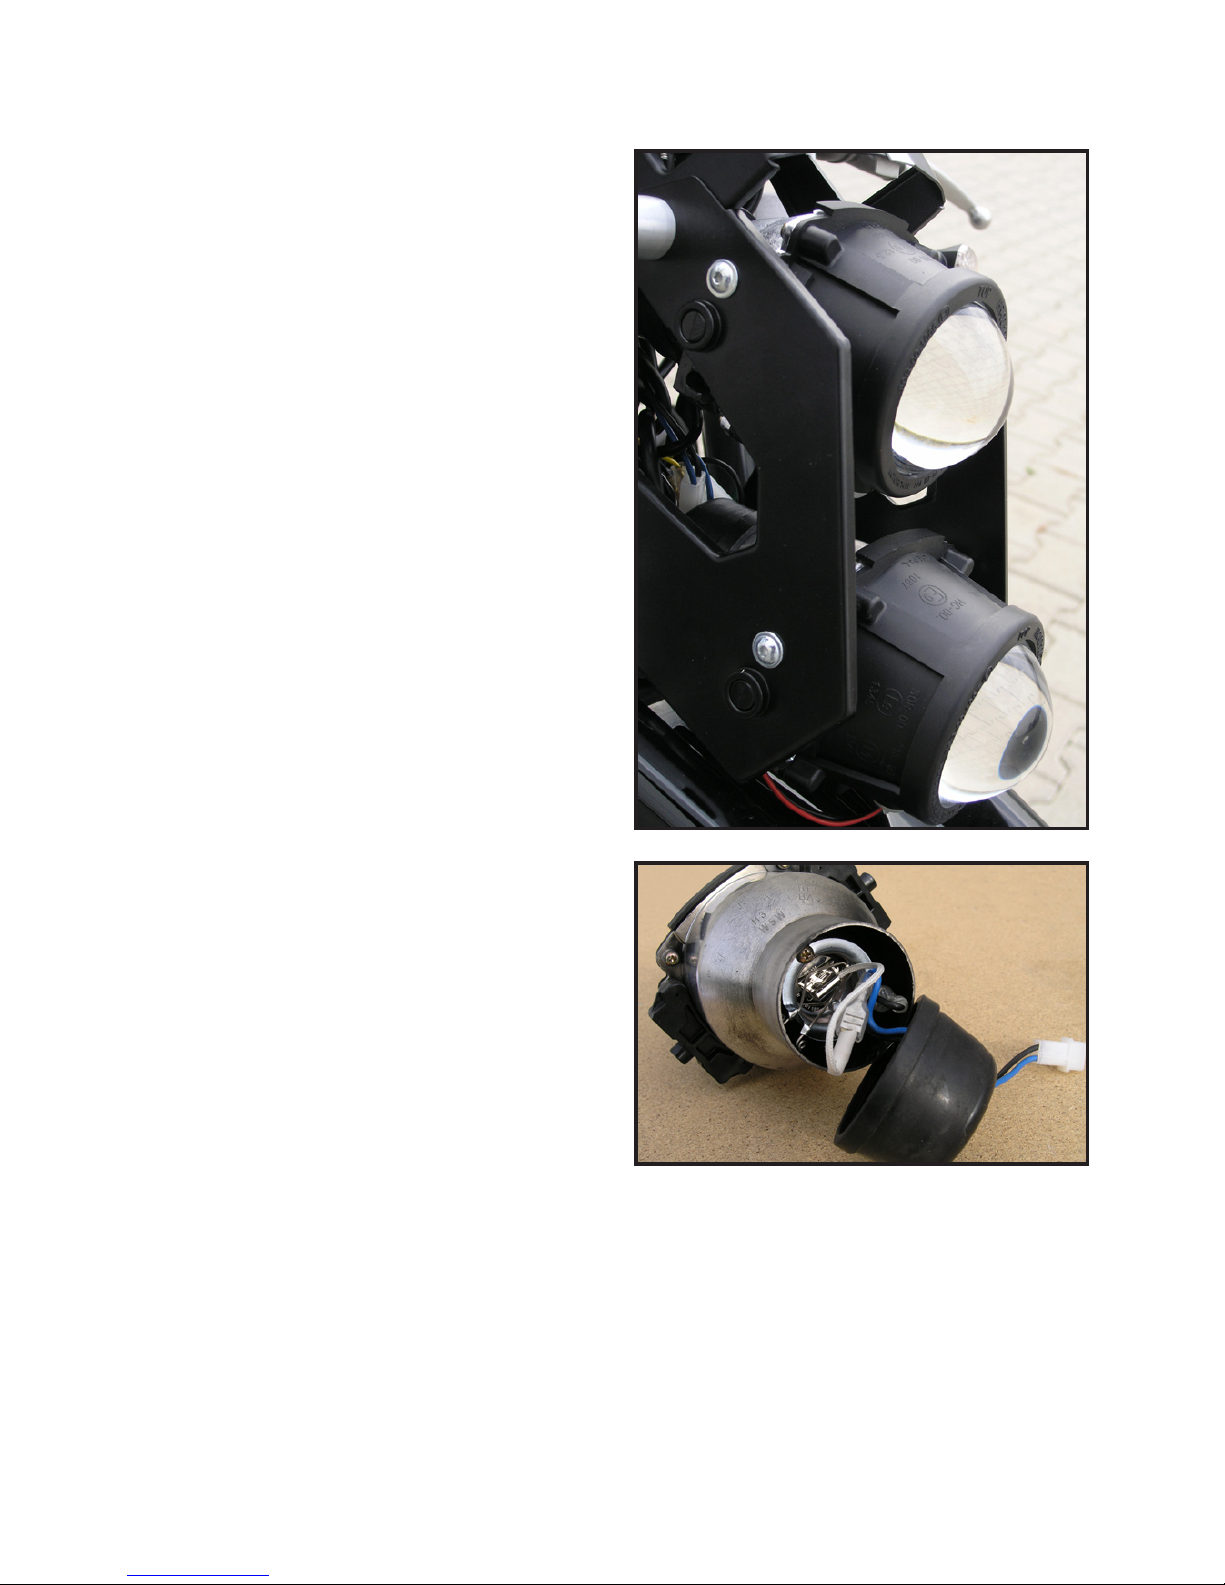
Low beam:
Remove the 2 screw on bottom light. Remove the light and
disconnect its terminal.
Remove the rubber liner from
headlight.
Release the xing spring holding the bulb and remove the
bulb.
Bulb: H3 12 55W
Lock the new bulb using the
xing spring and t the rubber
liner. Out the light back into the
body and lock it using the two
screws provided.
The headlight must be adjusted after installation (page 60).
Page 69
67
BULB REPLACEMENT
High beam:
The high beam bulb is located in the upper light. Follow similar
procedure when changing the bulb.
Bulb: H3 12V 55W
The headlight must be adjusted after installation (page 60).
Once the bulbs have been replaced, connect the position
light terminal, t the headlight
cover and lock it using the 3
xing bolts provided.
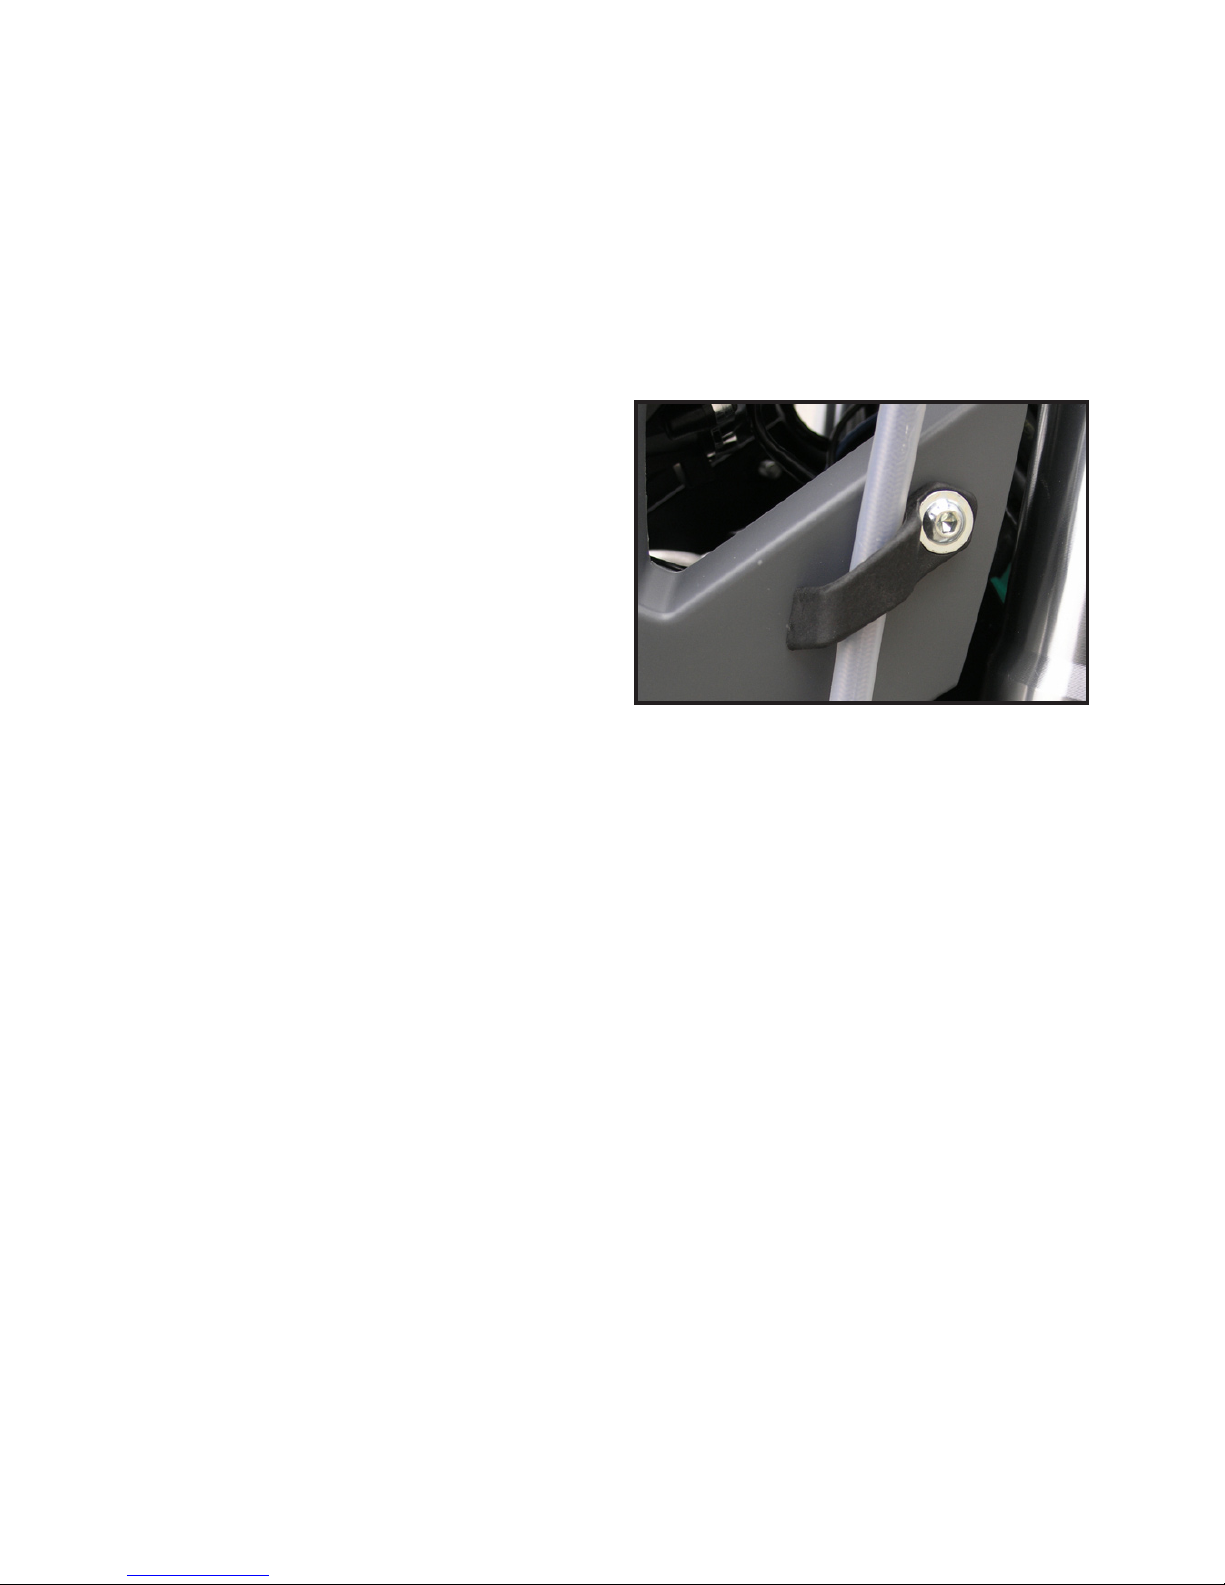
Insert droppers on 2 bolts on
sides between the headlight
bracket and the cover.
Hook the front brake tube into
the bracket on the left hand
side.
Page 70
68
FUSE REPLACEMENT
NOTE:
Always switch the ignition off before fuse replacement. Never try
to repair any blown fuses. We recommend that you keep spare
fuses with you at all times. In case of frequent fuse burns have the
electric system checked by an authorised Blata service centre.
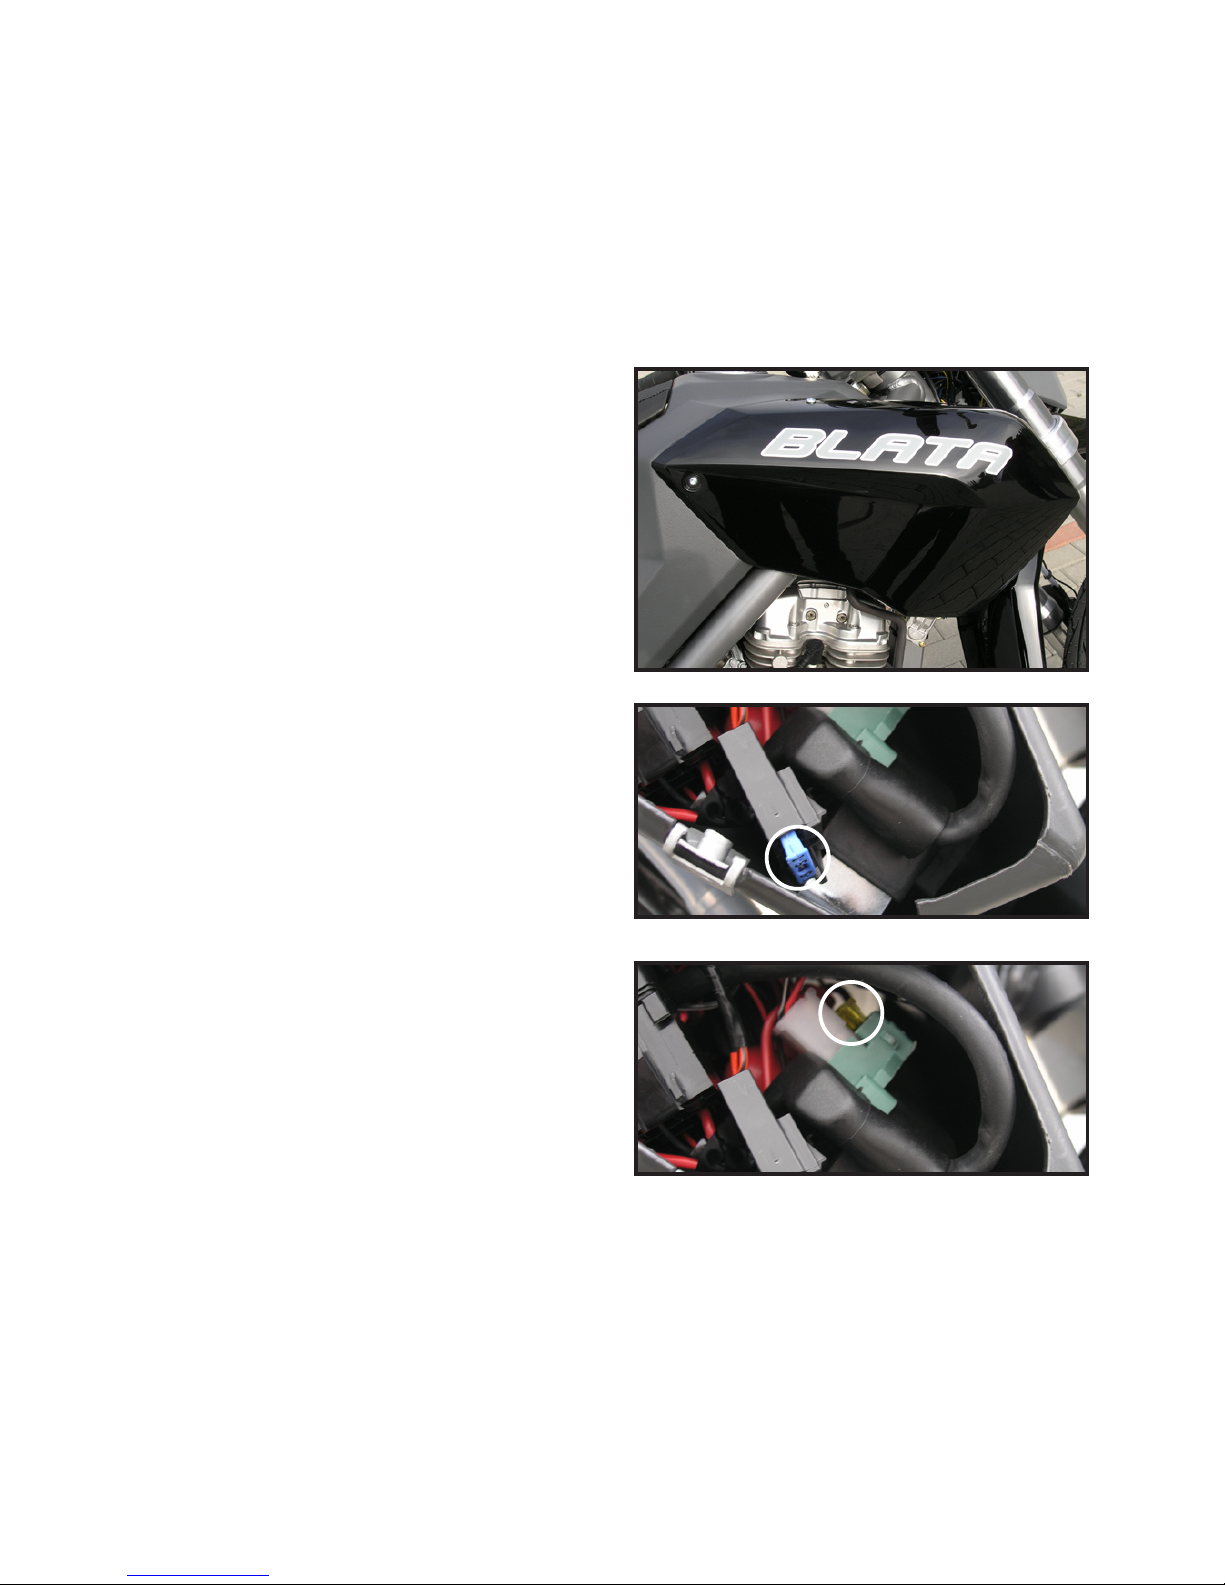
Fix the fuel tank side cover. Never tighten the xing bolts to exceed the prescribed tightening torque.
Tightening torque: 1.5 Nm (1.11 lbf.ft)
Replace the low beam and
choke fuse situated on the
conductor inside housing.
Low beam and choke fuse:
10A
Remove the 3 bolts out of the
front right cover of fuel tank
and remove this cover.
Or disconnect the starter relay connector and replace the
main fuse situated on the starter relay body.
Main fuse: 20A
Page 71
69
BATTERY
NOTE:
Always switch the ignition off before battery replacement.
Disconnecting the battery will delete the adjustable data in the vehicle
board unit.
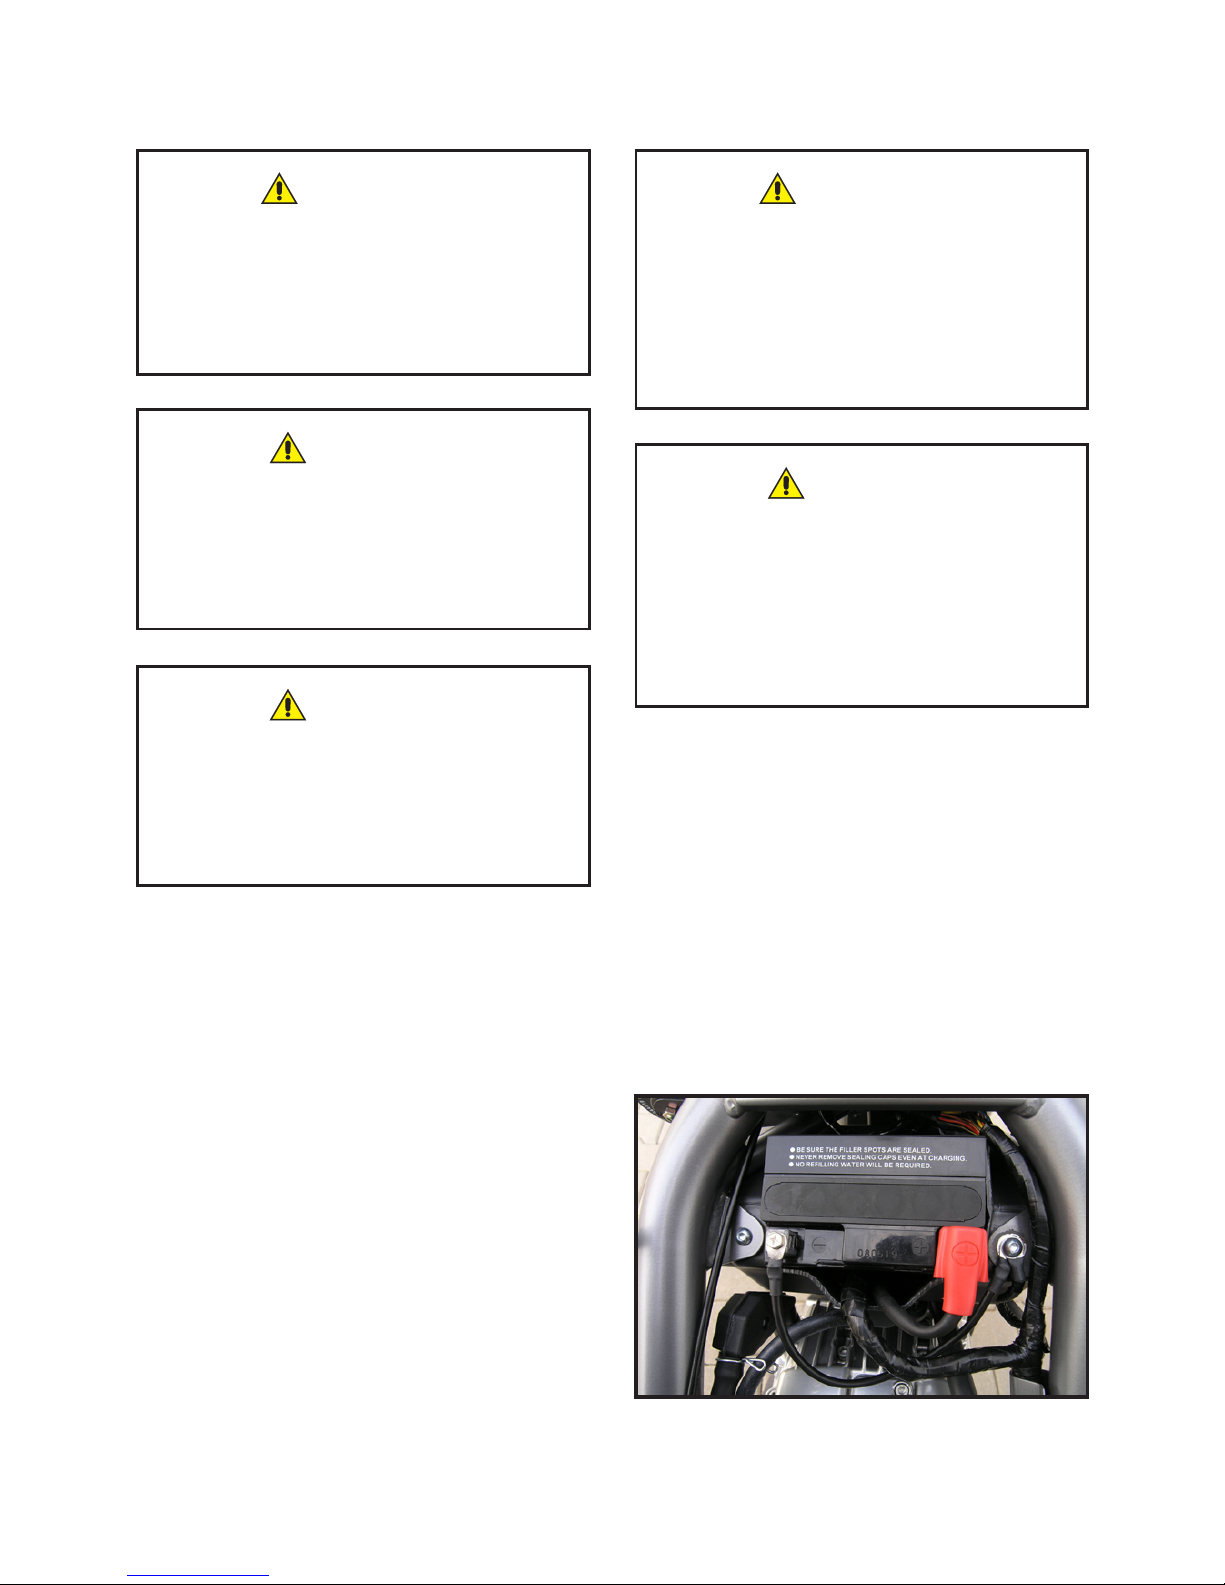
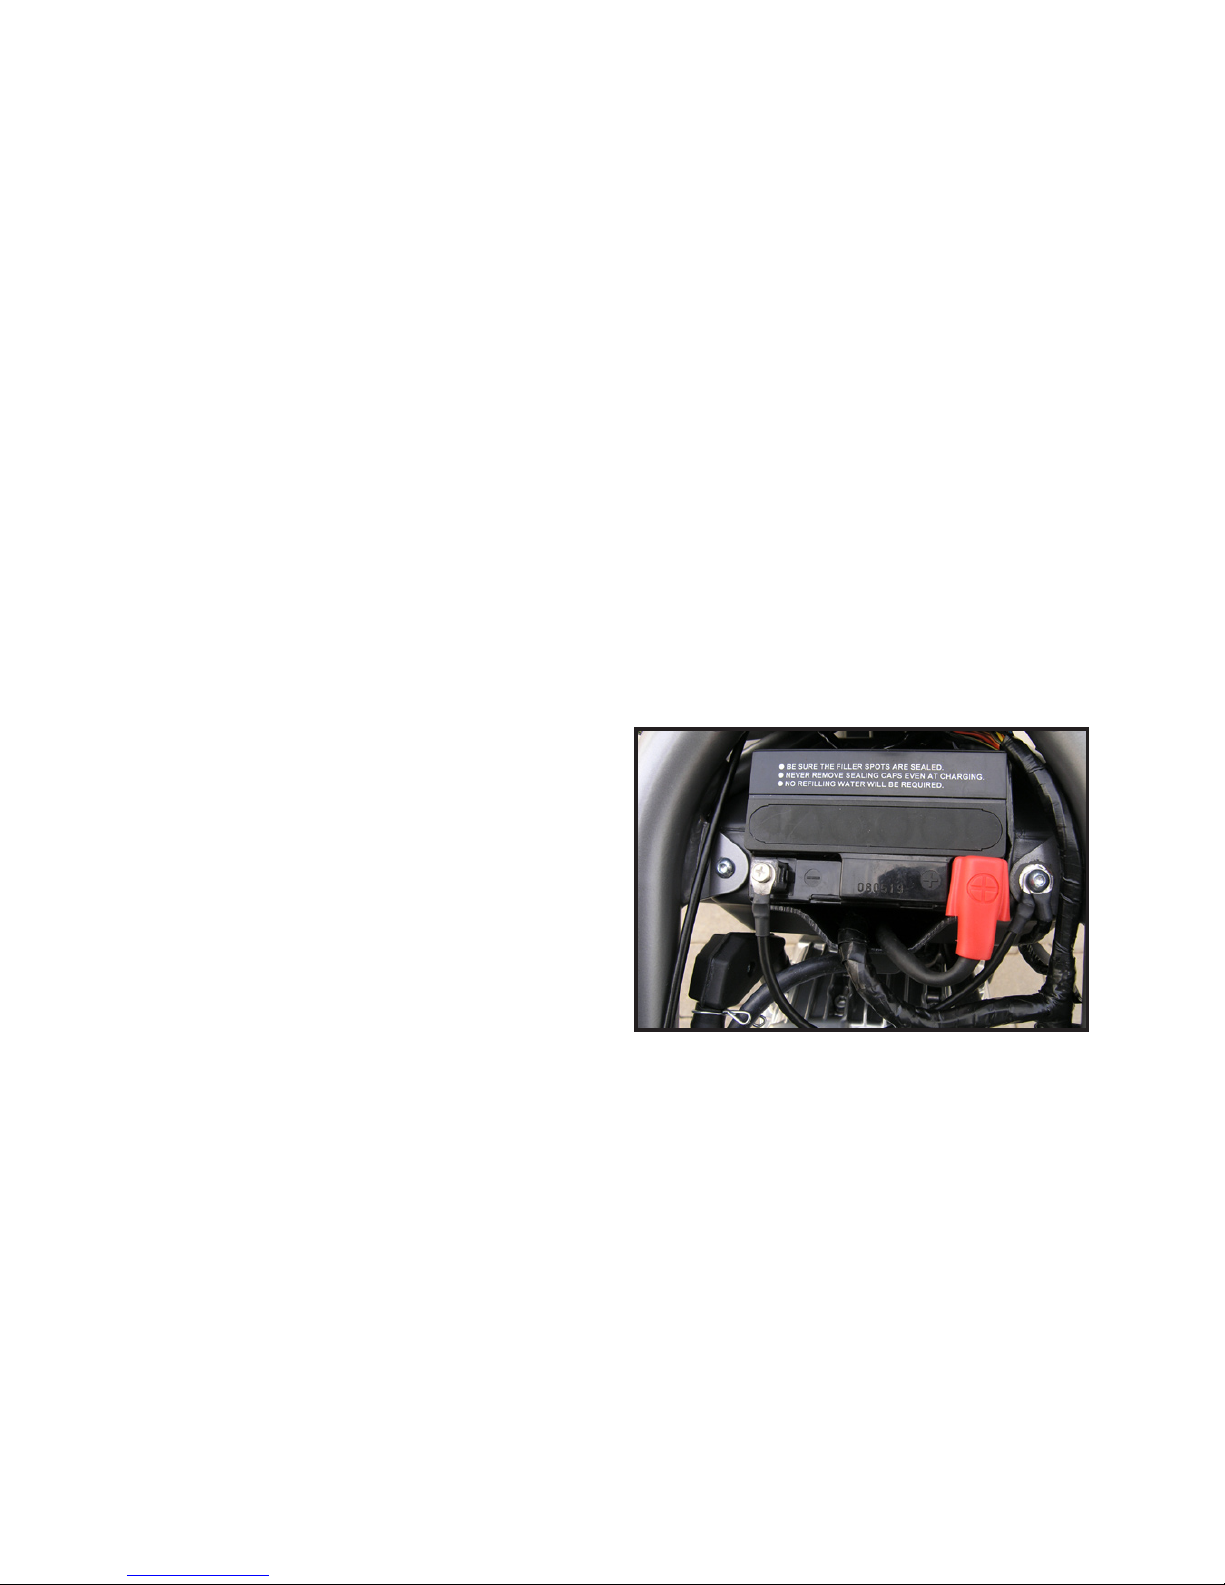
Battery removal:
Remove the vehicle seat.
Remove both the right and left fuel
tank covers and lift the tank up
(page 50). Disconnect the nega-
tive cable ( - ) of the battery rst.
Then disconnect the positive battery cable ( + ) (the cable with red
cover). Remove the battery.
The electrolyte may cause severe burns. When handling the
battery, use protective clothes
and the face shield.
In case of skin contact with the
electrolyte rinse the affected
place with plenty of water immediately.
In case the electrolyte enters
human your eyes, rinse your
eyes with plenty of water and
seek medical advice immediately.
In case of electrolyte swallowed
drink plenty of water or milk and
seek medical advice immediately. Never induce vomiting
Never handle any open re
in the battery proximity. Any
charging of the battery shall be
conducted within well-ventilated
premises only.
WARNING
DANGER
DANGER
DANGER
WARNING
Page 72
70
BATTERY
Battery maintenance:
NOTE:
Your motorcycle has been tted with maintenance free battery.
Never open or try to ll this battery up! The battery shall be kept
charged still! We recommend you to leave the charging and maintenance of the battery to a specialised service centre. Never
charge the battery when installed in the motorcycle.
Measure the voltage over terminals of a loose battery. If the voltage exceeds 12,6 V, the battery is all right and can be connected into the motorcycle. If the voltage is lower, the battery shall be
charged. When charging the battery, follow the instructions given
by the battery and charger manufacturer. Ask your Blata dealer for
information related to handling and charging of used batteries.
Battery installation:
Slide the battery into its position. Battery terminals shall be
treated with special grease designed for the purpose. Make
sure the ignition is switched
off. Connect the positive battery terminal ( + ) and slide the
red cover over it. Connect the
negative battery terminal ( - ).
Install the fuel tank and secure
it in together with both covers
(page 50). Install the seat.
Page 73
71
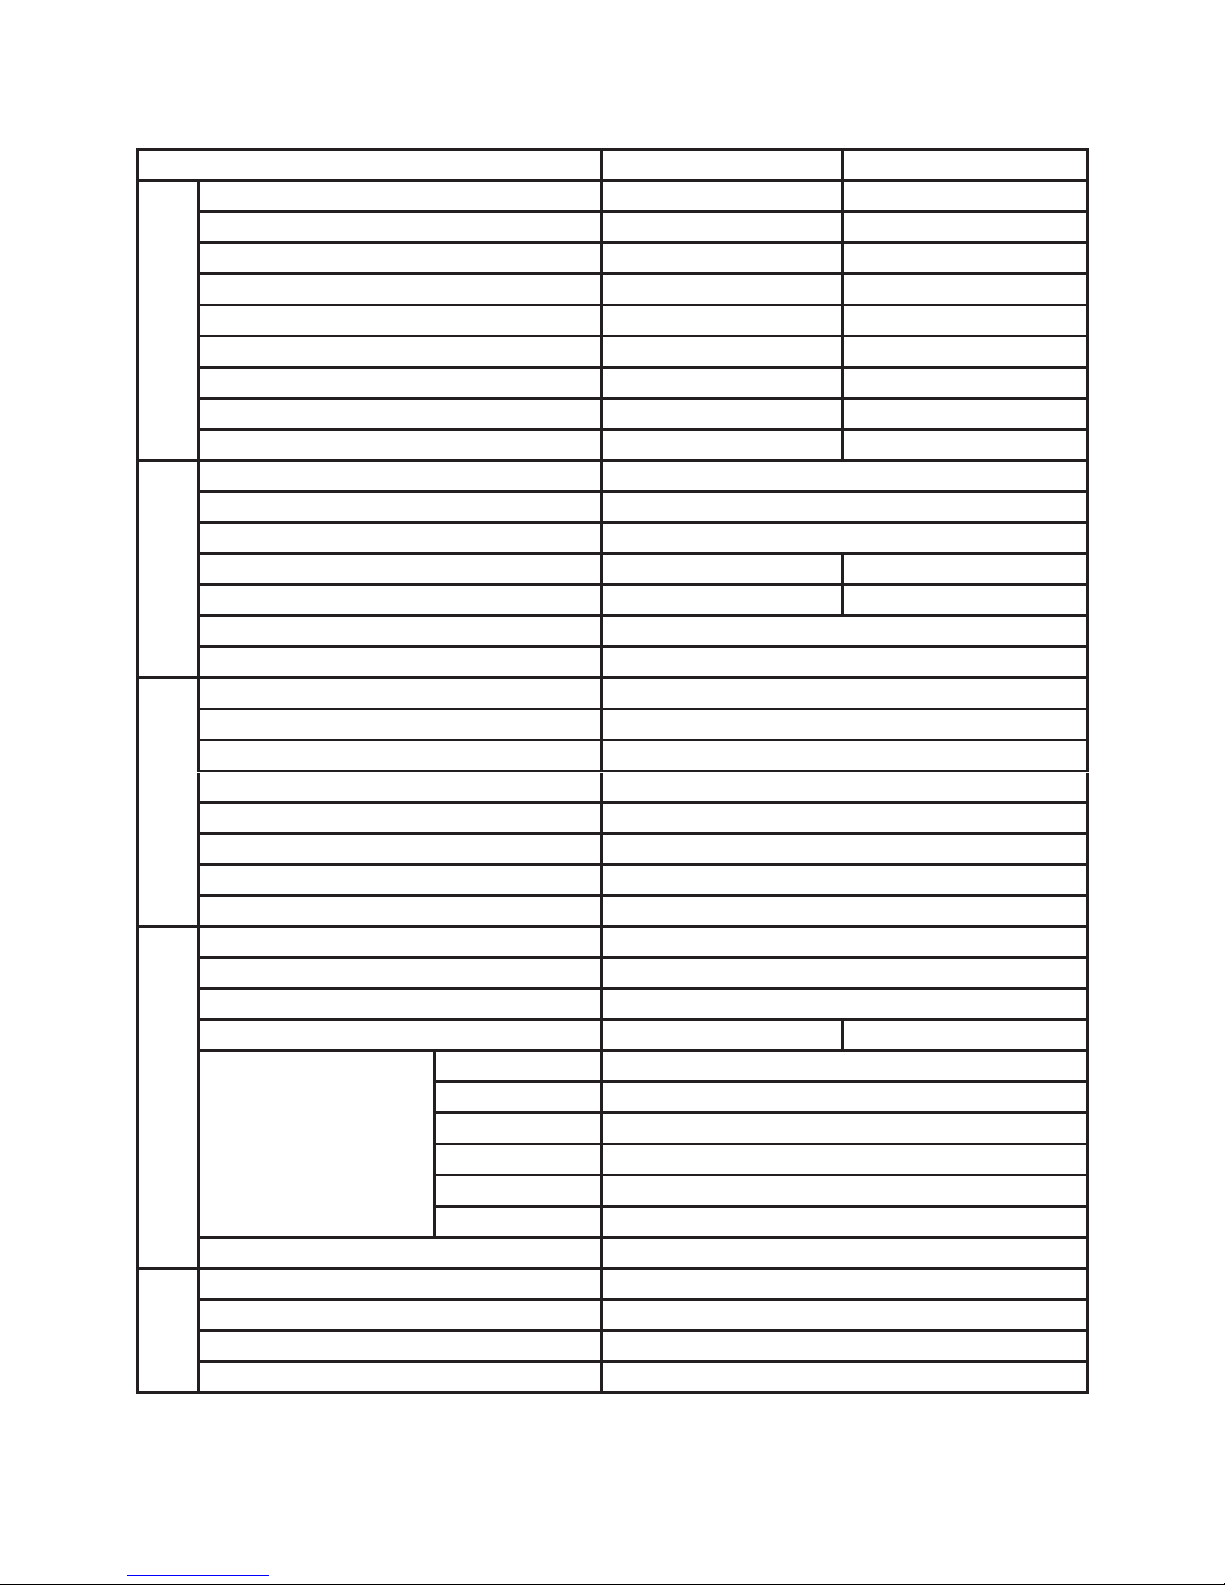
MOTORCYCLE TECHNICAL DATA
* The seat clearance can be adjusted higher by your Blata dealer
MOTARD ENDURO
Dimensions and weights
Overall length
1984 mm (77.38 in) 2080 mm (81.89 in)
Overall width
847 mm (33.35 in) 847 mm (33.35 in)
Overall height (excluding mirrors)
1110 mm (43.70 in) 1177 mm (46.34 in)
Wheelbase
1345 mm (52.95 in) 1365 mm (53.74 in)
Seat height *
913 mm (35.94 in) * 935 mm (36.81 in) *
Ground clearance
283 mm (11.14 in) 331 mm (13.03 in)
Dry weight
111 kg (245 lb) 115 kg (254 lb)
Curb weight
118 kg (260 lb) 122 kg (269 lb)
Maximum weight
280 kg (617 lb) 280 kg (617 lb)
Frame and chassis
Frame type
Tubular frame
Front suspension / travel
Telescopic fork / 170 mm (6.69 in)
Rear suspension / travel
Swingam / 25 mm (0.98 in)
Front tyre
100/80 17 52T 90/90 21 54T
Rear tyre
130/70 17 62T 4.10 18 60P
Front / rear brake
Hydraulic-disc / Hydraulic-disc
Fuel tank capacity
10.5 l (2.77 gal)
Engine
Engine type / valves per cylinder
4-stroke, single cylinder / 2
Bore x stroke
57 x 48.6 mm (2.244 x 1.913 in)
Displacement
124 cm3 (7.568 cu-in)
Compression ratio
11:1
Max. power / r.p.m.
9.9 kW (13.5 HP) / 9600
Max. torque / r.p.m.
10.6 N.m / 8400
Oil volume
1.1 l (1.0 lmp.qt)
Carburettor
constant velocity (CV)
Drive train
Clutch / control
wet multi-plate / mechanical
Gearbox / gearshift pattern
6-speed / 1-N-2-3-4-5-6
Primary reduction
3.47
Final reduction
3.33 3.53
Gear ratio 1st gear
0.361
2nd gear
0.548
3rd gear
0.714
4th gear
0.885
5th gear
1.042
6th gear
1.15 0
Maximum speed / per gear
115 km/h (71 mph) / 6th gear
Eletrical
Ignition system
electronic (CDI)
Bulb: position/low beam /high beam
12 V 5W / H3 12V 55W / H3 12V 55W
Fuse: strong / weak
20 A / 10 A
Battery
12 V - 6.5 Ah
Page 74

72
FINAL SUMMARY
- check your motorcycle before every ride and follow the
prescribed maintenance schedule
- we recommend you to have the service and maintenance of
your motorcycle performed by trainer personnel at an autho rised Blata service centre
- always wear the safety helmet, eye protection, suitable
footwear and distinctive reexive clothing
- ride safely to your abilities, the motorcycle properties and
actual conditions and regulations in force
- never exceed the permitted vehicle load
We wish you a safe journey and enjoyment of the ride.
Blata, s.r.o.
Page 75

73
NOTES
Page 76

Contact:
Blata, s.r.o.
Pražská 9
678 01, Blansko
Czech Republic
ver.: 1.02
 Loading...