

Page 1

Operating manual BDC3140 DBP/LPP
1/12
GB
Table of contents
Instructions for use ........................................................................... 2
Operator’s safety ............................................................................................ 2
General information for using the vacuum cleaner ............................................... 2
Proper uses .................................................................................................... 2
Improper Use ................................................................................................. 2
Dust emissions in the environment .................................................................... 3
General recommendations ................................................................................ 3
EC Declaration of conformity ............................................................................ 3
Vacuum cleaner description .............................................................. 4
Labels ........................................................................................................... 4
Optional kits ................................................................................................... 4
Accessories .................................................................................................... 4
Packing and unpacking .................................................................................... 4
Unpacking, moving, use and storage ................................................................. 4
Setting to work - connection to the power supply ................................................ 5
Extensions ..................................................................................................... 5
Dry applications .............................................................................................. 5
Maintenance and repairs .................................................................................. 5
Technical specications .................................................................................... 6
Dimensions .................................................................................................... 7
Controls, indicators and connections .................................................................. 7
Inspections prior to starting ............................................................................. 7
Starting up ..................................................................................................... 7
Emergency stopping ........................................................................................ 8
Emptying the dust container ............................................................................. 8
Operation of the ltering cartridges ................................................................... 8
Tilting discharge device replacement and use (BDC3140 LPP) ............................... 8
Single plastic bag replacement and use .............................................................. 8
Maintenance, cleaning and decontamination ....................................................... 9
Filter disassembly and replacement ................................................................... 9
Filter cartridge replacement .............................................................................. 9
HEPA lter replacement ..................................................................................10
Motor cooling fan inspection and cleaning ..........................................................10
Tightness inspection .......................................................................................10
Disposing of the vacuum cleaner ......................................................................10
Wiring diagrams ............................................................................................10
Recommended spare parts ..............................................................................11
Troubleshooting .............................................................................. 12
Translation of original instructions
Page 2
Operating manual BDC3140 DBP/LPP 2/12
GB
Instructions for use
Read the operating instructions and comply with the important safety
recommendations identied by the word WARNING!
Operator’s safety
WARNING!
Before starting the device, it is absolutely
essential to read these operating
instructions and to keep them ready at
hand for consultation.
The vacuum cleaner can only be used by people
who are familiar with the way it works and who
have been explicitly authorised and trained for the
purpose.
Before using the device, the operators must be
informed, instructed and trained on how to work
it and for which substances its usage is permitted
including the safe method for removing and
disposing of the vacuumed material.
WARNING!
The use of device by people (including children)
with limited physical and mental capacities or
lacking in experience and knowledge is strictly
forbidden, unless they are supervised by a person
who is experienced in the use and safe handling of
the device.
Children must be supervised to make sure they will
not play with the device.
General information for using the
vacuum cleaner
Use the vacuum cleaner in accordance with the laws in force
in the country where it is used.
Besides the operating instructions and the laws in force
in the country where the device is used, the technical
regulations for ensuring safe and correct operation must
also be observed (Legislation concerning environmental and
labour safety, i.e. European Union Directive 89/391/EC and
successive Directives).
Do not perform any operation that could jeopardize the
safety of people, property and the environment.
Comply with the safety indications and prescriptions in this
instruction manual.
Proper uses
This vacuum cleaner is suitable for commercial use, in
hotels, schools, hospitals, factories, shops, ofces and
apartment hotels for example, for hire and in any case for
purposes other than normal domestic use.
This vacuum cleaner was conceived to clean and collect solid
and liquid non-ammable materials indoor and outdoor.
WARNING – This vacuum cleaner can only be used to
vacuum dry materials.
■ Always leave enough room around the device to reach
the controls easily.
The device has been designed to be used by one operator at
a time.
This vacuum cleaner consists of an automated vacuum unit,
with a lter upstream and a container for collecting the
vacuumed material.
Improper Use
WARNING!
The following use of the device is strictly forbidden:
■ Outdoors in case of atmospheric precipitation.
■ When not placed on horizontal levelled
grounds.
■ When the ltering unit is not installed.
■ When the vacuum inlet and/or hose are turned
to parts of the human body.
■ When the dust bag is not installed.
■ Use without the guards, protective covers and
safety systems installed by the manufacturer.
■ When the cooling vents are partially or totally
clogged.
■ When the vacuum cleaner is covered with
plastic or fabric sheets.
■ When the air outlet is partially or totally closed.
■ When used in narrow areas where there is no
fresh air.
■ Vacuuming the following materials:
1. Burning materials (embers, hot ashes, lit
cigarettes, etc.).
2. Naked ames.
3. Combustible gas.
4. Flammable liquids, aggressive fuels
(gasoline, solvents, acids, alkaline solutions,
etc.).
5. Explosive dust/substances and/or ones
liable to ignite in a spontaneous way (such as
magnesium or aluminium dusts, etc.).
IMPORTANT: Fraudulent use is not admitted.
Page 3
Operating manual BDC3140 DBP/LPP
3/12
GB
Dust emissions in the environment
Indicative values of performance:
■ normal version (not suitable for vacuuming hazardous
dust): retains at least 99% of particles measuring ≥ 3
μm.
General recommendations
WARNING!
If an emergency situation occurs:
■ lter breakage
■ re outbreak
■ short-circuit
■ motor block
■ electric shock
■ etc.
Turn the vacuum cleaner off, unplug it and request
assistance from qualied personnel.
WARNING!
The vacuum cleaners must not be used or stored
outdoors in damp places.
These devices cannot be used in corrosive environment.
EC Declaration of conformity
Every vacuum cleaner comes with a CE Declaration of
conformity. See fac-simile in g. 17.
[ NOTE ]
The Declaration of conformity is an important document
and should be kept in a safe place to be presented to the
Authorities on request.
Page 4
Operating manual BDC3140 DBP/LPP 4/12
GB
Vacuum cleaner description
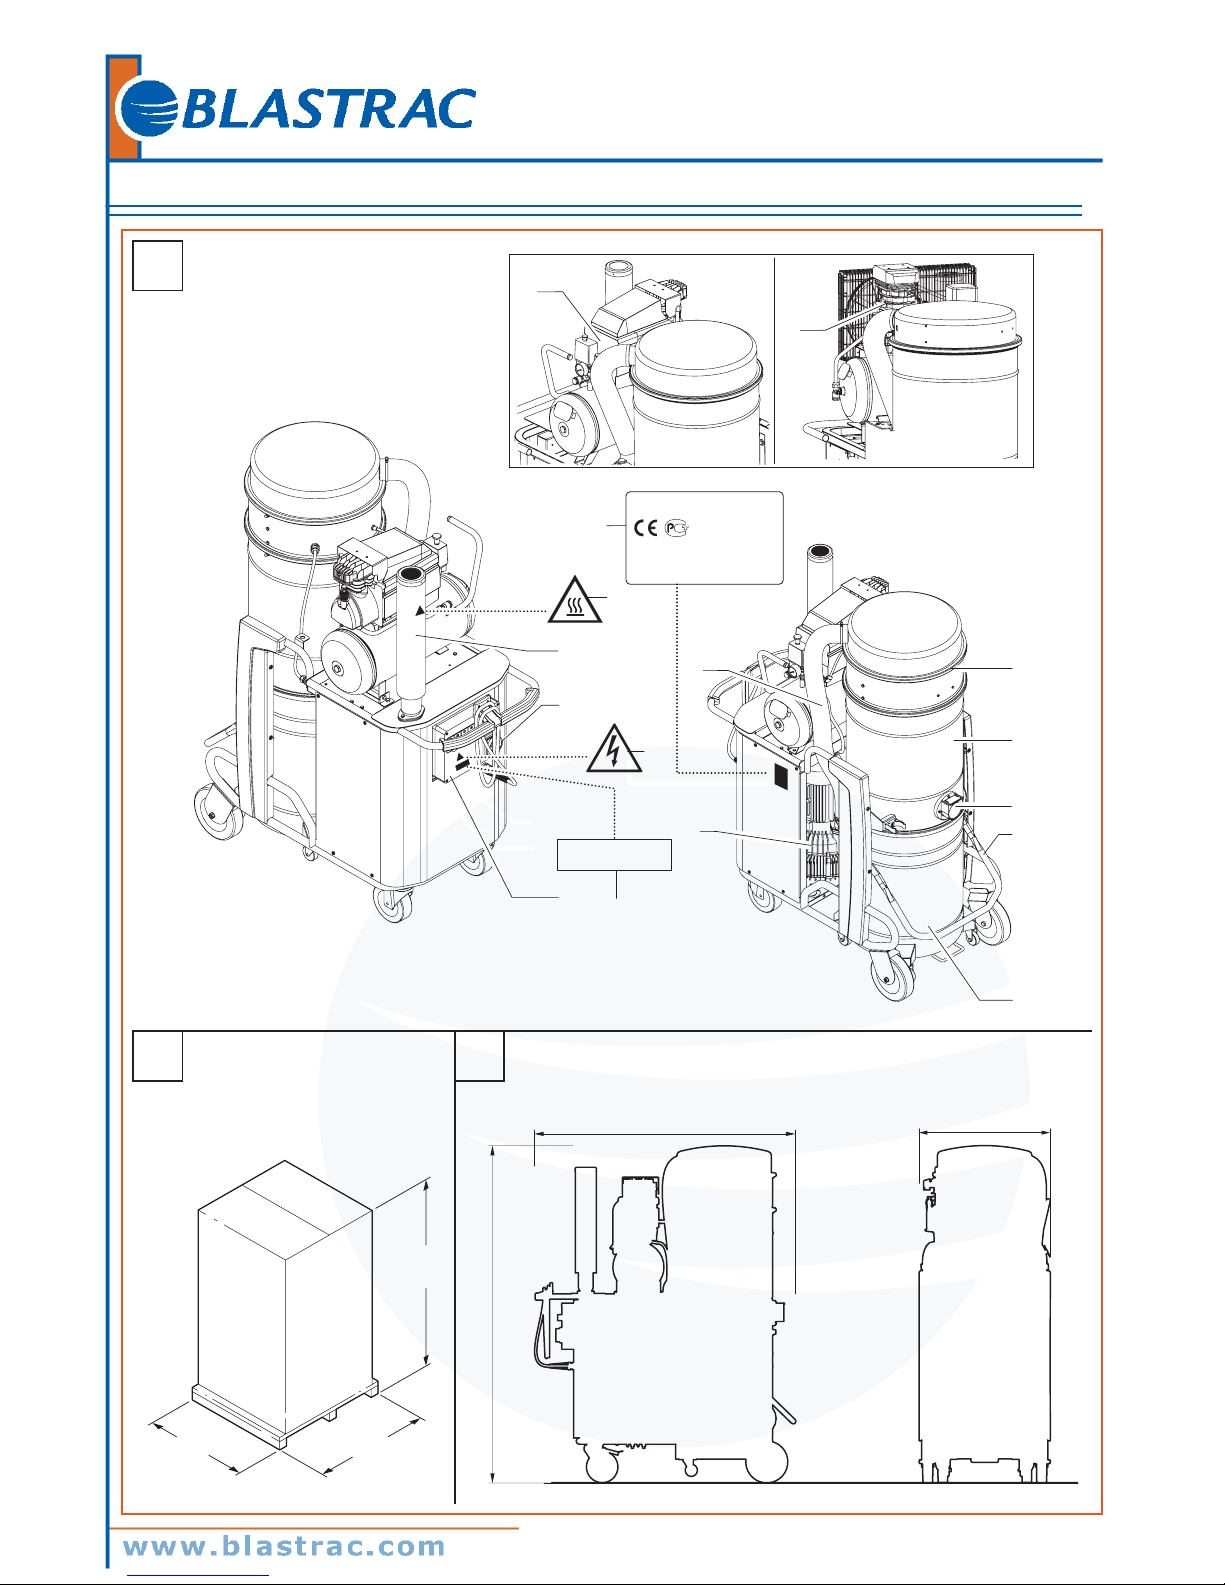
Labels
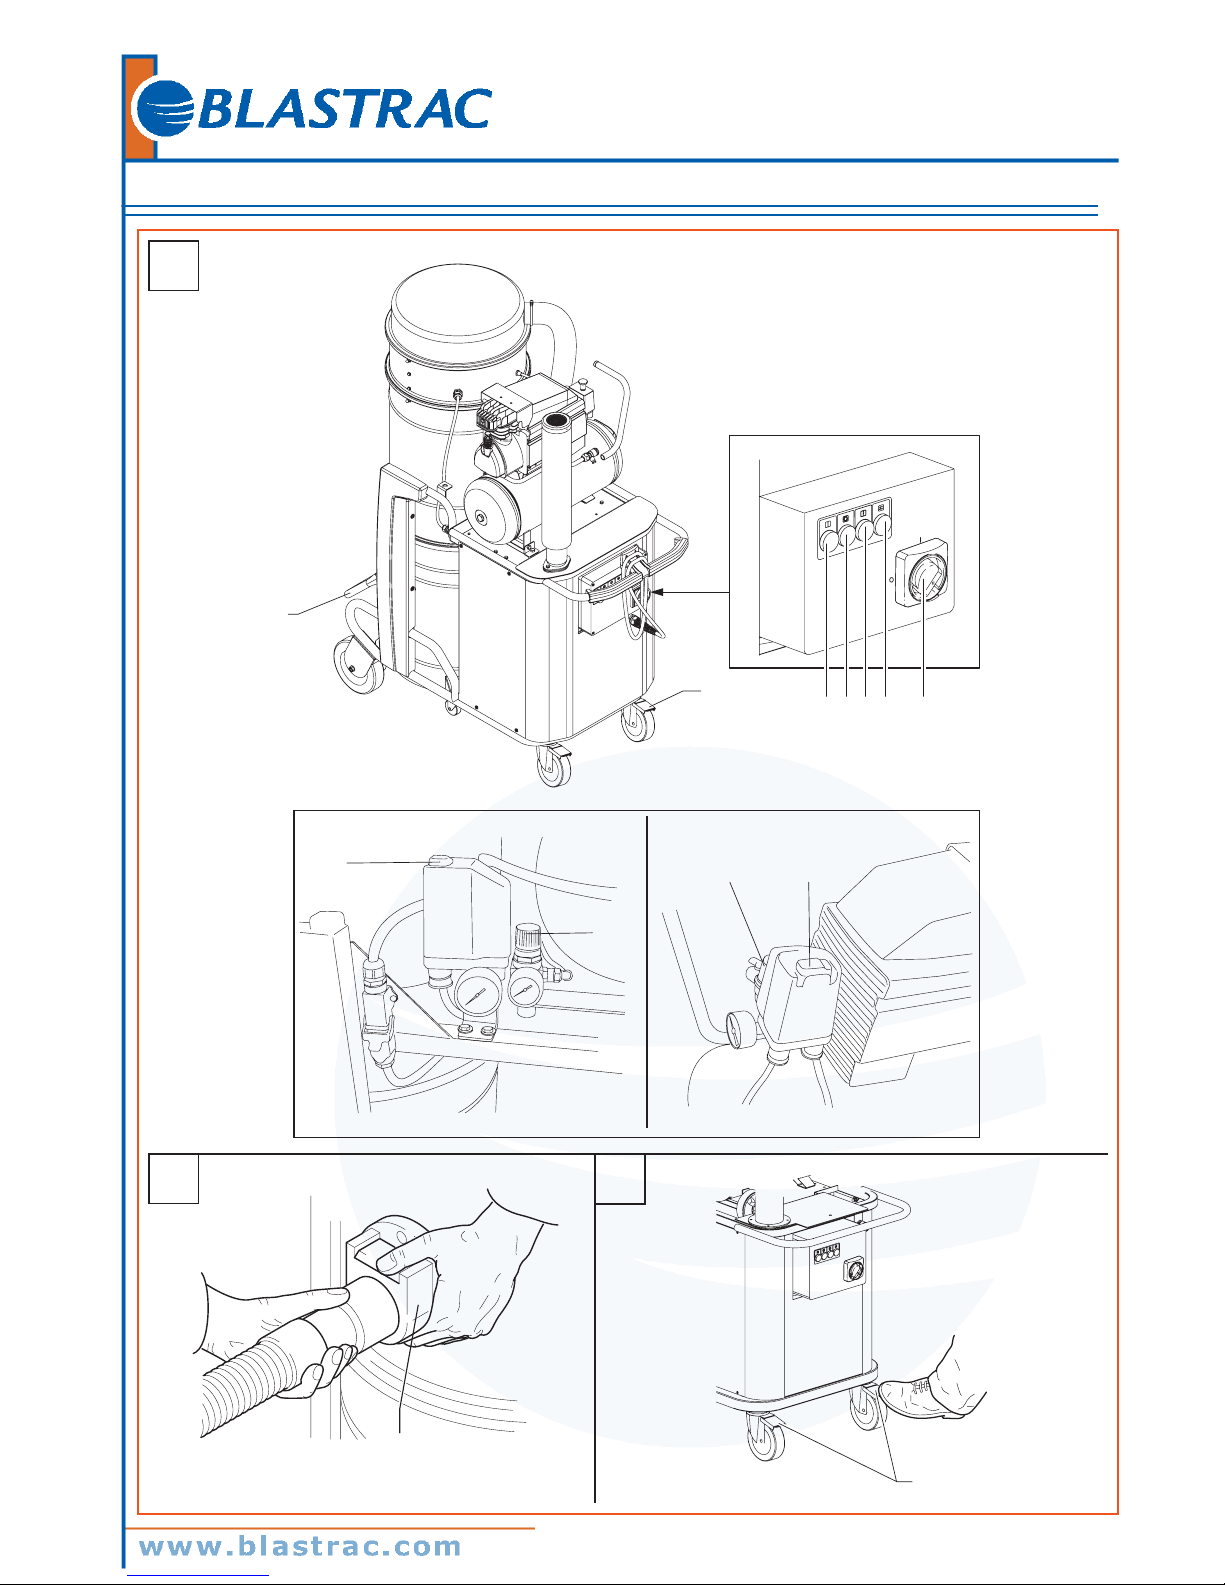
Figure 1
1. Identication plate
Code of the model which includes technical
specications, serial number, EC marking, year of
manufacture
2. Suction connecting hose
3. Control panel
4. Vacuuming unit
5. Dust container
6. Filtering chamber
7. Outlet
8. Container release handle
9. Panel power plate
Indicates that the panel is powered by the voltage
indicated on the data plate.
10. Inlet
11. On/off switch
12. Band latch
13. Filter cartridge cleaning compressor (400V/50Hz)
14. Filter cartridge cleaning compressor (440V/60Hz -
230V/60Hz)
15. Hot surface warning plates
They warn against the danger of being burnt because of
the high temperature reached by the indicated surfaces.
16. Powered electrical equipment warning plate
It signals the presence of powered electrical equipment.
This vacuum cleaner creates a strong air ow which is drawn
in through the inlet (10) and blows out through the outlet (7).
After the hose and tools have been tted, make sure that the
motor turns correctly.
Before turning the vacuum cleaner on, t the suction hose
into the inlet and then t the required tool on to the end
part. Refer to the manufacturer’s accessory catalogue or
Service Centre in order to choose the accessory to be used.
This vacuum cleaner is equipped with an internal bafe
plate which subjects the vacuumed substances to a circular
centrifugal movement that makes them drop into the
container. The vacuum cleaner is equipped with lters which
enable it to be used for the majority of applications.
Optional kits
Please contact the manufacturer’s sales network for
information on optionals.
Instructions for installing the optional are included in the
conversion kit.
WARNING!
Use only supplied and authorised genuine spare
parts.
Accessories
Various accessories are available; refer to the manufacturer’s
accessory catalogue.
WARNING!
Use only genuine accessories supplied and
authorised by the manufacturer.
Packing and unpacking
Dispose of the packing materials in compliance with the laws
in force.
Figure 2
Model
A
(mm)B (mm)
C (mm) Kg
230V/60Hz 1700 1350 700 230
400V/50Hz 1700 1350 700 215
440V/60Hz 1700 1350 700 255
Unpacking, moving, use and storage
Operate on at, horizontal surfaces.
The load-bearing capacity of the surface the vacuum cleaner
is placed on must be suitable for bearing its weight).
Page 5
Operating manual BDC3140 DBP/LPP
5/12
GB
Setting to work - connection to the
power supply
WARNING!
■ Make sure there is no evident sign of damage
to the vacuum cleaner before starting work.
■ Before plugging the vacuum cleaner into the
electrical mains, make sure the voltage rating
indicated on the data plate corresponds to that
of the electrical mains.
■ Plug the vacuum cleaner into a socket with a
correctly installed ground contact/connection.
Make sure that the vacuum cleaner is turned
off.
■ The plugs and connectors of the connection
cables must be protected against splashes of
water.
■ Check that for proper connection to the
electrical mains.
■ Use the vacuum cleaners only when the cables
that connect to the electrical mains are in
perfect condition (damaged cables could lead
to electric shocks!).
■ Regularly check there are no signs of damage,
excessive wear, cracks or ageing on the electric
cable.
WARNING!
When the vacuum cleaner is operating, do not:
■ Crush, pull, damage or tread on the cable that
connects to the electrical mains.
■ Only disconnect the cable from the electrical
mains by removing the plug (do not pull the
cable).
■ Only replace the electric power cable with
one of the same type as the original: H07
RN - F (400V/50Hz), SOOW (230V/60Hz
- 440V/60Hz), the same rule applies if an
extension is used.
■ The cable must be replaced by the
manufacturer’s Service Centre staff or by
equivalent qualied personnel.
Extensions
If an extension cable is used, make sure it is suitable for the
power input and protection degree of the vacuum cleaner.
Minimum section of extension cables:
Maximum length = 20 m
Cable = H07 RN-F (400V/50Hz) , SOOW (230V/60Hz-440V/60Hz)
Max power (kW) 3 5
Minimum section (mm2) 2.5 4
WARNING!
Sockets, plugs, connectors and installation of the
extension cable must maintain the IP protection
degree of the vacuum cleaner, as indicated on the
data plate.
WARNING!
The vacuum cleaner’s power socket must be
protected by a differential circuit-breaker with
surge current limitation, that shuts off the power
supply when the current discharged to the
ground exceeds 30 mA for 30 ms or an equivalent
protection circuit.
WARNING!
Never spray water on the vacuum cleaner: this
could be dangerous for persons exposed and could
short circuit the power supply.
Dry applications
[ NOTE ]
The supplied lters and the bag (if applicable) must be
installed correctly.
WARNING!
Comply with the safety regulations governing the
materials for which the vacuum cleaner is used.
Maintenance and repairs
WARNING!
Disconnect the vacuum cleaner from its power
source before cleaning, servicing or replacing parts;
the plug must be removed from the socket.
■ Carry out only the maintenance operations
described in this manual.
■ Use only original spare parts.
■ Do not modify the vacuum cleaner in any way.
Failure to comply with these instructions could
jeopardize your safety. Moreover, such action would
immediately void the EC declaration of conformity
issued with the device.
Page 6
Operating manual BDC3140 DBP/LPP 6/12
GB
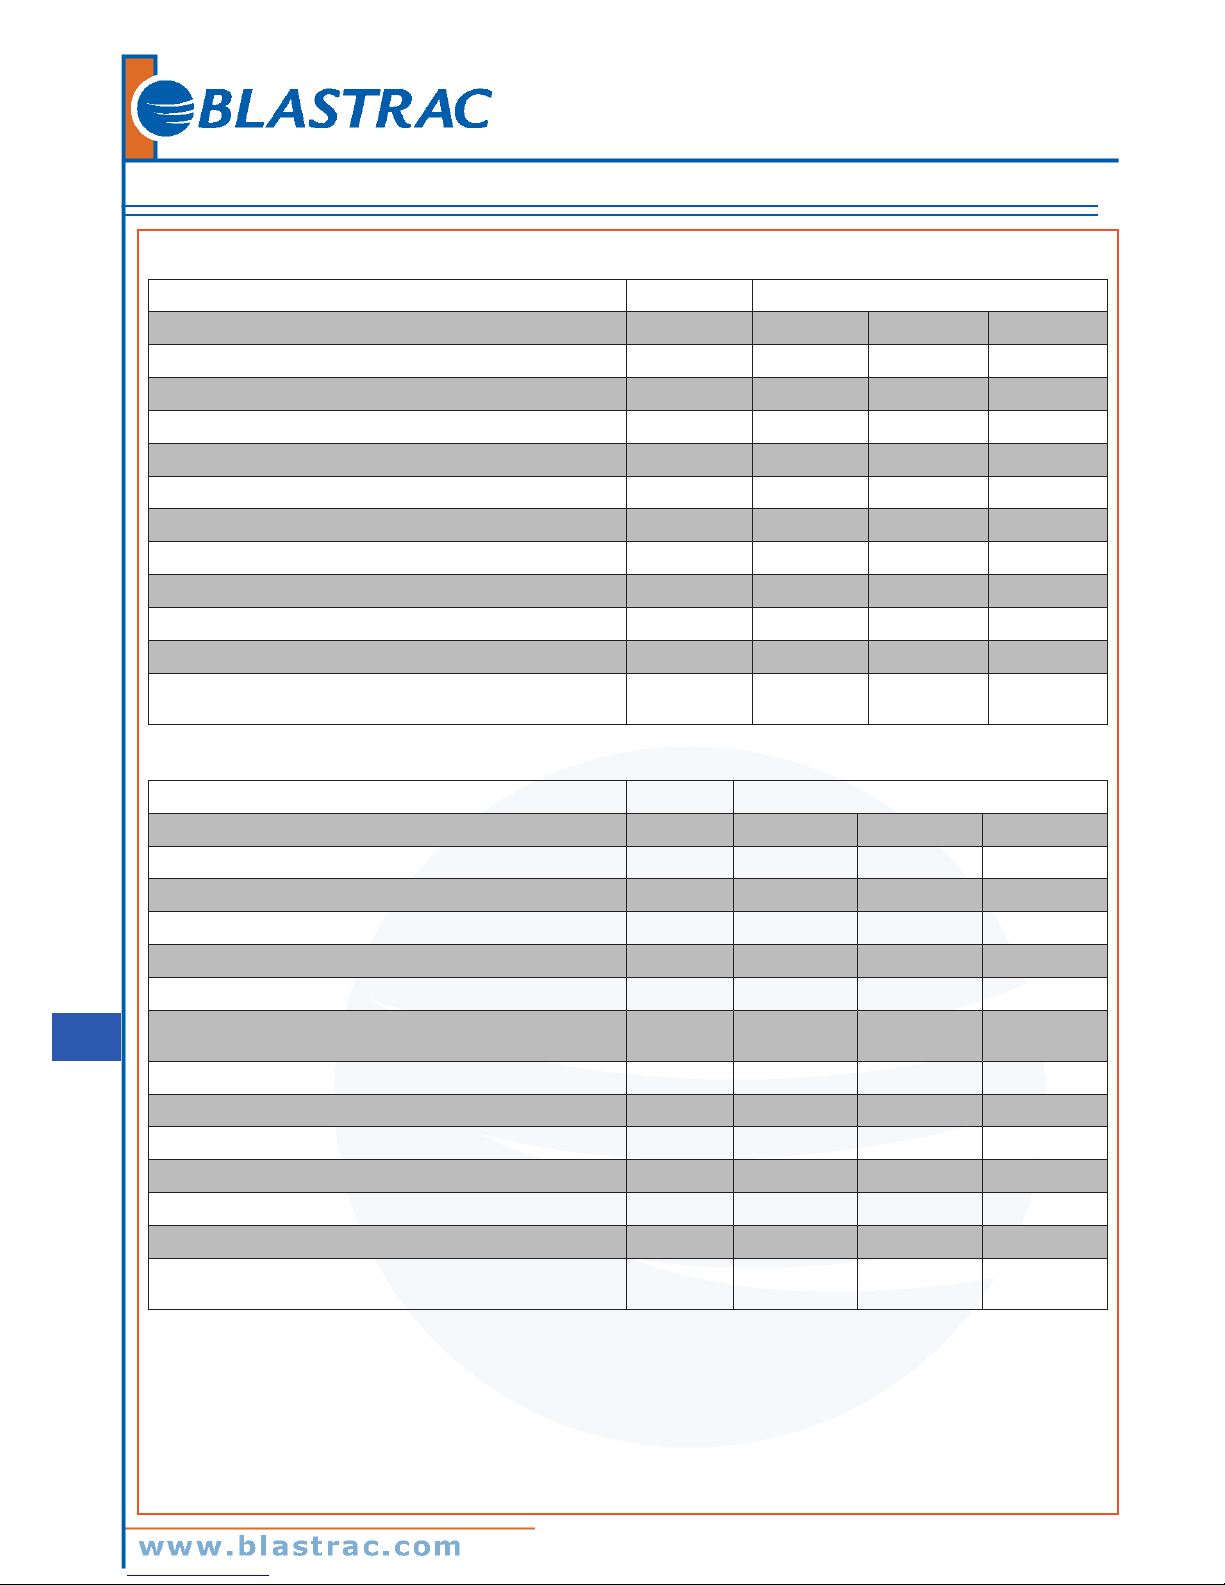
Technical specications
Parameter Units BDC3140 DBP/LPP
Voltage / frequency V/Hz 230/60 400/50 440/60
Power rating kW 4,6 4 6,3
Noise level dB(A) 72 71 80
Peak noise* dB(A) 75 82 81
Protection IP 55 55 55
Insulation Class F F F
Container capacity L 100 100 100
Inlet (diameter) mm 70 70 70
Max vacuum hPa - mbar 226 - 226 294 - 294 206 - 206
Maximum air ow rate (with hose, length: 3 m, diameter: 76 mm) m3/h - L/min’ 462 - 7700 450 - 7500 550 - 9250
Main lter surface m
2
15 15 15
Upstream absolute “H” lter surface - HEPA 14 according to
MPPS method (EN 1822)
m
2
3,5 3,5 3,5
* When the compressor is operating
Parameter Units BDC3140 DBP/LPP
Voltage / frequency V/Hz 230/60 400/50 440/60
Power rating kW 4,6 4 6,3
Noise level @ 3’3” (1 meter) dB(A) 72 71 80
Peak noise* dB(A) 75 82 81
Protection IP 55 55 55
Motor insulation Class F F F
Container capacity
Gallons/
litres
26 - 100 26 - 100 26 - 100
Inlet (diameter) Inches 3 3 3
Max vacuum Inches H2O 9.06 11.78 8.21
Max air ow rate cfm 272 265 327
Main lter surface Sq. ft 162 162 162
Absolute lter surface (HEPA optional) Sq. ft 38 38 38
Cable length ft 30 30 30
HEPA lter efciency
MPPS
tested
99.995% @
0.18 micron
99.995% @
0.18 micron
99.995% @
0.18 micron
* When the compressor is operating
Page 7
Operating manual BDC3140 DBP/LPP
7/12
GB
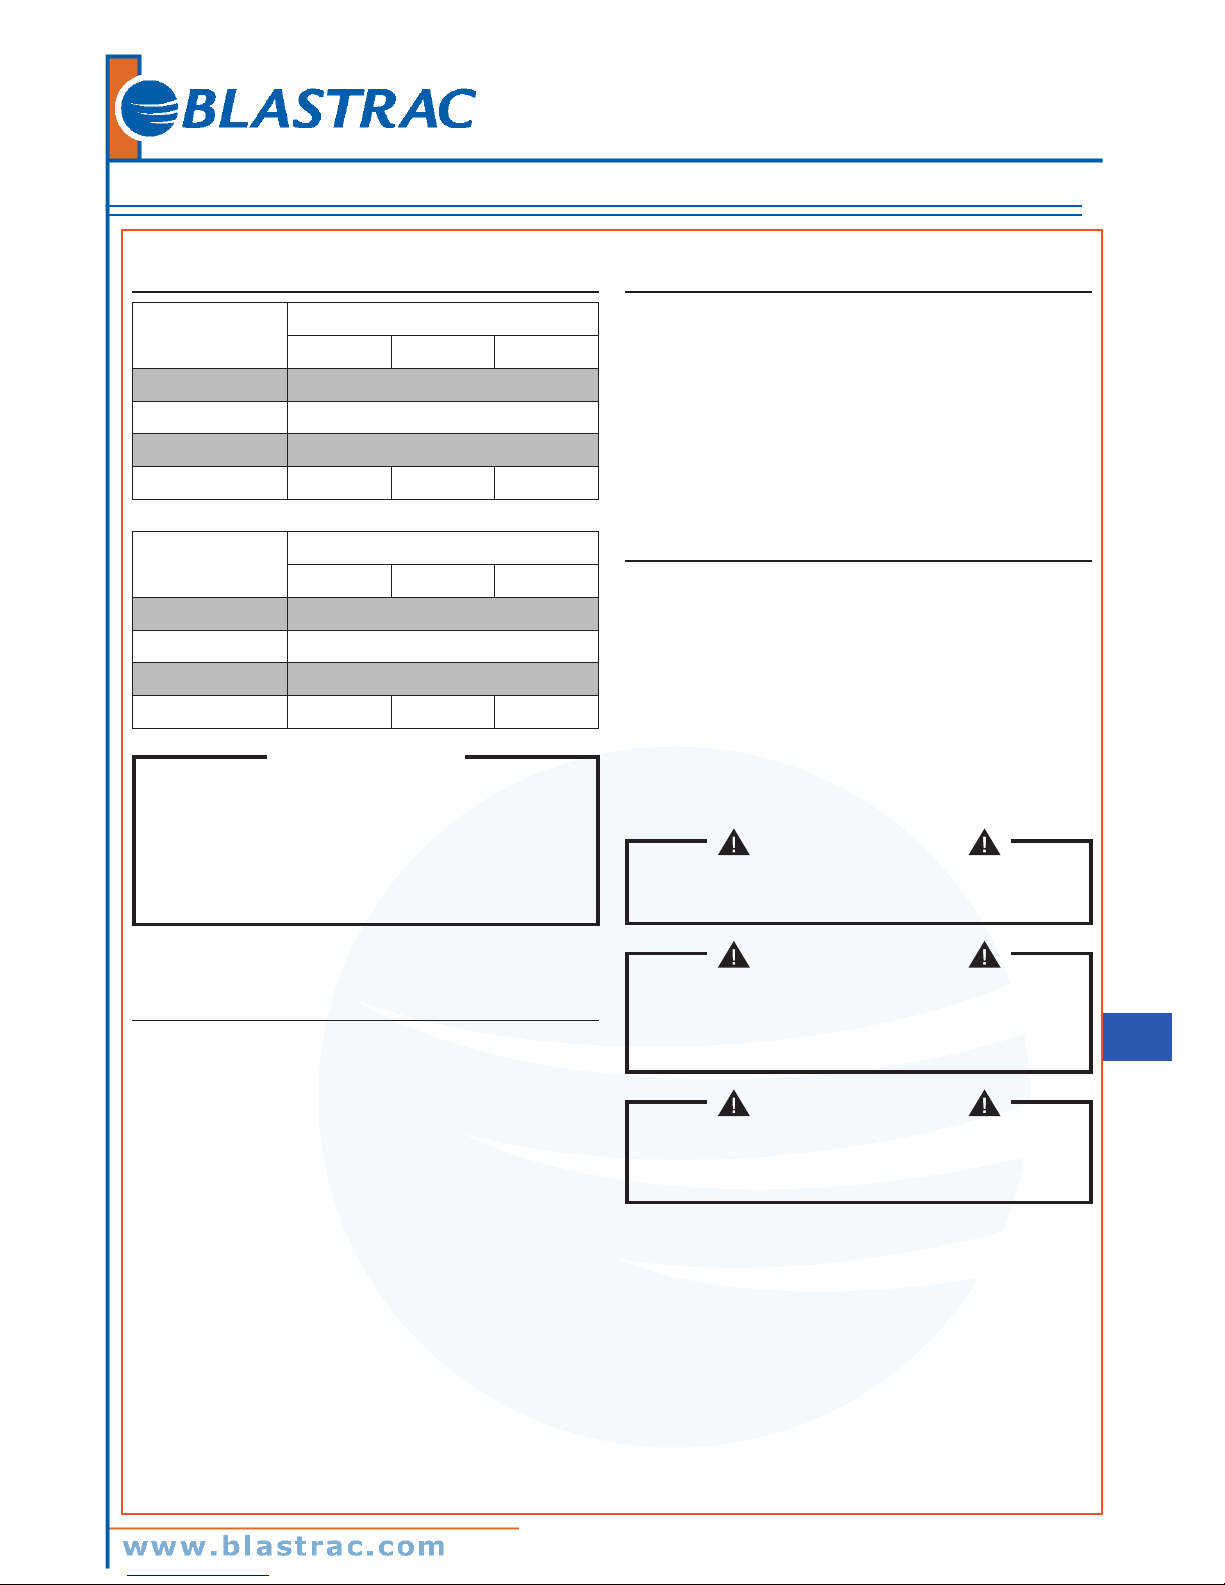
Dimensions
Figure 3
Model
BDC3140 DBP
230/60 400/50 440/60
A (mm) 1600
B (mm) 1200
C (mm) 600
Weight (kg) 211 196 234
Model
BDC3140 LPP
230/60 400/50 440/60
A (mm) 1600
B (mm) 1200
C (mm) 600
Weight (kg) 215 200 238
[ NOTE ]
■ Storage conditions:
Temperature: -10°C ÷ +40°C
Humidity: ≤ 85%
■ Operating conditions:
Maximum altitude: 800 m
(Up to 2,000 m with reduced performances)
Temperature: -10°C ÷ +40°C
Humidity: ≤ 85%
Controls, indicators and connections
Figure 4
1. Dust container release lever
2. Castor lever
3. Main switch
4. Start button
5. Stop button
6. Voltage presence white indicator
7. Thermal protection operation red indicator
8. Compressor start/stop button (440V/60Hz - 230V/60Hz)
9. Compressor pressure governor (440V/60Hz -
230V/60Hz)
10. Compressor start/stop button (400V/50Hz)
11. Compressor pressure governor (400V/50Hz)
Inspections prior to starting
Figure 5
1. Inlet
Prior to starting, check that:
■ The lter is installed.
■ All latches are tightly locked;
■ The vacuum hose and tools have been correctly tted
into the inlet (1);
■ The bag or safety container is installed, if applicable.
Do not use the device if the lter is faulty.
Starting up
Figure 6
1. Castor brakes
Lock the castor brakes before starting the vacuum cleaner (1).
Starting/stopping the vacuum cleaner
■ Turn the switch (3) (gure 4) to “I” position to
electrically power the vacuum cleaner. The voltage
presence indicator (6) (gure 4) comes on.
■ Push the start button (4) (gure 4) to start the vacuum
cleaner.
■ Push the stop button (5) (gure 4) to stop the vacuum
cleaner.
■ Turn the switch (3) (gure 4) to “0” position to turn off
the electrical power of the vacuum cleaner.
WARNING!
The start/stop button (8 and 10) (gure 4) of the
compressor should always be in “I” position during
the operation.
WARNING!
Check the pressure of the air used to clean the
lters which is produced by the compressor.
It must never be superior than 5 bars, if necessary,
adjust it to the correct level using the related
pressure governors (9 e 11) (gure 4).
WARNING!
The activation of the indicator (7) (gure 4) signals
the operation of the vacuum unit thermal protection
due to the excessive electrical power draw of the
unit.
Page 8
Operating manual BDC3140 DBP/LPP 8/12
GB
Emergency stopping
Turn the main switch (3) (gure 4) to “0” position.
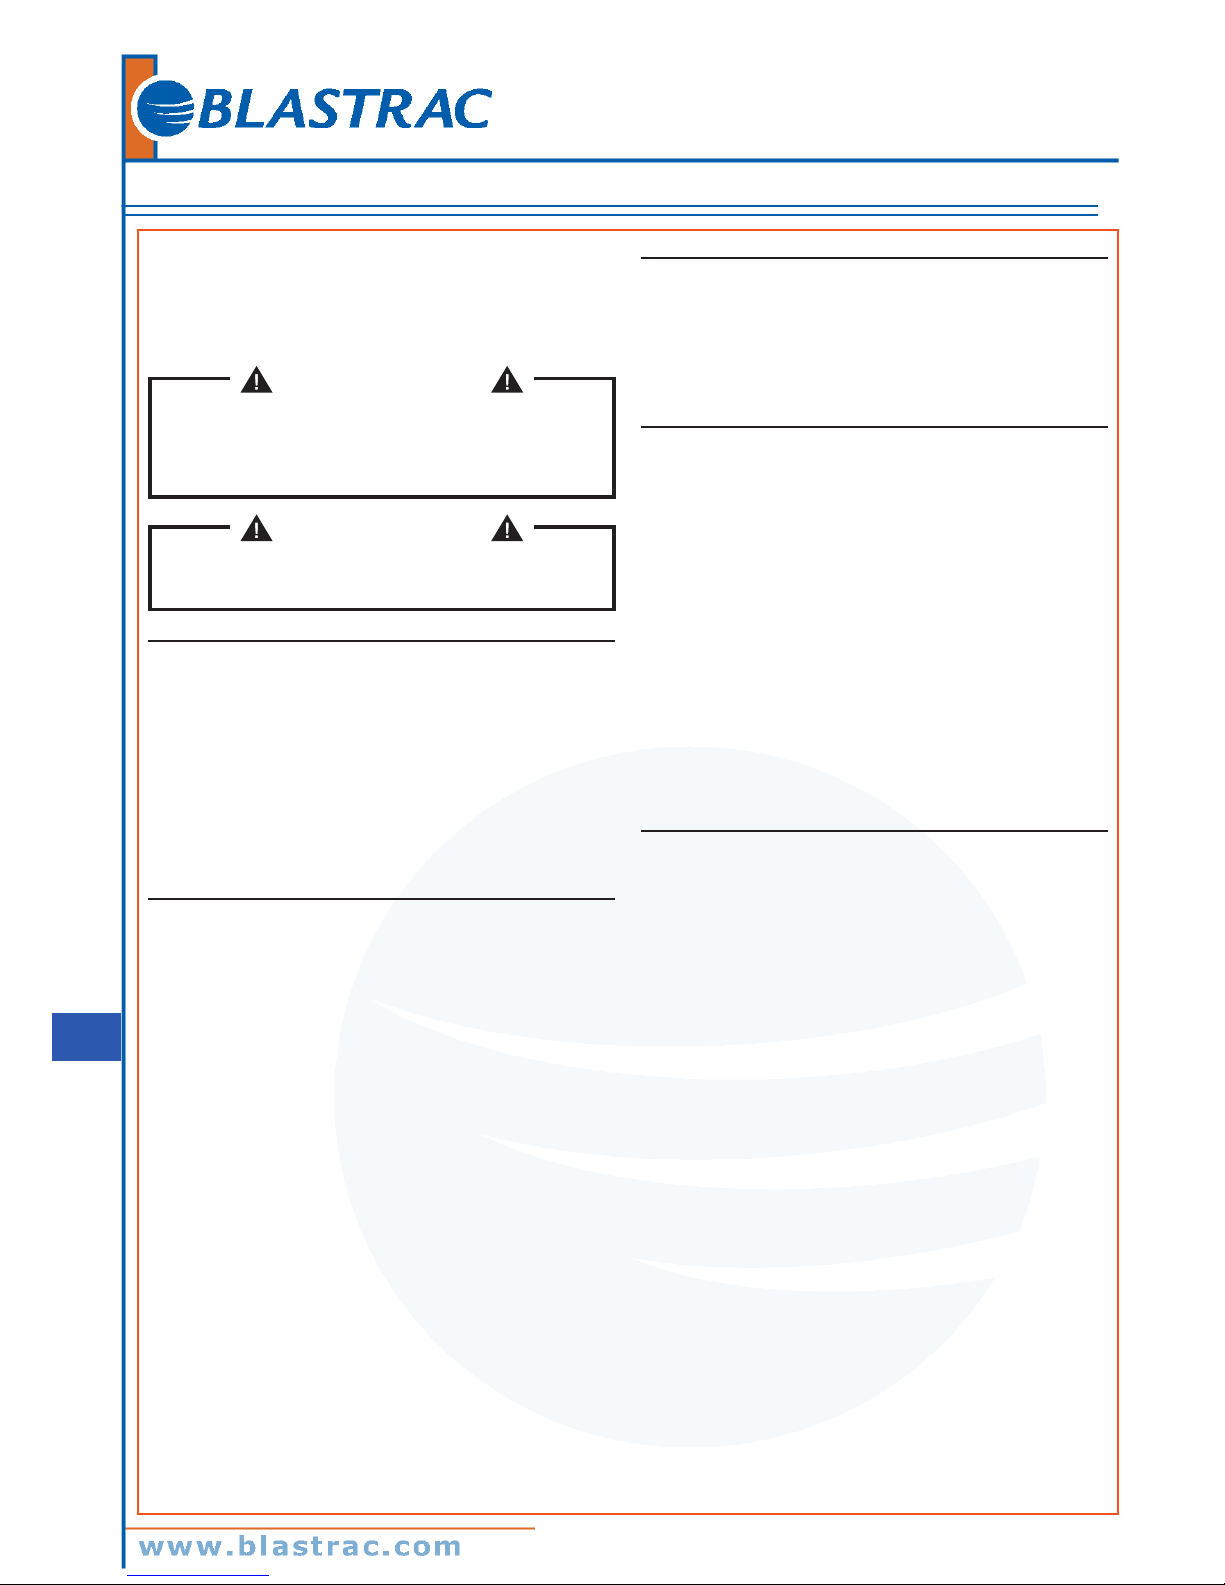
Emptying the dust container
WARNING!
WARNING! To lift the container and empty it, when
using a forklift truck, use 4056000394 kit if the
total weight of the container and collected material
is not greater than 80 kg. For greater weights, use
Z5 36073 or Z5 36074 kit.
WARNING!
Before proceeding with these operations, turn off
the vacuum cleaner and remove the plug from the
power socket.
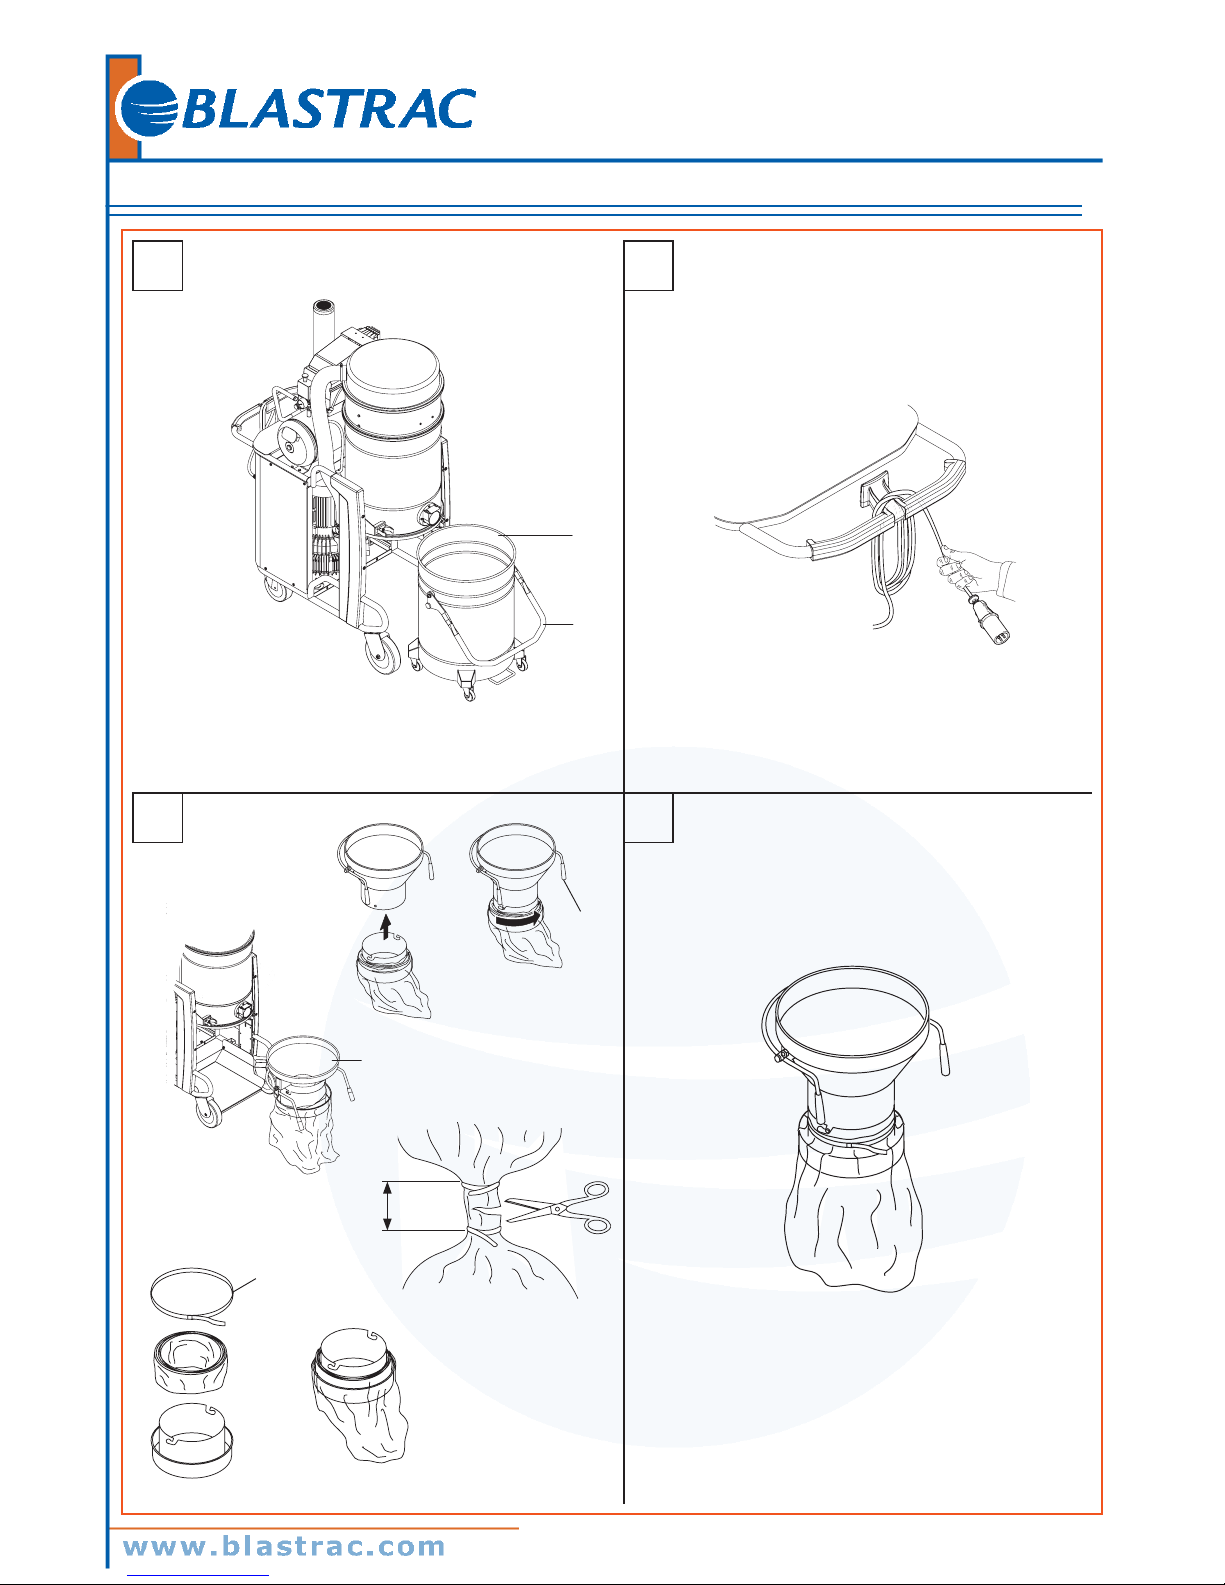
Figure 7
1. Dust container
2. Dust container release lever
Normal version
■ Release the dust container (1) using the lever (2), then
remove and empty it.
■ Make sure the seal is in perfect condition and correctly
positioned.
■ Place the container back in position and secure it again.
Operation of the ltering cartridges
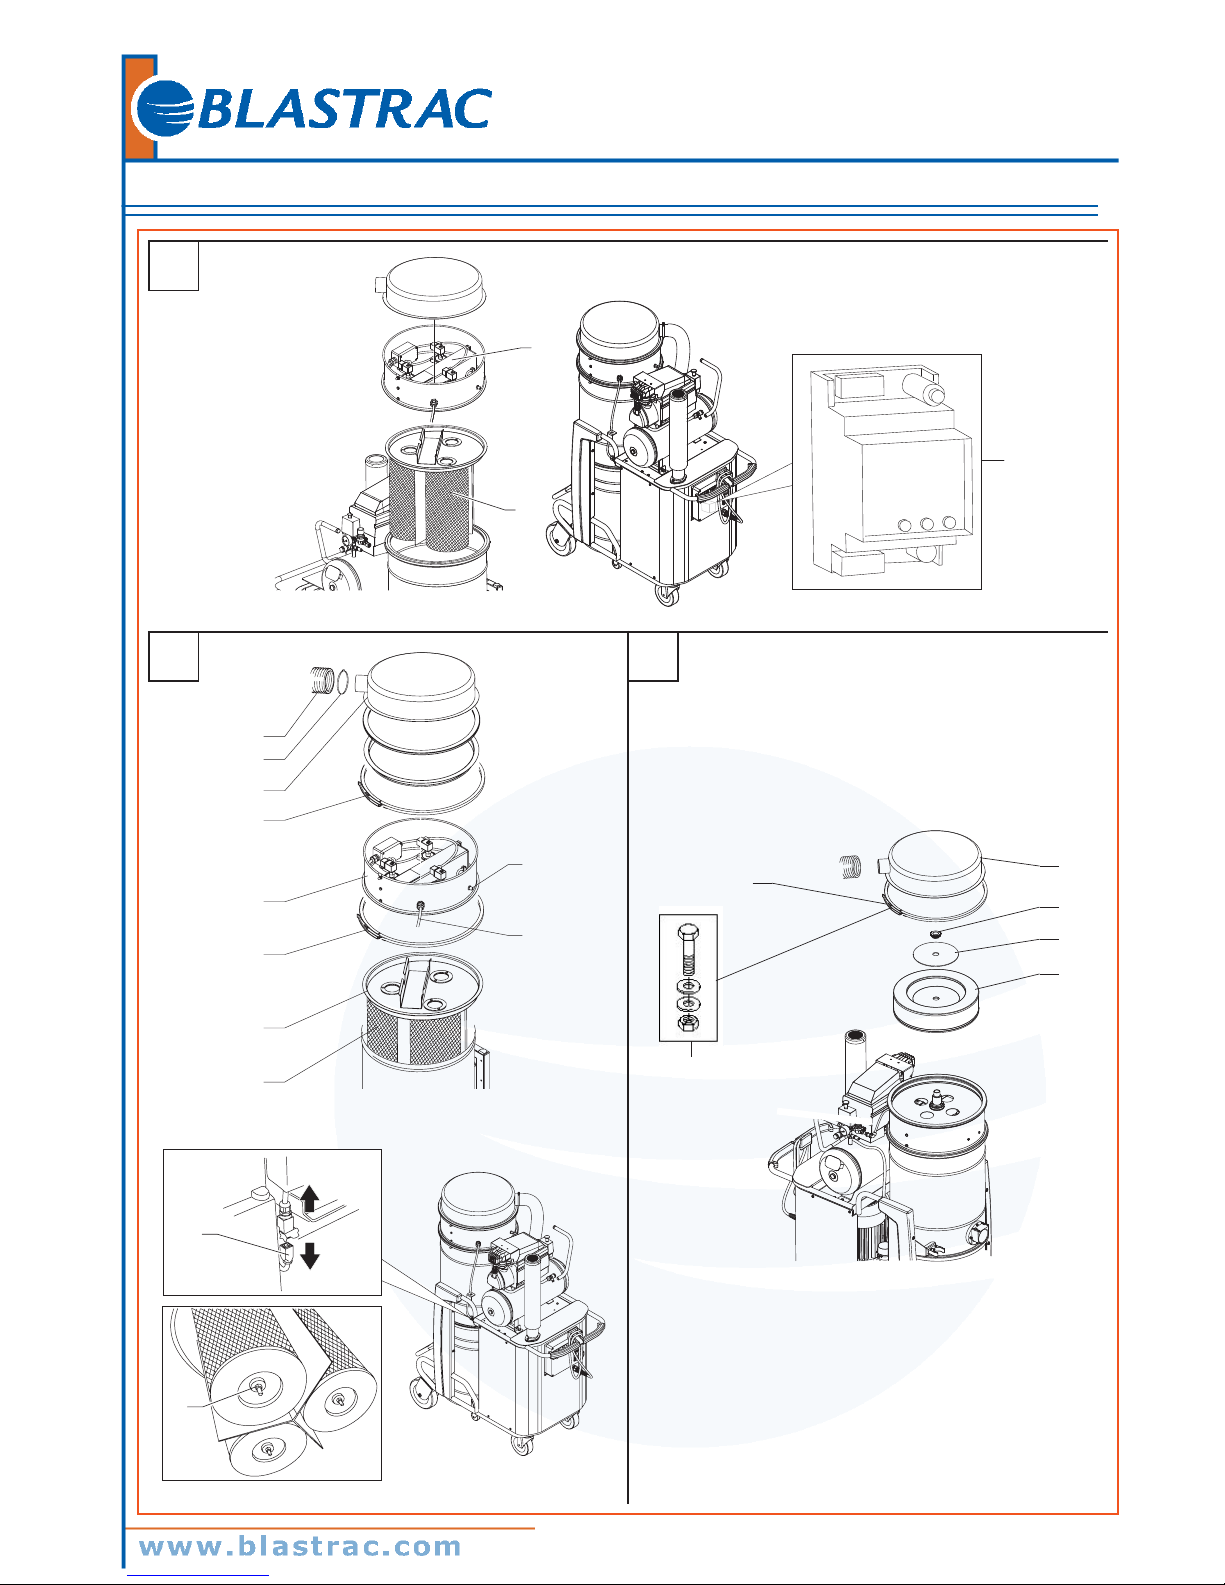
Figure 9
1. Electropneumatic device
2. Filter cartridges
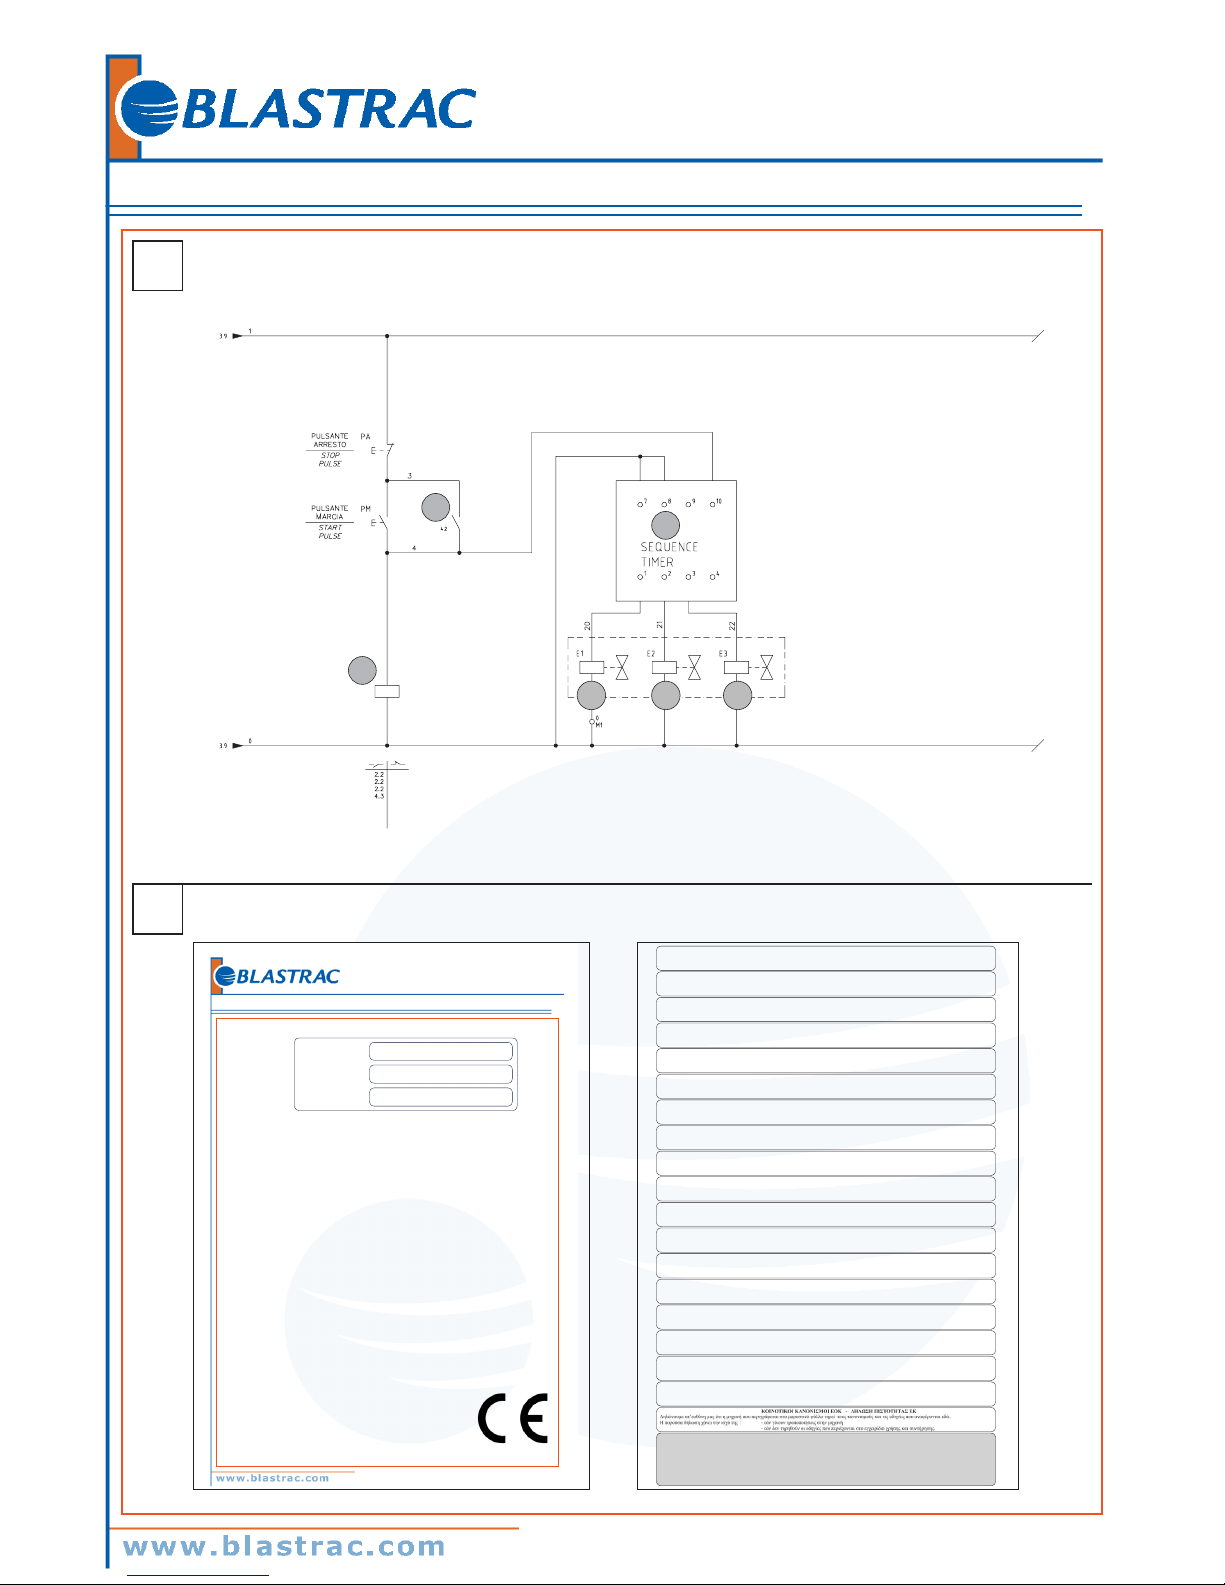
3. Timer
The ltering cartridges (2) serve the purpose of ltering
the intake air. The vacuum cleaner is equipped with a fully
automatic electropneumatic device (1) to alternately clean
the ltering cartridges (2), which guarantees continuous
service.
Powered with a 24V rating, is complete with cyclic timer (3)
to regulate the following times:
T3= time between one cleaning cycle and the next, set on 1
minute;
T2= time between one cleaning operation of the cartridge
(2) and the next, set on 30 seconds;
T1= opening time of the solenoid valve for backwashed air
exhaust into the cartridge, set at 2 tenths of a second.
The shorter the time, the more energetic the cleaning
action will be.
Check the arrows on the knobs of the timer (3) for the
exact regulation.
Factory setting should not be changed if without
consulting Blastrac.
The three solenoid valves of the electropneumatic device
control the cleaning of the relative lter cartridges.
Figure 16
1. Filter cleaning solenoid valve E1
2. Filter cleaning solenoid valve E2
3. Filter cleaning solenoid valve E3
Tilting discharge device replacement
and use (BDC3140 LPP)
Figure 8A
1. Tilting discharge device assembly
■ Fasten the hopper to the ltering chamber, by inserting
it into the relevant housings and, operating on the lever
(2) to lock it.
■ Insert the bag (Longopac®) into the relevant support
and fasten its end with the belt (1).
■ Engage the tilting discharge device support to the
hopper by fastening it with the relevant pins.
■ Remove the bag (Longopac®) until it lays on the lower
support platform and close its end with the supplied
clamp.
■ When the bag is full (Longopac®) close the upper end
with two clamps by fastening them at 50 mm one
from the other, then with a pair of scissors cut the bag
between the two clamps (3).
Single plastic bag replacement and
use
Figure 8B
Place the plastic bag outside the tilting discharge device
support, taking care that the bag bottom lays on the lower
support platform and lock the upper part of the bag with the
belt.
Page 9
Operating manual BDC3140 DBP/LPP
9/12
GB
Maintenance, cleaning and
decontamination
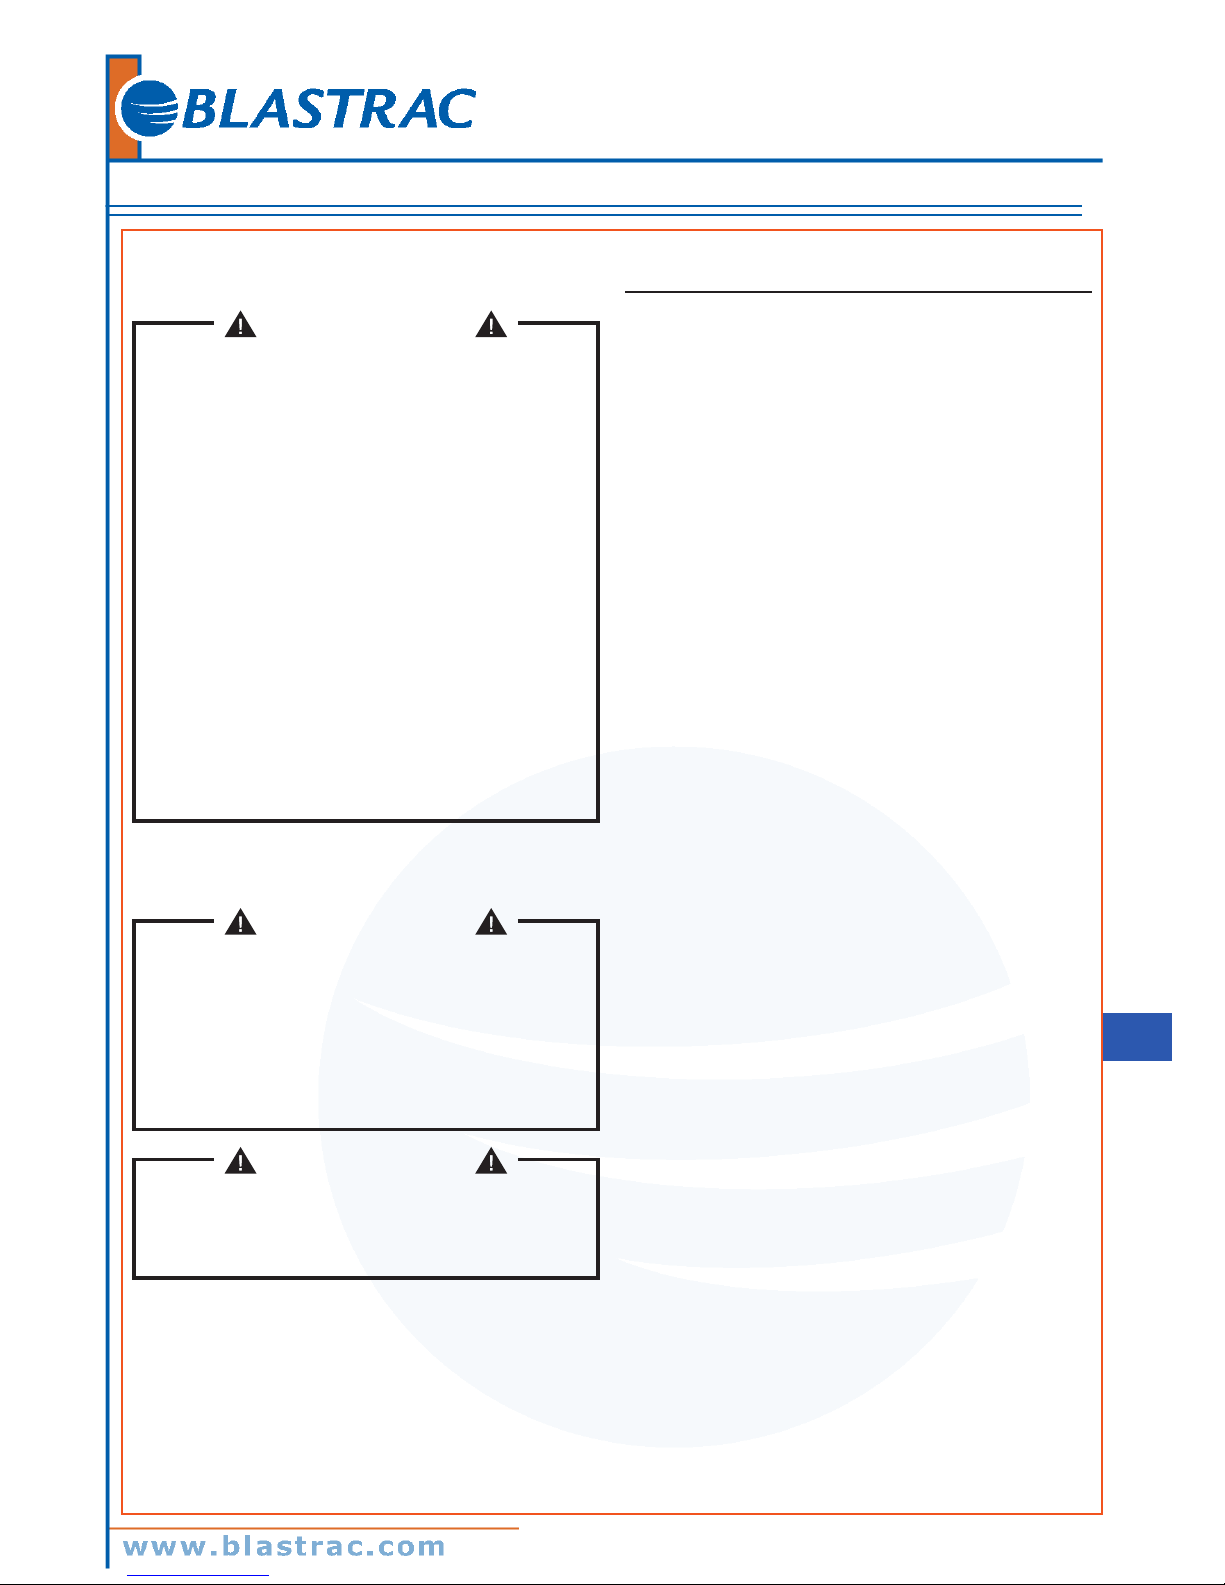
WARNING!
The precautions described below must be taken
during all the maintenance operations, including
cleaning and replacing of the lter.
■ To allow the user to carry out the maintenance
operations, the vacuum cleaner must be
disassembled, cleaned and overhauled as far as
is reasonably possible, without causing hazards
for the maintenance staff or other people. The
suitable precautions include decontamination
before disassembling the device, adequate
ltered ventilation of the exhaust air from the
room in which it is disassembled, cleaning of
the maintenance area and suitable personal
protection.
Compartments that are not dust-tight must
be opened with suitable tools (screwdrivers,
wrenches, etc.) and thoroughly cleaned.
■ Carry out a technical inspection at least once
a year, e.g.: check the air lter to nd out
whether the air-tightness of the vacuum
cleaner has been impaired in any way and
make sure that the electric control panel
operates correctly. This inspection must
be carried out by the manufacturer or by a
competent person.
Filter disassembly and replacement
WARNING!
When the vacuum cleaner is used to vacuum
hazardous substances, the lters become
contaminated, therefore:
■ Work with care and avoid spilling the
vacuumed dust and/or material.
■ Place the disassembled and/or replaced lters
in a sealed plastic bag.
■ Close it hermetically.
■ Dispose of the lters in accordance with the
laws in force.
WARNING!
Filter replacement is a serious matter. The lters
must be replaced with ones of identical ltering
surface characteristics.
Otherwise the vacuum cleaner will not operate
correctly.
Filter cartridge replacement
Figure 10
1. Vacuum hose
2. Fixing clamp
3. Compressed air hose
4. Electric cable
5. Electric connector
6. Release lever
7. Cover
8. Filter cartridge support
9. Filter cartridge
10. Filter cartridge xing nut
11. Side cover
Before proceeding with these operations, turn off the vacuum
cleaner and remove the plug from the power socket.
■ Disassemble the vacuum hose (1) and tighten the
clamp (2).
■ Disconnect the compressed air hose (3) by releasing its
quick-t coupling.
■ Disconnect the electric cable (4) by releasing the
connector (5).
■ Use the lever (6) to remove the cover (7) and the side
cover (11).
■ Disassemble the support (8) with the lter cartridges.
■ Remove the lters cartridge (9) by unscrewing the
xing nuts (10).
■ Assemble the new lter cartridges and proceed in the
reverse order of removal to install all the components,
making sure that the previously disconnected electrical
and pneumatic connections have been reconnected.
When reassembling, turn the cover until the
electropneumatic device is in the right position for the
cartridge support.
■ Dispose of the old lter cartridges according to the laws
in force.
Page 10
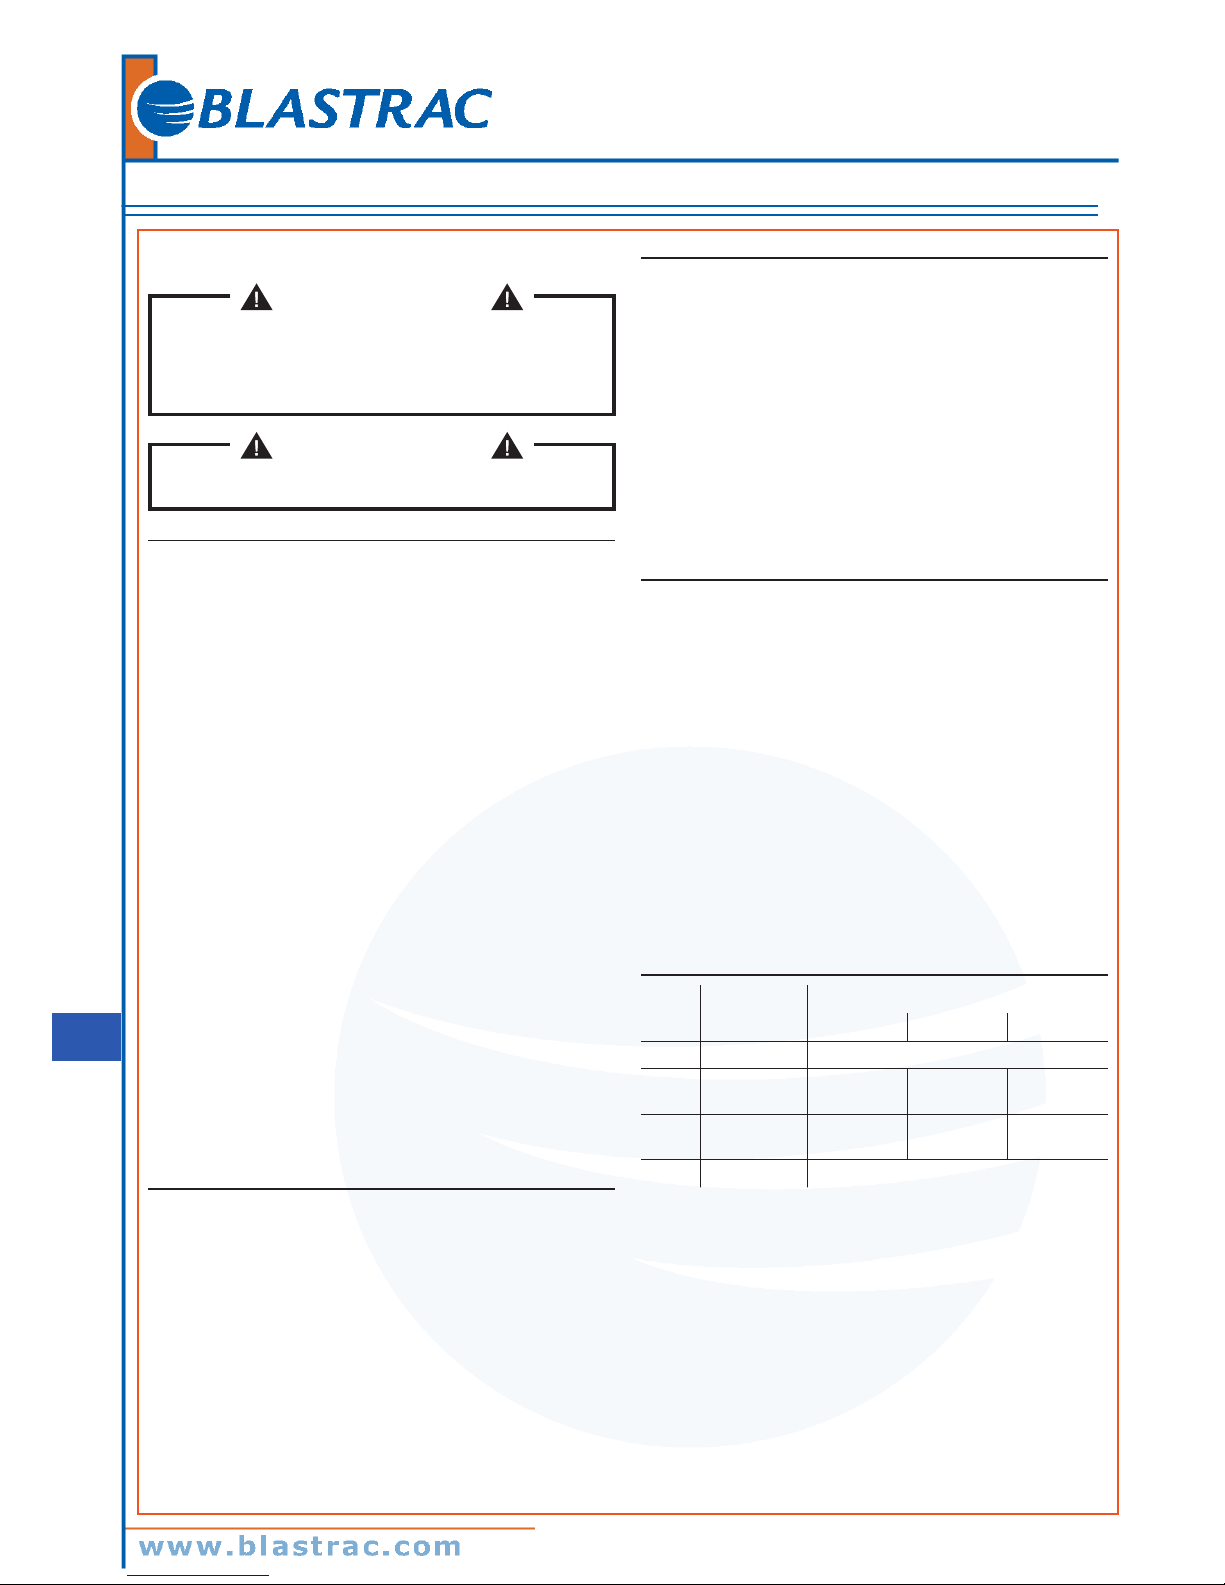
Operating manual BDC3140 DBP/LPP 10/12
GB
HEPA lter replacement
WARNING!
Take care not to raise dust when this operation is
carried out. Wear a P3 mask and other protective
clothing plus protective gloves (DPI) suited to the
hazardous nature of the dust collected, refer to the
laws in force.
WARNING!
Do not use the absolute lter again after having
removed it from the vacuum cleaner.
Figure 11
1. Vacuum cap
2. Locking lever
3. Safety bolt
4. Absolute lter lock ring
5. Absolute lter disc
6. Absolute lter
Before proceeding with these operations, turn the vacuum
cleaner off and disconnect the plug from the power socket.
■ Unlock the safety bolt (3).
■ Use the lever (2) to release the cap (1) then pull it up
and out of the vacuum cleaner.
■ Unscrew ring (4).
■ Pull out disc (5) and absolute lter (6).
■ Place absolute lter (6) in a plastic bag, close the bag
hermetically and dispose of the lter in accordance with
the laws in force.
■ Insert a new lter (6) with the same ltering
characteristics as the removed one.
■ Lock the absolute lter with disc (5) and tighten ring (4).
■ Insert the cap (1) again.
■ Fix the cap in place with the lever (2) and lock the
safety bolt (3) again.
Motor cooling fan inspection and
cleaning
Periodically clean the motor cooling fan to prevent the motor
from overheating, especially if the vacuum cleaner is used in
a dusty place.
Tightness inspection
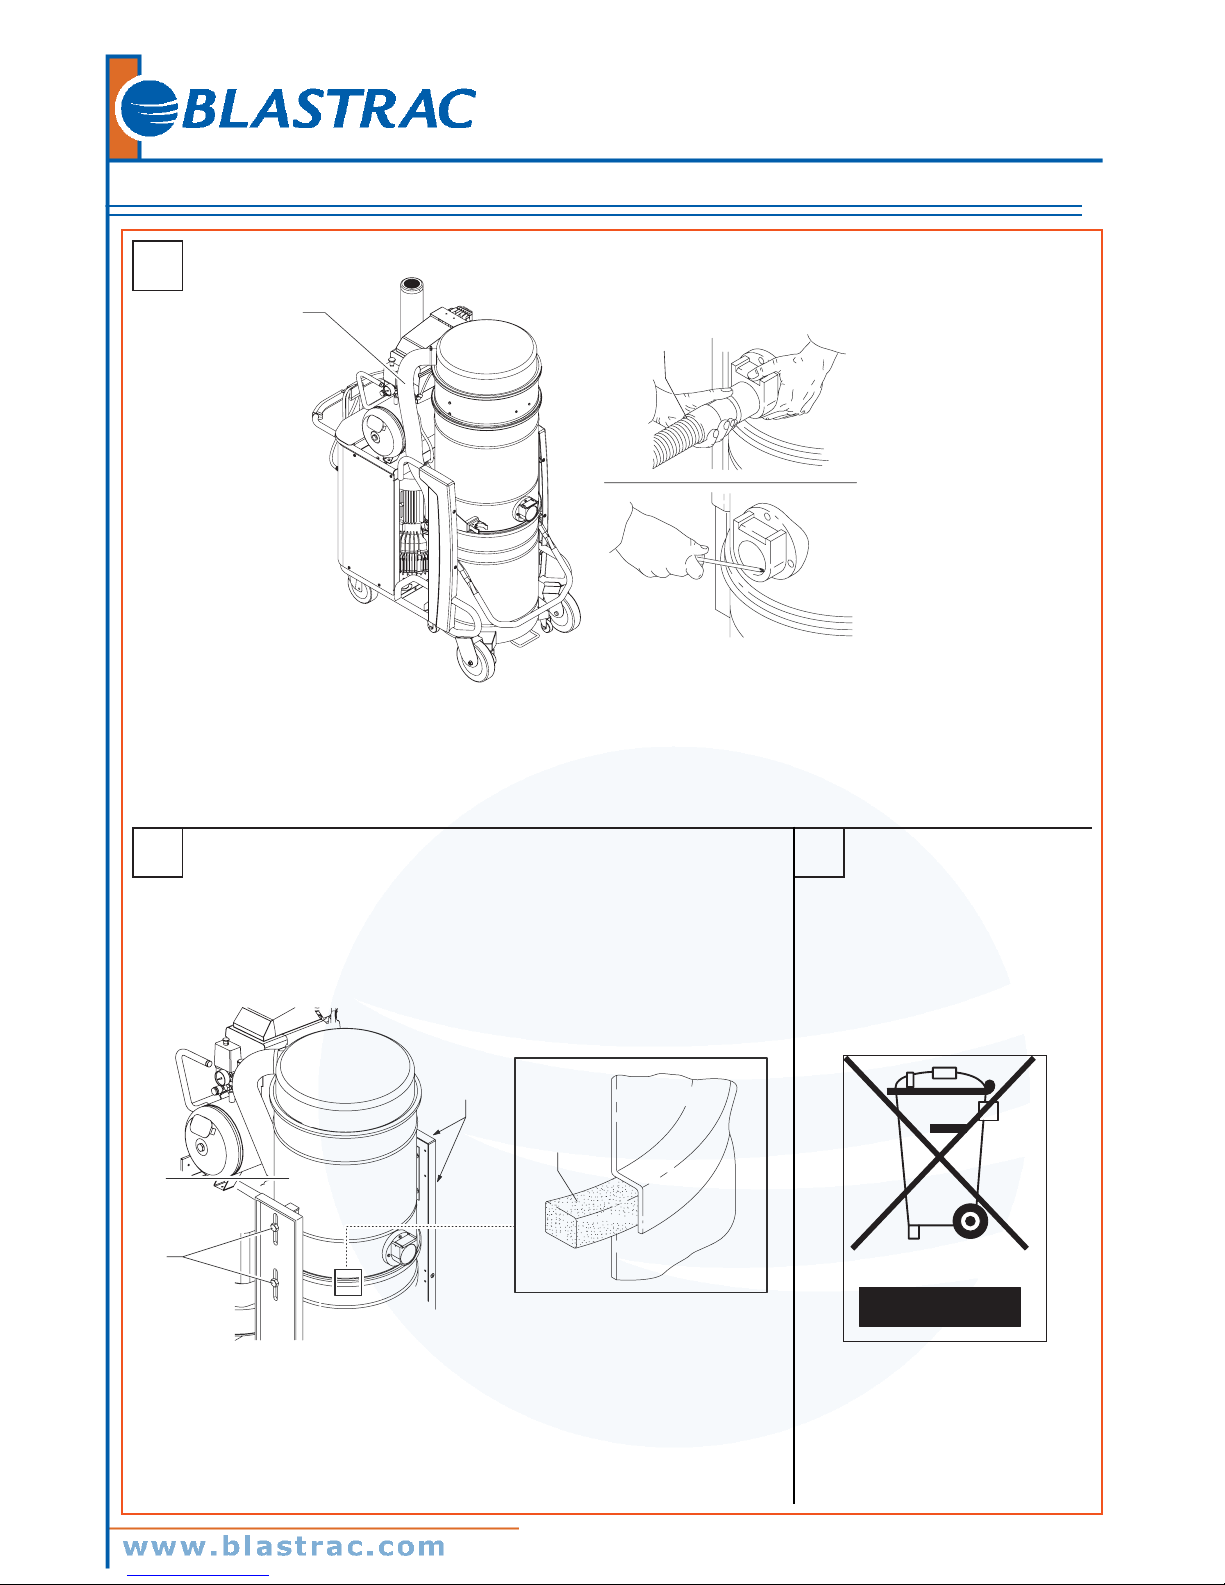
Figure 12
1. Suction connecting hose
2. Hose
■ Hoses check
Make sure that the suction connecting hose (1) is in a
good condition and correctly xed.
If the hose is damaged, broken or badly connected to
the unions, it must be replaced.
When sticky materials are treated, check for possible
clogging along the hose (2), in the inlet and on the
bafe plate inside the ltering chamber.
Scrape the inlet from the outside and remove the
deposited waste as indicated in the gure.
Figure 13
1. Seal
2. Screws
3. Filtering chamber
■ Filtering chamber tightness check
If the gasket (1) between the container and the ltering
chamber (3) fails to guarantee tightness:
▪ Loosen the four screws (2) that lock the ltering
chamber (3) against the vacuum cleaner structure.
▪ Allow the ltering chamber (3) to lower down and
tighten the screws (2) once it has reached the
tightness position.
The gasket (1) must be replaced if it is torn, cut, etc.
Disposing of the vacuum cleaner
Figure 14
Dispose of the vacuum cleaner in compliance with the laws
in force.
■ Proper disposal (electric and electronic waste).
(Applicable in the European Union and in
countries providing a separate collection system)
The above symbol (Fig. 14), which is present on the product
or in its documentation, indicates that the product cannot be
disposed of together with other domestic waste at the end of
its life cycle.
To prevent damage to the environment or health caused by
improper waste disposal, please separate this product from
other waste and recycle it responsibly in order to support the
sustainable reutilisation of material resources.
This product can not be disposed of together with other
commercial waste.
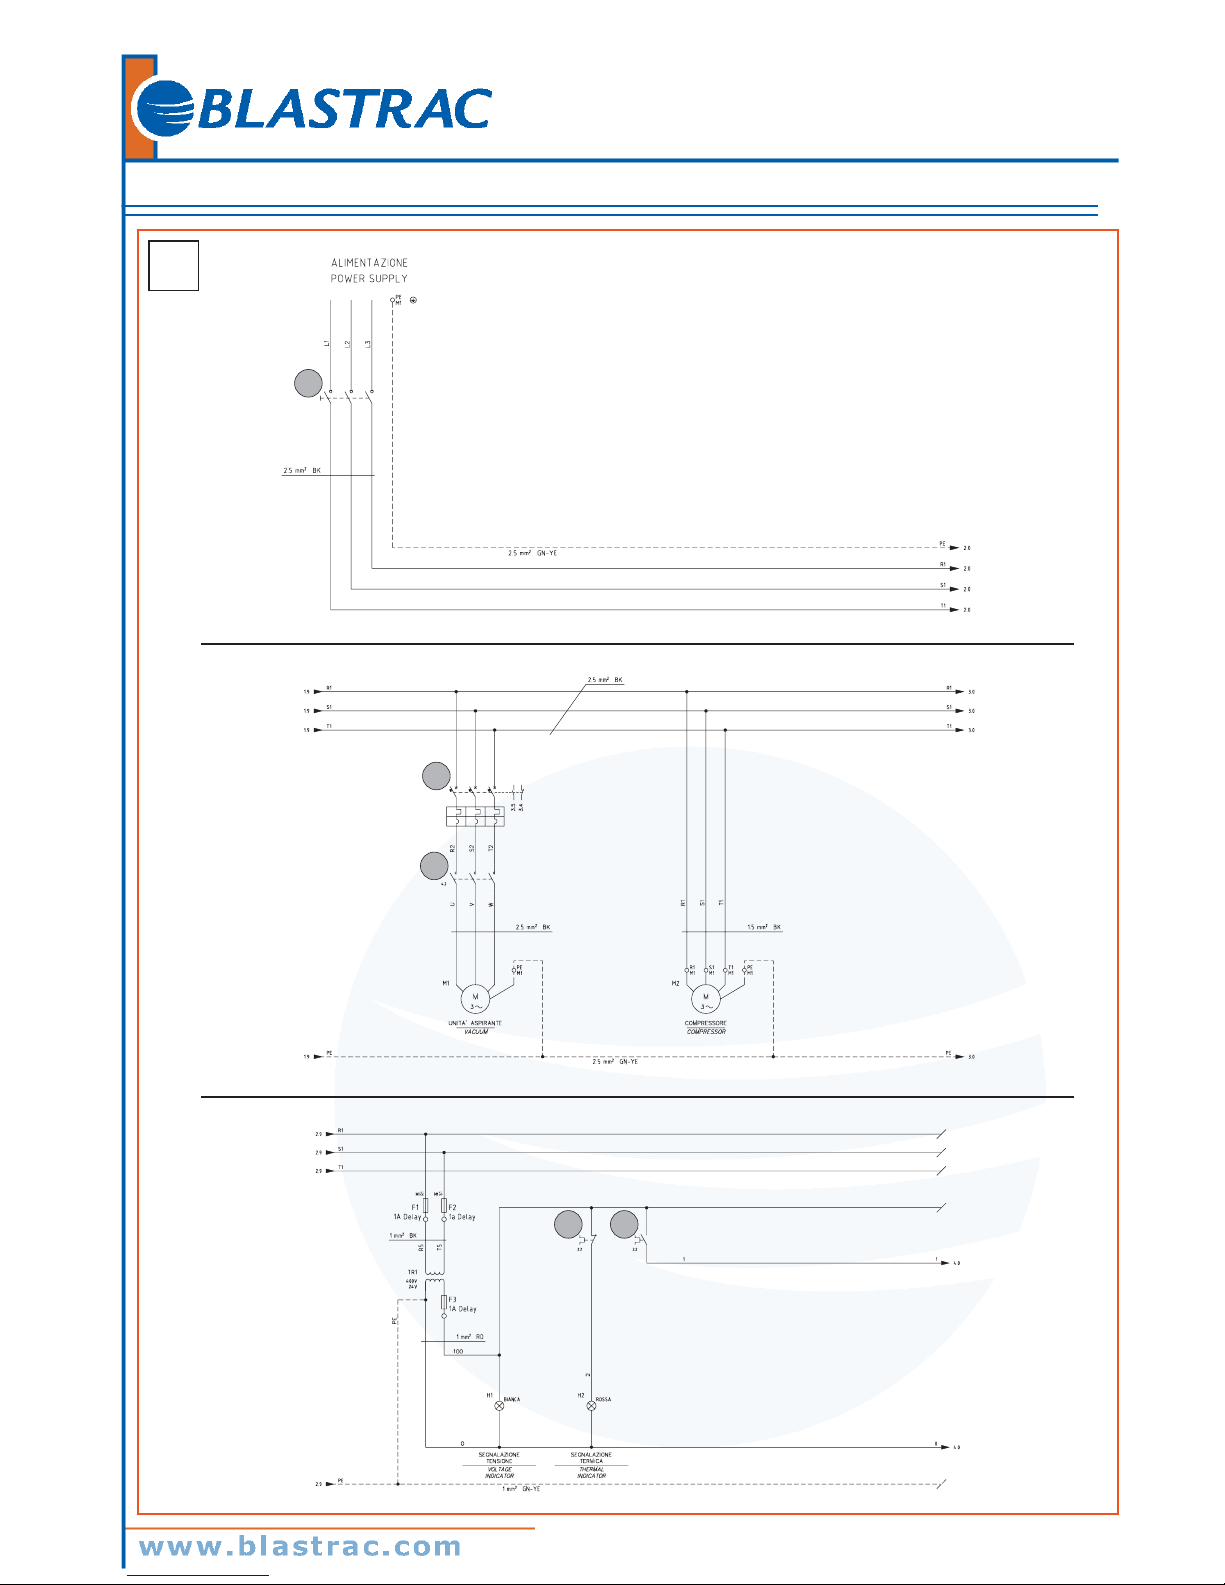
Wiring diagrams
Figure 15 - 16
Item Part
Code of the model
230V/60Hz 400V/50Hz 440/60Hz
Q1 Main switch Z8 39989
Q2
Circuit
breaker
Z8 39535
Z8 39726
Z8 39916
Z8 39726
Z8 39014
Z8 39726
KM1 Contactor
Z8 39102
Z8 39838
Z8 39281 Z8 391105
TS2 Cyclic timer Z8 391107
Page 11
Operating manual BDC3140 DBP/LPP
11/12
GB
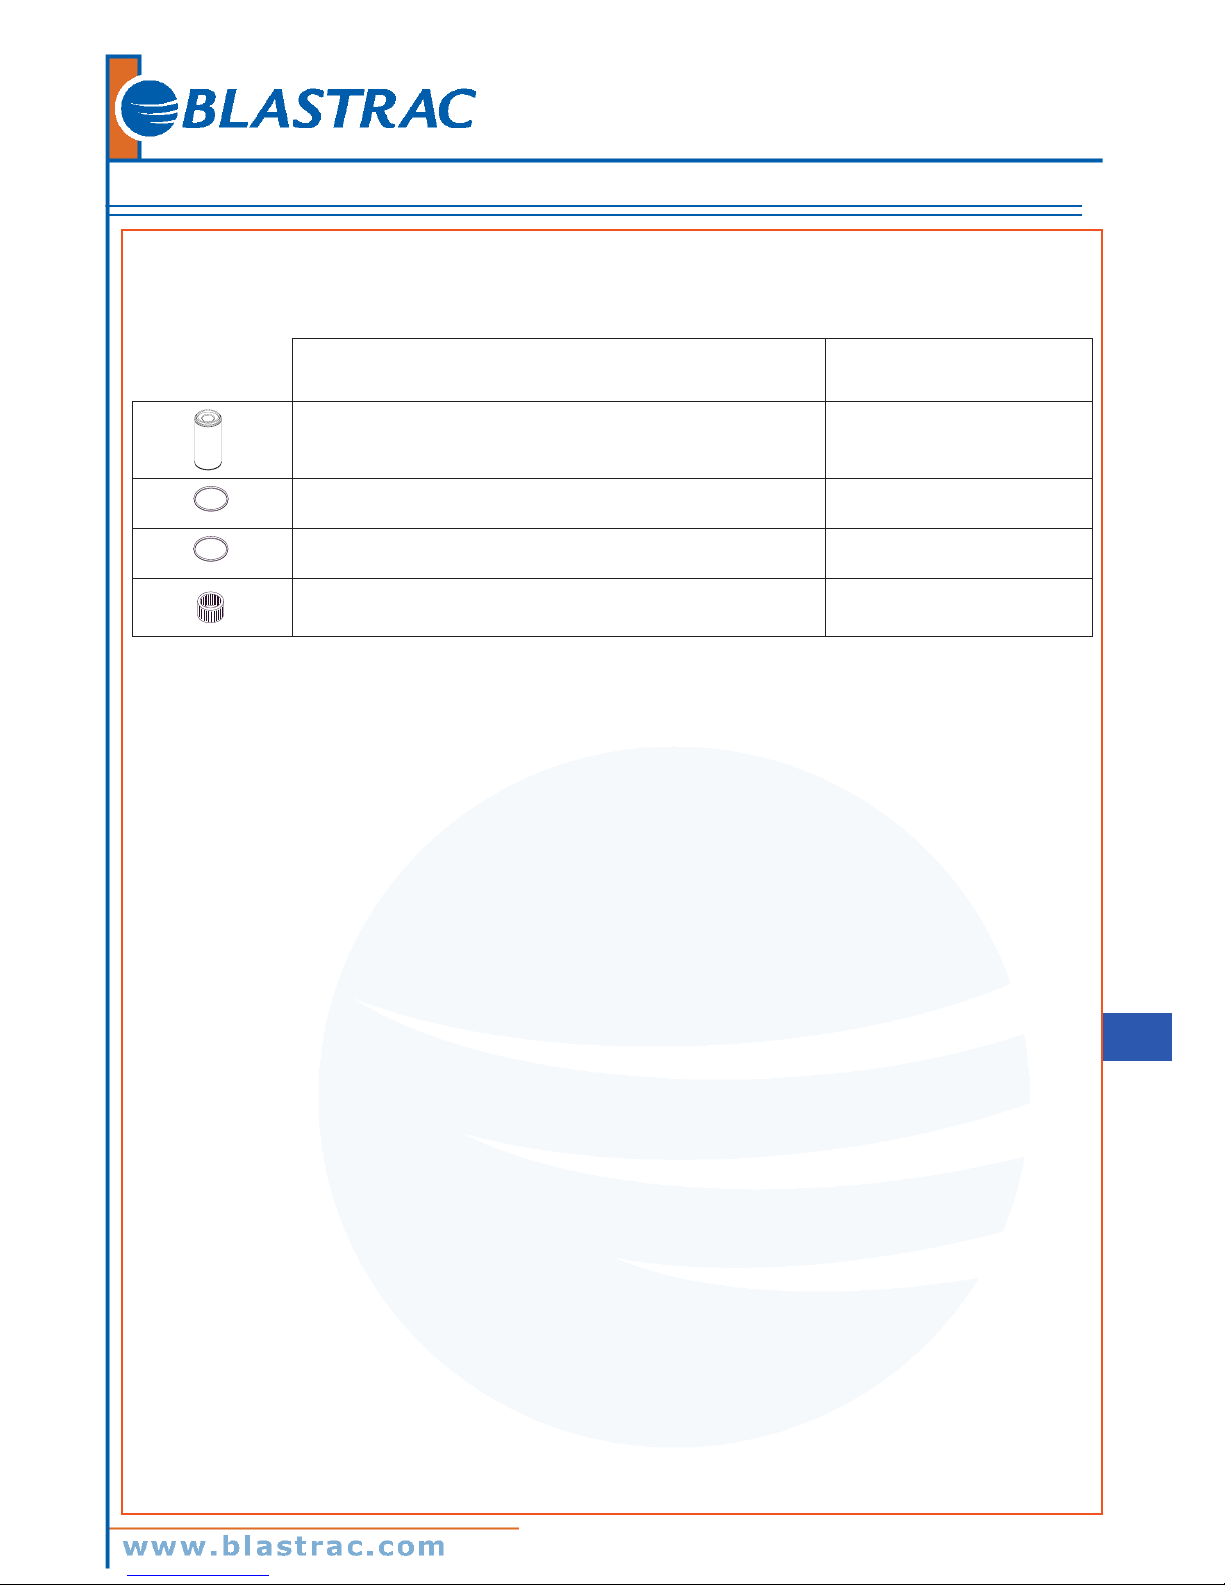
Recommended spare parts
The following is a list of spare parts that should be kept ready at hand in order to speed up maintenance operations.
Refer to the manufacturer’s spare parts catalogue when ordering spare parts.
Description Code
+
Primary cartridge lter
490803-1
Filter ring seal Z8 17026
Filter chamber gasket 40000762
Absolute lter 4081700936
Page 12
Operating manual BDC3140 DBP/LPP 12/12
GB
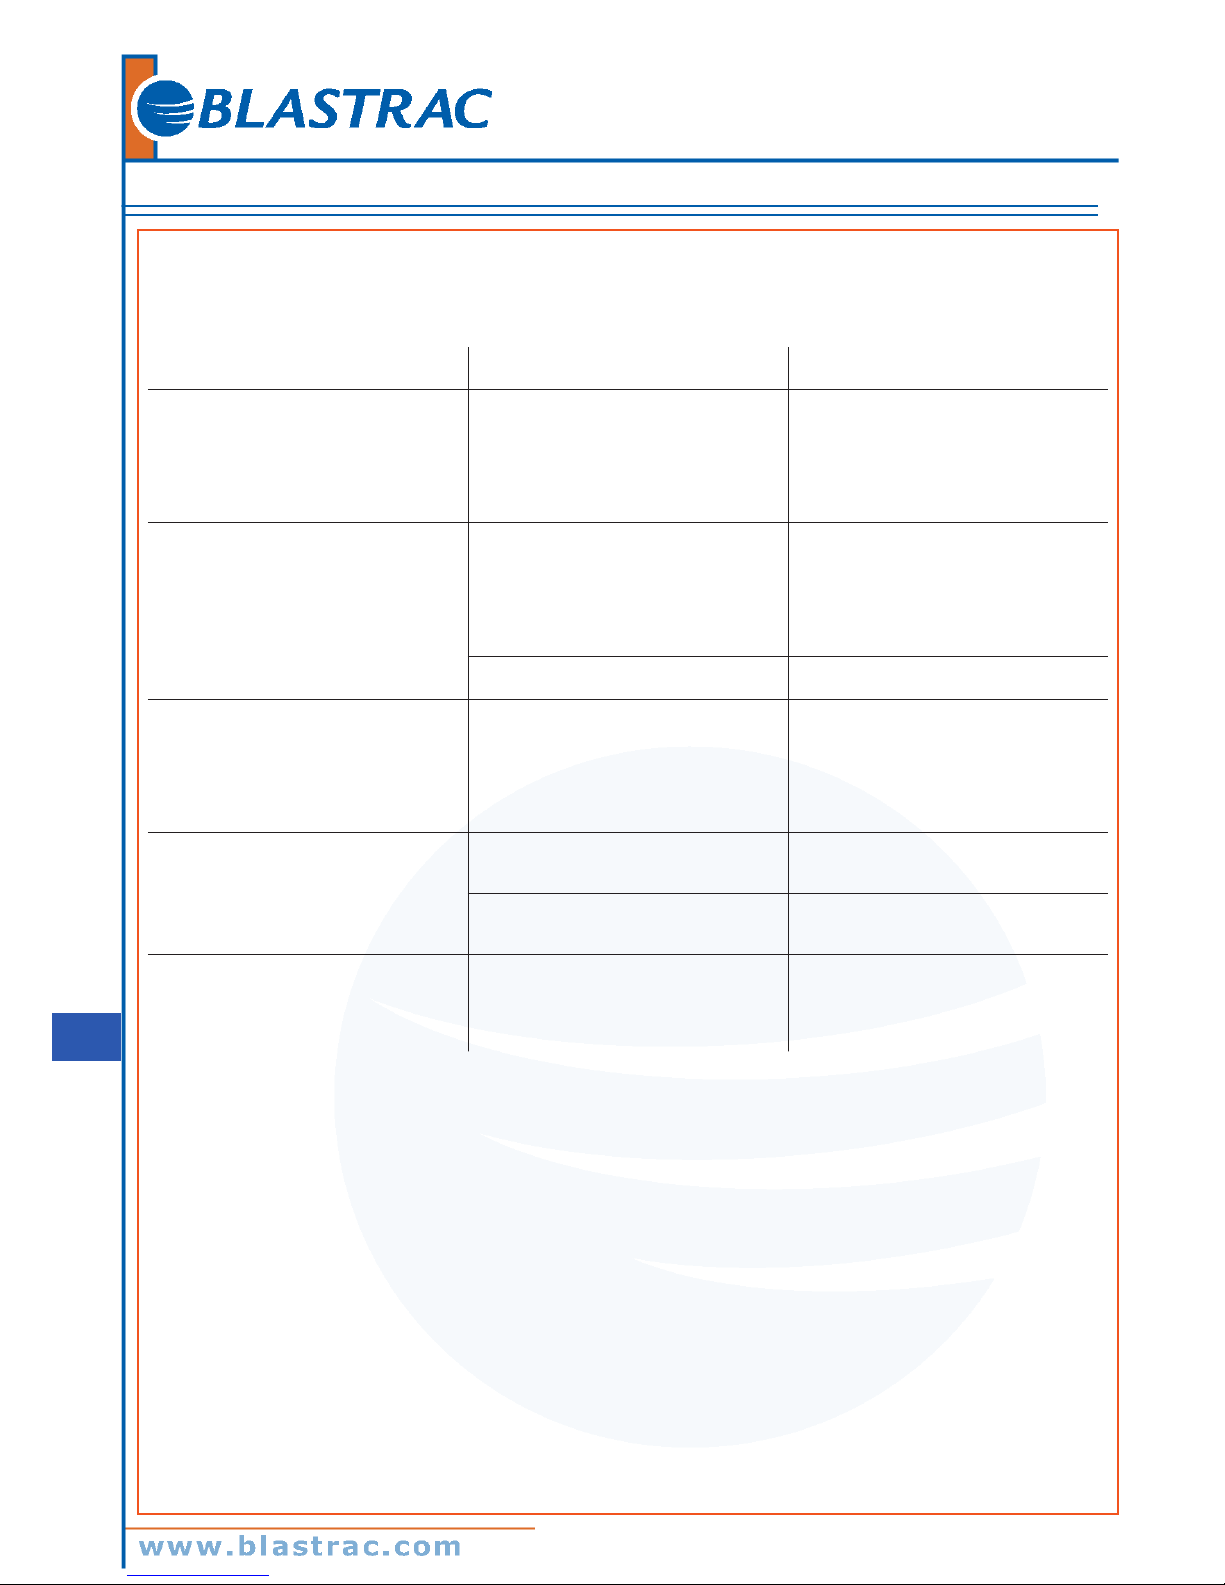
Troubleshooting
Problem Cause Remedy
The vacuum cleaner does not start Lack of power supply Check for power at the socket.
Check the condition of the socket and
the cable.
If necessary, ask for assistance to
be performed by a manufacturer’s
technician.
The vacuum cleaner does not vacuum
correctly
Clogged lters Check the lter cleaning operation or
replace the lters.
Check the compressor functionality
(see the relative manual).
Make sure that the compressed air
nozzles are aligned with the cartridges.
Clogged vacuum hose Check the vacuum hose and clean it.
The vacuum cleaner suddenly stops Circuit breaker activation Check the circuit breaker adjustment.
Check the motor electrical input.
Empty the container.
If necessary, ask for assistance to
be performed by a manufacturer’s
technician.
Dust leaks from the vacuum cleaner Filters are broken Replace them with others of identical
type.
Inadequate lter Replace it with another of a suitable
category and check.
Electrostatic current on the vacuum
cleaner
Non existent or inefcient grounding Check all ground connections. In
particular on the vacuum inlet tting;
replace the hose with an antistatic
hose.
Page 13
Operating manual BDC3140 DBP/LPP
1/8
1
2 3
1
9
10
6
12
5
8
7
15
3
11
2
13
14
4
.... VOLT
16
ME77
Typ S3 1~ 13 A
S/N 07AJ814 3000 W Kg 71
Ref.No: 4010300258 50/60 Hz 44
B
C
A
B
C
A
Page 14
Page 15
Page 16
10
6
8
1
2
4
3
7
6
11
5
10
5
1
2
4
5
6
3
Page 17
Page 18
Page 19
DIRETTIVE COMUNITARIE CE - EC DICHIARAZIONE DI CONFORMITA’ CE
Dichiariamo sotto la nostra responsabilità che la macchina sopra descritta è conforme alle Direttive e agli Standard sotto descritti.
La presente dichiarazione perde la sua validità: - qualora vengano apportate modiche alla macchina;
- qualora non vengano rispettate le prescrizioni del manuale di uso e manutenzione.
EWG - RICHTLINIEN - EG - KONFORMITÄTSERKLÄRUNG
Wir erklären unter eigener Verantwortung, dass die auf diesem Blatt beschriebene Maschine den hier angeführten Richtlinien und Normen entspricht.
Diese Erklärung verliert ihre Gältigkeit: - sobald Änderungen an der Maschine vorgenommen werden
- sobald die im Handbuch für Gebrauch und Wartung enthaltenen Vorschriften nicht berücksichtigt werden.
DIRECTIVES COMMUNAUTAIRES CE - DECLARATON DE CONFORMITE CE
Nous déclarons sous notre seule responsabilité que la machine décrite sur le recto de la page est conforme aux directives et normes qui y sont mentionnées.
La présente déclaration perd toute validité: - si la machine subit des modications;
- si les prescriptions contenues dans ce manuel d’utilisation et d’entretien ne sont pas respectées.
DIRECTIVAS COMUNITARIAS EC - DECLARACIÓN DE CONFORMIDAD CE
Declaramos bajo nuestra responsabilidad que la máquina descripta en el frente de la pàgina cumple con las directivas y normas enumeradas.
La presente declaración pierde su validez: - En el caso que se introduzcan modicaciones en la máquina
- En el caso que no se respeten las prescripciones contenidas en el manual de uso y manutención.
SMˇERNICE EVROPSKÉHO HOSPODÁˇRSKÉHO SPOLEˇCENSTVÍ - PROHLÁŠENÍ O SHODˇE SE SMˇERNICEMI EVROPSKÉHO SPOLEˇCENSTVÍ
Na svou vlastní zodpovˇednost prohlašujeme, ˇze zaˇrízení popsané v úvodu této publikace vyhovuje normám a smˇernicím v ní uveden´ych.
Toto prohlášení ztrácí svou platnost v následujících pˇrípadech: - pokud by na zaˇrízení byly provedeny zmˇeny;
- pokud by nebyly respektovány pokyny a naˇrízení uvedené v této uˇzivatelské pˇríruˇcce.
SMERNICE EURÓPSKEHO HOSPODÁRSKEHO SPOLOˇCENSTVA - PREHLÁSENIE O ZHODE SO SMERNICAMI EURÓPSKEHO SPOLOˇCENSTVA
Na vlastnú zodpovednost’ prehlasujeme, že zariadenie popísané v úvodu tejto publikácie vyhovuje normám a smerniciam v nej uveden´ych.
Toto prehlásenie stráca svoju platnost’ v nasledujúcich prípadoch: - ak by na zariadení boli prevedené zmeny;
- ak by neboli rešpektované pokyny a nariadenia uvedené v tejto užívatel’ské príruˇcke.
SMERNICA EVROPSKE GOSPODARSKE SKUPNOSTI - IZJAVA O USTREZNOSTI S SMERNICAMI EVROPSKE SKUPNOSTI
Na svojo odgovornost izjavljamo, da naprava, ki je napisana v uvodu te publikacije ustreza standardom in smernicam, ki so v njej navedene.
Ta izjava preneha veljati v sledeˇcih primerih: - ˇce je prišlo do kakršnekoli spremembe na napravi;
- ˇce niso bila upoštevana navodila in uredbe, ki so uvedene v tem priroˇcniku za uporabnika.
COMMUNAUTAIRE RICHTLIJNEN EG - VERKLARING VAN OVEREENKOMSTIGHEID EG
Wij verklaren onder onze verantwoordelijkheid dat de machine, beschreven op de voorzijde van de pagina, overeenkomt met de richtlijnen en normen cit. loc.
De onderhavige verklaring verliest zijn geldigheid: - indien wijzigingen aan de machine worden aangebracht
- indien de voorschriften, in de handleiding van gebruik en onderhoud, niet worden nageleefd.
DET EUROPÆISKE FÆLLESSKABS DIREKTIVER - EU KONFORMITETSERKLÆRING
Vi erklærer hermed under fuldt ansvar, at den på forsiden beskrevne maskine er konform med og overholder alle direktiver og heri indeholdte normer.
Nærværende erklæring mister sin gyldighed: - såfremt der foretages ændringer på maskinen
- såfremt anvisningerne i brugs- og vedligeholdelsesmanualen ikke overholdes.
EK KOMUNIT¯AR¯AS DIREKT¯IVAS - EK ATBILST¯IBAS CERTIFIK¯ATS
Apliecin¯am uz m¯usu atbild¯ıbu, ka maš¯ına, kas aprakst¯ıta ˇš¯ıs lapas priekšpus¯e, atbilst ˇšeit uzr¯ad¯ıtaj¯am direkt¯ıv¯am un norm¯am.
Šis certik¯ats zaud¯e savu der¯ıgumu: - ja, maš¯ınai tiek veiktas izmai¸nas
- ja netiek iev ¯eroti lietoˇšanas un apkopes rokasgr¯amat¯a aprakst¯ıtie nor¯ad¯ıjumi.
EL Direktiiv - EL vastavuse deklaratsioon
Kinnitame omal vastutusel et esilehel kirjueldatud masin on vastavuses ulalmainitud direktiivide ja määrustega.
Käesolev deklaratsioon kaotab kehtivuse juhul kui: - masinat moditseeritakse
- ei peeta kinni kasutamis-ja hooldusjuhendis ettenähtud reeglitest.
EUROOPAN YHTEISÖN DIREKTIIVIT - EU-VAATIMUSTENMUKAISUUSVAKUUTUS
Vakuutamme omalla vastuullamme, että lehden etupuolella kuvattu kone vastaa siinä lueteltuja direktiivejä ja normeja.
Tämä vakuutus ei ole voimassa: - jos koneeseen tehdään muutoksia
- jos käyttä- ja huolto-oppaan sisältämiä ohjeita ei noudateta.
EC BENDRIJOS DIREKTYVOS - ATITIKIMO EUROPOS BENDRIJOS EC DIREKTYVOMS DEKLARACIJA
Prisiimdami atsakomyb˛e deklaruojame kad tituliniame lape nurodytas prietaisas atitinka ˇcia išvardintoms direktyvoms ir normoms.
Ši deklaracija tampa negaliojanˇcia: - jeigu pakei ˇciama prietaiso konstrukcija
- jeigu nesilaikoma eksploatacijos instrukcijos nurodym˛u ar reikalavim˛u.
DIRETTIVI KOMUNITARJI KE - DIKJARAZZJONI TAL-KONFORMITÀ EC
Niddikjaraw taht ir-responsabbiltà taghna li l-magna deskritta fuq quddiem tal-pa˙gna hija konformi mad-Direttivi u ma’ l-Istandards elenkati ha.
Din id-dikjarazzjoni titlef il-validità taghha: - jekk isiru xi emendi fuq il-magna
- jekk ma ji˙gux rispettati l-ispe˙cikazzjonijiet li jinsabu l-manwal ta’ l-u˙zu u tal-manutenzjoni.
DYREKTYWY WSPÓLNOTOWE EWG - DEKLARACJA ZGODNO´SCI EC
Deklarujemy pod własna˛ odpowiedzialno´scia˛ , ˙ze maszyna opisana na stronie tytułowej spełnia wymogi wzmiankowanych na tej stronie dyrektyw i norm.
Niniejsza deklaracja traci wa˙zno´s´c: - w przypadku wykonania zmian w maszynie
- w przypadku nieprzestrzegania zalece´c zawartych w instrukcji obsługi i konserwacji.
DIRECTIVAS COMUNITÁRIAS EC - DECLARAÇÃO DE CONFORMIDADE EC
Declaramos sob nossa responsabilidade que a máquina descrita na frente da folha está em conformidade com as directivas e normas ai listadas.
A presente declaração perde a sua validez: - se forem feitas modicações na máquina
- se não forem respeitadas as prescrições contidas no manual de uso e manutenção.
GEMENSKAPSDIREKTIV EG - EG-KONFORMITETSFÖRKLARING
Härmed förklarar vi och påtar oss ansvaret für att den maskin som beskrivs på bladets framsida överensstämmer med de direktiv och riktlinjer som där anges.
Denna förklaring förlorar sin giltighet: - om modieringar utförs på maskinen
- om ej de föreskrifter följs som nns i handboken för drift och underhåll.
”
”
EGK KÖZÖSSÉGI IRÁNYELVEK - EK SZABVÁNYOSSÁGI NYILATKOZAT
Felelosségünk tudatában kijelentjük, hogy a lap címoldalán leírt gép megfelel az abban felsorolt irányelveknek és szabványoknak.
Jelen nyilatkozat érvényét veszti: - amennyiben a gépet módosítják
- amennyiben a használati és karbantartási kézikönyvben tartalmazott eloírásokat nem tartják be.
EC DECLARATION OF CONFORMITY - Enclosure II 1A - 2006/42/EC
Machines Directive 2006/42/EC
Electro Magnetic Compatibility 2004/108/EC
Harmonized Regulation Applied EN ISO 12100-1, EN ISO 12100-2, EN 60335-1, EN 60335-2-69, EN 55014-1
Responsible for the technical le according to 2006/42/EC: Blastrac BV
The present declaration loses its validity - in case of modications to the machine - when the rules cited in the use and maintenance booklet are
not respected
CE BLASTRAC_01
MODEL
MACHINE TYPE
SERIAL NUMBER
EC DECLARATION OF CONFORMITY
in accordance with Appendix II sub A of Directive 2006/42/EC
BLASTRAC B.V.
Utrechthaven 12
NL - 3433 PN NIEUWEGEIN
Tel: 0031 (0)30 601 88 66
Fax: 0031 (0)30 601 83 33
[email protected]
The Netherlands
We declare under our sole responsibility that the machine as described above
Conforms with the Health and Safety requirements of the European Directive
for machine Safety.
In case of changes to the machine without our written authorization this declaration loses its
validity.
1. satises the conditions set out in the Machine Directive (Directive 2006/42/EC); Low voltage
directive (2006/95/EC, as last amended; EMC directive 2004/108/EC, as last amended)
2. satises the following harmonized standards:
EN ISO 12100-1, EN ISO 12100-2, EN 60335-1, EN 60335-2-69, EN 55014-1
3. This declaration is no longer valid:
- Whenever modications are made to the machine
- Whenever the provisions contained in the instructions manual are not respected.
Nieuwegein 12-10-2010
fac-simile
fac-simile
Page 20

Operating manual BDC3140 DBP/LPP 8/8
 Loading...