

Page 1
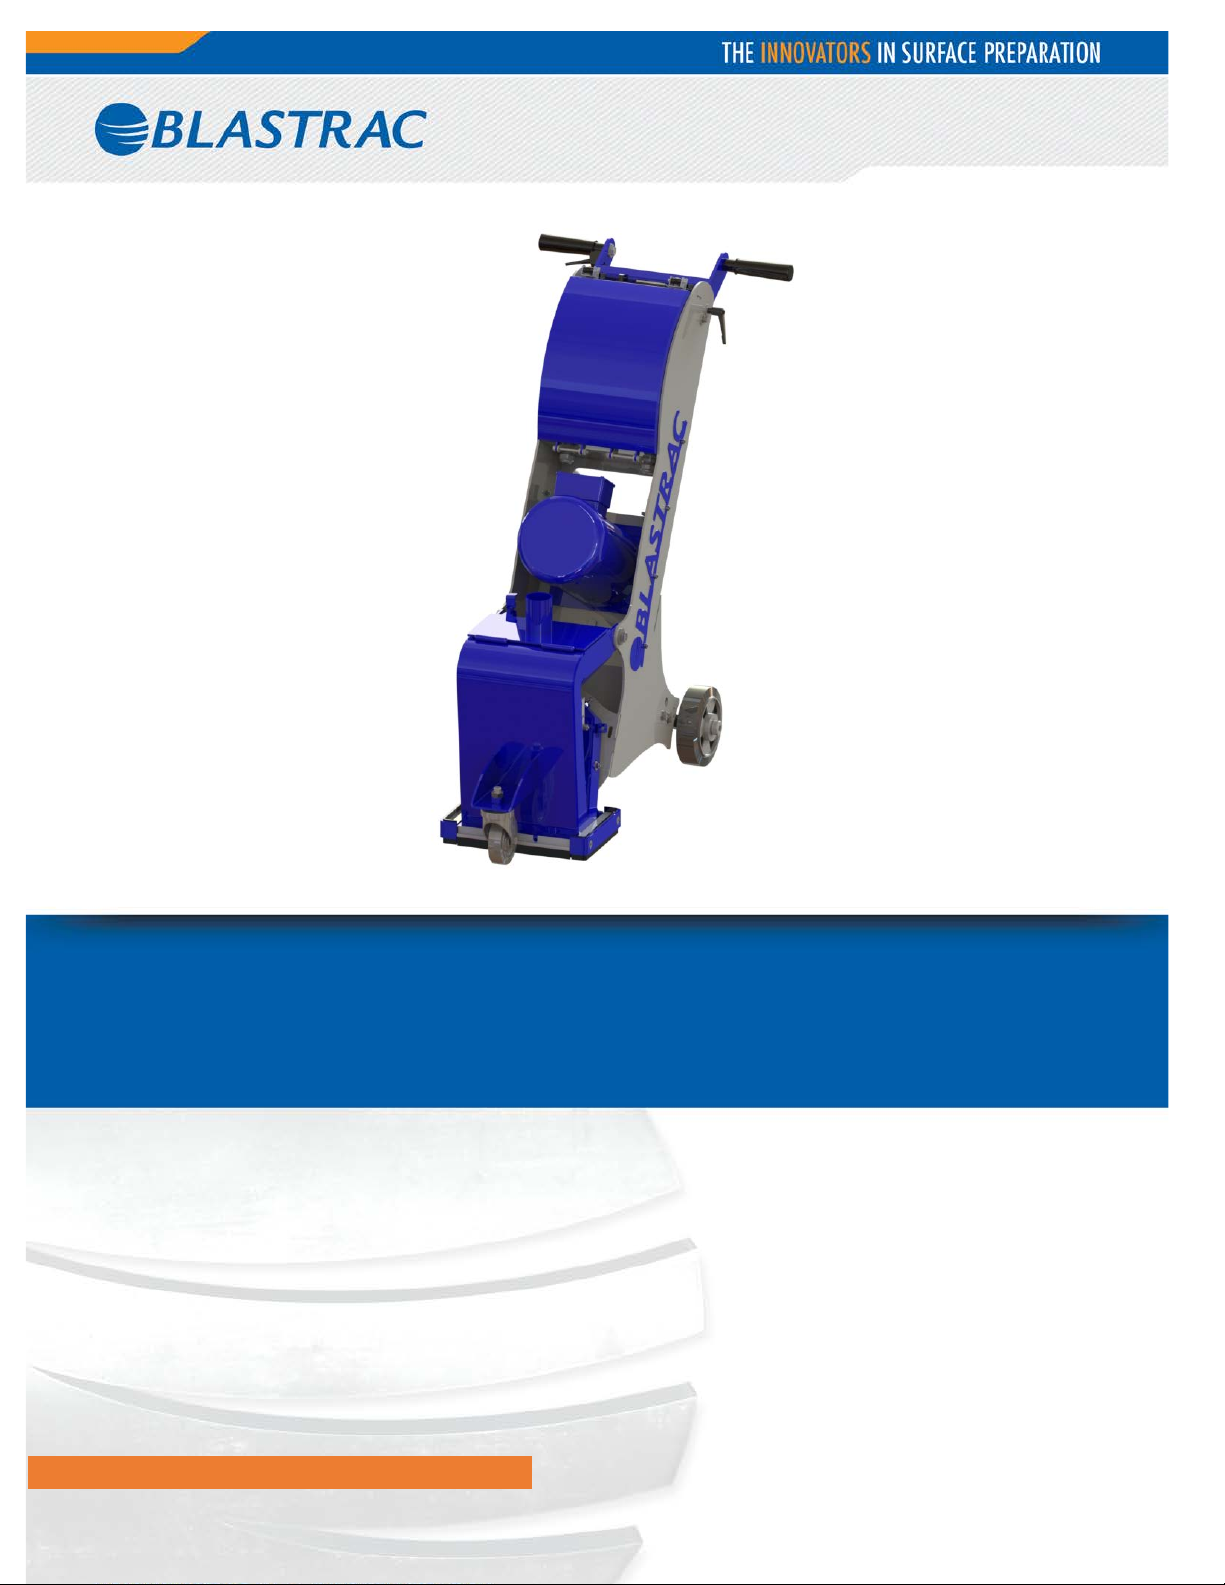
OPERATING MANUAL 1-8DM
VERSION 1.1
www.blastrac.com 1-800-256-3440
Page 2
Table of Contents
1. Introduction 3
2. Machine Description 3
3. Safety 4
4. Initial Operation 6
5. Operation 7
6. Maintainece 9
7. VFD Trouble Cod es 10
8. Technical Data 11
9. Contact 12
2
Page 3
1. Introduction
It is important that all persons who are working with or maintaining this m achine read the manual
carefully and under stand it fully. Keep this manual close to the machine, so it can be referred to at any
time.
Only authorized and trained personnel may operate this machine.
2. Machine description
The Blastrac 1-8DM is a downward blasting machine with a closed abrasive circuit, designed for the
pre-treatment of horizontal surfaces. The bouncing impact of metallic abrasive onto the surface to be
treated, thoroughly removes surface contaminants, coats of paint, seal ants and thin coatings.
A suitable dust collector must be connected to the machine in order to separate the dust from the
abrasive. A specially designed dust collection system ensures dust-f ree operation of the machine and
clean air in the workspace.
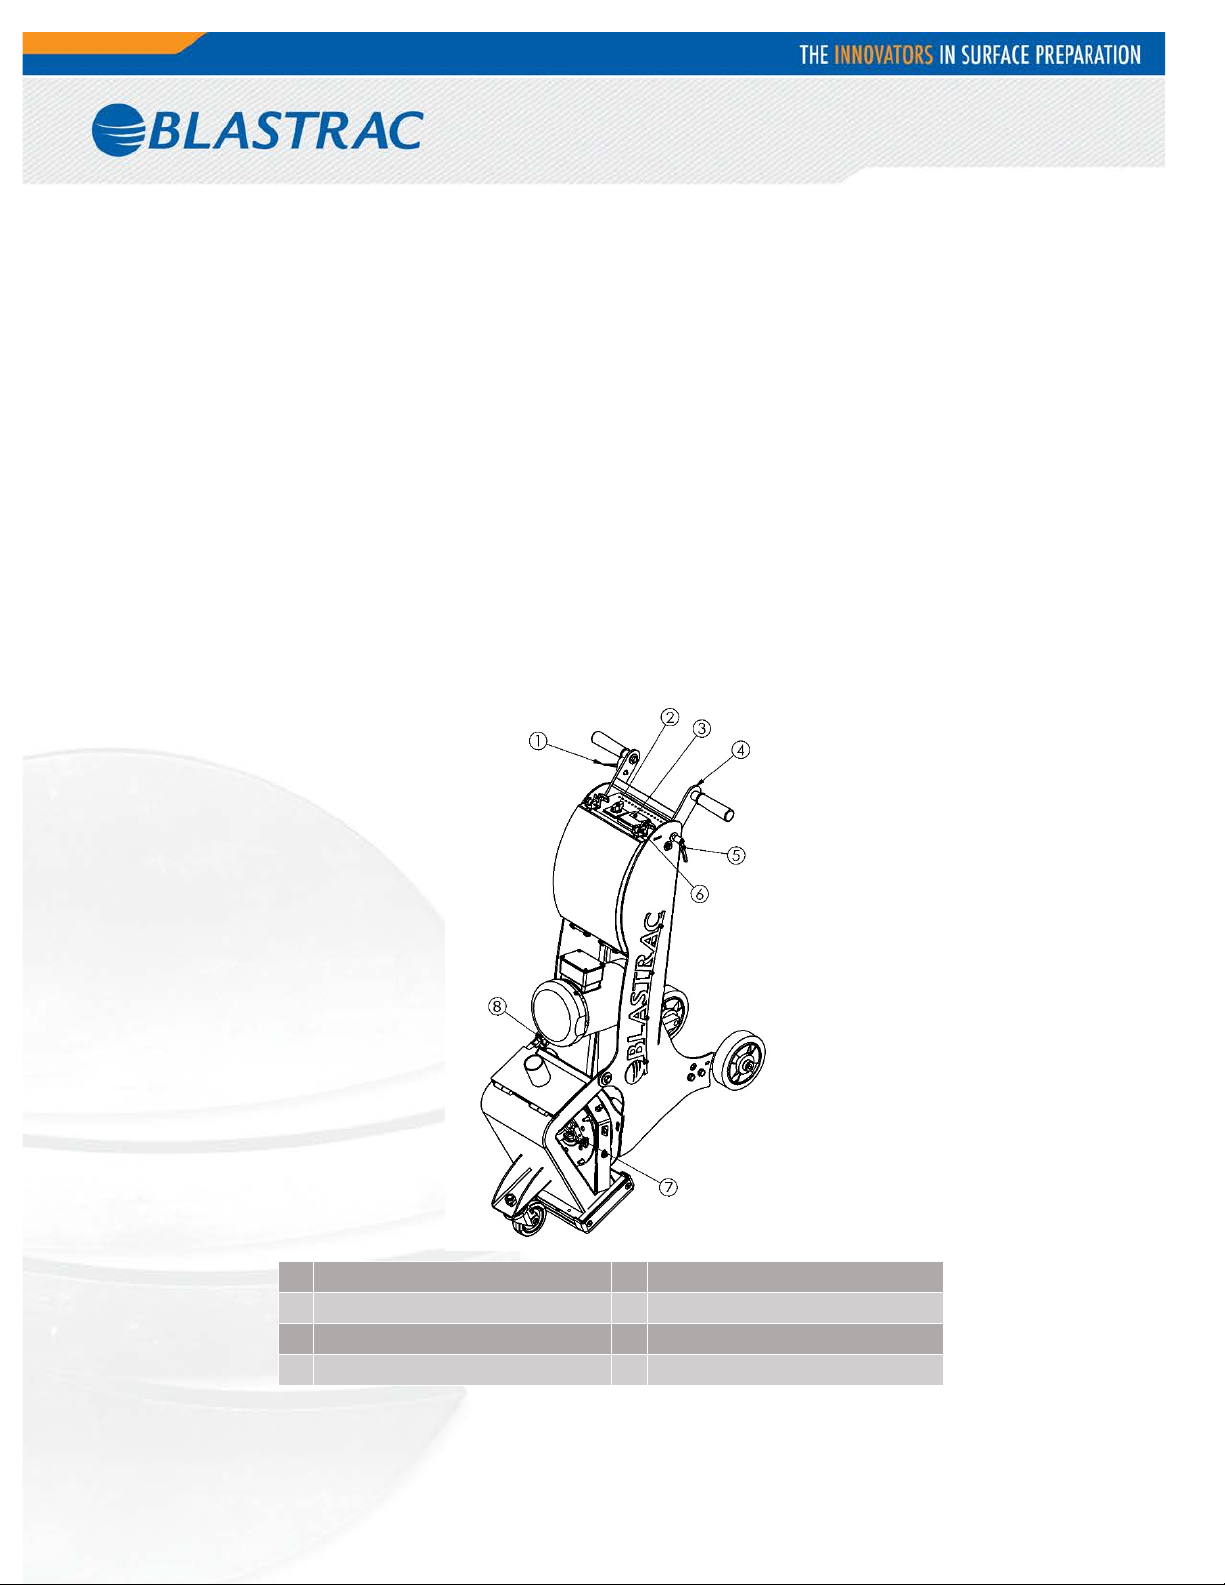
1 SHOT VALVE CONTROL LEVER 5 HANDLE ADJUSTMENT LEVER
2 ON/OFF SWITCH 6 VFD LID LATCH
3 AMMETER 7 SHOT VALVE ADJUSTMENT
4 HANDLE 8 BLAST HOUSING LID LATCH
3
Page 4
3. Safety
Before operating the m achine, the personne l must be familiar with the safety instructions given in this
manual.
Keep this manual near the machine, so it can always be consulted.
Safety precautions
The surface to be t reated must be swept clean to remove stone s, s c re w s et c.
Never use the machine when t he surface is not clear and if there is a risk of tripping.
Make sure there is not any water on the surface to be treated.
Don’t get distracted while blasting.
Remove any trailing electrical cables and or dust hoses from the surface to be treated.
Always switch on the dust collector before blasting.
Safety regulations
Persons who are not operating the machine are not permitted to stay in the surrounding area of the
machine.
Keep the machine original; Use approved cables that are free from defect. Never remove the earth
ground of the supply cable and machine. Only use cables & connectors that have an earth ground.
Connect main power supply ca ble to an installation with an earth-leakage circuit breaker.
Inspect and test the electrical components of the machine regularly.
Always call a skilled electrician when you have questions about the safety of the electrical
components.
Work on electrical equipment or operating materials may only be done by a skilled electrician
or by trained persons under the guidance and supervision of a skilled electrician as well as in
accordance with the electrical engineering regulations.
Pull out the main plug during inspections and repairing on the machine.
Never operate the machine when workplace is wet.
Never leave the machine in the rain.
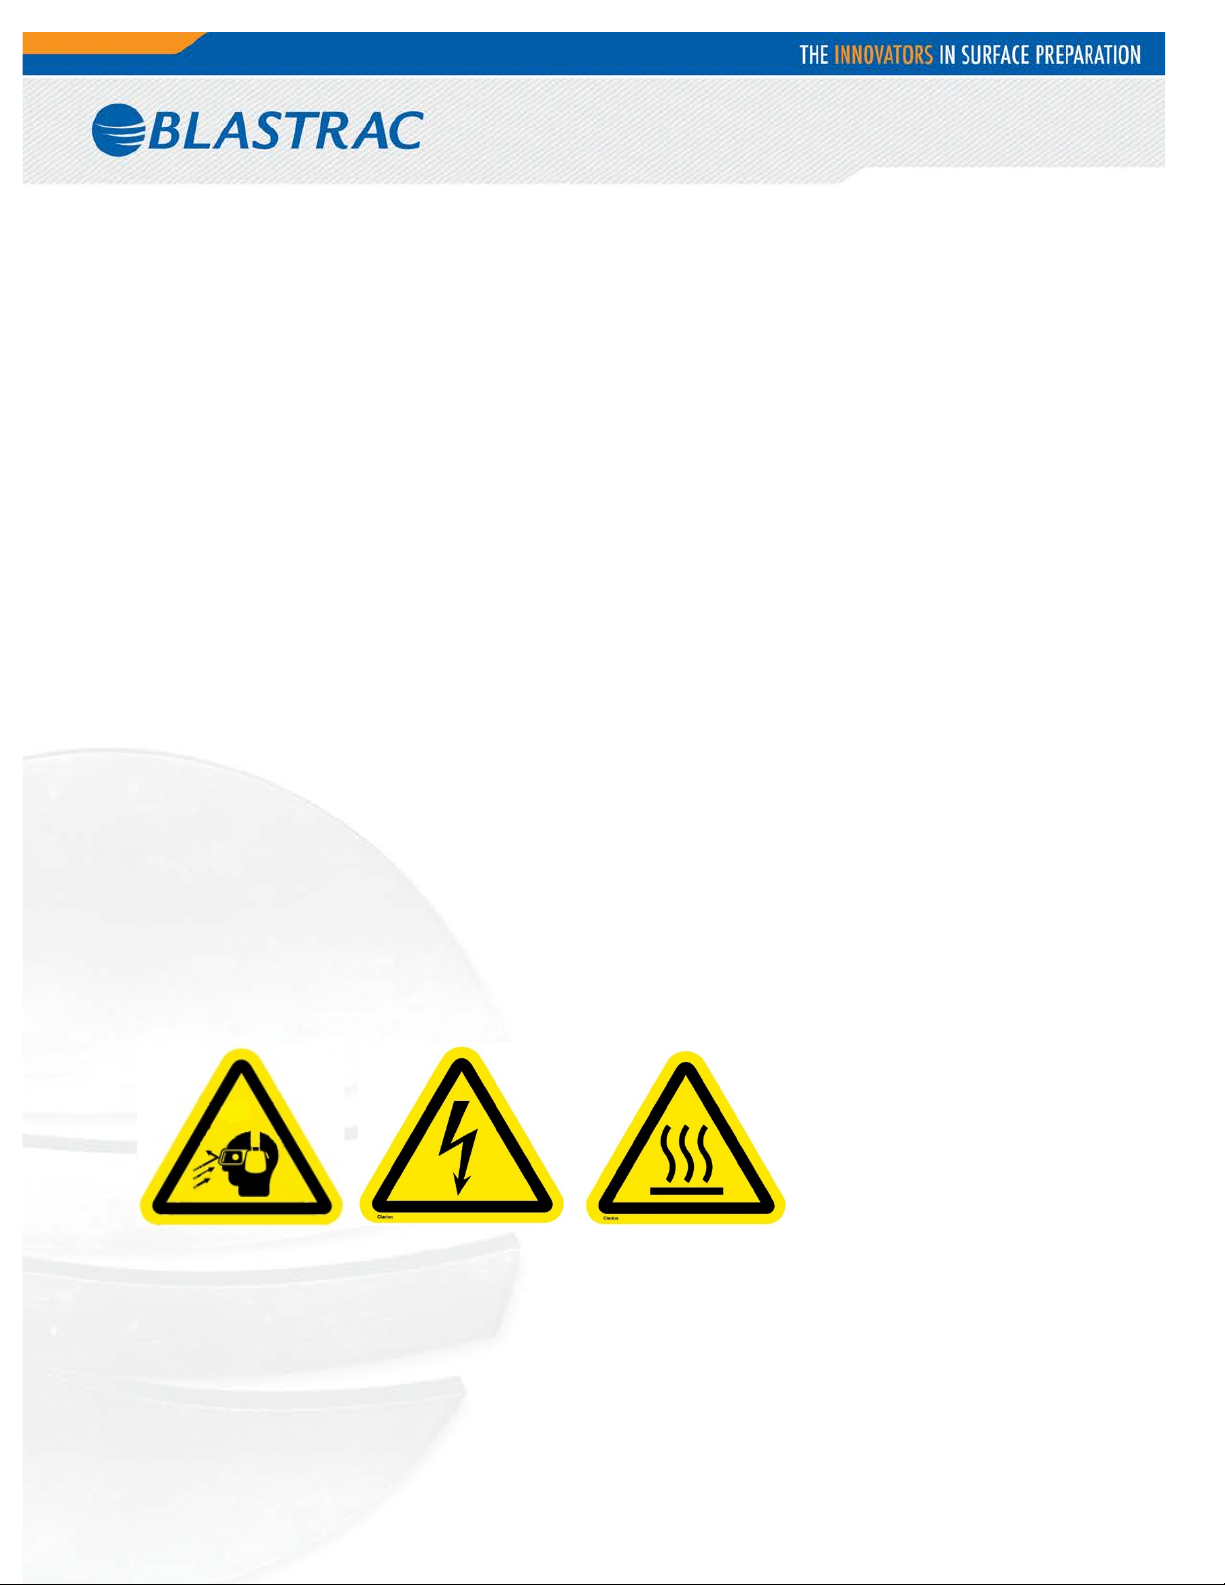
The following safety decals are placed on the machine.
Meanings of these symbols are:
Ear and eye protection are required.
Safety glasses with side shield s are required.
Electrical shock hazard.
Burn hazard.
4
Page 5
Operators must tie back long hair and not wear loose clothing or jewelry including rings.
Wear gloves, dust mask, safety glasses w/ side shields, and ear plugs during operating the machine.
Safety instructio n s
Abrasive can escape from the sides of the blast head at high speed. Wear safety glasses with side
shields and close-fitting protective clothing.
The dust container / bag of the dust collector must be emptied regularly. Comply with the local waste
treatment regulations considering the removed material.
The weight of the 1-8DM is 230lbs. Always use a team lift to pick up the machine.
5
Page 6
4. Initial operation
Before using the machine, it is of great importance to inspect the machine.
It is not permitted to use the machine if the machine safe ty is not a cc ording the checkpoints below.
Checkpoints power supply
Use only extension cables for extending the main cable that are sized and marked in accordance with
the overall power consumption of the machine.
Electrical cables must be fully unwound.
Cables must be free of damage.
Use an electrical connection with earth grounding.
Checkpoints of machine
Safety functions and op erating functions must work correctly.
Check the following parts for damage and wear: blast wheel, feed spout, liners, magnet, and brush
sealing.
Ensure all nuts/bolts are tight.
All electrical components must be free of damage.
Dust hose must be undamaged and the connection must be reliable.
Check the separa tor for wear and defects. Remove foreign bodies and dust deposits.
6
Page 7
5. Operation
Controls
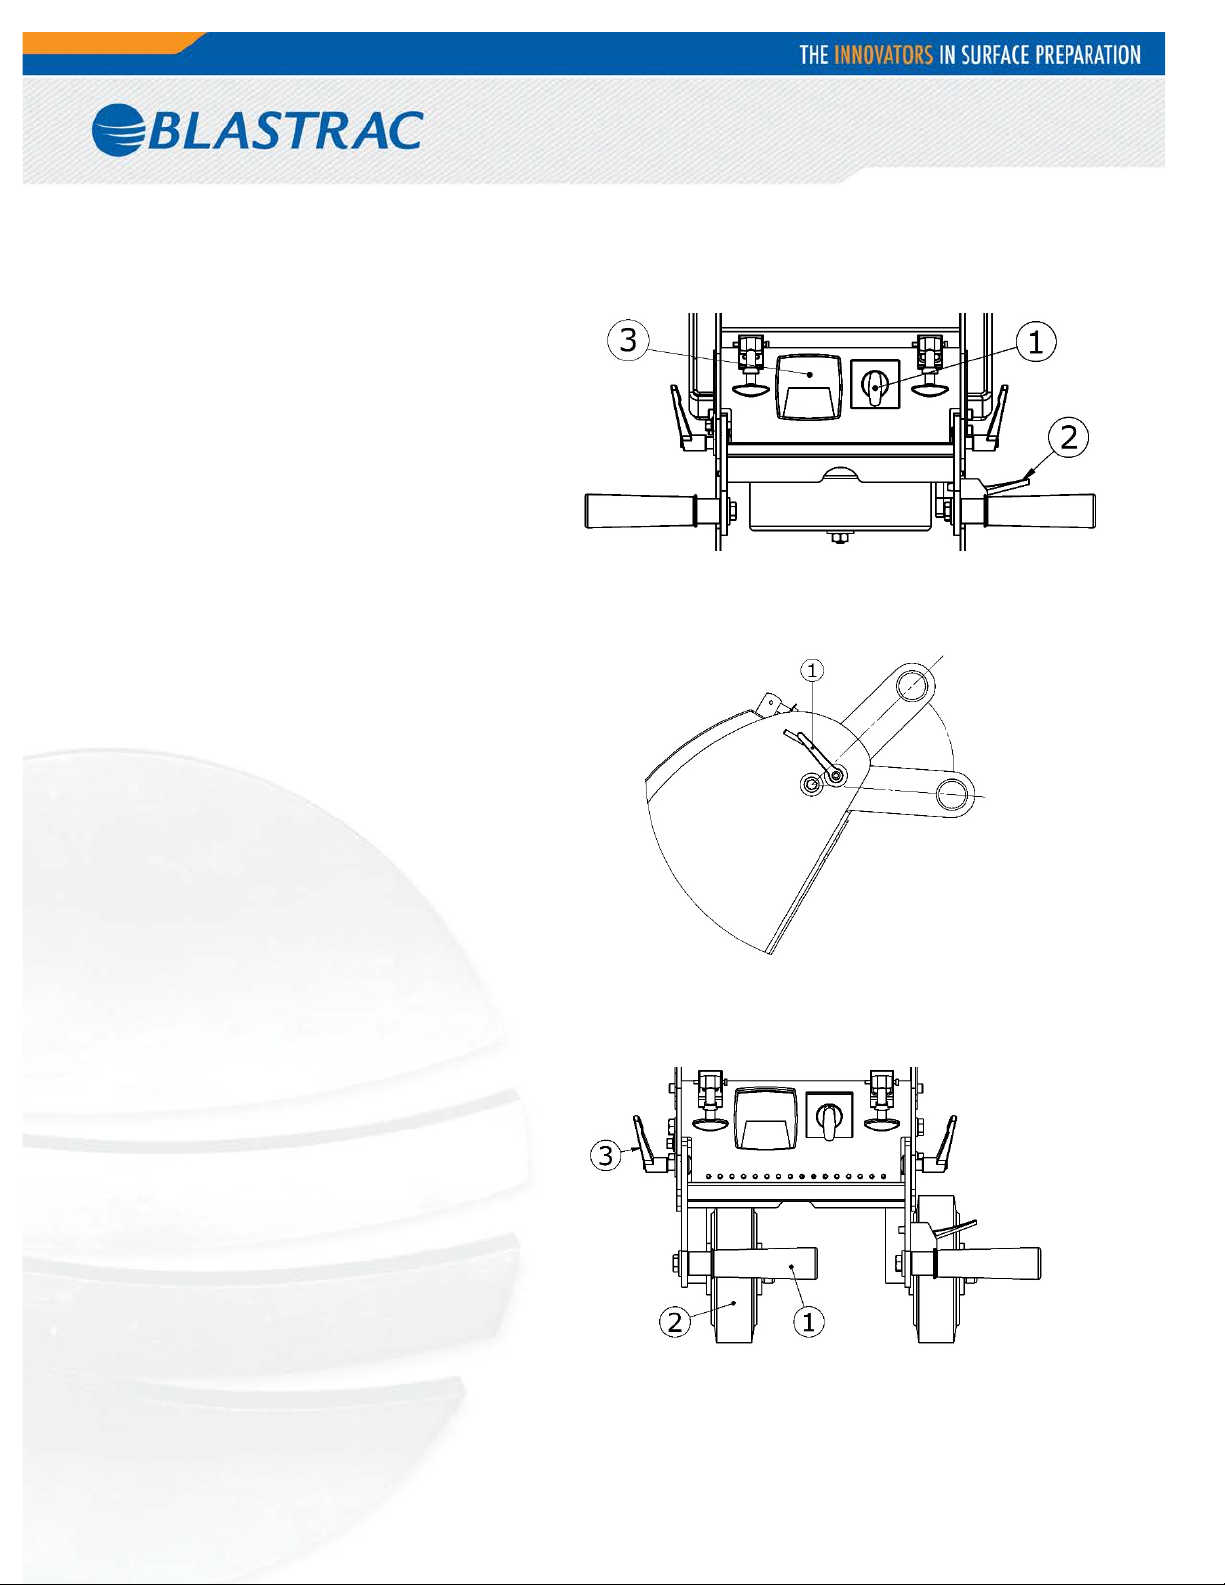
The ON/OFF switch (1) controls the blast
wheel motor. The shot valve lever (2)
controls the amount of abrasive going into
the blast wheel. Observe the Ammeter (3) to
ensure that the proper amount of shot is
being let through the shot valve.
Handle Adju st m ent
Adjusting the height of the handle is possible
by loosening handle adjustment levers (1)
and adjusting the handle to the desired
height.
Close Blasting Mode
To work as close as possible to the wall you
can invert the right-side handle (1) and rear
wheel (2). The handle grip can be screwed
into the opposite side of the handle and the
rear wheel can be screwed into the opposite
side of the wheel bracket.
7
Page 8
During operation of the 1-8DM, the following additional safety instructions must be followed closely:
Before switch on
Check if the distance from magnet to the floor is approx. 1/4”. Check this height with a luminum
strips.
Check the distance from brush sealing to the floor. This may be max. 1/32”.
Fill the separator equally with the selected abrasive up to the bottom of the separator tray. The
magnetic valve must be closed while doing this.
Connect the blast machine and dust collector with the dust hose. This connection must be reliable.
Connect the power supply cable of the dust collector to a power source. Be sure that electrical power
supply is correct.
Switch on the machine
Before turning on the blast machine, turn on the dust collector.
Turn power switch to “ON” and check the rotating direction of the blast motor. The correct direction is
given with an arrow on the ho u sing of the motor.
With the machine in motion pull the abrasive control cable to open the magnetic valve. Observe the
ammeter, to ensure proper amperage. After having blasted approx. 6’, close the abrasive valve, stop
the machine and check the blasted surface.
If the ‘hotspot’ is t oo much on the right, turn the cage slightly clockwise. Loosen the cage clamps and
turn the control cage in the suitable direction. The cast grooves on the control cage sho w the pos ition
of the control cage opening. Tighten the nuts of the ca ge clamps after adjusting.
Switch off the machine
Close the abrasive valve
Turn power switch to “OFF”.
Unplug the machine from the power supply.
Switch off the dust collector.
Wait for standstill of all drives before any inspection or maintenance works are started.
8
Page 9
6. Maintenance
Changing the liners
Loosen the press bolt of the top liner.
Loosen the nuts of the side liners and top liner. Take them out at the bottom of the housing.
To mount the liners, keep on the following sequence:
First place the top line r in the housing.
Place the side liners inside the housing. The sideliners may stick out the body for max. 1/32”. Tighten
the nuts.
Tighten the pressure bolt of the top liner slightly and press the top liner against the side liners.
Changing the tune-up kit
The tune-up kit consists of the blast wheel, the cage and a bolt.
Remove the feed spout
Remove the cage clamps
Remove the cage and blast wheel cover plate
Block the blast wheel and remove the central fixing bolt
Take the blast wheel out of the housing
Use a new central fixing bolt when mounting a new blast wheel
Place the blast wheel on the hub and tighten the central fixing bolt to 45 ft./lbs.
Install the blast wheel cover plate.
Insert the control cage in the center and clamp the ca ge with the control clamps so that the blast
wheel can rotate freely
Turn the blast wheel manually. It must rotate freely.
Place the feed spout between the abrasive valve and the cage.
Clean the machine every day with air and non-aggressive materials. Never use a high-pressure water
cleaner to clean the machine.
Store the cleaned machine in a dry room. Protect the electrical motor from moisture, heat, dust and
shocks. Remove the abrasive out of the abrasive storage hopper.
All repair work has to be done by qualified Blastrac personnel, this guarantees a safe and reliable
machine.
Any warranty on the machine is void when:
Original Blastrac spare parts and abrasive are not used.
Repair work is not done by qualified Blastrac personnel.
Changes, add-ons or conversions are performed without written permission of Blastrac NA.
9
Page 10
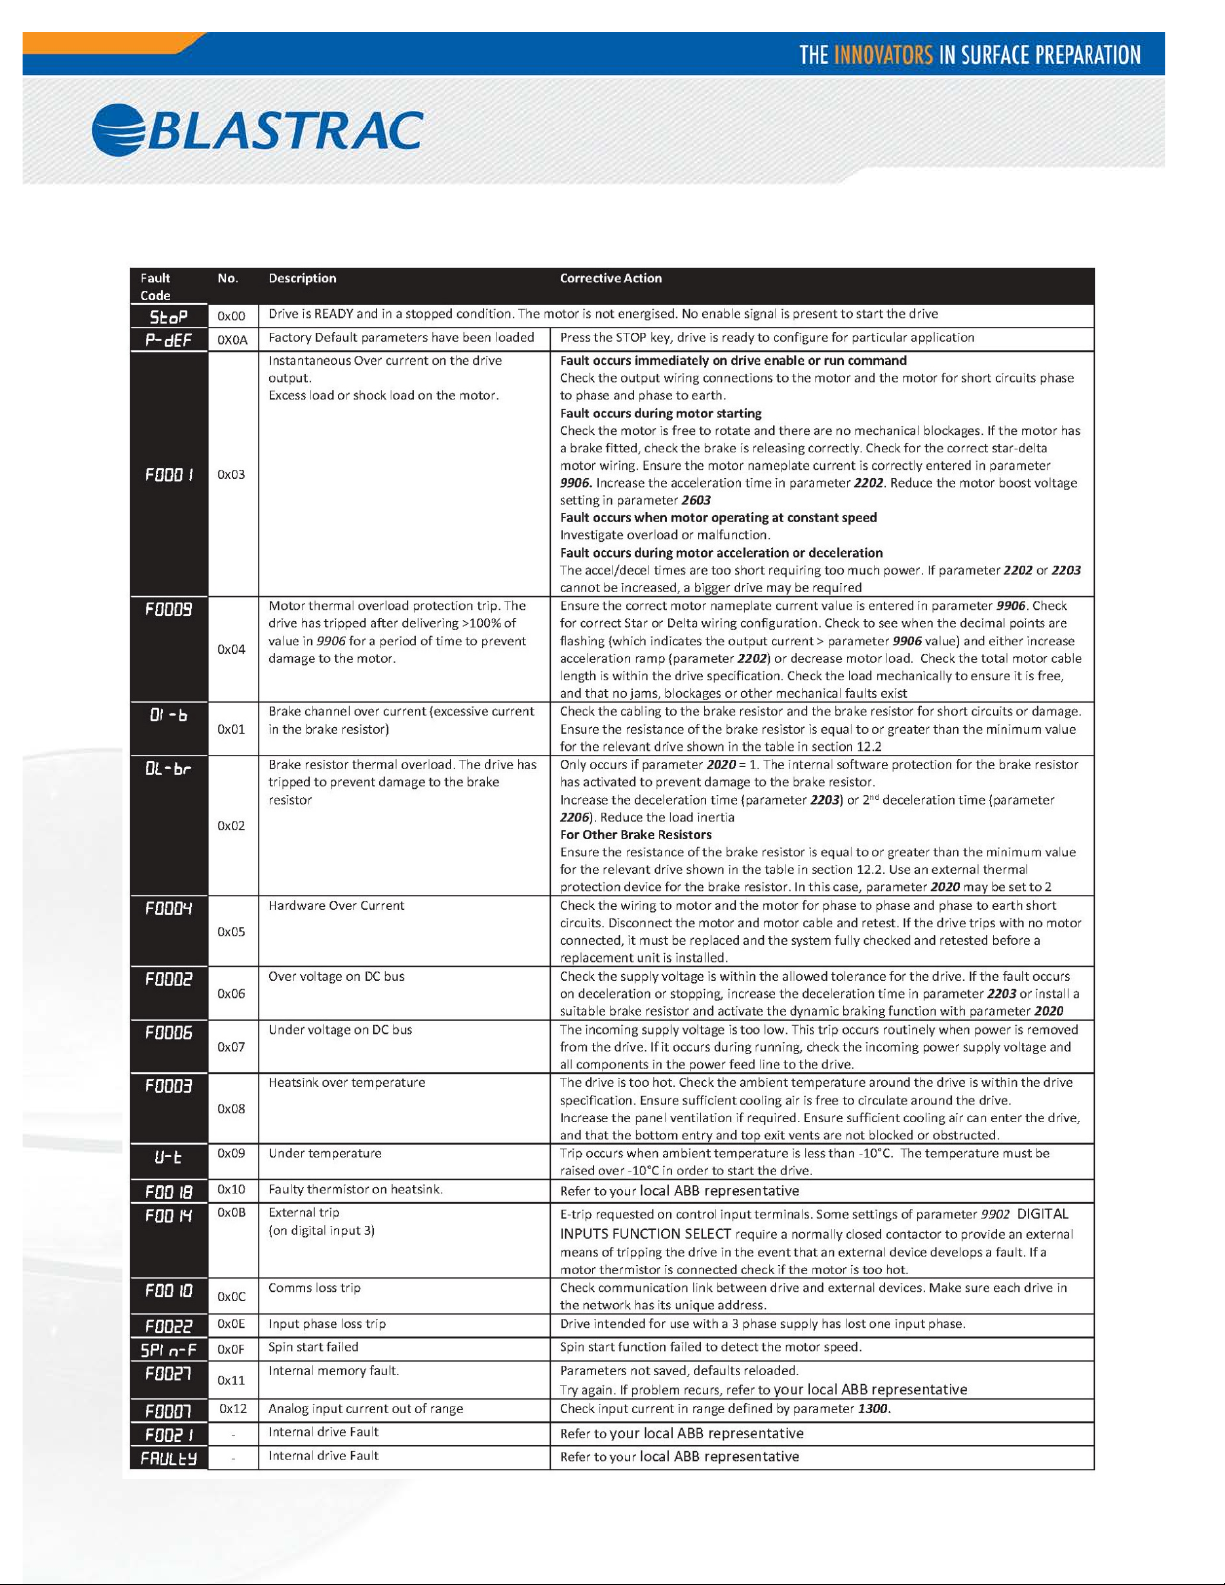
7. VFD Trouble Codes
10
Page 11
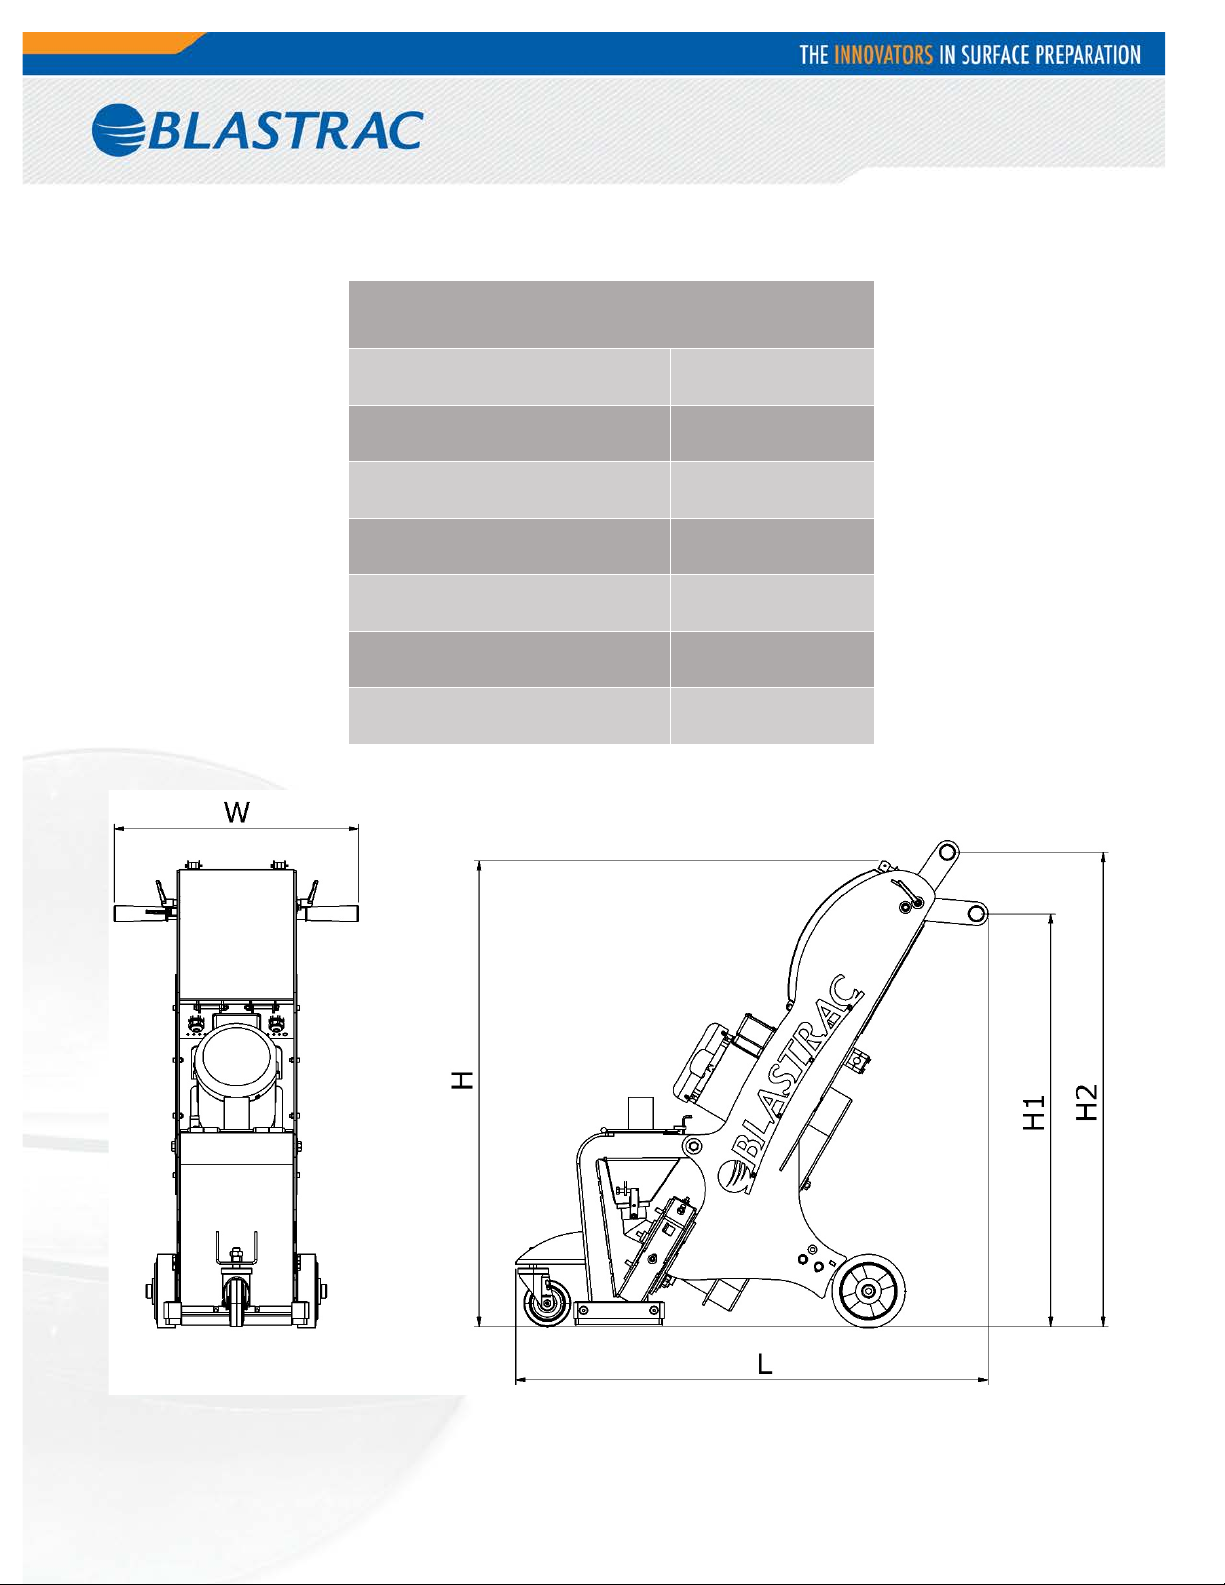
8. Technical Dat a
1-8DM
BLAST WHEEL MOTOR
POWER (110V/220V)
APPLICATION CONCRETE
LENGTH (L) 41"
WIDTH (W) 21"
MINIMUM HEIGHT HANDLE
(H1)
MAXIMUM HEIGHT HANDLE
(H2)
WEIGHT 230
1.32 kW/1.67kW
36"
41"
11
Page 12
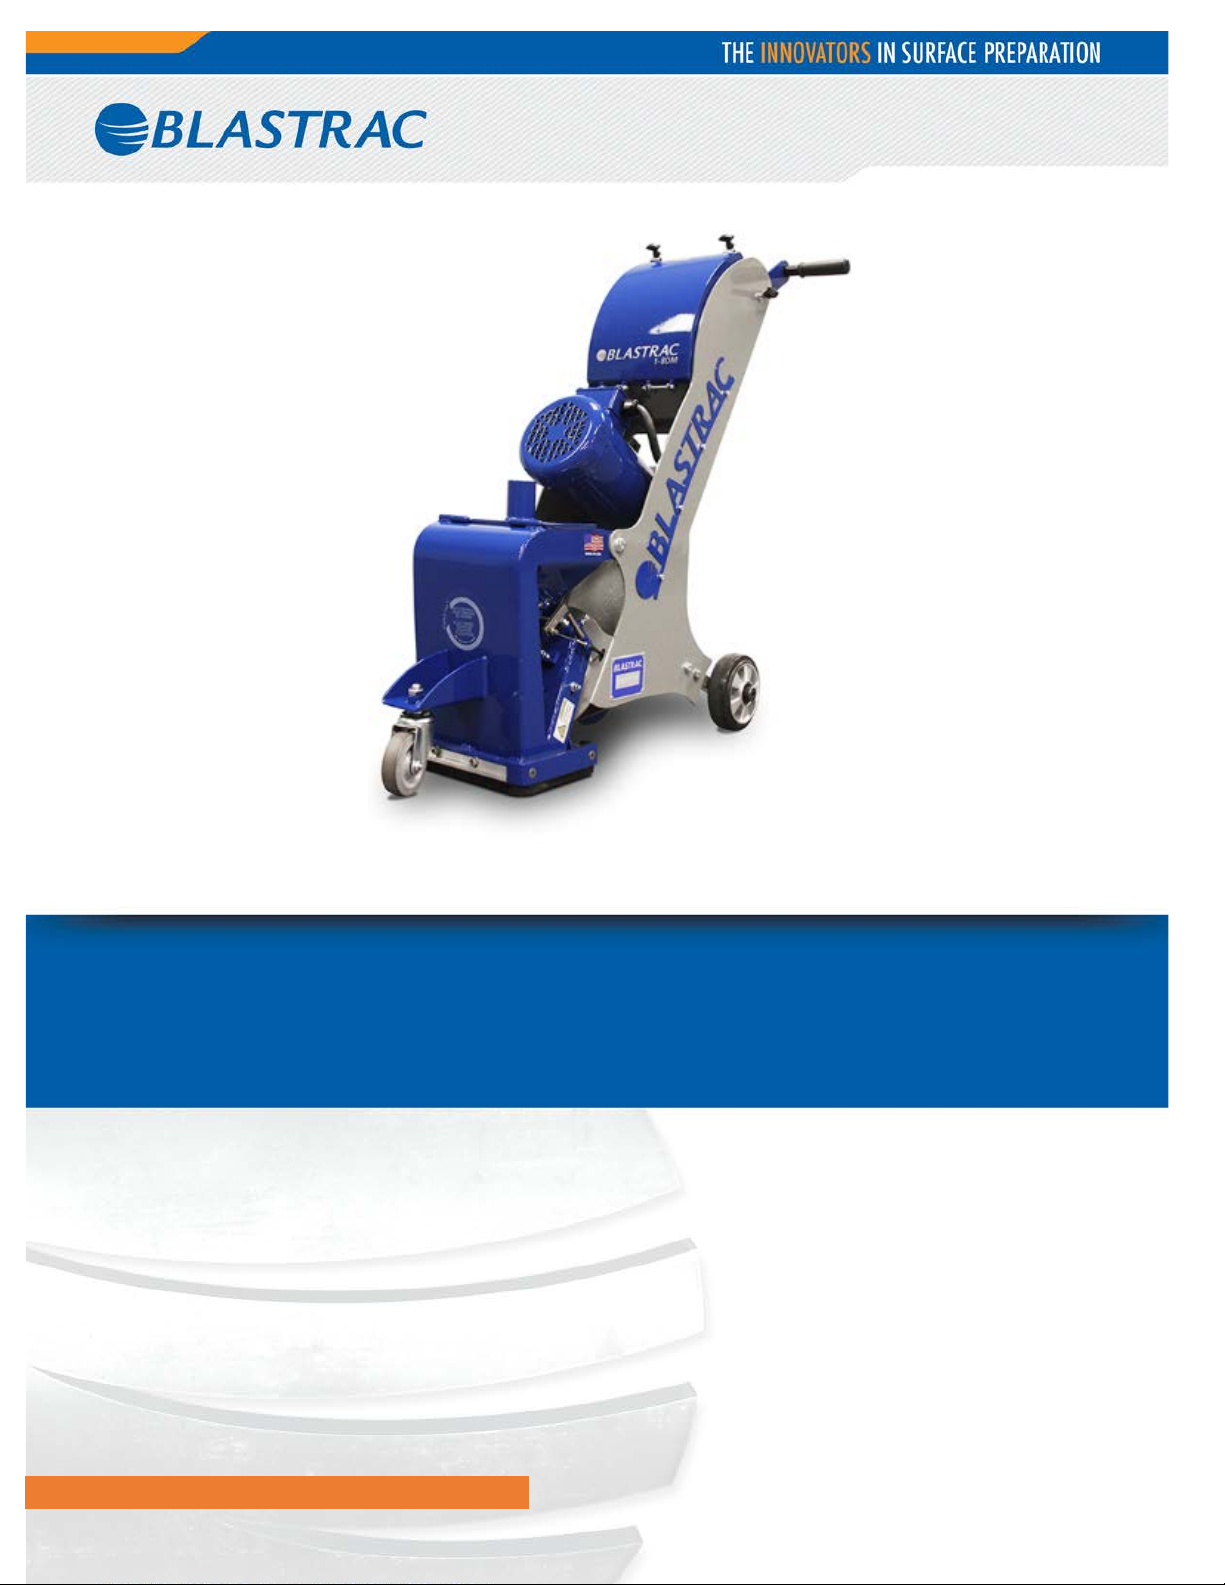
SERVICE MANUAL 1-8DM
VERSION 1.1
www.blastrac.com 1-800-256-3440
Page 13
Index
1. Spare parts 03
2. Accessories 09
3. Electrical 10
4. Contact 12
2
Page 14
1. Spare Parts
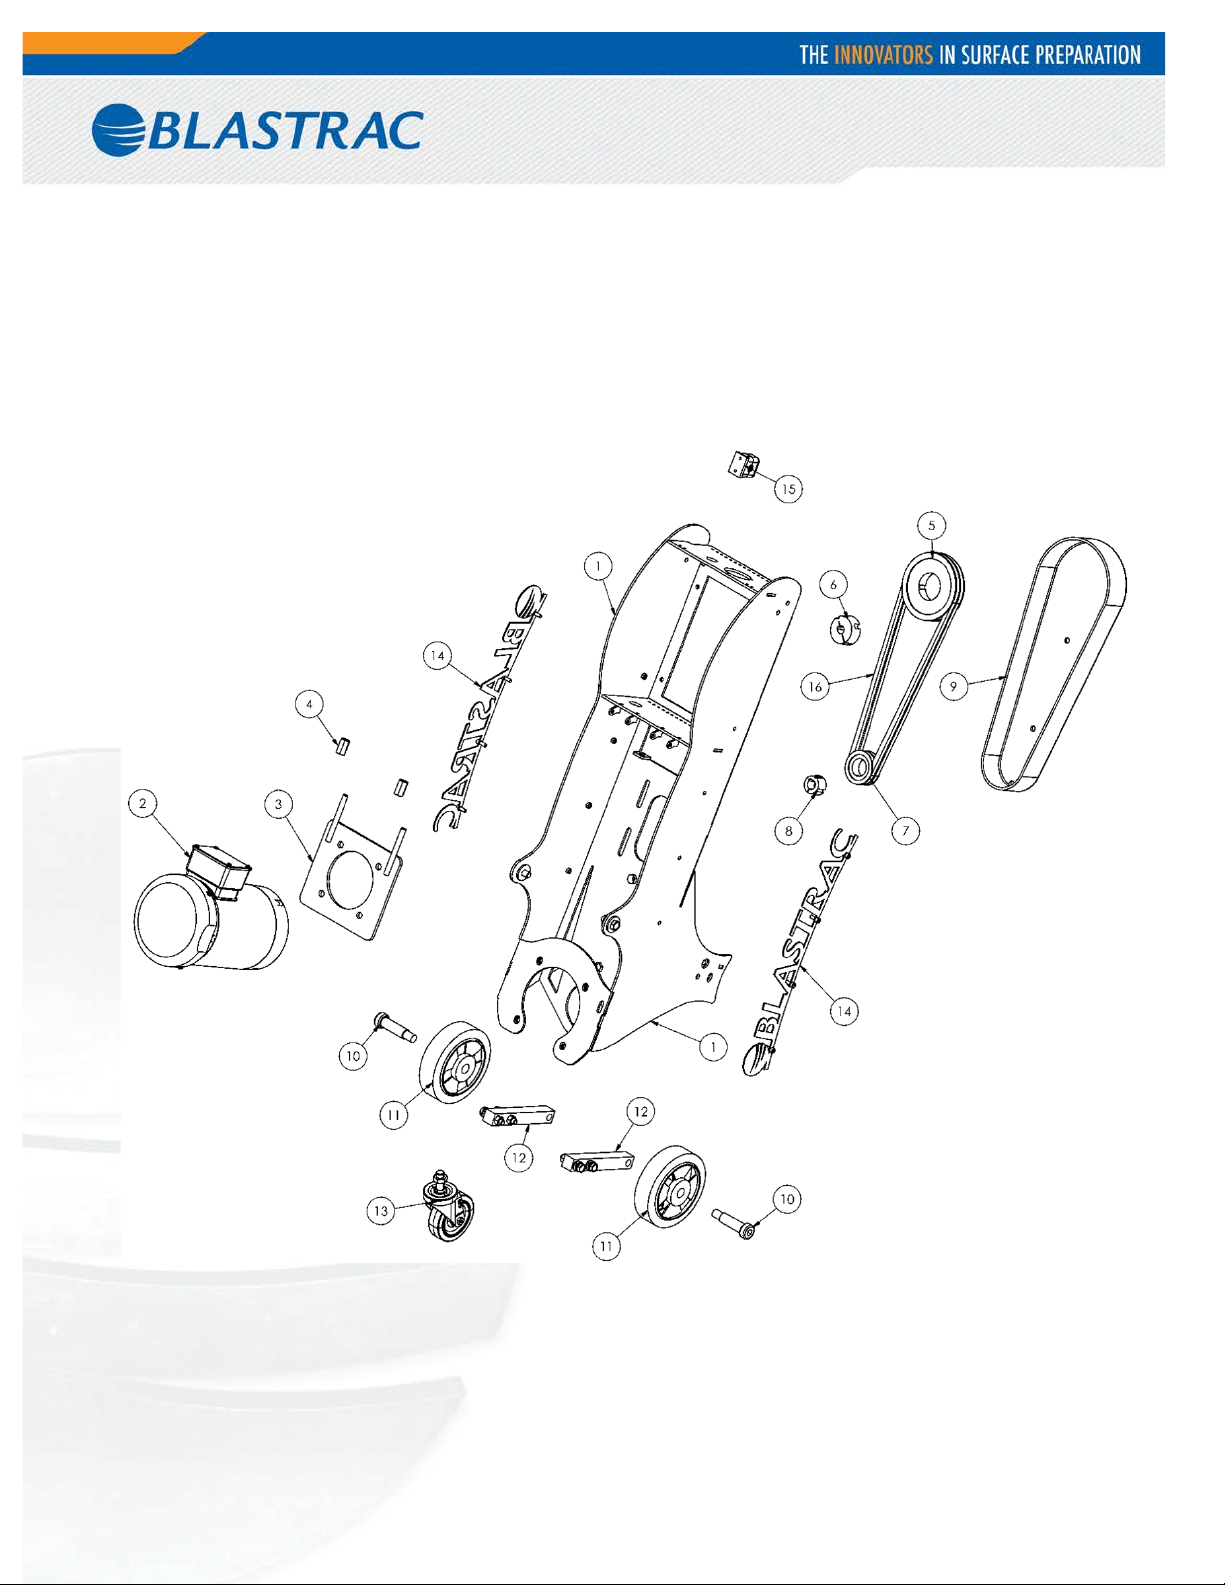
Fig. 01
3
Page 15
1
PG-10522
CHASSIS - 1-8DM
1
3
6908170-EU
MOTOR BASE PLATE
1
7
6908200
SHEAVE
1
10
PG -10759
SHOULDER BOLT
2
14
E07380
BLASTRAC LOGO (RADIUS)
2
Fig. 01
Item Part Number Description QTY.
2
4 PG -10846 NUT/COUPLING 2
5 6908190 SHEAVE 1
6 6908380 BUSHING/ TAPER LOCK 1
8 6908370 TAPERLOCK BUSHING 1
9 P000107-EU BELT GUARD 1
PG-10889 MOTOR – 110V 1
PG -10890 MOTOR – 220V 1
11 E03603 WHEEL 2
12 PA-11204 REAR WHEEL BRACKET 2
13 PG -10884 FRONT CASTER 1
15 999-9159 STRAIN RELIEF 1
16 06100006 BELT 2
4
Page 16
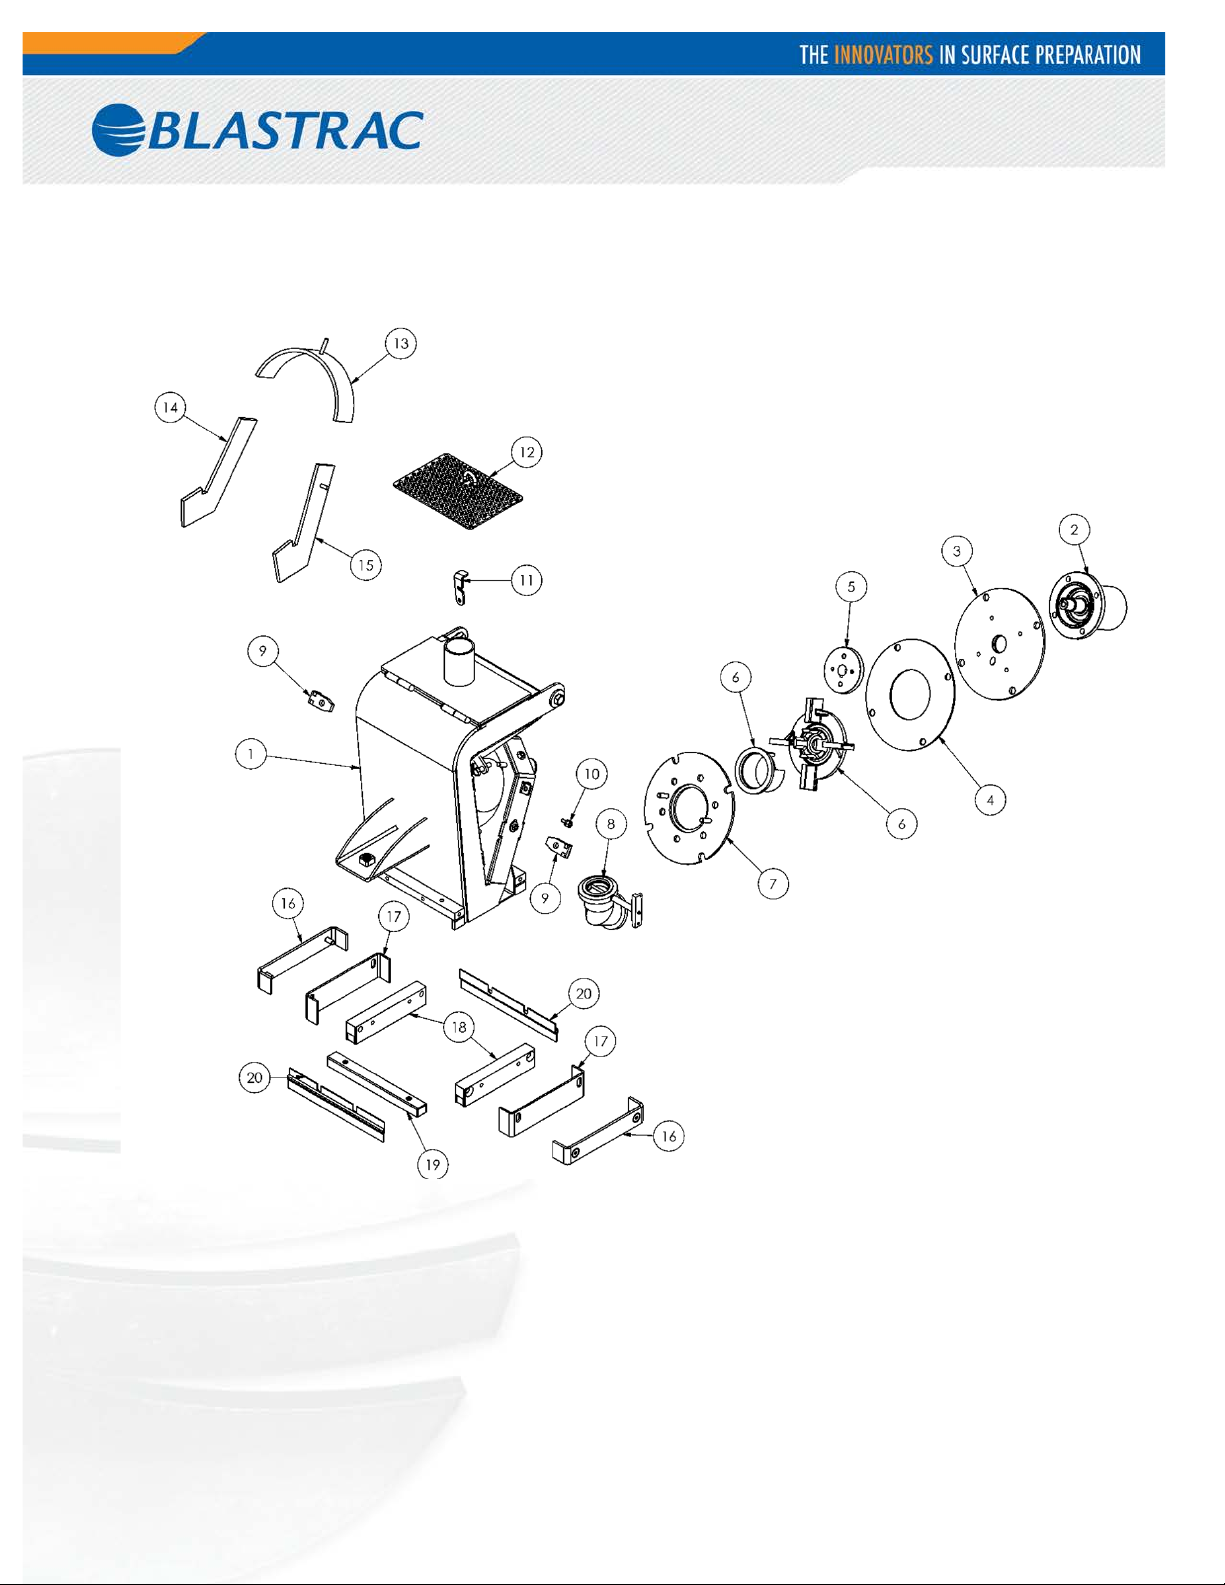
Fig. 02
5
Page 17
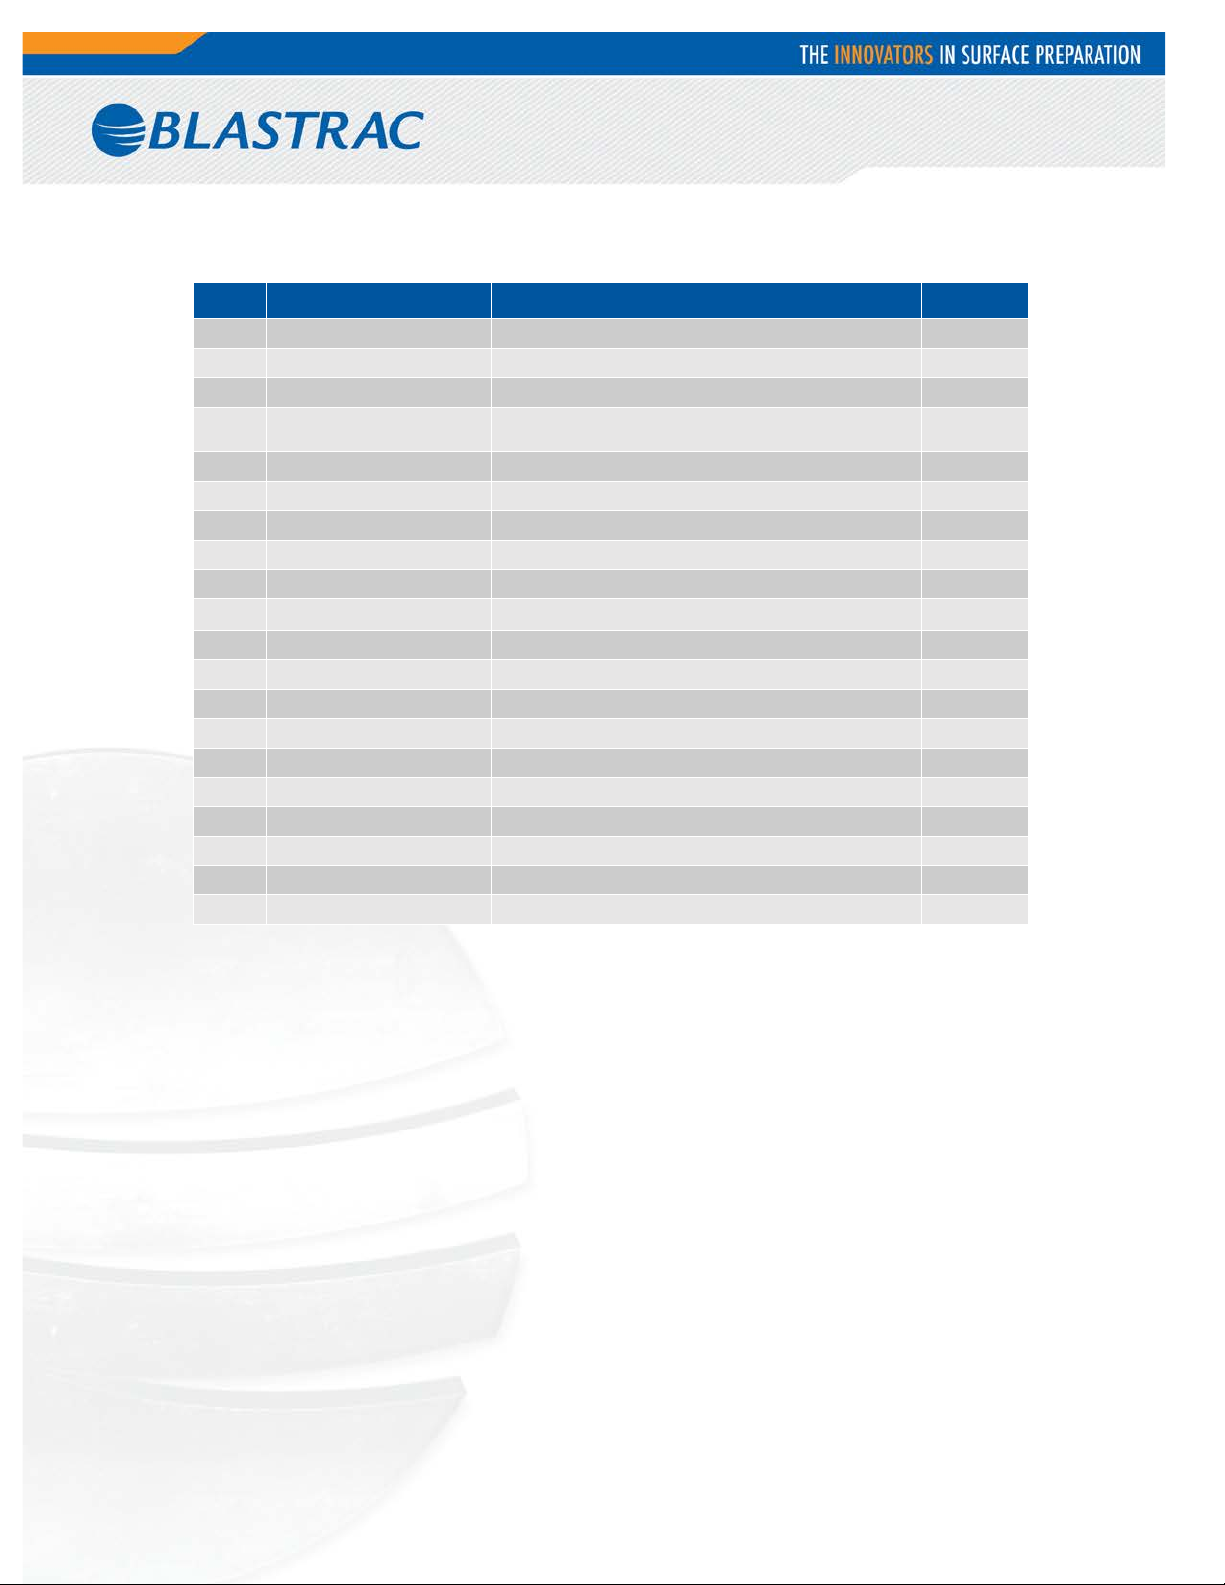
1
PG-10521
BLAST HOUSING
1
SEAL/BEARING MOUNTING
PLATE
7
9763240-EU
CONTROL CAGE BRACKET
1
14
6908260-EU
LINER/RIGHT HAND SIDE HATCHET
1
17
6811550
SKIRT/SIDE
2
20
6908300
BRUSH/FRONT & REAR
2
Fig. 02
Item Part number Description Qty.
2 979085 BEARING UNIT 1
3 9790660 BRACKET/ALUM BRG MTG 1
4 PA-11203
5 9763100 HUB 1
6 4923050-EU WHEEL-KIT 6.50" 1
1
8 P000001 MAGNETIC VALVE ASSY 1
9 9700120 CLAMP/CONTROL CAGE 2
10 6916120 NIPPLE/ THROTTLE & NUT 1
11 PA-11206 LATCH/BLASTHOUSING LID 1
12 PA-11211 SHOT TRAY 1
13 4973070-EU LINER/TOP 1
15 6908250-EU LINER/LEFT HAND SIDE H AT CH ET 1
16 6811540-EU RETAINER/SIDE SKIRT 2
18 9697800 MAGNET/SIDE 2
19 9697630 MAGNET/FRONT 1
6
Page 18
Fig. 03
7
Page 19
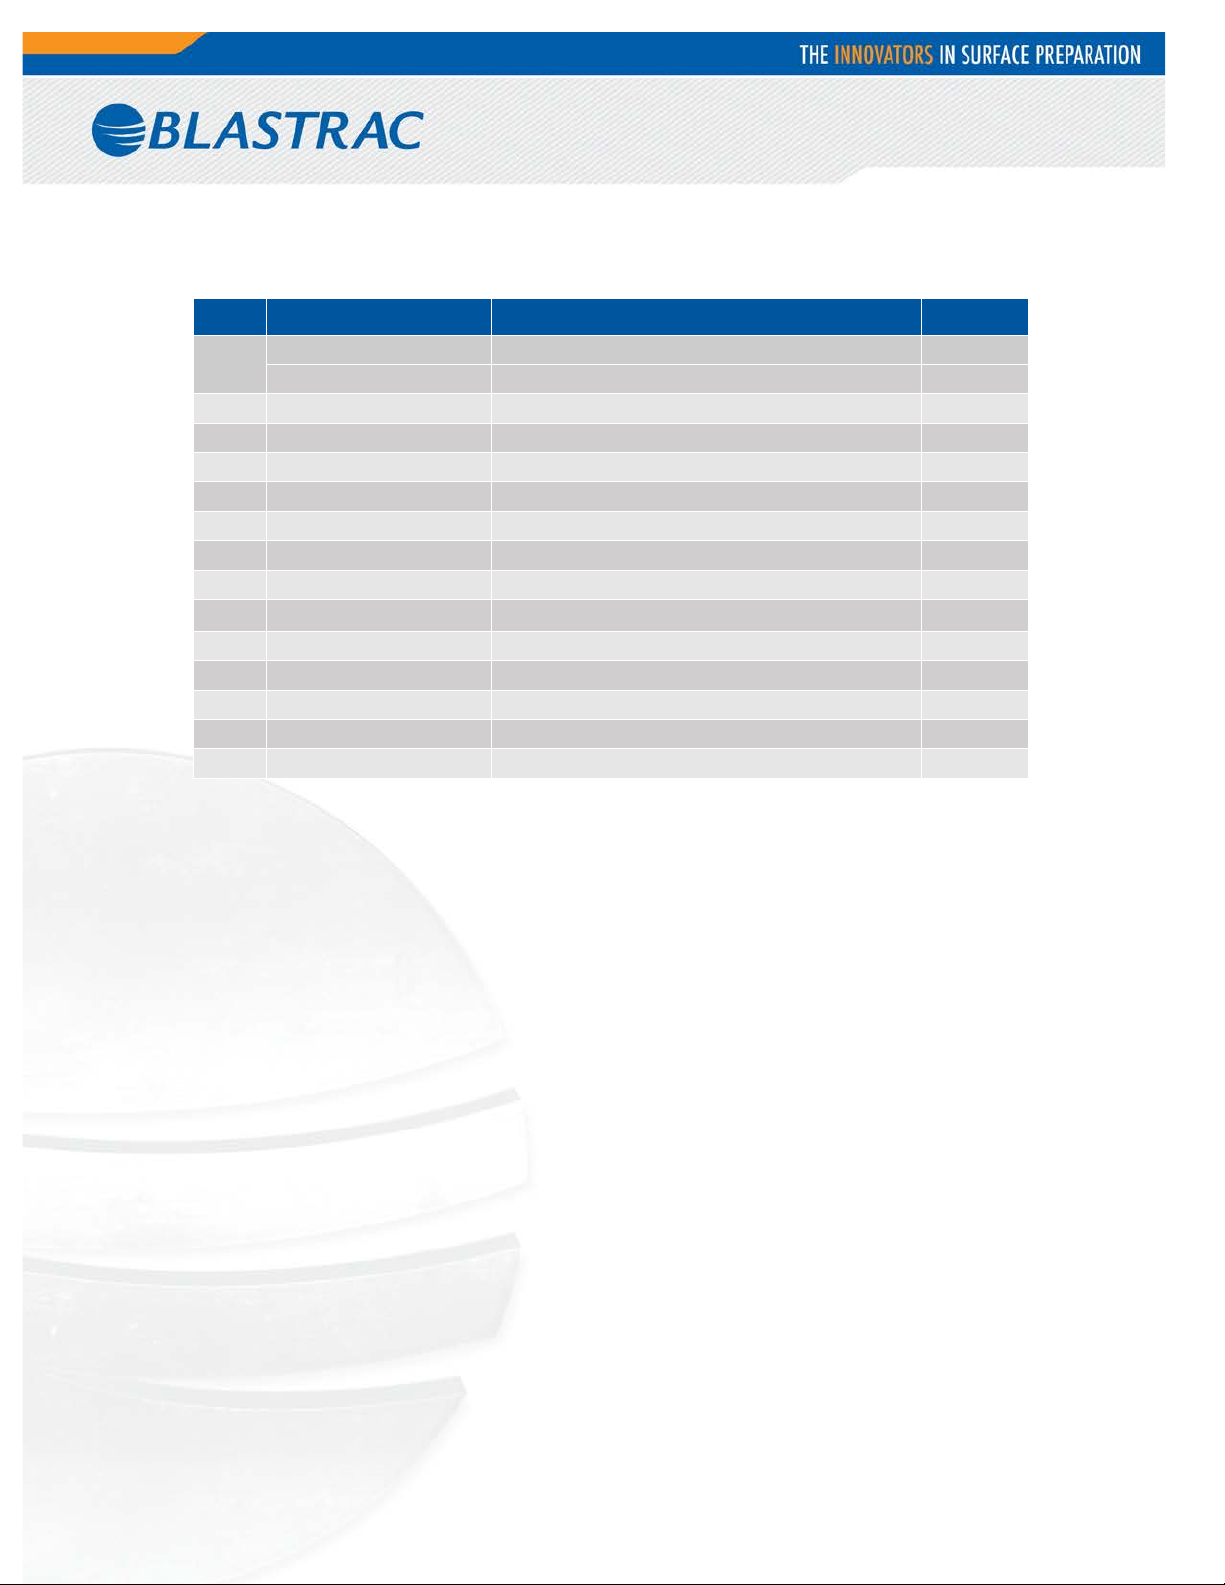
CP-10888
VARIABLE FREQUENCY DRIVE – 120V
1
7
CP-10880
CARRIAGE BOLT
2
11
PG-10527
HANDLE
1
14
P003739
CORD GRIP
2
Fig. 03
Item Part number Description Qty.
1
2 PA-11212 VFD MOUNTING PLATE 1
3 PG-10529 VFD LID 1
4 800931 HEX CAP SCREW 2
5 CP-10879 DR AW LATCH 2
6 CP-10882 NYLON ADJUSTABLE HANDLE 2
8 CP-10886 SHOT CABLE 1
9 CP-10874 HANDLE/GRIP 2
10 PA-11210 BAR/HANDLE 2
12 CP-10883 SWITCH/ ON/OFF 1
13 P000443 AMMETER/AC 1
CP-10887 VARIABLE FREQUENCY DRIVE – 220V 1
8
Page 20
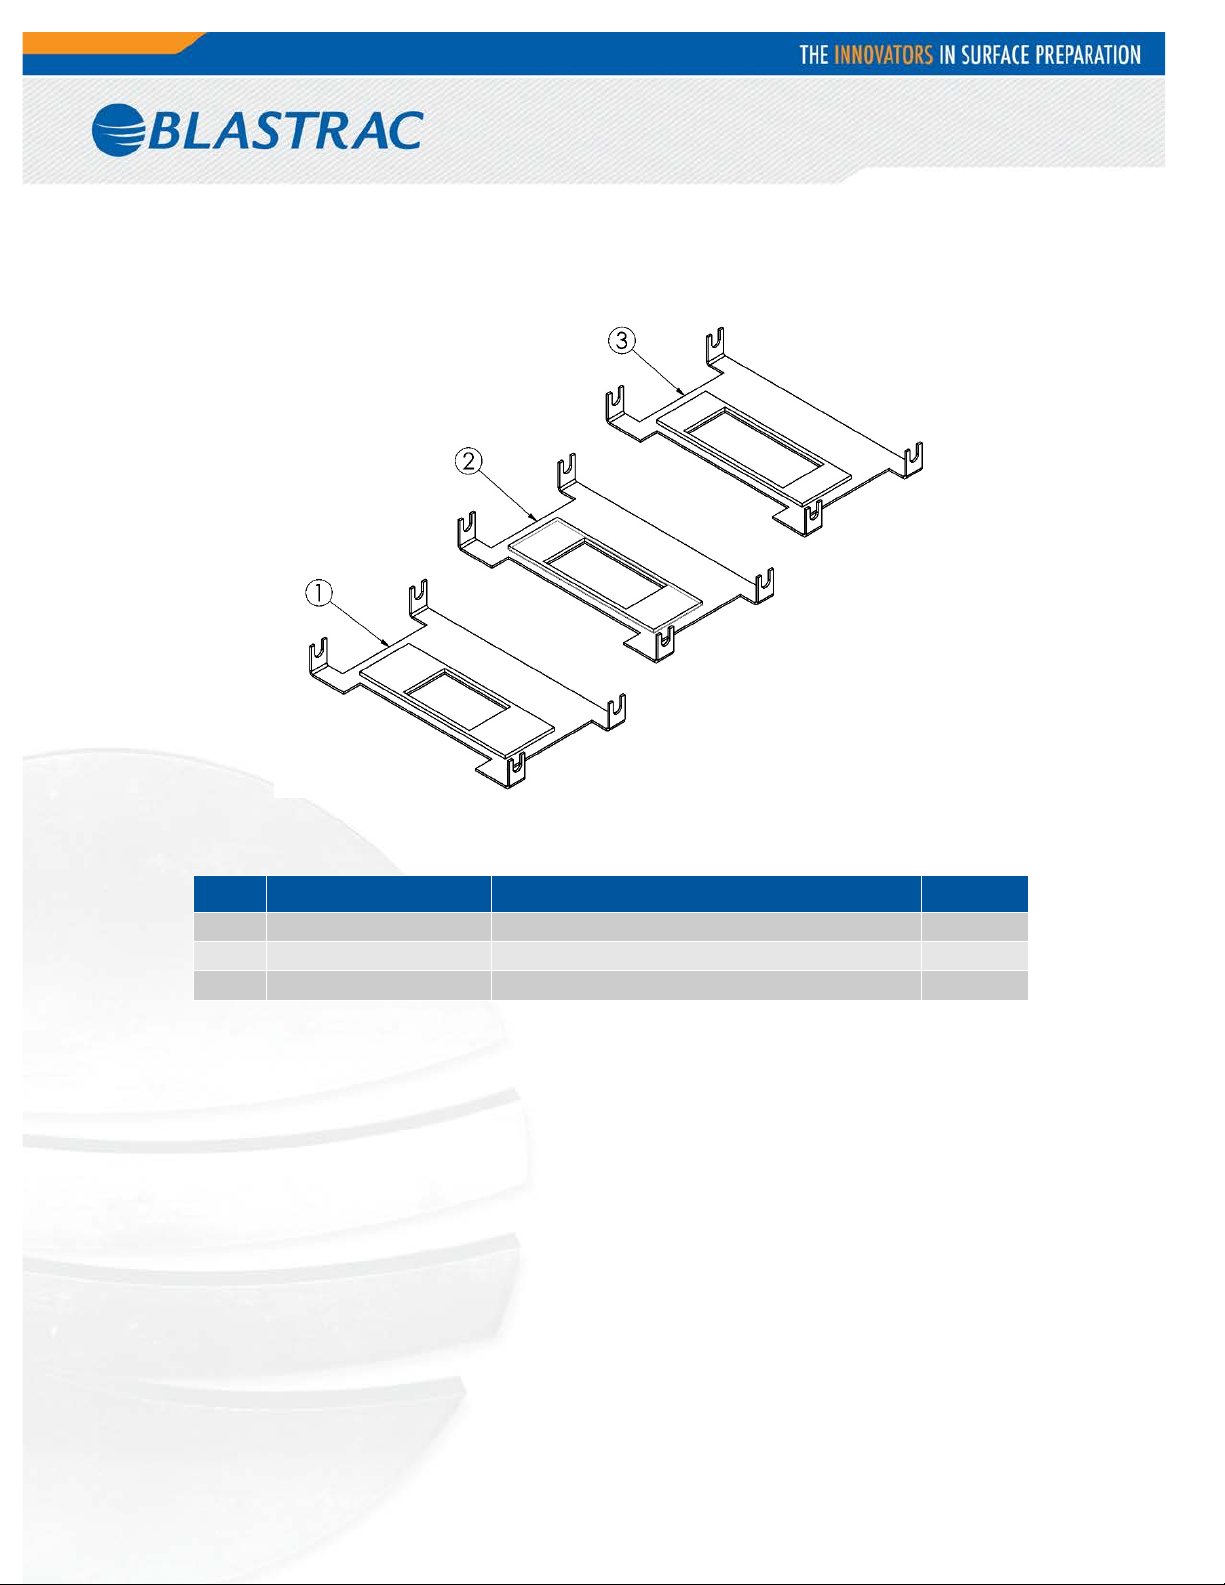
3
PG -10541
6” Edge Pattern Reducer
1
2. Accessories
Item Part number Description Qty.
1 PG-10539 4” Edge Pattern R educer 1
2 PG -10540 5” Edge Pattern Reducer 1
9
Page 21
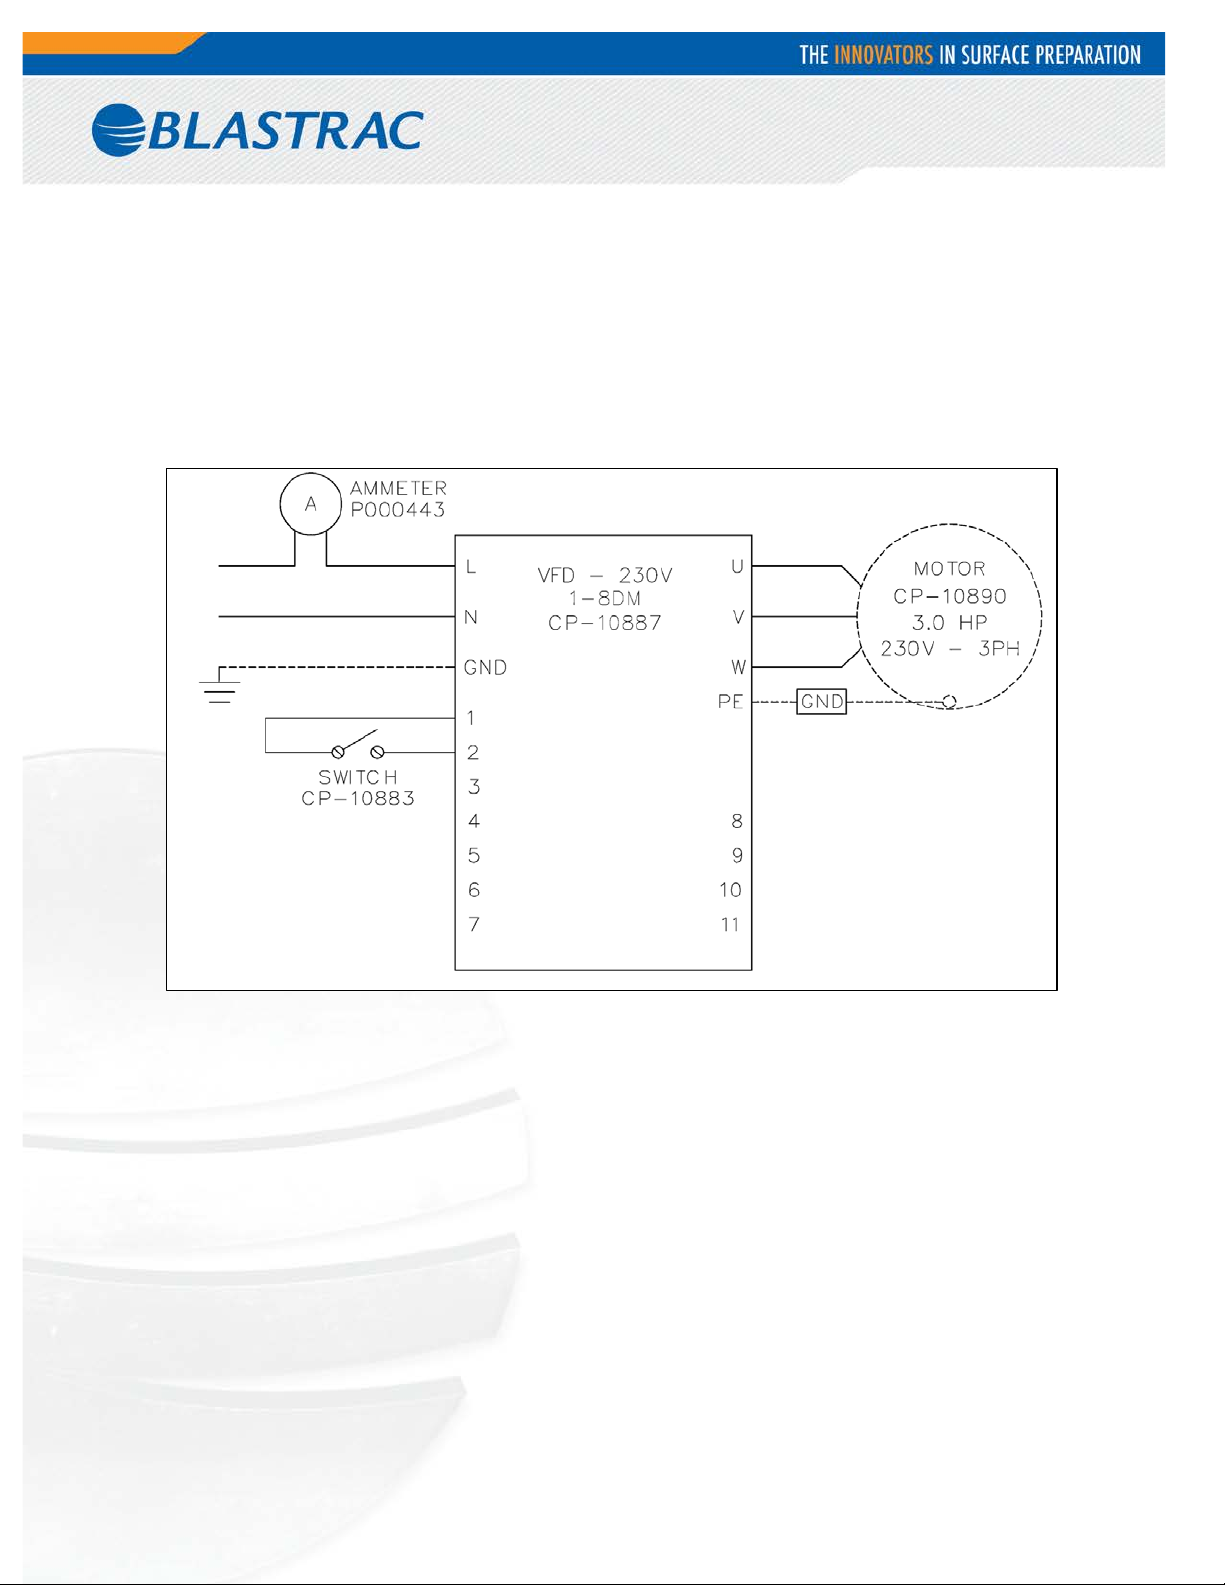
3. Electrical
Fig. 04
220V
10
Page 22
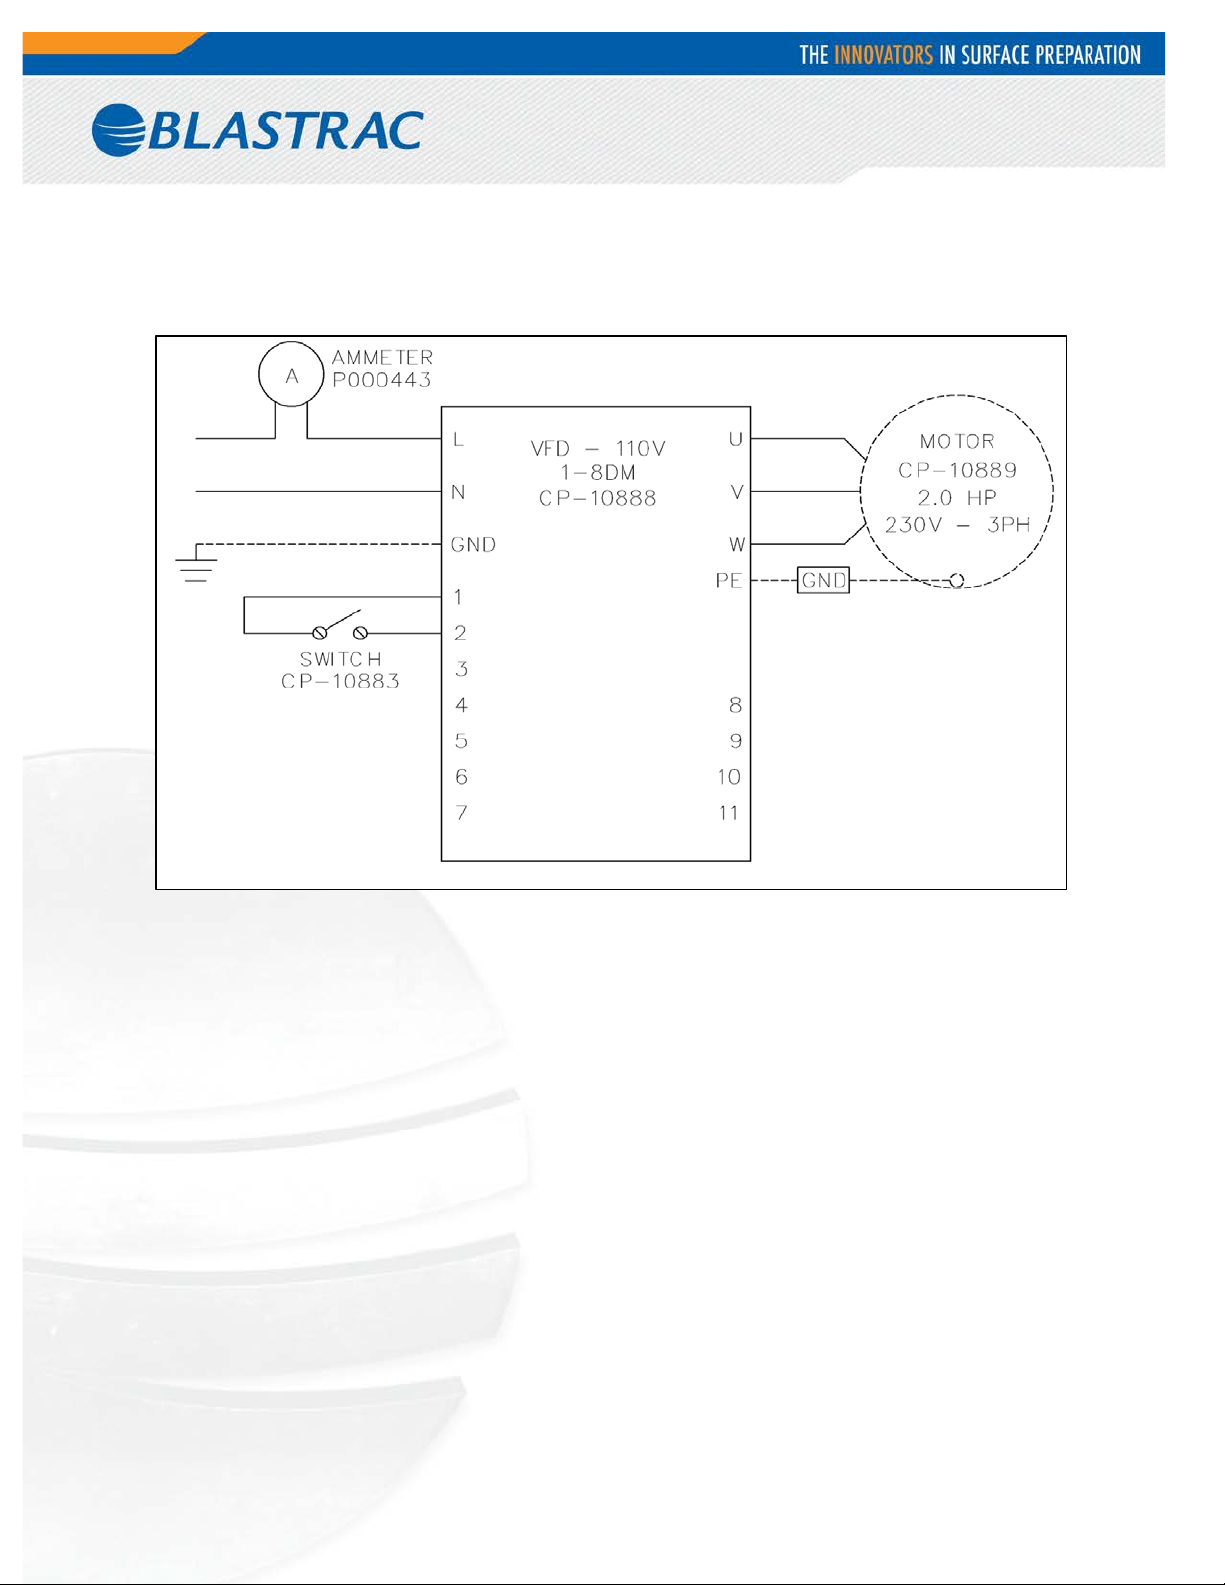
Fig. 05
110V
11
Page 23

13201 North Santa Fe Avenue Oklahoma City, OK 73114 Ph: 800-256-3440 F: 405-478-8608 blastrac.com
Product Warranty
Standard Equipment Products:
Blastrac warrants its Blastrac Standard Equipment Products against defects in quality of
material and workmanship, under normal and proper use for a period of 1 Year from the date of
delivery, as noted on the returned warranty registration card, or, in the case of Rental Fleet
Machines, 180 Days from the date of assignment to Rental Fleet. This warranty is nontransferable and is extended to machines purchased and entered into the normal service of
surface preparation by a recognized professional or qualified contractor. Blastrac makes this
warranty only to the buyer who purchases the products directly from Blastrac or its Authorized
Distributor. This warranty does not include expendable parts such as, but not limited to, blades,
blast wheels, wear plates, liners, seals, and electrical components. All purchased parts utilized
in the manufacture will be honored to the original manufacturer’s specified warranty.
If the buyer does not return the warranty card or register the product online at
www.blastrac.com within 30 days after taking delivery of Blastrac Standard Equipment Products,
the warranty period is limited to 6 months from the date of delivery noted on shipping receipt.
Hand Tool Products:
Blastrac warrants its BLASTRAC Hand Tool Products, including hand grinders and
accessories, against defects in material and workmanship under normal and proper use for a
period of 90 days from the date of delivery or, in the case of Rental Fleet Machines, from the
date of assignment to a Rental Fleet. Blastrac makes this warranty only to the buyer who
purchases the products directly from Blastrac or its authorized distributor. This warranty does
not include expendable parts such as blades.
If the buyer does not return the warranty card, or register online at www.blastrac.com
within 15 days after taking delivery of Blastrac Hand Tool Products, the warranty period is
limited to 30 days from the date of delivery noted on shipping receipt.
WARRANTY TERMS AND CONDITIONS:
1. Blastrac’s obligation under this warranty is limited to the replacement or repair, at
Blastrac’s option, of products and does not include, labor, the cost of transportation, loss
of operating time, or normal maintenance services.
2. This warranty does not apply to failure occurring as a result of abuse, misuse,
negligence, corrosion, erosion, normal wear and tear, alterations or modifications made to
products without the express written consent of Blastrac.
3. The buyer must submit all warranty claims no later than thirty (30) days after buyer
becomes aware of the basis for any such claim, or should have become aware of the basis
for any such claim in the exercise of reasonable diligence.
Page 24

To return parts for warranty consideration, please call Blastrac Customer Service at
800-256-3440. Your customer service representative will obtain the necessary
information to complete the Blastrac Returned Merchandise Authorization (RMA) Form.
Blastrac will then send the RMA form to the customer authorizing the return of the parts
for warranty evaluation. The parts must be received within sixty (60) days following the
RMA origination date or the warranty claim will be denied. Once the parts are received they
will be evaluated for warranty.
If the customer cannot wait for the evaluation/replacement of the parts during this
process, the customer must issue a new purchase order to Blastrac for the replacement
parts before they can be shipped. Once the evaluation process is complete and parts are
deemed a valid warranty claim, a credit will be issued against this invoice.
4. The buyer may not return Blastrac products without written authorization to do so
through a Blastrac RMA.
5. Blastrac reserves the right to inspect and determine the scope of its warranty
responsibilities for any returned Blastrac products.
6. Blastrac makes no warranty with respect to accessories it does not manufacture,
including but not limited to, engines, motors, batteries, tires and all other parts. See
component manufacture warranty.
7. Blastrac reserves the right to make product changes or improvements without
prior notice and without undertaking any obligation for such changes or improvements on
previously sold products.
8. The above warranty conditions can only be altered by Blastrac. Blastrac must
confirm alterations in writing for each specific transaction.
9. Blastrac reserves the right to modify this warranty for used or demo products on an
individual transaction basis. Blastrac will include warranty modifications on its invoices for
used or demo products.
10. BLASTRAC DOES NOT AUTHORIZE ANY PERSON, REPRESENTATIVE, SERVICE OR
SALES OUTLET TO MAKE ANY WARRANTY DIFFERENT FROM THIS PRODUCT WARRANTY.
11. EXCEPT FOR ITS PRODUCT REPAIR OR REPLACEMENT OBLGATIONS DESCRIBED
IN THIS PRODUCT WARRANTY, UNDER NO CIRCUMSTANCES SHALL BLASTRAC BE LIABLE
TO THE BUYER, OR ANY OTHER PERSON, FOR ANY DIRECT, INCIDENTAL, OR
CONSEQUENTIAL DAMAGES RESULTING FROM THE USE OF THE BLASTRAC PRODUCT, OR
FOR ANY SPECIAL OR CONSEQUENTIAL DAMAGES OF ANY CHARACTER, INCLUDING
WITHOUT LIMITATIONS, DAMAGES FOR ANY LOSS OF GOODWILL, WORK STOPPAGE, OR
ANY AND ALL OTHER COMMERCIAL DAMAGES OR LOSSES.
12. BLASTRAC MAKES NO OTHER PRODUCT WARRANTIES, EXPRESS OR IMPLIED,
INCLUDING, BUT NOT LIMITED TO, THE IMPLIED WARRANTIES OF MERCHANTABILITY AND
FITNESS FOR A PARTICULAR PURPOSE.
This Product Warranty Effective January 1, 2010.
Page 25

Warranty Registration Notification
IMPORTANT!
TO THE DELIVERING DISTRIBUTOR OR END USER
To ensure the proper warranty coverage is extended to the owner of this machine, fill
in the necessary information below COMPLETELY and ACCURATELY and retain for
your records. Go to www.blastrac.com and register online. Click on the Register icon
in the left column of the homepage, and fill out the product registration form with the
same information that will be recorded here.
The warranty period will start upon the delivery date of the machine.
The distributor or the end user must provide the machine warranty information when
the machine is delivered. Registration of the machine will extend the warranty period
from the recorded delivery date entered with product registration. Failure to comply
will make any and all warranties on the equipment void after 6 months.
OWNER/END USER’S REFERENCE INFORMATION
Delivery Date _________________________
Delivering Distributor’s Name and Address
_____________________________________
_____________________________________
_____________________________________
Machine Model No._____________________
Machine Serial No. _____________________
Modifications__________________________
_____________________________________
_____________________________________
_____________________________________
_____________________________________
Signature of Delivering Distributor’s Representative
Blastrac is a registered trademark of Blastrac,NA
Fold and Detach Here if Mailing
Warranty Registration
IMPORTANT! To ensure that your Blastrac
the information recorded here by registering online at blastrac.com, or complete this page and fax
to 866-485-1046, or if you prefer, detach and mail to:
Blastrac, 13201 North Santa Fe Avenue, Oklahoma City, OK 73114-9901
(Please print legibly)
_____________________________________
_____________________________________
®
machine is covered under warranty, please provide
Company _____________________________________________________________________
Address ______________________________________________________________________
City, State, & Zip _______________________________________________________________
Telephone No._____________________ Contact Person ______________________________
Date of Purchase___________________ Date Received ______________________________
Machine Model No. __________________________ Serial No. _________________________
Distributor Name _______________________________________________________________
End User Name _______________________________________________________________
End User E-mail _______________________________________________________________
Page 26
Contact
www.blastrac.com
Blastrac NA
13201 North Santa Fe Avenue
Oklahoma City, OK 73114
Tel: 800-256-3440
Fax: 405-478-8608
 Loading...