

Blanco CI905 Instructions For The Use And Care And Installation

Instructions for the Use and Care and Installation of
BIC63
BIC64
BIC84
Ceran Touch Control Cook Top.
CI905
Induction Cooktop

EN
As part of our commitment to constantly improving our products, we reserve the right to make
changes to them based on technological advances to their technical, functional and/or aesthetic properties.
Attention
BBeeffoorree iinnssttaalllliinngg aanndd uussiinngg yyoouurr aapppplliiaannccee,, pplleeaassee ccaarreeffuullllyy rreeaadd tthhiiss GGuuiiddee ttoo
IInnssttaallllaattiioonn aanndd UUssee,, wwhhiicchh wwiillll aallllooww yyoouu ttoo qquuiicckkllyy ffaammiilliiaarriissee yyoouurrsseellff wwiitthh iittss ooppeerraattiioonn..
Dear Customer
You will find that the clean lines and modern look of your Blanco cooktop
blends in perfectly with your kitchen décor. It is easy to use and performs to a
high standard.
Blanco also makes a range of products that will enhance your kitchen – such
as ovens, rangehoods, dishwashers, microwaves, sinks and taps. There are
models to complement your new Blanco cooktop.
Of course, we make every effort to ensure that our products meet all your
requirements, and our Customer Relations Department is at your disposal, to
answer all your questions and to listen to all your suggestions.
Please complete the warranty section of this manual and keep your receipt as
proof of purchase. Retain all documents relating to the purchase of Blanco
product.
Blanco is committed to providing increasingly efficient products that are easy
to use, respect the environment and are attractive and reliable.
BBLLAANNCCOO

EN
3
TABLE OF CONTENTS
• Safety Guidelines
____________________________________________________
4
• Environmental Protection
_____________________________________________
4
• After Sales Service
__________________________________________________
5
• Description of Your Appliance
_________________________________________
5
1 / INSTALLING YOUR APPLIANCE
• Proper positioning
___________________________________________________
6
• Building in
__________________________________________________________
6
• Electrical connection
_________________________________________________
7
2 / USING YOUR APPLIANCE
• Description of the top
_________________________________________________
8
• Cookware for induction
_______________________________________________
9
• Which cooking zone should you use based on your cookware?
_____________
9
• Description of control panel
___________________________________________
10
• Powering on /off
_____________________________________________________
10
• Adjusting the power
_________________________________________________
10
• Setting the timer
_____________________________________________________
11
• child safety use
_____________________________________________________
12
• Safety during operation
_______________________________________________
13
3 / DAILY CARE OF YOUR APPLIANCE
• Protecting your appliance
_____________________________________________
14
• Maintaining your appliance
____________________________________________
14
4 / SPECIAL MESSAGES, DIFFICULTIES
• During initial use
____________________________________________________
15
• When powering on
___________________________________________________
15
• During operation
____________________________________________________
15
5 / COOKING CHART
• Cooking chart for food types
__________________________________________
16
4
This appliance's packaging material is recyclable. Help recycle it and protect the environment by dropping it off in the municipal receptacles provided for this purpose.
Your appliance also contains a
great amount of recyclable material. It is marked with this label to
indicate this cooktop should not be
mixed with other waste. When disposing of your appliance, contact
your local council in relation to the
disposal locations.
We thank you doing your part to protect the
environment.
SAFETY GUIDELINES
We have designed this cooktop for domestic
use only.
This cooktop is meant to be used exclusively
for cooking foodstuffs and does not contain
any asbestos-based materials
.This appliance is not intended to be used by
persons (including children) with reduced
physical, sensory or mental abilities, or persons lacking experience or awareness, unless
using it with the help of a person reponsible
for their safety, or under supervision and with
prior instruction in its use. Children should be
supervised to ensure that they do not play
with the appliance.
••
Residual heat
A cooking zone can remain hot for several
minutes after use.
An
""HH""
is displayed during this period.
Avoid touching the hot areas during this time.
••
Child safety device
Your cooktop is equipped with a child safety
device that locks its operation after use or
during cooking (See " Child Safety use" section).
Do not forget to unlock it before using the
cooktop again.
••
For users of pacemakers and
active implants
The functioning of the hob conforms to current electromagnetic interference standards
and thus is in total compliance with legal
requirements (89/336/CEE directives).
In order to avoid interference between your
cooktop and a pacemaker, your pacemaker
must be designed and programmed in compliance with the regulations that apply to it.
Consequently, we can only guarantee that our
own product is compliant.
With regard to the compliance of the pacemaker or any potential incompatibility, you can
obtain information from the manufacturer or
your attending physician.
Electrical Danger
Ensure that the power cables of any
electrical appliances plugged in close to
the hob are not in contact with the cooking
zones.
If a crack appears in the glass worktop,
immediately disconnect your appliance to
avoid the risk of electric shock.
To do this, remove the fuses or use the circuit breaker.
Do not use your cooktop until you have
replaced the glass worktop.
••
DISPOSING OF WASTE
••
EN
5
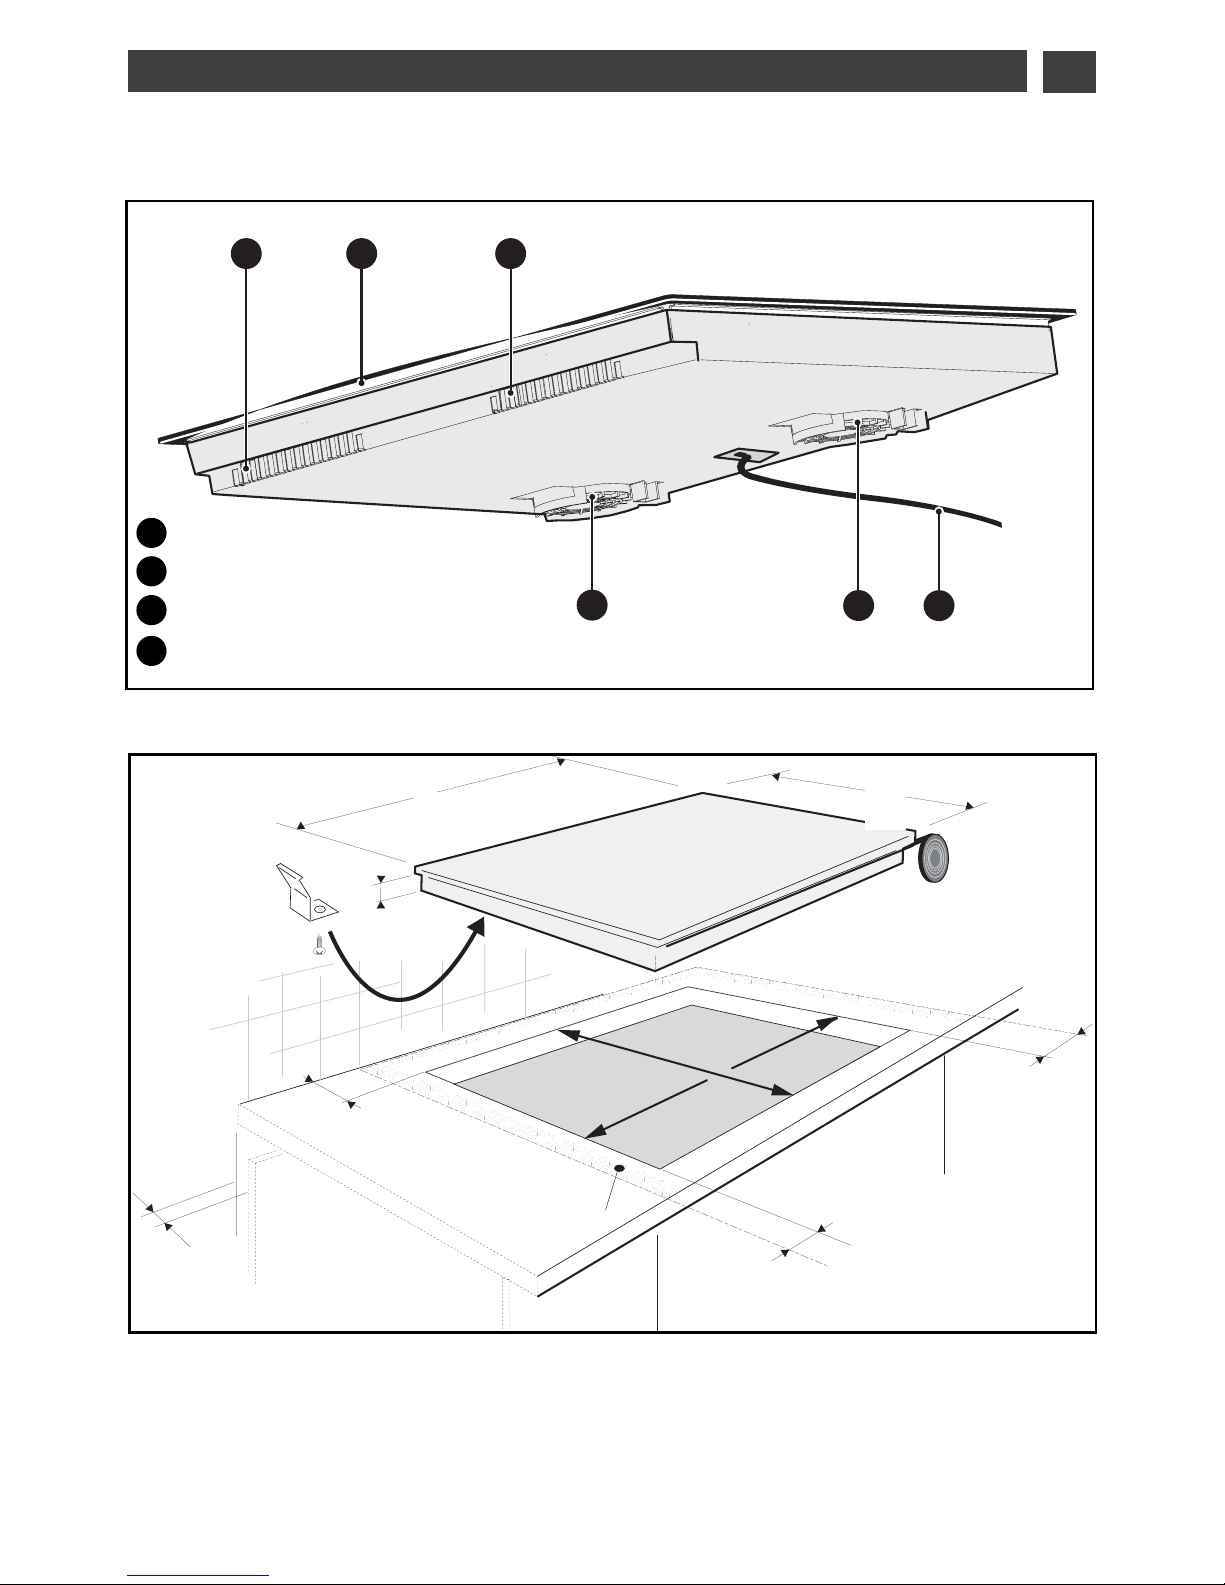
DESCRIPTION OF YOUR APPLIANCE
••
B
C
B
A
A
D
Air intake
Air outlet
Vitroceramic glass
Power cord
A
B
C
D
AFTER-SALES SERVICE
4 cm
4 cm
4 cm
4 cm
A
ventilation
space
5511
9933
66..44
4499
9900
Your appliance should be positioned so that the plug-in unit is accessible.
The distance between the edge of your appliance and the side and rear walls (or partitions)
must be at least four centimetres (area A).
Glue the foam seal underneath your appliance by following the outline of the worktop upon
which your appliance will rest. This will allow you to achieve an airtight seal with the worktop.
Attach the clips to the hob
((
depending on the model)
PROPER POSITIONING
6
Tip
If your oven is located below your cooktop, the cooktop's thermal safety measures forbid the simultaneous use of the cooktop and the pyrolysis program of your oven.
Your cooktop is equipped with an anti-overheating safety device.
This safety can be activated, for example, when the hob is installed over an oven that is not
sufficiently insulated. If this occurs, a series of small lines appear in the control panel. In
this case, we recommend that you increase the ventilation of your hob by creating an opening in the side of your cabinet (8 cm x 5 cm) and/or that you install the oven insulation kit
(reference 75X1652) that is available from the Post-Sales Service Department.
Warning
You must ensure that the air intakes located under your cooking appliance remain
clear at all times.
This induction cooktop requires adequate supply of cool air to function. The base of the
cooktop must have direct unrestricted ventilation to the room where the cooktop is installed. Ensure you follow the installation instructions detailed below.
••
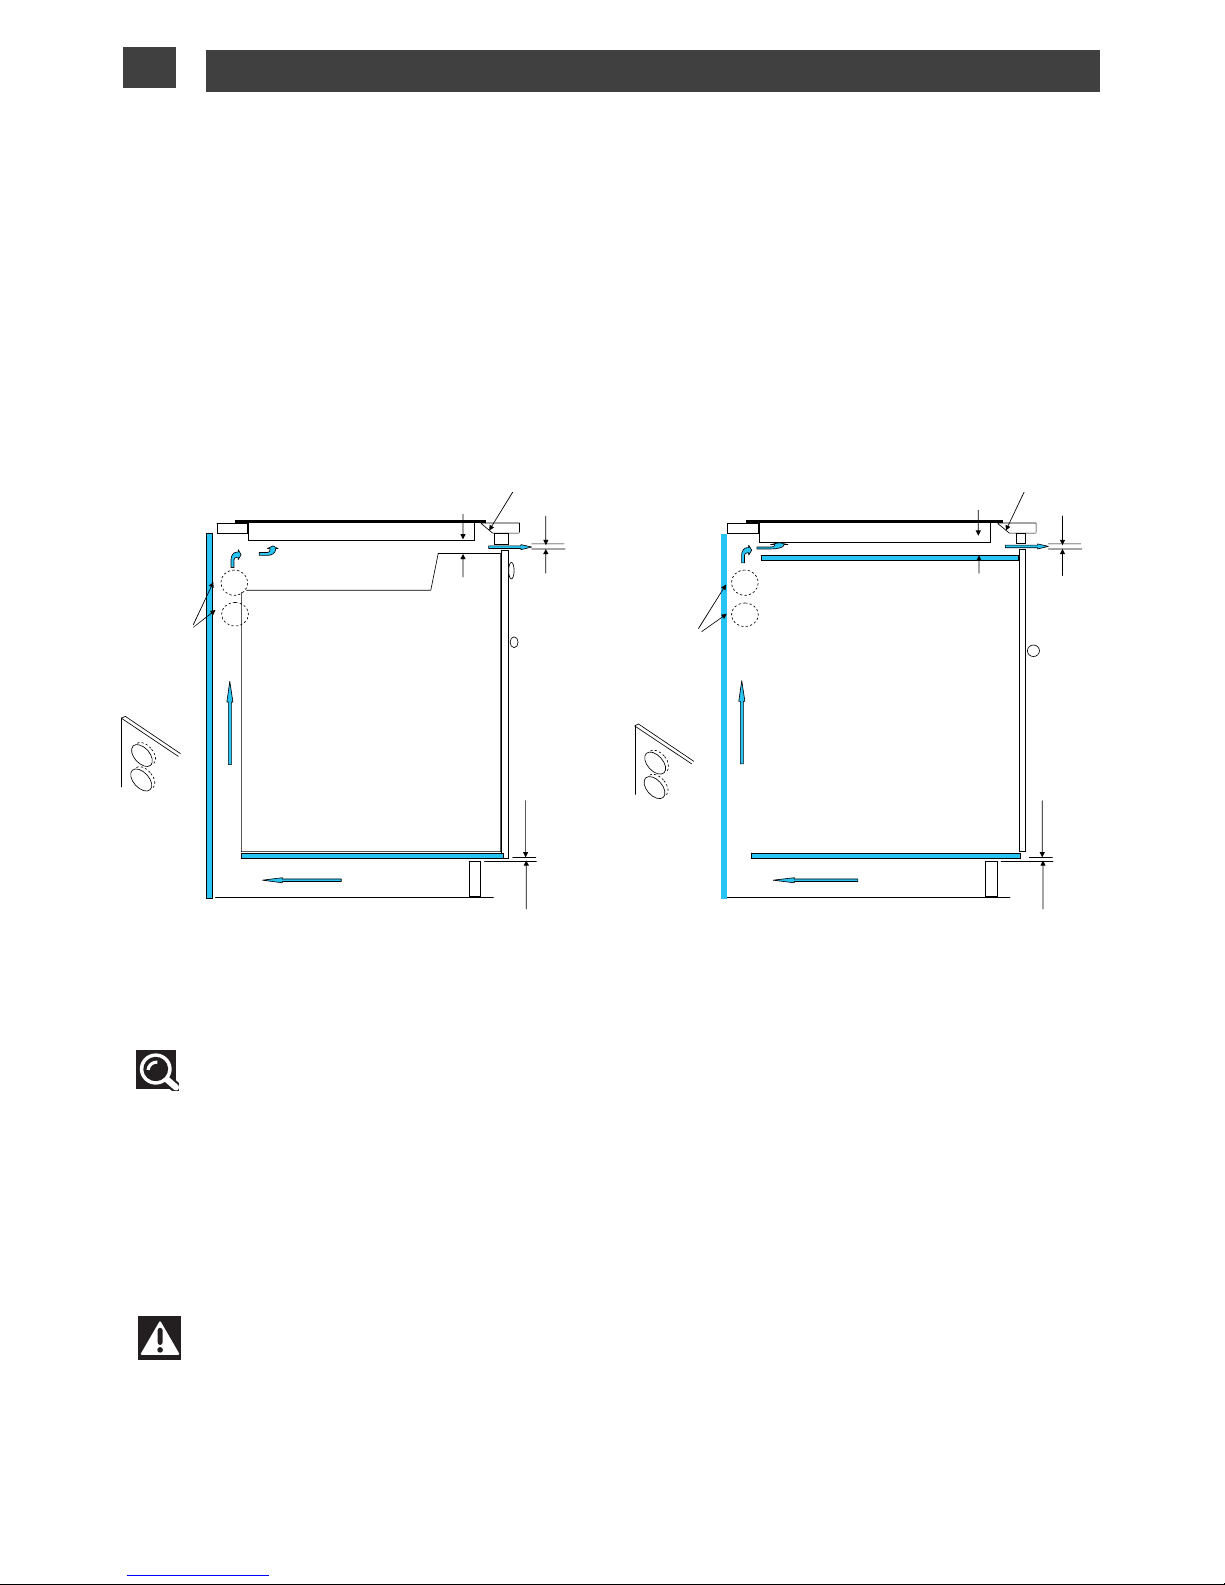
BUILD-IN
ABOVE A CUPBOARD OR DRAWER UNIT
The positioning must allow a fresh air intake and air outlet.
ABOVEANOVEN
The positioning must allow a fresh air intake and an air outlet of 4 mm minimum
Your appliance can be easily integrated above a cabinet, a built-in oven.
For all types of installation, your induction hob needs proper ventilation.
11
/ INSTALLING YOUR APPLIANCE
EN
20mm min 20mm min
4mm gap 4mm gap
10mm gap 10mm gap
Airflow Airflow
Minimum clearances and ventilation requirements Minimum clearances and ventilation requirements
for cooktops installed above an oven for cooktops installed above a cabinet or drawers
2 X 50mm
holes an be
cut into each
side wall of the
cabinet
for additional
cool air intake
2 X 50mm
holes can be
cut into each
side wall of the
cabinet
for additional
cool air intake
Top of drawer or cabinet.
Oven
Bevel the face opposite
the air vents to allow
air to exit the vents.
Bevel the face opposite
the air vents to allow air
to exit the vents.
 Loading...