

Page 1

Instructions for the Use and Care and Installation of
BOSE65
FAN FORCED OVEN
Page 2

Page 3

Dear Customer
You will find that the clean lines and modern look of your Blanco oven blends in
perfectly with your kitchen décor. It is easy to use and performs to a high standard.
Blanco also makes a range of products that will enhance your kitchen – such as cook
tops, rangehoods, dishwashers, microwaves, sinks and taps. There are models to
complement your new Blanco oven. Blanco now has a range of laundry products to
choose from.
Of course, we make every effort to ensure that our products meet all your requirements,
and our Customer Relations Department is at your disposal, to answer all your questions
and to listen to all your suggestions.
Please complete the warranty section of this manual and keep your receipt as proof of
purchase. Retain all documents relating to the purchase of Blanco product.
Blanco is committed to providing increasingly efficient products that are easy to use,
respect the environment and are attractive and reliable.
BLANCO
CONTENTS
Introduction 3
Contents
Safety recommendations 4-5
Specification
Cabinetry Preparation 7
Important notice to the User
Notes for
Instructions for Use
Instructions for Cooking
Table of cooking times and temperature 15
Cleaning and Maintenance
Technical assistance 19
Warranty card
the installation 9-10
11-13
14
16-18
20
3
6
8
3
Page 4

Safety recommendations
ELECTRIC OVEN
Read the following carefully to avoid an electric shock or fire
It is most important that this instruction book should be retained with the
appliance for future reference. Should the appliance be sold or transferred,
always ensure that the book is left with the appliance in order that the new
owner can get to know the functions of the appliance and the relevant warnings. These warnings are provided in the interest of safety. You MUST read
them carefully before installing or using the appliance.
Safety Warnings.
· The appliance is not intended for use by young children or infirm persons
unless they have been adequately supervised by a responsible person to
ensure that they can use the appliance safely.
· Young children should be supervised to ensure that they do not play with the
appliance.
· WARNING: Ensure the appliance is switched off before replacing the lamp to
avoid the possibility of electric shock.
· WARNING - Accessible parts will become hot when in use. To avoid burns and
scalds children should be kept away.
· Do not use a steam cleaner to clean a hob, oven or range.
· Do not spray aerosols in the vicinity of the appliance when it is in operation.
· Do not store flammable materials in or under the appliance, eg aerosols.
· Always turn the grill off immediately after use as fat left there may catch fire.
· Do not cover the insert with foil, as fat left there may catch fire.
· Always keep the grill dish clean as any fat left there may catch fire.
· Do not leave the grill on unattended.
· To avoid a fire, ensure that grill trays and fittings are always inserted into the
appliance in accordance with the instructions.
· Switch the appliance off before removing the oven light glass for globe replacement.
· To avoid an accident, ensure that oven shelves and fittings are always inserted
into the appliance in accordance with the instructions.
· Do not use the door as a shelf.
· Do not push down on the open oven door.
· An authorised person must install this appliance.
· Before using the appliance, ensure that all packing materials are removed from
the appliance.
· In order to avoid any potential hazard, the installation instructions must be followed.
· Ensure that all specified vents, openings and airspaces are not blocked.
· Only authorised personnel should carry out servicing.
· Always ensure the appliance is switched off before cleaning or replacing parts.
4
Page 5

Safety recommendations
· Always clean the appliance immediately after any food spillage.
· To maintain safe operation, it is recommended that the product be inspected
every five years by an authorised service person.
· If the supply cord is damaged, it must be replaced by the manufacturer or its
service agent or similarly qualified person in order to avoid hazard.
· During use the appliance becomes hot. Care should be taken to avoid touching heating elements inside the oven.
HEADING GENERAL WARNINGS.
Using for the first time:
Before you use your oven for the first time, leave it empty and, with the door
closed, turn it on to maximum temperature and let it heat up for 15 minutes.
During this time there may be some smell from the mineral wool that insulates
the oven and there could be some smoke. This is perfectly
normal.
Normal use:
- Always close the door properly. The oven is fitted with a seal designed to
work with a closed door.
· Always ensure the appliance is switched off before cleaning or replacing parts.
- If the supply cord is damaged, it must be replaced by the manufacturer or
its service agent or a similarly qualified person in order to avoid hazard.
-During use the appliance becomes hot. Care should be taken to avoid tou-
ching heating elements inside the oven.
Do not install the product if it is damaged.
5
Page 6
SPECIFICATION
Electrical features
Input voltage 230-240V 50 Hz
Grill element 1800 W
Upper element 800 W
Lower element 1000 W
Circular element 2100 W
Lighting bulb max 25 W
This appliance complies with EEC 89/336 specifications issued for the magnetic
compatibility. For components coming in contact with foodstuffs, the appliance
complies with EEC 89/109 specifications.
ELECTRICAL CONNECTION: The appliance is fit
Amp flexible
outlet.
The manufacturer is not liable for any direct or
installation or
connection operations are car
local and general regulations in force.
6
cord and plug which must be connected to a correctly earthed socked
connection. It is therefore necessary that all installation and
ried out by qualified personnel complying with the
ted with an Australian approved 10
indirect damage caused by faulty
Page 7

CABINETRY PREPARATION
100
450
594
575
598
23
560
560
558
499
573
575
450
560
560
100
450
400
80
CABINETRY MATERIALS MUST BE SUITABLE TO WITHSTAND
TEMPERATURES UP TO 90°C
Dimensions illustrated are for proudmount installation.
7
Page 8

IMPORTANT NOTICE TO THE USER
The base element is concealed beneath the bottom of the oven to make the oven easier
to clean and contribute to better access into the oven.
Because the element is concealed beneath the oven the following rules will need to be
observed during cooking to ensure optimum performance from the oven.
DO NOT PLACE ALUMINIUM FOIL OR METAL OBJECTS ON THE BASE OF THE OVEN
DURING COOKING.
Foil or dishes must never be placed on the base of the oven during cooking as the concentration of the direct and reflected heat will damage the enamel surface. Provisions of
the warranty do not cover damage resulting from such use.
NO YES
8
Page 9

NOTES FOR THE INSTALLATION
GENERAL INFORMATION
The appliance must be installed in accordance with all relevant codes laid down by
Electrical Supply Authorities. The original installation and adjustment must be made by a
licensed electrician.
ELECTRICAL CONNECTION
The appliances are provided with a three-pole feeding cable and work with alternate current and single-phase voltage indicated on the rating plate of the product and in the
instruction manual and on the product. The grounding conductor of the cable is marked
with the colours yellow/green.
CONNECTION OF THE FEEDING CABLE TO THE MAINS
Connect the feeding cable of the oven to a plug suitable for the load indicated on the
rating plate of the product. In case of a direct connection to the mains (cable without plug),
it is necessary to insert a suitable omnipolar switch before the appliance, with minimum
opening between contacts of 3 mm (the grounding wire should not be interrupted by the
switch).
Before connecting to the mains, make sure that:
• The electrical counter, the fuse, the feeding line and the socket are
adequate to withstand the maximum load required (see rating
plate).
• The supply system is regularly grounded, according to the regulations in force.
• The socket or the omnipolar switch can easily be reached after the
installation of the oven.
• After carrying out the connection to the mains, check that the supplying cable does not come into contact with parts subject to heating.
• Never use reductions, shunts, adaptors which can cause overheating or burning.
The manufacturer is not liable for any direct or indirect damage caused by faulty installation or connection. It is therefore necessary that all installation and connection operations
are carried out by qualified personnel complying with the local and general regulations in
force.
INSERTION AND ASSEMBLY
Insert the oven into the opening of the cabinet, resting it on the base and pushing it as far
as the ledge of the side stanchions against the shoulder of the cabinet. For the dimensions of the oven see cabinet and technical data.
9
Page 10

NOTES FOR THE INSTALLATION
•Open the door and fix the oven with four wood
screws to be screwed up through the holes in the
side stanchions of the oven.
Pay attention to fix the oven in an absolutely firm way,
as indicated. If the oven is hard wired, ensure that the
wiring is fixed securely into the terminal block to
prevent contact with metallic parts.
Once the electrical connection has been carried out, apply voltage to the oven only
after installing it.
10
Page 11

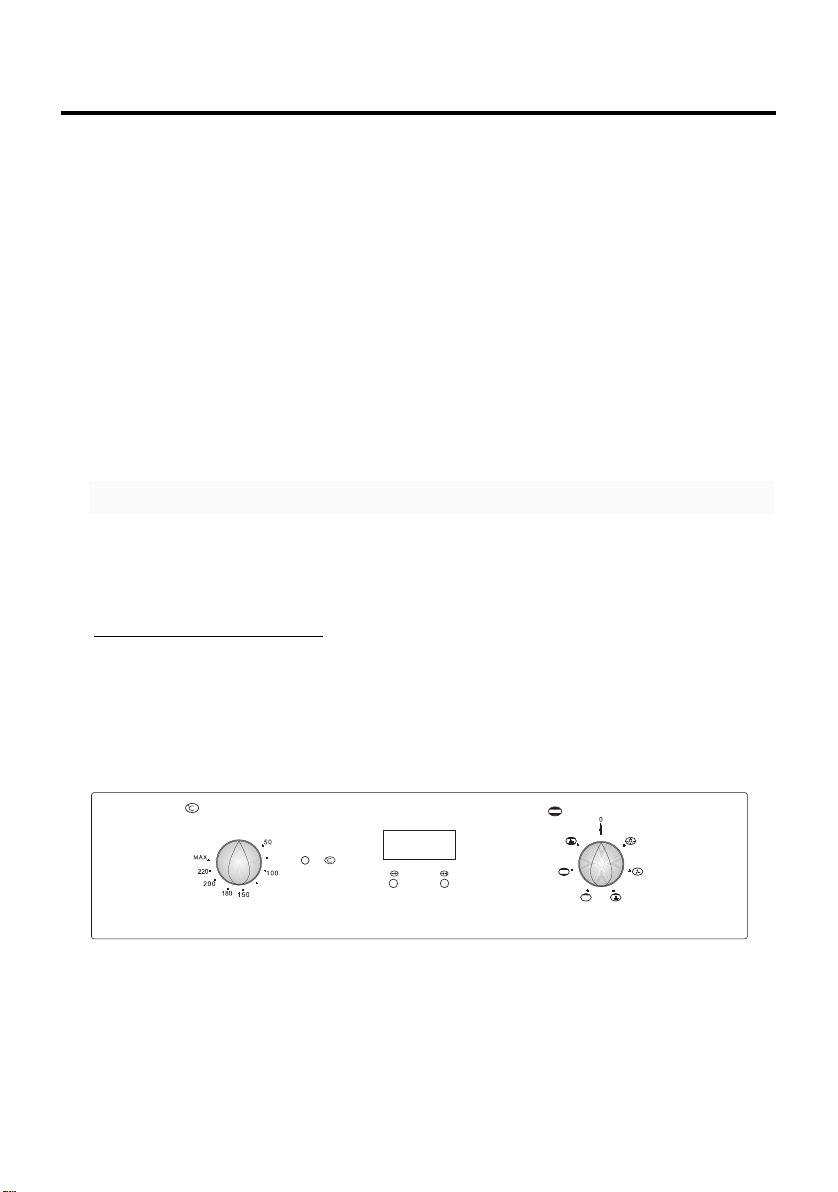
INSTRUCTIONS FOR USE
The selector A and thermostat B control is used to select the various oven functions and to choose the cooking temperatures best corresponding to the food to be
cooked. During oven operation the lamp will always remain on.
The lamp of the oven is on, with no heating elements operated (electrical resistances). During oven operation the lamp will always remain on.
TRADITIONAL
Upper and lower heating elements operated; temperature adjustable from 50°C
to MAX on the thermostat.
Suitable for the cooking of meats/poultry that require long, slow cooking as well
as for the cooking of bread and sponge cakes.
It is advisable to insert the food to be cooked into the oven when it has reached
the cooking temperature.
FAN ASSIST
U
pper and lower heating elements and the oven-fan operated; temperature adju-
stable from 50°C to MAX on the thermostat.
A continuous circulation of warm air is created. This kind of heating is specially
fit for cooking on multiple shelves. The cooking temperatures required are lower
than when using traditional methods, thus saving time and energy.
FAN FORCED
Back heating element and the oven-fan operated; temperature adjustable from
50°C to MAX on the thermostat.
The circular heating element and fan come into operation and the heat is spread
evenly to all shelf positions. Various types of food can be cooked on different
shelves, naturally with the appropriate cooking times. The oven must be preheated
before the foods are placed inside. Fan mode provides optimum results with: cakes
(soft and thick), large quantities of foods and cooking various dishes simultaneously.
To operate, select Fan Forced function along with the temperature.
FAN GRILL
Grill Element and oven fan operated; turn the thermostat to position 200
Used for grilling meats, vegetables and poultry. Preheat oven, place food on grill
rack in baking tray and place in the middle of the oven. Other foods may be cooked
underneath whilst grilling.
GRILL
Grill element operated; turn thermostat to position 200°C - Use for toasting and
melting cheese or browning. No longer than 5 minutes cooking time. To operate,
select Full Grill Function along with the temperature.
°C.
The oven door must be closed for all cooking methods
A
B
11
Page 12

INSTRUCTIONS FOR USE
PROGRAMMING THE OVEN
Setting the Clock.
Once the power has been connected,
the display 0.00 and the Auto indicator
will flash alternately.
Press both keys (1) and (2) at the
same time and release.
Within 4 seconds, set the clock by
pressing either button (1) or (2) until
the correct time is set.
A
U
T
O
1
2
The oven is now i
n manual mode and the manual indicator
will be
displayed. The oven can now be used without any further programming.
Setting End of Cooking Time
Step 1
• Select the oven mode and the temperature required using the function
and the thermostat switches.
Step 2
• Auto mode is activated when you press (1) or (2).
• The press button (1) or (2) to set and adjust the cooking time.
• The display will show briefly the time entered and then revert back to the
clock display.
• The oven is now in auto mode and the Auto indicator is displayed.
• If through the cooking time you would like to see how long is left, press
either buttons (1) or (2) once (and briefly) and the remaining time will be
displayed momentarily.
• At the end of cooking time an acoustic signal is activated, the oven will
turn off and the auto indicator will flash. You will need to either:
o Option 1 - Turn off oven function and temperature switches.
Push buttons (1) or (2) once to cancel the acoustic signal. Push
button (1) or (2) once again to put the oven back to manual mode.
o Option 2 – if you wish to continue cooking at this point you need
to put the oven back into manual. First of all stop the acoustic
signal by pressing either button (1) or (2). Then press button (1) or
(2) again to return to manual mode. Remember to turn off the
oven function and temperature switches when you have finished
cooking.
12
Page 13

INSTRUCTIONS FOR USE
• Note! The acoustic signal will cut out automatically after 2 minutes if it
hasn’t been cancelled as above. If this happens then you will also need
to:
o Turn off oven function and temperature switches.
o Push buttons (1) or (2) once to put the oven back to manual
mode.
SAFETY LOCK FOR CHILDREN
The program is provided with a safety lock that locks the operation of the
oven.
Activate the lock.
Press both switches (1) and (2) at same time for about 10 seconds, the
display shows “ON”; release the switches simultaneously and
immediately.
Press button switch (2) and the display will show the key symbol.
Now the safety lock is activated. The display shows the current time and
every 30seconds the key symbol will appear for approximately 3 seconds.
Deactivate the Lock.
Press both switches (1) and (2) at same time for about 10 seconds and
the display shows “OF”
Then press button (2) and “On” will be displayed; release the switch.
The safety lock is deactivated and the display will show the current time.
General remarks.
• The maximum programming time is 23 hours, 59 minutes.
• If there has been a voltage cut out it will be necessary to reset the clock.
PILOT LIGHT OF THE THERMOSTAT (°C)
It comes on any time the oven is heating and switches off when the oven reaches the
preset temperature.
SAFETY THERMOSTAT
It cuts out the electric supply preventing possible overheating when the appliance is not
correctly used. In this case, wait until the oven cools down before using it again. On the
other hand, if a fault is present with components, please contact your local Blanco
service agent.
COOLING MOTOR
The oven has a built in fan for cooling the oven cavity. The fan starts automatically when
using the oven.
13
Page 14

INSTRUCTIONS FOR COOKING
It is necessary to pre-heat the oven to the
preset cooking temperature. Only very fat
meat can be placed into a cold oven. To
minimise food splashes into the oven
(which can sometimes produce smoke)
deep baking dishes are recommended.
Practical hints to save energy
The oven can be switched off some minutes before the end of cooking. The residual
temperature is enough to complete
cooking. Open the oven door only when it is absolutely necessary. To check the cooking
progress, look through the glass (the oven lamp is always on).
General Advice
The oven offers various kinds of heating:
• Traditional heating for the cooking of special roasts that require slow cooking.
• Fan force
• If the fan forced coo
example
oven at the same time to hel
PROTECTION FILTER OF THE OVEN FAN
During the cooking of fatty products, to avoid too much fat
residue striking the fan, the filter should be placed in the oven
before use. When cooking is finished and oven cools, remove
the filter and wash it carefully. Install the filter by leaning it
against the rear wall at the same level of the fan, then push the
tang downwards. Reverse this operation to remove the filter.
d - for cooking cakes, biscuits and similar.
king is chosen, you can put your roast meat (as an
) on various shelf positions. You can also cook multiple dishes in the
p save energy.
ATTENTION:
The filter should be only used when cooking fatty foods.
Better cooking results for non fatty foods will be achieved
without the filler installed.
COOKING TIMES
• The times indicated in the table refer to the cooking of one food only. For more
than one food, the cooking times should be increased by 5 - 10 minutes.
For beef, veal, pork and turkey roasts with bones or rolled, add about 20 minutes to the
times shown in the table.
14
Page 15

TABLE OF COOKING TIMES
1
2
3
4
FAN OVEN
SHELF POSITIONS
The table below provides indicative shelf positions for use with your oven. Please note,
the temperature and cooking times are indicative only. According to different cooking
habits, it may be necessary to make further modifications. Add to the below mentioned
times about 15 minutes for preheating.
Shelf position Temperature (°C)
Fan oven Fan oven
Time (Mins)
Sweets
Pastry 2 (3/4) 200-230 20-30
Sponge cakes 2 (2/3/4) 185-200 35-45
Fish
Fillets or slices 2 (2/3) 180-200 15-20
Meat
Veal 2 (2/3/4) 175-190 60-70
Pork 2 (2/3/4) 175-200 70-90
Chicken 2 (2/3/4) 175-200 80-90
Turkey 2 (2/3/4) 175-200 90-120
Beef 2 (2/3/4) 175-200 70-90
Lamb 2 (2/3/4) 180-200 85-100
Bread and pizza
Pizza 2 (2/3) 200-230 15-25
Muffins 2 (2/3/4) 175 20-30
Bread 3 (2/3/4) 180-200 40-50
Bakes
Vegetable bake 2 (2/3) 175-185 30-40
15
Page 16

CLEANING AND MAINTENANCE
Caution: before any operation, disconnect electrically the oven.
GENERAL CLEANING
To keep the characteristics of brightness of the enamelled parts for a long time it is necessary to clean the oven after each use. Once the oven is cold, you will be able to easily
remove the fat deposits by means of a sponge or a cloth damp with warm soapy water
and eventually a detergent to be found on the market. Never use abrasive cloths or sponges, that could irreparably damage the enamel.
panel such as handgrip and knob have to be cleaned each time because they may become yellow due to the emissions of fat vapours. After the use, rinse throughly with water
the parts in stainless steel and dry them with a soft cloth or with a bockskin. In case of persistent stain, use the normal non-abrasive cleaning agents or one of the specific products
for stainless steel or some warm vinegar. Clean the door glass only with warm water, avoiding the use of rough cloths.
Ovens with facility to lower grill for cleaning purposes
1 Warning: ensure that all controls are in the “OFF”
position and wait for the grill element to cool.
2 Support the front of the grill element while you
remove the knurled screw retaining the element.
3 Lower the front of the element carefully to the rest
position.
4 When cleaning the oven take care to not apply
any forces to the grill element
5 When the cleaning is complete, carefully remove
any cleaning chemicals and water from the grill
element.
6 Carefully raise the front of the element into position and secure with the knur-
led screw.
NEVER USE THE OVEN WITH THE GRILL ELEMENT HANGING DOWN!
On white ovens even the parts of the control
Replacing the oven bulb
Once the oven has been electrically disconnected, unscrew the
glass protection cap and the bulb, replacing it with another one
suitable for high temperatures (300°C / E14). Reassemble the
glass cap and reconnect the oven.
16
Page 17

CLEANING AND MAINTENANCE
Cleaning the oven door
ATTENTION: for your safety, before removing the glasses you should
remove the oven door.
1. Set the oven door wide open.
2. Lift the hinge jumpers with your thumb and index fingers, then turn them fully
outwards to the end of stroke (Fig.A).
3. Turn the door towards the closure position and lay it on the jumpers: in this
way the hinge's spring is blocked. By fully closing the door the hinges are
unhooked from the connection slits which are integral with the oven muffle
(sequence 1,2,3 of fig.B).
A
Re-assemble the door by carrying-out the aforesaid operations in the opposite
order.
B
Disassembling of the door glasses
To facilitate the cleaning, after having removed the door from the oven, you
can proceed with the disassembly of the glass. Release the two upper
blocks (picture C) so that the glass can be removed (picture D). After
the cleaning you should reassemble the glass , replace the blocks and
lock into position. Check that all components have been assembled correctly
and than you can re-assemble the door onto the oven.
Please keep the OK symbol below on the right.
C
OK
D
17
Page 18

CLEANING AND MAINTENANCE
Care of Catalytic Liners. (If your oven has had these fitted)
Splashes of food and fats from cooking will collect on the catalytic liner.
After cooking a dish with high fat content or when you can see grease spots
on the liners, it is recommended that you :
* Remove baking dishes and oven racks
* Wipe out the bottom of the oven and clean the door
* Turn oven to 220°C for approximately 20 minutes
* When oven is cool, wipe out bottom of the oven
Manual cleaning of the catalytic liner is not recommended. Damage will occur
if soap impregnated steel wood pads, aerosol cleaners and any other
abrasives are used.
Slight discolouration and polishing of the Catalytic surface may occur in time.
This does not affect the Catalytic properties in any way.
18
Page 19

Blanco Contact Information.
NEW SOUTH WALES
Head Office, Sales & Marketing Office
104 Vanessa Street
Kingsgrove NSW 2208
Telephone: 02 9503 2888
Facsimile: 02 9503 2810
NSW Showroom*
40 Ebley Street
Bondi Junction NSW 2022
Telephone: 02 9386 1190
Facsimile: 02 9386 1671
Service and Spare Parts
All General Whitegoods Service
Telephone: 02 8788 8666
Facsimile: 02 9756 1091
AUSTRALIAN CAPITAL TERRITORY
Service and Spare Parts
Detlevs Appliance & Electrical Care
1/88 Sheppard Street
Hume
ACT 2905
Telephone: 02 6280 1033
Facsimile: 02 6260 1035
VICTORIA
State Office and Showroom*
35 Centre Road
Scoresby VIC 3179
Telephone: 03 8756 7888
Facsimile: 03 8756 7907
Service and Spare Parts
Advantage Appliances
Telephone: 03 9874 4222
Facsimile: 03 9874 6917
QUEENSLAND
State Office and Showroom*
148 Robinson Road - East
Geebung
QLD 4034
Telephone: 07 3259 2555
Facsimile: 07 3265 6933
Service and Spare Parts
Endeavour Appliances
Telephone: 07 3872 7444
Facsimile: 07 3852 2465
Platinum Appliance Service
Telephone: 07 3862 1154
Facsimile: 07 3862 1114
Roshad (Gold Coast)
Telephone 07 5535 7044
Facsimile 07 55 35 7407
SOUTH AUSTRALIA & NORTHERN TERRITORY
Agent and Sales Office
S C Lighting & Electrical Supplies
47 North Terrace
Hackney SA 5069
Telephone: 08 8362 4599
Facsimile: 08 8362 4591
Service and Spare Parts
Prestige Appliance Repair Centre
Telephone: 08 8352 2022
Facsimile: 08 8352 3044
WESTERN AUSTRALIA
1 Alvan Street
SUBIACO WA 6008
Telephone: 08 9382 1611
Facsimile: 08 9382 1622
Service and Spare Parts
Metropolitan Appliance Repairs
Telephone: 08 9330 1724
Facsimile: 08 9317 1296
TASMANIA
Agent and Sales Office
Mark Pearce Agencies
23 Tranmere Road
Howrah TAS 7018
Tel/Fax: 03 6247 9215
Service and Spare Parts
Electrical Equipment Service (Launceston)
Telephone: 03 6339 3873
Facsimile: 03 6339 4588
Baldocks Appliance Service (Hobart)
Telephone: 03 6234 5995
Facsimile: 03 6234 8134
BLANCO CUSTOMER SERVICE
1300 739 033
Website: www.meaappliances.com.au
* Showrooms open six days a week
19
Page 20

Rating plate of the product
Dis. S506_569 -I/C-
Cod. 099217009930
Rev. 0 del 04/07
 Loading...