

Page 1

BOSE45X
FAN ASSISTED OVEN
Page 2

Page 3

Dear Customer
Thank you for choosing our product
This appliances is easy to use; read this hand book carefully before installing and using
it, however you will find the correct indications for the best installation, use and care of
the product.
You will find that the clean lines and modern look of your Blanco oven blends in perfectly with your kitchen décor. It is easy to use and performs to a high standard.
Blanco also makes a range of products that will enhance your kitchen – such as cooktops, rangehoods, dishwashers, microwaves, sinks and taps. There are models to complement your new Blanco oven. Blanco now has a range of laundry products.
Of course, we make every effort to ensure that our products meet all your requirements,
and our Customer Relations Department is at your disposal, to answer all your questions
and to listen to all your suggestions.
Please complete the warranty section of this manual and keep your receipt as proof of
purchase. Retain all documents relating to the purchase of Blanco product.
Blanco is committed to providing increasingly efficient products that are easy to use,
respect the environment and are attractive and reliable.
BLANCO
CONTENTS
Introduction 3
Contents
Safety recommendations 4-5
Specification
Cabinetry Preparation 7
Important notice to the User
Notes for installation
Instructions for Use
Instructions for Cooking
Table of cooking times 15
Cleaning and Maintenance
Technical assistance 18
Warranty card
9-10
11-12
13-14
16-17
19
3
6
8
3
Page 4

Safety recommendations
ELECTRIC OVEN
Read the following carefully to avoid an electric shock or fire
It is most important that this instruction book should be retained with the
appliance for future reference. Should the appliance be sold or transferred,
always ensure that the book is left with the appliance in order that the new
owner can get to know the functions of the appliance and the relevant warnings. These warnings are provided in the interest of safety. You MUST read
them carefully before installing or using the appliance.
Safety Warnings.
· The appliance is not intended for use by young children or infirm persons
without supervision.
· Young children should be supervised to ensure that they do not play with the
appliance.
· WARNING: Ensure the appliance is switched off before replacing the lamp to
avoid the possibility of electric shock.
· WARNING - Accessible parts will become hot when in use. To avoid burns and
scalds children should be kept away.
· Do not use a steam cleaner to clean a hob, oven or range.
· Do not spray aerosols in the vicinity of the appliance when it is in operation.
· Do not store flammable materials in or under the appliance, eg aerosols.
· Accessible parts will become hot when in use. To avoid burns and scalds children should be kept away.
· Always turn the grill off immediately after use as fat left there may catch fire.
· Do not cover the insert with foil, as fat left there may catch fire.
· Always keep the grill dish clean as any fat left there may catch fire.
· Do not leave the grill on unattended.
· To avoid a fire, ensure that grill trays and fittings are always inserted into the
appliance in accordance with the instructions.
· Switch the appliance off before removing the oven light glass for globe replacement.
· To avoid an accident, ensure that oven shelves and fittings are always inserted
into the appliance in accordance with the instructions.
· Do not use the door as a shelf.
· Do not push down on the open oven door.
· An authorised person must install this appliance.
· Before using the appliance, ensure that all packing materials are removed from
the appliance.
· In order to avoid any potential hazard, the installation instructions must be followed.
· Ensure that all specified vents, openings and airspaces are not blocked.
· Only authorised personnel should carry out servicing.
· Always ensure the appliance is switched off before cleaning or replacing parts.
4
Page 5

Safety recommendations
· Always clean the appliance immediately after any food spillage.
· To maintain safe operation, it is recommended that the product be inspected
every five years by an authorised service person.
· If the supply cord is damaged, it must be replaced by the manufacturer or its
service agent or similarly qualified person in order to avoid hazard.
· During use the appliance becomes hot. Care should be taken to avoid touching heating elements inside the oven.
HEADING GENERAL WARNINGS.
Using for the first time:
Before you use your oven for the first time, leave it empty and, with the door
closed, turn it on to maximum temperature and let it heat up for 15 minutes.
During this time there may be some smell from the mineral wool that insulates
the oven and there could be some smoke. This is perfectly
normal.
Normal use:
- Always close the door properly. The oven is fitted with a seal designed to
work with a closed door.
· Always ensure the appliance is switched off before cleaning or replacing parts.
- If the supply cord is damaged, it must be replaced by the manufacturer or
its service agent or a similarly qualified person in order to avoid hazard.
-During use the appliance becomes hot. Care should be taken to avoid tou-
ching heating elements inside the oven.
Do not install the product if it is damaged.
5
Page 6

SPECIFICATION
Working volume of the multifunctional oven 37 L
Electrical features
Input voltage 230-240V 50 Hz
Grill element 1400 W
Upper element 600 W
Lower element 800 W
Lighting bulb MAX 25 W
Oven fan 25 W
Cooling fan 10 W
This appliance complies with EEC 89/336 specifications issued for the magnetic
compatibility. For components coming in contact with foodstuffs, the appliance
complies with EEC 89/109 specifications.
ELECTRICAL CONNECTION: The appliance is fit
Amp flexible
outlet.
The manufacturer is not liable for any direct orindirect damage caused by faulty
installation orconnection. It is therefore necessary that allinstallation and
connection operations are car
local and general regulations in force.
6
cord and plug which must be connected to a correctly earthed socked
ried out by qualified personnel complying with the
ted with an Australian approved 10
0
Page 7
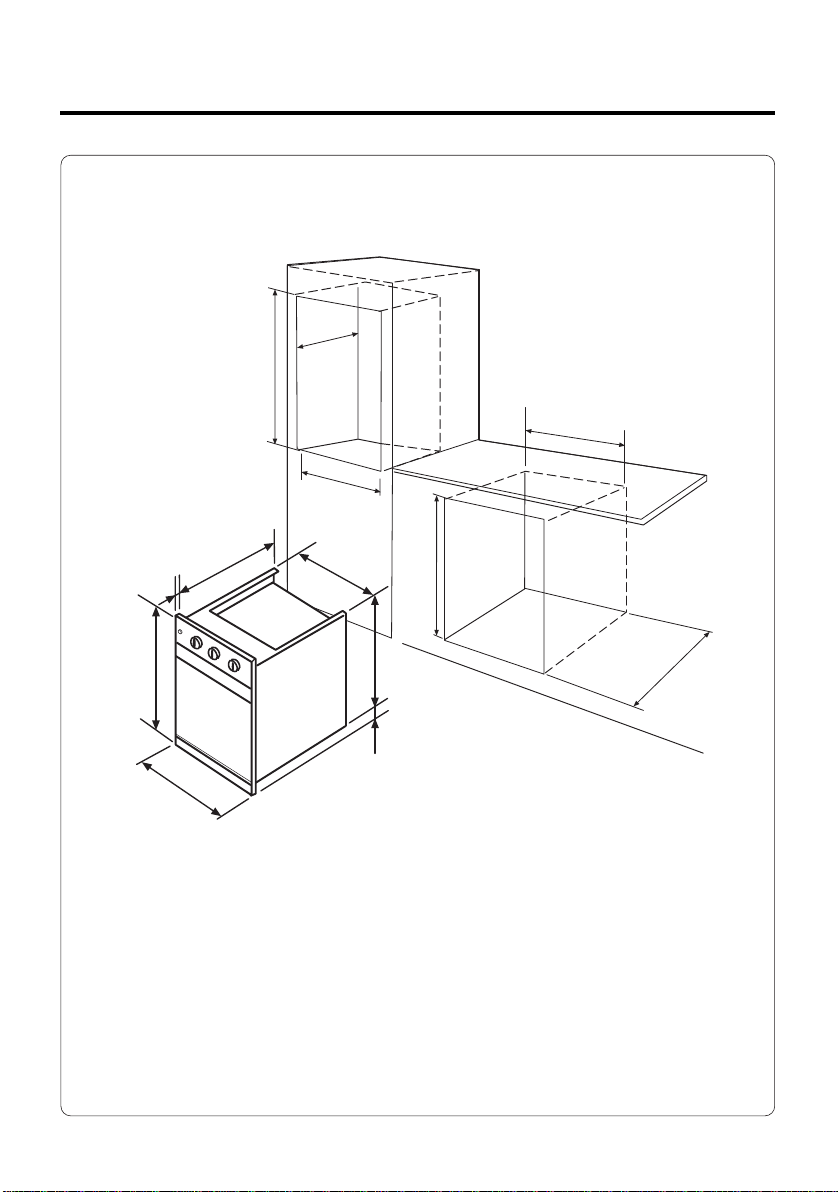
CABINETRY PREPARATION
560
570
410 ÷ 414
410 ÷ 414
546
410
570
25
596
567
560
19
450
CABINETRY MATERIALS MUST BE SUITABLE TO WITHSTAND
TEMPERATURES UP TO 90°C
Dimensions illustrated are for proudmount installation.
7
Page 8

IMPORTANT NOTICE TO THE USER
The base element is concealed beneath the bottom of the oven to make the oven easier
to clean and contribute to better access into the oven.
Because the element is concealed beneath the oven the following rules will need to observed during cooking to ensure optimum performance from the oven.
DO NOT PLACE ALUMINIUM FOIL OR METAL OBJECTS ON THE BASE OF THE OVEN
DURING COOKING.
Foil or dishes must never be placed on the base of the oven during cooking as the concentration of the direct and reflected heat will damage the enamel surface. Provisions of
the warranty do not cover damage resulting from such use.
NO YES
8
Page 9

NOTES FOR THE INSTALLATION
GENERAL INFORMATION
The appliance must be installed in accordance with all relevant codes laid down by
Electrical Supply Authorities. The original installation and adjustment must be made by a
licensed electrician.
ELECTRICAL CONNECTION
The appliances are provided with a three-pole feeding cable and work with alternate current and single-phase voltage indicated on the rating plate of the product and in the
instruction manual and on the product. The grounding conductor of the cable is marked
with the colours yellow/green.
CONNECTION OF THE FEEDING CABLE TO THE MAINS
Connect the feeding cable of the oven to a plug suitable for the load indicated on the
rating plate of the product. In case of a direct connection to the mains (cable without plug),
it is necessary to insert a suitable omnipolar switch before the appliance, with minimum
opening between contacts of 3 mm (the grounding wire should not be interrupted by the
switch).
Before connecting to the mains, make sure that:
• The electrical counter, the fuse, the feeding line and the socket are
adequate to withstand the maximum load required (see rating
plate).
• The supply system is regularly grounded, according to the regulations in force.
• The socket or the omnipolar switch can easily be reached after the
installation of the oven.
• After carrying out the connection to the mains, check that the supplying cable does not come into contact with parts subject to heating.
• Never use reductions, shunts, adaptors which can cause overheating or burning.
The manufacturer is not liable for any direct or indirect damage caused by faulty installation or connection. It is therefore necessary that all installation and connection operations
are carried out by qualified personnel complying with the local and general regulations in
force.
INSERTION AND ASSEMBLY
Insert the oven into the opening of the cabinet, resting it on the base and pushing it as far
as the ledge of the side stanchions against the shoulder of the cabinet. For the dimensions of the oven see cabinet and technical data.
9
Page 10

NOTES FOR THE INSTALLATION
•Open the door and fix the oven with four wood
screws to be screwed up through the holes in the
side stanchions of the oven.
Pay attention to fix the oven in an absolutely firm way,
as indicated. If the oven is hard wired, ensure that the
wiring is fixed securely into the terminal block to
prevent contact with metallic parts.
Moreover, the bonding agent joining the rolled sections to the cabinet has to withstand temperatures up to 90°C to avoid deformations and coating disjunction. In
case a plane with electrical plate is inserted, the electrical connection of the plane
and that of the oven should be carried out separately, both for electrical reasons
and to facilitate the frontal extractibility of the oven.
Once the electrical connection has been carried out, apply voltage to the oven only
after installing it.
10
Page 11
INSTRUCTIONS FOR USE
The selector A and thermostat B control is used to select the various oven functions and to choose the cooking temperatures best corresponding to the food to be
cooked. During oven operation the lamp will always remain on.
The lamp of the oven is on, with no heating elements operated (electrical resistances). During oven operation the lamp will always remain on
TRADITIONAL COOKING
The heat is provided from the top and bottom element. The oven must be preheated before the foods are placed inside. Static cooking provides optimum results
with: cakes, pizzas, bread and for gentle slow cooking of casseroles.
Characteristics of static cooking: heat provided from above and below, cooking is
possible only on middle shelf and should be centrally located in the oven.
FAN ASSIST
The heat is provided by the top and bottom element with the fan circulating the
heat. Position food in the middle of the oven. Base element gives good browning
underneath with a little extra browning from the top eg: apple pies, pizza, meat
pies.
GRILL
Grill Element - Use for toasting and melting cheese or browning. No longer than
5 minutes cooking time. To operate, select Full Grill Function along with the temperature.
Turn thermostat to position 200°C.
FAN GRILL
Use of the Grill Element and Fan. Use for grilling meats, vegetables and poultry.
Preheat oven, place food on grill rack in baking tray and place in the middle of
the oven. Other foods maybe cooked underneath whilst grilling.
Turn thermostat to position 200
°C.
DEFROSTING
The fan starts up but no heat is emitted. This is a hygienic method of defrosting
food. All foods maybe defrosted using this function.
The oven door must be closed for all cooking methods
0
A
B
11
Page 12

INSTRUCTIONS FOR USE
COMPONENT OPERATION
MINUTE-COUNTER
To use the minute-counter, wind up the ringer rotating the knob
clockwise by one complete rotation. Then turn it backwards until the
chosen time is reached (max. 60 minutes).
When the preset time has elapsed, the acoustic signal starts up.
Upon the acoustic signal the minute-counter does not interrupt the
functioning of the oven.
PILOT LIGHT OF THE THERMOSTAT (°C)
It comes on any time the oven is heating and switches off when the oven reaches the
preset temperature.
SAFETY THERMOSTAT
It cuts out the electric supply preventing possible overheating when the appliance is not
correctly used. In this case, wait until the oven cools down before using it again. On the
other hand, if a fault is present with components, we advise calling the Technical
Assistance Service.
COOLING MOTOR
The equipment comes with a motor for cooling the oven cavity. This motor starts automatically when using the oven.
12
Page 13

INSTRUCTIONS FOR COOKING
OVEN COOKING
The oven door must be closed for all cooking methods
For better cooking results it is recommended to pre-heat the oven to the preset cooking
temperature. Never use low-edged containers nor trays as baking-pans for roasts,
in order to soil as little as possible the walls of the oven, thus preventing fat splashes,
sauce burning and smoke production. Use instead high-edged containers, preferably terracotta containers, put on the grate at about half the height of the oven. Some examples
concerning the thermostat regulation and cooking time for the static functions are set forth
in the special table. The cooking times vary according to the type of food, its homogeneity
and volume. We are sure that, after a few endeavours, the experience will suggest possible variations to the values shown on the table.
Practical hints to save energy
The oven can be switched off some minutes before cooking end; the residual temperature is enough to complete cooking. Open the oven door only when it is absolutely necessary; to check the cooking phase, look through the glass (the oven lamp is always on).
General Advice
The oven offers various kinds of heating:
• the traditional heating for the cooking of special roasts
• the ventilated heating for the cooking of cakes, biscuits and similar.
If the ventilated heating is chosen, it is recommended to take advantage of it for cooking
of roasts on more shelves or for the preparation of complete menus, with time and energy
economy.
Fan cooking
In this way a continuous circulation of warm air is created.
This kind of heating is specially fit for the cooking on more shelves.
The cooking temperatures required are lower than when using traditional methods, thus
sparing time and energy.
The oven has an instantaneous heat source, thus the present temperature is reached in
a very short time.
Traditional cooking
It is especially suitable for the cooking of furred and feathered game and as well as for the
cooking of bread and sponge cakes.
It is advisable to insert the products to be cooked into the oven when the cooking temperature is reached, that is to say when the warning light extinguishes.
13
Page 14

INSTRUCTIONS FOR COOKING
COOKING OF PASTRY
The air circulation of the oven assures an instantaneous and uniform heat distribution.
The pre- heating of the oven is no longer necessary. However for specially delicate pastry
the oven can be pre-heated.
More trays can be inserted into the oven together with the pastries, taking care not to use
the first grid starting from above. Together with the pastry, also other products of different
nature can be cooked at the same time (fish, meat, etc.) without any transmission of smells and flavours.
These multiple cookings can be carried out only provided that, although having different
cooking times, the products to be cooked have the same cooking temperature.
GRILL
By this term is meant the surface browning of food, often forecooked, when, after being
introduced into the oven, it takes a golden-brown and crisp aspect.
“Gnocchi alla romana”, polenta pasticciata”, rice, lasagnas, noodles and vegetables dressed with bechamel are typical preparation for this type of cooking.
DEFROSTING
The defrosting takes place in the same way as at room temperature, but with the advantage that is much more rapid. The ten hours of the refrigerator are reduced to an hour for a
kilogram of meat. Put the product, in its packing on a dish. Setting the selector to defrost,
place product in the oven.
COOKING TIMES
The table shows some examples for the adjustment of the temperature and the cooking
time.
The cooking times can vary according to the type of food and its weight.
We are sure that, after a few endeavours, the experience will suggest possible variations to the values shown on the table.
REMARK:
• The times indicated in the table refer to the cooking of one food only. For more
than one food, the cooking times should be increased by 5 - 10 minutes.
14
Page 15

Cooking Times and Temperatures
The below cooking times, temperatures and shelf positions are a guide only.
Cooking times and temperatures may vary according to size variations.
Meat and
Vegetables
Beef Rare
Lamb Rare
Pork Well Done 3
Veal Rare
Cooked Shelf
Position
3
Medium
Well Done
Medium
Well Done
Medium
Well Done
3
3
3
3
3
3
3
3
Temperature Cº
Static Bake
170
170
170
170
170
170
220 for first 15
minutes
170 for remainder
170
170
170
Cooking Time
20 minutes per 500g or internal
temperature 60º C.
25 minutes per 500g or internal
temperature 70ºC.
30 minutes per 500g or internal
temperature 75ºC.
20 minutes per 500g or internal
temperature 60ºC.
25 minutes per 500g or internal
temperature 70ºC.
30 minutes per 500g or internal
temperature 75ºC.
15 minutes for crackling and then
30 minutes per 500g.
20 minutes per 500g or internal
temperature 60ºC.
25 minutes per 500g or internal
temperature 70ºC.
30 minutes per 500g or internal
temperature 75ºC.
Chicken Well Done 3 170 30 minutes per 500g
Turkey Well Done 3 170 30 minutes per 500g
Vegetable Bake 3 170 40-50 minutes
Fish
Whole Well Done 3 170
Thick Fillets
Salmon Fillets
Bread and Pizza
Pizza
Muffins
Bread
Sweets
Pastry Base
Sponge Cakes
(3eggs)
Well Done
Well Done
Medium
3
3 3 200
2
2
2
3
3
Fan Grill 190
Fan Grill 190
Fan Grill 190
200 –220
180
170
180
10 minutes
10 minutes
7-8 minutes
15-20 minutes
15-20 minutes
40-50 minutes
10-12 minutes
15-20 minutes
Page 16
CLEANING AND MAINTENANCE
1
Caution: before any operation, disconnect electrically the oven.
GENERAL CLEANING
To keep the characteristics of brightness of the enamelled parts for a long time it is necessary to clean the oven after each use. Once the oven is cold, you will be able to easily
remove the fat deposits by means of a sponge or a cloth damp with warm soapy water
and eventually a detergent to be found on the market. Never use abrasive cloths or sponges, that could irreparably damage the enamel. On white ovens even the parts of the dash
board such as handgrip and knob have to be cleaned each time because they may become yellow due to the emissions of fat vapours. After the use, rinse throughly with water
the parts in stainless steel and dry them with a soft cloth or with a bockskin. In case of persistent stain, use the normal non-abrasive cleaning agents or one of the specific products
for stainless steel or some warm vinegar. Clean the door glass only with warm water, avoiding the use of rough cloths.
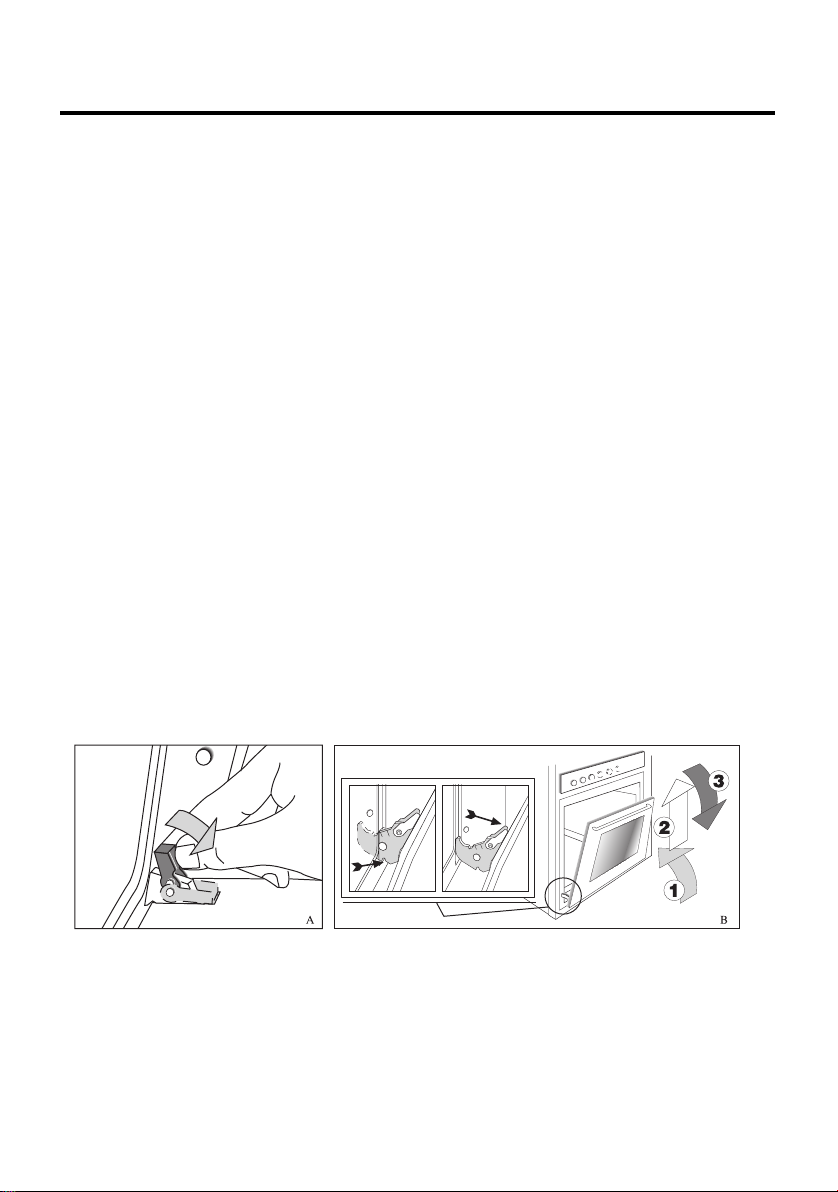
Cleaning the oven door
Unhooking the doors.
1. Set the oven's door wide open.
2. Lift the hinge jumpers by your thumb and index fingers, then turn them fully
outwards to the end of stroke (Fig.A).
3. Turn the door towards the closure position and lay it on the jumpers: in this
way the hinge's spring results as blocked. By fully closing the door the hinges are unhooked from the connection slits which are integral with the oven's
muffle (sequence 1,2,3 of fig.B).
Hooking the doors
1. Insert the door by hooking the hinges to the connection slits set on the muffle
front.
2. Fully open the door when inserted, then push and turn the cross connections
which fasten the springs full scale in the oven direction.
3. Close the door and check its correct operation.
16
Page 17

CLEANING AND MAINTENANCE
Replacing the oven bulb
Once the oven has been electrically disconnected, unscrew the
glass protection cap and the bulb, replacing it with another one
suitable for high temperatures (300°C / E14). Reassemble the
glass cap and reconnect the oven.
17
Page 18

Rating plate of the product
Dis: S506_000 -I-
Cod: 000000000
Rev. 0 del 29/05/06
Page 19

Blanco Contact Information.
NEW SOUTH WALES
Head Office, Sales & Marketing Office
104 Vanessa Street
Kingsgrove NSW 2208
Telephone: 02 9503 2888
Facsimile: 02 9503 2810
NSW Showroom*
40 Ebley Street
Bondi Junction NSW 2022
Telephone: 02 9386 1190
Facsimile: 02 9386 1671
Agent and Sales Office.
Hi –Performance Marketing
7 Coleman Street
Mascot NSW 2020
Telephone: 02 88354937
Facsimile: 02 90048739
Service and Spare Parts
All General Whitegoods Service
Telephone: 02 8788 8666
Facsimile: 02 9756 1091
AUSTRALIAN CAPITAL TERRITORY
Service and Spare Parts
Detlevs Appliance & Electrical Care
1/88 Sheppard Street
Hume
ACT 2905
Telephone: 02 6280 1033
Facsimile: 02 6260 1035
VICTORIA
State Office and Showroom*
35 Centre Road
Scoresby VIC 3179
Telephone: 03 8756 7888
Facsimile: 03 8756 7907
Service and Spare Parts
Advantage Appliances
Telephone: 03 9874 4222
Facsimile: 03 9874 6917
QUEENSLAND
State Office and Showroom*
148 Robinson Road - East
Geebung
QLD 4034
Telephone: 07 3259 2555
Facsimile: 07 3265 6933
Endeavour Appliances
Telephone: 07 3872 7444
Facsimile: 07 3852 2465
Platinum Appliance Service
Telephone: 07 3862 1154
Facsimile: 07 3862 1114
Roshad (Gold Coast)
Telephone 07 5535 7044
Facsimile 07 55 35 7407
SOUTH AUSTRALIA & NORTHERN TERRITORY
Agent and Sales Office
S C Lighting & Electrical Supplies
47 North Terrace
Hackney SA 5069
Telephone: 08 8362 4599
Facsimile: 08 8362 4591
Service and Spare Parts
Prestige Appliance Repair Centre
Telephone: 08 8352 2022
Facsimile: 08 8352 3044
WESTERN AUSTRALIA
Agent and sales Office
Elite Appliance Marketing Pty Ltd
P.O. Box 2387, Warwick, 6024
Telephone: 08 9201 0311
Facsimile: 08 9201 0366
Service and Spare Parts
Metropolitan Appliance Repairs
Telephone: 08 9330 1724
Facsimile: 08 9317 1296
TASMANIA
Agent and Sales Office
Mark Pearce Agencies
23 Tranmere Road
Howrah TAS 7018
Tel/Fax: 03 6247 9215
Service and Spare Parts
Electrical Equipment Service (Launceston)
Telephone: 03 6339 3873
Facsimile: 03 6339 4588
Baldocks Appliance Service (Hobart)
Telephone: 03 6234 5995
Facsimile: 03 6234 8134
BLANCO CUSTOMER SERVICE
1300 739 033
Website:
* Showrooms open six days a week
www.meaappliances.com.au
 Loading...