

Page 1
0
50
100
150
200
250
MAX
0
BMS 755
MULTIFUNCTIONAL OVEN
Page 2

INTRODUCTION
Dear BLANCO Customer,
Thank you for purchasing a product from our quality range of cooking appliances.
We recommend you read this instruction manual prior to switching on your new oven. The
information contained in this manual provides for safe and functional use of your new
appliance. Suggestions for maximising the various cooking functions that your appliance
offers you, are also included.
Prior to leaving the factory, this appliance was checked with the utmost care and attention
by expert and specialised personnel in order the give the best functional results. Should
your appliance require servicing of any type, you should contact the nearest BLANCO
Authorised Service Centre. Only BLANCO Authorised Service Centres are able supply original spare parts for your appliance.
Attention: The warranty card is contained in this instruction manual.
You should retain your purchase receipt as proof of purchase to support your warranty of
your new appliance.
We wish you many hours of happy and successful cooking.
BLANCO
CONTENTS
Introduction 2
Contents 2
Specification 3
Furniture Preparation 4
Important notice to the User 5
Notes for installation 6
Instructions for Use 7-10
Instructions for Cooking 11-13
Table of cooking times 14
Cleaning and Maintenance 15-16
Figures 17
Technical assistance 18
Warranty card 19
2
Page 3

SPECIFICATION
0
50
100
150
200
250
MAX
0
Working volume of the multifunctional oven 76 L
Electrical features
Input voltage 230-240V 50 Hz
Grill element 2000 W
Upper element 1200 W
Lower element 1400 W
Circular element 2600 W
Lighting bulb 2 x 15 W
Oven fan 30 W
Cooling fan 25 W
Max. power 2900 W
This appliance complies with EEC 89/336 specifications issued for the magnetic compatibility. For components coming in contact with foodstuffs, the appliance complies
with EEC 89/109 specifications.
ELECTRICAL CONNECTION: The appliance is fitted with an Australian approved 15
Amp flexible cord and plug which must be connected to a correctly earthed socked
outlet.
The manufacturer is not liable for any direct or indirect damage caused by faulty
installation or connection. It is therefore necessary that all installation and connection
operations are carried out by qualified personnel complying with the local and general regulations in force.
BMS 755
3
Page 4
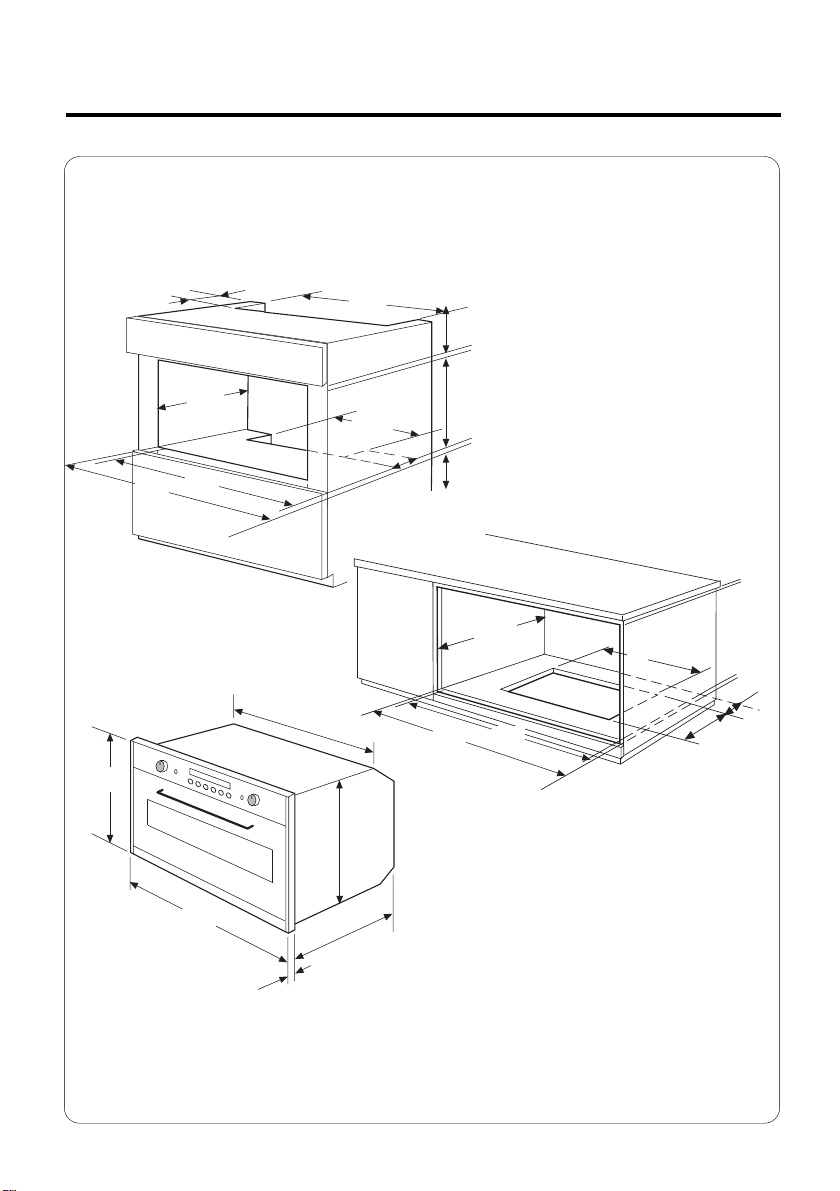
FURNITURE PREPARATION
544
710
550
340
560
20 min
575
550
100
560
550
100
575
5 min
713
752
100
713
752
748
598
21
572
20 min
5 min
FURNITURE MATERIALS MUST BE SUITABLE TO WITHSTAND
TEMPERATURES UP TO 90°C
4
Page 5
Important Notice to the User
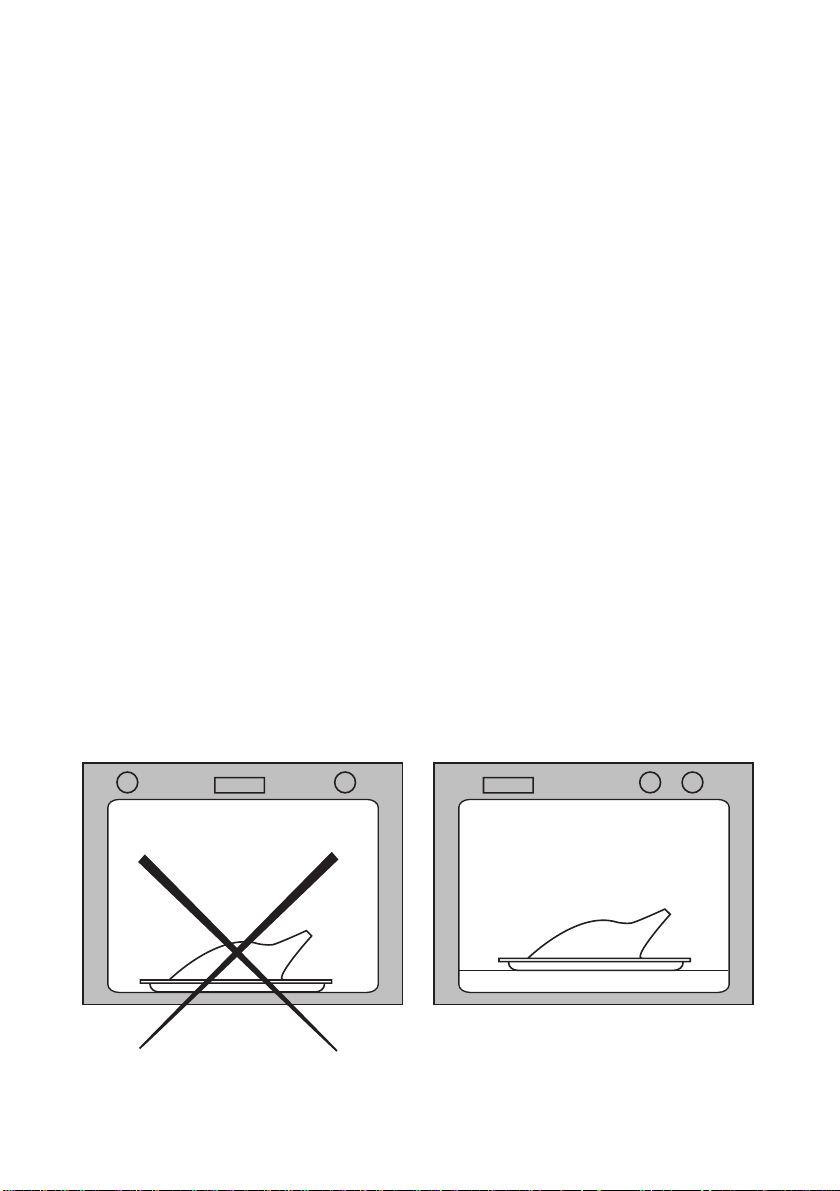
NO
YES
Dear Customer.
You have purchased one of the worlds leading brand electric ovens. This oven incorporates the latest technology to make the operation and cleaning of this appliance the
simplest and most affective.
The base element is concealed beneath the bottom of the oven to make the oven easier
to clean and contribute to better access into the oven.
Because the element is concealed beneath the oven the following rules will need to observed during cooking to ensure optimum performance from the oven.
DO NOT PLACE ALUMINIUM FOIL OR METAL OBJECTS ON THE BASE OF THE OVEN
DURING COOKING.
Foil or dishes must never be placed on the base of the oven during cooking as the concentration of the direct and reflected heat will damage the enamel surface. Provisions of
the warranty do not cover damage resulting from such use
5
Page 6

NOTES FOR THE INSTALLATION
INSERTION AND ASSEMBLY
Insert the oven into the opening of the furniture, resting it on the base and pushing it as
far as the edge of the side stanchions against the shoulder of the piece of furniture. For
technical specification and installation dimensions please refer to pages 5 and 6.
• Open the door and fix the oven with four wood screws to be screwed up through
the holes in the side stanchions of the oven (fig. 1).
• The sides and the base surface where the oven is to be installed should be rebated as shown in fig. 2 to allow a safe air intake and a free air circulation around
the oven, thus granting its good operation and avoiding damages to the furniture. Pay attention to fix the oven in an absolutely firm way, as above indicated.
Once the electrical connection has been carried out, apply voltage to the
oven only after installing it.
Before using the oven, we suggest to:
• remove the special film covering the oven door glass (when provided)
• heat the empty oven at max. temperature for 45 minutes (to remove unpleasant smell
and smoke caused by working residues and by the thermal insulation)
• carefully clean inside the oven with soapy water and rinse it.
IMPORTANT: When running, the front side of the appliance gets quite hot. See that children do not get near the oven.
6
Page 7

INSTRUCTIONS FOR USE
HEATING POSITIONS AND TEMPERATURE ADJUSTMENT
The knobs for the selector and the thermostat controls allow to select the various cooking
temperatures, most suitable for the products to be cooked.
The oven door must be closed
The lamp of the oven is on, with no heating elements operated (electrical resi-
stances). During oven operation the lamp will always remain on.
DEFROSTING
The oven-fan is operated; by stirring the cold air inside the oven, it aids a quick
defrosting of the frozen products . The knob of the thermostat is to be in the position (0). No heating elements is operated.
CONVECTION COOKING
Upper and lower heating elements operated; temperature adjustable from 50°C
to MAX on the thermostat.
FAN ASSISTED COOKING
Upper and lower heating elements and the oven-fan operated; temperature adju-
stable from 50°C to MAX on the thermostat.
Lower heating element and the oven-fan operated; temperature adjustable from
50°C to MAX on the thermostat.
FAN FORCED COOKING
Back heating element and the oven-fan operated; temperature adjustable from
50°C to MAX on the thermostat.
GRILL COOKING
Grill element operated; turn the thermostat to position 250 °C.
Grill element and the oven-fan operated; turn the termostat to position 250 °C
7
Page 8

INSTRUCTIONS FOR USE
A
U
T
O
1234
B
A
5
6
PROGRAMMING THE OVEN
The figure shows the keys, the pilot lights for all the functions and the programmer display.
(1) Setting and displaying the
minute counter - Timer
(2) Setting and displaying the
cooking time - Timer
(3) Setting and displaying the
end of the cooking time
(4) Manual operation
(5) Setting the times -
Decrease
(6) Setting the times - Increase
Indicator Lights for the Time Functions
When the indicator lights are on the appliance is operating, as follows.
(A) General operation
(B) Working programme
(C) Automatic
A
U
T
O
Setting the Timer
When the oven is installed and the power supply is switched on, the display flashes and shows
0.00.
To set the time of day
Press keys (1) and (2) at the same, and set the actual time, by pressing keys (-) and (+) within 4
seconds. The oven remains in manual operation and can be used without any programming.
Important Information
• Between 22.00 hrs and 6.00 hrs the display intensity is automatically dimmed.
• If the acoustic signal is not disconnected (as per subsequent instructions), it cuts off after 2
minutes.
8
Page 9

INSTRUCTIONS FOR USE
• Any programming described below is active ted after approximately 4 seconds from the pre-
setting.
• 23 hrs and 59 minutes is the maximum programmed time. Any and all programmed settings
are erased when there is a power cut or supply failure. When power is restored the display flashes and shows 0.00. To reset the programmer set both the actual time and the programme
again.
Automatic Operation
The oven can be programmed to switch on and off automatically.
To do this proceed as follows:
1. Select the required cooking function and temperature using the function selector and the ther-
mostat dial.
2. Press key (2) and set the cooking time by pressing keys (-) and (+) within the next 4 seconds
3. Press key (3) and set the end of the cooking time in the same way.
The actual time reappears and pilot light (AUTO) remains ON, when the cooking process
starts, pilot light (A) will remain on. The cooking time left can be controlled by pressing key
(2), or the time can be changed by repeating the same procedure.
Reset the cooking time to 0.00 to erase the preset programme, and when the actual time
reappears, press key (4) to reset the manual function. Once the cooking process is over
the acoustic signal goes off and the oven automatically switched off. Pres one of the keys
from (1) to (4) to return the programmer to the manual function.
Semi-automatic Operation
The oven can be programmed to switch off automatically.
To do this proceed as follows:
1. Select the required function and temperature using the cooking function selector and
the thermostat dial.
2. Press key (2) and set the cooking time by pressing keys (-) and (+) within the next 4
seconds. The actual time reappears and pilot lights (A) and (AUTO) remain ON.
The cooking time left can be checked by pressing key (2), or the time can be changed by
repeating the same procedure.
To erase the pre-set programme, reset the cooking time to 0.00, when the actual time
reappears, press key (4) to reset to manual function.
Once the cooking programme is complete, the acoustic signal will sound and the oven is
automatically switched off. Press one of the keys from (1) to (4) to switch off the acoustic
signal. Press key (4) to return the programmer to the manual function.
9
Page 10

INSTRUCTIONS FOR USE
Minute minder
When this device is used as a simple minute minder, press key (1) and programme the
required time by pressing keys (-) and (+) within the next 4 seconds: the actual time reappears and the symbol (B) is activated. Press one of the keys from 1 to 4 to disconnect
the acoustic signall. Also symbol (B) is deactivated.
Manual Operation
The oven may be used manually without any programming. Press key (4) for the manual
operation (“AUTO” pilot light off).
SAFETY LOCK FOR CHILDREN
The programmer is provided with a safety lock which stops the cooking programming
and consequently the oven operation.
Lock running:
- press both switches (1) (2) at same time for about 8 seconds
- the display shows “ON”; release the switches
- press switch (+); the display shows “OF” and the symbol “..key..”
Now the safety lock starts running and after about 5 seconds the display shows the current time and the symbol “..key..”.
Lock deactivation:
- press both switches (1) (2) at same time for about 8 seconds
- the display shows “OF”; release the switches
- press switch (+); the display shows “ON”
Now the safety lock is deactivated and after about 5 seconds the display shows the current time.
PILOT LIGHT FOR THE THERMOSTAT (°C)
It comes on any time the thermostat settles the cooking temperature inside the oven and
it is switched off when the oven reaches the preset temperature.
PILOT LIGHT FOR THE OPERATION (~)
It signals that the appliance is powered and stays on in all working positions.
SAFETY THERMOSTAT
Cuts out the electric supply for preventing possible overheating when the appliance is not
correctly used. In this case, wait for the oven to cool down before using it again. On the
other hand, if a fault is present on the appliance’s components, we advise calling the
Technical Assistance Service.
COOLING FAN
The cooling fan task is to cool down the control panel, the knobs and the inside elements
of the oven. The air flow comes out from both the control panel and oven door. The fan is
automatically connected and disconnected when the oven is switched on or off.
10
Page 11

INSTRUCTIONS FOR COOKING
OVEN COOKING
The oven door must be closed for all cooking methods
For better cooking results it is recommended to pre-heat the oven to the preset cooking
temperature. Never use low-edged containers nor trays as baking-pans for roasts (fig. 3),
in order to soil as little as possible the walls of the oven, thus preventing fat splashes,
sauce burning and smoke production. Use instead high-edged containers, preferably terracotta containers, put on the grate at about half the height of the oven. Some examples
concerning the thermostat regulation and cooking time for the static functions are set forth
in the special table. The cooking times vary according to the type of food, its homogeneity
and volume. We are sure that, after a few endeavours, the experience will suggest possible variations to the values shown on the table.
Practical hints to save energy
The oven can be switched off some minutes before cooking end; the residual temperature is enough to complete cooking. Open the oven door only when it is absolutely necessary; to check the cooking phase, look through the glass (the oven lamp is always on).
Pieces of general advice
The oven offers various kinds of heating:
• the traditional heating for the cooking of special roasts
• the ventilated heating for the cooking of cakes, biscuits and similar.
If the ventilated heating is chosen, it is recommended to take advantage of it for cooking
of roasts on more shelves or for the preparation of complete menus, with time and energy
economy.
Ventilated heating
In this way a continuous circulation of warm air is created.
This kind of heating is specially fit for the cooking on more shelves.
The temperature are inferior to the traditional ones, so sparing time and energy.
The oven has an instantaneous heat source, thus the present temperature is reached in
a very short time.
Traditional heating
It is especially suitable for the cooking of furred and feathered game and as well as for the
cooking of bread and sponge cakes.
It is advisable to insert the products to be cooked into the oven when the cooking temperature is reached, that is to say when the warning light extinguishes.
Fan forced cooking
In this way a continuous circulation of warm air is created.
This kind of heating is specially fit for the cooking on more shelves.
The temperature are inferior to the traditional ones, so sparing time and energy.
The oven has an instantaneous heat source, thus the present temperature is reached in
a very short time.
11
Page 12

INSTRUCTIONS FOR COOKING
GRILL COOKING
To cook on the grill or on the grate, pre-heat the oven for about 5 minutes. During grill operation the heat comes from above; it is based on the infrared radiation and is fit for low
thickness meat and for toasts. Food product to be grilled should be slightly oiled and always
placed on the grate and arranged on the nearest or on the furthest guide from the grill element, according to the thick of food to be cooked. The table shows some examples of
cooking times and food positions. The cooking times vary according to the type of food, its
homogeneity and volume.
Caution: Prudence is recommended when using the grill: keep children
away.
For a grill cooking of large pieces of meat and game (1 to 2 Kg.), it is possible to combine
the grill function with the effect of the rear fan.
COOKING OF THE PASTRY
The air circulation of the oven assures an instantaneous and uniform heat distribution.
The pre- heating of the oven is no longer necessary. However for specially delicate pastry
the oven can be pre-heated.
More trays can be inserted into the oven together with the pastries, taking care not to use
the first grid starting from above. Together with the pastry, also other products of different
nature can be cooked at the same time (fish, meat, etc.) without any transmission of smells and savours.
These multiple cookings can be carried out only provided that, although having different
cooking times, the products to be cooked have the same cooking temperature.
GRATINATING
By this term is meant the surface browning of food, often forecooked, when, after being
introduced into the oven, it takes a golden-brown and crisp aspect.
“Gnocchi alla romana”, polenta pasticciata”, rice, lasagnas, noodles and vegetables dressed with bechamel are typical preparation for this type of cooking.
REGENERATING
The defrosting takes place in the same way as at room temperature, but with the advantage that is much more rapid. The ten hours of the refrigerator are reduced to an hour for a
kilogram of meat. Put the product, in its packing on a dish. Setting the selector to defrost,
place product in the oven.
12
Page 13

INSTRUCTIONS FOR COOKING
PROTECTION FILTER OF THE OVEN FAN
During the cooking of fatty products, to avoid that too much fat residue striking the fan, the
filter should be placed in the oven before use. When the cooking has been brought to the
end and the oven cools, remove the filter and wash it carefully.
Mount the filter leaning it against the rear wall at the same level of the fan, then push the
filter downwards. Reverse this operation to remove the filter (fig. 4)
COOKING TIMES
The table shows some examples for the adjustment of the thermostat and of the cooking
time.
The cooking times can vary according to the type of food, its homogeneity and volume.
We are sure that, after a few endeavours, the experience will suggest possible variations
to the values shown on the table.
REMARK:
• For the beef, veal, pork and turkey roasts, with bones or rolled, add about 20
minutes to the times shown in the table.
• The indication suggested on the table for the use of the steps is the preferential
one in the case of the cooking of several products.
• The times indicated in the table refer to the cooking of one product only; for more
than one product, the cooking times should be increased by 5 - 10 minutes.
ATTENTION: The filter should only be used for the cooking of fatty products, better
cooking results for non fatty products will be achieved without the filter installed.
13
Page 14

Table of cooking times
Guide No.
Nature of food
FOOD
Long-cooking roast
Quick cooking roast
Fowl (Guinea hen, duck, etc)
Poultry
Game
Fish
PASTRIES
Christmas cake
Plum-cake
Base only
Orange cake
Base only
Savoy biscuits
Brioches
Puff pastry
Sponge cake
Meringues
Cream puff pastry
Fruit cake (unleavened pastry)
Fruit cake (leavened pastry)
Base only
Oven Temp.
4
3
°C
2
1
2
2
1
2
1
1
220-250
225-250
210-250
225-250
200-225
180-200
160-200
“
“
2
2
2
2
1
2
2
2
170-180
170-180
200
215-230
215
200-215
140
215-230
250
230
Time
Minutes
dep. on qty
50-60
150-180
50-60
dep. on qty
20-25
60-70
90-100
80-100
40-45
35-40
30-40
30-35
60-80
30
30-35
20-30
Table of grill cooking times
1
“
“
“
“
“
-
-
-
Guide No.
3
Qty.Kg
Nature of food
Veal cutlet
Lam cutlet
Liver
Chopped meat roulades
Veal heart
Roast in the net
Half-chicken
Fish fillet
Stuffed tomatoes
14
Temp.°C
4
3
2
1
250 °C
“
“
“
“
“
“
“
“
“
“
“
“
“
“
“
“
Pre-heat
time in minutes
5
“
“
“
“
“
“
“
“
Time
in min.
8-10
12-15
10-12
12-15
12-15
20-25
20-25
12-15
10-12
Page 15

CLEANING AND MAINTENANCE
Caution: before any operation, disconnect electrically the oven.
GENERAL CLEANING
To keep the characteristics of brightness of the enamelled parts for a long time it is necessary to clean the oven after each cooking. Once the oven is cold, you will be able to easily
remove the fat deposits by means of a sponge or a cloth damp with warm soapy water
and eventually a detergent to be found on the market. Never use abrasive cloths or sponges, that could irreparably damage the enamel. On white ovens even the parts of the dash
board such as handgrip and knob have to be cleaned each time because they may become yellow due to the emissions of fat vapours. After the use, rinse throughly with water
the parts in stainless steel and dry them with a soft cloth or with a bockskin. In case of persistent stain, use the normal non-abrasive cleaning agents or one of the specific products
for stainless steel or some warm vinegar. Clean the door glass only with warm water, avoiding the use of rough cloths.
Caution: during cleaning operations never remove the sealing gasket of the door (fig. 5).
OVENS WITH F
• Warning: ensure that all controls are in the “OFF” position and wait for the grill element cooling.
• Support the front of the grill element while you remove the knurled screw retaining
the element.
• Lower the front of the element carefully to the rest position.
• When cleaning the oven take care to not apply any forces to the grill element.
• When the cleaning is complete, carefully remove any cleaning chemicals and water
from the grill element.
• Carefully raise the front of the element into position and secure with the knurled
screw.
NEVER USE THE OVEN WITH THE GRILL ELEMENT HANGING DOWN!
ACILITY T
O LOWER GRILL FOR CLEANING PURPOSES
CLEANING THE OVEN DOOR
The inside glass of the oven can be easily removed for cleaning purposes unscrewing, by
means of a coin or a screwdriver, the screws fixing it to the counterdoor.
For a deeper cleaning of the oven door, it si recommended to remove the door as follows:
• open the door completely;
• turn upwards the brackets of the lower hinges and hook the upper ones;
• close the door a little and lift it slightly to let the lower hinges come out of their slots;
• finally extract it making sure that the two upper hinges come out of their seats. After
carrying out the cleaning operations, re-insert the door (fig. 6).
15
Page 16

CLEANING AND MAINTENANCE
CLEANING OF THE FAN
Periodically (all 8 - 10 cookings) the fan should be cleaned with warm water and suitable
detersives:
• wait fot the oven to cool down
• unscrew the four screws A (fig. 7 )
• unscrew the central nut C
• extract the fan D and clean it
reassemble in the reverse sense, paying attention that the
central seat E coincides with the peg F placed on the motor shaft (fig. 8 ).
MAINTENANCE
Replacing the oven bulb
Once the oven has been electrically disconnected, unscrew the glass protection cap and
the bulb (fig. 9), replacing it with another one suitable for high temperatures (300°C)
having the following characteristics:
Voltage: 230-240 V
Power: 15 W
Socket: E14
Reassemble the glass cap and reconnect the oven.
16
Page 17

0
0
50
100
150
200
250
MAX
F
D
C
E
21
3
4
65
7
8
9
17
Page 18

SALES, TECHNICAL, SERVICE SPARE PARTS ASSISTANCE
NEW SOUTH WALES
fice, Sales & Marketing Office
Head Of
104 Vanessa Street
Kingsgrove NSW 2208
Telephone: 02 9503 2888
Facsimile: 02 9503 2810
Showroom*
NSW
40 Ebley Street
Bondi Junction NSW 2022
Telephone: 02 9386 1190
Facsimile: 02 9386 1671
Service and Spare Parts
All General Whitegoods Service
Telephone: 02 9756 1511
Facsimile: 02 9756 1091
Southern and Central NSW
Kerry Newman Agencies
9 Kalang Place
Jerrabomberra NSW 2619
Telephone: 02 6255 8893
AUSTRALIAN CAPITAL TERRITORY
Service and Spare Parts
Premier Appliance
Telephone: 02 6280 5087
Facsimile: 02 6280 6783
VICTORIA
fice and Showroom*
State Of
35 Centre Road
Scoresby VIC 3179
Telephone: 03 8756 7888
Facsimile: 03 8756 7907
Service and Spare Parts
Advantage Appliances
Telephone: 03 9543 2088
Facsimile: 03 9544 2102
QUEENSLAND
fice and Showroom*
State Of
Citilink Business Centre
153 Campbell Street
Bowen Hills QLD 4006
Telephone: 07 3253 2000
Facsimile: 07 3216 1688
Service and Spare Parts
Tri-Us Appliances
Telephone: 07 3290 4833
Facsimile: 07 3290 2911
Endeavour Appliances
Telephone: 07 3872 7444
Facsimile: 07 3852 2465
Agent
SOUTH AUSTRALIA & NORTHERN
TERRITORY
Agent and Sales Of
S C Lighting & Electrical
47 North Terrace
Hackney SA 5069
Telephone: 08 8362 4599
Facsimile: 08 8362 4591
Service and Spare Parts
Prestige Appliance Repair Centre
Telephone: 08 8352 2022
Facsimile: 08 8353 3044
WESTERN AUSTRALIA
Agent and sales Of
Elite Appliance Marketing Pty Ltd
The Garden Centre
Building A
355 Scarborough Beach Road
OSBORNE PARK WA 6017
Telephone: 08 92010554
Facsimile: 08 92010553
Service and Spare Parts
Metropolitan Appliance Repairs
Telephone: 08 9330 1724
Facsimile: 08 9317 1296
TASMANIA
Agent and Sales Of
Mark Pearce Agencies
23 Tranmere Road
Howrah TAS 7018
Tel/Fax: 03 6247 9215
Service and Spare Parts
Electrical Equipment Service (Launceston)
Telephone: 03 6339 3873
Facsimile: 03 6339 4588
Baldocks Appliance Service (Hobart)
Telephone: 03 6234 5995
Facsimile: 03 6234 8134
* Showroom open six days a week
TOLL FREE NUMBERS
Blanco Sales & Advisory Centre1800 828 899
Blanco After Sales Customer Service 1800 646 843
Blanco Spare Parts: 1800 461 462
Website: www.meaappliances.com.au
fice
fice
fice
18
Page 19

STATEMENT OF STANDARD
WARRANTY CONDITIONS
1. The Warranty only applies provided that
the appliance has been used in accordance with the manufacturer’s instructions
and provided that the appliance has not
been damaged by an accident, misuse,
neglect or abuse of any person other than
the manufacturer or BLANCO/Major
Electrical Appliances (“MEA”) or from
faulty installation, misadjustment or tampering by unauthorised persons.
2. When a service inspection reveals the alleged fault or faults are caused by incorrect
operation, contrary to the instruction
manual, and otherwise the appliance is in
good order and working condition, the purchaser shall be liable for a service fee
charged by BLANCO/MEA or one of its’
Service Providers.
3. If the appliance is used in Commercial
Applications or for Rental purposes, a
separate warranty of Twelve (12) months
covering all parts with Three (3) months on
the labour will apply.
4. Subject to the provisions of any applicable
statute this Warranty applies to the original
retail purchaser only and is not transferable.
BLANCO COOKING PRODUCT WARRANTY
1. Subject to the “Statement of Standard
Warranty Conditions” this product is covered
by the following Warranty.
TWO (2) YEARS WARRANTY from date
of purchase, covering all parts and
labour.
2. The appliance is warranted under normal
single family domestic installation and use,
as set out in the instruction manual, against
manufacturing defects for the Warranty
periods shown above.
3. Should service be required under this
Warranty, the purchaser should contact an
approved BLANCO Service Provider during
their normal business hours
4. At no time does BLANCO/MEA have liability
for any freight or trasportation costs or for
any damage during transit or for any consequence of failure of this appliance outside of
the normal service area, unless such limitation of liability is prohibited by statute.
5. This Warranty excludes replacement of
parts required due to normal wear and tear
including light globes.
5. Subject to the provisions of any applicable
statute, at no time does BLANCO/MEA
have liability for freight. transport or travel
costs outside normal service areas.
6. None of the above Warranties purport to
exclude, restrict or modify either the application or the exercise of a right conferred
by any applicable statute.
7. Subject to any Warranties implied by statute, at no time will BLANCO/MEA or its’
Service Providers be liable for any economic loss consequent upon the failure of the
appliance
8. This Warranty is only valid for major
appliances imported and distributed by
BLANCO/MEA, purchased and used in
Australia.
6. This Warranty only applies, provided the
appliance has been used in accordance with
the manufacturer’s instructions and provided an accident, misuse, neglect or abuse
has not damaged the appliance.
7. None of the above Warranties purport to
exclude, restrict or modify either the application or the exercise of a right conferred by
any applicable Statute.
8. Please complete the details below, which
should be retained for future reference
along with your proof of purchase
Date of Purchase:.............................................
Model No:..........................................................
Serial No: .........................................................
19
Page 20

Dis: S506_141
Cod: 099299009826
Rev. 2 del 02/04
 Loading...