

Page 1
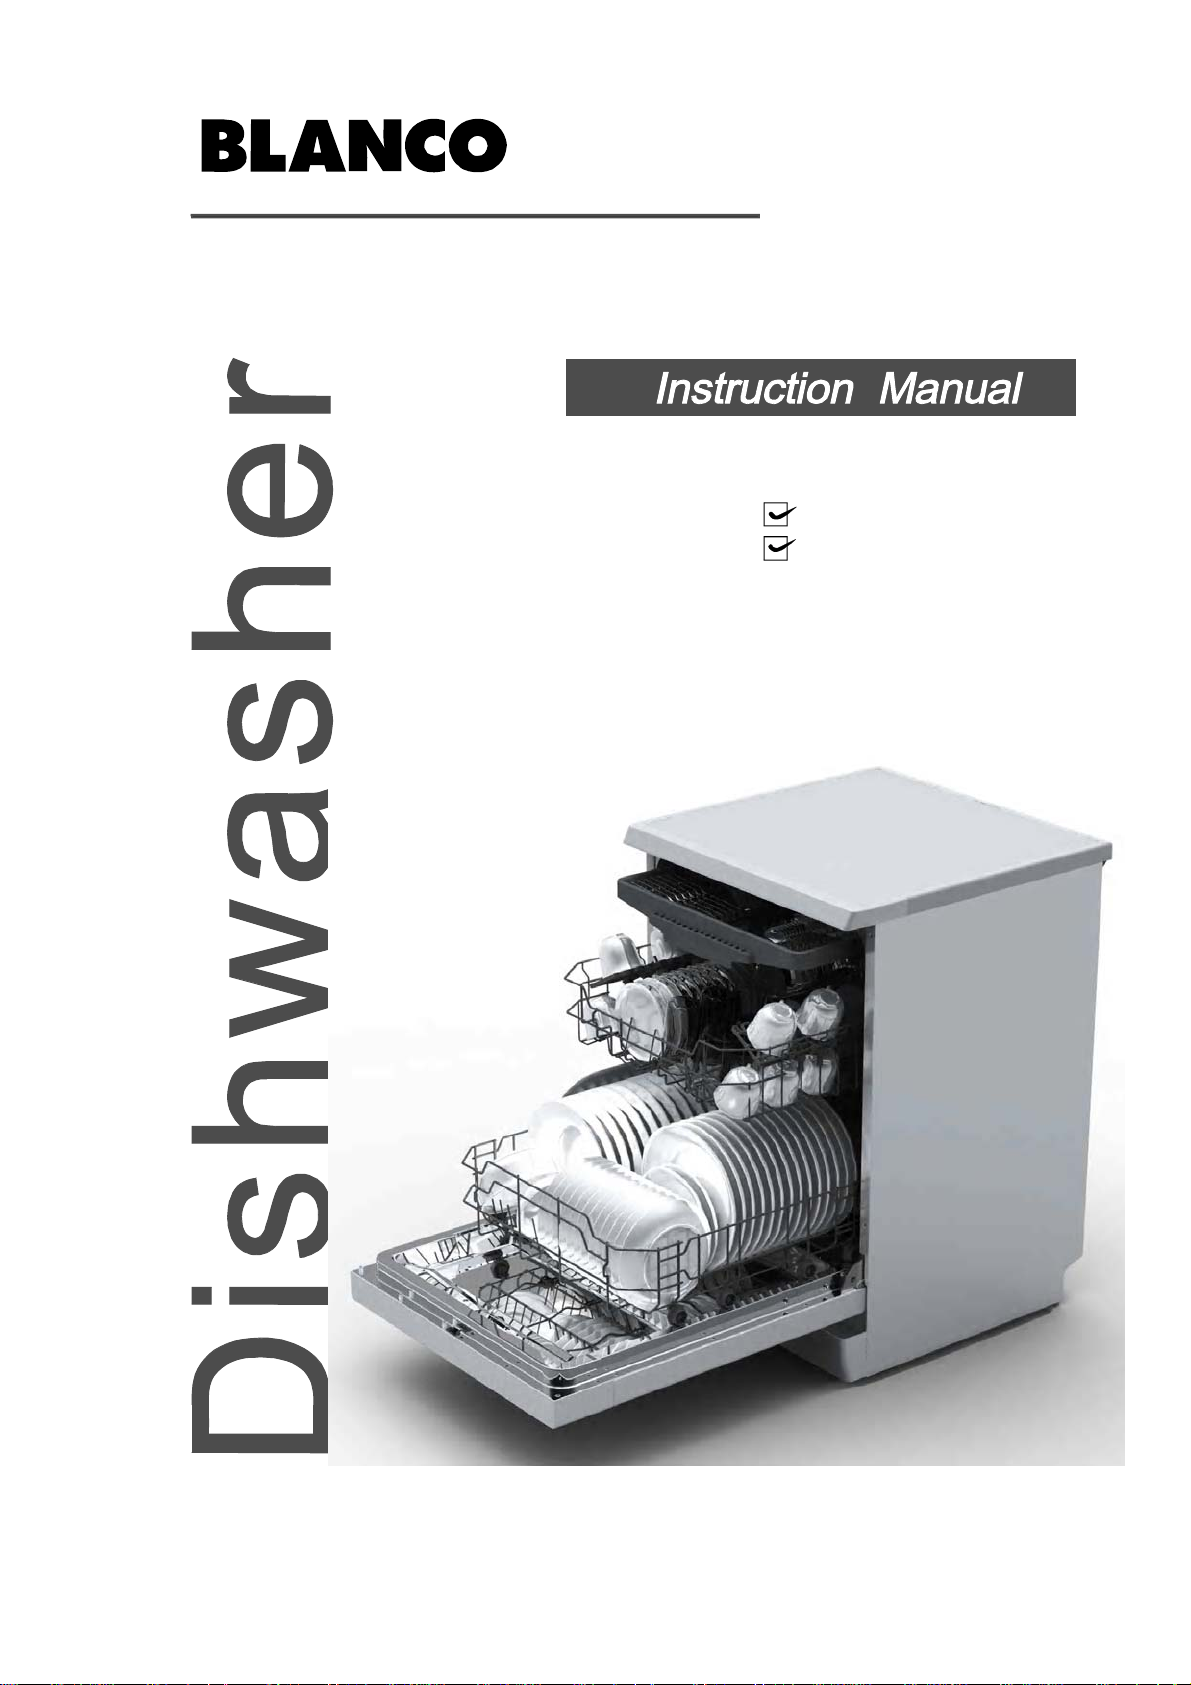
BDW146X
14 place settings
half-load function
Page 2
Fordetailedoperatingmethod read thecorresponding conte nt on theinstructio n manual.
Switch on the appliance Press the On/Off button to switch on the appliance, Open the door.
Witheachwashcycle.
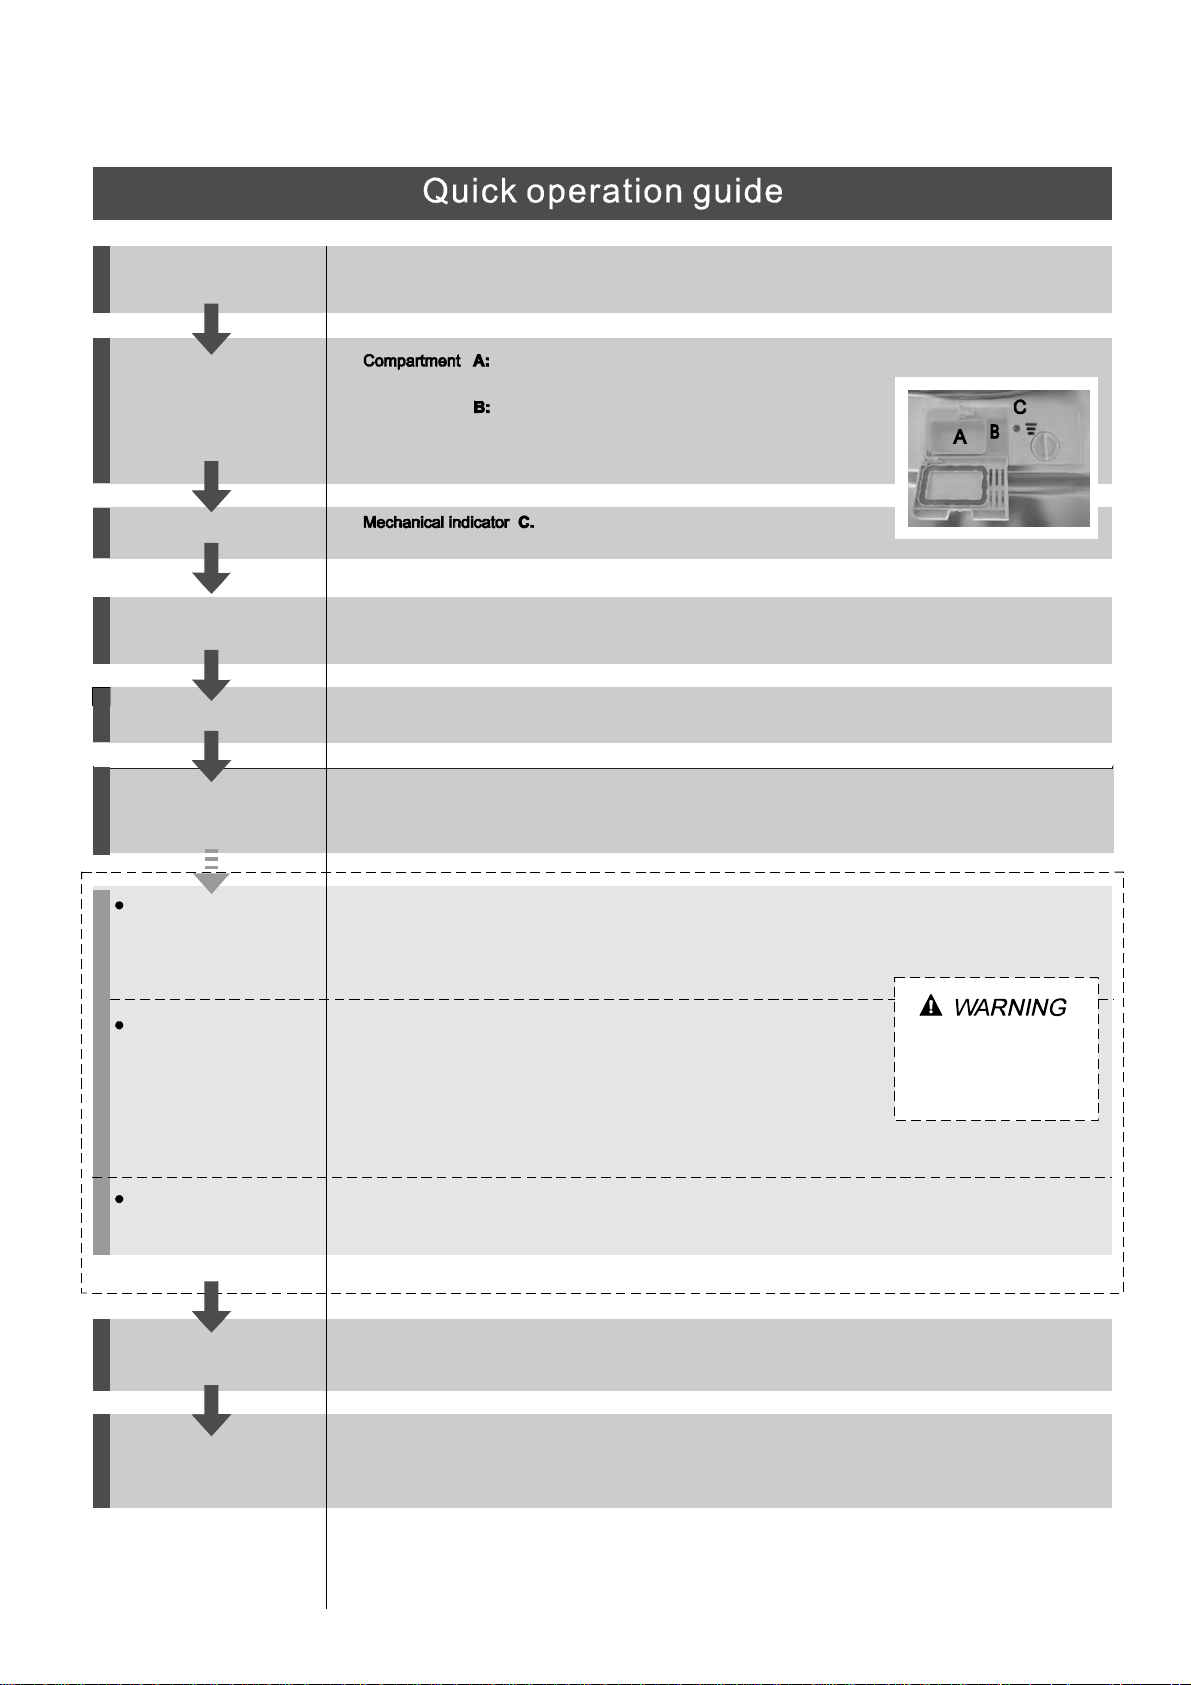
Fill the detergent dispenser
Compartment
For progr ammeswith pre-washonly.
(Follow the )User Manual
Check the rinse aid level
Load the baskets
Select a programme
Running the dishwasher
Changing the programme
Add forgottendishesin the
dishwasher.
Electric indicator oncontrol panel (if provided).
Scrapeoff any large amount ofleftover food. Soften remnants of burntfoodin pans,
thenloadthe baskets. Referto thedishwasherloadinginstructions.
Close the door,press the Programme Button until the selected programme lights up.
( See the section entitled Operation instruction )“”
Turn on the water tap and press the . The machine will start working
after about 10 seconds.
1.A runningcycle cano nly be modified ifit has been runningfora short time. O therwisethedetergent
may have already been released and the water a lready drained. If this is the case, the detergent
dispenser mustbe refilled.
Press the Start/Pause button, press the program button for more than three seconds, the
2.
Start/Pause Button
machine will be in standby state, then you can change the program to the desired cycle setting
1.Press the Start/Pause Button to stop the washing.
2.Open the door a little .
3.After the spray arms stop working, you can open the door
completely.
4.Addforgotten dishes.
5.Close the door.
6.Press the Start/Pause Button, the dishwasher will run
after 10 seconds.
Open th e door care f ull y.
Hotsteam may esc ape
when thedoor isopened.
If the appliance is switched
off during a wash cycle.
Switch off the appliance
Turn off the water tap,
unload the baskets
If the appliance is switched off during a wash cycle, when switched
on again, please re-select the washing cycle and operate the dishwasher
according to the original Power-on state.
When the working cycle hasfinished, the buzzer of the
dishwasher will sound 8 times, then stop.
Turn off the appliance using the On/Off Button.
Warning: wait a few minutes (about 15 minutes) before unloading the dishwasher to avoid handling
the dishes andutensils while they are still hot and more susceptible to break.
They will alsodry better.Unload the appliance, startingfrom the lower basket.
Page 3
Dear Cus tom e r,
This a ppliance isintended t o be used in h ousehol d and similar app lications such as:
-staff kitch en areas in s hops, off ices andother wo rking en viron ments;
-farm houses;
-by cli ents inhotels, m otels and other residential type environments;
-bed andbreakfasttypeenvironments.
Pleasecarefully readthismanualbefore using the dishwasher, i t will helpyouto use and maintainthe
dishwasher p roperly.
Keep it as a reference forlater days.
Passit on to any subsequentownerofthe appliance.
This manual contain s sections on safety Instruc tio n s,Op er at i ng Instruct io ns, Inst allation Instru cti o ns and
Troubles hooting Tips, et c .
The section ontroubleshooting Tipsw ill helpyou tos olve somecommon problemsby you rself .
Ifyou can not solv e the problemsby yo urself ,please askfor the helpof pro fessional technicians.
The manufa cturer, follo wing ap olicy ofconstant development a nd upda ting ofthe pr oduct, m ay make
modifications without giving prior notice.
Page 4
CONTENTS
Control Panel....... .................................................................... ....................................2
Dishwasher Fe atures............................ ........ .... ......... ......................... ........ ......... ........2
A FilltheRinse AidDispenser............. .. ................................. .............................3、 ..... ...
B Functionof Dete rgent .................................................................................... .4、 .... . ...
AttentionbeforeorafterloadingtheDishwasher
Baskets.....................................................................................................................6
The Meth od ofLoading Normal Dis hware
Wash Cyc leTable..................................... .......... ......... ............................................ ....9
Turning on theAppliance...................... .................. .....................................................9
Changethe P rogramme.............. ............................................................................10....
At the End of the WashCycle........................................................................... ......... ...10
Filtering Syst em....................................................................................... .................11
Caring fortheDishwasher..................... ................................................................ ....12.
Positioning theApplian ce................... ....................................................... ..............13..
AboutPower Connection........................ ..................................................................13.
Water Connec tion....... ...... ...... .... ........ ... ............... ..... ...... ...... ...... .... ........ .... ...... ...... 14.
Startof dishwasher................................ ...................................... ........ ......... ...........15..
Beforecallingfor service........................... .................. ...............................................16.
Error c odes.................................... .........................................................................17.
Technicalinformation. ............................. . ................ ...............................................18..
........... ...... ......... ...... ...... ......... ...... ... ......... .....7
Page 5
When using your dishwasher, follow the precautions listed b elow:
This appliance must be grounded. In the event of a
malfunction or breakdown, grounding will reduce
the risk of an electric shock by providing a path of
least resistance of electric current. This appliance
is equipped with a cord having an equipmentgrounding conductor and a grounding plug.
The plug must be plugged into an appropriate outlet
that is installed and gro unded in accordance with
all local codes and ordinances.
Donotabuse,siton,orstandonthedoorordish
rack of the dishwasher.
Do not touch the heating element during or
immediately after use.
(This instruction is only applicable to machines
with a visual heating element.)
Do not operate your dishwasher unless all
enclosure panels are properly in place. Open
the door very carefully if the dishwasher is
operating, there is a risk of water squirting out.
Do not place any heavy objects the
door when it is open. The appliance could tip
forward.
When loadi ng itemsto be washed:
1) Locate sharp items sothat th ey a re not likely
to damage the door seal;
2 Warning: Knives and other utensils with
)
sharp pointsmust be loadedin the basket
with th eir pointsdown or placedin a
horizontalposition.
When us ing y our dishwasher,youshoul d
pr ev en t pla stic ite m s fro m coming int o contac t
with t he h eating element.(This instruction i s only
applicable to machines witha visualheating
element. )
Check that th e detergent comparm ent isempty
after compl etion ofthe wash cycle.
Do not wash plastic items unless they are marked
dishwasher safe or the equivalent. For plastic items
n
ot so marked, check the manufacturer's
recommendations.
Use only detergent and rinse additiv es
design ed for an automatic dishwashe r.
Never use soap, laundry detergent, or hand
washing detergent in your dishwasher. Ke ep
these prod uct s ou t of the reac h of chil dren.
on or stand on
Improper connection of the equipment-grounding
conductor can result in the risk of an electric shock.
Check with a qualified electrician or service
representative if you are in doubt whether the
appliance is properly grounded. Do not modify the
plug provided with the appliance; If it does not fit
the outlet. Have a proper outlet installed by a
qualified electrician.
Keep children away from detergent and rinse aid, keep
child away from the open door of the dishwasher,
ren
there could still be some detergent left inside.
This appliance is not intended for use by persons
(including children with reduced physical, sensory or
mental capabilities, or lack of experience and
knowledge ,unless they have been given supervision
or instruction concerning use of the appliance by a
person responsible for their safety.
Children should be supervised to ensure that they do
not play with the appliance.
The dishwasher must always be connected to
the water system using new hose sets.
Dishwasher detergents are stronglyalkaline, they
can be extremely dangerou s if swallowed.Avoid
contact wit h skin andeyes andkeep children away
from the dishwasher when the door is open.
The door should not be left o pen,
since th is coul d increasethe ris k of tripping.
Ifthe supply cordisdamaged,itmust be replaced
bythemanufactureroritsserviceagentora
similar ly qualified person i n order t o av oid a
hazar d .
If th e appliance isinstalled on a carpet f loor,
take care that the openings in its base are not obstructe d.
Remove the door to the washing compartment when
removing an old dishwasher from service or discarding it.
Pleasedispo seof packing materials properly.
Use the dishwasher only for its intended function.
During i nstall ation, t he po wer supplymust not
be ex cessive ly or dangerously ben t or flattened.
Do not tamper with controls.
The a ppliance isto be connected to the water
mains usingnew hosesetsand that oldhose-sets
should no t bereused.
The maximum nu m b er of place set tings t o be
washed is 14.
The maximum pe r m i ssible inlet wat er pres s ur e is
1Mpa.
The mini mum permissi ble inlet wate r pres su re is
0.04Mpa.
)
Page 6
To g etthe best performance fromyourdishwasher,r ead all operating instructions
beforeusing itforthe firsttime.
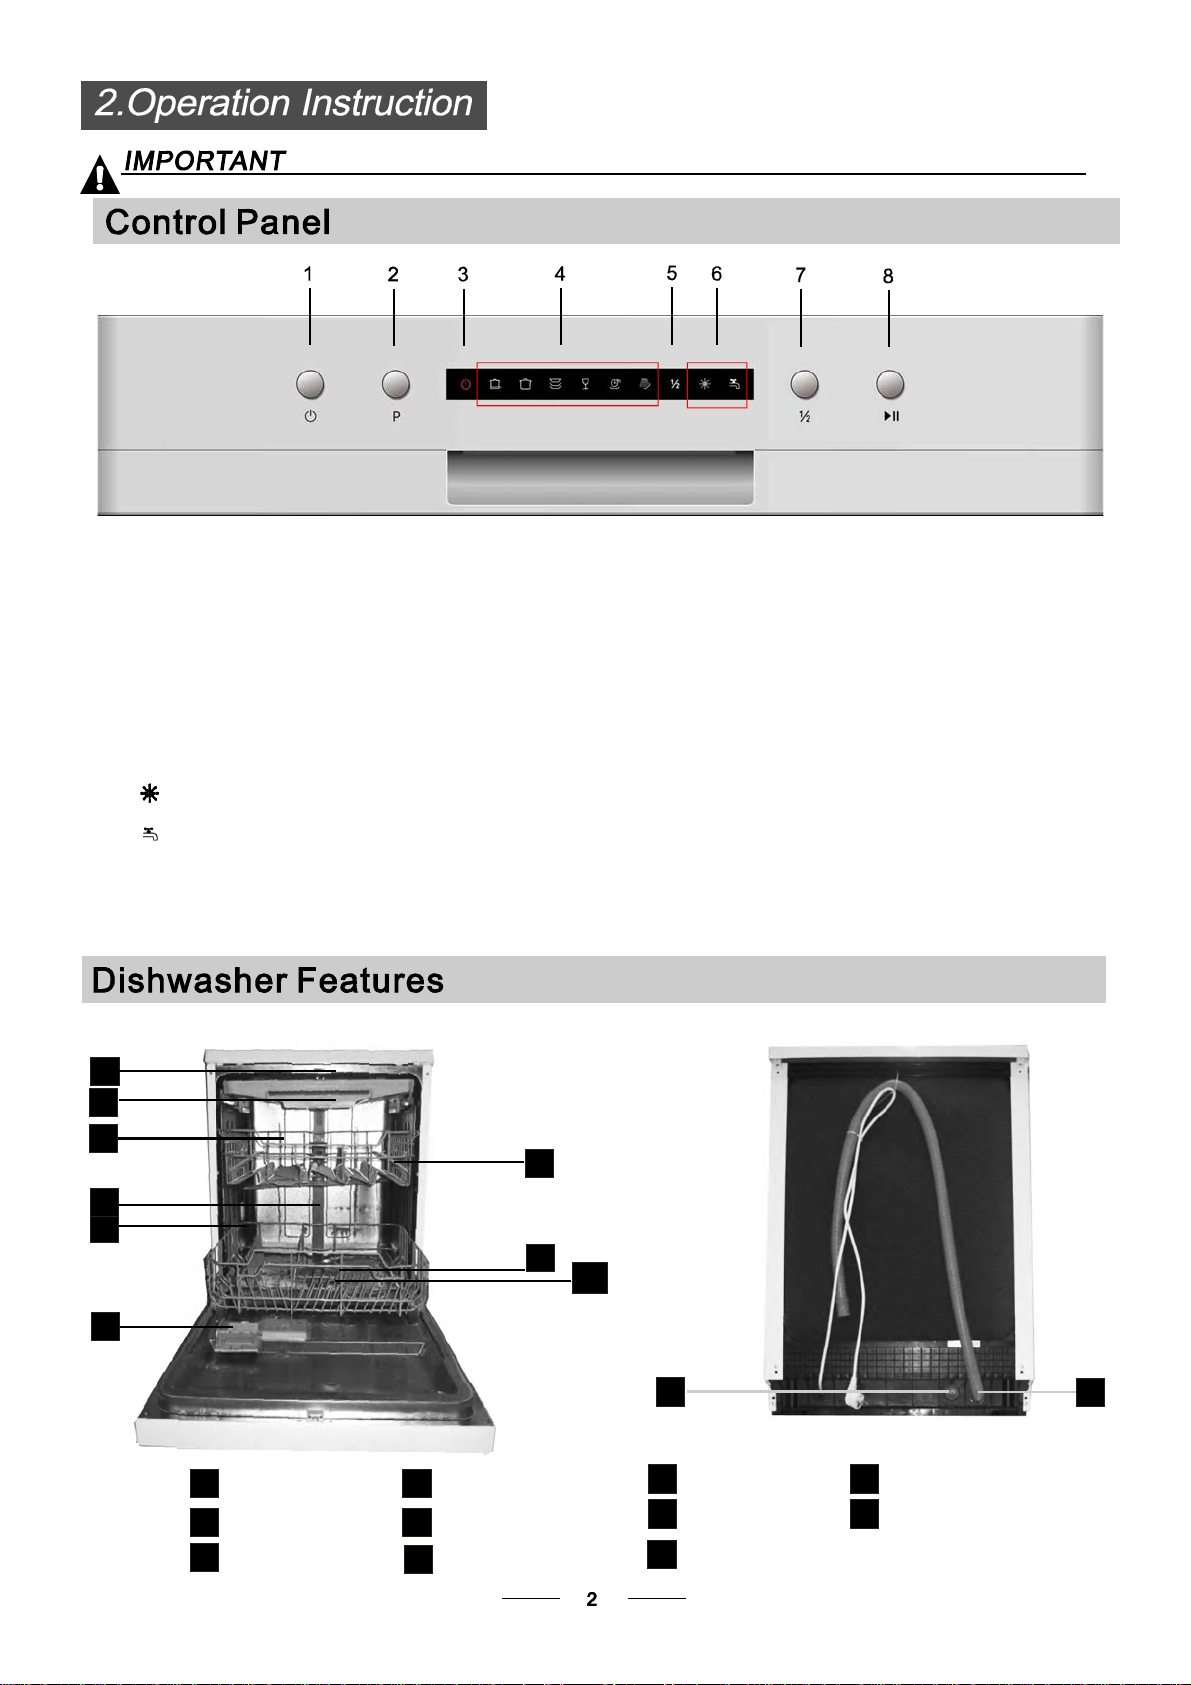
1. On/OffButton:t o switch On/Offtheappliance.
2.ProgramButton : To Pressthe button to select
appropriate Program.
3. Pow er indicator :To s how whenthe power i s o n.
4. Prog ram indicator s: Tosh ow which pro g r am
youhavechoose.
5. Hal f load indicat ors:Tosh ow Halfload fu nction
starting up ornot.
6.
Rinse aid w ar nin g light s: To sho w
when the dispenser needstoberefilled
Wat e r fa u cet light : to show whe n the wa t er
fa uc et is not turned on.
Front view
1
2
3
7. Half load f unctio n Bu tton: Toselect H alf l oad
function.(With thisHalf load fun ction youcan
only us e it whenyou ha ve o nly a bout orless t han
6 place setting ,andyouwillseeless
water a nd e nergy c onsumpt ion. can
only be used wit h Int ensive, Heavy, Normal, Glass
and 1 Hour .)
8. Sta rt /Pausebutton: To start theselected
washing program or pause the washing prog ram
when themachine isworking.
dishwa re
This function
Back View
7
4
5
8
9
6
Top spray arm
1
Cutlery rack
2
Upper basket
3
Inner pip e
4
Lower basket
5
Dispenser
6
10
Cupshelf
7
Spra y arm s
8
Fil ter assembly
9
10
Inlet pipeconnector
11
Drainpipe
11
Page 7

Before usingyour dishwasher for the first time:
A. Fillthe rinseaiddispenser
B. Function OfDetergent
Rin seA id Di spen se r
The r inseaid is releasedduri ngthefinal rinsetoprevent w ater from formingdroplets on yourdishes, wh ich can
leave spots and streaks.It also improves dryingby allowing water to rolloffthe dishes.Your dishwasher is
designedto useliquid rinseaids.The rinseaiddispenser is locatedinsidethedoornext to thedetergent dispenser.
To fil l t he dispenser,open the ca p and pourthe rinseaid into the di spenser untilthe le vel i ndica tor turns completely
black. Thevolumeof the rinseaidcontainer is about110ml.
Functi on of RinseAid
Rinse aidis automaticall y a dded during thelast rinse,ensuri ng thorough r in sing, andspo t an d streakfree drying.
Attenti on.
Only use branded rinseaidfor dishwasher. Neverfillthe rinseaiddisp enser with anyother substances
(e.g. Di shwas her cleaning agent, liqu id detergent). Thiswoul d d amage the appli ance.
When to Refil l the R inseA id Disp ense r
If ther e i s n o ri nse-aid warning l ight inthe c ontrol panel, you can judgethe am ount of rinse- aid bythe colorof the
optical levelindica tor "C" located next to the cap. Wh en therinse-aid container i s ful l, thewhole i ndicato r w ill b e
dark . As t he rinse-aid dim inishes, the size ofthe d ark d ot decreases. Youshould never let therinse aidget b elow
1/4full.
As the rinse aid diminishes, the size ofthe bl ack dot
on the rinse aid level indica tor changes, asillustrated below.
Full
3/4full
1/2full
1/4full-Shouldrefilltoeliminatespotting
Empty
RINSEAID DISPENSER
C(Rinse-Aidindicator)
To o pen thedispenser, turn thecap t o th e "open" (l eft) arrowand liftit out.
1
Pour the rinse aid into the dispense r, bei ng careful not to overfil l.
2
Replace the cap by insertingit alignedwith "open" arrowandturning it to the closed(right) arrow.
3
Be caref ul no t t o over fill th e dispenser,because thi s c ould cause over sudsing.Wipe awayany sp ills
witha damp cloth.Don'tforgettoreplacethecap beforeyou close the dishwasherdoor.
Attention.
Clean up any rinse aid spilt during filling with an absorbent cloth toavoid e xcess foaming
during t he ne xt w ash.
Page 8
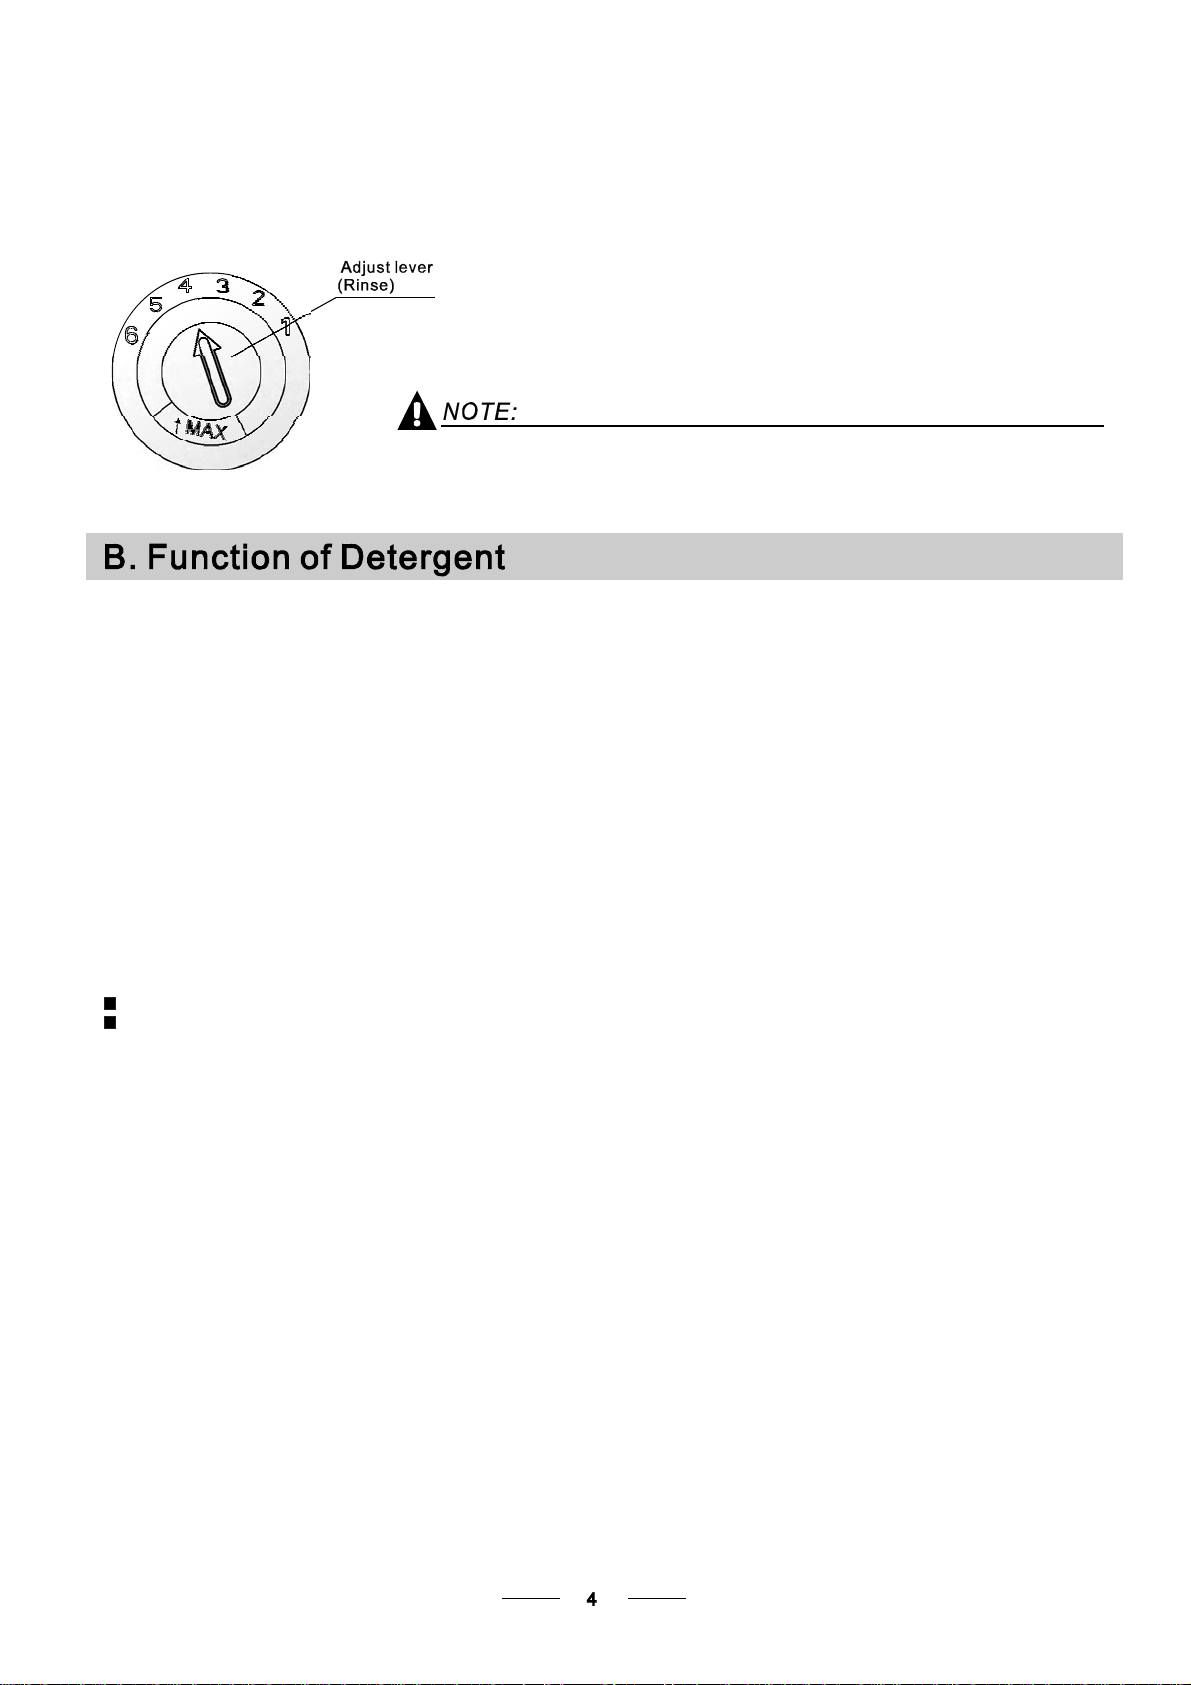
Adjust ing Rins eAid Dis penser
The ri nse aiddispenser hassix orfour s ettin gs.Always s tart withthe dispenser
set on "4". If spots and poordrying a re a pro blem, i ncrease theamount of rinse
aid dispensed by removing thedispenser lid androtatingthedialto"5". If the
dishes arestill not drying p roperly orare showingspots, adjust the dialto the next
higher le ver until your dishes are sp ot-f ree. T he recom mended setting is "4".
(Factoryvalue is "4".)
Increase thedose if there are drops of wateror limespots onthe di shes a fter washing.
Reduce i t if there are sticky whitis h sta ins on your di shes ora blu ish f ilm onglassware or
knifeblades.
Detergents withits c hemical ingredients a re ne cessary to remove dirt, crush dirt and transport it outof the dishwasher.
Most of the commerci al quality deterge nts ar e suitablefor t his p ur pose.
Detergen ts
There a re 3 sorts of d etergents
1.Withphosphate andwith ch lorine
2.Withphosphate andwithout c hlorine
3.Withoutphosphate andwithout chlorine
Normally new pulveris eddeter gent iswithout p hosphate. T hus t he w ater softener function of
phosphate isnot g iven. In this case werecommend t ofi ll sa lt in thesalt c ontainer evenwhen
thehardnessofwater is only 6 dH.Ifdetergents withoutphosphate areused in thecaseof hardwater
often whitespots appe ar o n di shes andglasses. Inthis case please add moredetergent toachieve
better results. Detergents without chlori ne doo nly b leach a little. Str ong andcoloured spots w ill not
be re moved c ompletel y.In this case please choosea progra m w ith a higher te mperature.
°
Concentrated Detergent
Based on their chemicalcomposition, detergentscanbesplit in twobasic types:
conventi onal, alk aline d etergents with caustic components
low a lkaline c oncentr ated detergents with natural enzymes
The use of normal washingprograms incombination with concentrated detergents
reducespollutionandisgoodforyour dishes ;these washprogramsare specificallymatched
to the dirt-dissolving pr operties ofthe enzymes of the concentrated dete rgent. Forthis rea son
normal washprograms inwhich conc entrated detergents are usedcan ac hieve t he sam e
“”
results thatcan oth erwise onlybe achiev ed using intensive programs.
“”
“”
Detergent Tablets
Detergent t ablets ofdifferent brand s disso lve atdifferent spe eds. For this reason some
detergent tabletscannot dissolve an ddevelop theirfull cleaning power during short
programs. The refore please use longprograms whenusing detergent tabl ets, to
ensure the completeremovalof detergentresiduals.
DetergentDispenser
Thedispensermus t be refilled beforethestartof each wash c yclefollowing th einstructions
provided i n thewash cy cle t able . Your dishwash er uses less detergent andrinse aidthan
Conventional dishwasher.Generally,only on e ta blespoon of detergent is needed for
a normal w ash load.More h eavilysoiled itemsneed moredetergent.Alwaysaddthe
detergent justbefore starting th e dishwa sher, otherw ise it couldget dampand wil l not
dissolve properly.
Page 9

Amountof DetergenttoUse
If the lid is clos ed: press release butt on . The li d will spring open.
Always add the detergent justbefore starting each w ash cycle.
Only use br ande d deterg ent aidford ishwasher.
Dishwasher detergent is corrosive.Take care tokeep it out ofreach of c hildren.
Proper Use ofDetergent
Use of d etergent specifically m ade fo r use indishwashers . Kee p yo ur de tergent freshand dry.
Don't putpowdered d etergent into the di spenser untilyou're ready to wash dishes.
Fill in Detergent
Fill the detergentdispen ser with detergent.
Themarkingindicates the dosinglevels , as
illustrated on theright:
The pla ce for main wash cycledetergent.
A
The pla ce for pre-wash cycledetergent.
B
Please observe the manufac turers d osing an d st orage
Rec omme nda tion s as st ated on the detergen t pac k a ging .
Close t he lid an d pr ess until itlocks in pla ce.
Ifthe dishes are heavily soiled, place an additional
detergent d ose i n the pre-wash dete rgent chamber.This detergentwill ta ke e ffect dur ing thepre-wash phase.
A
B
Information abou t theamount o f d etergen t for thesingle programme is locatedat th e wa shing cycle table .
Pleaseb e aware , tha t accord ing t o the level soiling and the specific hardne ss of water differences are possible.
Pleaseo bserve the manufacturer's re commen dations onthe detergent packaging.
Page 10

Considerbuying utensils whichare identified as dishwasher-proof.
Use a mild detergentthat i sdescribed as 'kindtodishes'.If necessary, seekfurther
information fromthedetergentmanufacturers.
Forparticular items, selectaprogramwith as low a temperatureas possible.
To prevent damage, d o not take glass a nd cutler y outof thedishw ashe r immediatel y
after theprog ram me h a s e nde d.
Are not suit able
Cutlery with wooden, hornchina or
mother-of-pearl handles
Plastic itemsthat ar e n ot h eat resistant
Older cut lery with glued partsthat a re not
temperature resistant
Bonded cut lery itemsor dishes
Pewter or cooper ite ms
Crystal gla ss
Steel it ems su bject torusting
Wooden platte rs
Items madefrom syntheticfibres
(For best performance of thedishwasher, follow these loading guidelines.
Features and appearance ofbaskets and cutlery basket s may vary from yourmodel.)
Scrape off any large a mounts ofleftover food.Soften r emnants ofburnt foodin pans.
It is notnecess ary to r inse thedishes u nder running water.
Place ob jects inthe dis hwasher inthe follow ing way:
1.Itemssuch a s cups, glasses, pots /pans, etc. arefaced downwards.
2.Curveditems, or ones with recesses, should beloaded a slant sothat water can run off.
3.Allutensils a re stackedsecurely andcan not tipover.
4.Allutensils areplaced in the way thatthe spray arms can rotatefreely duringwashin g.
Ve ry sm all it ems s hould n ot b e w ashed i n thedishwasher as theycould easilyfall out of the basket.
Are oflimited suitability
Some types ofglasses canbecome
dull afte r a larg e num ber of wash e s
Silver andalumi num parts havea
tendencytodiscolour duringwashing
Glazed patterns mayfade if machine
washed freq uently
Load hollow items such ascups, gl asses, p ans etc.With t he openi ng f acing downwardsso that
wat e r canno t col l ect in the cont a i n e r or a dee p ba se.
Dishes and items of cutlery mustnotlie insideone another,orcover eachoth er.
To avoiddamage toglasses, theymust nottouch.
Load largeitems w hich ar e mostdifficult to clean into thelower basket.
The uppe r bas ket i s de signed tohold m ore d elicate andlighter d ishware suchas glasses , coffee
andt eacups
Long bladedknives storedin a n uprightposition area potent ial hazard.
Long and/orsharp itemsof cut lery such as carving knives m ust bepositioned
horizon tally in the upp er b asket.
Please donot ove rload your dishwashe r. This isimportant forgood resultsand f or
reasonab le co nsum ption of energy.
To preventwater drippingfrom t he upperbasket i nto the lower basket,we rec ommend thatyou
empty the lower basket first and thenthe upp er basket.
Page 11

The Method Loading Normal DishwareThe Method Loading Normal Dishware
Loading the Upper BasketLoading the Upper Basket
The upper basket is designed to hold more delicate
and lighter dishware such as glasses, coffee and
tea cups and saucers, as well as plates, small bowls
and shallow pans (as long as they are not too dirty).
Position the dishes and cookware so that they will
not get moved by the spray of water.
IN
Please be reminded that:
Pots, serving bowls, etc, must always be placed top down.
Deep pots should be slanted to allow water to flow out.
The Bottom Basket features folding spikes so that larger or more pots and pans can be loaded.
Adjusting the Upper Basket
The height of the upper basket can be adjusted in order to
create more space for large utensils both for the upper
/lower basket. The height of the upper basket can be
adjusted by lift up the basket for the upper position, and up
press the handle to lower the upper basket, see the picture
below:
Loading the Lower BasketLoading the Lower Basket
We suggest that you place large items and the most
difficult to clean items into the lower basket: such as
pots, pans, lids, serving dishes and bowls, as shown
in the figure below. It is preferable to place serving
dishes and lids on the side of the racks in order to
avoid blocking the rotation of the top spray arm.
IN
Folding back the cup shelives
For better stacking of pots and pans,
the spikes can be folded down as
show in the picture right.
Up press the handle
Lift the basket
Lift the basket
for upper postion
for upper postion
Up press the handle
to lower the basket
to lower the basket
Adjust handleAdjust handle
Cutlery BasketCutlery Basket
Cutlery should be placed in the cutlery rack separately
from each other in the appropriate positions, and do
make sure the utensils do not nest together, this may
cause bad performance.
Folding Spikes of Lower Basket
For better stacking of pots and pans,
the spikes can be folded down as
show in the picture right.
For a top quality cleaning, place the silverware in the basket
For a top quality cleaning, place the silverware in the basket
making sure that:
making sure that:
They do not stick together.They do not stick together.
Silverware is placed with the male face up.Silverware is placed with the male face up.
Long utensils in the middle. Long utensils in the middle.
77
Page 12

Cutlery tray canbe 5 different positions
Mode 1
Position one: lift theleft b asket up, both left and ri ght
baskets areslanting.
Mode 2
Position two: adjust theleft bas ket t o lowerposition, left
basket isflat and r ight basket is slanting.
Mode3
Mode 4
Mode 5
Position three: lift the right basket up, both left andright
baskets areflat.
Position Four: Move the right basket from right to l eft, two
basket areoverlapping.
Position Five: Remov e t he r ight b asket from the tray,
only ha s the left basket .
Page 13

()
()
Means:needto fill rinseintothe Rinse -AidDispenser.
Means:needto fill rinseintothe Rinse -AidDispenser.
Intensive
Heavy
Normal
(*AS/NZS 2007.1 )
Glass
1Hour
For heav i e st soil e d croc kery,
and soiled pots pans
、、
dishesetc with dried
onsoiling.
Forheavily soiledloads,
such as pots, p lates, glasses
andligh tly soiled pans.
Standarddaily cycle for
normallysoiledloads, such
aspots plates glasses.、、
Forlightlysoiled crockery
andglass.
For lightly soiled loads that
do n ot need excell en t drying
efficie ncy.
To rinse dishes thatyou plan
to wash later thatday.
Pre-wash(50 )
Wash (65 )
℃
℃
Rinse
Rinse
Rinse(65 )
℃
Drying
Pre-wash(45 )
Wash (55 )
℃
℃
Rinse
Rinse(60 )
℃
Drying
Pre-wash
Wash (50 )
℃
Rinse
Rinse(50 )
℃
Drying
Pre-wash
wash(4 0 )
℃
Rinse
Rinse(60 )
℃
Drying
Pre-wash(50 )
Wash( 6 0 )
Rinse(55 )
℃
℃
℃
Drying
Pre-wash
5
/27.5g
(OrA ll )
in1
5
/27.5g
(OrAll )
in1
5/27.5g
(Or A ll )in1
20g
5/27.5g
135
165
160
115
60 10.0
8 0.01 3.8
1.4 0
1.15
0.87
0.80
0.90
18.0
14.5
13.6
14.5
* : T hi s prog ram is the test cycl e. T he info rma tion fo r co mpara bi li ty t es t
AS/NZS2007.1
in ac co rdance with , asfol low s:
AS/NZS 2007.1
Capacity:14s etting
Po si t io n Upper baske t: upper wheels on rai ls
Rinseaidsetti ng:6
Op en the doo r slight l y 50mm to assi s t in dryi n g of the dishes afte r every wash
Startinga cycle wash
1 Draw outthe lowe r and upper bask et, load thedishes a nd push the m back.
It is to l oad the lowerbasket first,then t he upperone ( see the section entitled
recommended
Loading the Dishwasher ).
“”
2 Pour inthe det ergent ( see the section e ntitled Deter gent andRinseAid ).
“”
3 Insert theplug in to t he socket.The power supply is 2 20- 240 VAC/50 HZ,the specificat ion
of th e socket is10A 250VAC. Make sure thatthe water supply isturned on tofull pressure.
4 Close thedoor,press theON/OFF Button,and the display will turn on.
5 Press theprogram Button , the wa sh p rogram w ill bechanged as fol lows direction:
Intensive->Heavy->Normal->Glass->1Hour->Soak;
If aprogram isselected, theresponse lightwill light. Thenpress the Start/Pause button , th e
dishwasher beginsto start.
Page 14

Whenyou pressthe Start/Pause buttonto pauseduring washing,therunningindicato r will
stop b linking and the d ishw asher w ill every m inute unless you pressthe
button to start.Start/Pause
Acycle that isunderway canonly bemodified ifit ha s only been running fo r a short time. Otherwise, the
1
detergent may have already be en relea sed, a nd theappliance may have alrea dy dr ained thewash water.
If t his i s the case, the detergent d ispenser must be refilled(see the sec tion entitled " Loadingthe
Detergent " ).
Press theStart/Paus e but ton, themachine willbe in standby stat e, press theprogram b utton formore than
2
3 then y ou can change the program t o the desired cycle setting (see thesection entitled "Starting
seconds
a wash cycle )."
be beeping
If you openthe door , t he m achine w ill p ause. The prog ram l ight will
st op bl i n king and t he buz zer wil l be ev e ry min ut e un less you clo se the door . Afte r
you cl ose th e doo r ,the machinewi llkeep o n w orking after10 se conds.
Aforgotten dish can beadded any time before the detergent cup opens.
Press the Start/Pause button
1
Open thedoor a little to stop the washing.
2
After the spray arms stop working, you can open the door
3
completely.
When the wo r king cyc l e has fi nished, the buz zer of the dish w a she r wil l sou nd for 8 s econd s , then sto p . Turn off
the app lia n c e using the Power swi tch button, shu t off the wate r su p p l y a nd open th e door of the dish washer.
Wait for afew min utes bef ore unloadingthe dis hwashe r to a voi d ha ndling th e di shes andutensils w hile they
are s till h ot a nd m ore susceptible to br eakage. Theywill als o dr y bet ter.
during aw ashcycle
beeping
Add forgotten dishes.
4
Close the door
5
Press the button, the dishwasher will run
6
after 10 seconds.
Start/Pause
SwitchOff the Dishwasher
The progr am l ight ison but isnot blink ing, on ly inthis case the programm e has ended.
2.Turn offthewatertap.
Power1.Switchoff the dishwasher by pressing the button.
Openthedoorcarefully.
Hot dishes are sensitive toknocks. The dishes should therefore be allowedto cooldown arou nd 15 minutes
beforeremovingfrom the appliance.
Open the dishwasher door, le ave itajar and waita f ew minu tes be fore removing the di shes. Inthis w ay they
will be cooler and t he dryingwill b e impr oved.
Unloading thedishwasher
Itis normalthat t he di shwasher iswet in side.
Empty th e low er ba sket f irst a nd thenthe upper one.This w ill avoidwater drippingfrom t he upperBasket on to
the dis hes in thelower one.
Washthe arms insoapy andwarm wat er an d use asoft brush to
clean t hejet s. R eplace themafter r insing themthorough ly.
When following this procedure from step1 to step 3, the filter system will be removed;
when following it from Step 3 to Step 1, the filter system will be installed.
Itis dangeroustoopenthedoorwhenwashing,because the hot water may scald you.
Page 15

The f ilter preventslarger remnants of foodor ot her objects from gettinginside th e p ump.
Theresiduesmayblockthefilter, in thiscase t heymust be removed.
The filter systemconsists ofa coarse filter,a flat (Main filter)
An d a mic rofilt e r( F i ne filter).
1
2
ande asily becometrapped in thecourse filter
caught by the filter, gentlysqueezethetap onthetop of this
3
2
1
3
Main filter
Foodand soil particles trap pedin thisfilter arepulverized by a
special jet onthe lower spray a rm a nd w ashed d own todrain.
Coarse filter
Larger items, s uc h as pie c es of bon e s or glas s, tha t c ould blo ck
the drain To remove
the items
filter andlift out.
Fine filter
This filterholds soiland foodresiduesinthesump areaand
preve nts itfrom being on th e di shes during wash cyc le.redeposited
Filterassembly
Thefilter efficiently
For b est p erformance and results, the filte r must be cleaned regularly. this r eason, it is a goodidea t o
remove t he la rger food particl es tr apped in the filte r aft er e ach washcycle b y rin sing thesemicircular filter and
cup unde r ru nnin gwater. Tore move th e fil ter d evice, pullthe c up ha ndle inthe upwa rd d irection.
removes f ood par ticles fromthe wa sh w ater,allowing itto be recycleddur ing the cycle.
For
Th e dish was her mus t never be us ed wit hout th e fi lters.
Improper replacement of thefilter mayreduce theperformance lev el ofthe app liance
anddamagedishes andutensils.
1
2
Step 1 Turn t he filterin ant i-clockwise direction,:
St ep 2 lif t the fil ter up:
When following this procedure from step 1 to step 2, the filter system will be removed;
when following it from Step2 to Step 1, thefilter system willbe installed.
Page 16

Remarks:
- Inspect the filters forblocking a fter e very timethe dis hwasher hasbeen u sed.
- By unscrewing the c oarse filter, you can remove the filter system. Removeany foo d re mna nts and
clean thefilters under running water.
Theentire filterassemblyshouldbe cleaned onceaweek.
Cleaning the Filter
To clean thecoarse filter and the fine filter, use a cleaning brush. Reassemble the filter parts as shown in the figures
on the previous page and reinsert the entire assembly in the dishwasher, positioning it in its seat and pressing downwards.
Whencleaningthe filters, don't knock onthem. Otherwise, the filters could be
contortedand theperformance of thedishwashercouldbedecreased.
The cont rol p anel can be cleaned byusing a lightly dampen ed c loth.
After cleaning, make sure t o dryit tho roughly.
For the exte ri or, use a g ood appliance polis h wax .
Neveruse s harp objects, scouring padsor har sh c leaners onany p art o f the dishwasher.
Cleaning TheDoor
To cle an theedge aroundthe door, you should use o nly asoft warm, damp cloth.
To av oid penetrationof wa ter i nto thedoor lock and electrica l com ponents, d o not
usea spraycleaner ofany kind.
Never use aspray c leaner toclean t he d oor panelasit m ay damage the doorlock
and electrical components.
Abrasive ag ents or some paper towelsshould not beused becauseof t he ris k of
scra tch ing or l eaving spot s on the stainless ste el s urf a ce.
Protec tAgain st Freezi ng
please takefrost pr otection measures on t he dishwasher in wi nter. Every fter wa shing c ycles,
please operateas f ollows
1.Cut offtheelectricalpower to the dishwasher.
2.Turnoff the w ater supplyand d isconnec t th e wat er i nlet pi pe fromthe wate r valve.
3.Drain the waterfrom t he inletpipe an d water valve. (Use apan togather the water)
4.Reconnect the water inlet pipeto the water valve.
5.Remove the filter at the bottomof thetub and use a spongeto soak up water inthe sump.
:
If your dishwasher cannot work becauseof the ice,
please contact professiona l servicepersons.
timea
Cleani ng the Spra yArms
It is necessary to cle an th e spray arm s reg ula r l y for har d
wate rchemicals w ill clog thespray armjets a ndbearings.
Tor e m ov e the upper spra y arm, hold the nut, rotate th e arm
clockwise to remove it.
Toremove thelower spray arm, pullout thespray armupward.
Washthe arm s in soapy and w arm waterand u se a softbrush to
clean the jets. Replace themafter rinsingthem thoroughly.
Page 17

AfterEveryWash
After everywash, t urn off the water supply to the
appliance andleave th e doorslightly op en sot hat
moisture andodours a re n ot t rapped inside.
RemovethePlug
Before cl eaning orperforming maintenance, alw ays
remove the plugfrom the socket.
No Solve nts or Abrasiv e Clea ning
To clean the exterior and rubberparts of the dishwasher,
donotusesolventsor abrasive cleaning products.
Only use acloth with warm soapy water.
Tore m ove spots o r stains from the surf ace ofthe
interi or, use a clot h dampened with wa t er a nd alitt le
vinegar,or a cleaning pro duct mad e sp ecifically for
dishwashers.
Position theappliance inthe d esired location.The backshould r est ag ainst thewall behindit, andthe side s,
along t he adj acent cabinetsor walls.The dishw asher i s equippedwith water supply anddrain hos es th at can
be pos itioned either to t he r ight orthe left sides to facilitate prop er in stallatio n.
When notin UseforaLongTime
It isrecommend that yourun a wash cycle with the
dishwasher e mpty an d the n remov e th e plu g fro m the
socket, turn offthe wa ter supplyand le ave thedoor of
the applia n c e slig ht ly ope n. Thi s wil l help the door
seals to lastlonger andpreventodours fromforming
withinth eappliance.
Moving t heAppliance
If the appliance must bemoved, t ry t o keepit in the
verticalposition.Ifabsolutely necessary, it canbe
positioned onits back.
Seals
Oneofthefactorsthatcauseodourstoforminthe
dishwasher is food that r emain s tr apped in the seals.
Periodic cleaning with adamp spo nge willprevent this
fro m occurr in g.
Once th e appl iance i s positionedfor levelling, the heightof thedishwasher
may be altered viaadjustment of the scre wing levelof the feet.In any case,
the applia nce sho uld not beinclin ed more than2 .
For personal safety:
DO NOT USE AN EXTENSION CORD ORAN ADAPTER PLUG WITH THIS APPLIANCE.
DONOT, UNDERANY CIRCUMSTANCES, CUTOR REMOVETHE EARTHING
CONNECTION FROM THE POWER CORD.
Please l ook at the r ating label to knowthe ratingvoltage andconnect t he dishwasher to the appropr iate powersupply.
Use the required fu se 1 0 amp,time de lay f use orcircuit breakerrecommended and prov ide sepa rate circuitserving
only thisappliance.
Ensure thevoltageandfrequency of the powerbeing usedcorresponds to
those onthe rating plate. Only in sert theplug into anelectrical socket which i s ear thed
properly.If the electrical sock et t o whi ch the appliance mu st be connected is not
appropriatefortheplug , replace the socket, rather thanusingaadaptor or the likesas
theycouldcause overheating andburns.
This appliance must be earthed. In the event of a malfunction or breakdown, earthing will reduce the risk of
electric shock by providing a path of least resistance for the electric current. This appliance is equipped with a
cord having an equipment-earthingconductor and an earthing plug. The plug mustbe plugged into an
appropriate outlet that is installed and earthed in accordance with all local standards and requirements.
Page 18

Improper connection of the equipment earthing conductor can result in the risk of an
electric shock.
Check with a qualified electrician or service representative if you are in doubt whether the
appliance is properly earthed.
Do not modify the plug provided with the appliance. If the plug does not fit properly to the
outlet, please have a qualified electrician to install a proper outlet.
1
2
3
for personal safety:
DO NOT USE AN EXTENSION CORD OR AN ADAPTER PLUG WITH THIS APPLIANCE.
DO NOT, UNDER ANY CIRCUMST ANC ES, CUT OR REMOVE THE
CONNECTION
Theappliance must be connected to thewater m ains usingnew hose-sets.
The old hose-se ts should n ot be reus ed.
Waterpressuremust be between 0,04 MPaand 1 MPa. If thepressureisbelow the
minimumconsult our Service Department for advice.
Pull The safety s upply hoses completely out from the storage compartment located at rear of
dishwasher.
Tighten the screwsof the safety supply hose to the faucet withthread 3/4inch.
Turn water fully on before starting the dishwasher.
FROM THE POWER CORD.
EARTHING
Thesafetysupply hoseconsistsofthedouble walls. The hose's systemguarantees itsintervention by blocking the
flow o f wa ter inca se o f thesupply hosebreaking an d when the air sp ace between the supply hose itselfand th e ou ter
corrugated ho se is full of water.
Ahose thatattachestoasink spraycanburstif itis installedonthe samewater lineasthe dishwasher.If yoursink
hasone,it isrecommended thatthehose be disconnected andthehole plugged.
Turn off the water.
1
Release the water pressureby depressing the pressure release button. This relieves water pressure and protects you, and the
2
room, from severe splashing.
Unscrew the safety supply hosefrom the faucet.
3
Connect thecold w ater sup ply h ose toa thre aded 3/4 (inch) connector and makesure thatit is fastened tig htly inplace.
Ifthewaterpipes are neworhave not beenusedfor an extended period of time,let the w ater runto make sure that the
water is clear and free of im purities. Ifthis pr ecau tion is nottaken, thereis a risk that the water in let c an g et bl ocked
and dama ge theappliance.
Page 19

Insert th e dr ain h ose int o ad rain pipe with a minimum diam eter o f 4 0mm, or let it runinto th e sink, making sur e to
avoid bendin g or crimping it. The top of thehose m ust beless than 1000mm.
Front
NOTE
The top of the hose
must be less t han
1000mm .
Drain pipe
A
B
φ 40mm
Counter
How toDrain Excess Water FromHoses
If the sink is 1000 mm higherfrom thefloor, the exc ess wat er in hoses ca nnot bedrained d irectly
into the sink.It willbenecessary to drainexcesswater from hoses into a bowl o rsuitable
container tha t isheld outsi de and lower th anthe sink.
Wat er O u t l et
Connect the wate r dr ain h ose. The drain hose mustbe correctlyfitted t o avoidwater leaks.
Ensure t hat thewater dra in h ose isnot kin ked orsquashed.
Extension Hose
Ifyouneedadrain hoseextension, makesure to use a similar drain hose.
It must b e nolonger th an 4 metres; otherw ise t he c leaning effectof the dishwasher coul d be reduced.
Syphon Conn ection
Insert the drain hose intoa dra in pi pe wi th a minimumdiameter of 40mm, orletit runinto th e sink, making sure to
avoid ben ding or crimping it .The topof the hosemust beless than 1000mm.
Thefollowing thingsshould bechecked beforestartingthe dishwasher.
1
Thedishwasher islevel andfixed properly
The inl et va lv e is ope n
2
3
There i s no lea kage atthe connec ti ons of the conducts
4
Thewires aretightly connected
5
The poweris switchedon
6
The inle t and dr ain ho ses are knotted
7
Allpacking materials and printings shouldbe takenout fromthedishwasher
After installation , pleasemake sure tokeep this manual.
The contentof this manualis very helpfulto the users.
Page 20

Fuse blown, or the home
circuit breakerhas been
triggered.
Power supply is not
turned on
Error code:E1;
Water pressure is low
Replace fuse or reset circuit breaker. Remove any other
appliances sharing the same circuit with the dishwasher
Make sure the dishwasher is turned on andthe door is
closed securely .
Make sure the power cord isproperly plugged into the
wall socket.
Check that the water supply is connected properly and
the water is turned on.
Door of dishwasher
not properly closed.
Kink in drain hose
Filter clogged
Kitchen sink clogged
Improper detergent
Spilled rinse-aid
Detergent with
colourant was used
Hard water minerals
Makesure t o close the door properlyandlatch it.
Check drain hose.
Check the filter
(seesection titled )" Cleaning The Filter "
Check the kitchen sink to make sure it is draining well.
If the problemis the kitchen sink notdraining ,you may
need a plumber rather than a serviceman for dishwashers.
Use only the special dishwasher detergent to avoid suds.
If this occurs, open the dishwasher and let suds evaporate.
Add 1 gallon of c oldwater to the tub. Close and latch the
dishwasher, then select any cycle. Dishwasher will drain
outthe waterat the first step.
Open the door after the draining
has stopped and check if the suds have disappeared.
Repeat if necessary.
Always wipe up rinse-aid spills immediately.
Make sure that the detergent is the one without
colourant.
To clean the interior, use a damp sponge with
dishwasher detergent and wear rubber gloves.
Never use any other cleaner than dishwasher
detergent for the risk of foaming or suds.
The affected items are
notcorrosion resistant.
Aspayarmis
r
knocking against
an itemin a basket
Items of crockery
are loose in the
wash cabinet
This may becaused
by on-site installation
or the cross-section of
the piping.
The items should be corrosion resistant.
Interrupt the programme, and rearrange the items
which are obstructing the sp ay arm.r
Interrupt the programme,
and rearrange the items of crockery.
Thishasno influence onthedishwasher function.
if in do ubt, contact a suitably qualified plumber.
Page 21

The dishes were not
loaded correctly.
See notes in " Loading the Dishwasher Baskets ".
Theprogramme was
notpowerful enough.
Not enough detergent
wasdispensed.
Items are blocking
the path of sp ay arms.r
The filter combination
inthebaseofwash
cabinet is not clean or
is not correctly fitted.
This may cause
the sp ay arm jets
r
to get blocked.
Combination of soft
water andtoomuch
detergent.
Aluminum utensils
have rubbed against
dishes.
Dishes block
detergent cups.
Improper loading
Too little rinse-aid
Select a more intens ive programme.
See" Wash CycleTable ."
Use more detergent, or changeyour detergent.
Rearrange the items so that the sp ay can rotate freely.r
Clean and/or fit the filter combination correctly.
Clean the sp ay arm jets. See "Cleaning the Spray
Arms".
Use less detergent ifyou have soft water and select
a shorter cycle to wash the glassware and to get
them clean.
Use a mild abrasive cleaner to eliminate those marks.
Re-loadin g the dishes properly.
Load the dishwasher as suggested in the directions.
Increase the amountof rinse-aid/refill the rinse-aid
dispenser.
r
Dishes are removed
too soon
Wrong program
has been selected
Use of cutlery with
a low-quality coating
Do notempty your dishwasher immediately after
washing. Open the door slightly so that the st eamcan
escape. Begin unloadingthe dishw asher only once
the dishesare barelywarm to the touch. Empty the low
basket first. This prevents water form dropping off
dishes in the upperbasket.
In short program the washing temperature is lower.
This also lowers cleaning performance. Choose
a program with a long washing time.
Water drainage is more difficult with these items.
Cutlery or dishes of this type are not suitable for
washing in the dishwasher.
When some malfunctions come on, the appliance will display error codes to warn you:
TheSoaklight flickerfleetly
The Glass l ig ht flicker fleetly
Longer inlet time.
Overflow.
Faucets is not opened, or water intake is
restricted,or water pressure is too low.
Some element of dishwashe rleaks .
If overflow occurs, turn off the main water supply before calling service.
If there is water in the base pan because of an overfill or small leak,
the water should be removed before restarting the dishwasher.
Page 22

Height: 845mm
Width : 598mm
Depth : 600mm
(with the door closed)
Waterpressure: 0.04-1.0MPa
Power supply: see rating label
Capacity: 14pla ce settings
Page 23

IN
5
t:3.
t:
rly baske
rly baske
Cutte
Cutte
3.
2
1
3
4
Teaspoons
4
Forks
1
Knives
5
1)
place settings Capacity: 14
place settings
he upper basket: lower Position of t
he upper basket: lower
for comparability tests in
Soup spoons
2
Dessert spoons
accordance with (*AS/NZS 2007.
Voltage:230V/50Hz Voltage:230V/50Hz
3
Information
Capacity: 14
Position of t
Rinse aid setting: 6 Rinse aid setting: 6
Detergent(Pre/main): 5 g/27.5 g Detergent(Pre/main): 5 g/27.5 g
Programme: Normal Programme: Normal
4
1
3
c
a
c
c
c
a
a
a
2
b
a
Cups
c
a
c
a
c
c
5
f
f
Dessert dishes
f
c
Saucers
a
c
c
Glasses
a
c
c
d
Dinner plates
d
e
Soup plates
b
e
a
1.Upper basket:1.Upper basket:
Loading the baskets according to (*AS/NZS 2007.1) : Loading the baskets according to :
IN
c
c
a
a
a
a
a
1919
2.Lower basket:2.Lower basket:
IN
f
b
Page 24

 Loading...