

Page 1

Instructions for the Use and Care and Installation of
BCC905T
Touch Control Cooktop
Page 2

Dear Customer
You will find that the clean lines and modern look of your Blanco cooktop blends in perfectly with your
kitchen décor. It is easy to use and performs to a high standard.
Blanco also makes a range of products that will enhance your kitchen – such as ovens, rangehoods,
dishwashers, microwaves, sinks and taps. There are models to comple- ment your new Blanco cooktop.
Blanco now has a range of laundry products to choose from.
Of course, we make every effort to ensure that our products meet all your require- ments, and our Customer
Relations Department is at your disposal, to answer all your questions and to listen to all your suggestions.
Please complete the warranty section of this manual and keep your receipt as proof of purchase. Retain all
documents relating to the purchase of Bl anco product.
Blanco is committed to providing increasingly efficient products that are easy to use, respect the
environment and are attractive and reliable.
BLANCO
CONTENTS
SECTION PAGE NO.
Safety Warnings 2-3
Description 4-5
Use 6-9
Cooking Guide 10
Cleaning 11
Installation 12-16
Servicing 17
Trouble Shooting 18-19
Technical Data 20
Warranty Card
Page 3

2
SAFETY WARNINGS
The appliance is not intended for use by persons (including children) with reduced
physical, sensory or mental capabilities, or lack of experience and knowledge, unless
they have been given supervised or instruction concerning
responsible person for their safety.
Young children should be supervised to ensure that do not play with the appliance.
If the supply cord is damaged, it must be replaced by the manufacturer or its
service agent or a similarly qualified person in order to avoid a hazard.
Do not use a steam cleaner to clean this appliance.
WARNING: If the surface is cracked, switch off the appliance to avoid the possibility of
an electric shock.
use the appliance by a
This appliance is not intended to be operated by means of external timer or separate
remote control system.
If the electrical supply is restricted, means of all-pole disconnection mus be
accessible and incorporated in the fixed wiring in accordance with the wiring rules.
Danger of fire - Do not store items on the cooking surface.
CAUTION - The cooking process has to be supervised. A short term cooking process
has to be supervised continuously.
WARNING - Unattended cooking on a hob with fat of oil can be dangerous and may
result in a fire. Never try to extinguish a fire with water, but switch off the appliance
and then cover the fire with a lid or fire blanket.
Do not modify this appliance.
Do not use as a room heater.
This appliance is meant for indoor use only.
Failure to follow these usage, installation and maintenance instructions could result in
a safety hazard resulting in injury or death.
Page 4

WARNING FOR USE:
SAFETY WARNINGS
►
The appliance is built to perform the following function, cooking and heating food.
Every other use is considered improper.
►
►
Never use this appliance as a room heater.
►
Do not attempt to change the technical characteristics of the product as it
can be dangerous and can affect your product.
For disposal of this product, ensure it is done in a safe manour and following all local
►
recycling guidelines.
► Do not touch the appliance with wet or damp hands or feet.
► Do not use the appliance barefoot.
► The manufacturer will not be liable for any damage resulting from improper, incorrect
or unreasonable use.
► During, and immediately after operation, some parts of the cook top are very hot: avoid
touching them.
Do Not leave heating elements on when not in use.
►
►
If the ceramic glass hob is not cleaned immediately, there is a risk of residues becoming
encrusted that they will be impossible to remove after the hob has cooled.
►
Before cooking for the first time, it is necessary to clean the hob as follows: switch on the
front heating elements to the maximum for at least 30 minutes, heating pans full of water.
After 30 minutes, switch off the front heating elements and switch on the rear heating
elements plus the central heating element, where possible, to the maximum. This is
necessary to eliminate the“new smell” and to allow any humidity which may have formed
during the production process to evaporate. This is necessary for the correct operation of
the electronic circuits and the control panel. If the controls do not work properly when the
30 minutes are up, there is still some humidity inside, leave the heating elements on until all
the humidity has completely evaporated, then switch off the hob.
Connection to the mains
When cook-top will be connected to power supply, a long beep will be hear. All leds and displays in the
Touch Control will be turned ON during 4 seconds. After an auto adjust period, cook-top go into
standby mode.
3
Page 5

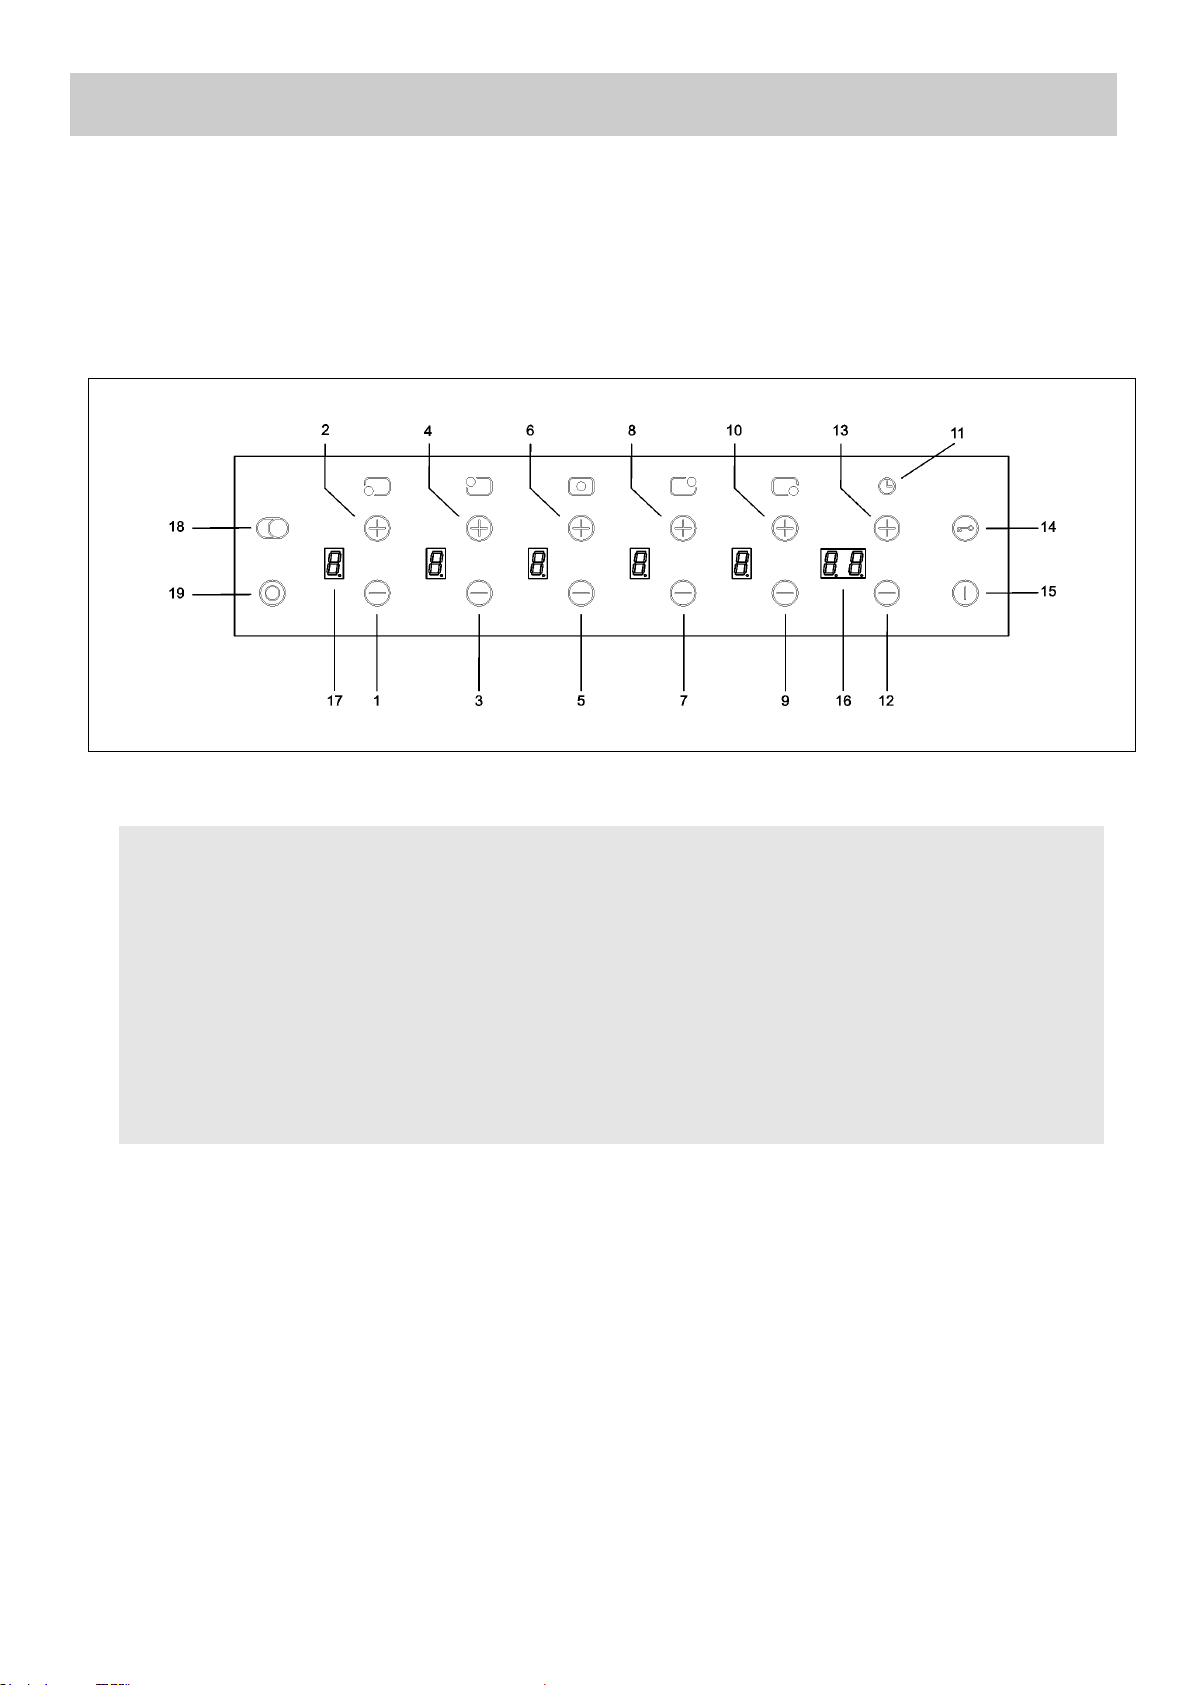
DESCRIPTION
The appliance has 5 cooking zones of different sizes and power levels. The heating elements are of the
Hi-light type, which come on after a few seconds, and the heat is adjusted using the buttons on the
touch control panel, from a minimum of 1 to a maximum of 9.
The cooking zones with concentric or oval disks have a double heating system: in the area inside the
small diameter or over both diameters.
1. 175mm Cooking Zone, 210mm Cooking Zone. 2000 W
2. 140mm Cooking Zone. 1200 W
3. 170mm Cooking Zone, 265mm Cooking Zone. 2400 W
4. 180mm Cooking Zone. 1800 W
5. 140mm Cooking Zone. 1200 W
6. Touch Control Panel
3
2
1
CAUTION:
In case of hotplate glass breakage:
●shut immediately off all burners and any electrical
heating element and isolate the appliance from
the power supply;
●do not touch the appliance surface;
●do not use the appliance.
4
5
6
4
Page 6
DESCRIPTION
BCC905T
1 - heating element 1 – button
2 - heating element 1 + button
3 - heating element 2 – button
4 - heating element 2 + button
5 - heating element 3 – button
6 - heating element 3 + button
7 - heating element 4 – button
8 - heating element 4 + button
9 - heating element 5 – button
10 - heating element 5 + button
11 - Timer symbol
12 - Clock programming – button
13 - Clock programming + button
14 - Safety lock button
15 - ON/OFF button
16 - Timer display
17 - Capacity levels display (0 - 9)
18 - Double cooking zone button (oval)
19 - Double cooking zone button
(concentric)
5
Page 7
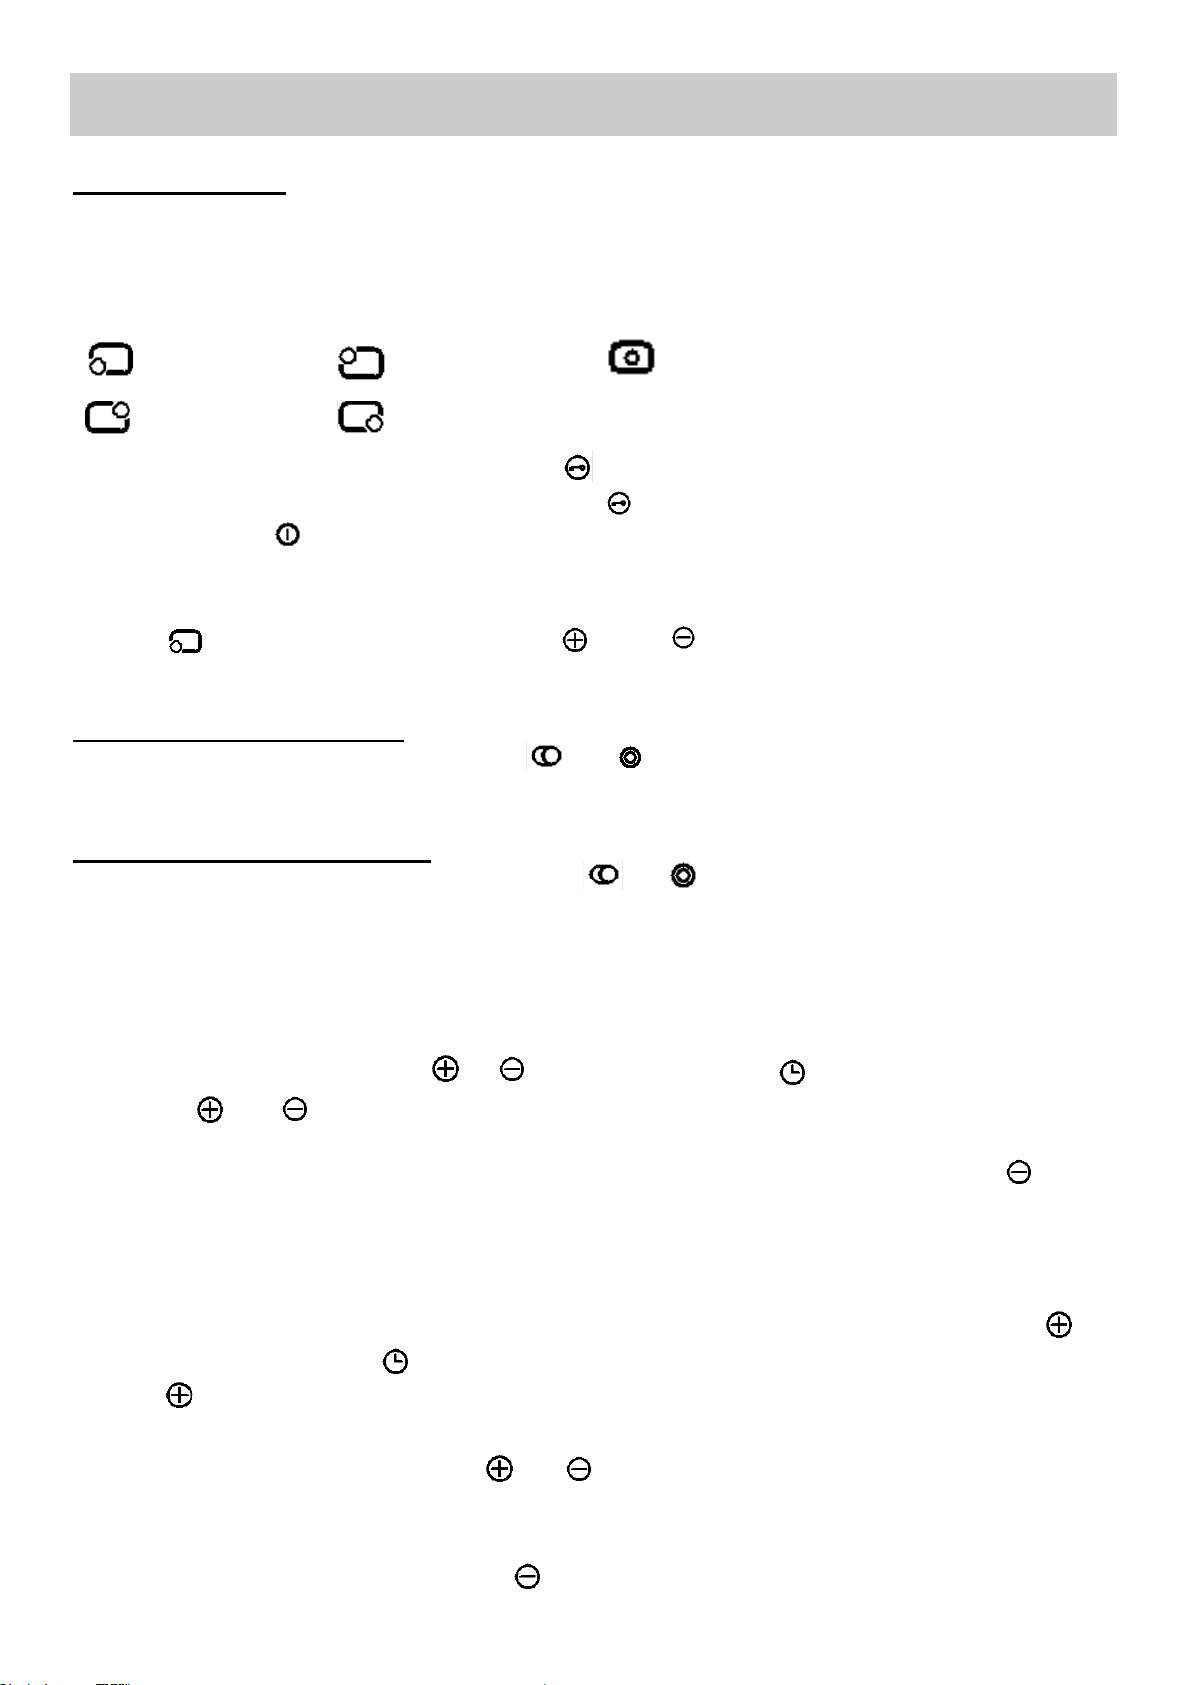
USE
Model BCC905T
Every time that a button is pressed, it is confirmed by a check beep. The functions of hobs that use this
type of technology are activated by gently pressing the serigraph buttons on the surface of the hob. The
first time the hob is connected to the electricity supply, an operating check will be run automatically and all
the warning lights will come on for several seconds.
LEFT FRONT LEFT REAR CENTRAL
RIGHT REAR RIGHT FRONT
When the hob is in standby, the safety lock button is active and the relative LED is on.
After removing the safety lock button (pressing the
pressing the button for 2 seconds.
If no function is activated within 10 seconds of switching on the hob, it switches off automatically.
The associated cooking zone is indicated next to each control area. Identify the cooking zone to be
activated ( ) and activate it using the buttons and to regulate the level of cooking
required on a user scale of 1 (minimum) to 9 (maximum).
symbol for 2 seconds), switch on the hob by
Double cooking area activation
After activating the cooking zone, press the or
depending on whether the plate is concentric or oval.
Double cooking area deactivation
When the double cooking zone is active, press the or
deactivated.
button and the double zone led will light up,
button and the corresponding LED will be
MINUTE MINDER
There is a minute minder for setting cooking zone run times from 1 to 99 minutes.
To set the minute minder, turn on the cook top, select a cooking zone and set the desired cooking setting.
Once this has been done, press the or below the timer symbol . Set the desired time by
pressing the and sy buttons. The Minute Minder will begin 5 seconds after the last key has been
pressed. When the time has ended, there will be 2 beeps at 3 second intervals for one minute. The
minute minder function does not deactivate the cooking zone. To stop timer mid cycle, use the
to decrease the time to 0.
button
TIMER
There is a timer for setting cooking zone run times from 1 to 99 minutes.
To set the timer, turn on the Hob and select the desired cooking zone and setting. Press the
button under the timer icon .This will cause all zones to flash "t" in the display.
Press the button of the required cooking zone. This will cause the cooking setting to flash alternately
with "t", this shows that the timer has been activated for this zone.
Set the desired cooking time by using the and buttons under the timer symbol.
The timer will indicate that it is set by have a dot next to the time shown.
When the time has ended, the cooking zone will turn off and there will be 2 beeps at 3 second intervals for
one minute. To stop timer mid cycle, use the button to decrease the time to 0.
6
Page 8

USE
HEAT-UP FUNCTIONS
This function takes the cooking level to maximum power for a defined time.
Activate the heat-up function
After removing the control panel lock (pressing the symbol for 2 seconds), switch on the hob by
pressing the button
Power level
1 2 3 4 5 6 7 8
Time (sec.) 1’12’’ 2’44’’ 4’48’’ 5’28’’ 6’30’’ 1’12’’ 2’44’’ 2’44’’
FIG. A
FIG. B
Select the desired cooking zone, then use the button to increase the cooking level to 9 (Maximum
and press the again. Once this is done the display will show the power level blinking with a blinking
dot for 10 seconds (Fig A, B) during which time the desired power level must be selected. Confirm the
power level by not pressing any button for 5 seconds. After this time, a beep sounds and the dot is fixed
on the display with the selected cooking level. This indicated that the Heat Up Function is on.
Deactivate the heat-up function
To deactivate the heat up function, hold the button of the selected cooking zone and wind down the
cooking level to 0.
for a 2 seconds.
7
Page 9

USE
LOCK FUNCTION
Lock function ( ): this function prevents the hob from being switched on accidentally (childproof
safety device). To activate it, the button must be pressed for three seconds (the warning light comes
on). It is not possible to adjust the heated areas when is active. While the cooking zones are still
working, it is possible to switch off the heating areas in . This function is deactivated by pressing the
button for two seconds, for all configurations.
RESIDUAL HEAT
Every plate has a device to indicate the presence of residual heat. After any plate has been switched off,
a flashing light may be shown on the display. This signal indicates that the particular cooking area is
still very hot. It is possible to start cooking food when the light is flashing, reactivating the cooking
zone required.
SWITCHING OFF THE COOKING ZONES
When the Cooking zones are switched off, the operating power display indicates 0.
The Cooking zones will be automatically deactivated 5 seconds after the display indicates 0. If the
cooking zones are hot, the residual heat indicator will appear after they are switched off .
SWITCHING OFF THE HOB
The hob is switched off by keeping the button pressed for one second, even with the cooking
zones in operation. All the plates will be deactivated and the hob will be switched off completely. If the
cooking zones are hot, the residual heat indicator will appear a few seconds after the hob is switched
off.
AUTOMATIC SAFETY OFF
If the power level is not changed during a present time, the corresponding heater turns off automatically.
The maximum time a heater can stay on, depends on the selected cooking level.
Power level Max. time on (hours)
1 10
2 5
3 5
4 4
5 3
6 2
7 2
8 2
9 1
8
Page 10

WARNINGS:
for a correct use, please look at fig. 1 and
remind:
- switch on the electricity only after having
placed the pot on the cooking zone.
- Use pots and pans with flat solid bottoms.
- Use p ots wit h th e same d i ameter o f the
cooking zones.
- Dry the bottom of the pot before put in on the
cooking zones.
- Do not scrape the pot against the glass so to
not damage it.
- During the use of the cooking zones, please,
keep the children away from the hot plates.
Pay close attention to children, because they
are unlikely to see the letter “H” indicating
that the plates are still hot. After using the
hob, the heating areas remain very hot for
some time, even after being switched off. Do
not allow children to place their hands on the
hob. After using the hob, always check that
the controls are in the “0” (off) position.
Make sure that the handles of the pots are
placed in the right way towards the interior.
Be aware that overheated fats and oils may
become inflamed.
- Cooking zones after using remain warm;
don’t leave objects, don’t lean your hands so
to avoid burns, till the indicator light is off.
- If the glass cracks, please, disconnect the
appliance.
- Don’t use plastic pots or alluminium sheets.
- Don’t use hob as a supplementary surface.
USE
FIG. 1
Note:
In order to avoid any undesired disturbance on the touch control,
place correct pots inside the marked place of the glass ceramic
surface (see fig. 1).
In order to cook with the cooking zone
efficiently using the least amount of
energy, use: thick,
flat-bottomed pots of a width suited to that
of the cooking zone (see picture). Cook
with the lid on to also save energy. Turn
down the heating element when it
reaches boiling point.
9
Page 11

COOKING GUIDE
The table below indicates the power values that can be set and the type of food to prepare is shown next
to each one. The values can change according to the amount of food and consumer preference.
TABLE
Touch control
positions
1
1 - 3
4 - 8
5 - 9
9 - P
Cooking
operations
To melt butter, chocolate
and else.
To heat small amounts of
liquid and to keep dishes
warm.
To heat larger amonts of
liquid; to prepare creams
and sauces reui ri ng
lenththy cooking times.
To cook foods that have to
be boiled, fo r de l ic ate
roastmeats and fish.
To boil large amounts of
liquid, to fry.
10
Page 12

CAUTION:
do not place the glass directly on the unit.
The bottom of the hob must rest on the unit.
CLEANING
FIG. 2
FIG. 3
- slights stains: it is enought the use of a moist clean
rag.
- Burnt or soiling may be removed with a special
razor scraper (fig. 2); be aware that the razor
can cause wounds.
- Marks of liquid, overflowed from the pot, can be
removed using vinegar or lemon.
- Pay attention to not let fall sugar or element with
sugar. In this case turn the switch off and clean
the surface with hot water and the razor blade
scraper.
- After a period of time may appear metal reflex and
scratches (fig. 3) due to the wrong cleaning and
the wrong use of the pots. The scratches are
difficultly removable, but they do not compromise
the good working of the hob.
- Don’ t use st e am jets f or the eq ui pm en t
cleaning.
Before any cleaning operation, disconnect the
appliance from the electric circuit.
If you want to preserve the surface clean and
bright, we recommend you to use a silicone
conditioner. The use of this conditioners, prior to
jam-making, helps to protect the surface of
the hob. This protective film is not durable, so it
is advisable
frequently.
It is very important to clean the surface soon after
every use, when the glass is still tepid.
Do not use metallic sponges, powder abrasives or
corrosive sprays.
Depending on the dirty level we recommend:
to repeat the application of the product
11
Page 13

INSTALLATION
TECHNICAL INSTRUCTIONS
FOR THE INSTALLER
Installation, transformations and maintenances
below listed, m ay only be carried out by a
competent technician.
The appliance must be correctly installed in
con form ity wit h cu rren t la w an d th e
manufacturer's instructions.
A wrong installation may provoke damages to
persons, animals or things, for which the builder
can not be responsible.
Throughout the life of the system, the devices
for the safety and automatic regulation of the
applia n ce s must only be modifi ed by the
manufacturer or the duly authorised supplier.
COMPLY WITH THE DIMENSIONS (in mm)
A B C D E F
FIG. 4 FIG. 5
IMPORTANT: a perfect installation, adjustment or transformation of the cook top to
use o ther gase s req uire s a QUA LIFI ED
INSTALLER: a failure to follow this rule will
void the warranty.
After having clear
components, make sure of the integrity of the
appliance.
If you are in any doubt, do not use the appliance
and contact qualified personnel.
The packing elements (cardboard, bags,
polystyrene, nails...) must not be left within the
reach of children as they are potential sources
of danger.
Make a cutout in the worktop, according to the
dimensions indicated in fig. 4; make sure that will
be respected the critical dimensions of the space in
which the appliance has to be installed (fig. 5).
In order to avoid accidental contact with the
surface of the box of the overheated hob during
use, it is necessary to install a wooden divider at a
minimum distance of 120 mm from the top,
fastening it in place with screws (fig. 4).
ed out all the packing
(90) 860
490 55
55
60 min.
min. 120 mm
12
Page 14

Model BCC905T
INSTALLATION
FIG. 6
A special sealing strip underneath the hob for
damage. Make sure it is correctly positioned with no
gaps; it avoids any water infiltration. To fix in the right
way th e stri p, ple ase, re spec t the fo llow ing
instructions:
- remove all the mobile parts of the hob.
- Cut the seal into 4 strips of the lengths suitable
to fit it along the 4 sides of the glass.
- Overturn the hot plate and correctly position seal
“E” (fig. 6) under the edge of the hot plate itself,
so that the outer si d e of t h e sea l p er f ect l y
matches the outer perimetral edge of the crystal.
The ends of the strips must fit together without
overlapping.
- Position the hob in the hole in the unit and fasten
it in place using the appropriate screws “F” of the
fastening hooks “G” (see fig. 7 for model 30
cm., 77 cm. and 90 cm.; fig. 7/A - 7/B for
model 60 cm.).
- In order to avoid accidental contact with the
surface of the box of the overheated hob during
use, it is necessary to install a wooden divider at
a minimum distance of 120 mm from the top,
fastening it in place with screws (fig. 4).
- To fasten this product to the supporting structure,
we advise you not to use mechanical or electrical
screwdrivers and to exercise moderate pressure
by hand on the fastening hooks.
WARNINGS:
be aware that the glue that join the laminated
pla stic t o the fu rnit ure, h as to r e sis t t o
temperature not below 150 °C, to avoid the
unstuck of the panelling.
The rear wall, adjacent and surrounding surfaces
mus t ther efor e be abl e to wit hst a nd an
temperature of 90 °C.
FIG. 7
MAINTENANCE SCHEDULE
Clean the cooktop surface after every use as specified within this manual.
13
Page 15

INSTALLATION
BCC774T
POSITION HOOKS ON THE BOTTOM
FIG. 7/A
FIG. 7/B
POSITION HOOKS ON THE BOTTOM
Model BCC905T
Warning:
fix the five hooks in the front and back!
14
Page 16

INSTALLATION
The electrical connection has to be done in
accordance with all electrical and installation
requirements of the regulation.
Before proceeding with the connection, please,
verify that:
- the voltage matches the value shown on the
specification plate and the section of the wires of
the electrical system can support the load, which
is also indicated on the specification plate.
- the power of the electrical system and the power
of the outlets is adequate to the maximum power
of the appliance (see the identification label in
the lower part of the body).
- The outelets and all the electrical system has an
efficient connection to the "earth" according with
the Regulation. We disclaim all responsabilities
for not observing such points.
When the connection to the input system has
been done through a outlet:
- apply to the input cable "C", if unprovided, a
normalized plug adequate to the load indicated
in the identification label. Connect the cables
according to the scheme of fig. 8 - 9 - 10 - 11,
making sure to respect the undermentioned
respondences:
Letter L (Live) = cable brown colour;
Letter N (Neutral) = cable blue colour;
Symbol (Earth) = cable green - yellow colour.
- The input cable has to be located so that never
reach the over temperature of 90 °C.
- P leas e d o n ot use in th e c onn e cti on any
reduction, adaptation that may provoke a false
contact with following dangerous overheatings.
- The outlet must be accessible after the built-in.
When the connection has been done directly to
the input system:
-
interpose between the appliance and the system
an onnipolar switch, in compliance with current
installation regulations, with a minimum aperture
between contacts of 3 mm.
- Keep in mind that the "earth" cable does not
have to be interrupted by the switch.
- The electrical connection can also be protected
by a differential switch with high sensitivity.
We recommend to fix the earth coloured cable to
an appropriate earth installation.
Before performing any service on the electrical
part of the appliance, it must absolutely be
disconnected from the electrical network.
WARNINGS:
all ou r pr oduc ts are con form wi t h t he
European Norms and relative amendments.
The product is therefore conform with the
requ ir emen t s of th e Europ ean Di r ectiv es
in force relating to:
- compatibility electromagnetic (EMC);
- electrical security (LVD);
IMPORTANT: the appliance must be installed
following the manufacturer's instructions.
The manufacturer will not be liable for injury
to persons or animals or property damage
caused by an incorrect installation.
If the installation requires modifications to
the home's electrical system or if the socket
is incompatible with the appliance's plug,
have changes or replacements performed by
professionally-qualified person. In particular,
this person must also make sure that the
section of the wires of the socket is suitable
for the power absorbed by the appliance.
- restriction of use of certain hazardous
substances (RoHS);
- EcoDesign (ERP).
15
Page 17

INSTALLATION
FIG. 9 FIG. 10
FIG. 11
BCC905T
16
Page 18

SERVICING
Always disconnect the appliance from the
electricity main before proceeding with any
servicing operation.
7) REPLACING THE ELECTRICAL
COMPONENTS
For a ccess to the v ario u s parts , remo v e the
hotplate from the top of the cabinet. Then overturn
it, unscrew screw and remove under the bottom.
After these actions is possible to work on the
plates, commutators, clamps and input cable.
For maintenance of the cable you need to reverse
the hob.
WARNING: MAINTENANCE MUST ONLY BE
PERFORMED BY AUTHORISED PERSONS.
In case of failure or cut in the cable, please move away from the cable
and do not touch it. Moreover the device must be unplugged and not switched on. Call the nearest authorized service center to fix the problem.
N.B. In case of substitution of the input cable,
the installer must keep the “earth” conductor
longer than “live” ones, and must respect the
cautions in paragraph “Electrical connection”.
To reassemble the appliance repeat the inverse
process.
17
Page 19

If you encounter a problem, it frecuently will merilly be something minor. So, before you call customer
service, consider the following suggestions and instructions:
The cooktop is not working
→
Che ck th e co ndit ion of t he f uses /cir cuit
breakers at your location . Che ck to see if
you are experiencing a power failure.
The cooktop has turned itself off
→
The main switch (ON/OFF key) was accidentally
touched or there is any object above any key.
Turn the unit on again without any object about
the keyboard. Enter your settings again.
REPAIRS
→
Repairs may only be performer by trained
customer service technicians.
WARNING:
If your unit is repaired in an
unprofessional manner, you may be
exposed to substancial risks.
Display F and numbers
→
If F and numbers appears in the display, your
unit has detected a fault. The following table list
actions you can take to correct the problem.
Heater
display
Fault Action
F0
Touch control
software error.
If error has occurred after initial calibration
disconnected and connect again the cooktop to
the power supply. If error persist, call after-sales
service. If error appears suddenly in a normal
operation, call after-sales service.
Fc
Touch control zone is too
hot and has turned off all
the heaters.
Wait until temperature goes down. Cook-top will
automatically recovered when temperature reaches a normal value.
Ft
Touch control temperature
sensor can be damaged.
Wait until temperature goes down. If message
persist when temperature reaches an environment value, call after-sales service.
TROUBLESHOOTING
18
Page 20

TROUBLESHOOTING
Heater
display
Fault Action
FE
Touch control temperature
sensor can be damaged.
Wait until temperature goes down. If message persist when temperature reaches an environment value, call after-sales service.
Fb
Excessive sensitivity
on any key.
See if cook-top is mounted correctly. Be sure
that keys touch correctly the glass surface.
FU / FJ
Security keyboard
error
This error is a keyboard auto-check. It disappears when auto-check return to secure value.
If error persist, call after-sale service.
FA
Security software
error
This error is a software auto-check. It disappears when auto-check return to secure value.
If error persist, call after-sale service.
FC / Fd
Security software
error
This error is a software auto-check. It disappears when auto-check return to secure value.
If error persist, call after-sale service.
Fr
Relays security
error
Any relay driver can have any problemn. Remove cook-top from the power supply, wait a minute and switch on again. If error persist, call aftersale service.
19
Page 21

TECHNICAL DATA
TYPE AND SECTION OF THE POWER CABLES (FOR 4/5 HEATING ELEMENTS)
TYPE OF HOBS
Hob with 4 heating
element “hi-light”
Hob with 5 heating
element “hi-light”
CABLE
TYPE
(rubber -
polychloroprene)
H05 RN - F
H05 RR - F
H07 RN - F
H05 RN - F
H05 RR - F
H07 RN - F
Single phase
power
230 V~
220 V~
220-240 V~
230-240 V~
3 x 2.5 mm
3 x 2.5 mm
3 x 2.5 mm
3 x 2.5 mm
3 x 2.5 mm
3 x 2.5 mm
2
2
2
2
2
2
(*)
(*)
(*)
(*)
(*)
(*)
Three phase
power
400 V 3N~
380 V 3N~
380-415 V 3N~
400-415 V 3N~
2
5 x 1 mm
5 x 1 mm
5 x 1 mm
5 x 1 mm
5 x 1 mm
5 x 1 mm
(*)
2
(*)
2
(*)
2
(*)
2
(*)
2
(*)
Two phase
power
400 V 2N~
380 V 2N~
380-415 V 2N~
400-415 V 2N~
2
4 x 1.5 mm
4 x 1.5 mm
4 x 1.5 mm
4 x 1.5 mm
4 x 1.5 mm
4 x 1.5 mm
(*)
2
(*)
2
(*)
2
(*)
2
(*)
2
(*)
BCC905T
MODEL 5 HEATING ELEMENTS (90 cm.)
(3 HI-LIGHT + 1 HI-LIGHT with conc. double zone + 1 HI-LIGHT with oval double zone)
Voltage 220 - 240/400 - 415 V 3N ~
Frequency 50/60 Hz or 50 Hz or 60 Hz
Tot. rating 8600 W
20
Page 22

AUSTRALIAN & NEW ZEALAND PRODUCT WARRANTY
STATEMENT OF STANDARD WARRANTY CONDITIONS
AUSTRALIAN CUSTOMERS
Our goods come with guarantees that cannot be excluded under the Australian Consumer Law. You are entitled to a replacement or refund
for a major failure and for compensation for any other reasonably foreseeable loss or damage. You are also entitled to have the goods
repaired or replaced if the goods fail to be of acceptable quality and the failure does not amount to a major failure.
NEW ZEALAND CUSTOMERS
Nothing herein contained shall be construed in any way as excluding or limiting your rights under the Consumer Guarantee Act 1993.
OUR WARRANTY
This product is also covered by the manufacturer's warranty set out in this document (Our Warranty).
Our Warranty is for a period of twenty four (24) months from the date of purchase and for dishwasher & refrigeration appliances will
have an additional thirty six (36) months after the first twenty four (24) months on the wash motor for dishwashers & on the Sealed
System (PARTS only Compressor & condenser etc) for refrigeration appliances. The labour cost to replace these parts is the
responsibility of the customer.
This is in addition to (and does not exclude, restrict or modify) any rights or remedies to which you may already be entitled under the
Australian consumer Law or the New Zealand Consumer Guarantee Act 1993 relating to this product.
Our Warranty (which is subject to the conditions below) covers rectification free of charge of any fault arising from defective materials or
components, or faulty workmanship. The product will be repaired or replaced at the option of Blanco, and all costs of installation, removal,
cartage, freight travelling expenses and insurance are to be paid by the customer.
Our Warranty is subject to the following conditions:
1. That the purchaser contact Blanco prior to any product repair.
2. That the purchaser carefully follows all instructions provided with the product and complies with all relevant electrical & plumbing
regulations in their State when installing the product.
3. That the purchaser carefully follows the instructions provided in the owner’s handbook relating to the proper use and care of the
product and does not use the product for any purpose other than the DOMESTIC use for which it has been designed. If the
appliance is used in commercial applications or for rental purposes, Our Warranty is limited to a warranty of Twelve (12) months
covering all parts with Three (3) months on any labour cost of service or repair.
SERVICE AREA
The provision of service under Our Warranty is limited by the boundary / territory area of the nearest service centre. Travelling cost incurred
for service outside this area is not covered by Our Warranty and service will incur commercial cost to be paid by the customer regulated by
the number of kilometres travelled beyond the service area. These costs will be disclosed to you for acceptance by you prior to your claim
being processed.
Microwave ovens must be returned to your nearest Authorised Service Centre for repair as they are a carry in serviceable appliance.
WHAT IS COVERED: By Our Warranty
During the warranty period, Blanco or its authorised Service Centre will at no extra charge, if your appliance is readily accessible without the
need of special equipment and subject to the terms and conditions of this warranty, repair or replace any parts which it considers defective.
WHAT IS NOT COVERED: By Our Warranty
1. Products installed damaged or incomplete or not in compliance with the relevant electrical & plumbing regulations in their State.
2. Normal wear and tear e.g. cleaning, light globes, filters etc.
3. Failure resulting from power surges and electrical storms.
4. Insect or vermin infestation.
5. Unauthorised repairs or use of non genuine Blanco parts.
6. Any failure caused by the product not being used in accordance with the instruction and the installation manual provided with the product.
7. Misuse or abuse, including failure to properly maintain or service.
8. The clearing of blockages in pumps and hoses.
9. Damage which occurs during delivery or installation.
10. Claims to product surface coating due to liquid or solid spill-overs, accidental damage or damage caused from cleaning products not
recommended by Blanco.
HOW TO CLAIM OUR WARRANTY
You will need to contact Blanco in Australia or New Zealand by using the contact details below.
IN AUSTRALIA
Blanco is distributed by Shriro Australia Pty Ltd
Locked Bag 5002, Kingsgrove, NSW, 2208 Phone:
1300 795 572 Fax: 1800 686 413
Email: customercare@shriro.com.au
Web: http://www.blanco-australia.com/
IN NEW ZEALAND
Blanco is distributed by Monaco Corporation
(Member of Shriro Australia Pty Ltd)
PO Box 4399, Shortland St, Auckland, 1140
Phone: 09 415 6000 Fax: 09 415 7060
Email: service@shriro.com.au
Web: http://www.blanco-australia.com/
Note: Please complete the following details when you have unpacked the product and staple this card with the purchase
invoice or sales docket.
Model No………………………………………… Serial No………………………………………
Date of Purchase……………………………..… Retailer……………………………………….…
 Loading...