

Page 1
Set-up Guide (24v OUTDOOR CPE)
CPE The Bridge
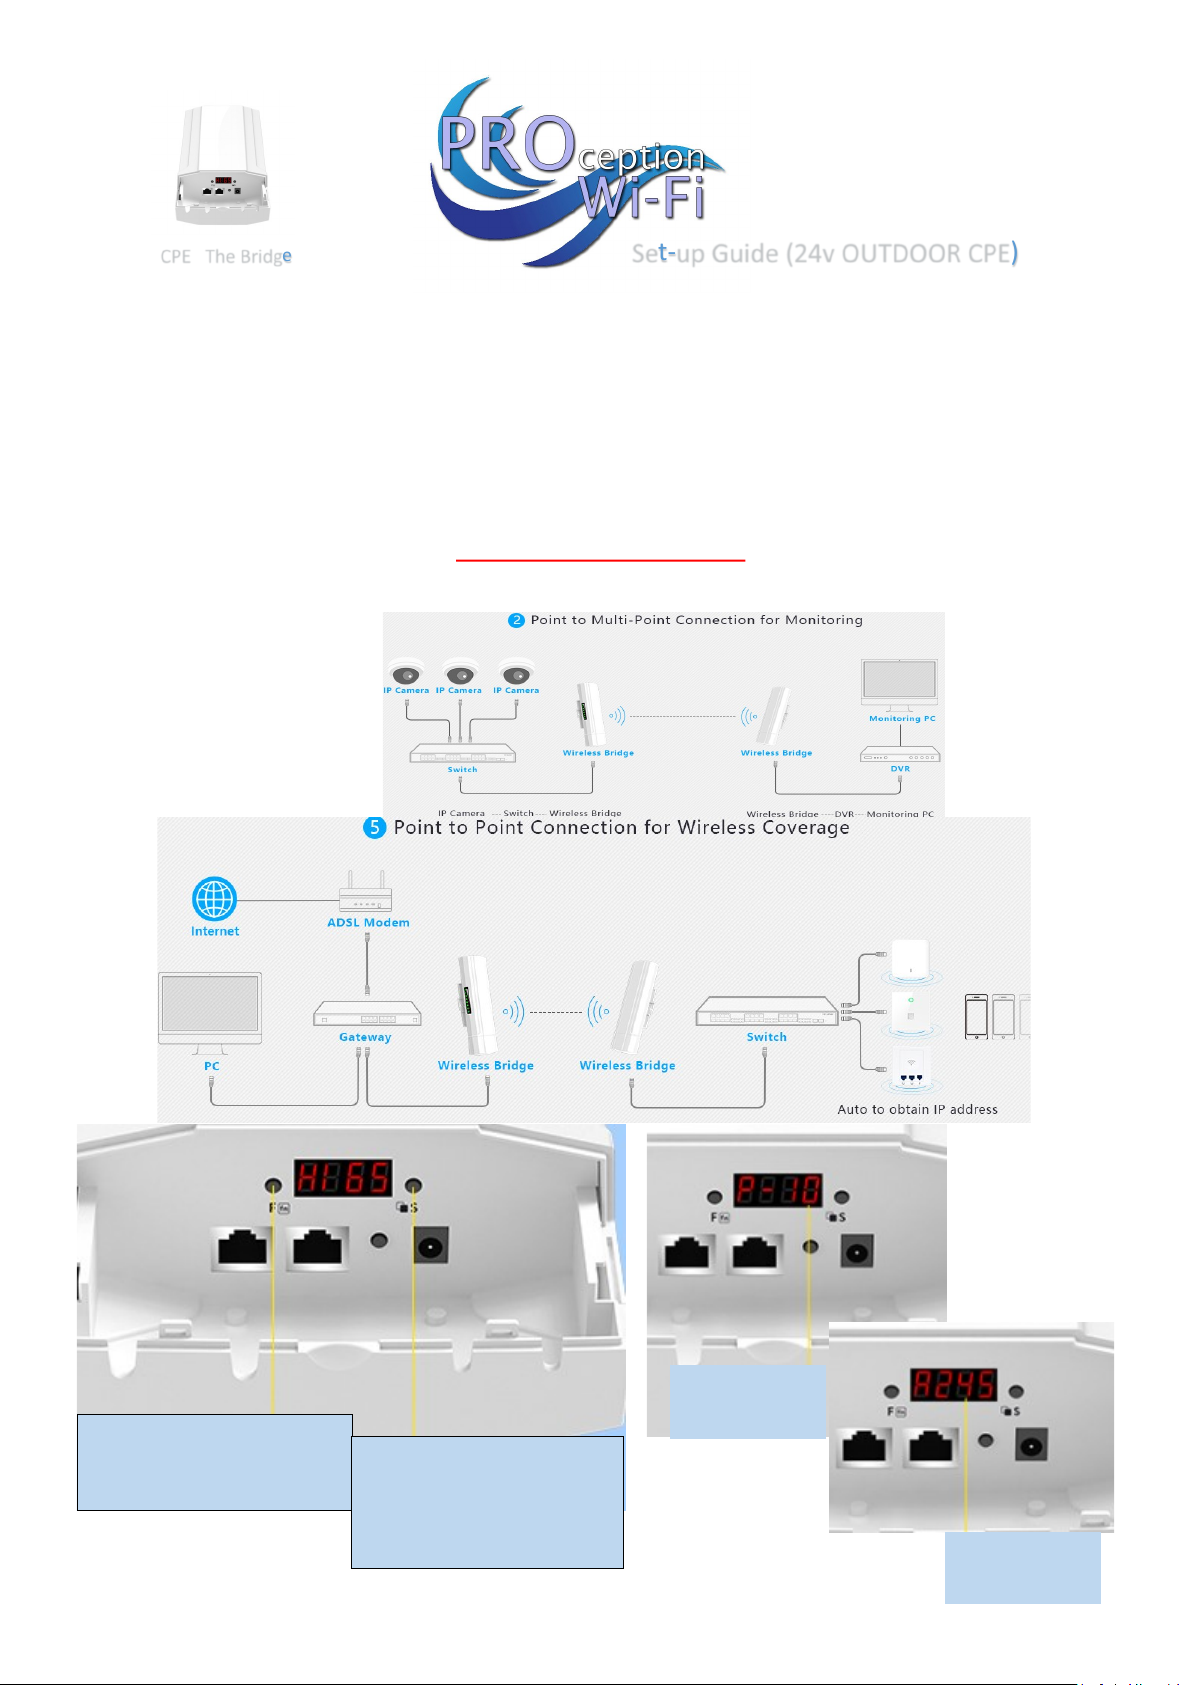
Press F Key to enter setup mode
H means Host/Master AP
C means Client/Slave AP
Press S Key & Set One unit to
Host (H) and the other to Client
(C) choose the same channel on
both units
Showing
Signal Strength
Showing
IP Address
Outdoor CPE/Bridge with LED display, High power industrial 5G outdoor CPE/Bridge with the next generaon 802.11ac
Wi-Fi standard, 802.11 ac/b/g/n 5 GHz 900 Mbps, MIMO 15dBi Dual Polarized High Gain Antenna, 500mW RF Power,
Mul-Mode, Support Mul SSID up to 4, PTP/PTMP, 5KM+ Distance Coverage. 802.11ac Wi-Fi and 2*2 MIMO technology,
900Mbps wireless speed. Equipped with Gigabit Ethernet port ensures high speed internet access and more end users
access.
4 in 1 Operaon Mode Wireless AP, Gateway, Wireless Bridge & Super WDS, Supports HI-MAX TDMA Technology, Sup-
port Mul SSID up to 4, Support Beamforming Technology, MIMO High Gain Omni 15dBi Internal Antenna, 802.11ac,
2T2R 900M MIMO Technology, 8MB Flash, 64M DDR2 RAM,
Supports 24V Passive PoE
Page 2
Set-up Guide (24v OUTDOOR CPE)
CPE The Bridge
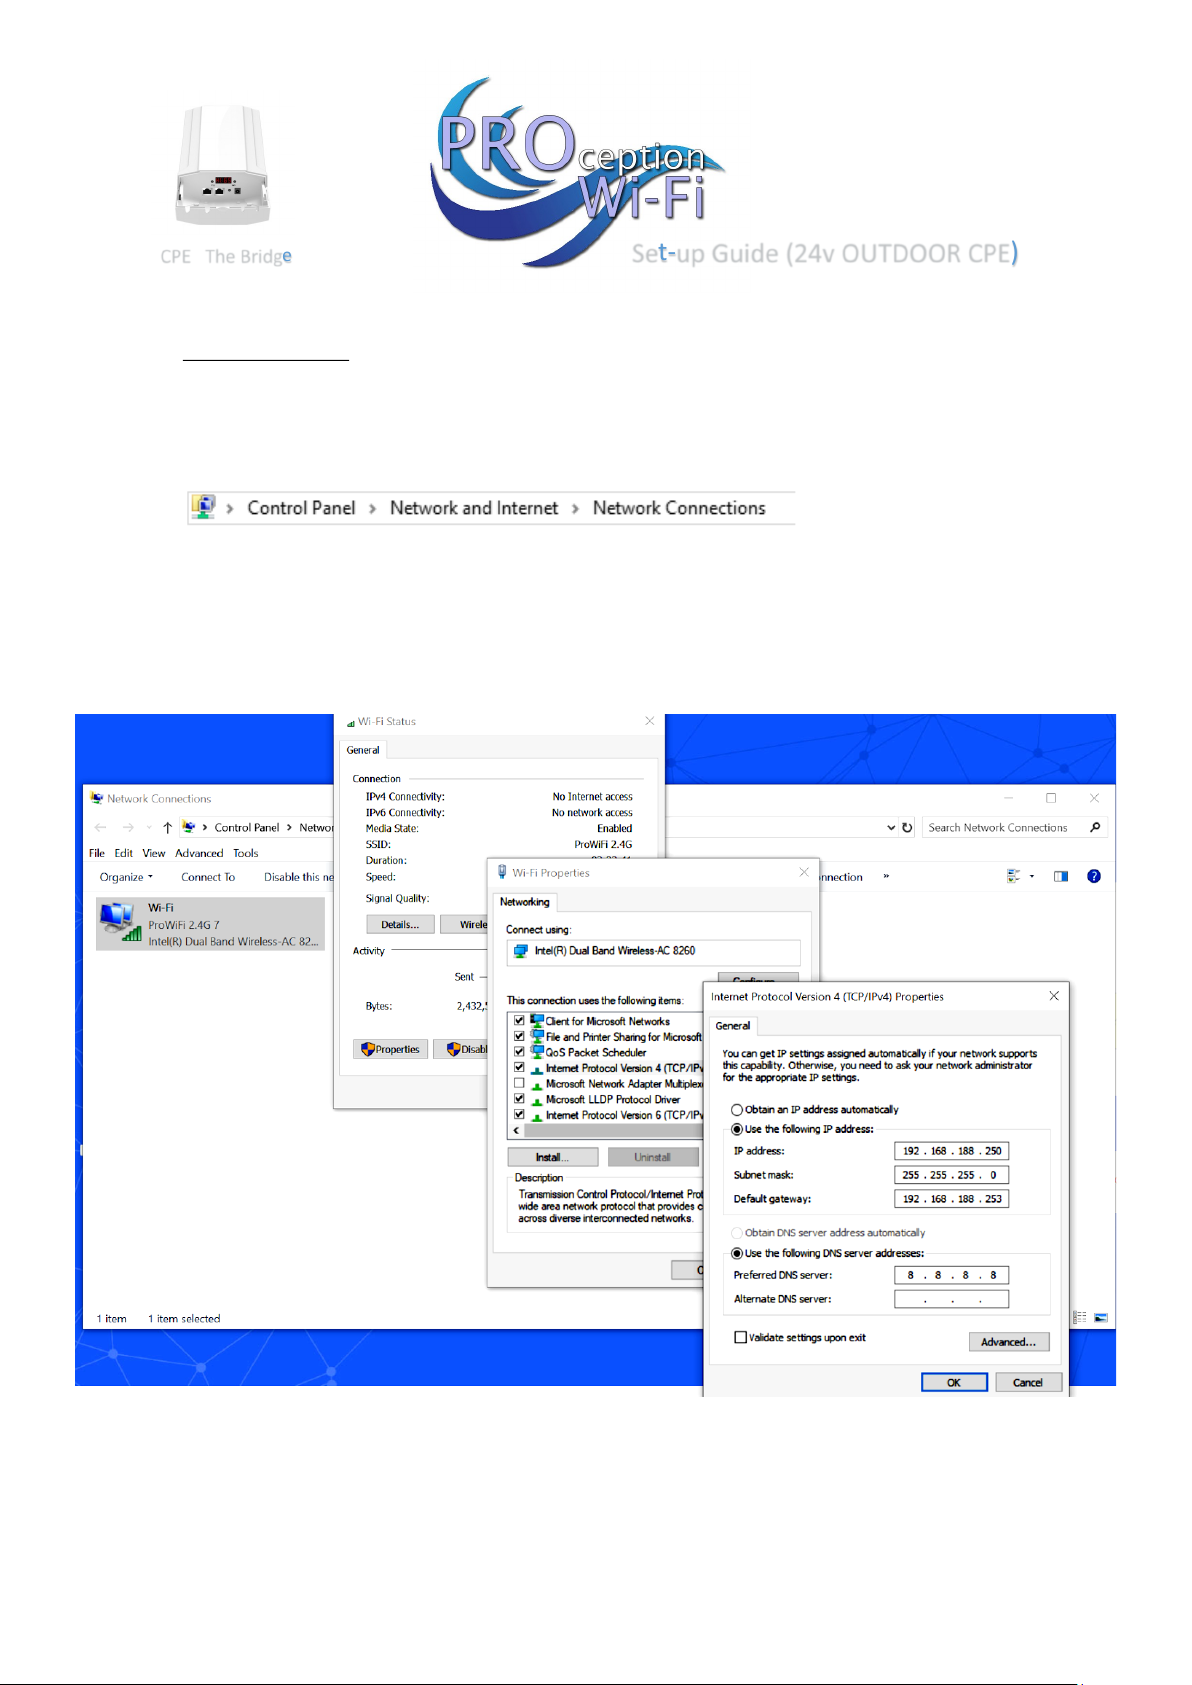
1. Connecng to setup
If you are connecng the outdoor CPE to the PC via the cable network socket
or Wi-Fi (ProWiFi 5G) password 4wG7cZXd
You will need to change the Network sengs of your PC to stac.
The sengs can be found in
Set the IP of the computer to 192.168.188.250
Set the Subnet mask 255.255.255.0
Set the Default gateway to 192.168.188.253
You can now access the login interface by going to 192.168.188.253 in your browser
Enter the default password admin on the login screen.
Page 3
Set-up Guide (24v OUTDOOR CPE)
CPE The Bridge
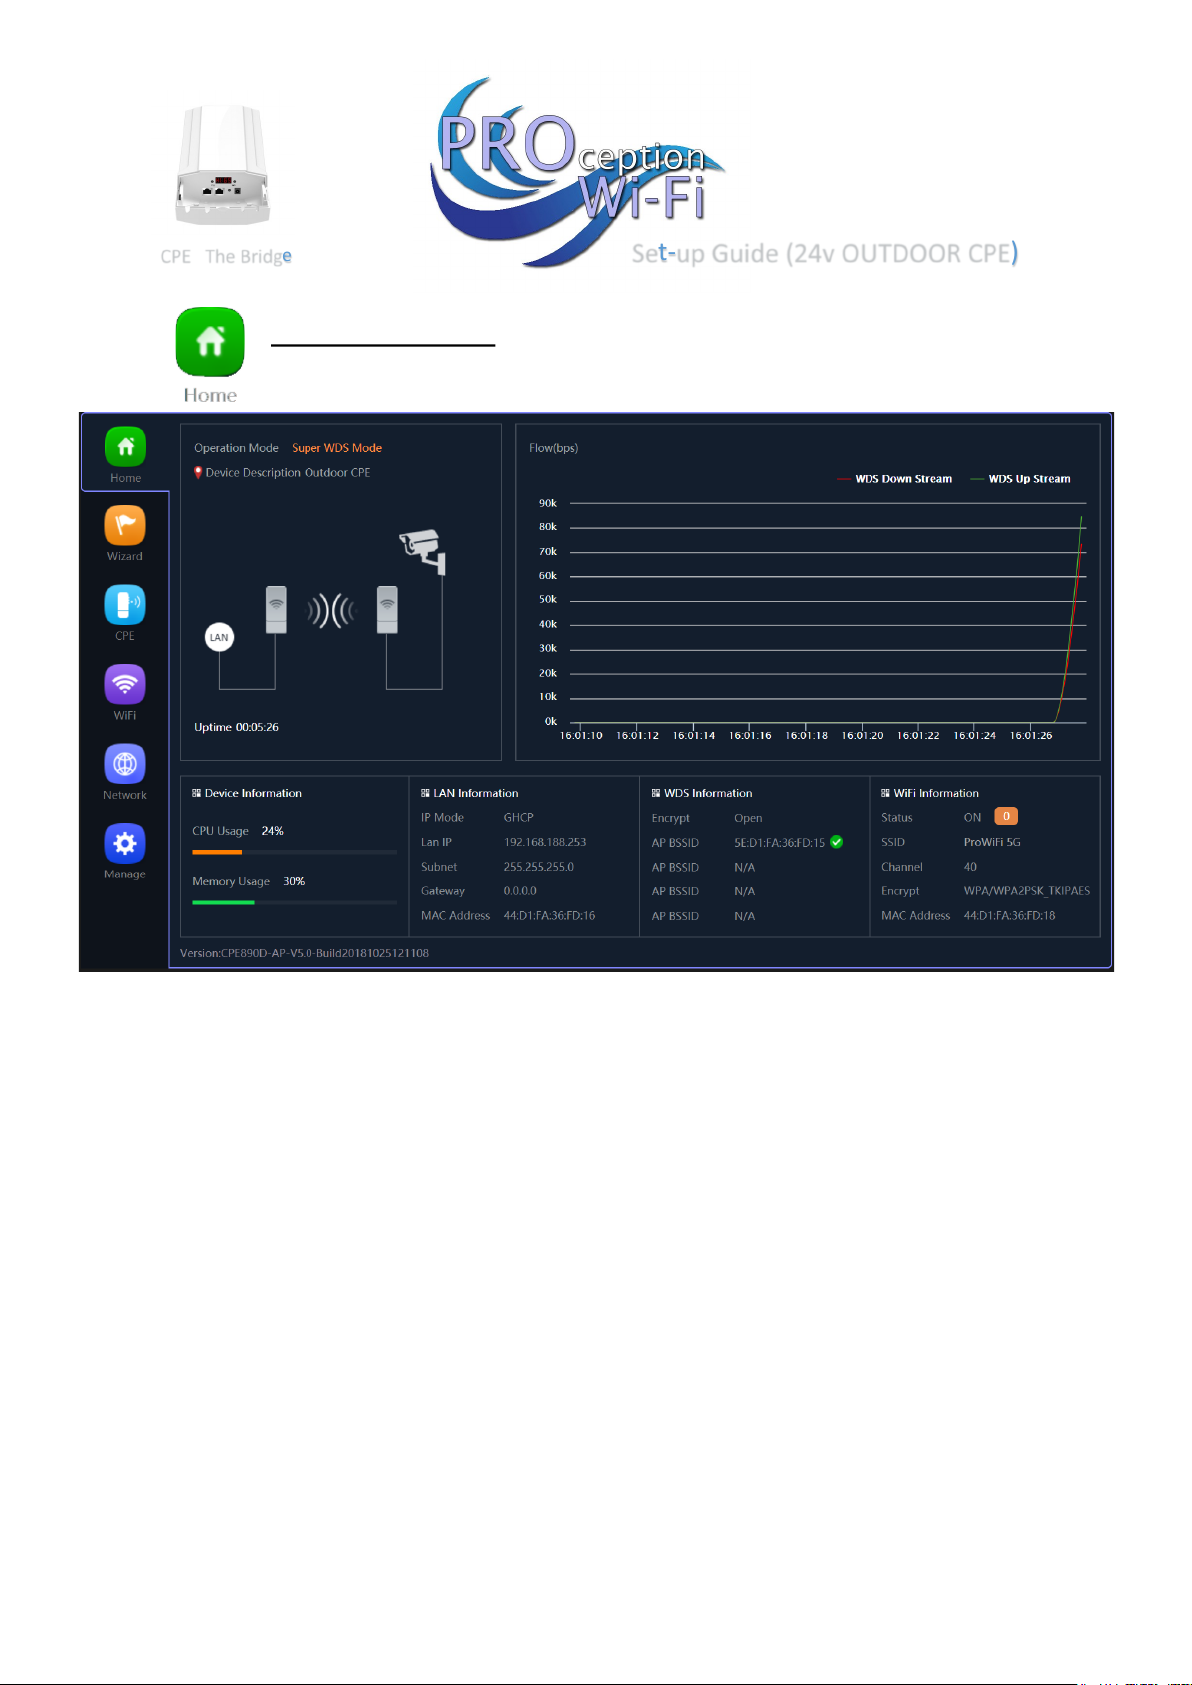
Current mode: - This shows the current operating mode (Gateway in this example)
Online users: - The number of users currently connected.
Device description:- Change this to best describe the AP or perhaps it’s location)
Uptime:- The amount of time the access point as has been running since last reboot
CPU and memory usage:- A good indication of whether the AP is working too hard.
WEB GUI Configuration
Once logged in the following home page will pop up as follow:
Page 4
Set-up Guide (24v OUTDOOR CPE)
CPE The Bridge
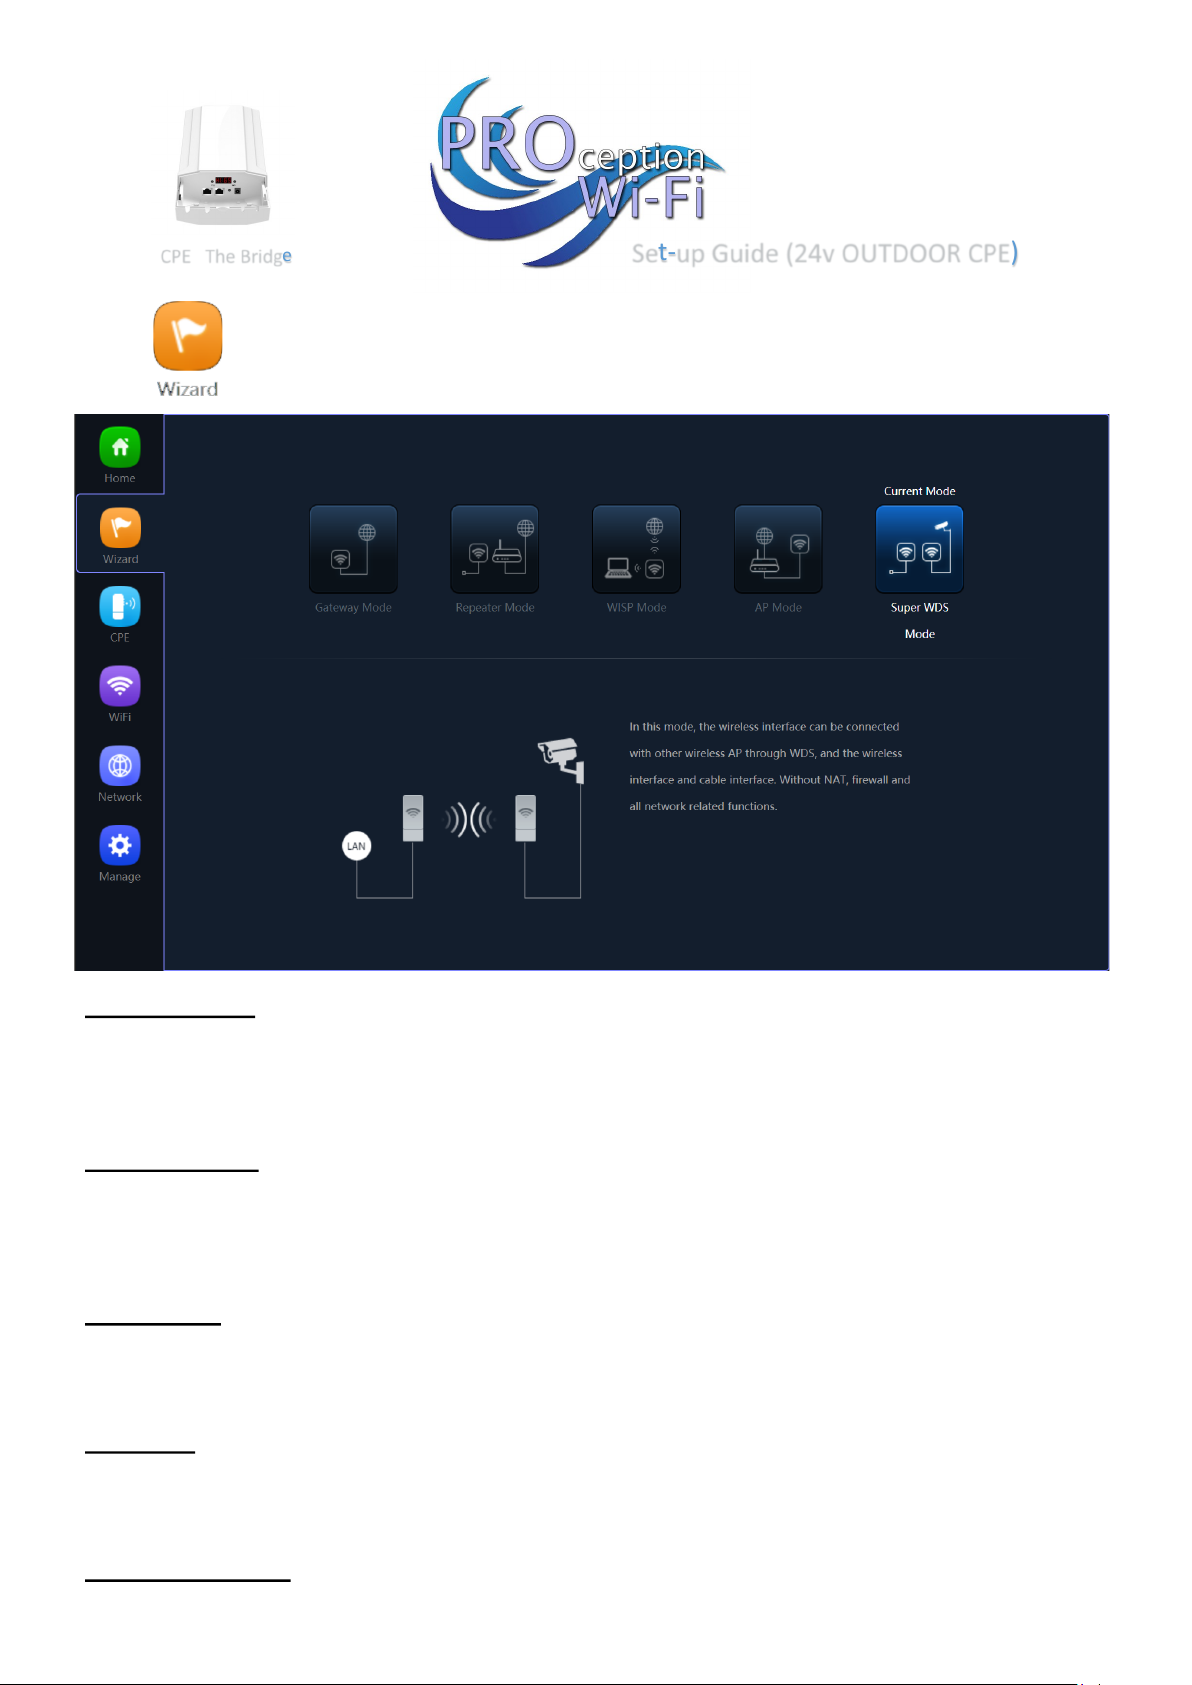
Gateway mode:-
The AP will allocate IP numbers to the connected devices. This mode is default as it permits you to connect and setup the AP very easily.
The AP could be left in this mode however, any connections to the AP (Wireless or not) will be allocated
different IP addresses to the main network, potentially preventing communication between devices on
the main network.
Repeater mode:-
The AP will receive & retransmit the Wi-Fi signal from another device.
It performs the same role as Access Point mode, but the key is that it talks over Wi-Fi instead. As such,
this doesn’t get around obstacles as well as an access point does. While an access point can be put in
front of an obstacle, a repeater will need to be angled around it. However, the benefit of repeaters is
that they don’t need a cable to connect to the central hub.
WISP mode:-
Wirelessly connects to a WISP (Wireless Internet Service Provider) AP. In this mode, the AP also acts
as a router for wired clients on your LAN and provides NAT (Network Address Translation) and a DHCP
server to generate IP addresses for wired clients only. NAT and the DHCP server allow many computers to share the same wireless Internet connection.
AP mode:-
Using Access Point mode is ideal if you want to extend the Wi-Fi range and CPE you’re using to extend
it isn’t far away from the main central router. The cable will ensure you get the best possible speeds between the access point and the router and the Wi-Fi will be transmitted in the direction of the antenna
face.
Super WDS mode:- Standard (Default mode of operation for automated binding)
Page 5
Set-up Guide (24v OUTDOOR CPE)
CPE The Bridge
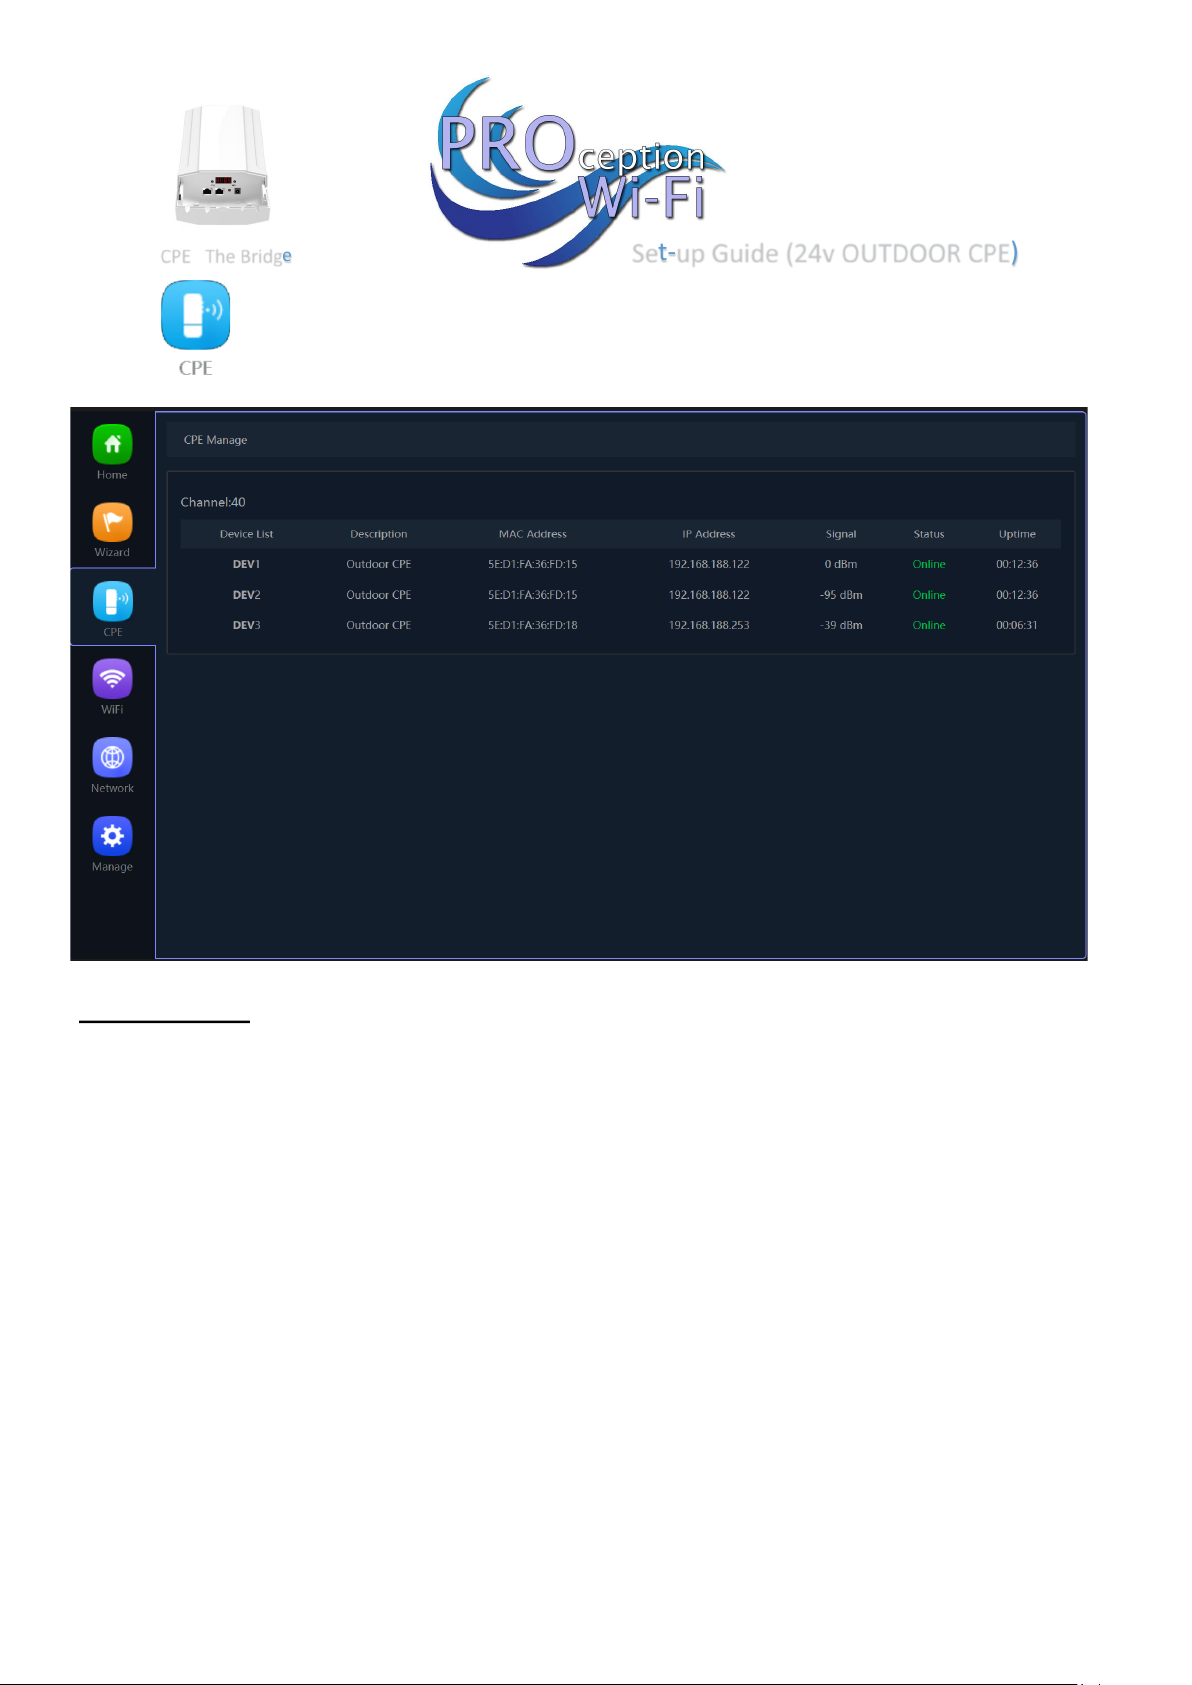
CPE Manager:-
Show current state of a Wi-FI points and signal level reception in each case.
Also shows the uptime, useful for fault diagnosis and the channel in use.
MAC and IP address is also displayed, useful for AP identification.
Status will show either Online or Offline as needed.
Page 6
Set-up Guide (24v OUTDOOR CPE)
CPE The Bridge
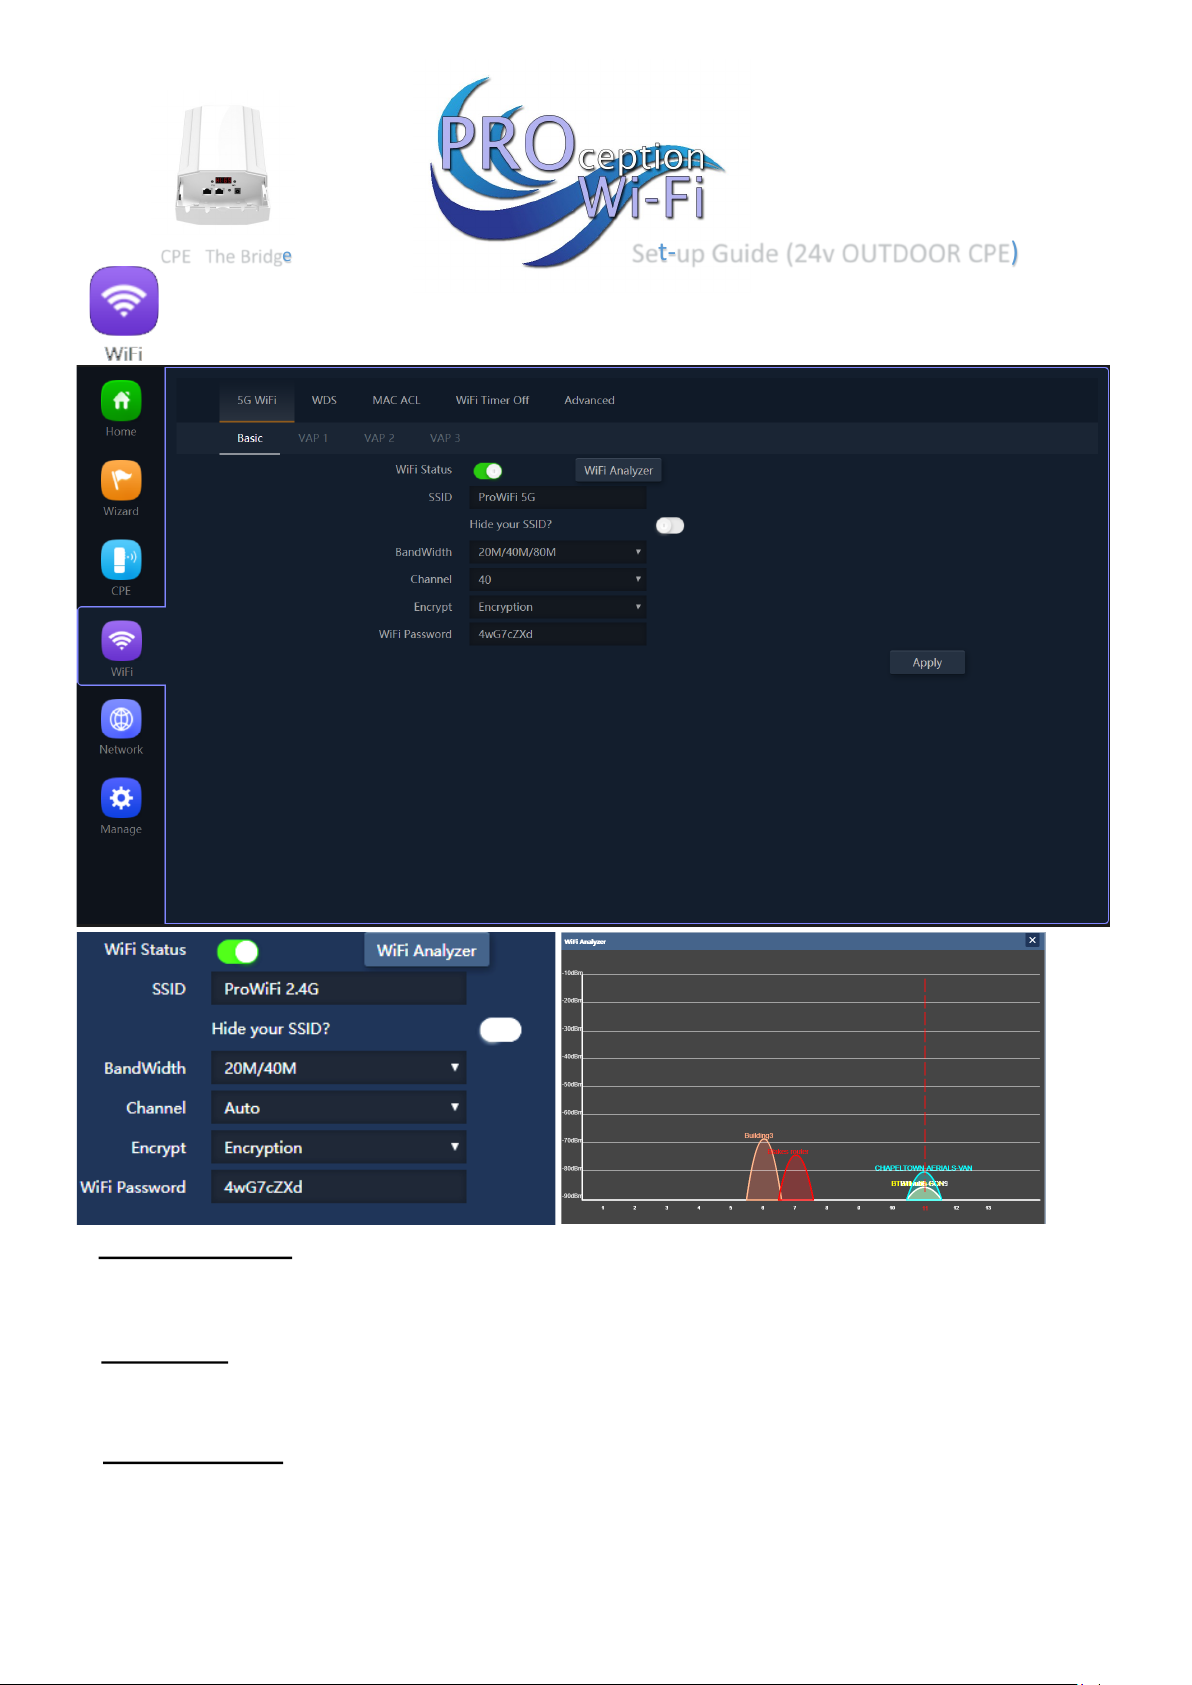
2G and 5G WiFi:- Setup the SSID (Name of the WiFi), Bandwidth, channel, Encryption
and password. This area also has a built-in WiFi analyser to look for the best channel to
set the 2.4/5G signal so that it doesn’t clash with other channels.
MAC ACL:- Access control lists (ACL) can control the traffic entering a network. When you
configure ACL, you can selectively admit or reject inbound traffic, thereby controlling access to
your network or to specific resources on your network or to specific resources on your network.
WiFi Timer Off:- Set the time to start and stop WiFi access
Page 7
Set-up Guide (24v OUTDOOR CPE)
CPE The Bridge
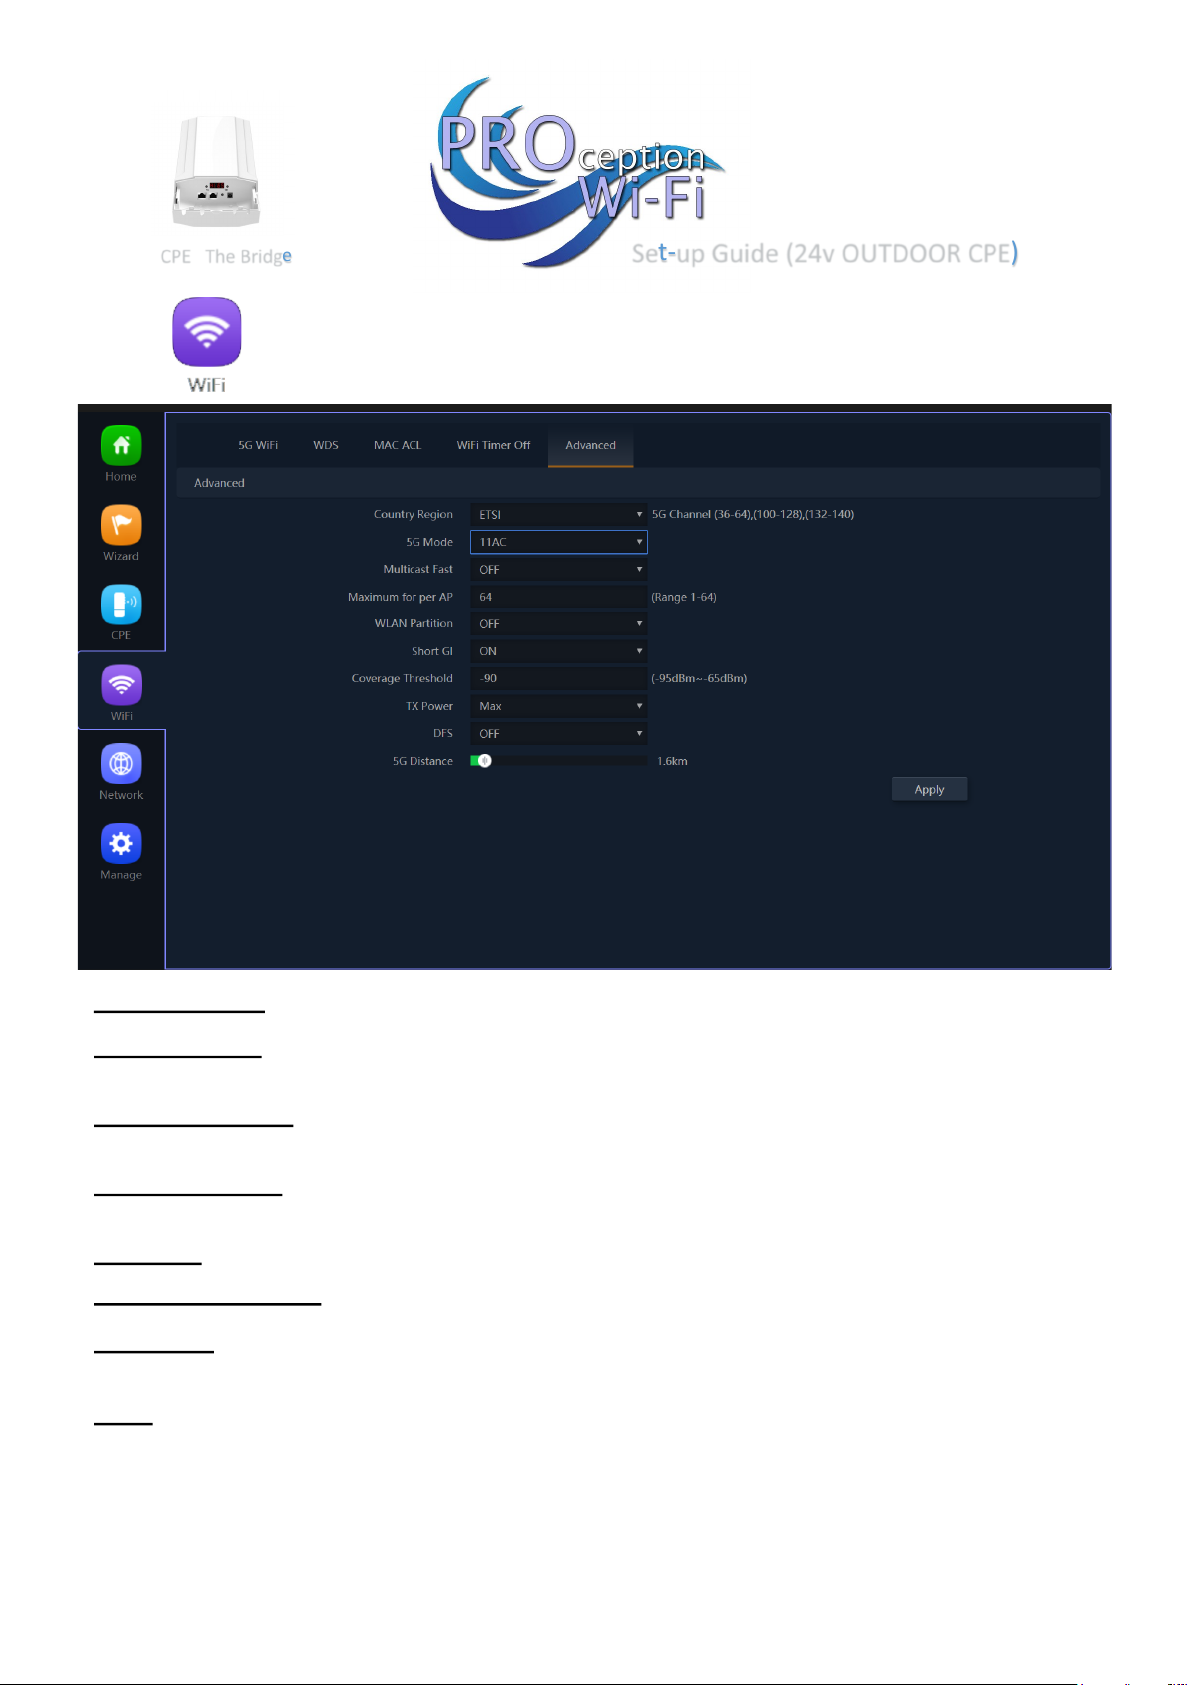
Country Region MUST be set to ETSI (For the UK channel allocation)
Multicast Fast: - Provides the ability to minimize packet loss in a network when there is a link or node
failure by enhancing, but not changing, multicast routing protocols.
Maximum per AP: - Number of permitted on the AP. Prevents over loading and therefore slowing
down of the AP
WLAN Partition: - For security. Enabling WLAN Partition prevents associated wireless clients from
communicating with each other.
Short GI: - Short Guard Interval can increases the data rate by up to 10%.
Coverage threshold: - The signal level at the point where the AP drops the device.
TX power: - Careful setting of this can reduce the channel overlap and degrading of the Wi-Fi signal if
using with more than one AP.
DFS:- When support for DFS is enabled, it will be necessary for WiFi access points to verify that any
radar in proximity is not using DFS frequencies. This process is called Channel Availability Check, and
it’s executed during the boot process of the access point (AP) as well as during its normal operations.
Page 8
Set-up Guide (24v OUTDOOR CPE)
CPE The Bridge
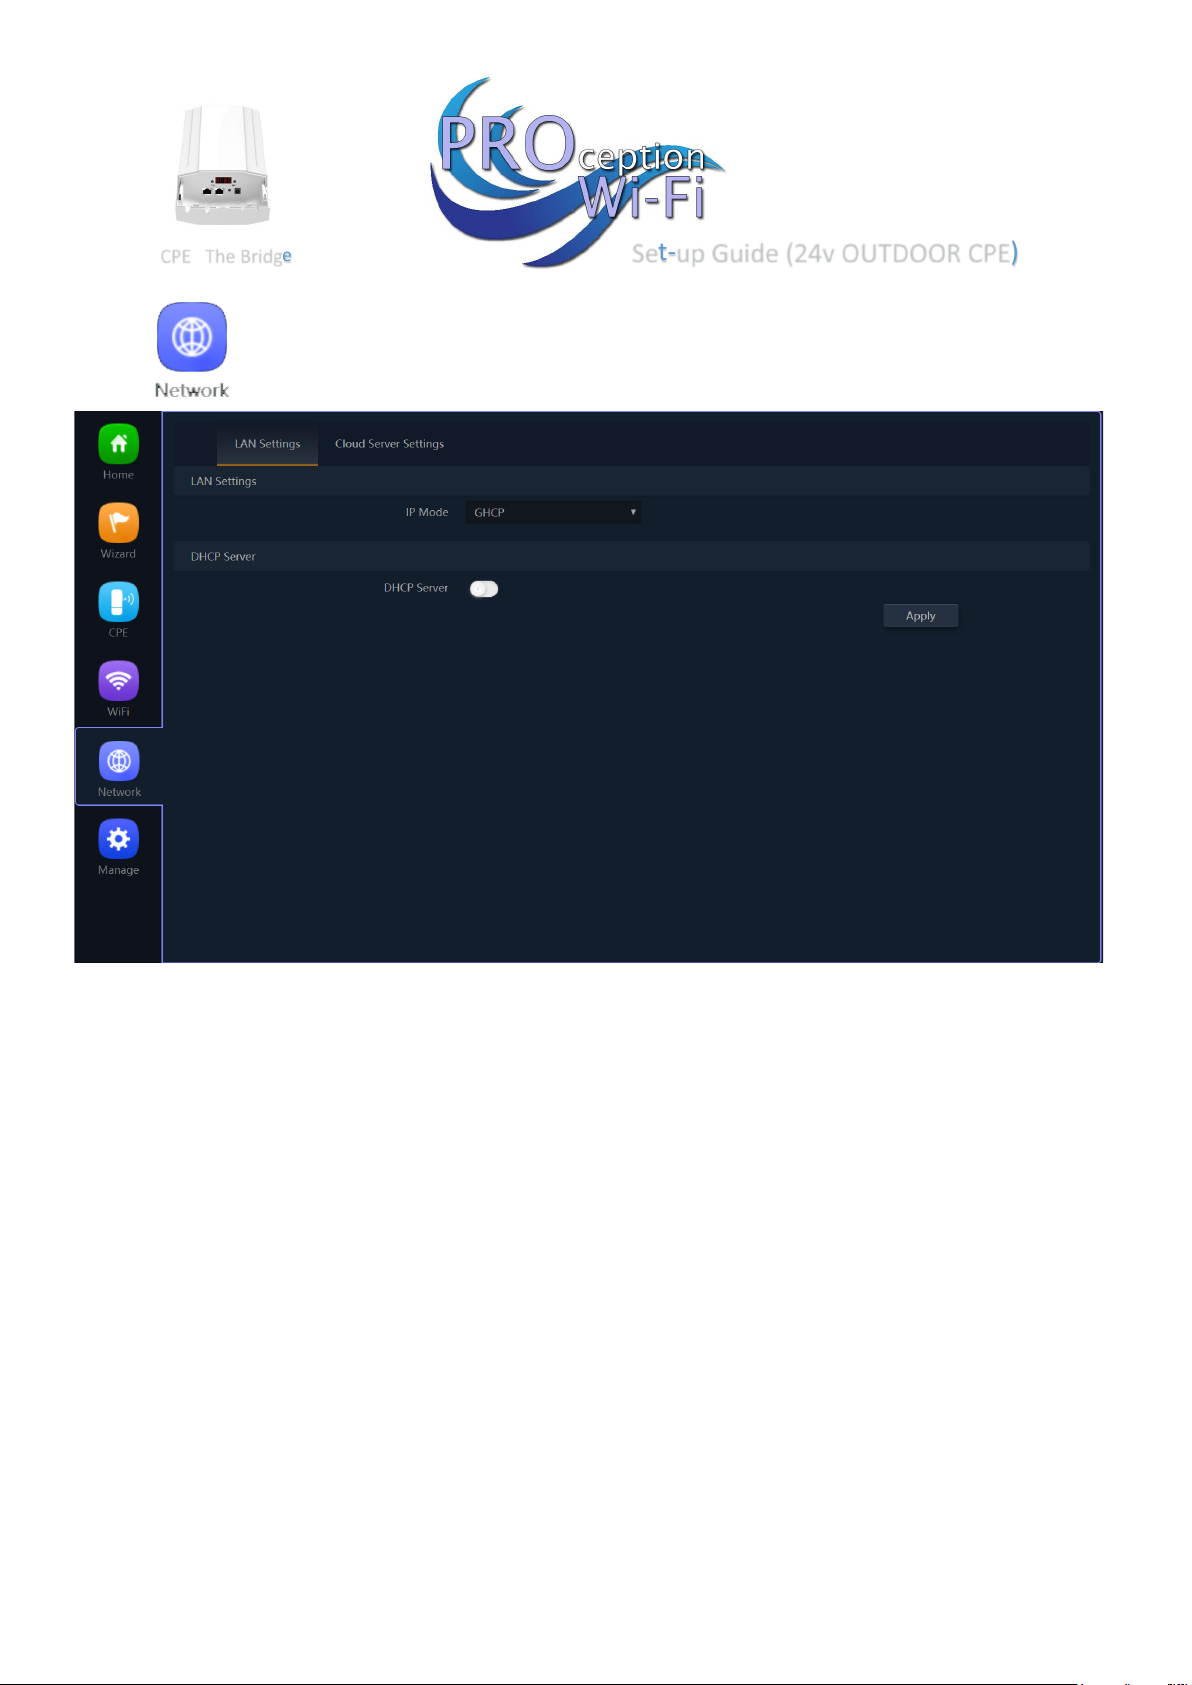
Lan IP Mode:- GHCP is the default mode of IP allocaon for binding and IP allocaon all are passed through in this mode.
Cloud server sengs are for remote access to all ProWiFi devices using a Cloud service which is free for all ProWiFi products
Page 9
Set-up Guide (24v OUTDOOR CPE)
CPE The Bridge
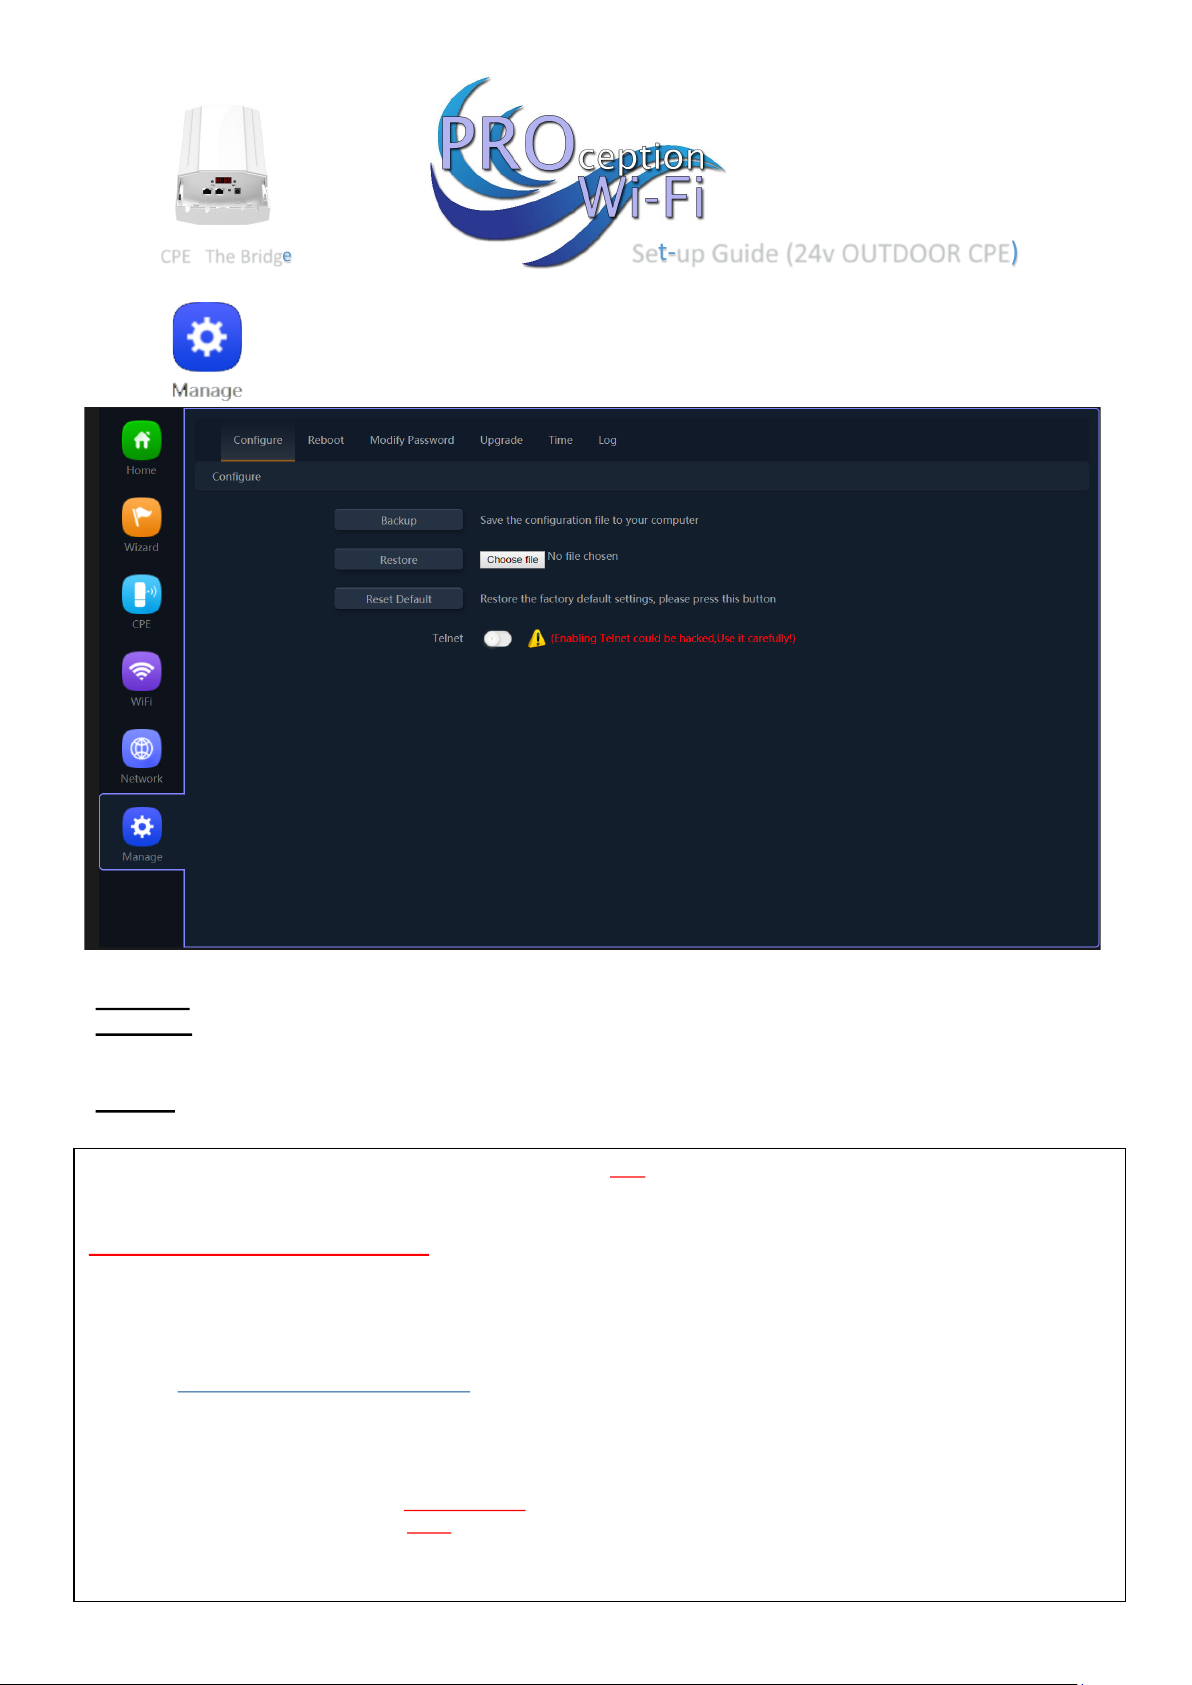
Backup:- Allows you to save the configuration file to your computer.
Restore:- Restore the back of the configuration file (also useful for installing many access points with
the same configuration).
Reset Default:- Resets the access point back to the manufacturers default settings.
Telnet:- Allows access to the devices Telnet port (port 22)
As a security risk we suggest this is turned off unless specifically needed
TIPS
Due to the Browser Cache process on PC please be aware that we advise to refresh any screen before working on sengs.
Usually a "force refresh" is enough.
Chrome: Press the following key combination: Shift + Ctrl + F5
IE: Press the following key combination: Ctrl + F5
Safari On PC: Ctrl + F5 or on Apple MAC: CMD + R
Alternavely, use the Chrome browser in Incognito mode can also reduce browser Cache issues.
Please see hps://www.refreshyourcache.com for further details on the Cache process.
Access point can take up to 2 minutes to reinialize on reboot.
Using the In-Wall AP in “AP Mode” will require you to set your devices IP to stac. Set 192.168.188.250 as the device IP and
192.168.188.253 as the gateway IP address.
Easiest install is using Gateway mode (as above)
App for nding spare Wi-Fi channels is Wi-Fi Analyzer (Apple or Android)
App for searching on networks for IP is FING (Apple or Android)
Reset back to default by holding front buon for 15 seconds.
Page 10
Set-up Guide (24v OUTDOOR CPE)
CPE The Bridge
24v “The Bridge” 900Mbps 11ac 5G High Power Outdoor CPE.
1. The CPE are supplied with Jubilee clip for pole mounng but can be wall mounted
with the two screw mounng holes.
2. Power the CPE with a 24v 1A POE Power supply. (PROAPPSU11)
3. Roughly align the CPE and power up.
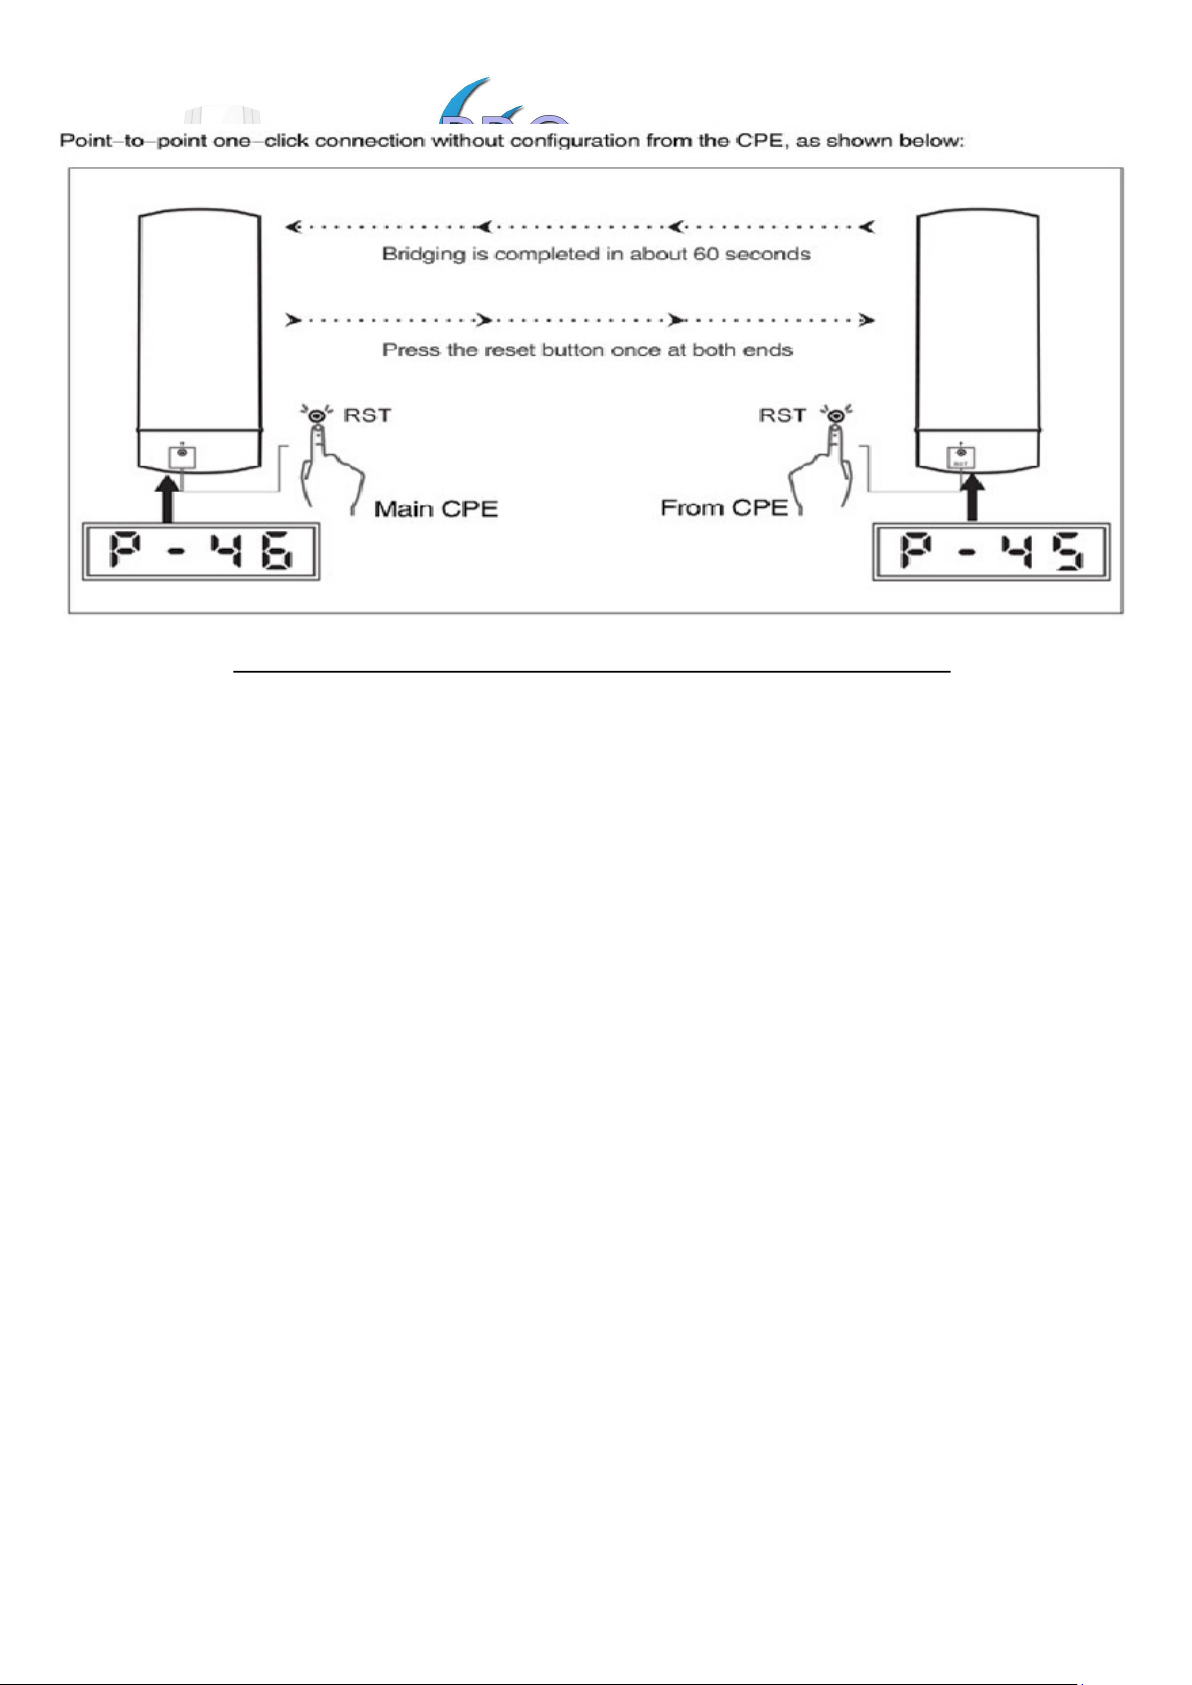
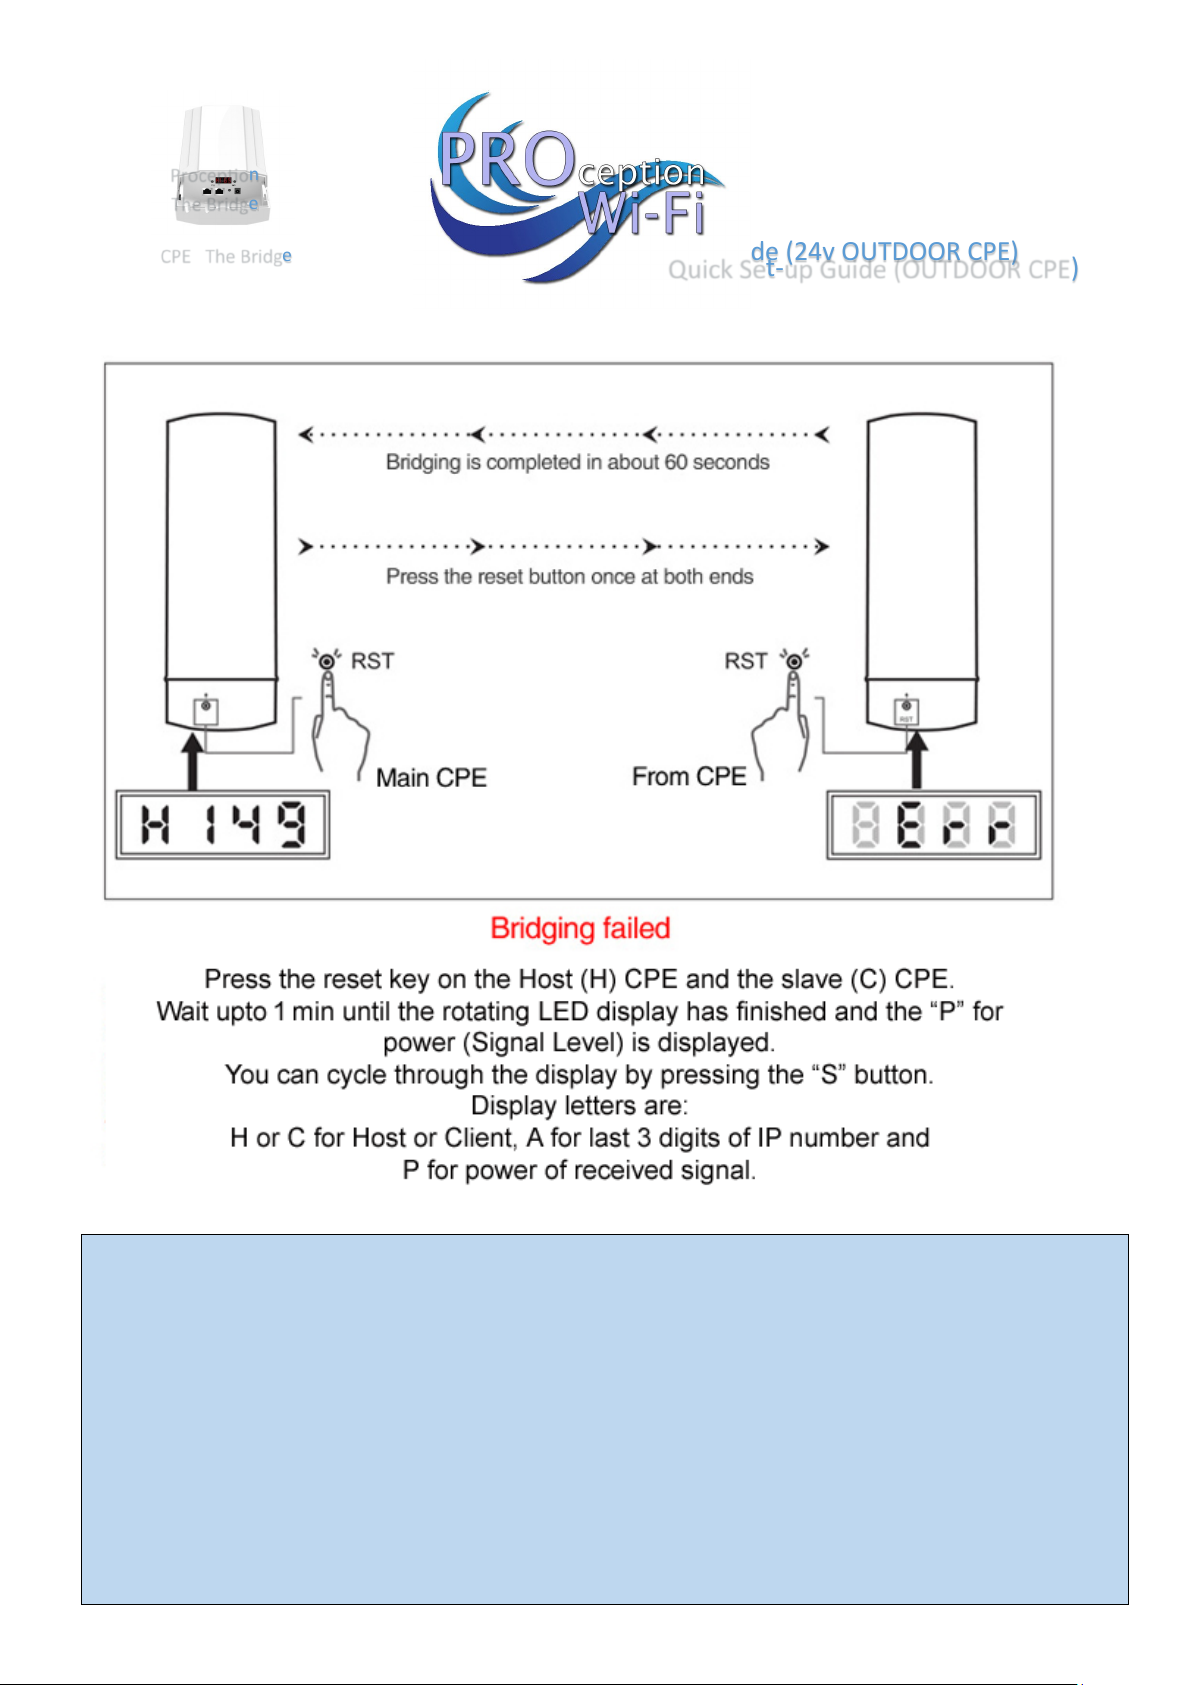
4. Press the F buon and select C (Client) on one CPE display and H (Host) on the other.
The display will ash to show conrmaon on saved informaon.
Ensure that they are on the same ETSI channel.
5. Press S buon to show the last 3 digits of the IP (eg A253 would be 192.168.188.253)
6. Press RST buon and leave for 1 minute unl the slave and host have bonded.
7. Press the select buon unl P is displayed.
Align both Host and Slave unl the maximum achieved number is displayed.
Transmission angle is 60° maximum.
Page 11
Set-up Guide (24v OUTDOOR CPE)
CPE The Bridge
Page 12
Set-up Guide (24v OUTDOOR CPE)
CPE The Bridge
Page 13
Set-up Guide (24v OUTDOOR CPE)
CPE The Bridge
TIPS
System performance is beer when distances is as close as possible
Reliability is increased when there is a clear line of sight.
The number of APs, locaon, size, and obstacles determine speed & reliability.
Performance & reliability of antennas are posioned higher. Antenna height is the distance from the imaginary line connecng
the antennas at the two sites to ground level. Ground level in an open area is the actual ground. In dense urban areas, ground
level is the average height of the buildings between the antenna sites.
Rooop Installaon Rooop installaons oer several advantages: ?? Fewer obstacles in the path. ?? Improved performance
due to greater height. Rooop Installaon
Rooop installaons oer several advantages:
Fewer obstacles in the path and Improved performance due to greater height.
Antenna polarizaon must be the same at both ends of the link
Quick Set-up Guide (OUTDOOR CPE)
Procepon
The Bridge
 Loading...