

Page 1
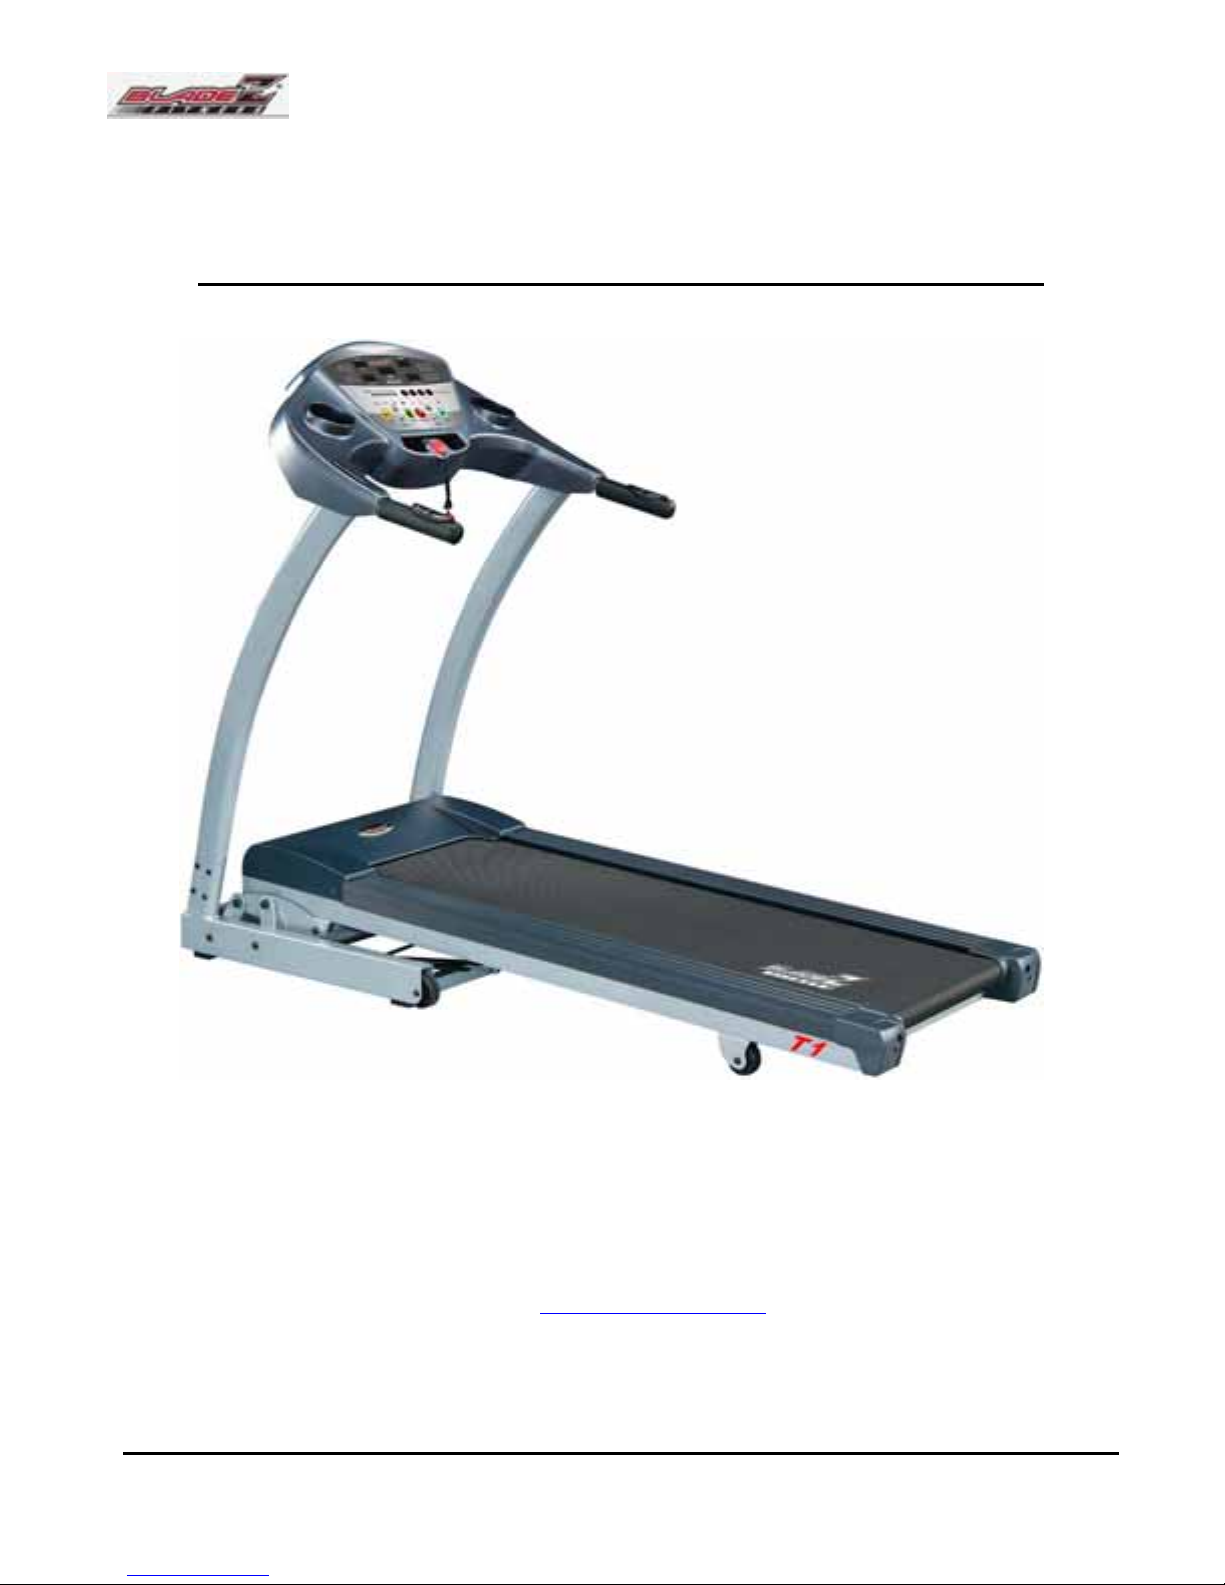
Treadmill Owner’s Manual
Bladez T1 Basic
BLADEZ Corporation
20155 Ellipse
Foothill Ranch, CA 92610
Phone: 949-206-8152
Fax: 949-206-0013
Email:
0
BladeZ Corporation • 20155 Ellipse • Foothill Ranch • CA • 92610
Revision Date: 9/08/06
www.ebladez.com
Page 2
INTRODUCTION:
C
ongratulations for selecting BLADEZ as your primary source of fitness.
BLADEZ treadmills offer many exercise programs that benefit users of all
levels and ages. Your new treadmill is designed to make your workouts more
effective and enjoyable. Please read this entire manual carefully before using
your treadmill. This will allow you to get a full understanding of all the
features your BLADEZ’ treadmill provides. If you have any questions or
concerns, please contact the BLADEZ Corporation or any authorized
BLADEZ FITNESS distributors in your area.
BLADEZ Corporation
20155 Ellipse
Foothill Ranch, CA 92610
Phone: 949-206-8152
Fax: 949-206-0013
Email:
1
BEFORE YOU BEGIN
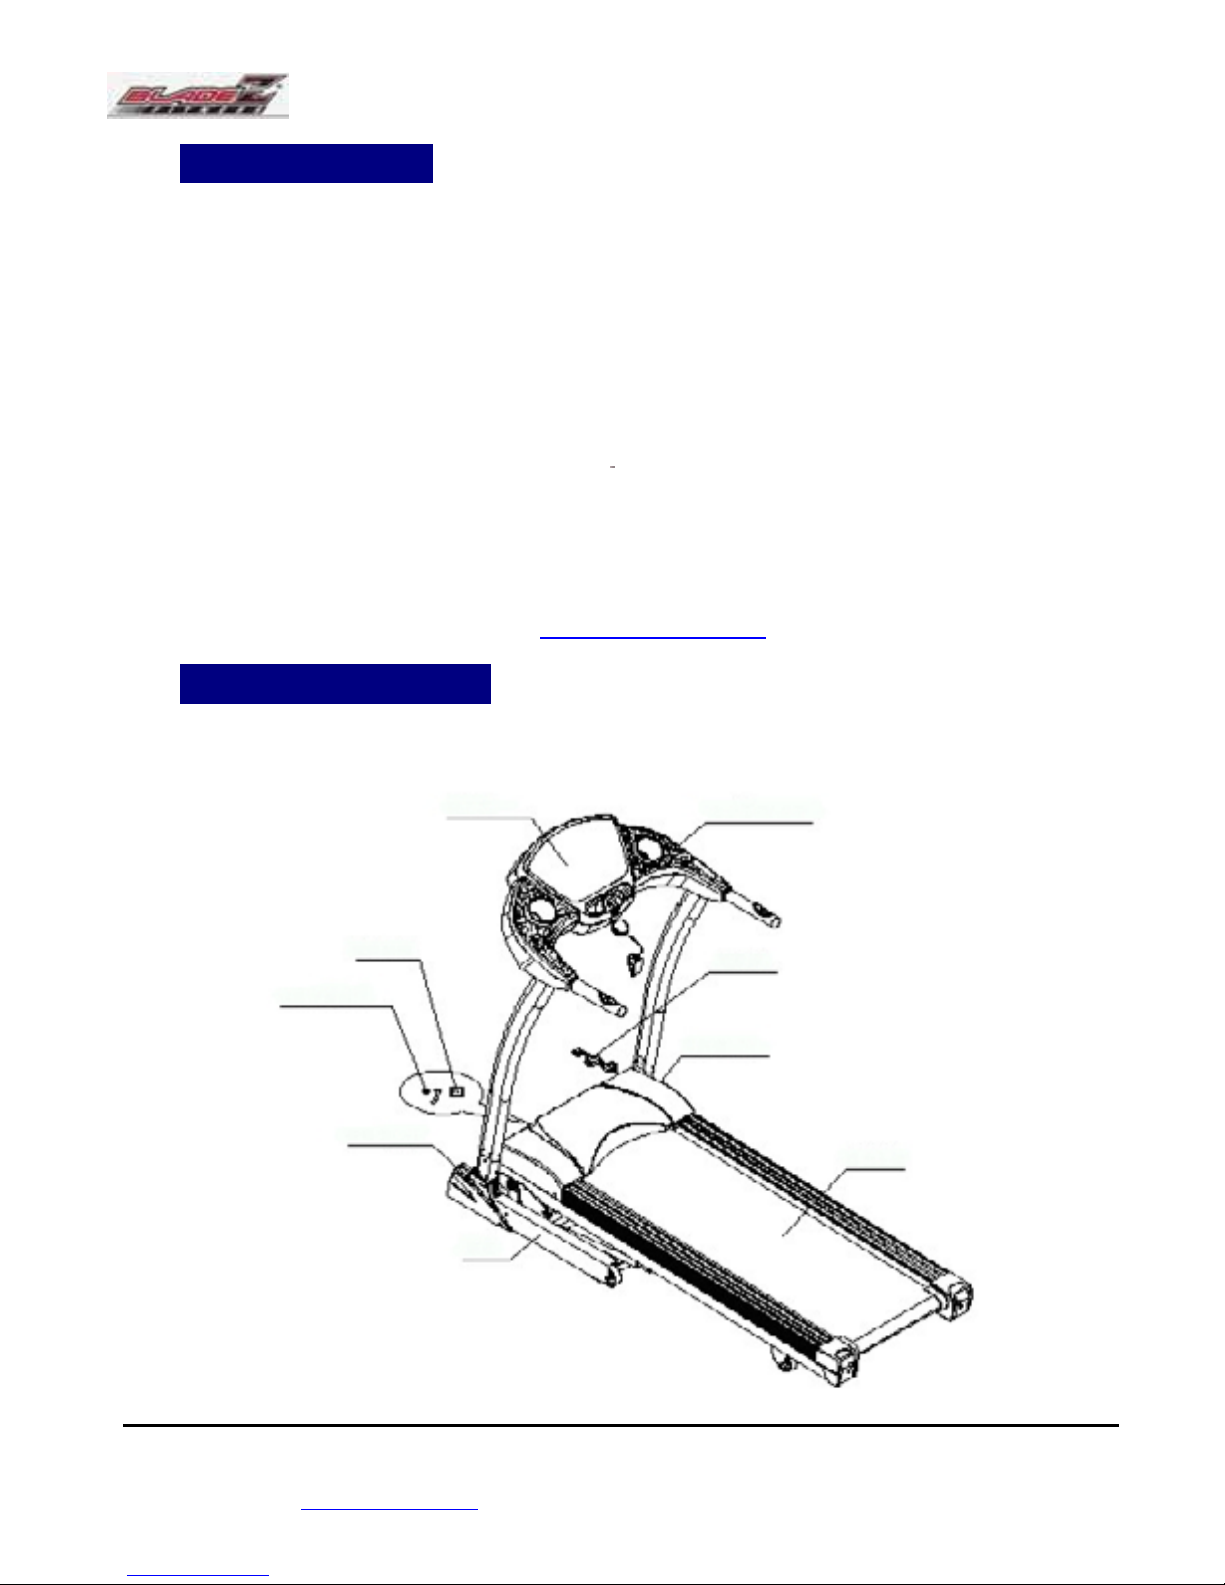
It is very important to become familiar with the frequently used components
of your Bladez treadmill.
Computer
Power Cord
Circuit Breaker
Decorative Cover (L)
Base Frame
Safety Key/Clip
Power Cord
Decorative Cover(R)
Main Frame
BladeZ Corporation • 20155 Ellipse • Foothill Ranch • CA • 92610
www.ebladez.com
1
• Phone 949-206-8152 • Fax 949-206-0013
Page 3

TABLE OF CONTENTS
SECTION PAGE
1. IMPORTANT SAFETY INSTRUCTIONS............................................................... 3
2. ASSEMBLY INSTRUCTIONS................................................................................. 5
3. GETTING STARTED.................................................................................................8
4. WORKOUT PROGRAM DETAILS .........................................................................12
5. PREVENTIVE MAINTENANCE.............................................................................19
6. TROUBLESHOOTING.............................................................................................20
7. WARRANTY.............................................................................................................22
BladeZ Corporation • 20155 Ellipse • Foothill Ranch • CA • 92610
www.ebladez.com
2
• Phone 949-206-8152 • Fax 949-206-0013
Page 4

SECTION 1
IMPORTANT SAFETY INSTRUCTIONS
Read all instructions before using the treadmill.
Notice: Before using this or any other exercise equipment consult your family physician
or health care professional to develop a well planned exercise program to fit your
health needs. If you encounter any pain or breathing discomfort while working out,
STOP!, and consult a physician before continuing
WARNING!
1. It is wise to always unplug this appliance from the electrical outlet immediately
after use.
2. Keep Children away from machine while in use.
3. Do not wear loose or dangling clothing while using the treadmill
4. Keep a minimum clearance of 18” on each side and 24” at the rear of the treadmill
for safety.
5. It is mandatory that you unplug the treadmill prior to cleaning to reduce the risk
of electric shock, serious burns, and the risk of injuries.
6. The treadmill should never be left unattended when in operation. Unplug the
treadmill from the outlet when not in use or when servicing the treadmill.
7. Close supervision is necessary when this appliance is used by or near children,
invalids, disabled persons, or those with diminished capacity.
8. Use this appliance only for its intended use as described in this manual.
Do not use any attachment not recommended by the manufacturer.
9. Never operate this appliance if it has a damaged cord or plug, or if it is not
working properly. Call your service center for any service concerns before taking
your treadmill in for repair.
10. Keep the cord away from heated surfaces.
11. Never drop or insert any object into any opening.
12. Do not use outdoors.
13. Do not operate where aerosol (spray) products are being used or where oxygen is
being administered.
14. To disconnect, turn all controls to the off position, then remove plug from outlet.
15. Connect this appliance to a properly grounded outlet only.
16. This appliance is intended for household use only.
SAVE THESE INSTRUCTIONS
BladeZ Corporation • 20155 Ellipse • Foothill Ranch • CA • 92610
www.ebladez.com
3
• Phone 949-206-8152 • Fax 949-206-0013
Page 5
IMPORTANT SAFETY INSTRUCTIONS CONTINUED
GROUNDING INSTRUCTIONS
This product must be grounded. If it malfunctions or breaks down, grounding
provides a path of least resistance for electric currents, to reduce the risk of
electric shock. This product is equipped with a cord which has an equipmentgrounding conductor and a grounding plug. The plug must be plugged into an
appropriate outlet that is properly installed and grounded in accordance with
all local codes and ordinances.
WARNING!
conductor can result in a risk of an electrical shock. Check with a qualified
electrician if you are in doubt as to whether the product is properly grounded.
Do not modify the plug provided to you. If it does not fit the outlet, have a
proper outlet installed by a qualified electrician.
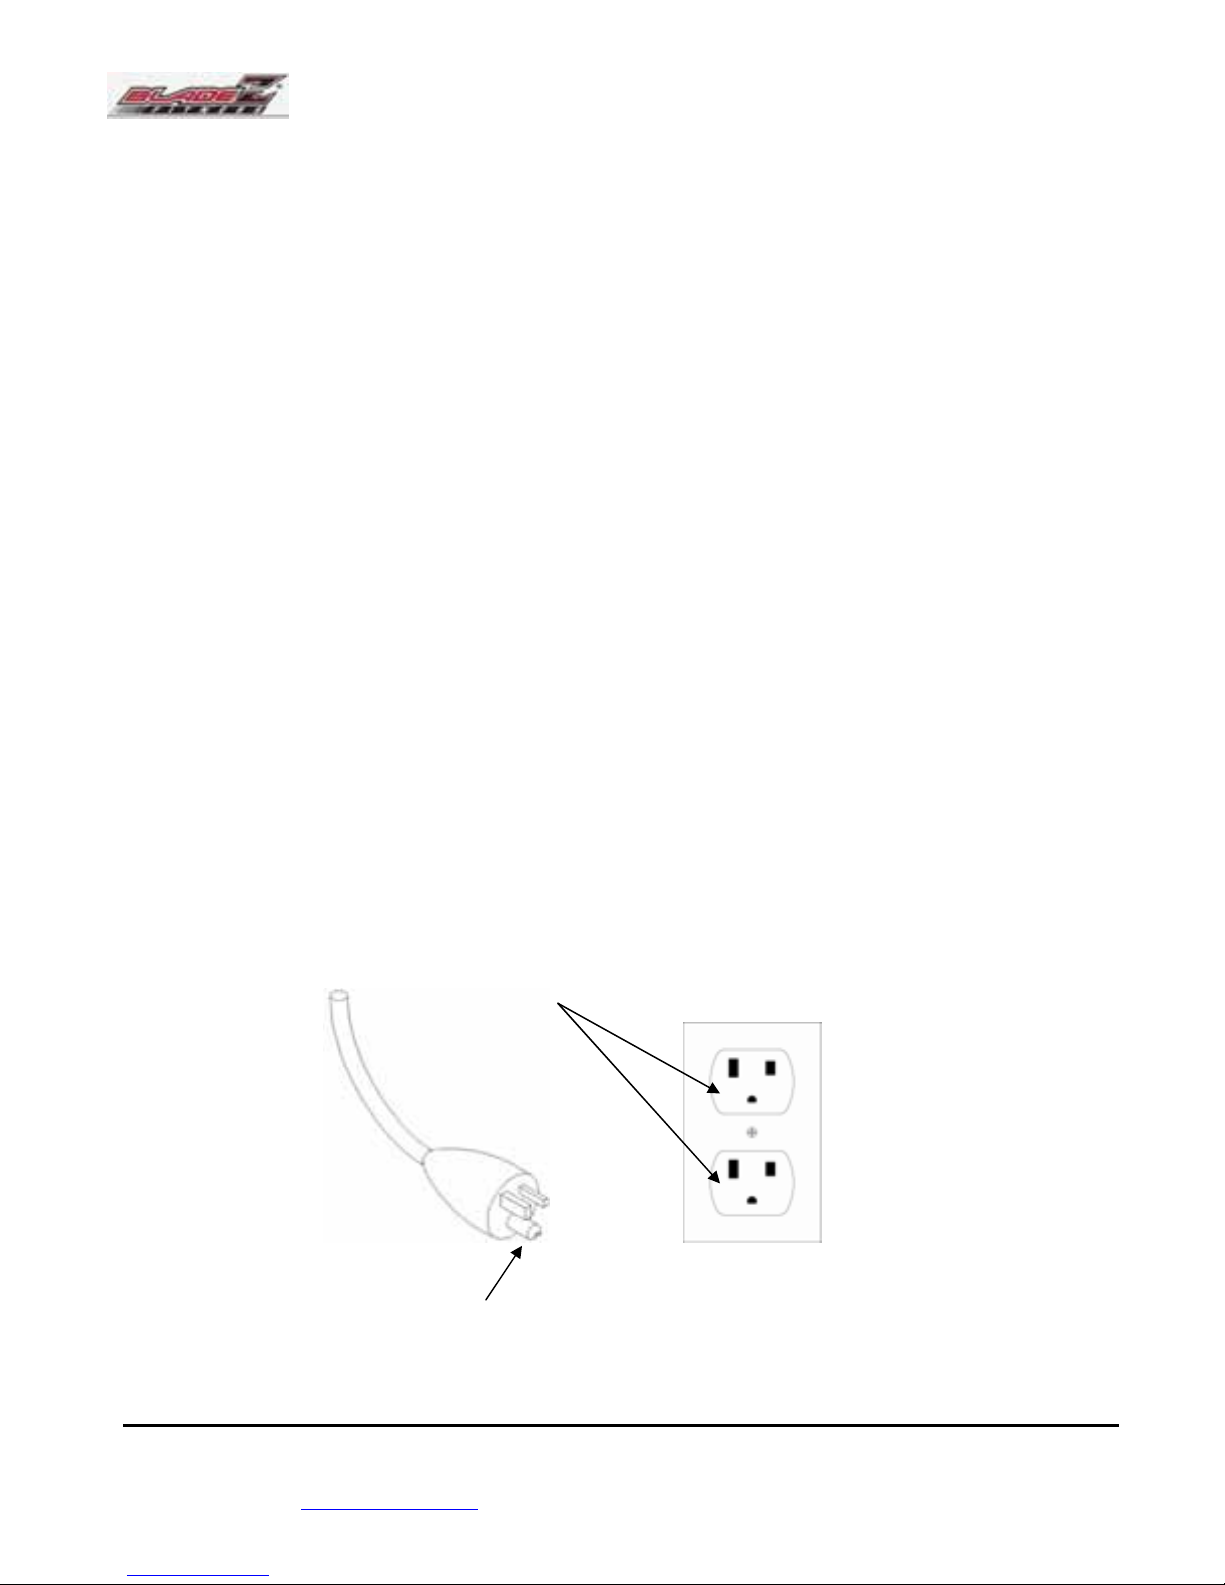
This product is for use on a nominal 110-120-volt circuit and has a grounding
plug that looks like the plug illustrated in the figure. Make sure that the
product is connected to an outlet having the same configuration as the plug.
No adapter or extension cord should be used with this product.
OUTLET
– An improper connection of the equipment grounding
GROUNDING METHODS
GROUNDED
GROUNDING
PIN
BladeZ Corporation • 20155 Ellipse • Foothill Ranch • CA • 92610
www.ebladez.com
4
• Phone 949-206-8152 • Fax 949-206-0013
Page 6
SECTION 2
ASSEMBLY INSTRUCTIONS
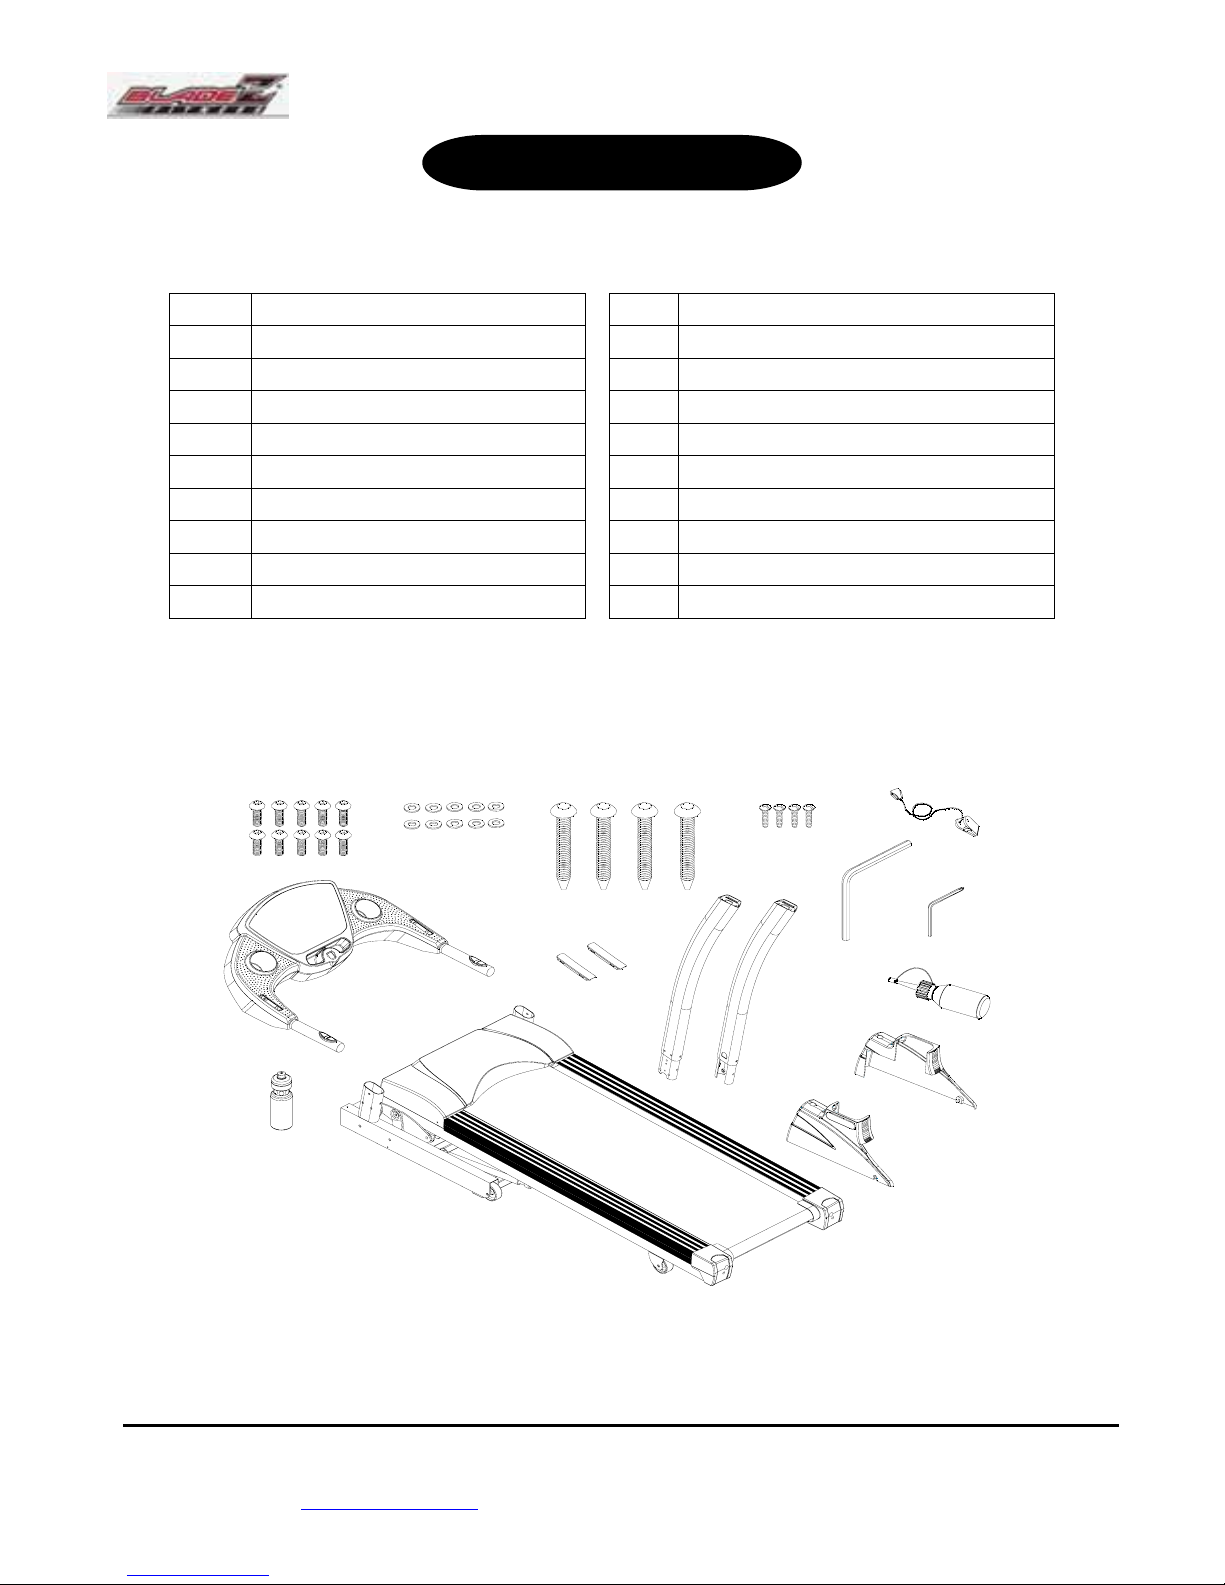
ITEM DESCRIPTION QTY ITEM DESCRIPTION QTY
A Computer Console 1 a Allen Bolt M8xP1.25x15 10
B Main Frame 1 b Washer Ø8xØ16x1.5t 10
C Upright (L) 1 c Allen Bolt M8xP1.25x60 2
D Upright (R) 1 d Screw M5xP0.8x10 4
E Handrail Protecting Cover 2 e Allen Key 5mm (70mmx70mm) 1
F Decorative Cover (L) 1 f Allen Key 6mm (80mmx80mm) 1
G Decorative Cover (R) 1 g Safety Key/Clip 1
H Bottle 1 h SILICON 1
i
Allen Bolt M8xP1.25x50
2
abc d
A
E
C
D
g
f
e
h
B
G
H
F
BladeZ Corporation • 20155 Ellipse • Foothill Ranch • CA • 92610
www.ebladez.com
5
• Phone 949-206-8152 • Fax 949-206-0013
Page 7
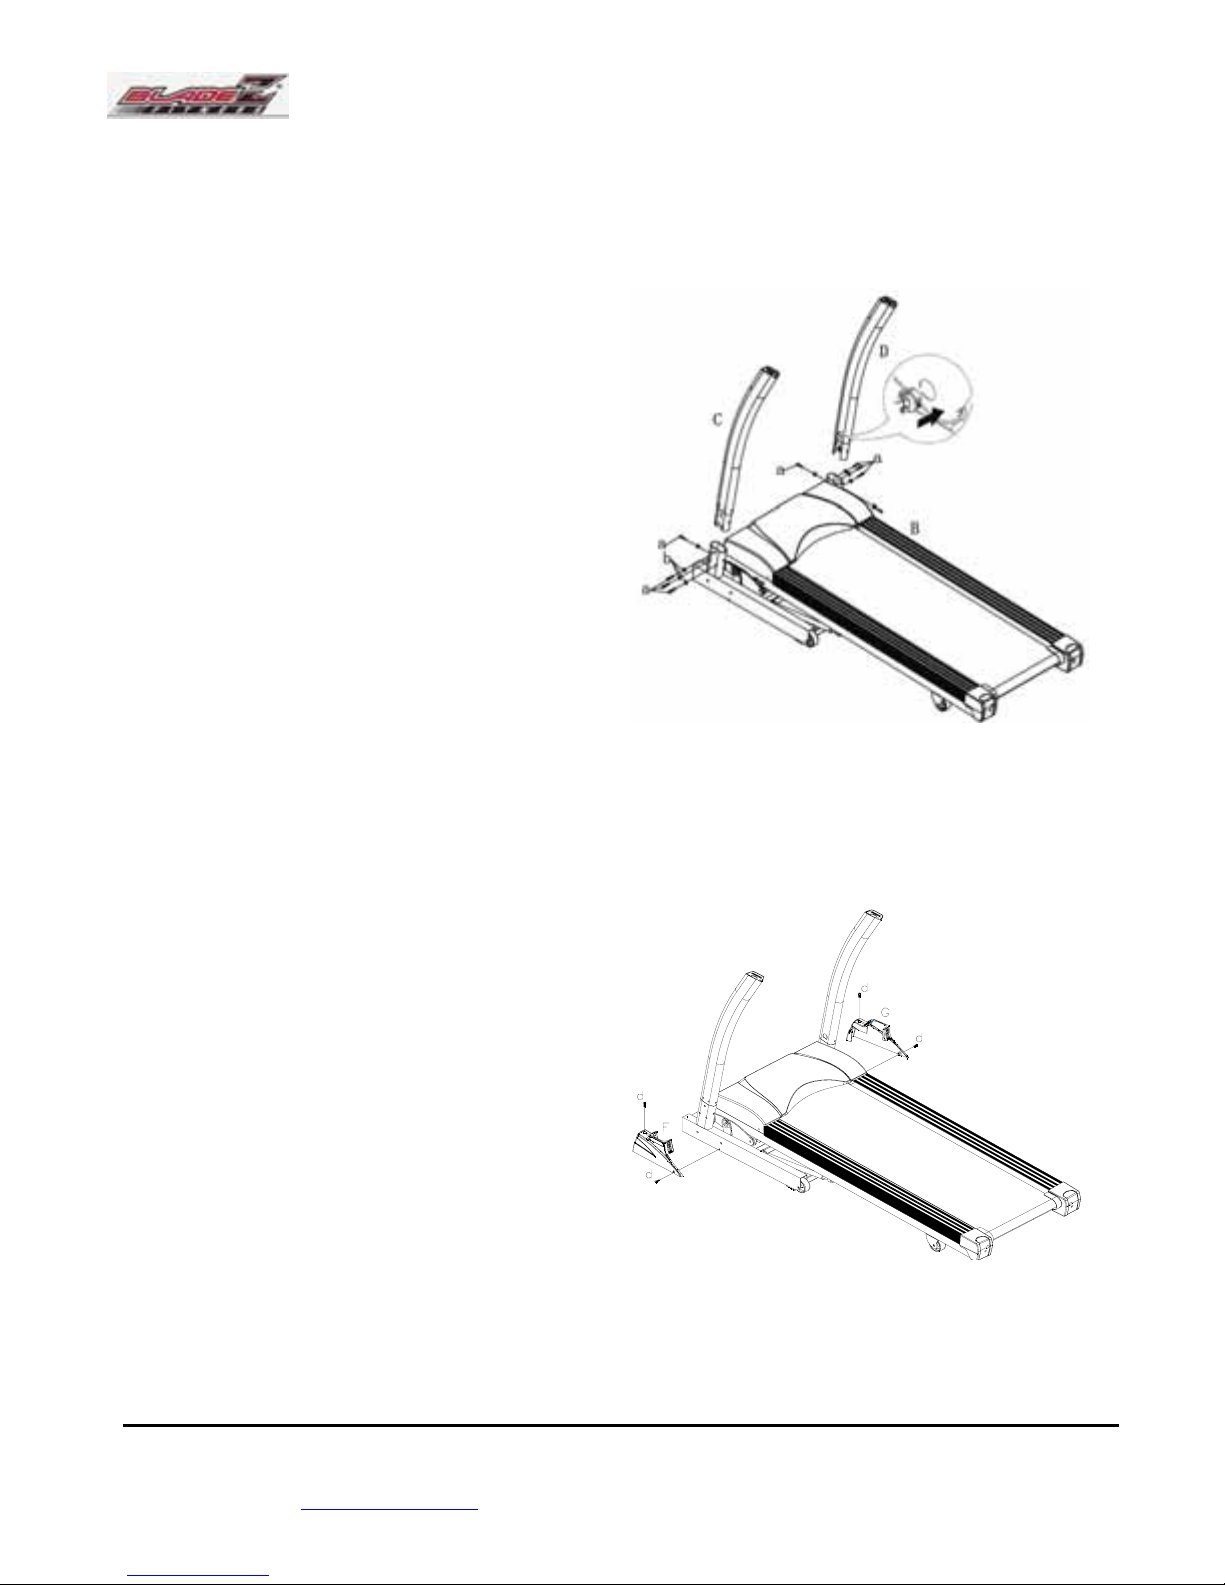
ASSEMBLY INSTRUCTIONS CONTINUED
A minimum of two people are required
to assemble this treadmill. Also, READ
and understand ALL INSTRUCTIONS
thoroughly BEFORE ASSEMBLING
the treadmill.
1. Tie the Lower Control Wire of
the Main Frame (B) with the
Guide Thread of the Right
Upright (D), pull the wire into
the Upright, and secure with
wire clip, then insert into the
Upright.
2. Secure the left (C) and right (D)
uprights onto the treadmill base
with 8 (a) bolts and washers (b).
* Ensure that the wire is not pinched
between the upright and the treadmill
base when securing the upright
3. After the Uprights are tightened,
pull out the Control Wire that
has been threaded into the
Upright to the position shown in
the drawing at the right, then
attach the Side Covers (F, G)
onto the Frame, and tighten
with Screws (d).
BladeZ Corporation • 20155 Ellipse • Foothill Ranch • CA • 92610
www.ebladez.com
6
• Phone 949-206-8152 • Fax 949-206-0013
Page 8
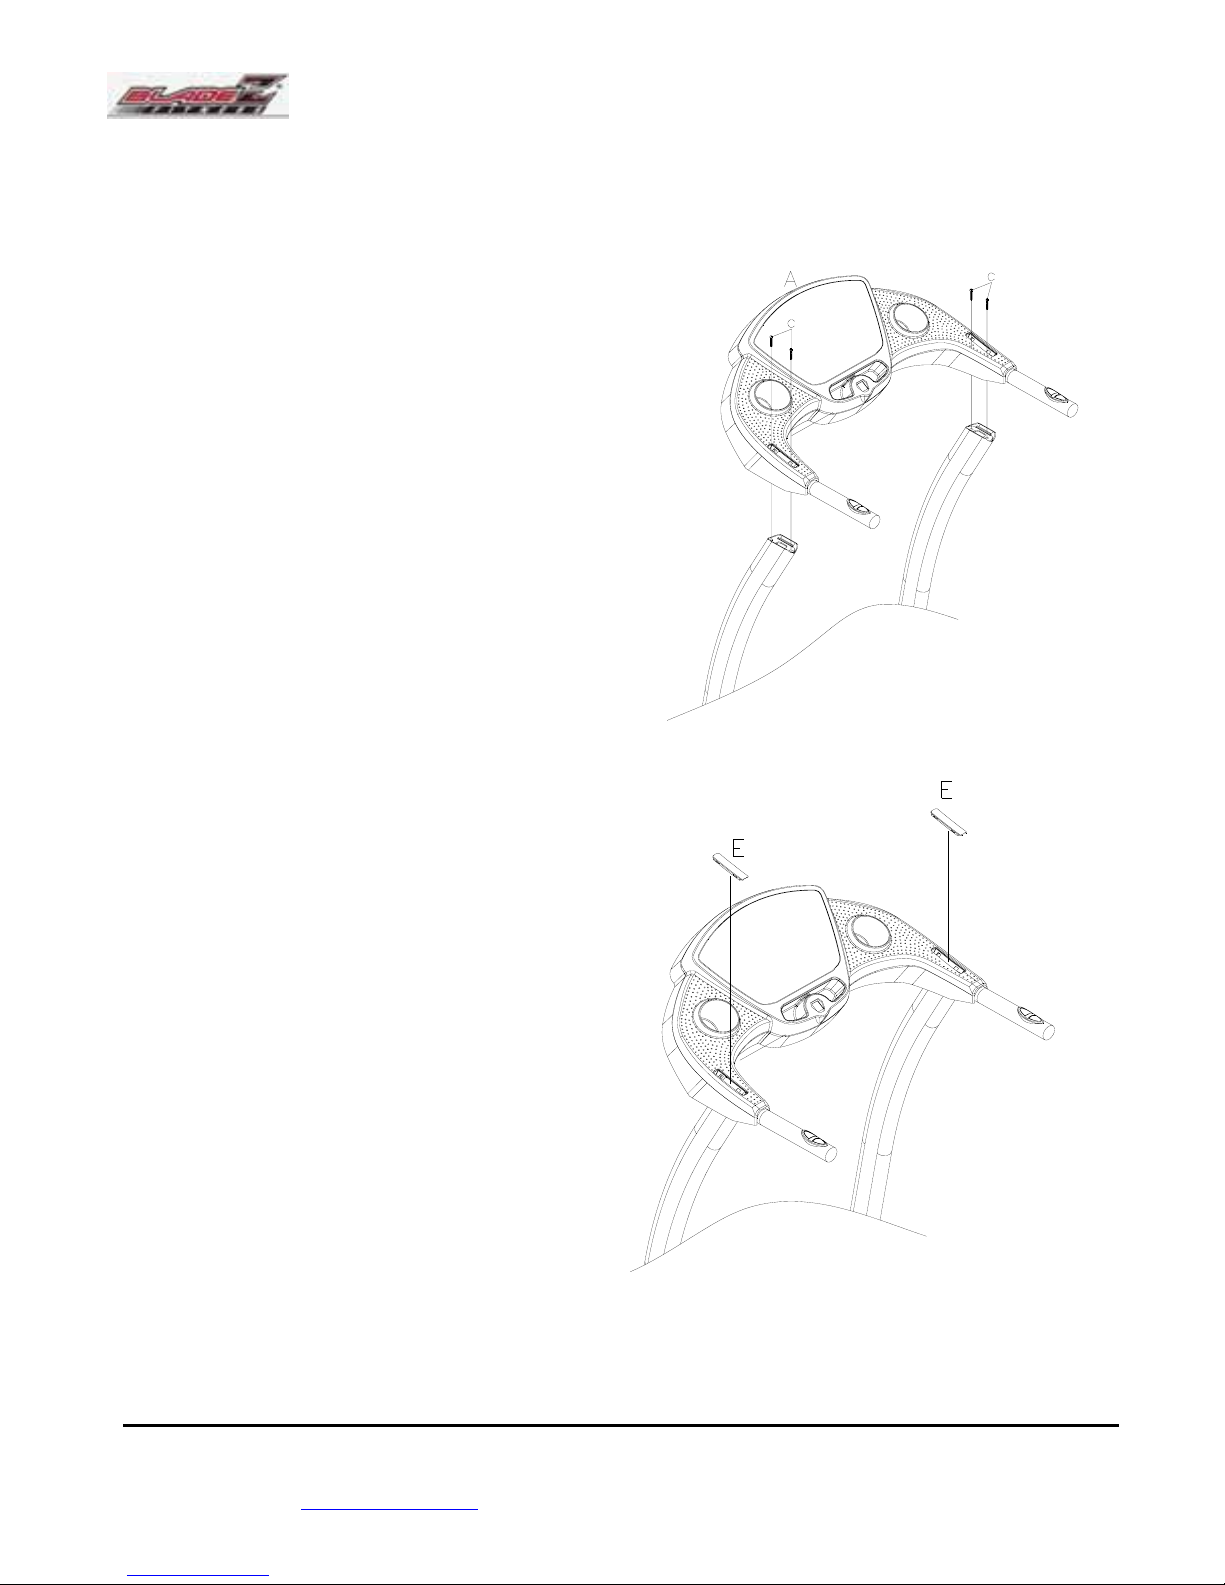
ASSEMBLY INSTRUCTIONS CONTINUED
4. Place the Computer Console (A)
on the Upright, then connect the
Control Wire of the Main Frame
to the Control Wire in the
Computer Console (A), then
secure with Allen Bolts (c, i).
* When you tighten the bolts, make
sure not to damage the control wires
in the tube.
5. After the above step is finished,
install the Protecting Covers (E)
onto the Handrail bar.
BladeZ Corporation • 20155 Ellipse • Foothill Ranch • CA • 92610
www.ebladez.com
7
• Phone 949-206-8152 • Fax 949-206-0013
Page 9
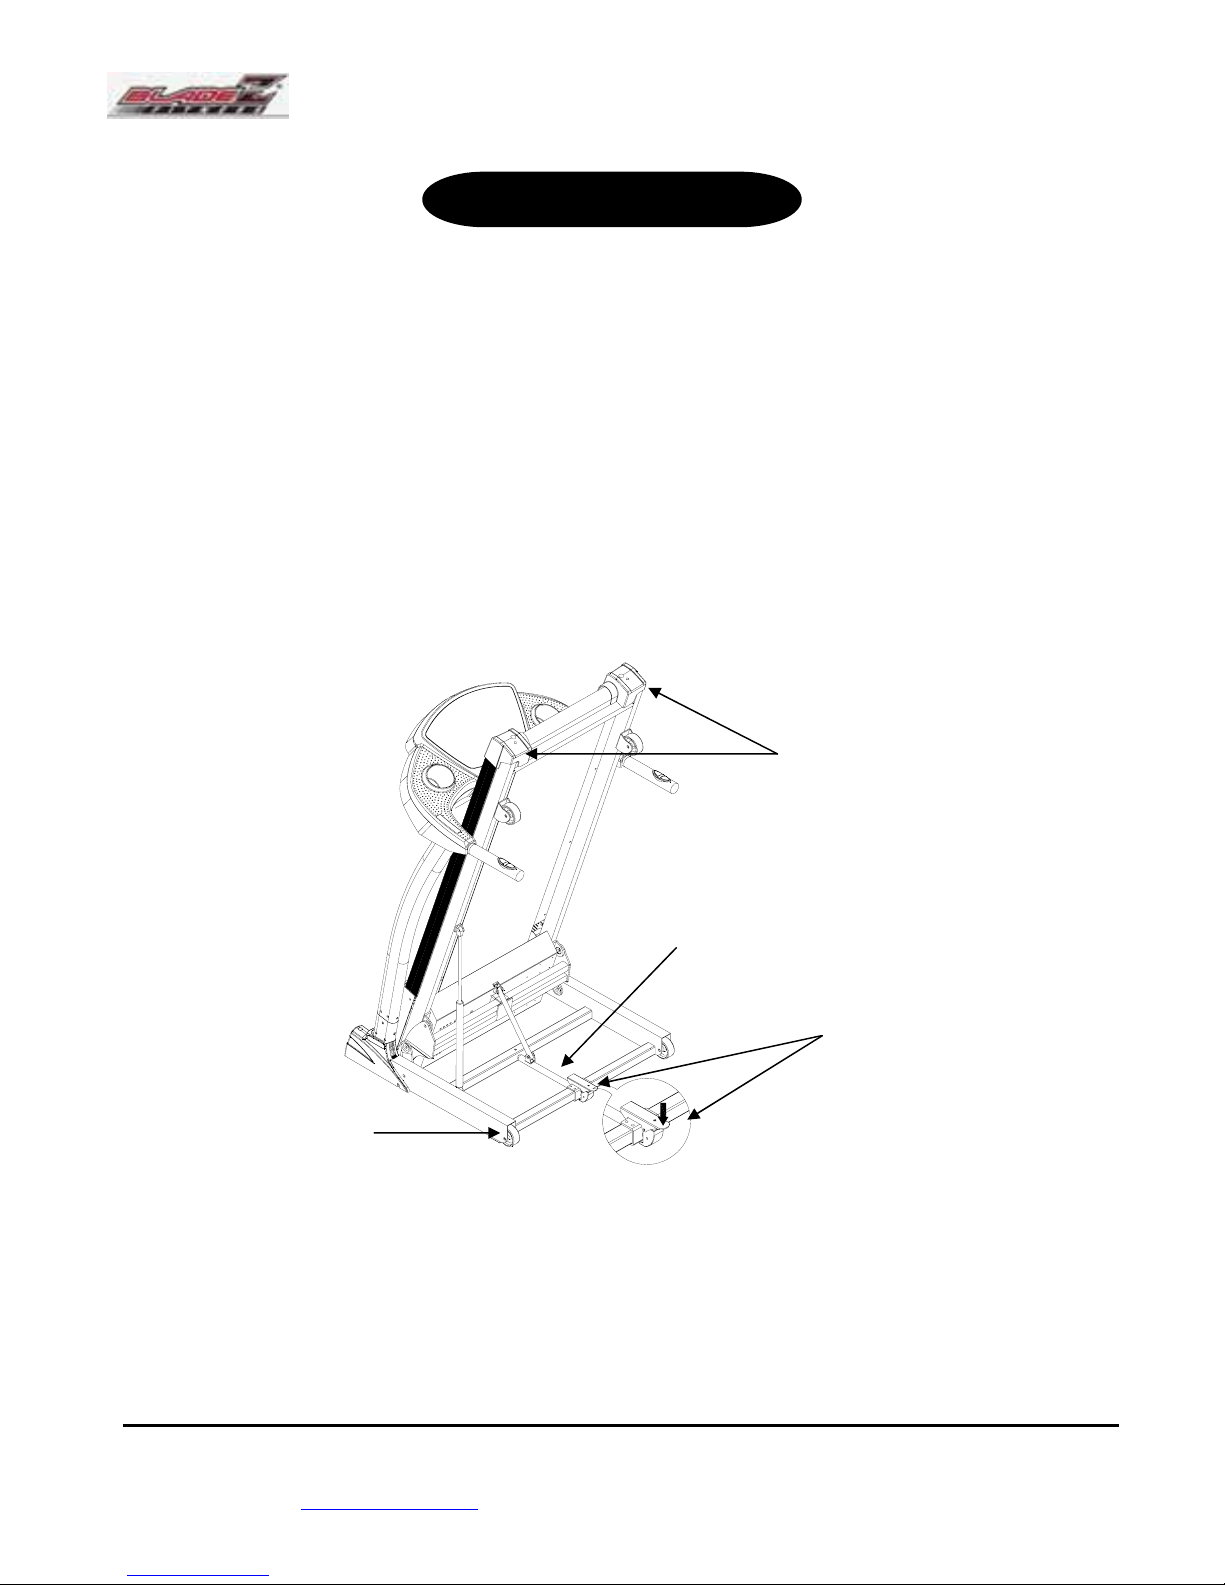
SECTION 3
GETTING STARTED
FOLDING:
To fold your treadmill into the upright position, first be sure to set the elevation to 0%
elevation. The treadmill will not lock into the upright position if the treadmill is not at
0 % elevation.
Using both hands, lift the treadmill by the end caps and push it up until the retaining shaft
locks the treadmill into place.
UNFOLDING:
To unfold the treadmill from the upright position simply depress the unfolding pedal with
your right foot and guide the deck down with both hands. The unfolding pedal may be
located as shown or near the side. Make sure that you do not let go until the deck is
firmly on the floor.
End Caps
Retaining Shaft
Unfolding Pedal
Casters
MOVING THE TREADMILL
The treadmill will need to be locked in the upright position as illustrated above. Grab the
end caps with two hands and slowly pull the deck down towards your body until the
casters are able to roll freely. Keep the treadmill at that angle until you are done with your
move. Always be sure to use correct lifting form / technique.
BladeZ Corporation • 20155 Ellipse • Foothill Ranch • CA • 92610
www.ebladez.com
8
• Phone 949-206-8152 • Fax 949-206-0013
Page 10
GETTING STARTED CONTINUED
SAFETY KEY & CLIP
Your Bladez treadmill is equipped with a safety key that will disable the
treadmill if it is not in place. You should attach the clip end to your clothing.
The magnet end goes into the recess in the center of the console. If at any
time you need to stop the treadmill simply pull the safety key quickly off the
console. This will cut all power to the treadmill and it will come to a
complete stop. To restart the treadmill, place the safety key back in place.
You will then need to program your workout again.
BEFORE STARTING
Straddle the walking belt and stand on the side rails. Insert the safety key
and attach the clip to your clothing. Do not stand on the walking belt while
starting or stopping the treadmill.
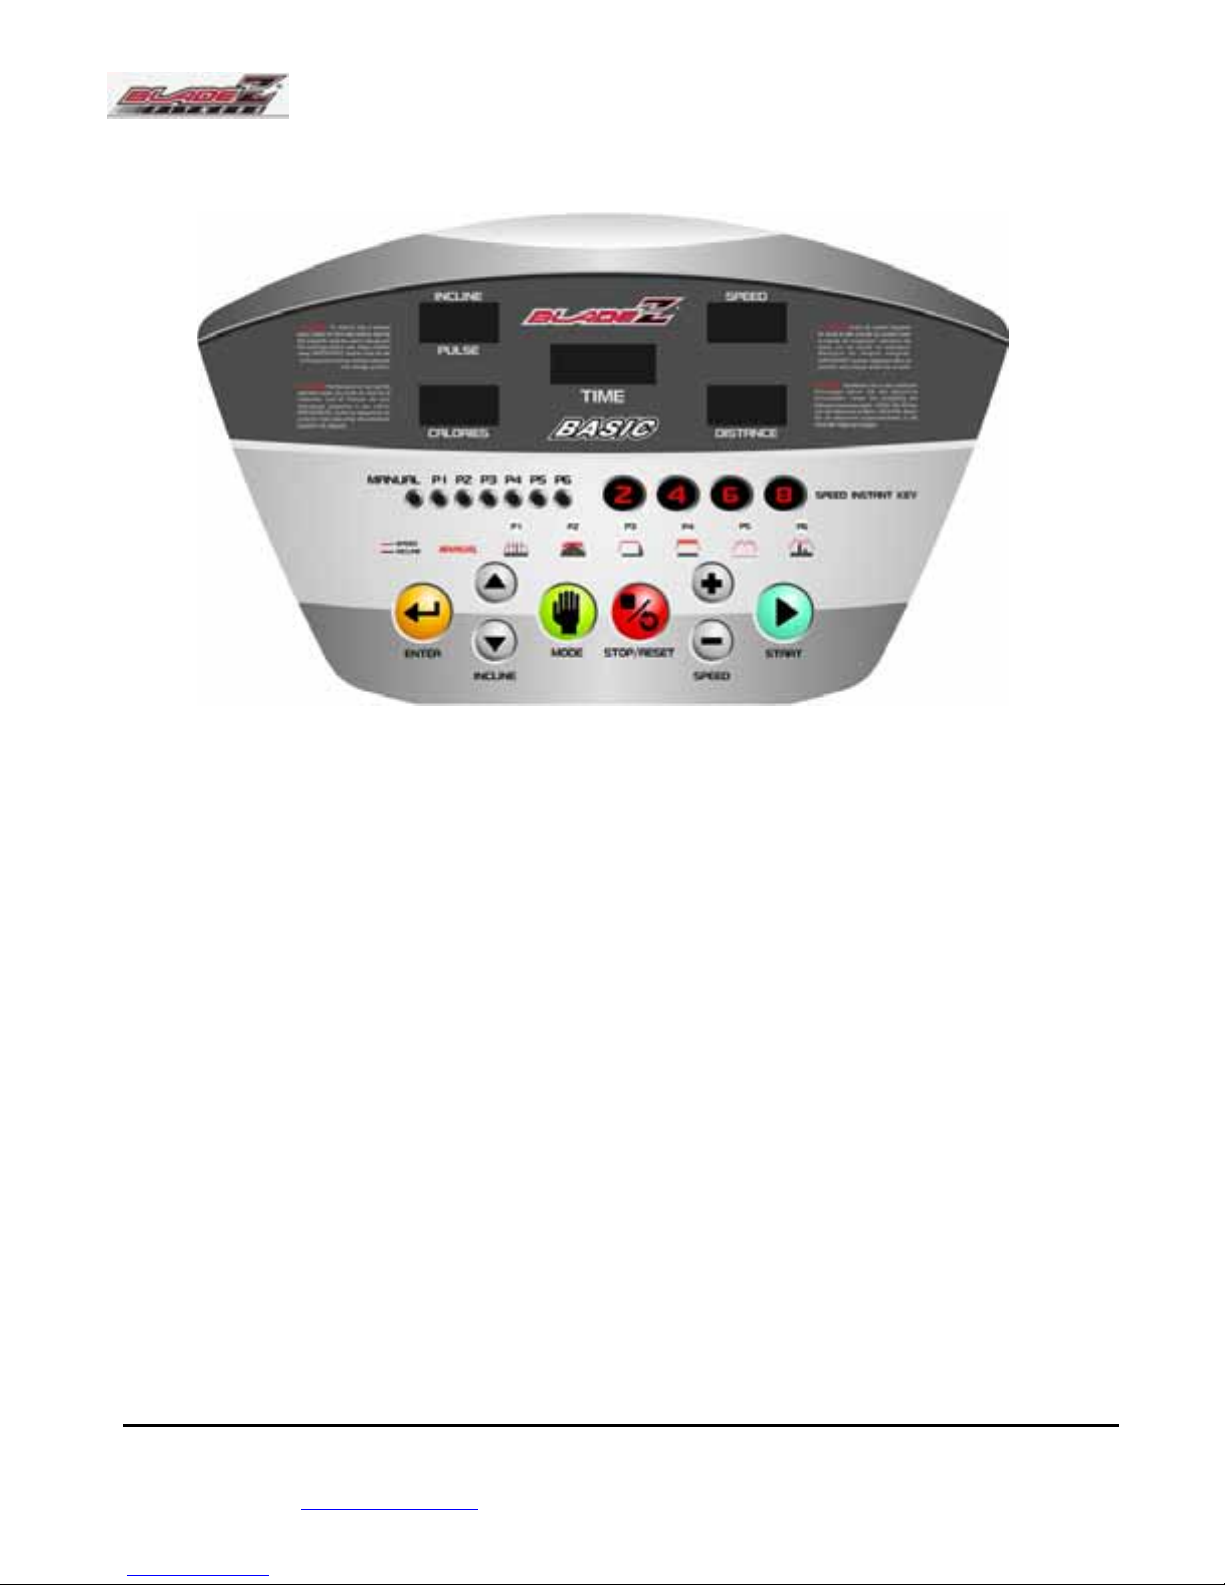
KEY FUNCTIONS
START – This key is used to begin any treadmill program or quick start.
MODE – This key is used to enter into the program mode. It is also used to
change the values on the display between incline and pulse.
STOP – This key is used to stop the treadmill at any time. Pressing and
holding the STOP button 3 seconds will reset the treadmill.
ENTER – This key is used to confirm your selection.
These keys are used to adjust the speed of the treadmill.
These keys are used to change values during programming.
They are also used to adjust the elevation of the treadmill.
INSTANT SPEED KEYS – You can change the speed of the treadmill by
pressing one of the Instant Key buttons. The keys represent Miles per Hour
(MPH).
BladeZ Corporation • 20155 Ellipse • Foothill Ranch • CA • 92610
www.ebladez.com
9
• Phone 949-206-8152 • Fax 949-206-0013
Page 11
GETTING STARTED CONTINUED
CONSOLE FEEDBACK
TIME – This will read the number of minutes left in the program that you
have selected. In Quick Start, it will read the number of minutes that
you have been exercising.
CALORIES – This reading is the amount of body heat in calories burned
during your workout. As with all pieces of exercise
equipment, this is an estimated value.
INCLINE – Incline will read as a percent of grade.
PULSE – Pulse will read in beats per minute. (BPM).
SPEED – This is how fast you are moving in terms of miles per hour
(MPH).
DISTANCE – Total distance traveled during your workout displayed in
miles.
USING HEART RATE
GRIP PULSE – To periodically check your heart rate, grasp the sensors on
the handrails. The PULSE LED will flash and after about 9 seconds your
pulse will be shown in the pulse window.
BladeZ Corporation • 20155 Ellipse • Foothill Ranch • CA • 92610
www.ebladez.com
10
• Phone 949-206-8152 • Fax 949-206-0013
Page 12
GETTING STARTED CONTINUED
QUICK START
1. Turn on POWER.
NOTE: For more accurate calorie count, adjust weight to match your own,
otherwise skip to step 4.
2. Weight will be flashing in Distance window. (Default 150 lbs.)
3. Adjust weight with keys.
4. Press START. The running belt will start to move at 0.5 MPH.
5. Adjust Speed with the
6. Adjust Incline with the
keys or Speed Instant Keys.
keys.
TO STOP
1. Step off running belt onto the side rails.
2. Press STOP. The running belt will stop.
Note: For an immediate stop, pull out the safety key from the safety key
recess and the treadmill will stop.
BladeZ Corporation • 20155 Ellipse • Foothill Ranch • CA • 92610
www.ebladez.com
11
• Phone 949-206-8152 • Fax 949-206-0013
Page 13
SECTION 4
WORKOUT PROGRAM DETAILS
Your BLADEZ treadmill will provide both manual controlled and factory
installed preset workout programs.
In MANUAL, you control the speed and elevation at your discretion.
For QUICK START exercise with Time setting, refer to Manual Program.
In PRESET programs, the speed and/or elevation will change in accordance
with the program’s profile (as illustrated on the following pages).
MANUAL PROGRAM SETUP
1. Turn on POWER.
2. Weight will be flashing in Distance window. (Default 150 lbs.)
3. Adjust weight with keys.
4. Press MODE key ~ Manual light will be flashing.
5. Press ENTER ~ Time will be flashing.
6. Adjust time with the
keys.
7. Press START.
8. Adjust Speed with the
9. Adjust Incline with the
keys or Speed Instant Keys.
keys.
PROGRAM SETUP
1. Turn on POWER.
2. Weight will be flashing in Distance window. (Default 150 lbs.)
3. Adjust weight with keys.
4. Press MODE key ~ Manual light will be flashing.
5. Select the program (P1-P6) with the
6. Press ENTER ~ Speed will be flashing.
7. Adjust speed if you wish with the
8. Press ENTER ~ Incline will be flashing.
9. Adjust incline if you wish with the
Note: Program P1, skip steps 10 & 11.
10. Press ENTER ~ Time will be flashing.
keys.
keys.
keys.
11. Adjust time if you wish with the
12. Press START.
BladeZ Corporation • 20155 Ellipse • Foothill Ranch • CA • 92610
www.ebladez.com
keys.
12
• Phone 949-206-8152 • Fax 949-206-0013
Page 14
WORKOUT PROGRAM DETAILS CONTINUED
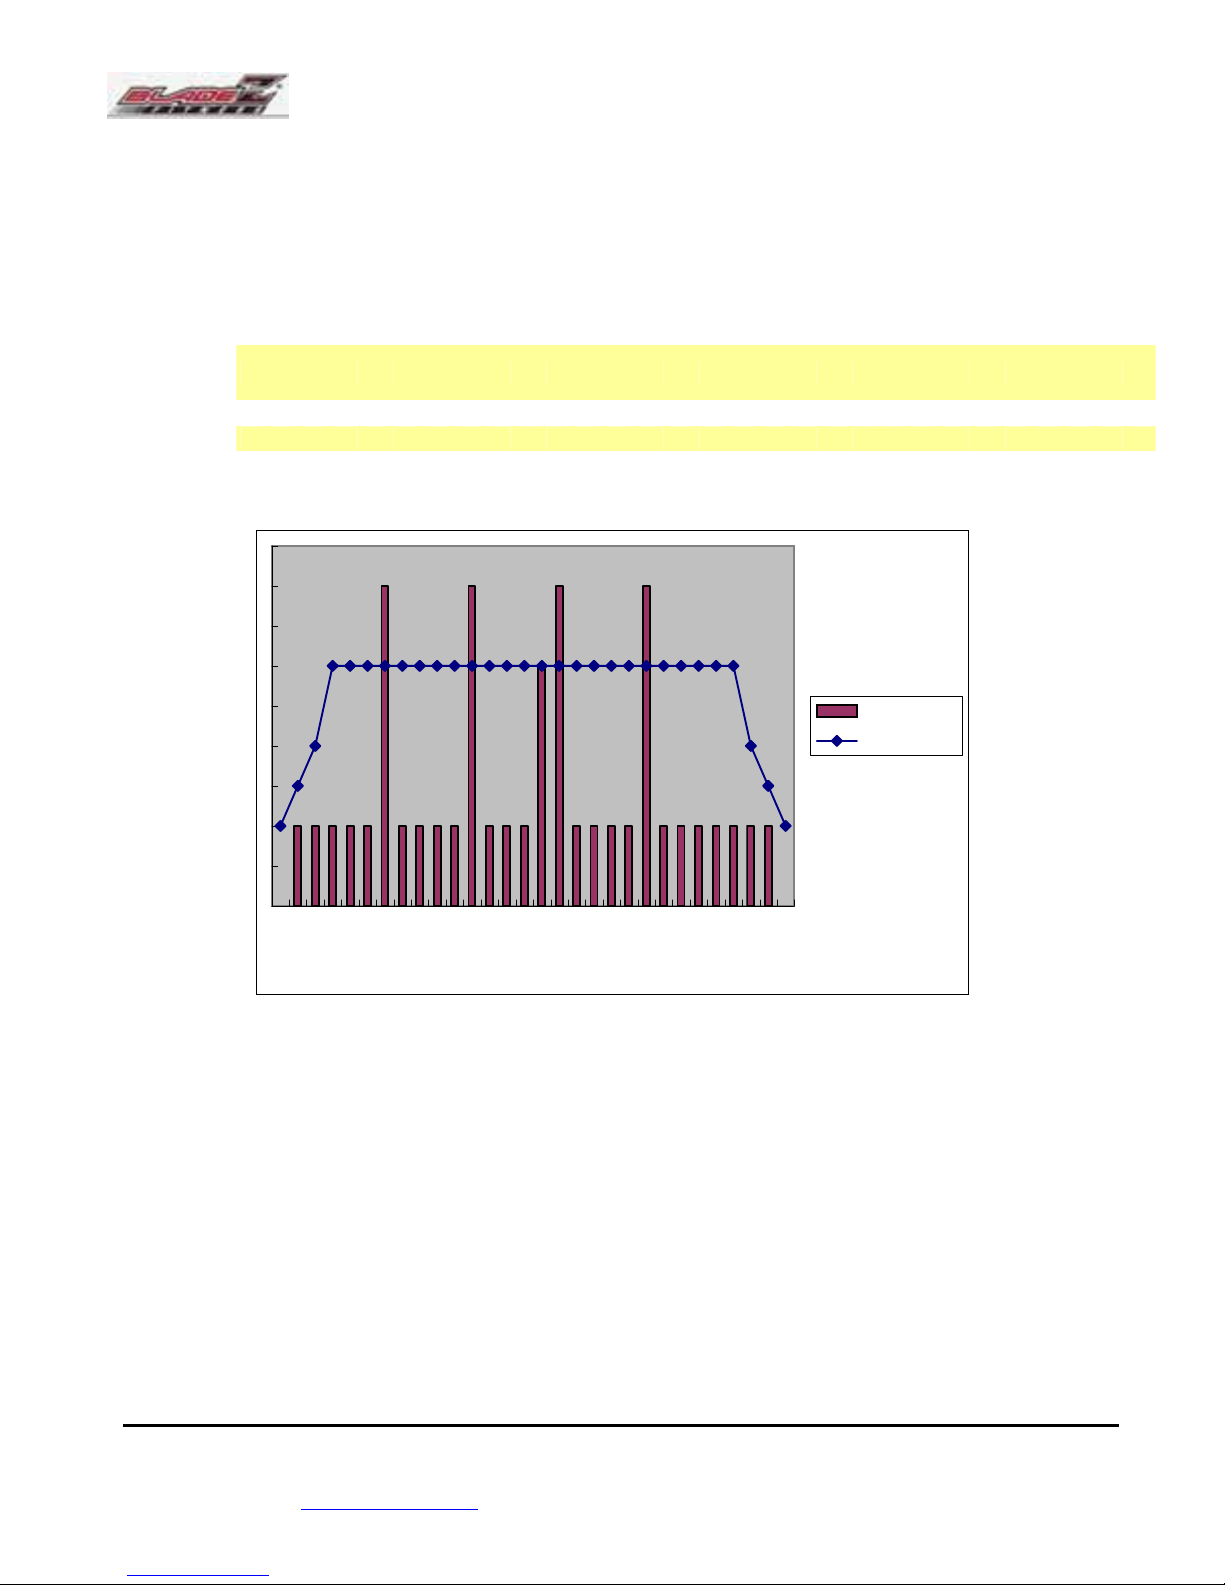
The Bladez T1 has 6 preset programs.
SPEED AND ELEVATION CHANGES
9 HOLE WALK
Elevation
Speed(Ml)
Speed(Km)
Program View
1 2 3 4 5 6 7 8 9 10 11 12 13 14 15 16 17 18 19 20 21 22 23 24 25 26 27 28 29 30
0.0 1.0 1.0 1.0 1.0 1.0 4.0 1.0 1.0 1.0 1.0 4.0 1.0 1.0 1.0 3.0 4.0 1.0 1.0 1.0 1.0 4.0 1.0 1.0 1.0 1.0 1.0 1.0 1.0 0.0
1.0 1.5 2.0 3.0 3.0 3.0 3.0 3.0 3.0 3.0 3.0 3.0 3.0 3.0 3.0 3.0 3.0 3.0 3.0 3.0 3.0 3.0 3.0 3.0 3.0 3.0 3.0 2.0 1.5 1.0
1.6 2.4 3.2 4.8 4.8 4.8 4.8 4.8 4.8 4.8 4.8 4.8 4.8 4.8 4.8 4.8 4.8 4.8 4.8 4.8 4.8 4.8 4.8 4.8 4.8 4.8 4.8 3.2 2.4 1.6
Elevation
Speed(Ml)
1 3 5 7 9 11 13 15 17 19 21 23 25 27 29
P1 9 HOLE: This program simulates the motion of golfers walking in a golf course and the resistance level
is based on uphill and downhill movement. The entire program is approximate
ly 3828 yards or 2.17
miles and will stop automatically once the distance is reached. No time setting is required.
13
BladeZ Corporation • 20155 Ellipse • Foothill Ranch • CA • 92610
www.ebladez.com
• Phone 949-206-8152 • Fax 949-206-0013
Page 15
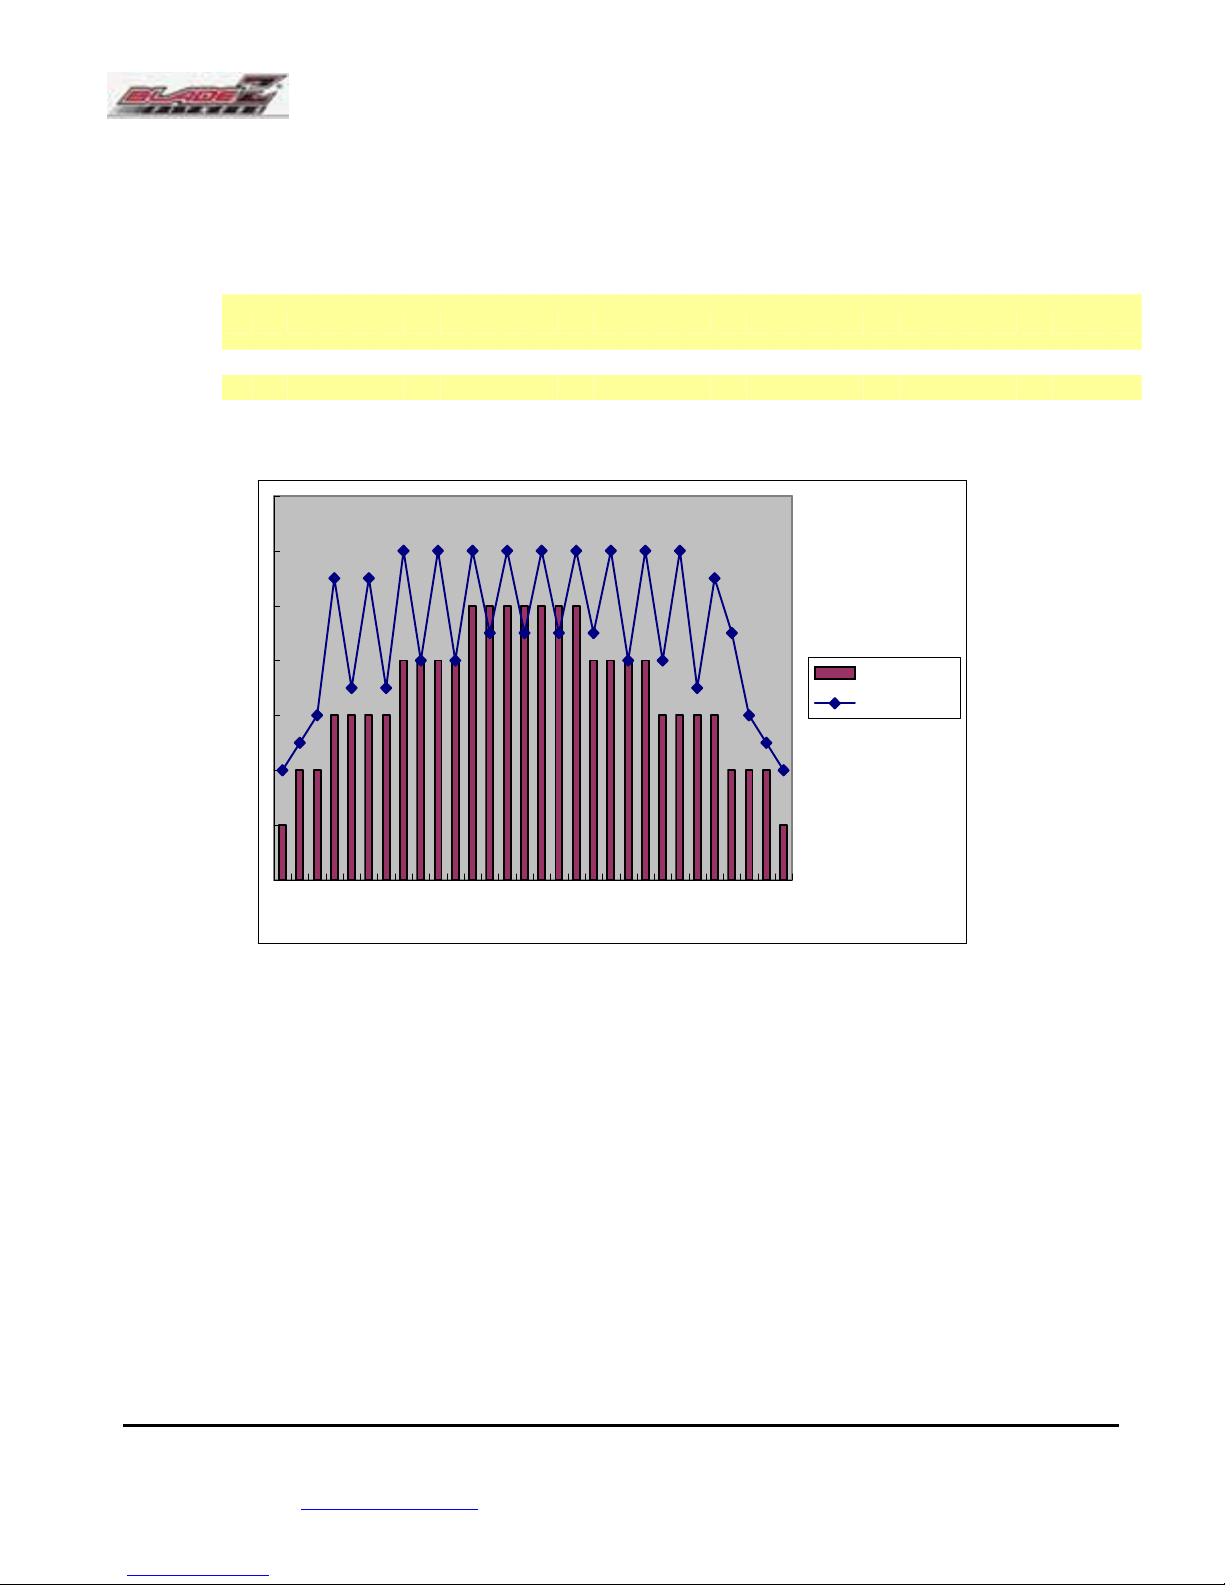
WORKOUT PROGRAM DETAILS CONTINUED
SPEED AND ELEVATION CHANGES
HILL CLIMB
Elevation
Speed(Ml)
Speed(Km)
Program View
1 2 3 4 5 6 7 8 9 10 11 12 13 14 15 16 17 18 19 20 21 22 23 24 25 26 27 28 29 30
1 2 2 3 3 3 3 4 4 4 4 5 5 5 5 5 5 5 4 4 4 4 3 3 3 3 2 2 2 1
2.0 2.5 3.0 5.5 3.5 5.5 3.5 6.0 4.0 6.0 4.0 6.0 4.5 6.0 4.5 6.0 4.5 6.0 4.5 6.0 4.0 6.0 4.0 6.0 3.5 5.5 4.5 3.0 2.5 2.0
3.2 4 4.8 8.8 5.6 8.8 5.6 9.6 6.4 9.6 6.4 9.6 7.2 9.6 7.2 9.6 7.2 9.6 7.2 9.6 6.4 9.6 6.4 9.6 5.6 8.8 7.2 4.8 4 3.2
Elevation
Speed(Ml)
1 3 5 7 9 11131517192123252729
BladeZ Corporation • 20155 Ellipse • Foothill Ranch • CA • 92610
www.ebladez.com
14
• Phone 949-206-8152 • Fax 949-206-0013
Page 16
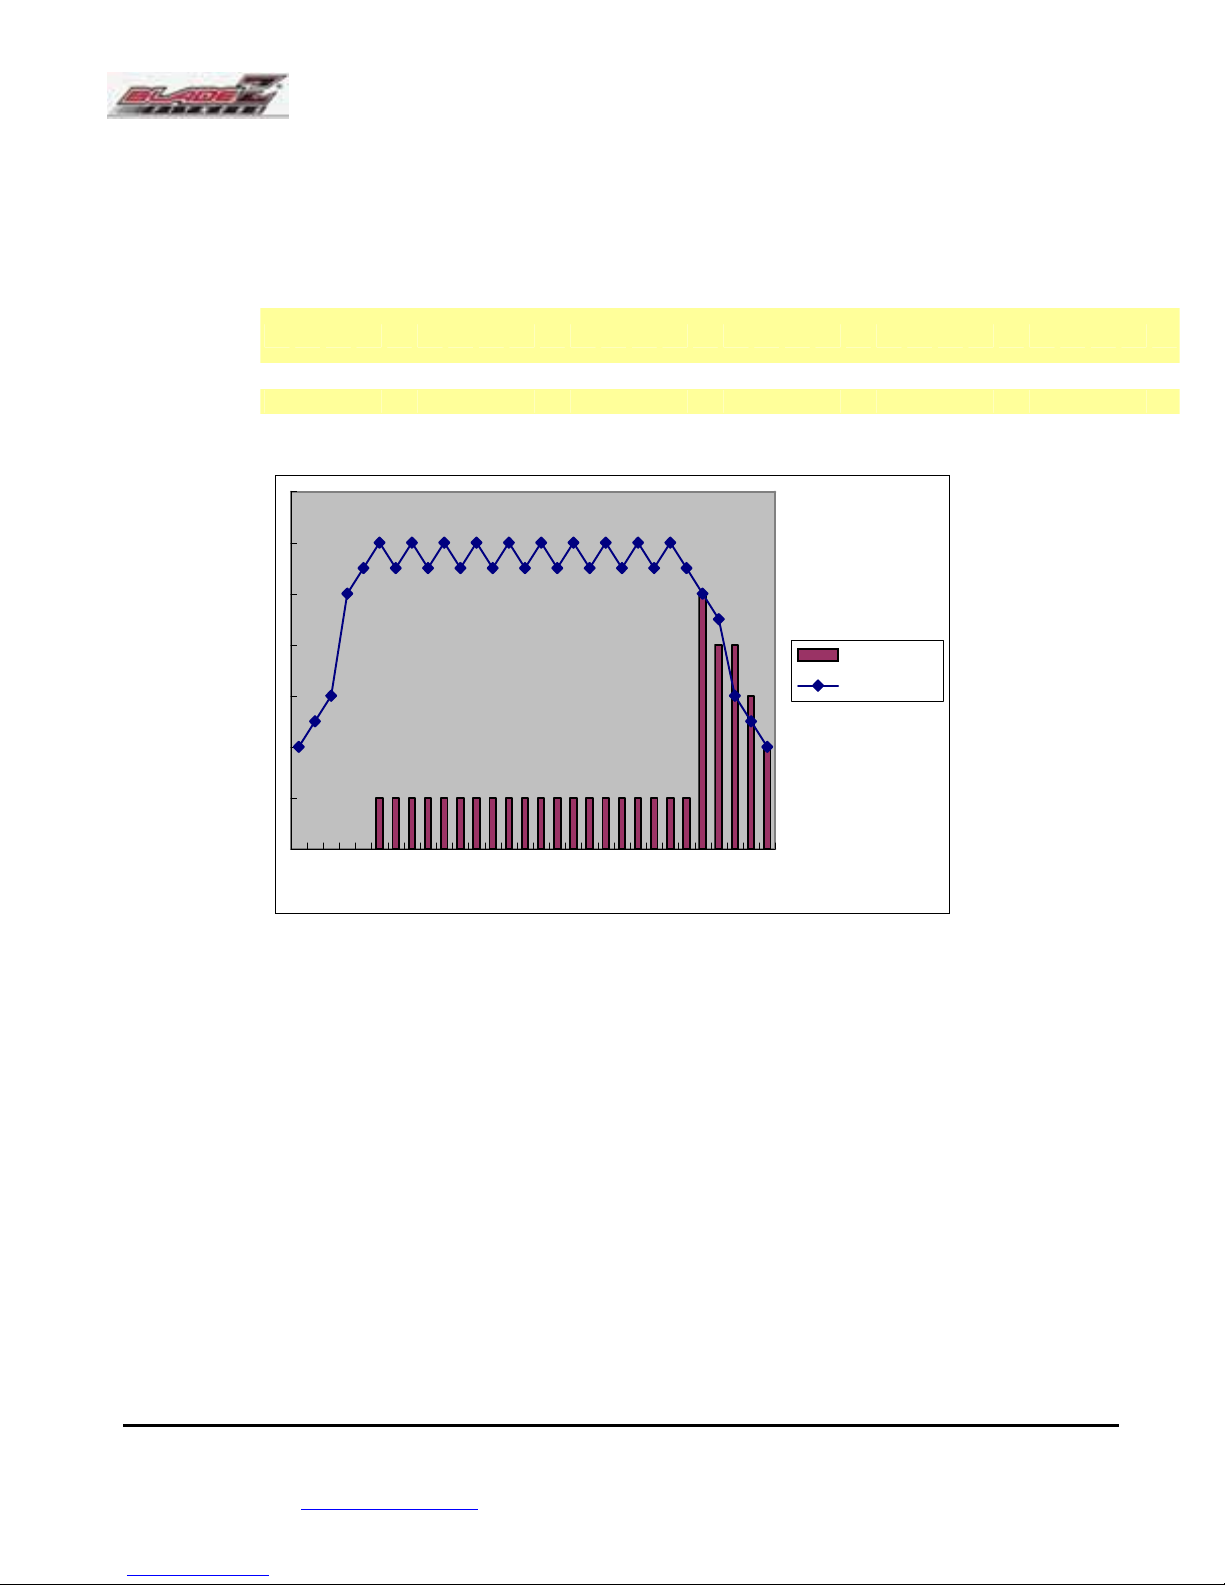
WORKOUT PROGRAM DETAILS CONTINUED
SPEED AND ELEVATION CHANGES
ENDURANCE RUN
Elevation
Speed(Ml)
Speed(Km)
Program View
1 2 3 4 5 6 7 8 9 10 11 12 13 14 15 16 17 18 19 20 21 22 23 24 25 26 27 28 29 30
0 0 0 0 0 1 1 1 1 1 1 1 1 1 1 1 1 1 1 1 1 1 1 1 1 5 4 4 3 2
2.0 2.5 3.0 5.0 5.5 6.0 5.5 6.0 5.5 6.0 5.5 6.0 5.5 6.0 5.5 6.0 5.5 6.0 5.5 6.0 5.5 6.0 5.5 6.0 5.5 5.0 4.5 3.0 2.5 2.0
3.2 4 4.8 8 8.8 9.6 8.8 9.6 8.8 9.6 8.8 9.6 8.8 9.6 8.8 9.6 8.8 9.6 8.8 9.6 8.8 9.6 8.8 9.6 8.8 8 7.2 4.8 4 3.2
Elevation
Speed(Ml)
1357911131517192123252729
15
BladeZ Corporation • 20155 Ellipse • Foothill Ranch • CA • 92610
www.ebladez.com
• Phone 949-206-8152 • Fax 949-206-0013
Page 17
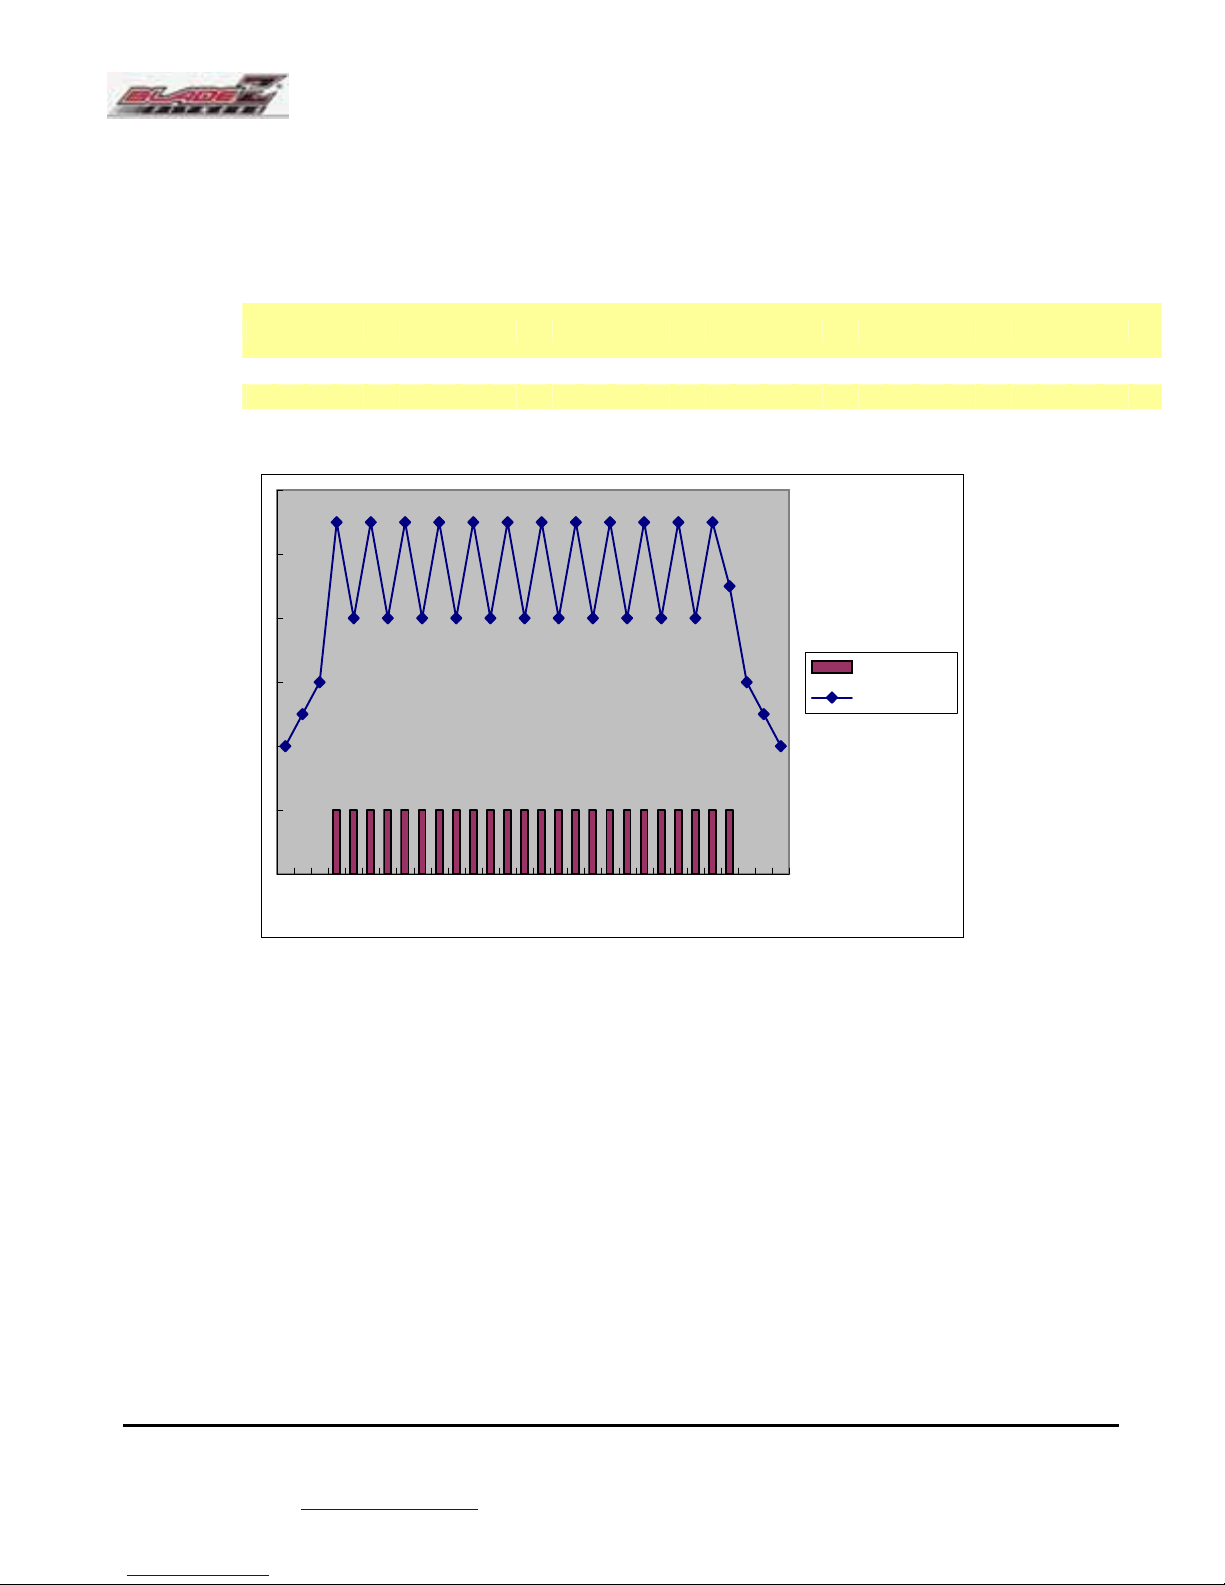
WORKOUT PROGRAM DETAILS CONTINUED
SPEED AND ELEVATION CHANGES
INTERVAL RUN
Elevation
Speed(Ml)
Speed(Km)
Program View
1 2 3 4 5 6 7 8 9 10 11 12 13 14 15 16 17 18 19 20 21 22 23 24 25 26 27 28 29 30
0 0 0 1 1 1 1 1 1 1 1 1 1 1 1 1 1 1 1 1 1 1 1 1 1 1 1 0 0 0
2.0 2.5 3.0 5.5 4.0 5.5 4.0 5.5 4.0 5.5 4.0 5.5 4.0 5.5 4.0 5.5 4.0 5.5 4.0 5.5 4.0 5.5 4.0 5.5 4.0 5.5 4.5 3.0 2.5 2.0
3.2 4 4.8 8.8 6.4 8.8 6.4 8.8 6.4 8.8 6.4 8.8 6.4 8.8 6.4 8.8 6.4 8.8 6.4 8.8 6.4 8.8 6.4 8.8 6.4 8.8 7.2 4.8 4 3.2
Elevation
Speed(Ml)
1 3 5 7 9 11131517192123252729
16
BladeZ Corporation • 20155 Ellipse • Foothill Ranch • CA • 92610
www.ebladez.com
• Phone 949-206-8152 • Fax 949-206-0013
Page 18
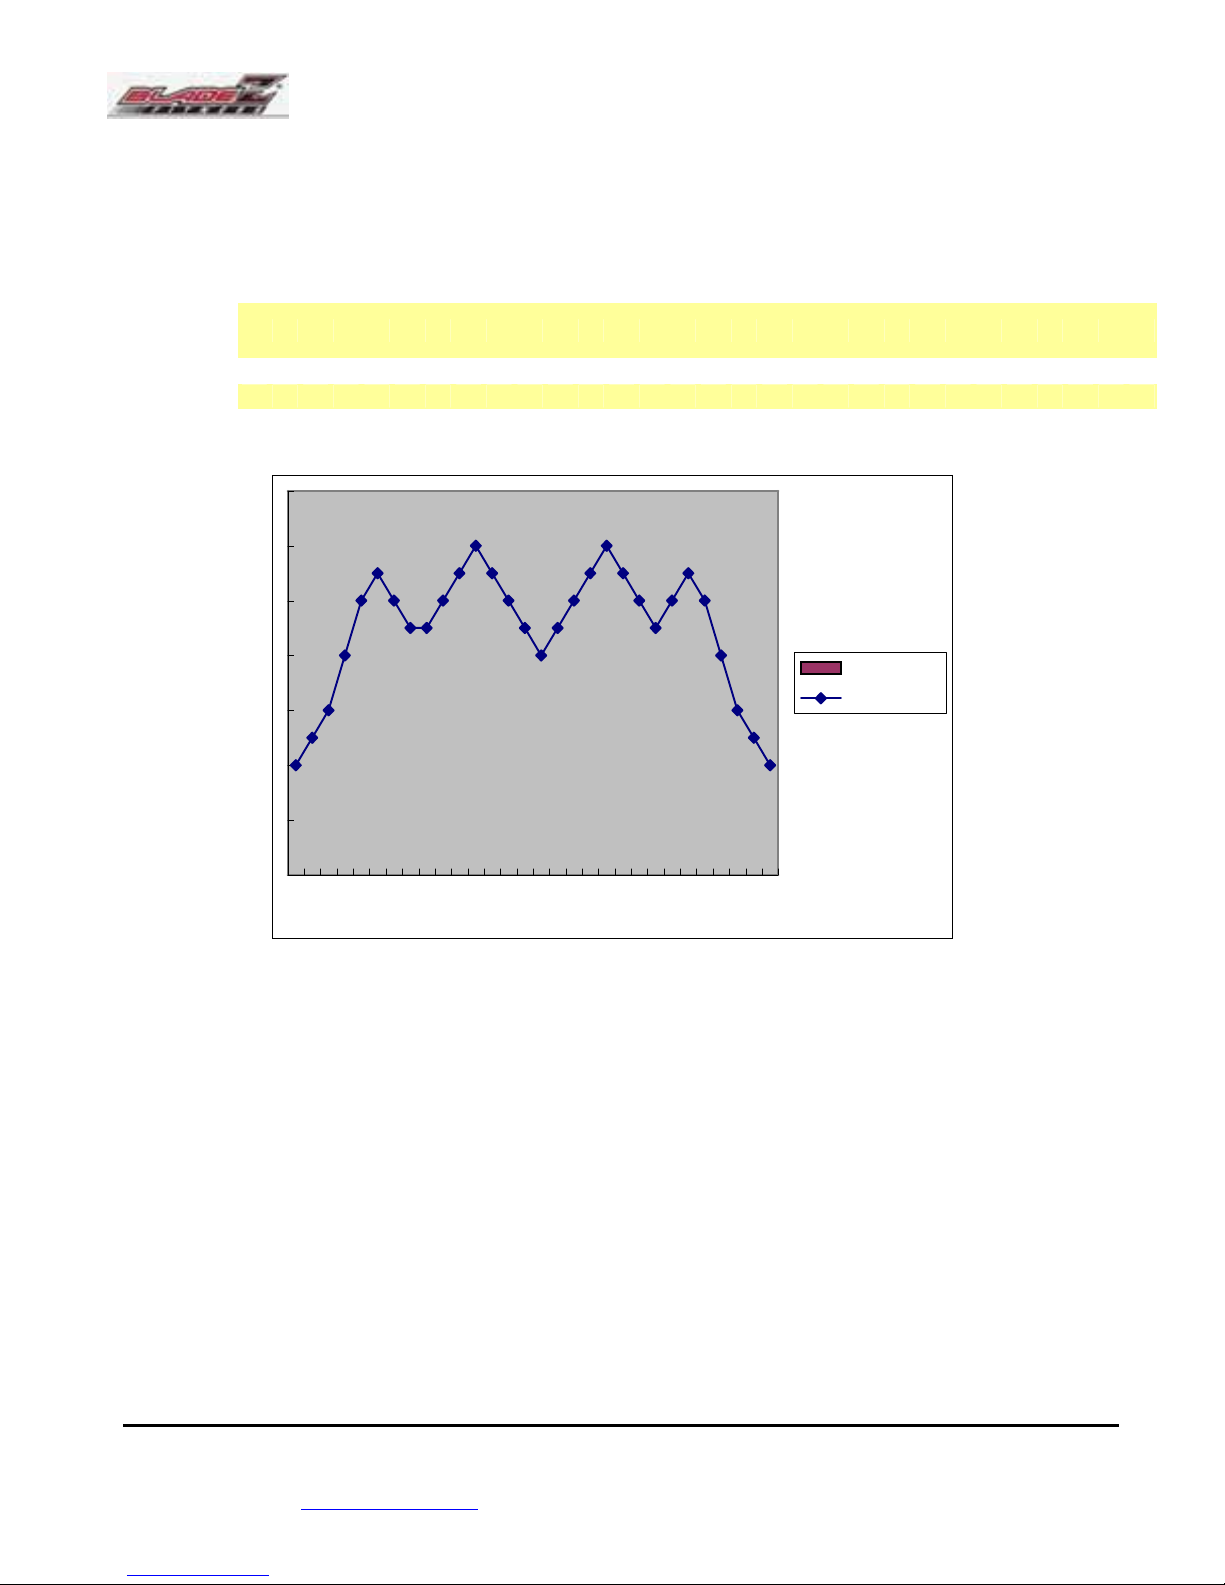
WORKOUT PROGRAM DETAILS CONTINUED
SPEED AND ELEVATION CHANGES
ROLLING RUN
Elevation
Speed(Ml)
Speed(Km)
Program View
1 2 3 4 5 6 7 8 9 10 11 12 13 14 15 16 17 18 19 20 21 22 23 24 25 26 27 28 29 30
0 0 0 0 0 0 0 0 0 0 0 0 0 0 0 0 0 0 0 0 0 0 0 0 0 0 0 0 0 0
2.0 2.5 3.0 4.0 5.0 5.5 5.0 4.5 4.5 5.0 5.5 6.0 5.5 5.0 4.5 4.0 4.5 5.0 5.5 6.0 5.5 5.0 4.5 5.0 5.5 5.0 4.0 3.0 2.5 2.0
3.2 4 4.8 6.4 8 8.8 8 7.2 7.2 8 8.8 9.6 8.8 8 7.2 6.4 7.2 8 8.8 9.6 8.8 8 7.2 8 8.8 8 6.4 4.8 4 3.2
Elevation
Speed(Ml)
1 3 5 7 9 11 13 15 17 19 21 23 25 27 29
17
BladeZ Corporation • 20155 Ellipse • Foothill Ranch • CA • 92610
www.ebladez.com
• Phone 949-206-8152 • Fax 949-206-0013
Page 19
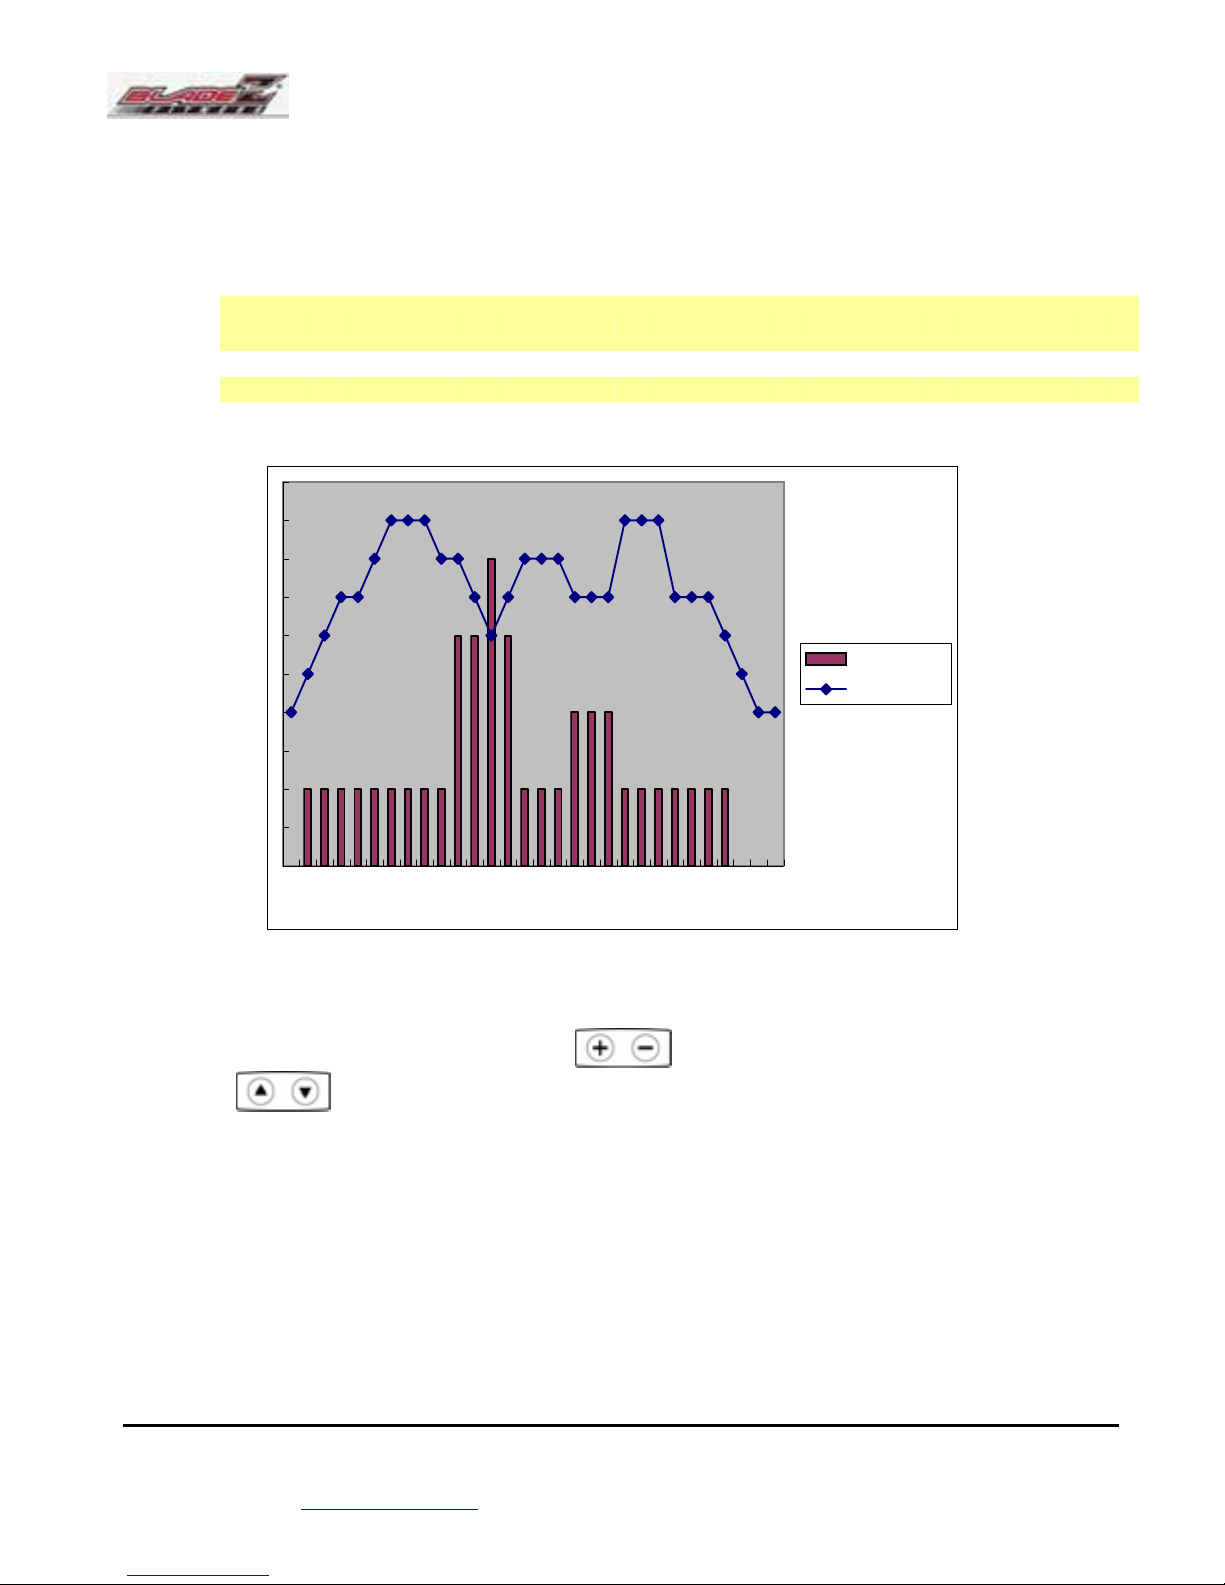
WORKOUT PROGRAM DETAILS CONTINUED
SPEED AND ELEVATION CHANGES
WEIGHT LOSS
Elevation
Speed(Ml)
Speed(Km)
Program View
1 2 3 4 5 6 7 8 9 10 11 12 13 14 15 16 17 18 19 20 21 22 23 24 25 26 27 28 29 30
0 1 1 1 1 1 1 1 1 1 3 3 4 3 1 1 1 2 2 2 1 1 1 1 1 1 1 0 0 0
2.0 2.5 3.0 3.5 3.5 4.0 4.5 4.5 4.5 4.0 4.0 3.5 3.0 3.5 4.0 4.0 4.0 3.5 3.5 3.5 4.5 4.5 4.5 3.5 3.5 3.5 3.0 2.5 2.0 2.0
3.2 4 4.8 5.6 5.6 6.4 7.2 7.2 7.2 6.4 6.4 5.6 4.8 5.6 6.4 6.4 6.4 5.6 5.6 5.6 7.2 7.2 7.2 5.6 5.6 5.6 4.8 4 3.2 3.2
Elevation
Speed(Ml)
1357911131517192123252729
NOTE:
any time during the workout by pressing
Press
The user can manually adjust the speed of any of the preset programs (P1-P6) at
to accelerate or decelerate.
to control the elevation. Once the change is made to the program (P1-P6),
it will stay at that level until the user makes another change.
There are 30 stages in each PROGRAM. The first 3 stages are WARM UP and the last
three stages are COOL DOWN.
The 9 HOLES PROGRAM has no WARM UP and COOL DOWN function. When the
distance reaches 2.17 miles, the motor stops, elevation returns to 0 and the program ends.
18
BladeZ Corporation • 20155 Ellipse • Foothill Ranch • CA • 92610
www.ebladez.com
• Phone 949-206-8152 • Fax 949-206-0013
Page 20
SECTION 5
PREVENTIVE MAINTENANCE
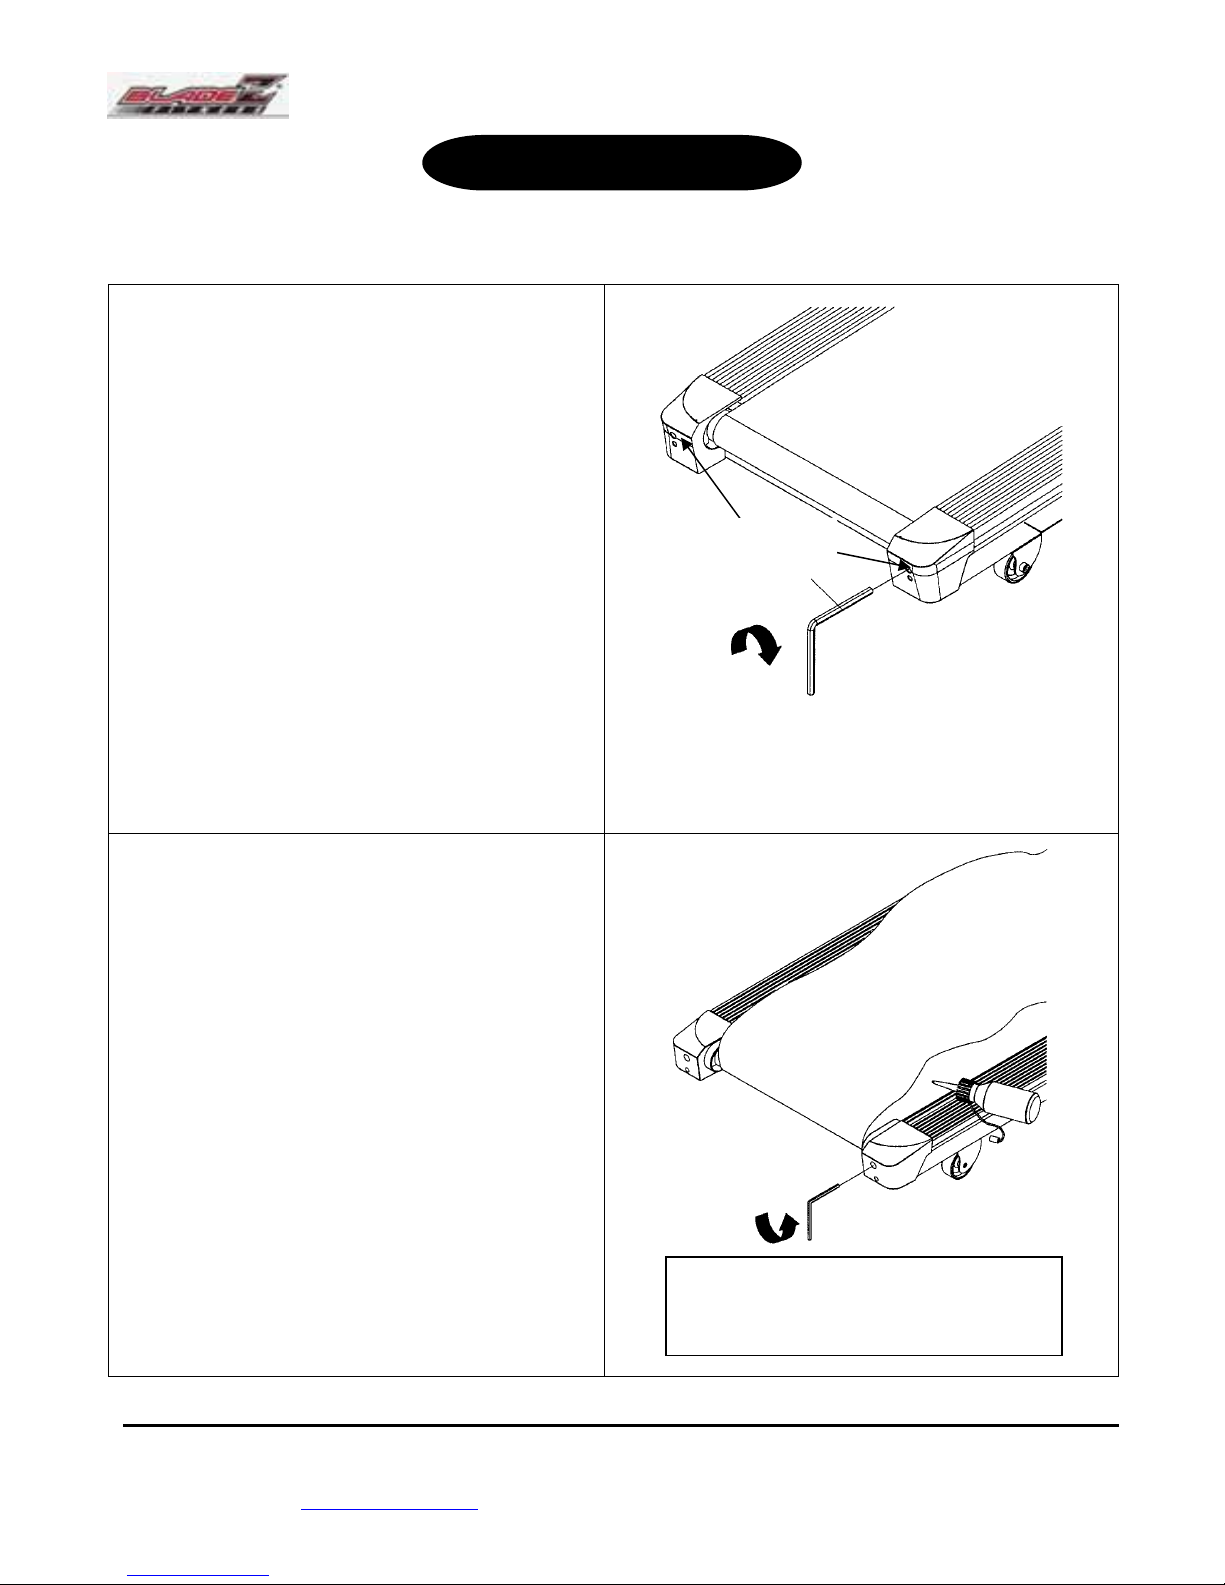
The running belt can shift to one side or simply ‘skid over’
when running. To center the belt using the 6mm Allen
wrench, run the machine at 3mph for a few minutes to
determine which side the belt is drifting towards; left or
right.
If the belt is drifting left
i) Turn the treadmill off and unplug from the machine
ii) Tighten the left bolt a ¼ turn (clockwise)
iii) Loosen the right bolt a ¼ turn (counterclockwise)
iv) Run the belt at 3 mph again for a few minutes
If the belt continues to drift to the left, repeat steps
If the belt is drifting right
i) Turn the treadmill off and unplug from the machine
ii) Tighten the right bolt a ¼ turn (clockwise)
iii) Loosen the left bolt a ¼ turn (counterclockwise)
iv) Run the belt at 3 mph again for a few minutes
If the belt continues to drift to the right, repeat steps
Once the running belt has been adjusted closer to the
center, the treadmill can be powered on again.
It is recommended that the deck be lubricated every
6~12 months according to the frequency of usage.
WARNING!
Do not use cleaner under the running belt.
i) Use 6mm Allen wrench to loosen the bolts in the
end caps. Remove excessive accumulations of dust,
dirt, and other substances from running deck. ONLY
use a clean soft cloth.
ii) Gently pull up the side of the running belt, and
dispense a thin layer of the lubricant on deck, and
spread evenly. DO NOT over lubricate
iii) Center the belt (top of this page), and tighten the
end caps.
Check belt condition and adjust if necessary referring
to the steps above.
Rear Roller Bolt
6 mm wrench
4 Miles or less / hr = lube every 1 year
4~8 Miles / hr = lube every 6 months
8 Miles or more / hr = lube every 3 months
BladeZ Corporation • 20155 Ellipse • Foothill Ranch • CA • 92610
www.ebladez.com
19
• Phone 949-206-8152 • Fax 949-206-0013
Page 21

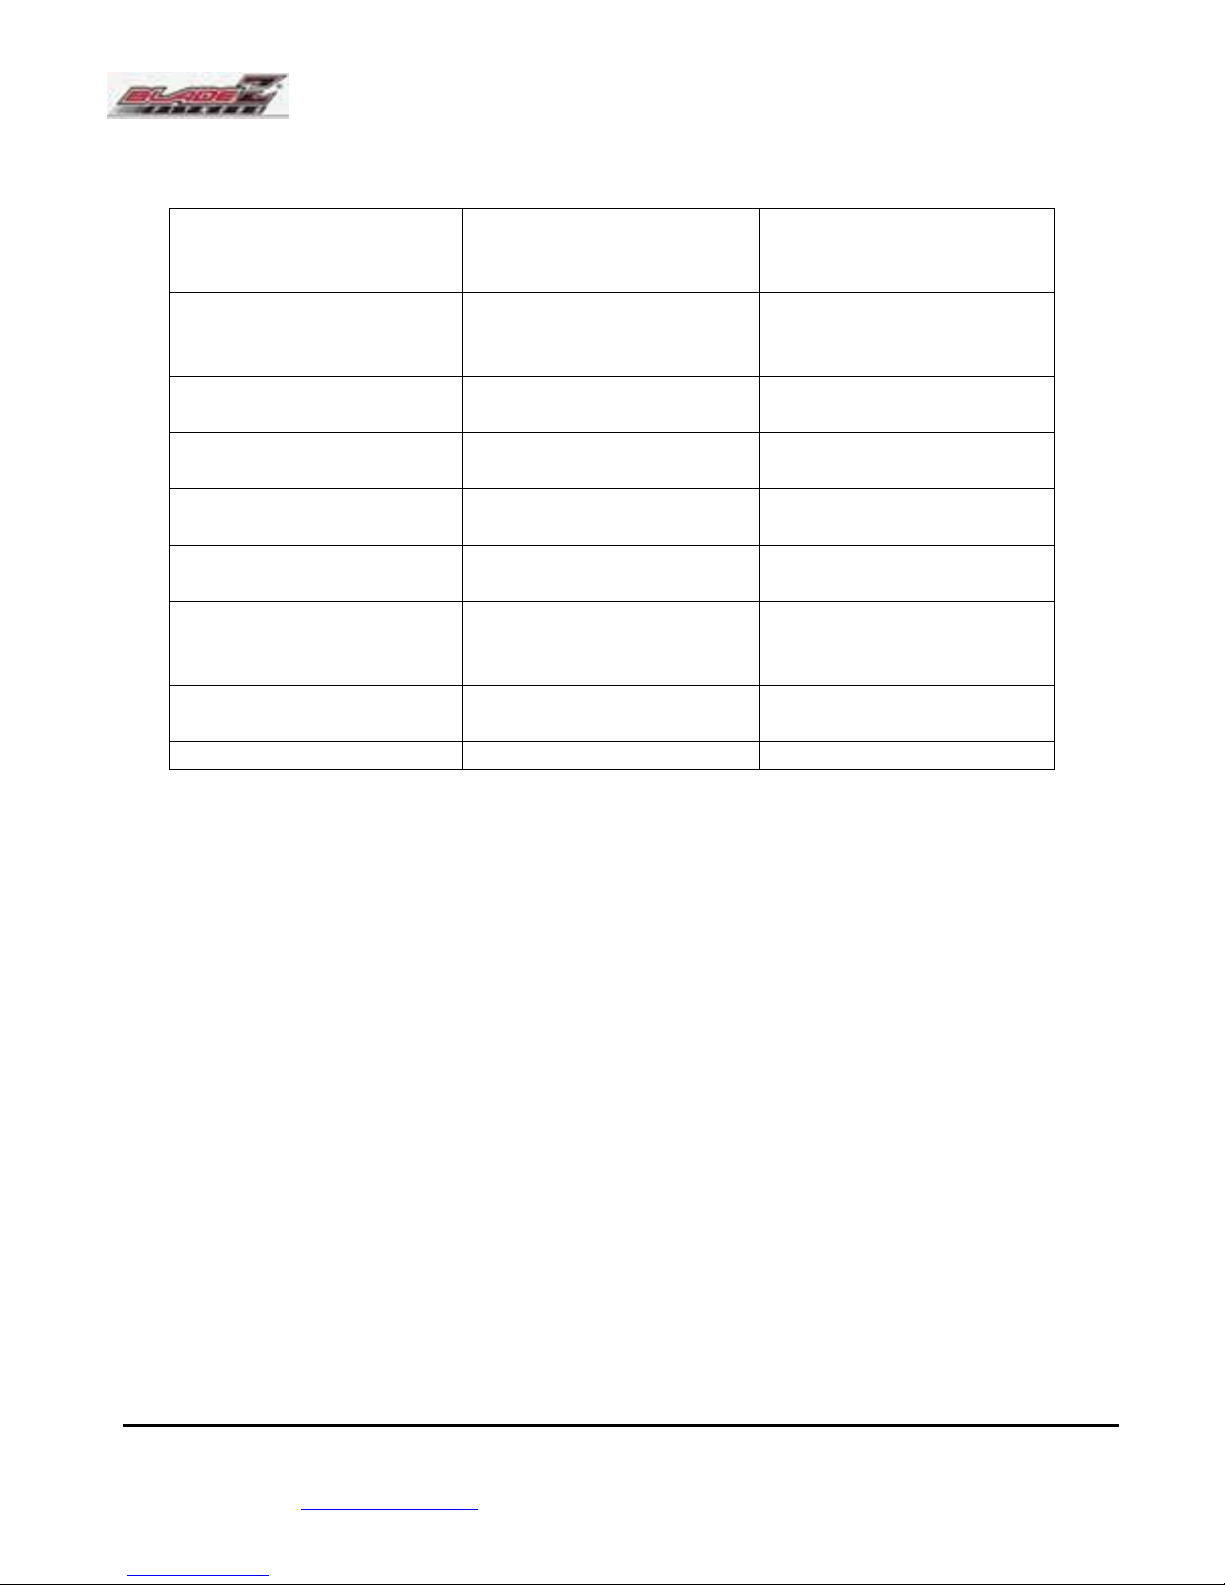
SECTION 6
TROUBLESHOOTING
ERROR MESSAGE
E1
- Loss of Feedback Speed Sensor disconnected Check Speed
- Running Deck Running Deck not
Speed Sensor Faulty Replace S-Sensor
Loose Display Cable Check Display
Faulty MCB
Drive Motor disconnected Check D-Motor connection
PROBABLE CAUSES
SOLUTION
Sensor Connection
Check R-Deck oil
lubricated
Speed Sensor misaligned
Check Sensor position
Cable connection
Replace MCB
(D2 LED on)
Drive Motor Faulty Replace D-Motor
E6
- Safety Key Off Safety Key Faulty Check Safety Key or Switch
- Elevation Motor Elevation Motor not moving
- Stalled Elevation Elevation Motor screw
binding
Check Elevation Motor
connection
Clean screw and lubricate
20
BladeZ Corporation • 20155 Ellipse • Foothill Ranch • CA • 92610
www.ebladez.com
• Phone 949-206-8152 • Fax 949-206-0013
Page 22
TROUBLESHOOTING CONTINUED
ERROR MESSAGE
Elevation Motor out of
E-Motor Potentiometer
E7
- Elevation Motor Elevation Motor out of
- Display Doesn’t Light Up On/Off switch Check if unit is turned on
Insufficient Power Source Plug unit in a dedicated
Line Cord Damaged Replace Line Cord
Fuse Check Fuse on MCB
PROBABLE CAUSES
Range
Range
SOLUTION
Check Zero Position of EMotor
Replace Elevation Motor
Replace Elevation Motor
120V, 20Amp Outlet
BladeZ Corporation • 20155 Ellipse • Foothill Ranch • CA • 92610
www.ebladez.com
21
• Phone 949-206-8152 • Fax 949-206-0013
Page 23

SECTION 7
WARRANTY
USA / CANADA Warranty
Warranties may vary in other countries. See your local Bladez Dealer.
BLADEZ FITNESS extends the following exclusive, limited warranty, which shall apply only to the use
of the device in the home, for residential, non-commercial purposes only. Any other use of the device shall
void this warranty.
FRAME – Lifetime
Bladez Fitness warrants the Frame against defects in workmanship and materials for Lifetime, so long as it
remains in the possession of the original owner.
MOTOR – Lifetime
Bladez Fitness warrants the Motor against defects in workmanship and materials for Lifetime from the date
of original purchase, so long as the device remains in the possession of the original owner.
ELECTRONICS & PARTS – 5 Years
Bladez Fitness warrants the Electronic components and all original parts (other than the Motor) against
defects in workmanship and materials for a period of Five years from the date of original purchase, so long
as the device remains in the possession of the original owner.
LABOR – 1 Year
Bladez Fitness shall cover the labor cost for the repair of the device for a period of One year from the date
of original purchase, so long as the device remains in the possession of the original owner.
EXCLUSIVE REMEDY
The exclusive remedy for any of the above warranties shall be repair or replacement of defective parts, or
the supply of labor to cure any defect, provided that labor shall be limited to one year. All labor shall be
supplied by the local retailer and the product must be located within the retailer’s service area. Products
located outside the retailer’s service area will not be covered by the labor warranty.
EXCLUSIONS AND LIMITATIONS
This warranty applies only to the original owner and is not transferable. This warranty is expressly limited
to the repair or replacement of a defective Frame, Electronic component, or defective part and is the sole
remedy of the warranty. The warranty does not cover normal wear
BLADEZ FITNESS expressly disclaims all other warranties, express or implied, including but not limited
to all warranties of fitness for a particular purpose or of merchantability. This warranty gives you specific
legal rights and your rights may vary from state to state.
WARRANTY REGISTRATION
Your warranty card must be completed and sent to BLADEZ FITNESS before a warranty claim can be
processed.
BladeZ Corporation • 20155 Ellipse • Foothill Ranch • CA • 92610
www.ebladez.com
22
• Phone 949-206-8152 • Fax 949-206-0013
 Loading...