

Page 1
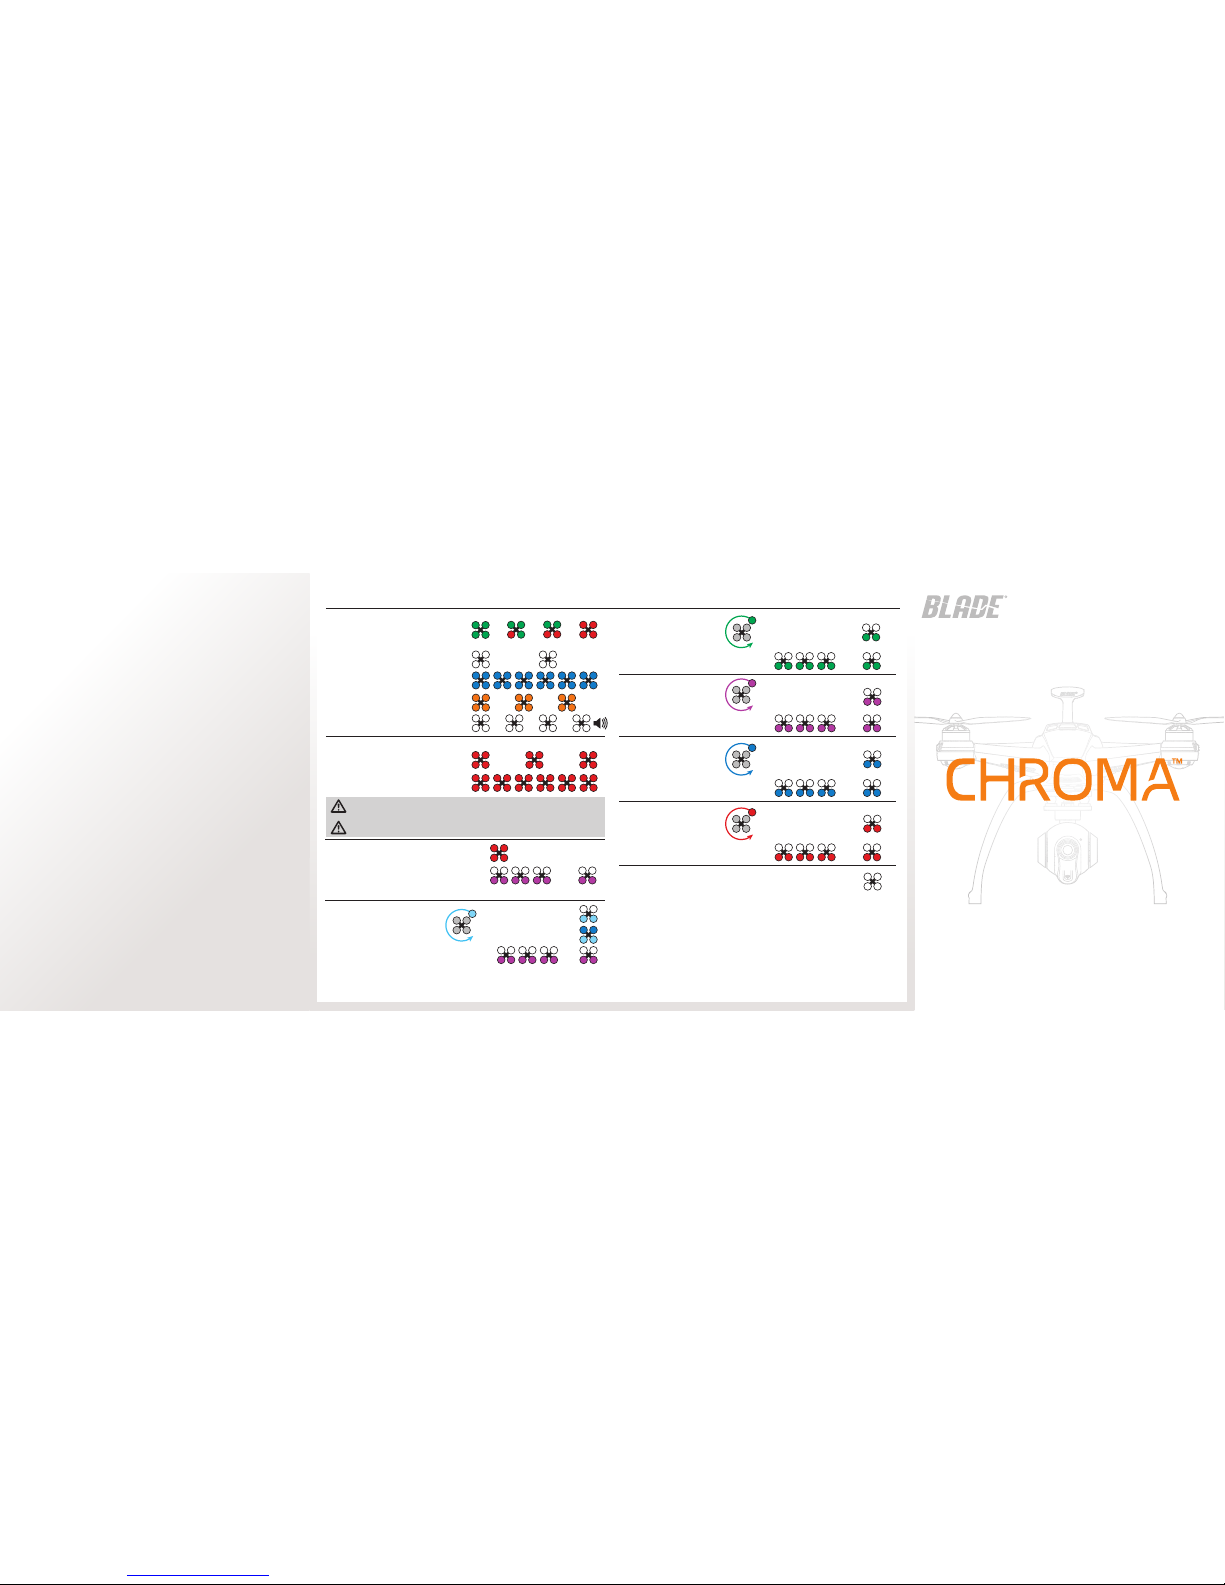
Startup Codes
Flying Codes
Battery level indication at startup .......
Transmitter off or not bound to the quad ...
Bind mode .........................................
Compass calibration needed ..............
Emergency mode
(cycle power to reinitialize).................
Low battery warning 1 (10.9V),
every 3 seconds
Low battery warning 2 (10.6V),
continuous, rapid fl ashing
Re turn to home mode active (solid red)
Re turn to home mode active, loss of GPS
(rapid fl ash for 2 seconds, then once
every second)
En tering Follow Me mode
(GPS acquired)
En tering Smart mode
(GPS acquired)
En tering AP mode
(GPS acquired)
En tering Stability mode
(GPS acquired)
En tering Agility mode
(GPS acquired)
Smart, AP and Return to Home Modes
Stability and Agility Modes
Normal operation
with GPS lock (all solid)
Normal operation
with GPS lock (all solid)
Normal operation
with GPS lock (all solid)
Normal operation
with GPS lock (all solid)
All solid white
Solid white front, rear fl ashes
active fl ight mode color
Normal operation
with GPS lock (all solid)
Camera tracking
with GPS lock (all solid)
Smart Mode
AP Mode
Stability Mode
Agility Mode
Return Home
GPS Off
Follow Me Mode (ST-10+ only)
Lo ss of GPS (rapid fl ash for 2 seconds,
then once every second)
Lo ss of GPS (rapid fl ash for 2 seconds,
then once every second)
Lo ss of GPS (rapid fl ash for 2 seconds,
then once every second)
Lo ss of GPS (rapid fl ash for 2 seconds,
then once every second)
Lo ss of GPS (rapid fl ash for 2 seconds,
then once every second)
GPS lock is required on both the quadcopter and the ST-10+ transmitter for
Follow Me Mode to function.
CAUTION: If you see the LED signal for low battery (10.6V),
immediately land your aircraft and recharge the battery.
CAUTION: Do not attempt to use Return Home with a low battery.
LED Codes
100% 75% 50% Dead
www.KnowChroma.com
©2015 Horizon Hobby, LLC.
Blade, Chroma and the Horizon Hobby logo are trademarks
or registered trademarks of Horizon Hobby, LLC. Patents pending
Created 10/15 51235 (EN)
REFERENCE GUIDE
Page 2

NOTICE: The following procedure has to be completed within 30 seconds after
entering compass calibration mode.
1. Power the ST10+ and Chroma™ quadcopter on and face the quadcopter
pointing North.
2. Touch the gear icon on the lower right side of the main screen.
3. Select OK.
4. Select Calibration.
5. Select Compass.
6. The quadcopter indicates it has entered compass calibration mode by flashing
the LEDs yellow.
7. The LEDs will indicate which direction to orient the quadcopter for each rotation
by lighting either one or two motor pods yellow. Turn the quadcopter to point
the yellow LEDs North, then rotate the quadcopter 360° as shown by the blue
arrows below. Complete all 4 rotations of the Chroma quadcopter as shown in
the illustration below within 30 seconds.
8. After the last rotation step, hold the quad level, facing North and check the LEDs.
Green = Ready
Red = Repeat Compass Calibration
1. Power on the ST10+ and Chroma quadcopter.
2. Place the quadcopter on a flat, level surface.
3. Touch the gear icon on the lower right side of the main screen.
4. Select OK.
5. Select Calibration.
6. Select Accelerometer.
7. The Chroma quadcopter will emit a series of slow tones followed by a series of
rapid tones, indicating the calibration has started.
8. Do not move the quadcopter while it performs the accelerometer calibration
procedure.
9. When the procedure has completed, the quadcopter will emit a “happy” tone and
the LED will display green indicating the calibration was successful. If it emits a
“sad” tone and the LED displays solid red, repeat the calibration procedure.
Compass Calibration Procedure
Accelerometer Calibration Procedure
Troubleshooting Quick Reference
For a complete description of the function, capabilities and maintenance
of the Chroma quadcopter, refer to the online videos at www.KnowChroma.com.
Problem Solution
Motors won’t start
Ensure GPS antenna has clear view of sky
and GPS lock has been acquired
Check for compass error indication
Review start up procedure in manual
Blinking yellow led
‘compass error’ indication
Move model away from large metal objects
or surfaces
Calibrate compass
(see calibration reference)
Won’t hold position in hover
Check GPS antenna mast is extended
Calibrate compass
(see calibration guide)
Calibrate accelerometers
(see calibration guide)
Binding
Binding the Chroma Quadcopter to the ST10+ Transmitter
1. With the transmitter and quadcopter powered OFF, connect the battery to the quadcopter.
2. Place the quadcopter on a at level surface.
3. Power the quadcopter ON and let it initialize. The status LEDs will blink white.
4. Hold the quadcopter upside down until the status LEDs ash blue, indicating it has
entered bind mode.
5. Set the quadcopter back upright.
6. Power on the ST-10+. If the RC and Wi-Fi connecting dialogue appears, touch the
screen anywhere outside of the pop up window to access the main menu.
7. Touch the “Model Select” button from the main menu. Click “OK” in the warning dialogue.
8. Select your model and return to the main menu.
9. From the main menu, select “Flight Settings” and click “OK” in the warning dialogue.
10. Select “Bind” and select your model from the list. Select the number in white text.
11. Click “OK” after the connection has been established.
12. Press the return key twice to return to the main menu. Your quadcopter should now
connect to the ST-10+.
13. After returning to the main menu there will be 2 loud beeps. The LEDs will indicate
which ight mode is selected.
If the LEDs are ashing red, the quadcopter is in Return Home mode. Switch to
Smart or AP Mode before attempting to start the motors.
14. Place the quadcopter outdoors in the desired starting position in preparation for ight.
For instructions on binding with GPS disabled, refer to the online video
at www.KnowChroma.com.
See the online videos at www.KnowChroma.com for a demonstration of the calibration procedures.
See the online videos at www.KnowChroma.com for a demonstration of the binding
procedure.
a
b
a
c
b
a
d
c
b
a
North
 Loading...