

Page 1
b
a
b
a
a
b
a
c
b
a
b
a
a
b
a
c
b
a
a
c
b
a
d
c
b
a
e
d
c
b
a
WITH CGO3 4K CAMERA GIMBAL AND ST-10+ PERSONAL GROUND STATION TRANSMITTER*
a
a
c
b
a
c
b
a
MANUAL
* This aircraft is not compatible with Spektrum
™
DSM®, DSM2® or DSMX® technology.
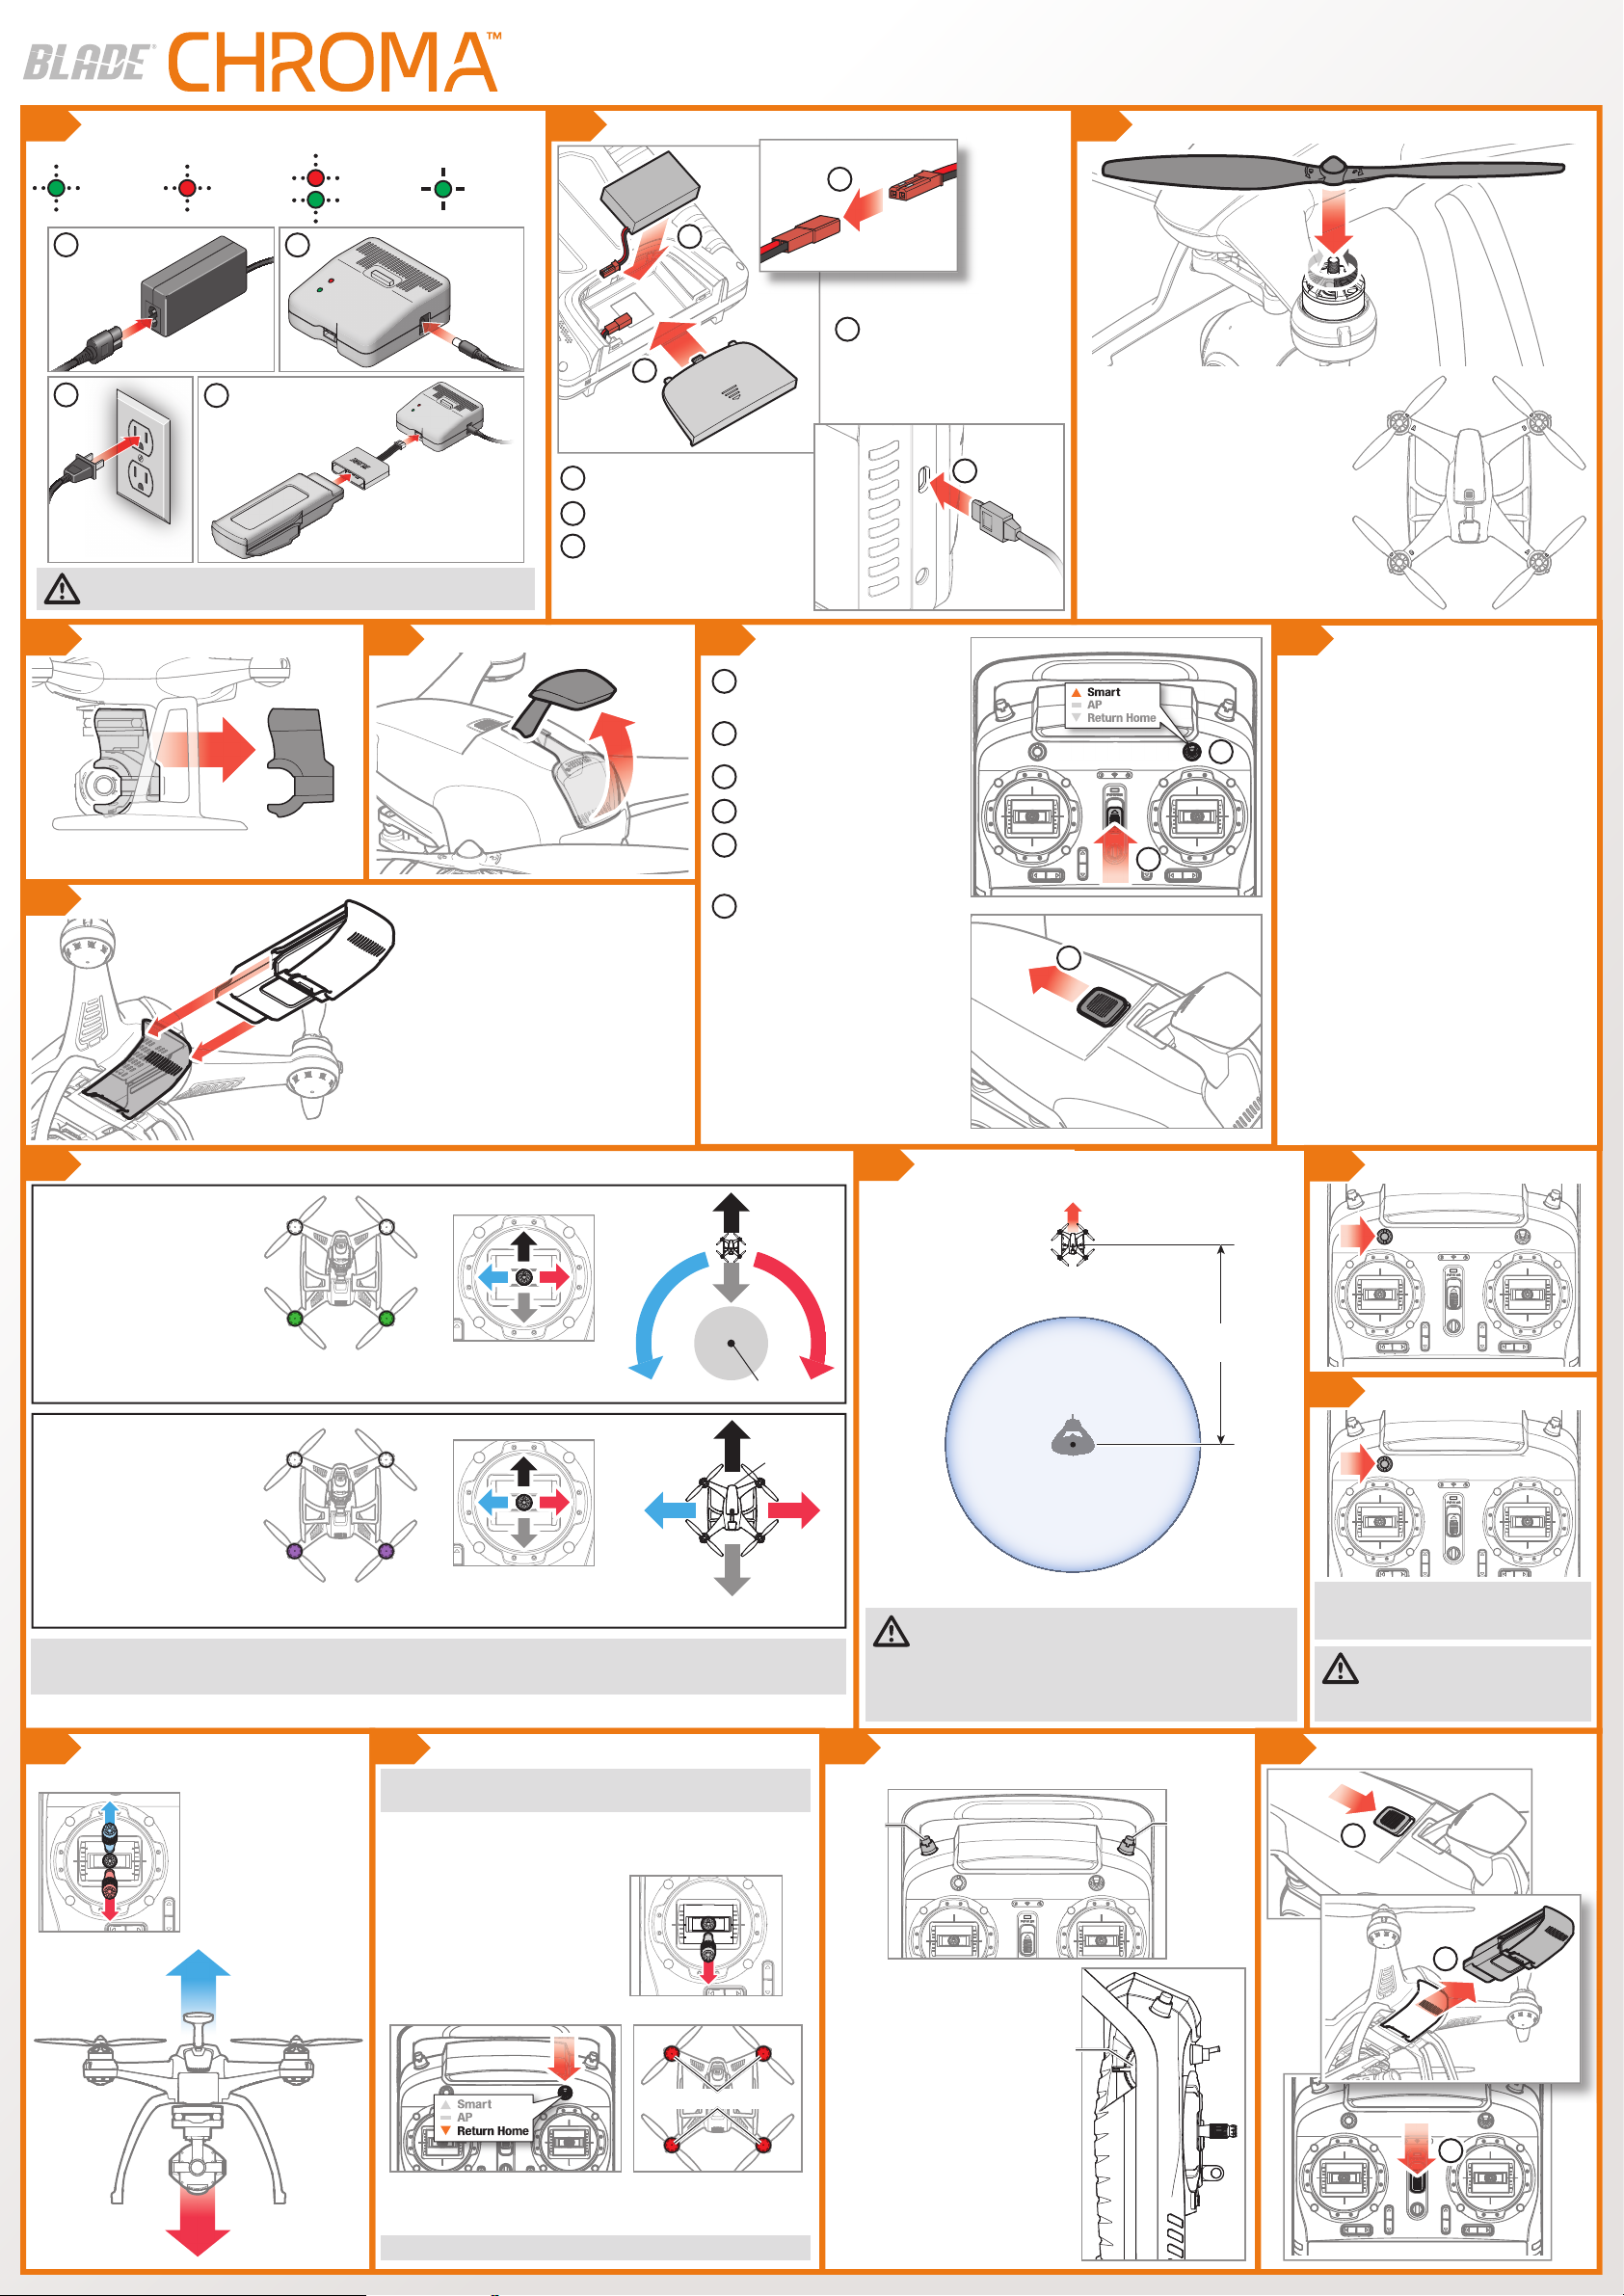
Charge the Flight Battery (~75 min) Install the propellers
1 2
Charger LED codes
Power
connected
a
c
CAUTION: All instructions and warnings must be followed exactly. Mishandling
of Li-Po batteries can result in a re, personal injury and/or property damage.
Charging
d
Balancing
b
4a 4b 6
Tip: Replace the gimbal cover after ying for storage and
transportation of the quadcopter to protect the gimbal.
5
Install the Flight Battery
• Slide the fully charged battery in until it locks.
• Remove the battery by pressing the locking tab and
sliding the battery to the rear of the quadcopter.
Charging
complete
Extend the GPS MastRemove the Gimbal Cover Power Up
Install and Charge the ST-10+ Transmitter Battery
b
a
Connect the USB cable to an
d
appropriate USB power source
c
Insert the LiPo battery into the
a
ST-10+ transmitter.
Connect the battery lead to the
b
transmitter noting the correct polarity.
Close the battery compartment.
c
a
b
c
d
e
f
pods while the quadcopter acquires a gps
signal. The front LEDs will show white and the
rear will show green when the quadcopter is
ready for ight.
Place the quadcopter outdoors on a at,
level surface.
Set the top right transmitter switch to
Smart.
Power on the transmitter.
Power on the quadcopter.
Perform the compass calibration
as shown in the video at
www.KnowChroma.com.
The LEDs will show green, rotating
counter-clockwise around the motor
and to the charge port of the transmitter.
The screen will show a charging battery
icon. Disconnect the USB cable when the
onscreen battery icon shows full capacity.
3
• The props and motor pods have a letter
code, either “A” or “B” molded in. Match
the “A” props to the “A” motor pods and the
“B” props to the “B” motor pods.
d
• The “A” props thread on counter-clockwise.
• The “B” props thread on clockwise.
• Tighten the props only nger tight.
DO NOT overtighten.
c
d
B
7
A
A
B
Connect the CGO3 Camera
B
A
to the ST-10+ via Wi-Fi
After the CGO3 camera powers on, the LED on the
gimbal will glow red for approximately 40 seconds.
When the LED changes to yellow, complete the
following steps to bind the CGO3 to the ST-10+:
b
• Select Flight Settings from the main menu on the
ST-10+.
• Select the Bind option.
• Under Camera, select the CGO3 network
(CGO3_******).
• Touch the Password line on the screen and enter
the password “1234567890” on the touchscreen.
• Select OK.
• The ST-10+ will indicate a successful connection.
Select OK.
• Return to the Main Menu.
The live video feed is now visible on the ST-10+
display.
Double tap on the image to expand the video to ll the
display. Double tap again to return to the main menu
with live video.
8 9
For information on additional ight modes, including “Follow Me,” see the online video at www.KnowChroma.com.
Understanding the Flight Modes
Smart Mode
• A green LED cycles around the motor
pods counter-clockwise until GPS is
acquired
• Once GPS is acquired, the front LEDs
are white and the rear are green
• Intended for the beginner pilot
• Maximum distance of 100 m from
the pilot
For best results while using Smart Mode, it is recommended that the
pilot always turn to face the quadcopter while ying.
AP Mode
• A purple LED cycles around the motor
pods counter-clockwise until GPS is
acquired
• Once GPS is acquired, the front LEDs
are white and the rear are purple
• Intended for the intermediate pilot
• Maximum distance of 100 m from
the pilot
NOTICE: If the Chroma™ quadcopter loses GPS signal while ying in either Smart or AP Mode, the LEDs will ash rapidly for 2 seconds and then
once every second. The quadcopter will default to a stable ight mode with similar control response as AP Mode. Return Home will not function.
Please familiarize yourself with the controls in AP Mode to ensure a safe return of the quadcopter in the event of GPS signal loss.
Right transmitter stick
Stick commands move
the Chroma
relative to the pilot location
Stick commands move
the Chroma
relative to its orientation
™
quadcopter
Right transmitter stick
™
quadcopter
=
=
Away from
the pilot
Toward
the pilot
Pilot location
Front
Placement at startup
Front
Home position
SAFE Circle
the pilot will stand during ight, pointing away from the pilot. If the aircraft
is pointed in any other direction, the SAFE Circle™ feature will not function
as expected and may result in personal injury or damage to property. Once
the aircraft’s motors are started, do not change your position.
™
Pilot location
CAUTION: Starting the motors sets the home location. The
quadcopter must be approximately 16 feet (5 meters) from where
16 ft
(5 m)
10a
Motor Start
Hold 3 seconds
10b
Motor Stop
Hold until the motors stop
NOTICE: Do not press the Motor Stop button
while the aircraft is airborne. The motors could
stop, causing the aircraft to crash.
WARNING: Stopping the motors while
the quadcopter is still in ight will cause
the quadcopter to crash. Crash damage is not
covered under warranty.
11
Left transmitter stick
Throttle control Flying and Landing After Your FlightControlling the Camera
• To maintain the current
altitude, allow the left
transmitter stick to return
to center.
Climb
Descend
12 1413
NOTICE: If you begin to lose control, release the control sticks and the
model will self-level.
Pay close attention to the LEDs while ying. If at any time the LEDs indicate
the ight battery voltage is low, as shown in the LED reference guide, land the
quadcopter immediately and charge the ight battery.
To land, you may either slowly lower the left
transmitter stick to descend and land,
stopping the motors as shown in step 10b:
or you may select “Return Home” on the top right switch on your transmitter:
Solid red
The quadcopter will return to the start position, land and stop the motors.
You may cancel the return to home function by switching back to Smart or
AP Mode on the top right switch on your transmitter.
NOTICE: Return home will only function if the quadcopter has GPS lock.
Use the buttons on the top of the ST-10+ to control the camera functions.
Use the Camera Tilt Slider to
adjust the vertical angle of the
camera gimbal.
Photo
Button
Camera Tilt Slider
For further information on controlling
the CGO3 camera with the ST-10
Ground Station, see the online video
at www.KnowChroma.com.
Video
Start/Stop
Button
a
b
c
Page 2
NOTICE
All instructions, warranties and other collateral documents are subject to change at the sole discretion of Horizon Hobby, LLC. For up-to-date
product literature, visit horizonhobby.com and click on the support tab for this product.
Meaning of Special Language
The following terms are used throughout the product literature to indicate various levels of potential harm when operating this product:
NOTICE: Procedures, which if not properly followed, create a possibility of physical property damage AND a little or no possibility of injury.
CAUTION: Procedures, which if not properly followed, create the probability of physical property damage AND a possibility of serious injury.
WARNING: Procedures, which if not properly followed, create the probability of property damage, collateral damage, and serious injury OR create a
high probability of super cial injury.
WARNING: Read the ENTIRE instruction manual to become familiar with the features of the product before operating. Failure to
operate the product correctly can result in damage to the product, personal property and cause serious injury.
This is a sophisticated hobby product. It must be operated with caution and common sense and requires some basic mechanical ability. Failure to
operate this Product in a safe and responsible manner could result in injury or damage to the product or other property. This product is not intended
for use by children without direct adult supervision. Do not use with incompatible components or alter this product in any way outside of the instructions provided by Horizon Hobby, LLC. This manual contains instructions for safety, operation and maintenance. It is essential to read and follow all
the instructions and warnings in the manual, prior to assembly, setup or use, in order to operate correctly and avoid damage or serious injury.
Age Recommendation: Not for children under 14 years. This is not a toy.
CAUTION: The ESCs for the Chroma quadcopter are not compatible with any other product, and the Chroma quadcopter is
not compatible with any other ESCs. Use of any other ESCs on the Chroma quadcopter will cause a crash, which may result in
property damage and/or personal injury.
WARNING AGAINST COUNTERFEIT PRODUCTS: If you ever need to replace a Spektrum component found in a Horizon Hobby
product, always purchase from Horizon Hobby, LLC or a Horizon Hobby authorized dealer to ensure authentic high-quality Spektrum
product. Horizon Hobby, LLC disclaims all support and warranty with regards, but not limited to, compatibility and performance of counterfeit
products or products claiming compatibility with DSM or Spektrum technology.
General Safety Precautions and Warnings
• Always keep a safe distance in all directions around your model to
avoid collisions or injury. This model is controlled by a radio signal
subject to interference from many sources outside your control.
Interference can cause momentary loss of control.
• Always operate your model in open spaces away from full-size
vehicles, traf c and people.
• Always carefully follow the directions and warnings for this and any optional support equipment (chargers, rechargeable battery packs, etc.).
• Always keep all chemicals, small parts and anything electrical out of
the reach of children.
• Always avoid water exposure to all equipment not speci cally designed
and protected for this purpose. Moisture causes damage to electronics.
• Never place any portion of the model in your mouth as it could cause
serious injury or even death.
• Never operate your model with low transmitter batteries.
• Always keep aircraft in sight and under control.
• Always move the throttle fully down at rotor strike.
• Always use fully charged batteries.
• Always keep transmitter powered on while aircraft is powered.
• Always remove batteries before disassembly.
• Always keep moving parts clean.
• Always keep parts dry.
• Always let parts cool after use before touching.
• Always remove batteries after use.
• Never operate aircraft with damaged wiring.
• Never touch moving parts.
Charging Warnings
WARNING: Failure to exercise caution while using this
product and comply with the following warnings could result
in product malfunction, electrical issues, excessive heat, FIRE, and
ultimately injury and property damage.
• NEVER LEAVE CHARGING BATTERIES UNATTENDED.
• NEVER CHARGE BATTERIES OVERNIGHT.
• Never attempt to charge dead, damaged or wet battery packs.
• Never attempt to charge a battery pack containing different types of
batteries.
• Never allow children under 14 years of age to charge battery packs.
• Never charge batteries in extremely hot or cold places or place in
direct sunlight.
• Never charge a battery if the cable has been pinched or shorted.
• Never connect the charger if the power cable has been pinched or
shorted.
• Never attempt to dismantle the charger or use a damaged charger.
• Never drop charger or batteries.
Front
• Always use only rechargeable Li-Po batteries designed for use with
this type of charger.
• Always inspect the battery before charging.
• Always keep the battery away from any material that could be affected
by heat.
• Always monitor the charging area and have a re extinguisher available at all times.
• Always end the charging process if the battery becomes hot to the
touch or starts to change form (swell) during the charge process.
• Always connect the charge cable to the charger rst, then connect the
battery to avoid short circuit between the charge leads. Reverse the
sequence when disconnecting.
• Always connect the positive red leads (+) and negative black leads (–)
correctly.
• Always disconnect the battery after charging, and let the charger cool
between charges.
• Always charge in a well-ventilated area.
• Always terminate all processes and contact Horizon Hobby if the
product malfunctions.
GPS Antenna Mast
AND ST-10+ PERSONAL GROUND STATION TRANSMITTER*
WITH CGO3 4K CAMERA GIMBAL
MANUAL
www.KnowChroma.com* This aircraft is not compatible with Spektrum™ DSM®, DSM2® or DSMX® technology.
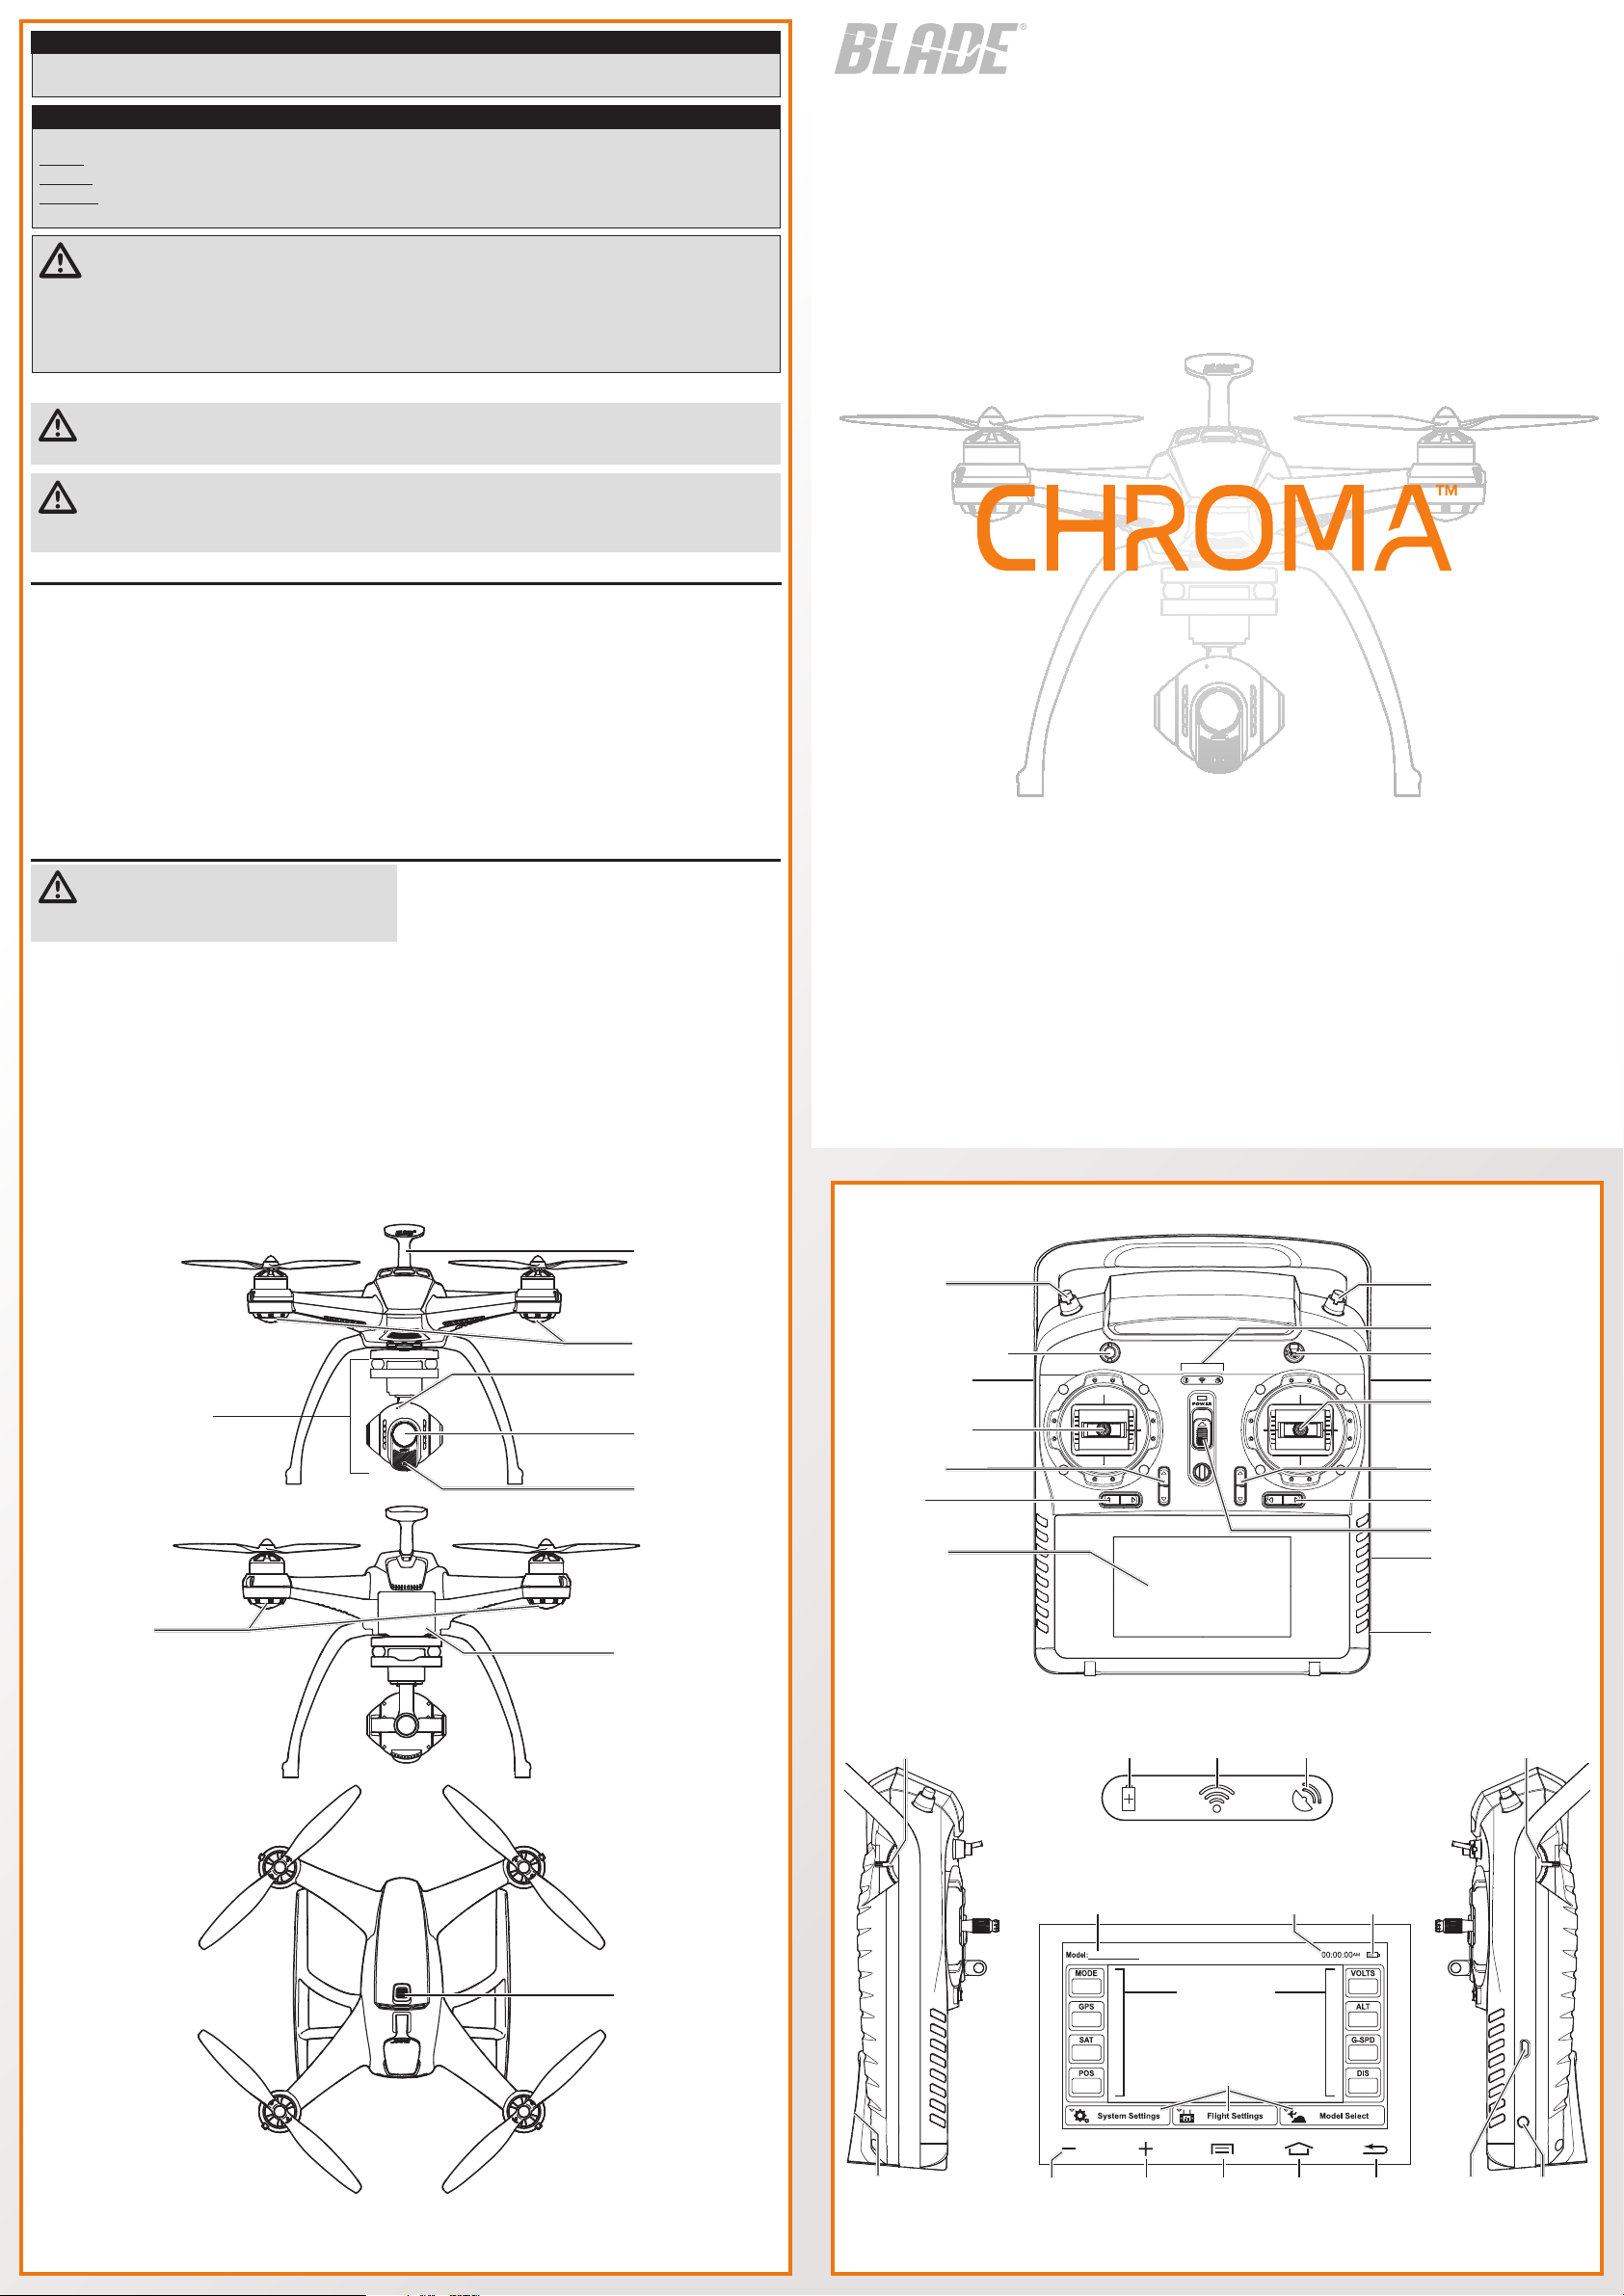
ST-10+ Personal Ground Station Transmitter*
Front
CGO3 Camera/Gimbal
Back
LED Indicators
Top
LED Indicators
Microphone
Camera Lens
Wi-Fi Antenna
Flight Battery
Motor Start/Stop Button
Camera Tilt Slider
Throttle (Altitude)/
Yaw Control
Video Display
Camera Tilt Slider
Battery Wi-Fi GPS
Video Start/Stop ButtonPhoto Button
LED Indicators
Flight Mode Switch
Airspeed Slider
Pitch/Roll Control
Pitch TrimThrottle Trim
Roll TrimYaw Trim
Power Switch
USB Port
Audio Port
RightTransmitter LEDsLeft
Airspeed Slider
©2015 Horizon Hobby, LLC.
Blade, Chroma , DSM, DSM2, DSMX and SAFE Circle are trademarks or registered trademarks of Horizon Hobby, LLC.
The Spektrum trademark is used with permission of Bachmann Industries, Inc.
All other trademarks, service marks and logos are property of their respective owners. Patents pending.
Created 5/15 49667 (EN) BLH8675
Power Switch
Video Display
Selected Model Clock Battery Capacity
Telemetry Values
Live Video Display Area
Navigation Buttons
Menu Home Back
* The included ST-10+ transmitter is not compatible with any receiver equipped with Spektrum
USB PortBattery Door Volume Down Volume Up
™
DSM®, DSM2® or DSMX® technology.
Audio Port
 Loading...