

Page 1

®
®
®
500 Bell 222 Body Set
Instruction Manual
Bedienungsanleitung
Manuel d’utilisation
Manuale di Istruzioni
Page 2
NOTICE
All instructions, warranties and other collateral documents are subject to change at the sole discretion of Horizon Hobby, Inc. For up-to-date product literature, visit horizonhobby.
com and click on the support tab for this product.
Meaning of Special Language
The following terms are used throughout the product literature to indicate various levels of potential harm when operating this product:
The purpose of safety symbols is to atttract your attention to possible dangers. The safety symbols, and their explanations, deserve your careful attention and understanding. The
safety warnings do not by themselves eliminate any danger. The instructions or warnings they give are not substitutes for proper accident prevention measures.
NOTICE: Procedures, which if not properly followed, create a possibility of physical property damage AND a little or no possibility of injury.
CAUTION: Procedures, which if not properly followed, create the probability of physical property damage AND a possibility of serious injury.
WARNING: Procedures, which if not properly followed, create the probability of property damage, collateral damage, serious injury or death OR create a high probability of superfi -
cial injury.
Safety Alert: Indicates a warning or caution. Attention is required in order to avoid serious personal injury.
WARNING: Read the ENTIRE instruction manual to become familiar with the features of the product before operating. Failure to operate the product correctly can result in
damage to the product, personal property and cause serious injury.
This is a sophisticated hobby product for advanced helicopter pilots with previous experience in the operation of CCPM helicopters (Cyclic Collective Pitch Mixing or Collective Pitch
Helicopter) such as the Blade SR or the Blade mCP X. It must be operated with caution and common sense and requires some basic mechanical ability.
Failure to operate this product in a safe and responsible manner could result in injury or damage to the product or other property. This product is not intended for use by children
without direct adult supervision. Do not attempt disassembly, use with incompatible components or augment product in any way without the approval of Horizon Hobby, Inc. This
manual contains instructions for safety, operation and maintenance. It is essential to read and follow all the instructions and warnings in the manual, prior to assembly, setup or use,
in order to operate correctly and avoid damage or serious injury.
WARNING: Failure to follow all instructions can lead to damage to your helicopter, property damage and bodily injury or death.
CAUTION: Do not make changes or adjustments to the product not shown in the instruction manual.
CAUTION: Please refer to your Blade 500 manual for all safety precautions and warnings for the use and maintenance of your helicopter.
HINWEIS
Alle Anweisungen, Garantien und dazugehörigen Dokumente können ohne Ankündigung von Horizon Hobby Inc. geändert werden. Eine aktuelle Version ersehen Sie bitte im Support
Feld unter: http://www.horizonhobby.com.
Begriffserklärung
Die folgende Begriffe werden in der gesamte Produktliteratur verwendet, um die Gefährdungsstufen im Umgang mit dem Produkt zu defi nieren:
Der Zweck der Sicherheitssymbole ist es Ihre Aufmerksamkeit auf mögliche Gefahren zu lenken. Die Symbole und ihre Erklärungen erfordern ihre sorgfältige Aufmerksamkeit und
Verstehen. Die Symbole eliminieren nicht die Gefahr. Die Anweisungen und Warnungen ersetzen nicht angemessene und korrekte Unfallverhütungsmaßnahmen.
HINWEIS: Verfahren können bei nicht ordnungsgemäßer Durchführung womöglich Schäden an physischem Eigentum UND geringfügige oder keine Verletzungen verursachen.
ACHTUNG: Verfahren können bei nicht ordnungsgemäßer Durchführung womöglich Schäden an physischem Eigentum UND schwere Verletzungen verursachen.
WARNUNG: Verfahren können bei nicht ordnungsgemäßer Durchführung möglicherweise Schäden an Eigentum, Kollateralschäden UND schwere Verletzungen bis zum Tot ODER
höchstwahrscheinlich oberfl ächliche Verletzungen verursachen.
Sicherheitsalarm: Zeigt eine Warnung oder Vorsichtmaßregel an. Hier ist Aufmerksamkeit erforderlich um ernste Körperverletzungen zu vermeiden.
WARNUNG: Lesen Sie die GESAMTE Bedienungsanleitung, um sich vor Inbetriebnahme mit den Funktionen des Produkts vertraut zu machen. Eine nicht ordnungsgemäße
Bedienung des Produkts kann das Produkts und persönliches Eigentum schädigen und schwere Verletzungen verursachen.
Dieses ist ein anspruchvolles Hobby Produkt für den fortgeschrittenen Hubschrauberpiloten mit Erfahrung von Pitchgesteuerten (CCPM) Hubschraubern ((Cyclic Collective Pitch Mixing oder Collective Pitch Helicopter) wie zum Beispiel dem Blade SR oder dem Blade mCP X. Es muss mit Vorsicht und Umsicht bedient werden und erfordert einige
mechanische Grundfertigkeiten.
Dies ist ein hoch entwickeltes Produkt für den Hobbygebrauch. Es muss mit Vorsicht und Umsicht bedient werden und erfordert einige mechanische Grundfertigkeiten. Wird das
Produkt nicht sicher und umsichtig verwendet, so könnten Verletzungen oder Schäden am Produkt oder anderem Eigentum entstehen. Dieses Produkt ist nicht für den Gebrauch
durch Kinder ohne direkte Aufsicht eines Erwachsenen vorgesehen. Versuchen Sie nicht, das Produkt ohne Zustimmung von Horizon Hobby, Inc. zu zerlegen, mit nicht-kompatiblen
Komponenten zu verwenden oder beliebig zu verbessern. Dieses Handbuch enthält Sicherheitshinweise sowie Anleitungen zu Betrieb und Wartung. Es ist unerlässlich, dass Sie
alle Anleitungen und Warnungen in diesem Handbuch vor dem Zusammenbau, der Einrichtung oder der Inbetriebnahme lesen und diese befolgen, um eine korrekte Bedienung zu
gewährleisten und Schäden bzw. schwere Verletzungen zu vermeiden.
WARNUNG: Das nicht befolgen dieser Anweisungen kann zu Beschädigung des Hubschraubers, Sachbeschädigungen und/oder Körperverletzungen bis hin zum Tod führen.
ACHTUNG: Nehmen Sie keine Änderungen oder Einstellungen an dem Produkt vor die nicht in der Bedienungsanleitung abgebildet sind.
ACHTUNG: Bitte lesen Sie die Bedienungsanleitung ihres Blade 500 für alle Warnungen, Sicherheitshinweise und Wartungsinformationen
2
Page 3
REMARQUE
Toutes les instructions, garanties et autres documents de garantie sont sujets àla seule discrétion de Horizon Hobby, Inc. Veuillez, pour une littérature produits bien àjour, visiter
horizonhobby.com et cliquer sur l’onglet de support de ce produit.
Signifi cation de certains termes spécifi ques
Les termes suivants servent, dans toute la documentation des produits, àdésigner différents niveaux de blessures potentielles lors de l’utilisation de ce produit:
Le but de symboles de sécurité est d’attirer votre attention sur des dangers possibles. Les symboles de sécurité, et leurs explications, méritent votre pleine attention et que vous
les compreniez. Les avertissements de sécurité n’éliminent pas, par eux-mêmes, tous les risques. Les instructions ou les avertissements qu’ils donnent ne remplacent pas des
mesures effi caces de prévention d’accident.
REMARQUE : Procédures qui, si elles ne sont pas suivies correctement, peuvent possiblement entraîner des dégâts matériels ET créent un risque faible à nul de blessures.
ATTENTION : Procédures qui, si elles ne sont pas suivies correctement, peuvent entraîner des dégâts matériels ET possiblement des blessures graves.
AVERTISSEMENT : Procédures qui, si elles ne sont pas suivies correctement, peuvent entraîner des dégâts matériels, dommages collatéraux et des blessures graves voire un décès
OU créer un risque élevé de blessure superfi cielle.
Alerte à la sécurité : Signale un avertissement ou une mise en garde. Il faut faire attention pour éviter des blessures de personnes graves.
AVERTISSEMENT : Lisez la TOTALITE du manuel d’utilisation afi n de vous familiariser avec les caractéristiques du produit avant de le faire fonctionner. Une utilisation
incorrecte du produit peut avoir comme résultat un endommagement du produit lui-même, celui de propriétés personnelles voire entraîner des blessures graves.
Ceci est un produit de loisirs perfectionné destiné aux pilotes d’hélicoptères ayant déjà l’expérience d’hélicoptères CCPM (Cyclic Collective Pitch Mixing ou Collective Pitch
Helicopter) tels que le Blade SR ou le Blade mCP X. Il doit être manipulé avec prudence et bon sens et requiert quelques aptitudes de base à la mécanique.
Ceci est un produit de loisirs perfectionné. L’incapacité àmanipuler ce produit de manière sûre et responsable peut provoquer des blessures ou des dommages au produit ou
àd’autres biens. Ce produit n’est pas destiné àêtre utilisé par des enfants sans la supervision directe d’un adulte. Ne pas essayer de démonter le produit, de l’utiliser avec des
composants incompatibles ou d’en améliorer les performances sans l’approbation de Horizon Hobby, Inc. Ce manuel comporte des instructions de sécurité, de mise en œuvre et
d’entretien. Il est capital de lire et de respecter toutes les instructions et avertissements du manuel avant l’assemblage, le réglage ou l’utilisation afi n de le manipuler correctement
et d’éviter les dommages ou les blessures graves.
AVERTISSEMENT : Une utilisation incorrecte du produit peut entraîner l’endommagement de l‘hélicoptère, des dégâts matériels, ainsi que des blessures graves voire un
danger de mort.
ATTENTION : Ne pas modifi er ni altérer le produit autrement que comme indiqué dans ce manuel.
ATTENTION : Veuillez vous référer au manuel de votre Blade 500 pour toutes les précautions et avertissements relatifs à la sécurité pour l’utilisation et
la maintenance de votre hélicoptère.
AVVISO
Istruzioni, garanzie etutti gli altri documenti accessori sono soggetti amodifi che atotale discrezione di Horizon Hobby Inc. Per avere documentazione aggiornata sul prodotto,
visitare il sito Web www.horizonhobby.com efare clic sulla scheda di supporto per questo prodotto.
Signifi cato dei termini particolari
Iseguenti termini vengono utilizzati in tutta la documentazione relativa al prodotto per indicare il livello di eventuali danni collegati all’utilizzo di questo prodotto:
Lo scopo dei simboli di sicurezza è quello di attirare l’attenzione sui possibili pericoli. I simboli di sicurezza e le loro spiegazioni servono per attirare l’attenzione e per comprenderne
il signifi cato. Gli avvertimenti di sicurezza di per se non eliminano nessun pericolo. Le istruzioni o gli avvertimenti forniti non sostituiscono dei corretti provvedimenti di prevenzione
degli incidenti.
AVVISO: Procedure che, in caso di mancata osservanza, possono creare danni materiali enessuna oscarsa possibilità di lesioni.
ATTENZIONE: Se non si seguono correttamente le procedure, sono possibili danni fi sici aoggetti E gravi lesioni apersone.
AVVERTENZA: Procedure, che in caso di mancata osservanza, possono provocare danni materiali, danni collaterali e lesioni gravi o morte O portare con forte probabilità a lesioni
superfi ciali.
Allarme di sicurezza: Indica avvertimento o cautela. E’ necessaria attenzione per evitare serie lesioni personali.
AVVERTENZA: Leggere TUTTO il manuale di istruzioni eacquisire confi denza con le caratteristiche del prodotto, prima di utilizzarlo. Se il prodotto non èutilizzato in modo
corretto potrebbero verifi carsi danni al prodotto, alle persone oalle cose, causando gravi lesioni.
Questo è un prodotto di hobbistica sofi sticato per piloti avanzati di elicotteri con esperienza pregressa nell’azionamento di elicotteri CCPM (Cyclic Collective Pitch Mixing or
Collective Pitch Helicopter) come il Blade SR o il Blade mCP X. Esso deve essere azionato con cautela e buon senso e necessita di conoscenze meccaniche di base.
Questo èun prodotto sofi sticato per hobby. Esso deve essere manipolato con cautela, con giudizio erichiede qualche conoscenza di base di meccanica. Se il prodotto non èutilizzato in maniera sicura eresponsabile potrebbero verifi carsi lesioni odanni al prodotto stesso oad altre proprietà. Questo prodotto non èconcepito per essere usato dai bambini senza
la diretta supervisione di un adulto. Non tentare in nessun caso di smontare il prodotto, di utilizzarlo con componenti non compatibili odi potenziarlo senza previa approvazione di
Horizon Hobby, Inc. Questo manuale contiene istruzioni relative asicurezza, utilizzo emanutenzione del prodotto. È fondamentale leggere eseguire tutte le istruzioni ele avvertenze
nel manuale prima di montare, mettere apunto ousare il prodotto, al fi ne di usarlo correttamente edi evitare danni olesioni gravi.
AVVERTENZA: Se non si seguono le istruzioni si puo’ danneggiare l’elicotttero, proprieta’ e danni all’individui e causare morte.
ATTENZIONE: non fare nessun cambiamento al prodotto che non sia mostrato nel manuale.
ATTENZIONE: per tutte le precauzioni e gli avvertimenti sull’uso e la manutenzione dell’elicottero, si prega di fare riferimento al manuale del Blade 500.
3
Page 4
CAUTION: Before fl ying your helicopter with the Bell
®
222® body installed, please be aware that the fl ying characteristics of the helicopter will change.
The Blade 500 3D and Blade 500 X helicopters fl y very smooth and scale-like with the Bell 222 body installed, however controls will be slower to
respond. The helicopter will still be capable of loops, rolls and inverted fl ight, but aggressive 3D maneuvers or backward fl ight should not be attempted.
Doing so increases the possibility of a boom-strike or the loss of the front hatch.
ACHTUNG: Bevor Sie ihren Hubschrauber mit dem Bell 222 Rumpf fl iegen müssen Sie wissen, dass sich die Flugcharakteristik des Hubschraubers ändert.
Der Blade 500 3D und der Blade 500X fl iegen mit dem montieren Rumpf mehr Scale und die Reaktion des Hubschrauber verlangsamt sich. Der Hubschrauber fl iegt noch Loopings, Rollen und Rückenfl ug, aber aggressive 3D Manöver oder Rückwärtsfl ug sollten vermieden werden. Es besteht dabei die Gefahr
der Heckrotorberührung oder des Verlustes der vorderen Rumpfhaube.
ATTENTION: Avant de faire voler votre hélicoptère avec le fuselage de Bell 222 installé, veuillez prendre conscience que les caractéristiques de vol de
l’hélicoptère vont être modifi ées. Le Blade 500 3D et le Blade 500X volent en douceur et de façon réaliste quand le fuselage de Bell 222 est installé,
les commandes répondront donc plus lentement. L’hélicoptère reste capable d’effectuer des boucles, des tonneaux et de vol inversé, cependant les fi gures 3D
agressives ou le vol en marche arrière ne doivent pas être tentés, sous peine d’obtenir un décrochage de l’anticouple ou la perte de la trappe avant amovible.
ATTENZIONE: prima di far volare l’elicottero con la fusoliera del Bell 222, bisogna essere consapevoli che le caratteristiche di volo cambieranno. Gli elicot-
teri Blade 500 3D e il Blade 500X con la fusoliera Bell 222 installata hanno un volo molto regolare, tipo riproduzione, quindi i comandi saranno più lenti
nella risposta. L’elicottero sarà ancora in grado di eseguire looping, tonneau e volo rovescio, ma non sarà più possibile fare l’acrobazia aggressiva 3D o il volo
all’indietro. Qualora si tentasse di farli, si aumenterebbe la possibilità di rompere il tubo di coda o di perdere lo sportello anteriore.
Tools Required/Erforderliches Werkzeug/Outils requis/Attrezzi necessari
1.5mm Hex 1,5mm Inbus Clé hexagonale 1.5mm 1,5mm esagonale
2mm Hex 2,0mm Inbus Clé hexagonale 2mm 2,0mm esagonale
2.5mm Hex 2,5mm Inbus Clé hexagonale 2.5mm 2,5mm esagonale
2.5mm Hex (150mm long) 2,5mm Inbus lang Clé hexagonale 2.5mm (longueur 150mm) 2,5mm esagonale (lunga 150mm)
Phillips Screw Driver Philips Schraubendreher Tournevis cruciforme Cacciavite a stella
Hemostats Klemme Pince hémostatique Pinzette
Needle nose pliers Spitzzange Pince à becs fi ns Pinze a becchi stretti
CA Glue Med CA Sekundenkleber Colle CA moyenne Colla CA media
Hot Glue Gun Heißkleber Pistolet à colle chaude Pistola per colla a caldo
Scissors Schere Ciseaux Forbici
4
Page 5
Preparing the Helicopter/Vorbereiten des Hubschraubers/Préparation de l’hélicoptère/Preparazione dell’elicottero
IMPORTANT: Read the entire instruction manual and
become familiar with all of the steps before starting the
Bell 222 Body Set installation.
WICHTIG: Lesen Sie diese Anleitung sorgfältig durch und
machen sich mit den Arbeitsschritten vertraut, bevor Sie
mit der Montage des Bell 222 Rumpfes beginnen.
IMPORTANT: Veuillez lire le manuel en entier afi n de vous
familiariser avec toutes les étapes avant de commencer
l’installation du fuselage du Bell 222.
IMPORTANTE: leggere interamente il manuale per prendere confi denza con le varie fasi prima di iniziare il montaggio
del set della fusoliera Bell 222.
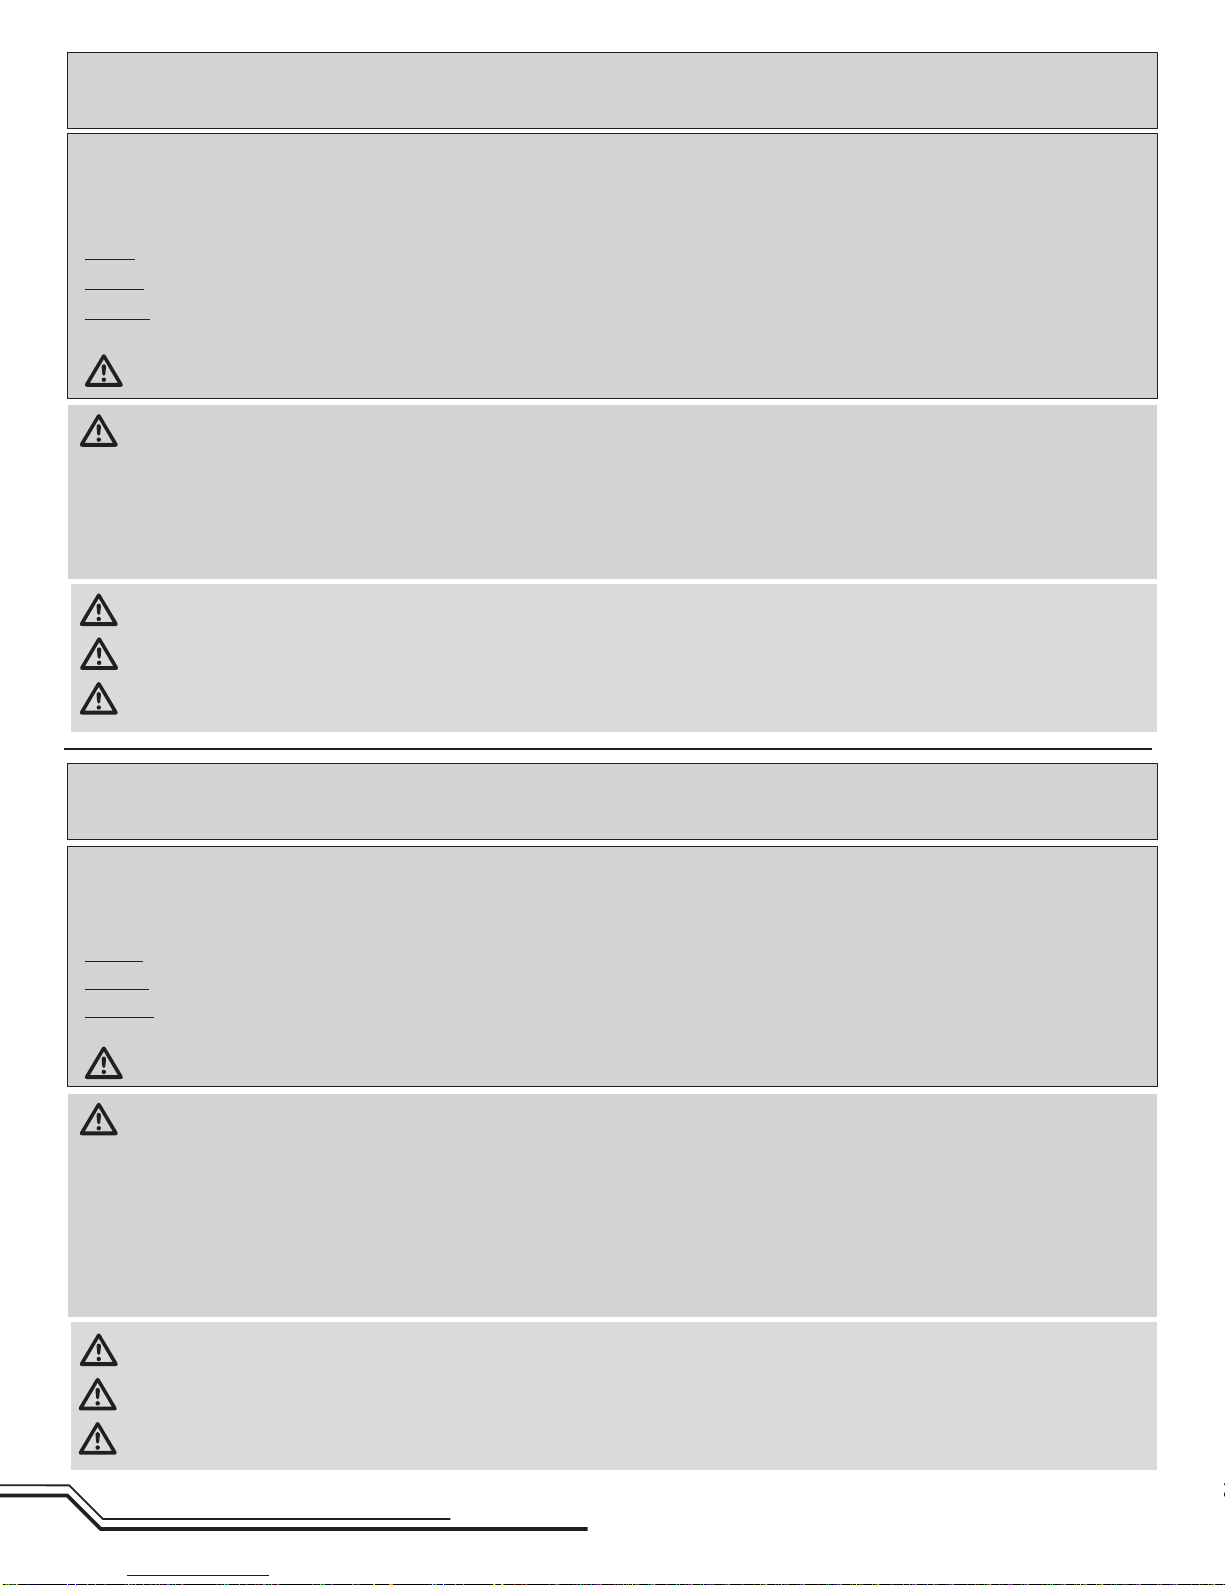
1. Remove the landing gear from the helicopter.
Entfernen Sie das Kufengestell vom Hubschrauber.
Retirez le train d’atterrissage de l’hélicoptère.
Smontare dall’elicottero i pattini di atterraggio.
2. Remove the tail boom supports, tailboom clamp and
Horizontal Fin.
Schrauben Sie die Heckrohrstütze, die Klampe und
horizontale Finne ab.
Retirez les renforts de la poutre, le support de stabilisateur horizontal et le stabilisateur horizontal.
Togliere il supporto del tubo di coda, il suo morsetto e
l’impennaggio orizzontale.
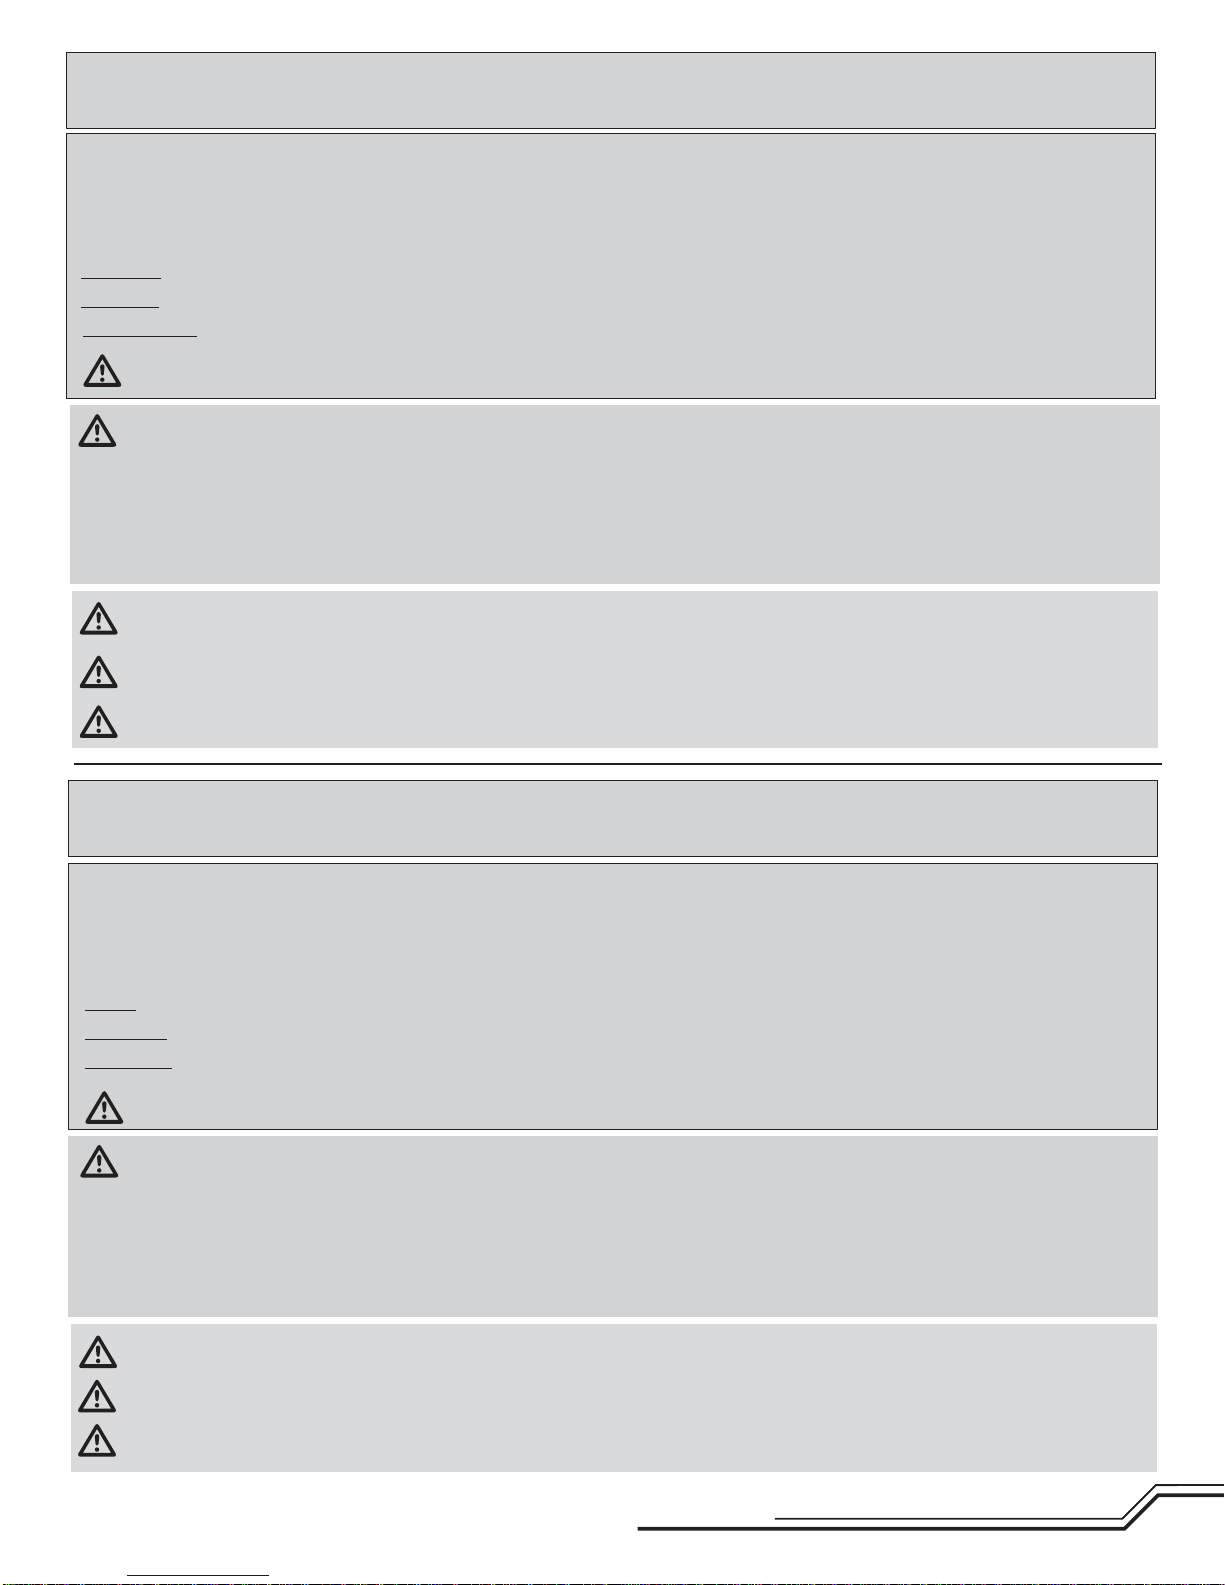
3. Remove the vertical fi n from the tail rotor case.
Schrauben Sie die Finne vom Heckrotorgehäuse ab.
Retirez la dérive verticale du boîtier d’anticouple.
Togliere l’impennaggio verticale dalla scatola del rotore
di coda.
4. Remove the upper canopy mounts.
Schrauben Sie die unteren Kabinenhaubenhalter ab.
Retirez les supports supérieurs de la bulle.
Togliere i supporti superiori della capottina.
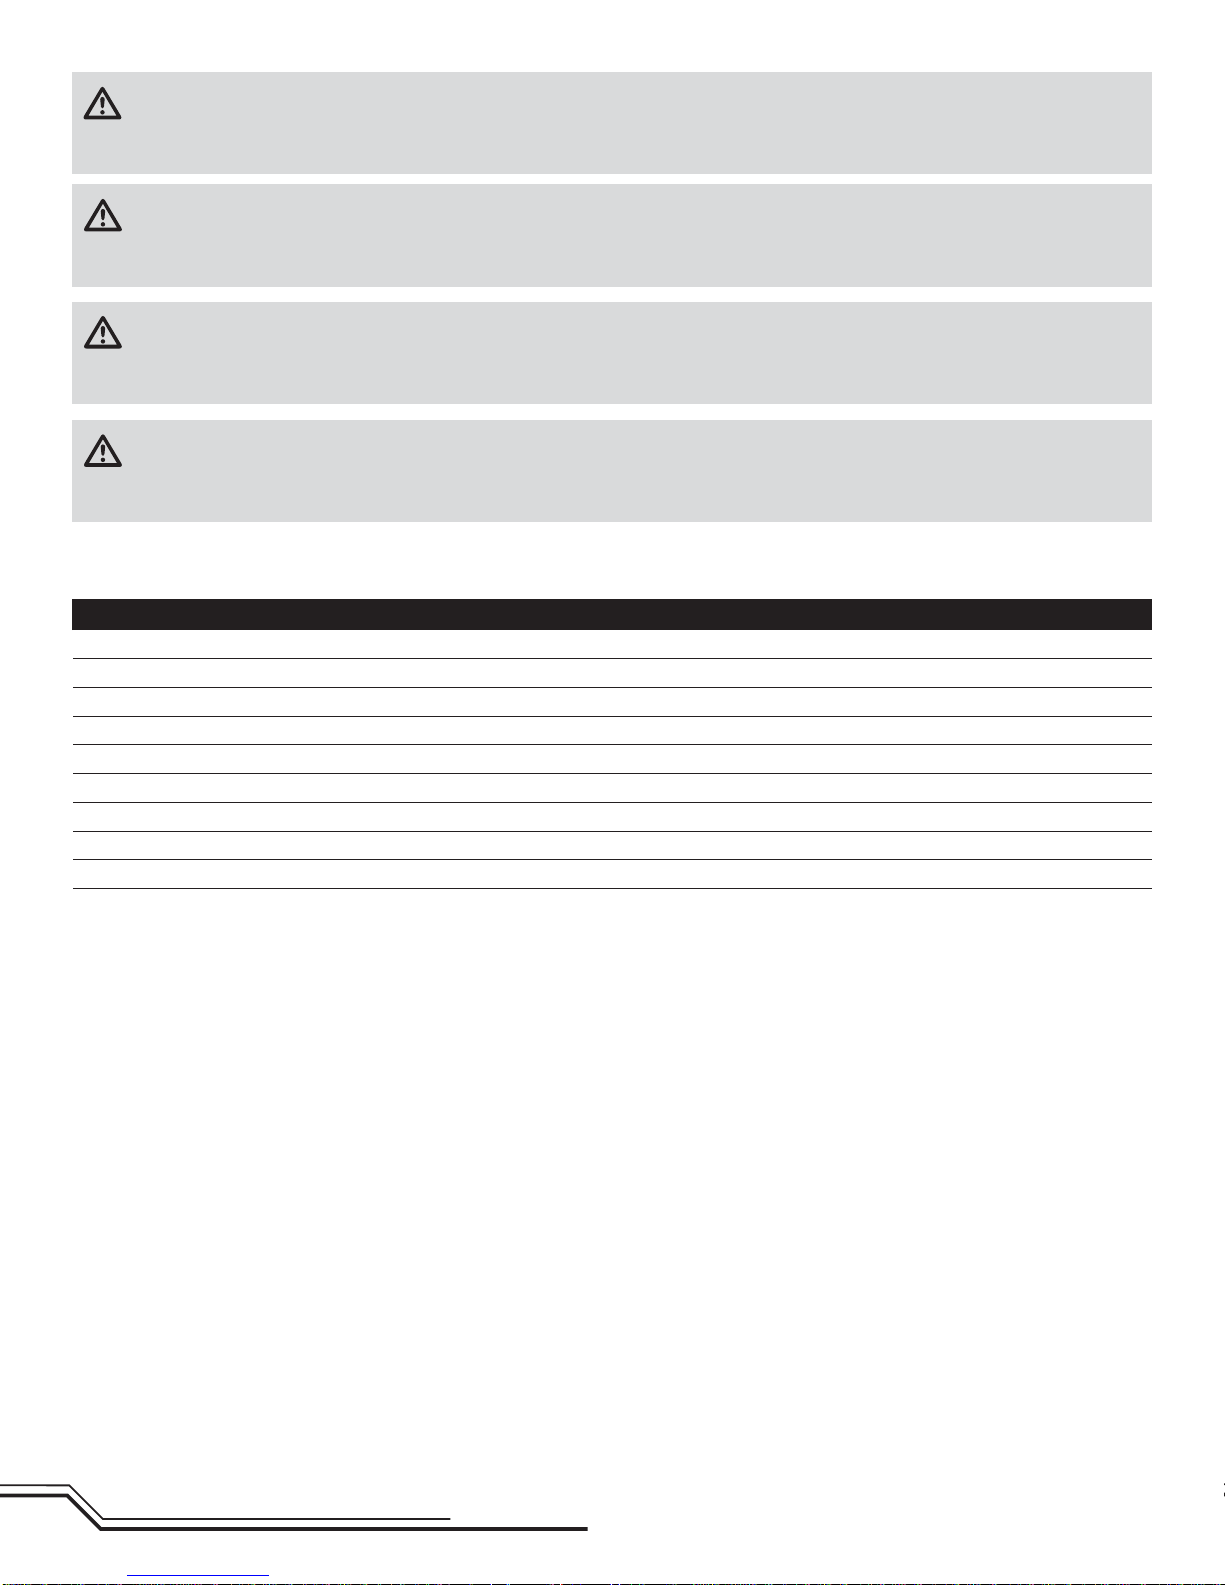
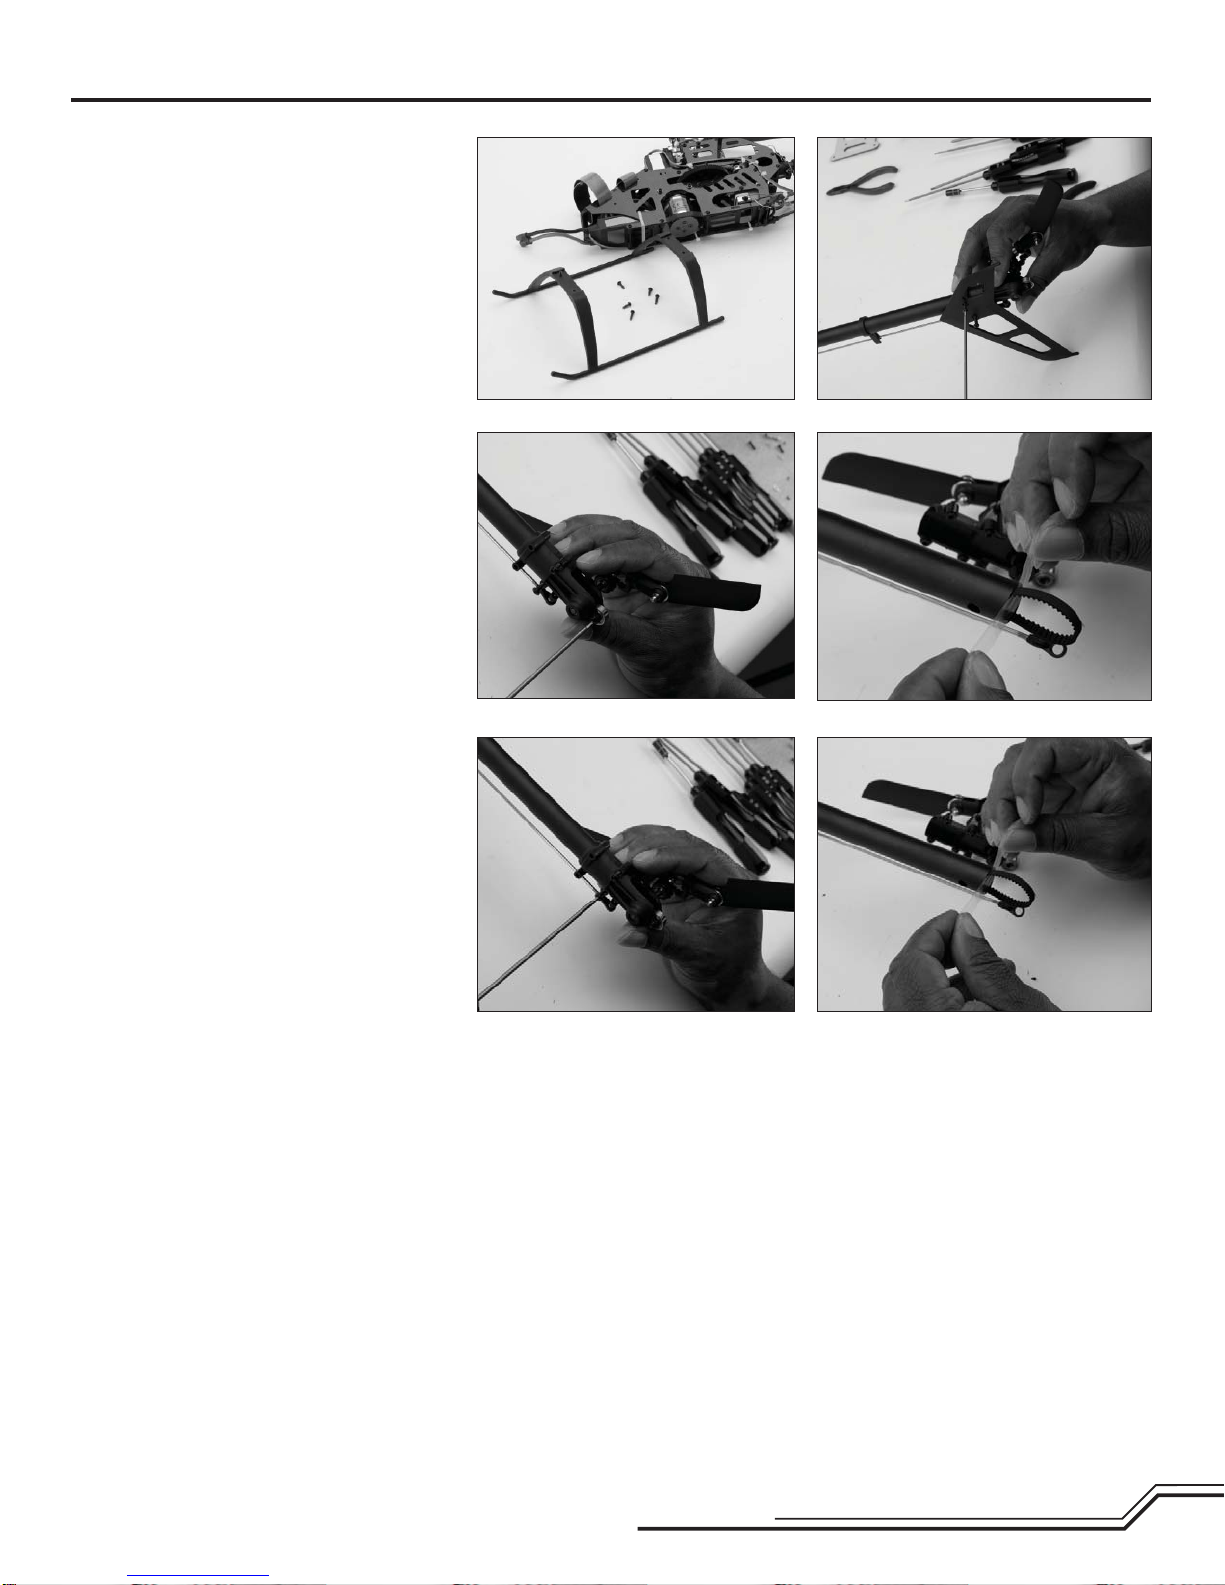
5. Remove the entire tail case assembly, noting the belt
direction. Place a piece of tape across the end of the
tail boom as shown. The tape prevents the tail belt
from twisting while you are working on the helicopter.
Nehmen Sie das gesamte Heckrotorgehäuse ab und
merken sich die Position des Zahnriemens. Kleben Sie
ein Stück Klebeband zwischen den Riemen auf das
Heckrohr. Das verhindert ein drehen des Zahnriemens
während Sie am Hubschrauber arbeiten.
Retirez le boîtier d’anticouple complet, observez le sens
de la courroie. Placez un morceau de ruban adhésif
sur l’extrémité de la poutre comme sur l’illustration. Le
ruban adhésif empêchera la courroie de se retourner
quand vous travaillerez sur l’hélicoptère.
Togliere tutto il gruppo della scatola di coda, annotando
la direzione della cinghia. Mettere un pezzo di nastro
adesivo sul terminale del tubo di coda, come si vede in
fi gura. Serve per evitare che la cinghia giri mentre si
sta lavorando sull’elicottero.
5
Page 6
6. Make sure that all parts (servos, linkages, and the main shaft) are in perfect working order. If they are not, they can cause vibration that will be amplifi ed
through the fuselage and damage the helicopter during fl ight. Test fl y the helicopter before installing the fuselage, as adjustments to the AR7200BX Receiver/
Flybarless System will be impossible after installation.
Stellen Sie bitte sicher, dass alle Teile (Servo, Anlenkungen und die Rotorwelle) perfekt arbeiten. Falls nicht, könnte dieses Vibrationen hervorrufen die durch den
Rumpf verstärkt werden und den Hubschrauber im Flug beschädigen. Testen Sie den Hubschrauber bevor Sie die Haube montieren, da spätere Einstellungen
am AR7200BX System mit montierter Haube nicht möglich sind.
Contrôlez l’état de toutes les pièces (Servos, tringleries et axe principal). Si elles ne sont pas en parfait état, elles peuvent causer des vibrations qui seront
amplifi ées par le fuselage et provoqueront des dommages à l’hélicoptère durant le vol. Essayez l’hélicoptère avant d’installer le fuselage, effectuez également
les réglages du module fl ybarless AR7200BX car après l’installation du fuselage les réglages seront impossibles à effectuer.
Accertarsi che tutte le parti (servi, collegamenti e albero principale) siano in perfetta effi cienza. Se non lo fossero, potrebbero causare vibrazioni che sarebbero ulteriormente amplifi cate attraverso la fusoliera, danneggiando l’elicottero mentre è in volo. Eseguire una prova di volo dell’elicottero prima di montare la
fusoliera, facendo le regolazioni del ricevitore/sistema fl ybarless AR7200BX perché sarebbero impossibili da fare dopo l’installazione.
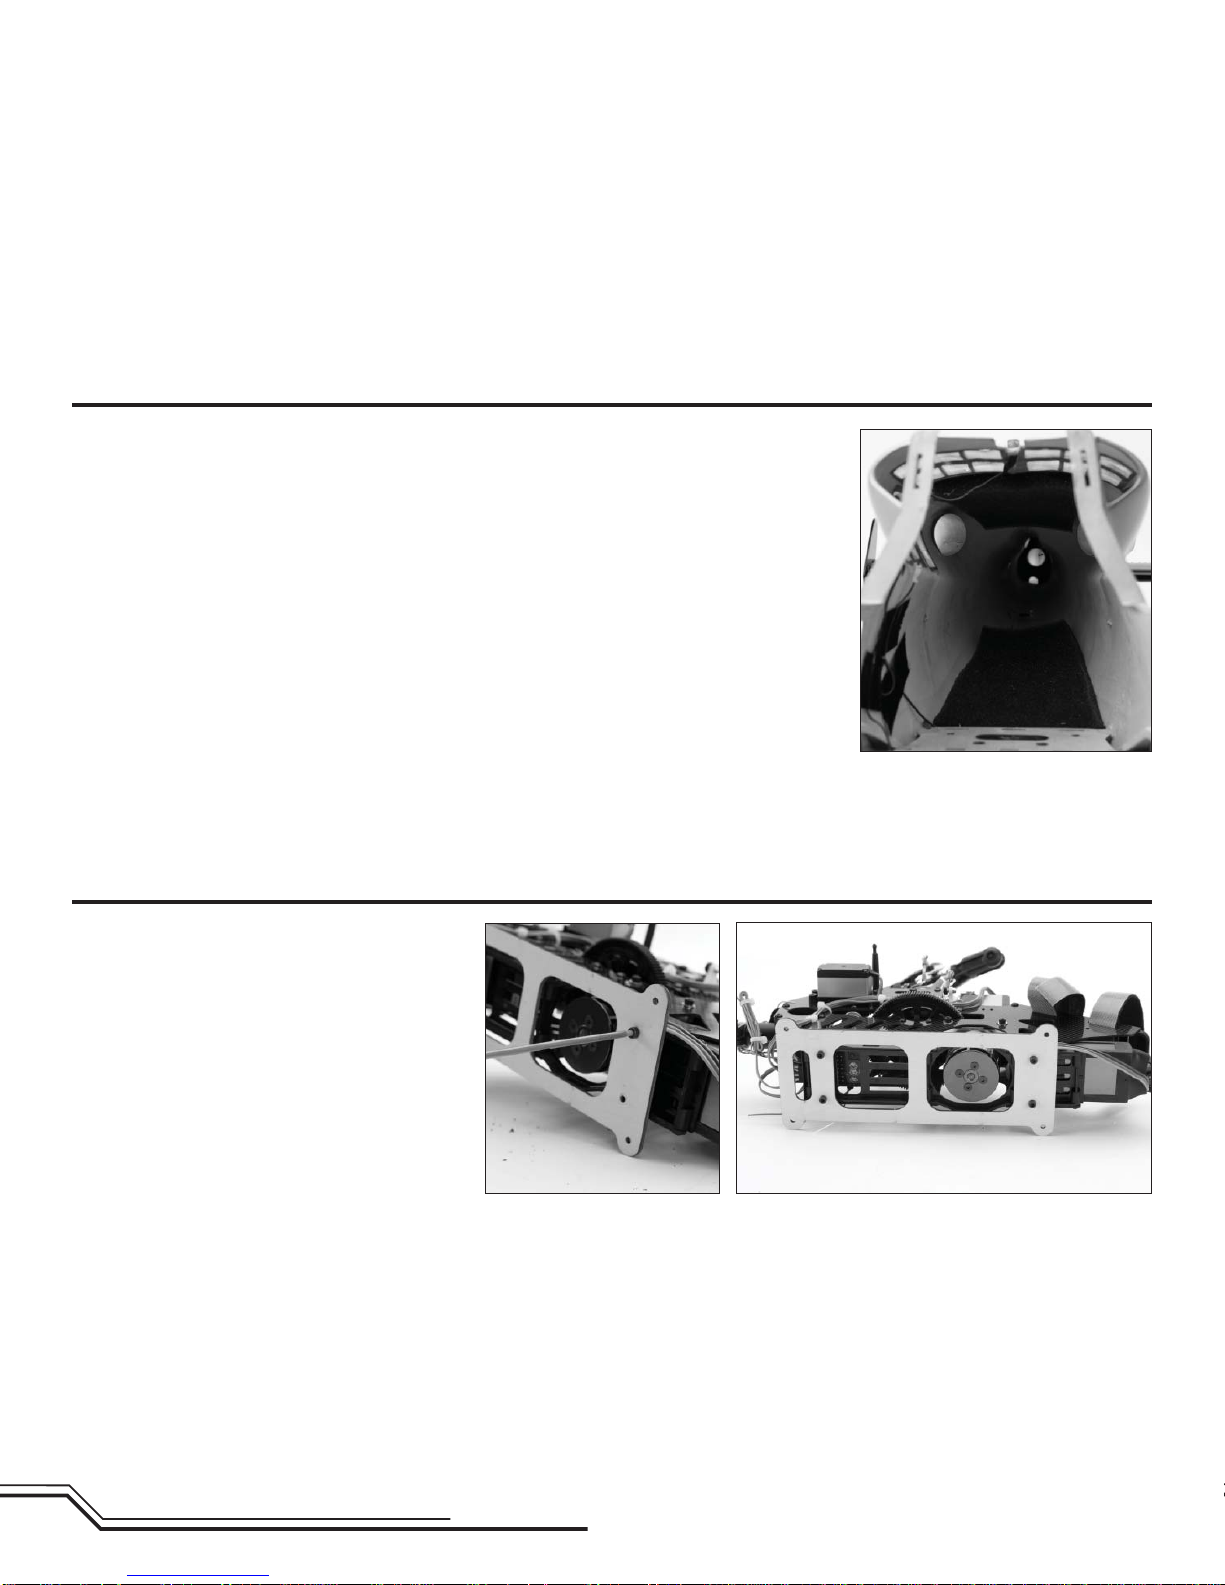
Installing the Foam Damping in the Fuselage/Montage der Schaumdämpfer im Rumpf/
Installation de la mousse anti-vibration dans le fuselage/Installare la gomma piuma ammortizzante nella fusoliera
1. Refer to the photos to determine the foam mounting locations.
Bitte entnehmen Sie den Fotos die Positionen der Schaumdämpfer.
Référez-vous à la photo pour déterminer les emplacements de la pose de la mousse.
Fare riferimento alle foto per individuare la posizione di montaggio.
2. Cut the foam sheet to fi t the mounting locations.
Schneiden Sie die Schaumstücke passend zum Montageort.
Coupez la plaque de mousse pour l’adapter à l’emplacement où elle doit être posée.
Tagliare il foglio di gomma piuma per adattarlo alle posizioni di montaggio.
3. Secure the foam sheet in the fuselage using hot glue.
Befestigen Sie Schaumstücke mit Heißkleber.
Collez la plaque de mousse en utilisant de la colle chaude.
Fissare le gomma piuma nella fusoliera usando colla a caldo.
4. Allow the glue to cool and make sure the foam is secure before installing the helicopter frame in the body.
Lassen Sie den Heißkleber abkühlen und stellen sicher dass der Schaum fest gesichert ist.
Laissez la colle refroidir et contrôlez qu’elle tient parfaitement en place avant d’installer le châssis de l’hélicoptère dans le fuselage.
Lasciare che la colla si raffreddi e verifi care che sia fi ssata bene prima di inserire il telaio dell’elicottero nella fusoliera.
Mount installation/Einbau der Trägerplatte/Installation de la platine de fi xation/Installazione del supporto
1. Locate (four) 3mm washers and socket head cap screws.
Legen Sie die vier (4) Unterlegscheiben und
Inbusschrauben bereit.
Repérez 4 vis BTR M3 ainsi que 4 rondelles M3.
Individuare le (4) rondelle da 3 mm e le viti con testa a
brugola.
2. Install a washer on each cap screw and press the screws
through the mounting plate as shown. Tighten the screws
so the mount is fl at against the frame.
Setzen Sie eine Unterlegscheibe auf jede Schraube und
die Schraube auf die Öffnung in der Trägerplatte. Ziehen
Sie die Schrauben so an, dass die Trägerplatte am
Chassis anliegt.
Placez une rondelle sur chacune des vis et pressez
les vis au travers de la platine de montage comme sur
l’illustration. Serrez les vis de façon à plaquer la platine à
plat contre le châssis.
Inserire una rondella in ogni vite, premendola attraverso
la piastra di montaggio, come illustrato. Stringere le viti
in modo che il supporto si appiattisca contro il telaio.
6
Page 7

Installation of Blade 500X/3D Main Frame Assembly into Bell 222 Fuselage/Einbau des Blade 500X/3D Chassis in den Bell
222 Rumpf/Installation du châssis de Blade 500X/3D dans le fuselage de Bell 222/Installazione del telaio del Blade 500X/3D
nella fusoliera del Bell 222
IMPORTANT: If you wish to install the optional light set, do so before installing the foam in the body.
See “Installing the Lights” for more information.
WICHTIG: Falls Sie das optionale Beleuchtungsset einbauen möchten müssen Sie das vor dem Einkleben der Schaumstücke tun.
Lesen Sie für mehr Informationen den Abschnitt: Einbau der Beleuchtung.
IMPORTANT: Si vous désirez installer le kit éclairage optionnel, faites-le avant de poser la mousse dans le fuselage. Consultez “Installation de l’éclairage” pour
obtenir des informations complémentaires.
IMPORTANTE: se si volesse installare il set opzionale di luci, bisognerebbe farlo prima di inserire la gomma piuma nella fusoliera. Si veda il paragrafo che spiega
l’installazione delle luci per avere maggiori dettagli.
1. Locate (four) 3mm washers and socket head cap screws, then install the screws in the remaining four
holes on the base mount.
Nehmen Sie die vier (4) Unterlegscheiben und Inbusschrauben zur Hand und schrauben diese in die
verbleibenden vier Löcher in der Trägerplatte.
Repérez 4 vis BTR M3 ainsi que 4 rondelles M3, puis installez-les dans les 4 trous libres de la platine
de fi xation.
Individuare le (4) rondelle da 3 mm e le viti con testa a brugola e poi installare le viti nei rimanenti 4
fori sulla base di montaggio.
2. Slide the main frame into the Bell 222 fuselage.
Schieben Sie das Chassis in den Bell 222 Rumpf.
Glissez le châssis de l’hélicoptère dans le fuselage du Bell 222.
Inserire il telaio principale nella fusoliera Bell 222.
3. Tighten the (4) 3mm cap screws in the body. You will need to use a 150mm long hex wrench to
tighten the two rear cap screws.
Ziehen Sie die vier (4) Inbusschrauben im Rumpf an. Zum anziehen der hinteren Schrauben benötigen
Sie einen 150mm langen Inbusschlüssel.
Serrez les 4 vis BTR M3 à l’intérieur du fuselage. Vous devrez utiliser une clé hexagonale de
150mmde long pour serrer les 2 vis situées à l’arrière.
Stringere le 4 viti da 3 mm nella fusoliera. È necessario usare la chiave esagonale da 150 mm per
stringere le due viti posteriori.
4. Remove the adhesive backing from the foam dampeners and press the dampeners together.
Nehmen Sie die Rückseitenabdeckung der Schaumdämpfer ab und drücken diese gegeneinander.
Retirez la protection de l’adhésif des absorbeurs en mousse et pressez l’un contre l’autre.
Togliere la protezione dell’adesivo dagli smorzatori in spugna e premerli insieme.
5. With the helicopter frame installed in the
body, slide the foam dampeners over the
end of the tail boom.
Schieben Sie mit in den Rumpf eingesetztem Chassis die Dämpfer über das Ende
des Heckrohrs.
Le châssis étant installé dans le fuselage,
glissez les absorbeurs par l’extrémité de
la poutre.
Con il telaio dell’elicottero inserito nella
fusoliera, far scorrere gli smorzatori fi no
al termine del tubo di coda.
Landing gear installation/Montage des Fahrwerks/Installation du train d’atterrissage/Installazione del carrello di atterraggio
Parts Required/erforderliche Teile/Pièces requises/Parti necessarie
Fixed Landing Gear Mounts x 3 Fahrwerkshalter x 3 Supports de train fi xe x 3 Supporti del carrello fi sso x3
Wheels x 3 Räder x 3 Roues x 3 Ruote x3
Wheel Collars x 3 Stellring x 3 Bagues d’arrête de roues x 3 Collari per ruote x3
Wood screws x 12 Holzschrauben x 12 Vis à bois x 12 Viti per legno x12
1. Press the fi xed landing gear mounts into the fuselage as shown.
Drücken Sie die Fahrwerkshalter wie abgebildet in den Rumpf.
Insérez les supports dans le fuselage comme sur l’illustration.
Premere i supporti per il carrello fi sso nella fusoliera come si vede in fi gura.
7
Page 8

2. Use the wood screws to secure the landing gear mounts in the fuselage.
Sichern Sie die Halter im Rumpf mit den Holzschrauben.
Utilisez les vis à bois pour fi xer les supports dans le fuselage.
Usare le viti da legno per fi ssare alla fusoliera i supporti per il carrello.
3. Slide the wheels onto the axles and secure them using the wheel collars. Place a small drop of threadlock on each wheel collar setscrew.
Schieben Sie die Räder auf die Achsen und sichern diese mit den Stellringen. Geben Sie einen kleinen Tropfen Schraubensicherungslack auf jede
Madenschraube am Stellring.
Glissez les roues sur les axes des jambes de train et maintenez-les à l’aide des bagues d’arrêt. Mettez une petite goutte de frein fi let sur les vis
sans tête des bagues.
Inserire le ruote nei loro assi e fi ssarle con i collari. Mettere una goccia di frenafi letti per fi ssare il grano di ogni collare.
Installing the Helicopter Tail/Montage des Hubschrauberleitwerks/Installation de la dérive de l’hélicoptère/
Installazione della coda dell’elicottero
1. Install the tail case on the tail boom. It is normal for the foam dampers to move forward when you install the tail case.
Montieren Sie das Heckrotorgehäuse am Heckrohr. Es ist normal, dass sich bei der Montage die Schaumdämpfer nach
vorne bewegen.
Installez le boîtier d’anticouple sur la poutre. Le déplacement vers l’avant des absorbeurs est normale durant
l’installation du boîtier d’anticouple.
Installare la scatola di coda nel tubo di coda. È normale che gli smorzatori di spugna si muovano in avanti quando si fa
questa operazione.
2. Locate the two Phillips screws and two washers. Put a washer on each of the screws.
Nehmen Sie die beiden Phililps Schrauben und zwei Unterlegscheiben zur Hand. Stecken Sie eine Unterlegscheibe auf
jede Schraube.
Repérez les deux vis cruciforme et les deux rondelles. Placez une rondelle sur chacune des vis.
Individuare le due viti con testa a croce con le loro rondelle. Mettere una rondella in ogni vite.
3. Press the screws through the vertical fi n and put a spacer on each screw. The spacers align the vertical fi n with the
fuselage.
Drücken Sie die Schrauben durch Leitwerksfi nne und setzen je ein Distanzstück auf jede Schraube. Die Distanzstücke
richten die Finne am Rumpf aus.
Passez les vis au travers de la dérive et placez une entretoise sur chaque vis. Les entretoises servent à aligner la
dérive par rapport au fuselage.
Premere le viti attraverso l’impennaggio verticale e mettere un distanziale in ogni vite. I distanziali servono per allineare l’impennaggio verticale alla fusoliera.
4. Tighten the screws in the holes used for the original vertical fi n.
Ziehen Sie die Schrauben in den Originallöchern an.
Serrez les vis dans les trous utilisez pour la fi xation de la dérive d’origine.
Stringere le viti nei fori usati per fi ssare l’impennaggio verticale originale.
Installing the Lights (Optional)/Einbau der optionale Beleuchtung /
Installation des éclairages (Optionnel) /Installazione delle luci (opzionali)
If you wish to install the optional lights, you will need to purchase the following items:
Wenn Sie die optionale Beleuchtung verwenden möchten benötigen Sie dafür die folgenden Teile:
Si vous désirez installer les éclairages optionnels, vous devrez acheter les éléments suivants :
Se si volessero installare le luci opzionali, sarebbe necessario acquistare i seguenti articoli:
EFLA600 Controller Controller Unité de contrôle Controller
EFLA607 Red LED Flashing light (2) Rote LED blinkend (2) LED rouge clignotante (2) LED rosso lampeggiante (2)
EFLA601 Red LED Solid Rote LED leuchtend LED rouge fi xe LED rosso a luce fi ssa
EFLA604 Green LED Solid Grüne LED leuchtend DEL verte fi xe LED verde a luce fi ssa
EFLA616 Y-harness 12 inch Y-Kabel 12-inch Cordon Y long. 30cm Prolunga a Y da 30 cm ca.
EFLA614 Extension 12 inch (4) Verlängerung 12-inch (4) Rallonge long.30cm (4) Prolunga normale da 30 cm ca. (4)
8
Page 9

1. Use a pair of hemostats to install the lower fl ashing light. Install a Red Flashing LED (EFLA607) in both the upper and lower light fi xtures. Use a drop of CA glue
to secure the LED in the light fi xture. Add a 12-inch extension to each LED.
Setzen Sie mit einer Pinzette das untere Blinklicht in Fassung. Setzten Sie je eine rote blinkende LED (EFLA607) in die obere und untere Aufnahme. Sichern Sie
die LED mit einem Sekundenkleber. Verlängern Sie die Anschlußkabel mit einer 12 inch Verlängerung an jede LED.
Utilisez une pince hémostatique pour installer la DEL clignotante inférieure. Installez une DEL rouge clignotante (EFLA607) dans l’ emplacement inférieur et
supérieur. Utilisez une goutte de colle CA pour maintenir les DELs dans leurs emplacements. Ajoutez une rallonge de 30cm de long à chaque DEL.
Usare delle pinzette per installare la luce lampeggiante inferiore. Mettere un LED rosso lampeggiante (EFLA607) nelle sedi per luci inferiore e superiore. Usare
una goccia di colla CA per fi ssare i LED nelle loro sedi. Aggiungere a ciascuno una prolunga da 30 cm.
2. Install a Red Solid LED (EFLA601) in the right side light fi xture and a Green Solid LED (EFLA604) in the left side light
fi xture. Use a drop of CA glue to secure the LED lights. When the CA glue is dry, connect a 12-inch extension to each
LED, then connect the 12-inch extensions to the Y-harness.
Setzen Sie eine rot leuchtende LED (EFLA601) in die rechte Seitenaufnahme und eine grün leuchtende LED (EFLA604)
in die linke Seitenaufnahme ein. Sichern Sie die LED´s mit einem Tropfen Sekundenkleber. Ist der Kleber getrocknet
schließen Sie an jede LED ein 12 inch Verlängerungskabel an und dann an die Verlängerungskkabel an das Y-Kabel.
Installez une DEL rouge fi xe (EFLA601) dans l’emplacement du côté droit et une DEL verte fi xe (EFLA604) dans
l’emplacement du côté gauche. Utilisez une goutte de colle CA pour maintenir les DELs dans leurs emplacements.
Quand la colle CA est sèche, connectez une rallonge de 30cm à chaque DEL, puis connectez les rallonges au cordon Y.
Mettere un LED rosso a luce fi ssa (EFLA601) nella sua sede di destra e un LED verde a luce fi ssa (EFLA604) nella sua
sede di sinistra. Usare una goccia di colla CA per fi ssare i LED nelle loro sedi. Quando la colla si è asciugata, collegare
a ciascuno una prolunga da 30 cm, e poi collegare la prolunga ad Y, sempre da 30 cm.
3. Connect the Y-harness and two extensions to the E-fl ite® Light Controller.
CAUTION: DO NOT allow the Light Controller to come in contact with any moving parts. Failure to do so could result in damage to the light controller and
could cause the helicopter to crash.
3. Schließen Sie das Y- Kabel und zwei Verlängerungen an den E-fl ite Light Controller
ACHTUNG: Lassen Sie den Light Controller nicht in Kontakt mit bewegten Teilen kommen. Dieses könnte den Controller beschädigen und den
Hubschrauber zum Absturz bringen.
3. Connectez le cordon Y et les deux rallonge à l’unité de contrôle des DELs E-fl ite.
ATTENTION: NE LAISSEZ PAS l’unité de contrôle entrer en contact avec des parties mobiles. Sous peine d’endommager l’unité de contrôle et d’entraîner
l’écrasement de l’hélicoptère.
3. Collegare la prolunga a Y e le altre due prolunghe al controller delle luci E-fl ite.
ATTENZIONE: NON lasciare che il controller delle luci entri in contatto con parti in movimento; altrimenti potrebbe danneggiarsi ed eventualmente far precipitare l’elicottero.
4. Connect the E-fl ite Light Controller to an open Aux channel on your receiver.
Schließen Sie den E-fl ite Light Controller an einen ungenutzten Aux Kanal des Empfängers an.
Connectez l’unité de contrôle E-fl ite à une voie auxiliaire libre de votre récepteur.
Collegare il Controller E-fl ite ad un canale ausiliario libero del ricevitore.
5. Move all wires to the bottom of the Bell 222 body. Use tape to secure all of the wires away from all moving parts.
Führen Sie alle Kabel zum Boden des Bell 222 Rumpfes. Sichern Sie die Kabel mit Klebeband weg von allen bewegten Teilen.
Guidez tous les câbles vers le bas du fuselage de Bell 222. Utilisez du ruban adhésif pour maintenir les câbles en place afi n qu’ils n’entrent pas
en contact avec les parties mobiles.
Spostare tutti i fi li nella parte inferiore della fusoliera del Bell 222. Usare del nastro adesivo per fi ssare tutti i cablaggi lontano dalle parti in movimento.
9
Page 10

Installing the E-fl ite Electric Retracts (Optional)/Einbau des optionalen elektrischen E-fl ite Einziehfahrwerk/
Installation du train rentrant électrique E-fl ite (Optionnel)/Installazione del carrello retrattile E-fl ite (opzionale)
1. Remove the fi xed landing gear mounts from the Bell 222 body.
Entfernen Sie die festen Fahrwerkshalter vom Bell 222 Rumpf.
Retirez les supports de train fi xe du fuselage de Bell 222.
Togliere i supporti del carrello fi sso dalla fusoliera del Bell 222.
2. Remove the fi xed landing gear struts from the mounts.
Nehmen Sie die Fahrwerksstreben aus dem Halter.
Retirez les jambes des supports de train fi xe.
Togliere le gambe del carrello fi sso dai supporti.
3. Remove the landing gear struts from the E-fl ite electric retracts, then install the Bell 222 fi xed landing gear struts in the retracts.
Schrauben Sie die Fahrwerkstrebe aus dem E-fl ite Fahrwerk und bauen die Streben aus dem festen Fahrwerk der Bell 222 ein.
Retirez les jambes des mécanismes de train rentrant électrique E-fl ite, puis y installer les jambes du train fi xe livrées avec le fuselage du Bell 222.
Togliere le gambe dal carrello retrattile elettrico E-fl ite, e installare quelle del carrello fi sso Bell 222.
4. Install the electric retracts in the Bell 222 body.
Bauen Sie das elektrische Fahrwerk in den Bell 222 Rumpf ein.
Installez les mécanismes de train rentrant électrique dans le fuselage de Bell 222.
Installare i carrelli retrattili elettrici nella fusoliera del Bell 222.
5. Connect the electric retracts to the 3-way Y-harness. Make sure all wires are away from any moving parts.
Schließen Sie das elektrische Fahrwerk an das 3-fach Y-Kabel an. Stellen Sie sicher, dass keine bewegten Teile durch Kabel behindert werden.
Connectez les mécanismes de train rentrant électrique à un cordon Y 3 voies. Tenez les câbles éloignés de toute partie mobile.
Collegare i carrelli retrattili elettrici alla prolunga a Y a 3 vie. Fare attenzione che tutti i cablaggi siano lontani dalle parti in movimento.
6. Connect the Y-harness to the GEAR channel on the receiver.
Schließen Sie das Y-Kabel an den Fahrwerkskanal (GEAR) des Empfängers an.
Connectez le cordon Y à la voie GEAR du récepteur.
Collegare la prolunga a Y al canale GEAR del ricevitore.
7. Before fl ying the helicopter, test the electric retracts to make sure they move correctly. If there is
any binding, you may need to use a rotary tool to remove a small amount of material from the Bell
222 body.
Bitte stellen Sie vor dem Flug sicher, dass das Einziehfahrwerk korrekt arbeitet. Sollte das Fahrwerk
am Rumpf irgendwo klemmen entfernen Sie etwas Material mit dem Trommelschleifer.
Avant de faire voler l’hélicoptère, veuillez vous assurer du bon fonctionnement du train rentrant
électrique. Si vous rencontrez un blocage, vous devrez utiliser une lime rotative pour retirer un peu
de matière du fuselage de Bell 222.
Prima di mandare in volo l’elicottero, verifi care che i carrelli retrattili elettrici si muovano correttamente. Se ci fossero delle forzature bisogna usare una piccola fresa per togliere eventuali parti
eccedenti sulla fusoliera Bell 222.
10
Page 11

Troubleshooting Guide
Problem Possible Cause Solution
Excessive Vibration Blades out of balance. Land the helicopter immediately and balance or replace the blades.
Servo gears are worn. Replace the gears in the servos or send the servos to a Horizon Service
Center for repair.
The bolts securing the frame to the fuselage are loose. Tighten the frame mounting bolts. Use medium strength threadlock to pre-
vent the bolts from loosening.
Main shaft is bent. Replace the main shaft.
Tail boom is slipping. Make sure the tail boom is installed correctly in the frame.
No foam damping material is installed. Install the foam dampener at the end of the tail boom. Use a small amount of
hot glue to secure the dampener to the fuselage, if necessary.
Excessive head speed (2200–2300). Change blades or pinion gear to reduce the headspeed.
Tail rotor turns
in the wrong
direction
Excessive noise No foam damping material is installed. Install the foam dampener at the end of the tail boom. Use a small amount of
Tail drive belt is turned in the wrong direction. Turn the tail drive belt 90 degrees clockwise when viewing the helicopter
from the tail.
Rudder/gyro servo channel is reversed. Test the response of the rudder/gyro servo. Refer to the Blade 500 3D or
Blade 500 X instruction manual for more information.
hot glue to secure the dampener to the fuselage, if necessary.
The bolts securing the frame to the fuselage are loose. Tighten the frame mounting bolts. Use medium strength threadlock to pre-
vent the bolts from loosening.
Main rotor blades are out of track. Correct the blade tracking or replace the main blades, if necessary. Refer to
the Blade 500 3D or Blade 500 X instruction manual for more information.
Rudder/gyro servo is touching the fuselage. Move the rudder/gyro servo and adjust the tail control rod to prevent the
servo from touching the fuselage.
Leitfaden zur Fehlerbehebung
Problem Mögliche Ursache Lösung
Starke Vibrationen Rotorblätter nicht gewuchtet. Landen Sie unverzüglich, wuchten oder wechseln Sie die Rotorblätter.
Servogetriebe verschlissen. Ersetzen Sie das Getriebe oder schicken das Servo zur Reparatur an den
technischen Service.
Die Befestigungsschrauben des Rumpfes sind lose. Ziehen Sie die Schrauben an und sichern diese mit mittleren Schraubensi-
cherungslack.
Hauptrotorwelle ist blockiert. Ersetzen Sie die Hauptrotorwelle.
Heckrohr bewegt sich. Stellen Sie sicher, dass das Heckrohr korrekt im Rumpf befestigt ist.
Keine Schaumdämpfer montiert. Montieren Sie die Schaumdämpfer am Ende des Heckrohrs. Kleben Sie den
Schaum falls notwendig mit etwas Heißkleber ein.
Zu hohe Rotorkopfdrehzahl (2200-2300). Wechseln Sie die Blätter oder die Übersetzung um die Kopfdrehzahl zu
reduzieren.
Heckrotor dreht in
die falsche Richtung
Starker Lärm Keine Schaumdämpfer montiert. Montieren Sie die Schaumdämpfer am Ende des Heckrohrs. Kleben Sie den
Zahnriemen in die falsche Richtung gedreht. Drehen Sie den Heckrotorriemen um 90° im Uhrzeigersinn
(von hinten betrachtet).
Seitenruder / Gyro Kanal ist reversiert. Testen Sie die Reaktion des Heckrotorservos / Kreisel. Bitte lesen Sie in der
Bedienungsanleitung des Blade 500 3D oder Blade 500X für mehr Information.
Schaum falls notwendig mit etwas Heißkleber ein.
Die Befestigungsschrauben des Rumpfes sind lose. Ziehen Sie die Schrauben an und sichern diese mit mittleren Schraubensi-
cherungslack.
Spurlauf der Rotorblätter nicht korrekt. Stellen Sie den Spurlauf ein oder ersetzen Sie die Blätter. Bitte lesen Sie dazu
in der Bedienungsanleitung des Blade 500 3D oder Blade 500XC.
Seitenruder / Kreiselservo berührt den Rumpf. Bewegen Sie das Seitenruder / Kreiselservo und justieren das Gestänge
damit es nicht den Rumpf berührt.
11
Page 12

Guide de dépannage
Problème Cause possible Solution
Vibrations excessives Les pales sont déséquilibrées. Posez immédiatement l’hélicoptère et équilibrez ou remplacez les pales.
Les pignons des servos sont usés. Remplacez les pignons des servos ou envoyez vos servos au service tech-
nique Horizon Hobby pour effectuer la réparation.
Les vis de fi xation du fuselage sont desserrées. Resserrez les vis de fi xation du fuselage. utilisez du frein fi let moyen sur les
vis pour éviter leur desserrage.
L’axe principal est tordu. Remplacez l’axe principal.
La poutre glisse. Contrôlez que la poutre est correctement installée sur le châssis.
L’absorbeur en mousse n’a pas été installé. Installez l’absorbeur en mousse sur l’extrémité de la poutre. Si nécessaire,
utilisez de la colle chaude pour fi xer l’absorbeur au fuselage.
Vitesse de rotation du rotor excessive
(2200-2300 tr/min).
Le rotor d’anticouple
tourne dans la mauvaise direction
Bruit excessif L’absorbeur en mousse n’a pas été installé. Installez l’absorbeur en mousse sur l’extrémité de la poutre. Si nécessaire,
La courroie est tournée dans la mauvaise direction. Tournez la courroie de 90° dans le sens horaire en regardant l’hélicoptère
La voie de dérive/servo du gyro est inversée. Testez la réponse de la voie dérive/servo de gyro. Référez-vous au manuel du
Les vis de fi xation du fuselage sont desserrées. Resserrez les vis de fi xation du fuselage. utilisez du frein fi let moyen sur les
Le tracking des pales est incorrect. Réglez le tracking des pales, ou remplacez les pales si nécessaire.
Le servo d’anticouple touche le fuselage. Déplacez le servo d’anticouple et réglez sa tringlerie afi n d’éviter le contact
Changez les pales ou le pignon pour réduire la vitesse de rotation du rotor.
depuis l’arrière.
Blade 500 3D ou Blade 500 X pour obtenir des informations complémentaires.
utilisez de la colle chaude pour fi xer l’absorbeur au fuselage.
vis pour éviter leur desserrage.
Référez-vous au manuel du Blade 500 3D ou Blade 500 X pour obtenir
des informations complémentaires.
avec le fuselage.
Guida alla soluzione dei problemi
Problema Possibile causa Soluzione
Eccessive vibrazioni Pale sbilanciate. Atterrare immediatamente e bilanciare o sostituire le pale.
Ingranaggi dei servi danneggiati. Sostituire gli ingranaggi dei servi o inviarli ad un centro assistenza Horizon.
Le viti che fi ssano il telaio alla fusoliera sono allentate. Stringere le viti di fi ssaggio al telaio. Usare del frenafi letti medio per evitare
che le viti si allentino.
L’albero principale è piegato. Sostituire l’albero principale.
Il tubo di coda scivola. Verifi care che il tubo di coda sia installato correttamente sul telaio.
Non è stata installata la gomma piuma smorzante. Inserire i blocchi di gomma piuma in fondo al tubo di coda. Se necessario
usare un po’ di colla a caldo per fi ssarli.
Velocità eccessiva della testa (2200-2300 rpm). Sostituire le pale o il pignone per ridurre la velocità della testa.
Le pale del rotore
di coda girano nella
direzione sbagliata
Rumore eccessivo Non è stata installata la gomma piuma smorzante. Inserire i blocchi di gomma piuma in fondo al tubo di coda. Se necessario
La cinghia di trasmissione è girata nel verso sbagliato. Girare la cinghia di trasmissione di 90° in senso orario guardando l’elicottero
dalla coda.
Il canale del timone/gyro è invertito. Verifi care la risposta del servo timone/gyro. Fare riferimento alle istruzioni
del Blade 500 3D o del Blade 500 X per avere maggiori informazioni.
usare un po’ di colla a caldo per fi ssarli.
Le viti che fi ssano il telaio alla fusoliera solo allentate. Stringere le viti di fi ssaggio al telaio. Usare del frenafi letti medio per evitare
che le viti si allentino.
Le pale del rotore principale non sono
allineate (tracking).
Il servo del timone/gyro tocca la fusoliera. Spostare il servo del timone/gyro regolando la barretta di comando di coda,
Correggere l’allineamento delle pale principali o, se necessario, sostituirle.
Fare riferimento alle istruzioni del Blade 500 3D o del Blade 500 X per avere
maggiori informazioni.
per evitare che il servo tocchi la fusoliera.
12
Page 13

Limited Warranty
What this Warranty Covers
Horizon Hobby, Inc., (Horizon) warrants to the original purchaser that the product purchased
(the “Product”) will be free from defects in materials and workmanship at the date of
purchase.
What is Not Covered
This warranty is not transferable and does not cover (i) cosmetic damage, (ii) damage due
to acts of God, accident, misuse, abuse, negligence, commercial use, or due to improper
use, installation, operation or maintenance, (iii) modifi cation of or to any part of the Product,
(iv) attempted service by anyone other than a Horizon Hobby authorized service center, (v)
Product not purchased from an authorized Horizon dealer, or (vi) Product not compliant with
applicable technical regulations.
OTHER THAN THE EXPRESS WARRANTY ABOVE, HORIZON MAKES NO OTHER WARRANTY
OR REPRESENTATION, AND HEREBY DISCLAIMS ANY AND ALL IMPLIED WARRANTIES,
INCLUDING, WITHOUT LIMITATION, THE IMPLIED WARRANTIES OF NON-INFRINGEMENT,
MERCHANTABILITY AND FITNESS FOR A PARTICULAR PURPOSE. THE PURCHASER
ACKNOWLEDGES THAT THEY ALONE HAVE DETERMINED THAT THE PRODUCT WILL
SUITABLY MEET THE REQUIREMENTS OF THE PURCHASER’S INTENDED USE.
Purchaser’s Remedy
Horizon’s sole obligation and purchaser’s sole and exclusive remedy shall be that Horizon
will, at its option, either (i) service, or (ii) replace, any Product determined by Horizon to be
defective. Horizon reserves the right to inspect any and all Product(s) involved in a warranty
claim. Service or replacement decisions are at the sole discretion of Horizon. Proof of
purchase is required for all warranty claims. SERVICE OR REPLACEMENT AS PROVIDED
UNDER THIS WARRANTY IS THE PURCHASER’S SOLE AND EXCLUSIVE REMEDY.
Limitation of Liability
HORIZON SHALL NOT BE LIABLE FOR SPECIAL, INDIRECT, INCIDENTAL OR CONSEQUENTIAL
DAMAGES, LOSS OF PROFITS OR PRODUCTION OR COMMERCIAL LOSS IN ANY WAY,
REGARDLESS OF WHETHER SUCH CLAIM IS BASED IN CONTRACT, WARRANTY, TORT,
NEGLIGENCE, STRICT LIABILITY OR ANY OTHER THEORY OF LIABILITY, EVEN IF HORIZON
HAS BEEN ADVISED OF THE POSSIBILITY OF SUCH DAMAGES. Further, in no event shall the
liability of Horizon exceed the individual price of the Product on which liability is asserted.
As Horizon has no control over use, setup, fi nal assembly, modifi cation or misuse, no liability
shall be assumed nor accepted for any resulting damage or injury. By the act of use, setup
or assembly, the user accepts all resulting liability. If you as the purchaser or user are not
prepared to accept the liability associated with the use of the Product, purchaser is advised
to return the Product immediately in new and unused condition to the place of purchase.
Law
These terms are governed by Illinois law (without regard to confl ict of law principals). This
warranty gives you specifi c legal rights, and you may also have other rights which vary from
state to state. Horizon reserves the right to change or modify this warranty at any time
without notice.
Warranty and Service Contact Information
WARRANTY SERVICES
Questions, Assistance, and Services
Your local hobby store and/or place of purchase cannot provide warranty support or service.
Once assembly, setup or use of the Product has been started, you must contact your local
distributor or Horizon directly. This will enable Horizon to better answer your questions and
service you in the event that you may need any assistance. For questions or assistance,
please visit our website at www.horizonhobby.com, submit a Product Support Inquiry, or call
877.504.0233 toll free to speak to a Product Support representative.
Inspection or Services
If this Product needs to be inspected or serviced and is compliant in the country you live
and use the Product in, please use the Horizon Online Service Request submission process
found on our website or call Horizon to obtain a Return Merchandise Authorization (RMA)
number. Pack the Product securely using a shipping carton. Please note that original boxes
may be included, but are not designed to withstand the rigors of shipping without additional
protection. Ship via a carrier that provides tracking and insurance for lost or damaged
parcels, as Horizon is not responsible for merchandise until it arrives and is accepted at our
facility. An Online Service Request is available at Horizon Hobby Service Center. If you do
not have internet access, please contact Horizon Product Support to obtain a RMA number
along with instructions for submitting your product for service. When calling Horizon, you will
be asked to provide your complete name, street address, email address and phone number
where you can be reached during business hours. When sending product into Horizon, please
include your RMA number, a list of the included items, and a brief summary of the problem.
A copy of your original sales receipt must be included for warranty consideration. Be sure
your name, address, and RMA number are clearly written on the outside of the shipping
carton.
Notice: Do not ship LiPo batteries to Horizon. If you have any issue with a LiPo
battery, please contact the appropriate Horizon Product Support offi ce.
Warranty Requirements
For Warranty consideration, you must include your original sales receipt verifying
the proof-of-purchase date. Provided warranty conditions have been met, your Product
will be serviced or replaced free of charge. Service or replacement decisions are at the sole
discretion of Horizon.
Non-Warranty Service
Should your service not be covered by warranty service will be completed and
payment will be required without notifi cation or estimate of the expense unless
the expense exceeds 50% of the retail purchase cost. By submitting the item for
service you are agreeing to payment of the service without notifi cation. Service estimates are
available upon request. You must include this request with your item submitted for service.
Non-warranty service estimates will be billed a minimum of ½ hour of labor. In addition
you will be billed for return freight. Horizon accepts money orders and cashier’s checks, as
well as Visa, MasterCard, American Express, and Discover cards. By submitting any item to
Horizon for service, you are agreeing to Horizon’s Terms and Conditions found on our website
Horizon Hobby Service Center.
NOTICE: Horizon service is limited to Product compliant in the country of use and
ownership. If non-compliant product is received by Horizon for service, it will be
returned unserviced at the sole expense of the purchaser.
Country of Purchase Horizon Hobby Address Phone Number / Email Address
Horizon Service Center
United States of
America
United Kingdom Horizon Hobby Limited
Germany Horizon Technischer Service
France Horizon Hobby SAS
China Horizon Hobby – China
(Electronics and engines)
Horizon Product Support
(All other products)
4105 Fieldstone Rd
Champaign, Illinois, 61822 USA
4105 Fieldstone Rd
Champaign, Illinois, 61822 USA
Units 1-4 Ployters Rd, Staple Tye
Harlow, Essex, CM18 7NS, United Kingdom
Christian-Junge-Straße 1
25337 Elmshorn, Germany
11 Rue Georges Charpak
77127 Lieusaint, France
Room 506, No. 97 Changshou Rd.
Shanghai, China 200060
877-504-0233
Online Repair Request visit: www.horizonhobby.com/service
877-504-0233
productsupport@horizonhobby.com
+44 (0) 1279 641 097
sales@horizonhobby.co.uk
+49 (0) 4121 2655 100
service@horizonhobby.de
+33 (0) 1 60 18 34 90
infofrance@horizonhobby.com
+86 (021) 5180 9868
info@horizonhobby.com.cn
Customer Service Information
Country of Purchase Horizon Hobby Address Phone Number / Email Address
United States
United Kingdom Horizon Hobby Limited
Germany Horizon Hobby GmbH
France Horizon Hobby SAS
China Horizon Hobby – China
Sales
4105 Fieldstone Rd
Champaign, Illinois, 61822 USA
Units 1-4 Ployters Rd, Staple Tye
Harlow, Essex, CM18 7NS, United Kingdom
Christian-Junge-Straße 1
25337 Elmshorn, Germany
11 Rue Georges Charpak
77127 Lieusaint, France
Room 506, No. 97 Changshou Rd.
Shanghai, China 200060
(800) 338-4639
sales@horizonhobby.com
+44 (0) 1279 641 097
sales@horizonhobby.co.uk
+49 (0) 4121 2655 100
service@horizonhobby.de
+33 (0) 1 60 18 34 90
infofrance@horizonhobby.com
+86 (021) 5180 9868
info@horizonhobby.com.cn
13
Page 14

Garantie und Service Informationen
Warnung
Ein ferngesteuertes Modell ist kein Spielzeug. Es kann, wenn es falsch eingesetzt wird,
zu erheblichen Verletzungen bei Lebewesen und Beschädigungen an Sachgütern führen.
Betreiben Sie Ihr RC-Modell nur auf freien Plätzen und beachten Sie alle Hinweise der
Bedienungsanleitung des Modells wie auch der Fernsteuerung.
Garantiezeitraum
Exklusive Garantie Horizon Hobby Inc (Horizon) garantiert, dass das gekaufte Produkt frei
von Material- und Montagefehlern ist. Der Garantiezeitraum entspricht den gesetzlichen
Bestimmung des Landes, in dem das Produkt erworben wurde. In Deutschland beträgt
der Garantiezeitraum 6 Monate und der Gewährleistungszeitraum 18 Monate nach dem
Garantiezeitraum.
Einschränkungen der Garantie
(a) Die Garantie wird nur dem Erstkäufer (Käufer) gewährt und kann nicht übertragen werden.
Der Anspruch des Käufers besteht in der Reparatur oder dem Tausch im Rahmen dieser
Garantie. Die Garantie erstreckt sich ausschließlich auf Produkte, die bei einem autorisierten
Horizon Händler erworben wurden. Verkäufe an dritte werden von dieser Garantie nicht
gedeckt.
Garantieansprüche werden nur angenommen, wenn ein gültiger Kaufnachweis erbracht
wird. Horizon behält sich das Recht vor, diese Garantiebestimmungen ohne Ankündigung zu
ändern oder modifi zieren und widerruft dann bestehende Garantiebestimmungen.
(b) Horizon übernimmt keine Garantie für die Verkaufbarkeit des Produktes, die Fähigkeiten
und die Fitness des Verbrauchers für einen bestimmten Einsatzzweck des Produktes. Der
Käufer allein ist dafür verantwortlich, zu prüfen, ob das Produkt seinen Fähigkeiten und dem
vorgesehenen Einsatzzweck entspricht.
(c) Ansprüche des Käufers¬ Es liegt ausschließlich im Ermessen von Horizon, ob das Produkt,
bei dem ein Garantiefall festgestellt wurde, repariert oder ausgetauscht wird. Dies sind die
exklusiven Ansprüche des Käufers, wenn ein Defekt festgestellt wird. Horizon behält sich vor,
alle eingesetzten Komponenten zu prüfen, die in den Garantiefall einbezogen werden können.
Die Entscheidung zur Reparatur oder zum Austausch liegt nur bei Horizon. Die Garantie
schließt kosmetische Defekte oder Defekte, hervorgerufen durch höhere Gewalt, falsche
Behandlung des Produktes, falscher Einsatz des Produktes, kommerziellen Einsatz oder
Modifi kationen irgendwelcher Art aus.
Die Garantie schließt Schäden, die durch falschen Einbau, falsche Handhabung, Unfälle,
Betrieb, Service oder Reparaturversuche, die nicht von Horizon ausgeführt wurden aus.
Rücksendungen durch den Käufer direkt an Horizon oder eine seiner Landesvertretung
bedürfen der Schriftform.
Schadensbeschränkung
Horizon ist nicht für direkte oder indirekte Folgeschäden, Einkommensausfälle oder
kommerzielle Verluste, die in irgendeinem Zusammenhang mit dem Produkt stehen
verantwortlich, unabhängig ab ein Anspruch im Zusammenhang mit einem Vertrag, der
Garantie oder der Gewährleistung erhoben werden. Horizon wird darüber hinaus keine
Ansprüche aus einem Garantiefall akzeptieren, die über den individuellen Wert des Produktes
hinaus gehen. Horizon hat keinen Einfl uss auf den Einbau, die Verwendung oder die Wartung
des Produktes oder etwaiger Produktkombinationen, die vom Käufer gewählt werden. Horizon
übernimmt keine Garantie und akzeptiert keine Ansprüche für in der folge auftretende
Verletzungen oder Beschädigungen. Mit der Verwendung und dem Einbau des Produktes
akzeptiert der Käufer alle aufgeführten Garantiebestimmungen ohne Einschränkungen und
Vorbehalte.
Wenn Sie als Käufer nicht bereit sind, diese Bestimmungen im Zusammenhang mit der
Benutzung des Produktes zu akzeptieren, werden Sie gebeten, dass Produkt in unbenutztem
Zustand in der Originalverpackung vollständig bei dem Verkäufer zurückzugeben.
Sicherheitshinweise
Dieses ist ein hochwertiges Hobby Produkt und kein Spielzeug. Es muss mit Vorsicht und
Umsicht eingesetzt werden und erfordert einige mechanische wie auch mentale Fähigkeiten.
Ein Versagen, das Produkt sicher und umsichtig zu betreiben kann zu Verletzungen von
Lebewesen und Sachbeschädigungen erheblichen Ausmaßes führen. Dieses Produkt ist nicht
für den Gebrauch durch Kinder ohne die Aufsicht eines Erziehungsberechtigten vorgesehen.
Die Anleitung enthält Sicherheitshinweise und Vorschriften sowie Hinweise für die
Wartung und den Betrieb des Produktes. Es ist unabdingbar, diese Hinweise vor der ersten
Inbetriebnahme zu lesen und zu verstehen. Nur so kann der falsche Umgang verhindert und
Unfälle mit Verletzungen und Beschädigungen vermieden werden.
Fragen, Hilfe und Reparaturen
Ihr lokaler Fachhändler und die Verkaufstelle können eine Garantiebeurteilung ohne
Rücksprache mit Horizon nicht durchführen. Dies gilt auch für Garantiereparaturen. Deshalb
kontaktieren Sie in einem solchen Fall den Händler, der sich mit Horizon kurz schließen wird,
um eine sachgerechte Entscheidung zu fällen, die Ihnen schnellst möglich hilft.
Wartung und Reparatur
Muss Ihr Produkt gewartet oder repariert werden, wenden Sie sich entweder an Ihren
Fachhändler oder direkt an Horizon. Rücksendungen/Reparaturen werden nur mit einer
von Horizon vergebenen RMA Nummer bearbeitet. Diese Nummer erhalten Sie oder ihr
Fachhändler vom technischen Service. Mehr Informationen dazu erhalten Sie im Serviceportal
unter www.horizonhobby.de oder telefonisch bei dem technischen Service von Horizon.
Packen Sie das Produkt sorgfältig ein. Beachten Sie, dass der Originalkarton in der Regel
nicht ausreicht, um beim Versand nicht beschädigt zu werden. Verwenden Sie einen
Paketdienstleister mit einer Tracking Funktion und Versicherung, da Horizon bis zur Annahme
keine Verantwortung für den Versand des Produktes übernimmt. Bitte legen Sie dem Produkt
einen Kaufbeleg bei, sowie eine ausführliche Fehlerbeschreibung und eine Liste aller
eingesendeten Einzelkomponenten. Weiterhin benötigen wir die vollständige Adresse, eine
Telefonnummer für Rückfragen, sowie eine Email Adresse.
Garantie und Reparaturen
Garantieanfragen werden nur bearbeitet, wenn ein Originalkaufbeleg von einem autorisierten
Fachhändler beiliegt, aus dem der Käufer und das Kaufdatum hervorgeht. Sollte sich ein
Garantiefall bestätigen wird das Produkt repariert oder ersetzt. Diese Entscheidung obliegt
einzig Horizon Hobby.
Kostenpfl ichtige Reparaturen
Liegt eine kostenpfl ichtige Reparatur vor, erstellen wir einen Kostenvoranschlag, den
wir Ihrem Händler übermitteln. Die Reparatur wird erst vorgenommen, wenn wir die
Freigabe des Händlers erhalten. Der Preis für die Reparatur ist bei Ihrem Händler zu
entrichten. Bei kostenpfl ichtigen Reparaturen werden mindestens 30 Minuten Werkstattzeit
und die Rückversandkosten in Rechnung gestellt. Sollten wir nach 90 Tagen keine
Einverständniserklärung zur Reparatur vorliegen haben, behalten wir uns vor, das Produkt zu
vernichten oder anderweitig zu verwerten.
ACHTUNG: Kostenpfl ichtige Reparaturen nehmen wir nur für Elektronik und Motoren
vor. Mechanische Reparaturen, besonders bei Hubschraubern und RC-Cars sind
extrem aufwendig und müssen deshalb vom Käufer selbst vorgenommen werden.
Garantie und Service Kontaktinformationen
Land des Kauf Horizon Hobby Adresse Telefon/E-mail Adresse
Deutschland Horizon Technischer Service
Christian-Junge-Straße 1
25337 Elmshorn, Deutschland
+49 (0) 4121 2655 100
service@horizonhobby.de
Kundendienstinformationen
Land des Kauf Horizon Hobby Adresse Telefon/E-mail Adresse
Deutschland Horizon Hobby GmbH
Christian-Junge-Straße 1
25337 Elmshorn, Deutschland
+49 (0) 4121 2655 100
service@horizonhobby.de
14
Page 15

Garantie limitée
Durée de la garantie
Garantie exclusive - Horizon Hobby, Inc. (Horizon) garantit que le Produit acheté (le « Produit
») sera exempt de défauts matériels et de fabrication à sa date d’achat par l’Acheteur. La
durée de garantie correspond aux dispositions légales du pays dans lequel le produit a été
acquis. La durée de garantie est de 6 mois et la durée d’obligation de garantie de 18 mois à
l’expiration de la période de garantie.
Limitations de la garantie
(a) La garantie est donnée à l’acheteur initial (« Acheteur ») et n’est pas transférable. Le
recours de l’acheteur consiste en la réparation ou en l‘échange dans le cadre de cette
garantie. La garantie s’applique uniquement aux produits achetés chez un revendeur
Horizon agréé. Les ventes faites à des tiers ne sont pas couvertes par cette garantie. Les
revendications en garantie seront acceptées sur fourniture d’une preuve d’achat valide
uniquement. Horizon se réserve le droit de modifi er les dispositions de la présente garantie
sans avis préalable et révoque alors les dispositions de garantie existantes.
(b) Horizon n’endosse aucune garantie quant à la vendabilité du produit ou aux capacités
et à la forme physique de l’utilisateur pour une utilisation donnée du produit. Il est de la
seule responsabilité de l’acheteur de vérifi er si le produit correspond à ses capacités et à
l’utilisation prévue.
(c) Recours de l’acheteur – Il est de la seule discrétion d‘Horizon de déterminer si un produit
présentant un cas de garantie sera réparé ou échangé. Ce sont là les recours exclusifs de
l’acheteur lorsqu’un défaut est constaté.
Horizon se réserve la possibilité de vérifi er tous les éléments utilisés et susceptibles d’être
intégrés dans le cas de garantie. La décision de réparer ou de remplacer le produit est du
seul ressort d’Horizon. La garantie exclut les défauts esthétiques ou les défauts provoqués
par des cas de force majeure, une manipulation incorrecte du produit, une utilisation
incorrecte ou commerciale de ce dernier ou encore des modifi cations de quelque nature
qu’elles soient.
La garantie ne couvre pas les dégâts résultant d’un montage ou d’une manipulation
erronés, d’accidents ou encore du fonctionnement ainsi que des tentatives d’entretien ou
de réparation non effectuées par Horizon. Les retours effectués par le fait de l’acheteur
directement à Horizon ou à l’une de ses représentations nationales requièrent une
confi rmation écrite.
Limitation des dégâts
Horizon ne saurait être tenu pour responsable de dommages conséquents directs ou
indirects, de pertes de revenus ou de pertes commerciales, liés de quelque manière que ce
soit au produit et ce, indépendamment du fait qu’un recours puisse être formulé en relation
avec un contrat, la garantie ou l’obligation de garantie. Par ailleurs, Horizon n’acceptera pas
de recours issus d’un cas de garantie lorsque ces recours dépassent la valeur unitaire du
produit. Horizon n’exerce aucune infl uence sur le montage, l’utilisation ou la maintenance
du produit ou sur d’éventuelles combinaisons de produits choisies par l’acheteur. Horizon
ne prend en compte aucune garantie et n‘accepte aucun recours pour les blessures ou les
dommages pouvant en résulter. En utilisant et en montant le produit, l’acheteur accepte sans
restriction ni réserve toutes les dispositions relatives à la garantie fi gurant dans le présent
document.
Si vous n’êtes pas prêt, en tant qu’acheteur, à accepter ces dispositions en relation avec
l’utilisation du produit, nous vous demandons de restituer au vendeur le produit complet, non
utilisé et dans son emballage d’origine.
Indications relatives à la sécurité
Ceci est un produit de loisirs perfectionné et non un jouet. Il doit être utilisé avec précaution
et bon sens et nécessite quelques aptitudes mécaniques ainsi que mentales. L’incapacité
à utiliser le produit de manière sûre et raisonnable peut provoquer des blessures et des
dégâts matériels conséquents. Ce produit n’est pas destiné à être utilisé par des enfants
sans la surveillance par un tuteur. La notice d’utilisation contient des indications relatives
à la sécurité ainsi que des indications concernant la maintenance et le fonctionnement
du produit. Il est absolument indispensable de lire et de comprendre ces indications
avant la première mise en service. C’est uniquement ainsi qu’il sera possible d’éviter une
manipulation erronée et des accidents entraînant des blessures et des dégâts.
Questions, assistance et réparations
Votre revendeur spécialisé local et le point de vente ne peuvent effectuer une estimation
d’éligibilité à l’application de la garantie sans avoir consulté Horizon. Cela vaut également
pour les réparations sous garantie. Vous voudrez bien, dans un tel cas, contacter le
revendeur qui conviendra avec Horizon d’une décision appropriée, destinée à vous aider le
plus rapidement possible.
Maintenance et réparation
Si votre produit doit faire l’objet d’une maintenance ou d‘une réparation, adressez-vous soit
à votre revendeur spécialisé, soit directement à Horizon. Emballez le produit soigneusement.
Veuillez noter que le carton d‘emballage d’origine ne suffi t pas, en règle générale, à protéger
le produit des dégâts pouvant survenir pendant le transport. Faites appel à un service de
messagerie proposant une fonction de suivi et une assurance, puisque Horizon ne prend
aucune responsabilité pour l’expédition du produit jusqu’à sa réception acceptée. Veuillez
joindre une preuve d’achat, une description détaillée des défauts ainsi qu’une liste de tous
les éléments distincts envoyés. Nous avons de plus besoin d’une adresse complète, d’un
numéro de téléphone (pour demander des renseignements)
et d’une adresse de courriel.
Garantie et réparations
Les demandes en garantie seront uniquement traitées en présence d’une preuve d’achat
originale émanant d’un revendeur spécialisé agréé, sur laquelle fi gurent le nom de l’acheteur
ainsi que la date d’achat. Si le cas de garantie est confi rmé, le produit sera réparé Cette
décision relève uniquement de Horizon Hobby.
Réparations payantes
En cas de réparation payante, nous établissons un devis que nous transmettons à votre
revendeur. La réparation sera seulement effectuée après que nous ayons reçu la confi rmation
du revendeur. Le prix de la réparation devra être acquitté au revendeur. Pour les réparations
payantes, nous facturons au minimum 30 minutes de travail en atelier ainsi que les frais de
réexpédition. En l’absence d’un accord pour la réparation dans un délai de 90 jours, nous
nous réservons la possibilité de détruire le produit ou de l’utiliser autrement.
Attention : nous n’effectuons de réparations payantes que pour les composants
électroniques et les moteurs. Les réparations touchant à la mécanique, en particulier
celles des hélicoptères et des voitures radiocommandées, sont extrêmement coûteuses et
doivent par conséquent être effectuées par l’acheteur lui-même.
Coordonnées de Garantie et réparations
Pays d’achat Horizon Hobby Adresse Numéro de téléphone/Courriel
France Horizon Hobby SAS
11 Rue Georges Charpak
77127 Lieusaint, France
+33 (0) 1 60 18 34 90
infofrance@horizonhobby.com
Informations de contact pour les pièces
Pays d’achat Horizon Hobby Adresse Numéro de téléphone/Courriel
France Horizon Hobby SAS
11 Rue Georges Charpak
77127 Lieusaint, France
+33 (0) 1 60 18 34 90
infofrance@horizonhobby.com
15
Page 16

Durata della Garanzia
Periodo di garanzia
Garanzia esclusiva - Horizon Hobby, Inc., (Horizon) garantisce che i prodotti acquistati (il
“Prodotto”) sono privi di difetti relativi ai materiali e di eventuali errori di montaggio. Il
periodo di garanzia è conforme alle disposizioni legali del paese nel quale il prodotto è stato
acquistato. Tale periodo di garanzia ammonta a 6 mesi e si estende ad altri 18 mesi dopo
tale termine.
Limiti della garanzia
(a) La garanzia è limitata all’acquirente originale (Acquirente) e non è cedibile a terzi.
L’acquirente ha il diritto a far riparare o a far sostituire la merce durante il periodo di questa
garanzia. La garanzia copre solo quei prodotti acquistati presso un rivenditore autorizzato
Horizon. Altre transazioni di terze parti non sono coperte da questa garanzia. La prova di
acquisto è necessaria per far valere il diritto di garanzia. Inoltre, Horizon si riserva il diritto di
cambiare o modifi care i termini di questa garanzia senza alcun preavviso e di escludere tutte
le altre garanzie già esistenti.
(b) Horizon non si assume alcuna garanzia per la disponibilità del prodotto, per l’adeguatezza
o l’idoneità del prodotto a particolari previsti dall’utente. è sola responsabilità dell’acquirente
il fatto di verifi care se il prodotto è adatto agli scopi da lui previsti.
(c) Richiesta dell’acquirente – spetta soltanto a Horizon, a propria discrezione riparare o
sostituire qualsiasi prodotto considerato difettoso e che rientra nei termini di garanzia. queste
sono le uniche rivalse a cui l’acquirente si può appellare, se un prodotto è difettoso.
Horizon si riserva il diritto di controllare qualsiasi componente utilizzato che viene coinvolto
nella rivalsa di garanzia. Le decisioni relative alla sostituzione o alla riparazione avvengono
solo in base alla discrezione di Horizon. Questa garanzia non copre dei danni superfi ciali
o danni per cause di forza maggiore, uso errato del prodotto, negligenza, uso ai fi ni
commerciali, o una qualsiasi modifi ca a qualsiasi parte del prodotto.
Questa garanzia non copre danni dovuti ad una installazione errata, ad un funzionamento
errato, ad una manutenzione o un tentativo di riparazione non idonei a cura di soggetti diversi
da Horizon. La restituzione del prodotto a cura dell’acquirente, o da un suo rappresentante,
deve essere approvata per iscritto dalla Horizon.
Limiti di danno
Horizon non si riterrà responsabile per danni speciali, diretti, indiretti o consequenziali; perdita
di profi tto o di produzione; perdita commerciale connessa al prodotto, indipendentemente
dal fatto che la richiesta si basa su un contratto o sulla garanzia. Inoltre la responsabilità
di Horizon non supera mai in nessun caso il prezzo di acquisto del prodotto per il quale si
chiede la responsabilità. Horizon non ha alcun controllo sul montaggio, sull’utilizzo o sulla
manutenzione del prodotto o di combinazioni di vari prodotti. Quindi Horizon non accetta
nessuna responsabilità per danni o lesioni derivanti da tali circostanze. Con l’utilizzo e il
montaggio del prodotto l’utente acconsente a tutte le condizioni, limitazioni e riserve di
garanzia citate in questa sede.
Qualora l’utente non fosse pronto ad assumersi tale responsabilità associata all’uso del
prodotto, si suggerisce di di restituire il prodotto intatto, mai usato e immediatamente presso
il venditore.
Indicazioni di sicurezza
Questo è un prodotto sofi sticato di hobbistica e non è un giocattolo. Esso deve essere
manipolato con cautela, con giudizio e richiede delle conoscenze basilari di meccanica
e delle facoltà mentali di base. Se il prodotto non verrà manipolato in maniera sicura e
responsabile potrebbero risultare delle lesioni, dei gravi danni a persone, al prodotto o
all’ambiente circostante. Questo prodotto non è concepito per essere usato dai bambini
senza una diretta supervisione di un adulto. Il manuale del prodotto contiene le istruzioni di
sicurezza, di funzionamento e di manutenzione del prodotto stesso. È fondamentale leggere e
seguire tutte le istruzioni e le avvertenze nel manuale prima di mettere in funzione il prodotto.
Solo così si eviterà un utilizzo errato e di preverranno incidenti, lesioni o danni.
Domande, assistenza e riparazioni
Il vostro negozio locale e/o luogo di acquisto non possono fornire garanzie di assistenza
o riparazione senza previo colloquio con Horizon. questo vale anche per le riparazioni in
garanzia. Quindi in tale casi bisogna interpellare un rivenditore, che si metterà in contatto
subito con Horizon per prendere una decisione che vi possa aiutare nel più breve tempo
possibile.
Manutenzione e riparazione
Se il prodotto deve essere ispezionato o riparato, si prega di rivolgersi ad un rivenditore
specializzato o direttamente ad Horizon. il prodotto deve essere Imballato con cura. Bisogna
far notare che i box originali solitamente non sono adatti per effettuare una spedizione
senza subire alcun danno. Bisogna effettuare una spedizione via corriere che fornisce una
tracciabilità e un’assicurazione, in quanto Horizon non si assume alcuna responsabilità
in relazione alla spedizione del prodotto. Inserire il prodotto in una busta assieme ad una
descrizione dettagliata degli errori e ad una lista di tutti i singoli componenti spediti. Inoltre
abbiasmo bisogno di un indirizzo completo, di un numnero di telefono per chiedere ulteriori
domande e di un indirizzo e-mail.
Garanzia a riparazione
Le richieste in garanzia verranno elaborate solo se è presente una prova d’acquisto in
originale proveniente da un rivenditore specializzato autorizzato, nella quale è ben visibile la
data di acquisto. Se la garanzia viene confermata, allora il prodotto verrà riparato o sostituito.
Questa decisione spetta esclusivamente a Horizon Hobby.
Riparazioni a pagamento
Se bisogna effettuare una riparazione a pagamento, effettueremo un preventivo che verrà
inoltrato al vostro rivenditore. La riparazione verrà effettuata dopo l’autorizzazione da parte
del vostro rivenditore. La somma per la riparazione dovrà essere pagata al vostro rivenditore.
Le riparazioni a pagamento avranno un costo minimo di 30 minuti di lavoro e in fattura
includeranno le spese di restituzione. Qualsiasi riparazione non pagata e non richiesta entro
90 giorni verrà considerata abbandonata e verrà gestita di conseguenza.
Attenzione: Le riparazioni a pagamento sono disponibili solo sull’elettronica e sui
motori. Le riparazioni a livello meccanico, soprattutto per gli elicotteri e le vetture RC
sono molto costose e devono essere effettuate autonomamente dall’acquirente
Garanzia e Assistenza informazioni per i contatti
Stato in cui il prodotto è stato acquistato Horizon Hobby Indirizzo Telefono/Indirizzo e-mail
Germania Horizon Technischer Service
Christian-Junge-Straße 1
25337 Elmshorn, Germania
+49 (0) 4121 2655 100
service@horizonhobby.de
Informazioni sul Servizio clienti
Stato in cui il prodotto è stato acquistato Horizon Hobby Indirizzo Telefono/Indirizzo e-mail
Germania Horizon Hobby GmbH
Christian-Junge-Straße 1
25337 Elmshorn, Germania
+49 (0) 4121 2655 100
service@horizonhobby.de
16
Page 17

©2012 Horizon Hobby, Inc.
Blade and E-fl ite are registered trademarks of Horizon Hobby, Inc.
Bell and 222 are registered trademarks of Textron Innovations, Inc. and are used under license by Horizon Hobby, Inc.
Created 10/12 32630 BLH1885
 Loading...