

Page 1

General Guidelines
• It is the user’s responsibility to read and follow all instructions.
• Keep these instructions with the product at all times and review before each use.
• It is the responsibility of this product’s owner to furnish the instructions to any person that borrows
• Inspect the product before use to ensure it is assembled properly and all parts are in safe working
• Never modify this product in any way.
• All circumstances cannot be addressed in these instructions. Please use common sense and
• Parts and/or instructions are subject to change without notice.
• Read and understand all instructions. Failure to follow all instructions listed may result in serious
• Do not exceed the 600 lb weight capacity. Distribute the load evenly.
• Only load the carrier on flat and level surfaces capable of supporting its maximum load.
• Prior to transport, make sure the ramp of the carrier and the motorcycle are properly secured to the
• When not in use, store the carrier in a secure place out of the reach of children.
• Be aware of the possible fire risk and property damage resulting from the vehicle’s exhaust system
• It is recommended that the general condition of any steel motorcycle carrier be examined each
• Before each use, make sure any dirt, debris, oil, grease, etc. is cleaned off the carrier. Clean the
• Periodically check all hardware for tightness.
Heavy Duty Steel Motorcycle Carrier
Instructions for Part # MCC-600
or purchases the product.
order and free of defects.
practice general safety measures when using this product.
Safety Warnings
injury.
carrier.
pointing at or running near the cargo in the carrier. Do not use if this condition exists.
Maintenance
time before it is used. Keep your steel motorcycle carrier in good repair by adopting a program of
conscientious repair and maintenance. Check misalignment, loose or damaged parts, and any other condition that may affect its safe operation. If any abnormal vibrations or noise occur, have the
problem corrected before further use. Have necessary repairs made by qualified service personnel.
carrier with a clean, moist cloth. Do not use solvents.
Page 2

Parts
Part
#
Description
Q’ty
Part
#
Description
Q’ty
1
Carrier frame
11110 nylon washer
2
2
Hitch tube
11210 flat washer
2
3
Hook tube
213M10 butterfly nut
2
4
M10*25 hexagon bolt
414Safety pin
2
5
M10 lock nut
14
15
Clamping block
1
6
M10*50 bolt
416Hitch pin
1
7
Wheel chock drop-leaf
117Hitch clip
1
8
Wheel chock front frame
118M10*50 hexagon bolt
2
9
M10*20 hexagon bolt
619M10*40 hexagon bolt
2
10
Ramp
1
Assembly
Note: Bolts and nuts should be tightened by hand first; after all parts have been assembled, go back
and tighten all hardware with a wrench.
Assembly Recommended Tools:
Open Wrench Allen Wrench
(2pcs) (1 pc)
Size=17mm Size=6mm
Page 3
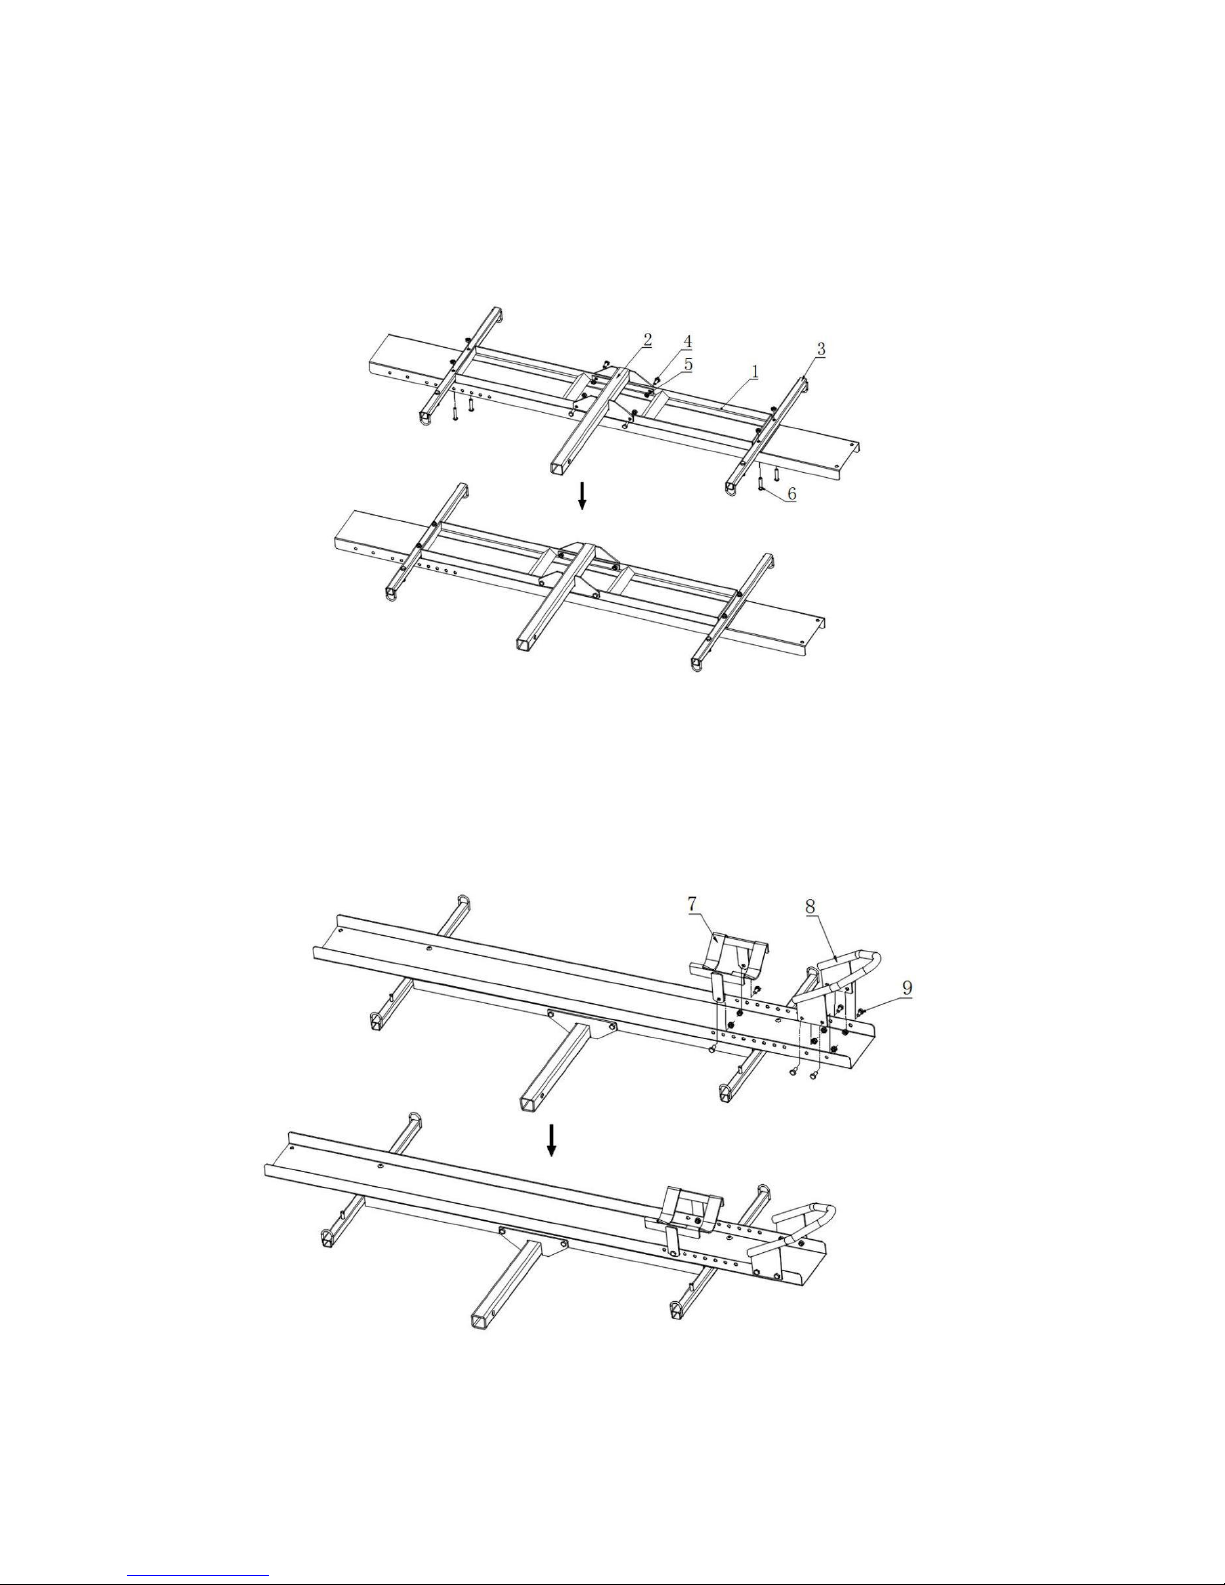
Step 1. Place the Carrier frame (1) upside down on a solid work surface, place hitch tube (2) in
the ramp. Align the holes, secure with M10*25 hexagon bolt (4) and M10 lock nut (5). Place hook
tube (3) on the ramp, align the holes, secure with M10*50 bolt (6) and M10 lock nut (5). See FIG
1..
FIG 1
Step 2.
Attach Wheel chock drop-leaf (7),Wheel chock front frame(8) and Carrier frame (1) with M10*20
hexagon bolt (9) and M10 lock nut(5), tighten bolt and nut. Make a right choice of the right hole according to
wheel size. See FIG 2.
FIG 2
Page 4
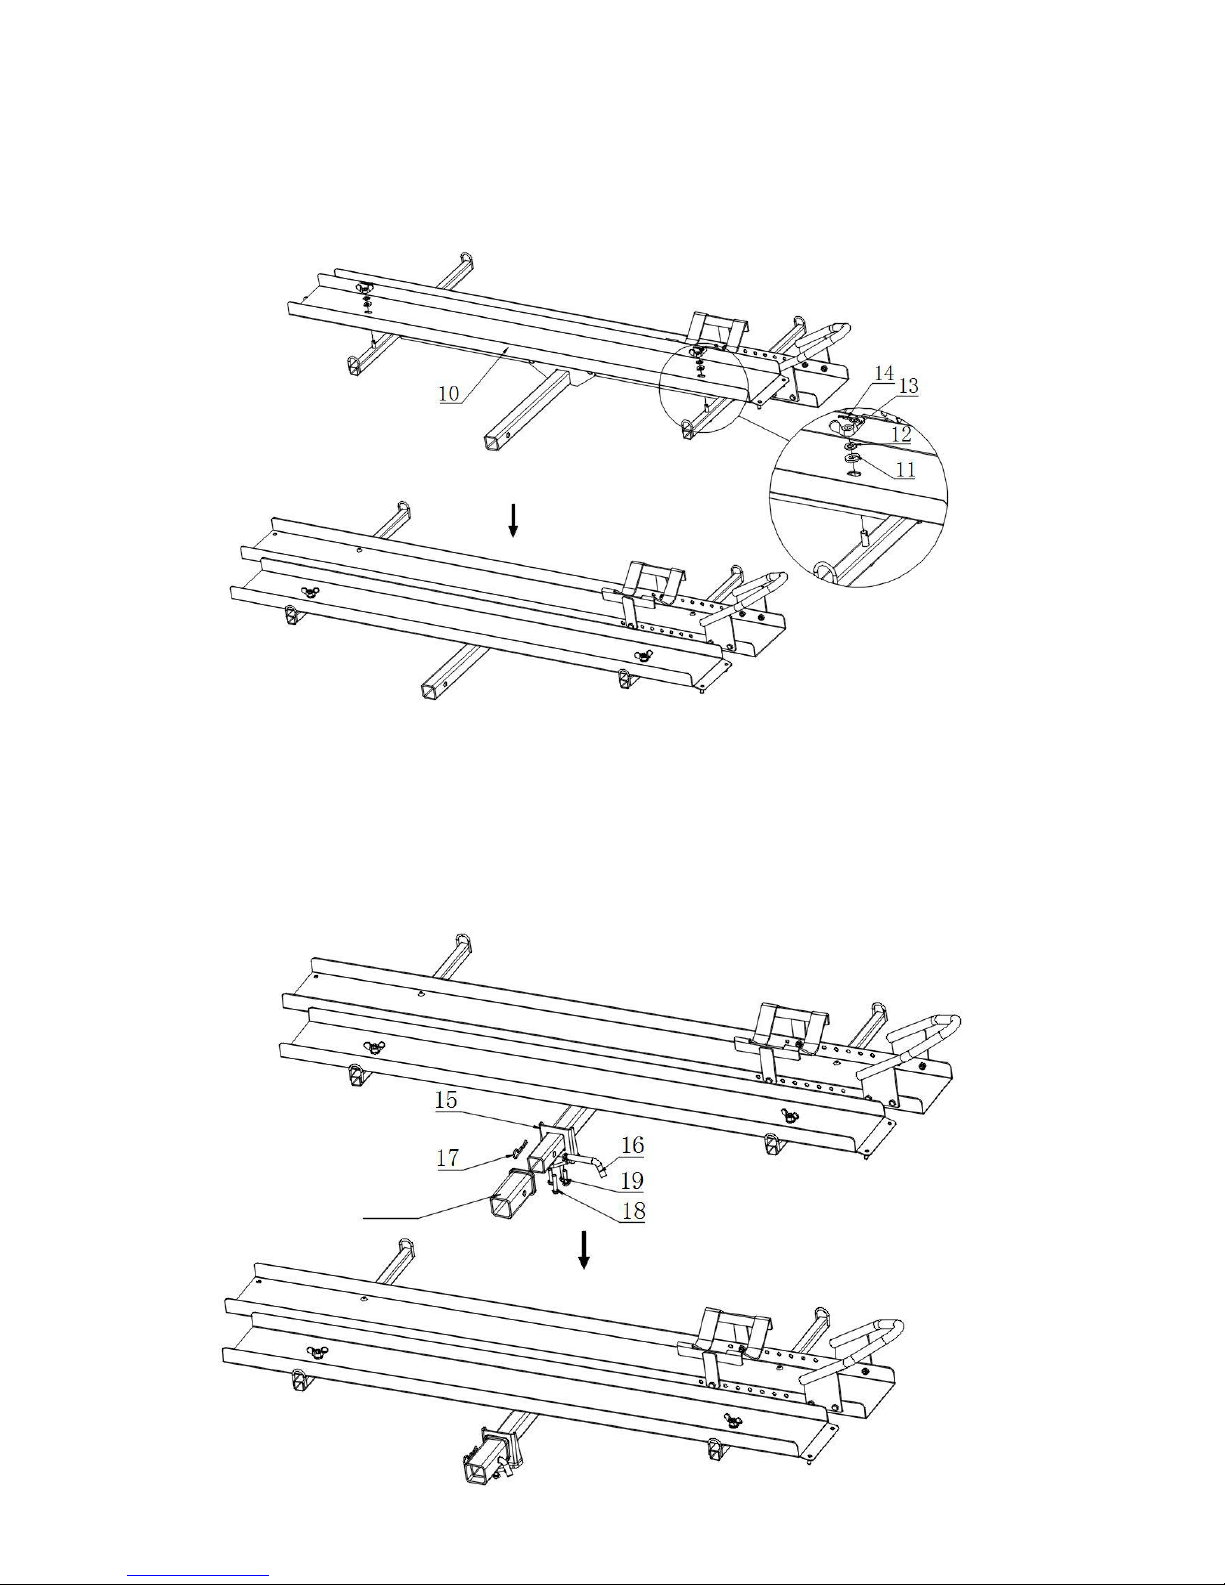
Step 3. Attach the 2pcs of Hook tube (3) and ramp (10) with 10 nylon washer (11) and 10 flat washer(12) and
Hitch receiver
M10 butterfly nut (13). Insert Safety pin (14) finally. See FIG 3..
FIG 3
STEP 4 Set clamping block (15) into Hitch tube (2) and put them into the hitch receiver. Insert Hitch pin
(16) and hitch clip (17). Screw clamping block (15) with M10*50 hexagon bolt (18) and M10*40 hexagon
bolt (19) tightly. See FIG 4.
FIG 4
Page 5
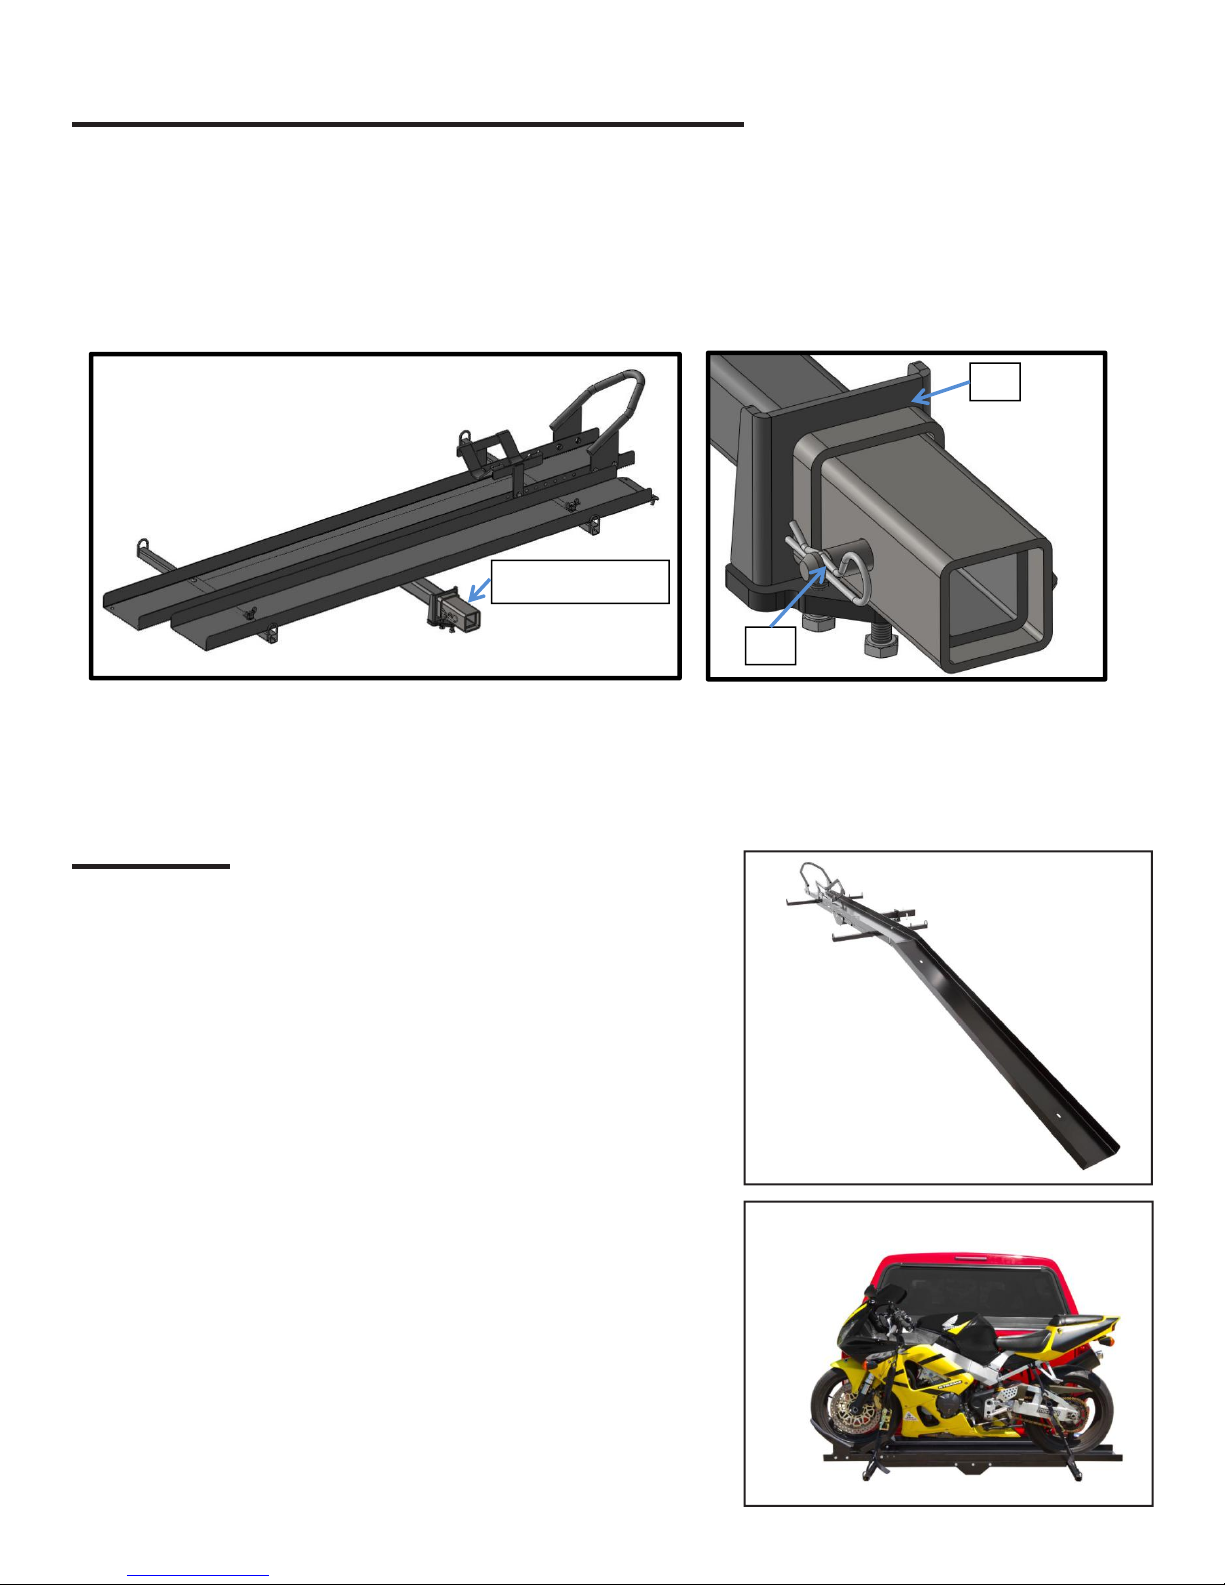
Mounting the Carrier to the Hitch Receiver
1. Slide the clamping block (G) over the end of the hitch tube. Make sure the large, open end of the
2. With assistance, lift the empty carrier and slide the open end of the hitch tube into thehitch
3. Slide the clamping block up against the hitch receiver. Tighten the bolts against the underside of
1. Remove the lock pin to unlock the ramp.
2. Remove the ramp and place the end rung onto the
3. Measure the motorcycle wheelbase to make sure the
4. Shift the motorcycle into neutral and, with another per-
5. Properly secure the motorcycle using tie down straps
6. Return the ramp to the mounted position and secure
7. Attach any needed markers and/or lights to the
G
Hitch receiver
K
clamping block faces the hitch receiver on the vehicle.
receiver. Secure with the hitch pin and clip (K).
the hitch receiver collar.
Operation
hook end of the platform, making sure the ramp is
securely in place. The bottom end of the ramp must
rest flat on a solid, level surface when loading and unloading equipment.
wheel pins are in the appropriate positions.
son’s assistance, push it up the ramp. Push the motorcycle completely onto the carrier platform until the front
wheel rests in place between the platform rungs.
(sold separately).
with the lock pin.
carrier and motorcycle as required by vehicle codes.
Page 6

Product Warranty and Liability
GENERAL PRODUCT WARRANTY: Products purchased from the Authorized Dealer (original place
of purchase) or Merchant (“Dealer”) will be free of defects in material and workmanship at the time of
receipt, and will meet the specifications stated at the place of purchase transaction or online at the
Dealer’s website, under normal use and service when correctly installed, operated and maintained.
This product warranty is effective for the period of time stated below, unless otherwise stated in the
product instructions or depicted in the product advertisement. All Authorized Dealer warranties are
NON-TRANSFERABLE and cover only the original end purchaser. This limited warranty does not
cover products purchased through non-authorized dealers. Non-authorized dealer receipts are not
accepted for warranty verification.
***Warranty claims must be made directly to the original place of purchase.***
WARRANTY PERIOD: This warranty remains in force for one year from the date of the product’s
accepted delivery. The Authorized Dealer offers a one year manufacturer’s warranty for most products
unless otherwise specified on the product advertisement.
WARRANTY SERVICE: The Authorized Dealer will replace any defective or malfunctioning part at
no charge, including payment of the shipping costs of parts or replacement product to and from the
Manufacturer. The purchaser is responsible for labor charges. If the product does not meet specifications as depicted in the advertisement, the Authorized Dealer will refund the full purchase price of the
product.
Questions regarding the warranty on a specific product and warranty claims should be directed to the
Authorized Dealer with whom the purchase transaction was made.
WARRANTY LIMITATIONS: The above warranty does not apply to products that are repaired, modified or altered by any party other than the Authorized Dealer; are subjected to unusual physical stress
or conditions (such as overloaded ramps or corrosion), natural disaster, governmental actions, wars,
strikes, labor disputes, riots, theft, vandalism, terrorism or any reason beyond reasonable control; are
damaged due to improper installation, misuse, abuse, accident or negligence in use, storage, transportation or handling, or tampering; or to products that are considered consumable items or items
requiring repair or replacement due to normal wear and tear.
Product should be inspected prior to signing for delivery. Product damage incurred during shipping,
unless noted on the Bill of Lading at the time of delivery, renders this warranty void.
LIMITED LIABILITY: In no event shall THE AUTHORIZED DEALER be liable to the purchaser or any
third party for any indirect, incidental, consequential, special, exemplary or punitive damages arising
out of the use of the product, including, without limitation, property damage, loss of value of the product or any third party products that are used in or with the product, or loss of use of the product or any
third party products that are used in or with the product.
DiscountRamps.com
1-888-651-3431
 Loading...