

ULTIMATE CAR DVR
BLACKSYS CF-100
2ch Full HD Car DVR with brilliant image
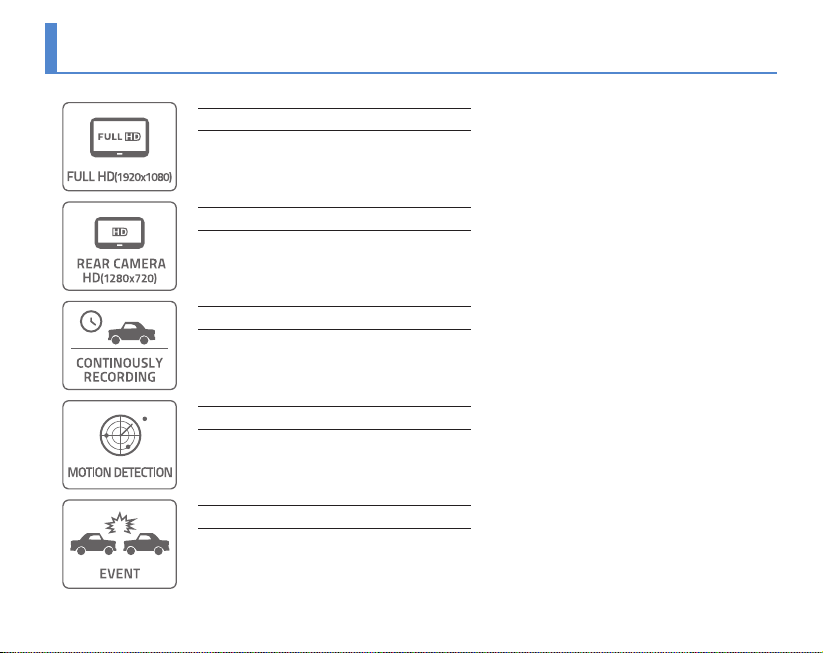
Simultaneous recording of front with Full HD resolution (1920x1080,30fps)
and rearview with HD resolution (1280x720,30fps) provides super high quality videos.
www.blacksys.co.kr/en
CAMMSYS
USER GUIDE

Notice
This product helps you to use the recorded video as a reference in case of car accident. The recorded video by this product carries no legal binding force.
CammSys will not be responsible for any legal conict and damage caused by recorded or non-recorded video.
• For the safety, do not operate the product during driving or stare at the product. Such action may result a car accident.
• On an accident with the impact lower than certain degree of acceleration, please be aware that the event data may not be
recorded in the product.(However it is recorded as a Normal file)
• Recording may not be executed in case the product is defect caused by car accident or other reason.
• Recording can be distorted under the condition where brightness suddenly changes like passing through a tunnel,
direct sunlight reflection during the day time or where light is not available at night time.
• All right to hardware, software and relevant data are reserved by CammSys Corp. and protected under copyright Law.
In case of illegal copy and process, not only civil compensation but criminal punishment based on protection of intellectual
property rights can be engaged.
• Do not use the product for other purpose rather than Car DVR.
• In case of recording other’s voice without permission, you will be liable for legal responsibility.
• CammSys will not be held responsible for damage caused by negligence, careless and improper management of user.
Notice
02

Table of contents
02 Notice
04 Caution
04 …… Installation and Management
05 …… SD Card Use
05 …… Use of Power
06 Main features
10 Name of the components
10 …… Standard & Optional Components
11 …… Front
11 …… Rear
12 …… Left Side
12 …… Right Side
13 Installation
13 …… Front Camera
15 …… Rear Camera
16 Function
16 …… Details on Video Record
17 …… LED and Voice guide
19 How to install PC Viewer
19 …… Software installation & uninstallation
20 …… Software installation
21 …… Software uninstallation
22 …… PC Viewer Layout
23 …… Basic use
24 …… Configuration
25 How to update firmware
25 …… firmware update
25 …… How to download Firmware and Software
26 How to format SD card
26 …… PC format
26 …… Manual format
27 Technical Specification
28 Customer Service
29 Warranty
30 Warranty Card
Table of contents
03

Caution
Before use the product, check if operation and video recording goes well.
Installation and Management
• Keep clean the camera lens by preventing dust or foreign substance from getting in the lens part.
Otherwise, it may result in video distortion. If another object is placed around, it can be reflected from the window.
So do not put another object around the installed product.
• If installation location of the product is changed, it may not record properly even if it worked after initial installation.
Therefore, install the product firmly and do not give an excessive shock or force to move the product.
• Continuous change of product location from the windshield may cause weakening of adhesive strength and the product
can fall off in the end.
• Before insert SD card into the product, check the location of SD card is correct.
• In case of using the power from the vehicle (DC fuse power), please disconnect the power cable from the product
if you do not use the product for a long time. (It may cause discharge the battery.)
• Do not power off while firmware is under upgrade. it may cause malfunctioning.
• Long time use of product or in case of severe vibration by driving unpaved road may cause change angle or location
of product. Correct the angle or location of product properly in a flat road after pull over to the side of the road.
• Do not use chemicals or detergents to clean the product. This can result in malfunctioning of the product.
• Never give an excessive shock to or inject a foreign substance into the product. Give an excessive force or shock
or injecting a foreign substance into this product can cause a trouble.
• Avoid high temperature(direct sunlight) or high humidity for the normal operation of product.
• Do not disassemble or remodel this product. It can cause an accident due to malfunctioning
and such action will result in the product being unfit for use and void all warranty/service provisions.
Installation and Management
04

Caution
SD Card Use
Be sure to turn OFF the power and LED is OFF before removing or inserting the SD card. Removing the SD card while product is in use, it can cause malfunctioning.
• Use the authorized SD card which a manufacturer/distributor provided.
If authorized SD card is not used, it can cause malfunctioning and loss of recorded Data.
• Do not disassemble or remodel this product. It can cause malfunctioning and service is not available.
• SD card is expendable supply. After long period of use, it may not able to record data correctly.
Please change the SD card to the new one. Data can be lost and damaged if data is kept in SD card for a long time.
• If you want to keep the videos, back up the data in other storage devices such as HDD, CD, USB.
If keep the data in SD card only, it may cause data loss and damage.
• Check the recorded data of SD card in a regular basis to make sure the recording is working well.
Use of Power
• This product is designed to use cigar jack power.In case of using the power from the vehicle, consult it with dealer in shop
and any damage caused by the user’s misuse, be noted that it’s user’s fault and manufacturer is not responsible for any case.
• Use the authorized cigar cable contained in the product box. Avoid connection of power supply without knowledge
and experience. Avoid using DC fuse power cable for permanent power. any damage caused by using DC fuse power cable,
be noted that it’s user’s fault and manufacturer is not responsible for any case.
• Do not remove or insert SD card while power is turned on, it can cause serious error of the product. Make sure to turn OFF
the power and LED is OFF before removing or inserting the SD card. Removing the SD card while product is in use it can cause
damage of video file.
SD Card Use & Use of Power
05
Main features
Main features
06
Full HD resolution for high quality video
F 1.8 lens with SONY Exmor sensor provides brighter and clear high quality Full HD images.
HD rear camera
720P HD resolution with 30fps
Normal Recording
Recording starts when ignition turned on and continuously recording video images and saving les
per 1 minute. If memory is full, recording starts overwriting from the oldest le by deleting them in order.
Motion Detection in Parking Mode
When motion is detected during parking or stopping, recording get started for a certain time and if motion is not
detected, recording is put on standby without recording. This mode stores only necessary videos, SD card memory
is managed ecently.
3D G-Sensor
3-axis G-Sensor detects vehicle impact, brake, acceleration and automatically record video images and
store les in a separated folder to avoid overwriting.
Main features
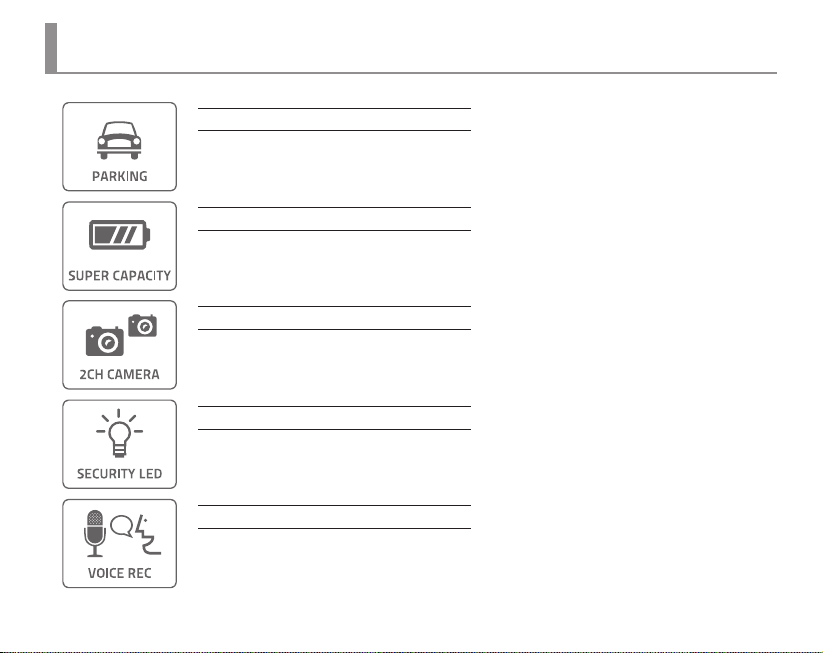
Parking Mode Recording
Parking mode activates automatically when vehicle stops for a certain amount of time if DC fuse power
cable is connected and any damage of vehicle can be recorded.
Super Capacity (backup battery)
Built-in super capacity secures safe storage of recorded data even when power supply is disconnected
caused by unexpected accident or impact.
Front and Rear recording
Front with Full HD, Rear with HD resolution at 30 fps respectively.
LED Lighting
Security LED in front indicates that Car DVR is installed in this vehicle and it’s always on while Car DVR is
powered on. Rear LED with blue color indicates state of each function such as recording, GPS reception.
Voice Guide/Recording
Kind voice guide announces each action and state. Built-in microphone records voice and surround sound
which helps situation analysis in case of video in accident.
Main features
07
Main features
Main features
08
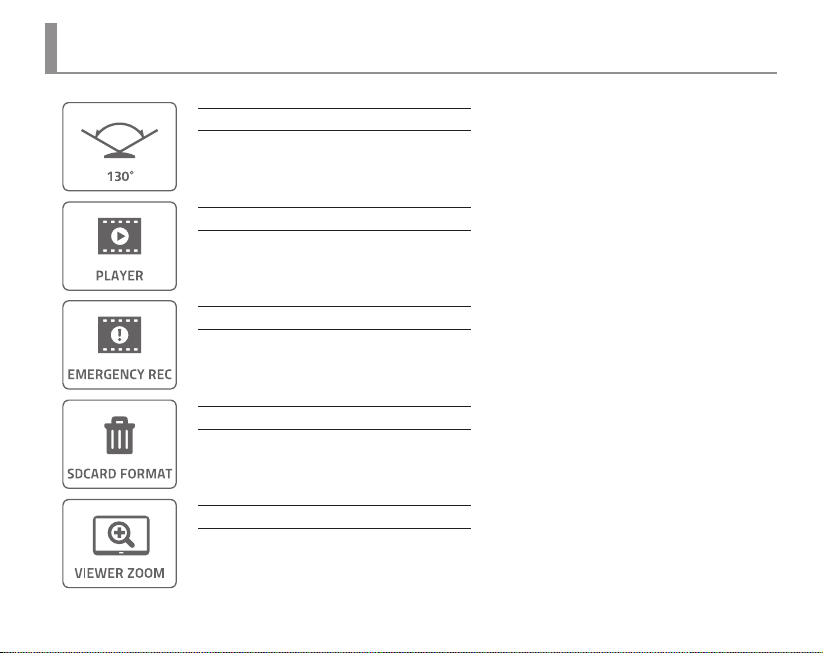
130° Angle of View
130° Diagonal angle of lens can record wider angle of view.
Dedicated PC viewer
BlackSys software(PC viewer) provides not only video playback and but video analysis.
Emergency Button Recording
User can record event manually with emergency button during driving, parking and accident.
Recording total 30 sec. including 10 sec. before and 20 sec. after from the time of pressing emergency
button is performed. The recorded video is stored in event folder.
Manual Format
Manual format is available without PC. (p.26)
Zoom in through PC viewer
Zoom in the important points of video through PC viewer.
Main features
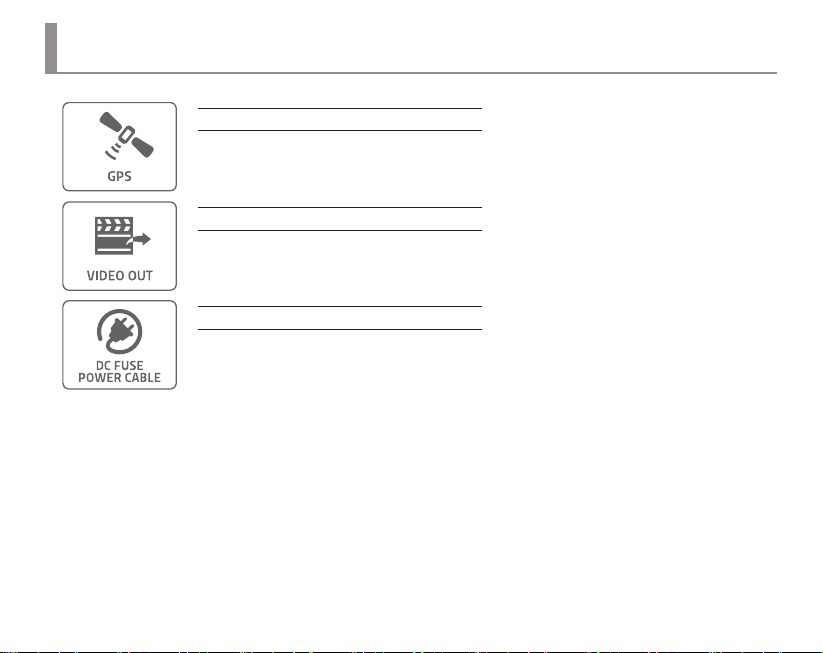
Location and route information (Optional GPS)
Optional high-sensitive GPS(SiRF 4) records vehicle speed, route and location information which synchronizes with Google Map to display the driving path.
Video Out (Optional Cable)
Video Out cable synchronizes with any media players for the real-time video monitoring.
DC Fuse Power Cable (Optional Cable)
If DC fuse power cable is connected, recording is available during parking mode.
※ Long time recording through DC fuse power cable may cause discharge of battery and malfunctioning
of product. So please unplug the cable in this case.
Main features
09
Name of the components
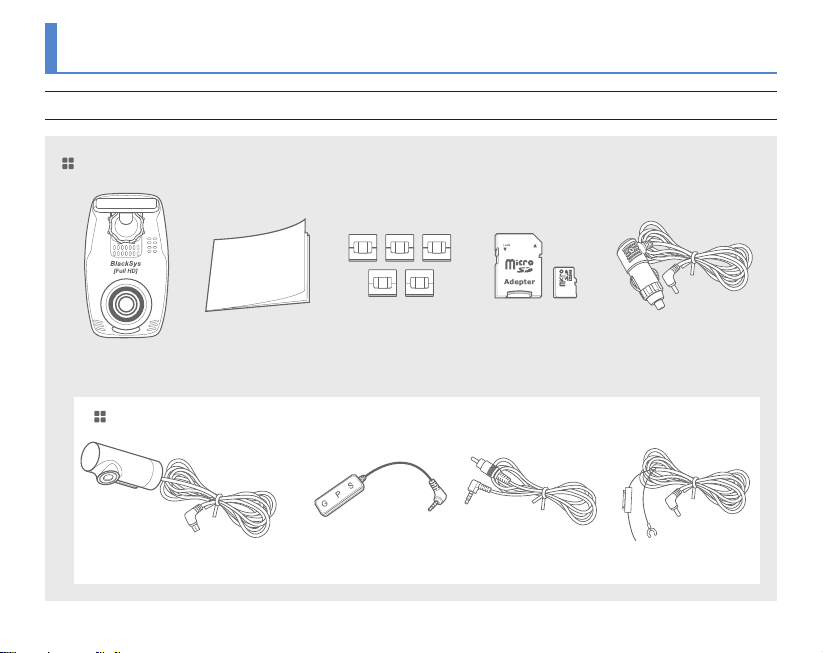
Actual components may be dierent with pictures and some components can be changed in case.
If package doesn’t include below components, please contact a retail shop or company where product was sold.
Standard components
E
D
I
U
G
R
U
E
S
Main unit User’s manual Cable Holder Micro SD Card Cigar Jack cable
Optional Components
External GPS module A/V Out cable DC Fuse Power CableHD Rear Camera
Standard components & Optional Components
10

Name of the components
Speaker
Action state, Voice guide
Camera lens
For video recording
Emergency Recording
button
For manual Recording
Surveillance LED
LED indicator for parking
or video recording
Sound control button
Speaker control button (-)
REC LED
Recording state indication
Sound control button
Speaker control button (+)
GPS LED
GPS connection state indication
MIC
Recording video
and voice simultaneously
Front & Rear
11

Name of the components
Power Terminal
For supplying power
to the main unit
A/V Out Port
Video review by connecting to external device
GPS Port
For checking location and
speed of vehicle through
dedicated PC viewer
Left & Right side
12
① GND
② AV OUT
③ GPS Data
④ Power
Holder
For attaching main unit
to windshield
Clamping lever
For xing holder to product
and adjustment available on
up/down, left/right side
Rear Camera
connection port
Mini USB port for HD Rear
Camera
Micro SD card slot
External Mirco SD card port

Installation
1. Attaching double-sided adhesive tape 2. Installing unit
Wipe up the foreign matters or moisture
completely from the location of installation.
Remove the release paper in double sided tape
and attach it to the holder and remove the red
adhesive protector.
Installation is recommended on the left/right of room
mirror. Tightly fasten the adhesive of holder to the
windshield by pushing it. Adjust the angle of camera to
record forward and unit to be vertically installed. Finally,
tighten the clamping lever.
※ If a video from navigation system or dashboard reect in
windshield, it can aect video quality. so avoid it.
Front Camera Installation
13

Installation
3. Power cable arrangement and connection 4. Power cable connection and check the LED state
By using the cable holders, arrange the Cigar jack
cable and connect it to the DC IN port(upper hole).
If car navigation system is installed on the car, it is
recommended to connect video out cable(option) to
navigation system to adjust by checking the current
view of the camera.
Front Camera Installation
14
After inserting the Cigar jack cable(Power cable) into
cigar jack, turn on the car ignition. If all LEDs of power
status are on, installation is completed.

Installation
※ Caution ※
Install arrow to the up
1. Rear Camera Installation
Connect cable of Rear Camera to the AV in port of Front
Camera(main unit). Clean up the cable of Rear Camera.
2. Installation
Wipe up the foreign matters or moisture completely
from the location of installation. Remove red cover in
double sided tape and attach it to the rear windshield.
Installation is recommended on the middle of rear
windshield and holder should be forwarded to the
left side.
※ Tinted window may cause unclear image of video from
rear camera. Avoid tinted window.
Rear Camera Installation
15

Function
Normal Recording le, Event Recording le and Parking mode Recording le are stored and if external SD card is full, overwriting gets started from the oldest le.
Overwriting gets started from the oldest les in order, regular data back-up is required to save important data.
Normal Recording
• Recording starts when vehicle power is turned on and recorded data are stored in SD card. (“Normal” folder)
Parking Mode Recording
• 10 minutes after parking or stopping the car, if no motion is detected, it converts to Parking mode recording automatically.
(In case of using DC fuse power cable or product is connected with a vehicle battery)
• If motion is detected consistently and driving is resuming, it converts Normal recording again.
• When it detects impact during Parking mode(Motion detection), the video file is stored in (“PARK” folder).
※ Long period of parking may cause discharge of a vehicle battery.
Last Scene Recording
• Though power supply is disconnected caused by accident or manually, last scene is recorded and stored by using built-in
super capacity battery.
EVENT Recording
• If Acceleration sensor(G-Sensor) detects impact, sudden unintended acceleration and quick braking or manually pressing
the event button during the car runs, it records 30 sec. of video to the (“EVENT” folder).(10 sec. before and 20 sec. after the event)
※ If power is disconnected within 2 min. after power is on, recorded le can be broken.
※ The less G-Sensor gure, the less shock sensitivity. (Initial settings come with 3 level. 1 is insensitive, 3 is medium, 5 is sensitive)
Details on Video Record
16

Function
※ Function can be changed according to product upgrade.
Mode Button Voice guide
Power
Recording start X
TV OUT
GPS
SD Card
format
ON X X
Connected
No connected
Connected
No connected
Format Mode
Format start
Format cancel
FW update
OFF
Keep pressing Emergency
Updating automatically if update
le is existing in SD card.
X Car DVR is ending.
X X
X X
X
X -
button over 8 sec.
▲ Button SD CARD is getting formatted.
▼ Button SD CARD is not formatted.
1CH recordings are getting
started.
2CH recordings are getting
started
GPS is connected.
(1 time if connected)
Do you want to format
SD CARD?
Update is starting.
LED state
REC GPS Parking
LED and Voice guide
17

Function
Mode Button Voice guide
Automatic
EVENT
Recording
Parking
Mode
Recording
Voice
Record-
※ Motion Detection: motion is detected during Parking Mode, parking LED is ickering per
Manual Pressing Emergency button shortly
ON ▲ Keep pressing over 3 sec. Parking mode is starting.
OFF ▲ Keep pressing over 3 sec. Parking mode is ending.
ON ▼ Keep pressing over 3 sec. Voice recording is starting.
ing
OFF ▼ Keep pressing over 3 sec. Voice recording is ending.
X Sound eect 1
Sound eect 1 + Sound eect 2
Error
Mode Button Voice guide
No SD card X Please insert SD CARD.
SD card error X SD CARD cannot be read.
Camera error X Camera is out of order.
Low capacity
memory card
LED and Voice guide
18
X SD CARD is not compatible.
LED state
REC GPS Parking
(3 times ickering)
(3 times ickering)
(3 times ickering)
(3 times ickering)
※ CF-100 supports SD card from 16 to 32GB.
LED state
REC GPS Parking

How to install PC Viewer
PC Viewer Installation
Insert SD card to the PC or download software from www.
blacksys.co.kr > Support > Download and execute.
Once installation is completed,
click CF-100 Player and execute it.
CF-100
Player
Uninstallation
1. Control panel > Program uninstallation & change
> Uninstall CF-100 Player
2. C:₩Program Files(x86)₩BlackSys₩CF-100 Player
₩ Uninstall CF-100Player
3. Execute Start > All program
> CF-100 Player > Uninstall CF-100Player
Recommended System for PC viewer
- OS : Windows XP SP3, Vista(32bit), 7(32/64bit)
- H/W : Pentium 4 2.8GHz over / 1G RAM over
- Web browser : MS Internet Explore 8.0 over
- Direct X ver. : Direct X 9.0(JUNE2010) over
- Other : Windows.NET Framework 3.5 over
Software installation & uninstallation
19

How to install PC Viewer
Software installation
1. Execute download & Setup.exe 2. Installation preparation 3. Installation folder choice
4. Installation start 5. Installation in process 6. Installation completion
Software installation
20

How to install PC Viewer
Software uninstallation
1. Click Start
4. Click [Yes] for uninstall 5. Uninstallation preparation 6. Uninstallation in process
2. Click All program and search
Uninstall CF-100Player
3. Chose CF-100Player > Uninstall CF-100Player
Software uninstallation
21

How to install PC Viewer
Viewer Screen
: Screen Minimization
: Full Screen / Previous Screen
: Close
ALL : All video le list
NORMAL : Normal video le list
EVENT : Event video le list
PARKING : Parking video le list
Play list
Progress bar
G-Sensor Data Review
Version information :
Conguration :
Video Screen Capture :
Print :
Folder open :
Select drive :
※ PC viewer enlargement(basic screen view): if scroll up mouse in front video while it’s playing, video size enlarge 0.2 times each and total 2.8 times are available(1 ~ 15 level).
※ PC viewer enlargement(full screen view): if scroll up mouse in front video while it’s playing, video size can enlarge 0.2 times each and total 2.2 times are available(1 ~ 12 level)
PC Viewer Layout
22
: Move to Previous File in the List
: Move to 1sec. Before
: Playback and stop video
: Move to 1sec. After
: Move to Next File in the List
: Move to Next Frame
: Enlargement of a part of Screen
: Screen Vertical
: Screen Horizontal
: Playback front camera
: Playback rear camera
: Map enlargement
Map view
GPS Speed (Km/h ↔ mph)
: Volume Control
: Image Brightness Control

How to install PC Viewer
Drive open
• [ ] Select SD card wish to open and click “OK”.
• Video files in the selected drive are displayed in time order.
• Select file wish to open and double click in the file list
[ ] or click play icon for the video play.
Folder open
• [ ] Select folder open icon and select folder wish to open in the folder search window. Click OK.
Basic use
23

How to install PC Viewer
24
Settings
Audio Recording
Speaker
G-Sensor Sensitivity Control
Parking Entry time
Parking LED
Time Zone
Date & Time Setting
Save
Default
Conguration
: OFF / ON
: 0-10 (Volume Control)
: Low-High (1~5)
: OFF/10 min./20 min./30 min.
: OFF / ON
: GPS Time Zone setting
: Check V mark and set d/m/y/time/min/sec
: Save setting gures in SD card
: Change setting to default
User
User’s name
Vehicle plate no.

How to update rmware
Firmware update
Please follow the below process in case of updating firmware.
① Remove SD card from the unit.
• Turn off the ignition first and remove cigar jack cable from the unit.
② Access our webpage (www.blacksys.co.kr > Support > Download) and download the latest update file.
③ Connect SD card to PC and paste downloaded latest update file(CF100update.tar) to the root of removable disk.
④ Insert SD card which contains latest update file to the unit.
• Turn on the ignition and connect cigar jack cable to the unit.
⑤ All LEDs are on and upgrade gets started and once upgrade is completed, recording goes on automatically.
• Do not disconnect power cable while update is in process. It can cause malfunctioning.
How to download Firmware and Software
• Access our webpage (www.blacksys.co.kr > Support > Download) and download the latest update file.
• Complete Installation software to the PC.
※ Internet connection is required to download firmware and software.
※ Please check notice before upgrading firmware as firmware upgrade may change some functions of the product.
How to download Firmware and Software
25

How to format SD card
Check the virus and format the SD card in a regular basis (twice a month at least ) to avoid disadvantage caused by storage error such as non-recording and abnormal recording.
PC format
① Insert or connect SD card to PC.
② Click [Start] → [My Computer]
③ Place mouse pointer in [Portable USB drive] SD card and click the right button of mouse. then click the [Format].
④ Once click the [Start] button, format is started.
• FAT 32 format is required if SD card recognition and record error happen.
• Change SD card if PC doesn’t recognize SD card or format is not able to be completed.
• If SD card contains other data, it can cause malfunctioning. Therefore, please remove it.
※ As SD card is expendable supply, manufacturer is not responsible for any data loss and damage.
Also, manufacturer cannot guarantee the recorded data in SD card.
Manual format Manual format is available without PC.
① If press Emergency button deeply over 8 sec. voice guide “Do you want to format SD Card ?” is announced.
② If press left [ ▲ ] button, voice guide “SD CARD is getting formatted” is announced and format gets started.
③ Once format is completed, it starts rebutting automatically and recording.
How to format SD card
26

Technical Specication
Model Name CF-100
Lens Front: 2M Pixels / Rear: 1M Pixels
Camera
Function
Display
Temperature
Power Operation DC 12V ~ 24V (±0.3V) / CIGAR JACK CABLE
Angle of View Front: 130° Rear: 120°
Sensitivity 1.0 LUX
Video / Voice Encoding H.264(AVI) / PCM
Resolution Front : 1920(H)x1080(V) Full HD, Rear : 1280(H)x720(V) HD
Recording Mode NORMAL (70% of memory space, 1min./le, 30 frame/s)
Option
Rec. Method In case SD Card is full, it deletes the oldest les in order
Voice Recording Built-in microphone records voice and surround sound
Format Micro SD Card Format
External GPS SiRF 4 (Option)
Shock Sensor Tri-axial shock detection G-Sensor
Memory Storage Memory Storage Micro SD Card (16G ~ 32G)
Rec. Frame Max. 30fps
External Video Output NTSC (Composite)
External Playback PC Media player & PC Viewer
Video Analysis Video Analysis through PC Viewer software
Operation -20℃ ~ 70℃
Storage -30℃ ~ 80℃
Dimension(mm) 58(w) X 100(L) X 34(H)
EVENT (20% of memory space, 30sec./le, 30 frame/s)
Auto Parking Mode (1min./le, 30frame/s)
※ Technical Specication can be changed without prior notice for product improvement.
Technical Specication
27

Customer Service
We don’t take any responsibility for the data loss during the service. Please back up the date before applying for service.
CammSys Customer Service
- Address : 6F Daeil B/D, 681-17, Yeoksam-dong, Gangnam-gu, Seoul, 135-081 Korea
- Opening hour: 09:00 ~ 18:00 (Mon. ~ Fri.)
- Closed : Saturday, Sunday, and Public Holiday
If you come to customer service center, service personnel will care for the service timely and properly.
For further information regarding customer service, please refer to www.blacksys.co.kr/en
Customer Service
28

Warranty
We provide product repair and replacement services within the warranty period
in accordance with the consumer protection regulations(the Korea Fair Trade Commission Directive 2008-3)
Warranty period
• Product(main unit): 12 months from the purchase date(But, if purchase date is not clear, it can be applying 3 months warranty after manufacturing date)
• Accessory(expendable supply): 6 months including SD card.(In case of using DC fuse power cable, memory card life can be shorter than general use)
• Service parts holding period: 5 years after stopping sales
Type of Damage
Claim a service for a main part within 10 days after purchase Replacement or refund Not applicable
Claim a service for a main part within 1 month after purchase Replacement or Free repair Not applicable
Claim a service for trouble
caused in a normal use
condition
Claim a service for not
holding service parts within
service parts holding period
Damaged unit from distribution Replacement Not applicable
Damaged unit from installation Replacement Not applicable
Customer’s negligence or
fault, Functional defect
Claim a service for faulty unit Free repair Repair at cost
Repair is not available Replacement or refund
Replacement is not available Refund at cost Applicable by bylaw
Claim a service for a main part within 1 month after unit exchange Refund at cost Applicable by bylaw
Same defect over 3 times Replacement or refund Not applicable
Multi defect over 5 times Replacement or refund Not applicable
Lost by service center during repair service Replacement or refund Applicable by bylaw
Trouble caused in a normal use condition Replacement or refund
Customer’s negligence or fault, Functional defect Repair at cost
Repair is available Replacement at cost Applicable by bylaw
Repair is not available Repair at cost Repair at cost
Within Warranty Period After Warranty Period
※ Warranty period is 12 months after purchase.
※ We provide product repair and replacement services within the warranty period in accordance with the consumer protection
regulations (the Korea Fair Trade Commission Directive 2008-3)
Compensation standard
Replacement or refund after
depreciation
Not applicable
Warranty
29

Warranty Card
Model Name CF-100
Manufacturer
Serial No.
Purchase Date
Warranty Period 12 months from the purchase date (But, if purchase date is not clear, it can be applying 3 months after manufacturing date)
Customer Information
Retail Shop Name Tel .
※ The warranty for the product is beneted by the details on the warranty card.
※ Warranty period is counted from the purchase date. So get the purchase date.
※ This warranty card is not reproduced.
Warranty Card
30
Name Tel .
Address

MEMO

Daeil Bldg 6F, 681-17, Yeoksam-dong, Gangnam-gu, Seoul, Korea
Tel. +82-70-4680-2595 / Fax. +82-70-8668-1161 / www.cammsys.net / www.blacksys.co.kr/en
 Loading...