

Blackstar Acoustic:Core 30 Service Manual

Designed and Engineered by
Blackstar Amplification UK
Owner’s Manual
187401M-1 10/20
Blackstar Amplification Ltd, Beckett House, 14 Billing Road, Northampton, NN1 5AW, UK
For the latest information go to: www.blackstaramps.com
Whilst the information contained herein is correct at the time of publication, due to our policy of constant improvement
and development, Blackstar Amplification Ltd reserves the right to alter specifications without prior notice.
Owner’s Manual
Designed and Engineered by
Blackstar Amplification UK

IMPORTANT SAFETY INSTRUCTIONS
1. Read these instructions.
2. Keep these instructions.
3. Heed all warnings.
4. Follow all instructions.
5. Do not use this apparatus near water.
6. Clean only with dry cloth.
7. Do not block any ventilation openings.
8. Install in accordance with the manufacturer’s instructions.
9. Do not install near any heat sources such as radiators, heat registers, stoves,
or other apparatus (including ampliers) that produce heat.
10. Do not defeat the safety purpose of the polarized or grounding-type plug.
A polarized plug has two blades with one wider than the other. A grounding type
plug has two blades and a third grounding prong. The wide blade or the third
prong are provided for your safety. If the provided plug does not t into your
outlet, consult an electrician for replacement of the obsolete outlet.
11. Protect the power cord from being walked on or pinched particularly at plugs,
convenience receptacles, and the point where they exit from the apparatus.
12. Only use attachments/accessories specied by the manufacturer.
13. Unplug this apparatus during lightning storms or when unused for long periods
of time.
14. Refer all servicing to qualied service personnel. Servicing is required when the
apparatus has been damaged in any way, such as power-supply cord or plug is
damaged, liquid has been spilled or objects have fallen into the apparatus, the
apparatus has been exposed to rain or moisture, does not operate normally, or
has been dropped.
"TO COMPLETELY DISCONNECT THIS APPARATUS FROM THE AC MAINS,
DISCONNECT THE POWER-SUPPLY CORD PLUG FROM THE AC RECEPTACLE."
"WARNING: TO REDUCE THE RISK OF FIRE OR ELECTRIC SHOCK, DO NOT
EXPOSE THIS APPARATUS TO RAIN OR MOISTURE. THE APPARATUS SHALL
NOT BE EXPOSED TO DRIPPING OR SPLASHING AND THAT OBJECTS FILLED
WITH LIQUIDS, SUCH AS VASES, SHALL NOT BE PLACED ON APPARATUS."
USA / Canada
This symbol is intended to alert the user to the presence of important
operation and maintenance (servicing) instructions in the literature
accompanying the appliance.
This symbol is intended to alert the user to the presence of
uninsulated "dangerous voltage" within the product’s enclosure that
may be of sucient magnitude to constitute a risk of electric shock
to persons.
4

English
Warning!
Warning!
Important safety information!
Important safety information!
READ THE FOLLOWING INFORMATION CAREFULLY. SAVE ALL
READ THE FOLLOWING INFORMATION CAREFULLY. SAVE ALL
INSTRUCTIONS FOR FUTURE REFERENCE!
INSTRUCTIONS FOR FUTURE REFERENCE!
Follow all warnings and instructions marked on the product!
Follow all warnings and instructions marked on the product!
Danger! High internal operating voltages.
Danger! High internal operating voltages.
Do not open the equipment case. There are no user serviceable parts in this
Do not open the equipment case. There are no user serviceable parts in this
equipment. Refer all servicing to qualied service personnel.
equipment. Refer all servicing to qualied service personnel.
Clean only with a dry cloth.
Clean only with a dry cloth.
Condensation can form on the inside of an amplier if it is moved from a cold
Condensation can form on the inside of an amplier if it is moved from a cold
environment to a warmer location. Before switching the unit on, it is recommended
environment to a warmer location. Before switching the unit on, it is recommended
that the unit be allowed to reach room temperature.
that the unit be allowed to reach room temperature.
Unauthorised modication of this equipment is expressly forbidden by Blackstar
Unauthorised modication of this equipment is expressly forbidden by Blackstar
Amplication Ltd.
Amplication Ltd.
Never push objects of any kind into ventilation slots on the equipment casing.
Never push objects of any kind into ventilation slots on the equipment casing.
Do not expose this apparatus to rain, liquids or moisture of any type.
Do not expose this apparatus to rain, liquids or moisture of any type.
Avoid placing vessels lled with liquid on top of the amplier.
Avoid placing vessels lled with liquid on top of the amplier.
Do not place this product on an unstable trolley, stand or table. The product may
Do not place this product on an unstable trolley, stand or table. The product may
fall, causing serious damage to the product or to persons!
fall, causing serious damage to the product or to persons!
Do not cover or block ventilation slots or openings.
Do not cover or block ventilation slots or openings.
This product should not be placed near a source of heat such as a stove, radiator,
This product should not be placed near a source of heat such as a stove, radiator,
or another heat producing amplier.
or another heat producing amplier.
Use only the supplied power cord which is compatible with the mains voltage
Use only the supplied power cord which is compatible with the mains voltage
supply in your area.
supply in your area.
Power supply cords should always be handled carefully and should be replaced if
Power supply cords should always be handled carefully and should be replaced if
damaged in any way.
damaged in any way.
Never break o the earth (ground) pin on the power supply cord.
Never break o the earth (ground) pin on the power supply cord.
The power supply cord should be unplugged when the unit is to be unused for long
The power supply cord should be unplugged when the unit is to be unused for long
periods of time.
periods of time.
Before the unit is switched on, the loudspeaker should be connected as described
Before the unit is switched on, the loudspeaker should be connected as described
in the handbook using the lead recommended by the manufacturer.
in the handbook using the lead recommended by the manufacturer.
Always replace damaged fuses with the correct rating and type.
Always replace damaged fuses with the correct rating and type.
Never disconnect the protective mains earth connection.
Never disconnect the protective mains earth connection.
High loudspeaker levels can cause permanent hearing damage. You should
High loudspeaker levels can cause permanent hearing damage. You should
therefore avoid the direct vicinity of loudspeakers operating at high levels. Wear
therefore avoid the direct vicinity of loudspeakers operating at high levels. Wear
hearing protection if continuously exposed to high levels.
hearing protection if continuously exposed to high levels.
If the product does not operate normally when the operating instructions are
If the product does not operate normally when the operating instructions are
followed, then refer the product to a qualied service engineer.
followed, then refer the product to a qualied service engineer.
The U.S. Government's Occupational Safety and Health Administration (OSHA) has
specied the following permissible noise level exposures:
Duration Per Day In Hours Sound Level dBA, Slow Response
8 90
6 92
4 95
3 97
2 100
1½ 102
1 105
½ 110
¼ or less 115
According to OSHA, any exposure in excess of the above permissible limits could
result in some hearing loss.
Ear plug protectors in the ear canals or over the ears must be worn when operating
this amplication system in order to prevent permanent hearing loss if exposure is
in excess of the limits as set forth above. To ensure against potentially dangerous
exposure to high sound pressure levels, it is recommended that all persons
exposed to equipment capable of producing high sound pressure levels such as
this amplication system be protected by hearing protectors while this unit is in
operation.
All electrical and electronic products should be disposed of separately
from the municipal waste stream via designated collection facilities
appointed by the government or the local authorities.
English
5
6

English
Introduction
Thank you for purchasing this Blackstar ACOUSTIC:CORE 30 amplifier.
Like all our products, this amp is the result of countless hours of painstaking
Research and Development by our world-class design team. Based in Northampton
(UK), the Blackstar team are all experienced musicians themselves and the sole aim
of this development process is to provide acoustic players with products which are
the ultimate tools for self-expression.
All Blackstar products are subjected to extensive laboratory and road testing to
ensure that they are truly uncompromising in terms of reliability, quality and above
all TONE.
Please read through this handbook carefully to ensure you get the maximum benefit
from your new Blackstar product.
If you like what you hear and want to find out more about the Blackstar range of
products please visit our website at www.blackstaramps.com.
Thanks!
The Blackstar Team
Features
ACOUSTIC:CORE 30 is the result of countless hours of technical research and
benchmarking against market-leading acoustic amplifiers. Designed from the
ground up for acoustic players, they are straightforward, compact and designed for
the way you play today: streaming, recording, practicing, or live.
Channel 1 features a 1/4" jack input with GAIN, LOW and HIGH EQ controls with
an ENHANCE select feature, which applies a studio-style EQ to give the feeling of
space to your instrument sound. An independent REVERB level with two REVERB
choices and a dedicated CHORUS level with two separate chorus effects, VINTAGE
and WIDE in immersive Super Wide Stereo.
Channel 2 features a combination XLR / jack input with GAIN, LOW, MID and HIGH
EQ controls – perfect for a microphone or other instruments, and a VOCAL CLARITY
select which makes your microphone dynamically cut through the mix with a more
pronounced professional vocal sound.
A global PHASE button also allows you to control any unwanted feedback.
Your ACOUSTIC:CORE 30 acts as your USB Audio interface. By connecting a USB
cable, you can simultaneously send both direct and processed audio to a computer
for recording purposes, with a LINE OUT / HEADPHONE jack for output to a PA,
recording desk, or headphones for quiet practice.
The LINE IN / STREAMING input allows you to connect your ACOUSTIC:CORE 30
to a music device or drum machine to play along with. You can also use a suitable
TRRS 3.5mm cable for easy input / output Live Streaming with a compatible device.
An integrated Tilt Stand is built in-to the base of the amplifier to allow you to finely
adjust the angle of your ACOUSTIC:CORE 30.
English
7
8

English
Front Panel
Channel 1
1. Input (1/4" instrument jack)
Plug your acoustic instrument in here. Always use a good quality screened
instrument cable.
2. Gain
This controls the input gain of Channel 1. Turning it clockwise increases the input
gain, increasing the volume.
3. Enhance
This switch applies a studio-style EQ and spatial process to your instrument sound.
With this switch in the OUT position the EQ is flat, providing a natural-sounding
starting point for most instruments. The IN position engages an advanced DSP
algorithm which gives a sense of space and depth to your sound.
4. Low
The LOW control adjusts the amount of bass frequencies in your tone.
This amplifier has active tone-shaping which allows the low frequencies to
be precisely controlled for both the desired sound and also to help control
instrument resonances.
Channel 2
8. Input 2 (combination XLR / jack)
Plug your microphone or another instrument in here. Always use good quality
screened XLR or instrument cables.
9. Gain
This controls the input gain of Channel 2. Turning it clockwise increases the input
gain, increasing the volume.
10. Vocal Clarity
The IN position applies a professional effect which allows your microphone to
dynamically cut through the mix with a more pronounced sound. If your vocal
sounds dark or too mid-focussed, engage this button to automatically enhance
your vocal sounds.
11. Low
The LOW control adjusts the amount of bass frequencies in your tone. This amplifier
has active tone-shaping which allows the low frequencies to be precisely controlled
for both the desired sound and also to help control instrument resonances.
12. Mid
The MID control adjusts the amount of middle frequencies in your tone. The middle
frequencies are particularly important in setting the amount of ‘body’ your tone has.
English
5. High
The HIGH control allows exact adjustment of the treble frequencies within your
sound. At low settings (counter-clockwise) the sound will be warm and darker in
character. As the control is increased (clockwise) the sound will become brighter
and more lively.
6. Chorus
This knob controls the two Super Wide Stereo Chorus effects; VINTAGE and WIDE.
Each of these effects has an adjustable level within the segment. With the control
fully counter-clockwise there will be no Chorus effect applied. Turning the control
clockwise from the OFF position will increase the mix level of the VINTAGE Chorus
effect, until the maximum VINTAGE Chorus level is reached with the control in
the middle position. From the middle position onwards, the WIDE Chorus effect
is controlled; at the fully clockwise position the WIDE chorus effect will be at the
maximum level.
7. Reverb
The Reverb control has two studio-quality Super Wide Stereo reverb choices, each
with an adjustable level within the segment. With the control fully counter-clockwise
there will be no Reverb applied. Turning this control clockwise to the middle position
will increase the level of the ROOM Reverb. From the middle position onwards, the
HALL Reverb is controlled. At the fully clockwise position the HALL Reverb will be
at the maximum level.
9
13. High
The HIGH control allows exact adjustment of the treble frequencies within your
sound. At low settings (counter-clockwise) the sound will be warm and darker in
character. As the control is increased (clockwise) the sound will become brighter
and more lively.
14. Reverb
The Reverb control has two studio-quality Super Wide Stereo reverb choices, each
with an adjustable level within the segment. With the control fully counter-clockwise
there will be no Reverb applied. Turning this control clockwise to the middle position
will increase the level of the ROOM Reverb. From the middle position onwards, the
HALL Reverb is controlled. At the fully clockwise position the HALL Reverb will be
at the maximum level.
15. USB Audio Socket
This USB Mini-B socket is for connection to a computer via a suitable USB cable
(not supplied). Standard audio drivers are used to connect the amplifier to a PC,
Mac or other applicable recording device – no specific drivers are required.
For a guide on low-latency USB recording visit www.blackstaramps.com/
usbrecording
NOTE: Always connect the amplifier via a main USB port, often found on the rear of
the computer. The amplifier will appear as an audio capture device within recording
software.
10

English
The audio output via USB from your amplifier directly to your computer is carried
across four independent, simultaneous channels:
USB Channel 1 + 2: A Stereo mix of your guitar and vocal channels, including
Reverb and Chorus eects.
USB Channel 3: A separate dry signal from channel 1 – this signal is taken after
your EQ.
USB Channel 4: A separate dry signal from channel 2 – this signal is taken after
your EQ.
16. Master Volume
This controls the overall output volume of your amplifier. Turning it clockwise
increases the volume.
17. Phase
This will reverse the phase of the signal within the preamp. Use this to help to
suppress acoustic feedback.
18. Footswitch (not supplied)
The optional FS-18 footswitch, or any 2-way latching footswitch, can be connected
here. The first switch on the FS-18 footswitch labelled 'A' toggles the Channel 1
Chorus effect on / off. The second switch, labelled 'B' toggles the Reverb effect on
/ off globally for both channels.
21. Power Switch
This switch is used to turn the amplifier on and off. The Power Indicator will be
illuminated when the amplifier is switched on.
Rear Panel
22. DC Input
The supplied detachable DC power supply is connected here. Always ensure the
Power Switch (21) is in the OFF position before connecting the power supply. The
power supply should only be connected to a power outlet that is compatible with
the voltage, power and frequency requirements stated on the power supply. If in
doubt seek advice from a qualified technician.
Optionally, your ACOUSTIC:CORE 30 can also be powered by Blackstar’s PB-1
PowerBank (not supplied). The PB-1 provides portable power for between 4-8
hours with your ACOUSTIC:CORE 30, depending on usage.
23. XLR D.I Mix Output
This is a professional balanced XLR output for connecting directly to a mixer, stage
box or front-of-house PA. This audio signal is a mix of both Channels, with Chorus
and Reverb, and is not affected by the Master Volume. Use this output when playing
live to send your mixed Guitar, Vocal and effects signals to a PA system.
Underside of the Amplifier
English
19. Line / Headphone Out
This output provides a natural tone for connection to headphones, a recording
device, PA system or mixing desk.
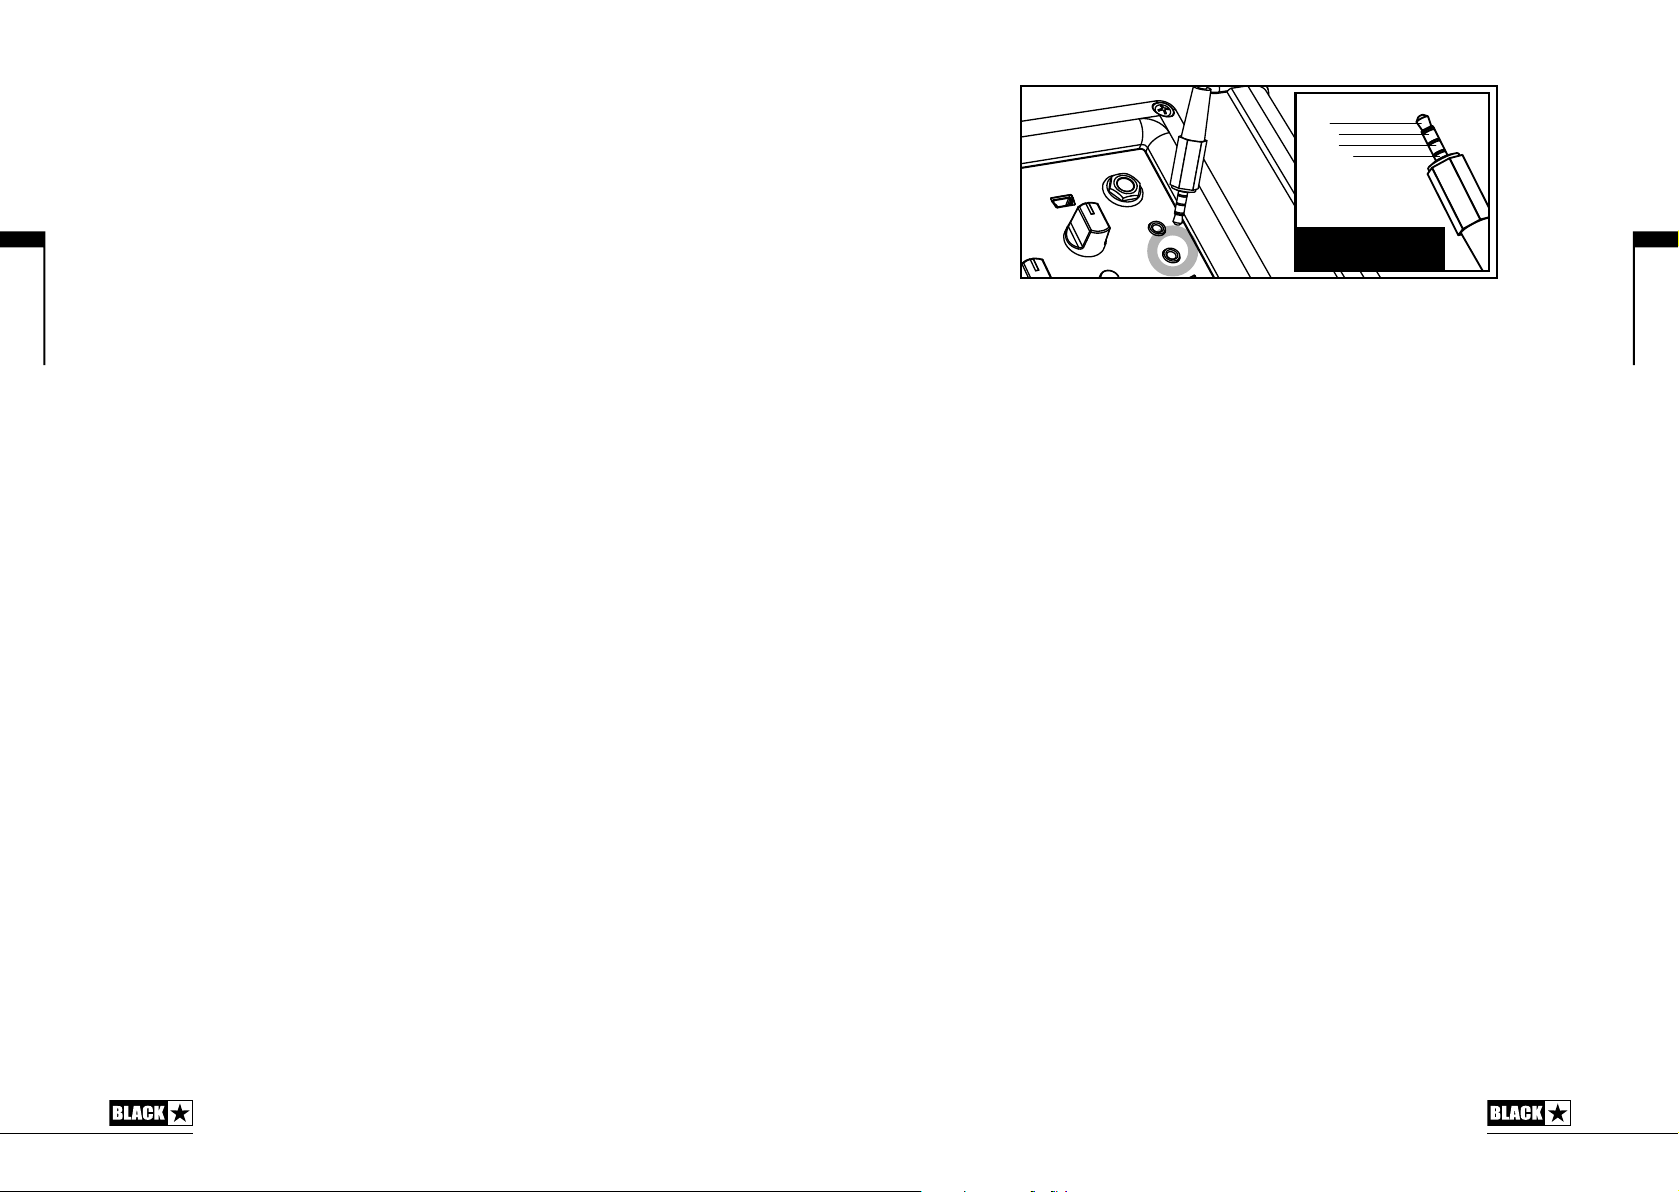
20. Line In / Streaming
Play audio from your phone, MP3 player, tablet or laptop through the
ACOUSTIC:CORE 30 using a stereo 3.5mm AUX cable (not supplied). Adjust the
player’s volume to match that of your acoustic guitar to enable you to play along.
Use your ACOUSTIC:CORE 30 as an interface to play, live stream, practice and
record on your mobile device. Unlike a standard audio 3.5mm TRS jack that only
An integrated Tilt Stand on the base of the amplifier allows you to easily adjust the
angle of your ACOUSTIC:CORE 30 for optimum projection of sound. Unscrew the
stand to extend it for your desired angle. Please take care not to extend to the
extreme length, as your ACOUSTIC:CORE 30 may become unstable and fall over.
Note: You can use your amp as a stage monitor when playing live. Simply tilt your
ACOUSTIC:CORE 30 to the desired angle towards you, and set the stage volume
using the Master Volume knob.
Also Available: Mount your ACOUSTIC:CORE 30 on a standard 35mm PA speaker
stand using the optional Blackstar SA-2 Stand Adaptor.
allows audio to be sent from your device, (e.g. to your headphones), the TRRS jack
on your ACOUSTIC:CORE 30 allows audio to be sent and received at the same
time. This allows you to playback audio from your device and send audio to your
device from your ACOUSTIC:CORE 30. This feature allows you to use apps such
as GarageBand and Instagram live with a single cable.
Left Audio In
T ip
Right Audio In
R ing
Ground
R ing
Streaming Out
S leeve
TRRS cable
11
12

English
Technical Specification
English
ACOUSTIC:CORE 30
Power (RMS): 30 Watts stereo (2x15 Watts)
Weight (kg): 6.3
Dimensions (mm): 375(W) x 292(H) x 185(D)
Accessories
FS-18 two-button latching footswitch (not supplied)
PB-1 PowerBank (not supplied)
SA-2 Stand Adaptor (not supplied)
13
14

Deutsch
Warnung!
Wichtige Sicherheitshinweise!
LESEN SIE DIE FOLGENDEN INFORMATIONEN SORGFÄLTIG DURCH.
HEBEN SIE ALLE ANLEITUNGEN FÜR REFERENZWECKE AUF!
Beachten Sie alle Warnungen und folgen Sie den auf dem Produkt
angebrachten Anweisungen!
Gefahr! Hohe interne Betriebsspannungen.
Önen Sie niemals das Gehäuse. Es benden sich keine vom Anwender
austauschbaren Teile im Gerät. Lassen Sie alle Wartungsarbeiten von qualiziertem
Fachpersonal ausführen.
Verwenden Sie zum Reinigen des Geräts ausschließlich ein trockenes Tuch.
Im Inneren von Verstärkern kann sich Kondensfeuchtigkeit bilden, wenn der
Verstärker aus einer kalten in eine wärmere Umgebung gebracht wird. Warten Sie
vor dem Einschalten, bis das Gerät die Raumtemperatur erreicht hat.
Nicht autorisierte Modikationen am Gerät sind von Blackstar Amplication Ltd.
ausdrücklich untersagt.
Führen Sie in keinem Fall irgendwelche Gegenstände in die Lüftungsschlitze im
Gehäuse ein.
Setzen Sie das Gerät niemals Regen oder Feuchtigkeit aus.
Stellen Sie keine mit Flüssigkeit gefüllten Gefäße auf dem Verstärker ab.
Platzieren Sie das Gerät nicht auf instabilen Rollwagen, Ständern oder Tischen.
Andernfalls könnte das Gerät herunterfallen und schwere Schäden am Produkt
oder Verletzungen verursachen.
Die Lüftungsschlitze dürfen nicht verdeckt werden.
Dieses Produkt darf nicht in der Nähe von Wärmequellen wie Öfen, Heizkörpern
oder einem anderen Wärme produzierenden Verstärker betrieben werden.
Verwenden Sie ausschließlich das mitgelieferte, mit dem Stromnetz in Ihrer Region
kompatible Netzkabel.
Netzkabel müssen sehr sorgfältig behandelt und bei jeglichem Defekt umgehend
ausgetauscht werden.
Entfernen Sie niemals den Erdungskontakt des Netzkabels.
Wenn Sie das Gerät längere Zeit nicht verwenden, ziehen Sie das Netzkabel ab.
Vor dem Einschalten muss der Lautsprecher wie in diesem Handbuch beschrieben
mit dem vom Hersteller empfohlenen Kabel angeschlossen werden.
Ersetzen Sie beschädigte Sicherungen immer durch Sicherungen gleichen Typs.
Manipulieren Sie niemals den Schutzleiter des Netzsteckers.
Hohe Lautsprecherpegel können zu dauerhaften Hörschäden führen. Halten Sie
sich nicht in direkter Nähe von mit hoher Lautstärke betriebenen Lautsprechern
auf. Falls Sie längere Zeit hohen Lautstärken ausgesetzt sind, verwenden Sie einen
Gehörschutz.
Wenn das Gerät oenbar nicht normal arbeitet, obwohl Sie die Inbetriebnahme wie
beschrieben vorgenommen haben, wenden Sie sich an einen qualizierten Service-
Techniker.
Das amerikanische Amt für Sicherheit und Gesundheitsschutz am Arbeitsplatz
(OSHA) hat folgende Grenzwerte für Lärmbelastung festgelegt:
Dauer pro Tag in Stunden Lärmpegel in dBA, langsame Ansprechzeit
8 90
6 92
4 95
3 97
2 100
1½ 102
1 105
½ 110
¼ oder weniger 115
Gemäß der OSHA kann eine anhaltende Beschallung über diese Grenzwerte hinaus
zu Hörverlusten führen.
Für den Betrieb dieses Verstärkersystems empehlt es sich, einen Hörschutz im
Gehörkanal oder über den Ohren zu tragen, um einen dauerhaften Hörverlust zu
vermeiden, wenn die genannten Grenzwerte nicht eingehalten werden. Um sich
gegen die potenziellen Gefahren hoher Schalldruckpegel zu schützen, sollten alle
Personen, die mit Geräten, die zur Ausgabe hoher Schalldruckpegel geeignet
sind (z. B. dieser Verstärker), für die Dauer des Betriebs solcher Geräte einen
Gehörschutz tragen.
Elektrische und elektronische Geräte dürfen nicht in den Hausmüll
gegeben, sondern müssen entsprechend den staatlichen bzw.
kommunalen Vorgaben entsorgt werden.
Deutsch
1615 1615

Deutsch
Einleitung
Vielen Dank, dass Sie sich für diesen Blackstar ACOUSTIC:CORE Verstärker
entschieden haben.
Dieser Amp ist wie alle unsere Verstärker das Ergebnis unzähliger Stunden
akribischer Arbeit durch unser erstklassiges Entwickler-Team. Die erfahrenen
Musiker des Blackstar-Teams aus Northampton (UK) verfolgen ein einziges Ziel:
Akustikgitarristen das bestmögliche Equipment zur Verfügung zu stellen, damit diese
sich optimal selbstverwirklichen können.
Alle Blackstar-Produkte wurden sowohl während der Entwicklung als auch im
Live-Betrieb auf Herz und Nieren getestet, um sicherzustellen, dass sie in puncto
Zuverlässigkeit, Qualität und SOUND absolut kompromisslose Ergebnisse liefern.
Bitte lesen Sie dieses Handbuch aufmerksam durch, um Ihr neues Blackstar-
Produkt optimal nutzen zu können.
Wenn Sie mehr über die Blackstar-Produktreihe erfahren möchten, besuchen Sie
unsere Webseite unter www.blackstaramps.com.
Vielen Dank!
Das Blackstar-Team
Merkmale
ACOUSTIC:CORE 30 ist das Ergebnis unzähliger Stunden intensiver
Entwicklungsarbeit und des Vergleichens mit marktführenden Akustikverstärkern.
Die von Grund auf für akustische Gitarristen entwickelten Verstärker sind ebenso
intuitiv wie kompakt und perfekt auf die heutigen Bedürfnisse wie Streaming,
Aufnehmen, Üben oder Live-Auftritte zugeschnitten.
Kanal 1 bietet einen 6,35 mm Klinkeneingang sowie Regler für GAIN, LOW und HIGH
EQ sowie eine schaltbare ENHANCE-Funktion für einen Studio-typischen EQ, der
Ihrem Instrumentenklang einen räumlichen Eindruck verleiht. Über einen separaten
REVERB-Regler lassen sich zwei REVERB-Optionen aussteuern, während der
Regler CHORUS die Lautstärke der beiden alternativen Super Wide Stereo-ChorusEffekte VINTAGE und WIDE kontrolliert.
Kanal 2 bietet eine XLR-/Klinken-Combo-Buchse sowie Regler für GAIN, LOW, MID
und HIGH EQ – für den Anschluss eines Mikrofons oder weiteren Instruments –
sowie eine VOCAL-CLARITY-Schaltung, die für einen markanteren, professionellen
Gesangssound sorgt, der sich im Mix dynamisch besser durchsetzt.
Über eine global schaltbare PHASE-Taste können Sie unerwünschte
Rückkopplungen unterbinden.
Ihr ACOUSTIC:CORE kann als USB-Audio-Interface genutzt werden. Durch
Anschluss eines USB-Kabels können Sie gleichzeitig das Direkt- als auch das
bearbeitete Signal zu Aufnahmezwecken auf einen Computer speisen, während die
Buchse LINE OUT / HEADPHONE zur Ausgabe an eine PA, ein Aufnahmemischpult
oder zum Anschluss eines Kopfhörers für lautloses Üben dient.
Über den Eingang LINE IN / STREAMING können Sie Ihren ACOUSTIC:CORE 30
mit einem Musikgerät oder einer Drum-Maschine verbinden, um zu einer Begleitung
zu spielen. Zudem können Sie ein geeignetes 3,5 mm TRRS-Kabel für die einfache
Ein- und Ausgabe eines Live-Streamings über ein kompatibles Gerät verwenden.
Im integriertes Neigestativ im Boden des Verstärkers erlaubt es Ihnen, den
Neigungswinkel Ihres ACOUSTIC:CORE 30 präzise einzustellen.
Deutsch
17
18

Deutsch
Bedienfeld
Kanal 1
1. Input (6,35 mm Instrumentenbuchse)
Hier schließen Sie Ihr akustisches Instrument an. Verwenden Sie in jedem Fall ein
hochwertiges geschirmtes Instrumentenkabel.
2. Gain
Mit diesem Regler steuern Sie die Eingangsverstärkung in Kanal 1 aus. Im
Uhrzeigersinn heben Sie die Eingangsverstärkung und damit auch die Lautstärke an.
3. Enhance
Mit diesem Schalter aktivieren Sie einen Studio-typischen EQ sowie eine räumliche
Bearbeitung für Ihren Instrumentenklang. In der Position OUT arbeitet der EQ linear:
Diese natürlich klingende Grundeinstellung empfiehlt sich als Ausgangspunkt für die
meisten Instrumente. In der Stellung IN wird ein fortschrittlicher DSP-Algorithmus
aktiviert, der Ihrem Sound einen räumlichen Eindruck und Tiefe verleiht.
4. Low
Der LOW-Regler steuert den Anteil der tiefen Frequenzen im Sound. Dieser
Verstärker verfügt über eine aktive Klangregelung, die es Ihnen erlaubt, die tiefen
Frequenzanteile exakt auszusteuern, um einerseits den gewünschten Klang
zu erzielen und andererseits das Resonanzverhalten Ihres Instruments unter
Kontrolle zu behalten.
Kanal 2
8. Input 2 (XLR-/Klinken-Combo-Buchse)
Hier schließen Sie Ihr Mikrofon oder ein weiteres Instrument an. Verwenden Sie in
jedem Fall gut geschirmte XLR- oder Instrumentenkabel.
9. Gain
Mit diesem Regler steuern Sie die Eingangsverstärkung in Kanal 2 aus. Im
Uhrzeigersinn heben Sie die Eingangsverstärkung und damit die Lautstärke an.
10. Vocal Clarity
In der Position IN wird ein professionell klingender Effekt aktiviert, der für einen
markanteren Klang Ihres Mikrofons sorgt, der sich im Mix dynamisch durchsetzt.
Wenn Ihr Gesang zu dumpf oder zu mittig klingt, können Sie ihn durch Aktivieren
dieser Taste automatisch verbessern.
11. Low
Der LOW-Regler steuert den Anteil der tiefen Frequenzen im Sound. Dieser
Verstärker verfügt über eine aktive Klangregelung, die es Ihnen erlaubt, die tiefen
Frequenzanteile exakt auszusteuern, um einerseits den gewünschten Klang zu
erzielen und andererseits das Resonanzverhalten Ihres Instruments unter Kontrolle
zu behalten.
12. Mid
Der Regler MID steuert den Anteil der Mittenfrequenzen im Gesamtsound aus. Die
Mitten sind insbesondere für den Grundsound entscheidend.
Deutsch
5. High
Mit dem Regler HIGH können Sie gezielt den Höhenanteil in Ihrem Sound
einstellen. Bei niedrigen Einstellungen (gegen den Uhrzeigersinn) erhält der Sound
einen wärmeren und dumpferen Charakter. Wenn der Regler angehoben wird (im
Uhrzeigersinn), wird der Sound immer höhenreicher und lebendiger.
6. Chorus
Dieser Regler steuert die beiden Super Wide Stereo-Chorus-Effekte VINTAGE und
WIDE. Die Lautstärke kann für jeden dieser Effekte in seinem jeweiligen Regelbereich
individuell eingestellt werden. Im Linksanschlag des Reglers ist kein Chorus-Effekt
hinzugefügt. Durch Drehen des Reglers im Uhrzeigersinn (ausgehend von der
OFF-Position) wird der Mix-Pegel des VINTAGE Chorus-Effekts bis zu seinem
Maximalwert in der Mittelposition des Reglers angehoben. Ab der Mittelposition
bis zum rechten Ende des Regelwegs wird der WIDE Chorus-Effekt bis zu seinem
maximalen Pegel angehoben.
7. Reverb
Der Reverb-Regler bietet Zugriff auf zwei Super Wide Stereo-Reverbs in
Studioqualität, deren Pegel im jeweiligen Regelbereich variabel eingestellt werden
kann. Im Linksanschlag des Reglers wird kein Reverb erzeugt. Durch Drehen
des Reglers im Uhrzeigersinn wird der Pegel des ROOM-Reverbs bis zu seinem
Maximalwert in der Mittelposition des Reglers angehoben. Ab der Mittelposition wird
das HALL-Reverb ausgesteuert. Im Rechtsanschlag des Reglers wird der HALL-
Reverb mit maximalem Pegel ausgegeben.
13. High
Mit dem Regler HIGH können Sie gezielt den Höhenanteil in Ihrem Sound
einstellen. Bei niedrigen Einstellungen (gegen den Uhrzeigersinn) erhält der Sound
einen wärmeren und dumpferen Charakter. Wenn der Regler angehoben wird (im
Uhrzeigersinn), wird der Sound immer höhenreicher und lebendiger.
14. Reverb
Der Reverb-Regler bietet Zugriff auf zwei Super Wide Stereo-Reverbs in
Studioqualität, deren Pegel im jeweiligen Regelbereich variabel eingestellt werden
kann. Im Linksanschlag des Reglers wird kein Reverb erzeugt. Durch Drehen
des Reglers im Uhrzeigersinn wird der Pegel des ROOM-Reverbs bis zu seinem
Maximalwert in der Mittelposition des Reglers angehoben. Ab der Mittelposition wird
das HALL-Reverb ausgesteuert. Im Rechtsanschlag des Reglers wird der HALL-
Reverb mit maximalem Pegel ausgegeben.
15. Buchse USB Audio
Diese USB-Buchse vom Typ Mini B dient zum Anschluss an einen Computer
über ein geeignetes (optionales) USB-Kabel. Die Kommunikation des Verstärkers
mit einem PC, Mac oder einem anderen kompatiblen Aufnahmegerät erfolgt über
Standard-Audiotreiber – es werden keine speziellen Treiber benötigt.
Eine kurze Anleitung zur USB-Aufnahme mit minimaler Latenz finden Sie unter:
www.blackstaramps.com/usbrecording
2019
Deutsch
ANMERKUNG: Schließen Sie den Verstärker immer über einen Haupt-USB-Port
des Computers an (meist auf der Rückseite zu finden). Der Verstärker erscheint
innerhalb der Aufnahme-Software auf dem Computer als Audio-Interface.
Das Audiosignal Ihres Verstärkers wird über den USB-Anschluss gleichzeitig über
vier unabhängige Kanäle an Ihren Computer ausgegeben:
USB-Kanal 1 + 2: Stereomischung Ihres Gitarren- und Gesangskanals
einschließlich der Reverb- und Chorus-Effekte.
USB-Kanal 3: Ein separates unbearbeitetes Signal von Kanal 1 – dieses Signal
wird hinter dem EQ abgegriffen.
USB-Kanal 4: Ein separates unbearbeitetes Signal von Kanal 2 – dieses Signal
wird hinter dem EQ abgegriffen.
16. Master Volume
Dieser Regler steuert die Gesamtausgangslautstärke Ihres Verstärkers. Im
Uhrzeigersinn heben Sie die Lautstärke an.
17. Phase
Mit dieser Taste kehren Sie die Phasenlage des Signals im Preamp um. Auf diese
Weise lassen sich akustische Feedbacks und Rückkopplungen unterdrücken.
18. Footswitch (nicht im Lieferumfang enthalten)
Hier können Sie den optional erhältlichen FS-18 Fußschalter oder jeden beliebigen
2-Wege-Fußschalter anschließen. Der erste, mit „A“ beschriftete Schalter des FS-18
schaltet den Chorus-Effekt in Kanal 1 an bzw. aus. Der zweite, mit „B“ beschriftete
Schalter schaltet den Reverb-Effekt global für beide Kanäle an bzw. aus.
19. Line / Headphone Out
Dieser Ausgang gibt ein natürlich klingendes Signal zum Anschluss eines Kopfhörers
oder Aufnahmegeräts bzw. zur Ansteuerung einer PA oder Mischkonsole aus.
20. Line In / Streaming
Hier schließen Sie Ihr Telefon/Smartphone, MP3-Player, Tablet oder Laptop mit
einem (nicht im Lieferumfang enthaltenen) 3,5 mm AUX-Kabel an, um Audiomaterial
über den ACOUSTIC:CORE wiederzugeben. Zum Üben passen Sie die Lautstärke
der externen Quelle an den Pegel Ihrer Akustikgitarre an.
Sie können den ACOUSTIC:CORE als Interface zum Einspielen, Streamen, Üben
und Aufnehmen auf Ihrem Mobilgerät verwenden. Im Gegensatz zu herkömmlichen
3,5 mm TRS-Buchsen, die lediglich die Audioausgabe von Ihrem Gerät erlauben
(z. B. zur Ansteuerung eines Kopfhörers), können Audiosignale über die TRRSBuchse Ihres ACOUSTIC:CORE gleichzeitig ausgegeben und empfangen werden.
Auf diese Weise können Sie Audiomaterial von Ihrem externen Gerät wiedergeben
und das Signal des ACOUSTIC:CORE auf das externe Gerät speisen. Dank dieser
Funktion können Sie Apps wie GarageBand und Instagram Live nach Anschluss
eines einzigen Kabels nutzen.
Left Audio In
T ip
Right Audio In
R ing
Ground
R ing
Streaming Out
S leeve
TRRS cable
21. Power-Schalter
Mit diesem Schalter schalten Sie den Verstärker ein bzw. aus. Die Power-Anzeige
leuchtet, wenn der Verstärker eingeschaltet ist.
Rückseite
22. Netzteilbuchse
Hier schließen Sie das mitgelieferte DC-Netzteil an. Stellen Sie sicher, dass sich
der Power-Schalter (21) immer in der Stellung OFF befindet, bevor Sie das Netzteil
anschließen. Das Netzteil muss an einer Steckdose angeschlossen werden, die in
puncto Spannung, Leistung und Netzfrequenz den auf dem Netzteil vermerkten
Spezifikationen entspricht. Im Zweifelsfall wenden Sie sich an einen qualifizierten
Techniker/Elektriker.
Optional kann Ihr ACOUSTIC:CORE auch über die (optional erhältliche) Blackstar
PB-1 PowerBank gespeist werden. Die PB-1 kann Ihren ACOUSTIC:CORE abhängig
von der aktuellen Nutzung zwischen 4 und 8 Stunden mit Strom versorgen.
23. XLR D.I Mix-Ausgang
Dieser professionelle symmetrische XLR-Ausgang dient zum Direktanschluss an
einen Mixer, eine Stagebox oder eine FoH-PA. Das Audiosignal ist eine vom Master
Volume unabhängige Mischung der beiden Kanäle und der Effekte Chorus und Reverb.
Verwenden Sie diesen Ausgang für das Live-Spielen, um ein gemischtes Gitarren- und
Gesangssignal mit Effekten auf ein PA-System zu speisen.
Unterseite des Verstärkers
Ein integriertes Neigestativ im Boden des Verstärkers erlaubt es Ihnen, den
Winkel Ihres ACOUSTIC:CORE 30 problemlos für ein optimales Abstrahlverhalten
einzurichten. Schrauben Sie das Stativ heraus, um den gewünschten Winkel
einzustellen. Achten Sie aber darauf, die maximale Länge nicht zu überschreiten,
da Ihr ACOUSTIC:CORE andernfalls nicht mehr stabil steht und umkippen kann.
Hinweis: Sie können Ihren Verstärker bei Live-Auftritten als Bühnenmonitor
verwenden. Bringen Sie Ihren ACOUSTIC:CORE einfach in eine für Ihre Position
passende Neigung und stellen Sie die Bühnenlautstärke über den Regler Master
Volume ein.
Deutsch
Auch verfügbar: Über den optional erhältlichen Stativadapter Blackstar
SA-2 können Sie Ihren ACOUSTIC:CORE auf einem genormten 35 mm PALautsprecherstativ montieren.
2221
 Loading...