

Page 1
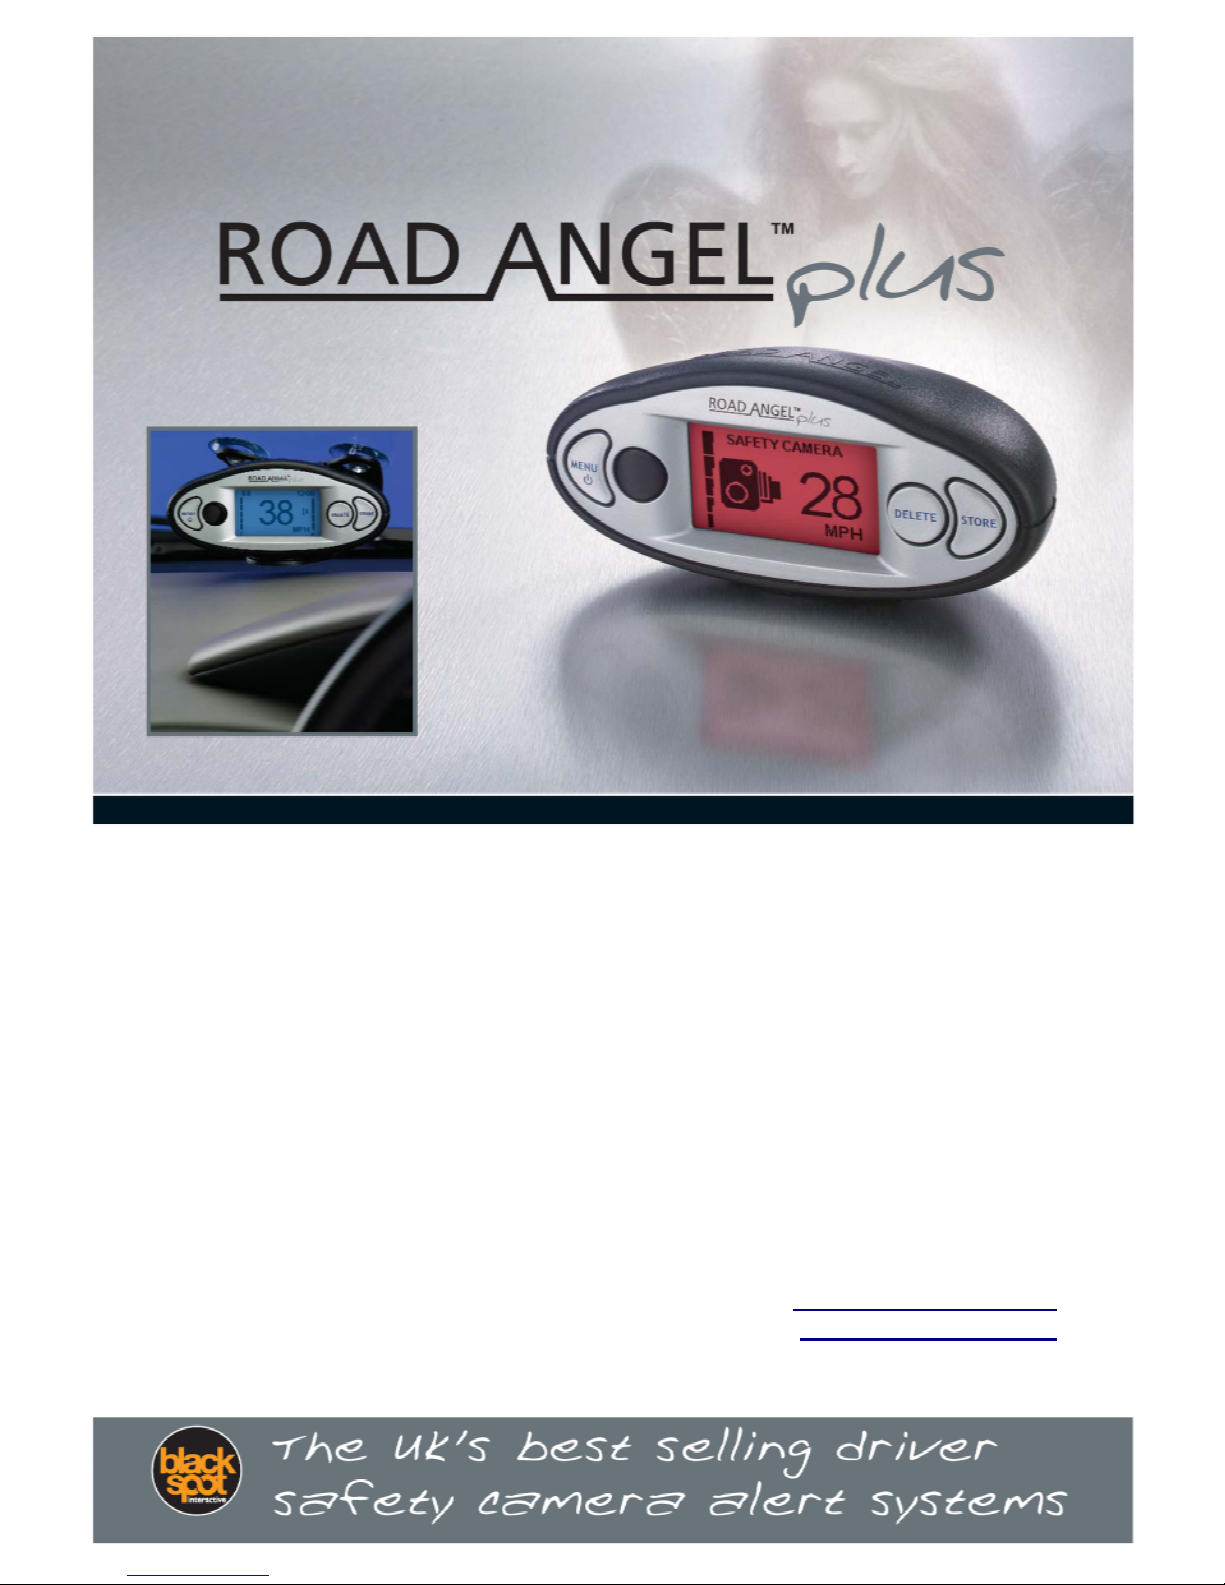
USER GUIDE
Blackspot Interactive Limited
Unit 5, New Rookery Farm, Little London
Silverstone, Northants NN12 8UP
Email: [email protected]
Web: www.blackspot.com
Page 2
Thank you for buying your ROAD ANGEL Plus
As our roads become busier, more congested and more regulated, staying
alert to road and traffic conditions is a challenge to everyone. Even the
most conscientious driver can have a momentary lapse of concentration
that could easily lead to an accident or a fine and points.
ROAD ANGEL Plus is specially designed to be a simple-to-use addition to
any vehicle, to alert and warn you in advance of known danger areas. In
the comprehensive ROAD ANGEL Plus database are stored Police, Local
Authority and Ministry of Transport designated danger spots, including
accident black spots and safety camera locations.
Using the latest Global Positioning Satellite (GPS) technology, ROAD
ANGEL Plus compares your position with the known danger spot locations
and gives you an audible and visual warning as you approach them. An
accurate GPS speedometer in the display gives you time to adjust your
driving to the approaching danger.
The safety of you and your passengers is our prime consideration, and we
trust that for all the miles you drive, your ROAD ANGEL Plus will enhance
the safety and enjoyment of your journey. Join other ROAD ANGEL Plus
users in guarding your life and livelihood.
We are pleased to have you as a valued customer and hope you will be
delighted with your fully integrated GPS and Laser ROAD ANGEL Plus.
Having listened to our customers we think the new features will make this
product your perfect driving companion.
Dave Clark, Managing Director
Blackspot Interactive Ltd.
The directors of Blackspot Interactive Ltd sell ROAD ANGEL
Plus as a road safety enhancement device. Driving within the
speed limits at all times and within the limitations of the road
condition and your abilities is paramount. The directors of
Blackspot Interactive Ltd take no responsibility for the use of
ROAD ANGEL Plus for other purposes than those stipulated.
Page 3

i
Contents
1. Introduction....................................................................1
Front View................................................................................2
Back View.................................................................................3
The ROAD ANGEL Plus Database...........................................4
Using ROAD ANGEL Plus Abroad...........................................4
Subscriptions...........................................................................5
Warranty...................................................................................5
Battery Power and Recharging ...............................................5
2. Unpacking the Box ........................................................6
3. Registration....................................................................7
4. Putting It All Together....................................................9
Security....................................................................................9
Assembling the Windscreen Mounting Bracket...................10
Fitting the ROAD ANGEL Plus...............................................12
Attaching the Visor................................................................13
Using the Dashboard Pad......................................................13
Mounting ROAD ANGEL Plus on a Motorbike......................14
Rear laser detection.................................................................14
5. Getting Started.............................................................16
6. Hazard Warnings .........................................................17
Understanding the Display....................................................17
Standby mode..........................................................................17
Alert mode ...............................................................................17
Audio and Speech Warnings.................................................18
Alert Types.............................................................................19
Page 4

ii
7. Updating the Database................................................21
System requirements...............................................................21
Updating..................................................................................22
8. Customising ROAD ANGEL Plus ...................................23
Changing Settings.................................................................23
Menu Settings........................................................................26
Alerts.......................................................................................26
Distances.................................................................................27
GPS.........................................................................................27
Unit Data .................................................................................28
Display.....................................................................................28
9. Adding and Deleting Danger Zones...........................29
Deleting Zones.......................................................................29
Adding New Locations ..........................................................29
Adding an Average Speed Monitoring Section
(SPECS Zone).........................................................................30
10. Background Information.............................................31
About Global Positioning Satellites (GPS) ...........................31
Laser Detection......................................................................31
How mobile laser traps operate................................................31
How the enforcement officer chooses which vehicles to target..31
Targeting Explained...............................................................32
Short range targeting...............................................................32
Long range targeting................................................................32
Following a vehicle being targeted...........................................33
Rear detection of laser.............................................................33
Speed Cameras and Black Spots..........................................34
11. Accessories .................................................................37
Page 5

1
1. Introduction
ROAD ANGEL Plus is a standalone, cable-free, GPS camera and accident
black spot locator. It uses the latest global positioning satellite and laser
detection technology (see page 31) to give you audible and visible alerts as
you approach hazardous sections of road:
Accident black spots (as designated by the Police and Local Authorities)
Safety cameras
Mobile laser guns
Mobile roadwork cameras
Average speed monitoring zones
Primary schools and congestion charging zones
ROAD ANGEL Plus also displays a constantly updated and accurate speed
reading. Should you break down, ROAD ANGEL Plus allows you to
pinpoint your location and direct rescue services to your vehicle.
IMPORTANT SAFETY INFORMATION!
Never attempt to alter settings while you are driving. Ask a
passenger to make any changes or find a suitable and safe
place to pull over and park your vehicle.
ROAD ANGEL Plus is designed as an aid to safe driving.
Always drive within the speed limits and traffic regulations,
taking account of the road conditions and your own abilities.
ROAD ANGEL Plus should not be used in any way that may
interfere with the safe operation of your vehicle. Ensure that
your ROAD ANGEL Plus and its associated equipment and
cables are securely and correctly mounted within the vehicle.
Blackspot Interactive Ltd assumes no responsibility for any
damage or injury resulting from the use of this product.
Page 6
2
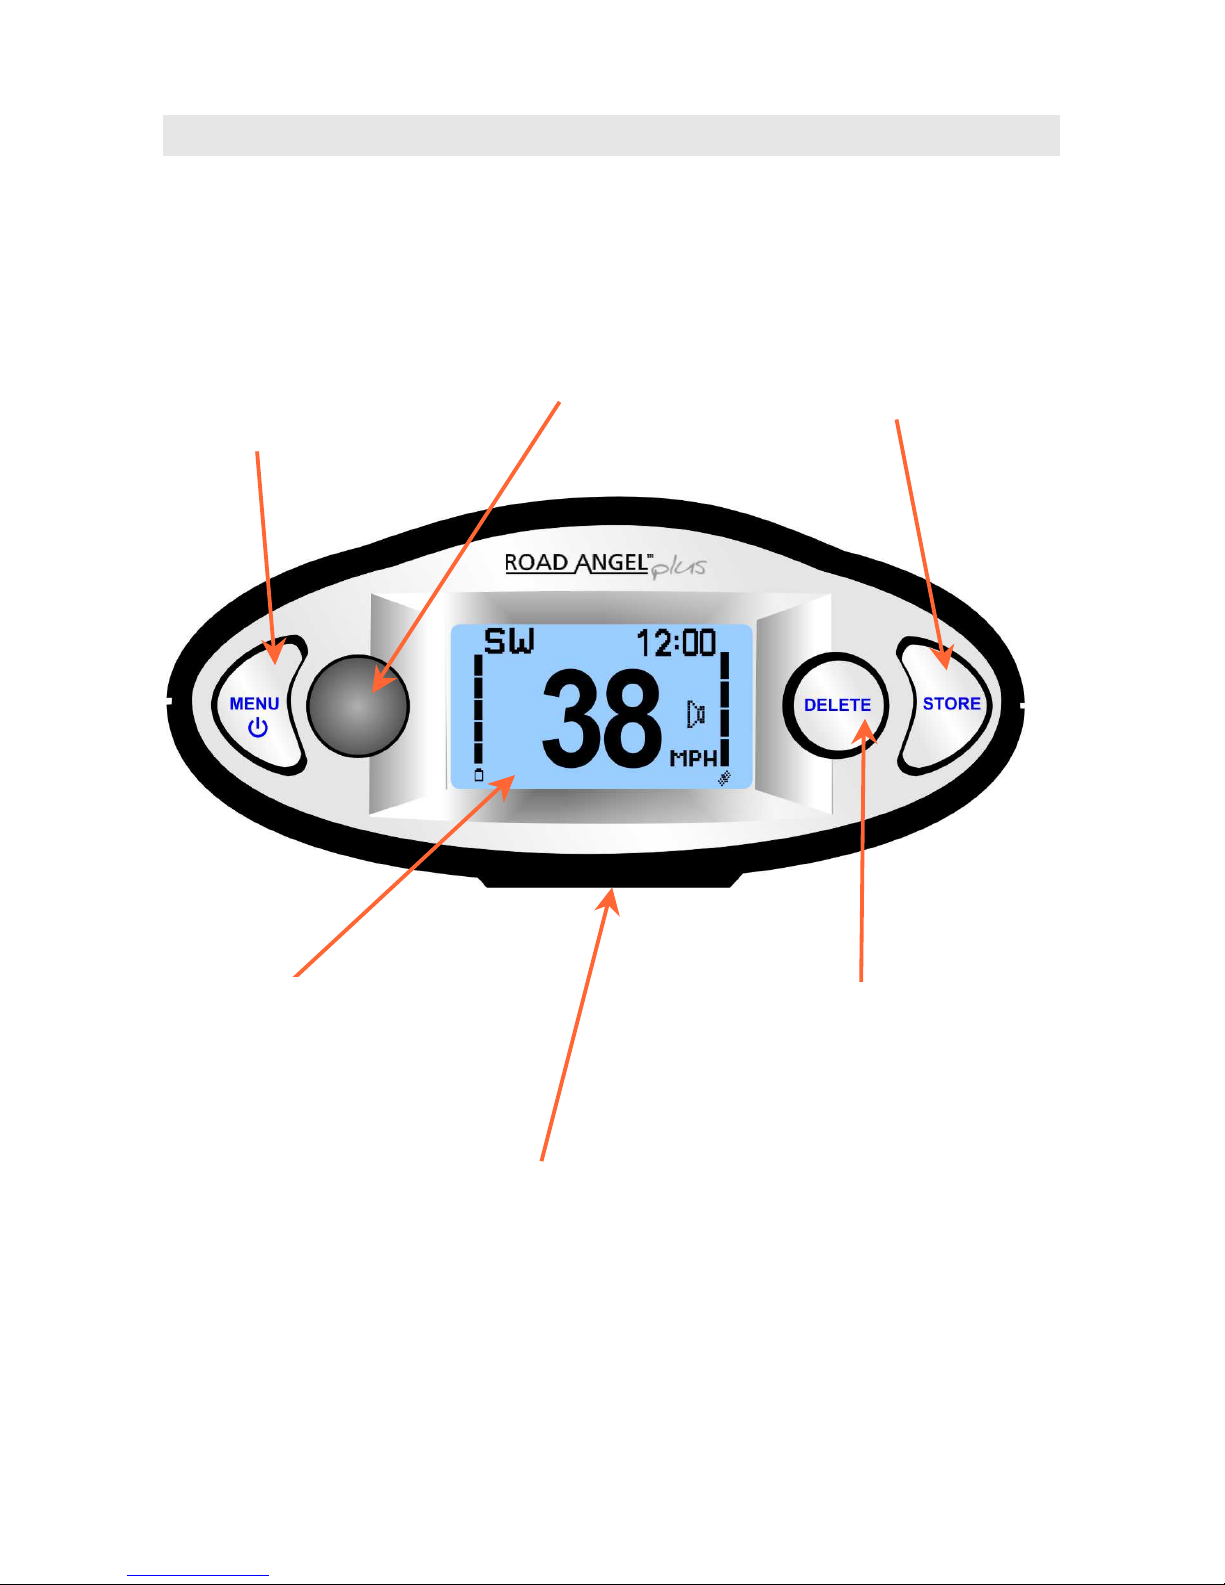
Front View
Menu/On/Off Button
Press to enter and
navigate ROAD ANGEL
Plus settings (see page
23). Press and hold down
to turn unit on/off.
Rear Laser
Sensor
Detects laser speed
measurement devices
targeting rear of vehicle
(see page 31).
Display
Shows speed, time,
heading, satellite reception,
battery level and hazard
information (see page 17).
Magnetic Base
Magnet in base of unit secures
ROAD ANGEL Plus to
rubberised metallic disk on
mounting bracket or dash pad.
Delete Button
Press to remove alert zone
from database (see page 29)
or to permanently mute unit
(see page 18).
Store Button
Press to enter new
zones (see page 29),
confirm new settings
(see page 23) or to
mute unit (see page 18).
Page 7
3
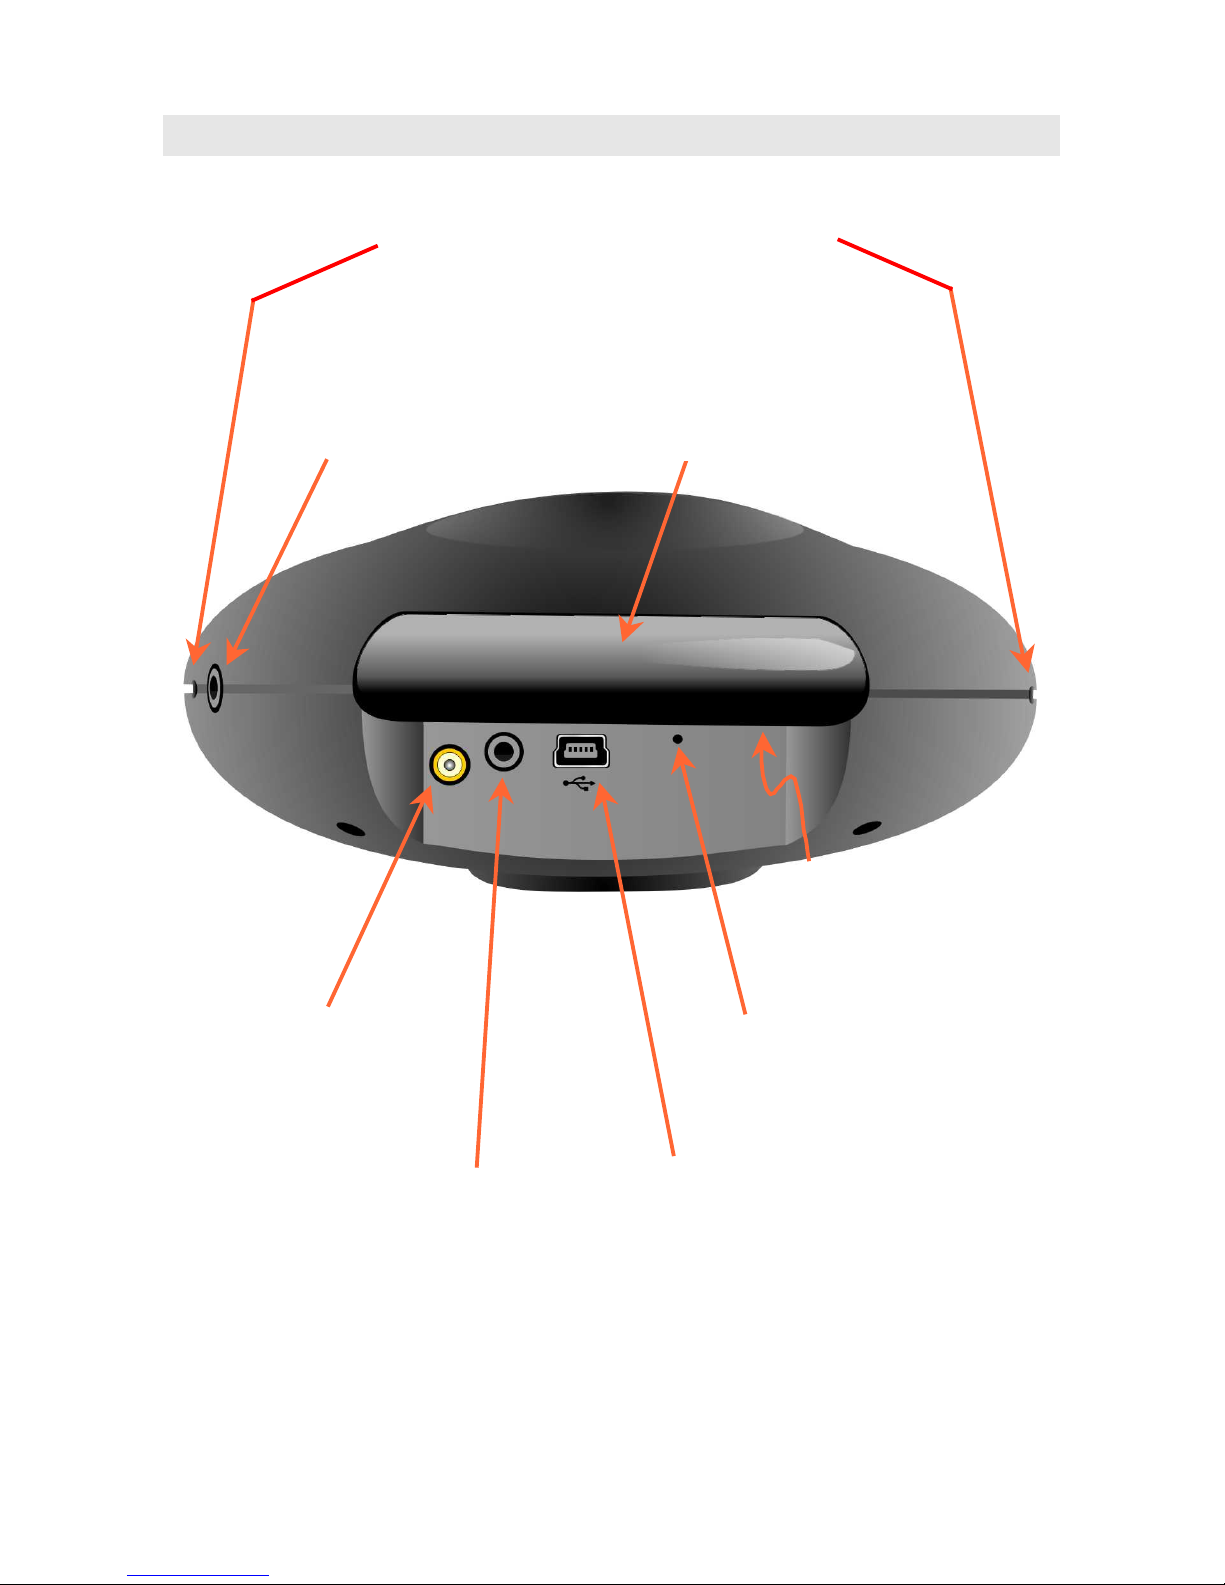
Back View
External Antenna (ANT)
Required for certain
vehicles (see page 15).
Visor
-
Locating Guides
Used to attach anti-glare visor or
additional motorbike mounting bracket.
Earpiece Socket
For earpiece supplied with
Motorbike Accessory kit
(see page 14).
Front Laser Sensor
Detects laser speed
measurement devices
targeting front of vehicle
(see page 31).
Auxiliary Port (AUX)
Connection for additional
laser sensor (see page 14).
Power/USB Port (USB)
Connect to PC to obtain database
updates and to charge battery. Also
connects to vehicle's cigar socket for
charging purposes (see page 12).
Serial Number
(under laser sensor)
Needed for product
registration.
Reset button
If a problem occurs, use
a paper clip to press the
internal reset button.
Page 8
4
The ROAD ANGEL Plus Database
ROAD ANGEL Plus uses a database of Police, Local Authority and Ministry
of Transport designated danger spots, including accident black spots and
safety camera locations, primary schools and congestion charging zones.
Your ROAD ANGEL Plus can store up to 50,000 unique danger locations.
Using the latest Global Positioning Satellite (GPS) technology, ROAD
ANGEL Plus compares your position with known danger spot locations and
gives you an audible and visual warning as you approach them.
It is critical to the accurate operation of your ROAD ANGEL Plus that you
update your unit regularly to maintain the very latest data. With up to 100
new hazard locations added each month, we suggest that you update your
ROAD ANGEL Plus every fortnight. If you are a high mileage driver, using
unfamiliar roads, we recommend weekly updates.
To qualify for database updates:
1. Register your ROAD ANGEL Plus with Blackspot Interactive Ltd.
You cannot update the database until you have registered (see
page 6).
2. Set up a monthly or yearly Direct Debit (see page 5). You are
prompted to do this after registration. Your ROAD ANGEL Plus
comes with an initial, free, 6-month subscription.
Using ROAD ANGEL Plus Abroad
Your ROAD ANGEL Plus is specifically designed for use within its
designated country, as stated on the packaging. It will have limited
functionality in other countries because the appropriate camera/safety GPS
data will not be present.
IN MOST OF EUROPE, LASER DETECTION DEVICES,
INCLUDING ROAD ANGEL Plus, ARE ILLEGAL. PUNISHMENTS
FOR CARRYING SUCH A DEVICE (EVEN IF IT IS NOT IN USE)
RANGE FROM IMPRISONMENT, CONFISCATION OF VEHICLE,
A DRIVING BAN AND/OR A HEAVY FINE.
If you intend to use ROAD ANGEL Plus abroad, seek independent legal
advice prior to departure.
Page 9

5
Subscriptions
Your ROAD ANGEL Plus comes with a free subscription for six months of
database updates and product support. It is critical to the operation of your
ROAD ANGEL Plus that you update the unit regularly and so continued
subscription is essential. With constant additions to the ROAD ANGEL Plus
database (1000+ sites per year), the benefit of your ROAD ANGEL Plus
and the protection it provides will be dramatically reduced if you fail to
maintain the database.
In order to receive free access to updates for the first six months, you will
be asked to complete an online Direct Debit form after registration. If you
prefer, you may print the form and post it to us (our address is on the front
of this manual). There are two subscription options: monthly or yearly.
Current subscription rates can be found at http://www.blackspot.com/. We
will not debit your account until the first 6-month period has elapsed.
Warranty
Your ROAD ANGEL Plus is guaranteed for one year from the date of
purchase from all defects that occur with normal use. If your unit fails to
perform as specified in these instructions, please visit:
http://www.blackspot.com/warranty
Battery Power and Recharging
ROAD ANGEL Plus is a cable-free device – it can operate independently
using power from its internal rechargeable battery for up to 8 hours. You
can also power ROAD ANGEL Plus directly from the cigar socket on your
vehicle or from a USB port on a PC using one of the supplied cables.
The unit’s battery level is indicated by a five-bar meter on the left side of
the display (see page 17). The number of blocks shown indicates the
current battery strength. When ROAD ANGEL Plus is on charge, it flashes
any remaining blocks sequentially.
When one single bar is showing it will flash, indicating that the battery in
your ROAD ANGEL Plus needs to be charged. You can charge the battery
using the in-car cigar lighter adapter and cable, or by connecting it to a
USB port on your PC. It takes approximately 6 hours to fully charge the
ROAD ANGEL Plus but it can be used whilst charging (you can charge the
ROAD ANGEL Plus at any time; there is no need to wait until the battery is
completely flat, unlike some rechargeable devices).
To conserve battery power, the unit automatically switches itself off if it is
stationary for more than 10 minutes. To resume use, press and hold the
Menu button.
Page 10
6
Anti
-
vibration
dampers (x7)
Dashboard
mounting pad
USB cable
Windscreen
mounting
bracket
Suction cups
(x2)
ROAD ANGEL Pl
us
unit
12V/24V cigar
socket leads
Visor
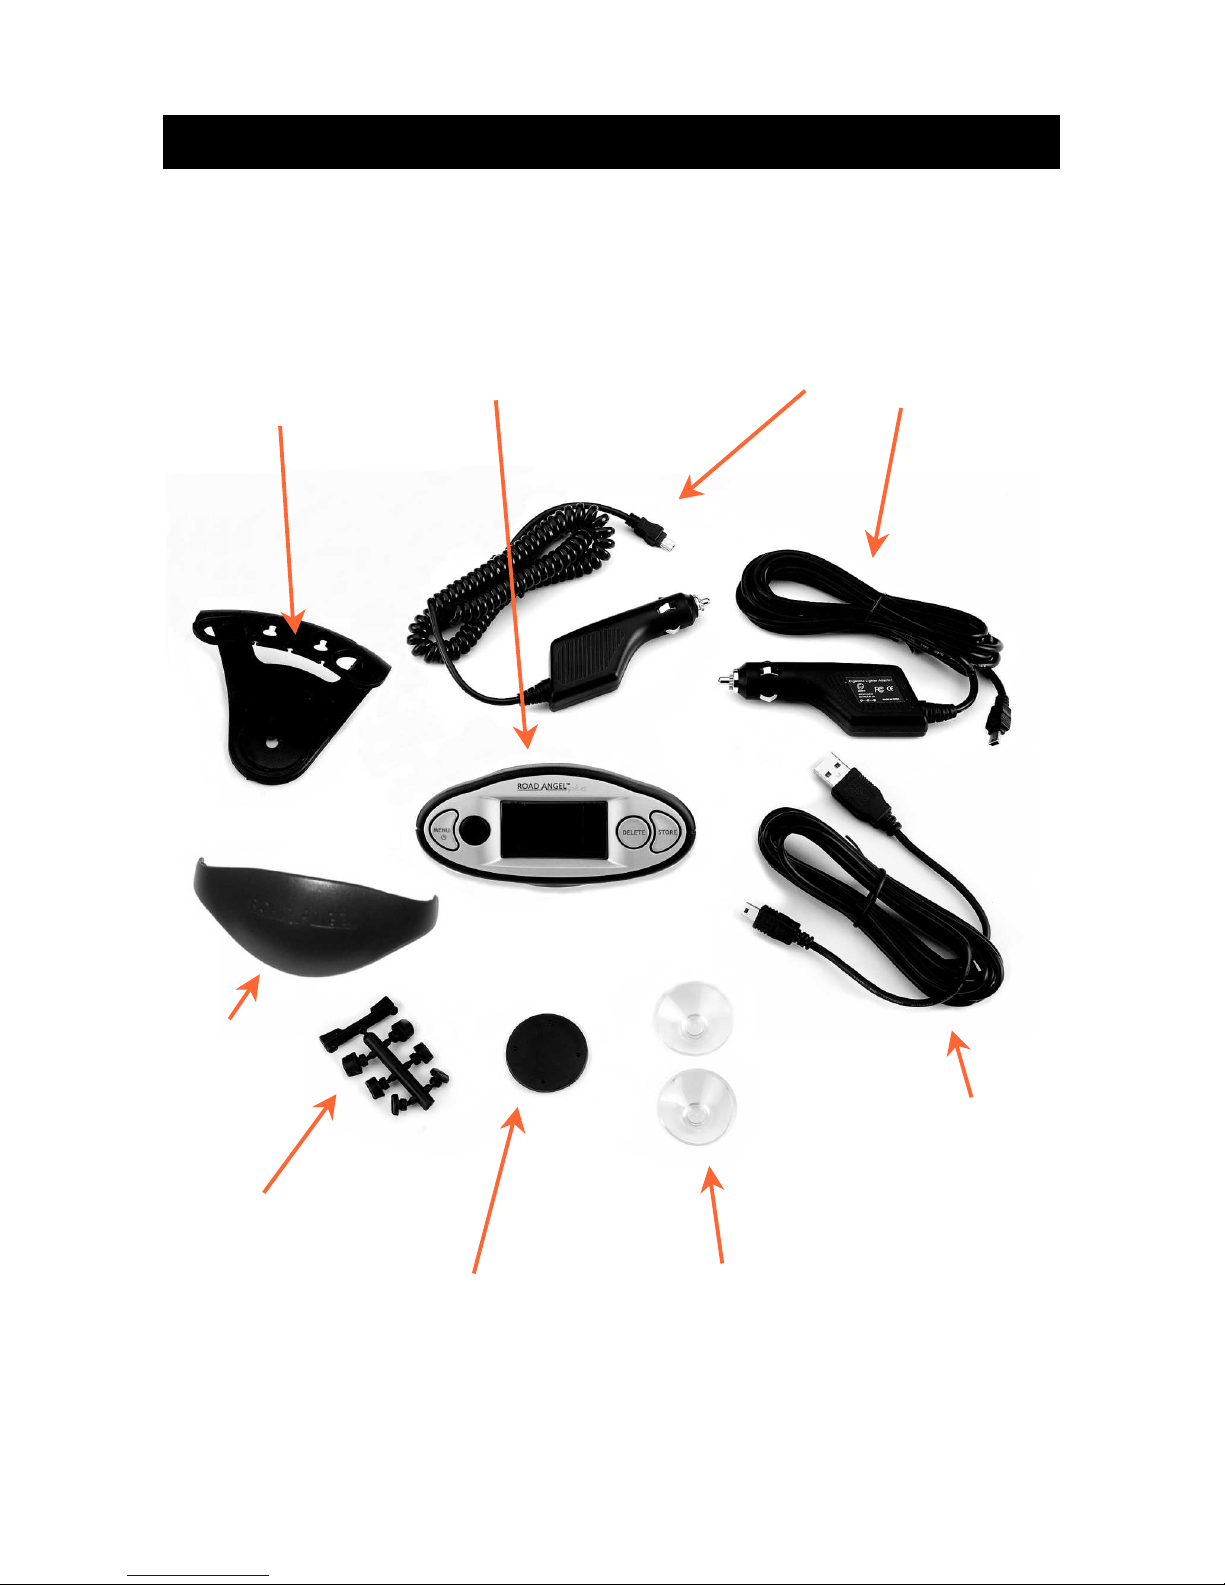
2. Unpacking the Box
Empty all the parts out of the box and familiarise yourself with each item.
Each pack contains the following:
Page 11
7
3. Registration
If you're in a rush to get started, you can come back to this step
later. However, it is important that you register your ROAD
ANGEL Plus as soon as possible after purchase.
You will need:
1. A PC with Internet access running Microsoft Windows 98SE, ME, 2000,
or XP
2. Internet Explorer version 5.5 or above
To register online:
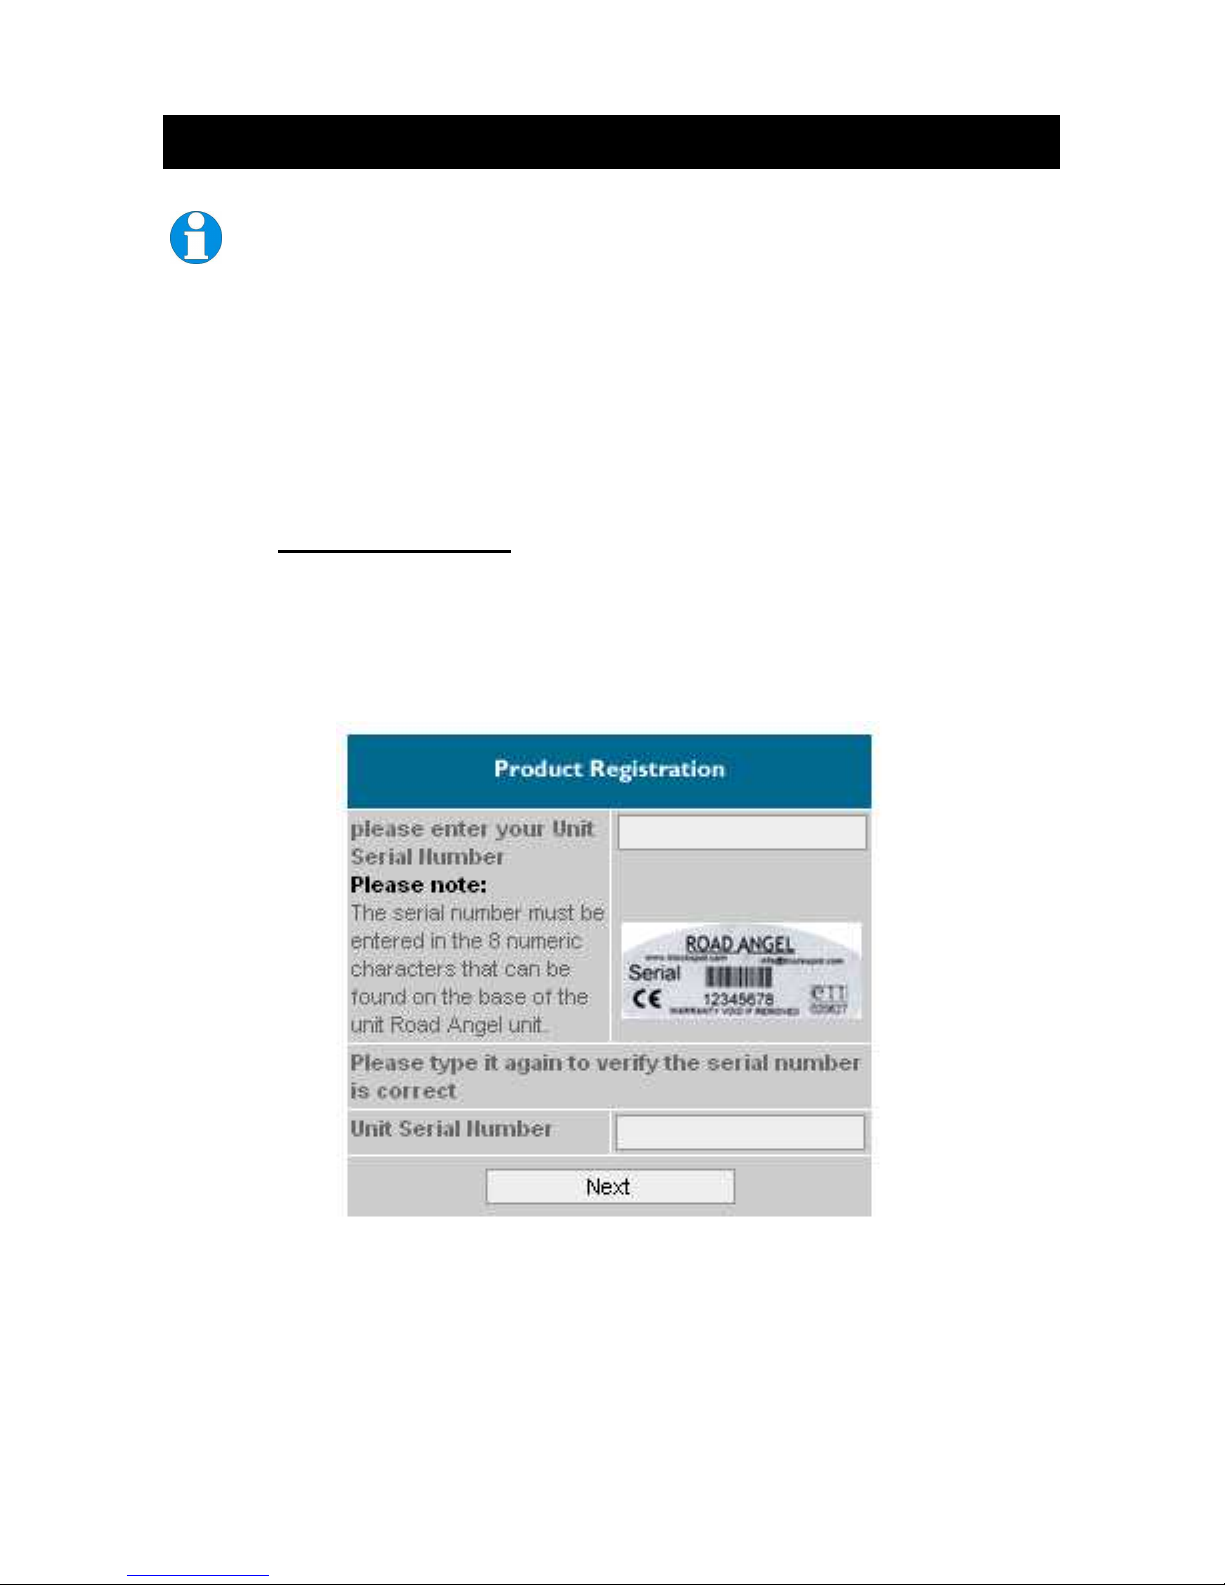
1. Go to www.blackspot.com
2. Click on the Product Registration link. The Product Registration form is
displayed.
3. Enter your ROAD ANGEL Plus's serial number. You can find this on the
back of the unit.
4. Click on the Next button.
The registration process normally takes one full working day – you can then
use the software to update your ROAD ANGEL Plus.
Page 12

8
Why should I register?
Registration is important for two reasons:
a) You cannot update the unit until it has been registered. Hazard and safety
camera database information may be significantly out-of-date at the time of
purchase and should be updated as soon as possible.
b) Without registration, we cannot resolve warranty issues, log queries or solve
problems with your ROAD ANGEL Plus.
How do I update my ROAD ANGEL Plus?
To update ROAD ANGEL Plus, you will need to install the update software on a PC
with Internet access. You are prompted to download the update software once you
have completed the online product registration. You can also download the software
directly from our website via the Customer Support section at www.blackspot.com.
How often should I update my ROAD ANGEL Plus?
As a guide, we recommend that you update your ROAD ANGEL Plus every two
weeks.
My ROAD ANGEL Plus keeps displaying the ‘Please register...’
message every time it is switched on.
You need to complete an update of your ROAD ANGEL Plus.
Page 13

9
4. Putting It All Together
We recommend that you install your ROAD ANGEL Plus on the dashboard
of your vehicle. ROAD ANGEL Plus has an internal high sensitivity GPS
antenna and requires a clear view of the sky to communicate with GPS
satellites.
If you want to install ROAD ANGEL Plus anywhere else within your vehicle,
you will require an external GPS antenna. Please visit www.blackspot.com
for details.
ROAD ANGEL Plus has a quick release magnetic base and is supplied
with:
A bracket for mounting ROAD ANGEL Plus on the front windscreen.
A mounting pad for fixing ROAD ANGEL Plus directly onto the
dashboard. Use this option if your vehicle has low profile windscreen
wipers or if it is more convenient than the windscreen mount.
Security
Owing to the high number of thefts, we strongly suggest you remove
your ROAD ANGEL Plus and its bracket from view when you leave
your vehicle.
Please contact Blackspot Interactive Ltd if your unit is stolen or lost.
Each ROAD ANGEL Plus is identified by a unique serial number on
the base. We can use this number to block the unit from being
updated. Any attempt to do so removes all the data from the device
and renders it useless. We can also detect any attempt to re-register
it. This has frequently resulted in the safe return of a ROAD ANGEL
Plus to its rightful owner.
Page 14
10
Assembling the Windscreen Mounting Bracket
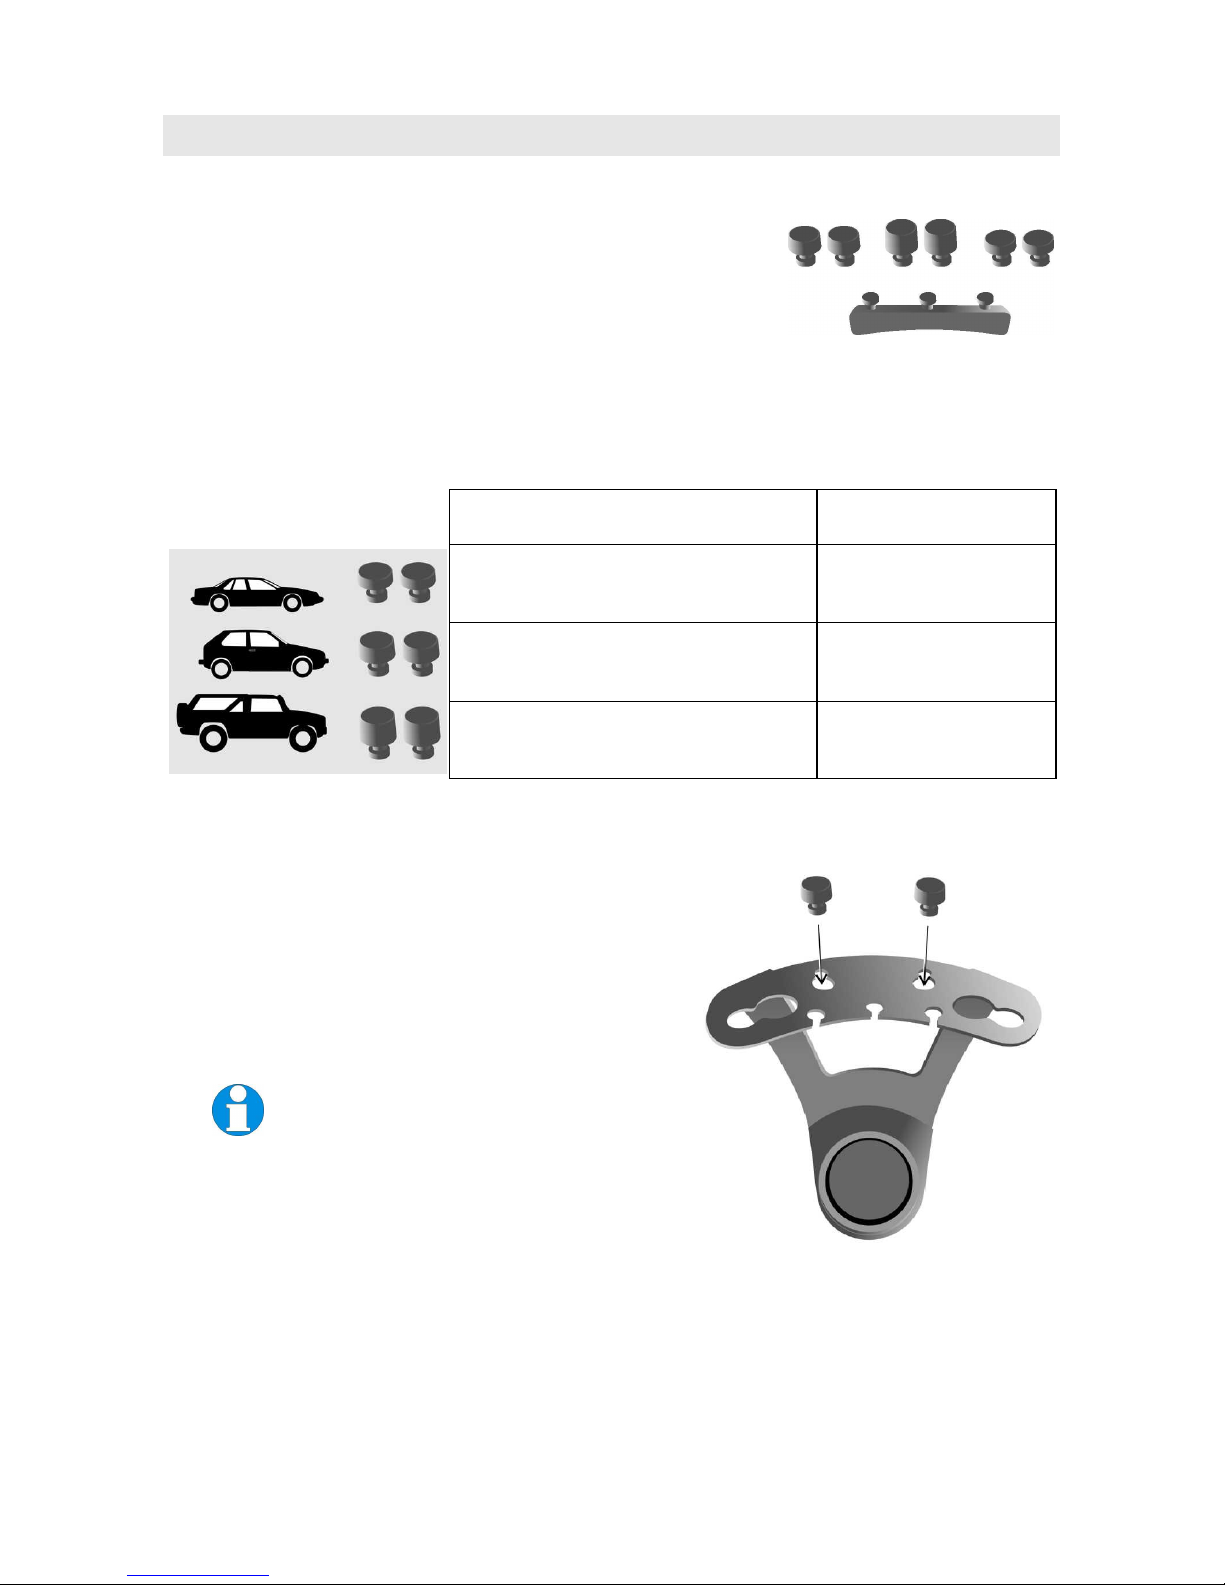
1. Locate the seven anti-vibration dampers; there
are three pairs of round dampers and a long
rectangular bar.
2. Select a pair of dampers according to the pitch of your vehicle's
windscreen:
Windscreen pitch Damper type
Low, streamlined
e.g. Sports car style
short
Standard e.g. Saloon style
medium
Upright e.g. 4X4 style
long
3. Insert the selected pair of dampers into
the two holes towards the back of the
bracket, and slide towards the back.
These dampers hold the bracket at the
correct angle and stop it from touching
the windscreen.
You may need to experiment with
different combinations of the
dampers to get the best fit.
(3)
Page 15
11
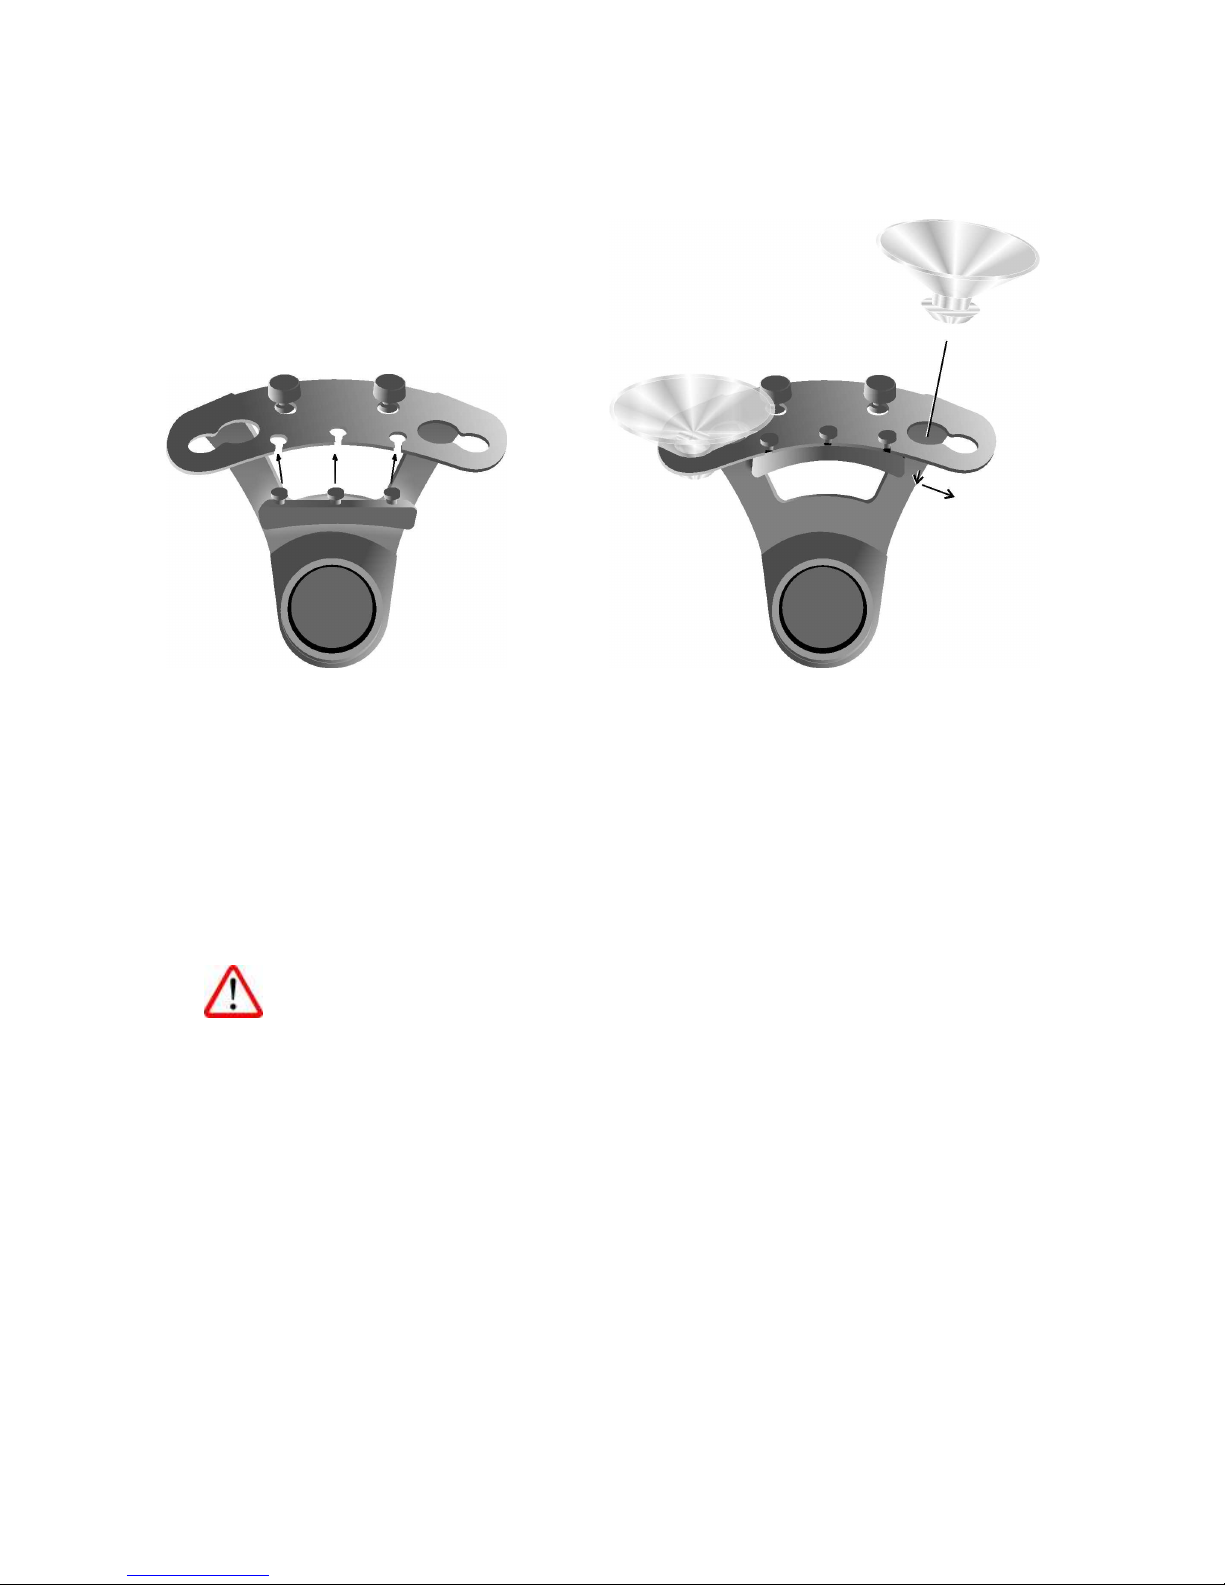
4. Press the rectangular damper into the three holes along the front edge
of the bracket. This damper stabilises the ROAD ANGEL Plus in the
mounting bracket.
(4) (5)
5. Attach the two clear suction cups. Push the cups into the large holes on
the top of the bracket. Then, to lock them position, slide each cup
across to the smaller hole at the outer edge of the bracket.
Do not leave the bracket on the front windscreen without the
product attached, for security reasons (see page 9).
Page 16
12
Fitting the ROAD ANGEL Plus
We strongly recommend that ROAD ANGEL Plus is positioned
in the centre of the front windscreen low down, just above the
dashboard.
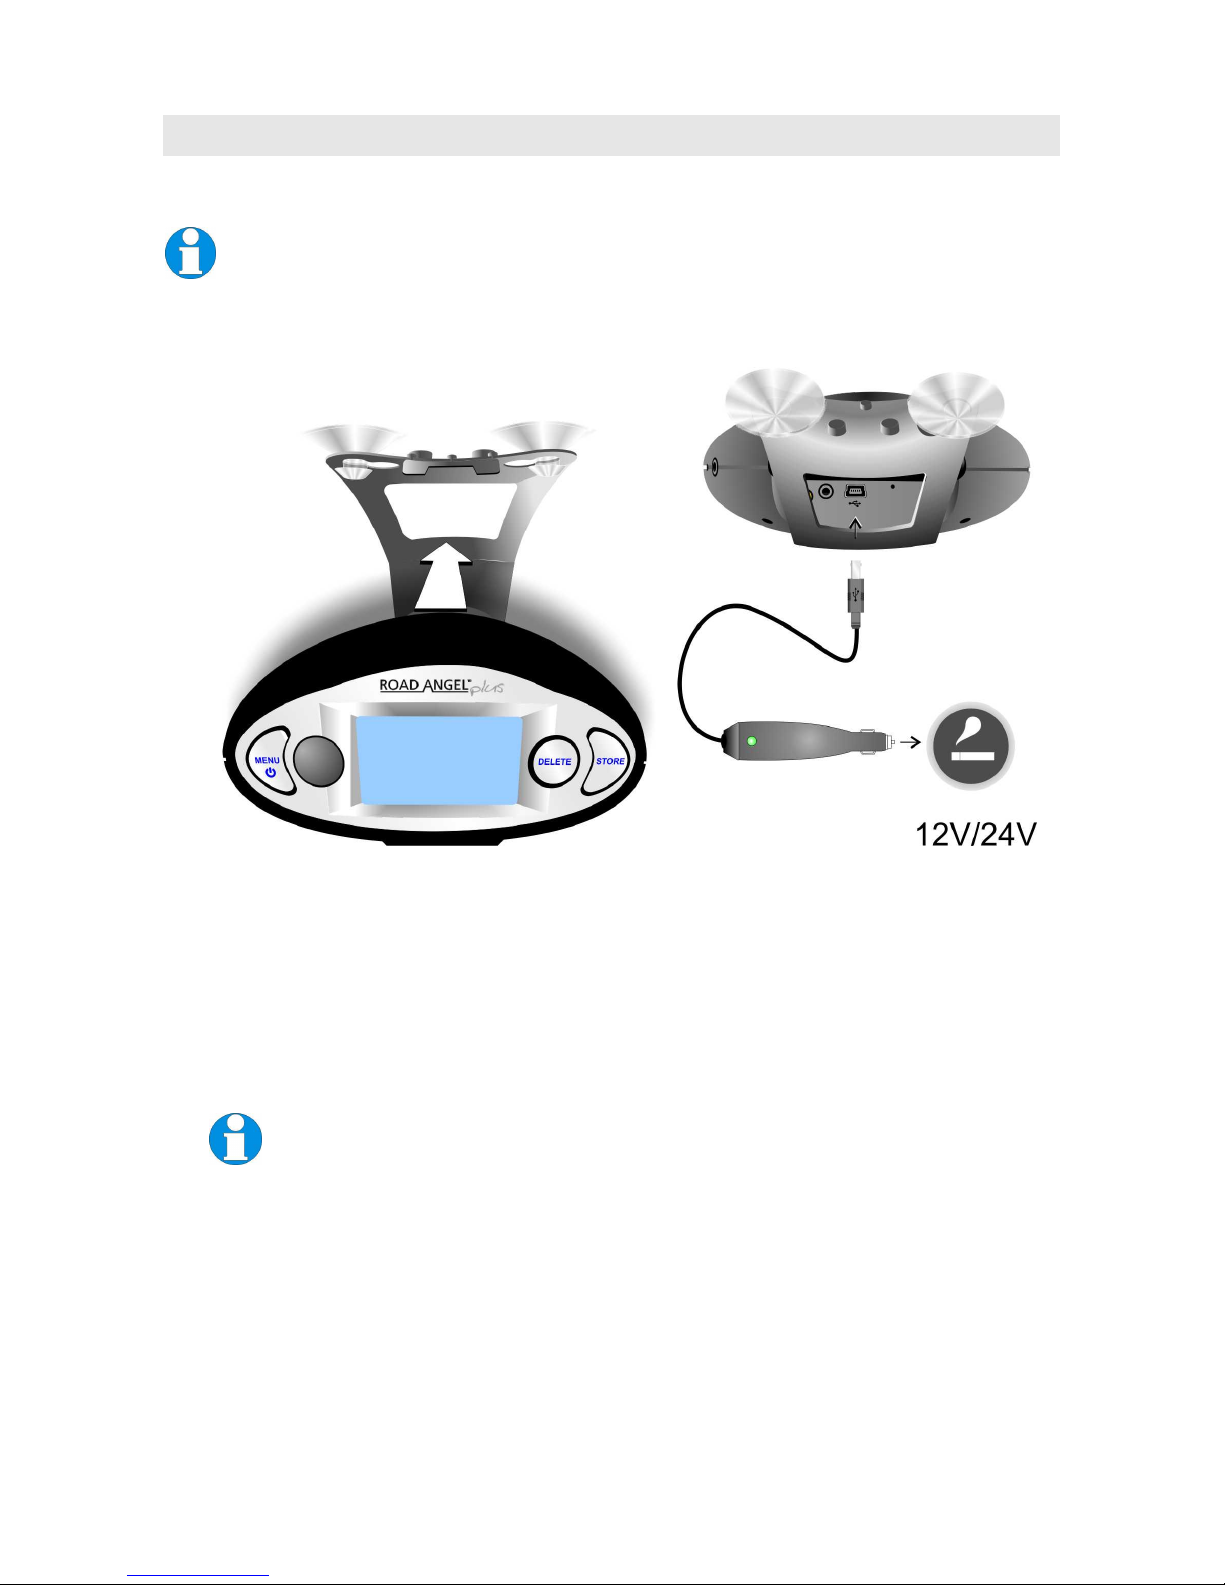
1. Slide the ROAD ANGEL Plus unit into the mounting bracket.
(1) (2) (3)
2. The new unit will need charging. Choose a power cable.
ROAD ANGEL Plus is supplied with two types of power cable (see page
6). Use the cable that suits your vehicle according to the location of your
vehicle's cigar socket (see page 15 for information about hardwiring).
Alternatively, you could charge the internal battery by connecting
your unit to a USB port on a PC using the supplied cable.
3. Use the cable to connect the USB port on the unit to your vehicle’s cigar
socket.
4. Ensure that the cable does not interfere with any of the vehicle's
controls or airbag modules. If you use your cigar socket for any other
devices, a dual adaptor may be used.
You are now ready to use the unit for the first time.
Page 17
13
Attaching the Visor
ROAD ANGEL Plus comes with a visor that can be attached to shade the
display from bright sunlight and stop reflections onto the windscreen at
night. Attach the visor using the two locating notches on each side of the
unit (see page 3).
The visor cannot be used in conjunction with the Motorbike
Accessory kit.
Using the Dashboard Pad
The mounting bracket allows you to put the unit in the best position for GPS
reception, laser detection and general viewing. ROAD ANGEL Plus is also
supplied with an adhesive pad allowing you to mount the unit directly on the
dashboard. This option is not suitable for all vehicles.
Use this method if the windscreen wipers on your vehicle are low profile
and do not present an obstruction to GPS reception or forward laser
detection. Also ensure that your ROAD ANGEL Plus is not located close to
any heater vents.
To use the pad, remove the backing from the base and fix it to the
dashboard. Place your ROAD ANGEL Plus directly onto the rubber pad
where it will be held firmly.
Page 18
14
Mounting ROAD ANGEL Plus on a Motorbike
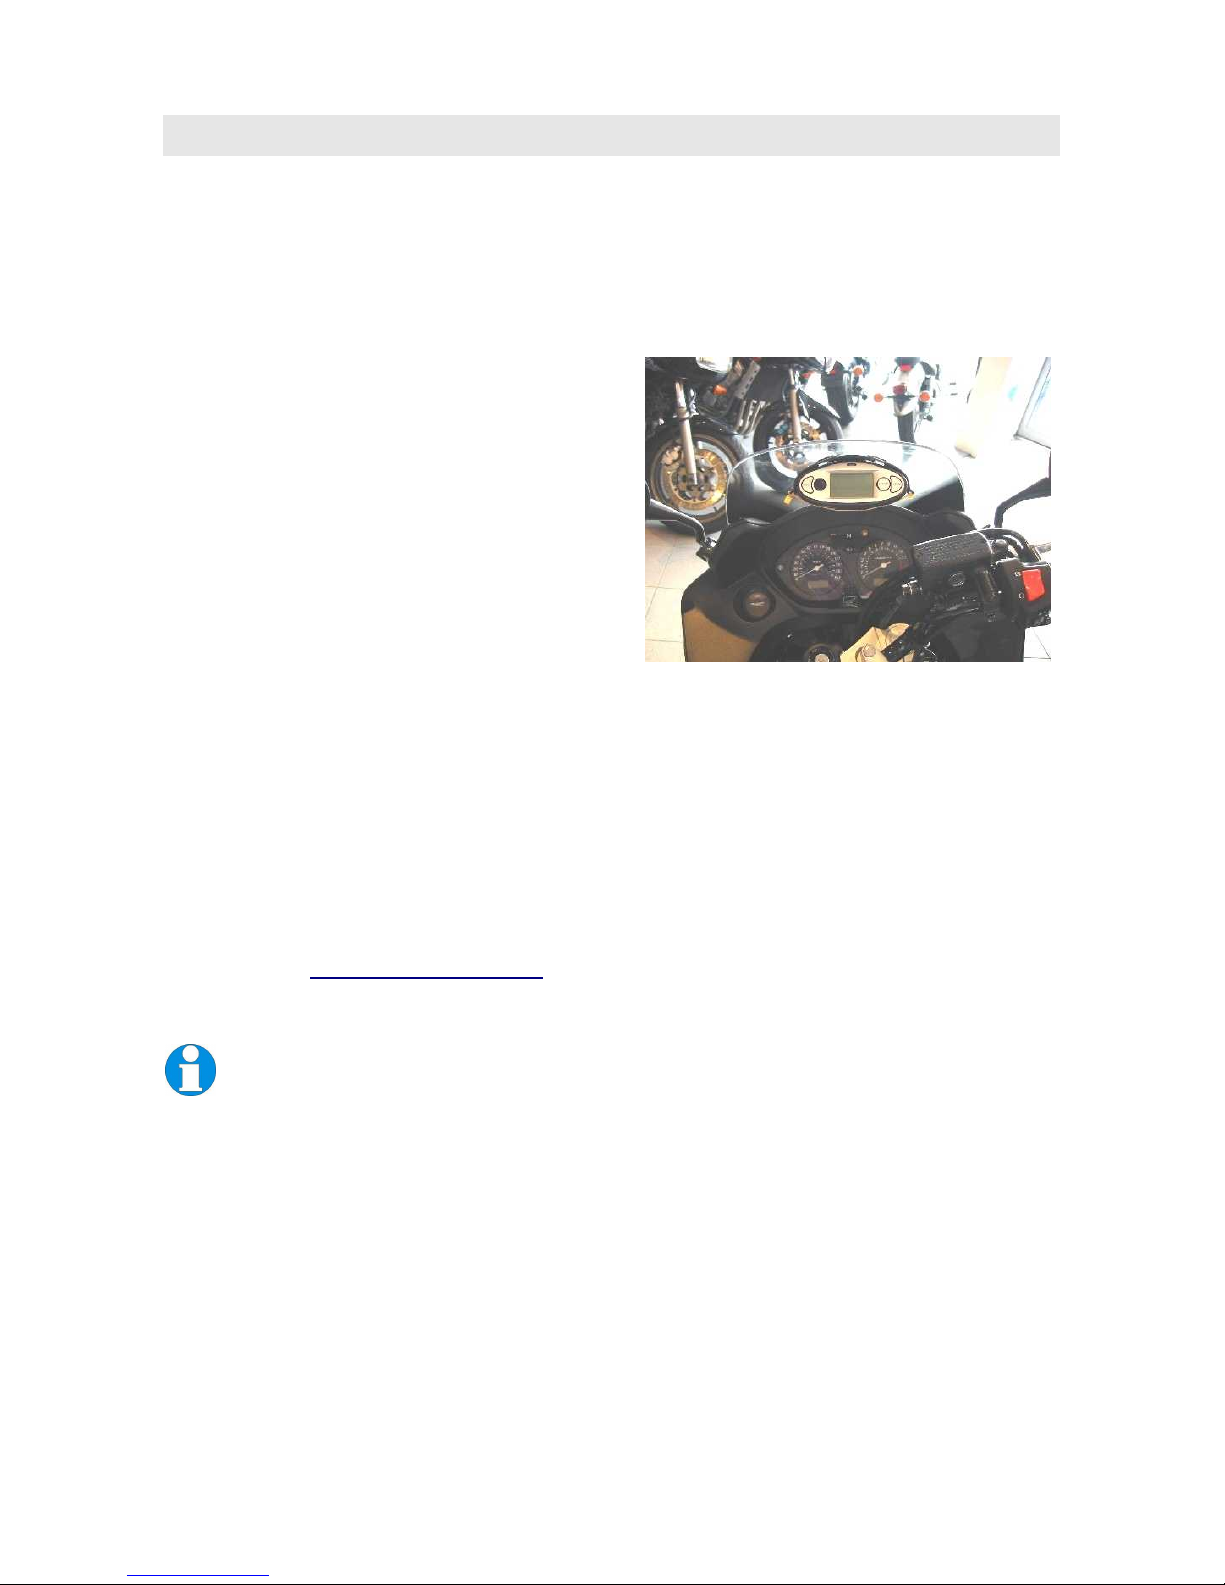
The windscreen mounting bracket can be used to mount ROAD ANGEL
Plus under the screen of a sports bike. However, Blackspot Interactive Ltd
also sells an additional Motorbike Accessory Kit for the ROAD ANGEL
Plus. This includes a mounting bracket specially designed for motorbike
windshields, a power lead, terminal connectors and an earpiece.
The earpiece supplied with the
Motorbike Accessory Kit can be used to
provide audible warnings inside a
helmet.
ROAD ANGEL Plus is NOT waterproof.
If it is going to be used in all weather
conditions, then a tank bag or another
type of waterproof holder is
recommended.
Rear laser detection
When used on a motorbike, ROAD ANGEL Plus is limited to forward laser
detection because its rear-facing sensor is blocked by the rider. To solve
this problem, Blackspot Interactive Ltd can supply an additional laser
sensor for fixing to your rear number plate. When connected to the AUX
socket on ROAD ANGEL Plus, this provides a rear laser detection
capability. Note that because of power limitations, only one sensor may be
connected to the AUX socket.
Please visit www.blackspot.comfor details of any of these products.
Electrical interference may cause false alarms. Please route all
cables away from the ignition circuitof the bike.
Page 19
15
Where should I put my ROAD ANGEL Plus?
ROAD ANGEL Plus has a high sensitivity GPS antenna and requires a clear view of
the sky to receive information from GPS satellites. We highly recommend that
ROAD ANGEL Plus is positioned in the centre of the front windscreen, low down,
just above the dashboard. If screen glare is a problem in this position, try installing
the unit beside the driver's “A-pillar”. Check that the GPS reception operates
correctly in this position.
If you want to install ROAD ANGEL Plus anywhere else within your vehicle, you
may require an external GPS antenna. Visit www.blackspot.com for details.
NO ROAD ANGEL PLUS OR ASSOCIATED ITEMS SHOULD BE
ATTACHED TO OR PLACED ACROSS THE PADDED SURFACE
OF THE AIRBAG MODULE ON THE PASSENGER SIDE OF THE
DASH PANEL. ALL WIRING MUST BE TUCKED AWAY SO AS
NOT TO INTERFERE WITH ANY OF THE VEHICLE'S
CONTROLS.
My car has a UV/heated windscreen
UV screens block GPS signals from entering the vehicle, stopping ROAD ANGEL
Plus from acquiring its position. This can be a problem with certain models of vehicle,
i.e. BMW, Mercedes, Renault, Peugeot & Citroen. Heated screens can also affect
GPS signal strength.
If your vehicle has a UV or heated screen, you may need an external antenna (please
visit www.blackspot.com for details). Most vehicles fitted with a UV screen have a
defined section behind the rear view mirror where you can fit the antenna.
Can I hardwire the unit?
ROAD ANGEL Plus has a 5V regulator built into its power
adapter. If the cable is cut and used to hardwire the unit into the
vehicle, you will damage the ROAD ANGEL Plus.
To hardwire ROAD ANGEL Plus into your vehicle, purchase a cigar socket; wire this
into the power system and use with the supplied cable and adapter
Consult an auto electrician if you are unsure how to carry out
this procedure as incorrect hardwiring may affect the validity of
vehicle and product warranty. Consult vehicle manufacturer if
in doubt.
Page 20
16
5. Getting Started
1. Find a location outside with a clear view of the sky (away from obstacles
such as tall buildings and overhanging trees – these may delay or
prevent satellite acquisition).
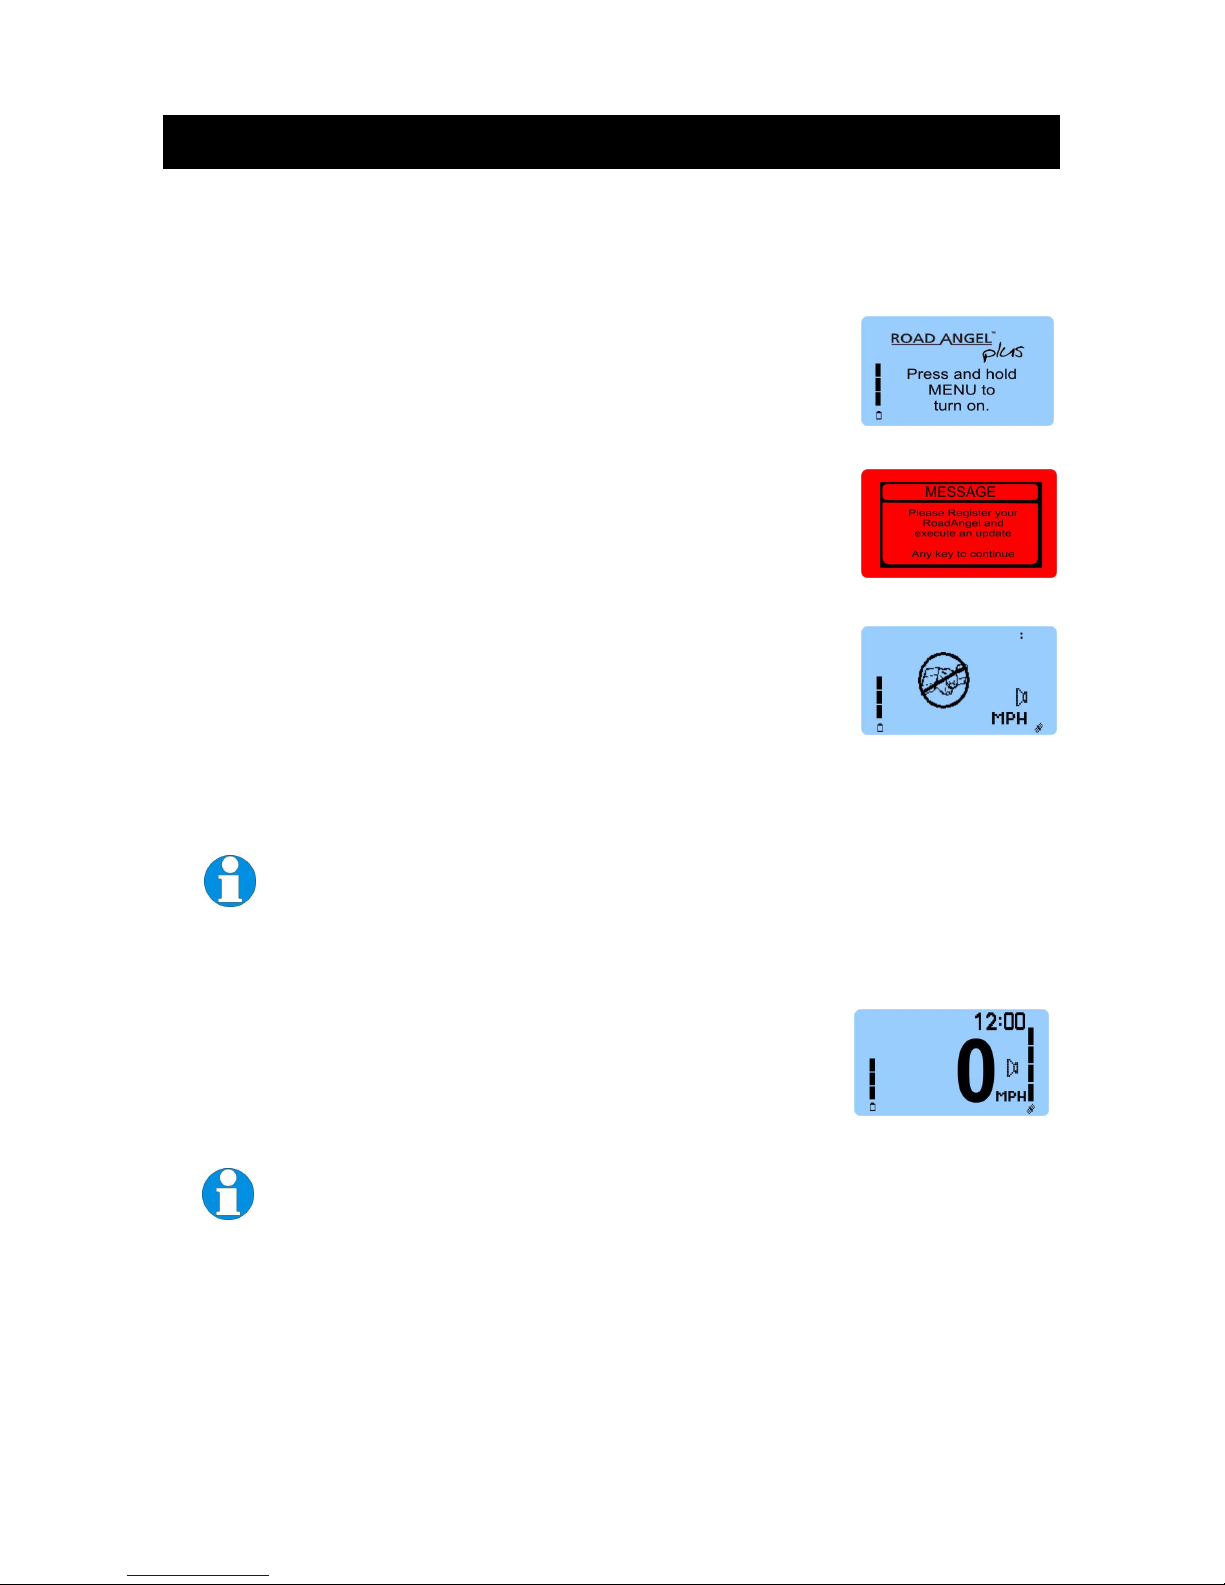
2. Switch the unit on by pressing and holding down the
Menu button. ROAD ANGEL Plus flashes its blue
and red backlights.
3. If you skipped registration (see page 7) and have not
therefore updated your ROAD ANGEL Plus, the
screen will show the registration prompt. Press any
key to continue (please register and update your unit
as soon as possible).
4. ROAD ANGEL Plus starts searching for satellites.
The first time the unit is switched on, it must acquire
data from a minimum of 4 satellites to establish its
position.
With further use, the unit should acquire satellites and establish your
location within 1-2 minutes of being switched on.
ROAD ANGEL Plus automatically switches off if it loses or
doesn’t acquire sufficient satellite signal for 10 minutes. This is to
preserve battery life (see page 5). If your unit is consistently
failing to acquire satellite signals within 10 minutes, check the
type of windscreen in your vehicle(see page 15).
5. When ROAD ANGEL Plus has established its
position, the display shows your speed (0 if you are
stationary).Your unit is now ready for use.
Some vehicles, for example Renault, Citroen, Peugeot, Vauxhall,
Ford, some BMWs and Mercedes, have what is known as an
Athermic, comfort or UV windscreen. This interferes with the
satellite signal being received by ROAD ANGEL Plus resulting in
an intermittent, erratic or absent speed display. To solve this
problem, you will need an external antenna; visit
www.blackspot.com/support for more information.
Page 21
17
6. Hazard Warnings
Understanding the Display
Standby mode
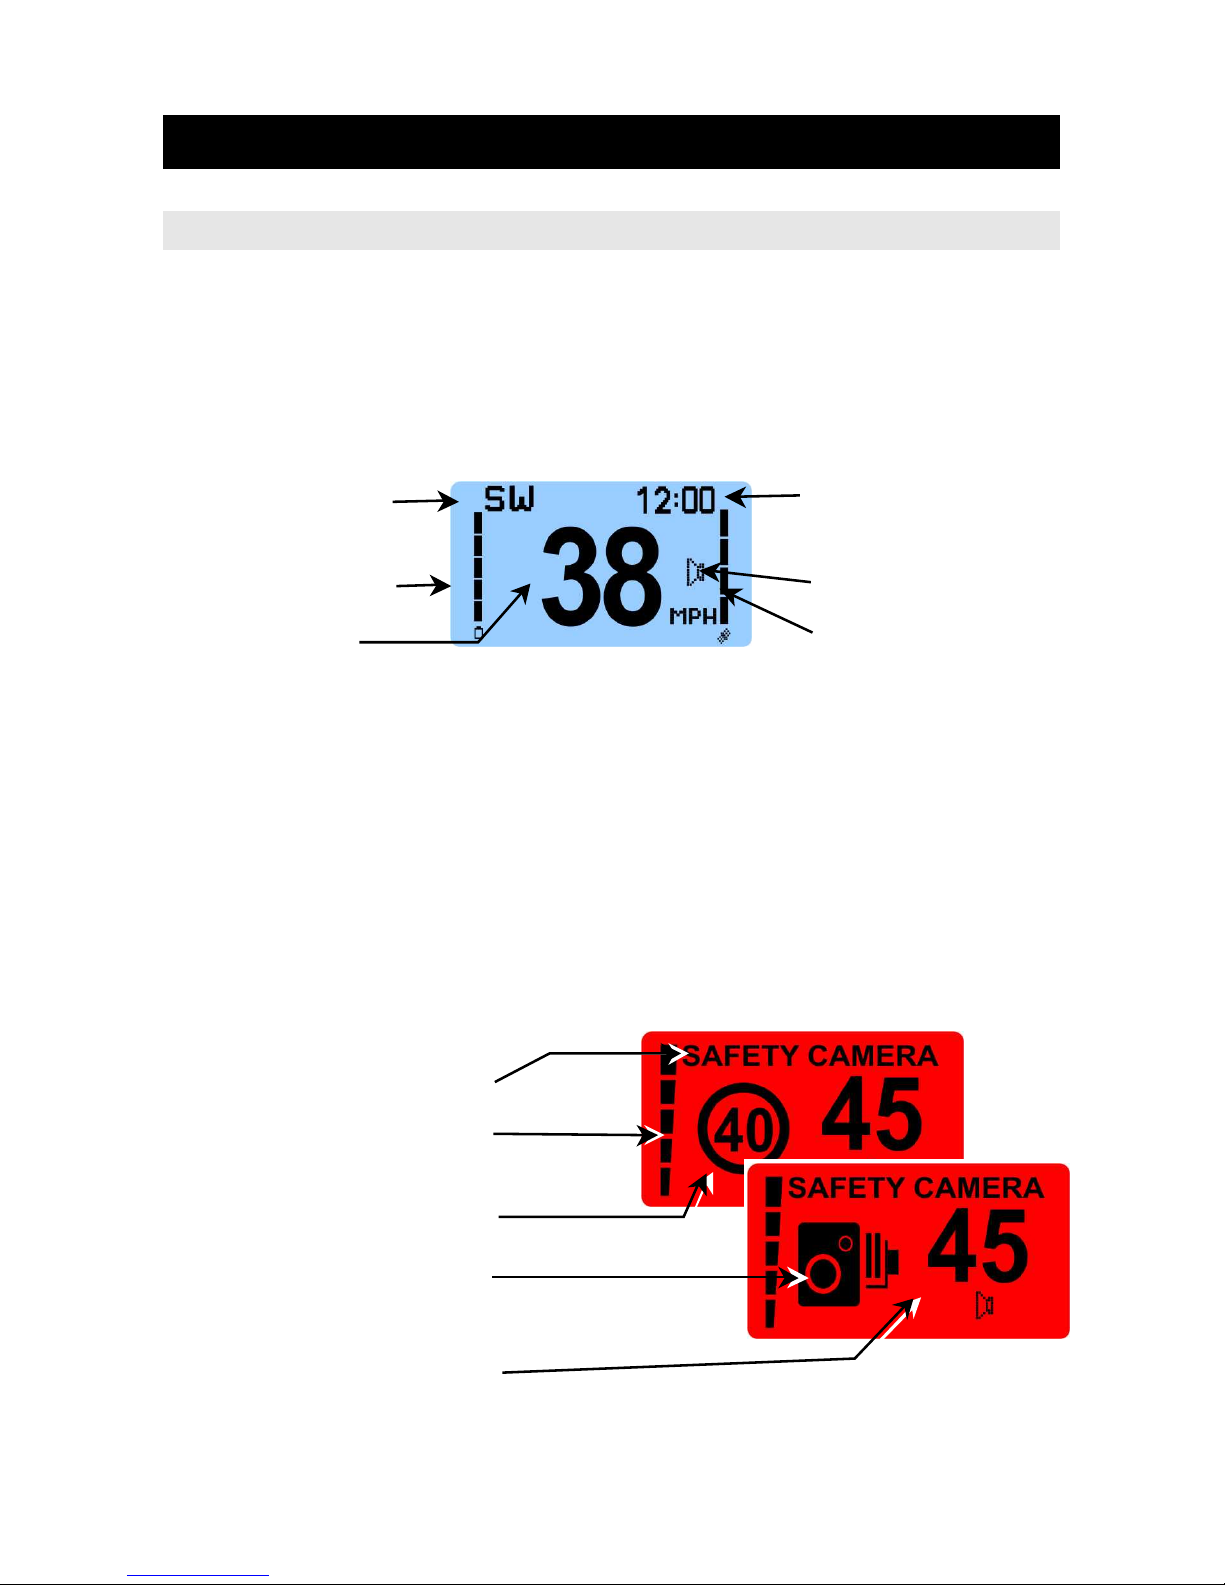
In its normal standby mode, ROAD ANGEL Plus's display shows your
speed, compass heading or time, and satellite reception (indicated by a
four-bar column – the more bars displayed, the greater the satellite
reception).
Alert mode
When you are approaching a known danger zone, ROAD ANGEL Plus
shows the type of hazard on the left side of the display. If you are
approaching a fixed, temporary or average speed camera location and
travelling belowthe advisory speed limit, the display remains blue (see
Intelligent Backlight, page 28). If you are travelling above the advisory limit,
or approaching a black spot or Primary school, the display backlight
changes to red. If your speed subsequently drops below the advisory
speed limit, the backlight returns to the normal blue colour.
Hazard type
Proximity-to-hazard meter
Camera warnings only:
Advisory speed alternates
with Alert type display
Alert type icon (for camera
warnings, alternates with
advisory speed).
Vehicle speed
Compass heading
Battery level meter
Vehicle speed
Time
Audio on/off indicator
Satellite reception
meter
Page 22
18
In addition:
The Proximity-to-hazard meter increases from 1 to 5 bars as you get
closer to the danger zone.
Speech warnings will tell you the type of zone followed by an audible
tone that increases with your proximity to the hazard.
When you have passed the danger, ROAD ANGEL Plus returns to Standby
Mode.
USE THE ADVISORY SPEED LIMIT FOR GUIDANCE ONLY. YOU
SHOULD ALWAYS KNOW THE SPEED LIMIT AND TAKE
ACCOUNT OF DRIVING CONDITIONS.
Audio and Speech Warnings
You can stop audio and speech warnings temporarily when you are in a
danger zone, or permanently from Standby mode:
To temporarily mute audio output when in a danger zone, press the
STORE button. When you have passed out of the danger zone, ROAD
ANGEL Plus restores audio output.
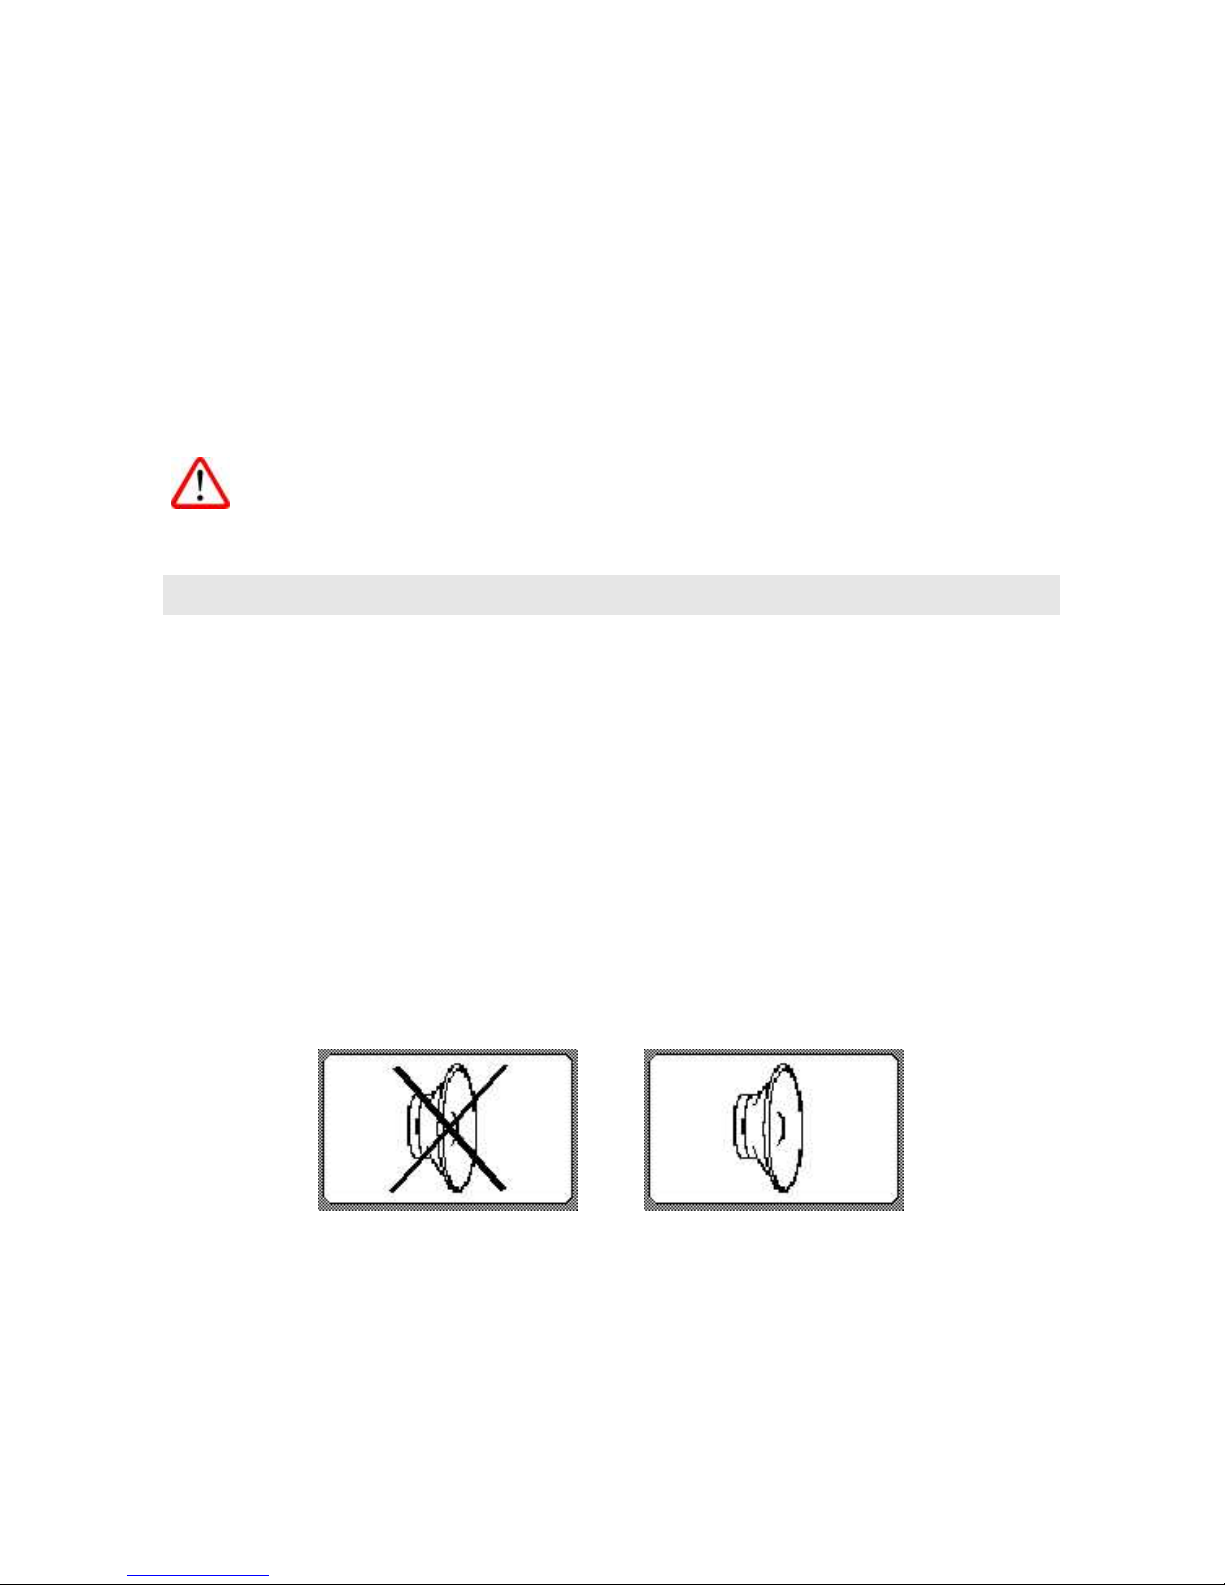
To stop all audio output when in Standby mode, press and hold down
the DELETE button for about two seconds. The screen will display a
symbol (see below) indicating that audio output is muted.
To restore audio output, press and hold the DELETE button again for
about two seconds. The screen shows the Restore audio symbol (see
below).
Mute audio Restore audio
To customise audio and speech alerts for each type of danger zone, adjust
the appropriate settings in the Alerts menu (see page 26).
Page 23
19
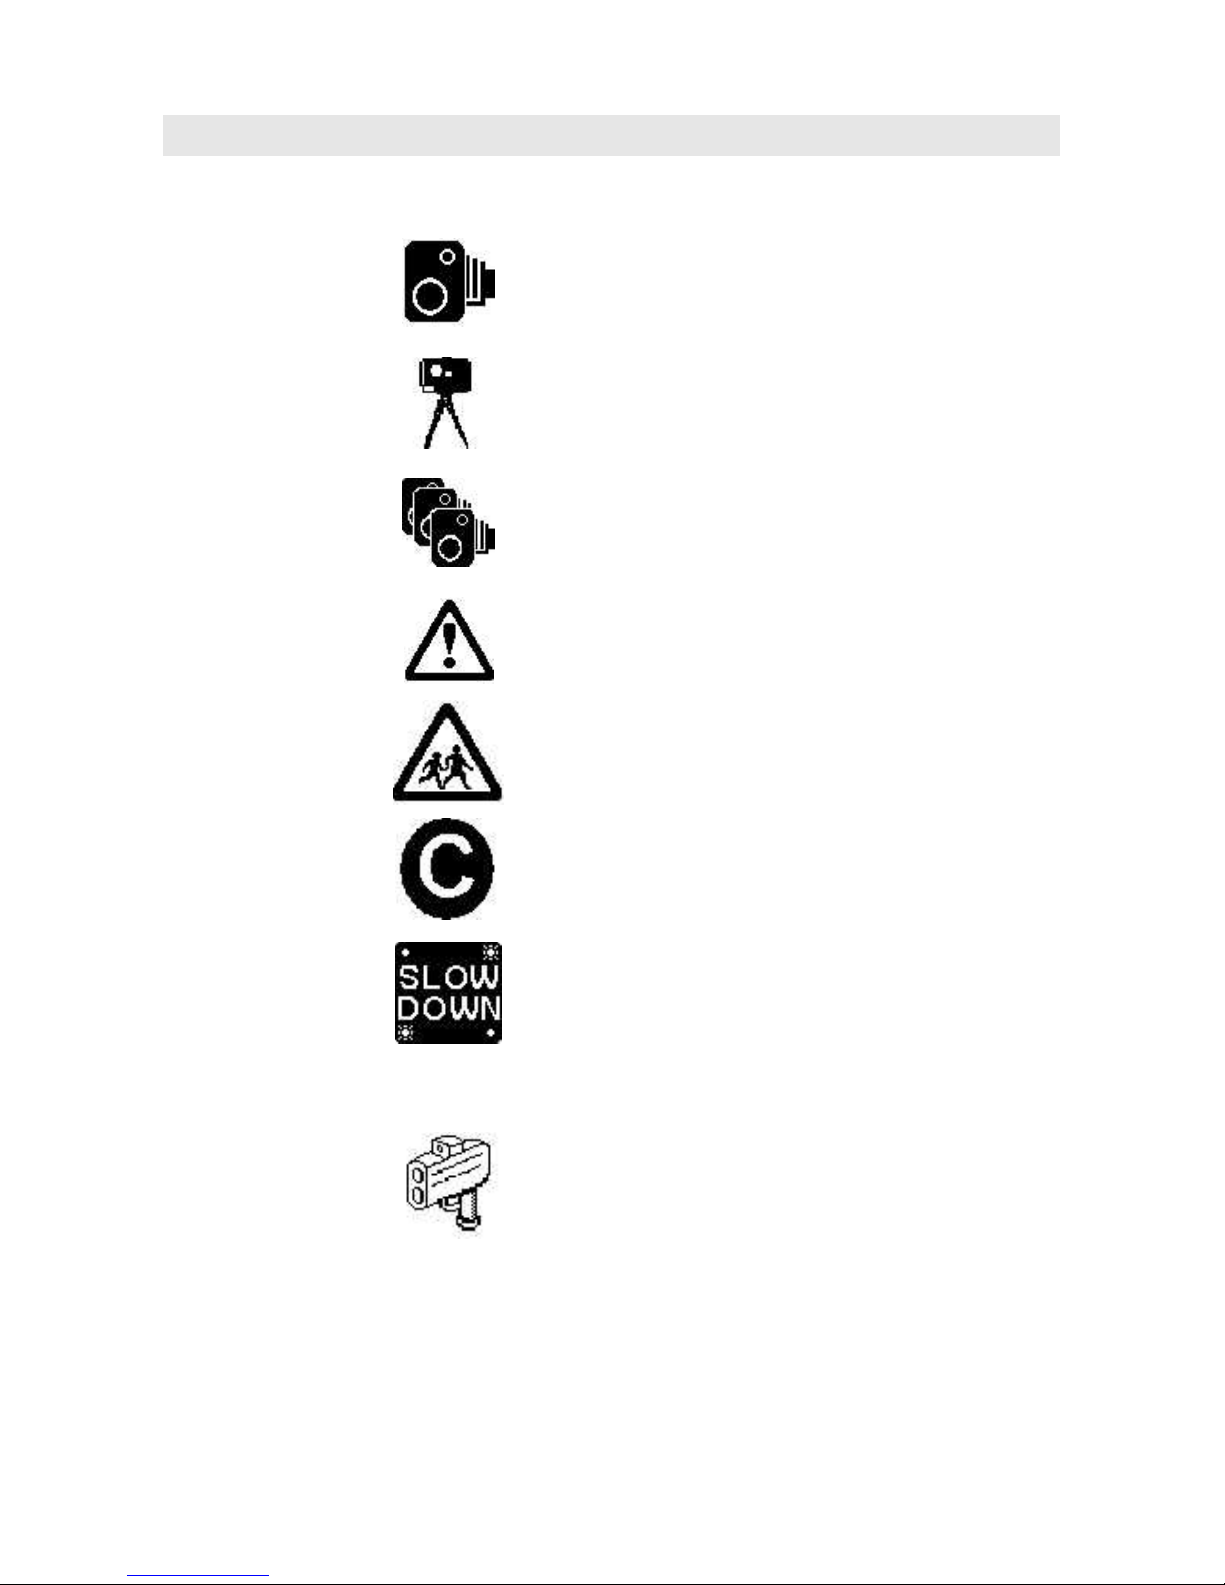
Alert Types
Alert Type Icon Location Type
Safety
Camera
You are approaching a fixed speed
camera ahead. ROAD ANGEL Plus only
alerts you if you are travelling in the
direction that the camera enforces.
Mobile
Camera
Temporary speed camera ahead, often
seen in road works, or at a Speedmaster
location.
Average
You are entering an average speed
detection zone. The icon remains on
screen whilst you are inside the
enforcement zone.
Blackspot
You are approaching an accident black
spot – an area identified by the police and
local authorities.
School Zone
Optional setting:
You are near a Primary school (see
Alerts on page 26).
Congestion
Optional setting:
You are approaching a congestion
charging zone (see Alerts on page 26).
Overspeed
Optional setting:
You are exceeding the speed limit you
have set in the Alerts menu
(see Alerts on page 26).
Int. Laser
(detected by
internal sensors)
Ext. Laser
(detected by
external sensor
connected to AUX
port)
Your vehicle is being targeted by a laser
speed measurement device. Laser
warnings require immediate action – your
speed may already have been measured.
ROAD ANGEL Plus may not detect a
mobile laser gun if your vehicle is targeted
at close range: 200m or less (see Laser
Detection on page 31 for more details).
Page 24

20
How accurate is the speed measurement?
ROAD ANGEL Plus calculates your vehicle speed from GPS data. The value is
updated every second and, at a constant speed, is highly accurate. If you are
accelerating or decelerating, the displayed value will lag behind the actual speed by a
small margin.
You may find a difference between the reading on your vehicle's speedometer and
ROAD ANGEL Plus. This is because all vehicles are manufactured with a tolerance
on the speedometer to allow for tread depth, tyre size and pressure changes.
Generally, your speedometer overestimates your speed.
How much warning does ROAD ANGEL Plus provide?
ROAD ANGEL Plus has three proximity options for fixed cameras: 250m, 500m or
1000m (see page 27). There is an additional setting called SDS or Speed Distance
Sensitivity. If you activate this setting, the proximity warning distance is doubled if
your speed is over 50mph.
My ROAD ANGEL Plus does not display my speed, it just
displays the satellites symbol.
See ‘My car has a UV/heated windscreen’ on page 15.
Why do I get a warning for a camera that is not there?
Has the unit been updated recently? The camera may have been removed from the
database.
ROAD ANGEL Plus may be warning you about a camera on a parallel road very
close to the road you are travelling on. If this is the case, the proximity bars may
switch off before they go all the way to maximum. This problem is more likely to
occur if your ROAD ANGEL Plus is set to a long alert distance setting in the Alerts
menu (see page 26).
I am not getting a warning on all fixed cameras
Has the unit been updated recently? Carry out an update to add all the new
locations. ROAD ANGEL Plus is directional: it ignores cameras that are enforcing the
speed limit in the opposite direction.
Page 25

21
7. Updating the Database
Your ROAD ANGEL Plus is capable of storing up to 50,000 unique danger
zones (see page 4). As soon as possible after your purchase, you should:
REGISTER the unit online at www.blackspot.com (see page 6).
Download the latest version of the update software.
Download the latest version of the database. You cannot update your
ROAD ANGEL Plus until your registration has been processed – this
can take up to 24 hours.
We recommend that you update your ROAD ANGEL Plus on a regular
basis, as safety camera locations are constantly changing. With new
locations being added and old cameras being removed, we recommend a
fortnightly update. If you are a high mileage motorist, using unfamiliar
roads, you may want to update your database weekly. You should also
update the database before you set off on a long trip.
To update ROAD ANGEL Plus, you will need to install the update software
on a Windows PC with Internet access. Installation instructions are
available online, explaining how to download and install the software, and
how to set up the USB communications between your PC and ROAD
ANGEL Plus.
System requirements
A PC with Internet access running Microsoft Windows 98SE, ME, 2000
or XP
Internet Explorer version 5.5 or above
We do not support Apple Macs
Page 26
22
Updating
1. Switch on your ROAD ANGEL Plus (if the internal battery is flat, you will
need to connect it to the PC first).
2. Connect your ROAD ANGEL Plus to the PC using the USB cable.
ROAD ANGEL Plus will recognise that it is connected to the PC and
display the message Connected to PC on an unlit background. If this
message is not displayed, you will need to install the USB drivers – visit
www.blackspot.com, click on Customer Support and select ROAD
ANGEL Plus for further information.
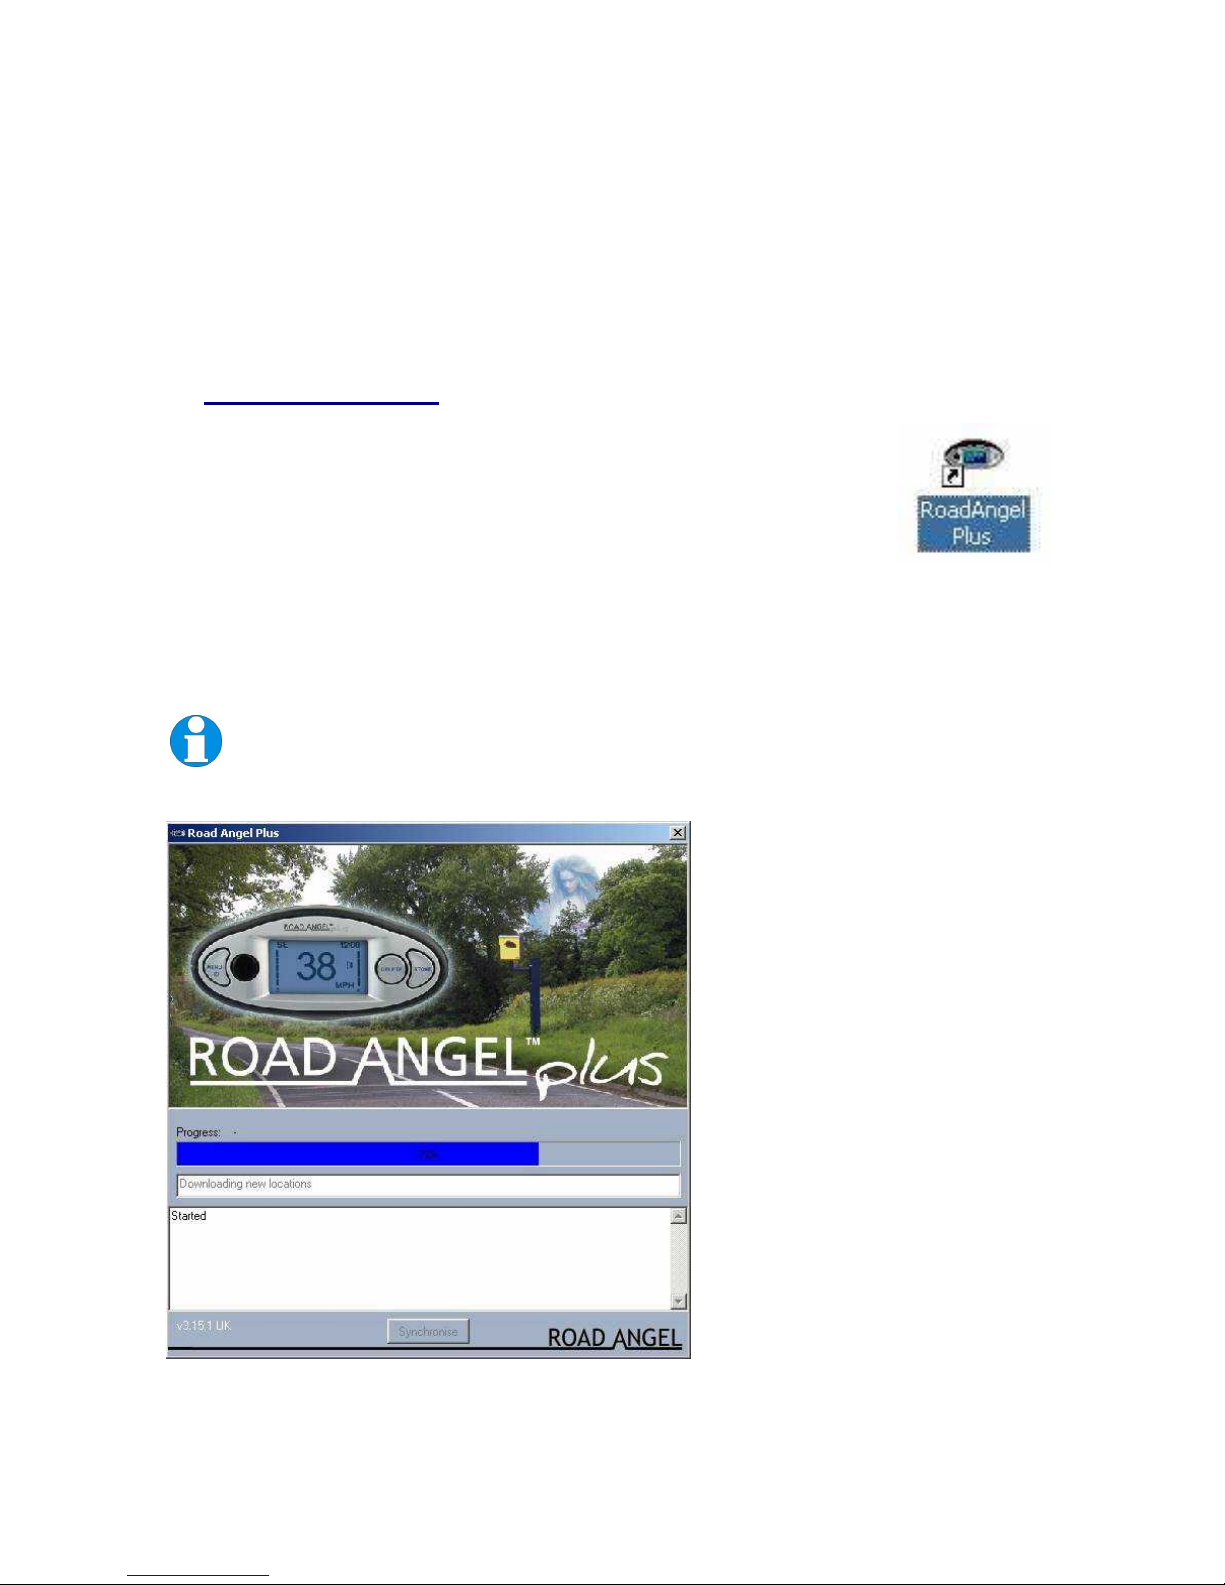
3. With your Internet connection active, start the ROAD
ANGEL Plus updating software by double-clicking on the
icon on your desktop.
4. Click on the Synchronise button.
5. Your ROAD ANGEL Plus is updated from the central database. Any
additions you have made to your database are downloaded for
confirmation and possible inclusion in future updates.
You may need to configure your firewall or Internet Security software
to allow the update software access to the Internet. Please refer to
your product support guide.
The ROAD ANGEL Plus updating software in action
Page 27
23
8. Customising ROAD ANGEL Plus
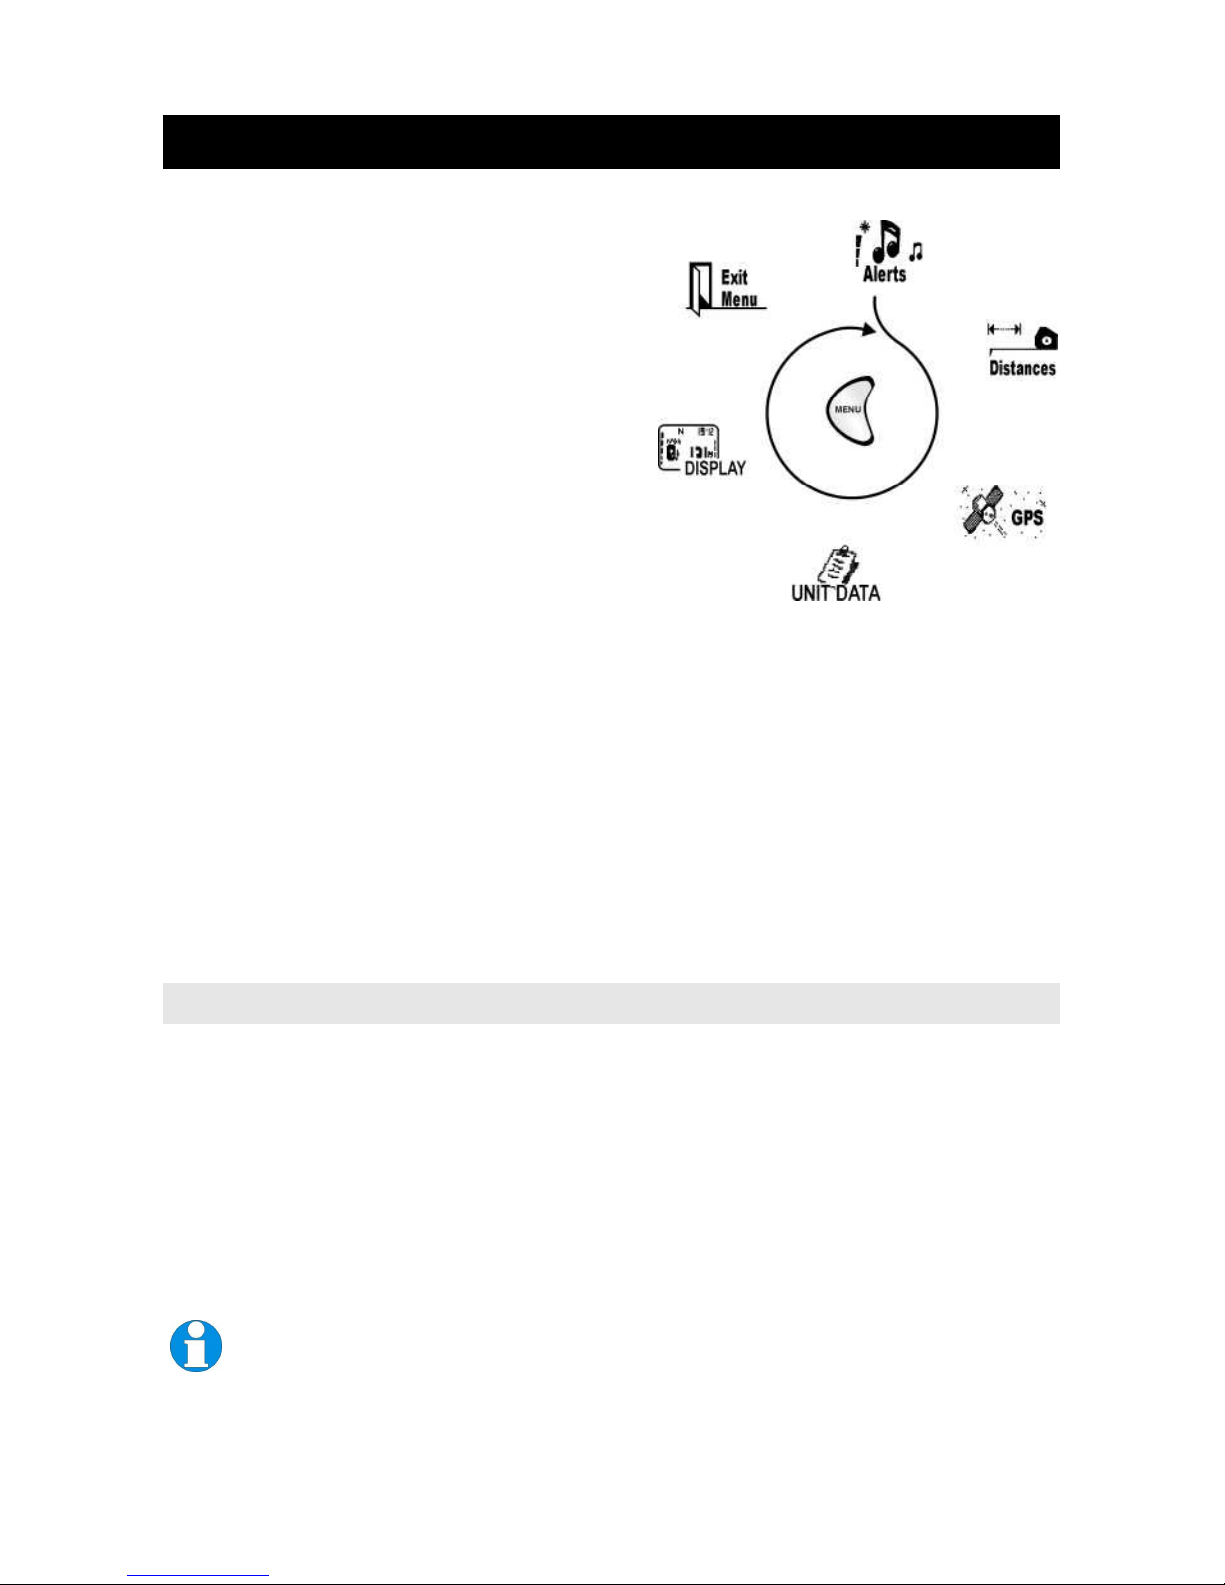
You can change the way ROAD ANGEL
Plus works by adjusting its menu
settings. Press the MENU button
repeatedly to view the menus and cycle
through them.
ROAD ANGEL Plus's properties are
arranged in the following menus:
Alerts How ROAD ANGEL
Plus alerts you
to road dangers with
audio and visual
prompts.
Distances Set the distance at which ROAD ANGEL Plus
commences its alerts.
GPS GPS information: RescueLoc (see page 27).
Unit Data Technical information about your ROAD ANGEL Plus:
its serial number and firmware version.
Display Screen contrast, speed units, time setting and intelligent
backlight.
After several seconds of inactivity on a menu screen, the display will return
to normal mode.
Changing Settings
Locate the property you want to change, and make a note of:
The menu it is in, for example: Alerts.
The position of the property within the menu. Each menu and property
has an associated number; ROAD ANGEL Plus displays the menu and
property numbers in the lower left corner of the screen. For example,
Alerts is menu 1 and Camera alert single beep is property 2 within the
menu. For this property, ROAD ANGEL Plus displays 1-2.
You can use this notation to find a setting quickly. For example,
Camera Alert single beep is setting 1-2. To view this quickly, press
MENU once, then DELETE, and then MENU twice more.
Page 28
24
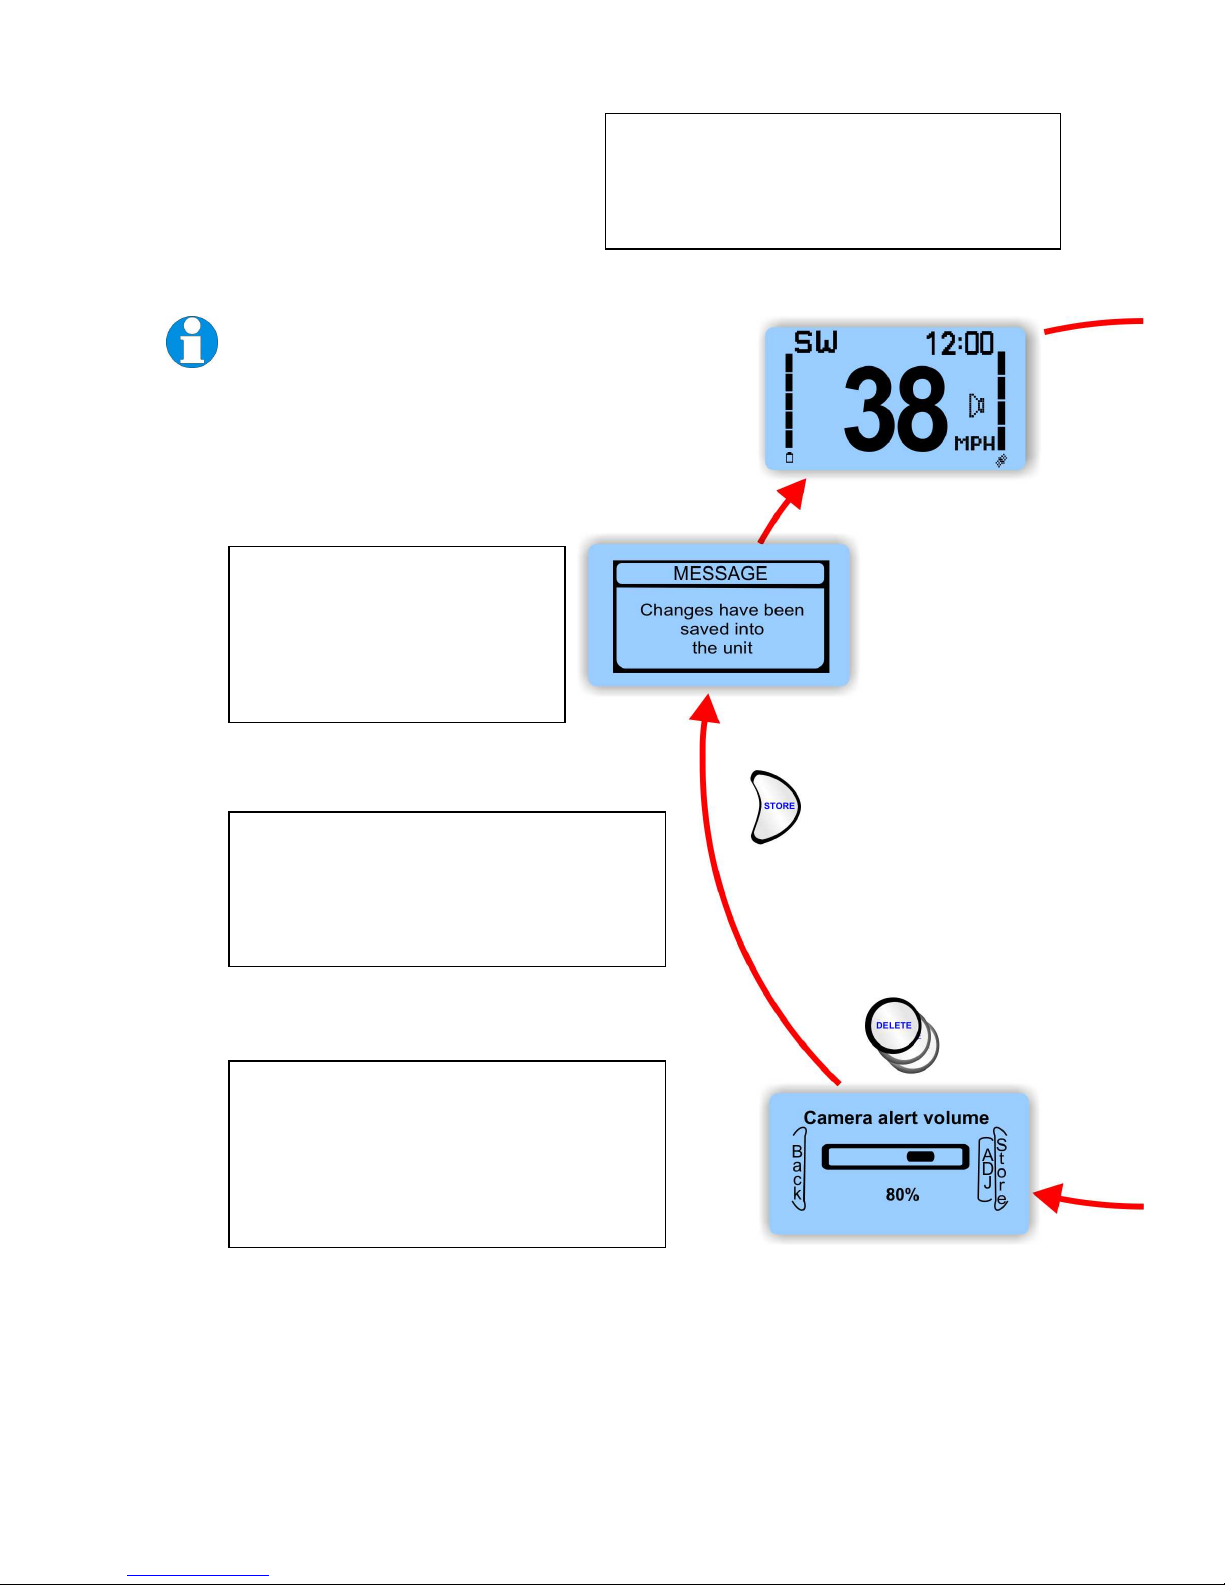
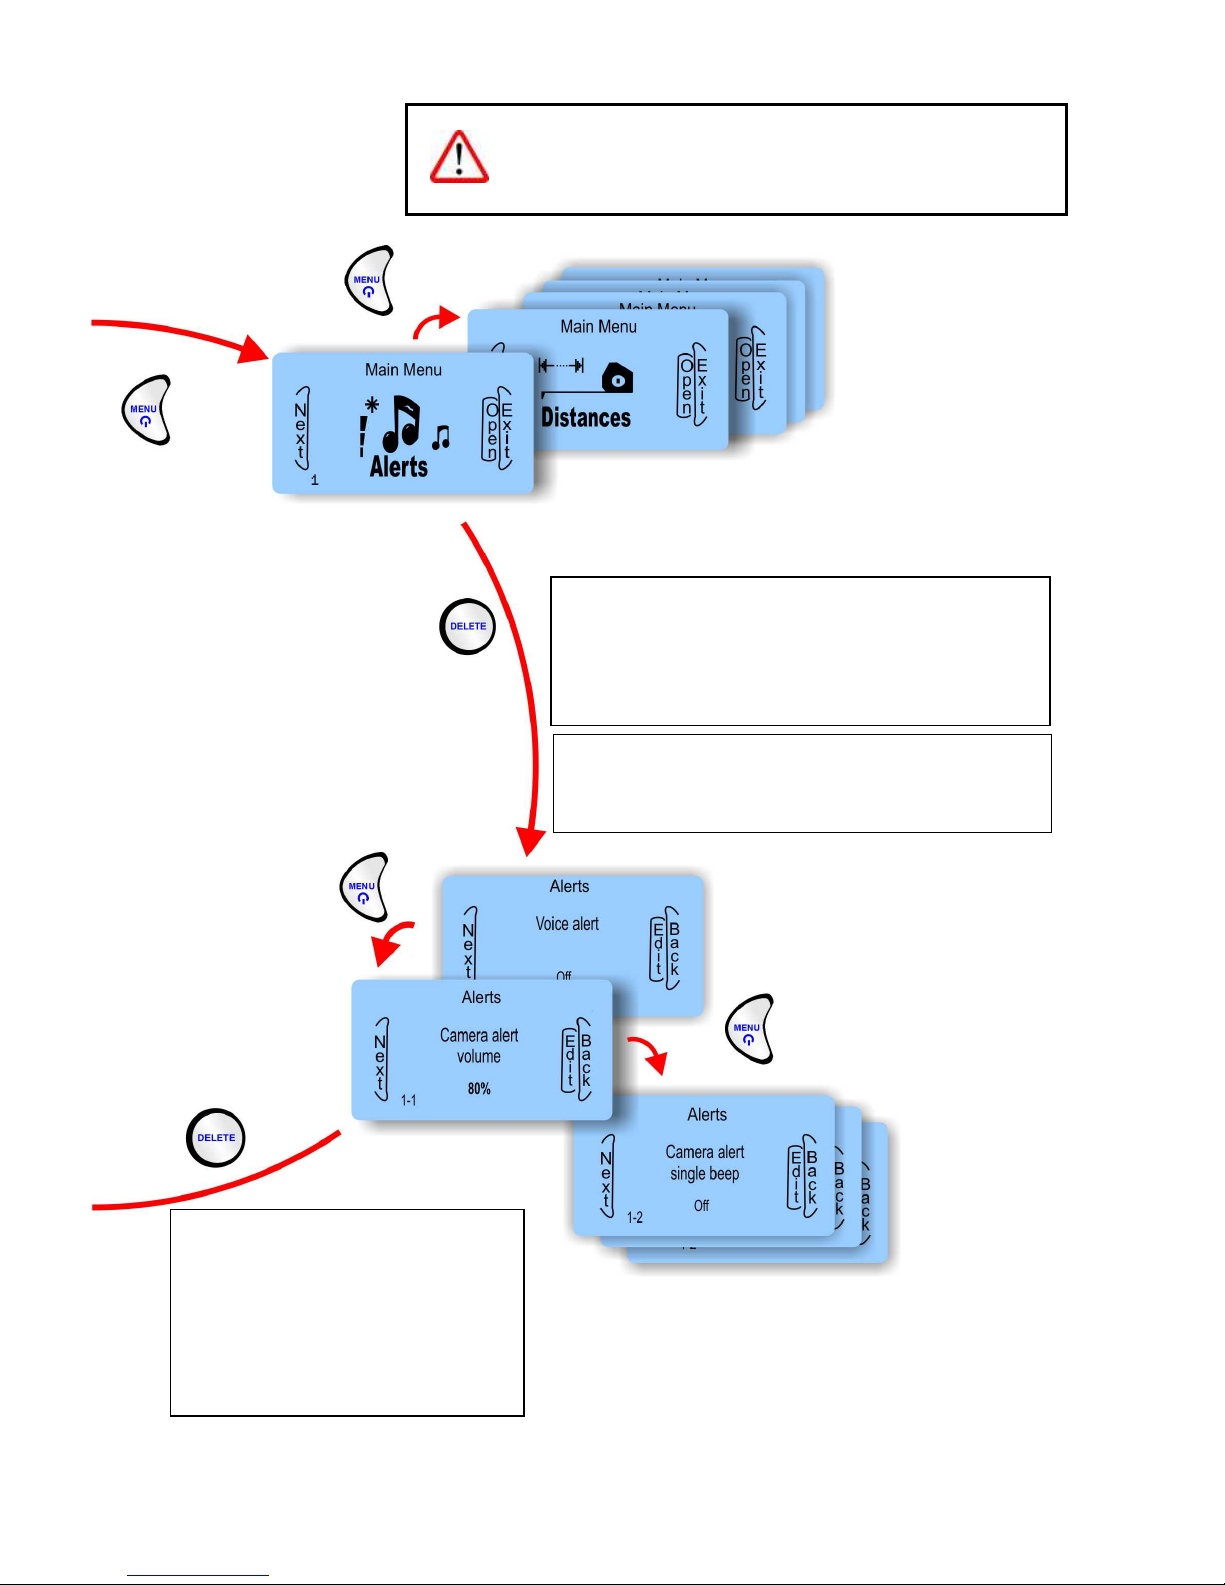
Illustration of the procedure for
changing ROAD ANGEL Plus’s
settings: how to edit the Camera
Alert Volume Setting.
1.
Press MENU to enter ROAD
ANGEL Plus's menu mode. The
Alerts menu icon is displayed.
7.
ROAD ANGEL Plus
confirms the change and
then returns to its
Standby display mode.
6.
When the screen displays the
setting you require, press the
STORE button. The property is
updated with the new value.
5.
Press the DELETE button to
adjust the value of the property. If
there are a number of options,
you may need to press the
DELETE button several times.
You use the MENU, DELETE and STORE
buttons to navigate through the menus and
change settings. The exact function of the
buttons at each stage of the procedure is
shown on-screen.
Page 29
25
PLEASE ONLY CHANGE MENU SETTINGS
WHEN IT IS SAFE TO DO SO.
If you want to
access another
menu, keep pressing
the MENU button to
cycle around the
other menus.
2.
To open a menu, press the
DELETE button. The first property in
the menu is displayed. In the Alerts
menu, this is Voice Alert.
3.
Press the MENU button to cycle
through the properties in the menu.
4.
When the property you
want to change is
displayed, press the
DELETE button. The
screen shows the options
available for the property.
Page 30
26
Menu Settings
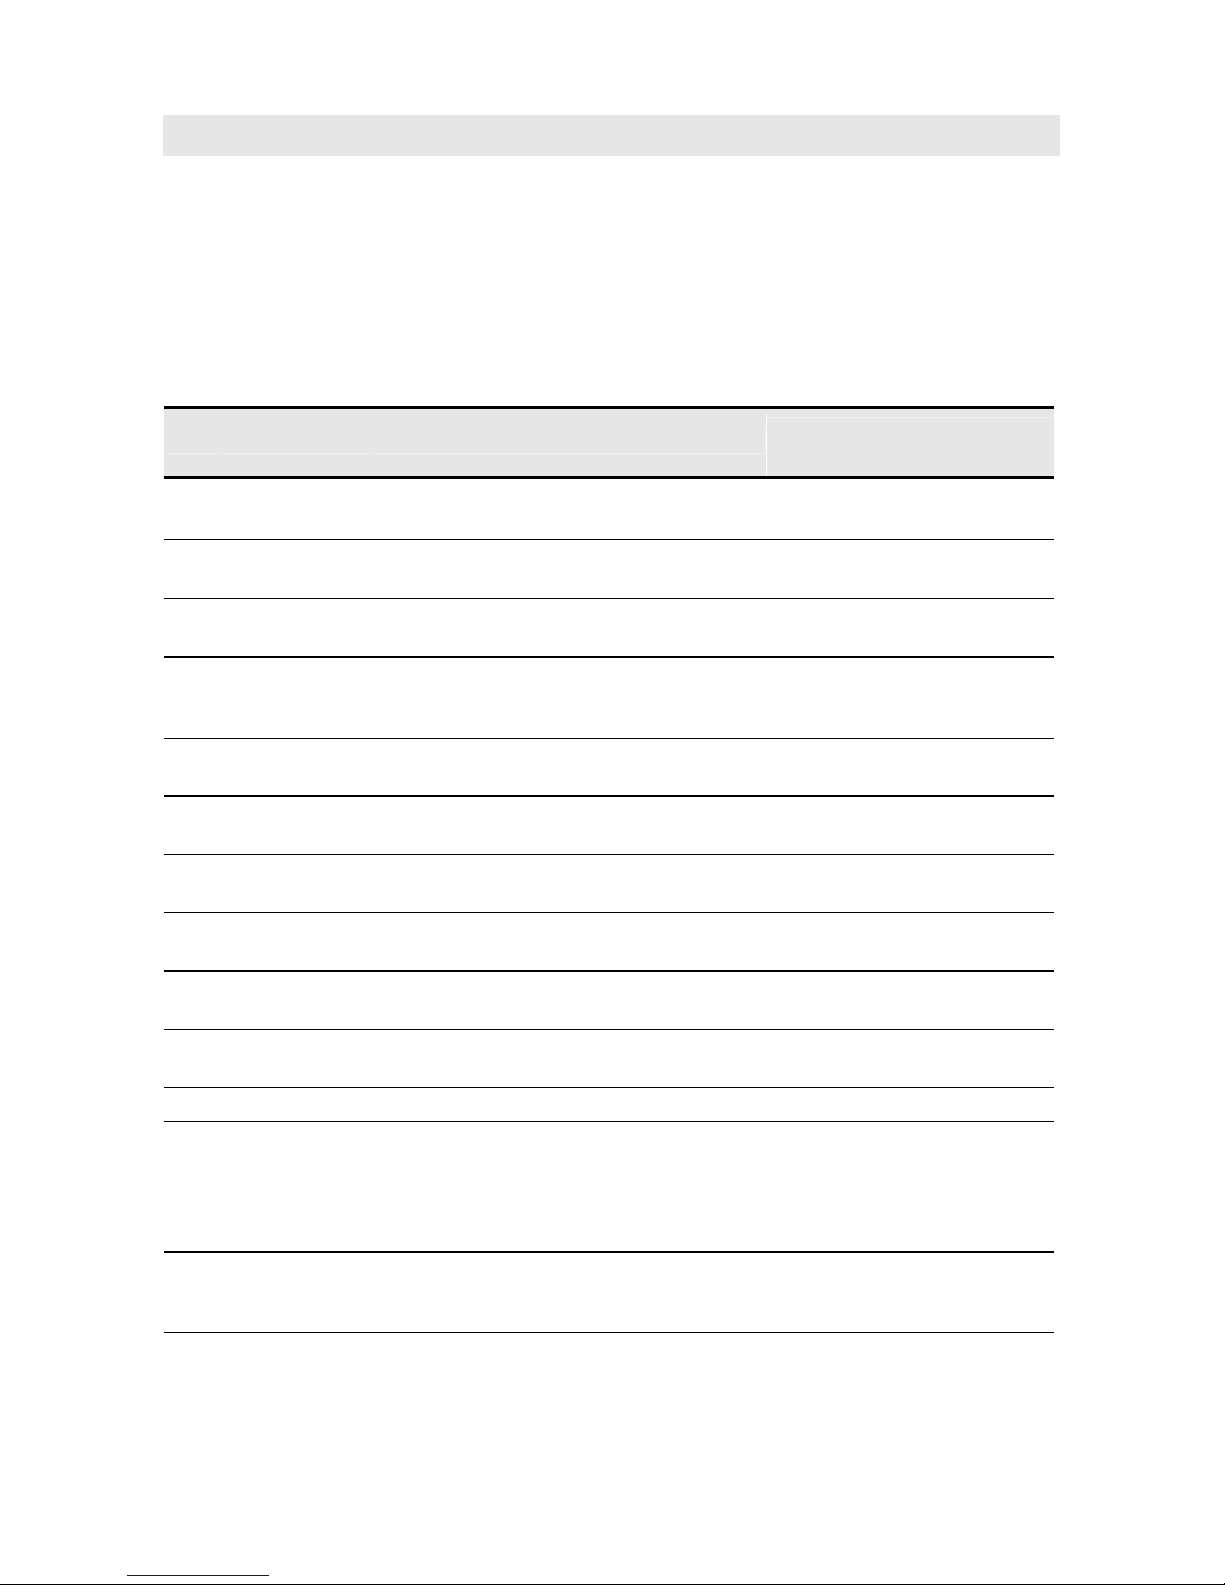
The following sections list all the editable properties in each of the menu
categories.
Alerts
Settings in the Alerts menu determine how ROAD ANGEL Plus warns you
about road hazards.
No Property Details
Options
(factory setting in bold)
1-0 Voice Alert Switch voice alerts on or off. Off...On
1-1
Camera Alert
volume
Change the sound level of safety
camera related warnings.
0..20...40...60...80...100%
1-2
Camera alert
single beep
Switch alert on or off, as each proximity
bar counts up it will emit a single beep.
Off...On
1-3
Safety Alert
Volume
Change the sound level for Blackspot,
School and Congestion related
warnings.
0..20...40...60...80...100%
1-4
Safety Alert
single beep
Switch alert on or off, as each proximity
bar counts up it will emit a single beep.
Off...On
1-5
Blackspot
alert
Switch Blackspot alerts on or off. Off...On
1-6
School zone
alert
Switch School alerts on or off. Off...On
1-7
Congestion
zone alert
Switch Congestion zone entry warnings
on or off.
Off...On
1-8
Overspeed
alert
Set a speed at which the unit will warn if
you exceed the speed.
Off...25 – 165
1-9
Laser Alert
Volume
Change the sound level of laser alert
warnings
0..20...40...60...80...100%
1-10 Laser Alert Switch internal laser detection on or off Off...On
1-11
Slow speed
automute
When travelling less than 15MPH the
unit will not give an audible warning. If
you enter a zone below 15MPH you will
hear a single beep, followed by the
proximity count up.
Off...On
1-12
Speed
sensitive
volume
Adjust the warning volumes depending
on how fast the vehicle is travelling.
Off...On
Page 31

27
No Property Details
Options
(factory setting in bold)
1-13 Startup Tune
Choose whether unit starts up silently,
with the ‘ROAD ANGEL’
announcement, or with a double-tone
beep.
Off...Voice...Tone
Distances
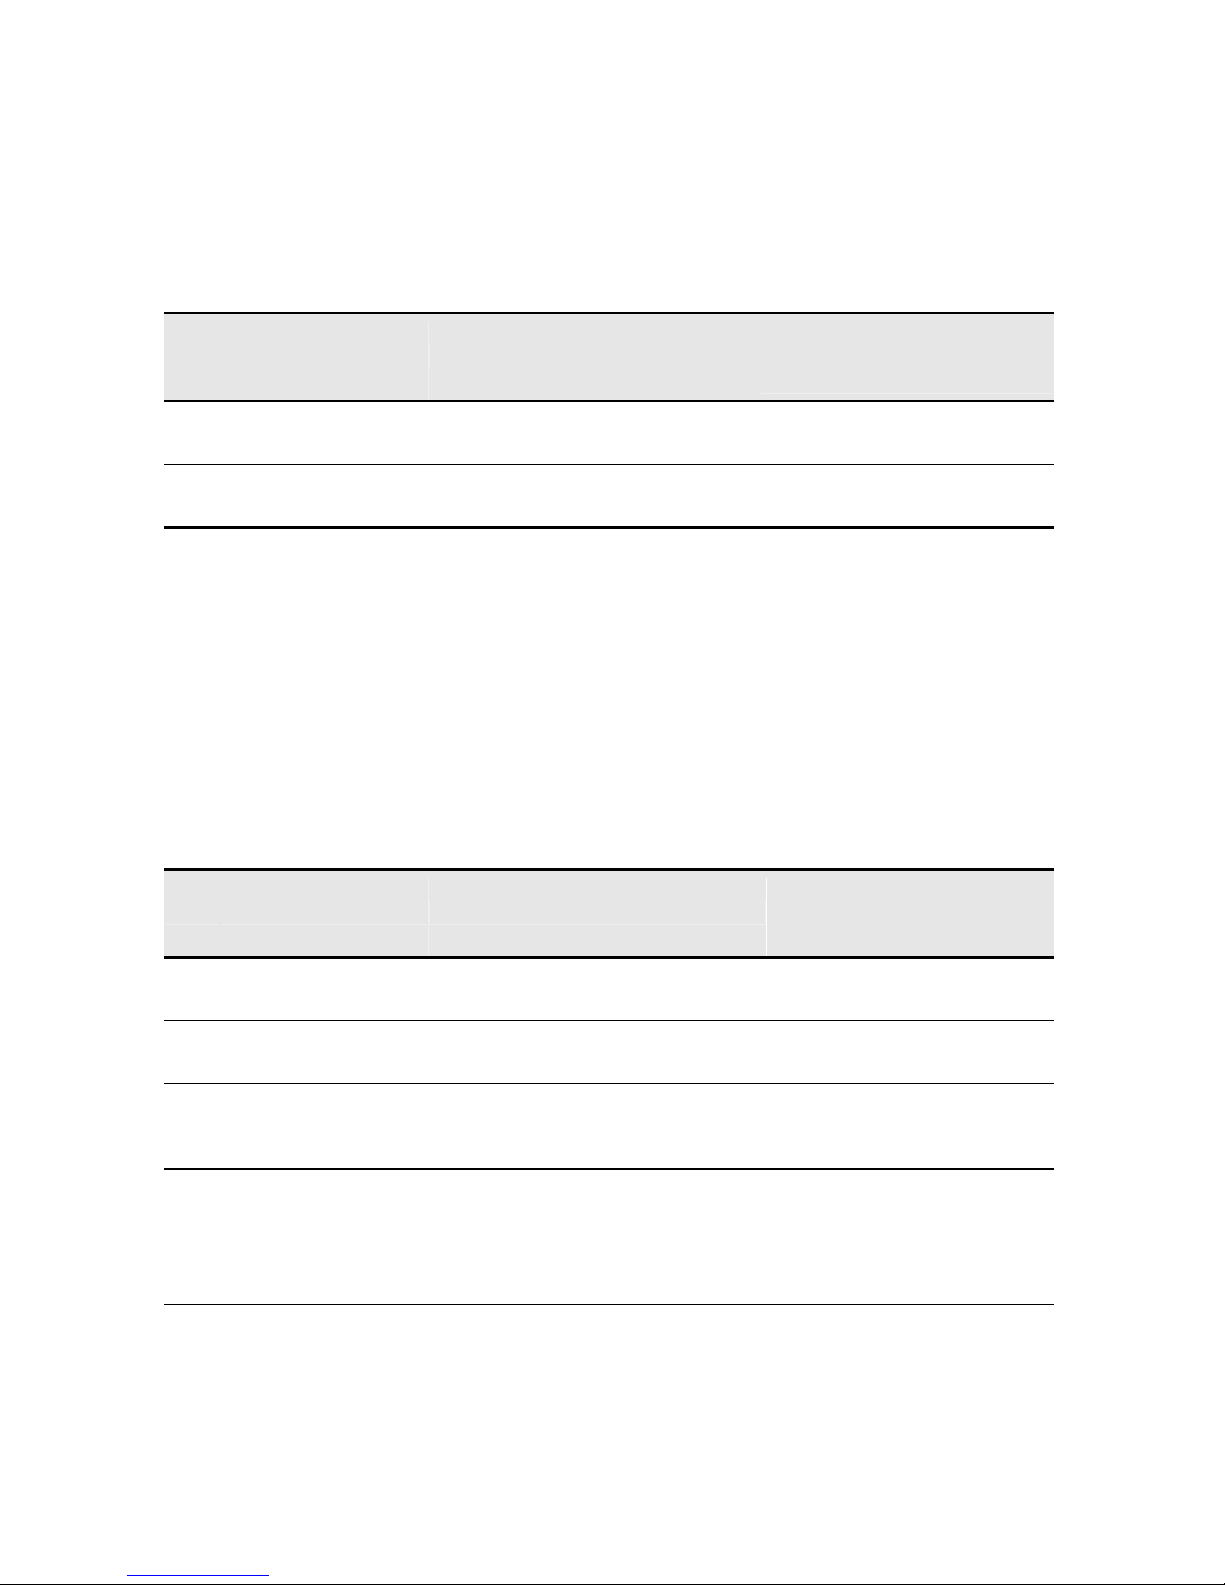
With its factory setting, ROAD ANGEL Plus alerts you to a hazard when
you are within 250m of it; you can change this to 500m or 1000m. In
addition, ROAD ANGEL Plus has a feature to increase the warning
distance when you are travelling over 50mph.
No Property Details
Options
(factory setting
shown in bold)
2-0 Alert distance
Adjusts the warning range as you
approach danger zones.
250...500...1000m
2-1
Speed distance
sensitivity
Doubles the advanced warning at
50MPH and above.
Off...On
GPS
The GPS menu allows you to view your precise GPS position so that you
can identify your location to rescue services (RescueLoc).
No Property Details
Options
(factory setting
shown in bold)
3-0
GPS
RescueLoc
Read off exact GPS position
(requires satellite acquisition) – can
be quoted to rescue services.
Read only
Latitude and Longitude, in
degrees, minutes and
seconds.
Page 32
28
Unit Data
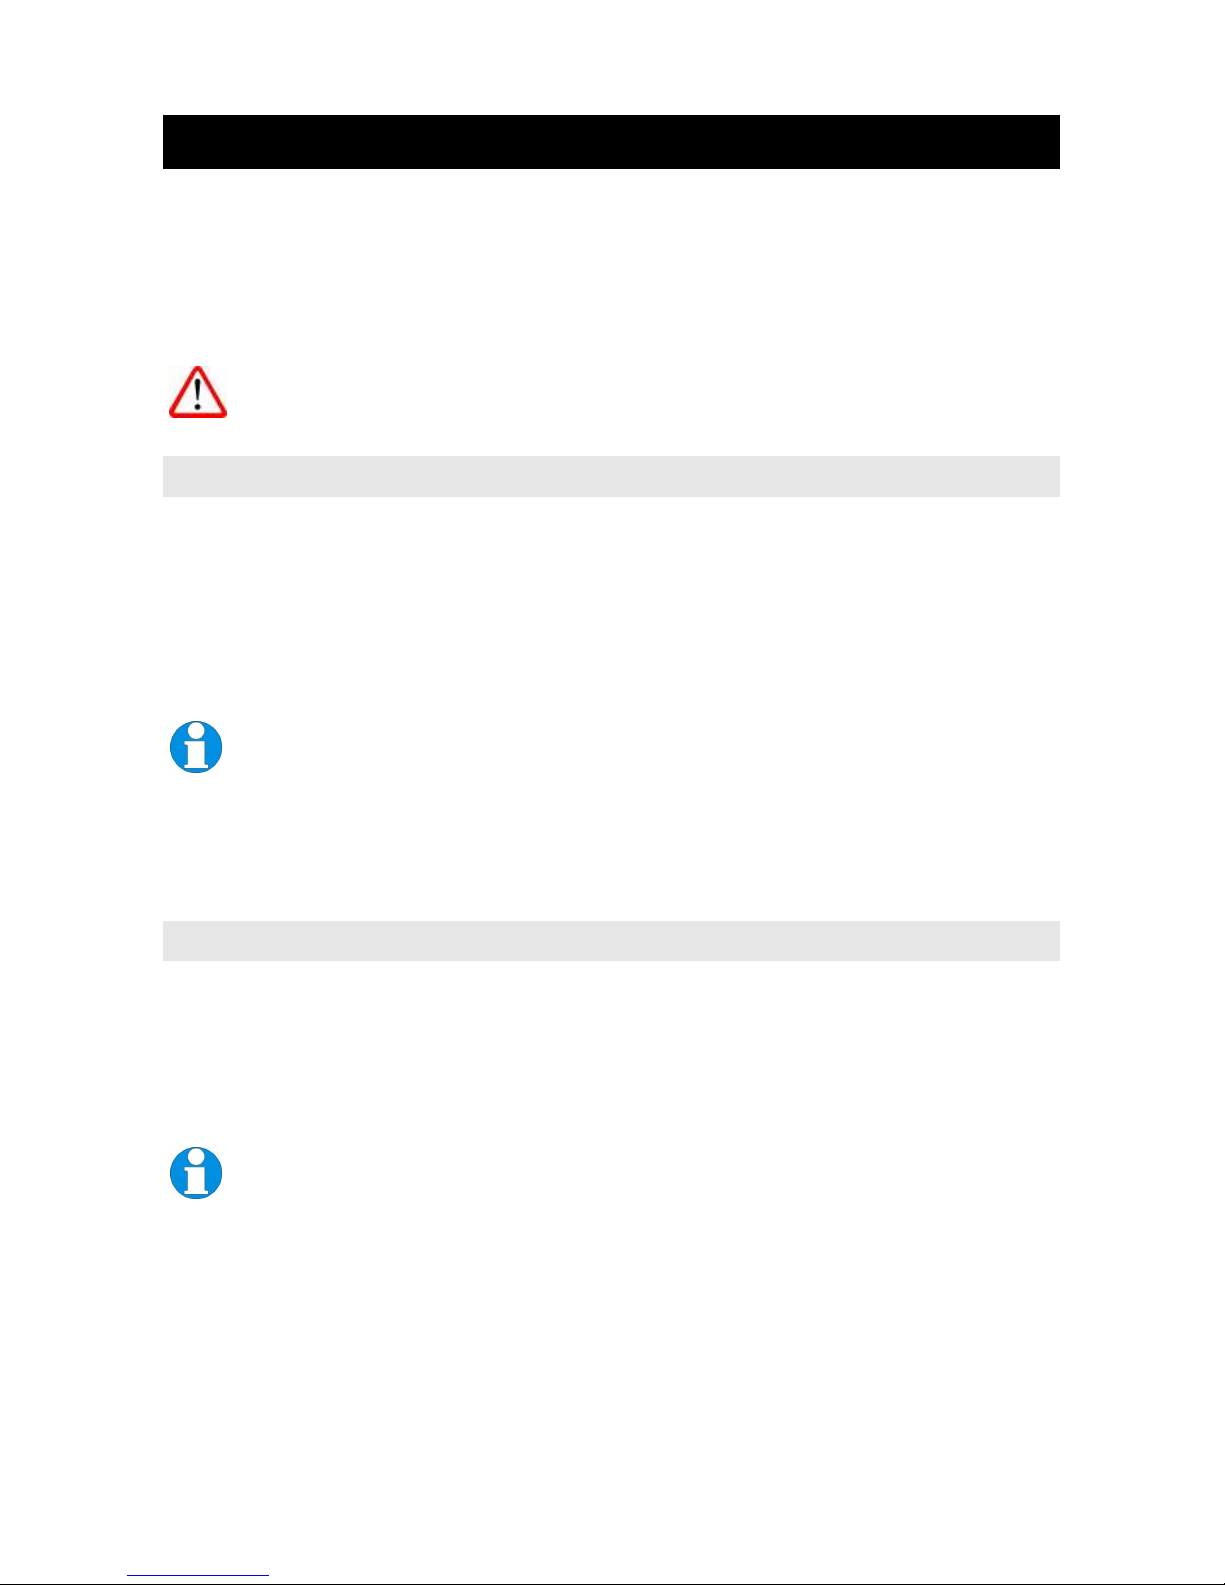
This menu provides technical information about your ROAD ANGEL Plus:
its serial number and firmware version.
No Property Details
Options
(factory setting
shown in bold)
4-0 Unit serial number
Serial number of ROAD ANGEL
Plus unit
Read only; 8 digit number
4-1 Firmware version
ROAD ANGEL Plus firmware
version
Read only, in format x.xx
Display
Using this menu, you can change the appearance of the display: its
contrast and the speed units in use. You can also adjust the clock to take
account of daylight saving time and enable or disable the intelligent
backlight option (see page 17).
Note: You cannot adjust the brightness of the display – use the visor to
shade the display from bright sunlight (see page 13).
No Property Details
Options
(factory setting
shown in bold)
5-0 Contrast
Adjust the contrast of the ROAD
ANGEL Plus display.
0 – 19 (10)
5-1 Speed units
Change displayed speed between
mph and km/hr
MPH....KMH
5-2 Clock adjust
Change time – ROAD ANGEL Plus
uses GPS data; may require offset
to account for daylight saving time.
± 20 hours in ½ hour
intervals. (+1.00)
5-3
Intelligent
backlight
Maintains blue backlight (instead of
red warning colour) when
approaching camera location if
vehicle speed is below advisory
speed limit
On ... Off
Page 33
29
9. Adding and Deleting Danger Zones
Blackspot Interactive Ltd is constantly updating the central database of
danger zones. You can be of great value to all ROAD ANGEL Plus users
by adding any new zones you encounter to your unit's own database.
When you subsequently update your ROAD ANGEL Plus, this data can be
verified by Blackspot Interactive Ltd before being added to the central file.
PLEASE ONLY ADD OR DELETE DANGER ZONES WHEN IT IS
SAFE TO DO SO.
Deleting Zones
You can delete any of the locations stored in the ROAD ANGEL Plus
database. When your ROAD ANGEL Plus alerts you to the required danger
zone:
Press DELETE.
Confirm the deletion by pressing DELETE again.
When a location has been deleted it can only be restored by reentering the location (see Adding new locations, below) or by
requesting a factory reset for your next update: email
[email protected] with your serial number and contact details.
Note: By using a factory reset all your personally stored
locations will be lost.
Adding New Locations
You may add new locations to the FIXED, MOBILE, AVERAGE,
BLACKSPOT and SCHOOL areas of your ROAD ANGEL Plus database.
When you update your ROAD ANGEL Plus, these new locations will also
be downloaded to the central database, and can then be verified by
Blackspot technicians for inclusion in future updates.
ROAD ANGEL Plus needs to be travelling in excess of 4 MPH to
calculate the heading for the location.
When your vehicle is precisely alongside the new location:
1. Press STORE once. This will confirm your location.
2. Press DELETE and choose the type of zone you want to store.
3. Press STORE to confirm your choice.
Page 34

30
Adding an Average Speed Monitoring Section
(SPECS Zone)
Store an average speed monitoring area only if you are absolutely sure of
the start and finish points. When passing underneath the first ‘start’ SPECS
camera carry out the following:
1. Press STORE once to store the first camera position.
2. Press DELETE to select the location type: AVERAGE.
3. Press STORE to confirm.
4. When you are underneath the finish camera, press any key to confirm
the finish position.
The section of average speed monitoring is now stored.
If you press STORE by mistake, you have the option to cancel by
pressing the MENU button.
Page 35

31
10. Background Information
About Global Positioning Satellites (GPS)
Operational since 1990, 24 GPS satellites orbit the earth at a height of
11,000 miles. At any given point on the globe, at least 4 satellites are in
view at any one time. Using sophisticated aerials and triangulation
techniques, units such as ROAD ANGEL Plus are able to compute your
exact position with great accuracy.
Laser Detection
How mobile laser traps operate
Police Laser Guns work by firing a pulsed beam of light at a vehicle and
measuring the time taken for it to return - this can take as little as a third of
a second. The beam is conical: at greater distances from the gun, it is
wider and more diffuse. However, at short distances (<200m), the
enforcement officer can be very precise in targeting a vehicle. Although any
part of a vehicle can be targeted, in most cases, the enforcement officer will
aim at the number plate because it is vertical to the road.
How the enforcement officer chooses which vehicles to
target
Even though the police have equipment for measuring and recording the
speeds of motorists, it is down to the officer using the equipment to choose
which vehicle to target.
The police are not checking every vehicle; guidelines state that an officer
can only measure the speed of a vehicle that they believe to be exceeding
the posted limit. This is why you may see a gun or van nearby, but will not
get a warning alarm from ROAD ANGEL Plus as you drive by.
Page 36
32
Targeting Explained
Short range targeting
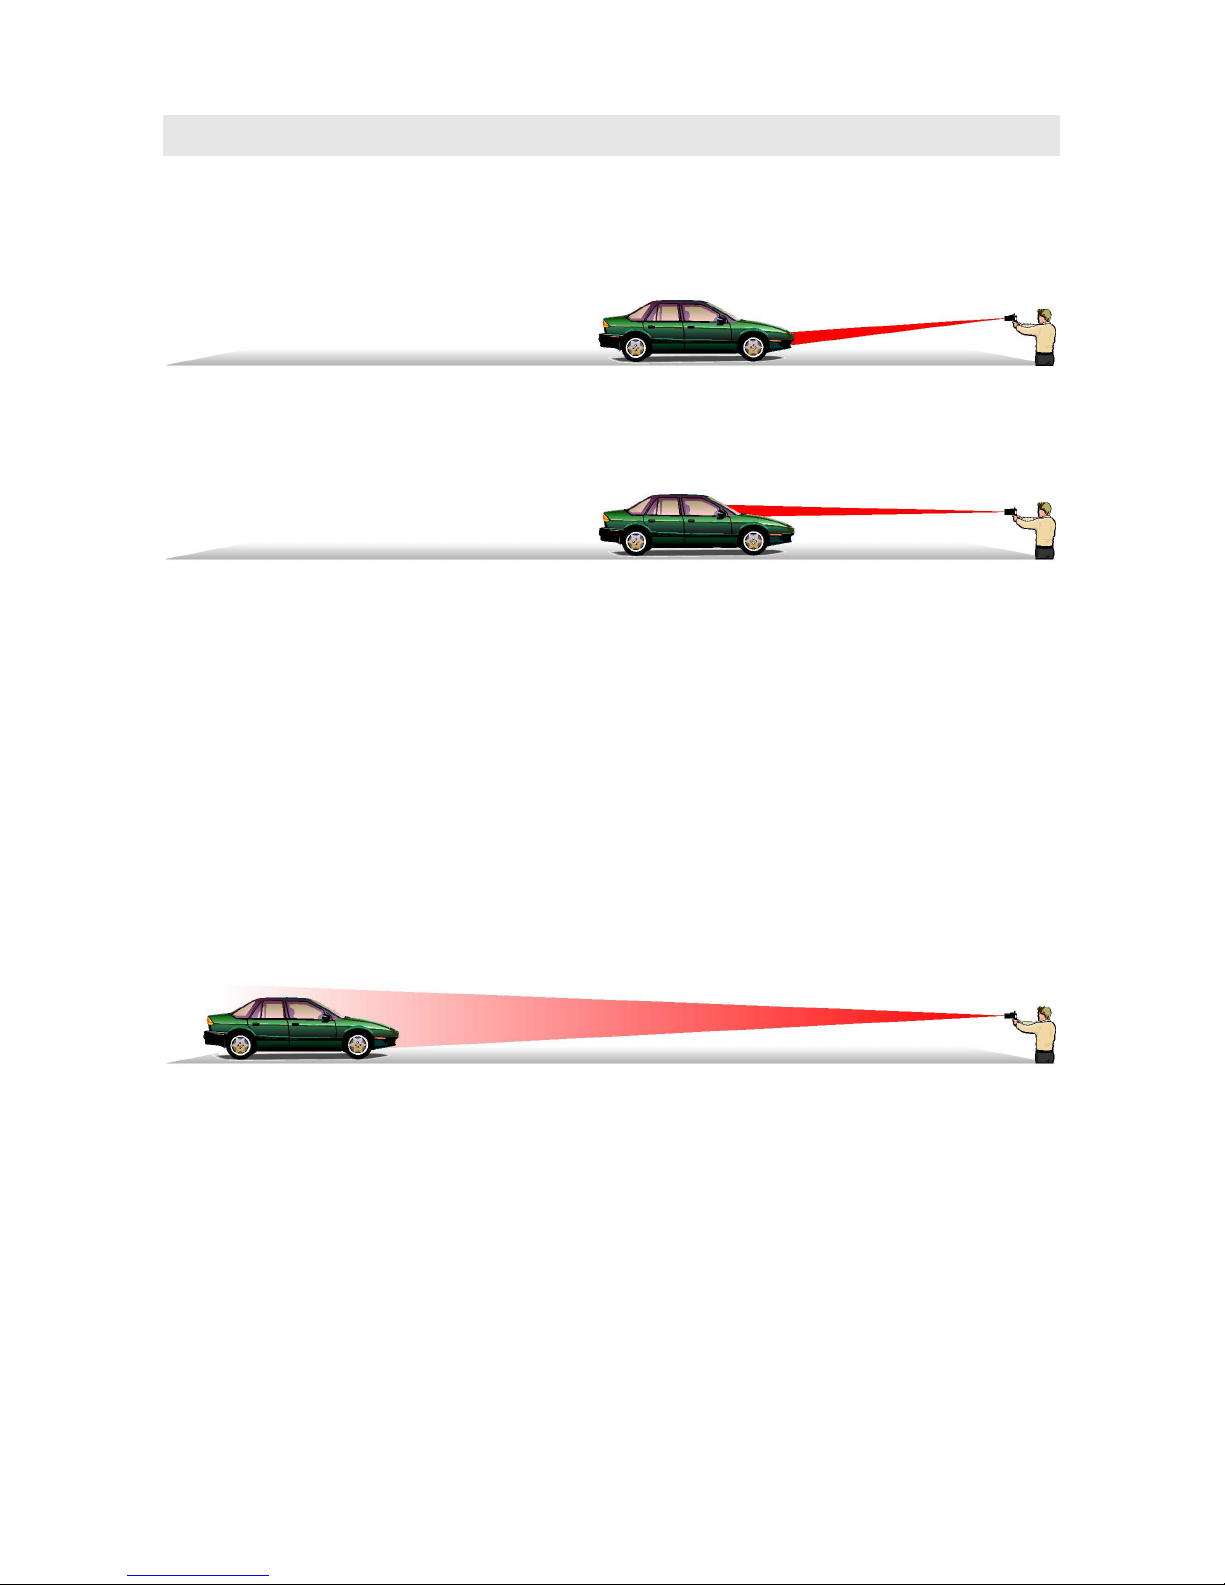
At 200m the beam of the laser can be as little as 200mm across. If the
Laser Gun is targeting your number plate, it is likely that your dashboard
mounted ROAD ANGEL Plus will not detect the signal.
Long range targeting
At long range, it is not possible for the enforcement officer to choose which
part of the vehicle to target. On some Laser Guns, the sight is bigger than
the vehicle. Wherever you have fitted ROAD ANGEL Plus, it is possible
that a laser gun targeted in your direction (not necessarily at your car) may
trigger it.
Short range (<200m) – Normal Police target area
ROAD ANGEL Plus only detects laser below
200m if it is targeted towards the unit
Long range (200m -1000m)
Page 37
33
Following a vehicle being targeted
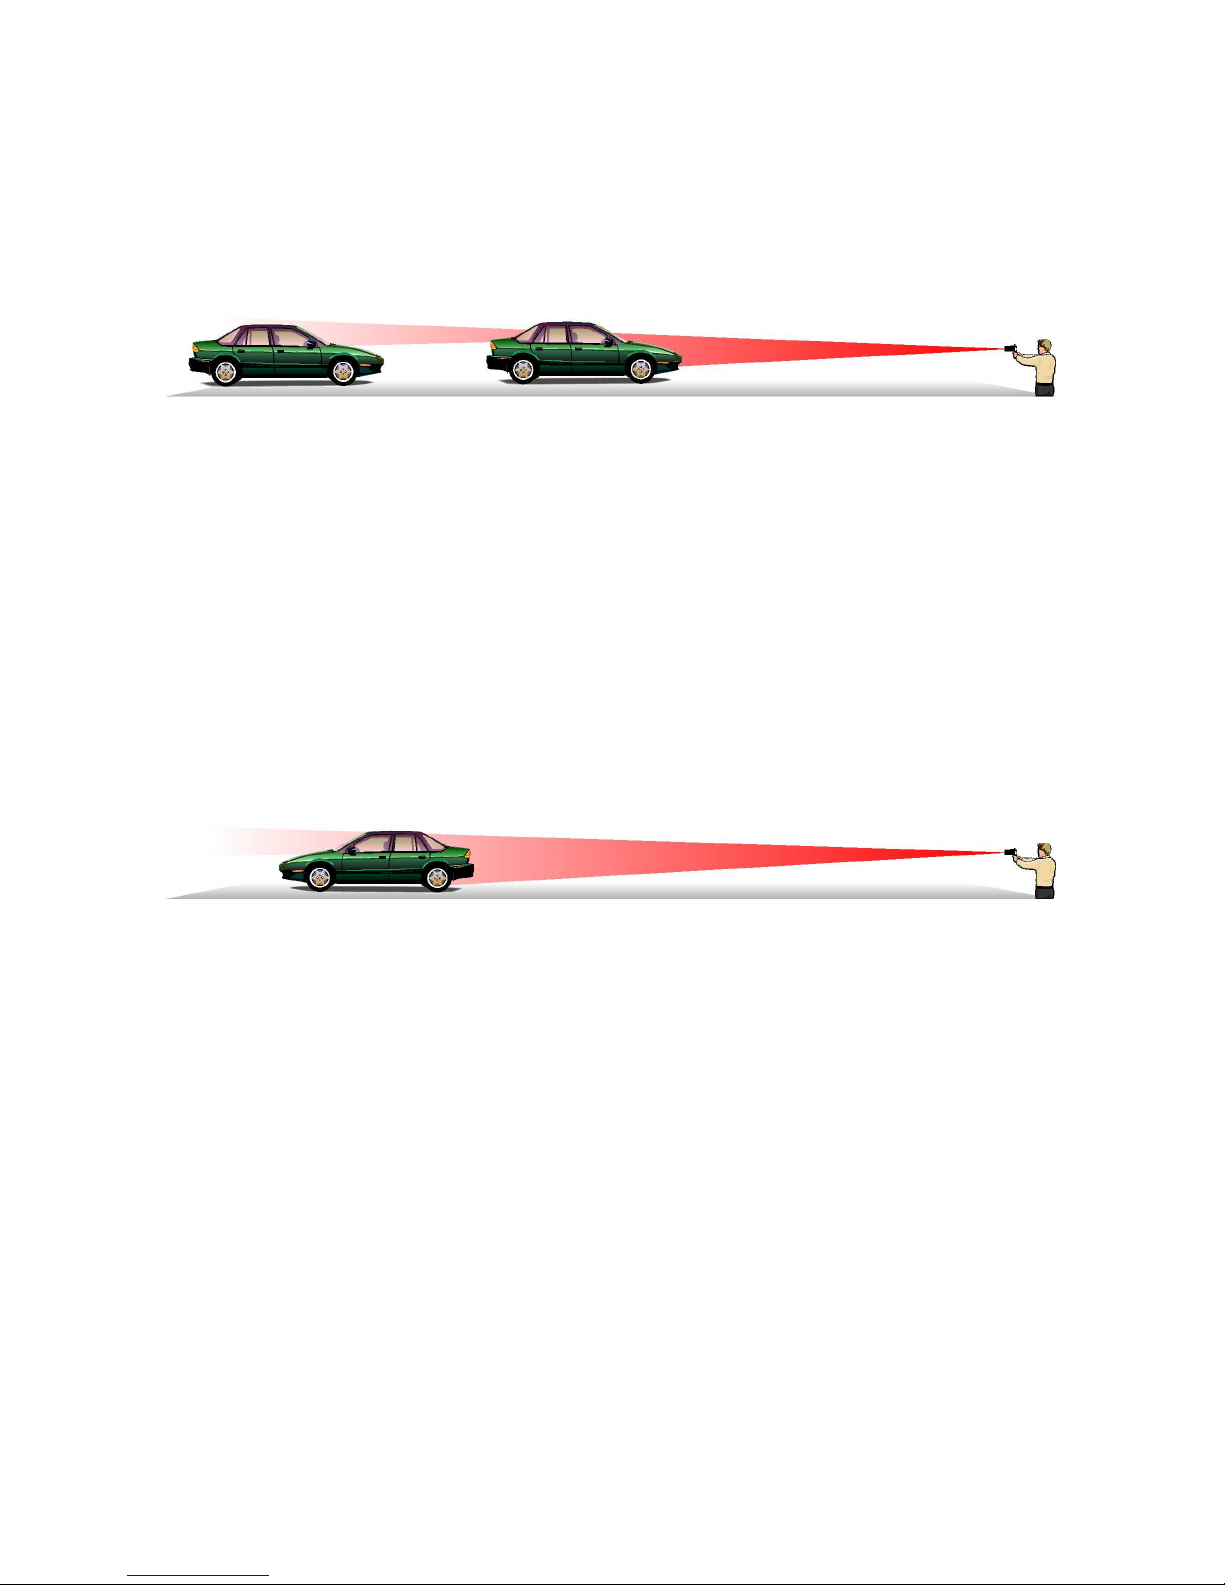
At short range it is difficult to detect, but if the vehicle in front is targeted
from long to medium range it is possible to detect as long as the sensor is
fitted to the front windscreen.
Rear detection of laser
When the vehicle is targeted from the rear, the laser signal will pass
thorough the rear windscreen and trigger a LASER ALERT as long as no
obstructions are in the way. ROAD ANGEL Plus must be visible from the
rear and not obstructed by headrests, high cargo, passengers or following
vehicles.
Following a vehicle being targeted (200m –
1000m) – effectiveness dramatically reduced
Rear Detection
Page 38
34
Speed Cameras and Black Spots
This section describes the type of cameras and road hazards covered by
ROAD ANGEL Plus:
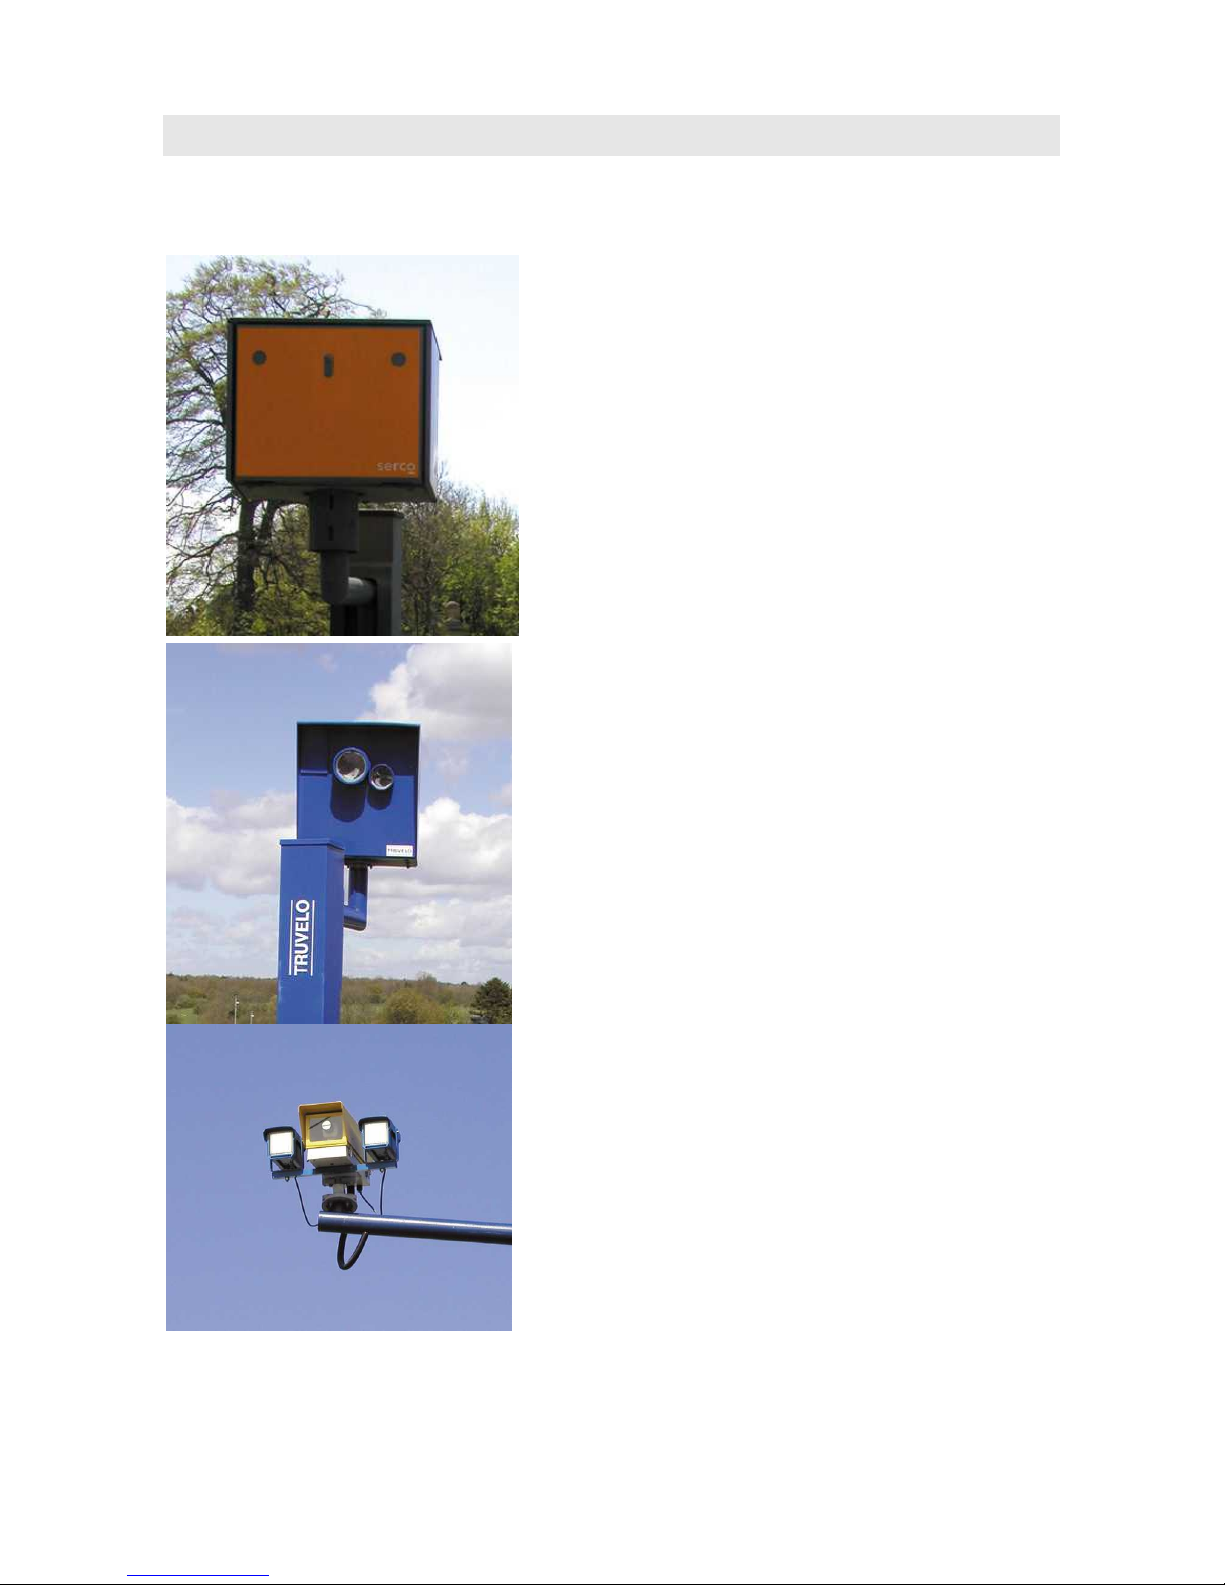
Gatso
The most common type of speed camera –
used in fixed positions mounted on
poles at
the roadside. Measures vehicle speed
using radar and, if the speed limit has been
exceeded, photographs the rear of the
vehicle. Uses a flash unit inside the camera
cabinet or mounted on a gantry to
illuminate the offending vehicle's rear
number plate. ROAD ANGEL Plus
relies on
up-to-date database information for
detection.
TruVelo
Measures vehicle speed using sensor
strips in the road and photographs the front
of a speeding vehicle, along with the driver.
Uses an infra-red flash. ROAD ANGEL
Plus relies on up-to-date database
information for detection.
SPECS
Takes a digital photograph of your vehicle
at the ‘start’ point and then another a set
distance further down the road. If your
average speed is greater than the speed
limit between these two cameras you are
automatically prosecuted. ROAD ANGEL
Plus relies on up-to-date database
information for detection.
Page 39
35
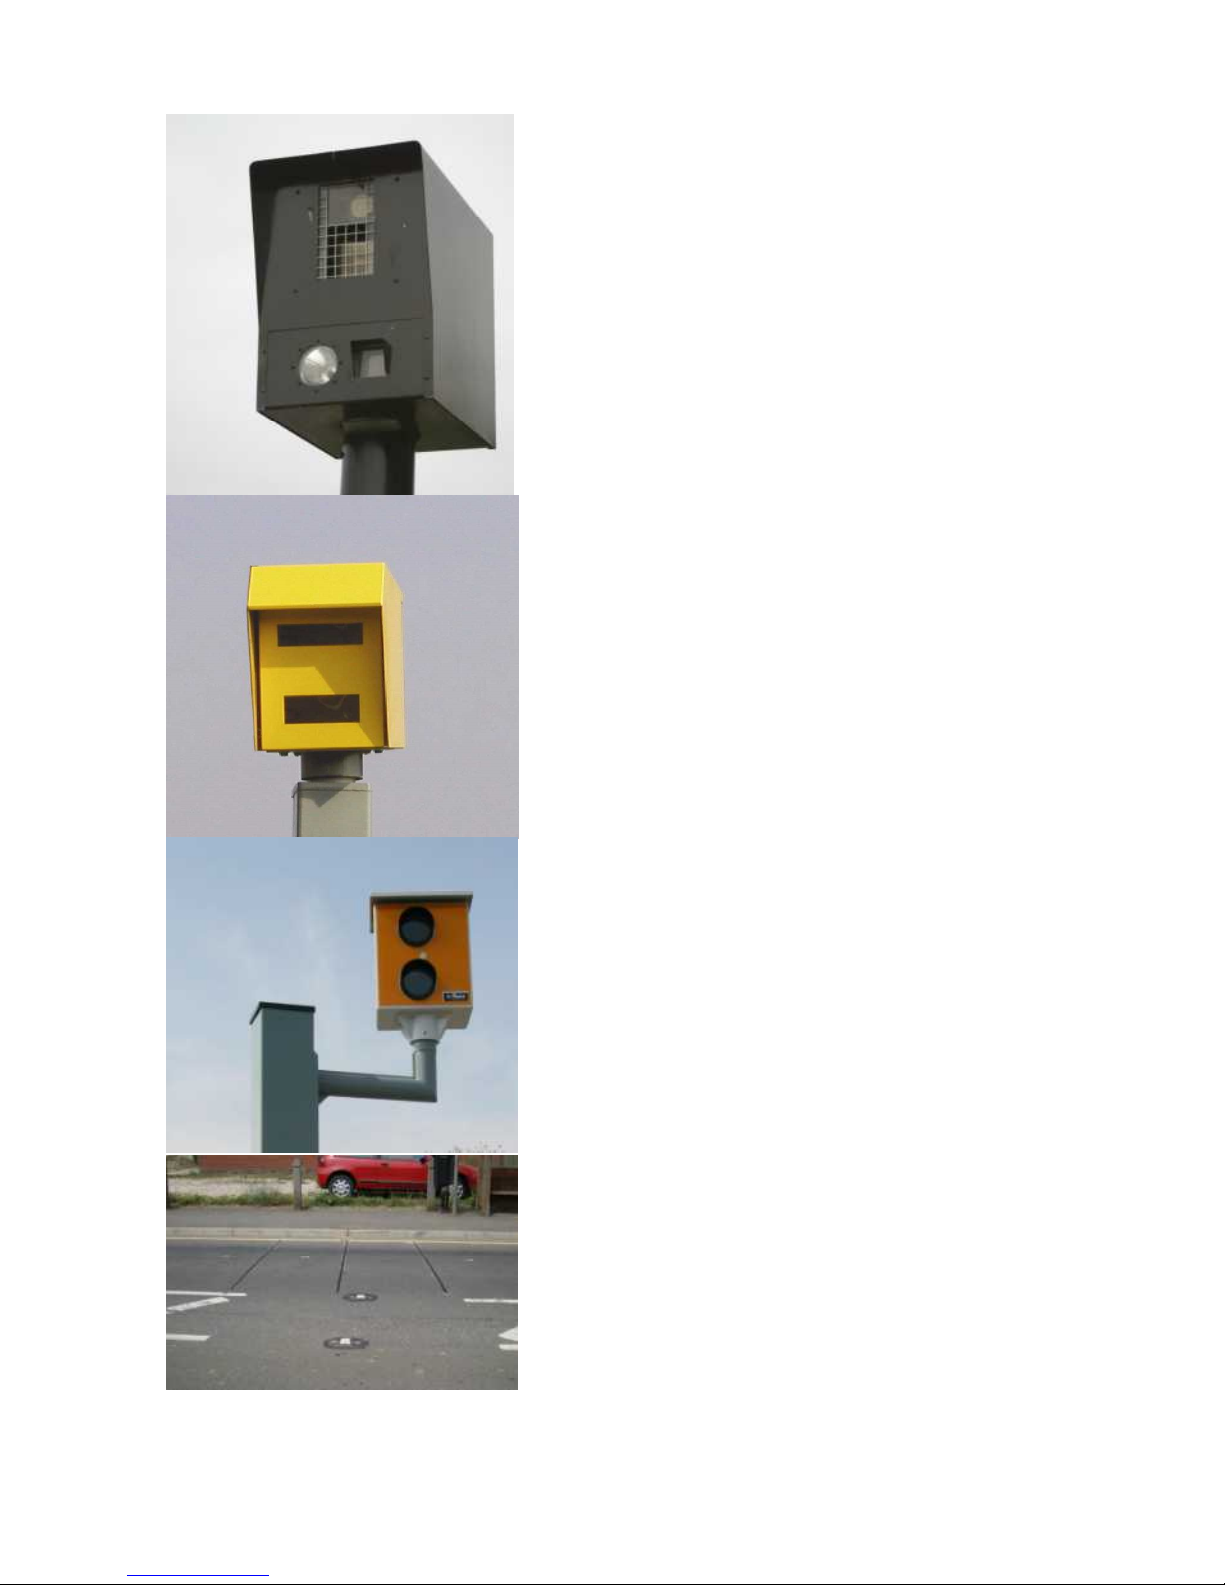
Watchman
Measures vehicle speed and, if the speed
limit has been exceeded, takes a
photograph of the rear of the vehicle. Can
be a
ccessed remotely allowing operators to
download live video, stored images or data.
ROAD ANGEL Plus relies on up-to-date
database information for detection.
Speedcurb
Measures the speed of vehicles in the
monitored section of road using pressure
sensors in the road surface. If the speed
limit has been exceeded, it takes a
photograph of the rear of the vehicle. Uses
a flash module for night-time operation.
ROAD ANGEL Plus relies on up-to-date
database information for detection.
Traffiphot
Uses pressure sensors in the road (similar
to Speedmaster – see below) to measure
vehicle speed and photographs the rear of
any speeding vehicle. Not to be confused
with red-light cameras. ROAD ANGEL Plus
relies on up-to-date database information
for detection.
Speedmaster
Semi-permanent (fixed location but only
used part-time), system that uses pressure
sensors in the road to measure vehicle
speed. Connects to a camera on a tripod
for evidence of any offence.
ROAD ANGEL
Plus relies on up-to-date database
information for detection.
Page 40
36
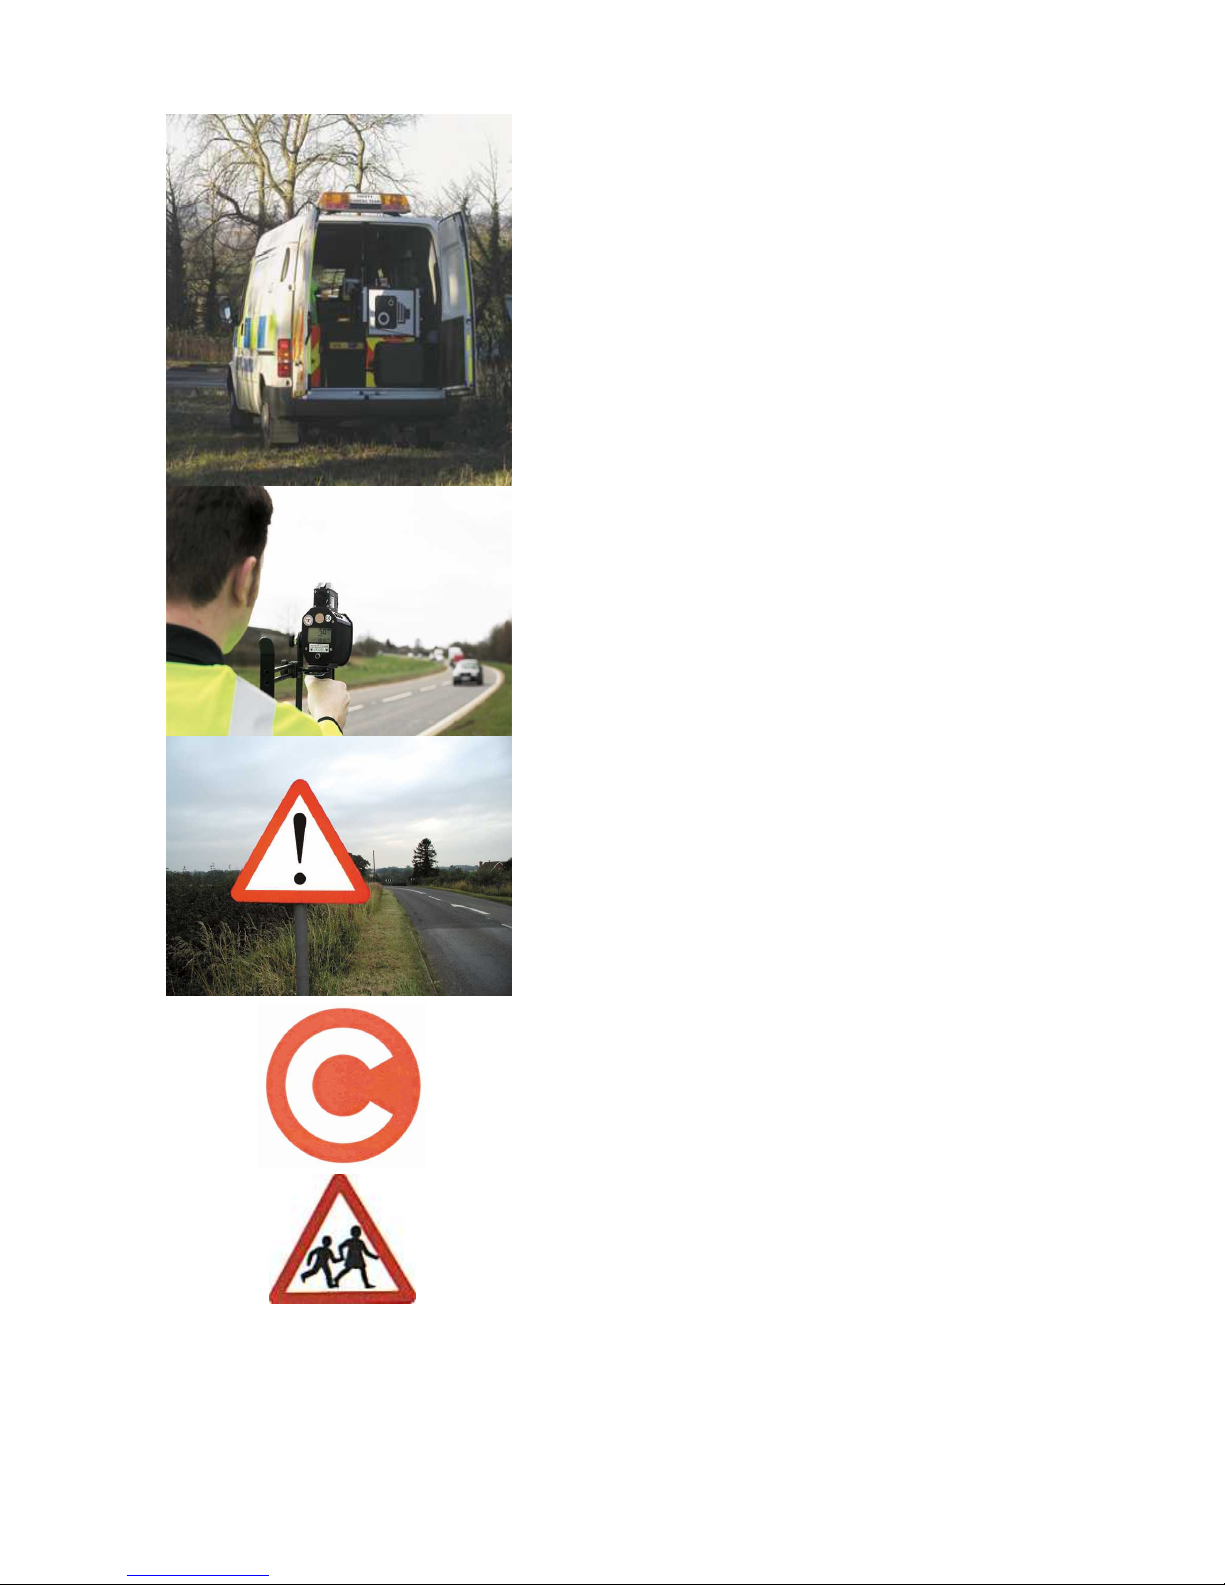
Safety Camera Vans
Mobile enforcement vehicles use Laser
guns to measure vehicle speed and,
normally, video equipment to record the
evidence of any offence. Vehicles can be
used in several locations on the same day.
ROAD ANGEL Plus relies on its laser
detection capability to alert you (see page
31).
Mobile Laser
Hand-held devices that record your speed
in either direction. ROAD ANGEL Plus
relies on its laser detection capability to
alert you (see page 31).
Black spot
A specific location, identified by the police
and local authorities, where a high number
of accidents have occurred e.g. a difficult
junction. Mobile speed enforcement units
often target black spots. ROAD ANGEL
Plus relies on up-to-date database
information to identify black spots.
Congestion
Drivers must pay in advance or on the day
of travel to enter the designated zone
during the scheme’s hours of operation.
There are substantial penalties if you do
not pay the congestion charge.
Primary Schools
You can set up ROAD ANGEL Plus
to alert
you whenever you are within 250 metres of
a primary school.
Page 41
37
11. Accessories
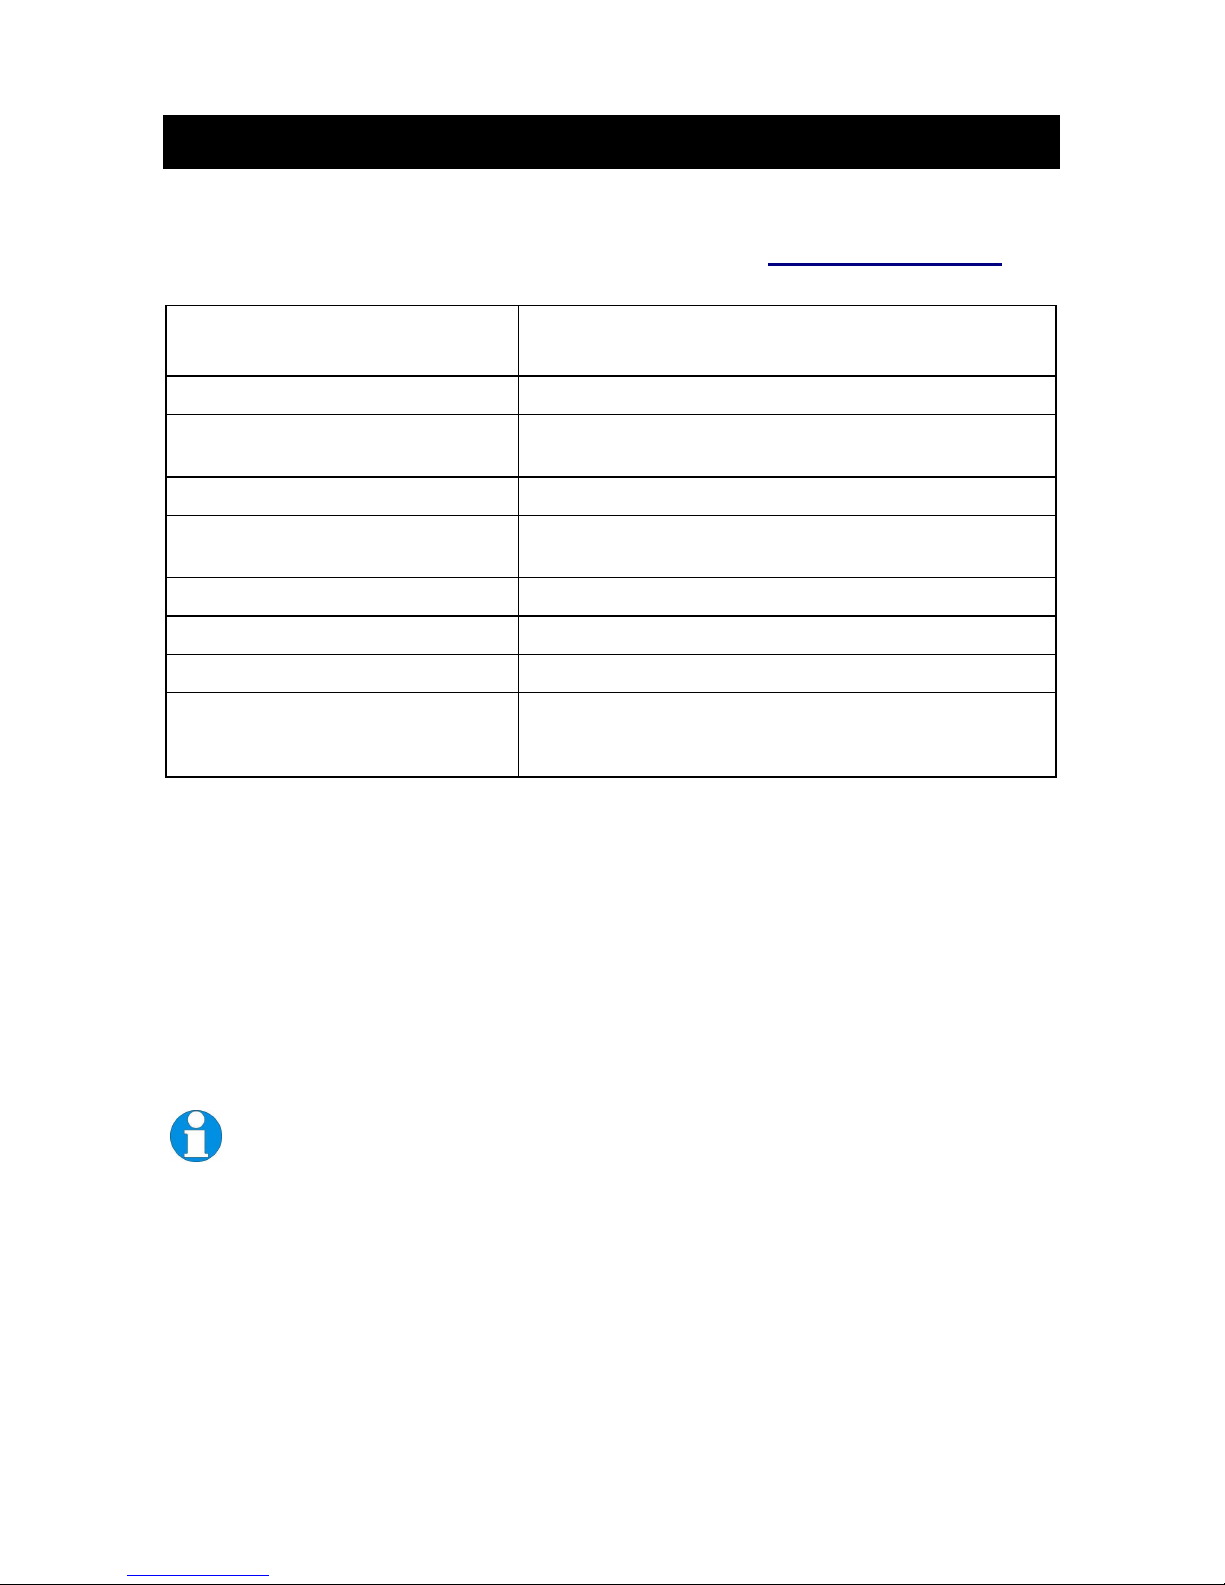
The following table lists the accessories available for ROAD ANGEL Plus.
Please visit the ROAD ANGEL Plus online shop at www.blackspot.com for
more details.
Item Details
Bike Kit Mounting bracket and hard-wire kit for motorbikes.
Dash Pad Adhesive pad for mounting ROAD ANGEL Plus directly
onto dashboard.
Dual Lock Two-piece, recloseable fastener.
Windscreen Mounting Kit Includes mounting bracket, anti-vibration dampers and
two clear suction cups.
12v Cigar Lead (Straight) 2.5 metre with standard fused cigar plug.
12v Cigar Lead (Sprung) 1.5 metre extendable with standard fused cigar plug.
Earpiece 2 metre with 3.5mm mono jack-plug.
Optional External Antenna (2m) Connects to ANT socket on ROAD ANGEL Plus – for
use in vehicles with UV screens or for discrete
mounting.
Blackspot Interactive Ltd. has made every effort to ensure that all the
information contained in this manual is accurate and reliable.
However, the information is subject to change without notice.
Page 42

 Loading...