

Page 1
User Manual
Page 2

Introduction ..........................................................................................................3
Features .................................................................................................................3
........................................................................................................3
Package Contents .................................................................................................4
Front .......................................................................................................................4
Back .......................................................................................................................4
Connection Diagrams ...........................................................................................5
Signal Flow/Hardware Block Diagram ..................................................................5
Repair .....................................................................................................................6
Warranty ................................................................................................................6
Disclaimer ..............................................................................................................6
Copyright ...............................................................................................................7
User Manual
Page 3
INTRODUCTION
The B173 Quad is a 4 channel version of our B173 preamp and is largely based on the classic
design of a Neve 1073. We originally set out to create a direct clone, but ultimately decided
to pursue our own unique design that combined both modern and vintage characteristics in
a portable, compact enclosure. The B173 Quad is a “ Class A,” fully discrete preamp with a
single-ended microphone amplifer and a balanced output amplifer. It is a 4 channel preamp
with input and output Cinemag transformers , stepped gain, an output attenuator, phantom
power, and switchable phase. It features up to 80dB of gain, is housed in a 2U, full rack
chassis, and has a high-impedance DI input that will work with anything from guitars to
keyboards . Our aim was to combine the creamy fullness of a Neve 1073 with the polished
clarity found in many expensive, modern preamps. The result is a well-balanced,
smooth-sounding preamp with low noise and plenty of gain.
FEATURES
• Cinemag Input Transformer
• Cinemag Output Transformer
• 70dB Gain
• D.I. Input (active, unbalanced)
• Phantom Power
SPECIFICATIONS
MIC SECTION
Max Microphone Input Level: +1dBu
Input Impedance: 200Ω
Pad: None
Gain (no pad): +12dB to +70dB
-105dBu
THD+N (@ +4dBu output):
• .03% @ +12 dBu
• .02% @ +45 dBu
• .06% @ +70dBu
Bandwidth (1kHz, 150Ω source,
unweighted): 10Hz to 30kHz
D.I. SECTION
Max D.I. Input Level: +18dBu
Input Impedance: 1.1MΩ
• Phase Switch
• Output Attenuator
• XLR Microphone Input
• XLR & TRS Line Output (balanced)
Pad: None
Gain: Up to +25dB of gain
-100dBu
THD+N (@ +4dBu output):
• .03% @ +25 dBu
Bandwidth (1kHz, 600Ω unbalanced
source, unweighted): 10Hz to 30kHz
OUTPUT SECTION
Max Output Level: +28dBu
Output Impedance: 600Ω
Power: 120-220VAC, Switchable IEC
Weight: 8 lbs
Dimensions: 19” x 3.5” x 7”
Shipping weight: 9.5lbs
Shipping dimensions: 25” x 7” x 10.5”
User Manual
Page 4
PACKAGE CONTENTS
• B173 Quad
• Power Supply (Line Lump)
• IEC Cable
FRONT
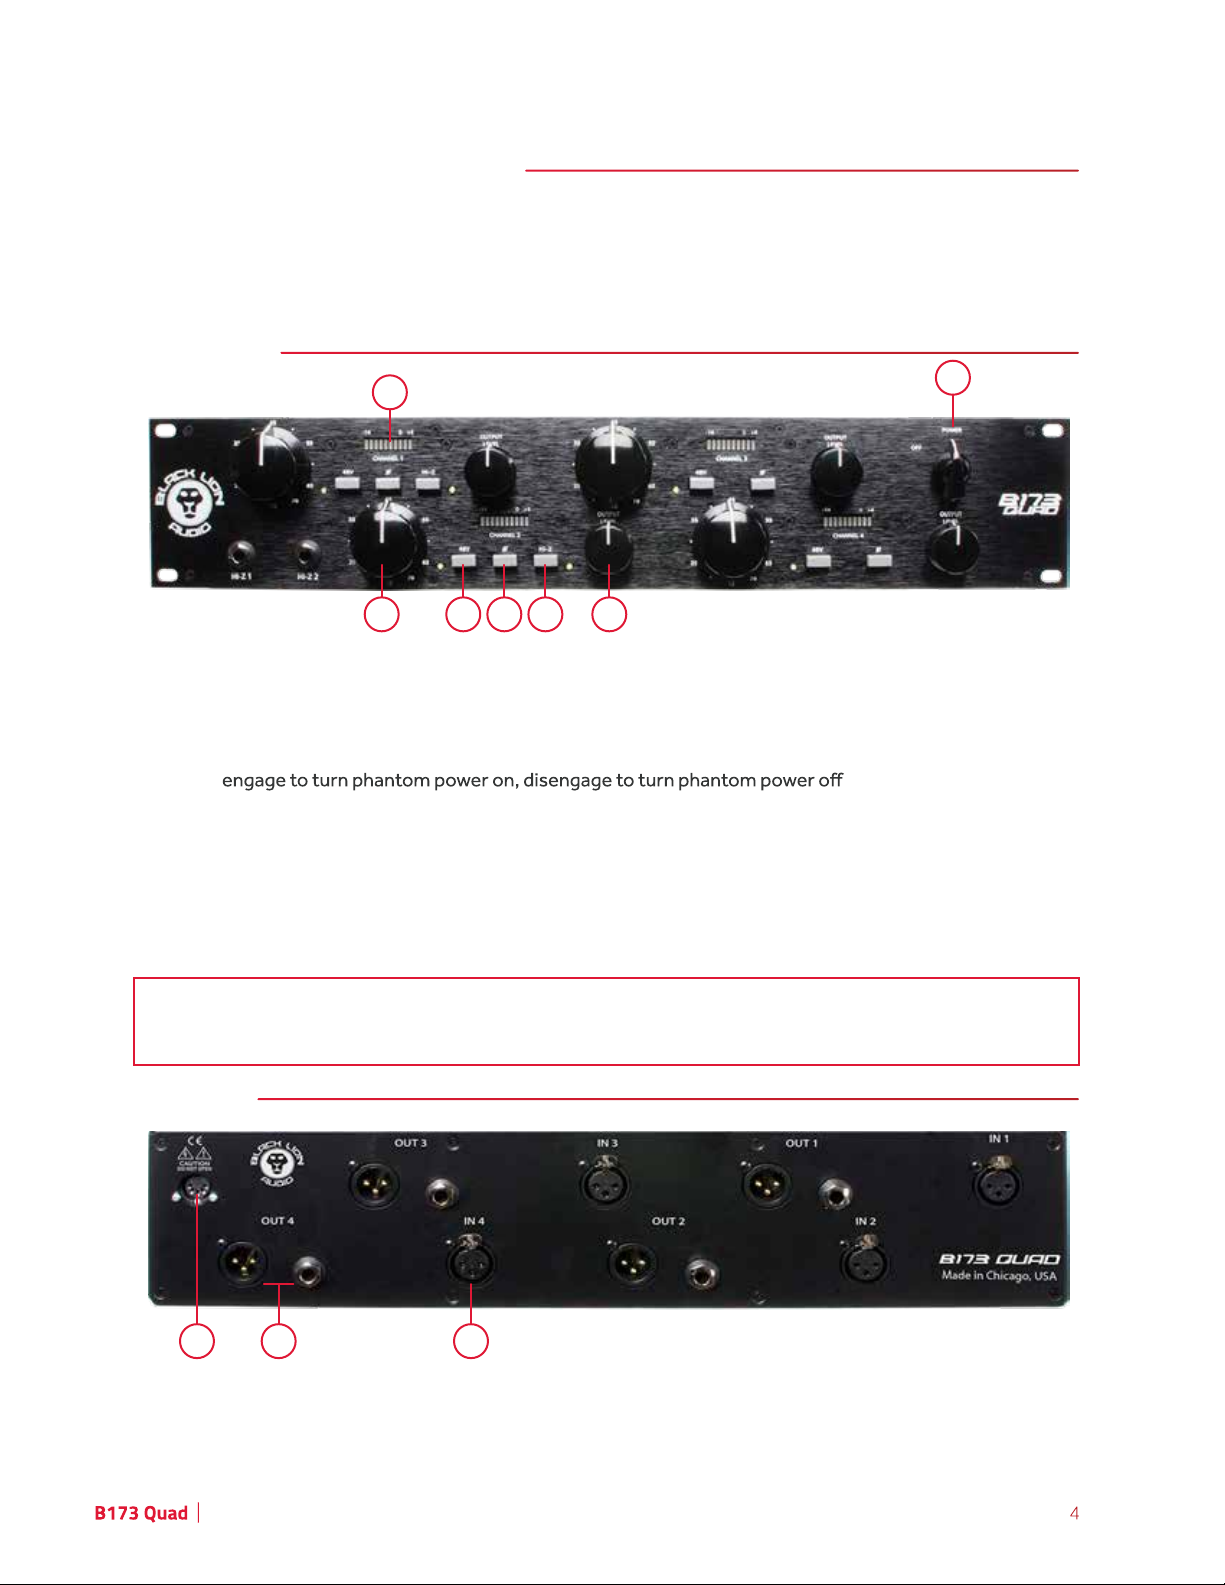
7
1
2
MIC GAIN (stepped, 12-position switch):
1. POWER: Turn switch clockwise to turn preamp on (There is a 2-3 minute warmup for
lowest distortion). Turn switch counter-clockwise to turn preamp off.
2. MIC GAIN (stepped, 12-position switch):
counterclockwise rotation yields a decrease in input signal amplitude
3. 48v:
4. PHASE (Ø): engage to adjust input signal polarity by 180°, disengage to leave input signal polarity
unchanged
5. OUTPUT LEVEL: clockwise rotation yields less attenuation, counterclockwise rotation yields more
attenuation (for beginners, it’s best to leave the output level fully clockwise and increase Mic Gain as
needed so as not to saturate the input transformer)
6. DI:
7. OUTPUT METER: Metering on this unit is designed to make sure your output level is correct. The meter
engage to select front panel TS jack as input source, disengage to select rear panel XLR jack as input
source
is showing output level and is affected by output attenuation. When the red led below +4 lights up, the
correct output level has been obtained. Red led does not mean clipping.
3 4 6 5
clockwise rotation yields an increase in input signal amplitude,
BACK
1 2 3
1. POWER: power supply input jack. Only use Black Lion power supply
2. OUTPUT: balanced XLR female & TRS outputs wired in parallel
3. INPUT: balanced XLR male input jack
User Manual
Page 5
CONNECTION DIAGRAMS
LEGEND
TRACKING
Digital Audio
Analog Audio
Data
Clock
Multi FX unit
Monitor controller/
SIGNAL FLOW/HARDWARE BLOCK DIAGRAM
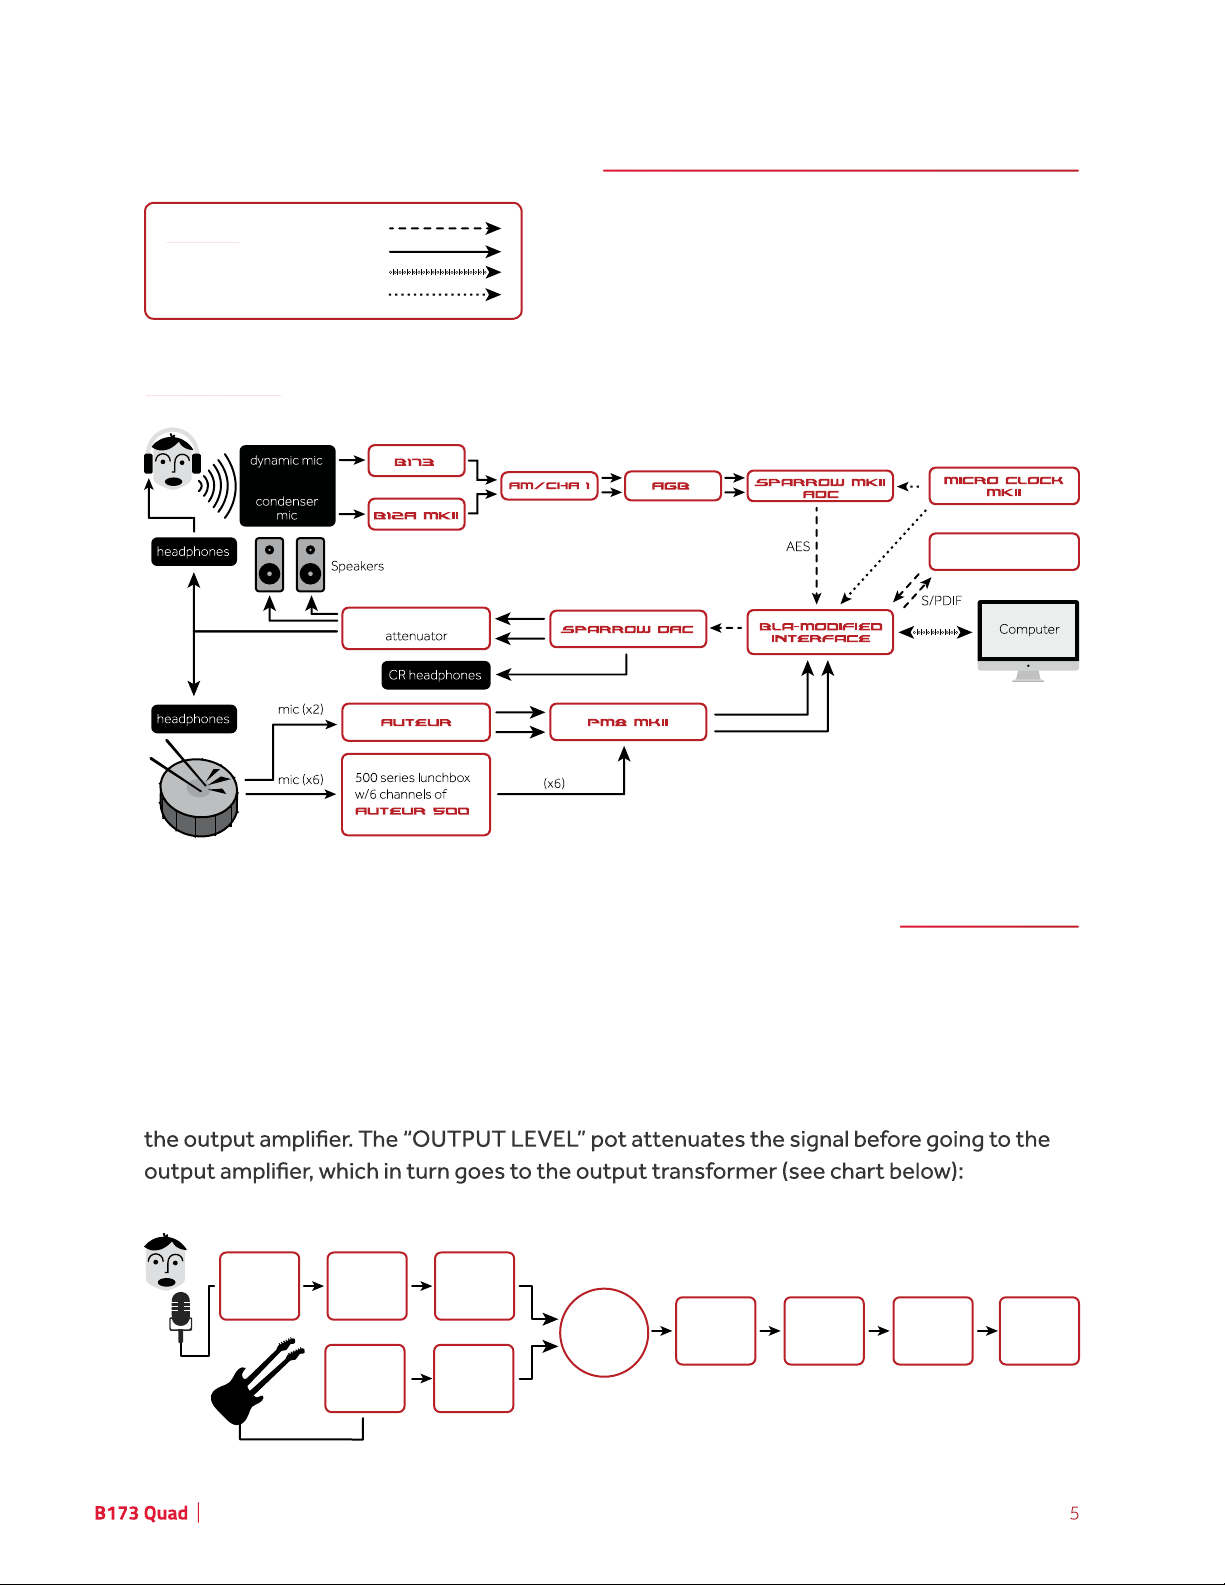
“MIC GAIN” is a 12-position, stepped switch ranging from +12dB minimum gain to +80dB
maximum gain. The majority of the gain for the XLR microphone input comes from the mic
amp gain stage. The signal passes through an input transformer before going to the mic
amp gain stage, which is controlled by the “MIC GAIN” rotary switch on the front panel.
The signal then passes to the DI switch, which selects which input signal (mic or DI) goes to
Backplate
XLR input
Mic Input
Transformer
Faceplate
1/4” Input
Mic Amp
Circuit
DI Input
Circuit
DI/Mic
Switch
Output
Level Pot
Output
Amp
Output
Transformer
Backplate
1/4” Output
User Manual
Page 6

REPAIR
should not attempt to repair the device
Please contact Black Lion Audio if you need assistance.
WARRANTY
We extend a three-year warranty on defects in materials and workmanship for all Black Lion
Audio products from the date of purchase. This does not cover user error, wear, tear, or
abuse. Should your B.L.A. product experience any problems or failures during the warranty
period, immediately contact us, and we will gladly correct the issue at no charge (excluding
shipping).
DISCLAIMER
For your safety, please read the following!
Grounding: For your safety, do not defeat the grounding connection. Use the device only
when it is properly grounded.
Liquids, water & moisture: The device should not be used near water, or when it is wet.
Care should be taken so that it remains dry. Be sure to keep the device away from rain or
other moisture.
Power: The device should be connected to a power supply only of the type described in the
user manual and/or as marked on the rear panel.
Power cables: Power supply cables should not be routed under carpets, or where they are
likely to be walked on or pinched by items placed upon or against them. Do not use power
supply cables that have become worn or frayed.
Multiple-input voltage:
plug, cable, or both, depending on the available power connection in your area.
User Manual
Page 7
1801 W. BELLE PLAINE AVE., SUITE 105
CHICAGO, IL 60613
BLACKLIONAUDIO.COM
Copyright © 2019 Black Lion Audio, Inc. All rights reserved. This manual and any associated
artwork, product designs, and design concepts are subject to copyright protection. No part of
this document may be reproduced in any form without prior written permission of Black Lion
Audio, Inc.
 Loading...