

Page 1
User Guide
A Mobile Worker Safety Device
Complementing Loner Mobile
Modication: 01 26, 2012
Page 2

Page 3

Legal Notices
Information in this document is subject to change without notice. This document is provided “as is” and Blackline GPS Inc. (“Blackline
GPS or Blackline”) and its aliated companies and partners assume no responsibility for any typographical, technical or other inaccuracies in this document. Blackline GPS reserves the right to periodically change information that is contained in this document. However,
Blackline GPS makes no commitment to provide any such changes, updates, enhancements or other additions to this document to you
in a timely manner or at all.
Copyright © 2011 Blackline GPS Inc. All rights reserved.
Except as expressly provided herein, no part of this manual may be reproduced, copied, transmitted, disseminated, downloaded, or
stored in any storage medium, for any purpose without the express prior written consent of Blackline GPS Inc. (“Blackline” or “Blackline
GPS”). Blackline GPS hereby grants permission to download a single copy of this manual onto some form of electronic storage medium
to be viewed and to print one copy of this manual or any revision hereto, provided that such electronic or printed copy of this manual
must contain the complete text of this copyright notice. Further, any unauthorized commercial distribution of this manual or any revision hereto is strictly prohibited.
The Blackline GPS families of related marks, images and symbols, including Loner FDU, Fall Detection Unit, FDU, Loner Mobile, Loner
GPS, Ultimate Sense, Protect. Share. Connect. and Blackline GPS are the exclusive properties and trademarks of Blackline GPS Inc. All
other brand names, company names, trademarks and service marks are the properties of their respective owners.
Warranty
Your Loner FDU™ powered by Blackline GPS is warranted against defects in materials and workmanship for up to one year from date of
purchase. For further details regarding your Blackline GPS warranty, please refer to your Terms and Conditions of Service.
More Information and Support
Visit http://blacklinesafety.com for more information.
FCC Notice
This device complies with part 15 of the FCC rules. Operation is subject to the following two conditions: (1) This device may not cause
harmful interference, and (2) this device must accept any interference received, including interference that may cause undesired operation. Changes or modications not expressly approved by the manufacturer could void the user’s authority to operate the equipment.
NOTE: This equipment has been tested and found to comply with the limits for a Class B digital device, pursuant to part 15 of the FCC
rules. These limits are designed to provide reasonable protection against harmful interference in a residential installation. This equipment generates, uses and can radiate radio frequency energy and, if not installed and used in accordance with the instructions, may
cause harmful interference to radio communications. However, there is no guarantee that interference will not occur in a particular
installation. If this equipment does cause harmful interference to radio or television reception, which can be determined by turning
the equipment o and on, the user is encouraged to try to correct the interference by one or more of the following measures:
• Reorient or relocate the receiving antenna.
• Increase the separation between the equipment and receiver.
• Connect the equipment into an outlet on a circuit dierent from that to which the receiver is connected.
• Consult the dealer or an experienced radio/TV technician for further assistance.
1
Page 4

Table of Contents
Safety Precautions
DANGER .................................................................................4
WARNING ................................................................................4
Getting Started
Service Activation ........................................................................6
Overview
Requirements ............................................................................7
Contents.................................................................................7
Using the Loner FDU
Loner FDU Hardware Details..............................................................8
Charging Loner FDU ....................................................................10
Pairing the Loner FDU with a Smartphone...............................................10
Turning the Loner FDU On (previously paired) . . . . . . . . . . . . . . . . . . . . . . . . . . . . . . . . . . . . . . . . . . .11
Turning the Loner FDU O ..............................................................11
Loner FDU Light Behaviour..............................................................12
Loner FDU Annunciation Patterns .......................................................13
Using the Loner FDU ....................................................................13
About Bluetooth ........................................................................13
2 // USER GUIDE
Page 5

Alerts
Alerts ...................................................................................14
Initiating an Emergency Alert (Emergency Latch Use)....................................15
Initiating a Silent Emergency Alert.......................................................15
About Activity/Motion Monitoring ......................................................16
About Fall Detection ....................................................................16
Missed Check-in Alert ...................................................................17
About Low Battery Detection ...........................................................18
Performance Expectations of the Fall Detection System: .................................18
Specications
Specications for Loner FDU ............................................................19
Loner FDU Care
Considerations Regarding Use and Storage of the Loner FDU............................20
Customer Care
Customer Care for the Loner FDU .......................................................20
3
Page 6
Safety Precautions
Blackline GPS takes your safety and the safety of those around you very
seriously. It is important for you to be aware of the following precautions.
DANGER
Do not place a Blackline GPS Product in or near an open ame or in the presence of ammable gases or fumes.
Operation of any electrical equipment in potentially explosive atmospheres
can constitute a safety hazard.
WARNING
When in a hospital or other health care facility, observe the restrictions on
the use of mobile devices, such as cellular phones. Do not operate Blackline
GPS Products where you are not able to operate your mobile/cellular phone.
Switch Blackline GPS Products o before boarding an aircraft and make sure
that it cannot be inadvertently turned on. The operation of wireless appliances, including Blackline GPS Products is forbidden aboard aircraft to prevent
interference with communication systems.
Road safety comes rst. Do not operate a Blackline GPS Product while you
are driving a vehicle. Park your vehicle before operating a Blackline GPS product, or using your mobile phone to interface to the Blackline GPS service.
Electrical equipment may be hazardous if misused. Operation of this Product,
or similar Products, must always be supervised by an adult. Do not allow children access to the interior of any electrical Product and do not permit them
to handle any cables.
4 // USER GUIDE
Page 7

Do Not:
Operate Blackline GPS products outside their specied operating temperature. Consult
the specications section.
Store Blackline GPS products outside their specied storage temperature. Consult the
specications section.
Operate Blackline GPS products outside their specied humidity rating. Consult the
specications section.
Dispose of Blackline GPS products in your household trash. Seek advice from your local
electronics recycling authority. Blackline products may contain an internal lithium-ion
battery pack.
5
Page 8

Getting Started
Service Activation
Your Loner FDU requires a valid Loner Mobile application license operating on a supported smart phone. Contact your company’s safety coordinator or Blackline GPS customer
care at [email protected] to obtain a license.
Please see Using the Loner FDU for detailed instructions.
NOTE: Service activation requires a valid credit card or,
a credit account setup with Blackline GPS .
Overview
The Blackline GPS Loner FDU provides multi-layered safety for you as a mobile worker
when it is connected via Bluetooth to a smartphone operating the Loner Mobile software.
This guide provides information that you will nd helpful to comfortably operate your
Loner FDU. The unit contains the following internal components:
Bluetooth radio
350 mAh rechargeable battery
Tri-axis accelerometers
Gyroscope
Vibration motor
Emergency Latch
Power Button and Indicator Light
Indicator Light Array
Alarm Beeper
USB interface for charging
Integrated weather proof and dust proof case
6 // USER GUIDE
Page 9

Requirements
The Loner FDU promotes a safe work environment for you when:
Bluetooth communication has been established with the smartphone
running Loner Mobile.
The Loner FDU and the smart phone both have sucient battery capacity
to operate.
You are wearing the device and carrying the associated smartphone.
The Loner Mobile application must be activated in a Loner Portal account. For complete
protection Loner Mobile must have a cellular connection and good GPS signal strength.
Contents
Loner FDU™
Micro USB charging clip
Charging cable
Wall charger
7
Page 10

Using the Loner FDU
Loner FDU Hardware Details
The Loner FDU is rugged and purpose-built for monitoring you as a mobile worker.
Physical details are outlined below.
Physical Feature Use
Charging Port Charges the Loner FDU.
Power Button &
Indicator Light
Acknowledge Button Acknowledges alert messages on the Loner FDU.
Indicator Light Array Indicates the Loner FDU is in an Alarm state.
Emergency Latch Sends an emergency alert to monitoring personnel.
Charging Light Indicates the charging state.
Product Label Provides device information including serial number.
Belt Clip Attaches the Loner FDU to a belt.
Powers the Loner FDU and indicates the
Bluetooth connection status.
8 // USER GUIDE
Page 11
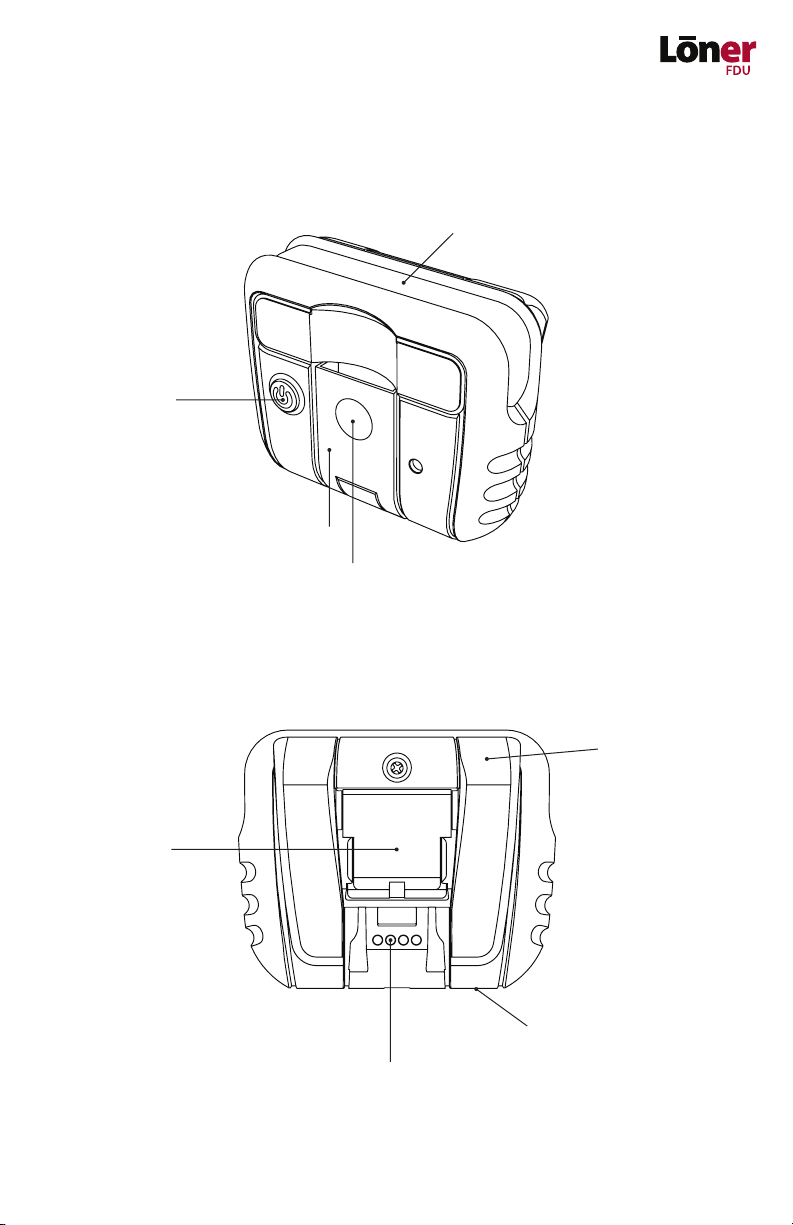
Power Button &
Indicator Light
Emergency Latch (pull)
Acknowledge Button (push)
Indicator Light Array
Belt Clip
Product Label
Charging Light (on bottom)
Charging Port
9
Page 12
Charging Loner FDU
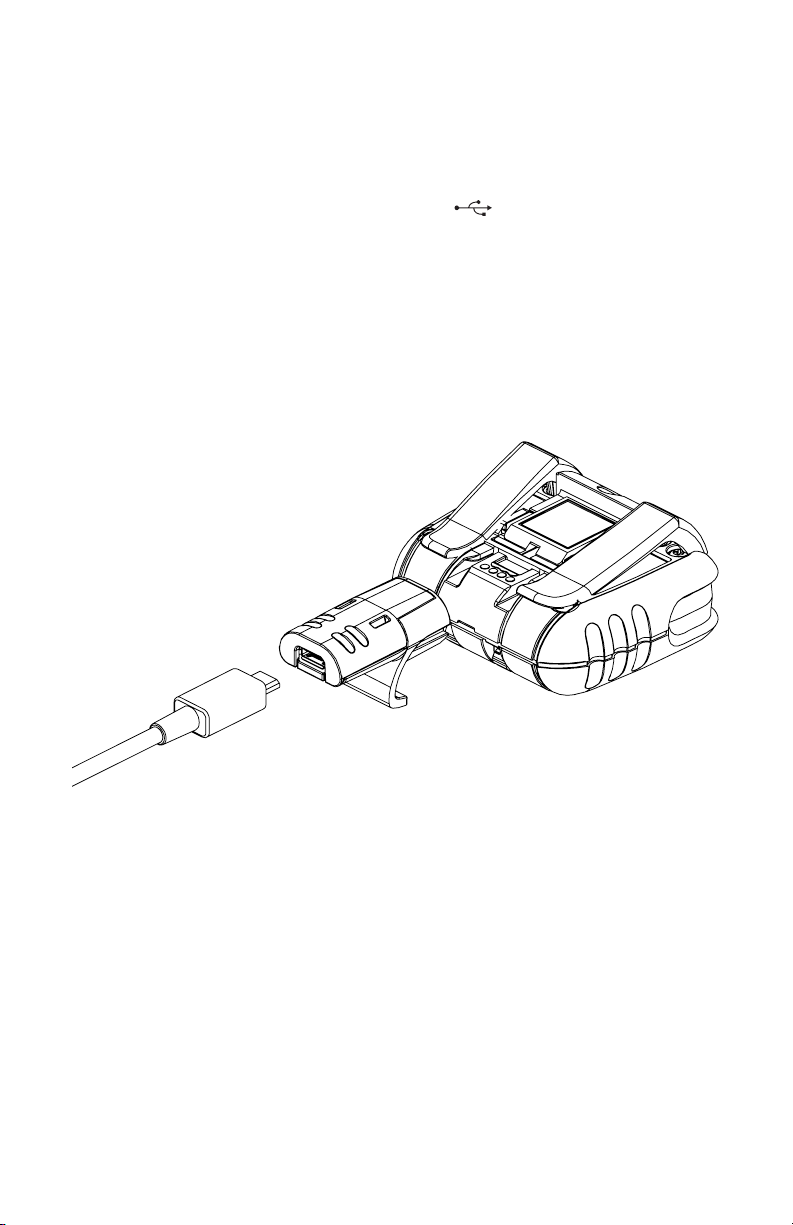
Plug the wall charger into an electrical outlet.
1. Insert the Micro USB Cable Plug into the corresponding Micro USB Charging Jack
on the charging clip ensuring the USB symbol on the cable faces the at side
of the charging clip.
2. Slide the charging clip onto the Loner FDU using the guides to align the clip with
the Charging Port on the device.
3. Completely charge the Loner FDU for two hours.
4. Remove the charging clip from the Loner FDU.
Charging status can be determined by observing the Charging Light. See the section
Loner FDU Light Behaviour for more detailed information.
Pairing the Loner FDU with a Smartphone
The rst time the Loner FDU powers on, you must pair it with a smartphone running the
Loner Mobile application.
1. Press the Power Button to turn the Loner FDU on. The Loner FDU will turn on, the
green Indicator Light will blink and the beeper, Indicator Light Array and vibration
motor will annunciate the chirp pattern.
2. Ensure the Bluetooth is enabled on your smart phone.
3. In the Loner Mobile application, from the Menu select Loner FDU Status.
4. In the Loner FDU Status screen, from the Loner FDU menu select Enable
Loner FDU Function.
10 // USER GUIDE
Page 13

5. In the Loner FDU search screen, select Search to search for available Bluetooth
devices. This process may take a few minutes as all Bluetooth devices within
range will be displayed.
6. Select the Loner FDU from the list that corresponds to the Unit ID on the
Product Label.
7. The smart phone and the Loner FDU will establish communications.
8. Once paired, the Loner FDU green Indicator Light will remain on continuously.
If the Loner FDU fails to connect via Bluetooth to the smart phone, the device will enter
the no Bluetooth alarm pattern.
Turning the Loner FDU On (previously paired)
If the Loner FDU has been previously paired, follow the steps below for turning on
the device:
1. Press the Power Button to turn the Loner FDU on.
2. The beeper, alarm status light and vibrator will annunciate the chirp pattern.
3. The Power Button Indicator Light will blink as the Loner FDU connects to the
paired Loner Mobile smartphone.
4. While the Loner FDU retains a Bluetooth connection, the Power Button Indicator
Light will remain on.
If the Loner FDU fails to connect via Bluetooth to the smartphone, the device will
enter the no Bluetooth alarm pattern.
Turning the Loner FDU O
If the Loner FDU is no longer required, follow these steps for turning o the device:
1. Press and hold the Power Button for three seconds to power the unit o.
2. The beeper sounds for three long beeps during the time the Power Button
is pressed.
3. The vibrator vibrates for three long pulses.
4. At the end of the three seconds the beeper, vibrator and Power Button Indicator
Light turn o.
11
Page 14

Loner FDU Light Behaviour
The Loner FDU features a Power Button Indicator Light and a Red Charging Light. Please
see below for the light behaviour.
Light Behaviour Power Button Indicator Light Red Charging Light
Light Flashing Indicates the Loner FDU is
powered and connecting to
the smartphone.
Light On Indicates that the Loner FDU
is powered and connected to
the smartphone.
Light O Indicates that the Loner FDU
is powered o or the battery
is depleted.
The Loner FDU is referred to as having no Bluetooth connection when the Power
Button Indicator Light is blinking or the device is powered o.
The Loner FDU is referred to as having a Bluetooth connection when the Power Button
Indicator Light is on continuously.
The Red Charging Light functions when the device is connected to a micro USB cable
for charging.
Indicates the Loner FDU
is charging.
Indicates that the Loner
FDU is fully charged.
Indicates that the Loner
FDU is not charging.
12 // USER GUIDE
Page 15

Loner FDU Annunciation Patterns
The Loner FDU features audible, tactile and visual indicators for annunciating dierent
types of messages. Please see below for these patterns.
Type Beeper Vibration Motor Indicator Light Array
Low Alarm Slow alarm
Pattern
High Alarm Fast alarm
pattern
Low Battery Single beep
once every 5 sec
Bluetooth Slow double
beep
Chirp Single beep Single vibrate Single ash
Single repeating
vibrate
Double repeating
vibrate
Single vibrate
once every 5 sec
Single repeating
vibrate
Slow ash
Fast ash
Single ash once every
5 sec
Slow double ash
Using the Loner FDU
When safety monitoring is required, perform the following steps to ensure you are
being protected.
1. Launch the Loner Mobile application on your smart phone.
2. Press the Power Button to turn on the Loner FDU.
3. The Power Button Indicator Light on the Loner FDU will blink while establishing a
Bluetooth connection with the smart phone.
4. Wait for the device to establish a Bluetooth connection. The Power Button Indicator
Light remains on continuously.
5. Wear the Loner FDU on your belt at your hip at all times that you require remote
safety monitoring.
6. Perform your work duties as you normally would. The Loner FDU automates remote
monitoring of your safety.
7. When remote monitoring of your safety is no longer required, power down the
Loner FDU and close the Loner Mobile application.
About Bluetooth
Bluetooth is a low power communication protocol that requires the Loner FDU and the
smart phone to be within close proximity of each other. To ensure constant communication between the Loner FDU and the smartphone, keep both devices with you.
13
Page 16

Alerts
Alert messages are congured for Loner Mobile and Loner FDU through the Loner Portal
web application. Alerts are displayed in Loner Portal and can be sent via email and SMS to
safety monitoring personnel.
Alerts
An alert is a message that communicates a device or system level event such as an
Emergency Alert or a Low Battery Alert. Depending on the priority level of the Alert,
dierent action must be taken by safety-monitoring personnel.
Priority Level 1 = Immediate action – mobile worker may need assistance.
Priority Level 2 = No immediate action required, but future action may be necessary.
Priority Level 3 = No action required – informational message
Alert Details Priority Level
Emergency Alert Loner FDU will send an Emergency Alert if the
Emergency Latch has been opened, or the
silent emergency alarm has been activated.
Fall Detected Alert Loner FDU will send a Fall Detected Alert
when the device has detected a fall and you
have not canceled the pending message
within 30 seconds.
No-motion Alert Loner FDU will send a No-motion Alert when
the device does not detect motion for 2 minutes and you have not canceled the pending
message within 30 seconds.
Missed Check-in
Alert
Low Battery Loner FDU will send a Low Battery Alert if the
Loner FDU will initiate the pending Missed
Check-in Alert if you have not checked in with
Loner Mobile. You have 30 seconds to cancel
before a Missed Check-in Alert is sent.
internal battery level falls below 10%.
1
1
1
1
2
For No-motion alert, options from 0 – 30 minutes are available. (0 Indicates the feature
is disabled.)
14 // USER GUIDE
Page 17

Initiating an Emergency Alert (Emergency Latch Use)
If you are in an emergency situation, perform the following:
1. Open the Emergency Latch.
2. Loner FDU will annunciate the alarm pattern to notify others nearby of the event.
3. Loner FDU will instantly send an Emergency Message to Loner Mobile.
4. Loner Mobile will acknowledge the message and instantly send the Emergency
Message to monitoring personnel.
5. Loner Mobile will annunciate the Emergency Alarm pattern based on the
LonerMobile_Emergency Ring Tone conguration.
6. The alarm pattern on the Loner FDU and Loner Mobile will continue until the
Emergency Alert has been canceled on the Loner FDU, or in the Loner Mobile application, or the battery is depleted.
Another Emergency Alert will not occur until the Emergency Alert has been canceled.
Canceling an Emergency Alert (Emergency Latch Use):
1. Return the Emergency Latch to the closed position.
2. Press and hold the Acknowledge Button for 3 seconds.
3. Cancel the alert in Loner Mobile.
After three seconds, the alarm pattern will be silenced and the Loner FDU will return to
regular operation.
If the user cancels an Emergency Alert, this does not clear the alert within the Loner
Portal user account. Monitoring personnel are required to address the safety incident.
Initiating a Silent Emergency Alert
If you are in an emergency situation, where you prefer to not alert others in the area (a
silent emergency), perform the following:
1. Push and hold the Acknowledge Button for 10 seconds.
2. Loner FDU will vibrate for 5 seconds, pause and then vibrate for 5 more seconds.
3. A Silent Emergency Message will be sent to Loner Mobile.
4. Loner FDU will NOT annunciate the alarm pattern (it will remain silent).
15
Page 18

5. Loner Mobile will acknowledge the message and instantly send the Emergency
Message to monitoring personnel.
6. Loner Mobile will NOT annunciate the Emergency Alarm pattern (it will remain silent).
7. The Silent Alarm can be canceled in Loner Mobile at any time.
The Loner FDU will return to normal operation. If the user cancels a Silent Emergency
Alert in Loner Mobile, this does not clear the alert within the Loner Portal user account.
Monitoring personnel are required to address the safety incident.
About Activity/Motion Monitoring
The Loner FDU is constantly monitoring your motion. If the Loner FDU has not detected
motion for two minutes, it will enter the alarm mode and annunciate the low alarm pattern to indicate a pending No-motion alert. If you do not require assistance, you have
30 seconds to cancel the alert.
Canceling a pending No-motion Alert:
1. Press the Acknowledge Button for 1 second.
2. After one second, the alarm pattern will be silenced and the Loner FDU will return
to regular operation.
If you have not cancelled the alert within 30 seconds, the No-motion Alert is sent, initiating the alert escalation process. The Loner FDU will annunciate the high alarm pattern
until the alert is canceled or the battery is depleted.
Canceling a No-motion Alert:
1. Press and hold the Acknowledge Button for 3 seconds.
2. After three seconds, the alarm pattern will be silenced and the Loner FDU will
return to regular operation.
If the user cancels a No-motion Alert, this does not clear the alert within the Loner
Portal user account. Monitoring personnel are required to address the safety incident.
About Fall Detection
The Loner FDU is constantly monitoring your motion for falls. If the Loner FDU detects a fall,
it will enter the alarm mode and annunciate the low alarm pattern to indicate a pending
Fall Detected alert. If you do not require assistance, you have 30 seconds to cancel the alert.
Cancelling a pending Fall Detected Alert:
1. Press the Acknowledge Button for 1 second.
2. After one second, the alarm pattern will be silenced and the Loner FDU will return
to regular operation.
16 // USER GUIDE
Page 19

If you have not cancelled the alert within 30 seconds, the Fall Detected Alert is sent,
initiating the alert escalation process. The Loner FDU will annunciate the high alarm
pattern until the alert is canceled or the battery is depleted.
Cancelling a Fall Detected Alert:
1. Press and hold the Acknowledge Button for 3 seconds.
2. After three seconds, the alarm pattern will be silenced and the Loner FDU will
return to regular operation.
If the user cancels a Fall Detection Alert, this does not clear the alert within the Loner
Portal user account. Monitoring personnel are required to address the safety incident.
Missed Check-in Alert
The Loner FDU will receive a Missed Check-in Alert if the Loner Mobile application is
congured to have you periodically check in. If the Loner FDU receives a Missed Checkin Alert, it will enter the alarm mode and annunciate the low alarm pattern to indicate a
pending Missed Check-in Alert. If you do not require assistance, you have 30 seconds to
cancel the alert.
Canceling a pending Missed Check-in Alert:
1. Press the Acknowledge Button for 1 second.
2. After one second, the alarm pattern will be silenced and the Loner FDU will return
to regular operation.
If you have not cancelled the alert within 30 secondes, the Missed Check-in Alert is sent,
initiating the alert escalation process. The Loner FDU will annunciate the high alarm pattern until the alert is cancelled or the battery is depleted.
Cancelling a Missed Check-in Alert
1. Press and hold the Acknowledge Button for 3 seconds.
2. After three seconds, the alarm pattern will be silenced and the Loner FDU will
return to regular operation.
If the user cancels a Missed Check-in Alert, this does not clear the alert within the Loner
Portal user account. Monitoring personnel are required to address the safety incident.
17
Page 20

About Low Battery Detection
The Loner FDU monitors the battery level of the device. If the battery level drops below
10% of battery capacity, a Low Battery Alert will be sent and the Loner FDU will annunciate the low battery alarm pattern.
The Loner FDU will continue all of the alarms until one of the following occurs:
The Loner FDU is powered o.
The Loner FDU automatically shuts down with a depleted battery.
The Loner FDU is plugged in for recharging.
The Loner FDU sends a Loner FDU Powered O by Low Battery message via Bluetooth
to the paired smartphone before nally powering o.
Performance Expectations of the Fall Detection System:
The Loner FDU utilizes gyroscope and accelerometers to determine the motion of normal
human activity and thus determine when an extreme event, such as a fall, occurs. Accuracy
of the system depends on the user wearing the Loner FDU correctly on the belt at the hip.
18 // USER GUIDE
Page 21

Specications
Specications for Loner FDU
Software Compatibility
Loner Mobile version 3.x for BlackBerry
Size & Weight
Size: 51 mm W x 32 mm H x 62 mm L (2.01” W x 1.26” H x 2.44” L)
Weight: 75 g (2.65 oz)
Power o
Power & Battery
Rechargeable Li-ion battery: 350 mAh capacity
Battery life: 12 hours continuous operation
Charging connector: 4-pin sealed connection
Safety Features
Fall detection technology: Tri-axis accelerometers, tri-axis gyros,
plus software processing
Emergency latch: Release latch to trigger alert
Silent emergency: Press and hold Acknowledge Button to
trigger alert
Worker motion monitoring: Congurable time window
(1 – 30 min or o)
Worker check-in (optional): Required check-in period
(5 – 180 min)
Buttons & Indicator Lights
Power button: Power on/o
Acknowledge button: Check-in/Silent emergency/cancel pending
alerts/acknowledge alerts
Emergency latch: Send emergency alert
Red indicator light array plus vibration & buzzer:
Safety alert triggered
Green indicator light: Blinking (powered), continuous (connected)
User Notication
Indicators: Acoustic buzzer, LEDs, and vibration motor
Acoustic buzzer sound pressure level: 90 dB @ 10 cm
(90 dB @ 3.94")
Wireless Communication
Bluetooth version 2, Class 2
Alert Messages
Fall detected
Emergency
No-motion
Missed check-in
Low battery
Environmental
Storage temperature: -30° C to 75° C (-22° F to 167° F)
Operating temperature: -20° C to 55° C (-4° F to 131° F)
Charging temperature: 0 to 45° C (32 to 113° F)
Ingress protection: Designed to meet IP65
Approvals
FCC Part 15 Subpart J
Device Requirements
Bluetooth communication must be paired to smartphone
Loner Mobile must be installed on smartphone
Loner Mobile must be activated within Loner Portal web app
Warranty
One year limited factory warranty
Loner Portal Web Application
Features include: Alarm banner, event history, device location
mapping, device management, alert & notication settings and more.
19
Page 22

Loner FDU Care
Considerations Regarding Use and Storage of the
Loner FDU
The Loner FDU meets IP65 ingress protection ensuring that under normal
operation no dirt or water can enter the device.
Storage temperature range of: -30 to 75°C (-22 to 167°F).
Operating temperature range of: -20 to 55°C (-4 to 131°F).
Charging temperature: 0 to 45° C (32 to 113° F).
More details can be found in the specications section.
Customer Care
Customer Care for the Loner FDU
Customer Care for the Loner FDU is available between the hours of 8 am and 5 pm
Mountain Time.
North America toll-free: 1-877-869-7212 | International: +1-403-451-0327
Email: [email protected]
www.blacklinetracking.com
20 // USER GUIDE
Page 23

Page 24

www.blackline gps.com
100898
 Loading...