

Page 1
CAUTION
GENERAL
- Read all instructions carefully for safe operation and installation.
- All electrical connections must be in accordance with local and national electrical code (N.E.C) standards.
- Remove the fixture and the mounting package from the box and make sure that no parts are missing by
referencing the illustrations on the installation instruction. Please contact Blackjack Lighting if any parts
are missing or damaged.
- This product is suitable for damp locations.
INSTALLATION
PREPARATION
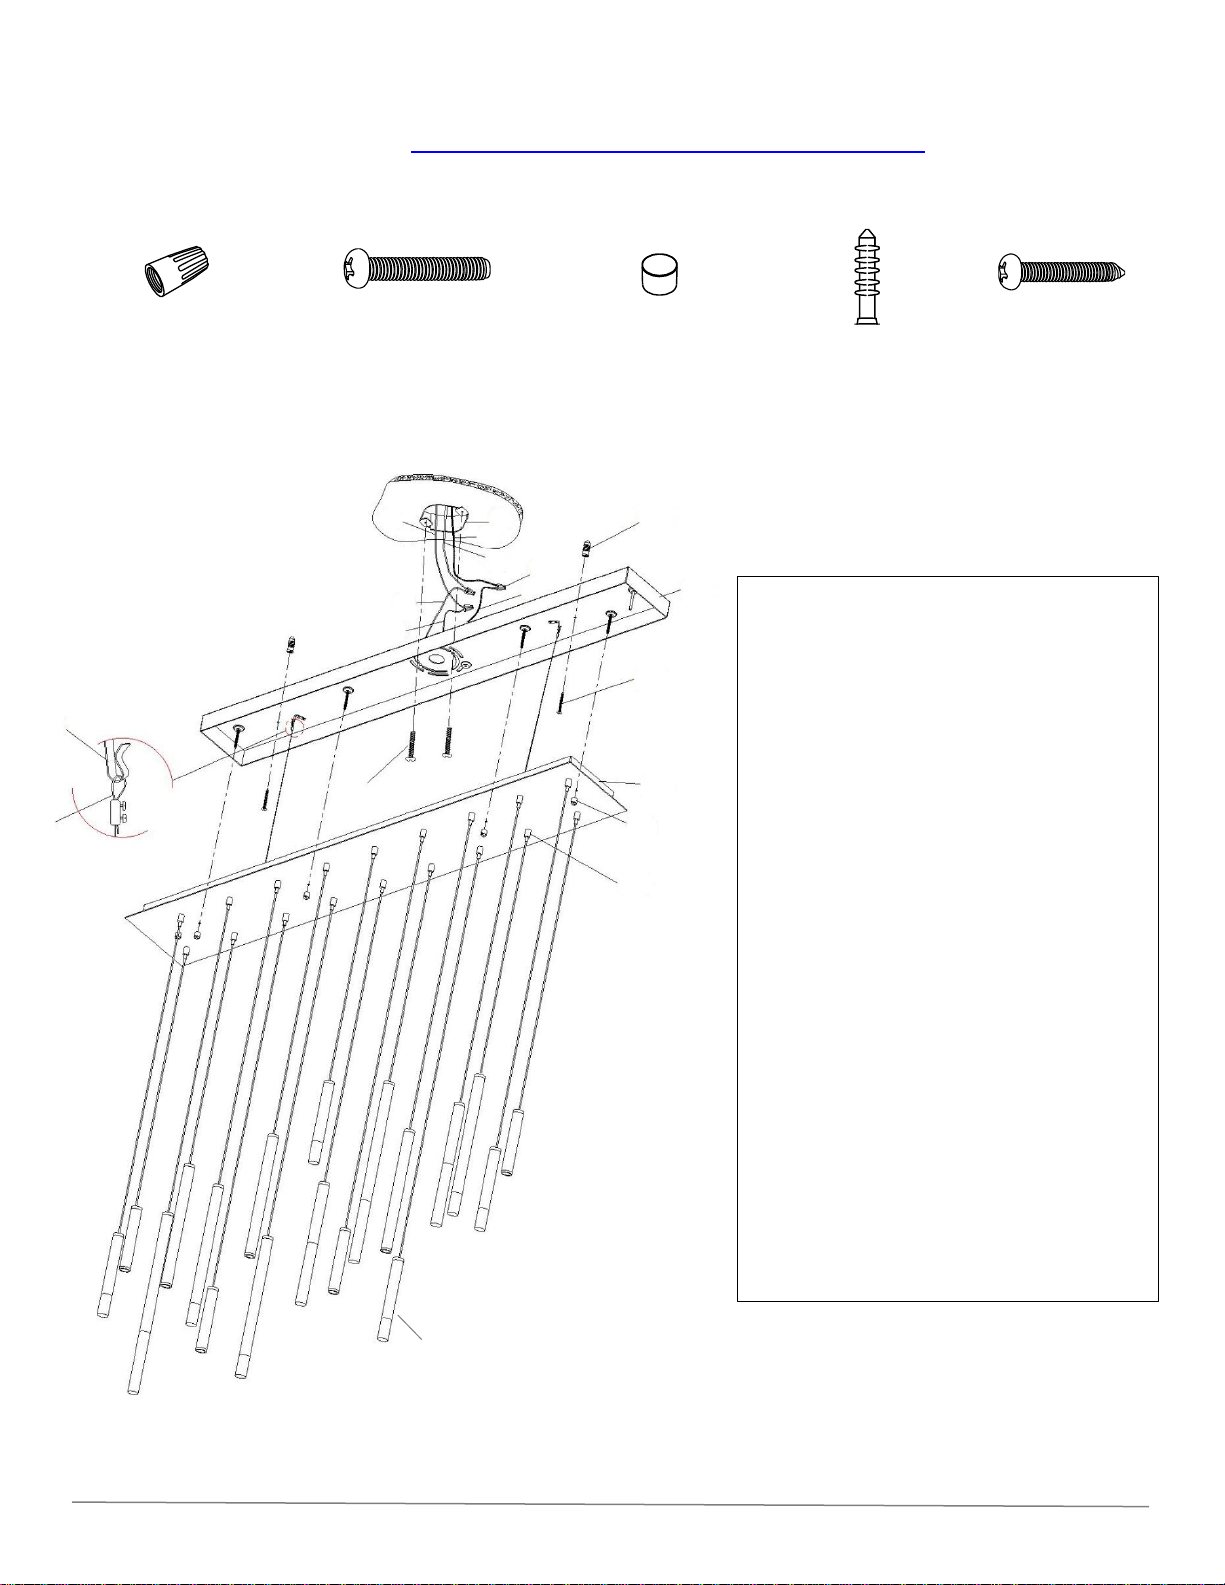
1. Remove the fixture from its box. Carefully unpack the bundled wire packages. Be careful not to bend or kink the wires
when unpacking them. Remove the additional package with the 18 decorative light guides(16).
2. Remove the ceiling plate(10) from the canopy cover(11) by loosening the four decorative nuts(12).
MOUNTING
3. Place the ceiling plate(10) over the outlet box(1) to mark for drilling the two support holes. Drill the two support holes
using the appropriately sized drill bit. Insert the provided ceiling anchors(17) into the holes. First screw the anchor
screws(18) halfway into the ceiling anchors(17), then further attach the ceiling plate(10) to the outlet box(1) using the
two mounting screws(9). Afterward fully tighten all the anchor screws(18) into the ceiling anchors(17).
4. Pull the supply wires(2&4) and the house ground wire(6) out of the outlet box(1) and thread them through the large
center hole in the back panel(10)
5. Temporarily suspend the canopy cover(11) from the ceiling plate(10) by attaching the two support loops(14) to the
mating hooks(13)(secured in the ceiling plate(10)).
ELECTRICAL CONNECTIONS
6. Using the wire connectors(8), connect the white supply wire(2) to the white fixture wire(3); connect the black supply
wire(4) to the black fixture wire(5); and connect the house ground wire(6) to the fixture ground wire(7). Carefully tuck all
of the wires back into the outlet box(1).
FINAL ASSEMBLY
7. Determine the appropriate length of each suspension cable (if in doubt about exact length needed, leave a little extra
cable until the final installation of the canopy cover(11)). Push the excess cable up into the canopy by pressing the small
barrel of the gripper(15) upward. This will release the cable tension and allow the suspended cable to be pulled through
gripper(15). Roll the excess cable into a small loop inside of the canopy. Wrap the supplied Velcro strap around the loop
to keep the excess cable from falling outside of the canopy(11).
8. Make sure all the cables are carefully placed inside canopy cover(11). Secure the canopy cover(11) to the ceiling
plate(10) by tightening the four decorative nuts(12).
9. Once the canopy is in place, use the gripper(15) to fine tune the wire lengths until each light guide(16) is adjusted to
its preferred length.
10. Once the length of each cable has been established, any remaining bends or kinks in the wire can be straightened by
bending out the kinks by hand while heating the cord up with the warm air from a hair dryer or heat gun.
TURN OFF THE MAIN POWER AT THE CIRCUIT
BREAKER BEFORE INSTALLING THE FIXTURE IN
ORDER TO PREVENT POSSIBLE SHOCK
IF YOU ARE UNFAMILIAR WITH PROPER
ELECTRICAL WIRING CONNECTIONS OBTAIN
THE SERVICES OF A QUALIFIED ELECTRICIAN
Page 2
DIMMING
- Fixture Dimming Type: TRIAC, ELV, or 0-10V dimmable.
- For recommended dimmers see https://www.blackjacklighting.com/dimming-information
HARDWARE
Wire Connectors (#8) Mounting Screws (#9) Decorative Nut (#12) Anchor (#17) Anchor Screw (#18)
[ 3 Included ] [ 2 Included ] [ 4 Included ] [ 2 Included ] [ 2 Included ]
BLACKJACK LIGHTING 1547 Barclay Blvd. Buffalo Grove, IL 60089 Blackjacklighting.com Tel: 847-941-0588
1. OUTLET BOX (by others)
2. WHITE SUPPLY WIRE
3. WHITE FIXTURE WIRE
4. BLACK SUPPLY WIRE
5. BLACK FIXTURE WIRE
6. HOUSE GROUND WIRE
7. FIXTURE GROUND WIRE
8. WIRE CONNECTORS
9. MOUNTING SCREWS
10. CEILING PLATE
11. CANOPY COVER
12. DECORATIVE NUT
13. HOOK
14. LOOP
15. GRIPPER
16. LIGHT GUIDE
17. CEILING ANCHOR
18. ANCHOR SCREW
(1)
(6)
(8)
(7)
(2)
(3)
(4)
(5)
(9)
(10)
(11)
(12)
(13)
(14)
(15)
(16)
(17)
(18)
 Loading...