

Black & Decker X750R, X810R User Manual
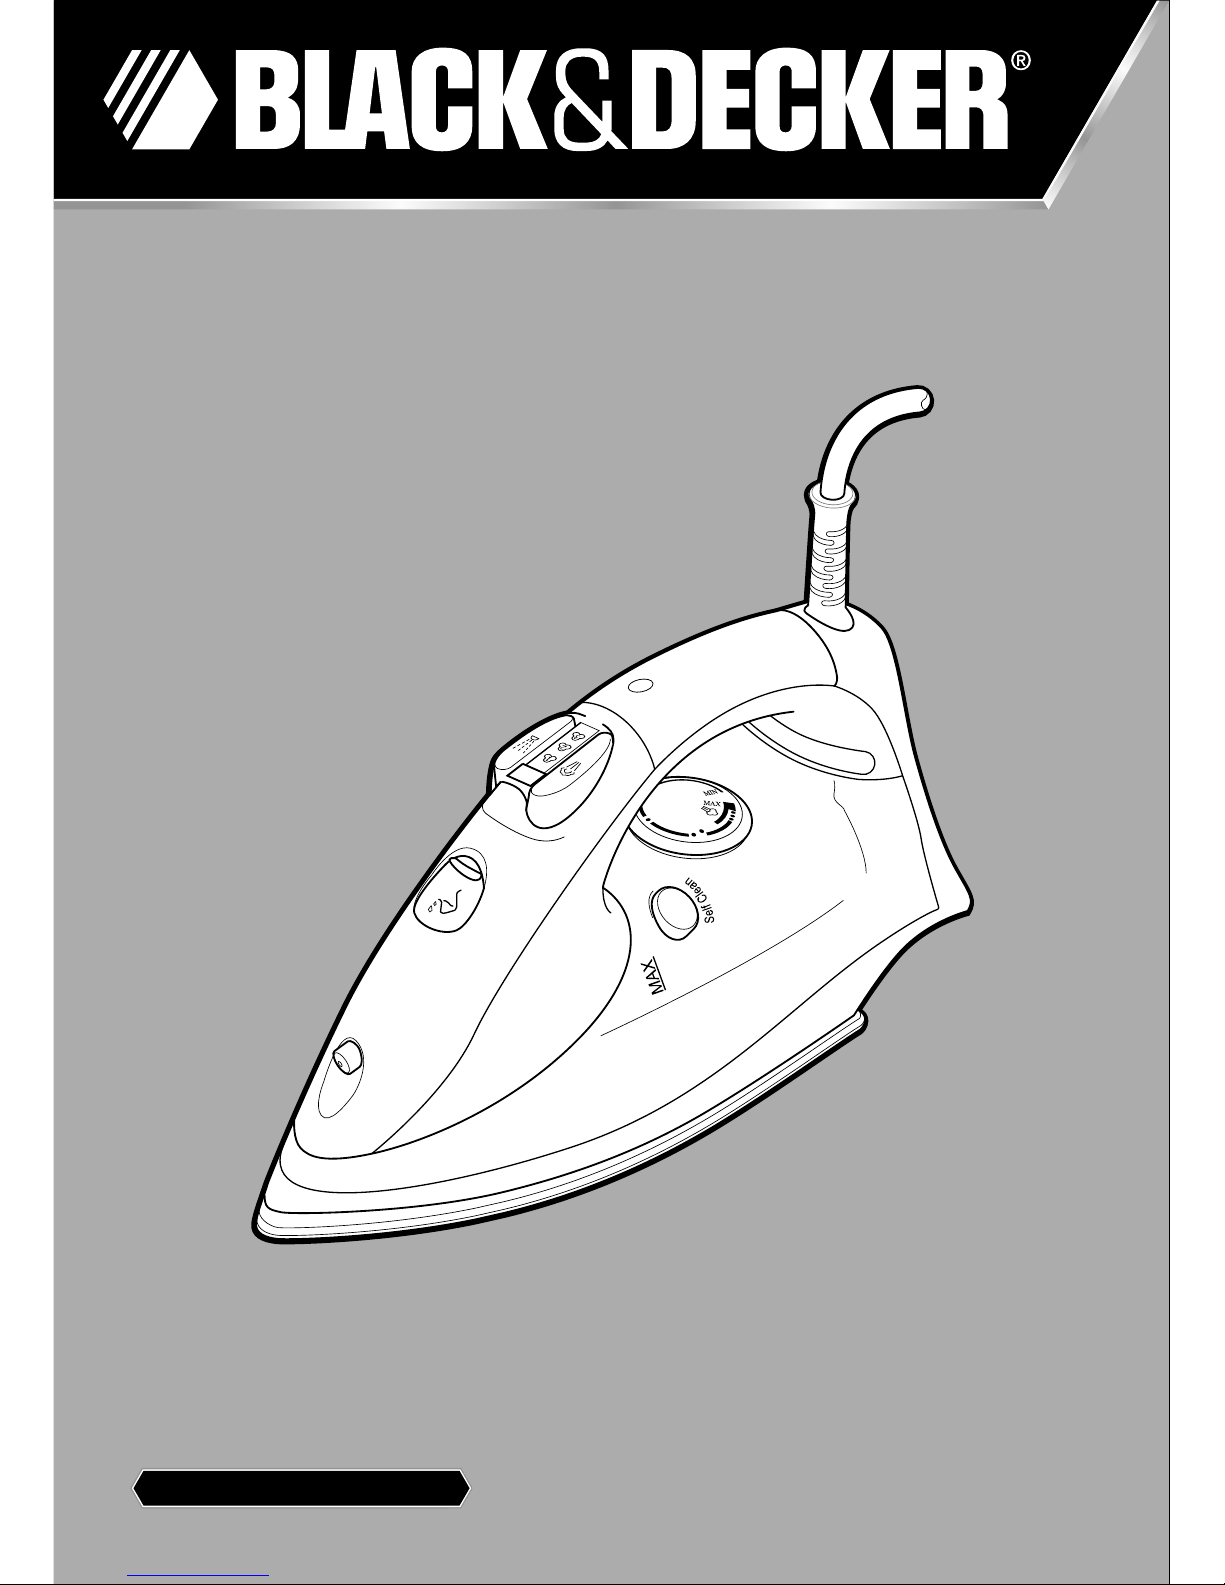
X750R
X810R
www.blackanddecker.ae
ENGLISH
2
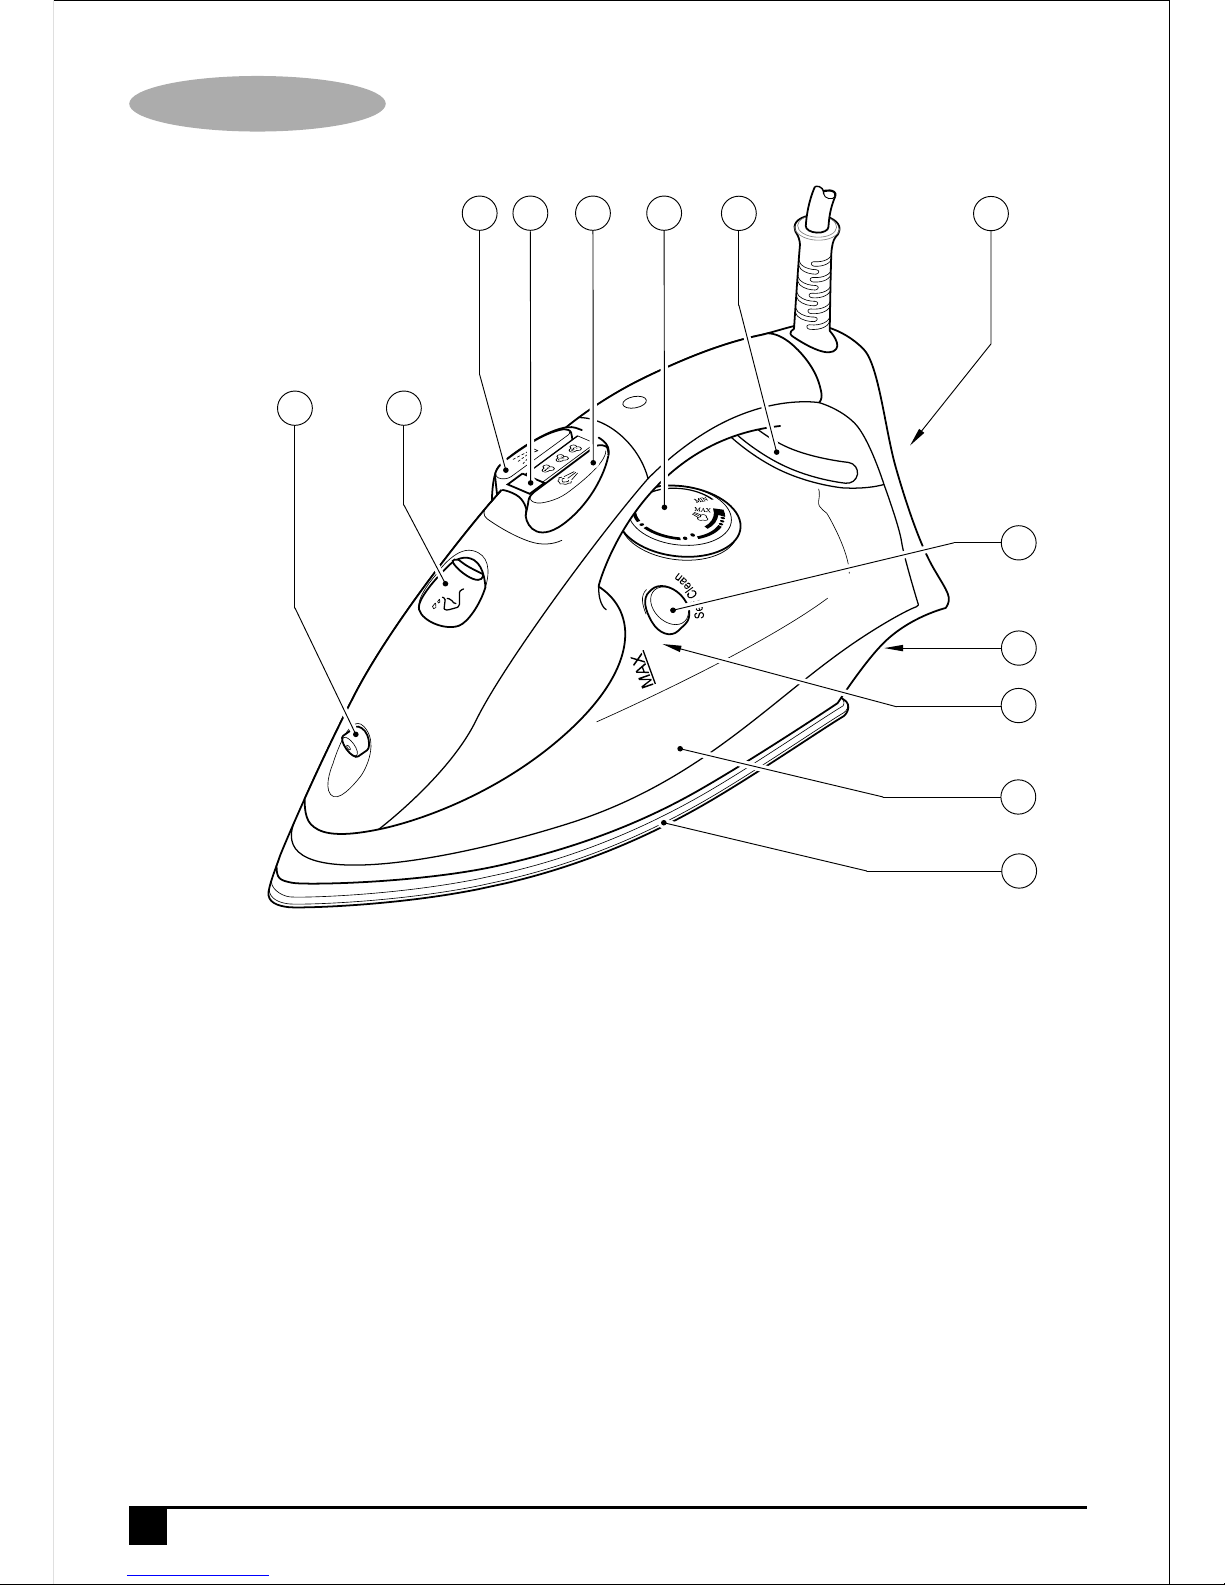
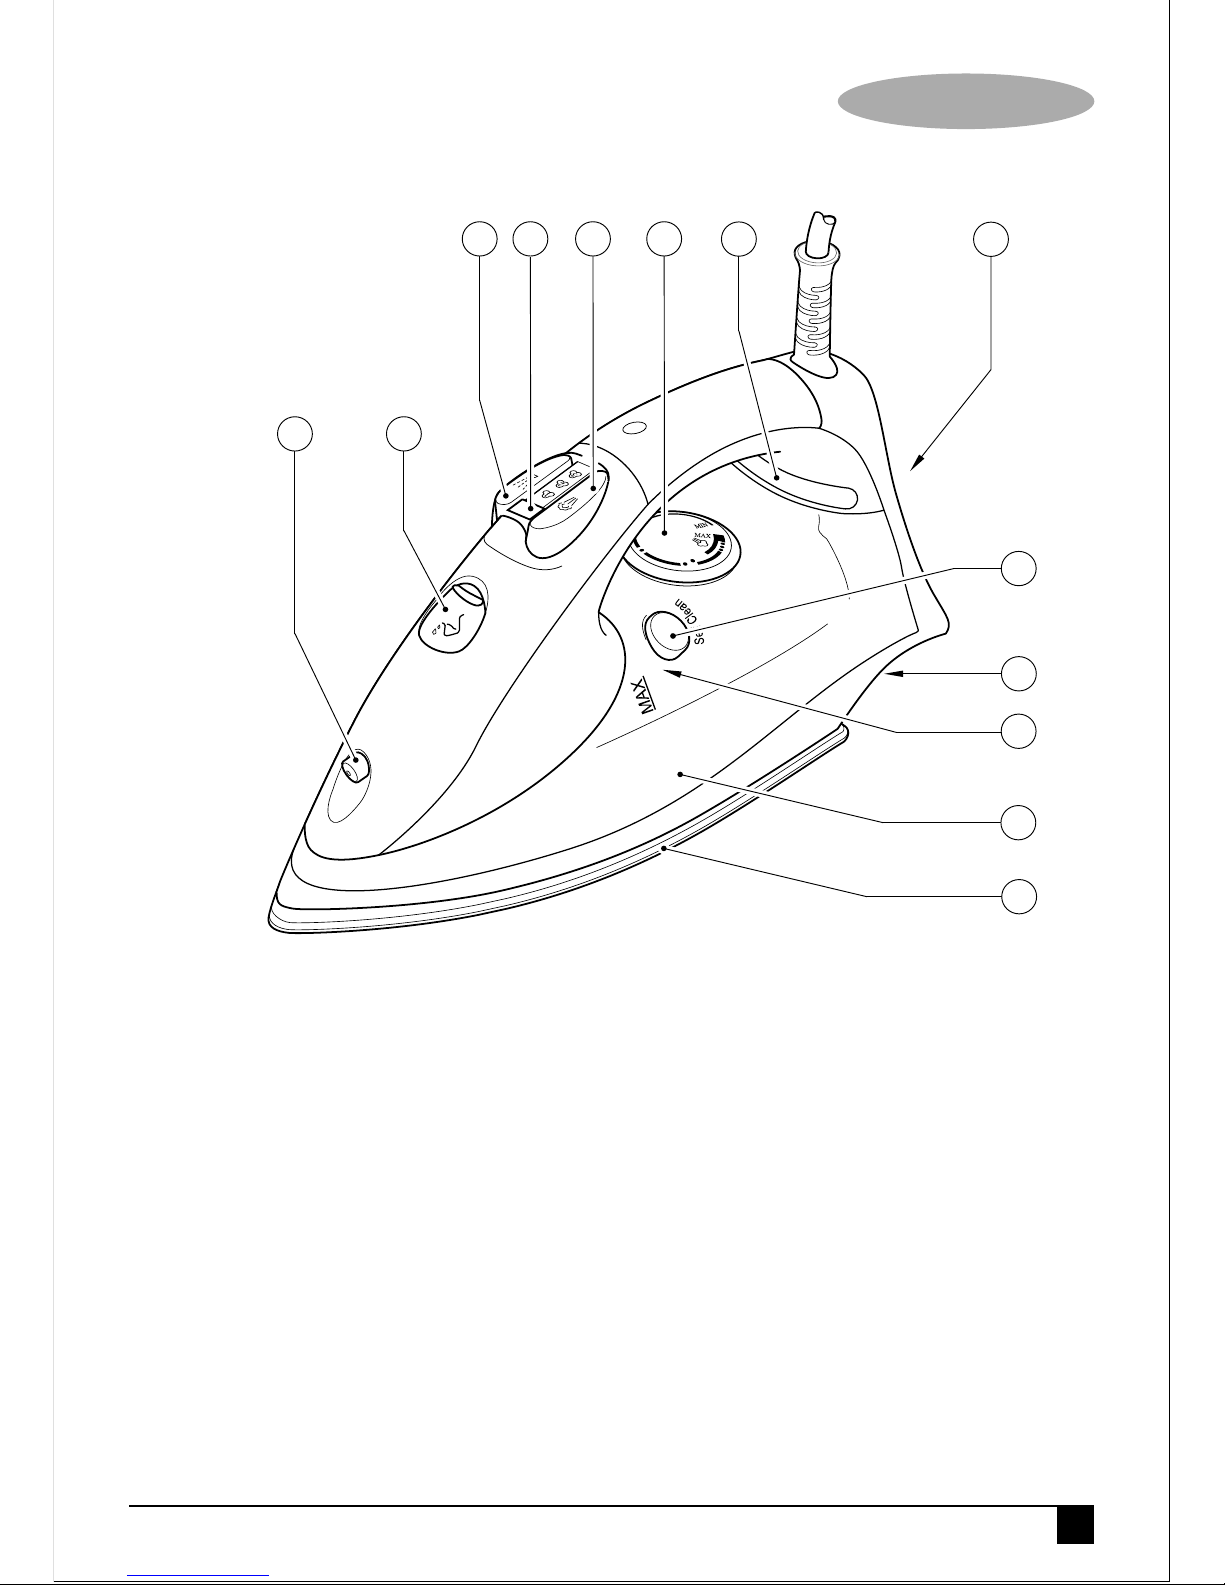
Parts Identification
1. Spray button
2. Steam control dial
3. Steam burst button
4. Temperature control dial
5. Heating light
6. Heel rest
7. Self-clean button
8. Cord storage
9. Maximum filling level indicator
10. Water tank
11. Soleplate
12. Water tank cover
13. Spray nozzle
1
1 2 3 4 5 6
7
8
9
10
11
1213

3
ENGLISH
Intended use
Your Black & Decker iron has been designed for
ironing garments made of linen, cotton, silk,
wool and synthetic materials. This product is
intended for household use only.
Safety instructions
Warning! When using mains-powered
appliances, basic safety precautions, including
the following, should always be followed to
reduce the risk of fire, electric shock, personal
injury and material damage.
Read all of this manual carefully before using
the appliance.
• The intended use is described in this manual.
The use of any accessory or attachment or
the performance of any operation with this
appliance other than those recommended in
this instruction manual may present a risk of
personal injury.
• Retain this manual for future reference.
Using your appliance
• Make sure that the appliance is switched off
before connecting to or disconnecting from
the power supply.
• Always take care when using the appliance.
• Do not use the appliance outdoors.
• Never pull the power supply cord to
disconnect the plug from the socket. Keep
the power supply cord away from heat, oil
and sharp edges.
• If the power supply cord is damaged during
use, disconnect the appliance from the
power supply immediately. Do not touch the
power supply cord before disconnecting from
the power supply.
• Disconnect the appliance from the power
supply when not in use, before fitting or
removing parts and before cleaning.
Safety of others
• This appliance is not intended for use by
persons (including children) with reduced
physical, sensory or mental capabilities, or
lack of experience and knowledge, unless
they have been give supervision or instruction
concerning use of the appliance by a person
responsible for their safety.
• Children must be supervised to ensure that
they do not play with the appliance.
After use
• Switch off and remove the plug from the
socket before leaving the appliance
unattended and before changing, cleaning or
inspecting any parts of the appliance.
• When not in use, the appliance should be
stored in a dry place. Children should not
have access to stored appliances.
Inspection and repairs
• Before use, check the appliance for damaged
or defective parts. Check for breakage of
parts, damage to switches and any other
conditions that may affect its operation.
• Do not use the appliance if any part is
damaged or defective.
• Have any damaged or defective parts
repaired or replaced by an authorised repair
agent.
4
ENGLISH
• Before use, check the power supply cord for
signs of damage, ageing and wear.
• Do not use the appliance if the power supply
cord or mains plug is damaged or defective.
• If the power supply cord or mains plug is
damaged or defective it must be repaired by
an authorised repair agent in order to avoid a
hazard. Do not cut the power supply cord
and do not attempt to repair it yourself.
• Never attempt to remove or replace any
parts other than those specified in this
manual.
Electrical Safety
This product must be earthed. Always
check that the power supply
corresponds to the voltage on the rating plate.
Power plugs must match the outlet. Never
modify the plug in any way. Do not use any
adapter plugs with earthed (Class 1) appliances.
Unmodified plugs and matching outlets will
reduce the risk of electric shock.
• To avoid risk of electric shock, do not
immerse the cord, plug or motor unit in water
or other liquid.
• Check that the supply voltage shown on the
rating plate of the appliance matches that of
your electrical system. Any connection error
will invalidate the guarantee.
Extension cables and Class I
product
A 3 core cable must be used as your
appliance is earthed and of Class I
construction. Up to 30m (100 ft) can be used
without loss of power.
Mains plug replacement
If a new mains plug needs to be fitted:
• Safely dispose of the old plug
• Connect the brown lead to the live terminal of
the new plug
• Connect the blue lead to the neutral terminal
• If the product is class I (earthed), connect the
green/yellow lead to the earth terminal.
Note: If your product is class II double insulated
(only 2 wires in the cord set), no connection is to
be made to the earth terminal.
Follow the fitting instructions supplied with good
quality plugs
Any replacement fuse must be of the same
rating as the original fuse supplied with the
product.
Warning! The above section on mains plug
replacement is for authorized service centre
personals.
Additional safety instructions
for irons
• Always route the cord carefully to avoid a
tripping hazard.
• Do not use the appliance near water.
• Do not place the appliance near heat sources
or directly under cabinets. Do not use the
appliance in the presence of explosive or
flammable materials.
• The filling apperture must not be opened
during use.

5
ENGLISH
• Steam may escape from the soleplate.
• Surfaces may be hot during use and during
the cooldown period.
• Set the temperature control dial to the min
position before plugging in or out.
• Let the appliance cool down before leaving it
unattended and before cleaning or inspecting
any parts of the appliance.
• The power supply cord should not touch the
hot soleplate during use or during the cool
down period.
• Do not touch the soleplate until it has cooled
down.
• Wait until the appliance has cooled down
before emptying the water tank as the water
may still be hot.
• Always diconnect the appliance from the
supply before filling, emptying, cleaning, or
carying out any maintenance on the
appliance.
• The iron must be used and rested on a
stable surface
• The iron is not to be used if it has been
dropped, if there are visible signs of damage
or if it is leaking
Before first use
Cleaning the soleplate
• Make sure that the appliance is unplugged.
• Fill the appliance with water as described
below.
• Use the self-clean system as described
below. When finished, wipe the soleplate and
steam vents with a cloth.
Some parts of the appliance have been lightly
greased and as a result the appliance may
smoke slightly when switched on for the first
time. This will cease after a short while.
Assembly
Warning! Before assembly, make sure that the
appliance is switched off and unplugged.
Filling the water tank (Fig. B)
In order to be able to use the steam function or
the spray feature, you will first need to fill the
water tank with water.
• Make sure that the appliance is unplugged.
• Open the water tank cover (12).
• Hold the appliance at an angle as shown.
• Fill the appliance with water using the beaker
provided.
• Close the water tank cover.
Warning! Never fill above the maximum filling
level (9). Normal tap water can be used, but if
you live in a hard water area the use of distilled
water is recommended.
• Do not use chemically descaled water.
Use
Warning! Do not leave the appliance
unattended while it is connected to the power
supply and during the cool down period.

6
ENGLISH
Temperature setting
The required temperature setting depends on
the garment fabric.
• Adjust the temperature control dial (4) to the
required setting:
1 Silk / Nylon
2 Acctate / Acrylic
3 Polyester / Rayan
4 Cotton / Blends
5 Wool
6 Cotton
7 Linen
• If you are unsure of the fibre content of a
garment, start with a low temperature setting
and test on a small area (seam or inside
hem). If wrinkles remain, gradually increase
the heat setting until you find the optimum
setting.
Using as a dry iron
• Stand the appliance on its heel rest (6).
• Plug the appliance in and switch on.
• Set the steam control dial (2) to the 'O'
position.
• Adjust the temperature control dial (4) to the
required setting.
The heating light (5) will switch off when the
appliance has reached the required
temperature.
Using as a steam iron
• Fill the water tank as described above.
• Stand the appliance on its heel rest (6).
• Plug the appliance in and switch on.
• Adjust the temperature control dial (4) to the
required steam setting.
The heating light (5) will switch on. When the
heating light switches off, the iron will be ready
for use as a steam iron. The heating light will
regularly switch on and off whilst ironing.
• To create steam, set the steam control dial
(2) to the required steam position.
Using the steam burst button
The steam burst feature can only be used whilst
ironing on a high temperature setting.
• Make sure that there is water in the tank and
the temperature control dial (4) is set to the
steam position.
• Lift the appliance and press the steam burst
button (3). You may need to press a few
times to activate the pump.
Using the spray button
The spray feature can be used at any
temperature setting when either steam or dry
ironing.
• Make sure that there is water in the tank.
• Press the button (1) several times to activate
the pump while you are ironing.
Using the self-clean button
The self-clean function must be used before
using the appliance for the first time and then
regularly to remove scale.
• Fill the tank (10) to the maximum filling level
(9).
• Set the temperature control dial (4) to the
max position.
• Plug the appliance in and switch on.
• Allow the appliance to heat up until the
heating light (5) switches off and then on
again.
• Unplug the appliance and hold it horizontally
over the sink.
• Press the self-clean button (7).
Hot water and steam will come out of the vents.
Impurities and scale will be washed away.
• Move the iron backwards and forwards while
this is happening.
• Release the self-clean button.
• Stand the appliance upright on its heel.
• Plug the appliance in and switch on.
• Iron an old cloth or towel to dry the soleplate.
Hints for optimum use
• Sort the articles to be ironed according to the
fabric. Start ironing with the fabrics requiring
the lowest heat setting.
• The appliance can be used as a dry iron
even if there is water in the tank. Do not fill
the tank with water if the appliance is to be
used as a dry iron for an extended period.
• Avoid ironing over zippers, rivets on jeans
etc. as they will scratch the soleplate.
Cleaning and storage
Warning! Before cleaning and storing, unplug
the appliance and allow it to cool down.
• Pour out any remaining water after each use
by tilting the appliance forward.
• Clean the body with a soft damp cloth.
• Wipe scale and other residues off the
soleplate with a damp cloth.
• Store in an upright position. The cord can be
wound around the cord storage (8).
Technical Data
7
ENGLISH
X750R X810R
Voltage 220-240V 220-240V
Frequency 50/60Hz 50/60Hz
Rated Power 1450-1750W 1600-2000W

8
ENGLISH
Protecting the environment
Separate collection. This product must not
be disposed of with normal household
waste.
Should you find one day that your Black &
Decker product needs replacement, or if it is of
no further use to you, do not dispose of it with
other household waste. Make this product
available for separate collection.
• Black & Decker provides a facility for
recycling Black & Decker products once they
have reached the end of their working life.
This service is provided free of charge. To
take advantage of this service please return
your product to any authorised repair agent
who will collect them on our behalf.
• You can check the location of your nearest
authorised repair agent by contacting your
local Black & Decker office at the address
indicated in this manual. Alternatively, a list of
authorized Black & Decker repair agents and
full details of our after-sales service and
contact are available on the Internet at:
www.2helpU.com.
Warranty
Black & Decker is confident of the quality of its
products and offers an outstanding warranty.
This warranty statement is in addition to and in
no way prejudices your statutory rights.
The warranty is valid within the territories of the
Member States of the European Union and the
European Free Trade Area.
If a Black & Decker product becomes defective
due to faulty materials, workmanship or lack of
conformity, within 24 months from the date of
purchase, Black & Decker warranty to replace
defective parts, repair products subjected to fair
wear and tear or replace such products to ensure
minimum inconvenience to the customer unless:
The product has been used for trade,
professional or hire purposes;
The product has been subjected to misuse
or neglect;
The product has sustained damage
through foreign objects, substances or
accidents;
Repairs have been attempted by persons
other than authorised repair agents or
Black & Decker service staff.
To claim on the warranty, you will need to submit
proof of purchase to the seller or an authorised
repair agent. You can check the location of your
nearest authorised repair agent by contacting
your local Black & Decker office at the address
indicated in this manual.
Alternatively, a list of authorised Black & Decker
repair agents and full details of our after-sales
service and contacts are available on the Internet
at: www.2helpU.com.
9
FRANÇAIS
Identification des pièces
1. Touche spray
2. Variateur de vapeur
3. Touche jet de vapeur
4. Cadran de réglage de la température
5. Voyant de température
6. Talon d’appui
7. Touche auto-nettoyage
8. Espace de rangement du cordon
9. Repère de remplissage maximum
10. Réservoir d’eau
11. Semelle de repassage
12. Dispositif de fermeture du réservoir d’eau
13. Gicleur
1
1 2 3 4 5 6
7
8
9
10
11
1213
 Loading...