

Black & Decker Workmate 79-020 Owner's Manual
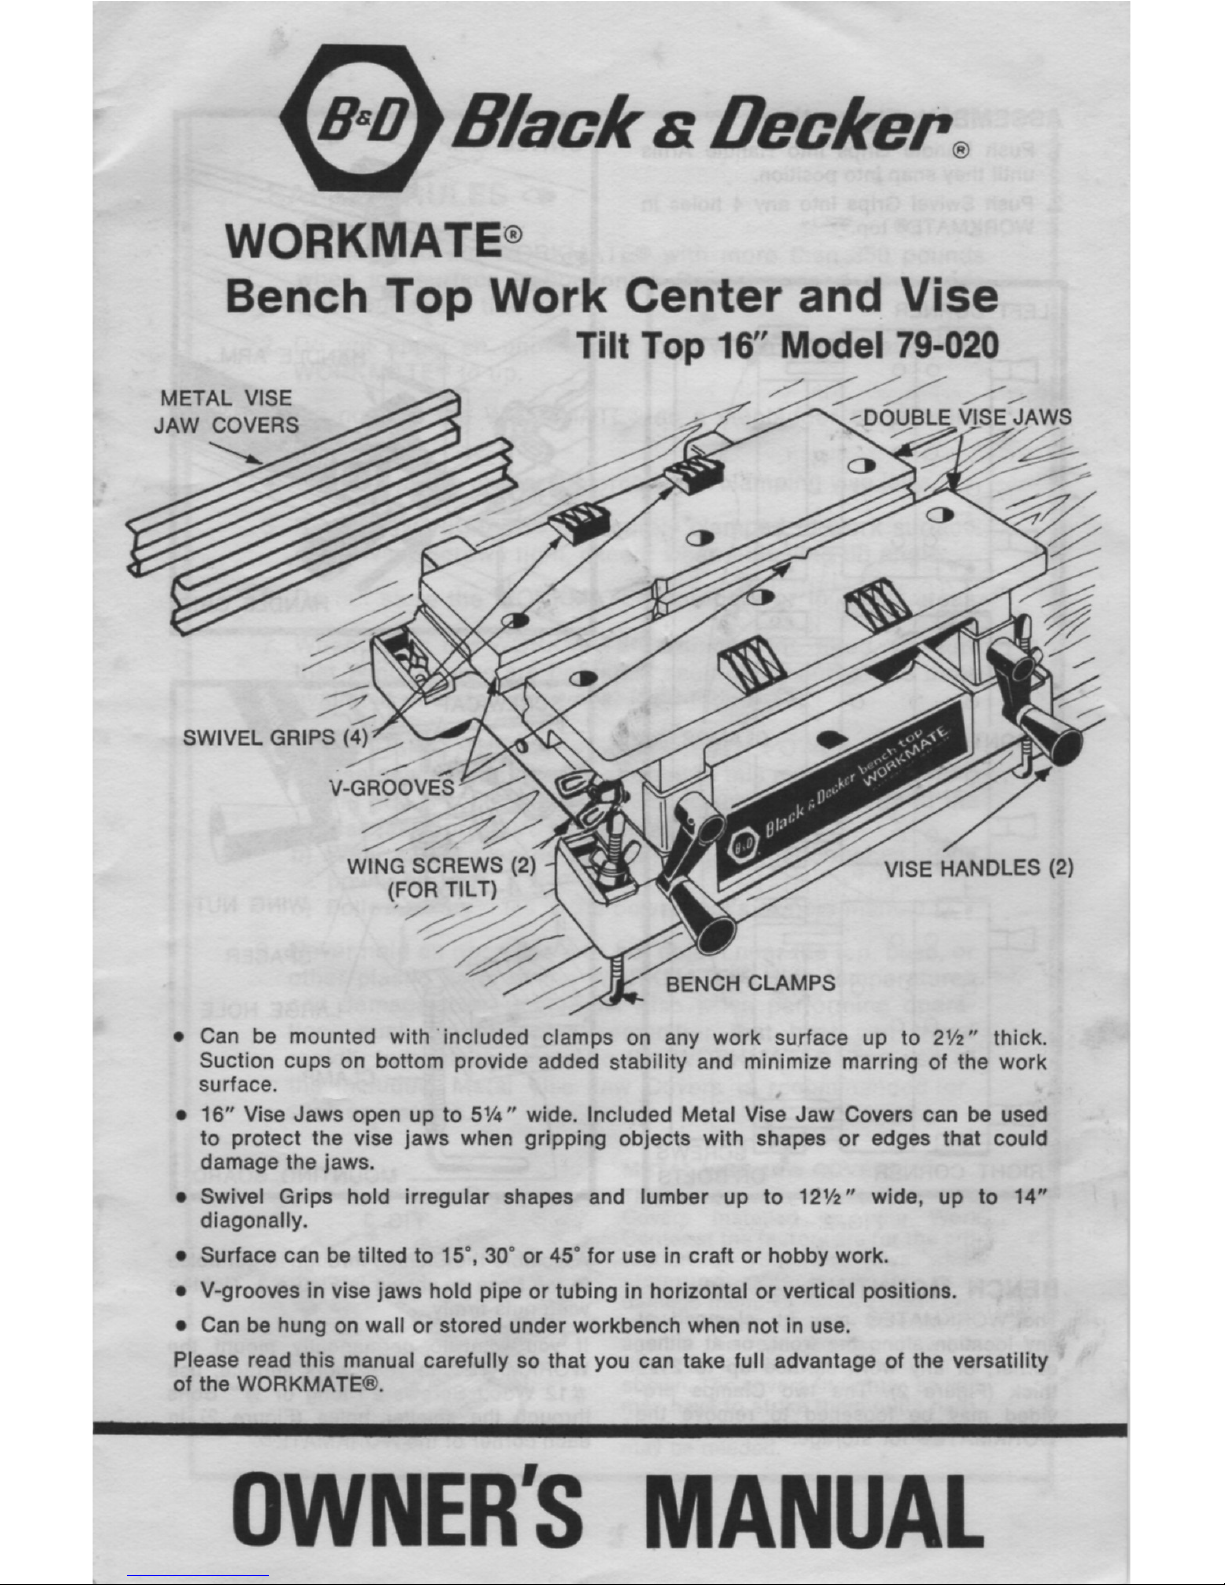
METAL VISE
JAW COVERS
SWIVEL GRIPS (4)
V-GROOVES
WING SCREWS (2)
(FOR TILT)
Black s Decker ,
WORKMATE®
Bench Top Work Center and Vise
Tilt Top 16" Model 79-020
-DOUBLE VISE JAWS
BENCH CLAMPS
VISE HANDLES (2)
• Can be mounted with included clamps on any work surface up to 21/2" thick.
Suction cups on bottom provide added stability and minimize marring of the work
surface.
• 16" Vise Jaws open up to 51/4" wide. Included Metal Vise Jaw Covers can be used
to protect the vise jaws when gripping objects with shapes or edges that could
damage the jaws.
• Swivel Grips hold irregular shapes and lumber up to 121/2" wide, up to 14"
diagonally.
• Surface can be tilted to 15°, 30° or 45° for use in craft or hobby work.
• V-grooves in vise jaws hold pipe or tubing in horizontal or vertical positions.
• Can be hung on wall or stored under workbench when not in use.
Please read this manual carefully so that you can take full advantage of the versatility
of the WORKMATE®.
OWNER'S MANUAL
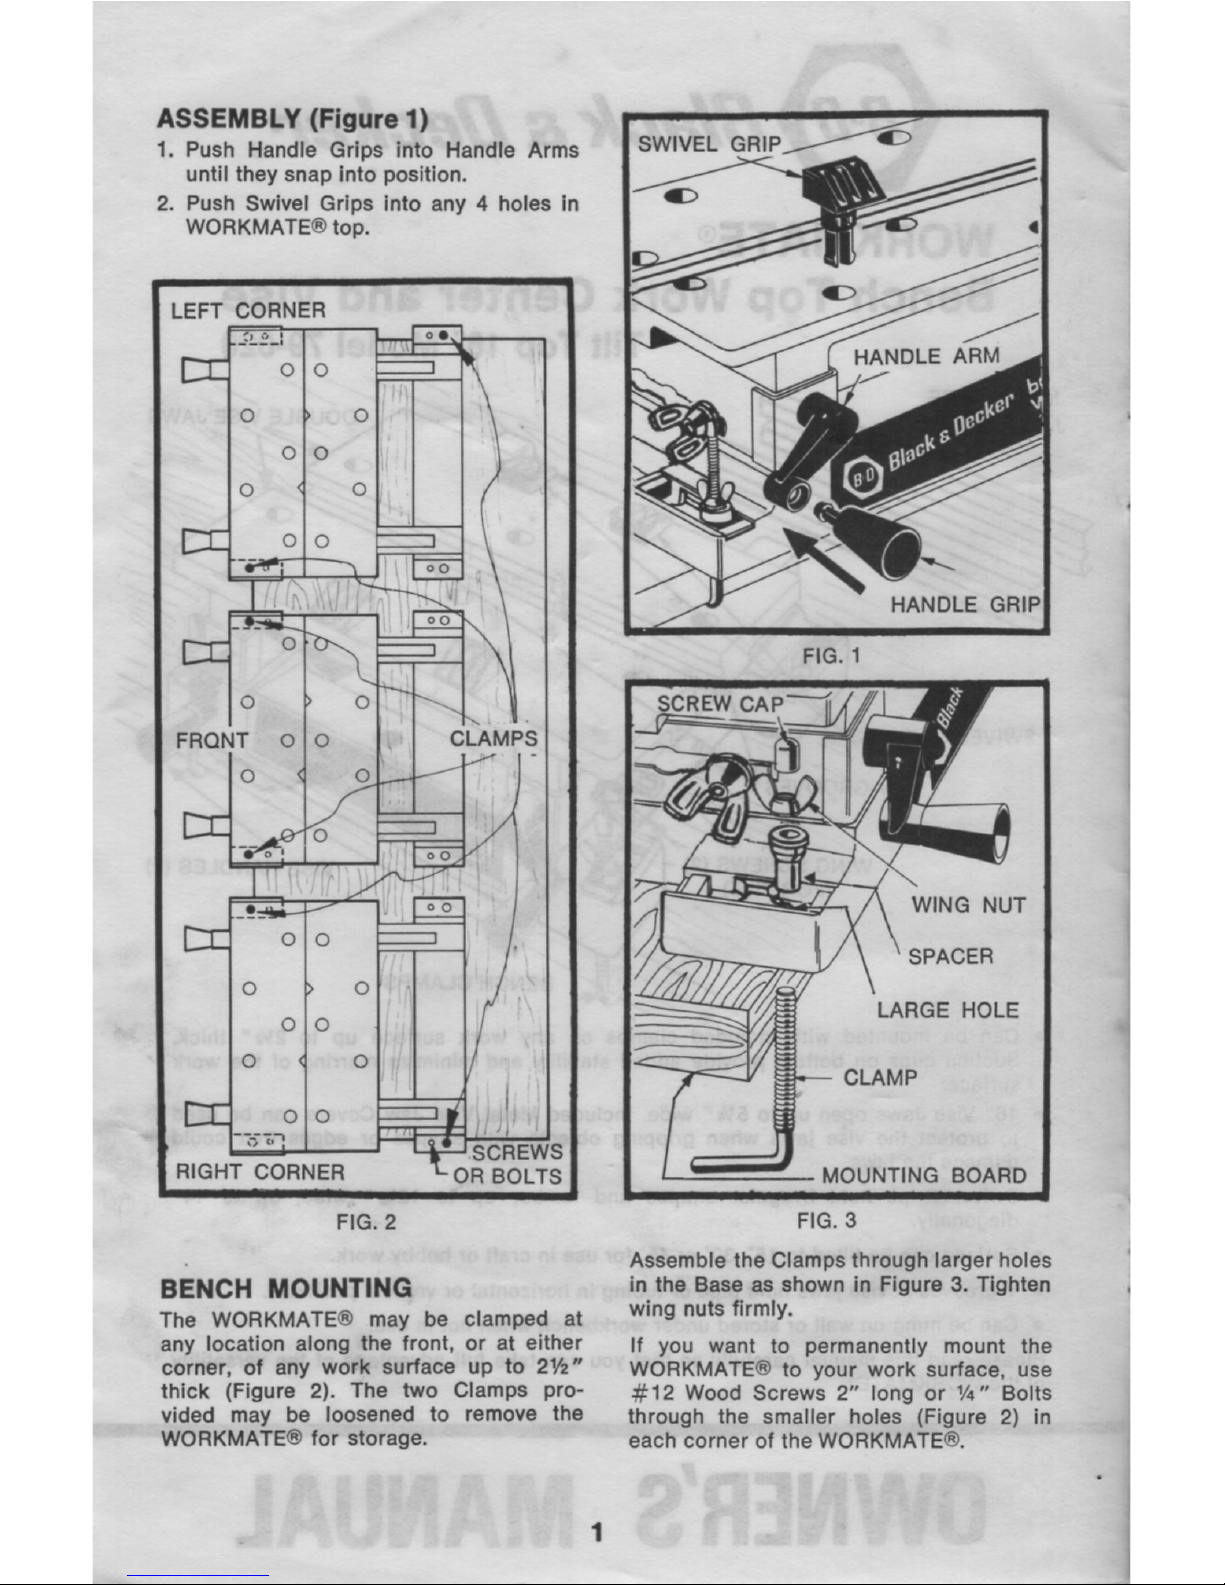
ASSEMBLY (Figure 1)
1. Push Handle Grips into Handle Arms
until they snap into position.
2. Push Swivel Grips into any 4 holes in
WORKMATE top.
LEFT CORNER
0
0
0
0
0
31_
0
0
FRONT 0
0 <
0
00
CLAMPSCLAMPS
I.
00
00
00
00
0
RIGHT CORNER OR SCREWS
0R BOLTS
FIG. 2
BENCH MOUNTING
The WORKMATE may be clamped at
any location along the front, or at either
corner, of any work surface up to 21/2"
thick (Figure 2). The two Clamps pro-
vided may be loosened to remove the
WORKMATE® for storage.
SWIVEL GRIP
SCREW CAP
HANDLE ARM
FIG. 1
HANDLE GRIP
WING NUT
SPACER
LARGE HOLE
CLAMP
MOUNTING BOARD
FIG. 3
Assemble the Clamps through larger holes
in the Base as shown in Figure 3. Tighten
wing nuts firmly.
If you want to permanently mount the
WORKMATE @ to your work surface, use
12 Wood Screws 2" long or 1/4" Bolts
through the smaller holes (Figure 2) in
each corner of the WORKMATE®.
1
SAFETY RULES
1. Do not load the WORKMATE® with more than 350 pounds
when top surface is horizontal. Do not exceed 40 pounds
when surface is tilted.
2. Do not apply an unbalanced load which could cause the
WORKMATE® to tip.
3. Do not use the WORKMATE® as a stepladder or standing
platform.
4. Avoid applying excessive force when clamping vise jaws.
5. Be sure WORKMATE® is securely clamped to work surface.
Keep Wing Screws tight, except when adjusting tilt angle.
6. Do not store the WORKMATE® outdoors or in damp areas.
7. When using the WORKMATE® with the top tilted, be sure
that Wing Screws are tightened securely in one of the three
available detented positions. (See Figure 17).
8. WHEN USING THE WORKMATE ® WITH POWER TOOLS:
a) Use only the methods described in this manual for mount-
ing power tools. Never mount power tools directly in the
vise jaws; pressure may damage tool.
b) Wear safety glasses or other eye protection when using
power tools.
c) Follow safety rules in the power tool's owners manual.
9. Never hold an open flame or hot object near the top, base, or
other plastic parts of the WORKMATE®. High temperatures
can damage these materials. Also when performing opera-
tions such as soldering, remember that heat can travel
rapidly through the metal to the WORKMATE®. The use of
the included Metal Vise Jaw Covers is recommended for
such operations.
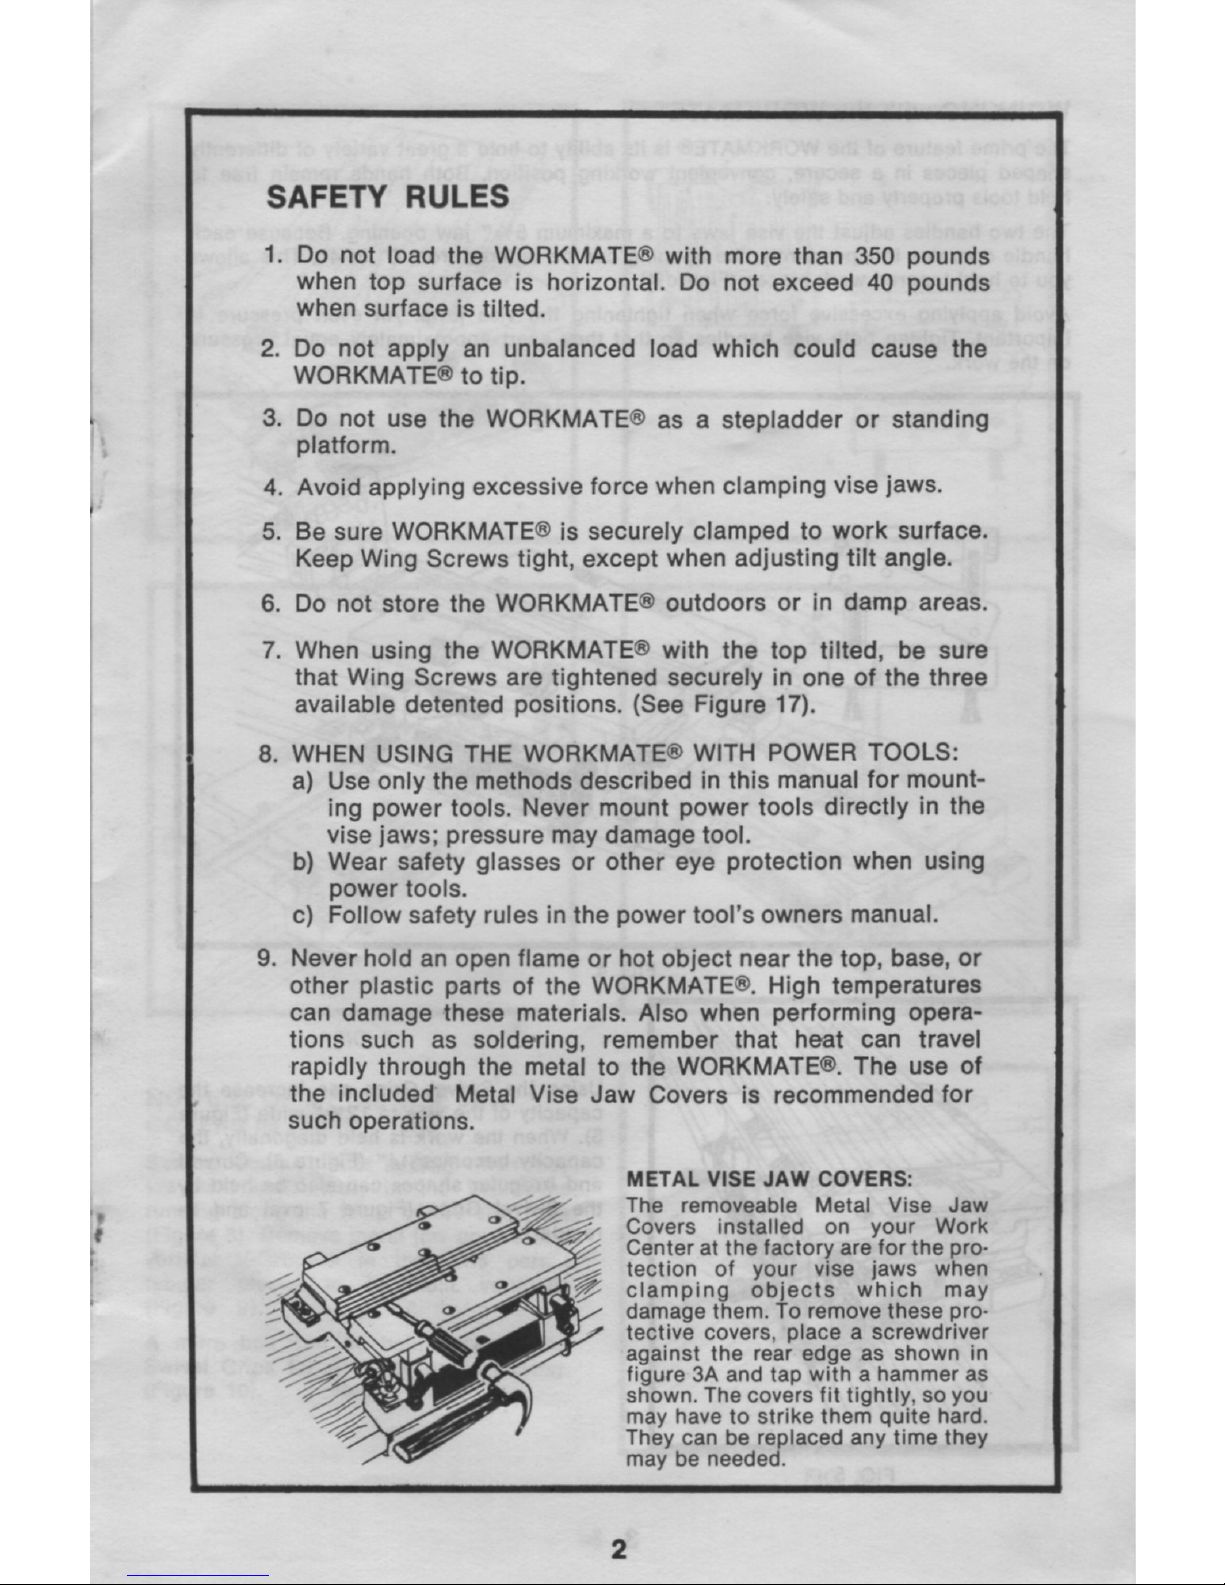
METAL VISE JAW COVERS:
The removeable Metal Vise Jaw
Covers installed on your Work
Center at the factory are for the pro-
tection of your vise jaws when
clamping objects which may
damage them. To remove these pro-
tective covers, place a screwdriver
against the rear edge as shown in
figure 3A and tap with a hammer as
shown. The covers fit tightly. so you
may have to strike them quite hard.
They can be replaced any time they
may be needed.
2
 Loading...