

Black & Decker Workmate 525 Instruction Manual
Workmate
®
525
Copyright © 2004 Black & Decker Printed in China
Cat. No. WM525 Form No. B&D 588974-03, Rev. 1 (Sept. ‘04)
588974-03,01,WM525* 9/24/04 2:07 PM Page 1

1-800-54-HOW-TO1-800-54-HOW-TO
BEFORE RETURNING THIS PRODUCT BEFORE RETURNING THIS PRODUCT
FOR ANY REASON PLEASE CALLFOR ANY REASON PLEASE CALL
IF YOU SHOULD EXPERIENCE A PROBLEM
WITH YOUR BLACK & DECKER PRODUCT,
CALL 1-800-54-HOW-TO (544-6986).
BEFORE YOU CALL, HAVE THE FOLLOWING INFORMATION
AVAILABLE, CATALOG NO., TYPE NO., AND DATE CODE.
IN MOST CASES, A BLACK & DECKER REPRESENTATIVE CAN RESOLVE
YOUR PROBLEM OVER THE PHONE. IF YOU HAVE A SUGGESTION OR
COMMENT, GIVE US A CALL. YOUR FEEDBACK IS VITAL TO BLACK & DECKER.
(544-6986)
I
MPORTANT SAFETY INSTRUCTIONS
WARNING:
1. Do not load with more than 450 lbs (204 kg) in Workmate Mode or 200 lbs (91 kg)
in Hand Cart Mode.
2. Do not apply an unbalanced load which could cause the Workmate to tip over.
3. Do not step on or stand on Workmate. Do not use the Workmate as a stepladder or
standing platform.
4. Do not store Workmate outdoors or in a damp location.
5. Avoid applying excessive force when clamping with the Swivel Grips.
6. Be sure that the legs are fully open and that the Transition Lever and Toe Plate Slider
locks in position. Secure Hand Cart loads to steel frame members as necessary
7. When using a power tool with the Workmate, follow the safety instructions in the
tool’s instruction manual.
8. Always wear safety glasses when operating power or hand tools.
9. An even pressure of the Vise Jaws on the workpiece is essential. Tighten both
Vise Hand Cranks uniformly.
10. Cutting or drilling into work surface may result in striking metal jaw support below,
damaging tool or work centre.
11. Caution required when using high temperature tools (heat guns, torch, solder
iron, etc.). May damage work surface and reduce clamping capability.
WARNING: This product contains chemicals, including lead, known to the
State of California to cause cancer, and birth defects or other reproductive harm.
Wash hands after handling.
SAVE THESE INSTRUCTIONS FOR FUTURE USE.
NOTE! The assembly of the Workmate should take approximately 1 hour.
Before you proceed to assem
ble you will need the following tools.
1 - Ham
m
er
1 - Phillips Screwdriver
1 - Nut Driver (supplied – item R of Fig.1))
1 - Com
bination W
rench (supplied) (not shown)
Fig. 1 : Unpack
Im
portant: Check that you have received all the parts.
Rem
ove the contents of the carton. The following com
ponents are in the carton.
(A) 1 - Fram
e Assem
bly
1 - Parts Bag containing:
(B) 2 - Vise Screw Packing Pieces (H) 4- Top Blocks
(installed to (C)) (I) 2- Top Blocks (one side flat)
(C) 2 - Vise Brackets (J) 2- M
6 x 36.5m
m
Bolts
1
588974-03,01,WM525* 9/24/04 2:07 PM Page 2

2
(D) 1 - Front Vise Jaw (K) 2 - M6 x 30mm Bolts
(E) 1 - Middle Vise Jaw (narrow) (L) 4 - M6 Locking Nuts
(F) 1 - Rear Vise Jaw (wide) (M) 6 - M8 Bolts
(G) 2 - Wheels (N) 4 - Swivel Grips
(O) 2 - Spring Pins
(P) 2 - Vise Hand Cranks
(Q) 2 - Snap-in Knobs
(R) 1 - Nut Driver
(S) 2 - M8 Wheel Nuts
(T) 2 - Flat Washer
(U) 2 - Vise Screw Protectors
(not shown) 1 - Combination Wrench
Assembly:
WARNING: Wear eye protection when assembling Workmate.
Fig. 2 & 3: Frame Assembly
1. Fig. 2: Pick up the Frame Assembly (A) as shown. Place foot on the lower portion of
the assembly and push the Transition Lever to the right to unlock the unit.
2. While holding the Transition Lever in the unlocked position, lift up on the upper cross
member until it is fully extended.
3. Rotate the upper cross member toward you and push back on the lower leg assembly
shown.
4. Fig. 3: Continue to push down on the upper cross member until the unit locks in the
fully open position.
5. Note! Make sure that the locking pin, is engaged and locked into the opposite
frame hole – a click sound will be heard when locked in place.
Fig. 3: Wheel Assembly
1. Using Wheels (G), M8 Wheel Nuts (S) and Flat Washers (T), assemble to the axles as
shown.
Tighten the M8 Wheel Nuts using the Nut Driver (R).
Fig. 4: Assembly of the Vise Brackets
1. Assemble the left hand Vise Bracket (C) as shown (Each bracket is stamped either
LH or RH).
2. NOTE! The Vise Brackets must be in the “Tilt” position as shown to assemble to
the legs.
3. Fig. 15: Pull vertical the locking button located on the side of the Vise Bracket back
toward the handle end of the unit as shown in the inset, and lift up on the tilting
bracket, until the assembly locks into a vertical position.
4. Fig. 4: Insert one M6 x 36.5mm Bolt (J) through the rear leg of Frame Assembly, then
through the rear of the Vise Bracket as shown. Using a Phillips screwdriver and a
Combination Wrench, tighten the M6 Lock Nut (L) onto the bolt.
5. Assemble the front leg of the Frame Assembly to the front of the Vise Bracket (C) as
shown.
6. Insert one M6 x 30 mm Bolt (K) completely through the front leg assembly and then
through the hole in the side of the Vise Bracket as shown. Thread an M6 Lock Nut (L)
onto the end of the bolt and tighten with a Combination Wrench and Phillips screw driver.
7. Repeat for the right side (RH) Vise Bracket
Fig. 5: Assembling the Front Vise Jaw
1. Return the Tilt Bracket to the horizontal position by pulling the tilt lock button back to
disengage the lock and rotate the brackets back to the horizontal position as shown.
2. Assemble the front Top Blocks ((I) - one side flat) to the Front Vise Jaw (D) as shown.
3. Thread an M8 Bolt (M) through the jaw, then through the mounting block.
4. While holding the Vise Screw and Pivot Nut up from the underside of the Tilt Bracket,
thread the M8 Bolt into the mounting hole in the pivot nut.
5. Tighten the M8 Bolts using the Nut Driver (R) (or Combination Wrench provided)
588974-03,01,WM525* 9/24/04 2:07 PM Page 3

Fig. 6: Assembling the Top Blocks to the Middle and Rear Vise Jaws
1. Assemble two Top Blocks (H) to the underside of the Rear Vise Jaw (F) by fitting the
raised posts on the Top Blocks into the smaller holes of the Rear Vise Jaw.
2. Insert the M8 Bolts (M) through top of the Rear Vise Jaw and into the Top Blocks
3. Tighten the M8 Bolts using the Nut Driver (R) (or Combination Wrench provided)
4. Assemble the Top Blocks (H) to the Middle Vise Jaw (E) using the same procedure as
the Rear Vise Jaw.
Fig. 7: Installing the Rear Vise Jaw
1. Install Rear Vise Jaw (F) in one of 2 possible indexed “keyhole” positions by inserting
the indexing lug into a keyhole in the Vise Bracket.
2. Secure the Rear Vise Jaw by moving the Rear Vise Jaw to the back of the key hole.
Fig. 8, 9 & 10: Installing the Vise Hand Cranks and Snap-in Knobs
1. Fig. 8: Remove and discard the plastic Vise Screw Packing Pieces (B).
2. Align the hole in the Vise Hand Crank (P) with the hole in the Vise Screw (area you
removed the vise screw packing pieces from), push the Vise Hand Crank onto the end
of the Vise Screw and realign the holes.
3. Using a hammer, drive the supplied Spring Pin (O) into the aligned holes.
4. Repeat this procedure for the installation of the other Vise Hand Crank.
5. Fig. 9: Complete the assembly by pushing the Snap-in Knobs (Q) into the holes in
the Vise Hand Cranks.
6. Fig. 10: Tap the Vise Screw Protectors (U) into position as shown.
Reference Fig. 7: Installing the Middle Vise Jaw:
1. Install the Rear Vise Jaw into the back keyholes.
2. With Front Vise Jaw cranked to the front of the work center, insert the indexing lugs of
the Middle Vise Jaw into the front keyholes.
3. Turn Hand Cranks clockwise to tighten.
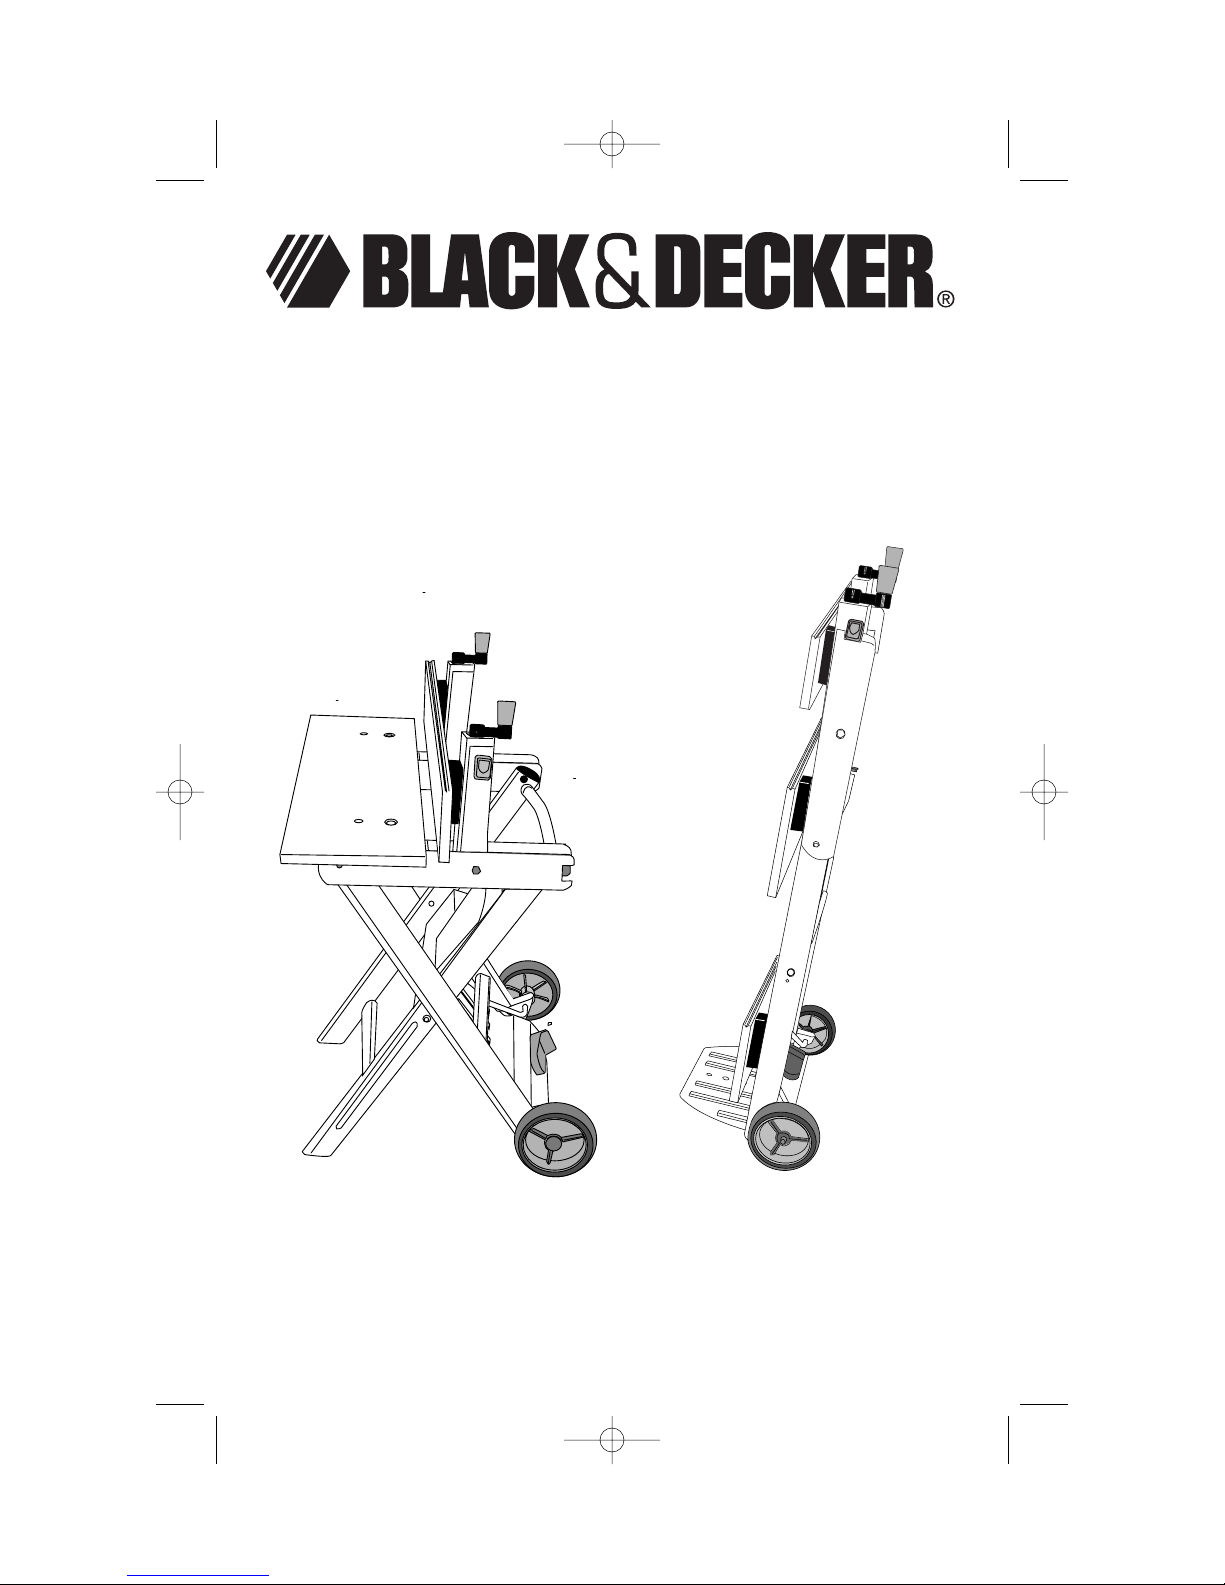
Fig. 11: Workmate Mode
After assembly the unit is in the Workmate mode.
Operation:
Fig.11 & 12: Storage Mode
1. Fig. 11: To close the unit from the workmate mode, push and hold the Transition
Lever (shown in the inset) to the right to unlock the unit.
2. Pull up on the upper cross member as shown.
3. Fig. 12: Release the Transition Lever and check that the unit is locked in the storage
position as shown.
Fig.12 & 13: Hand Cart Mode
1. Fig. 12: With the unit in storage mode, use your foot to slide the Toe Plate Slider fully
to the right as shown in the inset .
2. Maintain Toe Plate Slider in this position while pushing forward and down on the Toe
Plate. This will release the locking mechanism and allow the Toe Plate to rotate
forward.
3. Fig. 13: The Toe Plate will lock in place when in the working position.
4. To stow the Toe Plate feature, reverse the operation.
5. With your foot slide the Toe Plate Slider to the right.
6. Continue the pressure on the slider and press down on the back of the Toe Plate with
your foot.
7. The Toe Plate should rotate up and back to the upright position.
8. When the Toe Plate can go no further, simply release the slider and the Toe Plate will
lock into place.
9. Check the Toe Plate is locked by tilting back and then forward on the top of the unit.
3
588974-03,01,WM525* 9/24/04 2:07 PM Page 4

4
See ‘Tools-Electric’
– Yellow Pages –
for Service & Sales
Black & Decker
(U.S.) Inc.,
701 E. Joppa Rd.
Towson, MD 21286
U.S.A.
Fig. 14 & 11: To Convert Back Into Workmate Mode
Note: Ensure Toe Plate is in the upright (storage) position.
1. Push the Transition Lever (shown in the inset of Fig. 11) to the right to unlock the unit.
2. Fig. 14: Push down on the upper cross member as shown.
3. Fig. 11: Continue to push down until the unit locks (pins lock into outside frame) in
the Workmate position.
Features & Applications:
Fig. 15: Vertical Clamping
Note: Rear Vise Jaw must be in the rear keyhole position.
Rotate the Vise Hand Cranks counter clockwise to open the workmate jaws to the
extreme front position. Pull the vertical locking buttons located on each side of the Vise
Brackets back toward the handle end of the unit as shown in the inset, and lift up on the
Front Vise Jaw, rotating until the jaw locks in the vertical position.
Fig. 16: Swivel Grips
The four supplied Swivel Grips (N) can be used in any of the holes in the Front and
Rear Vise Jaws. The Swivel Grips are used to extend the size of your Workmate’s
holding capacity.
Service Information
Black & Decker offers a full network of company-owned and Authorized Service
locations throughout North America. All Black & Decker Service Centers are staffed with
trained personnel to provide customers with efficient and reliable power tool service.
Whether you need technical advice, repair, or genuine factory replacement parts,
contact the Black & Decker service location nearest you. To find your local service
location, refer to the yellow page directory under “Tools—Electric” or call:
1-800-54-HOW-TO.
Full Two-Year Home Use Warranty
Black & Decker (U.S.) Inc. warrants this product for two years against any defects in
material or workmanship. The defective product will be replaced or repaired at no
charge in either of two ways:
The first, which will result in exchanges only, is to return the product to the retailer from
whom it was purchased (provided that the store is a participating retailer). Returns
should be made within the time period of the retailer’s policy for exchanges (usually 30
to 90 days after the sale). Proof of purchase may be required. Please check with the
retailer for their specific return policy regarding returns that are beyond the time set for
exchanges.
The second option is to take or send the product (prepaid) to a Black & Decker owned
or authorized Service Center for repair or replacement at our option.
Proof of purchase may be required. Black & Decker owned and authorized service
centers are listed under “Tools-Electric” in the yellow pages of the phone directory.
This warranty does not apply to accessories. This warranty gives you specific legal
rights and you may have other rights which vary from state to state. Should you have
any questions, contact the manager of your nearest Black & Decker Service Center.
This product is not intended for commercial use.
588974-03,01,WM525* 9/24/04 2:07 PM Page 5

CONSIGNES DE SÉCURITÉ IMPORTANTES
AVERTISSEMENT :
1. Ne pas appliquer une charge de plus de 204 kg (450 lb) sur l’unité en mode Workmate
et plus de 91 kg (200 lb) en mode de chariot manuel.
2. Ne pas appliquer une charge mal équilibrée afin de ne pas faire basculer l’unité Workmate.
3. Ne pas mettre les pieds, ou se mettre debout, sur l’unité. Ne pas utiliser l’unité
Workmate comme escabeau ni comme plate-forme en se mettant debout sur celle-ci.
4. Ne pas ranger l’unité Workmate à l’extérieur ni dans un endroit humide.
5. Ne pas appliquer une force excessive en fixant l’unité au moyen des ferrures à griffes
articulées.
6. S’assurer que les pattes sont complètement ouvertes et que le levier de transition et le
coulisseau de la plaque inférieure sont bien enclenchés. Bien arrimer les charges du
chariot manuel et les fixer solidement aux charpentes d’acier, le cas échéant.
7. Lorsqu’on utilise un outil électrique avec l’unité Workmate, suivre les consignes de
sécurité du manuel d’utilisation de l’outil.
8. Toujours porter des lunettes de sécurité lorsqu’on utilise un outil électrique ou manuel.
9. Il est essentiel que les mâchoires d’étau appliquent une pression égale sur la pièce; on
doit donc serrer les deux manivelles de l’étau uniformément.
10. Lorsqu’on coupe ou qu’on perce la surface de travail, on risque de frapper le support
de mâchoire en métal qui se trouve en dessous et d’endommager l’unité ou le centre
de charge.
11. Il faut faire preuve de prudence lorsqu’on utilise un outil à haute température (pistolet à
air chaud, chalumeau, fer à souder, etc.) afin d’éviter d’endommager la surface de
travail et de réduire l’efficacité des dispositifs de fixation.
AVERTISSEMENT : Le produit renferme des produits chimiques, dont du plomb.
Selon l’état de la Californie, ce produit chimique peut causer le cancer ainsi que des
malformations congénitales, et il présente d’autres dangers au système reproductif
humain. Se laver les mains après l’utilisation.
CONSERVER LES PRÉSENTES DIRECTIVES À TITRE DE RÉFÉRENCE
REMARQUE! L’assemblage de l’unité Workmate devrait prendre environ une heure.
Avant de procéder à l’assemblage, on doit s’assurer d’avoir en main :
- un marteau;
- un tournevis Phillips;
- un tourne-écrou (fourni – article R de la figure 1);
- une clé mixte (fournie) (non illustrée)
Fig. 1 : Déballage
Important : S’assurer d’avoir bien reçu toutes les pièces.
Retirer le contenu du carton, soit :
(A) 1 bâti 1 – Un sac de pièces contenant :
(B) 2 pièces de remplissage de vis d’étau (H) 4 blocs supérieurs
(installées sur l’élément C) (I) 2 blocs supérieurs (un côté plat)
(C) 2 ferrures d’étau (J) 2 boulons M6 x 36,5 mm
AAAAVVVVAAAANNNNTTTT DDDDEEEE RRRREEEETTTTOOOOUUUURRRRNNNNEEEERRRR LLLLEEEE PPPPRRRROOOOD
DDDUUUUIIIITT
TT
PPPPOOOOUUUURRRR QQQQUUUUEEEELLLLQQQQUUUUEEEE RRRRAAAAIIIISSSSOOOONNNN QQQQUU
UUEEEE CCCCEEEE SSSSOOOOIIIITTTT,,,,
CCCCOOOOMMMMPPPPOOOOSSSSEEEERRRR LLLLEE
EE
1111 888800000000 555544444444----66669999888866
66
GUIDE D’UTILISATION
Nº de catalogue WM525
5
588974-03,01,WM525* 9/24/04 2:07 PM Page 6
 Loading...