

Page 1
W ARNING: IMPOR TANT SAFETY W ARNINGS
AND INSTRUCTIONS
TO REDUCE RISK OF INJURY:
• Before any use, be sure everyone using this tool reads and understands all safety instructions and
other information contained in this manual.
• Save these instructions and review frequently prior to use and in instructing others.
WARNING: When using electric tools, basic safety precautions should always be followed
to reduce risk of fire, electric shock, and personal injury, including the
following.
READ ALL INSTRUCTIONS
GENERAL SAFETY WARNINGS AND INSTRUCTIONS FOR ALL TOOLS
• KEEP WORK AREA CLEAN. Cluttered areas and benches invite injuries.
• CONSIDER WORK AREA ENVIRONMENT. Don’t expose power tools to rain. Don’t use power tools in damp
or wet locations. Keep work area well lit. Do not use in presence of flammable liquids or gases. Motors in
these tools normally spark, and the sparks may ignite the fumes.
• GUARD AGAINST ELECTRIC SHOCK. Prevent body contact with grounded surfaces. For example; pipes,
radiators, ranges, refrigerator enclosures. Use extreme caution when drilling, driving, or cutting into walls,
floors, ceilings or other areas or wherever live electrical wires may be contacted, do not touch any metal
parts of the tool. Hold the tools only by the plastic handle to prevent electric shock.
• KEEP CHILDREN AWA Y. Do not let children and visitors contact tool or extension cord. All children and
visitors should be kept away from work area.
• STORE IDLE TOOLS. When not in use, tools should be stored in dry, and high or locked-up place–out of
reach of children.
• DON’T FORCE TOOL. It will do the job better and safer at the rate for which it was intended.
• USE RIGHT TOOL. Don’t force small tool or attachment to do the job of a heavy-duty tool. Don’t use tool for
purposes not intended.
• DRESS PROPERLY. Do not wear loose clothing or jewelry . They can be caught in moving parts. Rubber gloves
and non-skid footwear are recommended when working outdoors. Wear protective hair covering to contain
long hair .
• USE SAFETY GLASSES AND OTHER SAFETY EQUIPMENT. Use safety goggles or safety glasses with side
shields, complying with applicable safety standards and, when needed, a face shield. Also use face or dust
mask if cutting operation is dusty. This applies to all persons in the work area. Also use a hard hat, hearing
protection, gloves, safety shoes and dust collection systems when specified or required.
• DON’T ABUSE CORD. Never carry tool by cord or yank it to disconnect from receptacle. Keep cord from
heat, oil, and sharp edges.
• SECURE WORK. Use clamps or a vise to hold work. It’s safer than using your hand and it frees both hands to
operate tool.
• DON’T OVERREACH. Keep proper footing and balance at all times.
• MAINTAIN TOOLS WITH CARE. Keep tools sharp and clean for better and safer performance. Follow
instructions for lubricating and changing accessories. Inspect tool cords periodically and if damaged, have
repaired by authorized service facility. Inspect extension cords periodically and replace if damaged. Keep
handles dry, clean, and free from oil and grease.
• DISCONNECT TOOLS. Unplug the tool when not in use, when moving tool from place to place, before
servicing, and when changing accessories (such as blades, bits, cutters) or making adjustments.
• REMOVE ADJUSTING KEYS AND WRENCHES. Form habit of checking to see that keys and adjusting
wrenches are removed from tool before turning it on.
• AVOID UNINTENTIONAL STARTING. Don’t carry tool with finger on switch. Be sure switch is off when
plugging in.
• STA Y ALER T. W atch what you are doing. Use common sense. Do not operate tool when you are tired or
otherwise impaired.
• CHECK DAMAGED PARTS. Before further use of the tool, a guard or other part that is damaged should be
carefully checked to determine that it will operate properly and perform its intended function. Check for
alignment of moving parts, binding of moving parts, breakage of parts, mounting, and any other conditions
that may affect its operation. A guard or other part that is damaged should be properly repaired or replaced
by an authorized service center. Do not use tool if switch does not turn it on and off.
• REPAIRS AND SERVICE. Repairs, maintenance and any adjustments not specified in this manual should be
performed by Black & Decker authorized service centers or other qualified service organizations, always
using identical replacement parts.
• USE OF ACCESSORIES AND ATT ACHMENTS.The use of any accessory or attachment not recommended for
use with the tool could be hazardous. Note: Refer to the accessory section of this manual for further details.
Important Safety Instructions (For Battery and Charger)
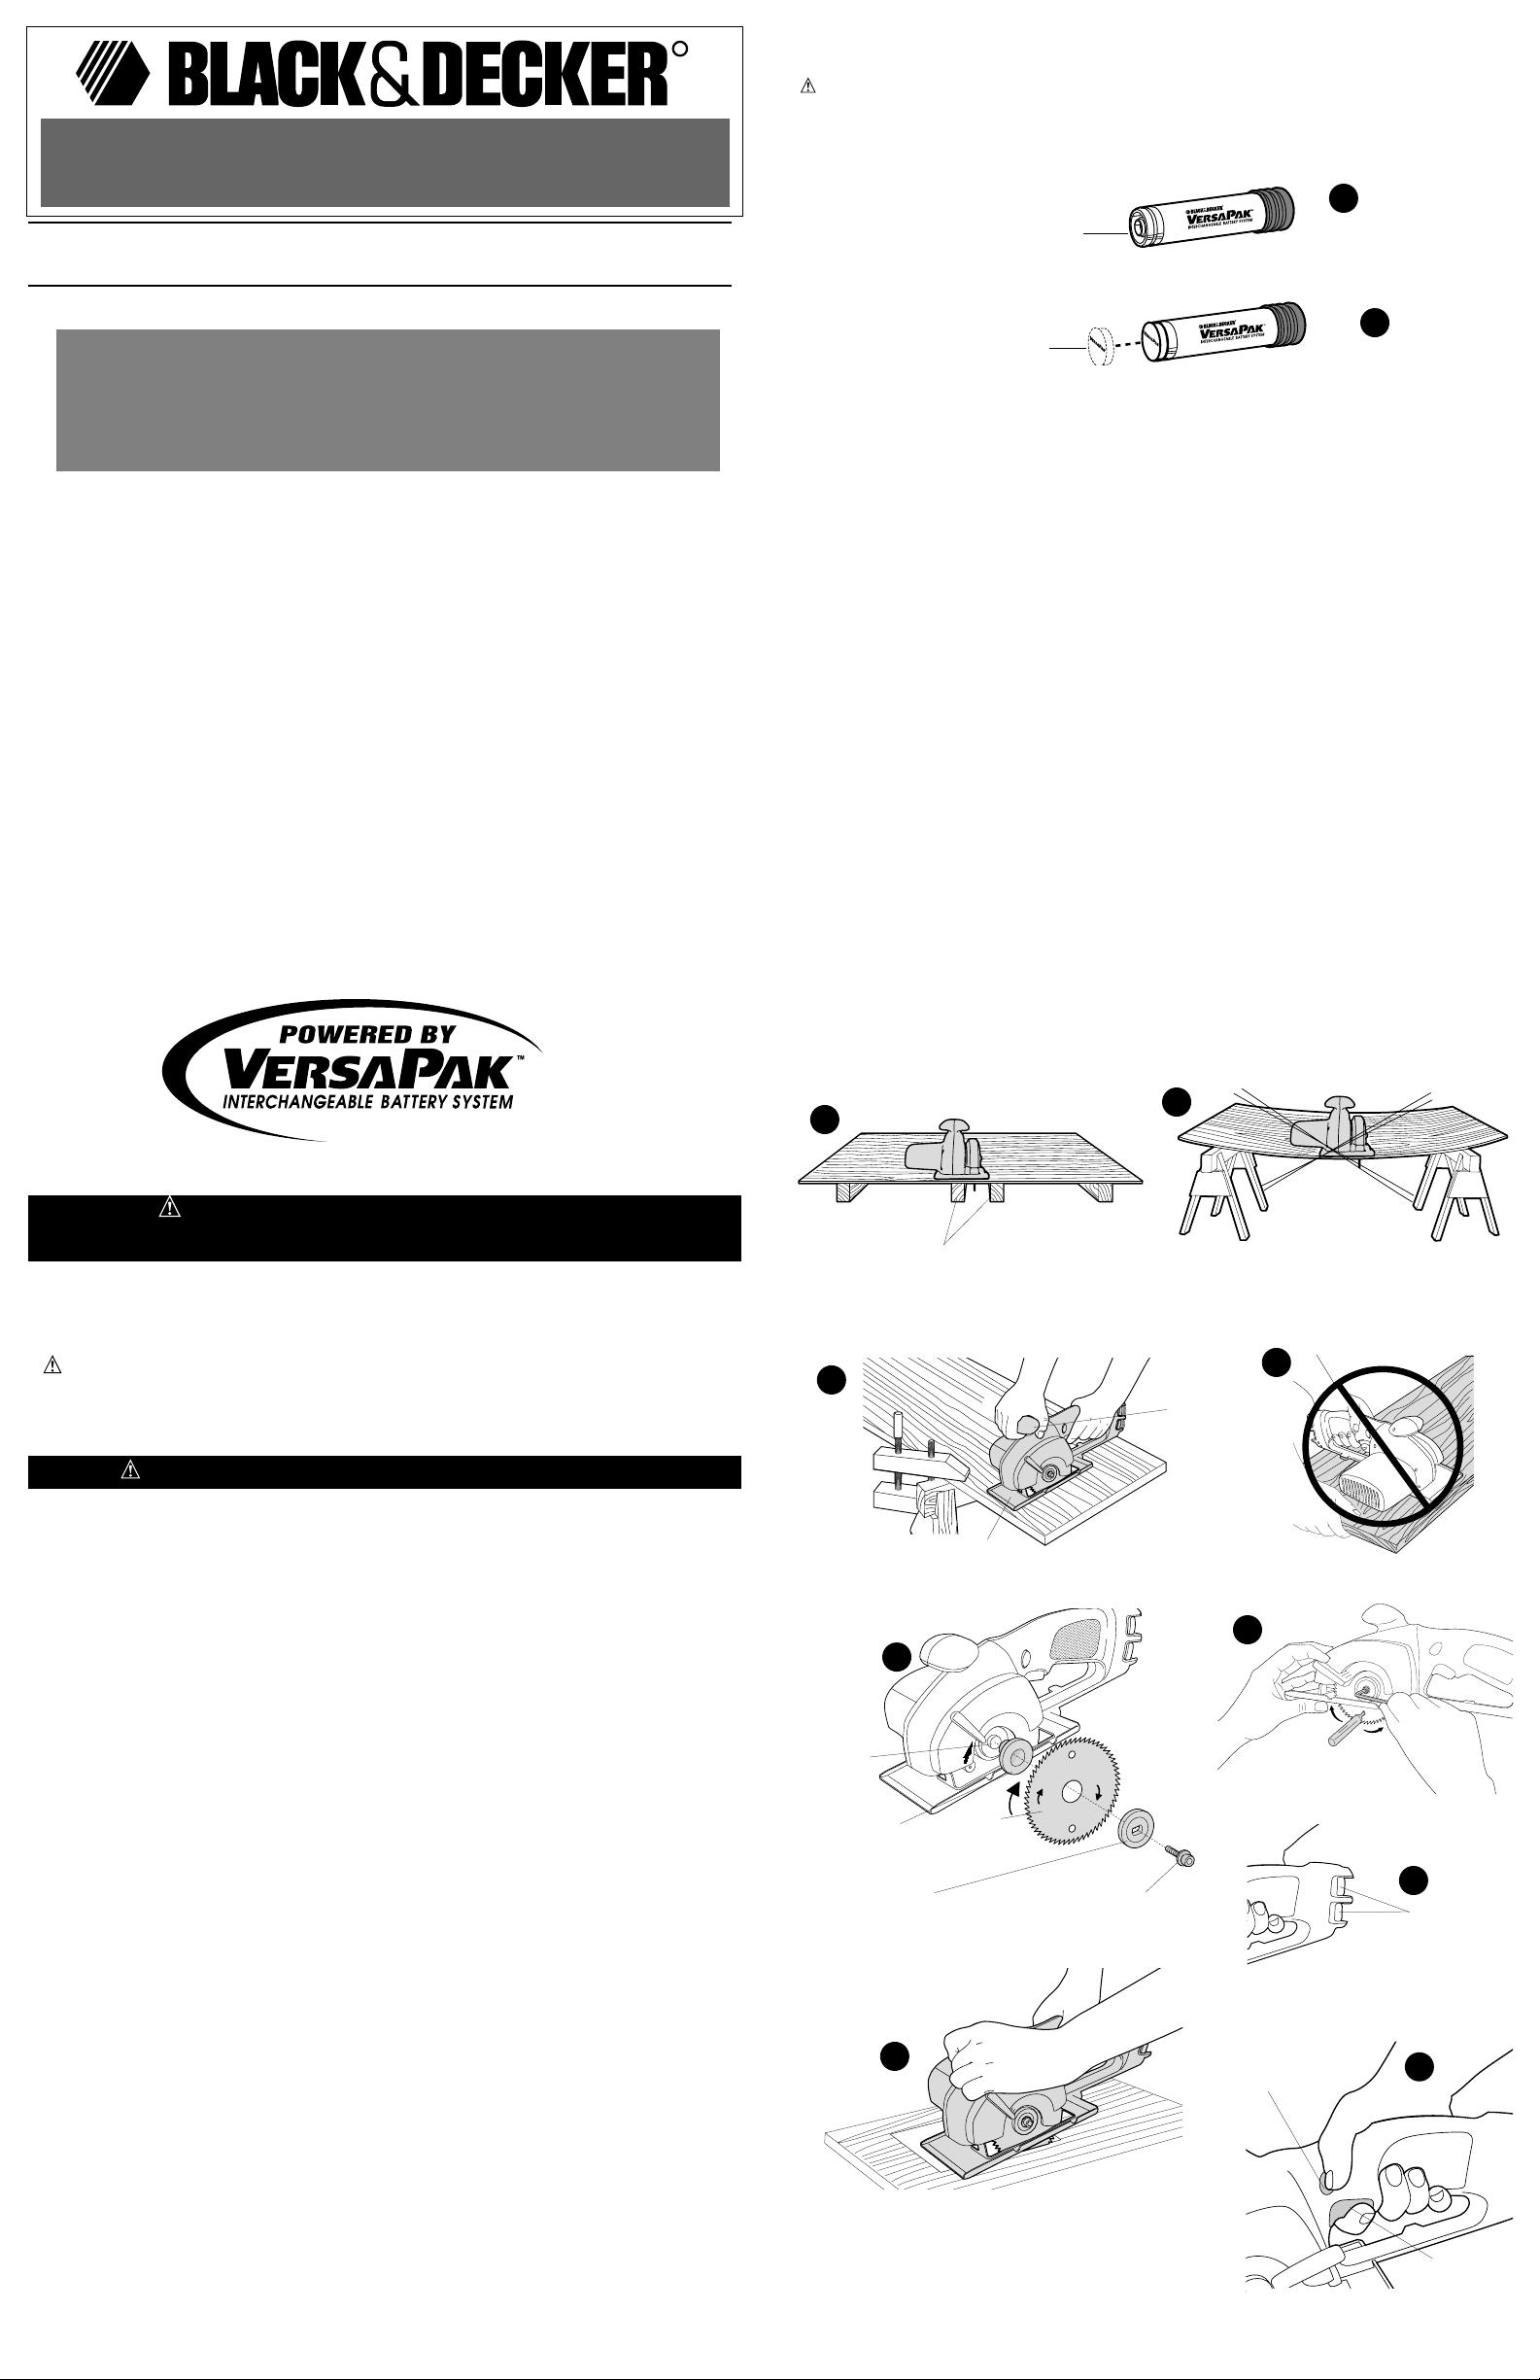
• Do not store or carry battery so that metal objects can contact exposed metal end shown in
Figure 1. For example, do not place battery in aprons, pockets, tool boxes, drawers etc. with
loose nails, screws, keys, etc. without battery cap. Battery could short circuit causing fire or burns
or damage to battery.
• Battery caps are provided for use when carrying batteries or while battery is stored in a pocket,
tool box, etc. Remove cap before placing battery in charger or tool (see Figure 2).
• Never attempt to open the battery for any reason. If the housing of the battery breaks or cracks,
immediately discontinue use and do not recharge.
• Do not incinerate the batteries. They can explode in a fire. A small leakage of liquid from the
battery cells may occur under extreme usage, charging or temperature conditions. This does not
indicate a failure. However , if the outer seal is broken and this leakage gets on your skin:
a. Wash quickly with soap and water.
b. Neutralize with a mild acid such as lemon juice or vinegar.
c. If the battery liquid gets in your eyes, flush them with clean water for a minimum of 10
minutes and seek immediate medical attention.
MEDICAL NOTE: The liquid is a 25-35% solution of potassium hydroxide.
• Charge batteries only with VersaPak battery charger.
• Do not use charger in wet or damp conditions. It is intended for indoor use only. Do not use near
sinks, tubs, or the like. Do not immerse in water .
• Do not use charger for any uses other than charging VersaPak batteries. Other batteries may
explode.
• Do not operate charger with damaged cord or plug — have them replaced immediately.
• Do not operate charger if it has received a sharp blow, been dropped, or otherwise damaged in
any way; take it to a qualified Black & Decker service center .
• Do not disassemble charger; take it to a qualified Black & Decker service center when service or
repair is required. Incorrect reassembly may result in risk of electric shock or fire. There are no
consumer serviceable parts inside.
• For best results, do not charge batteries when they or air temperature is BELOW +40°F or ABOVE
+105°F.
• The charger is designed to operate on standard household electrical power . Do not attempt to use
it on any other voltage. Be sure your power supply agrees with the nameplate marking.
• Unplug charger when not in use.
• Do not abuse charger cord. T o reduce the risk of damage to electric plug and cord, never carry
charger by cord or yank it to disconnect from receptacle. Keep charger cord from heat, oil, and
sharp edges.
• Use only charger supplied by the manufacturer to recharge.
Battery Cap
Metal End
KEY INFORMA TION YOU SHOULD KNOW:
•Charge batteries before first use.
•Charger may hum; batteries or charger may become warm while charging (batteries
and charger sold separately).
•Always support work properly. (See illustrations on work support in this manual.)
VEA EL ESPAÑOL EN LA CONTRAPORTADA.
SAVE THIS MANUAL FOR FUTURE REFERENCE.
INSTRUCTIVO DE OPERACIÓN, CENTROS DE SERVICIO Y PÓLIZA DE
GARANTÍA. ADVERTENCIA: LÉASE ESTE INSTRUCTIVO ANTES DE USAR EL
PRODUCTO.
INSTRUCTION MANUAL
Catalog Number VP600
Cat. No. VP600 Form No. 154621-01 (OCT 99-1) Copyright © 1999 Black & Decker Printed in U.S.A.
R
3333----3333////8888”””” ((((88885555....7777mmmmmmmm)))) CCCCoooorrrrddddlllleeeessssssss
CCCCiiiirrrrccccuuuullllaaaarrrr SSSSaaaaww
ww
Wrong
Incorrect
Incorrecto
Material bends on blade causing heavy loads or kickback
Le matériau plie au contact de la lame causant de lourdes surcharges ou des
rebonds.
El material oprime el disco ocasionando sobrecarga o contragolpe
Correct
Correct
Correcto
Auxiliary handle
Poignée auxiliaire
Mango auxiliar
Saw shoe
Patin de scie
Zapata de la sierra
Wrong
Incorrect
Incorrecto
Blade
Lame
Disco
Outer clamp washer
Rondelle de fixation externe
Roldana de sujeción exterior
Saw spindle
Arbre de la scie
Flecha de la sierra
Blade clamping screw
Vis de fixation de la lame
Tornillo de sujeción del disco
Inner clamp washer
Rondelle de fixation interne
Roldana de sujeción interior
Direction of teeth
Sens des dents
Dirección de los dientes
Tighten
Serrer
Apriete
Loosen
Desserrer
Afloje
Release buttons
Boutons de dégagement
Botones de liberación
For pocket cuts only
Pour coupes en retrait seulement
Solamente para cortes de bolsillo
Warning:When blade starts cutting, release retraction lever immediately
Avertissement : Lorsque la lame commence à découper, relâcher immédiatement
le ressort de rappel.
Advertencia: Cuando el disco inicie el corte, suelte inmediatamente la palanca del
mecanismo retráctil
Lock-off button
Bouton de verrouillage
Botón de seguro de apagado
Switch
Interrupteur
Interruptor
Correct
Correct
Correcto
Support work near cut
Soutenir la pièce près de la ligne de coupe.
Apoye la pieza cerca del corte
1
2
3
4
5
6
7
9
10
11
8
BEFORE RETURNING THIS PRODUCT
FOR ANY REASON PLEASE CALL
1-800-54-HOW-TO
IF YOU SHOULD EXPERIENCE A PROBLEM
WITH YOUR BLACK & DECKER PURCHASE,
CALL 1-800-54-HOW-TO (1-800-544-6986).
IN MOST CASES, A BLACK & DECKER REPRESENTATIVE
CAN RESOLVE YOUR PROBLEM OVER THE PHONE.
IF YOU HAVE A SUGGESTION OR COMMENT,
GIVE US A CALL. YOUR FEEDBACK IS VITAL
TO THE SUCCESS OF BLACK & DECKER’S QUALITY
IMPROVEMENT PROGRAM.
(544-6986)
S
T
O
R
C
A
A
S
T
C
G
R
E
R
O
A
R
C
&
Y
R
I
A
N
C
G
G
A
E
P
R
&
Y
I
N
G
A
P
Page 2
Important Charging Notes
• While charging, the charger transformer may hum and batteries and charger become warm.
This is a normal condition and does not indicate a problem.
• If a battery does not charge properly— (1) Check current at receptacle by plugging in a lamp
or other appliance. (2) Check to see if receptacle is connected to a light switch which turns
power off when you turn out the lights. (3) Move charger and batteries to a surrounding air
temperature of +40°F to +105°F. (4) If the receptacle and temperature are OK, and you do not
get proper charging, take or send the batteries and charger to your local Black & Decker
service center. See “Tools Electric” in yellow pages.
• The batteries should be recharged when they fail to produce sufficient power on jobs which
were easily done previously . DO NOT CONTINUE to use the tool with its batteries in a depleted
condition.
• Before using battery charger , read all instructions and cautionary markings on battery charger,
battery and product using battery .
CAUTION: To reduce the risk of injury, charge only nickel cadmium rechargeable batteries.
Other types of batteries may burst causing personal injury and damage.
SAVE THESE INSTRUCTIONS
Charging Procedure
Insert the metal end of the VersaPak battery into the charger. The indicator light will glow indicating that charging is taking place and will remain on as long as the battery is in the charger.
Continuous charging is not a safety concern.
NOTE: V ersaPak batteries are sent from the factory in an uncharged condition. Before
attempting to use them for the first time, they must be charged for 6 hours. Subsequent
charging for most fix up jobs will require 3-6 hours.
SAFETY WARNINGS AND INSTRUCTIONS: CIRCULAR SAWS
WARNING: Use of this tool can generate dust containing chemicals known to cause cancer , birth defects
or other reproductive harm. Use appropriate respiratory protection.
CAUTION: Remove batteries before changing blades, inspecting, or cleaning saw.
•KEEP GUARDS IN PLACE AND IN WORKING ORDER.
Never wedge or tie lower guard open. Check operation of lower guard before each use. Do not use if lower
guard does not close briskly over saw blade.
CAUTION: If saw is dropped, lower guard may be bent, restricting full return.
Snagging the lower guard on a surface below the material being cut can momentarily reduce operator
control. The saw can lift partially out of the cut increasing the chance of blade twist. Ensure there is sufficient
clearance under the workpiece.
•LOWER GUARD
When necessary to raise lower guard manually, use the retracting handle.
•KEEP THE BLADES CLEAN AND SHARP.
Sharp blades minimize stalling and kickback. The use of dull and/or dirty blades can increase the saw
loading causing the operator to push harder which promotes twisting.
DANGER: KEEP HANDS AWAY FROM CUTTING AREA.
Keep hands away from blades. Never place hands in front or behind the path of the blade while cutting. Do
not reach underneath work while blade is rotating. Do not attempt to remove cut material when blade is
moving.
CAUTION: Blades coast after turn off. When cut is completed, allow blade to stop before removing
saw. The telescoping lower guard will close as the saw is lifted.
NOTE: This saw is equipped with a Black & Decker general purpose 3 3/8" saw blade. Cutting particle
board or plastic with this blade is not recommended. For particle board, use a Black & Decker 3 3/8"
carbide saw blade (Cat. No. 73-699 or 73-339VP). For plastic, use a Black & Decker 3 3/8" smooth cut
saw blade (Cat. No. 73- 698).
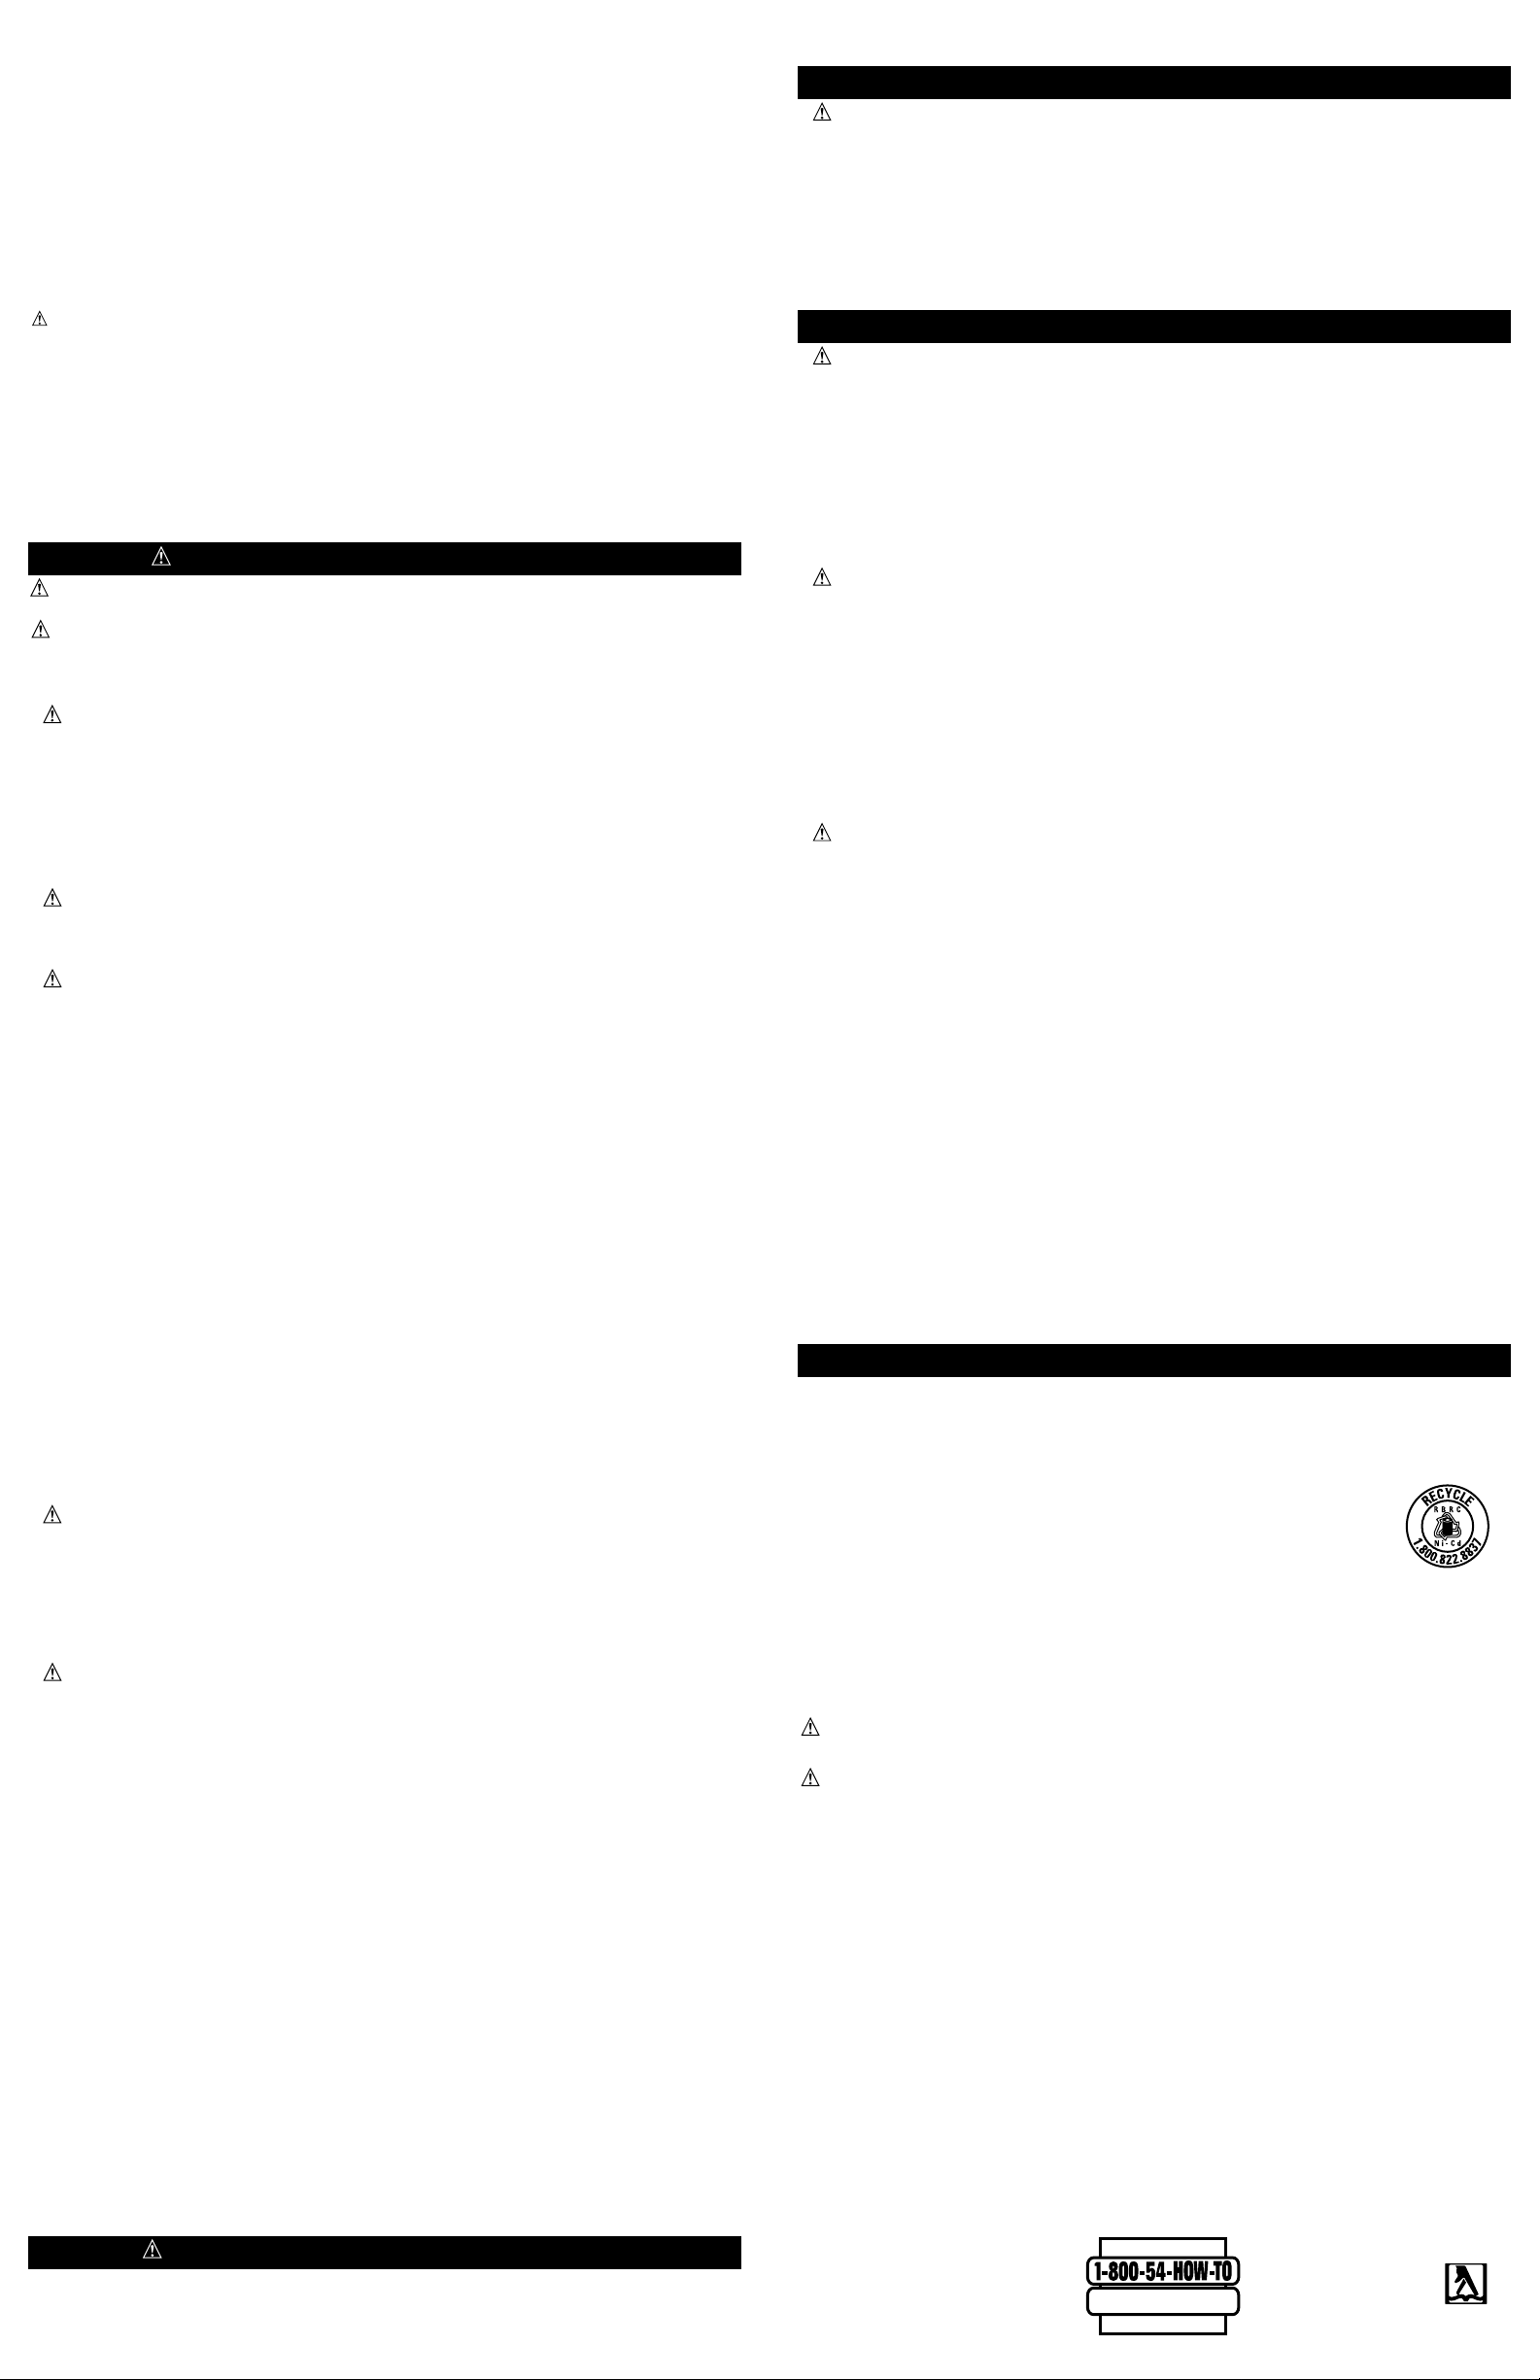
•SUPPORT LARGE P ANELS
Large panels must be supported as shown (Fig. 3) in this manual to minimize the risk of blade pinching and
kickback.
When cutting operation requires the resting of the saw on the workpiece, the saw shall be rested on the larger
portion and the smaller piece cut off.
•USE RIP FENCE
Always use a rip fence (Cat. No. 73-501) or straight edge guide when ripping.
•USE ONLY CORRECT BLADES AND BLADE ASSEMBLY COMPONENTS IN MOUNTING
Do not use blades with incorrect size holes. Never use defective or incorrect blade washers or bolts. Follow
blade assembly procedures.
•SUPPORT AND SECURE THE WORK PROPERLY
Insure that the material to be cut is clamped (Fig. 5) and solidly supported and balanced on a strong, stable
and level work set-up.
Support the work so that the wide portion of the saw shoe is on the portion of the material that doesn’t fall
after the cut is made.
Never hold cut off piece by hand (Fig. 6). Kickback from blade pinch can result. Keep both hands on saw at
all times.
•STAY ALERT AND EXERCISE CONTROL
Keep body positioned to one side of blade. Always maintain a firm grip and control of saw with both hands.
Do not change hand grip or body position while saw is running.
T ake precaution to avoid injury from cut off pieces and other falling material during operation.
CAUTION: When sawing into walls, floors, or wherever “live” electrical wires may be encountered,
DO NOT TOUCH ANY METAL PARTS OF THE TOOL! Hold the saw only by its plastic
handles to prevent electric shock if you accidentally saw into a live wire.
Guard Against Kickback
•WHAT IS KICKBACK?
Kickback is the sudden movement of the saw, during a cut, back toward the operator which may cause
serious personal injuries.
DANGER: RELEASE SWITCH IMMEDIATELY IF BLADE BINDS OR SAW STALLS.
•KICKBACK CAN BE CAUSED BY :
The saw blade becoming pinched, twisted or bound while cutting or the saw stalls.
When the blade becomes twisted or misaligned in the cut, the teeth at the back edge of the blade can dig into
the top surface of the wood causing the blade to climb out of the cut and move suddenly back toward the
operator.
•TO REDUCE THE RISK OF KICKBACK:
•Keep a firm grip on saw with both hands at all times.
•Stay alert – exercise control.
•Support long overhanging materials. As the material is cut and weakens, it will sag, causing a pinched
blade.
•Support large panels as shown (Fig. 3). Material supported only at the ends (Fig. 4) will lead to blade
pinching.
•Avoid sawing overhead. Material can sag and will pinch blade.
•Keep blades sharp and clean.
•Use fence or straight edge guide when ripping. Be careful as the cut off strip can sag or twist, closing the cut
and pinching the blade, leading to kickback.
•Don’t force tool. Wood variables such as knots, hardness, toughness, wetness, pressure treated and freshly
cut green lumber can heavily load the saw which can lead to stalling. Push the saw slower when this occurs.
•Don’t remove saw from work during a cut while the blade is moving.
•Allow saw to reach full speed before blade contacts material to be cut. Starting the saw with the blade
against the work or pushed forward into cut can lead to stalling or sudden backward movement of saw.
•Always secure work to prevent workpiece movement during cut.
•Do not try to force saw back on line if your cut begins to go off line. This can cause kickback. Stop saw,
withdraw from cut and start a new cut on line.
•Do not back up a rotating blade in the cut. Twisting the saw can cause the back edge of the blade to dig into
the material, climb out of the work and run back toward the operator .
•Avoid cutting nails. Inspect for and remove all nails from lumber before cutting.
•Never pull the saw backwards through the kerf while the saw blade is still rotating.
OTHER IMPORT ANT SAFETY WARNINGS AND INSTRUCTIONS
• Some wood contains preservatives such as copper chromium arsenate (CCA) which can be toxic. When
cutting these materials, extra care should be taken to avoid inhalation and minimize skin contact.
• Blade depth is not adjustable. Ensure there is ample room underneath the workpiece.
SA VE THESE INSTRUCTIONS
ASSEMBL Y/ADJUSTMENT SET-UP
WARNING: Always remove batteries from saw before any of the following operations.
•ATTACHING AND REMOVING BLADES
1. Place inner clamp washer on spindle.
2. Retract the lower blade guard and place blade over the inner clamp washer. The direction of the blade
rotation arrows must match the direction of the arrows on the upper guard (Fig. 7)
3. Place the outer clamp washer onto the spindle and tighten the the clamping screw by hand (the screw has
left-hand threads; turn counterclockwise to tighten).
4. Insert a screwdriver or long nail through one of the holes in the blade to prevent the blade from rotating
(Fig. 8).
5. Firmly tighten the blade clamping screw with the blade wrench (counterclockwise) (Fig.8).
OPERATING INSTRUCTIONS
WARNING: To reduce the risk of serious personal injury , read, understand and follow all important
safety warnings and instructions prior to using tool.
•GENERAL CUTS
•IMPOR TANT: Read safety warnings and instructions. GUARD AGAINST KICKBACK.
•With batteries removed, follow all assembly, adjustment and set up instructions. Make sure lower guard
operates. Select the proper blade for the material to be cut.
•Measure and mark work for cutting.
•Support and secure work properly (See Safety W arnings and Instructions).
•Use appropriate and required safety equipment (See Safety Instructions).
•Secure and maintain work area (See Safety Instructions).
•Make sure switch turns saw on and off.
WARNING: It is important to support the work properly and to hold the saw firmly to prevent loss of
control which could cause personal injury. Fig. 5 illustrates typical hand support of the saw.
•Place the front of the saw shoe flat on the material to be cut.
•Align the blade with the line of cut to be made making sure blade clears material.
•Pull trigger switch, allow blade to attain full speed. Never lock the trigger on by any means.
•Move the saw forward across the material, keeping the saw shoe flat until the cut is completed.
•Release trigger, allow blade to stop before removing saw.
•POCKET CUTTING (SEE FIG. 9)
Pocket cutting is used to cut a hole in a piece of material without cutting from the side.
•Tilt saw forward and rest front of the shoe on material to be cut. Align so that cut will begin at the back of
the drawn rectangle.
•Using the retracting lever, retract blade guard to an upward position, with the blade just clearing the
material, start motor and gradually lower the saw into the material.
WARNING: As blade starts cutting the material, release the retracting lever immediately.
•Never tie the blade guard in a raised position.
•When the shoe rests flat on the material being cut, complete the cut in forward direction.
•Allow the blade to come to a complete stop before lifting saw from material.
•When starting each new cut, repeat the above steps.
If you have any questions on how to properly operate tool, call: 1-800-54-HOW-TO (544-6986)
•
REMOVING AND INST ALLING THE BATTERIES
NOTE: VERSAP AK™ BATTERIES ARE NOT FULLY CHARGED AT THE FACTORY.
•To install the batteries into the tool, slide them into the handle until they click into place.
• T o remove the VersaPak™ batteries from the tool, press the release buttons, as shown in Fig. 10, and pull
the batteries out of the tool handle. Note: Battery caps are provided for use when carrying batteries or while
battery is stored in a pocket, tool box, etc. Remove cap before placing battery in charger or tool.
Install the battery cap, (see Fig. 2), by snapping it in place. To remove the cap, simply pull it off. Note: Only
operate tool with both VersaPak™ batteries installed.
•SWITCH
Saw is equipped with a switch lock-off feature to prevent unintentional running. To operate the tool, first slide
the switch lock-off button and hold it as you depress the trigger, (Fig. 11). After you have depressed the
trigger and the tool is running, release the switch lock-off button. The tool will continue to run as long as the
trigger is depressed. T o turn the tool off, release the trigger switch. When you release the trigger (each time)
the switch lock-off button will engage, locking the trigger off.
There is no provision for locking the tool on, and the switch should never be locked on by any other means.
•KERF AND BLADE TIP-IN INDICATOR
The front of the shoe has two markings which act as kerf indicators. The indicators help in guiding the saw
along pre-marked cutting lines. The markings are located 1" and 3" from the shoe’ s edge.
The outer edge of the shoe has one marking which acts as a blade tip-in indicator . This helps in anticipating
when the blade contacts the workpiece.
MAINTENANCE
Use only mild soap and damp cloth to clean the tool. Never let any liquid get inside the tool; never immerse
any part of the tool into a liquid. IMPORTANT: To assure product SAFETY and RELIABILITY, repairs,
maintenance and adjustment should be performed by authorized service centers or other qualified service
organizations, always using identical replacement parts.
THE RBRC™ SEAL
The RBRC™ (Rechargeable Battery Recycling Corporation) Seal on the nickel-cadmium battery
(or battery pack) indicates that the costs to recycle the battery (or battery pack) at the end of
its useful life have already been paid by Black & Decker . In some areas, it is illegal to place
spent nickel-cadmium batteries in the trash or municipal solid waste stream and the RBRC
program provides an environmentally conscious alternative.
RBRC in cooperation with Black & Decker and other battery users, has established programs in
the United States and Canada to facilitate the collection of spent nickel-cadmium batteries. Help protect our
environment and conserve natural resources by returning the spent nickel-cadmium battery to an authorized
Black & Decker service center or to your local retailer for recycling. You may also contact your local recycling
center for information on where to drop off the spent battery, or call 1-800-8-BATTERY.
ACCESSORIES
Recommended accessories for use with your tool are available from your local dealer or authorized service
center . If you need assistance regarding accessories, please call: 1-800-54-HOW-TO(544-6986).
WARNING: The use of any accessory not recommended for use with this tool could be hazardous.
WARNING: Never use abrasive, masonry, tile or metal cutting blades. Always use 3 3/8" (85.7mm)
diameter blades.
SERVICE INFORMA TION
Black & Decker offers a full network of company-owned and authorized service locations throughout North
America. All Black & Decker Service Centers are staffed with trained personnel to provide customers with
efficient and reliable power tool service.
Whether you need technical advice, repair , or genuine factory replacement parts, contact the Black & Decker
location nearest you. T o find your local service location, refer to the yellow page directory under “T ools—
Electric” or call: 1-800-54-HOW TO (544-6986).
FULL TWO-YEAR HOME USE W ARRANTY
Black & Decker (U.S.) Inc. warrants this product for two years against any defects in material or
workmanship. The defective product will be replaced or repaired at no charge in either of two ways.
The first, which will result in exchanges only, is to return the product to the retailer from whom it was
purchased (provided that the store is a participating retailer). Returns should be made within the time period
of the retailer’ s policy for exchanges (usually 30 to 90 days after the sale). Proof of purchase may be
required. Please check with the retailer for their specific return policy regarding returns that are beyond the
time set for exchanges.
The second option is to take or send the product (prepaid) to a Black & Decker owned or authorized Service
Center for repair or replacement at our option. Proof of purchase may be required. Black & Decker owned
and authorized Service Centers are listed under “Tools-Electric” in the yellow pages of the phone directory .
This warranty does not apply to accessories. This warranty gives you specific legal rights and you may have
other rights which vary from state to state and province to province. Should you have any questions, contact
the manager of your nearest Black & Decker Service Center. This product is not intended for commercial use.
See ‘Tools-Electric’
– Yellow Pages –
for Service & Sales
Imported by
Black & Decker (U.S.) Inc.,
701 E. Joppa Rd.
Towson, MD 21286 U.S.A.
YOU'VE GOT THE TOOL
NOW GET THE KNOW-HOW
http://www.blackanddecker.com
Page 3

A VER TISSEMENT: IMPORTANTES MESURES
DE SÉCURITÉ
AFIN DE RÉDUIRE LES RISQUES DE BLESSURES :
•Avant toute utilisation, s’assurer que tous ceux qui se servent de l’outil lisent et comprennent toutes les
mesures de sécurité et tout autre renseignement contenu dans le présent guide.
•Conserver ces mesures et les relire fréquemment avant d’utiliser l’outil et d’en expliquer le fonctionnement à
d’autres personnes.
•
AVERTISSEMENT : Afin de réduire les risques d’incendie, de secousses électriques ou de blessures
lorsqu’on utilise des outils électriques, il faut toujours respecter les mesures de
sécurité suivantes.
LIRE TOUTES LES DIRECTIVES.
MESURES DE SÉCURITÉ POUR TOUS LES OUTILS
• BIEN DÉGAGER LA SURFACE DE TRAVAIL. Des surfaces et des établis encombrés peuvent être la cause de
blessures.
• TENIR COMPTE DU MILIEU DE TRA VAIL. Protéger les outils électriques de la pluie. Ne pas s’en servir dans
des endroits humides ou mouillés. Bien éclairer la surface de travail. Ne pas se servir de l’outil en présence
de liquides ou de vapeurs inflammables. En effet, le moteur de tels outils génère habituellement des
étincelles et celles-ci peuvent enflammer les vapeurs.
• SE PROTÉGER CONTRE LES SECOUSSES ÉLECTRIQUES. Éviter tout contact avec des objets mis à la terre,
comme des tuyaux, radiateurs, cuisinières, réfrigérateurs et autres objets du genre. Prendre soin lorsqu’on
perce, visse ou coupe des murs, planchers, plafonds ou autres endroits qui pourraient cacher des fils
électriques sous tension. Ne pas toucher aux composants métalliques de l’outil. Saisir celui-ci seulement par
sa poignée en plastique afin d’éviter les secousses électriques.
• ÉLOIGNER LES ENFANTS. Tous les visiteurs doivent être tenus à l’écart de l’aire de travail et il faut les
empêcher de toucher à l’outil ou au cordon de rallonge.
• RANGER LES OUTILS INUTILISÉS. Il faut ranger les outils dans un endroit sec, situé en hauteur ou fermé à
clé, hors de la portée des enfants.
• NE JAMAIS FORCER L’OUTIL.Afin d’obtenir un rendement sûr et efficace, utiliser l’outil à son rendement
nominal.
• UTILISER L’OUTIL APPROPRIÉ. Ne jamais exiger d’un petit outil ou d’un accessoire le rendement d’un outil
de fabrication plus robuste. Se servir de l’outil selon l’usage prévu.
• PORTER DES VÊTEMENTS APPROPRIÉS. Éviter de porter des vêtements amples et des bijoux qui peuvent
être happés par les pièces en mouvement. Porter des gants de caoutchouc et des chaussures à semelle
antidérapante pour travailler à l’extérieur . Protéger la chevelure si elle longue.
• PORTER DES LUNETTES DE SÉCURITÉ ET AUTRE ÉQUIPEMENT DE SÉCURITÉ. Porter des lunettes de
protection ou de sécurité à écrans latéraux, conformément aux normes de sécurité appropriées, et, au
besoin, un écran facial. Porter également un masque respiratoire si le travail de coupe produit de la
poussière. La présente mesure vaut pour toute personne dans la zone de travail. Il faut également porter un
casque, des protège-tympans, des gants et des chaussures de sécurité ainsi qu’utiliser des systèmes de
dépoussiérage lorsque spécifié ou exigé.
• NE PAS MANIPULER LE CORDON DE FAÇON ABUSIVE. Ne pas transporter l’outil par le cordon ni tirer
sur ce dernier pour le débrancher de la prise. Éloigner le cordon des sources de chaleur , des flaques
d’huile et des arêtes tranchantes.
• ASSUJETTIR LA PIÈCE. Immobiliser la pièce à l’aide de brides ou d’un étau. On peut alors se servir des deux
mains pour faire fonctionner l’outil, ce qui est plus sûr .
• NE PAS DÉPASSER SA PORTÉE. Toujours demeurer dans une position stable et garder son équilibre.
• PRENDRE SOIN DES OUTILS. Conserver les outils propres pour qu’ils donnent un rendement supérieur et
sûr . Suivre les directives concernant la lubrification et le remplacement des accessoires. Inspecter
régulièrement le cordon de l’outil et le faire réparer au besoin à un atelier d’entretien autorisé. Inspecter
régulièrement les cordons de rallonge et les remplacer lorsqu’ils sont endommagés. S’assurer que les
poignées sont toujours propres, sèches et libres de toute tache d’huile ou de graisse.
• DÉBRANCHER LES OUTILS. Débrancher l’outil lorsqu’on ne s’en sert pas, qu’on doit le déplacer d’un endroit
à un autre et qu’on doit le réparer , en changer un accessoire (comme une lame, un foret ou un couteau) ou
le régler .
• ENLEVER LES CLÉS DE RÉGLAGE. Prendre l’habitude de vérifier si les clés de réglage ont été retirées avant
de faire démarrer l’outil.
• ÉVITER LES DÉMARRAGES ACCIDENTELS. Ne pas laisser le doigt sur l’interrupteur lorsqu’on transporte
l’outil. S’assurer que l’interrupteur est à la position hors circuit lorsqu’on branche l’outil.
• DEMEURER VIGILANT. Travailler avec vigilance et faire preuve de bon sens. Ne pas se servir de l’outil
lorsqu’on est fatigué ou autrement affaibli.
• VÉRIFIER LES PIÈCES ENDOMMAGÉES. Avant de continuer à utiliser l’outil, il faut vérifier si le protecteur ou
toute autre pièce endommagée remplit bien la fonction pour laquelle il a été prévu. Vérifier l’alignement et
les attaches des pièces mobiles, le degré d’usure des pièces et leur montage, ainsi que tout autre facteur
susceptible de nuire au bon fonctionnement de l’outil. Faire réparer ou remplacer tout protecteur ou toute
autre pièce endommagée dans un centre de service autorisé. Ne jamais se servir d’un outil dont
l’interrupteur est défectueux.
• RÉPARATIONS ET ENTRETIEN. Confier l’outil à un centre de service Black & Decker autorisés ou à tout autre
atelier d’entretien qualifié utilisant toujours des pièces de rechange identiques lorsqu’il doit subir des
réparations ainsi que des travaux d’entretien ou de réglage qui ne sont pas spécifiés dans le présent guide.
• ACCESSOIRES. L’utilisation d’accessoires non recommandé pour l’outil peut être dangereuse. Note :
Consulter la rubrique relative aux accessoires du présent guide pour obtenir de plus amples renseignements
à ce sujet.
IMPORT ANTES MESURES DE SÉCURITÉ
(POUR LA PILE ET LE CHARGEUR)
AVERTISSEMENT : Afin de réduire les risques d’incendie, de secousses électriques ou de blessures
lorsqu’on utilise des outils électriques, il faut toujours respecter les mesures de
sécurité suivantes.
LIRE TOUTES LES DIRECTIVES.
• Ne pas ranger ni transporter des piles de rechange de sorte que d’autres objets métalliques puissent entrer
en contact avec l’extrémité métallique illustrée
à la figure 1. Ainsi, il ne faut pas, par exemple, placer des piles dépourvues de bouchon dans des coffrets à
outils, dans des poches, dans des tabliers ou dans des tiroirs renfermant des clous, des vis ou des clés. Les
piles peuvent être court-circuitées; ce qui présente des risques de dommages à la pile, de blessures ou
d’incendie.
• La pile est fournie avec un bouchon qui devrait être utilisé lorsqu’on la transporte ou qu’on la range dans
une poche, dans un coffre ou ailleurs. Retirer le bouchon avant d’insérer la pile dans le chargeur ou dans
l’outil (fig. 2).\
• Ne pas essayer d’ouvrir la pile pour quelque raison que ce soit. Si la pile est craquée ou endommagée,
cesser l’utilisation immédiatement et ne pas la recharger .
• Ne pas incinérer les piles. La chaleur des flammes peut les faire exploser. Il peut se produire une légère fuite
du liquide excitateur des piles dans des conditions d’utilisation et de chargement difficiles ou en cas de
température extrême. Une telle fuite ne serait pas nécessairement un signe de panne. T outefois, si ce liquide
s’échappe par une rupture du joint étanche du boîtier et atteint la peau, il faut :
a.laver immédiatement à l’eau et au savon;
b.neutraliser à l’aide d’un acide doux (comme du jus de citron ou du vinaigre);
c. si le liquide excitateur atteint les yeux, il faut rincer à l’eau claire pendant au moins dix minutes et consulter
immédiatement un médecin.
AVIS AU MÉDECIN : Le liquide excitateur est une solution d’hydrogène de potassium à 25-35 p. 100.
• Charger la pile uniquement dans un chargeur VersaPak.
• Ne pas se servir du chargeur dans des conditions humides ou mouillées. Le chargeur est conçu pour être
utilisé à l’intérieur seulement. Ne pas s’en servir près d’éviers, de lavabos, de baignoires ou autres endroits
du genre. Ne pas immerger .
• Le chargeur est conçu seulement pour alimenter des piles VersaPak. Son utilisation avec d’autres piles
présente des risques d’explosion.
• Ne pas utiliser un chargeur dont la fiche ou le cordon sont endommagés. Les faire réparer sans tarder.
• Ne pas se servir d’un chargeur qui a reçu un coup brusque, qui est tombé ou qui a été endommagé. En
confier la réparation à un centre de service Black & Decker autorisé.
• Ne pas démonter le chargeur. En confier la réparation et l’entretien à un centre de service Black & Decker
autorisé. Le remontage incorrect présente des risques de secousses électriques ou d’incendie. L’utilisateur ne
peut remplacer aucune pièce à l’intérieur du produit.
• Afin d’optimiser le rendement, ne pas charger les piles lorsque leur température ou celle de l’air ambiant est
INFÉRIEURE à 5 °C (40 °F) ou SUPÉRIEURE à 40 °C (105 °F).
• Le chargeur est conçu pour fonctionner sur une alimentation domestique standard (120 volts c.a. seulement).
Ne pas tenter de s’en servir sur toute autre tension.
• Débrancher le chargeur lorsqu’il ne sert pas.
• Manipuler le cordon du chargeur avec soin. Il vaut mieux tirer sur la fiche que sur le cordon pour débrancher
le chargeur afin de minimiser les risques de dommages à la fiche et au cordon. Éloigner le cordon du
chargeur des sources de chaleur , des flaques d’huile et des arêtes tranchantes.
• Utiliser seulment le chargeur fourni par le fabricant.
NOTES IMPORT ANTES RELATIVES AU CHARGEMENT
1. Le chargeur peut émettre des sons et les piles ainsi que le chargeur peuvent devenir chauds au toucher
pendant le chargement. Cette situation est normale et ne pose aucun problème.
2. Lorsque la pile n’est pas bien chargée (1) vérifier l’alimentation de la prise en y branchant une lampe
ou un autre appareil, (2) vérifier si la prise est reliée à un interrupteur pour l’éclairage qui met la prise
hors circuit lorsqu’on éteint les lumières, (3) déplacer l’ensemble de piles et le chargeur dans une pièce
où la température ambiante se situe entre 5 °C et 40 °C (40 °F et 105 °F), (4) si le problème persiste, il
faut confier la pile et le chargeur au centre de service de la région. Consulter la rubrique «Outils électriques» des Pages Jaunes.
3. Il faut charger les piles lorsqu'elles ne fournissent plus la puissance nécessaire pour effectuer les tâches
avec autant de facilité qu'auparavant. NE PLUS SE SERVIR de l'outil lorsque les piles sont à plat.
CHARGEMENT
Insérer l'extrémité métallique de la pile VersaPak dans le chargeur. Le témoin s'allume pour indiquer que le
chargement a lieu et le témoin reste allumé tant que la pile se trouve dans le chargeur . Le chargement continu
de la pile ne pose aucun problème.
NOTE : Les piles VersaPak ne sont pas chargées en usine. Il faut les charger pendant 6 heures avant la
première utilisation. Par la suite, le chargement prend de 3 à 6 heures pour effectuer la plupart des
tâches.
MESURES DE SÉCURITÉ : SCIES CIRCULAIRES
MISE EN GARDE : Retirer les piles avant le remplacement des lames, l’inspection et le nettoyage de la
scie.
•
S’ASSURER QUE LES PROTECTEURS SONT EN PLACE ET EN ÉTAT DE FONCTIONNEMENT.
Ne jamais bloquer ni attacher le protecteur inférieur en position ouverte.
Vérifier le fonctionnement du protecteur inférieur avant chaque utilisation. Ne pas se servir de l’outil lorsque
le protecteur inférieur ne se referme pas complètement sur la lame.
MISE EN GARDE : Si la scie tombe, le protecteur inférieur peut se tordre et ne plus se refermer
complètement.
Le fait d’accrocher le protecteur inférieur contre une surface sous le matériau à découper peut minimiser
momentanément la maîtrise de l’outil. La scie peut alors ressortir en partie de la ligne de coupe ce qui
augmente les risques de torsion de la lame. S’assurer qu’il y a suffisamment de jeu sous la pièce à ouvrer.
•PROTECTEUR INFÉRIEUR
Lorsqu’il faut soulever le protecteur inférieur à la main, se servir du ressort de rappel.
•S’ASSURER QUE LES LAMES SONT PROPRES ET AFFÛTÉES.
Des lames affûtées minimisent les risques de calage et de rebond. L’utilisation de lames émoussées ou sales
augmente la charge de la scie et force l’utilisateur à pousser plus fort ce qui favorise les risques de torsion de
la lame.
DANGER : ÉLOIGNER LES MAINS DE LA ZONE DE COUPE.
Éloigner les mains de la lame. Ne pas placer les mains devant ou derrière la lame ni sous la pièce à découper
pendant les travaux lorsque la lame tourne. Ne pas tenter de retirer du matériau coupé lorsque la lame est en
mouvement.
MISE EN GARDE : La lame continue de tourner après la mise hors tension.
À la fin de la coupe, attendre l’immobilisation de la lame avant de retirer la scie du matériau. Le protecteur
inférieur télescopique se referme lorsqu’on soulève la scie.
NOTE : La scie est munie d’une lame universelle Black & Decker de 85,7 mm (3 3/8 po). Il n’est pas
recommandé de s’en servir pour couper des panneaux d’agglomérés ou du plastique. Dans le cas des
panneaux d’agglomérés, utiliser une lame au carbure de 85,7 mm (3 3/8 po) de Black & Decker (cat.
nos 73-699 ou 73-339VP). Pour couper le plastique, utiliser une lame pour coupe douce de 85,7 mm
(3 3/8 po) de Black & Decker (cat. no 73- 698).
•SOUTENIR LES GRANDS PANNEAUX.
Il faut soutenir les panneaux de grandes dimensions de la façon illustrée (fig. 3) dans le présent guide afin de
minimiser les risques de coincement de la lame et de rebond.
Lorsqu’il faut déposer la scie contre la pièce à découper pendant les travaux, il faut la déposer sur la partie la
plus large du matériau et découper la plus petite.
•UTILISER UN GUIDE DE REFENTE.
T oujours utiliser un guide de refente (cat. no. 73-501) ou un guide à rebord droit lors des coupes en refente.
•LORS DU MONTAGE, UTILISER SEULEMENT DES LAMES ET LES FERRURES APPROPRIÉES.
Ne pas utiliser une lame dont le diamètre du trou est inapproprié. Ne jamais utiliser des rondelles ou des
boulons de lames défectueux ni de dimensions inappropriés. Se conformer aux directives de montage de la
lame.
•BIEN SOUTENIR ET FIXER LA PIÈCE.
S’assurer que la pièce à découper est fixée (fig. 5) ainsi que bien soutenue et équilibrée à l’aide d’un
montage solide, stable et de niveau.
Soutenir la pièce de sorte que la partie la plus large du patin de la scie repose contre la partie du matériau
qui ne tombe pas après la coupe.
Ne jamais tenir de la main les pièces découpées (fig. 6). Cela présente des risques de rebond en raison du
coincement possible de la lame. Placer les deux mains sur la scie en tout temps.
•DEMEURER VIGILANT ET MAÎTRISER L’OUTIL.
Se placer d’un côté de la scie. T oujours saisir fermement l’outil et bien le maîtriser des deux mains. Ne pas
modifier la position des mains ni du corps lorsque la scie fonctionne.
Prendre soin de ne pas être blessé par les pièces découpées et autres matériaux qui tombent pendant les
travaux.
MISE EN GARDE : Lorsqu’on coupe dans les murs, les planchers ou tout autre endroit où peuvent se
trouver des fils sous tension, NE PAS TOUCHER AUX COMPOSANTS
MÉTALLIQUES DE L’OUTIL. Ne le saisir que par ses surfaces en plastique afin de se
protéger des secousses électriques si on entre en contact avec un fil sous tension.
Protection contre les risques de rebond
•QU’EST-CE QU’UN REBOND?
Le rebond est un mouvement soudain de la scie, pendant la coupe, vers l’arrière et l’utilisateur . Cela présente
des risques de blessures graves.
DANGER : RELÂCHER IMMÉDIATEMENT L’INTERRUPTEUR EN CAS DE COINCEMENT DE LA LAME
OU DE CALAGE DE LA SCIE.
•CAUSES DE REBOND
Le coincement, la torsion ou le saut de la lame pendant la coupe, ou le calage de la scie.
Lorsque la lame se tord ou perd son alignement dans la coupe, les dents à l’arrière de la lame peuvent
s’enfoncer dans la surface de la pièce ce qui fait ressortir la lame et la dirige soudainement vers l’arrière.
•RÉDUCTION DES RISQUES DE REBOND
•Saisir fermement la scie des deux mains en tout temps.
•Demeurer vigilant; maîtriser l’outil.
•Soutenir les matériaux de grandes dimensions. Lorsque le matériau est coupé, il s’affaiblit et s’affaisse, ce
qui coince la lame.
•Soutenir les panneaux de grandes dimensions (fig.3). Un matériau seulement soutenu aux extrémités
(fig. 4) coince la lame.
•Éviter de découper au-dessus de la tête. Le matériau peut s’affaisser et coincer la lame.
•S’assurer que les lames sont propres et affûtées.
•Utiliser un guide de refente ou un guide à rebord droit pour effectuer des coupes en refente. Prendre garde
RENSEIGNEMENTS IMPORTANTS
•Charger l’ensemble de piles avant la première utilisation.
•Le chargeur peut émettre des sons pendant le chargement et le chargeur ainsi que
l’ensemble de piles peuvent devenir chauds au toucher (l’ensemble de piles et le
chargeur sont vendus séparément).
•T oujours soutenir la pièce à couper. (Voir les figures appropriées dans le présent
guide.)
GUIDE D’UTILISATION
AVANT DE RETOURNER LE PRODUIT, PEU IMPORTE LARAI-
SON PRIÈRE DE COMPOSER
1 800 544-6986
Page 4

car la pièce coupée peut s’affaisser ou se tordre et coincer la lame, ce qui provoque un rebond.
•Ne pas forcer l’outil. Plusieurs caractéristiques du bois (comme les nœuds, la dureté, la résistance, la teneur
en humidité, le traitement sous pression et la coupe récente) peuvent lourdement surcharger la scie et la
faire caler . Pousser doucement sur la scie dans ces conditions.
•Ne pas retirer la scie de la coupe lorsque la lame tourne.
•Attendre le plein régime de la scie avant de mettre la lame en contact avec la pièce à couper. Le fait de
démarrer la scie lorsque la lame touche au matériau ou de la pousser dans la coupe peut entraîner le
calage de la scie ou un soudain mouvement arrière de la scie.
•Toujours fixer la pièce afin d’en empêcher le mouvement pendant la coupe.
•Ne pas tenter de forcer la scie dans la ligne de coupe lorsqu’elle en dévie. Cela présente des risques de
rebond. Arrêter la scie, la retirer de la coupe et recommencer une nouvelle coupe sur la ligne.
•Ne pas faire reculer la scie dans la ligne de coupe. La scie peut se tordre et les dents arrières de la lame
peuvent alors gruger le matériau et en ressortir vers l’utilisateur.
•Éviter de couper des clous. Vérifier s’il y en a dans la pièce avant de découper et les enlever.
•Ne jamais reculer la lame dans le trait de scie tant qu’elle ne s’est pas immobilisée.
AUTRES MESURES DE SÉCURITÉ IMPORT ANTES
• Certaines essences de bois renferment des agents de conservation (comme de l’arséniate de cuivre et de
chrome) qui peuvent être toxiques. Lorsqu’on doit couper de tels matériaux, prendre des mesures
supplémentaires afin d’éviter d’inhaler les vapeurs toxiques et de minimiser les contacts avec la peau.
• La profondeur de la lame n’est pas réglable. S’assurer que l’espace est suffisant sous la pièce.
CONSERVER CES MESURES.
RÉGLAGE ET INSTALLATION
AVERTISSEMENT : T oujours retirer les piles de la scie avant de procéder aux étapes suivantes.
•REMPLACEMENT ET RETRAIT DES LAMES
1. Placer la rondelle de fixation interne sur l’arbre de la scie.
2. Escamoter le protecteur inférieur et placer la lame par-dessus la rondelle de fixation interne. Les flèches
indiquant le sens de rotation de la lame doivent pointer dans le même sens que celles du protecteur
supérieur (fig. 7).
3. Placer la rondelle de fixation externe sur l’arbre de la scie et serrer la vis de fixation à la main (la vis est
filetée à gauche; tourner dans le sens antihoraire pour la serrer).
4. Insérer un tournevis ou un long clou dans un des trous de la lame pour éviter qu’elle ne tourne (fig. 8).
5. Serrer la vis de fixation de la lame fermement à l’aide de la clé de la lame (dans le sens antihoraire) (fig. 8).
FONCTIONNEMENT
AVERTISSEMENT : Afin de minimiser les risques de blessures graves, lire, comprendre et respecter
toutes les importantes mesures de sécurité avant d’utiliser l’outil.
• COUPE
•IMPOR TANT : Lire les mesures de sécurité. SE PROTÉGER CONTRE LES RISQUES DE REBOND.
•S’assurer que les piles ont été retirées de l’outil avant de respecter toutes les consignes relatives au montage,
au réglage et aux préparatifs. Vérifier si le protecteur inférieur fonctionne. Choisir la lame appropriée au
matériau à découper.
•Mesurer et marquer la pièce à découper.
•Bien soutenir et fixer la pièce (voir les mesures de sécurité).
•Porter l’équipement de sécurité approprié et requis (voir les mesures de sécurité).
•S’assurer que la zone de travail est sûre et propre (voir les mesures de sécurité).
•S’assurer que l’interrupteur met la scie en marche et hors tension.
AVERTISSEMENT : Il est essentiel de bien soutenir le matériau et de saisir fermement la scie afin de ne
pas perdre la maîtrise de l’outil et d’éviter les risques de blessures graves. La figure
5 montre le bon soutien de la scie.
•Placer le devant du patin de la scie à plat contre le matériau à couper.
•Aligner la lame sur la ligne de coupe en s’assurant que la lame ne touche pas au matériau.
•Enfoncer l’interrupteur à détente, attendre le plein régime de la lame. Ne jamais verrouiller la détente en
position de marche.
•Faire avancer la scie vers l’avant dans le matériau en maintenant le patin à plat contre le matériau jusqu’à
la fin de la coupe.
•Relâcher la détente et attendre l’immobilisation de la lame avant de retirer la scie de la ligne de coupe.
•COUPE EN RETRAIT (FIG. 9)
Ce genre de coupe sert à découper un trou dans un panneau sans partir du bord.
•Faire basculer la scie vers l’avant et appuyer le devant du patin contre le matériau à découper. Se placer de
sorte que la coupe commence à l’arrière du rectangle dessiné.
•À l’aide du ressort de rappel, escamoter le protecteur inférieur vers le haut. S’assurer que la lame ne touche
pas au matériau, faire démarrer la scie et l’abaisser graduellement dans le matériau.
AVERTISSEMENT : Relâcher le ressort de rappel dès que la lame entre en contact avec le matériau.
•Ne jamais attacher le protecteur en position soulevée.
•Lorsque le patin repose à plat contre le matériau, terminer la coupe en faisant avancer la scie.
•Attendre l’immobilisation complète de la lame avant de sortir la scie du matériau.
•Répéter les étapes précédentes avant de commencer une nouvelle coupe.
Pour toute question relative au bon fonctionnement de l’outil, composer le 1 800 544 6986
•RETRAIT ET INSTALLA TION DES PILES
NOTE : LES PILES VERSAP AKmcNE SONT PAS COMPLÈTEMENT CHARGÉES À L’USINE.
•Pour installer les piles dans l’outil, il suffit de les faire glisser dans la poignée de l’outil jusqu’à ce qu’elles
s’enclenchent en place.
•Pour retirer les piles VersaPakmc, Il suffit d’appuyer sur les boutons de dégagement (fig. 10) et de sortir les
piles de la poignée de l’outil.
NOTE : Les piles sont pourvues de capuchons à utiliser lorsqu’on les transporte ou qu’on les range dans une
poche, un coffre à outil ou ailleurs. Enlever le capuchon de la pile avant de placer celle-ci dans le chargeur ou
dans l’outil.
On installe le capuchon en le poussant en place (fig. 2). Pour l’enlever, il suffit de tirer dessus. Note: Utiliser
l’outil seulement lorsque les deux piles VersaPakmcsont en place.
•INTERRUPTEUR
L’outil comporte un dispositif de verrouillage en position hors tension en empêchant le démarrage accidentel .
Pour utiliser l’outil, il faut d.abord faire glisser le bouton de verrouillage et le maintenir dans cette position tout
en enfonçant la détente (fig. 11). Lorsque l’outil fonctionne, relâcher le bouton de verrouillage. L’outil continue
de fonctionner jusqu’à ce qu’on relâche la détente.
Pour mettre l’outil hors tension, relâcher la détente de l’interrupteur . Chaque fois que la détente est relâchée,
le dispositif de verrouillage de l’interrupteur est engagé et bloque la détente en position hors tension.
Il est impossible de verrouiller l’outil en mode de fonctionnement continu et l’interrupteur ne doit être bloqué
d’aucune manière que ce soit.
•INDICATEUR DE TRAIT DE SCIE ET DE DÉBUT DE COUPE
À l’avant du patin de la scie, on trouve deux indicateurs de trait de scie. Ces indicateurs servent à guider la
lame le long de la ligne de coupe. Ils sont situés à 25 mm (1 po) et 76 mm (3 po) du rebord du patin.
Le rebord extérieur du patin porte un indicateur de début de coupe. Celui-ci aide à prévoir le moment où la
lame entre en contact avec la pièce.
ENTRETIEN
Nettoyer l’outil seulement à l’aide d’un savon doux et d’un linge humide. Ne laisser aucun liquide s’infiltrer
dans l’outil et ne jamais immerger l’outil.
IMPORTANT : Pour assurer la SÉCURITÉ D’EMPLOI et la FIABILITÉ de l’outil, n’en confier la réparation,
l’entretien et les rajustements qu’à un centre de service ou à un atelier d’entretien autorisé n’utilisant que des
pièces de rechange identiques.
•LE SCEAU RBRCmc*
Le sceau RBRCmcde l’ensemble de piles au nickel-cadmium indique
que Black & Decker participe volontairement à un programme du monde industriel qui a pour
objet de ramasser et de recycler ces ensembles de piles à la fin de leur vie utile, si on s’en
débarrasse aux États-Unis. Le programme RBRCmcoffre une solution de rechange pratique à
la mise au rebut des ensembles de piles au nickel-cadmium usés, que ce soit à la poubelle ou
dans le système municipal car cette mise au rebut est illégale dans certains endroits.
Grâce à la contribution de Black & Decker au RBRC
mc
, il suffit de laisser un ensemble de piles usé chez les
détaillants qui vendent des piles au nickel-cadmium de rechange ou dans un centre de service Black & Decker
autorisé. On peut également se renseigner auprès de son centre local de recyclage pour savoir comment se
débarrasser d’un ensemble de piles usé. Black & Decker fait partie de ce programme en raison de son
engagement à protéger l’environnement et à préserver les ressources naturelles.
* RBRC
mc
est une marque de commerce de l’organisme américain Rechargeable Battery Recycling
Corporation.
Accessoires
Les détaillants et le centre de service de la région vendent les accessoires recommandés pour l’outil. Pour
trouver un accessoire, composer le 1 800 544-6986.
AVERTISSEMENT : L’utilisation de tout accessoire non recommandé pour l’outil peut être dangereuse.
AVERTISSEMENT : Ne jamais utiliser de lames abrasives ni de lames à maçonnerie, à tuiles ou à
métaux. T oujours utiliser des lames de 85,7mm (33/8 po) de diamètre.
Renseignements relatifs au service
Black & Decker exploite un réseau complet de centres de service et d'ateliers d'entretien autorisés par toute
l'Amérique du Nord. Le personnel de tous les centres de service Black & Decker a reçu la formation voulue
pour assurer l'entretien efficace et fiable des outils électriques.
Pour obtenir des renseignements d'ordre technique, des conseils relatifs aux réparations ou des pièces de
rechange d'origine, communiquer avec le centre de service Black & Decker de la région. On peut trouver
l'adresse du centre de service de la région dans l'annuaire des Pages Jaunes à la rubrique «Outils
électriques» ou en composant le numéro suivant : 1 (800) 544-6986.
Garantie complète de deux ans pour utilisation domestique
Black & Decker garantit le produit pour une période de deux ans contre les vices de matière ou de
fabrication. Le produit défectueux sera réparé ou remplacé sans frais conformément à l'une des conditions
suivantes.
Pour échanger l'outil, il suffit de le retourner au détaillant (si le détaillant participe au programme d'échange
rapide Black & Decker). Le retour doit être effectuer dans les délais impartis par la politique de retour du
détaillant (habituellement entre 30 et 90 jours suivant la date d'achat). Le détaillant peut exiger une preuve
d'achat. Prière de vérifier la politique de retour du détaillant au-delà des délais impartis.
On peut également retourner l'outil (port payé) à un centre de service Black & Decker ou à tout autre atelier
d'entretien accrédité pour y être remplacé ou réparé, à notre gré. On peut exiger une preuve d'achat. Les
adresses des centres de service Black & Decker se trouvent à la rubrique «Outils électriques» des Pages
Jaunes.
La présente garantie ne vaut pas pour les accessoires. Les modalités de la présente garantie donnent des
droits légaux spécifiques. L'utilisateur peut également se prévaloir d'autres droits selon l'état ou la province
qu'il habite. Pour obtenir de plus amples renseignements, communiquer avec le directeur du centre de
service Black & Decker de la région.Le produit n'est pas conçu pour un usage commercial.
Imported by / Importé par
Black & Decker Canada Inc.
100 Central Ave.
Brockville (Ontario) K6V 5W6
Voir la rubrique “Outils électriques”
des Pages Jaunes
pour le service et les ventes.
MANUAL DE INSTRUCCIONES
INFORMACION CLAVE QUE DEBE SABER
•Cargue las baterías antes de usar la herramienta por vez primera.
•El cargador puede zumbar; las baterías y el cargador pueden calentarse durante la
carga (las baterías y el cargador se venden por separado).
•Siempre apoye las piezas de trabajo apropiadamente. (Vea las ilustraciones de
soporte de las piezas de trabajo en este manual.)
ADVERTENCIA: ADVERTENCIAS E INSTRUCCIONES IMPOR TANTES DE SEGURIDAD
P ARA REDUCIR EL RIESGO DE LESIONES:
• Antes de cualquier uso, asegúrese que cualquier persona que vaya a utilizar esta herramienta lea y
comprenda todas las instrucciones de seguridad y la información contenida en este manual.
• Conserve estas instrucciones y repáselas con frecuencia antes de usar la herramienta e instruir a otras
personas.
ADVERTENCIA: Siempre que utilice herramientas eléctricas debe seguir ciertas precauciones básicas
de seguridad, a fin de reducir los riesgos de incendio, choque eléctrico y lesiones
personales, entre las que se encuentran las siguientes.
LEA TODAS LAS INSTRUCCIONES
ADVERTENCIAS E INSTRUCCIONES GENERALES DE SEGURIDAD P ARA TODAS LAS
HERRAMIENTAS.
• CONSERVE LIMPIA EL AREA DE TRABAJO. Las áreas y los bancos con objetos acumulados en desorden
propician los accidentes.
• DELE PRIORIDAD AL AMBIENTE DE TRABAJO. No exponga las herramientas eléctricas a la lluvia. No
utilice herramientas eléctricas en lugares húmedos o inundados. Ilumine bien la zona de trabajo. No utilice
las herramientas eléctricas en presencia de líquidos o gases inflamables. Los motores de estas herramientas
producen chispas, que pueden encender los vapores.
• PROTEJASE CONTRA EL CHOQUE ELECTRICO. Evite el contacto corporal con superficies aterrizadas, por
ejemplo; tuberías radiadores, hornos, gabinetes de refrigeración, etc. T enga precaución extrema cuando
taladre, atornille o corte en muros, pisos, techos u otras áreas en donde pueda encontrar cables eléctricos
vivos, no toque ninguna parte metálica de la herramienta. Sujete las herramientas solamente por las
empuñaduras de plástico para evitar descargas eléctricas.
• CONSERVE APARTADOS A LOS NIÑOS. No permita que niños ni otros visitantes toquen la herramienta ni
los cables de extensión. T odos los niños y otros visitantes deben apartarse del área de trabajo.
• GUARDE LAS HERRAMIENTAS QUE NO EMPLEE. Siempre que no use las herramientas, debe guardarlas en
un lugar seco y elevado o bajo chapa, fuera del alcance de los niños.
• NO FUERCE LA HERRAMIENTA. Esta hará el trabajo mejor y de manera más segura a la velocidad y
presión para las que se diseñó.
• EMPLEE LA HERRAMIENTA ADECUADA. No fuerce a una herramienta pequeña o a sus dispositivos de
montaje en una tarea destinada a una herramienta de alto rendimiento. No utilice la herramienta para
tareas para las que no ha sido diseñada.
• VISTASE DE LA MANERA ADECUADA. No utilice ropas sueltas ni joyas, pueden quedar atrapadas en las
partes móviles. Se recomienda el uso de guantes y calzado antiderrapante cuando trabaje a la intemperie.
Cúbrase el cabello si lo tiene largo.
• UTILICE GAFAS Y OTRO EQUIPO DE SEGURIDAD. Utilice anteojos de seguridad con cubiertas protectoras
laterales, que cumplan con los estándares de seguridad aplicables y, cuando se requiera, una máscara.
también utilice una mascarilla contra polvo si la operación de corte lo produce. Esto se aplica a todas las
personas en el área de trabajo. Utilice también un casco, protección para los oídos, guantes, calzado de
seguridad y sistemas recolectores de polvo cuando se especifiquen o se requieran.
• NO MALTRA TE EL CORDON ELECTRICO. Nunca cargue la herramienta por el cable ni tire de éste para
desconectarlo de la toma de corriente. Aléjelo de calor , aceite y bordes afilados.
• ASEGURE LAS PIEZAS DE TRABAJO. Utilice prensas para sujetar su pieza de trabajo; es más seguro que
usar su mano y le deja ambas manos libres para operar la herramienta.
• NO SE SOBREEXTIENDA. Apoye bien los pies y conserve el equilibrio siempre.
• CUIDE SUS HERRAMIENTAS.Conserve sus herramientas limpias y afiladas para un rendimiento mejor y
más seguro. Siga las instrucciones de lubricación y cambio de accesorios. Revise la herramienta
periódicamente y si está dañada, hágala reparar por una estación de servicio autorizada. revise los cables
de extensión periódicamente y reemplácelos si están dañados. Conserve las empuñaduras secas, limpias y
libres de aceite y grasa.
• DESCONECTE LAS HERRAMIENTAS. Desconecte la herramienta cuando no la utilice, cuando la cambie de
lugar , antes de darle servicio y cuando le cambie accesorios (como brocas, puntas, cortadores) o le haga
ajustes.
• QUITE LAS LLA VES DE AJUSTE Y LAS HERRAMIENTAS DE MANO. Acostúmbrese a verificar que se hayan
retirado todas las llaves antes de encender la unidad.
• EVITE EL ENCENDIDO ACCIDENTAL. No acarree la herramienta con el dedo en el interruptor. Asegúrese
que el interruptor esté en posición de apagado antes de conectar la unidad.
• ESTE ALERTA.Concéntrese en lo que hace. Utilice el sentido común. No opere la herramienta si está
cansado o discapacitado de alguna manera.
• REVISE LAS PARTES DAÑADAS.Antes de seguir usando la herramienta, debe revisar las guardas y otras
partes para determinar realizarán su función adecuadamente. Revise la alineación de las partes móviles, la
ANTES DE DEVOLVER ESTE PRODUCTO POR CUALQUIER
RAZON POR FAVOR LLAME
326-7100
Page 5

manera en que están sujetas, que no haya piezas o soportes rotos, y cualesquiera otras condiciones que
puedan afectar la operación. Una guarda u otra pieza que esté dañada debe ser reparada o reemplazada
en un centro de servicio autorizado. No use la herramienta si el interruptor no enciende y apaga.
• SERVICIO Y REPARACIONES. Las reparaciones, el mantenimiento y cualquier ajuste no especificados en
este manual deben ser realizados por los centros de servicio autorizado Black & Decker u otras estaciones
de servicio calificadas, que siempre utilicen refacciones idénticas.
• EMPLEO DE ACCESORIOS Y DISPOSITIVOS. El uso de cualquier accesorio o dispositivo no recomendado
para emplearse con esta herramienta puede ser peligroso. Nota: consulte la sección sobre los accesorios en
este manual para más detalles.
INSTRUCCIONES IMPORT ANTES DE SEGURIDAD (PARA LA BATERÍA Y EL CARGADOR)
ADVERTENCIA: Es indispensable sujetarse a las precauciones básicas de seguridad, con la
finalidad de reducir el peligro de incendio, choque eléctrico y lesiones personales,
en todas las ocasiones en que se utilicen herramientas eléctricas. Entre estas
precauciones se incluyen la siguientes:
LEA TODAS LAS INSTRUCCIONES
• No guarde o lleve la batería en tal manera que objetos metálicos puedan hacer contacto con el extremo
metálico de la batería, como se ilustra en la figura 1. Por ejemplo, no ponga baterías en delantales, bolsillos,
cajas de herramienta, cajones, etc., en los que pueda haber clavos, tornillos llaves, etc. La batería puede
hacer corto circuito, ocasionando riesgo de incendio o quemaduras, o daños a la batería.
•Los capuchones de las baterías se proporcionan para trasladarlas o guardarlas en bolsillos, cajas de
herramientas, etc. Quite el capuchón antes de colocar la batería en el cargador o en la herramienta (fig 2).
• Nunca intente abrir la batería por ningún motivo. Si la cubierta de la batería se rompe o estrella, descártela
de inmediato y no la recargue.
• No incinere las baterías, pueden explotar con el fuego. Puede ocurrir una pequeña fuga de líquido de las
celdas de la batería bajo condiciones extremas de uso, carga o temperatura. Esto no indica fallas, sin
embargo, si el sello externo está roto y el líquido hace contacto con su piel:
a. Lave inmediatamente con agua y jabón.
b. Neutralice con un ácido débil como jugo de limón o vinagre.
c. Si el líquido de la batería toca sus ojos, enjuáguelos con agua limpia por un mínimo de 10 minutos y
busque inmediatamente atención médica.
NOTA MEDICA: el líquido es una solución de potasa cáustica en concentración de 25 a 35%.
• Cargue las baterías solamente con el cargador de baterías VersaPak.
• No exponga el cargador a condiciones de humedad. Está diseñado para utilizarse únicamente bajo techo.
No lo utilice cerca de lavaderos, tinas o similares. No lo sumerja en agua.
• La batería no está diseñada para otra cosa que no sea cargar baterías VersaPak. Otras baterías pueden
estallar.
• No opere el cargador si la clavija o el cordón eléctrico están dañados —hágalos reemplazar
inmediatamente.
• No opere el cargador si ha recibido algún golpe seco, se ha caído, o se ha dañado en cualquier otra forma;
llévelo a un centro de servicio autorizado Black & Decker.
• No desarme el cargador, llévelo a un Centro de Servicio autorizado Black & Decker cuando requiera ser
reparado. Ensamblarlo de modo incorrecto puede ocasionar descargas eléctricas o incendios. No contiene
partes susceptibles de ser reparadas por el usuario en su interior.
• Para obtener mejores resultados, no cargue la batería cuando la temperatura sea INFERIOR a 5°C (+40°F),
o SUPERIOR a 40°C (+105°F).
• El cargador está diseñado para funcionar con corriente eléctrica doméstica estándar (120 volts, corriente
alterna). No intente utilizarlo con otro voltaje.
• Desconecte el cargador cuando no lo utilice.
• No abuse del cordón eléctrico del cargador. Para reducir el riesgo de daños a la clavija y al cordón
eléctrico, nunca sujete el cargador por el cordón eléctrico ni tire de éste para desconectarlo de la toma de
corriente. Consérvelo alejado de calor, aceite y bordes cortantes.
• Solamente emplee el cargador suministrado por el fabricante para recargar sus baterías.
NOT AS IMPORTANTES SOBRE LA CARGA
1. Durante la carga, el transformador del cargador puede zumbar y el cargador y las baterías pueden
calentarse, esto es una condición normal y no indica problemas.
2. Si una batería no carga adecuadamente — (1) Verifique la corriente en la toma conectando una lám-
para u otro aparato. (2) Revise para ver si la toma de corriente está conectada a un interruptor que
corte la corriente al apagar las luces. (3) Lleve el cargador y las baterías a un lugar en donde la temperatura del aire se encuentre entre 5°C (40°F) y 40°C (105°F). (4) Si la toma de corriente y la temperatura son adecuadas, y no consigue cargar adecuadamente, lleve o envíe las baterías y el cargador a
su centro de servicio Black & Decker local. Vea “Herramientas eléctricas” en la sección amarilla.
3. Las baterías deben recargarse cuando dejan de producir la potencia suficiente en tareas que se
realizaron anteriormente con facilidad. NO CONTINUE utilizando su herramienta con las baterías
descargadas.
PROCEDIMIENTO DE CARGA
Inserte el extremo metálico de la batería VersaPak en el cargador. La luz indicadora se encenderá señalando
así que el proceso de carga está teniendo lugar y permanecerá encendida mientras la batería esté en el
cargador . La carga continua no es materia de seguridad.
NOTA: Su batería VersaPak viene de fábrica sin carga, antes de intentar utilizarla por primera vez, debe
cargarla durante 6 horas. Las cargas subsecuentes para la mayoría de sus tareas requerirá entre 3 y 6
horas.
ADVERTENCIAS E INSTRUCCIONES DE SEGURIDAD: SIERRAS CIRCULARES
PRECAUCION: Retire las baterías antes de cambiar de discos y de inspeccionar o limpiar la sierra.
•CONSERVE LAS GUARDAS EN SU SITIO Y LISTAS PARA TRABAJAR.
Nunca sujete o amarre la guarda de manera que quede abierta.
Verifique la operación de la guarda inferior antes de cada uso. No se use si la guarda inferior no cierra
completamente sobre el disco de la sierra.
PRECAUCION: Si la sierra se cae la guarda inferior puede doblarse, restringiendo el regreso
completo.
Enganchar la guarda inferior en una superficie que se encuentre por debajo del material que se va a cortar
puede reducir el control del operador momentáneamente. La sierra se puede levantar parcialmente
incrementando las posibilidades de que el disco se doble. asegúrese que haya suficiente espacio libre debajo
de la pieza de trabajo.
•GUARDA INFERIOR
Utilice el asa del mecanismo retráctil cuando sea necesario levantar la guarda manualmente.
•CONSERVE LOS DISCOS LIMPIOS Y AFILADOS.
Los discos afilados minimizan el riesgo de atascaduras y contragolpes. El empleo de discos desafilados y/o
sucios puede incrementar la carga de la sierra, ocasionando que el operador tenga que empujar con más
fuerza, lo que promueve la formación de dobleces.
PELIGRO: CONSERVE LAS MANOS ALEJADAS DEL AREA DE CORTE.
Aleje las manos del disco. Nunca coloque las manos por delante o por detrás del camino del disco mientras
corta. No las coloque por debajo de la pieza de trabajo mientras el disco gira. No intente sacar la pieza
cortada mientras el disco continúe en movimiento.
PRECAUCION: El disco continúa girando después de apagar la herramienta.
Cuando complete el corte, permita que el disco se detenga antes de sacar la sierra. La guarda telescópica
inferior se cerrará al levantar la sierra.
NOTA:Esta sierra está equipada con un disco Black & Decker para uso general de 85,7 mm (3-3/8"). No se
recomienda cortar aglomerados o plástico con este disco. Para cortar aglomerado, utilice un disco de carburo
(Cat. No. 73-699 o 73-339VP). Para plástico, utilice un disco Black & Decker de 85,7 mm (3-3/8") de corte
liso (Cat. No. 73-698).
•APOYO PARA PIEZAS GRANDES
Los páneles grandes deben soportarse como se ilustra en la figura 3 de este manual para minimizar la
posibilidad de que el disco se atore y ocasione un contragolpe.
Cuando la operación de corte requiera que la sierra descanse sobre la pieza de trabajo, la sierra debe
apoyarse en la porción más grande, y la parte más pequeña debe ser la que se separe.
•USO DE GUIA PARA COR TE DE TIRAS
Siempre utilice una guía (Cat. No. 73-501) o una regla cuando vaya a cortar tiras.
•SOLAMENTE EMPLEE EL DISCO ADECUADO Y LOS COMPONENTES DE ENSAMBLAJE DEL DISCO
CORRECTOS EN EL MONTAJE
No utilice discos con orificios de tamaño incorrecto. Nunca utilice tornillos o tuercas defectuosos o incorrectos
para el disco. Siga los procedimientos de ensamblaje del disco.
•APOYE Y ASEGURE LA PIEZA DE MANERA ADECUADA
Asegúrese que el material que vaya a cortar esté sujeto (fig. 5) y sólidamente soportado y balanceado en
una base de trabajo estable y nivelada.
Apoye la pieza de manera que la porción más ancha de la zapata de la sierra quede sobre la parte del
material que no caerá después del corte.
Nunca sujete la pieza que se desprende con la mano (fig. 6). Puede ocurrir un contragolpe. Conserve
siempre ambas manos en la sierra.
•CONSERVESE ALERT A Y EN CONTROL
Coloque su cuerpo a un lado del disco. Siempre sujete con firmeza y controlando la sierra con ambas
manos. No cambie la manera de sujetar la sierra ni la posición del cuerpo durante la operación de la sierra.
T enga cuidado para evitar lesiones con las piezas que se desprenden y otros materiales que caen durante la
operación.
PRECAUCION: Cuando corte en muros, pisos, o dondequiera que pueda encontrar cables eléctricos
“vivos”, NO TOQUE NINGUNA PAR TE METALICA DE LA HERRAMIENT A. Sujete la sierra únicamente por las
empuñaduras de plástico para evitar descargas eléctricas si accidentalmente corta un cable vivo.
Protéjase contra el contragolpe
•¿QUE ES EL CONTRAGOLPE?
El contragolpe es el movimiento repentino de la sierra durante un corte, hacia el operador, lo que puede
ocasionar lesiones personales graves.
PELIGRO: LIBERE EL INTERRUPTOR INMEDIATAMENTE SI EL DISCO SE ATORA O LA SIERRA SE
ATASCA.
•EL CONTRAGOLPE PUEDE SER OCASIONADO POR:
El disco al atorarse, doblarse o rebotar durante el corte o si la sierra se atasca.
Cuando el disco se desvía o pierde la línea de corte, los dientes y el borde trasero del disco pueden
enterrarse en la superficie superior de la madera ocasionando que el disco salga del canal de corte y se mueva
súbitamente hacia el operador .
•PARA REDUCIR EL RIESGO DE CONTRAGOLPE:
• Sujete firmemente la sierra con ambas manos siempre.
• Consérvese alerta y en control.
• Apoye los materiales largos que sobresalgan. Al cortar el material, éste se debilita y aprisiona el disco.
• Apoye los páneles largos como se muestra en la figura 3. El material apoyado solamente en los extremos
(fig. 4) ocasionará que el disco quede atrapado.
• Evite cortar en alto. El material se puede doblar y atrapar al disco.
• Conserve los discos limpios y afilados.
• Utilice una guía o una regla cuando corte tiras. Tenga cuidado ya que la tira que se desprende puede
aprisionar el disco y ocasionar un contragolpe.
• No fuerce la herramienta. Las maderas tienen condiciones variables como nudos, dureza, humedad, etc.
Las maderas tratadas a presión y las recién cortadas pueden sobrecargar la sierra ocasionando que se
atasque. Empuje lentamente la sierra cuando esto ocurra.
• No retire la sierra del trabajo durante un corte y mientras el disco esté en movimiento.
• Permita que la sierra alcance la máxima velocidad antes que el disco haga contacto con el material a
cortar. Encender la sierra con el disco apoyado en la pieza, o forzar el corte puede ocasionar que se atore
o que la sierra salta hacia atrás intempestivamente.
• Siempre asegure la pieza de trabajo para evitar movimientos durante el corte.
• No intente forzar la sierra de regreso a la línea de corte si ésta se desvía. Esto puede ocasionar
contragolpe. Apague la sierra, retírela del corte e inicie un corte nuevo en la línea.
• No regrese el disco cuando esté en movimiento, ya que se puede desviar y algún diente se puede enterrar
en el material, ocasionando que la sierra salte hacia atrás, hacia el operador .
• Evite cortar clavos. revise la pieza y quite todos los clavos de la madera antes de cortarla.
• Nunca tire de la sierra hacia atrás a través del canal de corte mientras el disco aún esté en movimiento.
OTRAS INSTRUCCIONES Y ADVERTENCIAS DE SEGURIDAD IMPORTANTES
• Algunos tipos de madera contienen conservadores como el arsenato cúprico de cromo (CCA) que pueden
ser tóxicos. Cuando corte estos materiales, debe tener precaución extrema para evitar la inhalación y
minimizar el contacto con la piel.
• La profundidad del disco no se puede ajustar. Asegúrese que haya espacio suficiente debajo de la pieza de
trabajo.
CONSERVE ESTAS INSTRUCCIONES
ENSAMBLAJE/AJUSTES INICIALES
ADVERTENCIA: Siempre retire las baterías antes de realizar cualquiera de las siguientes
operaciones.
•INSTALACION Y REMOCION DE DISCOS
1. Coloque la roldana de seguridad interior en la flecha.
2. Abra la guarda inferior y coloque el disco sobre la roldana de sujeción interior. Las flechas de sentido de
rotación del disco deben concordar con la dirección de las flechas de la guarda superior (fig. 7).
3. Coloque la roldana de sujeción exterior en la flecha y apriete el tornillo de sujeción a mano (el tornillo tiene
cuerda izquierda; gírelo en sentido contrario a las manecillas del reloj para apretarlo).
4. Introduzca un destornillador o un clavo largo a través de uno de los orificios del disco para evitar que gire
(fig. 8).
5. Apriete firmemente tornillo del disco con la llave del disco (en sentido contrario a las manecillas del reloj)
(fig. 8).
INSTRUCCIONES DE OPERACION
ADVERTENCIA: Para reducir el riesgo de lesiones personales graves, lea, comprenda y siga todas
las advertencias e instrucciones importantes de seguridad antes de usar la
herramienta.
•CORTES GENERALES
• IMPORTANTE:Lea las advertencias e instrucciones de seguridad - PROTEJASE CONTRA EL
CONTRAGOLPE.
• Siga todas las instrucciones de ensamblaje y ajuste con las baterías fuera de la herramienta. Asegúrese que
la guarda inferior funcione. Seleccione el disco apropiado para el material que va a cortar.
• Mida y marque la pieza en la zona de corte.
• Apoye y sujete la pieza apropiadamente (consulte las advertencias e instrucciones de seguridad).
• Emplee el equipo de seguridad adecuado y requerido (vea las instrucciones de seguridad).
• Conserve el área de trabajo segura (vea las instrucciones de seguridad).
• Asegúrese que el interruptor encienda y apague.
ADVERTENCIA: Es importante dar buen apoyo a la pieza de trabajo y sujetar la sierra con firmeza
para evitar la pérdida de control que podría ocasionar lesiones personales. La
figura 5 ilustra la manera correcta de sujetar la sierra.
• Coloque la parte frontal de la zapata en plano sobre la superficie que va a cortar .
• Haga coincidir el disco con la línea de corte para asegurarse que el disco pasa libre.
• Oprima el gatillo interruptor, permita que el disco alcance la velocidad máxima. Nunca trabe el gatillo en
posición de encendido por ningún motivo.
• Mueva la sierra hacia adelante, a través del material, conserva la zapata plana hasta completar el corte.
• Suelte el gatillo, permita que el disco se detenga antes de sacar la sierra.
•CORTE DE BOLSILLO (VEA LA FIGURA 9)
El corte de bolsillo se emplea para hacer un orificio en una pieza sin cortar el material desde la orilla.
• Incline la sierra hacia adelante y apoye el frente de la zapata en la pieza que va a cortar.
Colóquela de manera que el corte se inicie en la parte posterior del rectángulo que dibujó.
• Suba la guarda inferior por medio de la palanca del mecanismo retráctil, con el disco libre en la parte que
iniciará el corte, encienda el motor y comience a bajar la guarda paulatinamente.
ADVERTENCIA: Al iniciar el corte, libere la palanca del mecanismo retráctil inmediatamente.
• Nunca ate la guarda en posición levantada.
• Cuando la zapata descanse sobre el material que está cortando, complete el corte empujando hacia
adelante.
• Permita que el disco se detenga completamente antes del sacar la sierra del material.
• Cuando inicie un corte nuevo repita los pasos mencionados arriba.
Si tiene cualquier pregunta relacionada con la operación de la herramienta, llame al 91-800-701-28.
•REMOCION E INSTALACION DE LAS BATERIAS
NOTA:LAS BATERIAS VERSAPAK™ NO VIENEN COMPLETAMENTE CARGADAS DE FABRICA.
• Para instalar las baterías en la herramienta, simplemente deslícelas dentro del mango hasta que hagan
“clic” en su lugar .
• Para sacar las baterías VersaPak™ de la herramienta, oprima los botones de liberación, como se observa
en la figura 10, y tire de las baterías hacia afuera del mango de la herramienta..
NOTA:los capuchones de las baterías se proporcionan para usarlos cuando se requiera transportar las
baterías, o para guardarlas en un bolsillo, caja de herramientas, etc. Quite el capuchón antes de colocar la
batería en la herramienta o en el cargador .
Instale el capuchón de la batería (figura 2), oprimiéndolo en su lugar; para quitarlo, simplemente tire de él
hacia afuera.
NOTA:Solamente opere la herramienta con ambas baterías VersaPak™ instaladas.
•INTERRUPTOR
La herramienta está equipada con un sistema de seguro de apagado para evitar el encendido accidental.
Para operar la herramienta, debe deslizar primero el botón del seguro y sujetarlo mientras oprime el gatillo.
Después de oprimir el gatillo, con la herramienta en funcionamiento, suelte el botón del seguro; la herramienta
continuará en funcionamiento mientras el gatillo esté oprimido.
Para apagar la herramienta, suelte el gatillo interruptor . Cuando libere el gatillo (cada vez) se activará el
botón de seguro de apagado, asegurando la herramienta en esa posición.
Page 6

No hay ningún mecanismo para asegurar la herramienta en posición de encendido, y el interruptor nunca
debe trabarse por ningún medio.
•INDICADOR DE CORTE
El frente de la zapata tiene dos marcas que actúan como indicadores de corte. Los indicadores ayudan a
guiar la sierra a lo largo de las líneas pre marcadas. Las marcas se localizan a 25,4 mm (1") y a 76,2 mm
(3") de la orilla de la zapata.
El borde frontal de la zapata tiene una marca que funciona como indicador de la punta de los dientes del
disco, que ayuda a anticipar el contacto del disco con la pieza de trabajo.
MANTENIMIENTO
Solamente utilice jabón suave y un trapo húmedo para limpiar la herramienta. Nunca permita que ningún
líquido se introduzca en la herramienta; nunca sumerja ninguna parte de la herramienta en ningún líquido.
IMPORTANTE: Para garantizar la SEGURIDAD y la CONFIABILIDAD del producto, las reparaciones, el
mantenimiento y los ajustes deben ser realizados por centros de servicio autorizados u otras organizaciones
de servicio calificadas, que siempre utilicen partes de repuesto idénticas.
•EL SELLO RBRC™
El sello RBRC™ en las baterías de níquel-cadmio indica que
Black & Decker participa voluntariamente en un programa industrial para recolectar y
reciclar estas baterías al término de su vida útil, cuando se retiran de servicio dentro de los
Estados Unidos. El programa RBRC™ proporciona una conveniente alternativa para el
depósito en los lotes de basura municipales de las baterías de níquel-cadmio desgastadas,
hecho que es ilegal en algunas regiones.
Los pagos de Black & Decker a RBRC™ hacen más sencillo para usted deshacerse de sus baterías
desgastadas con los distribuidores de baterías de níquel-cadmio de su localidad, o en los centros de servicio
autorizado Black & Decker . También puede comunicarse al centro de reciclaje de su localidad para que le
informen de los lugares a los que puede regresar las baterías desgastadas. La entrada de Black & Decker a
este programa es parte de su compromiso para proteger nuestro medio ambiente y conservar los recursos
naturales.
RBRC™ es una marca registrada de Rechargeable Battery Recycling Corporation.
Accesorios
Los accesorios recomendados para emplearse con su herramienta se encuentran a su disposición con su
distribuidor local o en los centros de servicio autorizado. Si necesita ayuda en relación con los accesorios,
por favor llame 326-7100
ADVERTENCIA: El uso de cualquier accesorio no recomendado para emplearse con esta
herramienta puede ser peligroso.
ADVERTENCIA: Nunca utilice discos abrasivos o para corte de metal ni para corte de concreto.
Utilice siempre discos de 85,7 mm (3-3/8”) de diámetro.
INFORMACIÓN DE SERVICIO
Black & Decker ofrece una red completa de centros de servicio propiedad de la compañía y
franquiciados a través de toda Norteamérica. Todos los centros de servicio Black & Decker cuentan con
personal capacitado para proporcionar el servicio a herramientas más eficiente y confiable.
Siempre que necesite consejo técnico, reparaciones o partes de repuesto genuinas, comuníquese con
el centro Black & Decker más cercano a usted.
Para encontrar su centro de servicio local, consulte la sección amarilla bajo "Herramientas eléctricas", o
llame al: 326-7100
GARANTÍA COMPLET APOR DOS AÑOS PARA USO DOMÉSTICO
Black & Decker (U.S.) garantiza este producto por dos años completos contra cualquier falla originada
por materiales o mano de obra defectuosos. El producto defectuoso será reemplazado o reparado sin
cargo alguno en cualquiera de las siguientes dos maneras:
La primera, que resulta únicamente en cambios, es regresar el producto al vendedor al que se compró
(en la suposición que es un distribuidor participante). Las devoluciones deberán hacerse dentro del
tiempo estipulado por la política de cambios del distribuidor (usualmente de 30 a 90 días después de la
venta). Se puede requerir prueba de compra. Por favor verifique con el vendedor las políticas
específicas de devolución relacionadas a las devoluciones en tiempo posterior al estipulado para
cambios.
La segunda opción es llevar o enviar el producto (con porte pagado) a los centros de servicio Black &
Decker propios o autorizados, para que la reparemos o reemplacemos a nuestra opción. Se puede
requerir prueba de compra. Los centros de servicio Black & Decker propios y autorizados están
enlistados bajo “Herramientas eléctricas” en la sección amarilla del directorio telefónico.
Esta garantía no se aplica a los accesorios. Esta garantía le otorga derechos legales específicos, y
usted puede tener otros que varíen de estado a estado. Si tiene usted cualquier pregunta,
comuníquese con el gerente del centro de servicio Black & Decker más cercano.
Este producto no está destinado a uso comercial.
PARAREPARACION Y SERVICIO DE SUS HERRAMIENTAS ELECTRICAS FAVOR DE DIRIGIRSE
AL CENTRO DE SERVICIO MAS CERCANO
CULIACAN
Av . Nicolas Bravo #1063 Sur (91 671) 242 10
GAUDALAJARA
Av . La Paz #1779 (91 3) 826 69 78.
MEXICO
Eje Lázaro Cárdenas No. 18 Local D, Col. Obrera 588-9377
MERIDA
Calle 63 #459-A (91 99) 23 54 90
MONTERREY
Av . Francisco I. Madero Pte. 1820-A (91 83) 72 11 25
PUEBLA
17 Norte #205 (91 22) 46 37 14
QUERETARO
Av . Madero 139 Pte. (91 42) 14 16 60
SAN LOUIS POTOSI
Pedro Moreno #100 Centro (91 48) 14 25 67
TORREON
Blvd. Independencia, 96 pte. (91 17) 16 52 65
VERACRUZ
Prolongación Diaz Miron #4280 (91 29) 21 70 16
VILLAHERMOSA
Constitucion 516-A (91 93) 12 53 17
PARAOTRAS LOCALIDADES LLAME AL: 326 7100
IMPORTADO: BLACK & DECKER S.A. DE C.V.
BOSQUES DE CIDROS ACCESO RADIATAS NO. 42
COL. BOSQUES DE LAS LOMAS.
05120 MÉXICO, D.F
TEL. 3-26-71-00
SECCI N
AMARILLA
Si funciona…
y funciona muy bien.
Para servicio y ventas consulte
“HERRAMIENTAS ELECTRICAS”
en la sección amarilla.
ESPECIFICACIONES
C.# VP130
Cargador: VP130, 120V, 60 Hz, 7W
C.# VP100 Salida: 4,35 VDC @ 420mA
 Loading...