


AR PT FR EN
www.blackanddecker.ae
VM1200

ENGLISH
(Original instructions)
2
5
4
3
7
6
8
12
9
14
1
13
1011
2

(Original instructions)
ENGLISH
A
12
8
9
1
2
B
1
11
1
10
C
E
D
11
5
F
3

ENGLISH
(Original instructions)
15
G
I
16
16
H
174
J
4

(Original instructions)
ENGLISH
Intended use
Your BLACK+DECKER VM1200 vacuum
cleaner has been designed for dry vacuum
cleaning purposes. This appliance is
intended for consumer indoor use only.
This appliance is not to be used in:
• Staff kitchen areas in shops, offices and
other working environments;
• Farm Houses;
• By clients in hotels, motels and other
residential type environments;
• Bed and breakfast type environments or
any other non-household type
environments.
Safety instructions
Warning! Read all safety warnings
and all instructions. Failure to
follow the warnings and
instructions listed below may result in
electric shock, fire and/or serious injury.
• Read all of this manual carefully before
using the appliance.
• The intended use is described in this
manual. The use of any accessory or
attachment or the performance of any
operation with this appliance other than
those recommended in this instruction
manual may present a risk of personal
injury.
• Retain this manual for future reference.
Using your appliance
• Make sure that the appliance is switched
off before connecting to or
disconnecting from the power supply.
• Always take care when using the
appliance.
• Do not use the appliance outdoors.
• Never pull the power supply cord to
disconnect the plug from the socket.
Keep the power supply cord away from
heat, oil and sharp edges.
• If the power supply cord is damaged
during use, disconnect the appliance from
the power supply immediately. Do not
touch the power supply cord before
disconnecting from the power supply.
• Disconnect the appliance from the power
supply when not in use, before fitting or
removing parts and before cleaning.
• Do not immerse the appliance in water.
After use
• Switch off and remove the plug from the
socket before leaving the appliance
unattended and before changing,
cleaning or inspecting any parts of the
appliance.
• When not in use, the appliance should be
stored in a dry place.
• Children should not have access to stored
appliances.
Inspection and repairs
• Before use, check the appliance for
damaged or defective parts. Check for
breakage of parts, damage to switches
and any other conditions that may affect
its operation.
• Do not use the appliance if any part is
damaged or defective.
• Have any damaged or defective parts
repaired or replaced by an authorized
repair agent.
• Before use, check the power supply cord
for signs of damage, ageing and wear.
• Do not use the appliance if the power
supply cord or mains plug is damaged or
defective.
• If the power supply cord or mains plug is
damaged or defective it must be repaired
by the manufacturer or its service agent
or a similarly qualified person in order to
avoid a hazard. Do not cut the power
supply cord and do not attempt to repair
it yourself.
• Never attempt to remove or replace any
parts other than those specified in this
manual.
5

ENGLISH
(Original instructions)
Additional safety instructions for
vacuum cleaners
• Before use, always make sure that the
filter or dust bag is correctly seated.
• Do not use the appliance to pick up any
materials that could catch fire.
• Do not use the appliance to pick up any
materials that are burning or smoking
(matches, cigarettes, hot ash, etc.).
• Do not block the vents of the appliance.
• Avoid inhaling dust when emptying the
appliance or the dust bag.
• Always keep the brush, crevice tool and
other accessories away from the body
whilst the unit is in operation.
• Always empty the product outside.
• Use extra care when cleaning stairs, use
caution when vacuuming at the top of
stairs, near children, etc.
• Always be aware of the position of the
power cable and hose so as to avoid a
tripping hazard during use.
• Keep the motor exhaust away from eyes
and faces.
• Keep children and animals at a safe
distance when using this appliance.
• Always work from bottom up when using
the appliance on stairs, and keep the
appliance at least a stair below your
working position.
• Do not use the appliance without the
suction head or another suitable
accessory mounted to the tube.
• Keep your hair, clothing and gloves away
from moving parts.
• Do not use damaged accessories.
• Use only BLACK+DECKER accessories.
• Do not use the appliance on animals.
• Disconnect the product from the
electrical supply before emptying,
cleaning or carrying out any
maintenance on the appliance.
Safety of others
• This appliance is not intended for use by
persons (including children) with reduced
physical, sensory or mental capabilities,
or lack of experience and knowledge,
unless they have been given supervision
or instruction concerning the use of the
appliance by a person responsible for
their safety.
• Children should be supervised to ensure
that they do not play with the appliance.
Electrical safety
This appliance is double insulated;
therefore no earth wire is
required. Always check that the
power supply corresponds to the
voltage on the rating plate.
Power plugs must match the outlet. Never
modify the plug in any way. Unmodified
plugs and matching outlets will reduce risk
of electric shock.
• If the supply cord is damaged, it must be
replaced by the manufacturer or an
authorised BLACK+DECKER Service
Centre in order to avoid a hazard.
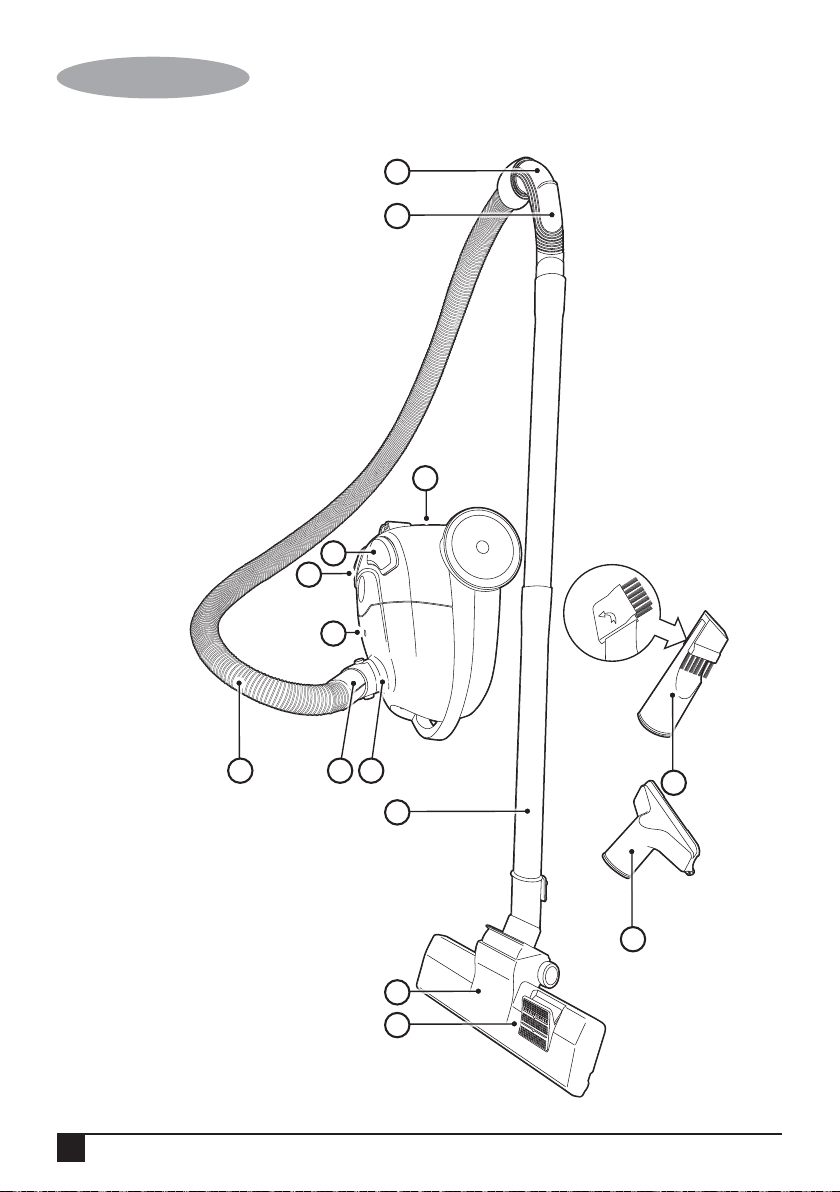
Features
This Appliance includes some or all of the
following features.
1. Plastic tube (X2)
2. Handle
3. On/Off switch
4. Exhaust filter
5. Manual air inlet valve
6. Vac gauge
7. Cord rewind button
8. Air intake duct
9. Hose connector
10. Floor brush
11. Function change pedal
12. Flexible hose
6

(Original instructions)
ENGLISH
13. Upholstery attachment
14. Crevice attachment (with flip-down
brush)
Assembly
Connecting the hose (fig. A)
• Insert the hose connector (9) into the
inlet (8) of the appliance.
• Press firmly until it clicks into place.
Disconnecting the hose (fig. A)
• Press and hold the hose release buttons.
• Pull the hose connector (9) out of the
inlet (8) of the appliance.
Fitting the plastic tube (fig. B)
• Firmly push handle adaptor (2) in to the
plastic tube (1).
Adding second plastic tube (fig. C)
• Firmly push second plastic into the first
plastic tube.
Fitting accessories (fig. D)
Your vacuum cleaner comes equipped with
three attachments intended for different
applications. Each individual attachment
can either be fitted onto the plastic tube (1)
or directly onto the handle of the suction
hose (2), as required.
Floor brush (10)
You will probably work most frequently with
the floor brush. This is suitable for cleaning
wide areas. The floor brush is fitted with a
practical 360° joint. This ensures that you
can reach easily into any corner.
• Clean carpets and wall-to-wall carpets
without using the brush feature. Press
the tip switch marked with the carpet
symbol on the function change pedal (11)
and the brush is raised.
• Smooth floors such as PVC, parquet or
tiles are best cleaned and cared for using
the brush. To do so press the tip switch
with the symbol for smooth floors on the
function change pedal (11) and the brush
will come out
Upholstery attachment (13)
You can use this attachment to clean the
dust from books or sensitive objects such as
picture frames, upholstered furniture,
mattresses, cushions, curtains etc.
Crevice attachment (14)
The crevice tool (14) allows for vacuuming in
narrow and hard-to-reach places.
Use
Switching on and o (fig. E)
• To switch the appliance on, press the
on/off switch (3).
• To switch the appliance off, press the
on/off switch (3).
Vacuuming
• When operating the appliance, make sure
that the hose is not trapped, twisted or
blocked.
• Before using the device first roll out a
sufficient length of electric flex cable and
plug into the mains socket. The yellow
mark on the electric flex cable is the
maximum length that must not be
exceeded.
Note: In a few cases there may be a
“whistling” sound at the start. This is not a
fault and the sound goes away after a time.
WARNING! Do not suck up toner, plaster,
cement, stone dust or drill dust. The sucking
up of these materials blocks the filter
Regulating the suction power (fig. F)
The manual air inlet valve (5) allows you to
vary the amount of suction depending on
the task at hand. The wider the valve is
opened, the less the suction power and
vice-versa.
7

ENGLISH
(Original instructions)
Choose:
• Minimal suction power for curtains and
sensitive materials.
• Medium suction power for upholstery
cushions, mattresses, carpet floors.
• Maximum suction power for tiled,
wooden and robust floor surfaces.
Cord rewind
• Press and hold the cord rewind button
(7).
Fitting and removing the dust bag (fig. G,
H, I)
• Open the dust bowl by pressing the
release button (15) as shown in figure G.
• Fit the dust bag (16) to dust bag holder
as shown in figure I. Make sure the dust
bag clicks in place.
• Fit the dust bag and dust bag holder
together into the dust box as shown in
figure H.
• Follow this procedure in reverse when
the dust bag is full and requires
emptying.
Note: The VM1200 vacuum cleaner has a
system that prevents the unit operating with
the dust bag uninstalled, if the dust bag is
improperly inserted the front cover can not
be closed, causing the device to fail to
operate. Always make sure the dust bag is
properly installed.
Cleaning the exhaust air filter (fig. J)
The exhaust air filter cleans the air a final
time before it leaves the vacuum cleaner.
You can clean the exhaust air filter as
follows:
• Switch off the vacuum cleaner and
disconnect the plug from the mains.
NEVER pull on the cable to disconnect.
• Open the exhaust air grill (4) by pushing
down on the catch with your finger.
• The exhaust air filter (17) is visible when
the grill has been opened.
• Rinse the filter under cold running water
and allow to dry.
Note: Only ever clean the filter with clean
water do not use soap or detergent. Dry the
filter naturally. Do not dry it by heat
otherwise it will distort.
Storing the appliance
Warning! When storing the appliance, switch
the appliance off and unplug it.
• Store the appliance in a dry location.
Maintenance
Your BLACK+DECKER corded appliance has
been designed to operate over a long period
of time with a minimum of maintenance.
Continuous satisfactory operation depends
upon proper tool care and regular cleaning.
Warning! Before performing any
maintenance on corded appliances:
• Switch off and unplug the appliance.
• Regularly clean the ventilation slots in
your appliance using a soft brush or dry
cloth.
• Regularly clean the motor housing using
a damp cloth. Do not use any abrasive or
solvent-based cleaner.
Mains plug replacement (U.K. &
Ireland only)
If a new mains plug needs to be fitted:
• Safely dispose of the old plug.
• Connect the brown lead to the live
terminal in the new plug.
• Connect the blue lead to the neutral
terminal.
Warning! Follow the fitting instructions
supplied with good quality plugs.
Recommended fuse: 10A.
Technical data
VM1200 (Type 1)
Voltage Vac 220 - 240 50-60Hz
Power W 1000
Weight kg 3.7
8

(Original instructions)
ENGLISH
Protecting the environment
Separate collection. This product must
not be disposed of with normal
household waste.
Should you find one day that your
Black+Decker product needs replacement,
or if it is of no further use to you, do not
dispose of it with other household waste.
Make this product available for separate
collection.
• Black+Decker provides a facility for
recycling Black+Decker products once
they have reached the end of their
working life. This service is provided free
of charge. To take advantage of this
service please return your product to any
authorised repair agent who will collect
them on our behalf.
• You can check the location of your
nearest authorised repair agent by
contacting your local Black+Decker
office at the address indicated in this
manual. Alternatively, a list of authorized
Black+Decker repair agents and full
details of our after-sales service and
contact are available on the Internet at:
www.2helpU.com.
Warranty
Black+Decker is confident of the quality of
its products and offers an outstanding
warranty.
This warranty statement is in addition to and
in no way prejudices your statutory rights.
The warranty is valid within the territories of
the Member States of the European Union
and the European Free Trade Area.
If a Black+Decker product becomes
defective due to faulty materials,
workmanship or lack of conformity, within
24 months from the date of purchase,
Black+Decker warranty to replace defective
parts, repair products subjected to fair wear
and tear or replace such products to ensure
minimum inconvenience to the customer
unless:
The product has been subjected to
The product has sustained damage
Repairs have been attempted by
To claim on the warranty, you will need to
submit proof of purchase to the seller or an
authorised repair agent. You can check the
location of your nearest authorised repair
agent by contacting your local
Black+Decker office at the address
indicated in this manual.
Alternatively, a list of authorised
Black+Decker repair agents and full details
of our after-sales service and contacts are
available on the Internet at:
www.2helpU.com.
The product has been used for
trade, professional or hire
purposes;
misuse or neglect;
through foreign objects,
substances or accidents;
persons other than authorised
repair agents or Black+Decker
service staff.
9
FRANÇAIS
(Traduction des instructions d'origine)
2
5
4
3
7
6
10
12
8
9
14
1
13
1011

(Traduction des instructions d'origine)
FRANÇAIS
A
12
8
9
1
2
B
1
11
1
10
C
E
D
11
5
F
11

FRANÇAIS
(Traduction des instructions d'origine)
15
G
I
16
16
H
174
J
12

(Traduction des instructions d'origine)
FRANÇAIS
Usage prévu
Votre aspirateur BLACK+DECKER VM1200
est destiné au nettoyage par aspiration à
sec. Cet appareil est destiné à un usage
domestique uniquement.
Cet appareil n'est pas à utiliser :
• dans une cuisine pour les employés d'une
boutique, de bureaux et d'autres
environnements professionnels ;
• dans les fermes ;
• par les clients d'hôtels, motels et autres
environnements de type résidentiel ;
• dans les chambres d'hôtes ou tout autre
environnement non résidentiel.
Consignes de sécurité
Avertissements de sécurité générale de
l'outil.
Attention ! Lisez toutes les
consignes de sécurité et toutes les
instructions. Le non-respect de ces
avertissements et de ces instructions peut
causer un incendie, une électrocution ou de
graves blessures.
• Lisez attentivement ce manuel dans son
intégralité avant d'utiliser l'appareil.
• L'usage prévu est décrit dans le présent
manuel. L'utilisation d'accessoires ou
pièces rajoutées et de l'appareil en
lui-même doit se faire uniquement selon
les recommandations de ce manuel
d'instructions. Dans le cas contraire, il
existe un risque de blessure.
• Conservez ce manuel de sorte à pouvoir
vous y reporter plus tard.
Utilisation de votre appareil
• Assurez-vous que l'appareil est mis hors
tension avant de le brancher ou de le
débrancher de l'alimentation.
• Utilisez toujours l'appareil avec
précaution.
• N'utilisez pas l'appareil à l'extérieur.
• Ne tirez jamais sur le cordon
d'alimentation pour débrancher la prise.
Maintenez le cordon d'alimentation à
l'écart des sources de chaleur, de l'huile et
des bords tranchants.
• Si le cordon d'alimentation est
endommagé pendant l'utilisation,
débranchez immédiatement l'appareil. Ne
touchez pas le cordon d'alimentation
avant de le débrancher de l'alimentation.
• Débranchez l'appareil avant le
montage/démontage et le nettoyage des
pièces.
• N'immergez pas l'appareil dans l'eau.
Après utilisation
• Éteignez et débranchez la prise avant de
laisser l'appareil sans surveillance et avant
d'en changer, nettoyer ou inspecter les
pièces.
• Lorsqu'il n'est pas utilisé, l'appareil doit
être rangé à un endroit sec.
• Les enfants ne doivent pas avoir accès
aux appareils rangés.
Inspection et réparations
• Avant d'utiliser l'appareil, vérifiez
qu'aucune pièce n'est endommagée ou
défectueuse. Vérifiez l'absence de pièces
cassées, d'interrupteurs endommagés ou
d'autres éléments pouvant affecter son
fonctionnement.
• N'utilisez pas l'appareil si une pièce est
endommagée ou défectueuse.
• Les pièces endommagées ou
défectueuses doivent être réparées ou
remplacées par un agent de réparation
agréé.
• Avant d'utiliser l'appareil, contrôlez
l'absence de signes d'endommagement,
de vieillissement et d'usure au niveau du
cordon d'alimentation.
• N'utilisez pas l'appareil si la prise ou le
cordon d'alimentation est endommagé ou
défectueux.
13

FRANÇAIS
(Traduction des instructions d'origine)
• Si le cordon d'alimentation ou la prise est
endommagé ou défectueux, il doit être
remplacé par le fabricant ou son
réparateur ou une personne de même
qualification afin d'éviter tout danger. Ne
coupez pas le cordon d'alimentation et
n'essayez pas de le réparer par vos
propres moyens.
• N'essayez jamais de retirer ou de
remplacer des pièces différentes de
celles indiquées dans le présent manuel.
Consignes de sécurité
supplémentaires pour aspirateurs
• Assurez-vous toujours de vérifier que le
filtre ou le sac à poussière est
correctement installé avant l'utilisation.
• N'utilisez pas l'appareil pour récupérer
des matériaux potentiellement
inflammables.
• N'utilisez pas l'appareil pour récupérer
des matériaux en cours de combustion
ou produisant de la fumée (allumettes,
cigarettes, cendres chaudes, etc.).
• Ne bloquez pas les aérations de
l'appareil.
• Évitez d'inhaler de la poussière qui se
dégage de l'appareil ou du sac lorsque
vous le videz.
• Tenez toujours la brosse, le suceur et tout
autre accessoire à l'écart du corps de
l'appareil lorsque celui-ci est en cours de
fonctionnement.
• Effectuez toujours le vidage dehors.
• Soyez plus attentif lorsque vous nettoyez
des escaliers. Soyez prudent lorsque
vous êtes en haut des marches ou près
d'enfants, notamment.
• Surveillez toujours la position du câble et
du tuyau afin d'éviter tout risque de
chute au cours de l'utilisation.
• Éloignez le souffle du moteur des yeux et
des visages.
• Lorsque vous utilisez l'appareil,
assurez-vous que les enfants et animaux
se tiennent à une distance sécurisée.
• Lorsque vous utilisez l'appareil dans les
escaliers, nettoyez toujours de bas en
haut, en maintenant l'appareil une marche
en dessous de votre position de travail.
• N'utilisez pas l'appareil sans tête
d'aspiration ou autre accessoire approprié
sur le tube.
• Tenez vos cheveux, vêtements et gants
éloignés des pièces mobiles.
• N'utilisez pas d'accessoire endommagé.
• N'utilisez que des accessoires
BLACK+DECKER.
• N'utilisez pas l'appareil sur les animaux.
• Débranchez l'appareil de l'alimentation
avant de le vider, de le nettoyer, ou
d'effectuer toute opération d'entretien.
Sécurité d'autrui
• Cet appareil n'est pas destiné à être
utilisé par des personnes (y compris les
enfants) présentant des capacités
physiques, sensorielles ou mentales
réduites, ou sans expérience, ni
connaissances, à moins qu'elles soient
surveillées ou qu'elles aient été instruites
à l'utilisation de l'appareil par une
personne responsable de leur sécurité.
• Les enfants doivent être surveillés pour
s'assurer qu'ils ne jouent pas avec
l'appareil.
Sécurité électrique
Cet appareil dispose d'une double
isolation ; ainsi, aucun fil de terre
n'est nécessaire. Vérifiez toujours
que l'alimentation du secteur
correspond à celle de la plaque
signalétique.
La fiche d'alimentation de l'appareil doit
correspondre à la prise murale. Ne modifiez
jamais la prise, de quelque manière que ce
soit. Des prises non modifiées et branchées à
la prise murale correspondante réduiront les
risques de choc électrique.
• Si le cordon d'alimentation est abîmé, il
doit être remplacé par le fabricant ou un
Centre de service agréé BLACK+DECKER
afin d'éviter tout danger.
14

(Traduction des instructions d'origine)
FRANÇAIS
Caractéristiques
Cet appareil présente certaines ou toutes
les caractéristiques suivantes.
1. Tube en plastique (X2)
2. Poignée
3. Interrupteur MARCHE/ARRÊT
4. Filtre d'échappement
5. Vanne d'entrée d'air manuelle
6. jauge Vca
7. Bouton d'enroulement du câble
8. Prise d'air
9. Connecteur du tuyau
10. Brosse à planchers
11. Pédale de changement de fonction
12. Tuyau flexible
13. Attache pour brosse pour meubles
14. Attache pour suceur (avec brosse
rabattable)
Montage
Connexion du tuyau (figure A)
• Insérez le connecteur du tuyau (9) dans
l'orifice d'entrée (8) de l'appareil.
• Appuyez fermement jusqu'à ce que vous
entendiez un clic.
Déconnexion du tuyau (figure A)
• Appuyez sur les boutons d'éjection du
tuyau en restant appuyé.
• Tirez le connecteur du tuyau (9) hors de
l'orifice d'entrée (8) de l'appareil.
Installation du tube en plastique (figure B)
• Poussez fermement l'adaptateur de la
poignée (2) dans le tube en plastique (1).
Ajout d'un deuxième tube en plastique
(figure C)
• Poussez fermement le deuxième tube
dans le premier.
Installation des accessoires (figure D)
Votre aspirateur est équipé de trois attaches
aux applications variées. Chaque attache
peut être installée sur le tube en plastique (1)
ou directement sur la poignée du tuyau
d'aspiration (2), en fonction des besoins.
Brosse à planchers (10)
Vous utiliserez probablement la brosse à
planchers en majorité. Elle convient au
nettoyage de grandes surfaces. La brosse à
planchers est installée avec un joint 360°
pratique. Grâce à lui, vous pouvez atteindre
les coins en toute facilité.
• N'utilisez pas la fonction brosse lorsque
vous nettoyez les tapis et moquettes. Sur
la pédale de changement de fonction (11),
appuyez sur le bouton poussoir doté du
symbole représentant un tapis : la brosse
se lève.
• Pour les sols lisses comme les parquets
en PVC ou les carrelages, l'utilisation de la
brosse offre de meilleurs résultats en
termes de nettoyage et d'entretien. Pour
cela, appuyez sur le bouton poussoir doté
du symbole représentant un sol lisse sur
la pédale de changement de fonction (11)
: la brosse ressort.
Attache pour brosse pour meubles (13)
Vous pouvez l'utiliser pour nettoyer la
poussière des livres ou d'objets fragiles tels
que les cadres photo, meubles en tissu,
matelas, coussins, rideaux, etc.
Attache pour suceur (14)
Le suceur (14) permet de nettoyer dans les
endroits étroits et difficiles d'accès.
Mode d'emploi
Mise sous et hors tension (figure E)
• Pour mettre l'outil en marche, appuyez
sur l'interrupteur Marche/arrêt (3).
15

FRANÇAIS
(Traduction des instructions d'origine)
• Pour éteindre l'appareil, appuyez sur
l'interrupteur Marche/arrêt (3).
Nettoyage
• Lorsque l'appareil est en marche, vérifiez
qu'il n'est pas bloqué ou tordu.
• Avant d'utiliser l'appareil, sortez une
longueur de câble électrique suffisante
et branchez-le dans la prise secteur. La
marque jaune sur le câble indique la
longueur maximale à ne pas dépasser.
Remarque : Vous pouvez entendre un
sifflement au début. Il ne s'agit pas d'un
défaut, le son finit par s'interrompre après
un certain temps.
AVERTISSEMENT : N'aspirez pas de toner,
de plâtre ou poussière de pierre ou de
perçage. Ces substances bloquent le filtre.
Contrôler la puissance d'aspiration
(figure F)
La vanne d'entrée d'air manuelle vous
permet de modifier la force d'aspiration en
fonction de la tâche à effectuer. Plus la valve
est ouverte t plus l'aspiration est faible, et
inversement.
Choisissez :
• une aspiration faible pour les rideaux et
surfaces fragiles ;
• une aspiration moyenne pour les
coussins, les matelas et les moquettes ;
• une aspiration maximale pour les
surfaces carrelées, boisées et résistantes.
Enroulement du câble
• Maintenez appuyé le bouton
d'enroulement du câble (7).
Installation et retrait du sac à poussière
(figures G, H et I)
• Ouvrez la coupe à poussière en appuyant
sur le bouton d'éjection (15) comme
indiqué sur la figure G.
• Placez le sac à poussière (16) dans le
support, comme indiqué sur la figure I.
Vérifiez que vous entendez le clic
indiquant le bon positionnement.
• Installez le sac à poussière et son support
dans la coupe à poussière, comme
indiqué sur la figure H.
• Suivez cette procédure dans le sens
inverse pour vider le sac lorsqu'il est
plein.
Remarque : L’aspirateur VM1200 dispose
d’un système empêchant l’unité de
fonctionner tant que les sac n’est pas installé
: si le sac est mal placé et que le couvercle
avant ne peut pas se fermer, l’appareil ne
fonctionne pas. Vérifiez toujours que le sac
est correctement installé.
Nettoyage du filtre d’échappement
(figure J)
Le filtre d’échappement nettoie l’air une
dernière fois avant qu’il s’échappe de
l’aspirateur. Vous pouvez procéder comme
suit pour nettoyer le filtre :
• Mettez l’aspirateur hors tension et
débranchez la prise de l’alimentation
secteur. Ne tirez JAMAIS sur le câble pour
le débrancher.
• Ouvrez la grille d’échappement (4) en la
poussant vers le bas sur la prise avec
votre doigt.
• Le filtre d’échappement (17) est visible
lorsque la grille est ouverte.
• Rincez le filtre sous un courant d’eau
froide et laissez-le sécher.
Remarque : Nettoyez le filtre à l’eau
uniquement. N’utilisez pas de savon ou de
détergeant. Laissez le filtre sécher de
manière naturelle. Ne le séchez pas à chaud,
il risquerait de se déformer.
Rangement de l’appareil
Avertissement ! Lorsque vous rangez
l’appareil, mettez-le hors tension et
débranchez-le.
• Stockez l'appareil dans un endroit sec.
16

(Traduction des instructions d'origine)
FRANÇAIS
Entretien
Votre appareil BLACK+DECKER câblé a été
conçu pour fonctionner pendant une longue
période avec un minimum d'entretien. Un
fonctionnement continu satisfaisant de
l'appareil dépend d'un entretien soigneux et
régulier.
Attention ! Avant d’effectuer des tâches
d’entretien sur un appareil câblé :
• Mettez-le hors tension et débranchez-le.
• Nettoyez régulièrement les fentes
d'aération de votre appareil à l'aide d'une
brosse douce et d'un chiffon sec.
• Nettoyez régulièrement le boîtier du
moteur à l'aide d'un chiffon humide.
N'utilisez pas de nettoyants abrasifs ou à
base de solvants.
Remplacement de la prise
électrique (RU et Irlande
uniquement)
En cas de besoin de montage d'une
nouvelle prise :
• Mettez dûment l'ancienne prise au rebut.
• Connectez le fil marron à la borne sous
tension de la nouvelle prise.
• Connectez le fil bleu à la borne neutre.
Attention ! Suivez les consignes
d'installation fournies avec les prises de
bonne qualité. Fusibles recommandés : 10A.
Protection de l'environnement
Collecte séparée. Ce produit ne doit
pas être jeté avec les déchets
domestiques normaux.
Si vous décidez de remplacer ce produit
Black & Decker, ou si vous n'en avez plus
l'utilité, ne le jetez pas avec vos déchets
domestiques Rendez-le disponible pour une
collecte séparée.
• Black+Decker fournit un dispositif
permettant de collecter et de recycler les
produits Black & Decker lorsqu'ils ont
atteint la fin de leur cycle de vie. Pour
pouvoir profiter de ce service, veuillez
retourner votre produit à un réparateur
agréé qui se chargera de le collecter pour
nous.
• Pour connaître l'adresse du réparateur
agréé le plus proche de chez vous,
contactez le bureau Black & Decker à
l'adresse indiquée dans ce manuel. Vous
pourrez aussi trouvez un liste des
réparateurs agréés de Black & Decker et
de plus amples détails sur notre service
après-vente sur le site Internet à l'adresse
suivante : www.2helpU.com
Caractéristiques techniques
VM1200 (Type 1
Tension Vca 220 - 240 50-60 Hz
Puissance W 1 000
Poids kg 3,7
17

FRANÇAIS
(Traduction des instructions d'origine)
Garantie
Black+Decker est confiant dans la qualité de
ses produits et vous offre une garantie très
étendue.
Ce certificat de garantie est un document
supplémentaire et ne peut en aucun cas se
substituer à vos droits légaux.
La garantie est valable sur tout le territoire
des Etats Membres de l'Union Européenne
et de la Zone de Libre Echange Européenne.
Si un produit Black+Decker s'avère
défectueux en raison de matériaux en
mauvaises conditions, d'une erreur humaine,
ou d'un manque de conformité dans les 24
mois suivant la date d'achat, Black+Decker
garantit le remplacement des pièces
défectueuses, la réparation des produits
usés ou cassés ou remplace ces produits à la
convenance du client, sauf dans les
circonstances suivantes :
Le produit a été utilisé dans un but
commercial, professionnel, ou a été
loué.
Le produit a été mal utilisé ou avec
négligence.
Le produit a subi des dommages à
cause d'objets étrangers, de
substances ou à cause d'accidents.
Des réparations ont été tentées par
des techniciens ne faisant pas partie
du service technique de Black &
Decker.
Pour avoir recours à la garantie, il est
nécessaire de fournir une preuve d'achat au
vendeur ou à un réparateur agréé. Pour
connaître l'adresse du réparateur agréé le
plus proche de chez vous, contactez le
bureau Black+Decker à l'adresse indiquée
dans ce manuel.
Vous pourrez aussi trouver une liste des
réparateurs agréés de Black+Decker et de
plus amples détails sur notre service
après-vente sur le site Internet à l'adresse
suivante : www.2helpU.com
18

(Tradução das instruções originais)
2
5
4
3
7
6
PORTUGUÊS
12
8
9
14
1
13
1011
19

PORTUGUÊS
(Tradução das instruções originais)
A
12
8
9
1
2
B
1
11
1
10
20
C
E
D
11
5
F

(Tradução das instruções originais)
15
PORTUGUÊS
G
I
16
16
H
174
J
21

PORTUGUÊS
(Tradução das instruções originais)
Uso previsto
O aspirador BLACK+DECKER VM1200 foi
concebido para aspirar a seco. Este
aparelho é destinado apenas para a
utilização pelo consumidor.
Este aparelho não deve ser utilizado em:
• Áreas de cozinha de empregados em
lojas, escritórios e outros ambientes de
trabalho;
• Casas Rurais;
• Por clientes em hotéis, motéis e outros
ambientes de tipo residencial;
• Ambientes do tipo alojamento e
pequeno-almoço ou outros ambientes
não domésticos.
Instruções de segurança
Avisos de segurança gerais para
ferramentas elétricas.
Aviso! Leia todos os avisos de
segurança e todas as instruções. A
não-observância dos avisos e
instruções listados abaixo podem resultar
em choque elétrico, incêndio e/ou lesão
grave.
• Leia este manual inteiro atentamente
antes de utilizar o aparelho.
• O uso previsto está descrito neste
manual. A utilização de qualquer
acessório ou a realização de qualquer
operação com este aparelho que não
seja a recomendada neste manual de
instruções pode representar um risco de
ferimentos pessoais.
• Guarde este manual para referência
futura.
Utilização do aparelho
• Assegure-se de que o aparelho está
desligado antes de o ligar ou desligar da
rede de alimentação.
• Tenha sempre cuidado enquanto estiver
a utilizar o aparelho.
• Não utilize o aparelho no exterior.
• Nunca puxe o cabo de alimentação para
extrair a ficha da tomada. Mantenha o
cabo de alimentação longe do calor, óleo
e objetos cortantes.
• Se o cabo de alimentação for danificado
durante a utilização, desligue o aparelho
da rede elétrica imediatamente. Não
toque no cabo de alimentação antes de
desligá-lo da rede elétrica.
• Desligue o aparelho da rede elétrica
quando não estiver em uso, antes de
montar ou remover peças e antes da
limpeza.
• Não mergulhe o aparelho em nenhum
líquido.
Após a utilização
• Desligue e retire a ficha da tomada antes
de deixar o aparelho sem vigilância e
antes de trocar, limpar ou inspecionar
qualquer peça do aparelho.
• Quando não estiver em uso, o aparelho
deve ser armazenado em local seco.
• As crianças não devem ter acesso a
eletrodomésticos guardados.
Inspeção e reparações
• Antes de utilizar, verifique se o aparelho
apresenta quaisquer danos ou peças
defeituosas. Verifique se tem as peças
quebradas, danos nas ligações e
quaisquer outras condições que possam
afetar a operação.
• Não utilize o aparelho se encontrar
qualquer peça danificada ou defeituosa.
• Quaisquer peças danificadas ou
defeituosas devem ser reparadas ou
substituídas por um agente de
reparações autorizado.
• Antes da utilização, verifique se o cabo
de alimentação apresenta sinais de
danos, envelhecimento ou desgaste.
• Não utilize o aparelho se o cabo de
alimentação ou a ficha principal
apresentar danos ou defeitos.
22

(Tradução das instruções originais)
PORTUGUÊS
• Se o cabo de alimentação ou a ficha
principal apresentarem danos ou
defeitos, deverão ser reparados pelo
fabricante, ou por um agente de serviço
autorizado para evitar possíveis riscos.
Não corte o cabo de alimentação nem
tente repará-lo por si mesmo.
• Nunca tente remover ou substituir
quaisquer peças que não estejam
especificadas no manual.
Instruções adicionais de
segurança para aspiradores
• Antes de utilizar, assegure-se de que o
filtro ou o saco de pó estejam
encaixados corretamente.
• Não utilize o aparelho para apanhar
quaisquer materiais que possam
incendiar-se.
• Não utilize o aparelho para apanhar
quaisquer materiais que estejam a
queimar ou com fumo (fósforos, cigarros,
cinza quente, etc.).
• Não bloqueie as ventoinhas do aparelho.
• Evite a inalação de poeira ao esvaziar o
aparelho ou saco de pó.
• Mantenha sempre a escova, bico e outros
acessórios afastado do corpo, enquanto
a unidade estiver em operação.
• Esvazie sempre o produto no exterior.
• Redobre o cuidado quando limpar
escadas, tenha cuidado ao limpar no
topo da escada, perto de crianças, etc.
• Esteja sempre atento à posição do cabo
de alimentação e à mangueira de modo a
evitar o risco de tropeçar durante a
utilização.
• Mantenha o exaustor do motor afastado
dos olhos e faces.
• Mantenha as crianças e animais a uma
distância segura quando utilizar este
aparelho.
• Trabalhe sempre de baixo para cima ao
utilizar o aparelho em escadas, e
mantenha o aparelho a, pelo menos, um
degrau abaixo da sua posição de
trabalho.
• Não utilize o aparelho sem a cabeça de
sucção ou outro acessório adequado
montado no tubo.
• Mantenha o cabelo, vestuário e luvas
afastados de peças móveis.
• Não utilize um acessório danificado.
• Utilize apenas acessórios
BLACK+DECKER.
• Não utilize o aparelho em animais.
• Desligue o aparelho da alimentação
elétrica antes de esvaziar, limpar ou de
realizar qualquer manutenção.
Segurança de terceiros
• Este aparelho não pode ser utilizado por
pessoas (incluindo crianças) com
capacidades físicas, sensoriais ou
psíquicas diminuídas ou com falta de
experiência e conhecimentos, a não ser
que se encontrem sob vigilância ou a
utilização segura do aparelho lhes tenha
sido ensinada por uma pessoa
responsável da sua segurança.
• As crianças devem ser supervisadas para
garantir que não brincam com o aparelho.
Segurança elétrica
Este aparelho tem isolamento
duplo, portanto, não é necessário
um fio de terra. Verifique sempre
se a alimentação de corrente
corresponde à tensão que figura
na chapa de características.
As fichas de alimentação devem
corresponder à tomada. Nunca, de forma
alguma, modifique uma ficha. Tomadas não
modificadas e fichas certas irão reduzir o
risco de choques elétricos.
• Se o cabo de alimentação estiver
danificado, deverá ser substituído pelo
fabricante ou por um Centro de Serviços
da BLACK+DECKER autorizado, para
evitar possíveis riscos.
23

PORTUGUÊS
(Tradução das instruções originais)
Funcionalidades
Este aparelho inclui algumas ou todas as
seguintes funcionalidades.
1. Tubo plástico (X2)
2. Punho
3. Interruptor Ligar/Desligar
4. Filtro de exaustão
5. Válvula de entrada de ar manual
6. Calibrador
7. Botão de retrocesso do cabo
8. Conduta de entrada de ar
9. Conector da mangueira
10. Escova para pavimento
11. Pedal de troca de função
12. Mangueira flexível
13. Acessório para estofos
14. Acessório bico (com escova abatível)
Montagem
Conectar a mangueira (fig. A)
• Introduza o conector da mangueira (9)
na entrada (8) do aparelho.
• Pressione firmemente para a direita até
que encaixe no lugar.
Desconectar a mangueira (fig. A)
• Pressione e segure os botões de
liberação da mangueira.
• Puxe o conector da mangueira (9) para
fora da entrada (8) do aparelho.
Colocar o tubo de encaixe (fig. B)
• Empurre firmemente o adaptador do
punho (2) no tubo de plástico (1).
Adicionar segundo tubo de plástico (fig. C)
• Empurre firmemente o segundo tubo de
plástico no primeiro tubo de plástico.
Colocar acessório (fig. D)
O aspirador vem equipado com três
acessórios destinados a diferentes
aplicações. Cada acessório individual pode
ser colocado no tubo de plástico (1) ou
diretamente no punho da mangueira de
sucção (2), conforme necessário.
Escova para pavimentos (10)
Provavelmente trabalhará mais
frequentemente com a escova para
pavimento. Isto é adequado para a limpeza
de áreas mais ampla. A escova para
pavimento está equipada com uma prática
articulação de 360°. Deste modo pode
chegar facilmente em qualquer canto.
• Limpa tapetes e carpetes de parede a
parede sem utilizar o recurso da escova.
Pressione a extremidade do interruptor
marcado com o símbolo tapete no pedal
de troca de função (11) e a escova é
elevada.
• Os pavimentos lisos como PVC, parquet
ou azulejos ficam mais limpos e bem
cuidados com a utilização da escova. Para
fazer isso, pressione a extremidade do
interruptor com o símbolo para pisos lisos
no pedal de troca de função (11) e a
escova sairá
Acessório para estofos (13)
É possível utilizar este acessório para limpar
o pó dos livros ou objetos sensíveis, como
molduras, mobiliário estofados, colchões,
almofadas, cortinas, etc.
Acessório bico (14)
O bico (14) permite a aspiração em locais
estreitos e de difícil alcance.
Utilização
Ligar e Desligar (fig. E)
• Para ligar o aparelho, prima o botão
ligar/desligar (3).
24

(Tradução das instruções originais)
PORTUGUÊS
• Para desligar o aparelho, prima o botão
ligar/desligar (3).
Aspirar
• Quando operar o aparelho, certifique-se
de que a mangueira não esteja presa,
entrelaçada ou bloqueada.
• Antes de utilizar o dispositivo primeiro
deixe rolar um comprimento suficiente
de cabo elétrico flexível e ligue na
tomada de alimentação. A marca em
amarelo do cabo elétrico flexível é o
comprimento máximo que não deve ser
excedido.
Nota: Em alguns casos, pode haver um som
de "assobio" no início. Isto não é uma falha
e após um tempo o som vai embora.
AVISO! Não aspire toner, gesso, cimento, pó
de pedra ou pó de perfuração. A aspiração
desses materiais bloqueia o filtro
Regular a potência de sucção (fig. F)
A válvula de entrada de ar manual (5)
permite variar a quantidade de sucção,
dependendo da tarefa em mãos. Quanto
maior for a abertura da válvula menor será o
poder de sucção, e vice-versa.
Escolha:
• Mínimo poder de sucção para cortinas e
materiais sensíveis.
• Médio poder de sucção para almofadas
de estofos, colchões, pisos de carpete.
• Máximo poder de sucção para
superfícies de piso de azulejo, madeira e
robustos.
Retrocesso do cabo
• Prima e segure o botão de retrocesso do
cabo (7).
Colocar e remover o saco de pó (fig. G, H,
I)
• Abra o recipiente de pó, premindo o
botão de libertação (15) como indica a
figura G.
• Monte o saco de pó (16) no suporte
correspondente, como indica a figura I.
Certifique-se de ouvir o clique de
encaixe do saco de pó no lugar.
• Monte o saco de pó e o suporte
correspondente juntos na caixa de pó,
como mostrado na figura H.
• Siga este procedimento no sentido
inverso quando o saco de pó estiver
cheio e necessitar ser esvaziado.
Nota: O aspirador VM1200 tem um sistema
que evita que a unidade opere com o saco
de pó desinstalado. Se o saco de pó for
incorretamente colocado, a tampa frontal
não fecha, fazendo com que o dispositivo
deixe de funcionar. Certifique-se sempre de
que o saco de pó esteja instalado
corretamente.
Limpar o filtro de ar de exaustão (fig. J)
O filtro de ar de exaustão limpa o ar uma vez
mais antes de sair do aspirador de pó. Pode
limpar o filtro de ar de exaustão da seguinte
forma:
• Desligue o aspirador e remova a ficha da
tomada. NUNCA puxe o fio para
removê-lo.
• Abra a grelha do ar do exaustor (4),
empurrando para baixo no agarre com o
dedo.
• O filtro de ar do exaustor (17) fica visível
quando a grelha tiver sido aberta.
• Enxague o filtro com água corrente fria e
deixe secar.
Nota: Limpe sempre o filtro apenas com
água limpa, sem sabão ou detergente. Seque
o filtro naturalmente. Não o seque com calor,
porque senão irá deformar.
Armazenar o aparelho
Aviso! Quando armazenar o aparelho,
desligue o aparelho e remova a ficha.
• Armazene o aparelho num local seco.
Manutenção
O seu aparelho com fio BLACK+DECKER foi
concebido para funcionar durante um longo
período de tempo com uma manutenção
mínima. O funcionamento contínuo e
satisfatório depende do cuidado adequado
que tenha com ele e de uma limpeza regular.
25

PORTUGUÊS
(Tradução das instruções originais)
Aviso! Antes de realizar qualquer
manutenção em aparelhos com fio:
• Desligue e remova a ficha o aparelho.
• Limpe regularmente as ranhuras de
ventilação do aparelho utilizando uma
escova suave ou um pano seco.
• Limpe regularmente o compartimento do
motor utilizando um pano húmido. Não
utilize nenhum agente de limpeza
abrasivo ou à base de solvente.
Substituição da ficha principal
(apenas no RU e Irlanda)
Se alguma ficha principal necessitar ser
substituída:
• Elimine de forma segura a ficha antiga.
• Una o fio castanho ao terminal positivo
da nova ficha.
• Una o fio azul ao terminal neutro.
Aviso! Siga as instruções de montagem
fornecidas usando fichas de boa qualidade.
Fusível recomendado: 10A.
Dados técnicos
VM1200 (Tipo 1)
Tensão Vac 220 - 240 50-60Hz
Potência W 1000
Peso kg 3,7
Proteção do ambiente
Recolha separada. Este produto não
deve ser eliminado com o lixo
doméstico.
Se considerar que o seu produto da
Black+Decker necessita ser substituído ou
se já não lhe for útil, não o elimine com
outros lixos domésticos. Leve-o para ser
reciclado.
• A Black+Decker proporciona um local
para reciclar produtos Black+Decker
quando atingirem o final da sua vida útil.
Este serviço é gratuito. Para aproveitar
este serviço, devolva o produto a
qualquer agente de reparação
autorizado que o reciclará por nós.
• Informe-se sobre a localização do agente
de reparação autorizado mais próximo a
si entrando em contacto com uma filial
da Black+Decker na morada indicada
neste manual. De forma alternativa, uma
lista de agentes de reparação
autorizados da Black+Decker e os
pormenores completos do nosso serviço
de atendimento pós-venda estão
disponíveis na Internet em:
www.2helpU.com.
26

(Tradução das instruções originais)
Garantia
A Black+Decker acredita na qualidade dos
seus produtos e oferece uma garantia
excelente.
Esta declaração de garantia é um
complemento aos seus direitos estatutários
e não os compromete em caso algum.
A garantia é válida nos territórios dos
Estados Membros da União Europeia e na
Associação Europeia de Comércio Livre.
Se um produto Black+Decker se avariar
devido a materiais com defeito, problemas
de fabrico ou faltas de conformidade no
período de 24 meses a partir da data de
compra, a Black+Decker garante a
substituição das peças avariadas, a
reparação de produtos sujeitos a desgaste
normal ou a substituição de tais produtos,
no sentido de de minimizar o inconveniente
causado ao cliente, salvo se:
O produto for utilizado para fins
comerciais, profissionais ou de
aluguer;
O produto for sujeito a má utilização
ou negligência;
O produto tiver sido danificado por
objetos, substâncias ou acidentes
estranhos;
Forem tentadas reparações por
pessoas que não os agentes
reparadores autorizados ou o pessoal
da assistência técnica da
Black+Decker .
Para reclamar a garantia, terá de apresentar
o comprovativo da compra ao vendedor ou
agente reparador autorizado. Pode verificar
a localização do agente reparador mais
próximo, contactando os escritórios locais
Black+Decker através do endereço indicado
neste manual.
Como alternativa, está disponível na Internet
uma lista de agentes reparadores
Black+Decker, dados completos do serviço
de pós-venda e contactos em:at:
www.2helpU.com.
PORTUGUÊS
27

ﺔـﻴـﺑﺮـﻌـﻟﺍ
(ﺔﻴﺴﻴﺋﺮﻟﺍ ﺕﺎﻤﻴﻠﻌﺘﻟﺍ)
ﻥﺎﻤﻀﻟﺍ
ﺎﹰﻧﺎﻤﺿ ﺽﺮﻌﺗﻭ ﺎﻬﺗﺎﺠﺘﻨﻣ ﺓﺩﻮﺟ ﻲﻓ ﺮﻜﻳﺩ ﺪﻧﺁ ﻙﻼﺑ ﻖﺜﺗ
.ﻞﺟﻷﺍ ﻞﻳﻮﻃ
ﻲﺘﻟﺍ ﻚﻗﻮﻘﺣ ﻰﻟﺇ ﺔﻓﺎﺿﻹﺎﺑ ﻥﻮﻜﻳ ﺍﺬﻫ ﻥﺎﻤﻀﻟﺍ ﻥﺎﻴﺑ
.ﻝﺍﻮﺣﻷﺍ ﻦﻣ ﻝﺎﺣ ﻱﺄﺑ ﺎﻬﺑ ﻞﺨﻳ ﻻﻭ ﻥﻮﻧﺎﻘﻟﺍ ﺎﻬﺤﻨﳝ
ﺩﺎﲢﻻﺍ ﻲﻓ ﺀﺎﻀﻋﻷﺍ ﻝﻭﺪﻟﺍ ﻢﻴﻟﺎﻗﺃ ﻲﻓ ﻥﺎﻤﻀﻟﺍ ﻱﺮﺴﻳ
.ﺔﻴﺑﻭﺭﻭﻷﺍ ﺓﺮﳊﺍ ﺓﺭﺎﺠﺘﻟﺍ ﺔﻘﻄﻨﻣﻭ ﻲﺑﻭﺭﻭﻷﺍ
ﺐﺒﺴﺑ ﺮﻜﻳﺩ ﺪﻧﺁ ﻙﻼﺑ ﺞﺘﻨﻣ ﻲﻓ ﻞﻠﺧ ﺩﻮﺟﻭ ﺔﻟﺎﺣ ﻲﻓ
،ﺮﻴﻳﺎﻌﳌﺍ ﻊﻣ ﻖﻓﺍﻮﺘﻟﺍ ﻡﺪﻋ ﻭﺃ ﺔﻋﺎﻨﺼﻟﺍ ﻭﺃ ﺩﺍﻮﳌﺍ ﻲﻓ ﺐﻴﻋ
ﺪﻧﺁ ﻙﻼﺑ ﻦﻤﻀﺗ ،ﺀﺍﺮﺸﻟﺍ ﺦﻳﺭﺎﺗ ﻦﻣ ﺍﹰﺮﻬﺷ 24 ﻝﻼﺧ
ﻊﻣ ﺕﺎﺠﺘﻨﳌﺍ ﺡﻼﺻﺇﻭ ﺔﺒﻴﻌﳌﺍ ﺀﺍﺰﺟﻷﺍ ﻝﺍﺪﺒﺘﺳﺍ ﺮﻜﻳﺩ
ﻩﺬﻫ ﻝﺍﺪﺒﺘﺳﺍ ﻭﺃ ﻲﻌﻴﺒﻄﻟﺍ ﻰﻠﺒﻟﺍﻭ ﻞﻛﺂﺘﻟﺍ ﺓﺎﻋﺍﺮﻣ
:ﻢﻟ ﺎﻣ ﻞﻴﻤﻌﻠﻟ ﺝﺎﻋﺯﺇ ﻞﻗﺃ ﻥﺎﻤﻀﻟ ﺕﺎﺠﺘﻨﳌﺍ
ﻭﺃ ﺔﻳﺭﺎﲡ ﺽﺍﺮﻏﺃ ﻲﻓ ﺞﺘﻨﳌﺍ ﻡﺍﺪﺨﺘﺳﺍ ﻢﺘﻳ
؛ﺮﻴﺟﺄﺗ ﺽﺍﺮﻏﺃ ﻭﺃ ﺔﻴﻨﻬﻣ
؛ﻝﺎﻤﻫﻹﺍ ﻭﺃ ﻡﺍﺪﺨﺘﺳﻻﺍ ﺀﻮﺴﻟ ﺞﺘﻨﳌﺍ ﺽﺮﻌﺘﻳ
28
ﺩﺍﻮﻣ ﻭﺃ ﺀﺎﻴﺷﺃ ﺔﺠﻴﺘﻧ ﻒﻠﺘﻠﻟ ﺞﺘﻨﳌﺍ ﺽﺮﻌﺘﻳ
؛ﺙﺩﺍﻮﺣ ﻭﺃ ﺔﺒﻳﺮﻏ
ﺔﻄﺳﺍﻮﺑ ﺞﺘﻨﳌﺍ ﺡﻼﺻﺇ ﺔﻟﻭﺎﺤﻣ ﻢﺘﻳ
ﻭﺃ ﻦﻳﺪﻤﺘﻌﳌﺍ ﺔﻧﺎﻴﺼﻟﺍ ﺀﻼﻛﻭ ﺮﻴﻏ ﺹﺎﺨﺷﺃ
.ﺮﻜﻳﺩ ﺪﻧﺁ ﻙﻼﺑ ﺔﻛﺮﺸﻟ ﻊﺑﺎﺘﻟﺍ ﺔﻧﺎﻴﺼﻟﺍ ﻖﻳﺮﻓ
ﻰﻟﺇ ﺝﺎﺘﲢ ﻑﻮﺳ ،ﻥﺎﻤﻀﻟﺍ ﺐﺟﻮﲟ ﺔﺒﻟﺎﻄﻣ ﱘﺪﻘﺘﻟ
.ﺪﻤﺘﻌﳌﺍ ﺔﻧﺎﻴﺼﻟﺍ ﻞﻴﻛﻭ ﻭﺃ ﻊﺋﺎﺒﻠﻟ ﺀﺍﺮﺸﻟﺍ ﻞﻴﻟﺩ ﱘﺪﻘﺗ
ﺔﻧﺎﻴﺻ ﻞﻴﻛﻭ ﺏﺮﻗﺃ ﻊﻗﻮﻣ ﻰﻠﻋ ﻑﺮﻌﺘﻟﺍ ﻚﻨﻜﳝﻭ
ﺮﻜﻳﺩ ﺪﻧﺁ ﻙﻼﺑ ﺐﺘﻜﻣ ﻰﻠﻋ ﻝﺎﺼﺗﻻﺍ ﻝﻼﺧ ﻦﻣ ﺪﻤﺘﻌﻣ
.ﻞﻴﻟﺪﻟﺍ ﺍﺬﻫ ﻲﻓ ﺢﺿﻮﳌﺍ ﻥﺍﻮﻨﻌﻟﺍ ﻲﻓ ﻲﻠﶈﺍ
ﻦﻳﺪﻤﺘﻌﳌﺍ ﺔﻧﺎﻴﺼﻟﺍ ﺀﻼﻛﻮﺑ ﺔﻤﺋﺎﻗ ﺪﺟﻮﺗ ،ﻚﻟﺫ ﻦﻣ ﹰﻻﺪﺑﻭ
ﺔﻠﻣﺎﻜﻟﺍ ﻞﻴﺻﺎﻔﺘﻟﺍﻭ ﺮﻜﻳﺩ ﺪﻧﺁ ﻙﻼﺑ ﺔﻛﺮﺸﻟ ﲔﻌﺑﺎﺘﻟﺍ
ﺎﻨﺑ ﺔﺻﺎﳋﺍ ﻝﺎﺼﺗﻻﺍ ﻞﺋﺎﺳﻭﻭ ﻊﻴﺒﻟﺍ ﺪﻌﺑ ﺎﻣ ﺕﺎﻣﺪﳋ
:ﻲﻧﻭﺮﺘﻜﻟﻹﺍ ﻊﻗﻮﳌﺍ ﻰﻠﻋ ﺖﻧﺮﺘﻧﻹﺍ ﻰﻠﻋ
.www.2helpU.com

(ﺔﻴﺴﻴﺋﺮﻟﺍ ﺕﺎﻤﻴﻠﻌﺘﻟﺍ)
ﺔـﻴـﺑﺮـﻌـﻟﺍ
ﺔﺌﻴﺒﻟﺍ ﺔﻳﺎﻤﺣ
ﻦﻣ ﺺﻠﺨﺘﻟﺍ ﻡﺪﻋ ﻡﺰﻠﻳ .ﻞﺼﻔﻨﳌﺍ ﻊﻤﳉﺍ
.ﺔﻳﺩﺎﻌﻟﺍ ﺔﻴﻟﺰﻨﳌﺍ ﺔﻣﺎﻤﻘﻟﺍ ﻊﻣ ﺞﺘﻨﳌﺍ ﺍﺬﻫ
ﺪﻧﺁ ﻙﻼﺑ ﺞﺘﻨﻣ ﻝﺍﺪﺒﺘﺳﺍ ﻡﺎﻳﻷﺍ ﻦﻣ ﻡﻮﻳ ﻲﻓ ﻡﺰﻟ ﺍﺫﺇ
ﻼﻓ ،ﻪﻣﺪﺨﺘﺴﺗ ﺪﻌﺗ ﻢﻟ ﺍﺫﺇ ﻭﺃ ،ﻚﺑ ﺹﺎﳋﺍ ﺮﻜﻳﺩ
ﺪﻛﺄﺗ ﻞﺑ ،ﻯﺮﺧﻷﺍ ﺔﻴﻟﺰﻨﳌﺍ ﺔﻣﺎﻤﻘﻟﺍ ﻊﻣ ﻪﻨﻣ ﺺﻠﺨﺘﺗ
.ﻞﺼﻔﻨﳌﺍ ﻊﻤﺠﻠﻟ ﺞﺘﻨﳌﺍ ﺍﺬﻫ ﺔﺣﺎﺗﺇ ﻦﻣ
ﺮﻳﻭﺪﺗ ﺓﺩﺎﻋﻹ ﻖﻓﺮﻣ ﺮﻜﻳﺩ ﺪﻧﺁ ﻙﻼﺑ ﺔﻛﺮﺷ ﺮﻓﻮﺗ •
ﻰﻟﺇ ﺎﻬﻟﻮﺻﻭ ﺩﺮﺠﲟ ﺮﻜﻳﺩ ﺪﻧﺁ ﻙﻼﺑ ﺕﺎﺠﺘﻨﻣ
ﻢﺘﻳﻭ .ﻞﻤﻌﻠﻟ ﺎﻬﺘﻴﺣﻼﺻ ﻡﺪﻋﻭ ﺎﻫﺮﻤﻋ ﺔﻳﺎﻬﻧ
ﻩﺬﻫ ﻦﻣ ﺓﺩﺎﻔﺘﺳﻼﻟ .ﺎﹰﻧﺎﺠﻣ ﺔﻣﺪﳋﺍ ﻩﺬﻫ ﱘﺪﻘﺗ
ﺔﻧﺎﻴﺻ ﻞﻴﻛﻭ ﻱﺃ ﻰﻟﺇ ﺞﺘﻨﳌﺍ ﺓﺩﺎﻋﺇ ﻰﺟﺮﻳ ،ﺔﻣﺪﳋﺍ
ﻊﻤﺟ ﻩﺭﻭﺪﺑ ﻰﻟﻮﺘﻳ ﻑﻮﺳ ﻱﺬﻟﺍﻭ ﺪﻤﺘﻌﻣ
.ﺎﻨﻋ ﺔﺑﺎﻴﻧ ﺕﺎﺠﺘﻨﳌﺍ
ﺔﻧﺎﻴﺻ ﻞﻴﻛﻭ ﺏﺮﻗﺃ ﻊﻗﻮﻣ ﻰﻠﻋ ﻑﺮﻌﺘﻟﺍ ﻚﻨﻜﳝ •
ﺪﻧﺁ ﻙﻼﺑ ﺐﺘﻜﻣ ﻰﻠﻋ ﻝﺎﺼﺗﻻﺍ ﻝﻼﺧ ﻦﻣ ﺪﻤﺘﻌﻣ
ﺍﺬﻫ ﻲﻓ ﺢﺿﻮﳌﺍ ﻥﺍﻮﻨﻌﻟﺍ ﻲﻓ ﻲﻠﶈﺍ ﺮﻜﻳﺩ
ﺀﻼﻛﻮﺑ ﺔﻤﺋﺎﻗ ﺪﺟﻮﺗ ،ﻚﻟﺫ ﻦﻣ ﹰﻻﺪﺑﻭ .ﻞﻴﻟﺪﻟﺍ
ﺪﻧﺁ ﻙﻼﺑ ﺔﻛﺮﺸﻟ ﲔﻌﺑﺎﺘﻟﺍ ﻦﻳﺪﻤﺘﻌﳌﺍ ﺔﻧﺎﻴﺼﻟﺍ
ﻊﻴﺒﻟﺍ ﺪﻌﺑ ﺎﻣ ﺕﺎﻣﺪﳋ ﺔﻠﻣﺎﻜﻟﺍ ﻞﻴﺻﺎﻔﺘﻟﺍﻭ ﺮﻜﻳﺩ
ﻰﻠﻋ ﺖﻧﺮﺘﻧﻹﺍ ﻰﻠﻋ ﺎﻨﺑ ﺔﺻﺎﳋﺍ ﻝﺎﺼﺗﻻﺍ ﻞﺋﺎﺳﻭﻭ
.www.2helpU.com :ﻲﻧﻭﺮﺘﻜﻟﻹﺍ ﻊﻗﻮﳌﺍ
.AÉHô¡µdG øY RÉ¡÷G π°üaGh 𫨰ûàdG ∞bhCG •
ΩGóîà°SÉH ∑RÉ¡L ‘ ΩɶàfÉH ájƒ¡àdG òaÉæe ∞q¶f •
.áaÉL ¢Tɪb á©£b hCG áªYÉf IÉ°Tôa
’ .á∏∏Ñe ¢Tɪb á©£≤H ΩɶàfÉH ∑ôëŸG áÑ∏Y ∞q¶f •
.áÑjòŸG hCG ᣰTɵdG äÉضæŸG Ωóîà°ùJ
IóëàŸG áµ∏ªŸG) »°ù«FôdG òNCÉŸG ¢ùHÉb ∫GóÑà°SG
(§≤a GóædôjCGh
,»°ù«FôdG òNCɪ∏d ójóL ¢ùHÉb Ö«cÎd áLÉ◊G ádÉM ‘
:»∏j Ée ™ÑJG
.¢UôëH Ëó≤dG ¢ùÑ≤ŸG øe ¢ü∏îJ •
¢ùHÉ≤dG ‘ »◊G ±ô£∏d »æÑdG ∂∏°ùdG π«°UƒàH ºb •
.ójó÷G
π°UƒŸG ±ô£dÉH ¿ƒ∏dG »æÑdG π«°UƒàdG ∂∏°S π°U •
.ójó÷G ¢ùHÉ≤dG øe QÉ«àdÉH
á«dÉY ¢ùHGƒ≤dG ™e á≤aôŸG Ö«cÎdG äɪ«∏©J ™ÑJG !ôjò–
.A 10 :¬H ≈°UƒŸG ô¡°üŸG .IOƒ÷G
á«æØdG äÉfÉ«ÑdG
(1 ´ƒædG )
õJôg 60-50 240 - 220 OOôJ (âdƒØdG) »Hô¡µdG ó¡÷G
VM1200
1000 äGh IQó≤dG
3^7 ΩGôZ ƒ∏«c ¿RƒdG
29

ﺔـﻴـﺑﺮـﻌـﻟﺍ
(ﺔﻴﺴﻴﺋﺮﻟﺍ ﺕﺎﻤﻴﻠﻌﺘﻟﺍ)
Ωɶf ≈∏Y á«FÉHô¡µdG VM1200 á°ùæµe …ƒà– :á¶MÓe
GPEG ,QÉѨdG áÑ«≤M Ö«côJ ΩóY ádÉM ‘ IóMƒdG 𫨰ûJ ™æÁ
≥∏Z øµÁ Óa ,áë«ë°U á≤jô£H áÑ«≤◊G Ö«côJ ºàj ⁄
𫨰ûJ ≈∏Y IQó≤dG ΩóY ¬æY èàæj ɇ ,»eÉeC’G AÉ£¨dG
.í«ë°U πµ°ûH QÉѨdG áÑ«≤M Ö«côJ øe ÉkªFGO ócCÉJ .RÉ¡÷G
(… πµ°ûdG) ΩOÉ©dG AGƒg í°Tôe ∞«¶æJ
»FÉ¡f πµ°ûH AGƒ¡dG ∞«¶æJ ≈∏Y ΩOÉ©dG AGƒg í°Tôe πª©j
í°Tôe ∞«¶æJ ∂æµÁ .á«FÉHô¡µdG á°ù浟G øe êhôÿG πÑb
:»∏j ɪc ΩOÉ©dG AGƒg
òNCÉe øY É¡∏°üaGh á«FÉHô¡µdG á°ù浟G 𫨰ûJ ∞bhCG •
øY ¬∏°üØd ∂∏°ùdG Öë°S Ék«FÉ¡f ô¶ëj .»Hô¡µdG QÉ«àdG
.QÉ«àdG
ê’õŸG ≈∏Y §¨°†dÉH (4) ΩOÉ©dG AGƒg ∂Ñ°T íàaG •
.∂©Ñ°UEÉH πØ°SC’
íàa óæY (17) ΩOÉ©dG AGƒg í°Tôe ájDhQ òFóæY øµÁ •
.∂Ñ°ûdG
.∞éj ¬côJGh …QÉ÷G OQÉÑdG AÉŸG πØ°SCG í°TôŸG ∞£°TG •
™æÁh »≤ædG AÉŸÉH ’EG í°TôŸG ∞«¶æJ ô¶ëj :á¶MÓe
πµ°ûH ∞éj í°TôŸG ´O .äÉضæŸG hCG ¿ƒHÉ°üdG ΩGóîà°SG
.∞∏àj ±ƒ°ùa ’EGh ,IQGô◊ÉH ¬ØØŒ ’ .»©«ÑW
RÉ¡÷G øjõîJ
AÉHô¡µdG πHÉc OôaG ¤hC’G Iôª∏d RÉ¡÷G ∫ɪ©à°SG πÑb •
.AÉHô¡µdG ¢ùÑ≤e ‘ ¬∏°Uh ºK m±Éc ∫ƒ£H ¿ôŸG
¿ôŸG AÉHô¡µdG πHÉc ≈∏Y IOƒLƒŸG AGôØ°üdG áeÓ©dG
.√RhÉŒ ΩóY Öéj …òdGh ¬d ∫ƒW ≈°übCG »g
䃰U Qó°üj ¿CG øµÁ ä’É◊G ¢†©H ‘ :á¶MÓe
∫hõj ±ƒ°ùa ,kÓ∏N ó©j ’ Gògh .ájGóÑdG ‘ "ÒØ°U"
.âbƒdG øe IÎa ó©H 䃰üdG
QÉÑZ hCG â檰SE’G hCG ≥°ü∏dG hCG È◊G §Ø°T ô¶ëj !ôjò–
ó°S ¤EG OGƒŸG √òg §Ø°T …ODƒj .ôØ◊G QÉÑZ hCG ôé◊G
í°TôŸG
(h πµ°ûdG) §Ø°ûdG ábÉW º«¶æJ
QGó≤e Ò«¨J (5) …hó«dG AGƒ¡dG Öë°S Ωɪ°U ∂d í«àj
OGR ɪ∏c .¬H Ωƒ≤J …òdG πª©dG Ö°ùM √ójôJ …òdG §Ø°ûdG
.í«ë°U ¢ùµ©dGh §Ø°ûdG Iƒb ∫ó©e πb ,AGƒ¡dG Ωɪ°U íàa
:ÎNG
OGƒŸGh ôFÉà°ù∏d §Ø°ûdG ábÉW øe ≈fOC’G ó◊G •
.á°SÉ°ù◊G
ó«éæàdG óFÉ°Sƒd §Ø°ûdG ábÉW øe §°SƒàŸG ó◊G •
.äÉ«°VQC’G â«cƒeh ÖJGôŸGh
øe äÉ«°VQC’G í£°SC’ §Ø°ûdG ábÉW øe ≈°übC’G ó◊G •
.áæ«àŸGh á«Ñ°ûÿG äÉ«°VQC’Gh •ÓÑdG
øY ¬∏°üaGh ¬∏«¨°ûJ ∞bhCG ,RÉ¡÷G øjõîJ óæY !ôjò–
.AÉHô¡µdG
.±ÉL ¿Éµe ‘ RÉ¡÷G ßØMG •
áfÉ«°üdG
»µd ∑Ó°SC’G hP BLACK+DECKER RÉ¡L º«ª°üJ ”
QGôªà°SG óªà©jh .áfÉ«°üdG øe Qób πbCÉH á∏jƒW IÎØd πª©j
ájÉæ©dG ≈∏Y »°VôŸG ƒëædG ≈∏Y ¬∏ªY AGOCG ‘ RÉ¡÷G
.º¶àæŸG ∞«¶æàdG h áÑ°SÉæŸG
Iõ¡LC’G ≈∏Y áfÉ«°U …CG AGôLEG πÑb »∏j Éà ∂«∏Y !ôjò–
:∑Ó°SC’G äGP
30
∂∏°ùdG ´ÉLΰSG
.(7) ∂∏°ùdG ´ÉLΰSG QR ≈∏Y QGôªà°SÉH §¨°VG •
(• ,ì ,R πµ°ûdG) É¡©∏Nh QÉѨdG áÑ«≤M Ö«côJ
ɪc (15) ôjôëàdG QR ≈∏Y §¨°†dÉH QÉѨdG AÉYh íàaG •
.R πµ°ûdG ‘ í°Vƒe ƒg
ƒg ɪc áÑ«≤◊G πeÉM ‘ (16) QÉѨdG áÑ«≤M ÖcQ •
‘ á≤£≤W ´Éª°S øe ócCÉJh .• πµ°ûdG ‘ í°Vƒe
.áÑ«≤◊G ¿Éµe
¥hóæ°U ‘ Ék©e áÑ«≤◊G πeÉMh QÉѨdG áÑ«≤M ÖcQ •
.ì πµ°ûdG ‘ í°Vƒe ƒg ɪc QÉѨdG
áÑ«≤M AÓàeG óæY á«°ùµY á≤jô£H AGôLE’G Gòg ™ÑJG •
.É¡ZGôaEG ‘ áÑZôdGh QÉѨdG

(ﺔﻴﺴﻴﺋﺮﻟﺍ ﺕﺎﻤﻴﻠﻌﺘﻟﺍ)
ﺔـﻴـﺑﺮـﻌـﻟﺍ
Ö«côJ ºàj .á©°SGƒdG äÉMÉ°ùŸG ∞«¶æàd ÉkÑ°SÉæe ó©j Ée ƒgh
Ée ƒgh .áLQO 360 ájhGõH á«∏ªY á∏°UƒH á«°VQC’G IÉ°Tôa
.øcQ …CG ¤EG ádƒ¡°ùH ∂dƒ°Uh á«fɵeEG øª°†j
ΩGóîà°SG ¿hóH â«cƒŸGh äÉ«°VQC’G OÉé°S ∞¶f •
õeôH õ«ªŸG »°SCGôdG ìÉàØŸG ≈∏Y §¨°VG .IÉ°TôØdG
IÉ°TôØdGh (11) áØ«XƒdG Ò«¨J á°SGhO ≈∏Y IOÉé°ùdG
.áYƒaôe
∂«à°SÓÑdG øe áYƒæ°üŸG πãe ,áªYÉædG äÉ«°VQC’G •
ºàj •ÓÑdG hCG ¬«cQÉÑdG hCG "π«æ«ØdG ójQƒ∏c ‹ƒH"
ΩGóîà°SÉH ¿ƒµj Ée π°†aCG ≈∏Y É¡H ájÉæ©dGh É¡Ø«¶æJ
õ«ªŸG »°SCGôdG ìÉàØŸG ≈∏Y §¨°VG ∂dòH ΩÉ«≤∏d .IÉ°TôØdG
áØ«XƒdG Ò«¨J á°SGhO ≈∏Y áªYÉædG äÉ«°VQC’G õeôH
êQÉî∏d IÉ°TôØdG RÈJ ±ƒ°Sh (11)
(13) ó«éæàdG ≥ë∏e
AÉ«°TC’G hCG ÖàµdG ∞«¶æàd ≥ë∏ŸG Gòg ∫ɪ©à°SG ∂æµÁ
ÖJGôŸGh óéæŸG çÉKC’Gh Qƒ°üdG ôWCG πãe ,á°SÉ°ù◊G
.QÉѨdG øe ,∂dP ¤EG Éeh ôFÉà°ùdGh óFÉ°SƒdGh
ájƒîàdG ¢SÉ«≤e .6
πHɵdG ´ÉLΰSG QR .7
AGƒ¡dG Öë°S •ÉØ°T .8
ΩƒWôÿG π°Uƒe .9
á«°VQC’G IÉ°Tôa .10
(πØ°SC’G ¤EG áHƒ∏≤e IÉ°Tôa ™e) ¥ƒ≤°ûdG ≥ë∏e .14
.RÉ¡÷ÉH (8) áëàØdG ‘ (9) ΩƒWôÿG π°Uƒe πNOCG •
.¿ÉµŸG ‘ á≤£≤W 䃰U ´Éª°S ≈àM Iƒ≤H §¨°VG •
.ΩƒWôÿG ôjô– QGQRCG ≈∏Y QGôªà°SÉH §¨°VG •
.RÉ¡÷ÉH (8) áëàØdG øe (9) ΩƒWôÿG π°Uƒe Öë°SG •
(Ü πµ°ûdG) »µ«à°SÓÑdG ܃ÑfC’G Ö«côJ
∞FÉXƒdG Ò«¨J á°SGhO .11
¿ôe ΩƒWôN .12
ó«éæàdG ≥ë∏e .13
(CG πµ°ûdG) ΩƒWôÿG π«°UƒJ
(CG πµ°ûdG) ΩƒWôÿG π°üa
™«ªéàdG
(14) ¥ƒ≤°ûdG ≥ë∏e
»àdGh á≤«°†dG øcÉeC’G ∞«¶æJ (14) ¥ƒ≤°ûdG IGOCG í«àJ
.É¡«dEG ∫ƒ°UƒdG Ö©°üj
ΩGóîà°S’G
(`g πµ°ûdG) ±É≤jE’Gh 𫨰ûàdG
ìÉàØe ≈∏Y §¨°†dG ≈Lôoj ,RÉ¡÷G 𫨰ûJ AóÑd •
.(3) ±É≤jE’G/𫨰ûàdG
ìÉàØe ≈∏Y §¨°†dG ≈Lôoj ,RÉ¡÷G 𫨰ûJ ±É≤jE’ •
.á«fÉK Iôe (3) ±É≤jE’G/𫨰ûàdG
QÉѨdG ∞«¶æJ
hCG Ék≤dÉY ¢ù«d ΩƒWôÿG ¿CG ócCÉJ ,RÉ¡÷G 𫨰ûJ óæY •
.GkOhó°ùe hCG Ékjƒà∏e
܃ÑfC’G πNGO (2) ¢†Ñ≤ŸG ∫qƒfi ≈∏Y Iƒ≤H §¨°VG •
.(1) »µ«à°SÓÑdG
(ê πµ°ûdG) m¿ÉK »µ«à°SÓH ܃ÑfCG áaÉ°VEG
πNGO ÊÉãdG »µ«à°SÓÑdG ܃ÑfC’G ≈∏Y Iƒ≤H §¨°VG •
.∫hC’G »µ«à°SÓÑdG ܃ÑfC’G
(O πµ°ûdG) äÉ≤ë∏ŸG Ö«côJ
çÓãH IOhõe ∂«JCÉJ ∂H á°UÉÿG á«FÉHô¡µdG á°ù浟G
…Oôa ≥ë∏e πc .äÉ≤«Ñ£àdG ∞∏àîŸ á°ü°üfl äÉ≤ë∏e
hCG (1) »µ«à°SÓÑdG ܃ÑfC’G ‘ ¬Ñ«côJ ºàj ¿CG øµÁ
.áÑZôdG Ö°ùM ,(2) §Ø°ûdG ΩƒWôN ¢†Ñ≤e ‘ IöTÉÑe
(10) á«°VQC’G IÉ°Tôa
.á«°VQC’G IÉ°Tôa Ékeóîà°ùe RÉ¡÷G Ωóîà°ùJ ±ƒ°S ÉkÑdÉZ
31

ﺔـﻴـﺑﺮـﻌـﻟﺍ
(ﺔﻴﺴﻴﺋﺮﻟﺍ ﺕﺎﻤﻴﻠﻌﺘﻟﺍ)
.áØdÉJ äÉ≤ë∏e Ωóîà°ùJ ’ •
.§≤a BLACK+DECKER äÉ≤ë∏e Ωóîà°SG •
.äÉfGƒ«◊G ≈∏Y RÉ¡÷G Ωóîà°ùJ ’ •
≠jôØàdÉH ΩÉ«≤dG πÑb »FÉHô¡µdG QÉ«àdG øY èàæŸG π°üaG •
.RÉ¡÷G ≈∏Y áfÉ«°U ∫ɪYCG …CG AGôLEG hCG ∞«¶æàdG hCG
øjôNB’G áeÓ°S
‘ ÉÃ) ¢UÉî°TC’G ¬eóîà°ù«d ºª°üe ÒZ RÉ¡÷G Gòg •
äGQó≤dG ‘ Qƒ°üb øe ¿ƒfÉ©j øjòdG (∫ÉØWC’G ∂dP
¿hô≤àØj øjòdG ∂ÄdhCG hCG á«∏≤©dG hCG á«°ù◊G hCG á«fóÑdG
¬«LƒJ hCG ±GöTEG ÒaƒJ •öûH ’EG ,áaô©ŸGh IÈÿG ¤EG
øY ∫hDƒ°ùe ¢üî°T πÑb øe RÉ¡÷G ΩGóîà°SÉH ≥∏©àj
.º¡àeÓ°S
.RÉ¡÷ÉH º¡ãÑY ΩóY ¿Éª°†d ∫ÉØWC’G áÑbGôe Ωõ∏j •
á«FÉHô¡µdG áeÓ°ùdG
’ ∂dòdh ;ÉkLhOõe k’õY ∫hõ©e RÉ¡÷G Gòg
øe kɪFGO ≥≤– .»°VQCG ∂∏°S π«°UƒJ ¤EG áLÉM
âdƒØ∏d πKɇ AÉHô¡µdG Qó°üe âdƒa ¿CG
.ó¡÷G áMƒd ≈∏Y ÚÑŸG ܃∏£ŸG
πjó©J ô¶ënj .AÉHô¡µdG áëàØd kÉÑ°SÉæe ¢ùHÉ≤dG ¿ƒµj ¿CG Öéj
äÉëàa ΩGóîà°SGh ¢ùHÉ≤dG πjó©J ΩóY .á≤jôW …CÉH ¢ùHÉ≤dG
.á«Hô¡µdG äÉeó°üdG ôWÉfl øe óëj áÑ°SÉæŸG AÉHô¡µdG
øe ¬dGóÑà°SG Öéj ,AÉHô¡µdG π«°UƒJ ∂∏°S ∞∏J ádÉM ‘ •
áeóN õcôe …CG hCG á©
.ôWÉîŸG Öæéàd óªà©e BLACK+DECKER
æ°üŸG á¡÷G πÑb
p
q
¢UGƒÿG
.É¡©«ªL hCG á«dÉàdG AGõLC’G ¢†©H ≈∏Y RÉ¡÷G Gòg πªà°ûj
»µ«à°SÓH ܃ÑfCG 2 .1
¢†Ñ≤e .2
±É≤jE’G/𫨰ûàdG ìÉàØe .3
ΩOÉ©dG í°Tôe .4
…hó«dG AGƒ¡dG Öë°S Ωɪ°U .5
∂∏J ÒZ AGõLCG …CG ∫GóÑà°SG hCG ádGREG kÉ≤∏£e ∫hÉ– ’ •
.π«dódG Gòg ‘ É¡«dEG QÉ°ûoŸG
ΩGóîà°SG óæY á«aÉ°VEG áeÓ°S äɪ«∏©J
á«FÉHô¡µdG ¢ùfɵŸG
hCG QÉѨdG áÑ«≤M ¿CG øe ÉkªFGO ócCÉJ ,ΩGóîà°S’G πÑb •
.í«ë°üdG ¬fɵe ‘ ´ƒ°Vƒe í°TôŸG
¤EG …ODƒJ ób OGƒe …CG •É≤àdG ‘ RÉ¡÷G Ωóîà°ùJ ’ •
.∫É©à°T’G
áæNóe hCG á∏©à°ûe OGƒe …CG •É≤àd’ RÉ¡÷G Ωóîà°ùJ ’ •
¤EG ,øNÉ°ùdG OÉeôdGh ,ôFÉé°ùdGh ,âjȵdG OGƒYCG)
.(√ôNBG
.RЙ¡чЙH IOƒLƒŸG дЙлаШdG у°щJ ’ •
áÑ«≤M hCG RÉ¡÷G ≠jôØJ óæY QÉѨdG ¥É°ûæà°SG ÖæŒ •
.QÉѨdG
¥ƒ≤°ûdG IGOCGh IÉ°TôØdG AÉ≤HEG ≈∏Y ÉkªFGO ¢UôMG •
πªY AÉæKCG º°ù÷G øY Gkó«©H iôNC’G äÉ≤ë∏ŸGh
.IóMƒdG
.ÉkªFGO ¿ÉµŸG êQÉN èàæŸG ÆôaCG •
GkQòM øch ,êQnódG ∞«¶æJ óæY ᣫ◊G øe Gkójõe òîJG •
¤EG ,∫ÉØWC’G øe Üô≤dÉHh ,êQnódG ≈∏YCG ∞«¶æJ øY
.√ôNBG
Öæéàd ΩƒWôÿGh AÉHô¡µdG ¢ùHÉb ™°VƒŸ ÉkªFGO ¬ÑàfG •
.ΩGóîà°S’G AÉæKCG Ì©àdG ô£N
.∑ôëŸG ΩOÉY øY Gkó«©H ∂¡Lhh ∂æ«Y ≥HCG •
óæY áæeBG áaÉ°ùe ≈∏Y äÉfGƒ«◊Gh ∫ÉØWC’G ≥HCG •
.RÉ¡÷G ΩGóîà°SG
≈∏Y RÉ¡÷G ΩGóîà°SG óæY ≈∏YC’G ¤EG πØ°SC’G øe CGóHG •
™°Vƒe øe πØ°SCG áLQO ≈∏Y RÉ¡÷G ™°Vh ,êQódG
.πbC’G ≈∏Y ∂∏ªY
ôNBG ≥ë∏e hCG §Ø°ûdG ¢SCGQ ¿hóH RÉ¡÷G Ωóîà°ùJ ’ •
.܃ÑfC’G ‘ ¬Ñ«côJ ó©H Ö°SÉæe
Gkó«©H äGRÉØ≤dGh ∂°ùHÓeh ∑ô©°T AÉ≤HEG ≈∏Y ¢UôMG •
.ácôëàŸG AGõLC’G øY
32

(ﺔﻴﺴﻴﺋﺮﻟﺍ ﺕﺎﻤﻴﻠﻌﺘﻟﺍ)
ﺔـﻴـﺑﺮـﻌـﻟﺍ
øY kGó«©H AÉHô¡µdG ∂∏°S ™°Vh ≈∏Y ¢UôMGh .¢ùÑ≤ŸG
.IOÉ◊G ±Gƒ◊Gh âjõdGh IQGô◊G
π°üaG ,ΩGóîà°S’G AÉæKCG AÉHô¡µdG ∂∏°ùd ∞∏J çóM GPEG •
AÉHô¡µdG ∂∏°S ¢ùª∏J ’ .kGQƒa AÉHô¡µdG Qó°üe øe RÉ¡÷G
.AÉHô¡µdG Qó°üe øe ¬∏°üa πÑb
ΩóY ádÉM ‘ AÉHô¡µdG Qó°üe øY RÉ¡÷G π°üaG •
πÑbh É¡dGóÑà°SG hCG AGõLC’G Ö«côJ πÑbh ¬eGóîà°SG
.∞«¶æàdG
.AÉŸG ‘ RÉ¡÷G ¢ùª¨J ’ •
ΩGóîà°S’G ó©H
πÑb AÉHô¡µdG áëàa øe ¢ùHÉ≤dG ´õfGh 𫨰ûàdG ∞bhCG •
AõL …CG ¢üëa hCG ∞«¶æJ hCG Ò«¨J πÑbh RÉ¡÷G ∑ôJ
.¬FGõLCG øe
¿Éµe ‘ ¬æjõîJ Öéj ,RÉ¡÷G ΩGóîà°SG ΩóY ádÉM ‘ •
.±ÉL
.∫ÉØWC’G ∫hÉæàe øY kGó«©H Iõ¡LC’G ™«ªL ßØM Öéj •
ìÓ°UE’Gh ¢üëØdG
ΩóY øe ≥≤ëà∏d RÉ¡÷G ¢üëa Öéj ,ΩGóîà°S’G πÑb •
ΩóY øe kÉ°†jCG ócCÉJ .áØdÉJ hCG IQƒ°ùµe AGõLCG OƒLh
…CG hCG QGQRC’G ‘ ∞∏J OƒLh hCG ,AGõLC’G ‘ Qƒ°ùc OƒLh
.RÉ¡÷G 𫨰ûJ ≈∏Y ôKDƒj ób Ö«Y
.∞∏J hCG Ö«Y …CG ¬«a âLh GPEG RÉ¡÷G Ωóîà°ùJ ’ •
AGõLC’G ∫GóÑà°SG hCG ìÓ°UEÉH óªà©e π«ch Ωƒ≤j ¿CG Öéj •
.áØdÉàdG hCG IQƒ°ùµŸG
hCG áØdÉJ AGõLCG OƒLh ΩóY øe ≥≤– ,ΩGóîà°S’G πÑb •
.∂∏°ùdG ‘ á∏cBÉàe hCG á«dÉH
Oƒ°ü≤ŸG ΩGóîà°S’G
RGôW BLACK+DECKER á°ùæµe ⪪o°U
Gòg .±É÷G ∞«¶æàdG ¢VGôZC’ á«FÉHô¡µdG VM1200
.§≤a á≤∏¨ŸG øcÉeC’G ‘ ∂∏¡à°ùŸG ΩGóîà°S’ ó©e RÉ¡÷G
:‘ RÉ¡÷G Gòg Ωóîà°ùoj ’
•É°ShCGh ÖJɵŸGh ôLÉàŸG ‘ ∫ɪ©dG ïHÉ£e ≥WÉæe •
,iôNC’G πª©dG
;á«ØjôdG ∫RÉæŸG •
IÒ¨°üdG ¥OÉæØdGh ¥OÉæØdG ‘ AÓª©dG πÑb øe •
,iôNC’G áeÉbE’G øcÉeCGh
ÒZ iôNCG øcÉeCG …CG hCG QÉ£aE’Gh â«ÑŸG øcÉeCG •
.á«dõæe
áeÓ°ùdG äɪ«∏©J
á«FÉHô¡µdG ábÉ£dG IGOCG áeÓ°ùH á≤∏©àe áeÉY äGôjò–
äGôjò– πc IAGôb ≈∏Y ¢UôMG !ôjò–
‘ Qƒ°üb …CG .á∏°üdG äGP äɪ«∏©àdGh áeÓ°ùdG
áë°VƒŸG áeÓ°ùdG äɪ«∏©Jh äGôjòëàdG ´ÉÑJG
h á«FÉHô¡c áeó°üd ¢Vô©àdG ‘ ÖÑ°ùàJ ¿CG øµÁ √ÉfOCG
.á¨dÉH äÉHÉ°UEG ´ƒbh hCG/h ≥jôM ܃°ûf
.RÉ¡÷G 𫨰ûJ πÑb ájÉæ©H πeɵdÉH π«dódG Gòg CGôbG •
.¬d RÉ¡÷G ºª°üŸG ΩGóîà°S’G π«dódG Gòg Oóëj •
™e IOƒLƒŸG ÒZ á≤ë∏e hCG á«dɪc ™£b …CG ΩGóîà°SG
¢Uƒ°üæŸG ÒZ ¢VôZ ‘ RÉ¡÷G ΩGóîà°SG hCG RÉ¡÷G
¤EG …ODƒj hCG kGô£N πµ°ûj ób π«dódG Gòg ‘ ¬«∏Y
.áHÉ°UEG çhóM
.áLÉ◊G óæY ¬«dEG ´ƒLô∏d π«dódG Gò¡H ßØàMG •
hCG AÉHô¡µdG ∂∏°S ∞∏J ádÉM ‘ RÉ¡÷G Ωóîà°ùJ ’ •
.ɪ¡æe …CÉH Ö«Y OƒLh hCG »°ù«FôdG ¢ùHÉ≤dG
…CG OƒLh hCG ¢ùHÉ≤dG hCG AÉHô¡µdG ∂∏°S ∞∏J ádÉM ‘ •
π«ch hCG RÉ¡÷G ™
π«gCÉàdG iƒà°ùe ¢ùØf ≈∏Y ¢üî°T …CG hCG áeóÿG
∂∏°S ™£≤J ’ .á浇 ôWÉfl …CG Öæéàd ∂dPh ¬MÓ°UE’
æ°üà áfÉ©à°S’G Öéj ,¬H ܃«Y
p
q
.∂°ùØæH ¬MÓ°UEG ∫hÉ– ’h AÉHô¡µdG
RÉ¡÷G ΩGóîà°SG
hCG ¬d AÉHô¡µdG π«°UƒJ πÑb CÉØ£e RÉ¡÷G ¿CG ócCÉJ •
.¬æY É¡©£b
.RÉ¡÷G ΩGóîà°SG óæY ÉkªFGO Qò◊G ñƒJ •
.≥∏£dG AGƒ¡dG ‘ RÉ¡÷G Ωóîà°ùJ ’ •
øY ¢ùHÉ≤dG π°üØd AÉHô¡µdG ∂∏°S ó°T kÉ≤∏£e ∫hÉ– ’ •
33

ﺔـﻴـﺑﺮـﻌـﻟﺍ
(ﺔﻴﺴﻴﺋﺮﻟﺍ ﺕﺎﻤﻴﻠﻌﺘﻟﺍ)
١٥
G
I
١٦
١٦
H
١٧٤
J
34

(ﺔﻴﺴﻴﺋﺮﻟﺍ ﺕﺎﻤﻴﻠﻌﺘﻟﺍ)
ﺔـﻴـﺑﺮـﻌـﻟﺍ
A
١٢
٨
٩
١
٢
B
1
١١
١
١٠
C
E
D
١١
٥
F
35

ﺔـﻴـﺑﺮـﻌـﻟﺍ
(ﺔﻴﺴﻴﺋﺮﻟﺍ ﺕﺎﻤﻴﻠﻌﺘﻟﺍ)
٢
٥
٤
٣
٧
٦
36
١٢
٨
٩
١
١٠١١
١٤
١٣


N a me s & A d d r e ss es f o r B l a c k & D e c k e r S e r v i c e C o n c e s s i on ar i e s
ALGERIA: Sarl Outillage Corporation, DW, B&D Pet, HHD, 08, Rue Med Boudiaf (ex TELLA Achen) Cheraga, Alger, Tel:
0021 3- 0-21 3751 30/ 0 0213 -0-21 37 5131 , F ax : 00213 -0 -213 6966 7, Email: hak im .mer djad i@ou tilla ge -dz. com;
nefissa.merdjadi@outillage-dz.com; sidahmed.merdjadi@outillage-dz.com. AZERBAIJAN: Kontakt - NN LLC, HHD, M.Qashqay 43, Baku
Azerbaijan Az1000, Tel: 00994 12 408 20 50, Mob: +994503442204, Fax: 00994 12 411 70 90, eganjaly@hotmail.com. BAHRAIN: Alfouz
Services Co. WLL, Tubli, DW, B&D PET, HHD, P.O. Box 26562, Tubli, Manama, Tel: +973-17783562/ 17879987, Fax: 17783479, Email:
alfouz@batelco.com.bh. EGYPT: Anasia Egypt for Trading S.A.E. (Mentrade), HHD, P.O. Box 2443, 9, Mostafa Refaat Street, Sheraton
Heliopolis 11361, Cairo, Tel: 00202 22684159, Fax: 00202 22684169, Email: wael.salah@anasia.com; nevien.elbeshbishy@anasia.com.
ETHIOPIA: Seif Tewfik Sherif, DW, B&D PET, HHD, Arada Sub City, Kebele 01/02, Global Insurance Bldg, 2nd Flr, Room 43, P.O. Box
2525, Addis Ababa, Tel: 00-251-11-1563968/ 1563969, Fax: 00-251-11-1558009, Email: seif@ethionet.et; nawanag@ethionet.et;
seifudint@hotmail.com. IRAQ: Financial Links, B&D PET, HHD, Kazzaz Building Arasat Al-Hindia, Block No: 629, Street: 31, Building No:
1, Baghdad, Iraq, Tel: 00964-(0)780-195-2223/ +964-(0)781-3763044, Email: info@financiallinks-truevalue.com. JORDAN: Bashiti
Hardware (Palestine), B&D pet, HHD, "93 King Abdullah, 2nd St., Opp ELBA House, P.O. Box 3005, Amman 11953, Tel:
00962- 6-534909 8, ext.11, Fax: 00962 -6-53307 31, Email: manal@bash itihardw are.com; inf o@bas hitihard ware.com ;
rami@bashitihardware.com. KENYA: Zylog Enterprises Ltd. (T/A Leading Concepts), HHD, IPS Building,Kaunda Street, P.O. Box
40877-00100, Nairobi, Tel: 00 25 4-20-69 05000 , Fax : 0025 4- 20-6 905111, Em ail: a dm in@a libha is hari ff.c o.ke;
leading@alibhaishariff.co.ke; info@alibhaishariff.co.ke. LEBANON: Aces Service Centre (Est. F.A.Ketaneh SA), HHD, P.O. Box 90-102,
Nahr El Mot, Seaside Highway, Pharaon Building, Beirut, Tel: 00961-1-898989/ + 961-(1)-262626, Fax: 0096-1-1245880, Email:
Nissrine.hajj@aces.com.lb; Nassim.aziz@Aces.com.lb; Johnny.sailian@Aces.com.lb; Paul.tahan@aces.com.lb. LIBYA: North Africa
Trading (El Ghoul Brothers), DW, B&D Pet, HHD, P.O. Box 348, 7 October Street 11, Benghazi, Tel: 00218-061-3383994, Fax:
00218-092-7640688, Email: nagte.ly@gmail.com; CC: nagte.dpt@gmail.com; elghol@technpower.com. North Africa Trading ( El Ghoul
Brothers), DW, B&D Pet, HHD, AlBarniq Dewalt Center, Mokhazin-elsukar St., ElFallah, Tripoli, Tel: 00218-021-3606430, Fax:
00218-092-6514813, Email: nagte.ly@gmail.com; cc: (nagte.dpt@gmail.com; elghol@technpower.com. Homeworld Co., HHD, Senidal St.
Amr Ibn Elaas Road, Benghazi, Libya, P.O. Box 18182, Salmany, Tel: 00218-61-9094183, ext. 103, Fax: 00218.61.9094123, ext. 108,
Email: nagte.ly@gmail.com. MAURITIUS: J.M. Goupille & Co.Ltd. The Brandhouse Ltd., HHD, Rogers Industrial Park 1, Riche Terre,
Mauritius, Tel: 00230-2069450/ +230-207-1700, Fax: 00230-2483188/ 00230-2069474, Email: claims(service.centre@goupille.mu;
stephanie.bijou@ gma il. com ; beatrice.li@gmail.com; sharon.laprovidence.jmg@gmail.co m, tim. moszuti@goupille.mu; Cc.
Jfrancois.dromart@goupille.mu; mario.catherine@goupille.mu; gerard.gouges@goupille.mu. MOROCCO: UATS, HHD, "No. 37,
Lotissement KADIRIA, km 10 Route, Eljadida, LISASSFA, Casablanca, Morocco, Tel: 00212-522652602, Fax: 00212-522652603, Email:
farah1406@yahoo.fr; noureddine.uats@gmail.com. OMAN: Oman Marketing & Service Co.(Omasco), Wattayah/ Muscat, HHD, B&D
PET, P.O. Box 2734, Behind Honda Showroom, Wattayah, Oman, Tel: +968 24560232/ 24560255, Fax: 24560993, Email:
npservice@omasco.com.om; Cc. ashok.balan@omasco.com.om, damodaran.pillai@omasco.com.om; unnikrishnan@omasco.com.om.
Oman Marketing & Service Co.(Omasco), Sohar, HHD, B&D PET, Al Ohi, Sohar, Oman, Tel: +968 26846379, Fax: 26846379, Email:
sooraj.neeran@omasco.com.om. Oman Marketing & Service Co.(Omasco), Salalah, HHD, B&D PET, Sanaya, Salalah, Oman, Tel: +968
23212290, Fax: 23210936, Email: rajagopal.pr@omasco.com.om. Omar Mohammed Ali Bawain Trading Co., Salalah, Al-Awqadain, PC
217, P.O.Box 112, Salalah, Sultanate of Oman, Tel: +968 23214874, Fax: 23214874/ 23211878, Email: jithin@omartrad.com. PAKISTAN:
Ammar Service & Spares, B&D PET, HHD, Office No 6068, 6th Floor Central Plaza, Behind Gul Plaza Marston Road, Karachi, Tel:
0092-21-32426905/ 021-32775252, Fax: 0092-21-32427214, Email: babji93@yahoo.com. QATAR: Al Muftah Service Centre, Doha,
HHD, B&D PET, Al Wakrah, Road, P.O. Box 875, Doha, Qatar, Tel: +974 44650880/ 44650110/ 44446868, Fax: 44441415/ 44662599,
Email: service@almuftah.com; almuftah@almuftah.com. SAUDI ARABIA: Fawaz Ebrahim Al Zayani Trading Est., Dammam, DW, B&D
PET, HHD, P.O. Box 76026, Al Raka: 31952, Tel: +966-3-8140914, Fax: 8140824, Email: dewaltdammam@hotmail.com;
(vinoderakatyil@yahoo.com); Website: www.fawazalzayanigroup.com. Fawaz Ebrahim Al Zayani Trading Est., Makkah, DW, B&D PET,
HHD, 4753-Wali Alahed, Makkah, 9130-24353 Tel: +966-12-8140914/ 581121778, Fax: 128140914, Email: meraj2515@gmail.com.
Banaja Trading Co. Ltd., Riyadh, HHD, P.O. Box 566, Riyadh-11421, Tel: +966-1-4124444, Fax: 4033378, Email: jijophilip@hotmail.com.
Banaja Trading Co. Ltd, Jeddah, HHD P.O. Box 366, Jeddah-21411, Tel: +966-2-6511111, Fax: 6503668, Email: afouad@banaja.com;
jijophilip@hotmail.com. SOUTH AFRICA: Benray Tool Wholesalers C.C., B&D PET, HHD, 460 Koeberg Road, Cape Town, South Africa,
Tel: 021-551-7244, Fax: 021-552-6395, Email: dewaltct@benray.co.za. Stanley Black & Decker-RSA, BED, PET, HHD, 199 Winze Drive
Stormill Ext 9 Roodepoort Tel: (2711) 472-0454, Fax: (2711) 472-0482, Email: service@sbdinc.co.za; vincent.roets@sbdinc.co.za;
jacquesvincent.roets@sbdinc.com. SRI LANKA: Delmege Forsyth & Co. Ltd, DW, B&D Pet, HHD, Delmege Forsyth & Co. Ltd, Lifestyle
Cluster, 101, Vinayalankara Mawatha, Colombo 10, Sri Lanka, Tel: +94-11-2688462/ +94-11-2, Email: dgeservice@delmege.com;
Samith.lifestyle@delmege.com cc: Jayantha.lifestyle@delmege.com. TUNISIA: Societe Tunisienne De Maintenance (STM), B&D Pet,
HHD, Rue De La Physique. Nouvelle Zone Industrielle Ben Arous.2013 Ben Arous, TUNISIA. Tel: +216-79-389687, Fax: +216-71-385154,
Email: importa@stqu.com. UAE: (Abu Dhabi) Galaxy Equipment Trading, Abu Dhabi, DW, B&D PET, HHD, Madinath Zayed (Baada
Zaid), Abu Dhabi P.C. 58910, Tel: +971-2-8844279, Fax: 8844297, Email: galaxyeq@eim.ae; galaxyeq@emirates.net.ae. Light House
Electrical, Abu Dhabi, DW, B&D PET, HHD, P.O. Box 120, Abu Dhabi, Tel: +971-2-6726131, Fax: 6720667, Email:
dewalt_lhe@hotmail.com. Light House Electrical, Musaffah, DW, B&D PET, HHD, P.O. Box 120, Abu Dhabi, Tel: +971-2-5548315, Fax:
5540461, Email: dewalt_lhe@hotmail.com. (Al Ain) Zillion Equipment and Spare Parts Trading LLC. Al Ain, DW, B&D PET, HHD, P.O. Box
19740, Opp. Bin Sadal/ Trimix Redymix Sanaiya, Al Ain Tel: +971-3-7216690, Fax: 7216103, Email: zilliontrdg@gmail.com. (Dubai)
BLACK & DECKER (OVERSEAS) GmbH, Dubai, DW, B&D PET, HHD, P.O. Box 5420, Dubai, Tel: +971-4-8127400/ 8127406, Fax:
2822765, Email: service.mea@sbdinc.com. (Ras Al Khaimah) Mc Coy Middle East LLC, Ras Al Khaimah, DW, B&D PET, HHD, P.O. Box
10584, Ras Al Khaimah, Tel: +971-7-2277095, Fax: 2277096, Email: mccoyrak@gmail.com. (Sharjah) Mc Coy Middle East LLC, Sharjah,
DW, B&D PET, HHD, P.O. Box 25793, Sharjah, Tel: +971-6-5395931, Fax: 5395932, Email: mccoy@emirates.net.ae;
mccoydewalt@gmail.com. UGANDA: Anisuma Investment & Service Ltd. (Jacky's Electronics), HHD, J.R Comples, Ware house No.5,
Plot No.101 . 3r d In dus trial Area, Jinja Rd, Kampala, Tel: 00256-414237106, Mob: 00256 77942950 1, E mail:
ha.service.uganda@anisuma.com. YEMEN: Middle East Trading Co. (METCO) DW, B&D Pet, HHD, 5th Flr. Hayel Saeed Anam Bldg.
Al-Mugamma St. Taiz, Yemen, Tel: +00967-4-213455, Fax: 00967-4-219869, Email: metco@metcotrading.com; sami@metcotrading.com.
Middle East Trading Co. (METCO) DW, B&D Pet, HHD, Mualla Dakka, Aden, Tel: 00967-2-222670, Fax: 00967-2-222670,
metco@metcotrading.com; sami@metcotrading.com. Middle East Trading Co. (METCO), DW, B&D Pet, HHD, Hayel st., Sana'a, Yemen,
Tel: 00967-1-204201, Fax: 00967-1-204204, Email: metco@metcotrading.com; sami@metcotrading.com.


WARRANTY REGISTRATION CARD
YOUR NAME/
YOUR ADDRESS
POSTCODE
DATE OF PURCHASE
DEALER'S NAME & ADDRESS/
«ùßr
«∞FMu«Ê
«∞d±e «∞∂d¥bÍ
¢U¸¥a «∞Ad«¡
≈ßr Ë ´Mu«Ê «∞∂Uzl
PRODUCT MODEL NO.
VM1200
 Loading...