

Page 1
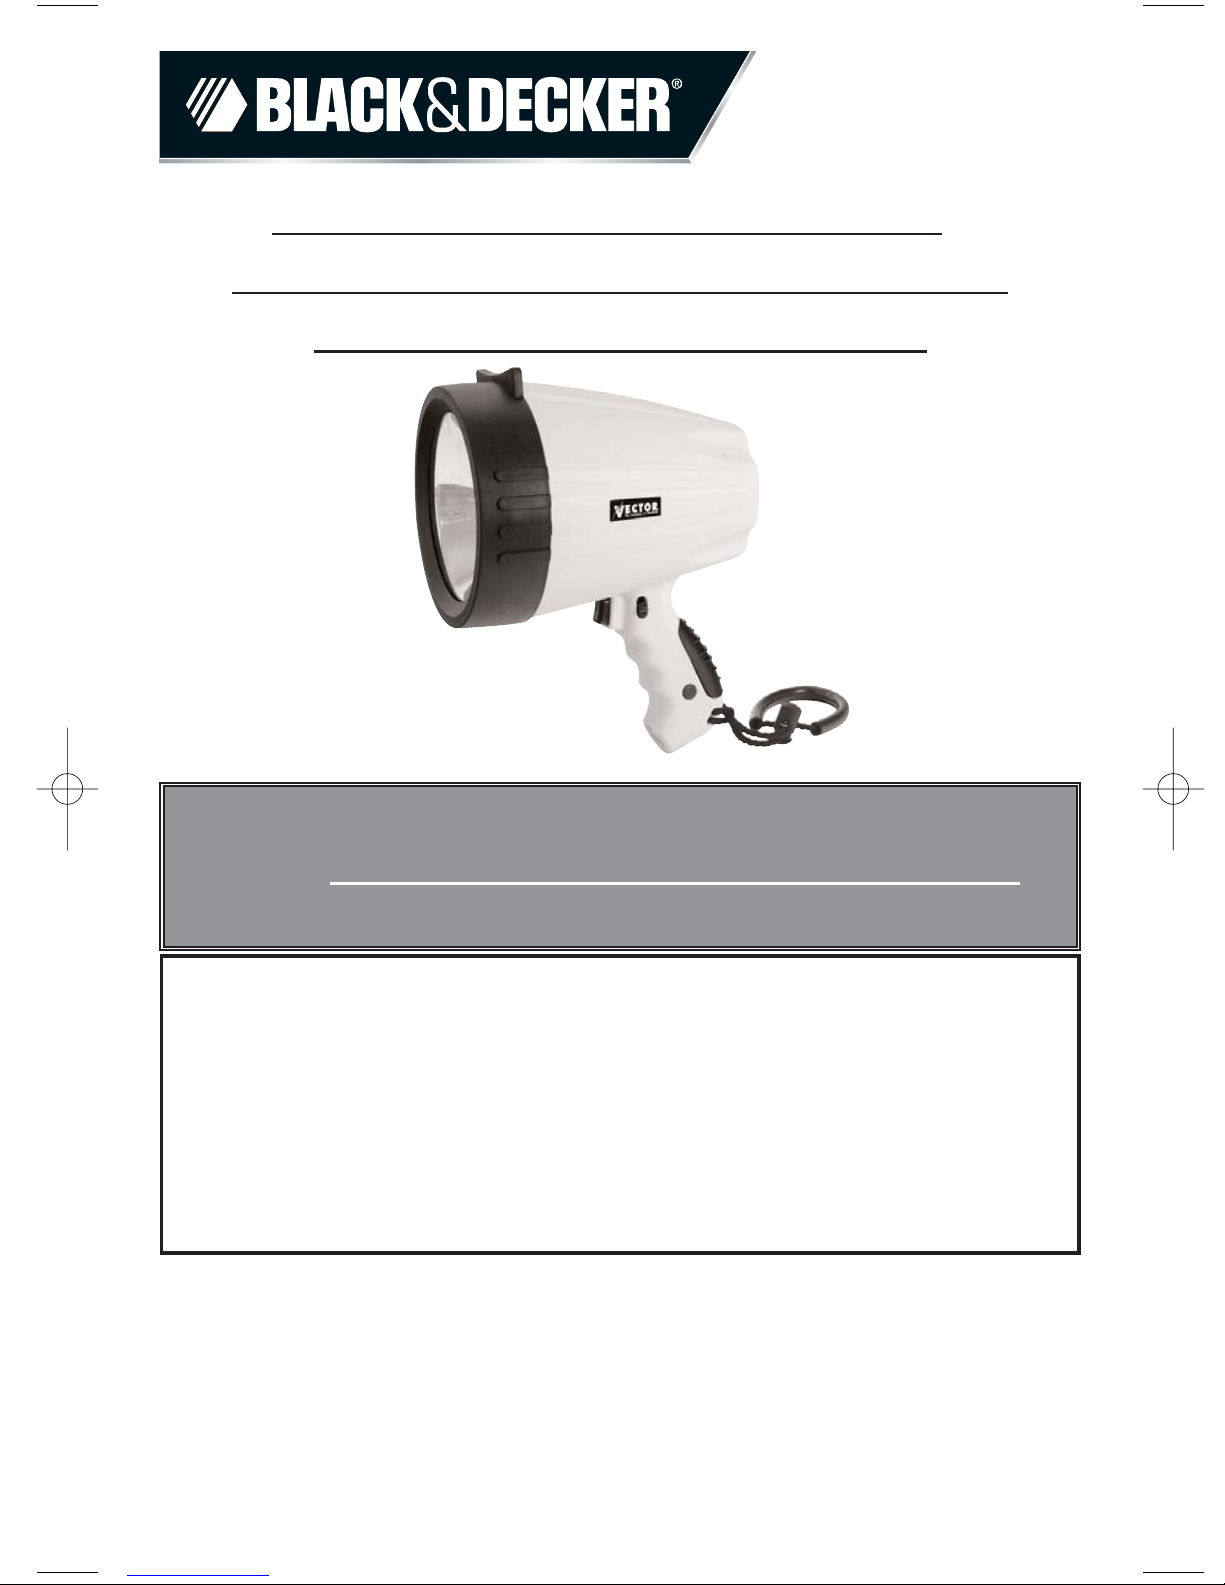
2,000,000 POWER SERIES
™
RECHARGEABLE SPOTLIGHT
INSTRUCTION MANUAL
Catalog Number VEC1138
Thank you for choosing Black & Decker!
Go to www
.BlackandDecker.com/NewOwner
to register your new product
BEFORE RETURNING THIS PRODUCT
FOR ANY REASON PLEASE CALL
1-800-544-6986
BEFORE YOU CALL, HAVE THE CATALOG No, AND DATE CODE
AVAILABLE. IN MOST CASES, A BLACK & DECKER REPRESENTATIVE
CAN RESOLVE THE PROBLEM OVER THE PHONE. IF YOU HAVE A
SUGGESTION OR COMMENT, GIVE US A CALL. YOUR FEEDBACK IS
VITAL TO BLACK & DECKER.
TO REDUCE THE RISK OF INJURY, THE USER MUST READ AND
UNDERSTAND THE INSTRUCTION MANUAL.
SAVE THIS MANUAL FOR FUTURE REFERENCE.
Cat. # VEC1138 Form # 90522933
June 2007 Copyright © 2007 Black & Decker Printed in China
Page 2

GENERAL SAFETY WARNINGS AND INSTRUCTIONS FOR ALL APPLIANCES
READ ALL INSTRUCTIONS
WARNING: Read all instructions before operating product. Failure to follow all instructions listed below may
result in electric shock, fire and/or serious injury.
• AVOID DANGEROUS ENVIRONMENTS. Don’t use appliances in damp or wet locations. Don’t use appliances in
the rain.
• KEEP CHILDREN AWAY. All visitors should be kept at a distance from work area.
• STORE IDLE APPLIANCES INDOORS. When not in use, appliances should be stored indoors in dry, and high or
locked-up place – out of reach of children.
• DON’T FORCE APPLIANCE. It will do the job better and with less likelihood of a risk of injury at the rate for
which it was designed.
• USE RIGHT APPLIANCE. Do not use the appliance for any job except that for which it is intended.
• DRESS PROPERLY. Do not wear loose clothing or jewelry. They can be caught in moving parts. Rubber gloves
and substantial, non-skid footwear are recommended when working outdoors. Wear protective hair covering to
contain long hair.
• USE SAFETY GLASSES AND OTHER SAFETY EQUIPMENT. Use safety goggles or safety glasses with side
shields, complying with applicable safety standards and, when needed, a face shield. Also use face or dust
mask if operation is dusty. This applies to all persons in the work area. Also use a hard hat, hearing protection,
gloves, safety shoes and dust collection systems when specified or required. Safety glasses or the like are
available at extra cost at your local dealer or Black & Decker Service Center.
• DON’T ABUSE CORD. Never carry appliance by cord or yank it to disconnect from receptacle. Keep cord from
heat, oil, and sharp edges.
• DON’T OVERREACH. Keep proper footing and balance at all times.
• DISCONNECT APPLIANCES. Disconnect the appliance from the power supply when not in use, before servicing,
and when changing accessories such as blades and the like.
• AVOID UNINTENTIONAL STARTING. Don’t carry plugged-in appliance with finger on switch. Be sure switch is
off when plugging in.
• GROUND FAULT CIRCUIT INTERRUPTER (GFCI) protection should be provided on the circuits or outlets to be
used. Receptacles are available having built in GFCI protection and may be used for this measure of safety.
• USE OF ACCESSORIES AND ATTACHMENTS. The use of any accessory or attachment not recommended for use
with this appliance could be hazardous. Note: Refer to the accessory section of this manual for further details.
• STAY ALERT. Watch what you are doing. Use common sense. Do not operate tool when you are tired.
• CHECK DAMAGED PARTS. Before further use of the tool, a guard or other part that is damaged should be
carefully checked to determine that it will operate properly and perform its intended function. Check for
alignment of moving parts, binding of moving parts, breakage of parts, mounting, and any other conditions that
may affect its operation. A guard or other part that is damaged should be properly repaired or replaced by an
authorized service center unless otherwise indicated elsewhere in this instruction manual. Have defective
switches replaced by authorized service center. Do not use tool if switch does not turn it on and off.
• DO NOT OPERATE portable electric tools near flammable liquids or in gaseous or explosive atmospheres.
Motors in these tools normally spark, and the sparks might ignite fumes.
• OUTDOOR USE EXTENSION CORDS. When tool is used outdoors, use only extension cords intended for use
outdoors and so marked.
Minimum Gage for Cord Sets
Volts Total Length of Cord in Feet
120V 0-25 26-50 51-100 101-150
(0-7,6m) (7,6-15,2m) (15,2-30,4m) (30,4-45,7m)
240V 0-50 51-100 101-200 201-300
Ampere Rating
More Not more American Wire Gage
Than Than
0 - 6 18 16 16 14
6 - 10 18 16 14 12
10 - 12 16 16 14 12
12 - 16 14 12 Not Recommended
(0-15,2m) (15,2-30,4m) (30,4-60,9m) (60,9-91,4m)
1
Page 3
• EXTENSION CORDS. Make sure your extension cord is in good condition. When using an extension cord, be
sure to use one heavy enough to carry the current your product will draw. An undersized cord will cause a drop
in line voltage resulting in loss of power and overheating. The following table shows the correct size to use
depending on cord length and nameplate ampere rating. If in doubt, use the next heavier gage. The smaller the
gage number, the heavier the cord.
SAFETY GUIDELINES / DEFINITIONS
DANGER: Indicates an imminently hazardous situation which, if not avoided, will result in death or serious injury.
WARNING: Indicates a potentially hazardous situation which, if not avoided, could result in death or serious injury.
CAUTION: Indicates a potentially hazardous situation which, if not avoided, may result in minor or moderate injury.
CAUTION: Used without the safety alert symbol indicates potentially hazardous situation which, if not avoided,
may result in property damage.
RISK OF UNSAFE OPERATION. When using tools or equipment, basic safety precautions should always be
followed to reduce the risk of personal injury. Improper operation, maintenance or modification of tools or
equipment could result in serious injury and property damage. There are certain applications for which tools and
equipment are designed. Black & Decker strongly recommends that this product NOT be modified and/or used for
any application other than for which it was designed. Read and understand all warnings and operating
instructions before using any tool or equipment.
IMPORTANT SAFETY INSTRUCTIONS
WARNING: This product or its power cord contains lead, a chemical known to the State of California to cause
cancer and birth defect or other reproductive harm. Wash hands after handling.
WARNING: TO REDUCE THE RISK OF ELECTRIC SHOCK:
Do not plug in a power supply without the bulb lens and cover in place.
WARNING: FIRE HAZARD: Never contact combustible material to the lens and never tape or tie the switch in
the on position.
CAUTION: TO REDUCE THE RISK OF INJURY OR PROPERTY DAMAGE:
• All halogen lights give off heat:
– Do not touch lens while operating.
– Keep combustibles away from spotlight lens. Extreme heat can cause fires.
– Never place the light face-down on any surface when lit.
• Never look directly into the light or shine the light into another person’s eyes.
• Keep sharp objects away from lens — it is glass and can break.
• Do not immerse spotlight in water.
• Do not drop or throw spotlight. It contains glass and a sealed lead acid battery.
• Only replace bulb with type indicated in specifications (6 volt, H3 55 watt quartz halogen).
• Use only with AC or DC charging adapters that are provided with unit. Plug in the charging adapter at the
spotlight first, then plug into the charging source.
• NEVER ATTEMPT TO USE THE AC CHARGER AND DC CHARGING PORT SIMULTANEOUSLY.
• After charging/recharging, disconnect charging adapter or extension cord and wait 5 minutes before use.
• Do not crush, cut, pull or expose charging adapter cords to extreme heat.
• Position charging adapter cords so they do not become entangled or become a safety hazard. Keep charging
adapter cords away from sharp edges.
• Use in a dry location only.
• Do not open body casing. There are no user-serviceable parts inside.
• To reduce risk of damage to electric plug and cord, pull by plug rather than cord when disconnecting the 120
Volt AC Charging Adapter.
• Do not attempt to charge the unit if the 120 Volt AC Charging Adapter plug is damaged— return the unit to
manufacturer for repair.
• Read and Understand This Instruction Manual Before Using This Unit.
SAVE THESE INSTRUCTIONS
2
Page 4
THIS MANUAL CONTAINS IMPORTANT SAFETY AND OPERATING INSTRUCTIONS FOR THE 2,000,000 POWER
SERIES
TM
RECHARGEABLE SPOTLIGHT MODEL VEC1138.
WARNING: TO REDUCE THE RISK OF INJURY:
• Follow these instructions and those published by the manufacturer of any equipment you intend to use with this
unit. Review cautionary markings on these products.
INTRODUCTION
Thank you for choosing the
Black & Decker®2,000,000 Power Series™Rechargeable Spotlight.
Please read this
guide carefully before use to ensure optimum performance and to avoid damage to the unit.
TURES
FEA
• Powerful, focused quartz halogen beam
• Luz auxiliar incorporada del área
• Protective rubber safety guard (bezel) around lens
• Rubber safety cap protects battery compartment
• Comfortable pistol grip
• Battery Status LED Indicator
• UL listed, built-in 120 volt AC charger that works with a standard household extension cord (not included)
• 12 volt DC charging adapter included
• Rechargeable, non-spillable, sealed lead acid battery
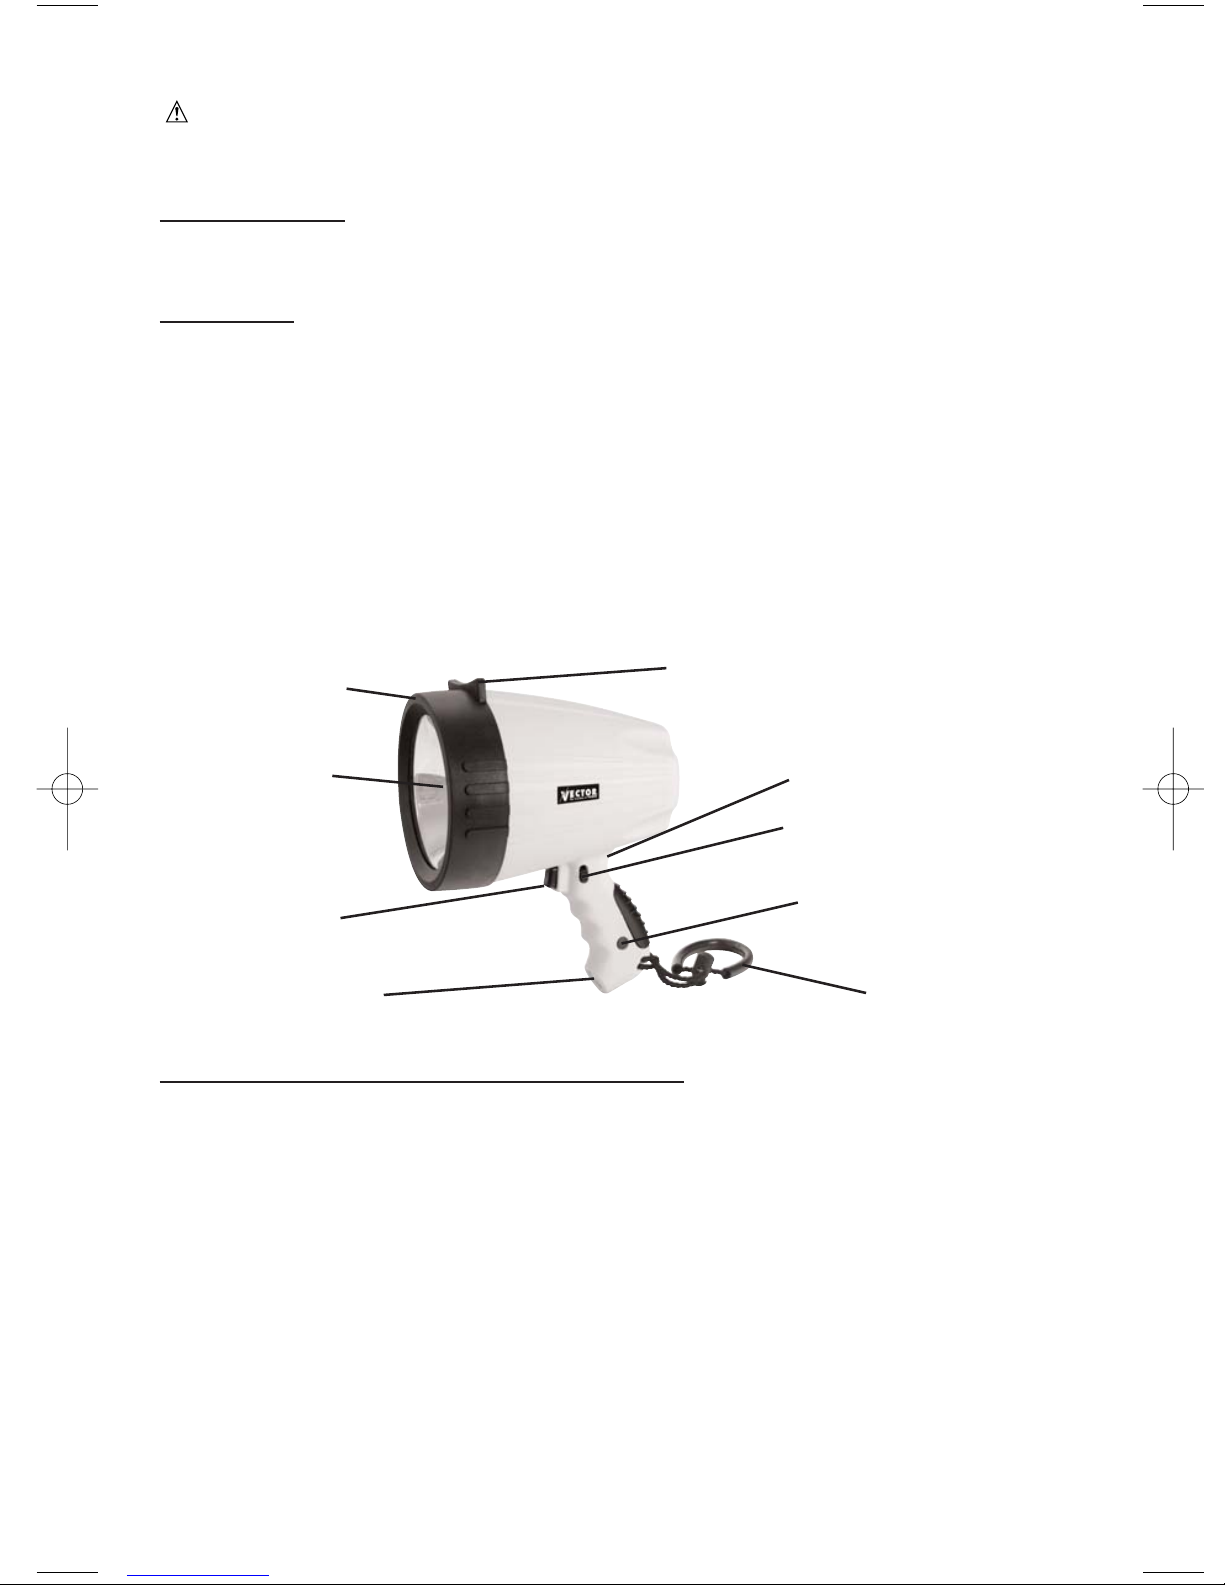
Controls and Functions
PROTECTIVE
RUBBER BEZEL
QUARTZ
HALOGEN BULB
ON/OFF TRIGGER
SWITCH
BUILT-IN AREA LIGHT
HANDS-FREE WORKSTAND
RECHARGING PORT
AND LED INDICATOR
TRIGGER LOCK
SWITCH
AREA LIGHT
PUSHBUTTON
CARRY LANYARD
CHARGING/RECHARGING THE SPOTLIGHT
This unit is shipped in a partially charged state. Charge unit BEFORE first use using the 120 Volt AC Charging
Adapter for 20 hours or until the red Battery Status LED flashes. Charge after each use until red LED flashes.
120 Volt AC Charging
Plug the AC Adapter (included) into the jack on the back of the spotlight body, and then plug into a standard AC
wall outlet. Make sure the Trigger Lock Switch is in the OFF position. The red LED indicator (on the back of the
pistol-grip handle) will illuminate to show the spotlight is charging. For initial charge, allow 20 hours.
12 Volt DC Charging
Plug the DC Adapter (included) into the jack on the back of the spotlight body, and then insert the 12 volt DC plug
into the 12 volt DC outlet of your vehicle or other 12 volt DC power source. Make sure the Trigger Lock Switch is
in the OFF position. The red LED indicator light will illuminate to show the Spotlight is charging. Allow
approximately 20 hours charging time.
Charging from a 120 volt AC power source is the most efficient method, and is strongly recommended for
Note:
first-time charging.
Be sure to use only the adapter cords supplied by the manufacturer for recharging – use of unauthorized
adapter cords may damage the unit and will void the warranty.
3
Page 5

CAUTION
Wait 5 minutes after charging before using the unit.
USING THE SPOTLIGHT
The Spotlight is controlled by the Trigger Switch on the top front of the pistol grip (see “Controls and Functions”
on page 3). Squeezing the Trigger turns the Spotlight ON; releasing the Trigger turns the Spotlight OFF.
For continuous operation, use the Trigger Lock Switch. Simply squeeze the Trigger and firmly slide the Trigger
Lock Switch located on the side of the handle into the “locked” position. The Spotlight will remain ON until the
Trigger Lock Switch is returned to the “unlocked” position. Make sure the Trigger Lock Switch is “unlocked” when
the unit is being recharged or stored.
USING THE AUXILIAR
The Built-In Area Light at the base of the pistol grip is controlled by the Area Light Pushbutton located on the side
of the pistol grip. Make sure the Area Light is turned OFF when the unit is being recharged or stored.
USING THE HANDS-FREE WORKST
To access hands-free operation, simply turn the spotlight upside down and rest it on the workstand (see “Controls
and Functions”).
Y AREA LIGHT
AND
CARE AND MAINTENANCE
Fuse Replacement (DC Adapter)
1. Remove plug from accessory outlet. Remove the cap by turning counterclockwise and lifting off.
2. Remove center pin and spring. Remove fuse.
3. Replace fuse with same type and size fuse (2 amp).
4. Replace center pin and spring inside plug.
5. Replace cap by turning clockwise.
Spotlight Bulb Replacement
Refer to the illustration on the following page. Disconnect one battery wire before replacing the bulb (see the
“Battery Replacement/ Disposal” section on the following page).
1. Disconnect the Spotlight from power source.
2. Remove the rubber bezel. This pulls off.
3. Remove the two screws securing the retaining ring as illustrated.
4. Pull out the reflector.
5. Unsnap the metal prongs from around the neck of the reflector.
6. Loosen the Phillips-head screw in the neck of the reflector (no need to fully remove). This will release the bulb.
7. Gently pull out the bulb and replace with a new H3, 6 volt halogen bulb.
8. Reverse the above procedure to reassemble the spotlight.
9. Operate the Trigger to ensure proper operation of Spotlight.
4
Page 6
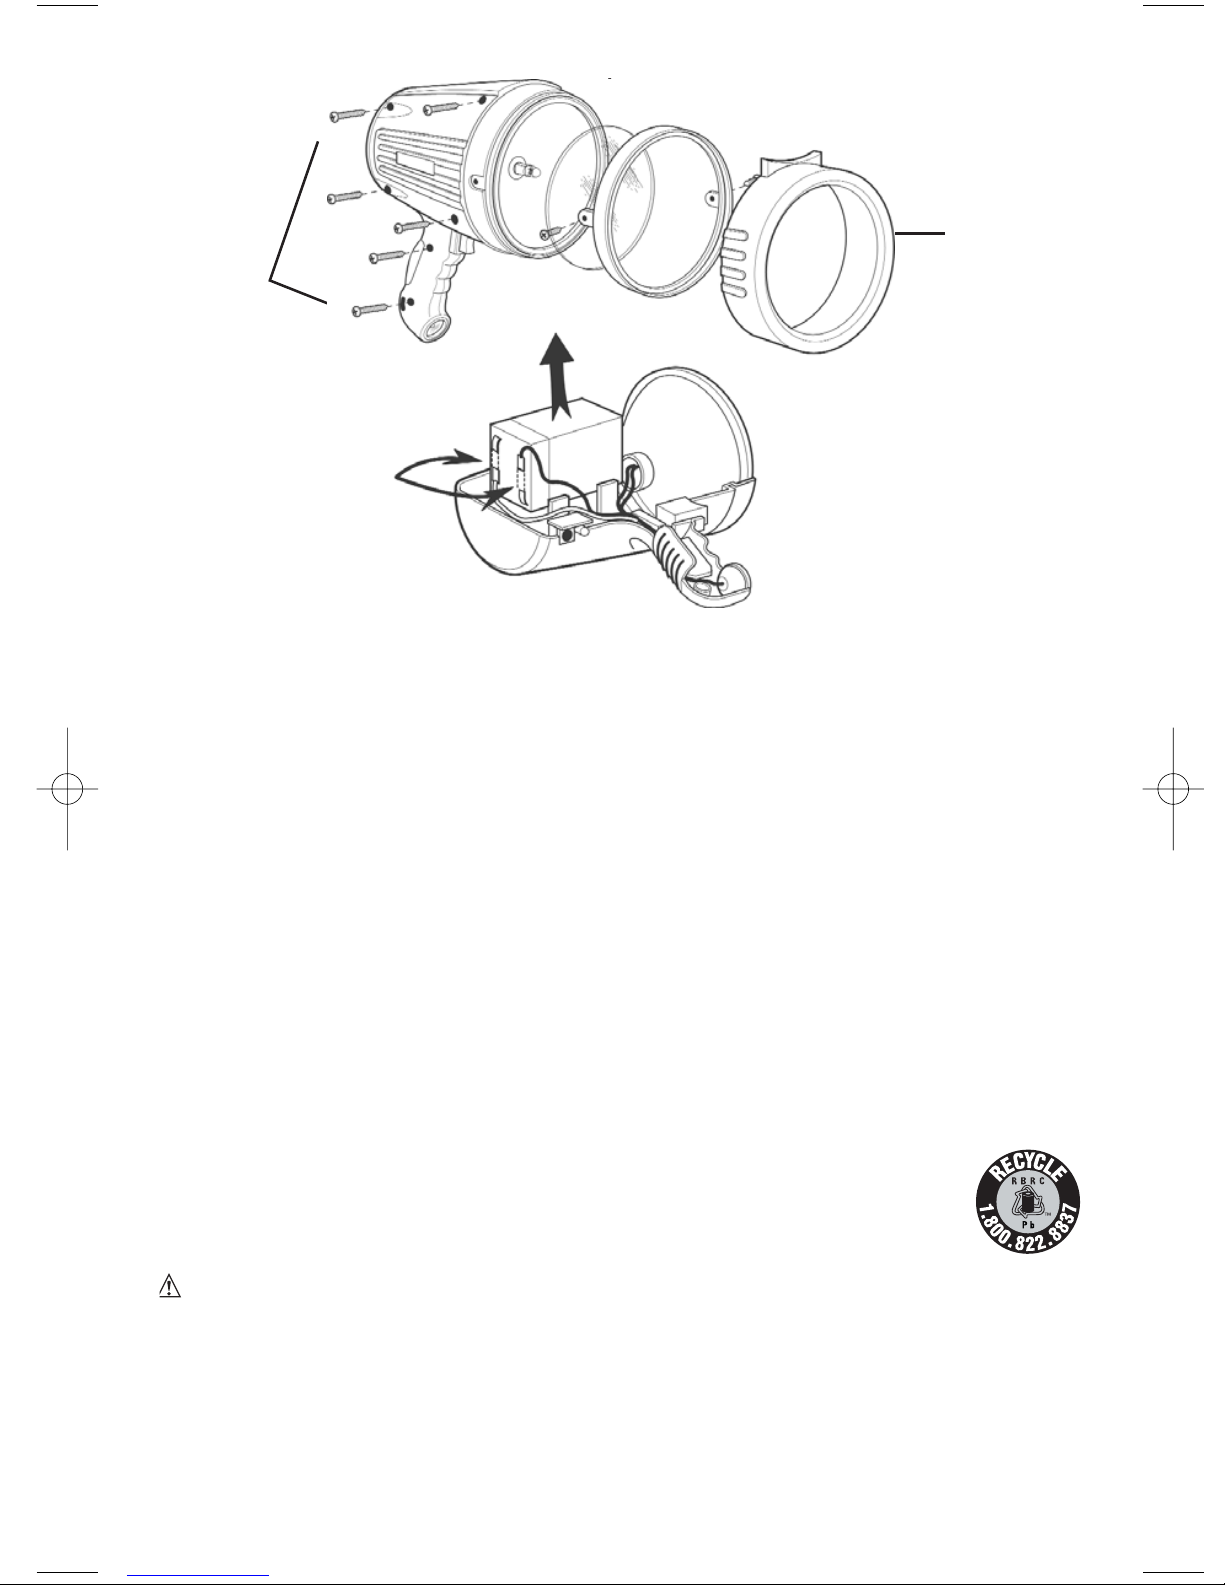
Glass Lens
Retaining Ring
Protective
Rubber Bezel
Phillips Screws
Battery
Reflector
Battery Replacement/Disposal
The life expectancy of the 6 volt, 4.5 amp-hour, sealed lead-acid battery is approximately 500 charging cycles. A
replacement battery may be purchased from an electrical supply store or from the manufacturer, you can reach
Customer Service toll-free at (800) 544-5504
Do not allow the battery to completely discharge. A dim light indicates the battery charge is low, and the Spotlight
should be recharged. Charge the battery as soon as possible after each use.
Battery Replacement
1. Disconnect the Spotlight from power source.
2. Remove the rubber bezel.
3. Loosen and remove two screws located on the side of the spotlight housing.
4. Lift up and set aside the retaining ring and reflector.
5. Remove six screws on the side of the spotlight housing and separate both halves of the unit.
6. Carefully unplug positive and negative wires from battery clips and remove battery pack. (Do not allow the
connectors to touch each other.)
7. Attach a new battery to wires, taking care to match up proper polarity (positive (red) to positive; negative (black)
to negative).
8. Position battery in housing and reassemble spotlight. Tighten all screws.
Battery Disposal
This unit contains a maintenance-free, non-spillable, sealed lead-acid battery. This battery is fully
recyclable and should be accepted at any location that accepts common automotive batteries.
Examples of places that accept these batteries are: county or municipal recycling drop-off
centers, scrap metal dealers and retailers who sell automotive replacement lead lead acid
batteries.
WARNINGS
• Do not dispose of the battery in fire as this may result in an explosion.
• Before disposing of the battery, protect exposed terminals with heavy-duty electrical tape to prevent shorting
(shorting can result in injury or fire).
• Do not expose battery to fire or intense heat as it may explode.
• For more information on recycling this battery, call toll-free (877) 288-7722.
5
Page 7

Accessories
Recommended accessories for use with your tool are available from your local dealer or authorized service center.
If you need assistance regarding accessories, please call: 1-800-544-6986.
WARNING: The use of any accessory not recommended for use with this tool could be hazardous.
TROUBLESHOOTING
NO RED LED CHARGE LIGHT
If red LED light does not turn on when charging, do the following:
A) Check for bad connection to Spotlight recharge port
B) Check for bad connection to AC or DC adapter
C) Confirm there is a functioning AC or DC current.
Operating Issues
A) Operating the Spotlight causes charging to stop. Auxiliary Area Light will turn on when pressed while charging.
Make sure Spotlight charge port is disconnected before main beam usage.
B) If Trigger cannot be pressed fully, check to see if Trigger Lock Switch is in the “locked” position. If it is, press
lock button on either side of handle to unlock.
C) If unit does not operate, battery may be completely discharged. Charge unit using AC adapter. Follow charging
instructions in this manual.
D) If you suspect the bulb is blown, check bulb filament. If filament is coiled and unbroken, the bulb is NOT blown.
If filament is broken, replace bulb by following bulb replacement instructions.
VICE INFORMATION
SER
All Black & Decker Service Centers are staffed with trained personnel to provide customers with efficient and
reliable power tool service. Whether you need technical advice, repair, or genuine factory replacement parts,
contact the Black & Decker location nearest you. To find your local service location, refer to the yellow page
directory under "Tools—Electric" or call: 1-800-544-6986 or visit www.blackanddecker.com.
FULL TWO-YEAR HOME USE WARRANTY
Black & Decker (U.S.) Inc. warrants this product for two years against any defects in material or workmanship.
The defective product will be replaced or repaired at no charge in either of two ways.
The first, which will result in exchanges only, is to return the product to the retailer from whom it was purchased
(provided that the store is a participating retailer). Returns should be made within the time period of the retailer’s
policy for exchanges (usually 30 to 90 days after the sale). Proof of purchase may be required. Please check with
the retailer for their specific return policy regarding returns that are beyond the time set for exchanges.
The second option is to take or send the product (prepaid) to a Black & Decker owned or authorized Service
Center for repair or replacement at our option. Proof of purchase may be required. Black & Decker owned and
authorized Service Centers are listed under "Tools-Electric" in the yellow pages of the phone directory and on our
website www.blackanddecker.com.
This warranty does not apply to accessories. This warranty gives you specific legal rights and you may have other
rights which vary from state to state or province to province. Should you have any questions, contact the
manager of your nearest Black & Decker Service Center. This product is not intended for commercial use.
FREE WARNING LABEL REPLACEMENT: If your warning labels become illegible or are missing, call 1-800-5446986 for a free replacement.
SPECIFICATIONS
Bulb: H3, 6 V 55 W
Battery: 6 V, 4.5 AH
AC Charger: Input 120 V AC, 60 Hz / Output 12 V DC, 300 mA
DC Charger: Fused 2 A
Imported by
Black & Decker (U.S.) Inc.,
701 E. Joppa Rd.
Towson, MD 21286 U.S.A
See ‘Tools-Electric’
– Yellow Pages –
for Service & Sales
RD062007
6
 Loading...