

Page 1

TEMPERATURE/˚C
150
100
SELECTOR
TIMER/min
60
50
AR FR EN
200
250
OFF
10
20
30
40
www.blackanddecker.ae
POWER
TR066
Page 2
1
ENGLISH
(Original instructions)
7
6
5
4
2
3
8
9
10
11
12
13
2
Page 3

(Original instructions)
ENGLISH
Intended use
Your BLACK+DECKER™ TR066 Electric oven has been
designed to heat appropriate foods. Always check the
suitability of ingredients before cooking. This product is
intended for consumer use only. Thank you for choosing
Black+Decker We hope that you will enjoy using this product
for many years. For indoor domestic household use only.
This appliance is not to be used in:
• Staff kitchen areas in shops, offices and other working
environments;
• Farm Houses;
• By clients in hotels, motels and other residential type
environments;
• Bed and breakfast type environments or any other non
household type environments.
Safety instructions
Warning! Read all safety warnings and all
instructions. Failure to follow the warnings and
instructions listed below may result in electric
shock, fire and/or serious injury.
• Read all of this manual carefully before using the
appliance.
• The intended use is described in this manual. The use of
any accessory or attachment or the performance of any
operation with this appliance other than those
recommended in this instruction manual may present a
risk of personal injury.
Warning! When using mains-powered appliances, basic
safety precautions, including the following, should always be
followed to reduce the risk of fire, electric shock and
personal injury and material damage.
• Retain this manual for future reference.
Important safety instructions. Read carefully
and keep for future reference
Warning! If the door or door seals are damaged, the oven
must not be operated until it has been repaired by a
competent person.
Warning! It is hazardous for anyone other than a
competentperson to carry out any service or repair.
Using your appliance
• Do not operate any appliance with a damaged cord or
plug, or after the appliance malfunctions, or is dropped
or damaged in any manner. Return the complete
appliance to your nearest authorised service facility for
examination, electrical repair, mechanical repair or
adjustment to avoid any hazard
• Do not attempt to repair the appliance yourself; instead,
take it to your BLACK+DECKER-owned or Authorised
Service Centre for repair. u The use of attachments or
accessories not recommended
or sold by this appliance manufacturer may result in fire,
electric shock or personal injury.
• Do not let the cord hang over the edge of a table,
counter, or touch hot surfaces.
• Avoid touching hot surfaces, use handles and knobs.
• Do not operate or place any part of this appliance on or
near any hot surfaces (such as gas or electric burner or
in a heated oven) or any appliance that generates steam.
• Do not abuse the cord. Never carry the appliance by the
cord or yank it to disconnect it from the outlet; instead,
grasp the plug and pull to disconnect.
• When using an extension cord with your appliance, make
sure the extension cord is correctly wired, and rated for
its use.
• The oven should be placed on a flat stable surface which
can hold the weight of the appliance and the heaviest of
food likely to be cooked inside.
• Do not place any item on top of the oven.
• Do not place the oven where heat, moisture or high
humidity are generated, or near combustible materials.
• The power outlet this oven is connected to must be
readily accessible so it can be easily unplugged if
necessary.
• Do not operate the appliance when empty. This could
damage the oven.
• Do not use the oven to store any items.
• Always use oven gloves when removing items from the
oven.
• Do not use the appliance outdoors.
• Do not operate the appliance if your hands are wet. Do
not operate the appliance if you are barefoot.
• If the power supply cord is damaged during use,
disconnect the appliance from the power supply
immediately. Do not touch the power supply cord before
disconnecting from the power supply.
• Disconnect the appliance from the power supply when
not in use and before cleaning.
• If an extension lead is used, it must be earthed.
• To protect against the risk of electric shock, DO NOT
IMMERSE the appliance, cord set or plug in water or
other liquids.
• Do not let the cord hang over the edge of a table,
counter, or touch hot surfaces.
• Leave a 30cm gap above the unit, and 10cm at each side
and the back for ventilation.
• Do not allow combustible items such as curtains, wall
coverings, etc. come in contact with the appliance.
• Care must be taken when opening the appliance as hot
air may escape on opening.
• Disconnect the product from the electrical supply before
cleaning or carrying out any maintenance on the
appliance.
• Surfaces may be hot during use and during the cool
down period.
3
Page 4
ENGLISH
(Original instructions)
• The door glass & the outside surfaces of the oven get
very hot during use. Oil & other cooking liquids may also
get very hot during use. Always use the handle provided
and wear oven gloves when opening the door & when
removing trays from the oven.
• Switch off the appliance and disconnect from supply
before changing accessories or approaching parts that
move in use.
Safety of others
• This appliance is not intended for use by persons
(including children) with reduced physical, sensory or
mental capabilities, or lack of experience and
knowledge, unless they have been given supervision or
instruction concerning use of the appliance by a person
responsible for their safety.
• Children should be supervised to ensure that they do not
play with the appliance.
• Do not allow children or any person unfamiliar with these
instructions to use the appliance.
• Do not allow children or animals to come near the work
area or to touch the appliance or power supply cord.
• Close supervision is necessary when the appliance is
used near children.
After use
• Switch off and remove the plug from the socket before
leaving the appliance unattended and before changing,
cleaning or inspecting any parts of the appliance.
• When not in use, the appliance should be stored in a dry
place. Children should not have access to stored
appliances.
Electrical safety
Before use, check that the mains voltage
corresponds to the voltage on the rating plate.
This product must be earthed. Always check
that the mains voltage corresponds to the voltage on the
rating plate
• Appliance plugs must match the outlet. Never modify the
plug in any way.
• Do not use any adapter plugs with earthed (Class 1)
appliances. Unmodified plugs and matching outlets will
reduce the risk of electric shock.
• To avoid the risk of electric shock, do not immerse the
cord, plug or motor unit in water or other liquid.
Extension cables & class 1 product
• A 3 core cable must be used as your tool is earthed and
of class 1 construction.
• Up to 30m (100 ft) can be used without loss of power.
• If the supply cord is damaged, it must be replaced by the
manufacturer or an authorised BLACK+DECKER
Service Centre in order to avoid a hazard.
Labels on Appliance
The following pictograms along with the date code are shown
on the appliance:
Warning! Hot surface.
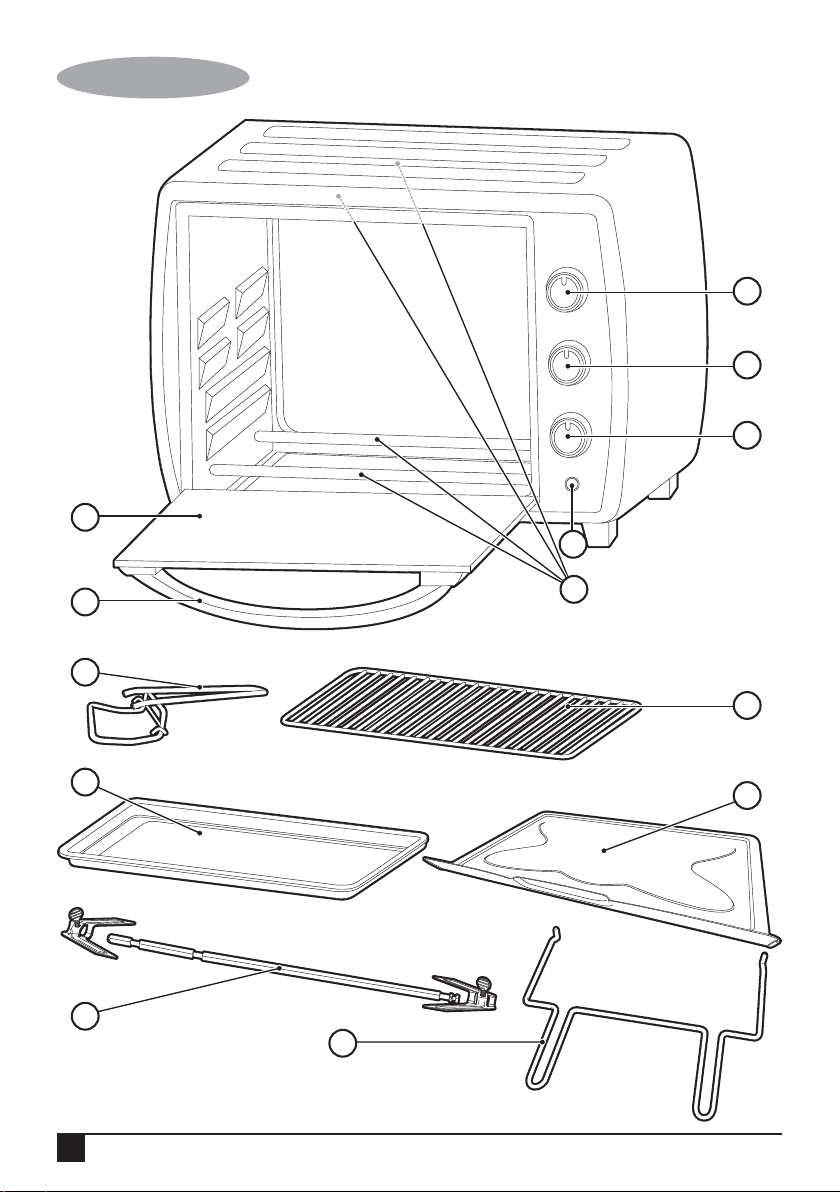
Features
1. Glass door
2. Door handle
3. Heating elements
4. Indicator light
5. Timer knob
6. Function knob
7. Temperature knob
8. Tray handle
9. Wire rack
10. Baking tray
11. Crumb tray
12. Rotisserie fork set
13. Handle for rotisserie fork
Unpacking
• Remove all packaging from the appliance.
• Inspect the oven after unpacking for any damage such as
a misaligned or damaged door, door seals, dents or holes
in the door window, and any dents in the cavity. If any of
these are seen, DO NOT use the oven.
Assembly
Warning! Before assembly, make sure that the appliance is
switched off and unplugged and the timer knob is in the
“OFF”position.
• Place the appliance on a flat, even surface.
• Remove all accessories. Wash in hot soapy water or in
dishwasher.
• Thoroughly dry all accessories and insert into oven. Plug
oven into outlet and you are ready to use your new
electric oven with grill rack and food tray.
• The first time the oven is used, smoke may emerge. This
is normal. It is due to the protective substance on the
heating elements, which is used to avoid salt effects
during shipping from factory.It is recommended operating
the oven dry for about 15 minutes. Also, make sure the
room is well ventilated.
Use
Make sure you familiarize yourself with the following oven
functions and accessories prior to first use:
Temperature knob (7)
Choose desired temperature from 100° to 250°C.
4
Page 5
(Original instructions)
ENGLISH
Function knob (6)
Choose function from:
Off
Upper and lower heating with convection
Lower heating with convection
Upper and lower heating
Upper heating with rotisserie
Upper and lower heating with rotisserie and
convection
Timer knob (5)
Turn the control to the right (clockwise) and the oven will
turn off automatically at the end of the selected time and a
bell will ring. When setting the Timer to less than 5 min, turn
it to more than 6 min. and then back to the selected time.
Power indicator (4)
This illuminates whenever oven is turned on.
Wire rack (9)
For toasting, baking, and general cooking with casserole
dishes and standard pans.
Baking tray (10)
For use in broiling and roasting meat, poultry, fish, and
various other foods.
Warning! Do not cover trays or other parts with metal foil as
this may cause overheating.
Crumb tray (11)
Used to collect crumbs and prototct the lower heating
elements.
Warning! Always use oven gloves and the handle (8)
provided when removing wire rack and trays from the oven.
Operation
• Place food to be cooked directly on to the wire rack (9)
and place onto baking tray (10).
• Close the oven door (2).
• Selected the required function on the function knob (6).
• Select the correct temperature on the temperature knob
(7).
• Select the correct time on the timer knob (5) and start the
oven.
• Make sure to turn Timer Knob to “0”, turning off the oven
when cooking is completed.
Note: All cooking timing is based on meats at refrigerator
temperature. Frozen meats may take considerably longer to
cook, therefore, use of a meat thermometer is highly
recommended. The below chart is for reference only. Please
check recipes and manufacturers packaging for cooking
times and special instructions.
Type of Number/ Temp (°C) Time
food thickness (minutes)
Toast 12pcs/1.3cm 250 6
Fish 220 50
Sausage 0.5Kg/1cm 250 10
Cake 180 15
Steak 0.5Kg/4mm 250 6
Rotisserie fork set (12)
Upper heating with rotisserie
• Insert the rounded end of the rotisserie skewer through
one fork, making sure that the points of the fork face the
same direction as the rounded end of the spit.
• Slide the fork towards the square section of the spit and
secure it with the thumbscrew.
• Push the spit through the centre of the food.
• Fit the second fork on to other end of the spit, piercing
the food with both forks, make sure that the food is
centred on the spit.
• Secure it with the thumbscrew.
• If required, preheat the oven as directed in the recipe.
• Insert the rounded end of the spit into the drive socket
located on right-hand side of the oven wall. Make sure
the square end of the spit rests on the support on the
lefthand side of the oven wall.
Upper and lower heating with rotisserie and convection
• Place the tray (10) in the bottom of the oven, directly
under the food to be cooked.
• Set the temperature control (7) to high.
• Set the function knob (6) to the upper and lower heating
with rotisserie and convection setting.
• Set the timer (5) to the required cooking time. If a time of
less than 10 minutes is required, turn the dial past 10
minutes and then turn it back to the correct time.
• As soon as the cooking time has elapsed, cooking will
stop automatically and an alarm bell will be heard.
5
Page 6
ENGLISH
(Original instructions)
Cleaning and maintenance & storage
Warning! Before cleaning and maintenance, switch the
appliance off and remove the plug from the socket.
Warning! Do not immerse the appliance or the cord set or
the plug in water or any other liquid.
• Clean the cavity of the oven after using with a slightly
damp cloth.
• Clean the accessories in the usual way in soapy water.
• The door frame and seal and neighbouring parts must
be cleaned carefully with a damp cloth when they are
dirty.
• Do not use harsh abrasive cleaners or sharp metal
scrapers to clean the oven door glass since they can
scratch the surface, which may result in shattering of the
glass.
• Do not use solvents or other corrosive chemicals or
vapours for cleaning this appliance.
Warning! Always use the handle for rotisserie fork (13)
when removing the rotisserie from the oven.
Mains plug replacement
If a new mains plug needs to be fitted:
• Safely dispose of the old plug.
• Connect the brown lead to the live terminal of the new
plug.
• Connect the blue lead to the neutral terminal.
• If the product is class l (earthed), connect the green /
yellow lead to the earth terminal.
Warning! If your product is class ll double insulated (only 2
wires in the cord set), no connection is to be made to the
earth terminal.
Follow the fitting instructions supplied with good quality
plugs. Any replacement fuse must be of the same rating as
the original fuse supplied with the product.
Protecting the environment
Separate collection. This product must not be
disposed of with normal household waste.
Technical data
TR066
Rated voltage VAC 220 - 240V
Rated Input W 2200
Warranty
BLACK+DECKER is confident of the quality of its products
and offers an outstanding warranty.
This warranty statement is in addition to and in no way
prejudices your statutory rights.
The warranty is valid within the territories of the Member
States of the European Union and the European Free Trade
Area.
If a BLACK+DECKER product becomes defective due to
faulty materials, workmanship or lack of conformity, within 24
months from the date of purchase, BLACK+DECKER
warranty to replace defective parts, repair products
subjected to fair wear and tear or replace such products to
ensure minimum inconvenience to the customer unless:
The product has been used for trade, professional or
hire purposes;
The product has been subjected to misuse or neglect;
The product has sustained damage through foreign
objects, substances or accidents;
Repairs have been attempted by persons other than
authorised repair agents or BLACK+DECKER service
staff.
To claim on the warranty, you will need to submit proof of
purchase to the seller or an authorised repair agent. You can
check the location of your nearest authorised repair agent by
contacting your local BLACK+DECKER office at the address
indicated in this manual.
Alternatively, a list of authorised BLACK+DECKER repair
agents and full details of our after-sales service and contacts
are available on the Internet at: www.2helpU.com.
Should you find one day that your BLACK+DECKER product
needs replacement, or if it is of no further use to you, do not
dispose of it with other household waste. Make this product
available for separate collection.
• BLACK+DECKER provides a facility for recycling
BLACK+DECKER products once they have reached the
end of their working life. This service is provided free of
charge. To take advantage of this service please return
your product to any authorised repair agent who will
collect them on our behalf.
• You can check the location of your nearest authorised
repair agent by contacting your local BLACK+DECKER
office at the address indicated in this manual.
Alternatively, a list of authorized BLACK+DECKER
6
Page 7

(Traduction des instructions d'origine)
FRANÇAIS
Usage prévu
Votre four électrique TR066 BLACK+DECKER™ a été
conçu pour chauffer des aliments appropriés. Avant de cuire
les aliments, vérifiez toujours qu’ils sont adaptés. Ce produit
est destiné à un usage domestique uniquement. Merci
d’avoir choisi Black+Decker. Nous espérons que vous
profiterez de ce produit pendant de nombreuses années.
Pour usage domestique en intérieur uniquement.
Cet appareil ne doit pas être utilisé :
• dans les cuisines pour les employés de boutiques, de
bureaux et d’autres environnements professionnels ;
• dans les fermes ;
• par les clients d’hôtels, de motels et autres
environnements de type résidentiel ;
• dans les chambres d’hôtes ou tout autre environnement
non résidentiel.
Consignes de sécurité
Avertissement ! Lisez toutes les consignes de
sécurité et toutes les instructions. Le non-respect
de ces avertissements et de ces instructions
peut provoquer un incendie, une électrocution
et/ou de graves blessures.
• Lisez attentivement ce manuel dans son intégralité
avant d’utiliser l’appareil.
• L’usage prévu est décrit dans le présent manuel.
L’utilisation d’un accessoire ou d’une pièce jointe ou
l’exécution de toute opération avec cet appareil autre
que celles qui sont recommandées dans ce mode
d’emploi peut présenter un risque de blessure.
Avertissement ! Lorsque vous utilisez des appareils
électriques, veuillez toujours respecter les précautions
élémentaires de sécurité, entre autres, pour réduire le risque
d’incendie, d’électrocution, de blessures corporelles et de
dommages matériels.
• Conservez ce manuel à titre de référence.
Consignes de sécurité importantes. À lire attentivement et à
conserver pour référence ultérieure
Avertissement ! Si la porte ou ses joints sont endommagés,
le four ne doit pas être mis en marche tant qu’il n’a pas été
réparé par une personne compétente.
Avertissement ! Toute opération d'entretien ou de
réparation effectuée par une personne non compétente peut
constituer un danger.
Utilisation de l’appareil
• N’utilisez pas l’appareil si le câble ou la fiche est
endommagé, s’il ne fonctionne pas correctement, s'il a
subi une chute ou a été endommagé de quelque autre
façon que ce soit. Retournez l'ensemble de l'appareil
vers le centre d'entretien agréé le plus proche pour
vérification, réparation électrique, mécanique ou réglage
afin d’éviter tout danger.
• N’essayez pas de réparer l’appareil vous-même ;
faites-le réparer par votre centre de services agréé
BLACK+DECKER ou par un fournisseur autorisé.
L’utilisation d’accessoires ou de pièces non
recommandés ou non vendus par le fabricant de cet
appareil peut provoquer un incendie, une électrocution
ou des blessures corporelles.
• Ne laissez pas le cordon pendre au bord de la table, du
comptoir, ou toucher les surfaces chaudes.
• Évitez de toucher les surfaces chaudes, utilisez les
poignées et les boutons.
• N'utilisez pas l’appareil et n’en placez pas une pièce sur
ou à proximité de surfaces chaudes (comme une plaque
électrique ou à gaz ou dans un four chaud) ou de tout
appareil générant de la vapeur.
• Ne malmenez pas le cordon d’alimentation. Ne
transportez jamais l’appareil par le cordon ou ne tirez
jamais brusquement sur le cordon pour débrancher la
fiche du secteur ; au lieu de cela, tenez la fiche et tirez-la
pour débrancher l’appareil.
• Si vous utilisez une rallonge avec votre appareil,
assurez-vous qu’elle est câblée correctement et que sa
tension nominale est adaptée à son utilisation.
• Placez le four sur une surface plate et stable, capable de
supporter son poids ainsi que le poids maximal de
nourriture pouvant être chauffée.
• Ne placez aucun objet sur le four.
• Placez le four dans un lieu non propice à la chaleur, à
l’humidité modérée ou extrême, et à l’écart de tout
matériau combustible.
• La prise à laquelle ce four est connecté doit être facile
d’accès afin de pouvoir le débrancher facilement, si
nécessaire.
• Ne mettez pas le four en marche s’il est vide. Cela peut
l’endommager.
• N’utilisez pas le four à des fins de stockage.
• Utilisez toujours des gants de cuisine lorsque vous sortez
les objets du four.
• N’utilisez pas l’appareil à l’extérieur.
• N’utilisez pas l’appareil avec les mains mouillées.
N’utilisez pas l’appareil pieds nus.
• Si le cordon d’alimentation est endommagé pendant
l’utilisation, débranchez immédiatement l’appareil. Ne
touchez pas le cordon d’alimentation avant de le
débrancher.
• Débranchez l’appareil de l’alimentation électrique en cas
de non-utilisation et avant de le nettoyer.
• En cas d’utilisation d’une rallonge électrique, celle-ci doit
être reliée à la terre.
• Pour éviter tout risque d’électrocution, NE PLONGEZ
PAS l’appareil, le cordon ou la fiche dans l’eau ou
d’autres liquides.
• Ne laissez pas le cordon pendre au bord de la table, du
comptoir, ou toucher les surfaces chaudes.
• Pour la ventilation, faites en sorte qu'il y ait un espace
vide de 30 cm au-dessus du four et de 10 cm au niveau
des parties latérales et arrière.
7
Page 8

FRANÇAIS
(Traduction des instructions d'origine)
• Évitez tout contact entre l'appareil et des objets
inflammables tels que des rideaux, des revêtements
muraux, etc.
• Soyez prudent au moment d’ouvrir l'appareil, car l'air
chaud risque de s’échapper.
• Débranchez l'appareil de l'alimentation avant de le
nettoyer ou d'effectuer toute opération d'entretien.
• Les surfaces peuvent devenir chaudes pendant
l’utilisation ou la période de refroidissement.
• La porte vitrée et les surfaces extérieures du four
peuvent devenir très chaudes pendant l'utilisation.
L'huile et d'autres liquides de cuisson peuvent
également devenir très chauds pendant l'utilisation.
Utilisez toujours la poignée fournies et portez toujours
des gants de cuisine lorsque vous ouvrez la porte et
lorsque vous retirez les plateaux du four.
• Éteignez l’appareil et débranchez-le avant de remplacer
des accessoires ou d’approcher des pièces mobiles en
cours d'utilisation.
Sécurité d’autrui
• Cet appareil n’est pas prévu pour être utilisé par des
personnes (y compris les enfants) présentant des
capacités physiques, sensorielles ou mentales réduites,
ou manquant d’expérience et de connaissances, sans
surveillance ou sans avoir reçu d’instructions concernant
l’utilisation de l’appareil de la part d’une personne
responsable de leur sécurité.
• Les enfants doivent être surveillés pour s’assurer qu’ils
ne jouent pas avec l’appareil.
• Ne laissez pas les enfants et les personnes non
familiarisées avec ces instructions utiliser cet appareil.
• Ne laissez pas les enfants ou les animaux s’approcher
de la zone de travail ou toucher l’appareil ou le cordon
d’alimentation.
• Lorsque l’appareil est utilisé à proximité d’enfants, une
surveillance étroite doit être exercée.
Après utilisation
• Éteignez l’appareil et débranchez la fiche du secteur
avant de laisser l’appareil sans surveillance et avant
d’en changer, nettoyer ou inspecter les pièces.
• Lorsqu’il n’est pas utilisé, l’appareil doit être rangé à un
endroit sec. L’appareil doit être rangé hors de portée des
enfants.
Sécurité électrique
Avant d’utiliser l’appareil, vérifiez que la tension
secteur correspond à celle de la plaque
signalétique. Ce produit doit être relié à la terre.
Vérifiez toujours que la tension secteur
correspond à celle de la plaque signalétique.
• La fiche de l’appareil doit correspondre à la prise
secteur. Ne modifiez jamais la fiche, de quelque manière
que ce soit.
• N’utilisez pas d’adaptateur secteur avec les appareils
reliés à la terre (classe 1). L’utilisation de fiches non
modifiées et de prises murales correspondantes réduira
le risque d’électrocution.
• Pour éviter le risque d’électrocution, ne plongez pas le
cordon, la fiche ou le groupe moteur dans l’eau ou
d’autres liquides.
Rallonges électriques et produit de classe 1
• Vous devez utiliser un câble à 3 conducteurs car
l’appareil est doté d’une mise à la terre et est de
construction de classe 1.
• Une rallonge de 30 m (100 pieds) au plus peut être
utilisée sans perte de puissance.
• Si le cordon d’alimentation est abîmé, il doit être
remplacé par le fabricant ou un centre de services agréé
BLACK+DECKER afin d’éviter tout danger.
Étiquettes sur l’appareil
Les pictogrammes suivants ainsi que le code de date
apparaissent sur l’appareil :
Avertissement. Surface chaude.
Caractéristiques
1. Porte vitrée
2. Poignée de porte
3. Éléments chauffants
4. Voyant lumineux
5. Bouton de minuterie
6. Bouton de fonction
7. Bouton de température
8. Poignée de plateau
9. Grille
10. Plateau de cuisson
11. Plateau à miettes
12. Ensemble de fourchettes de rôtisserie
13. Poignée pour fourchette de rôtisserie
Déballage
• Déballez complètement l’appareil.
• Après le déballage, inspectez le four à la recherche de
dommages éventuels, tels que : porte mal alignée ou
endommagée, joints d’étanchéité endommagés, entailles
ou trous dans la porte vitrée, et entailles à l’intérieur du
four. Si vous détectez l'un de ces problèmes, N'UTILISEZ
PAS le four.
8
Page 9

(Traduction des instructions d'origine)
FRANÇAIS
Montage
Avertissement ! Avant d’assembler l’appareil, assurez-vous
qu’il est éteint et débranché, et que le bouton de minuterie
est en position ARRÊT.
• Placez l’appareil sur une surface plate et homogène.
• Retirez tous les accessoires. Nettoyez-les à l'eau
chaude et savonneuse ou au lave-vaisselle.
• Essuyez soigneusement tous les accessoires et
replacez-les dans le four. Branchez la fiche du four dans
la prise secteur et votre nouveau four électrique avec
grille et plateau pour aliments est prêt à l'emploi.
• Lors de la première utilisation du four, de la fumée peut
en sortir. C’est normal. C'est à cause de la substance de
protection sur les éléments chauffants, laquelle est
utilisée contre les effets du sel lors du transport de
l'appareil au départ de l'usine. Il est conseillé de mettre
en marche le four à sec pendant 15 minutes.
Assurez-vous aussi que la pièce est bien aérée
Mode d’emploi
Veillez à vous familiariser avec les fonctions et accessoires
suivants du four avant la première utilisation :
Bouton de température (7)
Choisissez la température souhaitée (100-250°C).
Bouton de fonction (6)
Choisissez parmi :
Arrêt
Réchauffement supérieur et inférieur avec
convection
Réchauffement inférieur avec convection
Réchauffement supérieur et inférieur
Réchauffement supérieur avec rôtisserie
Il s'allume chaque fois que le four est allumé.
Grille (9)
Pour griller, faire de la pâtisserie ou pour la cuisson générale
avec des plats à four ou plats normaux.
Plateau de cuisson (10)
Pour griller et rôtir de la viande, volaille, du poisson et
d'autres aliments.
Avertissement ! Ne couvrez pas les plateaux ou d'autres
pièces avec une feuille métallique car elle peut provoquer
une surchauffe.
Plateau à miettes (11)
Sert à récupérer les miettes et protéger les éléments
chauffants inférieurs.
Avertissement ! Utilisez toujours des gants de cuisine et la
poignée (8) fournie lorsque vous sortez la grille et les
plateaux du four.
Fonctionnement
• Placez les aliments à cuire directement sur la grille (9) et
placez sur le plateau à miettes (10).
• Fermez la porte du four (2).
• Sélectionnez la fonction souhaitée avec le bouton de
fonction (6).
• Sélectionnez la température correcte avec le bouton de
température (7).
• Sélectionnez la durée correcte avec le bouton de
minuterie (5) et mettez le four en marche.
• Veillez à tourner le bouton de minuterie sur « 0 », ce qui
éteint le four une fois la cuisson terminée.
Remarque : Toutes les durées de cuisson sont basées sur
des viandes se trouvant au réfrigérateur. Les viandes se
trouvant au congélateur peuvent prendre bien plus de temps
à cuire. En conséquence, il est fortement conseillé d'utiliser
un thermomètre de viande. Le tableau ci-dessous n'est
donné qu'à titre de référence. Veuillez consulter les recettes
et l'emballage du fabricant pour connaître les durées de
cuisson et les instructions spéciales.
Réchauffement supérieur et inférieur avec
rôtisserie et convection
Bouton de minuterie (5)
Tournez la commande vers la droite (sens horaire) et le four
s'éteindra automatiquement une fois écoulée la durée
sélectionnée, une sonnerie retentira alors. Si vous réglez la
minuterie à moins de 5 minutes, tournez-la à plus de 6
minutes, puis revenez à la durée choisie.
Indicateur d'alimentation (4)
Type
Toast 12pcs/1.3cm 250 6
Poisson 220 50
Saucisse 0.5Kg/1cm 250 10
Gâteau 180 15
Steak 0.5Kg/4mm 250 6
Nombre
/
aliment épaisseur
Température(°C) Durée
(
minutes
)
9
Page 10

FRANÇAIS
(Traduction des instructions d'origine)
Ensemble de fourchettes de rôtisserie (12)
Réchauffement supérieur avec rôtisserie
• Insérez l'extrémité arrondie de la broche de la rôtissoire
dans une fourchette, assurez-vous que les pointes de la
fourchette sont orientées dans la même direction que
l'extrémité arrondie de la broche.
• Faites glisser la fourchette dans la section carrée de la
broche et fixez-la avec la vis moletée.
• Enfoncez la broche au centre du plat.
• Fixez la seconde fourchette sur l'autre extrémité de la
broche, et en perçant l'aliment avec les deux
fourchettes, veillez à ce que l'aliment soit au centre de la
broche.
• Fixez-la avec la vis moletée.
• Au besoin, préchauffez le four tel qu'indiqué dans la
recette.
• Insérez l'extrémité arrondie de la broche dans la douille
d'entraînement située sur le côté droit de la paroi du
four. Assurez-vous que la section carrée de la broche
repose sur le support situé sur le côté gauche de la
paroi du four.
Réchauffement supérieur et inférieur avec rôtisserie et
convection
• Placez le plateau (10) dans la partie inférieure du four,
directement en dessous de l'aliment à cuire.
• Réglez la commande de température (7) sur la position
élevée.
• Réglez le bouton de fonction (6) pour un réchauffement
supérieur et inférieur conjointement avec le réglage de
rôtisserie et de convection.
• Réglez la minuterie (5) sur la durée de cuisson
nécessaire. Si vous avez besoin d'une durée de moins
de 10 minutes, tournez le cadran à plus de 10 minutes
et ensuite tournez-le à nouveau vers la durée adéquate.
• À la fin du temps de cuisson, la cuisson s'arrête
automatiquement et la sonnerie retentit.
Nettoyage, entretien et stockage
Avertissement ! Avant le nettoyage et l’entretien, éteignez
l’appareil et débranchez la fiche du secteur.
Avertissement ! Ne plongez pas l’appareil ou le cordon ou
la fiche dans l’eau ou tout autre liquide.
• Nettoyez la cavité du four après utilisation avec un
chiffon légèrement humide.
• Nettoyez les accessoires normalement, avec de l’eau
savonneuse.
• Lorsqu’ils sont sales, nettoyez le cadre de la porte, les
joints et les pièces alentour soigneusement avec un
chiffon humide.
• N’utilisez pas de produits nettoyants abrasifs ou de
racloirs en métal pour nettoyer la porte en verre, ces
outils pouvant railler le verre et le briser.
• Ne nettoyez pas l’appareil à l’aide de solvants ou autres
produits corrosifs, ou encore de vapeur.
Avertissement ! Utilisez toujours la poignée pour fourchette
de rôtisserie (13) lorsque vous sortez un aliment rôti du four.
Changement de la fiche
En cas de besoin de montage d’une nouvelle fiche :
• Mettez dûment l’ancienne fiche au rebut.
• Connectez le fil marron à la borne sous tension de la
nouvelle fiche.
• Connectez le fil bleu à la borne neutre.
• Si le produit est de classe l (relié à la terre), connectez le
fil vert/jaune à la borne de terre.
Avertissement ! Si votre appareil est un produit de classe ll
avec double isolation (seulement 2 fils dans le cordon),
aucun raccordement à la borne de terre n’est nécessaire.
Suivez les consignes d’installation fournies avec les fiches de
bonne qualité. Tout fusible de rechange doit avoir les mêmes
caractéristiques nominales que le fusible d’origine fourni avec
le produit.
Protection de l'environnement
Collecte séparée. Ce produit ne doit pas être jeté
avec les déchets domestiques normaux.
Si vous décidez de remplacer ce produit BLACK+DECKER,
ou si vous n'en avez plus l'utilité, ne le jetez pas avec vos
déchets domestiques Rendez-le disponible pour une collecte
séparée.
• BLACK+DECKER fournit un dispositif permettant de
collecter et de recycler les produits BLACK+DECKER
lorsqu'ils ont atteint la fin de leur cycle de vie. Pour
pouvoir profiter de ce service, veuillez retourner votre
produit à un réparateur agréé qui se chargera de le
collecter pour nous.
• Pour connaître l'adresse du réparateur agréé le plus
proche de chez vous, contactez le bureau
BLACK+DECKER à l'adresse indiquée dans ce manuel.
Vous pourrez aussi trouvez un liste des réparateurs
agréés de BLACK+DECKER et de plus amples détails
sur notre service après-vente sur le site Internet à
l'adresse suivante : www.2helpU.com
Caractéristiques techniques
TR066
Tension nominale VAC 220 - 240V
Puissance nominale W 2200
10
Page 11

(Traduction des instructions d'origine)
Garantie
BLACK+DECKER est confiant dans la qualité de ses
produits et vous offre une garantie très étendue.
Ce certificat de garantie est un document supplémentaire et
ne peut en aucun cas se substituer à vos droits légaux.
Si un produit BLACK+DECKER s'avère défectueux en
raison de matériaux en mauvaises conditions, d'une erreur
humaine, ou d'un manque de conformité dans les 24 mois
suivant la date d'achat, BLACK+DECKER garantit le
remplacement des pièces défectueuses, la réparation des
produits usés ou cassés ou remplace ces produits à la
convenance du client, sauf dans les circonstances
suivantes:
Le produit a été utilisé dans un but commercial,
professionnel, ou a été loué.
Le produit a été mal utilisé ou avec négligence.
Le produit a subi des dommages à cause d'objets
étrangers, de substances ou à cause d'accidents.
Des réparations ont été tentées par des techniciens ne
faisant pas partie du service technique de
BLACK+DECKER
Pour avoir recours à la garantie, il est nécessaire de fournir
une preuve d'achat au vendeur ou à un réparateur agréé.
Pour connaître l'adresse du réparateur agréé le plus proche
de chez vous, contactez le bureau BLACK+DECKER à
l'adresse indiquée dans ce manuel.
Vous pourrez aussi trouver une liste des réparateurs agréés
de BLACK+DECKER et de plus amples détails sur notre
service après-vente sur le site Internet à l'adresse suivante :
www.2helpU.com
FRANÇAIS
11
Page 12

ﺔـﻴـﺑﺮـﻌـﻟﺍ
(ﺔﻴﺴﻴﺋﺮﻟﺍ ﺕﺎﻤﻴﻠﻌﺘﻟﺍ)
¿Éª°†d
Ékfɪ°V ¢Vô©Jh É¡JÉéàæe IOƒL ‘ BLACK+DECKER ≥ãJ
¿ƒfÉ≤dG É¡ëæÁ »àdG ∂bƒ≤M ¤EG áaÉ°VE’ÉH ¿ƒµj Gòg ¿Éª°†dG ¿É«H
Ö«Y ÖÑ°ùH
BLACK+DECKER èàæe ‘ π∏N OƒLh ádÉM ‘
øe Gkô¡°T 24 ∫ÓN ,ÒjÉ©ŸG ™e ≥aGƒàdG ΩóY hCG áYÉæ°üdG hCG OGƒŸG ‘
AGõLC’G ∫GóÑà°SG BLACK+DECKER øª°†J ,AGöûdG ïjQÉJ
hCG »©«С£dG ≈∏СdGh πcBЙаdG IЙYGфe ™e дЙйажŸG мУ°UEGh бС«©ŸG
:⁄ Йe 𫪩∏d кЙYREG πbCG ¿Йª°†d дЙйажŸG √тg ∫GуСа°SG
¢VGôZCG hCG á«æ¡e hCG ájQÉŒ ¢VGôZCG ‘ èàæŸG ΩGóîà°SG ºàj
;∫ɪgE’G hCG ΩGóîà°S’G Aƒ°ùd èàæŸG ¢Vô©àj
;çOGƒM hCG áÑjôZ OGƒe hCG AÉ«°TCG áé«àf ∞∏à∏d èàæŸG ¢Vô©àj
áfÉ«°üdG AÓch ÒZ ¢UÉî°TCG ᣰSGƒH èàæŸG ìÓ°UEG ádhÉfi ºàj
AGöûdG π«dO Ëó≤J ¤EG êÉà– ±ƒ°S ,¿Éª°†dG ÖLƒÃ áÑdÉ£e Ëó≤àd
ÜôbCG ™bƒe ≈∏Y ±ô©àdG ∂æµÁh .óªà©ŸG áfÉ«°üdG π«ch hCG ™FÉÑ∏d
.π«dódG Gòg ‘ í°VƒŸG ¿Gƒæ©dG ‘ »∏ëŸG BLACK+DECKER
ácöûd Ú©HÉàdG øjóªà©ŸG áfÉ«°üdG AÓcƒH áªFÉb óLƒJ ,∂dP øe k’óHh
™«ÑdG ó©H Ée äÉeóÿ á∏eɵdG π«°UÉØàdGh BLACK+DECKER
:ÊhεdE’G ™bƒŸG ≈∏Y âfÎfE’G ≈∏Y ÉæH á°UÉÿG ∫É°üJ’G πFÉ°Shh
ácöûd ™HÉàdG áfÉ«°üdG ≥jôa hCG øjóªà©ŸG
Öàµe ≈∏Y ∫É°üJ’G ∫ÓN øe óªà©e áfÉ«°U π«ch
.∫GƒMC’G øe ∫ÉM …CÉH É¡H πîj ’h
.
BLACK+DECKER
.πLC’G πjƒW
;ÒLCÉJ
www.2helpU.com
§≤a ¿Éµ∏°S) kÉLhOõe k’õY ádhõ©ŸG 2 áÄØdG øe èàæŸG ¿Éc GPEG !ôjò–
™e ≥aôŸG »∏°UC’G ô¡°üŸG ∞«æ°üJ ¢ùØf ≈∏Y ∫óÑà°ùŸG ô¡°üŸG ¿ƒµj
.»°VQC’G ±ô£dÉH π«°Uƒà∏d òFóæY áLÉM Óa ,(πHɵdG ‘
¿CG Öéj .IOƒ÷G á«dÉY ¢ùHGƒ≤dG ™e á≤aôŸG Ö«cÎdG äɪ«∏©J ™ÑJG
.èàæŸG
áÄ«ÑdG ájɪM
™e èàæŸG Gòg øe ¢ü∏îàdG ΩóY Ωõ∏j .π°üØæŸG ™ª÷G
.ájOÉ©dG á«dõæŸG áeɪ≤dG
BLACK+DECKER èàæe ∫GóÑà°SG ΩÉjC’G øe Ωƒj ‘ Ωõd GPEG
áeɪ≤dG ™e ¬æe ¢ü∏îàJ Óa ,¬eóîà°ùJ ó©J ⁄ GPEG hCG ,∂H ¢UÉÿG
.π°üØæŸG ™ªé∏d èàæŸG Gòg áMÉJEG øe ócCÉJ πH ,iôNC’G á«dõæŸG
ôjhóJ IOÉYE’ ≥aôe
ájÉ¡f ¤EG É¡dƒ°Uh Oôéà BLACK+DECKER дЙйажe
.ÉkfÉ› áeóÿG √òg Ëó≤J ºàjh .πª©∏d É¡à«MÓ°U ΩóYh ÉgôªY
π«ch …CG ¤EG èàæŸG IOÉYEG ≈Lôj ,áeóÿG √òg øe IOÉØà°SÓd
бHЙ«f дЙйажŸG ™ªL √QhуH ¤ƒаj ±ƒ°S …тdGh уªа©e бfЙ«°U
∫ÓN øe óªà©e áfÉ«°U π«ch ÜôbCG ™bƒe ≈∏Y ±ô©àdG ∂æµÁ •
‘ »∏ëŸG
AÓcƒH áªFÉb óLƒJ ,∂dP øe k’óHh .π«dódG Gòg ‘ í°VƒŸG ¿Gƒæ©dG
BLACK+DECKER ácöûd Ú©HÉàdG øjóªà©ŸG áfÉ«°üdG
∫É°üJ’G πFÉ°Shh ™«ÑdG ó©H Ée äÉeóÿ á∏eɵdG π«°UÉØàdGh
BLACK+DECKER ácöT ôaƒJ •
.ÉæY
BLACK+DECKER Öàµe ≈∏Y ∫É°üJ’G
:ÊhεdE’G ™bƒŸG ≈∏Y âfÎfE’G ≈∏Y ÉæH á°UÉÿG
.www.2helpU.com
á«æØdG äÉfÉ«ÑdG
TR066
âdƒa 240 – 220 OOÎe QÉ«J âdƒa ≤ŸG ó¡÷G
2200 äGh ≤ŸG πNódG
12
Page 13

(ﺔﻴﺴﻴﺋﺮﻟﺍ ﺕﺎﻤﻴﻠﻌﺘﻟﺍ)
ﺔـﻴـﺑﺮـﻌـﻟﺍ
.ï«°ù∏d
Qɪ°ùà ɡ£HQ ºµMCGh ï«°ù∏d ™HôŸG ´É£≤dG √ÉŒG ‘ ácƒ°ûdG ≥dRG •
.ΩÉ©£dG ∞°üàæe ‘ ï«°ùdG ™aOG •
π∏îàJ å«ëH ,ï«°ùdG øe ôNB’G ÖfÉ÷G ≈∏Y á«fÉãdG ácƒ°ûdG âÑK •
.ï«°ùdG §°Sƒàj ΩÉ©£dG ¿CG ócCÉJh ,ΩÉ©£dG ¿Éàcƒ°ûdG
.Ödƒ∏ŸG Qɪ°ùŸG ᣰSGƒH ΩɵMEÉH ¬£HQG •
‘ QƒcòŸG ƒëædG ≈∏Y Ékeó≤e ¿ôØdG Úî°ùJ øµÁ ,áLÉ◊G óæY •
≈∏Y OƒLƒŸG ¬«LƒàdG ∞jƒŒ ‘ ï«°ùdG øe ôjóà°ùŸG ±ô£dG πNOG •
™HôŸG ±ô£dG QGô≤à°SG øe ócCÉJh .¿ôØdG QGóL øe øÁC’G ÖfÉ÷G
.¿ôØdG QGóL øe öùjC’G ÖfÉ÷G áeÉYO ≈∏Y ï«°ù∏d
.Ödƒ∏e
.»¡£dG áØ°Uh
πª◊G ™eh IGƒ°ûŸG ™e ¢†ØîæŸGh ™ØJôŸG Úî°ùàdG
…QGô◊G
¬«¡W ºàj …òdG ΩÉ©£dG πØ°SCG ,¿ôØdG ´Éb ‘ (10) á«æ«°üdG ™°V •
.™ØJôe ™°Vh ≈∏Y (7) IQGô◊G áLQO ìÉàØe §Ñ°VG •
¢†ØîæŸGh ™ØJôŸG Úî°ùàdG OGóYEG ≈∏Y (6) ∞FÉXƒdG ìÉàØe §Ñ°VG •
.…QGô◊G πª◊G ™eh IGƒ°ûŸG ™e
øe πbCG øeõdG ¿Éc GPEG .܃∏£ŸG »¡£dG øeR ≈∏Y (5) âbDƒŸG §Ñ°VG •
¤EG ìÉàØŸG ôjhóJ óYCG ºK ≥FÉbO 10 ≈àM ìÉàØŸG QOCG ,≥FÉbO 10
±ƒ°Sh Ék«µ«JÉeƒJhCG »¡£dG ∞bƒà«°S ,»¡£dG âbh AÉ¡àfG Oôéà •
.IöTÉÑe
.í«ë°üdG âbƒdG
.¢Sô÷G ÚfQ ™ª°ùoj
øjõîàdGh áfÉ«°üdGh ∞«¶æàdG
øe ¢ùHÉ≤dG ∫RCGh RÉ¡÷G 𫨰ûJ ∞bhCG ,áfÉ«°üdGh ∞«¶æàdG πÑb !ôjò–
…CG ‘ hCG AÉŸG ‘ ¢ùHÉ≤dG hCG ∑Ó°SC’G áYƒª› hCG RÉ¡÷G ôª¨J ’ !ôjò–
.kÓ«∏b á∏∏Ñe ¢Tɪb á©£≤H ¬eGóîà°SG ó©H ¿ôØdG ∞jƒŒ ∞«¶æàH ºb •
.¿ƒHÉ°üdGh AÉŸG ‘ IOÉà©ŸG á≤jô£dÉH äÉ≤ë∏ŸG ∞«¶æàH ºb •
óæY ájÉæ©H áÑjô≤dG AGõLC’Gh IOGó°ùdGh ÜÉÑdG QÉWEG ∞«¶æJ Öéj •
á«fó©ŸG §°ûµdG äGhOCG hCG ᣰTɵdG á«°SÉ≤dG äÉØ
ób ɇ ,í£°ùdG ¢TóîJ ób É¡fC’ ¿ôØdG ÜÉH êÉLR ∞«¶æàd IOÉ◊G
IôîHC’G hCG πcBÉà∏d áÑÑ°ùŸG á«FÉ«ª«µdG OGƒŸG hCG äÉÑjòŸG Ωóîà°ùJ ’ •
IGƒ°ûŸG ádGREG óæY (13) IGƒ°ûŸG ácƒ°T ™e ¢†Ñ≤ŸG ÉkªFGO Ωóîà°SG !ôjò–
.á∏∏Ñe ¢Tɪb á©£b ΩGóîà°SÉH É¡NÉ°ùJG
¶æŸG Ωóîà°ùJ ’ •
q
p
.êÉLõdG º£– ¤EG …ODƒj
.RÉ¡÷G Gòg ∞«¶æàd
.¢ùÑ≤ŸG
.ôNBG πFÉ°S
.¿ôØdG øe
AÉHô¡µdG ¢ùHÉb ∫GóÑà°SG
:ójóL AÉHô¡c ¢ùHÉb Ö«côJ ¤EG áLÉ◊G ádÉM ‘
.áæeBG á≤jô£H Ëó≤dG ¢ùHÉ≤dG øe ¢ü∏îJ •
.ójó÷G ¢ùHÉ≤dG ‘ »◊G ±ô£dÉH »æÑdG ∂∏°ùdG π°UhCG •
.ójÉëŸG ±ô£dÉH ¥QRC’G π«°UƒàdG ∂∏°S π°UhCG •
/ö†NC’G ∂∏°ùdG π°UhCÉa ,(¢VQDƒe) 1 áÄØdG øe èàæŸG ¿Éc GPEG •
.»°VQC’G ±ô£dÉH ôØ°UC’G
(5) âbDƒŸG ìÉàØe
𫨰ûJ ∞bƒà«°Sh (áYÉ°ùdG ÜQÉ≤Y √ÉŒÉH) Úª«dG ¤EG ºµëàdG ¢Uôb QOCG
§Ñ°V óæY .¢Sô÷G ¿Ò°Sh OóëŸG âbƒdG ájÉ¡f ™e Ék«µ«JÉeƒJhCG ¿ôØdG
√óYCG ºK ≥FÉbO 6 ió©àj ≈àM √QOCG ,≥FÉbO 5 øe πbCG âbh ≈∏Y âbDƒŸG
.OóëŸG âbƒdG ≈àM
(4) ábÉ£dG öTDƒe
.¿ôØdG 𫨰ûJ AóH ɪ∏c A»°†j
(9) »µ∏°S ±Q
‹É≤ŸGh øLGƒ£dG ‘ ΩÉ©dG »¡£dÉHh ÈÿÉHh ¢ü«ªëàdÉH ¢UÉN
.á«°SÉ«≤dG
(10) õÑÿG á«æ«°U
áØ∏àîŸG ᪩WC’Gh ∂ª°ùdGh êÉLódGh ºë∏dG Òª–h »°T ‘ ΩGóîà°SÓd
…QGô◊G Ωƒ«æŸC’G ¥QƒH iôNC’G ™£≤dG hCG ÊGƒ°üdG »£¨J ’ !ôjò–
.IQGô◊G áLQO IOÉjR ‘ ÖÑ°ùàj ’ ≈àM
.iôNC’G
(11) ΩÉ©£dG äÉàa á«æ«°U
.≈Ø∏°ùdG Úî°ùàdG öUÉæY ájɪ◊h ΩÉ©£dG äÉàa ™«ªéàd Ωóîà°ùoJ
ádGREG óæY (8) ≥ë∏ŸG ¢†Ñ≤ŸGh ¿ôØdG äGRÉØb ÉkªFGO Ωóîà°SG !ôjò–
‘ ¬©°Vh (9) »µ∏°ùdG ±ôdG ≈∏Y IöTÉÑe ¬«¡£d ΩÉ©£dG ™°V •
.(6) ∞FÉXƒdG ìÉàØe ‘ áHƒ∏£ŸG áØ«XƒdG QÉàNG •
.(7) IQGô◊G áLQO ìÉàØe ‘ áë«ë°üdG IQGô◊G áLQO QÉàNG •
.¿ôØdG 𫨰ûJ CGóHGh (5) âbDƒŸG ìÉàØe ‘ í«ë°üdG âbƒdG QÉàNG •
øY ¿ôØdG 𫨰ûJ ∞bhh ,“0” ≈∏Y âbDƒŸG ìÉàØe IQGOEG øe ócCÉJ •
.áLÓãdG IQGôM áLQO ‘ ºë∏dG ≈∏Y »¡£dG äÉàbDƒe πc õµJôJ :á¶MÓe
ΩGóîà°SÉH í°üæoj ,Gò¡dh ,¬«¡£d ∫ƒWCG Ékàbh óªéŸG ºë∏dG ¥ô¨à°ùj óbh
á©LGôe ≈Lôoj .§≤a IQÉ°TEÓd ƒg √ÉfOCG ∫hó÷Gh .ºë∏d IQGôM ¢SÉ«≤e
дЙª«∏©аdGh »¡£dG Iуe ¿CЙ°ыH Ъ©ж°ьŸG дЙйажeh »¡£dG дЙШ°Uh
≥FÉbO) âbƒdG)
6
50
10
15
6
IQGô◊G áLQO
(°∂ªo°ùdG (Ω
.¿ôØdG øe ÊGƒ°üdGh »µ∏°ùdG ±ôdG
ΩÉ©£dG /ºbôdG
250
220
250
180
250
º°S 1^3 /á©£b 12
º°S 1 /ºéc 0,5
º∏e 4 /ºéc 0,5
𫨰ûàdG
.(10) õÑÿG á«æ«°U
.(2) ¿ôØdG ÜÉH ≥∏ZCG •
.»¡£dG AÉ¡àfG
.á°UÉÿG
´ƒædG
¢üªfi õÑN
∂ª°S
≥é°S
∂«c
∂«à°S
(12) IGƒ°ûŸG ácƒ°T áYƒª›
IGƒ°ûŸG ™e ™ØJôŸG Úî°ùàdG
™e ,IóMGh ácƒ°T ∫ÓN ‘ IGƒ°ûŸG ï«°ùd ôjóà°ùŸG ±ô£dG πNOG •
ôjóà°ùŸG ±ô£dG √ÉŒG ¢ùØf πHÉ≤J ácƒ°ûdG ¿Éæ°SCG ¿CG ócCÉàdG
13
Page 14

ﺔـﻴـﺑﺮـﻌـﻟﺍ
(ﺔﻴﺴﻴﺋﺮﻟﺍ ﺕﺎﻤﻴﻠﻌﺘﻟﺍ)
õÑÿG á«æ«°U .10
ΩÉ©£dG äÉàa á«æ«°U .11
IGƒ°ûŸG ácƒ°T áYƒª› .12
IGƒ°ûŸG ácƒ°T ¢†Ñ≤e .13
äÉjƒàëŸG ≠jôØJ
.IƒÑ©dG øe πeɵdÉH RÉ¡÷G êôNCG •
ÜÉH πãe ,∞∏J …CG OƒLh ΩóY øe ≥≤ëà∏d ¬LGôNEG ó©H ¿ôØdG ¢üëaG •
OƒLh hCG ÜÉÑdG äGOGó°S ‘ ∞∏J hCG √QÉ°ùe øY ±ôëæe hCG ∞dÉJ
.∞jƒéàdG ‘ äÉLÉ©ÑfG …CG hCG ÜÉÑdG IòaÉf ‘ ܃≤K hCG äÉLÉ©ÑfG
.¿ôØdG Ωóîà°ùJ ’ ,ôcoP ɇ …CG ájDhQ ádÉM ‘
™«ªéàdG
ìÉàØe ¿CGh ∫ƒ°üØeh CÉØ£e RÉ¡÷G ¿CG øe ≥≤– ,™«ªéàdG πÑb !ôjò–
≈∏Y •ƒÑ°†e ∞bDƒŸG
.“OFF” ™°VƒdG
.âHÉKh ƒà°ùe í£°S ≈∏Y RÉ¡÷G ™°V •
.¥ÉÑWC’G ádÉ°ùZ ‘ ¿ƒHÉ°Uh øNÉ°S AÉà ɡ∏°ùZG .äÉ≤ë∏ŸG πc ∫RCG •
¿ôØdG π°UhCG .¿ôØdG ‘ É¡∏NOCGh πeɵdÉH äÉ≤ë∏ŸG πc ∞ØL •
ójó÷G »FÉHô¡µdG ¿ôØdG ΩGóîà°S’ õgÉL âfCG ¿B’Gh QÉÑàdG Qó°üÃ
.ΩÉ©£dG á«æ«°Uh AGƒ°ûdG ±Q ™e
™°Vh Gòg .Iôe ∫hC’ ¿ôØdG ΩGóîà°SG óæY ,¿ÉNO å©Ñæj ÉÃQ •
öUÉæY ≈∏Y óLƒJ »àdG á«bGƒdG IOÉŸG ¤EG Gòg ™Lôjh .»©«ÑW
øe øë°ûdG AÉæKCG á«ë∏ŸG äGÒKCÉàdG Öæéàd Ωóîà°ùoJ »àdGh ,Úî°ùàdG
.ÉkÑjô≤J á≤«bO 15 IóŸ ±ÉL ƒgh ¿ôØdG 𫨰ûàH í°üæojh .™æ°üŸG
.ájƒ¡àdG Ió«L áaô¨dG ¿CG øe ≥≤– ,∂dòch
ΩGóîà°S’G
:ΩGóîà°SG ∫hCG πÑb á«dÉàdG äÉ≤ë∏ŸGh ¿ôØdG ∞FÉXh ≈∏Y äóàYG ∂fCG ócCÉJ
(7) IQGô◊G áLQO ìÉàØe
.Ω° 250 ¤EG Ω° 100 øe áHƒ∏£ŸG IQGô◊G áLQO ÎNG
(6) ∞FÉXƒdG ìÉàØe
:øe áØ«XƒdG QÉàNG
…QGô◊G πª◊G ™e ¢†ØîæŸGh ™ØJôŸG Úî°ùàdG
…QGô◊G πª◊G ™e ¢†ØîæŸG Úî°ùàdG
¢†ØîæŸGh ™ØJôŸG Úî°ùàdG
IGƒ°ûŸG ™e ™ØJôŸG Úî°ùàdG
πª◊G ™eh IGƒ°ûŸG ™e ¢†ØîæŸGh ™ØJôŸG Úî°ùàdG
…QGô◊G
.RÉ¡÷ÉH º¡ãÑY ΩóY ¿Éª°†d ∫ÉØWC’G ≈∏Y ±GöTE’G Öéj •
√òg ≈∏Y ™∏£e ÒZ ¢üî°T …CG hCG ∫ÉØWCÓd ìɪ°ùdG ΩóY Öéj •
.RÉ¡÷G ΩGóîà°SÉH äGOÉ°TQE’G
hCG πª©dG ¿Éµe øe ÜGÎb’ÉH äÉfGƒ«◊G hCG ∫ÉØWCÓd íª°ùJ ’ •
.AÉHô¡µdG πHÉc hCG RÉ¡÷G ¢ùŸ
.∫ÉØWC’G øe Üô≤dÉH RÉ¡÷G ΩGóîà°SG óæY Üôb øY ±GöTE’G Ωõ∏j •
ΩGóîà°S’G ó©H
RÉ¡÷G ∑ôJ πÑb ¢ùÑ≤ŸG øe ¢ùHÉ≤dG ´õfGh RÉ¡÷G 𫨰ûJ ∞bhCG •
hCG É¡Ø«¶æJ hCG RGèdG AGõLCG øe …CG Ò«¨J πÑbh áÑbGôe ¿hO
.É¡°üëa
.±ÉL ¿Éµe ‘ ¬æjõîJ Öéj ,RÉ¡÷G ΩGóîà°SG ΩóY ádÉM ‘ •
.∫ÉØWC’G ∫hÉæàe øY Gkó«©H áfqõîŸG Iõ¡LC’G ™«ªL ßØM Öéj
AÉHô¡µdG ôWÉfl øe áeÓ°ùdG
Qó°üe ó¡L ≥aGƒJ øe ócCÉàdG ΩGóîà°S’G πÑb »¨Ñæj
.Úæ≤àdG áMƒd ≈∏Y í°VƒŸG ó¡÷G ™e »FÉHô¡µdG QÉ«àdG
øe kɪFGO ≥≤– .Ék°VQDƒe èàæŸG GP ¿ƒµj ¿CG Öéj
áMƒd ≈∏Y í°VƒŸG ó¡÷G ™e »°ù«FôdG QÉ«àdG ó¡L ≥aGƒJ
.򾲈dG
ô¶ëoj .»FÉHô¡µdG QÉ«àdG Qó°üe ™e RÉ¡÷G ¢ùHGƒb ≥aGƒJ Ωõ∏j •
.á≤jôW ájCÉH ¢ùHÉ≤dG πjó©J
á°VQDƒŸG á«FÉHô¡µdG Iõ¡LC’G ™e ÅjÉ¡e ¢ùHGƒb …CG Ωóîà°ùJ ’ •
øe ó– áÑ°SÉæŸG ¢ùHÉ≤ŸGh ádó©ŸG ÒZ ¢ùHGƒ≤dG.(1 áÄØdG)
.á«FÉHô¡µdG äÉeó°üdG ôWÉfl
¢ùHÉ≤dG hCG ∂∏°ùdG ôª¨J ’ ,á«FÉHô¡c áeó°üd ¢Vô©àdG ô£N Öæéàd •
.ôNBG πFÉ°S …CG hCG AÉŸG ‘ ∑ôëŸG IóMh hCG
"1" áÄØdG èàæeh OGóàe’G äÓHÉc
øeh á°VQDƒe IGOC’G âfÉc GPEG ܃∏≤dG »KÓK πHÉc ΩGóîà°SG Öéj •
.1 áÄØdG
(Ωób 100) kGÎe 30 ¤EG ¬dƒW π°üj ádÉWEG πHÉc ΩGóîà°SG øµÁ •
.ábÉ£∏d ó≤a …CG ¿hO
hCG ™æ°üoŸG πÑb øe ¬dGóÑà°SG Öéj ,AÉHô¡µdG ∂∏°S ∞∏J ádÉM ‘ •
Öæéàd BLACK+DECKER øe óªà©e áeóN õcôe …CG
.ôWÉîŸG
RÉ¡÷G ≈∏Y IOƒLƒŸG äÉ≤°ü∏ŸG
:RÉ¡÷G ≈∏Y ¿GOƒLƒe ïjQÉàdG Oƒc ™e á«dÉàdG Iô¨°üŸG Qƒ°üdG
.øNÉ°S í£°S .ôjò–
äÉØ°UGƒŸG
»LÉLõdG ÜÉÑdG .1
ÜÉÑdG ¢†Ñ≤e .2
Úî°ùàdG öUÉæY .3
öTDƒŸG ìÉÑ°üe .4
âbDƒŸG ìÉàØe .5
∞FÉXƒdG ìÉàØe .6
IQGô◊G áLQO ìÉàØe .7
á«æ«°üdG ¢†Ñ≤e .8
»µ∏°S ±Q .9
14
Page 15

(ﺔﻴﺴﻴﺋﺮﻟﺍ ﺕﺎﻤﻴﻠﻌﺘﻟﺍ)
ﺔـﻴـﺑﺮـﻌـﻟﺍ
√ó°T hCG ∂∏°ùdG ᣰSGƒH kGóHCG RÉ¡÷G πª– ’h .∂∏°ùdG ΩGóîà°SG Å°ùJ ’ •
kɪFGO ¢ùHÉ≤dG ≈∏Y ¢†ÑbG ,∂dP øe k’óHh ;QÉ«àdG òNCÉe øe ¬∏°üØd
.QÉ«àdG øY ¬∏°üØd ¬Ñë°SGh
πµ°ûH ¬∏«°UƒJ øe ócCÉàdG ≈Lôj ,ójó“ ∂∏°S ΩGóîà°SG ádÉM ‘ •
.RÉ¡÷G Gòg ™e ΩGóîà°SÓd ídÉ°U ¬fCGh ,º«∏°S
¿Rh πqª– ¬æµÁ ô≤à°ùeh mƒà°ùe í£°S ≈∏Y ¿ôØdG ™°Vh Öéj •
.πNGódÉH ¬«¡W πªàëŸG ΩÉ©£dG π≤Kh RÉ¡÷G
.¿ôØdG ¥ƒa öüæY …CG ™°†J ’ •
hCG π∏Ñe í£°S ≈∏Y hCG IQGôM ¬æe óqdƒàj ¿Éµe ‘ ¿ôØdG ™°†J ’ •
.∫É©à°TÓd á∏HÉb OGƒe øe Üô≤dÉH hCG á«dÉY áHƒWQ ¬H ¿Éµe
™°Vƒe ‘ ¿ôØdG Gòg ¬H π°üàŸG AÉHô¡µdG ¢ùÑ≤e ¿ƒµj ¿CG Öéj •
ádƒ¡°ùH ¬æY ¢ùHÉ≤dG π°üa øµÁ ≈àM ádƒ¡°ùH ¬«dEG ∫ƒ°UƒdG øµÁ
.Ωhõ∏dG óæY
ÖÑ°ùàj ¿CG øµªŸG øe å«M .ÉkZQÉa ¿ƒµj ÉeóæY RÉ¡÷G π¨°ûoJ ’ •
.¿ôØdG ∞∏J ‘ ∂dP
.öüæY …CG øjõîJ ‘ ¿ôØdG Ωóîà°ùJ ’ •
.¿ôØdG øe öUÉæ©dG ádGREG óæY ¿ôØdG äGRÉØb ÉkªFGO Ωóîà°SG •
.∫õæŸG êQÉN RÉ¡÷G Ωóîà°ùJ ’ •
âæc GPEG RÉ¡÷G π¨°ûJ ’ .¿Éà∏àÑe ∑Gój âfÉc GPEG RÉ¡÷G π¨°ûJ ’ •
.Úeó≤dG ‘ÉM
RÉ¡÷G π°üaG ,ΩGóîà°S’G AÉæKCG »FÉHô¡µdG QÉ«àdG ∂∏°ùd ∞∏J çóM GPEG •
πÑb »FÉHô¡µdG QÉ«àdG ∂∏°S ¢ùª∏J ’ .QƒØdG ≈∏Y AÉHô¡µdG Qó°üe øY
.AÉHô¡µdG Qó°üe øY ¬∏°üa
ΩGóîà°S’G ΩóY ádÉM ‘ »FÉHô¡µdG QÉ«àdG Qó°üe øY RÉ¡÷G π°üaG •
.∞«¶æàdG πÑbh
.¬°†jQCÉJ ºàj ¿CG Öé«a ,ádÉWEG πHÉc ΩGóîà°SG ” Ée GPEG •
hCG RÉ¡÷G ôª¨J ’ ,á«FÉHô¡c áeó°üd ¢Vô©àdG ô£N øe ájɪë∏d •
.iôNCG πFGƒ°S …CG hCG AÉŸG ‘ ¢ùHÉ≤dG hCG ∂∏°ùdG
¢ùeÓj hCG ádhÉ£dG hCG Ió°†æŸG áaÉM ¥ƒa ¤óàj ∂∏°ùdG ´óJ ’ •
.áæNÉ°S kÉ룰SCG
‘h ÖfÉL πc ‘ º°S 10h ,IóMƒdG ¥ƒa º°S 30 ÆGôa áMÉ°ùe ∑ôJG •
.ájƒ¡àdG Òaƒàd ∞∏ÿG
ïdEG ,§FGƒ◊G á«£ZCGh ôFÉà°ùdG πãe ¥GÎMÓd á∏HÉ≤dG OGƒŸG ´óJ ’ •
.RÉ¡÷G ¢ùeÓJ
Üöùàj ób øNÉ°ùdG AGƒ¡dG ¿C’ RÉ¡÷G íàa AÉæKCG Qò◊G »NƒJ Öéj •
.¾e
∫ɪYCG …CG AGôLEG hCG ∞«¶æàdG πÑb »FÉHô¡µdG QÉ«àdG øY èàæŸG π°üaG •
.RÉ¡÷G ≈∏Y áfÉ«°U
.ójÈàdG IÎa AÉæKCGh 𫨰ûàdG AÉæKCG áæNÉ°S í£°SC’G ¿ƒµJ ób •
AÉæKCG Ió°ûH ¿Éæî°ùj ¿ôØ∏d »LQÉÿG í£°ùdGh »LÉLõdG ÜÉÑdG •
iôNC’G »¡£dG πFGƒ°Sh äƒjõdG IQGôM áLQO ™ØJôJ ɪc .𫨰ûàdG
íàa óæY ¿ôØdG äGRÉØb óJQGh ÜÉÑdG ¢†Ñ≤e ÉkªFGO Ωóîà°SG .Ió°ûH
.¿ôØdG øe ÊGƒ°üdG êGôNEG óæYh ÜÉÑdG
Ò«¨J πÑb AÉHô¡µdG Qó°üe øY ¬∏°üaGh RÉ¡÷G 𫨰ûJ ±É≤jEÉH ºb •
.ΩGóîà°S’G AÉæKCG ∑ôëàJ »àdG AGõLC’G øe ÜGÎb’G hCG äÉ≤ë∏ŸG
øjôNB’G áeÓ°S
ájó°ù÷G äGQó≤dG hhP ¢UÉî°TC’G ¬eóîà°ù«d ºª°üe ÒZ RÉ¡÷G Gòg •
∂dP ‘ ÉÃ) Úà∏«∏≤dG áaô©ŸGh IÈÿGh áæjóàŸG á«∏≤©dGh á«°ù◊Gh
äɪ«∏©àdÉH ºgójhõJ hCG º¡«∏Y ±GöTE’G πX ‘ ’EG ,(∫ÉØWC’G
.º¡àeÓ°S øY ∫hDƒ°ùŸG ¢üî°ûdG πÑb øe RÉ¡÷G ΩGóîà°SÉH á≤∏©àŸG
ΩGóîà°S’G øe ¢Vô¨dG
Úî°ùàd BLACK+DECKER™ TR066 »FÉHô¡µdG ¿ôØdG ºªo°U
Gòg .É¡«¡W πÑb äÉfƒµŸG áeAÓe øe ÉkªFGO ≥≤– .áÑ°SÉæŸG ᪩WC’G
èàæe ∑QÉ«àN’ kGôµ°T .§≤a ∂p∏¡à°ùŸG ΩGóîà°S’ ló©oe èàæŸG
èàæŸG Gòg ΩGóîà°SÉH ™àªà°ùJ ¿CG ∂d ≈æªàfh .Black+Decker
.§≤a »∏NGódG ‹õæŸG …OÉ©dG ∫ɪ©à°SÓd ¢ü°üfl .IójóY äGƒæ°ùd
:‘ RÉ¡÷G Gòg Ωóîà°ùoj ’
πª©dG •É°ShCGh ÖJɵŸGh ôLÉàŸG ‘ ∫ɪ©dG ïHÉ£e ≥WÉæe •
áeÉbE’G øcÉeCGh IÒ¨°üdG ¥OÉæØdGh ¥OÉæØdG ‘ AÓª©dG πÑpb øe •
.iôNCG á«dõæe ÒZ øcÉeCG …CG hCG ,QÉ£aE’Gh ΩƒædG øcÉeCG •
;iôNC’G
;á«ØjôdG ∫RÉæŸG •
;iôNC’G
áeÓ°ùdG äɪ«∏©J
…CG .äɪ«∏©àdG πch ¿ÉeC’G äGôjò– πc CGôbG !ôjò–
πØ°SC’ÉH áæ«ÑŸG äɪ«∏©àdGh äGôjòëàdG ´ÉÑJG ‘ Qƒ°üb
hCG/h ≥jôM hCG á«FÉHô¡c áeó°U ¤EG …ODƒj ¿CG øµÁ
.RÉ¡÷G 𫨰ûJ πÑb ájÉæ©H πeɵdÉH π«dódG Gòg CGôbG •
…CG ∫ɪ©à°SG ¿EG .π«dódG Gòg ‘ í°Vƒe ΩGóîà°S’G øe ¢Vô¨dG ¿EG •
»àdG ÒZ RÉ¡÷G Gò¡H á«∏ªY ájCG AGôLEG hCG äÉ≤aôe hCG äÉ≤ë∏e
.á«°üî°ûdG áHÉ°UE’G ô£N ÖÑ°ùj ób π«dódG Gòg ‘ É¡H ≈°Uƒoj
IÉYGôe kɪFGO Ú©àj ,á«FÉHô¡µdG Iõ¡LC’G ΩGóîà°SG óæY !ôjò–
ô£N øe óë∏d ∂dPh ;»∏j Ée ∂dP ‘ Éà ᫰SÉ°SC’G áeÓ°ùdG äÉWÉ«àMG
.OGƒŸG ∞∏J hCG á«°üî°ûdG áHÉ°UE’G hCG á«FÉHô¡c áeó°üdG hCG ≥jô◊G
.kÓÑ≤à°ùe ¬«dEG ´ƒLô∏d π«dódG Gò¡H ßØàMG •
.á¨dÉH äÉHÉ°UEG
É¡H ßØàMGh ájÉæ©H ÉgCGôbG .áeÓ°ù∏d ᪡e äɪ«∏©J
k
ÓÑ≤à°ùe É¡«dEG ´ƒLô∏d
¿ôØdG 𫨰ûJ ΩóY Öé«a ,ÜÉÑdG äGOGó°S hCG ÜÉÑdG ∞∏J ádÉM ‘ !ôjò–
ájCG AGôLEG ¢üàîŸG ¢üî°ûdG ÒZ ¢üî°T …CG ≈∏Y ô£ÿG øe !ôjò–
.¢üàîŸG ¢üî°ûdG πÑb øe ¬MÓ°UEG ºàj ≈àM
.RÉ¡é∏d ìÓ°UEG hCG áeóN
∂H ¢UÉÿG RÉ¡÷G ΩGóîà°SG
Aƒ°S ó©H hCG ∞∏à∏d ¬°ùHÉb hCG ¬µ∏°S ¢Vô©J RÉ¡L …CG π¨°ûJ ’ •
RÉ¡÷G óYCG .á≤jôW …CÉH ¬aÓJG ” hCG ¬Wƒ≤°S óæY hCG RÉ¡÷G 𫨰ûJ
í«∏°üJ hCG ¢üëa AGôLE’ Ióªà©e áfÉ«°U IóMh ÜôbCG ¤EG ¬∏ªcCÉH
ÜôbCÉH ø©à°SG ,∂dP øY Én°VƒYh ;∂°ùØæH RÉ¡÷G ìÓ°UEG ∫hÉ– ’ •
BLACK+DECKER ácöT øe óªà©e hCG ™HÉJ áeóN õcôe
ÒZ äÉ≤aôŸGh äÉ≤ë∏ŸG ΩGóîà°SG ÖÑ°ùàj ób .RÉ¡÷G ìÓ°UE’
´’ófG ‘ RÉ¡÷G ™æ°üoe πÑb øe áYÉÑŸG ÒZh CG É¡H ≈°UƒŸG
¢ùeÓj hCG ádhÉ£dG hCG Ió°†æŸG áaÉM ¥ƒa ¤óàj ∂∏°ùdG ´óJ ’ •
.í«JÉØŸGh ¢†HÉ≤ŸG Ωóîà°SGh ,áæNÉ°ùdG í£°SC’G á°ùeÓe ÖæŒ •
øe Üô≤dÉH hCG ≈∏Y ¬FGõLCG øe AõL …CG ™°†J hCG RÉ¡÷G π¨°ûoJ ’ •
¿ôa ‘ hCG øNÉ°S »FÉHô¡c hCG …RÉZ óbƒe πãe ) áæNÉ°S í£°SCG
.ôWÉîŸG …OÉØàd §Ñ°V hCG »µ«fɵ«e hCG »FÉHô¡c
.á«°üî°T áHÉ°UG hCG á«FÉHô¡c áeó°U hCG ≥jôM
.áæNÉ°S kÉ룰SCG
.QÉîH óqdƒj RÉ¡L …CG øe hCG (øNÉ°S
15
Page 16

N am es & A d d re ss es fo r B L A C K + D EC KE R S er vi ce C o n c e ss io na ri es
COUNTRY NAME ADDRESS TELEPHONE NO. EMAIL
BAHRAIN Alfouz Services Co. WLL P.O. Box 26562, Tubli, Manama (00973) 17783562 / 17879987 alfouz@batelco.com.bh
BAHRAIN Kewalram & Sons Co. WLL P.O. Box 84, Manama, (00973) 17213110 kewalram02@batelco.com.bh
Kingdom of Bahrain 17210617 kewalram@batelco.com.bh
EGYPT Anasia Egypt for Trading P.O. Box 2443, 9, Mostafa Refaat Street, (00202) 22684159 wael.salah@anasia.com
S.A.E. (Mentrade) Sheraton Heliopolis 11361, Cairo Hotline19311 nevien.elbeshbishy@anasia.com
JORDAN Mega Hardware - 93 King Abdullah II St., (009626) 5349098 info@mega-hardware.com
(Sami Bashiti & Partners Co.) P.O.BOX 3005 AMMAN 11953 www.mega-hardware.com
KSA Fawaz Ebrahim Al Zayani P.O. Box 76026, Al Raka : 31952 (009663) 8140914 dewaltdammam@hotmail.com
Trading Est. www.fawazalzayanigroup.com
KSA United Trading & Marketing Co; #15, Khamis Mushait 62411, Abha, (00966) 172500378 serviceabha@u-mark.net
(U-MARK) Military city road – Near City max
and Ghunaim Market
KSA United Trading & Marketing Co; #116, Prince Fahad Ibn Ibrahim (00966) 11473-3258 malazservice@u-mark.ne
(U-MARK) Al Saud Street - Near Nawan Hotel
KSA United Trading & Marketing Co; Ash Shiqah, Al Hamr, Buraydah (00966) 16-3694969 serviceqaseem@u-mark.net
(U-MARK) 52371 Al Hamr Road near Jaryat
Al Umran & Khub Ath Thinayan
KSA United Trading & Marketing Co; King Abdulaziz St, Al Aziziyah (00966) 138179319 servicedammam@u-mark.net
(U-MARK) Dammam 32424 near Dat AS 138172654
Sihha Medical Center
KSA United Trading & Marketing Co; Jabal Ar-Rubabah, Misrifah, (00966) 126612552 servicejeddah@u-mark.net
(U-MARK) Jeddah 23331 Falastin Road Near
New Jeddah National Hospital
KSA United Trading & Marketing Co; (U-MARK) #356, Al Talah Medina 42322 (00966) 148423339 servicemadina@u-mark.net
KUWAIT Al Omar Technical Co. P.O. Box 4062, Safat 13041, Kuwait (00965) 24848595 / 24840039 alexotc@usa.net
KUWAIT The Sultan Centre P.O. Box 26567-13126 Safat, Kuwait (00965) 24343155 allina@sultan-center.com
Etn. 432 nedalt@sultan-center.com
LEBANON Aces Service Centre P.O. Box 90-102, Nahr El Mot, (009611) 898989 / 262626 nissrine.hajj@aces.com.lb
(Est. F.A.Ketaneh SA) Seaside Highway, Pharaon nassim.aziz@Aces.com.lb
Building, Beirut
LIBYA Homeworld Co. Senidal St. Amr Ibn Elaas Road, (0021861) 9094183 nissrine.hajj@aces.com.lb
Benghazi, Libya (P.O. Box 18182 Salmany) ext. 103
LIBYA North Africa Trading P.O. Box 348, 7 October (00218061) 3383994 nissrine.hajj@aces.com.lb
( El Ghoul Brothers) Street 11, Benghazi
LIBYA North Africa Trading AlBarniq Dewalt Center, (00218021) 3606430 nagte.ly@gmail.com
( El Ghoul Brothers) Mokhazin-elsukar St. ElFallah, Tripoli nagte.dpt@gmail.com
MAURITIUS The Brandhouse Ltd. Rogers Industrial Park 1, Riche (00230) 2069450 claims(service.centre@goupille.mu
Terre, Mauritius 2071700 stephanie.bijou@gmail.com
MOROCCO Electronia Bd, Sidi Abdelrahman- Gr ceinture (00212) 618532680 r.makhlouti@electronia.ma
residence Rio - Ain Diab - 20050.
Casa Blanca
OMAN Oman Marketing & Service Co. P.O. Box 2734,Behind Honda (00968) 24560232 npservice@omasco.com.om
(Omasco) Showroom,Wattayah,Oman 24560255 ashok.balan@omasco.com.om
OMAN Oman Marketing & Service Co. (Omasco) Al Ohi, Sohar,Oman (00968) 26846379 sooraj.neeran@omasco.com.om
OMAN Oman Marketing & Service Co. (Omasco) Sanaya, Salalah,Oman (00968) 23212290 rajagopal.pr@omasco.com.om
PAKISTAN Ammar Service & Spares Office No 6068 6th Floor Central (009221) 32775252 babji93@yahoo.com
Plaza Behind Gul Plaza Marston
Road.KARACHI
QATAR Al Muftah Service Centre Al Wakrah Road, P.O. Box 875, (00974) 44650880 service@almuftah.com
Doha,Qatar 44650110 almuftah@almuftah.com
SRI LANKA Delmege Forsyth & Co. Ltd Delmege Forsyth & Co. Ltd (009477) 2211111 dgeservice@delmege.com
Lifestyle Cluster 101, Vinayalankara jayantha.lifestyle@delmege.com
Mawatha Colombo 10 Sri Lanka
TUNISIA Societe Tunisienne De RUE DE LA PHYSIQUE. NOUVELLE (0021679) 389687 importa@stqu.com
Maintenance(STM) ZONE INDUSTRIELLE BEN AROUS.
2013 BEN AROUS, TUNISIA.
UAE Light House Electrical P.O. Box 120, Abu Dhabi (009712) 6726131 dewalt_lhe@hotmail.com
UAE Light House Electrical P.O. Box 120, Abu Dhabi (009712) 5548315 dewalt_lhe@hotmail.com
UAE BLACK+DECKER (Overseas) GmbH P.O. Box 5420, Dubai (009714) 8127400 / 8127406 service.mea@sbdinc.com
UAE Zillion Equipment and P.O. Box 10584, Ras Al Khaimah (009717) 2277095 zillionrak@gmail.com
UAE Zillion Equipment and Spare Parts P.O. Box 19740, Opp. Bin Sadal / (009713) 7216690 zilliontrdg@gmail.com
Trading LLC Trimix Redymix Sanaiya, Al Ain
YEMEN Middle East Trading Co. (METCO) 5th Flr.Hayel Saeed Anam (009674) 213455 metco@metcotrading.com
Bldg. Al-Mugamma St. Taiz, Yemen sami@metcotrading.com
YEMEN Middle East Trading Co. (METCO) Mualla Dakka, Aden (009672) 222670 metco@metcotrading.com
sami@metcotrading.com
YEMEN Middle East Trading Co. (METCO) Hayel st.,Sana'a,Yemen (009671) 204201 metco@metcotrading.com
sami@metcotrading.com
Page 17

Page 18

WARRANTY REGISTRATION CARD
YOUR NAME/ VOTRE NOM/
YOUR ADDRESS/ VOTRE ADRESSE/
POSTCODE/ CODE POSTAL/
DATE OF PURCHASE/ JOUR D’ACHAT/
DEALER'S NAME & ADDRESS/ NOM ET ADRESSE DU VENDEUR/
«ùßr
«∞FMu«Ê
«∞d±e «∞∂d¥bÍ
¢U¸¥a «∞Ad«¡
≈ßr Ë ´Mu«Ê «∞∂Uzl
PRODUCT MODEL NO.
TRO066
Page 19

Page 20

02.2017
 Loading...