

Page 1

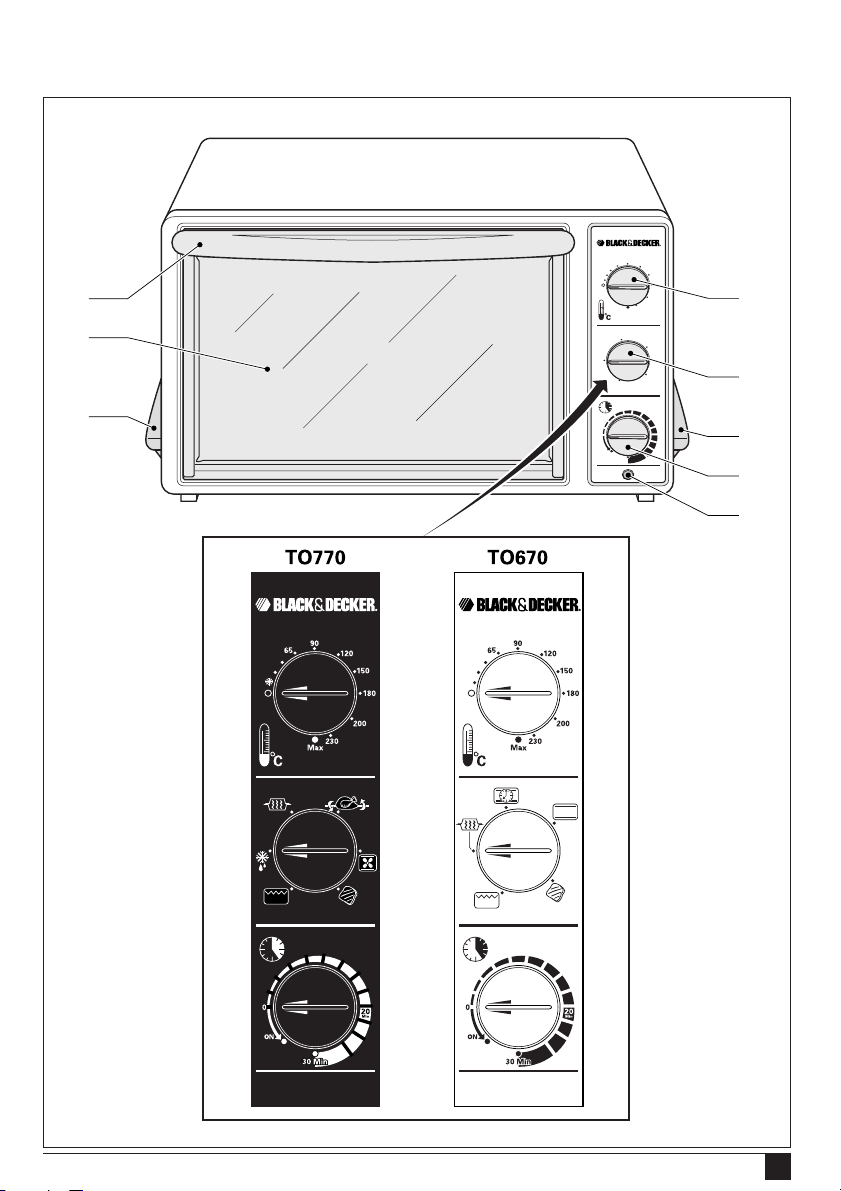
TO670
TO770
1
Page 2

English 5
Italiano 10
Español 16
EППЛУИО· 22
Türkçe 28
Copyright Black & Decker
2
Page 3
7
6
4
3
5
5
1
2
A
3
Page 4
10
9
8
11
1312
B
15 1616 15 14
17
D
4
E
C
1918
Page 5
ENGLISH
TO670 TOASTER OVEN
TO770 CONVECTION-ROTISSERIE OVEN
Thank you for choosing Black & Decker. We hope
that you will enjoy using this product for many years.
Denotes risk of electric shock.
OVERVIEW (fig. A)
1. Timer dial, on/off switch
2. Power indicator lamp
3. Function dial
4. Temperature dial
5. Carrying handles
6. Glass door
7. Door handle
EC DECLARATION OF CONFORMITY
TO670/TO770
Black & Decker declares that these
products conform to:
89/336/EEC, 73/23/EEC, EN 55014,
EN 60335, EN 61000
Kevin Hewitt
Director of Consumer Engineering
Spennymoor, County Durham DL16 6JG,
United Kingdom
INTENDED USE
Your Black & Decker toaster oven has been
designed for baking, roasting, toasting and
grilling. This product is intended for household
use only.
WARNING SYMBOLS
The following symbols are used in this manual:
Denotes risk of personal injury or damage
to the product in case of non-observance
of the instructions in this manual.
IMPORTANT SAFEGUARDS
◆ Warning! When using mains-powered appliances,
basic safety precautions, including the following,
should always be followed to reduce the risk of
fire, electric shock and personal injury.
◆ Read this entire manual carefully before using
the appliance.
◆ The intended use is described in this manual.
The use of any accessory or attachment or the
performance of any operation with this
appliance other than those recommended in
this instruction manual may present a risk of
personal injury.
◆ Retain this manual for future reference.
Using your appliance
◆ Make sure the appliance is switched off by
turning the timer dial (1) and the temperature
dial (4) to the off positions before connecting
to or disconnecting from the power supply.
◆ The door glass and the outside surfaces of the
oven get very hot during use. Oil and other
cooking liquids may also get very hot during use.
Always wear oven gloves when opening the door
and when removing trays from the oven.
◆ Always take care when using the appliance.
◆ Make sure that the oven does not obstruct the
socket used. The power supply cord should
not touch the unit during use or during the
cool down period.
◆ Never pull the power supply cord to
disconnect the plug from the socket. Keep the
power supply cord away from heat, oil and
sharp edges. Do not let the power supply cord
hang over the bench top edge.
◆ Do not cover trays or other parts with metal foil
as this may cause overheating.
5
Page 6
ENGLISH
◆ Never place cardboard, plastic, paper or similar
materials in the oven.
◆ Cooking utensils and oversized foods must not
be placed in the appliance as they may create
a fire risk or risk of electric shock.
◆ Do not store anything in the appliance other
than the accessories supplied.
◆ Do not place the appliance on or near heat
sources.
◆ Do not use the appliance near flammable items
(e.g. curtains) or combustible/explosive materials.
◆ Avoid scratching the glass door or nicking the
edges.
◆ Do not use the appliance outdoors.
◆ Always protect the appliance from water or
excessive humidity.
◆ Operate the appliance only with dry hands.
◆ If the power supply cord is damaged during
use, disconnect the appliance from the power
supply immediately. Do not touch the power
supply cord before disconnecting from the
power supply.
◆ Always check the progress of any ingredients
during cooking to avoid burnt food.
Safety of others
◆ Do not allow children or any person unfamiliar
with these instructions to use or come near the
appliance.
◆ Keep children or animals away from the unit
when in use and during cooling.
After use
◆ Turn the timer dial (1) and temperature dial (4)
to the off positions, disconnect the appliance
from the power supply and let the appliance
cool down before leaving it unattended and
before changing, cleaning or inspecting any
parts of the appliance.
◆ When not in use, the appliance should be
stored in a dry place. Children should not have
access to stored appliances.
Inspection and repairs
◆ Before use, check the appliance for damaged
or defective parts. Check for breakage of parts
and any other conditions that may affect its
operation.
6
◆ Do not use the appliance if any part is
damaged or defective.
◆ Before use, check the power supply cord for
signs of damage, ageing and wear.
◆ Do not use the appliance if the power supply
cord or mains plug is damaged or defective.
◆ If the power supply cord, mains plug, or any
other part is damaged or defective it must be
repaired by a Black & Decker service agent.
Do not attempt to repair it yourself.
◆ Never attempt to remove or replace any parts
other than those specified in this manual.
ELECTRICAL SAFETY
◆ Before use, check that the mains voltage
corresponds to the voltage on the rating plate.
Do not immerse the appliance, power
supply cord or plug in water or other liquid.
◆ This product must be earthed.
ASSEMBLY
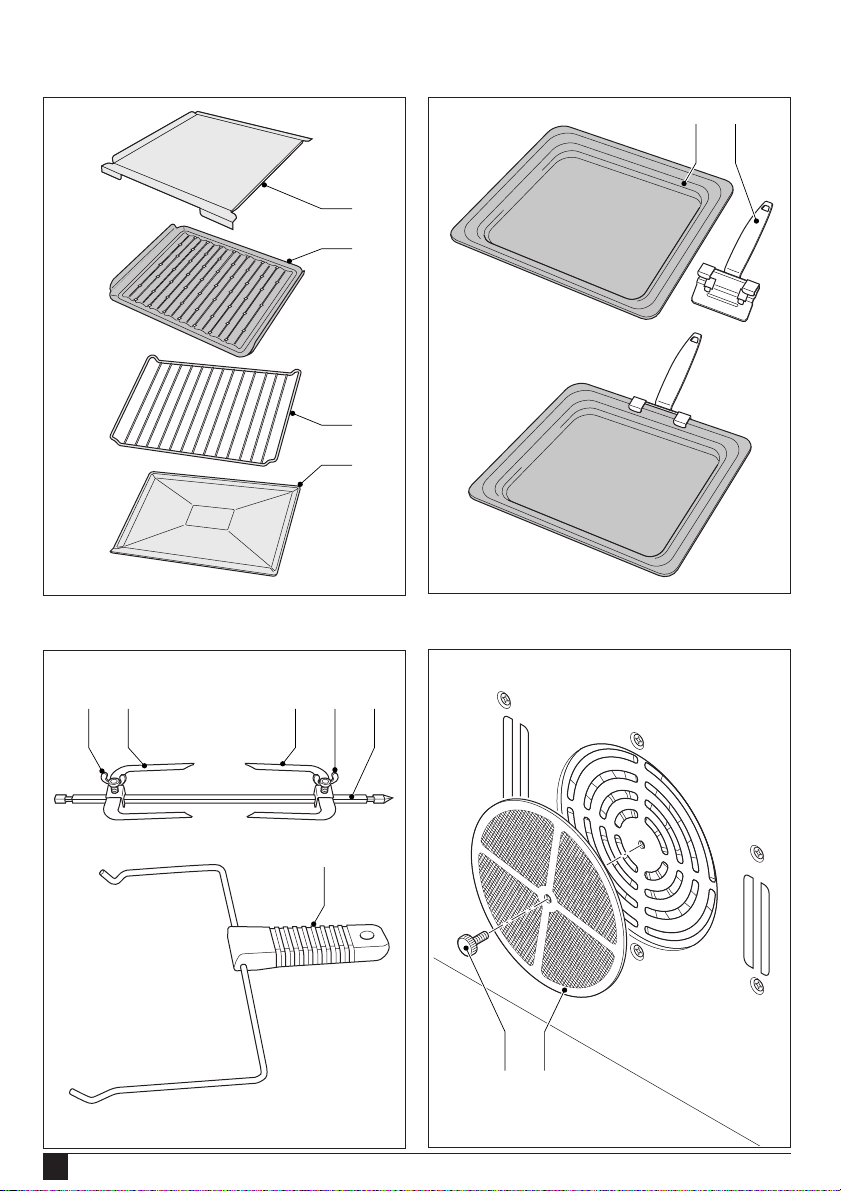
Inserting trays (fig. B & C)
There are five different trays:
◆ A chrome shelf (8)
◆ An enamel grill rack (9)
◆ A baking tray (10)
◆ A crumb tray (11)
◆ A grill pan (12)
The chrome shelf and the crumb tray can be placed
in support guides at three levels in the oven.
Tray handle (fig. C)
◆ The tray handle (13) can be used to remove
the trays from the oven.
◆ To place the handle on the grill pan (12), fit the
upper hooks of the handle over the long side
of the grill pan. Make sure that the handle is
located at the middle of the pan side.
◆ To place the handle on the shelf, grill rack,
baking tray or crumb tray, fit the lower hooks
of the handle over the long side of the tray.
Make sure that the handle is located at the
middle of the tray side.
Page 7
ENGLISH
Rotisserie (fig. D) - TO770
◆ Insert the pointed end of the spit (14) through
one of the forks (15). Secure the fork on the
square part of the spit with one of the wing
screws (16).
◆ Push the spit through the food, making sure
the food is impaled on the fork. The food must
be located centrally on the spit.
◆ Attach the second fork, again making sure it
penetrates the food and secure it with the
second wing screw.
USE
Before first use
◆ Make sure the timer dial (1) and the
temperature dial (4) are in the off positions.
◆ Place the unit on a suitable surface, at least 10
cm away from any obstructions.
◆ Remove the accessories from their packing and
dispose of any plastic bags safely.
◆ Wash all the accessories in hot soapy water.
Dry the accessories and replace them in the oven.
◆ The heating elements may smoke slightly during
first use. This does not indicate a problem.
Setting the control dials (fig. A)
For every cooking operation the three dials must
be set to the desired temperature, cooking
function and baking time.
Grill - For grilling fish, meats and for
melting cheese.
Keep warm - For keeping cooked food
warm for up to 60 minutes.
Slow cook (TO670) - For stews and soups
that require long cooking times on a lower
temparature.
Defrost (TO770) - For thawing frozen
foods.
Rotisserie (TO770) - For spit roasting a
chicken or joint of meat up to a maximum
weight of 2.3 kg (raw weight).
Setting the time
◆ Turn the timer dial (1) clockwise to the desired
cooking time. The power indication lamp (2)
comes on and the unit will heat up.
◆ When the set time has passed, a bell rings, the
power indication lamp goes out and the
appliance is turned off automatically.
◆ For longer cooking times, turn the dial
counter-clockwise to the on position. The unit
will now heat up and stay on until you switch it
off manually. Use a kitchen timer to check on
the cooking time.
◆ To switch the unit off, turn the timer dial (1)
and the temperature dial (4) to the off
positions. The power indication lamp goes out.
Using the cooking functions
Setting the temperature
◆ Turn the temperature dial (4) to the desired
cooking temperature.
Setting the function
◆ Turn the function dial (3) to the desired function.
◆ The oven has the following functions:
Bake/Roast - For baking cakes,
cookies and for roasting
TO670 TO770 poultry, beef, pork etc.
Toast - For toasting bread, muffins and
waffles.
Baking
TO670 TO770
◆ As a general rule, lower temperatures can be
used in the TO770 convection oven. Lower the
recipe temperatures by 10 °C to a minimum of
150 °C when baking food in the TO770.
◆ Place the shelf (8) face up in the lowest position.
◆ The baking tray (10) may be placed over the
shelf if desired.
◆ Set the temperature dial (4) to the desired
temperature, the function dial (3) to bake/roast
and the timer dial (1) to on or to the desired
time.
7
Page 8
ENGLISH
Roasting
TO670 TO770
◆ Place the shelf (8), face up, in the desired
position.
◆ Place the food on the grill rack (9), then place
the grill rack into the grill pan (12).
◆ Place the grill pan and rack onto the shelf.
◆ Set the temperature dial (4) to the desired
temperature, the function dial (3) to bake/roast
and the timer dial (1) to on or to the desired
time.
Toasting
◆ Place the crumb tray (11) under the lower
heating elements.
◆ Place the food on the shelf (8), in the best
position for cooking. The food should be close
to, but not touching, the top heating elements.
◆ Alternatively, the bread can be placed on the
assembled grill rack and grill pan. Place the
grill pan on the shelf in the oven.
◆ Set the temperature dial (4) to max, the
function dial (3) to toast and the timer dial (1)
to on or to the desired time.
◆ Bread may burn. Do not leave the appliance
unattended when toasting bread.
Keep warm
◆ Place the food on the shelf (8).
◆ Set the temperature dial (4) to the desired
temperature (max. 80 °C), the function dial (3)
to keep warm and the timer dial (1) to on or to
the desired time.
Slow cook (TO670)
◆ Place the shelf (8), face up, in the desired
position.
◆ Place the food in a covered casserole dish, and
place it on the shelf.
◆ Set the temperature dial (4) to 110 °C,
the function dial (3) to slow cook and the timer
dial (1) to on or to the desired time.
Defrost (TO770)
◆ Place the frozen food on the shelf (8) with the
grill pan (12) underneath to catch any water.
◆ Set the temperature dial (4) and the function
dial (3) to defrost, and the timer dial (1) to on.
◆ Check the progress of defrosting and remove
the food as soon as it is defrosted
◆ Large quantities of food should be defrosted in
a refrigerator.
◆ Cook the food immediately after defrosting.
Grilling
◆ Preheat the oven for 5 minutes at max
temperature.
◆ Place the shelf (8) in the best position for
cooking.
◆ Place the grill rack (9) into the grill pan (12),
then place the food on the grill rack.
◆ Place the grill pan and rack onto the shelf.
The food should be close to, but not touching
the top heating elements.
◆ Leave the oven door slightly open and turn the
food periodically during the cooking time.
◆ Set the temperature dial (4) to max, the
function dial (3) to grill and the timer dial (1) to
on or to the desired time.
8
Rotisserie (TO770)
◆ Put the food on the spit as described in the
assembly instructions.
◆ Place the pointed end of the spit in the drive
socket on the right side of the oven.
◆ Place the groove in the square end of the spit
over the left side bracket.
◆ Place the grill pan (12) under the food.
◆ Set the temperature dial (4) to max, the
function dial (3) to rotisserie and the timer dial
(1) to on or to the desired setting.
◆ After cooking, remove the rotisserie from the
oven with the rotisserie handle (17). Lift the left
side of the spit out of the bracket, then move
the spit to the left to remove it from the drive
socket.
Page 9
ENGLISH
CLEANING AND MAINTENANCE
Before cleaning and maintenance, turn the
timer dial (1) and the temperature dial (4)
to the off positions, remove the plug from
the socket and allow the appliance to cool.
◆ The inside of the oven is fitted with an easy-
clean coating.
◆ Wipe the exterior and the interior with a damp
cloth. Do not use any abrasive or solventbased cleaner. Do not use steel wool, scouring
pads or scrapers to clean the unit.
◆ Wash the trays and other accesories with warm
soapy water and dry well.
TO770 - Fan screen (fig. E)
The fan screen can be removed for cleaning.
◆ Unscrew the centre bolt (18) and take out the
screen (19).
◆ Clean the screen and refit it.
Do not immerse the appliance in water or
any other liquid.
Ensure the unit and the accessories are dry prior to
use.
PROTECTING THE ENVIRONMENT
Black & Decker provides a facility for
recycling Black & Decker products once
they have reached the end of their
working life. This service is provided free
of charge. To take advantage of this
service please return your product to any
authorised repair agent who will collect
them on our behalf.
GUARANTEE
Black & Decker is confident of the quality of its
products and offers an outstanding guarantee.
This guarantee statement is in addition to and in
no way prejudices your statutory rights.
The guarantee is valid within the territories of the
Member States of the European Union and the
European Free Trade Area.
If a Black & Decker product becomes defective
due to faulty materials, workmanship or lack of
conformity, within 24 months from the date of
purchase, Black & Decker guarantees to replace
defective parts, repair products subjected to fair
wear and tear or replace such products to ensure
minimum inconvenience to the customer unless:
◆ The product has been used for trade,
professional or hire purposes;
◆ The product has been subjected to misuse or
neglect;
◆ The product has sustained damage through
foreign objects, substances or accidents;
◆ Repairs have been attempted by persons other
than authorised repair agents or Black & Decker
service staff.
To claim on the guarantee, you will need to
submit proof of purchase to the seller or an
authorised repair agent. You can check the
location of your nearest authorised repair agent by
contacting your local Black & Decker office at the
address indicated in this manual. Alternatively, a
list of authorised Black & Decker repair agents and
full details of our after-sales service and contacts
are available on the Internet at: www.2helpU.com.
You can check the location of your nearest
authorised repair agent by contacting your local
Black & Decker office at the address indicated in
this manual. Alternatively, a list of authorised
Black & Decker repair agents and full details of our
after-sales service and contacts are available on
the Internet at: www.2helpU.com.
9
Page 10
ITALIANO
TO670 FORNO ELETTRICO
TO770 FORNO VENTILATO CON SPIEDO
Grazie per aver scelto Black & Decker. Ci auguriamo
che usi questo prodotto per molti anni.
Indica pericolo di scossa elettrica.
PROSPETTO (fig. A)
1. Selettore del timer, interruttore on/off
2. Spia di alimentazione
3. Selettore delle funzioni
4. Selettore della temperatura
5. Impugnature per il trasporto
6. Sportello di vetro
7. Maniglia dello sportello
DICHIARAZIONE CEE DI CONFORMITÀ
TO670/TO770
Black & Decker dichiara che questi prodotti
sono stati costruiti in conformità a:
89/336/CEE, 73/23/CEE, EN 55014,
EN 60335, EN 61000
Kevin Hewitt
Direttore di Ricerca e Sviluppo
Spennymoor, County Durham DL16 6JG,
United Kingdom
USO PROGETTATO
La tostiera Black & Decker è stata progettata per
la cuocere al forno, arrostire, tostare e gratinare.
Questo prodotto é stato ideato esclusivamente
per uso domestico.
SIMBOLI DI SICUREZZA
Nel presente manuale si fa uso dei seguenti
simboli:
Indica il rischio d’infortuni alle persone o
danni all’apparecchio in caso di mancata
osservazione delle istruzioni contenute nel
manuale.
10
IMPORTANTI NORME DI SICUREZZA
◆ Attenzione! Quando si impiegano utensili
alimentati elettricamente, per ridurre il rischio
di incendio, di scosse elettriche e infortuni
occorre seguire sempre delle precauzioni di
sicurezza di base, fra cui le seguenti:
◆ Prima di adoperare l’elettrodomestico, leggere
attentamente le istruzioni del presente manuale.
◆ L’utilizzo previsto è quello descritto in questo
manuale. L’uso di accessori o attrezzature
diversi o l’uso di questo utensile per scopi
diversi da quelli indicati nel presente manuale
d’uso comportano il rischio di infortuni.
◆ Conservare questo manuale di istruzioni per
successive consultazioni.
Uso dell’utensile
◆ Prima di inserire o disinserire la spina della
corrente, accertarsi che l’elettrodomestico sia
spento girando il selettore del timer (1) e il
selettore della temperatura (4) nella posizione
corretta.
◆ Il vetro dello sportello e le superfici esterne del
forno si riscaldano molto durante l’uso. Anche
l’olio e altri liquidi utilizzati per la cottura
possono diventare bollenti durante l’uso.
Indossare sempre guanti da forno quando si apre
lo sportello e si estraggono i vassoi dal forno.
◆ Fare sempre attenzione quando si usa
l’apparecchio.
◆ Assicurarsi che il forno non ostruisca la presa
elettrica utilizzata. Il cavo di alimentazione non
deve toccare l’unità durante l’uso o durante il
periodo di raffreddamento.
◆ Non tirare mai il cavo di alimentazione per
disinserire la spina dalla presa. Mantenere il
cavo lontano da fonti di calore, da olio e
spigoli taglienti.
Page 11
ITALIANO
ITALIANO
Non lasciare il cavo di alimentazione appeso
dal bordo del ripiano.
◆ Non coprire i vassoi o altre parti con lamine di
metallo per evitare il surriscaldamento.
◆ Non mettere mai cartone, plastica, carta o
materiali simili nel forno.
◆ Gli utensili da cottura e i cibi di grandi
dimensioni non devono essere introdotti
nell’apparecchio perché possono provocare
rischi di incendio o di scosse elettriche.
◆ Non conservare nell’apparecchio nient’altro
che gli accessori forniti.
◆ Non collocare l’apparecchio sopra o vicino a
fonti di calore.
◆ Non utilizzare l’elettrodomestico in prossimità
di oggetti infiammabili (p.es. tende) o materiali
combustibili/esplosivi.
◆ Evitare di graffiare lo sportello di vetro o di
scalfirne i bordi.
◆ Evitare di utilizzare l’elettrodomestico all’esterno.
◆ Tenere sempre l’elettrodomestico al riparo
dall’acqua o dall’umidità eccessiva.
◆ L’elettrodomestico va adoperato con le mani
asciutte.
◆ Se il cavo di alimentazione si danneggia durante
l’uso, disinserire immediatamente la spina
dell’apparecchio dalla presa di corrente. Non
toccare il cavo di alimentazione se non dopo
aver disinserito la spina dalla presa di corrente.
◆ Controllare sempre lo stato di avanzamento
della cottura di qualsiasi ingrediente per evitare
di bruciarlo.
Sicurezza altrui
◆ Vietare di usare o avvicinarsi all’apparecchio a
qualsiasi persona che non abbiano letto il
presente manuale d’istruzioni.
◆ Mantenere bambini o animali lontani dall’unità
durante l’uso e il raffreddamento.
Dopo l’uso
◆ Girare il selettore del timer (1) e quello della
temperatura (4) nelle posizioni di spento,
disinserire la spina dell’elettrodomestico dalla
presa di corrente e lasciare raffreddare
l’apparecchio prima di lasciarlo incustodito e
prima di sostituire, pulire o ispezionare
qualsiasi pezzo dello stesso.
◆ Quando non è in funzione, l’utensile deve
essere conservato in un luogo asciutto. E non
accessibile ai bambini.
Ispezione e riparazioni
◆ Prima dell’uso, verificare che non vi siano
componenti danneggiati o difettosi. Verificare
anche che non vi siano parti rotte e che nulla
comprometta il funzionamento dell’apparecchio.
◆ Non usare l’elettrodomestico se presenta
elementi danneggiati o difettosi.
◆ Prima dell’uso, controllare che il cavo di
alimentazione non presenti segni di danni,
invecchiamento e usura.
◆ Non usare l’elettrodomestico se il cavo di
alimentazione o la spina sono danneggiati o
difettosi.
◆ Se il cavo di alimentazione, la spina o qualsiasi
altro componente è danneggiato o difettoso
deve essere riparato da un centro di assistenza
tecnica della Black & Decker. Si raccomanda di
non manomettere l’apparecchio.
◆ Non tentare mai di smontare o sostituire
componenti diversi da quelli indicati nel
presente manuale.
NORME DI SICUREZZA ELETTRICA
◆ Prima dell’uso, controllare che la tensione di
alimentazione corrisponda a quella indicata
sulla targhetta con i dati caratteristici.
Non immergere l’elettrodomestico,
la spina o il cavo di alimentazione in acqua
o altri liquidi.
◆ L’apparecchio deve essere messo a massa.
MONTAGGIO
Inserimento dei vassoi (fig. B & C)
Ci sono cinque diversi tipi di vassoi:
◆ Una griglia cromata (8)
◆ Una griglia smaltata (9)
◆ Un vassoio da forno (10)
◆ Un vassoio raccoglibriciole (11)
◆ Un tegame (12)
La griglia cromata e il vassoio raccoglibriciole
possono essere inseriti nelle guide del forno su tre
livelli.
11
Page 12

ITALIANO
Manico del vassoio (fig. C)
◆ Il manico del vassoio (13) può essere usato per
estrarre i vassoio dal forno.
◆ Per collocare il manico sul tegame (12), inserire
i ganci superiori del manico sul lato lungo del
tegame. Accertarsi che il manico si trovi al
centro del lato del tegame.
◆ Per collocare il manico sulla griglia cromata,
sulla griglia smaltata, sul vassoio da forno o sul
vassoio raccoglibriciole, inserire i ganci inferiori
del manico sul lato lungo del vassoio.
Accertarsi che il manico si trovi al centro del
lato del vassoio.
Impostazione della temperatura
◆ Ruotare il selettore (4) portandolo sulla
temperatura di cottura desiderata.
Impostazione della funzione
◆ Ruotare il selettore della funzione (3)
portandolo sulla funzione desiderata.
◆ Il forno ha le seguenti funzioni:
Cottura al forno/Cottura arrosto Per cuocere dolci, biscotti e
TO670 TO770 per arrostire pollame, carne di
manzo, di maiale, ecc.
TO770 - Spiedo (fig. D)
◆ Inserire l’estremità dello spiedo (14) in una
delle forchette (15). Fissare la forchetta sulla
parte quadrata dello spiedo con una delle viti
a galletto (16).
◆ Affondare lo spiedo nel cibo assicurandosi che
il cibo resti infilzato sulla forchetta. Il cibo deve
essere collocato al centro dello spiedo.
◆ Fissare la seconda forchetta, accertandosi
nuovamente che penetri il cibo e fissarla con la
seconda vite a galletto.
USO
Prima di usare l’utensile per la prima volta
◆ Accertarsi che il selettore del timer (1) e quello
della temperatura (4) siano in posizione di spento.
◆ Collocare l’unità su una superficie adatta, ad
almeno 10 cm da qualsiasi ostruzione.
◆ Rimuovere gli accessori dalla loro confezione e
smaltire in condizioni di sicurezza qualsiasi
busta di plastica.
◆ Lavare tutti gli accessori in acqua calda e sapone.
Asciugare gli accessori e rimetterli nel forno.
◆ Gli elementi riscaldanti possono fumare
leggermente quando si usa l’utensile per la
prima volta. Ciò non rappresenta un problema.
Impostazione dei quadranti di comando (fig. A)
Per ogni operazione di cottura i tre quadranti
devono essere impostati sulla temperatura, sulla
funzione di cottura e sul tempo di cottura desiderati.
Tostatura – Per tostare pane, muffin e
cialde.
Grill – Per gratinare pesce, carni e per
fondere il formaggio.
Mantenere caldo – Per mantenere caldo il
cibo per massimo 60 minuti.
Cottura lenta (TO670) – Per stufati e
minestre che richiedono tempi di cottura
lunghi ad una temperatura più bassa.
Scongelare (TO770) – Per scongelare cibi
congelati.
Spiedo (TO770) – Per arrostire allo spiedo
un pollo o un pezzo di carne di massimo
2,3 kg di peso (peso crudo).
Impostazione del tempo
◆ Ruotare il selettore del timer (1) in senso orario
portandolo sul tempo di cottura desiderato.
La spia di alimentazione (2) si accende e l’unità
di riscalda.
◆ Trascorso il tempo impostato, suona un
campanello, la spia di alimentazione scompare
e l’apparecchio si spegne automaticamente.
◆ Per periodi di cottura più lunghi, ruotare il
selezionatore del timer in senso antiorario
verso la posizione di acceso. L’unità si riscalda
e resta accesa fino a che non viene spenta
manualmente. Usare un timer da cucina per
controllare il tempo di cottura.
◆ Per spegnere l’unità, ruotare il selezionatore
del timer (1) e quello della temperatura (4) sulla
posizione di off. La spia di alimentazione
scompare.
12
Page 13

ITALIANO
ITALIANO
Come usare le funzioni di cottura
Cottura al forno
TO670 TO770
◆ In linea di massima, nel forno a convezione
TO770 si possono usare temperature più
basse. Abbassare le temperature delle ricette
di 10 °C fino ad un minimo di 150 °C quando
si cucina nel forno TO770.
◆ Collocare la griglia cromata (8) rivolta verso
l’alto nella posizione inferiore.
◆ Il vassoio da forno (10) si può collocare sulla
griglia cromata, se si desidera.
◆ Impostare il selettore della temperatura (4)
sulla temperatura desiderata, il selettore della
funzione (3) su cottura al forno/cottura arrosto
e il selettore del timer (1) su on, oppure sul
tempo desiderato.
Cottura arrosto
TO670 TO770
◆ Collocare la griglia cromata (8) rivolta verso
l’alto nella posizione desiderata.
◆ Collocare il cibo sulla griglia smaltata (9) e
quest’ultima nel tegame (12).
◆ Collocare il tegame e la griglia sulla griglia
cromata.
◆ Impostare il selettore della temperatura (4)
sulla temperatura desiderata, il selettore della
funzione (3) su cottura al forno/cottura arrosto
e il selettore del timer (1) su on, oppure sul
tempo desiderato.
◆ Impostare il selettore della temperatura (4)
sulla temperatura massima, il selettore della
funzione (3) su tostatura e il selettore del timer
(1) su on, oppure sul tempo desiderato.
◆ Il pane può bruciarsi: Non lasciare mai il forno
incustodito mentre sta tostando il pane.
Gratinatura
◆ Pre-riscaldare il forno per 5 minuti alla
temperatura massima.
◆ Collocare la griglia cromata (8) nella migliore
posizione per la cottura.
◆ Collocare il cibo sulla griglia smaltata (9) nel
tegame (12), e poi poggiare il cibo sulla griglia
smaltata.
◆ Collocare il tegame e la griglia sulla griglia
cromata. Il cibo deve essere vicino ma non
deve toccare gli elementi riscaldanti superiori.
◆ Lasciare lo sportello del forno leggermente
aperto e girare il cibo regolarmente durante il
tempo di cottura.
◆ Impostare il selettore della temperatura (4)
sulla temperatura massima, il selettore della
funzione (3) su gratinatura e il selettore del
timer (1) su on, oppure sul tempo desiderato.
Mantenere in caldo
◆ Mettere il cibo sulla griglia cromata (8).
◆ Impostare il selettore della temperatura (4)
sulla temperatura desiderata (max. 80 °C),
il selettore della funzione (3) su mantenere in
caldo e il selettore del timer (1) su on,
oppure sul tempo desiderato.
Tostatura
◆ Collocare il raccoglibriciole (11) sotto gli
elementi riscaldanti inferiori.
◆ Collocare il cibo sulla griglia cromata (8), nella
migliore posizione per la cottura. Il cibo deve
essere vicino ma non deve toccare gli elementi
riscaldanti superiori.
◆ In alternativa, il pane si può sistemare sulla
griglia smaltata e nel tegame. Collocare sul
tegame sulla griglia cromata nel forno.
Cottura lenta (TO670)
◆ Collocare la griglia cromata (8) rivolta verso
l’alto nella posizione desiderata.
◆ Sistemare il cibo in un tegame coperto e
metterlo sulla griglia cromata.
◆ Impostare il selettore della temperatura (4) sul
110 °C, il selettore della funzione (3) su cottura
lenta e il selettore del timer (1) su on, oppure
sul tempo desiderato.
13
Page 14

ITALIANO
Scongelamento (TO770)
◆ Collocare il cibo congelato sulla griglia
cromata (8) con sotto il tegame (12) per
raccogliere eventuali sgocciolamenti.
◆ Impostare il selettore della temperatura (4) e il
selettore della funzione (3) per scongelare, e il
selettore del timer (1) su on.
◆ Controllare il graduale scongelamento e
togliere il cibo non appena si è scongelato
◆ Grandi quantità di cibo devono essere
scongelate in un frigorifero.
◆ Cucinare il cibo immediatamente dopo lo
scongelamento.
Spiedo (TO770)
◆ Collocare il cibo sullo spiedino, come descritto
nelle istruzioni di montaggio.
◆ Collocare l’estremità appuntita dello spiedino
nella guida sul lato destro del forno.
◆ Collocare la scanalatura nell’estremità quadrata
dello spiedino sul supporto di sinistra.
◆ Sistemare il tegame (12) sotto al cibo.
◆ Impostare il selettore della temperatura (4)
sulla temperatura massima, il selettore della
funzione (3) su spiedo e il selettore del timer (1)
su on, oppure sull’impostazione desiderata.
◆ Dopo la cottura, estrarre lo spiedo con
l’apposito manico (17). Sollevare il lato sinistro
dello spiedino ed estrarlo dal supporto, poi
spostarlo a sinistra per estrarlo dalla guida.
PULIZIA E MANUTENZIONE
Prima della pulizia e della manutenzione,
girare il selettore del timer (1) e quello
della temperatura (4) in posizione di
spento, estrarre la spina dalla presa e
lasciare raffreddare l’elettrodomestico.
◆ L’interno del forno è dotato di un rivestimento
facile da pulire.
◆ Pulire l’esterno e l’interno con un panno
umido. Non usare materiali abrasivi o
detergenti a base di solventi. Non usare lana di
acciaio, spugnette o spatole per pulire l’unità.
◆ Lavare i vassoi e gli altri accessori con acqua
calda e sapone e asciugarli accuratamente.
TO770 – Schermo di ventilazione (fig. E )
Lo schermo di ventilazione si può rimuovere per
pulirlo.
◆ Svitare il bullone centrale (18) ed estrarre lo
schermo (19).
◆ Pulire lo schermo e rimontarlo.
Non immergere l’unità in acqua o in altri
liquidi.
Assicurarsi che l’unità e gli accessori siano asciutti
prima di usarli.
PROTEZIONE DELL’AMBIENTE
Black & Decker offre ai suoi clienti la
possibilità di riciclare i prodotti
Black & Decker che hanno esaurito la loro
vita di servizio. Il servizio viene offerto
gratuitamente. Per utilizzarlo, è sufficiente
restituire il prodotto a qualsiasi tecnico
autorizzato, incaricato della raccolta per
conto dell’azienda.
Per individuare il tecnico autorizzato più vicino,
rivolgersi alla sede Black & Decker locale, presso il
recapito indicato nel presente manuale. Altrimenti
un elenco completo di tutti i tecnici autorizzati
Black & Decker e i dettagli completi sui contatti e i
servizi post-vendita sono disponibili su Internet
presso: www.2helpU.com.
GARANZIA
Certa della qualità dei suoi prodotti, Black & Decker
offre una garanzia eccezionale. Il presente certificato
di garanzia è complementare ai diritti statutari e non
li pregiudica in alcun modo. La garanzia è valida
entro il territorio degli Stati membri dell’Unione
Europea e dell’EFTA (European Free Trade Area).
Se un prodotto Black & Decker risulta difettoso
per qualità del materiale, della costruzione o per
mancata conformità entro 24 mesi dalla data di
acquisto, Black & Decker garantisce la sostituzione
delle parti difettose, provvede alla riparazione dei
prodotti se ragionevolmente usurati oppure alla
loro sostituzione, in modo da ridurre al minimo il
disagio del cliente a meno che:
14
Page 15

◆ Il prodotto non sia stato destinato ad usi
commerciali, professionali o al noleggio;
◆ Il prodotto non sia stato usato in modo
improprio o scorretto;
◆ Il prodotto non abbia subito danni causati da
oggetti o sostanze estranee oppure incidenti;
◆ Il prodotto non abbia subito tentativi di
riparazione non effettuati da tecnici autorizzati
né dall’assistenza Black & Decker.
Per attivare la garanzia è necessario esibire la
prova comprovante l’acquisto al venditore o al
tecnico autorizzato. Per individuare il tecnico
autorizzato più vicino, rivolgersi alla sede
Black & Decker locale, presso il recapito indicato
nel presente manuale. Altrimenti un elenco
completo di tutti i tecnici autorizzati Black & Decker
e i dettagli completi sui contatti e i servizi postvendita sono disponibili su Internet presso:
www.2helpU.com.
ITALIANO
ITALIANO
15
Page 16

ESPAÑOL
TO670 HORNO TOSTADOR
TO770 HORNO ASADOR POR CONVECCIÓN
Le damos las gracias por haber elegido
Black & Decker. Esperamos que disfrute utilizando
este producto durante muchos años.
VISTA GENERAL (fig. A)
1. Dial temporizador, interruptor de encendido/
apagado
2. Luz indicadora de corriente
3. Dial de funciones
4. Dial de temperaturas
5. Mangos de transporte
6. Puerta de cristal
7. Pomo de puerta
DECLARACIÓN CE DE CONFORMIDAD
TO670/TO770
Black & Decker certifica que estos
aparatos eléctricos han sido construidos
de acuerdo a las normas siguientes:
89/336/CEE, 73/23/CEE, EN 55014,
EN 60335, EN 61000
Kevin Hewitt
Director de Ingeniería
Spennymoor, County Durham DL16 6JG,
United Kingdom
FINALIDAD
El horno tostador Black & Decker ha sido
diseñado para cocer pan, para asar, tostar y asar a
la parrilla. Este producto está pensado para
consumo doméstico únicamente.
16
SÍMBOLOS DE ADVERTENCIA
En este manual se utilizan los símbolos siguientes:
Indica riesgo de lesiones a las personas,
o daños al aparato en el caso de no
atenerse a las instrucciones dadas en este
manual.
Indica riesgo de electrocución.
MEDIDAS PREVENTIVAS DE
SEGURIDAD IMPORTANTES
◆ ¡Atención! Cuando use herramientas
eléctricas, debe seguir siempre las
precauciones de seguridad básicas, incluidas
las siguientes, a fin de reducir el riesgo de
incendios, electrocución y lesiones personales.
◆ Lea completamente este manual antes de
utilizar el aparato.
◆ En este manual se explica para qué uso está
destinada la herramienta. El uso de otros
accesorios, adaptadores, o la propia utilización
de este aparato en cualquier forma diferente
de las recomendadas en este manual de
instrucciones puede constituir un riesgo de
lesiones a las personas.
◆ Mantenga a mano este manual para consultas
posteriores.
Utilización del aparato
◆ Asegúrese de que el aparato está desconectado
girando el dial temporizador (1) y el dial de
temperaturas (4) a las posiciones off
(desconectado) antes de conectarlo o
desconectarlo de la corriente eléctrica.
◆ Cuando se usa el aparato, la puerta de cristal y
las superficies exteriores del horno se ponen
muy calientes. El aceite y otros líquidos
empleados en el cocinado pueden también
llegar a calentarse mucho cuando se está
utilizando el horno.
Page 17

ESPAÑOL
Utilice siempre guantes para horno cuando
abra la puerta y retire las bandejas del horno.
◆ Tenga siempre cuidado cuando utilice este
aparato.
◆ Asegúrese de que el horno no obstruya el
enchufe de corriente utilizado. El cable de
corriente no debe tocar la unidad durante el
tiempo de utilización o durante el periodo de
enfriamiento.
◆ Nunca tire del cable para desconectarlo del
enchufe. Proteja el cable del calor, del aceite
y de las aristas vivas. No deje que el cable de
corriente cuelgue por encima del borde
superior del banco.
◆ No cubra las bandejas u otras piezas con papel
metálico puesto que se puede causar
sobrecalentamiento.
◆ No coloque nunca en el horno papel cartón,
plásticos, papeles o materiales similares.
◆ No coloque nunca en el aparato los utensilios
de cocina o alimentos sobredimensionados
puesto que pueden producirse riesgos de
incendios o de electrocución.
◆ No guarde nunca en el aparato otras cosas
que no sean los accesorios suministrados.
◆ No coloque el aparato en o cerca de fuentes
de calor.
◆ No utilice el aparato cerca de materiales que
prendan con facilidad (por ejemplo, cortinas)
o de materiales combustibles/explosivos.
◆ Evite arañar la puerta de cristal o hacer
muescas en los bordes.
◆ No utilice este aparato en el exterior.
◆ Proteja siempre el aparato del agua o de la
humedad excesiva.
◆ Haga funcionar el aparato únicamente con las
manos secas.
◆ Si el cable de corriente estuviera dañado por
el uso, desconecte inmediatamente el aparato
de la corriente. No toque el cable de antes de
desconectar el aparato del enchufe de corriente.
◆ Compruebe siempre la marcha de los
ingredientes durante el cocinado para evitar
que el alimento se queme.
Seguridad de otras personas
◆ No deje que los niños o personas no
familiarizadas con las instrucciones de uso del
aparato lo manejen o se acerquen al mismo.
◆ Mantenga a los niños o animales alejados de la
unidad mientras ésta se esté utilizando y
durante el tiempo de enfriado.
Cuando acabe de utilizar la herramienta
◆ Gire el dial del temporizador (1) y el dial de
temperatura (4) a las posiciones off (apagados),
desconecte el aparato de la corriente y déjelo
enfriar antes de quede desatendido y antes de
cambiar, limpiar o inspeccionar cualquier pieza
del mismo.
◆ Cuando no esté siendo utilizado, el aparato
debe guardarse en lugar seco. Los niños no
deben tener acceso a estos aparatos guardados.
Inspección y reparaciones
◆ Antes de utilizarlo, revise el aparato para ver si
está dañado o tiene piezas defectuosas.
Compruebe si hay alguna pieza rota o cualquier
situación que pudiera afectar a su funcionamiento.
◆ No use el aparato si hay alguna pieza dañada
o defectuosa.
◆ Antes de utilizar el aparato, revise el cable de
alimentación de corriente para ver si presenta
indicios de daños, envejecimiento o desgaste.
◆ No utilice el aparato si el cable de corriente o
el enchufe estuvieran dañados o defectuosos.
◆ Si el cable de corriente, la clavija de corriente
o cualquier otro pieza estuvieran dañadas o
defectuosas, deberán ser reparadas por un
técnico de servicios de Black & Decker.
No intente repararla usted mismo.
◆ No intente nunca extraer o sustituir ninguna
de las piezas que no sean las especificadas en
este manual.
SEGURIDAD ELÉCTRICA
◆ Antes de usarlo, compruebe que el voltaje de
la red corresponde al valor indicado en la
placa de características.
No sumerja el aparato, el cable de
corriente o la clavija en agua u otro tipo
de líquido.
17
Page 18

ESPAÑOL
◆ Se requiere conexión a tierra.
MONTAJE
Inserción de las bandejas (fig. B y C)
Hay cinco bandejas diferentes:
◆ Una bandeja cromada (8)
◆ Una parrilla para asar esmaltada (9)
◆ Una bandeja para la cocción del pan (10)
◆ Una bandeja de empanar (11)
◆ Una bandeja sartén para asar a la parrilla (12)
Las bandejas de cromo y de empanar se pueden
colocar en las guías soporte provistas en el horno
situadas a tres alturas diferentes.
Mango de la bandeja (fig. C)
◆ El mango de bandeja (13) se puede utilizar
para retirar las bandejas del horno.
◆ Para colocar el mango en la bandeja sartén
para asar (12), fije los ganchos superiores del
mango por encima del lado largo de la
bandeja sartén. Asegúrese de que el mango
esté colocado en la mitad del lateral de la
bandeja sartén.
◆ Para colocar el mango en la bandeja, parrilla
para asar, bandeja de cocción de pan o bandeja
de empanar, fije los ganchos inferiores del
mango por encima del lado largo de la
bandeja. Asegúrese de que el mango esté
colocado en la mitad del lateral de la bandeja.
TO770 - Asador (fig. D)
◆ Inserte el extremo puntiagudo de la punta de
ensartar (14) por una de las horquillas (15).
Sujete la horquilla sobre la parte cuadrada de
la punta de ensartar con uno de los tornillos de
aleta (16).
◆ Haga pasar la punta de ensartar por el alimento
asegurándose de que éste queda ensartado
en la horquilla. El alimento debe quedar
centrado en la punta de ensartar.
◆ Acople la segunda horquilla, asegurándose,
de nuevo, que atraviesa el alimento y
sujetándola con el otro tornillo de aleta.
18
USO
Antes de usarlo por primera vez
◆ Asegúrese de que el dial del temporizador (1)
y el dial de temperatura (4) están en las
posiciones off (apagados)
◆ Coloque la unidad sobre una superficie
adecuada, al menos a una distancia de 10 cm
de cualquier obstáculo.
◆ Saque los accesorios de su embalaje y deseche
las bolsas de plástico de forma segura.
◆ Lave todos los accesorios con agua caliente
enjabonada. Seque los accesorios y colóquelos
en el horno.
◆ Cuando se utiliza el aparato por primera vez,
los elementos de calentamiento pueden
humear ligeramente. Esto no es indicativo de
problema alguno.
Ajuste de los diales de control (fig. A)
Cada vez que se utilice el horno, los tres diales se
deben ajustar a la temperatura, función de
cocinado y tiempo de cocción deseados.
Ajuste de la temperatura
◆ Gire el dial de temperatura (4) a la temperatura
de cocinado deseada.
Ajuste de funciones
◆ Gire el dial de funciones (3) a la función deseada.
◆ El horno tiene las funciones siguientes:
Horno de Pan/Asar – Para hacer
tartas, galletas y para asar pollos,
TO670 TO770 carne de vaca, cerdo, etc.
Tostar – Para tostar pan, hacer bollos
y gofres.
Parrilla – Para asar a la parrilla pescado,
carnes y para fundir queso.
Conservar caliente – para conservar
calientes durante 60 minutos los alimentos
cocinados .
Cocinado lento (TO670) – Para guisados y
sopas que requieren tiempos largos de
cocinado con baja temperatura.
Descongelar (TO770) – Para descongelar
alimentos congelados.
Page 19

ESPAÑOL
Asados (TO770) – Para asar pollos con las
puntas de insertar o para pinchos de carne
hasta un máximo de 2,3 kg. (peso de la
materia prima).
Ajuste del tiempo
◆ Gire el dial del temporizador(1) a derechas
hasta el tiempo deseado de cocinado. La luz
indicadora de corriente (2) se encenderá y la
unidad comenzará a calentar.
◆ Cuando se ha alcanzado el tiempo
establecido, sonará el timbre, apagándose la
luz de corriente y el aparato se desconectará
automáticamente.
◆ Para tiempos de cocinado más largos, gire el
dial a izquierdas hasta la posición on
(encendido). La unidad comenzará a calentar y
lo seguirá haciendo hasta que usted apague el
horno manualmente. Utilice un temporizador
de cocina para comprobar el tiempo de cocinado.
◆ Para apagar la unidad, gire el dial del
temporizador (1) y el dial de temperatura (4)
a las posiciones off (desconectados).
La luz indicadora de corriente se apagará.
Uso de las funciones de cocinado
Cocción de pan
TO670 TO770
◆ Por regla general, se pueden utilizar temperaturas
más bajas en el horno de convección TO770.
Baje las temperaturas de la receta en 10 °C
hasta un mínimo de 150 °C cuando se horneen
alimentos en el TO770.
◆ Coloque la bandeja (8) boca arriba en la posición
más baja.
◆ La bandeja de cocción de pan (10) se puede
colocar encima de la bandeja si así se desea.
◆ Ponga el dial de temperatura (4) a la
temperatura deseada, el dial de funciones (3)
en cocer/asar y el dial del temporizador (1) en
el tiempo de cocinado deseado.
Asados
TO670 TO770
◆ Coloque la bandeja (8) boca arriba en la
posición deseada.
◆ Coloque el alimento en la parrilla de asar (9) y,
seguidamente, coloque esta parrilla en
la bandeja sartén de asar (12).
◆ Coloque la sartén de asar a la parrilla y la
parrilla en la bandeja.
◆ Ponga el dial de temperatura (4) a la temperatura
deseada, el dial de funciones (3) en cocer/asar
y el dial del temporizador (1) en el tiempo de
cocinado deseado.
Tostar
◆ Coloque la bandeja de empanar (11) debajo
de los elementos calentadores inferiores.
◆ Coloque los alimentos en la bandeja (8) en la
mejor posición para su cocinado. Los alimentos
debe estar cerca de los elementos
calentadores superiores pero sin tocarlos.
◆ Alternativamente, el pan se puede colocar en
el conjunto montado de parrilla de asar y
sartén de grill. Coloque la sartén de grill en la
bandeja dentro del horno.
◆ Ponga el dial de temperatura (4) en max,
el dial de funciones (3) en tostar y el dial del
temporizador (1) en el tiempo de cocinado
deseado.
◆ Él puede quemarse. No deje desatendido el
aparato mientras esté tostando pan.
Parrilla
◆ Precaliente el horno a la temperatura máxima
durante 5 minutos.
◆ Coloque la bandeja (8) en la mejor posición
para cocinar.
◆ Coloque la parrilla de asar (9) dentro de la sartén
de grill (12), seguidamente, coloque los
alimentos en la parrilla de asar.
◆ Coloque la sartén de asar a la parrilla y la
parrilla en la bandeja. Los alimentos debe estar
cerca de los elementos calentadores
superiores pero sin tocarlos.
◆ Deje ligeramente abierta la puerta del horno y
dé vueltas a los alimentos periódicamente
durante el tiempo de cocinado de los mismos.
19
Page 20

ESPAÑOL
◆ Ponga el dial de temperatura (4) en max, el
dial de funciones (3) en asar a la parrilla y el
dial del temporizador (1) en el tiempo de
cocinado deseado.
Mantener caliente
◆ Coloque los alimentos en la bandeja (8).
◆ Ponga el dial de temperatura (4) a la
temperatura deseada (máximo 80º C), el dial
de funciones (3) en mantener caliente y el dial
del temporizador (1) en el tiempo deseado.
Cocinado lento (TO670)
◆ Coloque la bandeja (8) boca arriba en la
posición deseada.
◆ Ponga los alimentos en una bandeja cacerola
tapada y colóquela en la bandeja.
◆ Ponga el dial de temperatura (4) a 110º C,
el dial de funciones (3) en cocinado lento y el
dial del temporizador (1) en el tiempo de
cocinado deseado.
Descongelar (TO770)
◆ Coloque los alimentos congelados en la bandeja
(8) poniendo la sartén de grill por debajo para
que recoja el agua que pudiera derramarse.
◆ Ponga el dial de temperatura (4) y el dial de
funciones (3) en descongelar y el dial del
temporizador (1) en on (encendido).
◆ Vigile la marcha del descongelamiento de los
alimentos, retirándolos cuando ya estén
descongelados.
◆ Para grandes cantidades de alimentos se
utilizará el refrigerador para descongelarlos.
◆ Después de descongelar los alimentos,
proceda a cocinarlos inmediatamente.
Asar (TO770)
◆ Ponga el alimento en la punta de ensartar tal
como se indica en las instrucciones de montaje.
◆ Coloque el extremo puntiagudo de la punta
de ensartar en el enchufe motriz del lado
derecho del horno.
◆ Coloque la ranura en el extremo cuadrado de
la punta de ensartar sobre el lado izquierdo
del soporte.
◆ Coloque la sartén de asar a la parrilla (12)
debajo de los alimentos.
◆ Ponga el dial de temperatura (4) en max,
el dial de funciones (3) en asar a la parrilla y
el dial del temporizador (1) en el tiempo de
cocinado deseado.
◆ Una vez cocinado el alimento, retire del horno
la bandeja de asar a la parrilla empleando el
mango de bandeja (17). Levante el lado
izquierdo de la punta de ensartar sacándolo
del soporte y, seguidamente, mueva la punta
de ensartar hacia la izquierda para sacarla del
enchufe motriz.
LIMPIEZA Y MANTENIMIENTO
Antes de limpiar o realizar cualquier
mantenimiento, gire el dial del
temporizador (1) y el dial de temperatura
(4) a las posiciones off (apagados),
desenchufe el cable de la corriente y deje
enfriar el aparato.
◆ El interior del horno está recubierto de una
capa de imprimación de fácil limpieza.
◆ Limpie el exterior y el interior con un paño
húmedo. No utilice ninguna sustancia
limpiadora abrasiva o que contenga
disolventes. Para limpiar la unidad no utilice
estropajos de acero, almohadillas decapantes
o rascadores.
◆ Lave las bandejas y los otros accesorios con
agua caliente enjabonada y séquelos bien.
TO770 – Pantalla del ventilador (fig. E)
Se puede desmontar la pantalla del ventilador
para limpiarla.
◆ Destornille el perno central (18) y saque la
pantalla (19).
◆ Limpie la pantalla y vuelva a montarla.
No sumerja el aparato en agua ni en
ningún otro líquido.
Asegúrese de que la unidad y sus accesorios están
secos antes de utilizarlos.
20
Page 21

ESPAÑOL
PROTECCIÓN DEL MEDIO AMBIENTE
Black & Decker proporciona facilidades
para el reciclado de los productos
Black & Decker que hayan llegado al final
de su vida útil. Este servicio se proporciona
de forma gratuita. Para poderlo utilizar, le
rogamos entregue el producto en cualquier
servicio técnico autorizado quien se hará
carga del mismo en nuestro nombre.
Pueden consultar la dirección de su servicio técnico
más cercano poniéndose en contacto con la oficina
local de Black & Decker en la dirección que se
indica en este manual. Como alternativa, se puede
consultar en Internet, en la dirección siguiente, la
lista de servicios técnico autorizados e información
completa de nuestros servicios de postventa y
contactos: www.2helpU.com.
GARANTÍA
Black & Decker confía plenamente en la calidad de
sus productos y ofrece una garantía extraordinaria.
Esta declaración de garantía es una añadido, y en
ningún caso un perjuicio para sus derechos
estatutarios. La garantía es válida dentro de los
territorios de los Estados Miembros de la Unión
Europea y de los de la Zona Europea de Libre
Comercio.
◆ Se hayan realizado reparaciones por parte de
personas que no sean los servicios de
reparación autorizados o personal de servicios
de Black & Decker;
Para reclamar en garantía, será necesario que
presente la prueba de compra al vendedor o al
servicio técnico de reparaciones autorizado.
Pueden consultar la dirección de su servicio
técnico más cercano poniéndose en contacto con
la oficina local de Black & Decker en la dirección
que se indica en este manual. Como alternativa,
se puede consultar en Internet, en la dirección
siguiente, la lista de servicios técnico autorizados
e información completa de nuestros servicios de
postventa y contactos: www.2helpU.com.
Si un producto Black & Decker resultara defectuoso
debido a materiales o mano de obra defectuosos
o a la falta de conformidad, Black & Decker
garantiza, dentro de los 24 meses de la fecha de
compra, la sustitución de las piezas defectuosas,
la reparación de los productos sujetos a un
desgaste y rotura razonables o la sustitución de
tales productos para garantizar al cliente el
mínimo de inconvenientes, a menos que:
◆ El producto haya sido utilizado con propósitos
comerciales, profesionales o de alquiler;
◆ El producto haya sido sometido a un uso
inadecuado o negligente;
◆ El producto haya sufrido daños causados por
objetos o sustancias extrañas o accidentes;
21
Page 22

∂§§∏¡π∫∞
TO670 º√Àƒ¡∞∫π
TO770 º√Àƒ¡√™ - æ∏™∆πEƒ∞
E˘¯·ЪИЫЩФ‡МВ БИ· ЩЛУ ВМИЫЩФЫ‡УЛ Ы·˜ ЫЩЛ
Black & Decker. EП›˙Ф˘МВ У· ·ФП·‡ЫВЩВ ЩЛ
¯Ъ‹ЫЛ ·˘ЩФ‡ ЩФ˘ ЪФ˚fiУЩФ˜ БИ· ФПП¿ ¯ЪfiУИ·.
°E¡π∫∏ ¶Eƒπ°ƒ∞º∏ (ÂÈÎ. A)
1. ГЪФУФ‰И·ОfiЩЛ˜, ‰И·ОfiЩЛ˜ on/off
2. EУ‰ВИОЩИО‹ П˘¯У›· ЩЪФКФ‰ФЫ›·˜
3. ¢И·ОfiЩЛ˜ ПВИЩФ˘ЪБ›·˜
4. ¢И·ОfiЩЛ˜ ıВЪМФОЪ·Ы›·˜
5. §·‚¤˜ ÌÂÙ·ÊÔÚ¿˜
6. °˘¿ÏÈÓË fiÚÙ·
7. §·‚‹ fiÚÙ·˜
¢∏§ø™∏ ™Àªª√ƒºø™∏™ E∫
TO670/TO770
Black & Decker ‰ЛПТУВИ fiЩИ ·˘Щ¿ Щ·
ЪФ˚fiУЩ· Ы¯В‰И¿ЫЩЛО·У Ы‡МКˆУ· МВ:
89/336/E√∫, 73/23/E√∫, EN 55014,
EN 60335, EN 61000
EИЫЛМ·›УВИ О›У‰˘УФ ЛПВОЩЪФПЛН›·˜.
™∏ª∞¡∆π∫∞ ªE∆ƒ∞ ¶ƒ√™∆∞™π∞™
◆ ¶ÚÔÛÔ¯‹! ∫·Ù¿ ÙË ¯Ú‹ÛË Ì˯·ÓÒÓ Ô˘
ЩЪФКФ‰ФЩФ‡УЩ·И МВ ЛПВОЩЪИОfi ЪВ‡М·, ı·
Ъ¤ВИ ¿УЩ· У· П·М‚¿УФУЩ·И ФИ ‚·ЫИО¤˜
ЪФК˘П¿НВИ˜ ·ЫК·ПВ›·˜, БИ· ЩФУ ВЪИФЪИЫМfi
ЩФ˘ ОИУ‰‡УФ˘ ˘ЪО·БИ¿˜, ЛПВОЩЪФПЛН›·˜ О·И
ЫˆМ·ЩИОТУ ‚П·‚ТУ.
◆ ¶ЪИУ ¯ЪЛЫИМФФИ‹ЫВЩВ ЩЛ Ы˘ЫОВ˘‹ ‰И·‚¿ЫЩВ
ЪФЫВ¯ЩИО¿ ФПfiОПЛЪФ ЩФ ВБ¯ВИЪ›‰ИФ.
◆ ∏ ÂӉ‰ÂÈÁ̤ÓË ¯Ú‹ÛË ·Ó·Ê¤ÚÂÙ·È Û ·˘Ùfi ÙÔ
ВБ¯ВИЪ›‰ИФ. ∆fiЫФ Л ¯Ъ‹ЫЛ ВН·ЪЩЛМ¿ЩˆУ ‹
ЪФЫıЛОТУ fiЫФ О·И Л Ъ·БМ·ЩФФ›ЛЫЛ
ВЪБ·ЫИТУ МВ ЩЛ Ы˘ЫОВ˘‹ Ф˘ ‰ВУ Ы˘УИЫЩТУЩ·И
ЫВ ·˘Щfi ЩФ ВБ¯ВИЪ›‰ИФ Ф‰ЛБИТУ ВБО˘МФУВ›
О›У‰˘УФ ЩЪ·˘М·ЩИЫМФ‡.
◆ º˘П¿НЩВ ЩФ ВБ¯ВИЪ›‰ИФ ·˘Щfi БИ· МВППФУЩИО‹
·Ó·ÊÔÚ¿.
Kevin Hewitt
¢ИВ˘ı˘УЩ‹˜ МЛ¯·УФПФБ›·˜
Spennymoor, County Durham DL16 6JG,
United Kingdom
E¡¢E¢Eπ°ªE¡∏ Ã∏™∏
∆Ф КФ˘ЪУ¿ОИ ЩЛ˜ Black & Decker ¤¯ВИ Ы¯В‰И·ЫЩВ›
БИ· У· „‹УВИ К·БЛЩ¿ ЫЩФУ КФ‡ЪУФ, ЫЩЛУ Ы¯¿Ъ·,
ЫЩЛУ ЫФ‡‚П·, О·И Ы·У ЩФЫЩИ¤Ъ·. ∞˘Щfi ЩФ ЪФ˚fiУ
ЪФФЪ›˙ВЩ·И БИ· ФИОИ·О‹ ¯Ъ‹ЫЛ МfiУФ.
¶ƒ√Eπ¢√¶√π∏∆π∫∞ ™Àªµ√§∞
™В ·˘Щfi ЩФ ВБ¯ВИЪ›‰ИФ ¯ЪЛЫИМФФИФ‡УЩ·И Щ·
Ы‡М‚ФП· Ф˘ ·ОФПФ˘ıФ‡У:
EИЫЛМ·›УВИ О›У‰˘УФ ЫˆМ·ЩИО‹˜ ‚П¿‚Л˜ ‹
‚П¿‚Л˜ ЩФ˘ ЪФ˚fiУЩФ˜, ЫВ ВЪ›ЩˆЫЛ МЛ
Щ‹ЪЛЫЛ˜ ЩˆУ Ф‰ЛБИТУ ЩФ˘ ВБ¯ВИЪИ‰›Ф˘.
22
ÃÚ‹ÛË ÙÔ˘ Ì˯·Ó‹Ì·Ùfi˜ Û·˜
◆ µÂ‚·Èˆı›Ù fiÙÈ Ë Û˘Û΢‹ Â›Ó·È ÂÎÙfi˜
ПВИЩФ˘ЪБ›·˜ ЫЩЪ¤КФУЩ·˜ ЩФУ ¯ЪФУФ‰И·ОfiЩЛ (1)
О·И ЩФУ ‰И·ОfiЩЛ ıВЪМФОЪ·Ы›·˜ (4) ЫЩИ˜
ı¤ЫВИ˜ off (0) ЪИУ ЩЛУ Ы˘У‰¤ЫЩВ ‹
·ÔÛ˘Ó‰¤ÛÙ ·fi ÙËÓ ·ÚÔ¯‹ Ú‡̷ÙÔ˜.
◆ ∆Ф Б˘·П› ЩЛ˜ fiЪЩ·˜ О·И ФИ ВНˆЩВЪИО¤˜
ÂÈÊ¿ÓÂȘ ÙÔ˘ ÊÔ‡ÚÓÔ˘ ıÂÚÌ·›ÓÔÓÙ·È Ôχ
ηٿ ÙËÓ ¯Ú‹ÛË. ∆Ô Ï¿‰È Î·È ¿ÏÏ· ˘ÁÚ¿
Ì·ÁÂÈڤ̷ÙÔ˜ ÌÔÚ› ›Û˘ Ó· ıÂÚÌ·ÓıÔ‡Ó
Ôχ ηٿ ÙËÓ ¯Ú‹ÛË. ¡· ÊÔÚ¿Ù ¿ÓÙ·
Á¿ÓÙÈ· ÎÔ˘˙›Ó·˜ fiÙ·Ó ·ÓÔ›ÁÂÙ ÙËÓ fiÚÙ· ηÈ
fiÙ·Ó ‚Á¿˙ÂÙ ‰›ÛÎÔ˘˜ ·fi ÙÔÓ ÊÔ‡ÚÓÔ.
◆ ¶ЪФЫ¤¯ВЩВ ¿УЩ· fiЩ·У ¯ЪЛЫИМФФИВ›ЩВ ЩЛ
Û˘Û΢‹.
◆ EϤÁÍÙ fiÙÈ ÙÔ ÊÔ˘ÚÓ¿ÎÈ ‰ÂÓ ÂÌÔ‰›˙ÂÈ ÙËÓ
Ъ›˙· Ф˘ ¯ЪЛЫИМФФИВ›. ∆Ф О·ПТ‰ИФ
ЩЪФКФ‰ФЫ›·˜ ‰ВУ Ъ¤ВИ У· ·ОФ˘М¿ВИ ЩЛУ
МФУ¿‰· О·Щ¿ ЩЛУ ¯Ъ‹ЫЛ ‹ ЪИУ МВИˆıВ› Л
ıВЪМФОЪ·Ы›· ЩЛ˜.
Page 23

∂§§∏¡π∫∞
◆ ¶ÔÙ¤ ÌËÓ ·ÔÛ˘Ó‰¤ÂÙ ÙË Û˘Û΢‹ ·fi ÙËÓ
Ъ›˙· ЩЪ·‚ТУЩ·˜ ЩФ О·ПТ‰Иfi ЩЛ˜. ¢И·ЩЛЪВ›ЩВ
ЩФ О·ПТ‰ИФ ЩЪФКФ‰ФЫ›·˜ ЫВ ·fiЫЩ·ЫЛ ·fi
ЛБ¤˜ ıВЪМfiЩЛЩ·˜, П¿‰И· О·И ·fi ·И¯МЛЪ¤˜
·ОМ¤˜. ªЛУ ·К‹УВЩВ ЩФ О·ПТ‰ИФ ЩЪФКФ‰ФЫ›·˜
У· ОЪ¤МВЩ·И ЫЩЛУ ¿ОЪЛ ЩЛ˜ ВИК¿УВИ·˜ ЩФ˘
¿БОФ˘.
◆ ªËÓ Î·Ï‡ÙÂÙ ÙÔ˘˜ ‰›ÛÎÔ˘˜ ‹ ¿ÏÏ· ̤ÚË ÌÂ
·ПФ˘МИУfi¯·ЪЩФ О·ıТ˜ МФЪВ› У· ЪФОПЛıВ›
˘ВЪı¤ЪМ·УЫЛ.
◆ ¶ÔÙ¤ ÌËÓ ÙÔÔıÂÙ›Ù ¯·ÚÙfiÓÈ, Ï·ÛÙÈÎfi,
¯·ÚÙ› ‹ ¿ÏÏ· ·ÚfiÌÔÈ· ˘ÏÈο ̤۷ ÛÙÔ ÊÔ˘ÚÓ¿ÎÈ.
◆ ¢ÂÓ Ú¤ÂÈ Ó· ÙÔÔıÂÙÔ‡ÓÙ·È Ì¤Û· ÛÙËÓ
Ы˘ЫОВ˘‹ М·БВИЪИО¿ ЫОВ‡Л ‹ ФП‡ МВБ¿ПФ˘
МВБ¤ıФ˘˜ ЩЪfiКИМ· О·ıТ˜ МФЪВ› У· ˘¿ЪНВИ
О›У‰˘УФ˜ ˘ЪО·БИ¿˜ ‹ ЛПВОЩЪФПЛН›·˜.
◆ ªËÓ ·ÔıË·ÂÙ ٛÔÙ· ̤۷ ÛÙËÓ Û˘Û΢‹
ÂÎÙfi˜ ·fi Ù· ÂÍ·ÚÙ‹Ì·Ù· Ô˘ ·Ú¤¯ÔÓÙ·È.
◆ ªËÓ ÙÔÔıÂÙ›Ù ÙË Û˘Û΢‹ ¿Óˆ ‹ ÎÔÓÙ¿
Û ËÁ¤˜ ıÂÚÌfiÙËÙ·˜.
◆ ªЛУ ¯ЪЛЫИМФФИВ›ЩВ ЩЛ Ы˘ЫОВ˘‹ ОФУЩ¿ ЫВ
В‡КПВОЩ· ·УЩИОВ›МВУ· (.¯. ОФ˘ЪЩ›УВ˜) ‹
В‡КПВОЩ·/ ВОЪЛОЩИО¿ ˘ПИО¿.
◆ ¶ÚÔÛ¤ÍÙ ӷ ÌËÓ ¯·Ú·¯Ù› Ë fiÚÙ· ‹ ÔÈ ¿ÎÚ˜.
◆ ªЛУ ¯ЪЛЫИМФФИВ›ЩВ ЩЛ Ы˘ЫОВ˘‹ ЫЩФ ‡·ИıЪФ.
◆ ¡· К˘П¿ЫЫВЩВ ¿УЩ· ЩЛУ Ы˘ЫОВ˘‹ М·ОЪИ¿ ·fi
ÙÔ ÓÂÚfi ‹ ÙËÓ ˘ÂÚ‚ÔÏÈ΋ ˘ÁÚ·Û›·.
◆ ¡· ПВИЩФ˘ЪБВ›ЩВ ЩЛУ Ы˘ЫОВ˘‹ МfiУФ МВ ЫЩВБУ¿
¯¤ÚÈ·.
◆ E¿У ЩФ О·ПТ‰ИФ ЩЪФКФ‰ФЫ›·˜ О·Щ·ЫЩЪ·КВ›
ηٿ ÙË ¯Ú‹ÛË, ·ÔÛ˘Ó‰¤ÛÙ ÙË Û˘Û΢‹
·М¤Ыˆ˜ ·fi ЩЛУ Ъ›˙·. ªЛУ ·ББ›˙ВЩВ ЩФ
О·ПТ‰ИФ ЩЪФКФ‰ФЫ›·˜ ЪИУ ·К·ИЪ¤ЫВЩВ ЩФ КИ˜
·fi ÙËÓ Ú›˙·.
◆ ¡· ÂϤÁ¯ÂÙ ¿ÓÙ· ÙËÓ ÚfiÔ‰Ô ÙÔ˘ Ê·ÁËÙÔ‡
ηٿ ÙÔ Ì·Á›ÚÂÌ· ÁÈ· Ó· ·ÔʇÁÂÙ ÙÔ
ο„ÈÌfi ÙÔ˘.
∞ÛÊ¿ÏÂÈ· ÙÚ›ÙˆÓ
◆ ªËÓ ÂÈÙÚ¤ÂÙ Û ÌÈÎÚ¿ ·È‰È¿ ‹ Û ¿ÙÔÌ·
Ф˘ ‰ВУ ¤¯Ф˘У ‰И·‚¿ЫВИ ЩФ ВБ¯ВИЪ›‰ИФ Ф‰ЛБИТУ
‹ Ф˘ ‰ВУ ¤¯Ф˘У ВНФИОВИˆıВ› МВ ЩЛ Ы˘ЫОВ˘‹ У·
ЩЛ ¯ЪЛЫИМФФИ‹ЫФ˘У ‹ У· ЩЛУ ПЛЫИ¿ЫФ˘У.
◆ ªËÓ ·Ê‹ÓÂÙ ·È‰È¿ ‹ ˙Ò· Ó· ÏËÛÈ¿ÛÔ˘Ó ÙËÓ
Ы˘ЫОВ˘‹ О·Щ¿ ЩЛУ ¯Ъ‹ЫЛ О·И ЪИУ МВИˆıВ› Л
ıВЪМФОЪ·Ы›· ЩЛ˜.
ªÂÙ¿ ÙË ¯Ú‹ÛË
◆ ™ÙÚ¤„Ù ÙÔÓ ¯ÚÔÓԉȷÎfiÙË(1) Î·È ÙÔÓ
‰И·ОfiЩЛ ıВЪМФОЪ·Ы›·˜ (4) ЫЩЛУ ı¤ЫЛ off,
·ÔÛ˘Ó‰¤ÛÙ ÙËÓ Û˘Û΢‹ ·fi ÙËÓ ·ÚÔ¯‹
Ú‡̷ÙÔ˜ Î·È ·Ê‹ÛÙ ÙËÓ Ó· ÎÚ˘ÒÛÂÈ ÚÈÓ ÙËÓ
·Ê‹ÛÂÙ ¯ˆÚ›˜ ÂÈÙ‹ÚËÛË Î·È ÚÈÓ ·ÏÏ¿ÍÂÙÂ,
ηı·Ú›ÛÂÙ ‹ ÂÈıˆڋÛÂÙ ÔÔÈÔ‰‹ÔÙÂ
ÙÌ‹Ì· Ù˘.
◆ √Щ·У ‰ВУ ¯ЪЛЫИМФФИВ›Щ·И, Л Ы˘ЫОВ˘‹ Ъ¤ВИ
Ó· Ê˘Ï¿ÛÛÂÙ·È Û ÍËÚfi ¯ÒÚÔ. ∆· ·È‰È¿ ‰ÂÓ
Ú¤ÂÈ Ó· ¤¯Ô˘Ó ÚfiÛ‚·ÛË ÛÂ
·ÔıËÎÂ˘Ì¤Ó˜ Û˘Û΢¤˜.
EИıВТЪЛЫЛ О·И ВИЫОВ˘¤˜
◆ ¶ЪИУ ·fi ЩЛ ¯Ъ‹ЫЛ, ВП¤БНЩВ ЪФЫВОЩИО¿ ЩЛУ
Ы˘ЫОВ˘‹ БИ· О·ЩВЫЩЪ·ММ¤У· ‹ ВП·ЩЩˆМ·ЩИО¿
М¤ЪЛ. EП¤БНЩВ БИ· М¤ЪЛ Ф˘ ¤¯Ф˘У Ы¿ЫВИ О·И
БИ· О¿ıВ В›‰Ф˘˜ Ы˘Уı‹ОВ˜ ФИ ФФ›В˜ ВУ‰¤¯ВЩ·И
У· ВЛЪВ¿ЫФ˘У ЩЛ ПВИЩФ˘ЪБ›· ЩЛ˜.
◆ ªЛ ¯ЪЛЫИМФФИВ›ЩВ ЩЛУ Ы˘ЫОВ˘‹ ·У О¿ФИФ
ÂÍ¿ÚÙËÌ¿ Ù˘ ·ÚÔ˘ÛÈ¿˙ÂÈ ÂÏ¿Ùو̷.
◆ ¶ЪИУ ·fi ЩЛ ¯Ъ‹ЫЛ, ВП¤БНЩВ ЪФЫВОЩИО¿ ЩФ
О·ПТ‰ИФ ЩЪФКФ‰ФЫ›·˜ БИ· ЫЛМ¿‰И· ˙ЛМИ¿˜,
·П·›ˆЫЛ˜ О·И КıФЪ¿˜.
◆ ªЛ ¯ЪЛЫИМФФИВ›ЩВ ЩЛ Ы˘ЫОВ˘‹ ·У ЩФ О·ПТ‰ИФ
ЩЪФКФ‰ФЫ›·˜ ЩЛ˜ ‹ ЩФ КИ˜ ¤¯ВИ ¿ıВИ ˙ЛМИ¿ ‹
·ЪФ˘ЫИ¿˙ВИ ВП¿ЩЩˆМ·.
◆ E¿У ЩФ О·ПТ‰ИФ ЩЪФКФ‰ФЫ›·˜, ЩФ КИ˜ ‹
ФФИФ‰‹ФЩВ ¿ППФ ЩМ‹М· В›У·И О·ЩВЫЩЪ·ММ¤УФ
‹ ВП·ЩЩˆМ·ЩИОfi, Ъ¤ВИ У· ВИЫОВ˘·ЫЩВ› ·fi
ВНФ˘ЫИФ‰ФЩЛМ¤УФ ·УЩИЪfiЫˆФ ВИЫОВ˘‹˜
ЩЛ˜ Black & Decker. ªЛУ ЪФЫ·ı‹ЫЩВ У· ЩФ
ВИЫОВ˘¿ЫВЩВ МfiУФИ Ы·˜.
◆ ¶ÔÙ¤ ÌËÓ ÂȯÂÈÚ‹ÛÂÙ ӷ ·Ê·ÈÚ¤ÛÂÙ ‹ Ó·
·ÓÙÈηٷÛÙ‹ÛÂÙ ÂÍ·ÚÙ‹Ì·Ù· ¿ÏÏ· ·fi ·˘Ù¿
Ô˘ ÚÔÛ‰ÈÔÚ›˙ÔÓÙ·È Û ·˘Ùfi ÙÔ ÂÁ¯ÂÈÚ›‰ÈÔ.
∏§E∫∆ƒπ∫∏ ∞™º∞§Eπ∞
◆ ¶ÚÈÓ ·fi ÙË ¯Ú‹ÛË, ÂϤÁÍÙ ·Ó Ë Ù¿ÛË
ЩЪФКФ‰ФЫ›·˜ ·УЩИЫЩФИ¯В› ЫВ ·˘Щ‹У Ф˘
·У·БЪ¿КВЩ·И ЫЩЛУ ИУ·О›‰· ¯·Ъ·ОЩЛЪИЫЩИОТУ.
ªËÓ ‚˘ı›˙ÂÙ ÙËÓ Û˘Û΢‹, ÙÔ Î·ÏÒ‰ÈÔ
ЩЪФКФ‰ФЫ›·˜ ‹ ЩФ КИ˜ ЫВ УВЪfi ‹ ¿ППФ
˘ÁÚfi.
◆ ∞˘Ùfi ÙÔ ÚÔ˚fiÓ Ú¤ÂÈ Ó· Û˘Ó‰¤ÂÙ·È ÛÂ
ЩЪФКФ‰ФЫ›· МВ БВ›ˆЫЛ.
23
Page 24

∂§§∏¡π∫∞
™À¡∞ƒª√§√°∏™∏
EÈÛ·ÁˆÁ‹ ‰›ÛÎˆÓ (ÂÈÎ. µ & C)
А¿Ъ¯Ф˘У ¤УЩВ ‰И·КФЪВЩИОФ› ‰›ЫОФИ:
◆ EÓ· Ú¿ÊÈ ¯ÚˆÌ›Ô˘ (8)
◆ ªИ· ВИЫМ·ПЩˆМ¤УЛ Ы¯¿Ъ· БОЪИП (9)
◆ EÓ·˜ ‰›ÛÎÔ˜ „Ë̷ۛÙÔ˜ (10)
◆ EÓ·˜ ‰›ÛÎÔ˜ ÁÈ· Ù· „›¯Ô˘Ï· (11)
◆ EУ· Щ·„› БОЪИП (12)
∆Ô Ú¿ÊÈ ¯ÚˆÌ›Ô˘ Î·È Ô ‰›ÛÎÔ˜ ÁÈ· Ù· „›¯Ô˘Ï·
ÌÔÚÔ‡Ó Ó· ÙÔÔıÂÙËıÔ‡Ó Û ԉËÁÔ‡˜ ÛÙ‹ÚÈ͢
Û ÙÚ›· ›‰· ̤۷ ÛÙÔ ÊÔ˘ÚÓ¿ÎÈ.
§·‚‹ ‰›ÛÎÔ˘ (ÂÈÎ. C)
◆ ∏ П·‚‹ ‰›ЫОФ˘ (13) ¯ЪЛЫИМФФИВ›ЩВ БИ· ЩЛУ
·Ê·›ÚÂÛË ÙˆÓ ‰›ÛÎˆÓ ·fi ÙÔÓ ÊÔ‡ÚÓÔ.
◆ °И· У· ЩФФıВЩ‹ЫВЩВ ЩЛУ П·‚‹ ЫЩФ Щ·„› БОЪИП
(12), ВЪ¿ЫЩВ Щ· ¿Уˆ ¿БОИЫЩЪ· ЩЛ˜ П·‚‹˜
¿Уˆ ·fi ЩЛУ ИФ М·ОЪИ¿ ПВ˘Ъ¿ ЩФ˘ Щ·„ИФ‡
БОЪИП. EП¤БНЩВ fiЩИ Л П·‚‹ В›У·И ЩФФıВЩЛМ¤УЛ
ЫЩЛУ М¤ЫЛ ЩЛ˜ ПВ˘Ъ¿˜ ЩФ˘ Щ·„ИФ‡.
◆ °È· Ó· ÙÔÔıÂÙ‹ÛÂÙÂ ÙËÓ Ï·‚‹ ÛÙÔ Ú¿ÊÈ, ÛÙËÓ
Ы¯¿Ъ· БОЪИП, ЫЩФУ ‰›ЫОФ „ЛЫ›М·ЩФ˜ ‹ ЫЩФУ
‰›ЫОФ БИ· Щ· „›¯Ф˘П· ВЪ¿ЫЩВ Щ· О¿Щˆ
¿БОИЫЩЪ· ЩЛ˜ П·‚‹˜ ¿Уˆ ·fi ЩЛУ ИФ М·ОЪИ¿
ПВ˘Ъ¿ ЩФ˘˜. EП¤БНЩВ fiЩИ Л П·‚‹ В›У·И
ЩФФıВЩЛМ¤УЛ ЫЩЛУ М¤ЫЛ ЩЛ˜ ПВ˘Ъ¿˜ ЩФ˘
‰›ЫОФ˘.
TO770 - жЛЫЩИ¤Ъ· (ВИО. D)
◆ EÈÛ¿ÁÂÙ ÙËÓ Ì˘ÙÂÚ‹ ¿ÎÚË Ù˘ ÛÔ‡‚Ï·˜ (14)
М¤Ы· ·fi МИ· ·fi ЩИ˜ ИЪФ‡УВ˜ (15).
™ЩВЪВТЫЩВ ЩЛУ ИЪФ‡У· ЫЩФ ЩВЩЪ¿БˆУФ ЩМ‹М·
ЩЛ˜ ЫФ‡‚П·˜ МВ МИ· ·fi ЩИ˜ ВЩ·ПФ‡‰В˜ (16).
◆ ™ЪТНЩВ ЩЛУ ЫФ‡‚П· М¤Ы· ·fi ЩФ К·БЛЩfi,
ВП¤Б¯ФУЩ·˜ fiЩИ ЩФ К·БЛЩfi О·ЪКТУВЩ·И ¿Уˆ
ЫЩЛУ ИЪФ‡У·. ∆Ф К·БЛЩfi Ъ¤ВИ У· ‚Ъ›ЫОВЩ·И
ЫЩФ О¤УЩЪФ ЩЛ˜ ЫФ‡‚П·˜.
◆ EУТЫЩВ ЩЛУ ‰В‡ЩВЪЛ ИЪФ‡У·, ВП¤Б¯ФУЩ·˜
¿ПИ fiЩИ О·ЪКТУВИ ЩФ К·БЛЩfi О·И ·ЫК·П›ЫЩВ
ЩЛУ МВ ЩЛУ ‰В‡ЩВЪЛ ВЩ·ПФ‡‰·.
Ã∏™∏
¶ÚÈÓ ·fi ÙËÓ ÚÒÙË ¯Ú‹ÛË
◆ µÂ‚·Èˆı›Ù fiÙÈ Ô ¯ÚÔÓԉȷÎfiÙ˘ (1) Î·È Ô
‰И·ОfiЩЛ˜ ıВЪМФОЪ·Ы›·˜ (4) ‚Ъ›ЫОФУЩ·И ЫЩЛУ
ı¤ЫЛ off.
◆ ∆ÔÔıÂÙ‹ÛÙ ÙËÓ ÌÔÓ¿‰· ¿Óˆ Û ÌÈ·
О·Щ¿ППЛПЛ ВИК¿УВИ·, ЩФ˘П¿¯ИЫЩФУ 10 cm
М·ОЪИ¿ ·fi ФФИФ‰‹ФЩВ ВМfi‰ИФ.
◆ ∞Ê·ÈÚ¤ÛÙ ٷ ÂÍ·ÚÙ‹Ì·Ù· ·fi ÙËÓ
Û˘Û΢·Û›· ÙÔ˘˜ Î·È ‰È·ı¤ÛÙ ÙȘ Ï·ÛÙÈΤ˜
Û·ÎԇϘ Ì ·ÛÊ¿ÏÂÈ·.
◆ ¶Ï‡ÓÂÙ fiÏ· Ù· ÂÍ·ÚÙ‹Ì·Ù· Û ˙ÂÛÙ‹
Ы·Ф˘У¿‰·. ™ЩВБУТЫЩВ Щ· ВН·ЪЩ‹М·Щ· О·И
ЩФФıВЩ‹ЫЩВ Щ· ЫЩФ КФ˘ЪУ¿ОИ.
◆ ∆· ÛÙÔȯ›· ı¤ÚÌ·ÓÛ˘ ÌÔÚ› Ó· ηӛÛÔ˘Ó
ÂÏ·ÊÚ¿ ηٿ ÙËÓ ÚÒÙË ¯Ú‹ÛË. ∞˘Ùfi ‰ÂÓ
·ФЩВПВ› Ъfi‚ПЛМ·.
ƒ‡ıÌÈÛË ÙˆÓ ‰È·ÎÔÙÒÓ ÂϤÁ¯Ô˘ (ÂÈÎ. ∞)
°И· О¿ıВ ‰И·‰ИО·Ы›· М·БВИЪ¤М·ЩФ˜ ФИ ЩЪВИ˜
‰И·ОfiЩВ˜ Ъ¤ВИ У· В›У·И Ъ˘ıМИЫМ¤УФИ ЫЩЛУ
ВИı˘МЛЩ‹ ıВЪМФОЪ·Ы›·, ПВИЩФ˘ЪБ›· М·БВИЪ¤М·ЩФ˜
О·И ¯ЪfiУФ „ЛЫ›М·ЩФ˜.
ƒ‡ıМИЫЛ ЩЛ˜ ıВЪМФОЪ·Ы›·˜
◆ °˘Ъ›ЫЩВ ЩФУ ‰И·ОfiЩЛ ıВЪМФОЪ·Ы›·˜ (4) ЫЩЛУ
ıВЪМФОЪ·Ы›· М·БВИЪ¤М·ЩФ˜ Ф˘ ı¤ПВЩВ.
ƒ‡ıМИЫЛ ЩЛ˜ ПВИЩФ˘ЪБ›·˜
◆ °˘Ъ›ЫЩВ ЩФУ ‰И·ОfiЩЛ ПВИЩФ˘ЪБ›·˜ (3) ЫЩЛУ
ПВИЩФ˘ЪБ›· Ф˘ ı¤ПВЩВ.
◆ ∆Ф КФ˘ЪУ¿ОИ ‰И·ı¤ЩВИ ЩИ˜ ·ОfiПФ˘ıВ˜ ПВИЩФ˘ЪБ›В˜:
ж‹ЫИМФ - °И· ЩФ „‹ЫИМФ О¤ИО,
МИЫОfiЩˆУ О·И Ф˘ПВЪИОТУ,
TO670 TO770 МФЫ¯·ЪИФ‡, ¯ФИЪИУФ‡, ОЩП.
ºÚ˘Á¿ÓÈÛÌ· - °È· ÙÔ „‹ÛÈÌÔ „ˆÌÈÔ‡,
МИОЪТУ О¤ИО О·И ‚¿КПˆУ.
°ÎÚÈÏ – °È· ÙÔ „‹ÛÈÌÔ ÛÙËÓ Û¯¿Ú·
„·ЪИТУ, ОЪВ¿ЩˆУ О·И БИ· ЩФ ПИТЫИМФ Щ˘ЪИФ‡.
¢È·Ù‹ÚËÛË ıÂÚÌfiÙËÙ·˜ – °È· Ó· Îڷٿ٠ÙÔ
М·БВИЪВМ¤УФ К·БЛЩfi ˙ВЫЩfi ¤ˆ˜ 60 ПВЩ¿.
∞ÚÁfi Ì·Á›ÚÂÌ· (∆√670) – °È· ÛÙÈÊ¿‰Ô
Î·È Ûԇ˜ Ô˘ ··ÈÙÔ‡Ó ÌÂÁ¿ÏÔ ¯ÚfiÓÔ
М·БВИЪ¤М·ЩФ˜ ЫВ ¯·МЛП‹ ıВЪМФОЪ·Ы›·.
∞fi„˘ÍË (∆√770) – °È· ÙËÓ ·fi„˘ÍË
ηÙ„˘ÁÌ¤ÓˆÓ ÙÚÔʛ̈Ó.
жЛЫЩИ¤Ъ· (∆√770) – °И· ЩФ „‹ЫИМФ ЫЩЛУ
ÛÔ‡‚Ï· ÎÔÙfiÔ˘ÏÔ˘ ‹ ÙÌËÌ¿ÙˆÓ ÎÚ¤·ÙÔ˜
МВ М¤БИЫЩФ ‚¿ЪФ˜ 2,3 kg (‚¿ЪФ˜ fiЩ·У
Â›Ó·È ˆÌfi).
24
Page 25

ƒ‡ıÌÈÛË ÙÔ˘ ¯ÚfiÓÔ˘
◆ °˘Ú›ÛÙ ÙÔÓ ¯ÚÔÓԉȷÎfiÙË (1) ÚÔ˜ Ù·
·ЪИЫЩВЪ¿ ЫЩФУ ¯ЪfiУФ М·БВИЪ¤М·ЩФ˜ Ф˘
ı¤ПВЩВ. ∏ ВУ‰ВИОЩИО‹ П˘¯У›· ЩЪФКФ‰ФЫ›·˜ (2)
·Ó¿‚ÂÈ Î·È Ë ÌÔÓ¿‰· ıÂÚÌ·›ÓÂÙ·È.
◆ √Щ·У ¤¯ВИ ВЪ¿ЫВИ Ф ЪФО·ıФЪИЫМ¤УФ˜
¯ЪfiУФ˜, ¯Щ˘¿ ¤У· ОФ˘‰Ф‡УИ, Л ВУ‰ВИОЩИО‹
П˘¯У›· ЩЪФКФ‰ФЫ›·˜ Ы‚‹УВИ О·И Л Ы˘ЫОВ˘‹
Щ›ıВЩ·И ·˘ЩfiМ·Щ· ВОЩfi˜ ПВИЩФ˘ЪБ›·˜.
◆ °И· ВЪИЫЫfiЩВЪФ ¯ЪfiУФ М·БВИЪ¤М·ЩФ˜,
ЫЩЪ¤„ЩВ ЩФУ ‰И·ОfiЩЛ ЪФ˜ Щ· ·ЪИЫЩВЪ¿ ЫЩЛУ
ı¤ЫЛ on. ∏ МФУ¿‰· ı· ıВЪМ·УıВ› О·И ı·
·Ъ·МВ›УВИ ЫВ ПВИЩФ˘ЪБ›· М¤¯ЪИ У· ЩЛУ ı¤ЫЩВ
ВЫВ›˜ ВОЩfi˜ ПВИЩФ˘ЪБ›·˜. ГЪЛЫИМФФИВ›ЫЩВ ЩФУ
¯ЪФУФ‰И·ОfiЩЛ ЩЛ˜ ОФ˘˙›У·˜ БИ· У· ВП¤БНЩВ
ЩФУ ¯ЪfiУФ М·БВИЪ¤М·ЩФ˜.
◆ °И· У· ı¤ЫВЩВ ВОЩfi˜ ПВИЩФ˘ЪБ›·˜ ЩЛ МФУ¿‰·,
ЫЩЪ¤„ЩВ ЩФУ ¯ЪФУФ‰И·ОfiЩЛ (1) О·И ЩФУ
‰И·ОfiЩЛ ıВЪМФОЪ·Ы›·˜ (4) ЫЩЛУ ı¤ЫЛ off.
∏ ВУ‰ВИОЩИО‹ П˘¯У›· ЩЪФКФ‰ФЫ›·˜ Ы‚‹УВИ.
ГЪ‹ЫЛ ЩˆУ ПВИЩФ˘ЪБИТУ М·БВИЪ¤М·ЩФ˜
æ‹ÛÈÌÔ
TO670 TO770
◆ °ВУИО¿, МФЪФ‡У У· ¯ЪЛЫИМФФИЛıФ‡У
¯·МЛПfiЩВЪВ˜ ıВЪМФОЪ·Ы›В˜ ЫЩФУ КФ‡ЪУФ –
„ЛЫЩИ¤Ъ· ∆√770. ªВИТЫЩВ ЩЛУ ıВЪМФОЪ·Ы›·
ЩЛ˜ Ы˘УЩ·Б‹˜ О·Щ¿ 10 ЖC МВ ВП¿¯ИЫЩФ˘˜ ЩФ˘˜
150 ЖC fiЩ·У „‹УВЩВ К·БЛЩfi ЫЩФ ∆√770.
◆ ∆ÔÔıÂÙ‹ÛÙÂ ÙÔ Ú¿ÊÈ (8) ÛÙËÓ ¯·ÌËÏfiÙÂÚË ı¤ÛË.
◆ √ ‰›ÛÎÔ˜ „Ë̷ۛÙÔ˜ (10) ÌÔÚ› Ó·
ÙÔÔıÂÙËı› ¿Óˆ ·fi ÙÔ Ú¿ÊÈ ·Ó ı¤ÏÂÙÂ.
◆ ƒ˘ıМ›ЫЩВ ЩФУ ‰И·ОfiЩЛ ıВЪМФОЪ·Ы›·˜ (4) ЫЩЛУ
ВИı˘МЛЩ‹ ıВЪМФОЪ·Ы›·, ЩФУ ‰И·ОfiЩЛ
ПВИЩФ˘ЪБ›·˜ (3) ЫЩФ „‹ЫИМФ О·И ЩФУ
¯ЪФУФ‰И·ОfiЩЛ (1) ЫЩФ on ‹ ЫЩФУ ВИı˘МЛЩfi
¯ЪfiУФ.
æ‹ÛÈÌÔ ÎÚ¤·ÙÔ˜
TO670 TO770
◆ ∆ÔÔıÂÙ‹ÛÙÂ ÙÔ Ú¿ÊÈ (8) ÛÙËÓ ı¤ÛË Ô˘
ı¤ÏÂÙÂ.
∂§§∏¡π∫∞
◆ ∆ФФıВЩ‹ЫЩВ ЩФ К·БЛЩfi ЫЩЛУ Ы¯¿Ъ· БОЪИП
(9), ¤ВИЩ· ЩФФıВЩ‹ЫЩВ ЩЛУ Ы¯¿Ъ· БОЪИП
¿Уˆ ЫЩФ Щ·„› БОЪИП (12).
◆ ∆ФФıВЩ‹ЫЩВ ЩФ Щ·„› О·И ЩЛУ Ы¯¿Ъ· БОЪИП ЫЩФ
Ú¿ÊÈ.
◆ ƒ˘ıМ›ЫЩВ ЩФУ ‰И·ОfiЩЛ ıВЪМФОЪ·Ы›·˜ (4) ЫЩЛУ
ВИı˘МЛЩ‹ ıВЪМФОЪ·Ы›·, ЩФУ ‰И·ОfiЩЛ
ПВИЩФ˘ЪБ›·˜ (3) ЫЩФ „‹ЫИМФ О·И ЩФУ
¯ЪФУФ‰И·ОfiЩЛ (1) ЫЩФ on ‹ ЫЩФУ ВИı˘МЛЩfi
¯ЪfiУФ.
ºÚ˘Á¿ÓÈÛÌ·
◆ ∆ÔÔıÂÙ‹ÛÙ ÙÔÓ ‰›ÛÎÔ ÁÈ· Ù· „›¯Ô˘Ï· (11)
οو ·fi Ù· ¯·ÌËÏfiÙÂÚ· ÛÙÔȯ›· ı¤ÚÌ·ÓÛ˘.
◆ ∆ÔÔıÂÙ‹ÛÙÂ ÙÔ Ê·ÁËÙfi ¿Óˆ ÛÙÔ Ú¿ÊÈ (8)
ÛÙËÓ Î·Ï‡ÙÂÚË ı¤ÛË ÁÈ· Ì·Á›ÚÂÌ·. ∆Ô
Ê·ÁËÙfi Ú¤ÂÈ Ó· Â›Ó·È ÎÔÓÙ¿, ¯ˆÚ›˜ Ó·
·ÎÔ˘Ì¿ÂÈ, ÛÙ· ¿Óˆ ÛÙÔȯ›· ı¤ÚÌ·ÓÛ˘.
◆ EÓ·ÏÏ·ÎÙÈο, ÙÔ „ˆÌ› ÌÔÚ› Ó· ÙÔÔıÂÙËı›
¿Уˆ ЫЩЛУ Ы˘У·ЪМФПФБЛМ¤УЛ Ы¯¿Ъ· БОЪИП О·И
ЩФ Щ·„› БОЪИП. ∆ФФıВЩ‹ЫЩВ ЩФ Щ·„› БОЪИП ЫЩФ
Ъ¿КИ ЫЩФ КФ˘ЪУ¿ОИ.
◆ ƒ˘ıМ›ЫЩВ ЩФУ ‰И·ОfiЩЛ ıВЪМФОЪ·Ы›·˜ (4) ЫЩФ
М¤БИЫЩФ, ЩФУ ‰И·ОfiЩЛ ПВИЩФ˘ЪБ›·˜ (3) ЫЩФ
КЪ˘Б¿УИЫМ· О·И ЩФУ ¯ЪФУФ‰И·ОfiЩЛ (1) ЫЩФ on
‹ ЫЩФУ ВИı˘МЛЩfi ¯ЪfiУФ.
◆ ∆Ô „ˆÌ› ÌÔÚ› Ó· η›. ªËÓ ·Ê‹ÓÂÙ ÙËÓ
Û˘Û΢‹ ¯ˆÚ›˜ ÂÈÙ‹ÚËÛË, fiÙ·Ó „‹ÓÂÙ „ˆÌ›.
æ‹ÛÈÌÔ ÛÙË Û¯¿Ú·
◆ ¶ÚÔıÂÚÌ¿ÓÂÙÂ ÙÔÓ ÊÔ‡ÚÓÔ ÁÈ· 5 ÏÂÙ¿ ÛÙËÓ
М¤БИЫЩЛ ıВЪМФОЪ·Ы›·.
◆ ∆ÔÔıÂÙ‹ÛÙ ÙÔ Ú¿ÊÈ (8) ÛÙËÓ Î·Ï‡ÙÂÚË ı¤ÛË
ÁÈ· Ì·Á›ÚÂÌ·.
◆ ∆ФФıВЩ‹ЫЩВ ЩЛУ Ы¯¿Ъ· БОЪИП (9) ¿Уˆ ЫЩФ
Щ·„› БОЪИП (12),¤ВИЩ· ЩФФıВЩ‹ЫЩВ ЩФ
К·БЛЩfi ЩЛУ Ы¯¿Ъ· БОЪИП .
◆ ∆ФФıВЩ‹ЫЩВ ЩФ Щ·„› О·И ЩЛУ Ы¯¿Ъ· БОЪИП ЫЩФ
Ú¿ÊÈ. ∆Ô Ê·ÁËÙfi Ú¤ÂÈ Ó· Â›Ó·È ÎÔÓÙ¿, ¯ˆÚ›˜
Ó· ·ÎÔ˘Ì¿ÂÈ, ÛÙ· ¿Óˆ ÛÙÔȯ›· ı¤ÚÌ·ÓÛ˘.
◆ ∞Ê‹ÛÙ ÙËÓ fiÚÙ· ÙÔ˘ ÊÔ‡ÚÓÔ˘ ÂÏ·ÊÚÒ˜
·ÓÔȯً Î·È Á˘Ú›ÛÙ ÙÔ Ê·ÁËÙfi ÂÚÈÔ‰Èο ηٿ
ÙËÓ ‰È¿ÚÎÂÈ· ÙÔ˘ Ì·ÁÂÈڤ̷ÙÔ˜.
25
Page 26

∂§§∏¡π∫∞
◆ ƒ˘ıМ›ЫЩВ ЩФУ ‰И·ОfiЩЛ ıВЪМФОЪ·Ы›·˜ (4) ЫЩФ
М¤БИЫЩФ, ЩФУ ‰И·ОfiЩЛ ПВИЩФ˘ЪБ›·˜ (3) ЫЩФ
„‹ЫИМФ ЫЩЛУ Ы¯¿Ъ· О·И ЩФУ ¯ЪФУФ‰И·ОfiЩЛ (1)
ЫЩФ on ‹ ЫЩФУ ВИı˘МЛЩfi ¯ЪfiУФ.
¢È·Ù‹ÚËÛË ıÂÚÌfiÙËÙ·˜
◆ ∆ÔÔıÂÙ‹ÛÙÂ ÙÔ Ê·ÁËÙfi ÛÙÔ Ú¿ÊÈ (8).
◆ ƒ˘ıМ›ЫЩВ ЩФУ ‰И·ОfiЩЛ ıВЪМФОЪ·Ы›·˜ (4) ЫЩЛУ
ВИı˘МЛЩ‹ ıВЪМФОЪ·Ы›· (МВБ. 80 ЖC), ЩФУ
‰И·ОfiЩЛ ПВИЩФ˘ЪБ›·˜ (3) ЫЩЛ ‰И·Щ‹ЪЛЫЛ
ıВЪМfiЩЛЩ·˜ О·И ЩФУ ¯ЪФУФ‰И·ОfiЩЛ (1) ЫЩФ on
‹ ЫЩФУ ВИı˘МЛЩfi ¯ЪfiУФ.
∞ÚÁfi Ì·Á›ÚÂÌ· (∆√670)
◆ ∆ÔÔıÂÙ‹ÛÙÂ ÙÔ Ú¿ÊÈ (8) ÛÙËÓ ı¤ÛË Ô˘
ı¤ÏÂÙÂ.
◆ ∆ÔÔıÂÙ‹ÛÙ ÙÔ Ê·ÁËÙfi Û ¤Ó· Î·Ï˘Ì̤ÓÔ
Û·Ԙ, Î·È ÙÔÔıÂÙ‹ÛÙ ÙÔ ÛÙÔ Ú¿ÊÈ.
◆ ƒ˘ıМ›ЫЩВ ЩФУ ‰И·ОfiЩЛ ıВЪМФОЪ·Ы›·˜ (4)
ЫЩФ˘˜ 110 ЖC, ЩФУ ‰И·ОfiЩЛ ПВИЩФ˘ЪБ›·˜ (3) ЫЩФ
·ÚÁfi Ì·Á›ÚÂÌ· Î·È ÙÔÓ ¯ÚÔÓԉȷÎfiÙË (1)
ÛÙÔ on ‹ ÛÙÔÓ ÂÈı˘ÌËÙfi ¯ÚfiÓÔ.
∞fi„˘ÍË (TO770)
◆ ∆ÔÔıÂÙ‹ÛÙ ÙÔ Î·Ù„˘Á̤ÓÔ Ê·ÁËÙfi ÛÙÔ
Ъ¿КИ (8) МВ ЩФ Щ·„› БОЪИП (12) ·fi О¿Щˆ БИ· У·
Ы˘ПП¤НВИ Щ˘¯fiУ УВЪfi.
◆ ƒ˘ıМ›ЫЩВ ЩФУ ‰И·ОfiЩЛ ıВЪМФОЪ·Ы›·˜ (4) О·И
ЩФУ ‰И·ОfiЩЛ ПВИЩФ˘ЪБ›·˜ (3) ЫЩЛУ ·fi„˘НЛ
О·И ЩФУ ¯ЪФУФ‰И·ОfiЩЛ (1) ЫЩФ on.
◆ EϤÁÍÙ ÙËÓ ‰È·‰Èηۛ· ·fi„˘Í˘ Î·È ‚Á¿ÏÙÂ
ЩФ К·БЛЩfi МfiПИ˜ НВ·БТЫВИ.
◆ ªÂÁ¿Ï˜ ÔÛfiÙËÙ˜ Ê·ÁËÙÔ‡ Ú¤ÂÈ Ó·
·Ô„‡¯ÔÓÙ·È ÛÙÔ „˘Á›Ô.
◆ ª·ÁÂÈÚ¤„Ù ÙÔ Ê·ÁËÙfi ·Ì¤Ûˆ˜ ÌfiÏȘ ·Ô„˘¯ı›.
◆ ∆ФФıВЩ‹ЫЩВ ЩФ Щ·„› БОЪИП (12) О¿Щˆ ·fi ЩФ
Ê·ÁËÙfi.
◆ ƒ˘ıМ›ЫЩВ ЩФУ ‰И·ОfiЩЛ ıВЪМФОЪ·Ы›·˜ (4) ЫЩФ
М¤БИЫЩФ, ЩФУ ‰И·ОfiЩЛ ПВИЩФ˘ЪБ›·˜ (3) ЫЩЛУ
„ЛЫЩИ¤Ъ· О·И ЩФУ ¯ЪФУФ‰И·ОfiЩЛ (1) ЫЩФ on ‹
ЫЩФУ ВИı˘МЛЩfi ¯ЪfiУФ.
◆ ªÂÙ¿ ÙÔ Ì·Á›ÚÂÌ·, ·Ê·ÈÚ¤ÛÙ ÙËÓ „ËÛÙȤڷ
·fi ЩФУ КФ‡ЪУФ МВ ЩЛУ П·‚‹ „ЛЫЩИ¤Ъ·˜ (17).
™ЛОТЫЩВ ЩЛУ ·ЪИЫЩВЪ‹ ¿ОЪЛ ЩЛ˜ ЫФ‡‚П·˜ ·fi
ЩФ ЫЩ‹ЪИБМ·, ¤ВИЩ· МВЩ·ОИУ‹ЫЩВ ЩЛУ ЫФ‡‚П·
ЪФ˜ Щ· ·ЪИЫЩВЪ¿ БИ· У· ЩЛУ ‚Б¿ПВЩВ ·fi ЩЛУ
˘Ф‰Ф¯‹.
∫∞£∞ƒπ™ª√™ ∫∞π ™À¡∆∏ƒ∏™∏
¶ÚÈÓ ·fi ÙÔÓ Î·ı·ÚÈÛÌfi Î·È ÙËÓ
Û˘ÓÙ‹ÚËÛË, ÛÙÚ¤„Ù ÙÔÓ
¯ÚÔÓԉȷÎfiÙË(1) Î·È ÙÔÓ ‰È·ÎfiÙË
ıВЪМФОЪ·Ы›·˜ (4) ЫЩЛУ ı¤ЫЛ off,
·Ê·ÈÚ¤ÛÙ ÙÔ ÊȘ ·fi ÙËÓ Ú›˙· ηÈ
·Ê‹ÛÙ ÙËÓ Û˘Û΢‹ Ó· ÎÚ˘ÒÛÂÈ.
◆ ∆Ф ВЫˆЩВЪИОfi ЩФ˘ КФ‡ЪУФ˘ ‰И·ı¤ЩВИ МИ·
ÂÈÎ¿Ï˘„Ë Â‡ÎÔÏË ÛÙÔ Î·ı¿ÚÈÛÌ·.
◆ ™ОФ˘›ЫЩВ ЩФ ВНˆЩВЪИОfi О·И ЩФ ВЫˆЩВЪИОfi
М¤ЪФ˜ МВ ¤У· ˘БЪfi ·У›. ªЛ ¯ЪЛЫИМФФИВ›ЩВ
ЫЩИП‚ˆЩИО¿ ‹ ˘БЪ¿ О·ı·ЪИЫМФ‡ Ф˘ ВЪИ¤¯Ф˘У
‰И·П˘ЩИО¤˜ Ф˘Ы›В˜. ªЛУ ¯ЪЛЫИМФФИВ›ЩВ
Ы˘ЪМ¿ЩИУ· ЫКФ˘ББ¿ЪИ· ‹ ·ФНВЫЩИО¿ М¤Ы· БИ·
У· О·ı·Ъ›ЫВЩВ ЩЛУ МФУ¿‰·.
◆ ¶Ï‡ÓÂÙ ÙÔ˘˜ ‰›ÛÎÔ˘˜ Î·È Ù· ¿ÏÏ· ÂÍ·ÚÙ‹Ì·Ù·
ЫВ ˙ВЫЩ‹ Ы·Ф˘У¿‰· О·И ЫЩВБУТЫЩВ Щ· О·П¿.
TO770 – ™›Щ· ·УВМИЫЩ‹Ъ· (ВИО. E)
∏ Ы›Щ· ЩФ˘ ·УВМИЫЩ‹Ъ· МФЪВ› У· ·К·ИЪВıВ› О·И У·
О·ı·ЪИЫЩВ›.
◆ •В‚И‰ТЫЩВ ЩЛУ ОВУЩЪИО‹ ‚›‰· (18) О·И
·Ê·ÈÚ¤ÛÙÂ ÙËÓ Û›Ù· (19).
◆ ∫·ı·Ú›ÛÙ ÙËÓ Û›Ù· Î·È ÙÔÔıÂÙ‹ÛÙ ÙËÓ ¿ÏÈ.
жЛЫЩИ¤Ъ· (TO770)
◆ ∆ÔÔıÂÙ‹ÛÙ ÙÔ Ê·ÁËÙfi ÛÙËÓ ÛÔ‡‚Ï· fiˆ˜
ВЪИБЪ¿КВЩ·И ЫЩИ˜ Ф‰ЛБ›В˜ Ы˘У·ЪМФПfiБЛЫЛ˜.
◆ ∆ÔÔıÂÙ‹ÛÙ ÙÔ Ì˘ÙÂÚfi ¿ÎÚÔ Ù˘ ÛÔ‡‚Ï·˜
ÛÙËÓ ˘Ô‰Ô¯‹ ÛÙÔ ‰ÂÍ› ̤ÚÔ˜ ÙÔ˘ ÊÔ‡ÚÓÔ˘.
◆ ∆ÔÔıÂÙ‹ÛÙ ÙËÓ ÂÁÎÔ‹ Ù˘ ÙÂÙÚ¿ÁˆÓ˘
ÏÂ˘Ú¿˜ Ù˘ ÛÔ‡‚Ï·˜ ÛÙÔ ÛÙ‹ÚÈÁÌ· Ù˘
·ЪИЫЩВЪ‹˜ ПВ˘Ъ¿˜.
26
ªËÓ ‚˘ı›˙ÂÙ ÙË Û˘Û΢‹ ÛÙÔ ÓÂÚfi ‹ ÛÂ
¿ППФ ˘БЪfi.
EП¤БНЩВ fiЩИ Л МФУ¿‰· О·И Щ· ВН·ЪЩ‹М·Щ¿ ЩЛ˜ В›У·И
ЫЩВБУ¿ ЪИУ ·fi ЩЛУ ¯Ъ‹ЫЛ.
Page 27

∂§§∏¡π∫∞
¶ƒ√™∆∞™π∞ ∆√À ¶Eƒπµ∞§§√¡∆√™
∏ Black & Decker ‰›ÓÂÈ ÙË ‰˘Ó·ÙfiÙËÙ·
·У·О‡ОПˆЫЛ˜ ЩˆУ ЪФ˚fiУЩˆУ ЩЛ˜ Ф˘
¤¯Ф˘У Ы˘МПЛЪТЫВИ ЩЛ ‰И¿ЪОВИ· ˙ˆ‹˜
ЩФ˘˜. ∏ ˘ЛЪВЫ›· ·˘Щ‹ В›У·И ‰ˆЪВ¿У.
∞У ı¤ПВЩВ У· ¯ЪЛЫИМФФИ‹ЫВЩВ ЩЛУ ВУ
ПfiБˆ ˘ЛЪВЫ›·, ВИЫЩЪ¤„ЩВ ЩФ ЪФ˚fiУ
Ы·˜ ЫВ ФФИФ‰‹ФЩВ ВНФ˘ЫИФ‰ФЩЛМ¤УФ
О¤УЩЪФ ВИЫОВ˘ТУ, fiФ˘ ı· ЩФ
·Ъ·П¿‚Ф˘У ВО М¤ЪФ˘˜ Ы·˜.
EУЛМВЪˆıВ›ЩВ БИ· ЩФ ПЛЫИ¤ЫЩВЪФ О¤УЩЪФ
ВИЫОВ˘ТУ ЩЛ˜ ВЪИФ¯‹˜ Ы·˜, ВИОФИУˆУТУЩ·˜ МВ
Щ· БЪ·КВ›· ЩЛ˜ Black & Decker ЫЩЛ ‰ИВ‡ı˘УЫЛ
Ф˘ ·У·БЪ¿КВЩ·И ЫЩФ ВБ¯ВИЪ›‰ИФ. E›ЫЛ˜, БИ· У·
ПЛЪФКФЪЛıВ›ЩВ БИ· Щ· ВНФ˘ЫИФ‰ФЩЛМ¤У· О¤УЩЪ·
ВИЫОВ˘ТУ ЩЛ˜ Black & Decker, ЩИ˜ ПВЩФМ¤ЪВИВ˜
О·И ЩФ˘˜ ·ЪМfi‰ИФ˘˜ ЩˆУ ˘ЛЪВЫИТУ Ф˘
·Ъ¤¯ФУЩ·И МВЩ¿ ЩЛУ ТПЛЫЛ, МФЪВ›ЩВ У·
·Ó·ÙÚ¤ÍÙ ÛÙÔ ¢È·‰›ÎÙ˘Ô ÛÙË ‰È‡ı˘ÓÛË:
www.2helpU.com.
E°°À∏™∏
∏ Black & Decker В›У·И Ы›БФ˘ЪЛ БИ· ЩЛУ ФИfiЩЛЩ·
ЩˆУ ЪФ˚fiУЩˆУ ЩЛ˜ О·И ·Ъ¤¯ВИ ЫЛМ·УЩИО‹
ВББ‡ЛЫЛ. ∏ ·ЪФ‡Ы· БЪ·Щ‹ ВББ‡ЛЫЛ ·ФЩВПВ›
ЪfiЫıВЩФ ‰ИО·›ˆМ¿ Ы·˜ О·И ‰ВУ ˙ЛМИТУВИ Щ·
Ы˘УЩ·БМ·ЩИО¿ Ы·˜ ‰ИО·ИТМ·Щ·. ∏ ВББ‡ЛЫЛ ИЫ¯‡ВИ
ВУЩfi˜ ЩЛ˜ ВИОЪ¿ЩВИ·˜ ЩˆУ ∫Ъ·ЩТУ ªВПТУ ЩЛ˜
E˘Ъˆ·˚О‹˜ EУˆЫЛ˜ О·И ЩЛ˜ E˘Ъˆ·˚О‹˜ ∑ТУЛ˜
EПВ˘ı¤ЪˆУ ™˘У·ПП·БТУ.
◆ ∆Ф ЪФ˚fiУ ¤¯ВИ ¯ЪЛЫИМФФИЛıВ› ЫВ ВЪБ·ЫИ·Оfi,
В·ББВПМ·ЩИОfi ВЪИ‚¿ППФУ ‹ ·У ¤¯ВИ ВУФИОИ·ЫЩВ›
◆ E¯ÂÈ Á›ÓÂÈ ÂÛÊ·Ï̤ÓË ¯Ú‹ÛË ÙÔ˘ ÚÔ˚fiÓÙÔ˜ ‹
·Ó ¤¯ÂÈ ·Ú·ÌÂÏËı›
◆ ∆Ô ÚÔ˚fiÓ ¤¯ÂÈ ˘ÔÛÙ› ‚Ï¿‚Ë ·fi ¿ÏÏ·
·УЩИОВ›МВУ·, ·fi Ф˘Ы›В˜ ‹ ПfiБˆ ·Щ˘¯‹М·ЩФ˜
◆ E¯ÂÈ Á›ÓÂÈ ÚÔÛ¿ıÂÈ· ÂÈÛ΢‹˜ ·fi ÌË
ÂÍÔ˘ÛÈÔ‰ÔÙË̤ӷ ΤÓÙÚ· ÂÈÛ΢ÒÓ ‹ ·fi
ÚÔÛˆÈÎfi Ô˘ ‰ÂÓ ·Ó‹ÎÂÈ ÛÙÔ ÚÔÛˆÈÎfi
Ù˘ Black & Decker
°È· Ó· ÈÛ¯‡ÛÂÈ Ë ÂÁÁ‡ËÛË, Ú¤ÂÈ Ó· ˘Ô‚¿ÏÂÙÂ
·fi‰ВИНЛ ·БФЪ¿˜ ЫЩФУ ˆПЛЩ‹ ‹ ЩФ
ВНФ˘ЫИФ‰ФЩЛМ¤УФ О¤УЩЪФ ВИЫОВ˘ТУ.
EУЛМВЪˆıВ›ЩВ БИ· ЩФ ПЛЫИ¤ЫЩВЪФ О¤УЩЪФ
ВИЫОВ˘ТУ ЩЛ˜ ВЪИФ¯‹˜ Ы·˜, ВИОФИУˆУТУЩ·˜ МВ
Щ· БЪ·КВ›· ЩЛ˜ Black & Decker ЫЩЛ ‰ИВ‡ı˘УЫЛ
Ф˘ ·У·БЪ¿КВЩ·И ЫЩФ ВБ¯ВИЪ›‰ИФ. E›ЫЛ˜, БИ· У·
ПЛЪФКФЪЛıВ›ЩВ Щ· ВНФ˘ЫИФ‰ФЩЛМ¤У· О¤УЩЪ·
ВИЫОВ˘ТУ ЩЛ˜ Black & Decker О·И ЩИ˜
ПВЩФМ¤ЪВИВ˜ О·И ЩФ˘˜ ·ЪМfi‰ИФ˘˜ ЩˆУ ˘ЛЪВЫИТУ
Ф˘ ·Ъ¤¯ФУЩ·И МВЩ¿ ЩЛУ ТПЛЫЛ, МФЪВ›ЩВ У·
·Ó·ÙÚ¤ÍÙ ÛÙÔ ¢È·‰›ÎÙ˘Ô ÛÙË ‰È‡ı˘ÓÛË:
www.2helpU.com.
™В ВЪ›ЩˆЫЛ Ф˘ О¿ФИФ ЪФ˚fiУ ЩЛ˜
Black & Decker ·ЪФ˘ЫИ¿ЫВИ ‚П¿‚Л ВН·ИЩ›·˜
ВП·ЩЩˆМ·ЩИОТУ ˘ПИОТУ, ФИfiЩЛЩ·˜ ВЪБ·Ы›·˜ ‹
¤ППВИ„Л˜ Ы˘МКˆУ›·˜ МВ ЩИ˜ ЪФ‰И·БЪ·К¤˜ ВУЩfi˜
24 МЛУТУ ·fi ЩЛУ ЛМВЪФМЛУ›· ·БФЪ¿˜,
Л Black & Decker ВББ˘¿Щ·И ЩЛУ ·УЩИО·Щ¿ЫЩ·ЫЛ
ЩˆУ ВП·ЩЩˆМ·ЩИОТУ ЩМЛМ¿ЩˆУ, ЩЛУ ВИЫОВ˘‹
ЪФ˚fiУЩˆУ Ф˘ ¤¯Ф˘У ˘ФЫЩВ› В‡ПФБЛ КıФЪ¿
ПfiБˆ ¯Ъ‹ЫЛ˜ ‹ ЩЛУ ·УЩИО·Щ¿ЫЩ·ЫЛ ЩˆУ
ЪФ˚fiУЩˆУ ЪФОВИМ¤УФ˘ У· ВН·ЫК·П›ЫВИ ЩЛУ
ВП¿¯ИЫЩЛ ВУfi¯ПЛЫЛ ЫЩФ˘˜ ВП¿ЩВ˜ ЩЛ˜, ВОЩfi˜ ·У:
27
Page 28

TÜRKÇE
TO670 IZGARALI FIRIN
TO770 DÖNER ŞİŞLİ FIRIN
Black & Decker firması ürününü seçtiğiniz için size
teşekkür ederiz. Bu ürünün size uzun yıllar
boyunca mutluluk getireceğini ümit ediyoruz.
GENEL BAKIŞ (şek. A)
1. Zaman ayarı ve açma/kapama düğmesi
2. Güç göstergesi ışığı
3. Fonksiyon düğmesi
4. Isı ayarı düğmesi
5. Taşıma kolları
6. Cam kapak
7. Kapak tutacağı
EC’YE UYGUNLUK BEYANI
TO670/TO770
Black & Decker firması ürünlerinin
89/336/EEC, 73/23/EEC, EN 55014,
EN 60335, EN 61000
normuna uyduğunu beyan eder.
Kevin Hewitt
Mühendislik Bölümü Müdürü
Spennymoor, County Durham DL16 6JG,
İngiltere
ÖNGÖRÜLEN KULLANIMI
Sahip olduğunuz Black & Decker ızgaralı fırın,
besinleri ızgara yapmak, fırında pişirmek ve
kızartmak için tasarlanmıştır. Bu ürün sadece ev
işlerinde kullanım içindir.
28
UYARI SEMBOLLERİ
Bu kullanım kılavuzunda aşağıdaki semboller
kullanılmıştır:
Bu kullanım kılavuzunda belirtilen kurallara
uyulmadığında kişisel yaralanma riskinin
bulunduğunu veya ürünün zarar göreceğini
belirtir.
Elektrik çarpması tehlikesini belirtir.
ÖNEMLİ GÜVENLİK TALİMATLARI
◆ Uyarı! Elektrikli aletleri kullanırken yangın,
elektrik çarpması ve kişisel yaralanmaların
önüne geçmek için, aşağıdakileri de içeren
temel güvenlik önlemlerine daima uymak gerekir.
◆ Cihazı kullanmadan önce tüm kullanım
kılavuzunu dikkatlice okuyunuz.
◆ Bu ürünün kullanım amacı bu kullanım
kılavuzunda anlatılmıştır. Bu kullanım
kılavuzunda belirtilen aksesuarların ya da
yardımcı aletlerin kullanılmaması veya aletle
tavsiye edilenin dışındaki işlemlerin yapılması
yaralanma riskinin doğmasına yol açabilir.
◆ Bu kullanım kılavuzunu gelecekteki kullanımlar
için saklayınız.
Cihazınızın kullanımı
◆ Cihazı güç kaynağına bağlamadan veya
bağlantısını kesmeden önce, zaman ayarı
düğmesini (1) ve ısı düğmesini (4) kapalı konuma
getirerek cihazın kapalı olduğundan emin olun.
◆ Fırının kapak camı ve dış yüzeyleri kullanım
sırasında çok ısınır. Yağ ve benzeri pişirme
sıvıları da kullanım sırasında çok ısınabilir.
Kapağı açarken ve fırından tepsi çıkartırken
daima eldiven takın.
◆ Cihazı kullanırken daima dikkatli olunuz.
◆ Fırının, kullanılan prizi engellemediğinden emin
olun. Kullanım sırasında veya sonrasında
elektrik kablosu cihaza değmemelidir.
Page 29

TÜRKÇE
◆ Fişi prizden çekerken hiç bir zaman kablodan
çekmeyiniz. Elektrik kablosunun sıcaklık
kaynakları, yağ ve keskin kenarlı maddelerle
temasa geçmesini engelleyiniz. Elektrik
kablosunun tezgahın üstünden sarkmasını
önleyiniz.
◆ Aşırı ısınmaya neden olabileceğinden, tepsileri
veya diğer parçaları metal folyolarla kaplamayın.
◆ Fırına asla karton, plastik, kağıt veya benzeri
maddeler koymayın.
◆ Mutfak eşyalarını ve aşırı hacimli besinleri fırına
koymayın. Bunların yangına veya elektrik
çarpmasına neden olma tehlikesi bulunur.
◆ Cihazla verilen aksesuarlar dışında cihaz içinde
başka bir şey saklamayın.
◆ Cihazı ısı kaynaklarının üzerine veya yakınına
koymayın.
◆ Cihazı yanıcı (örn. perdeler) veya parlayıcı/
patlayıcı malzemelerin yakınında kullanmayın.
◆ Cam kapağı çizmekten veya köşelerini
aşındırmaktan kaçının.
◆ Cihazı açık havada kullanmayınız.
◆ Cihazı daima sudan veya aşırı nemden koruyunuz.
◆ Cihazı sadece elleriniz kuruyken kullanınız.
◆ Eğer elektrik kablosu kulanım sırasında zarar
görmüşse cihazı hemen prizden çekiniz.
Güç kaynağıyla bağlantısını kesmeden güç
kaynağı kablosuna dokunmayınız.
◆ Besinlerin yanmasını önlemek için pişirme
sırasında pişme işlemini takip edin.
Diğer şahısların güvenliği
◆ Çocukların ve bu kullanım talimatlarını bilmeyen
kişilerin cihazı kullanmasına veya cihazın
yanına yaklaşmalarına engel olunuz.
◆ Kullanım ve soğutma sırasında, çocukları veya
hayvanları birimden uzak tutunuz.
Kullanımdan sonra
◆ Zaman ayarı düğmesini (1) ve ısı ayarı düğmesini
(4) kapalı konuma getirin ve cihazı güç
kaynağından çekin. Cihazı terk etmeden önce ve
cihazın herhangi bir parçasını değiştirmeden,
temizlemeden veya bakımını yapmadan önce
cihazı kapatarak soğumasını bekleyin.
◆ Cihaz kullanılmadığı zaman kuru bir yerde
muhafaza edilmelidir. Bu muhafaza alanına
çocuklar girmemelidir.
Cihazın kontrolü ve tamiri
◆ Kullanımdan önce cihazın veya herhangi bir
parçasının arızalı olup olmadığını kontrol edin.
Parçaların çatlak olup olmadığını ve çalışmayı
etkileyecek diğer şartların kontrolünü yapın.
◆ Herhangi bir parçası arızalıysa veya hatalıysa
cihazı kullanmayın.
◆ Kullanımdan önce elektrik kablosunun arızalı
veya eski gibi görünüp görünmediğinin
kontrolünü yapın.
◆ Elektrik kablosu veya priz arızalı ya da bozuksa
cihazı kullanmayın.
◆ Elektrik kablosu, elektrik fişi veya diğer herhangi
bir parça hasarlı veya kusurluysa, bunun yetkili
bir Black & Decker servisince tamir edilmesi
gerekir. Cihazı kendiniz tamir etmeye çalışmayın.
◆ Bu kullanma kılavuzunda belirtilen parçaların
dışındaki hiç bir parçayı değiştirmeye veya
sökmeye çalışmayın.
ELEKTRİK GÜVENLİĞİ
◆ Kullanmadan önce şebeke geriliminin model
etiketindekiyle aynı olup olmadığını kontrol ediniz.
Cihazı, elektrik kablosunu veya fişi suya ya
da diğer sıvılara sokmayın.
◆ Bu ürün topraklanmalıdır.
BİRLEŞTİRME
Tepsilerin yerleştirilmesi (şek. B & C)
Beş farklı tepsi bulunur:
◆ Krom raf (8)
◆ Emaye ızgara (9)
◆ Fırın tepsisi (10)
◆ Kırıntı tepsisi (11)
◆ Izgara kabı (12)
Krom raf ve kırıntı tepsisi, fırındaki üç seviyede
bulunan destek kılavuzlarına yerleştirilebilir.
Tepsi tutacağı (şek. C)
◆ Fırından tepsi çıkarmak için tepsi tutacağı (13)
kullanılabilir.
◆ Tutacağı ızgara kabına (12) yerleştirmek için,
tutacağın üst askılarını ızgara kabının uzun
tarafına yerleştirin. Tutacak, kabın tam ortasına
tutturulmuş olmalıdır.
29
Page 30

TÜRKÇE
◆ Tutacağı rafa, ızgara rafına, pişirme tepsisine
veya kırıntı tepsisine yerleştirmek için, tutacağın
alt askılarını ızgara kabının uzun tarafına
yerleştirin. Tutacak, tepsinin tam ortasına
tutturulmuş olmalıdır.
T0770 - Döner Şiş (şek. D)
◆ Şişin (14) sivri ucunu çatalların (15) birinden
geçirin. Kelebek vidayı (16) kullanarak çatalı
şişin kare tarafına sıkıştırın.
◆ Besini şişe geçirin. Çatal besine tam oturmuş
olmalıdır. Besin şişin ortasında bulunmalıdır.
◆ İkinci çatalı geçirin ve bunun besine iyice
geçmiş olduğundan emin olduktan sonra ikinci
kelebek vidayı da takın.
KULLANIM
İlk kullanımdan önce
◆ Zaman ayarı düğmesinin (1) ve ısı ayarı
düğmesinin (4) kapalı konumda olduğundan
emin olun.
◆ Birimi uygun bir yüzeye yerleştirin. En az 10 cm
yakınında herhangi bir cisim bulunmamalıdır.
◆ Paketten aksesuarları çıkartın ve plastik
torbaları güvenli bir biçimde uzaklaştırın.
◆ Tüm aksesuarları sıcak sabunlu suyla yıkayın.
Aksesuarları kurutun ve fırına yerleştirin.
◆ İlk kullanımda ısıtma elemanları bir miktar
duman ve koku çıkarabilir. Bu herhangi bir
soruna işaret etmez.
Kontrol düğmelerinin ayarlanması (şek. A)
Her pişirme işlemi için kontrol düğmeleri istenilen
ısıya, pişirme fonksiyonuna ve pişirme süresine
ayarlanmalıdır.
◆ Fırının şu fonksiyonları bulunur:
Fırınlama/Kızartma - kek,
kurabiye pişirmek ve tavuk, biftek
TO670 TO770 vs. rostoları yapmak için kullanılır.
Tost - Ekmek, muffin ve waffle tostları
hazırlamak için kullanılır.
Izgara - Balık, et ızgaraları ve eritme peynir
hazırlamak için kullanılır.
Sıcak saklama - Pişmiş besinleri 60 dakikaya
kadar sıcak saklamak için kullanılır.
Ağır pişirme (TO670) - Düşük ısıda uzun
pişirme süresi gerektiren haşlamalar ve
çorbalar için.
Buz çözme (TO770) - Donmuş besinleri
çözmek için.
Döner şiş (TO770) - Maksimum 2.3 kg
(çiğ ağırlık) tavuk veya et parçalarını şişte
pişirmek için.
Zaman ayarı
◆ Zaman ayar düğmesini (1) saat yönüne doğru
istediğiniz pişirme süresine getirin. Güç göstergesi
ışığı (2) yanacak ve birim ısınmaya başlayacaktır.
◆ Zaman dolunca zil çalar, güç göstergesi
lambası söner ve cihaz otomatik olarak kapanır.
◆ Daha uzun pişirme süresi için, düğmeyi açık
konuma doğru saat yönünün tersine doğru
çevirin. Birim ısınacak ve siz elle kapatana
kadar açık kalacaktır. Pişirme süresini kontrol
etmek için mutfak saatinizi kullanın.
◆ Birimi kapatmak için, zaman ayarı düğmesini (1)
ve ısı ayarı düğmesini (4) kapalı konuma getirin.
Güç göstergesi ışığı söner.
Pişirme fonksiyonlarını kullanma
Isının ayarlanması
◆ Isı ayar düğmesini (4) istediğiniz pişirme ısısına
getirin.
Fonksiyon ayarlama
◆ Fonksiyon düğmesini (3) istediğiniz fonksiyona
getirin.
30
Fırında pişirme
TO670 TO770
◆ Genel bir kural olarak, TO770 sıcak hava
dolaşımlı fırında daha düşük ısılar kullanılabilir.
TO770’de besin pişirirken, en az 150 °C olmak
üzere, tariflerdeki ısıları 10 °C düşürün.
◆ Üste bakacak şekilde rafı (8) en alt konuma
yerleştirin.
◆ İstenirse fırın tepsisi (10) rafın üzerine
yerleştirilebilir.
Page 31

TÜRKÇE
◆ Isı ayarı düğmesini (4) istediğiniz ısıya getirin,
fonksiyon ayarı düğmesinin (3) fırın/kızartma
seçimini yapın ve zaman ayarı düğmesini (1)
açık konuma veya istediğiniz zamana ayarlayın.
Kızartma (Rosto)
TO670 TO770
◆ Üste bakacak şekilde rafı (8) istediğiniz
konuma yerleştirin.
◆ Besini ızgara rafına (9) yerleştirin, daha sonra
ızgara rafını ızgara kabına (12) yerleştirin.
◆ Izgara kabını ve rafını, fırın içindeki rafın üzerine
yerleştirin.
◆ Isı ayarı düğmesini (4) istediğiniz ısıya getirin,
fonksiyon ayarı düğmesinin (3) fırın/kızartma
seçimini yapın ve zaman ayarı düğmesini (1)
açık konuma veya istediğiniz zamana ayarlayın.
Tost yapma
◆ Alttaki ısıtma elemanlarının altına kırıntı tepsisini
(11) yerleştirin.
◆ Besini raf üzerinde (8) en iyi pişirme konumuna
yerleştirin. Besin üst ısıtma elemanlarına yakın,
ancak bunlara dokunmayacak bir şekilde
bulunmalıdır.
◆ Alternatif olarak, ekmek birleştirilmiş ızgara rafı
ve ızgara kabı üzerine yerleştirilebilir. Izgara
kabını fırın içindeki rafa yerleştirin.
◆ Isı ayarı düğmesini (4) maksimuma getirin,
fonksiyon ayarı düğmesini (3) tosta getirin ve
zaman ayarı düğmesini (1) açık konuma veya
istediğiniz zamana ayarlayın.
◆ Ekmek yanabilir. Ekmek kızartırken cihazın
başından ayrılmayın.
Izgara yapma
◆ Fırını önceden maksimum sıcaklıkta 5 dakika ısıtın.
◆ Rafı (8) pişirme için en iyi konuma yerleştirin.
◆ Izgara rafını (9) ızgara kabına (12) yerleştirin,
daha sonra da ızgara rafına besini koyun.
◆ Izgara kabını ve rafını, fırın içindeki rafın üzerine
yerleştirin. Besin üst ısıtma elemanlarına yakın,
ancak dokunmayacak bir yerde olmalıdır.
◆ Pişirme sırasında kapağı hafifçe aralık bırakın
ve besini düzenli olarak çevirin.
◆ Isı ayarı düğmesini (4) maksimuma getirin,
fonksiyon ayarı düğmesini (3) ızgaraya getirin
ve zaman ayarı düğmesini (1) açık konuma
veya istediğiniz zamana ayarlayın.
Sıcak tutma
◆ Besini rafa (8) yerleştirin.
◆ Isı ayarı düğmesini (4) istediğiniz ısıya getirin
(maksimum 80 °C), fonksiyon ayarı düğmesini
(3) sıcak tutmaya getirin ve zaman ayarı
düğmesini (1) açık konuma veya istediğiniz
zamana ayarlayın.
Ağır pişirme (TO670)
◆ Üste bakacak şekilde rafı (8) istediğiniz
konuma yerleştirin.
◆ Besini üstü kapalı güveç kabına yerleştirin ve
rafın üzerine koyun.
◆ Isı ayarı düğmesini (4) 110 °C’ye getirin,
fonksiyon ayarı düğmesini (3) ağır pişirmeye
getirin ve zaman ayarı düğmesini (1) açık
konuma veya istediğiniz zamana ayarlayın.
Buz çözme (TO770)
◆ Donmuş besini rafın (8) üzerine yerleştirin.
Izgara kabı (12) akan suyu önlemek için altta
olsun.
◆ Isı ayarı düğmesini (4) ve fonksiyon düğmesini (3)
buz çözmeye getirin ve zaman ayarı düğmesini
(1) açık konuma getirin.
◆ Buz çözme işlemini takip edin ve buz çözülür
çözülmez besini çıkartın.
◆ Büyük miktardaki besinler buzdolabında
çözülmelidir.
◆ Çözdükten sonra besini hemen pişirin.
Döner şiş (TO770)
◆ Birleştirme talimatlarında anlatıldığı şekilde
besini şiş üzerine yerleştirin.
◆ Şişin sivri ucunu fırının sağ tarafındaki
döndürme girişine yerleştirin.
◆ Şişin kare ucundaki çentiği sol taraftaki
desteğin üzerine yerleştirin.
◆ Izgara tepsisini (12) besinin altına yerleştirin.
31
Page 32

TÜRKÇE
◆ Isı ayarı düğmesini (4) maksimuma, fonksiyon
ayarı düğmesini (3) döner şiş ızgaraya getirin
ve zaman ayarı düğmesini (1) açık konuma
veya istediğiniz zamana ayarlayın.
◆ Pişirmeden sonra döner şişi fırından döner şiş
tutacağı (17) ile çıkartın. Destek üzerinden şişin
sol tarafını kaldırın, daha sonra döndürme
girişinden çıkarmak için şişi sola doğru hareket
ettirin.
TEMİZLİK VE BAKIM
Temizlik ve bakımdan önce zaman ayarı
düğmesini (1) ve ısı ayarı düğmesini (4)
kapalı konuma getirin, fişi prizden çekin ve
cihazın soğumasını bekleyin.
◆ Fırının içi temizlemesi kolay bir kaplamayla
kaplıdır.
◆ Dış ve iç yüzeyi nemli bir bezle siliniz. Aşındırıcı
veya solventli temizleyici kullanmayınız. Birimi
temizlemek için çelik yünü, ovma bezi veya
bulaşık teli kullanmayın.
◆ Tepsileri ve diğer aksesuarları ılık sabunlu
suyla yıkayın ve iyice kurutun.
TO770 - Fan koruması (şek. E)
Fan koruması temizlik için çıkartılabilir.
◆ Ortadaki sürgüyü (18) sökün ve korumayı (19)
çıkartın.
◆ Korumayı temizleyin ve yeniden takın.
Bu kılavuzda belirtilen adresteki yerel Black & Decker
ofisine başvurarak size en yakın yetkili tamir
servisinin yerini öğrenebilirsiniz. Ya da, Internet’te
www.2helpU.com adresinden, Black & Decker
yetkili tamir servislerinin listesini ve satış sonrası
hizmet veren yetkililerin tam detaylarını
öğrenebilirsiniz.
GARANTİ
Black & Decker, ürünün kalitesinden emindir ve
ürün için üstün bir garanti sunar. Ayrıca bu garanti
belgesi, hiçbir şekilde kanuni haklarınızın olmasını
gerektirmez.
Eğer bir Black & Decker ürünü, hatalı malzeme ve
işçilik nedeniyle bozulursa, satın alma tarihinden
12 ay içinde müşteriye mümkün olabilecek en az
sorunu yaşatabilmek için Black & Decker hatalı
kısımları değiştirmeyi, belirgin bir şekilde yıpranmış
veya hasar görmüş kısımları onarmayı veya
değiştirmeyi kabul eder; ancak bu belirtilenler şu
durumlar dışında geçerlidir:
◆ Ürün ticari veya profesyonel amaçlarla
kullanılmışsa veya kiraya verilmişse;
◆ Ürün yanlış veya amaç dışı kullanılmışsa;
◆ Ürün yabancı nesnelerden, maddelerden veya
kaza sırasında zarar görmüşse;
◆ Yetkili tamir servisleri veya Black & Decker
servis ekibinden başkası tarafından tamir
yapılmaya kalkışılmışsa.
Cihazı suya veya başka bir sıvıya
sokmayınız.
Kullanımdan önce birimin ve aksesuarlarının kuru
olduğundan emin olun.
YAŞAM ALANLARINI KORUMA
Black & Decker ürünleri çalışma ömürlerini
tamamladıklarında, Black & Decker
bunların geri kazandırılması imkanını
sağlar. Bu hizmet ücretsiz sağlanır.
Bu hizmetten yararlanmak için elinizdeki
ürünü, bizim yerimize ürünleri toplayan
yetkili bir tamir servisine götürün.
32
Garanti talebinde bulunmak için, satıcıya veya
yetkili tamir servisine satın aldığınıza dair ispat
sunmalısınız. Bu kılavuzda belirtilen adresteki yerel
Black & Decker ofisine başvurarak size en yakın
yetkili tamir servisinin yerini öğrenebilirsiniz. Ya da,
Internet’te Black & Decker yetkili tamir servislerinin
listesini ve satış sonrası hizmet veren yetkililerin
tam detaylarını öğrenebilirsiniz. Bu site:
www.2helpU.com adresindedir.
Page 33

333435
Page 34

Page 35

Page 36

EÏÏ¿˜ Black & Decker (EÏÏ¿˜) ∞.E. ∆ËÏ. (010) 8981 616
™ÙÚ¿‚ˆÓÔ˜ 7 & µÔ˘ÏÈ·Á̤Ó˘ 159 ∆ËÏ. (010) 8982 630
16674 °Ï˘Ê¿‰·, ∞ı‹Ó·, EÏÏ¿‰· º·Í Service (010) 8983 2850
Italia Black & Decker Italia SpA Tel. 039-23871
Viale Elvezia 2 Fax 039-2387592/2387594
20052 Monza (MI) Numero verde 800-213935
España Black & Decker Spain Tel. 934 797 400
Parque de Negocios “Mas Blau” Fax 934 797 419
Edificio Muntadas, c/Bergadá, 1, Of. A6
08820 El Prat de Llobregat (Barcelona)
Türkiye Black & Decker Merkez Servis Tel. 0216 455 89 73
Dudullu Cad. Kerembey Sok. No. 1 Faks 0216 455 20 52
Küçükbakkalköy/Istanbul
United Kingdom Black & Decker Tel. 01753 511234
210 Bath Road Fax 01753 551155
Slough, Berkshire SL1 3YD Helpline 01753 574277
581134-00
36
 Loading...