

Page 1

CONVECTION COUNTERTOP OVEN
FOUR
À CONVECTION POUR LE COMPTOIR
CustomerCare Line:
USA 1-800-231-9786
Accessories/Parts (USA)
1-800-738-0245
For online customer service
and to register your product, go to
www.prodprotect.com/applica
Service à la clientèle:
Canada 1-800-231-9786
Accessoires/Pièces (Canada)
1-800-738-0245
Pour accéder au service à la clientèle
en ligne ou pour inscrire votre
produit en ligne, rendez-vour à
www.prodprotect.com/applica
MODEL/MODÈLE
❍ TO1160C
Page 2

Please Read and Save this Use and Care Book
IMPORTANT SAFEGUARDS
When using electrical appliances, basic safety precautions should always
be followed, including the following:
❍ Read all instructions before using.
❍ Do not touch hot surfaces. Use handles or knobs.
❍ To protect against electrical shock do not immerse cord, plugs or
appliance in water or other liquid.
❍ Close supervision is necessary when any appliance is used by or near
children.
❍ Unplug from outlet when not in use and before cleaning. Allow to cool
before putting on or taking off parts.
❍ Do not operate any appliance with a damaged cord or plug, or after the
appliance malfunctions or has been damaged in any manner. Return
appliance to the nearest authorized service facility for examination,
repair or adjustment. Or, call the appropriate toll-free number on the
cover of this manual.
❍ The use of accessory attachments not recommended by the appliance
manufacturer may cause injuries.
❍ Do not use outdoors.
❍ Do not let cord hang over edge of table or counter, or touch hot
surfaces.
❍ Do not place on or near a hot gas or electric burner, or in a heated
oven.
❍ Extreme caution must be used when moving an appliance containing
hot oil or other hot liquids.
❍ Always attach plug to appliance first, then plug cord into the wall outlet.
To disconnect, turn any control to OFF (O), then remove plug from wall
outlet.
❍ Do not use appliance for other than intended use.
❍ Use extreme caution when removing tray or disposing of hot grease.
❍ Oversized foods or metal utensils must not be inserted in a toaster
oven, as they may create a fire or risk of electric shock.
❍ A fire may occur if the toaster oven is covered or touching flammable
material including curtains, draperies, walls and the like, when in
operation.
❍ Do not clean with metal scouring pads. Pieces can break off the pad
and touch electrical parts resulting in a risk of electric shock.
❍ Extreme caution should be exercised when using containers
constructed of other than metal or glass.
2
Page 3

❍ Do not store any material, other than manufacturer's recommended
accessories, in this oven when not in use.
❍ Do not place any of the following materials in the oven: paper,
cardboard, plastic and the like.
❍ Do not cover crumb tray or any part of this oven with metal foil. This
will cause overheating of the oven.
SAVE THESE INSTRUCTIONS.
This product is for household use only.
GROUNDED PLUG
As a safety feature, this product is equipped with a grounded plug, which will
only fit into a three-prong outlet. Do not attempt to defeat this safety feature.
Improper connection of the grounding conductor may result in the risk of
electric shock. Consult a qualified electrician if you are in doubt as to whether
the outlet is properly grounded.
TAMPER-RESISTANT SCREW
Warning: This appliance is equipped with a tamper-resistant screw to prevent
removal of the outer cover. To reduce the risk of fire or electric shock, do
not attempt to remove the outer cover. There are no user-serviceable parts
inside. Repair should be done only by authorized service personnel.
ELECTRICAL CORD
a) A short power-supply cord is to be provided to reduce the risk resulting from
becoming entangled in or tripping over a longer cord.
b) Longer extension cords are available and may be used if care is exercised in
their use.
c) If an extension cord is used,
1) The marked electrical rating of the cord set or extension cord should
be at least as great as the electrical rating of the appliance, and
2) The cord should be arranged so that it will not drape over the
countertop or tabletop where it can be pulled on by children or tripped
over unintentionally.
If the appliance is of the grounded type, the extension cord should
be a grounding-type 3-wire cord.
Note: If the power supply cord is damaged, it should be replaced by qualified
personnel; in Latin America by an authorized service center.
ENGLISH
3
Page 4

Product may vary slightly from what is illustrated.
l
k
A
1. ON indicator light
† 2. Temperature (
† 3. Cooking function (MODE) selector knob (Part# TO9602-A-10-02)
† 4. Toast shade and 60-minute timer (
5. Convection cooking OFF/ON (O/I) switch
6. Extra-deep curved interior
† 7. Broil rack (Part # TO9507-80-05)
† 8. Bake pan/drip tray (Part# TO9506-20-14)
9. Door handle
† 10. Slide-out crumb tray (Part# TO9507-20-14)
11. Rack slots
† 12. Slide rack (Part # CTO6160-02)
Note: † indicates consumer replaceable/removable parts
4
˚F / ˚C) selector knob (Part# TO9602-A-10-01)
) selector knob (Part# TO9602-A-10-02)
Page 5

Control Panel
ENGLISH
B
1. On indicator light
2. Temperature (
3. Cooking Function (MODE) selector knob
4. Toast shade and 60-minute timer (
5. Convection cooking OFF/ON (O/I) switch
˚F / ˚C) selector knob
Important:
When using TOAST / TIMER
(
the knob past 20 and then turn
back or forward to desired setting
) selector knob
) function, always turn
5
Page 6

How to Use
This product is for household use only.
Important: The oven top and side surfaces get hot.
CAUTION
THIS OVEN GETS HOT.
WHEN IN USE, ALWAYS USE OVEN
MITTS OR POT HOLDERS WHEN
TOUCHING ANY OUTER OR INNER
SURFACE OF THE OVEN.
GETTING STARTED
• Remove packing materials and any stickers.
• Remove the slide rack, broil rack and bake pan/drip tray from oven.
• Wash in sudsy water, rinse and dry with a cloth or paper towel.
• Replace slide rack in oven.
• Select a location for the unit. Do not place unit under cabinets or too close to the wall
to allow heat to flow without damaging counter space.
SLIDE RACK POSITIONS
There are four positions for the slide rack (C). It can be inserted in either the upper or
lower slot. It can also be inverted for two additional positions.
Position 1
Use upper slots
along oven walls.
Insert rack using a
rack-up position.
Important:
Not recommended for baking or broiling.
Position 2
Use upper slots
along oven walls.
Insert rack using a
rack-down position.
C
6
Position 3
Use lower slots along
oven walls. Insert
rack using a rack-up
position.
Position 4
Use lower slots along
oven walls. Insert rack
using a rack-down
position.
Page 7

OVERVIEW OF FUNCTIONS
Important: You must set the timer or select "Stay On" for the oven to function.
To Bake
1. Turn the temperature (
2. Turn cooking function (MODE) selector knob to Bake/Conv Bake.
3. Turn timer (
baking time including preheat time.
For Convection Cooking
Press the convection cooking OFF/ON (O/I) switch to the ON (I) position.
Convection uses a fan to circulate heat evenly for consistently better cooking.
To Broil
Note: Preheat oven for 5 minutes.
1. Turn temperature (
2. Turn cooking function (MODE) selector knob to Broil.
3. Turn timer (
broiling time. Select "Stay On", if you want to control cooking time yourself.
To Toast
1. Turn temperature (
2. Turn cooking function (MODE) selector knob to Toast (
3. Turn toast shade (
shade.
Keep Warm
1. Turn temperature (
2. Turn cooking function (MODE) selector knob to Warm.
3. Turn timer (
warming time.
TOASTING
Important: The oven top and side surfaces get hot.
It is not necessary to preheat the oven for toasting.
Important: You must set the toast shade (ICON) selector knob as desired for the oven
to function.
1. Make sure temperature (
(
/ Broil) / Broil) position.
D
Note: For best results, select the medium setting for your first cycle, then adjust
lighter or darker to suit your taste. The ON indicator light comes on and stays on
during the toasting cycle. When toasting is done, the signal bell sounds, the oven
automatically shuts off and the ON indicator light goes off.
6. Open oven door and using oven mitt or pot holder, slide out rack to remove toast.
) selector knob pasT 20 and then turn back or forward to desired
) selector knob past 20 and then turn back or forward to desired
) selector knob past 20 and then turn back or forward to desired
˚F / ˚C) selector knob to desired temperature.
˚F / ˚C) selector knob to Toast/Broil.
˚F / ˚C) selector knob to Toast/Broil (
) selector knob pass 20 and then turn back to desired toast
˚F / ˚C) selector knob to 150˚ F / 65˚ C.
˚F / ˚C) selector knob is set to the Toast/Broil
2. Open oven door. Insert the slide rack into the
bottom rack-slot using the rack-up position (D).
Note: See slide rack position 3 (illustration C).
3. Place the bread directly on the slide rack and close
the door.
4. Turn the cooking function (MODE) selector knob to
the Toast (
5. Turn toast shade (
then turn back to desired toast shade.
) position.
) selector knob past 20 and
/ Broil).
).
ENGLISH
7
Page 8

Important: Always use an oven mitt or pot holder to
remove food from the oven as the door and the slide rack
will be hot (E).
Note: You must turn off (0) the toast shade selector if you
want to discontinue toasting.
Tip: When making more toast immediately after one
E
BAKING
Important: The oven top and side surfaces get hot.
Note: For best results, when baking, always preheat the oven for 8 minutes at the desired
temperature setting.
1. Open oven door.
2. Insert the slide rack into the oven.
Important: For even baking, select slide rack position 2 or 3 (illustration C).
3. Turn the temperature (
4. Turn cooking function (MODE) selector knob to Bake/Conv Bake.
Important: You must set the timer (ICON) or select "Stay On" for the oven to function.
5. Turn timer (
time including preheat time.
Tip: Set the timer (
cooking time yourself or need to cook your food longer than 60 minutes.
• The ON indicator light comes on and stays on during baking cycle.
• The heating elements cycle on and off to maintain the temperature.
6. You can cook your food two ways:
• In the bake pan placed on the slide rack (Fa), OR
• Directly on the broil rack using the bake pan as a drip tray underneath (Fb).
) selector knob past 20 and then turn back or forward to desired baking
) selector knob to the "Stay On" setting if you want to control
toasting cycle, set the toast shade selector to a slightly
lighter setting to get the same results.
˚F / ˚C) selector knob to the desired temperature setting.
OR
Fa
8
Fb
Page 9

7. Place your food in the oven for cooking.
Note: Be sure the top edge of the food or container is at least 1½” (3.81 cm) away from
the upper heating elements.
Important: Food should not extend beyond the edge(s) of the bake pan/drip tray to
avoid drippings from falling onto the heating elements.
8. Close oven door.
9. For convection cooking, turn the convection (
the ON (I) position. You will hear the fan running during the cooking cycle.
Important: When baking using convection, the temperature selected should be 25
degrees lower than the recommended temperature for conventional cooking, since
the circulated air increases the average temperature in the cavity.
10. The first time you bake an item in this oven, cook according to recipe or package
instructions and check at minimum time to see if it is done.
11. Once cooking cycle is finished:
• If the timer was on, the signal bell sounds, the ON indicator light goes off
and the oven automatically turns off.
• If the timer was not on, turn the TOAST/TIMER (
from the "Stay On" position to the OFF (0) position. The ON indicator light
goes off.
12. If you used the convection cooking feature, turn the convection (
OFF/ON (O/I) switch to the OFF (O) position .
13. Open oven door and using oven mitt or pot holder, slide out rack to remove food.
Important: Always use an oven mitt or pot holder to
remove food from the oven as the door and the slide
rack will be hot (G).
/ CONV) OFF/ON (O/I) switch to
) selector knob
/ CONV)
ENGLISH
G
BROILING
Note: When broiling, preheat oven for 5 minutes.
1. Turn the temperature (
2. Turn the cooking function (MODE) selector knob to Broil.
Important: You must set the timer or select "Stay On" for the oven to function.
3. Turn timer (
broiling time. Select "Stay On", if you want to control cooking time yourself.
) selector knob past 20 and then turn back or forward to desired
H
6. The first time you broil an item in this oven, cook according to recipe or package
instructions and check at minimum time to see if it is done.
˚F / ˚C) selector knob to Toast/Broil (
4. Place the broil rack on top of the bake pan (H).
5. Place food on top of the broil rack.
Note: Make sure the top edge of the food or container
is at least 1½” (3.81 cm) away from the upper heating
elements.
Important: Food should not extend beyond the edges
of the bake pan/drip tray to avoid drippings from
falling onto the heating elements.
/ Broil)
9
Page 10

7. When finished broiling:
• If the timer was on, the signal bell sounds, the ON indicator light goes off and the
oven automatically shuts off.
• If the timer was not on, turn the TOAST SHADE AND 60-MINUTE TIMER
(
The ON indicator light goes off.
8. Using an oven mitt or pot holder, slide out broiling rack together with bake pan to
remove food.
J
• Turn cooking function (MODE) selector knob to Broil.
• Set the timer (
to control cooking time yourself or need to cook your food longer than 60 minutes.
Broiling Tips
• Use the top rack position for broiling such foods as hamburgers, steaks, fish steaks,
chicken parts, garlic bread and cheese toppings on casseroles.
• Use the bottom rack position for such foods as fish fillets, chicken cutlets,
frankfurters, toasted open-face cheese sandwiches and nachos.
) SELECTOR KNOB from the "Stay On" position to the OFF position.
Important: Always use an oven mitt or pot holder to
remove food from the oven as the door and the slide rack
will be hot (J).
Broiling Guide
Note: When broiling foods, use the broil rack on top of the
bake pan/drip tray.
• Preheat oven for 5 minutes.
• Turn temperature (
Broil (
) selector knob to desired broiling time. Select "Stay On", if you want
/ Broil).
˚F / ˚C) selector knob to Toast/
10
Page 11
Care and Cleaning
This product contains no user serviceable parts. Refer service to qualified service
personnel.
CLEANING YOUR OVEN
Important: Before cleaning any part, be sure the oven is off (0), unplugged and cool.
Always dry parts thoroughly before using oven after cleaning.
1. Clean the glass door with a sponge, soft cloth or nylon pad and sudsy water. Do not
use a spray glass cleaner.
2. To remove the slide rack, open the door, pull the rack forward and out. Wash the
slide rack in sudsy water or in the dishwasher. To remove stubborn spots, use a
polyester or nylon pad.
3. Wash the bake pan/drip tray and broil rack in sudsy water. To minimize scratching,
use a polyester or nylon pad.
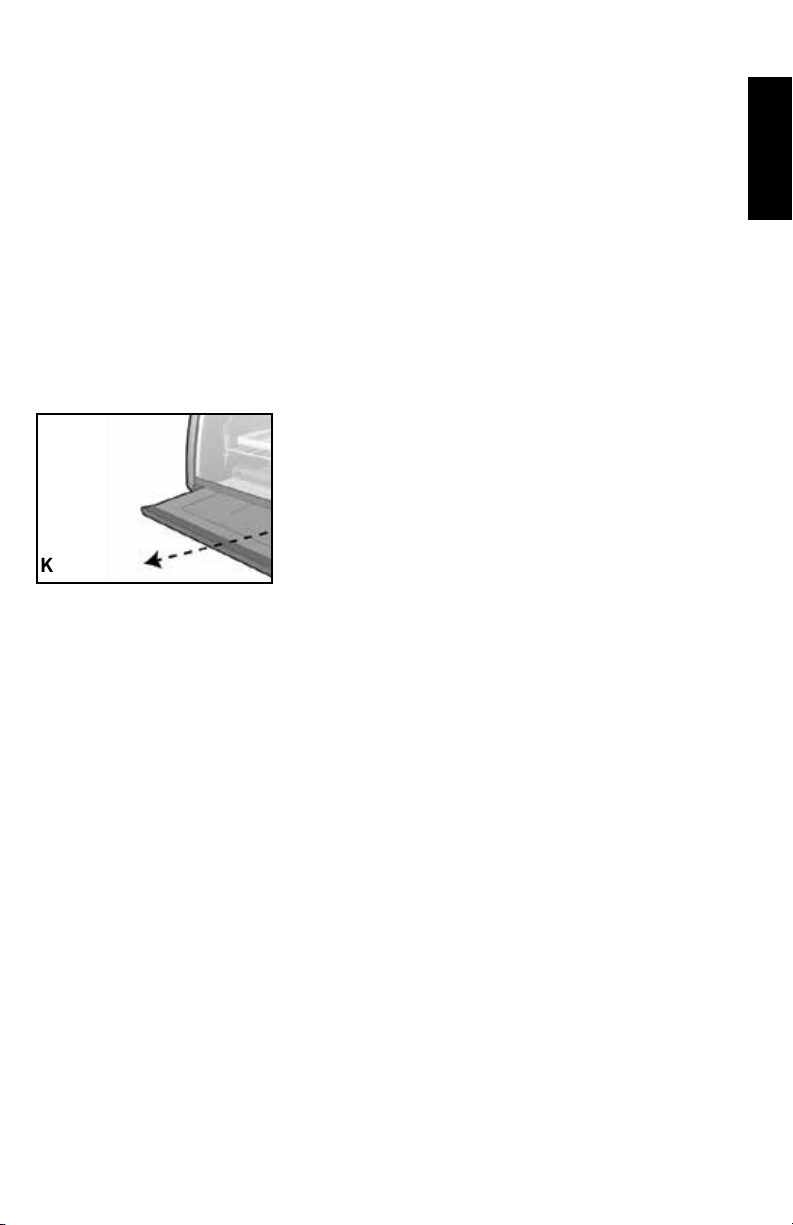
Crumb Tray
Note: The oven door must be closed to remove crumb tray.
1. Grasp the handle below the oven glass door and pull
out the tray (K).
2. Dispose of crumbs and wipe the tray with a
dampened cloth.
3. Make sure to dry thoroughly before inserting the tray
back into the oven.
K
Exterior Surfaces
Important: The oven top and side surfaces get hot. Make sure the oven has cooled
completely before cleaning.
Wipe the top and exterior walls with a damp cloth or sponge. Dry thoroughly.
COOKING CONTAINERS
Metal, ovenproof glass or ceramic bakeware without glass lids can be used in your
oven.
Follow manufacturer’s instructions. Make sure the top edge of the container is at least
1½” (3.81 cm) away from the upper heating elements.
ENGLISH
11
Page 12

TROUBLESHOOTING
PROBLEM POSSIBLE CAUSE SOLUTION
Unit is not heating or stops
heating.
Second toasting is too dark. Setting on toast is too dark. If doing repeated
Moisture forms on the inside of
the glass door during toasting.
Food is overcooked or
undercooked.
There is burnt food odor or
smoking when oven is being
used.
Heating elements do not seem
to be on.
Electrical outlet is not
working or oven is
unplugged.
The amount of moisture
differs in different products,
whether bread, bagels or
frozen pastries.
Temperature and cook time
may need to be adjusted.
There are remnants of food
in crumb tray or on the walls
of the oven.
The heating elements cycle
on and off during baking.
Check to make sure
outlet is working. Both
the temperature control
and the timer must be
set in order for the oven
to function.
toasting in the oven,
select a shade slightly
lighter than the previous
setting.
The moisture that
forms on the oven door
is quite common and
will usually disappear
during the toasting
cycle. Since the oven
is closed the moisture
cannot evaporate as it
would in a toaster.
As your oven is much
smaller than a regular
oven, it may heat up
faster and cook faster.
Try lowering the
temperature 25 degrees
from the suggested
temperature in a recipe
or on a label.
Refer to the directions
in the CARE AND
CLEANING section of
this Use & Care manual.
Make sure all parts of
the oven, baking pan
and rack are clean.
Check the oven to make
certain the function
desired is being used.
On broil, only the top
element is on.
12
Page 13

NEED HELP?
For service, repair or any questions regarding your appliance, call the appropriate
800 number on cover of this book. Please DO NOT return the product to the place of
purchase. Also, please DO NOT mail product back to manufacturer, nor bring it to a
service center. You may also want to consult the website listed on the cover of this
manual.
Two-Year Limited Warranty
(Applies only in the United States and Canada)
What does it cover?
• Any defect in material or workmanship provided; however, Applica’s liability will not
exceed the purchase price of product.
For how long?
• Two years from the date of original purchase with proof of such purchase.
What will we do to help you?
• Provide you with a reasonably similar replacement product that is either new or
factory refurbished.
How do you get service?
• Save your receipt as proof of date of sale.
• Visit the online service website at www.prodprotect.com/applica, or call toll-free
1-800-231-9786, for general warranty service.
• If you need parts or accessories, please call 1-800-738-0245.
What does your warranty not cover?
• Damage from commercial use
• Damage from misuse, abuse or neglect
• Products that have been modified in any way
• Products used or serviced outside the country of purchase
• Glass parts and other accessory items that are packed with the unit
• Shipping and handling costs associated with the replacement of the unit
• Consequential or incidental damages (Please note, however, that some states do
not allow the exclusion or limitation of consequential or incidental damages, so this
limitation may not apply to you.)
How does state law relate to this warranty?
• This warranty gives you specific legal rights. You may also have other rights that
vary from state to state or province to province.
ENGLISH
is a trademark of The Black & Decker Corporation,
Towson, Maryland, USA
Made in People’s Republic of China
Printed in People’s Republic of China
13
Page 14

Veuillez lire et conserver ce guide d'utilisation et d'entretien.
IMPORTANTES CONSIGNES
DE SÉCURITÉ
Lorsqu’on utilise des appareils électriques, il faut toujours respecter
certaines règles de sécurité fondamentales, notamment les suivantes :
❍ Lire toutes les directives.
❍Ne pas toucher aux surfaces chaudes; utiliser les poignées et les
boutons.
❍Afin d’éviter les risques de choc électrique, ne pas immerger le
cordon, la fiche ou l’appareil dans l’eau ou tout autre liquide.
❍Exercer une étroite surveillance lorsque l’appareil est utilisé par un
enfant ou près d’un enfant.
❍Débrancher l’appareil lorsqu’il ne sert pas ou avant de le nettoyer.
Laisser l’appareil refroidir avant d’y placer ou d’en retirer des
composantes.
❍Ne pas utiliser un appareil dont la fiche ou le cordon est abîmé, qui
fonctionne mal ou qui a été endommagé de quelque façon que ce soit.
Pour un examen, une réparation ou un réglage, rapporter l’appareil
à un centre de service autorisé. Ou composer le numéro sans frais
inscrit sur la page couverture du présent guide.
❍L’utilisation d’accessoires non recommandés par le fabricant de
l’appareil peut occasionner des blessures.
❍Ne pas utiliser l’appareil à l’extérieur.
❍Ne pas laisser pendre le cordon sur le bord d’une table ou d’un
comptoir ni le laisser entrer en contact avec une surface chaude.
❍Ne pas placer l’appareil sur le dessus ou près d’un élément chauffant
électrique ou à gaz ni dans un four chaud.
❍Faire preuve de grande prudence pour déplacer un appareil contenant
de l’huile brûlante ou autre liquide chaud.
❍Pour débrancher l’appareil, placer toutes les commandes à la position
« off » (arrêt) et retirer la fiche de la prise.
❍Utiliser l’appareil uniquement aux fins pour lesquelles il a été conçu.
❍Faire preuve de grande prudence pour déplacer le plateau ou jeter la
graisse chaude.
❍Ne pas introduire dans l'appareil des aliments grandes dimensions
ni des ustensiles en métal qui pourraient provoquer des risques
d'incendies ou de secousses électriques.
14
Page 15

❍Il y a risque d'incendie lorsque le grille-pain est recouvert de
matériaux inflammables comme des rideaux, des draperies ou des
revêtements muraux, ou lorsqu'il entre en contact avec ceux-ci
alors qu'il fonctionne. Ne rien ranger sur l’appareil en service.
❍Ne pas nettoyer l'appareil avec des tampons métalliques abrasifs.
Ces derniers peuvent s'effriter et entrer en contact avec les
composants électriques de l'appareil, ce qui présente un risque de
secousses électriques.
❍Ne pas nettoyer l'appareil avec des tampons métalliques abrasifs.
Bien surveiller lorsqu'on utilise des plats qui ne sont pas en metal
ni en verre.
❍Ne rien ranger d'autre que les accessoires recommandés par le
fabricant dans l'appareil lorsqu'il ne sert pas.
❍Ne pas placer l’un des matériaux suivants dans le four : du papier,
du carton, de la pellicule plastique et d’autres matériaux du genre.
❍Éviter de recouvrir le plateau à miettes ou toute autre pièce de
l'appareil de papier métallique car cela présente des risques de
surchauffe.
CONSERVER CES INSTRUCTIONS.
L'appareil est conçu pour une utilisation domestique
seulement.
FRANÇAIS
15
Page 16

FICHE MISE À LA TERRE
Par mesure de sécurité, le produit comporte une fiche mise à la terre qui n’entre
que dans une prise à trois trous. Il ne faut pas neutraliser ce dispositif de
sécurité. La mauvaise connexion du conducteur de terre présente des risques
de secousses électriques. Communiquer avec un électricien certifié lorsqu’on se
demande si la prise est bien mise à la terre.
VIS INDESSERRABLE
AVERTISSEMENT : L’appareil est doté d’une vis indesserrable empêchant
l’enlèvement du couvercle extérieur. Pour réduire les risques d’incendie ou
de secousses électriques, ne pas tenter de retirer le couvercle extérieur.
L’utilisateur ne peut pas remplacer les pièces de l’appareil. En confier la
réparation seulement au personnel des centres de service autorisés.
CORDON ÉLECTRIQUE
a) Le cordon d’alimentation de l’appareil est court afin de minimiser les risques
d’enchevêtrement ou de trébuchement.
b) Il existe des cordons d’alimentation ou de rallonge plus longs et il faut s’en
servir avec prudence.
c) Lorsqu’on utilise un cordon de rallonge, il faut s’assurer que :
1) la tension nominale du cordon d’alimentation ou de rallonge soit
au moins égale à celle de l’appareil, et que;
2) le cordon soit placé de sorte qu’il ne soit pas étalé sur le comptoir
ou la table d’où des enfants pourraient le tirer, ni placé de manière
à provoquer un trébuchement par inadvertance.
Lorsque l’appareil est de type mis à la terre, il faut utiliser un cordon de rallonge
mis à la terre à trois broches.
Note : Lorsque le cordon d’alimentation est endommagé, il faut le faire
remplacer par du personnel qualifié ou, en Amérique latine, par le personnel
d’un centre de sevice autorisé.
16
Page 17

Le produit peut différer légèrement de celui qui est illustré.
l
k
A
1. Témoin de fonctionnement
† 2. Sélecteur de température (
(pièce n° TO9602-A-10-01)
† 3. Sélecteur de la fonction (MODE) de cuisson (pièce n° TO9602-A-10-02)
† 4. Minuterie de 60 minutes (
(pièce n° TO9602-A-10-02)
5. Interrupteur arrêt/marche (O/I) pour la cuisson par convection
6. Intérieur courbé très profond
† 7. Grille de lèchefrite (pièce n° TO9507-80-05)
† 8. Plat de cuisson / Plateau d’égouttage (pièce n° TO9506-20-14)
9. Poignée de la porte
† 10. Plateau à miettes coulissant (pièce n° TO9507-20-14)
11. Grille fentes
† 12. Gille coulissante (Part # CTO6160-02)
Note : Le symbole † indique une pièce amovible/remplaçable par l'utilisateur
˚F / ˚C) pour la cuisson/le grillage
) / Sélecteur du degré de rôtissage
FRANÇAIS
17
Page 18

TABLEAU DE COMMANDE
Important :
Lorsque vous utilisez la fonction
RÔTISSAGE/MINUTERIE
B
1. Témoin de fonctionnement
2. Sélecteur de température (
3. Sélecteur de la fonction (MODE) de cuisson
4. Minuterie de 60 minutes / Sélecteur du degré de rôtissage (
5. Interrupteur arrêt/marche (O/I) pour la cuisson par convection
18
˚F / ˚C) pour la cuisson/le grillage
(
sélecteur de façon à dépasser
la marque 20, puis le tourner
de nouveau jusqu’au réglage
souhaité.
), toujours tourner le
)
Page 19

Utilisation
Cet appareil est conçu uniquement pour une utilisation domestique.
Important : Le dessus et les côtés du four deviennent chauds pendant le
fonctionnement.
ATTENTION
LE FOUR DEVIENT CHAUD LORSQU’IL
EST EN MARCHE. TOUJOURS
UTILISER DES MITAINES DE CUISINE
OU DES POIGNÉES POUR TOUCHER
LES SURFACES EXTÉRIEURES OU
INTÉRIEURES DU FOUR.
POUR COMMENCER
• Retirer le matériau d’emballage et les autocollants posés sur l'appareil.
• Retirer du four la grille coulissante/grille de lèchefrite ainsi que le plat de cuisson/
plateau d’égouttage.
• Laver dans de l’eau savonneuse, rincer et essuyer avec un chiffon ou un
essuie-tout.
• Replacer la grille coulissante/grille de lèchefrite dans le four.
• Choisir l’emplacement de l’appareil. Ne pas placer l'appareil directement sous les
armoires ou trop près d'un mur, afin de permettre à la chaleur de circuler sans
endommager le comptoir ou les armoires.
POSITIONS DE LA GRILLE COULISSANTE
Il y a quatre positions possibles pour la grille coulissante (C). Elle peut être insérée
dans la fente du haut ou du bas. Elle peut également être inversée, ce qui offre deux
positions supplémentaires.slot. It can also be inverted for two additional positions.
Position 1
Utiliser les fentes
supérieures qui
se trouvent le long
des parois du four.
Insérer la grille en
position vers le haut.
Important :
Non recommandé pour la cuisson
ou le grillage.
Position 2
Utiliser les fentes
supérieures qui
se trouvent le long
des parois du four.
Insérer la grille en
position vers le bas
C
Position 3
Utiliser les fentes
inférieures qui se
trouvent le long
des parois du four.
Insérer la grille en
position vers le haut
Position 4
Utiliser les fentes
inférieures qui se
trouvent le long
des parois du four.
Insérer la grille en
position vers le bas.
FRANÇAIS
19
Page 20

APERÇU DES FONCTIONS
Important: Vous devez régler la minuterie (timer ICON) ou sélectionner «
Fonctionnement continu » (Stay On) pour que le four fonctionne.
Cuisson
1. Tourner le sélecteur de température (Temperature
2. Tourner le sélecteur de la fonction (MODE) de cuisson à « Cuisson/Cuisson par
convection » (Bake/Conv Bake).
3. Tourner le sélecteur de minuterie (Timer
le tourner de nouveau pour sélectionner le temps de cuisson souhaité, en incluant le
temps de préchauffage.
Cuisson par convection
Appuyer sur le bouton ARRÊT/MARCHE (O/I) pour le mettre en position MARCHE (I). La
fonction de convection active un ventilateur qui fait circuler la chaleur uniformément à
l’intérieur du four de façon à améliorer considérablement la cuisson.
Rôtissage
Note : Préchauffer le four pendant cinq minutes.
1. Tourner le sélecteur de température (Temperature
TOAST/BROIL (
2. Tourner le sélecteur de la fonction (MODE) de cuisson à « Rôtissage » (Broil).
3. Tourner le sélecteur de minuterie (Timer
le tourner de nouveau pour sélectionner le temps de grillage souhaité. Sélectionner «
Fonctionnement continu » (Stay On) pour contrôler vous-même le temps de cuisson.
Grillage
1. Tourner le sélecteur de température (Temperature
(Toast/Broil) (
2. Tourner le sélecteur de la fonction de cuisson à « Rôtissage » (Toast).
3. Tourner le sélecteur du degré de grillage de façon à dépasser la marque 20, puis le
tourner de nouveau pour sélectionner le degré de grillage souhaité.
Mode « garde-au-chaud »
1. Tourner le sélecteur de température (Temperature
2. Tourner le sélecteur de la fonction (MODE) de cuisson à « Chaud » (Warm).
3. Tourner le sélecteur de minuterie de façon à dépasser la marque 20, puis le tourner de
nouveau pour sélectionner le temps de chauffage souhaité.
RÔTISSAGE
Important : Le dessus et les côtés du four deviennent chauds pendant le
fonctionnement.
Il n’est pas nécessaire de préchauffer le four pour le rôtissage.
Important : Vous devez régler le sélecteur du degré de rôtissage au niveau désiré pour
que le four fonctionne.
1. S’assurer que le sélecteur de température (Temperature
Grillage/Rôtissage » (
2. Ouvrir la porte du four. Insérer la grille coulissante dans
/ Broil).
/ Broil).
/ Broil).
) de façon à dépasser la marque 20, puis
) de façon à dépasser la marque 20, puis
˚F / ˚C) à la température désirée.
˚F / ˚C) à « Grillage/Rôtissage »
˚F / ˚C) à « Grillage/Rôtissage »
˚F / ˚C) à 150˚ F / 65˚ C.
˚F / ˚C) est en position «
20
Page 21

la fente du bas, en position vers le haut (D).
Note : Voir la position 3 de la grille coulissante
(illustration C).
3. Placer le pain directement sur la grille coulissante et
fermer la porte.
4. Tourner le sélecteur de la fonction (MODE) de cuisson
D
Note : Pour obtenir de meilleurs résultats, choisir le réglage moyen pour le premier
cycle de grillage, puis utiliser un réglage plus clair ou foncé, selon vos goûts. Le
témoin de fonctionnement s’allume et reste allumé tout au long du cycle de rôtissage.
Une fois le rôtissage terminé, le four émet un son, s’éteint automatiquement et le
témoin de fonctionnement s’éteint également.
6. Ouvrir la porte du four avec une mitaine de cuisine ou une poignée, sortir la grille et
retirer les rôties.
Important : Toujours utiliser une mitaine de cuisine ou une poignée pour
à la position « Grillage » (Toast
5. Tourner le sélecteur du degré de grillage de façon à
dépasser la marque 20, puis le tourner de nouveau
pour sélectionner le degré de grillage souhaité.
retirer les aliments du four, car la porte et la grille
coulissante deviennent chaudes (E).
Note : Vous devez tourner le sélecteur du degré de
rôtissage en position d’arrêt si vous désirez interrompre
le rôtissage.
)
E
immédiatement après un cycle de rôtissage, tourner le sélecteur du degré de rôtissage
à un réglage légèrement plus clair pour obtenir le même résultat.
CUISSON
Important : Le dessus et les côtés du four deviennent chauds.
Note : Pour obtenir de meilleurs résultats lors de la cuisson, toujours préchauffer le
four 8 minutes pour atteindre la température désirée.
1. Ouvrir la porte du four.
2. Insérer la grille coulissante dans le four.
Important : Pour une cuisson uniforme, sélectionner les positions 2 ou 3 de la grille
coulissante, présentées à (illustration C).
3. Tourner le sélecteur de température à la température voulue.
4. Tourner le sélecteur de la fonction (MODE) de cuisson à « Cuisson/Cuisson à
convection » (Bake/Conv Bake).
Important : Vous devez régler la minuterie (timer ICON) ou sélectionner le mode
« Fonctionnement continu » (Stay On) pour que le four fonctionne.
5. Tourner le sélecteur de minuterie de façon à dépasser la marque 20, puis le tourner
de nouveau pour sélectionner le temps de cuisson souhaité, en incluant le temps de
préchauffage.
Conseil : Régler la minuterie au mode « Fonctionnement continu » si vous voulez
contrôler le temps de cuisson vous-même ou si les aliments doivent cuire plus de
60 minutes.
• Le témoin de fonctionnement s’allume et reste allumé pendant tout le cycle
Conseil : Si vous voulez faire cuire d’autres rôties
FRANÇAIS
21
Page 22

de cuisson.
• Les éléments chauffants s’allument et s’éteignent pour maintenir la
température voulue.
6. Il y deux façons de faire cuire les aliments :
• dans le plat de cuisson, placé sur la grille coulissante (Fa); OU
• directement sur la grille de lèchefrite en plaçant le plat de cuisson en dessous
comme bac récepteur (Fb).
7. Placer les aliments dans le four pour les faire cuire.
OU
Fa
Note : S’assurer que le dessus des aliments ou du récipient se trouve à au moins 3,81 cm
(1½ po) des éléments chauffants supérieurs.
Important : Les aliments ne doivent pas dépasser les extrémités du plat de cuisson/
plateau d’égouttage afin d’éviter tout déversement sur les éléments chauffants.
8. Fermer la porte du four.
9. Pour la cuisson à convection, pousser l’interrupteur de CONVECTION (
à la position de marche (I). Vous entendrez le ventilateur fonctionner pendant le cycle
de cuisson.
Important : Pour la cuisson à convection, la température doit être de 25 degrés
inférieure à la température recommandée pour la cuisson conventionnelle car l’air qui
circule augmente la température moyenne dans la cavité.
10. Lors de la première utilisation du four, suivre la recette ou les instructions de cuisson
des aliments et vérifier si les aliments sont cuits au temps minimal.
11. Une fois le cycle de cuisson terminé :
• Si vous avez réglé la minuterie, la sonnerie se fait entendre, le témoin de
fonctionnement s’éteint et le four s’éteint automatiquement.
• Si vous n’avez pas réglé la minuterie, tourner la minuterie de 60 minutes/sélecteur
du degré de rôtissage à la position « Arrêt » (0). Le témoin de fonctionnement
s’éteint.
12. Si vous avez utilisé la fonction de cuisson à convection, pousser l’interrupteur de
CONVECTION (
13. Ouvrir la porte du four et, à l’aide de gants de cuisine ou de poignées, faire glisser la
grille à l’extérieur pour retirer les aliments.
Important : Toujours utiliser des gants de cuisine ou des poignées pour sortir les
/ CONV) à la position « Arrêt » (O).
aliments du four car la porte et la grille coulissante
seront chaudes (G).
POUR FAIRE GRILLER
Fb
/ CONV)
G
22
Page 23

Important : Le dessus et les côtés du four deviennent chauds.
Note : Pour griller les aliments, préchauffer le four pendant cinq minutes.
1. Tourner le sélecteur de température à « Grillage / Rôtissage » (
2. Tourner le sélecteur de la fonction (MODE) de cuisson à « Rôtissage » (Broil).
Important : Vous devez régler la minuterie (timer ICON) ou sélectionner le mode «
Fonctionnement continu » pour que le four fonctionne.
3. Tourner le sélecteur de minuterie (Timer
20, puis le tourner de nouveau pour sélectionner le temps de grillage souhaité.
Sélectionner « Fonctionnement continu » (Stay On) pour contrôler vous-même le
temps de cuisson.
4. Placer la grille de lèchefrite sur le plat de cuisson
H
recette ou les instructions de cuisson des aliments et vérifier si les aliments sont
cuits au temps minimal.
7. Une fois le grillage terminé :
• Si vous avez réglé la minuterie, la sonnerie se fait entendre, le témoin de
fonctionnement s’éteint et le four s’éteint automatiquement.
• Si vous n’avez pas réglé la minuterie (Timer
60 minutes/sélecteur du degré de rôtissage à la position « Arrêt ». Le témoin
de fonctionnement s’éteint.
8. À l’aide de gants de cuisine ou de poignées, faire glisser la grille de lèchefrite et le
plat de cuisson à l’extérieur pour retirer les aliments.
J
• Tourner le sélecteur de la fonction (MODE) de cuisson à « Grillage ».
• Régler la minuterie au temps de grillage voulu. Régler la minuterie au mode «
Fonctionnement continu » si vous voulez contrôler le temps de cuisson vous-même
ou si les aliments doivent cuire plus de 60 minutes.
Conseils de grillage
(H).
5. Placer les aliments sur la grille de lèchefrite.
Note : S’assurer que le dessus des aliments ou du
récipient se trouve à au moins 3,81 cm (1½ po) des
éléments chauffants supérieurs.
Important : Les aliments ne doivent pas dépasser du
plat de cuisson/bac récupérateur pour éviter que des
gouttes ne tombent sur les éléments chauffants.
6. Lors du premier grillage avec le four, suivre la
Important : Toujours utiliser des gants de cuisine ou
des poignées pour sortir les aliments du four car la
porte et la grille coulissante seront chaudes (J).
Guide de grillage
Note : Pour faire griller des aliments, placer la grille de
lèchefrite sur le plat de cuisson/bac récupérateur.
• Le dessus et les côtés du four deviennent chauds.
• Tourner le sélecteur de température (Temperature
˚F / ˚C) à « Grillage / Rôtissage » (
) de façon à dépasser la marque
), tourner la minuterie de
/ Broil).
/ Broil)
FRANÇAIS
23
Page 24

• Placer la grille en position vers le haut pour faire griller des aliments comme des
hamburgers, des steaks, des steaks de poisson, de la volaille, du pain à l’ail et des
casseroles gratinées.
• Placer la grille en position vers le bas pour faire griller des aliments comme des filets
de poisson, des escalopes de poulet, des saucisses fumées, des sandwichs ouverts au
fromage grillé et des nachos.
Entretien et nettoyage
L’utilisateur ne peut effectuer lui-même l’entretien d’aucune pièce de cet appareil. En
confier l’entretien à du personnel qualifié.
NETTOYAGE DU FOUR
Important : Avant de nettoyer une pièce quelconque, s’assurer que le four est éteint,
débranché et froid.
Toujours bien sécher les pièces avant d’utiliser le four après un nettoyage.
1. Nettoyer la porte en verre avec une éponge, un linge doux ou un tampon en nylon et de
l’eau savonneuse. Ne pas utiliser de nettoyant à vitres en vaporisateur.
2. Pour enlever le grille coulissantes, ouvrir la porte, puis tirer le grille et les sortir. Les
laver dans de l’eau tiède savonneuse ou au lave-vaisselle. Pour venir à bout des taches
tenaces, utiliser un tampon en nylon ou en polyester.
3. Laver le plat de cuisson/bac récupérateur et la grille de lèchefrite dans de l’eau tiède
savonneuse ou au lave-vaisselle. Utiliser un tampon en nylon ou en polyester pour
réduire au minimum les égratignures.
Plateau à miettes
Note : La porte du four doit être fermée pour retirer le plateau à miettes.
1. Saisir la poignée sous la porte en verre et tirer le
plateau (K).
2. Jeter les miettes et essuyer le plateau avec un linge
humide.
3. Bien assécher le plateau avant de le remettre dans le
four.
K
Surfaces extérieures
Important : Le dessus et les côtés du four deviennent chauds. S’assurer que el four est
froid avant de le nettoyer.
Essuyer le dessus et les surfaces extérieures avec un linge humide ou une éponge. Bien
assécher.
RÉCIPIENTS DE CUISSON
Dans le four, on peut utiliser des plats en métal, des plats en verre allant au four ou
des plats en céramique, sans couvercle de verre. Suivre les instructions du fabricant.
S’assurer que le dessus du récipient se trouve à au moins 3,81 cm (1½ po) des éléments
chauffants supérieurs.
24
37
Page 25

DÉPANNAGE
PROBLÈME CAUSE POSSIBLE SOLUTION
L’appareil ne chauffe pas
ou cesse de chauffer.
Le deuxième grillage est
trop foncé.
Une buée se forme à
l’intérieur de la porte en
verre pendant le grillage.
Les aliments sont trop ou
pas assez cuits.
Il y a une odeur d’aliments
brûlés ou de la fumée
lorsque le four fonctionne.
La prise de courant est
défectueuse ou le four n’est
pas branché.
Le four est réglé à un degré
de grillage trop foncé.
La quantité d’humidité
présente varie selon les
produits, que ce soit du
pain, des bagels ou des
pâtisseries congelées.
La température et le
temps de cuisson doivent
possiblement être réglés.
Il peut y avoir des restes
d’aliments dans le plateau
à miettes ou sur les parois
du four.
S’assurer que la prise
de courant fonctionne
bien. Le régulateur
de température et la
minuterie doivent être
réglés pour que le four
fonctionne.
Si vous effectuez des
grillages répétés dans
le four, sélectionner un
degré de grillage un
peu moins élevé que le
réglage précédent.
La formation de buée
sur la porte du four
est assez courante et
disparaît généralement
pendant le cycle de
grillage. Comme le four
est fermé, l’humidité
ne peut pas s’évaporer
comme elle le fait dans
un grille pain.
Comme un grille pain
four est beaucoup
plus petit qu’un four
ordinaire, il peut
réchauffer et cuire
plus rapidement.
Essayer de diminuer la
température suggérée
dans une recette ou
sur une étiquette de 25
degrés.
Voir les directives à la
section ENTRETIEN
ET NETTOYAGE du
guide d’utilisation et
d’entretien. S’assurer
que toutes les pièces
du four, la plaque de
cuisson et la grille sont
propres.
FRANÇAIS
38
25
Page 26

PROBLÈME CAUSE POSSIBLE SOLUTION
Les éléments chauffants
ne semblent pas
fonctionner.
Les éléments chauffants
s’allument et s’éteignent
pendant la cuisson.
Vérifier le four afin de
s’assurer qu’il est réglé
à la fonction désirée.
Pendant le grillage,
seul l’élément du haut
fonctionne.
26
Page 27

BESOIN D’AIDE?
Pour communiquer avec les services d’entretien ou de réparation, ou pour adresser
toute question relative au produit, composer le numéro sans frais approprié indiqué
sur la page couverture. Ne pas retourner le produit où il a été acheté. Ne pas poster
le produit au fabricant ni le porter dans un centre de service. On peut également
consulter le site web indiqué sur la page couverture.
Garantie limitée de deux ans
(Valable seulement aux États-Unis et au Canada)
Quelle est la couverture?
• Tout défaut de main-d’oeuvre ou de matériau; toutefois, la responsabilité de la
société Applica se limite au prix d’achat du produit.
Quelle est la durée?
• Deux année(s) à compter de la date d’achat initiale, avec une preuve d’achat.
Quelle aide offrons nous?
• Remplacement par un produit raisonnablement semblable nouveau ou réusiné.
Comment se prévaut-on du service?
• Conserver son reçu de caisse comme preuve de la date d’achat.
• Visiter notre site web au www.prodprotect.com/applica, ou composer sans frais
le 1 800 231-9786, pour obtenir des renseignements généraux relatifs à la garantie.
• On peut également communiquer avec le service des pièces et des accessoires
au 1 800 738-0245.
Qu’est-ce que la garantie ne couvre pas?
• Des dommages dus à une utilisation commerciale.
• Des dommages causés par une mauvaise utilisation ou de la négligence.
• Des produits qui ont été modifiés.
• Des produits utilisés ou entretenus hors du pays où ils ont été achetés.
• Des pièces en verre et tout autre accessoire emballés avec le produit.
• Les frais de transport et de manutention reliés au remplacement du produit.
• Des dommages indirects (il faut toutefois prendre note que certains états ne
permettent pas l’exclusion ni la limitation des dommages indirects).
Quelles lois régissent la garantie?
• Les modalités de la présente garantie donnent des droits légaux spécifiques.
L’utilisateur peut également se prévaloir d’autres droits selon l’état ou la province
qu’il habite.
FRANÇAIS
Marque de commerce déposée de la société The Black & Decker Corporation,
Towson, Maryland, É.-U.
Fabriqué en République populaire de Chine
Imprimé en République populaire de Chine
27
Page 28

© 2013 Applica Consumer Products, Inc.
2013-8-22-115 E/F
Printed on recycled paper.
Imprimé sur du papier recyclé.
 Loading...