

Page 1

2-IN-1 ROTISSERIE & COUNTERTOP OVEN
RÔTISSOIRE ET FOUR POUR LE COMPTOIR 2-EN-1
Customer Care Line:
USA 1-800-231-9786
Accessories/Parts (USA)
1-800-738-0245
For online customer service
and to register your product, go to
www.prodprotect.com/applica
Service line à la clientèle :
Canada 1-800-231-9786
Accessoires/Pièces (Canada)
1-800-738-0245
Pour accéder au service à la clientèle en
ligne ou pour inscrire votre produit en
ligne, rendez-vous à
www.prodprotect.com/applica
MODEL/MODÈLE
❍
TO1021BC
Page 2

Please Read and Save this Use and Care Book.
IMPORTANT SAFEGUARDS
When using electrical appliances, basic safety precautions should always
be followed, including the following:
❑ Read all instructions.
❑ Do not touch hot surfaces. Use handles or knobs.
❑ To protect against electrical shock do not immerse cord, plugs or
appliance in water or other liquid.
❑ Close supervision is necessary when any appliance is used by or near
children.
❑ Unplug from outlet when not in use and before cleaning. Allow to cool
before putting on or taking off parts.
❑ Do not operate any appliance with a damaged cord or plug, or after
the appliance malfunctions or has been damaged in any manner.
Return appliance to the nearest authorized service facility for
examination, repair or adjustment. Or, call the appropriate toll-free
number on the cover of this manual.
❑ The use of accessory attachments not recommended by the appliance
manufacturer may cause injuries.
❑ Do not use outdoors.
❑ Do not let cord hang over edge of table or counter, or touch hot
surfaces.
❑ Do not place on or near a hot gas or electric burner, or in a heated
oven.
❑ Extreme caution must be used when moving an appliance containing
hot oil or other hot liquids.
❑ To disconnect the appliance, press power button then remove plug
from wall outlet.
❑ Do not use appliance for other than intended use.
❑ Use extreme caution when removing tray or disposing of hot grease.
❑ Oversized foods or metal utensils must not be inserted in a toaster
oven, as they may create a fire or risk of electric shock. A fire may
occur if the toaster oven is covered or touching flammable material
including curtains, draperies, walls and the like, when in operation.
❑ Do not clean with metal scouring pads. Pieces can break off the pad
and touch electrical parts resulting in a risk of electric shock.
❑ Extreme caution should be exercised when using containers
constructed of other than metal or glass.
❑ Do not store any material, other than manufacturer's recommended
accessories, in this oven when not in use.
2
❑ Do not place any of the following materials in the oven: paper,
cardboard, plastic and the like.
❑ Do not cover crumb tray or any part of this oven with metal foil.
This will cause overheating of the oven.
❑ This appliance is not intended for use by persons (including
children) with reduced physical, sensory or mental capabilities,
or lack of experience and knowledge, unless they have been given
supervision or instruction concerning use of the appliance by a
person responsible for their safety.
❑ Children should be supervised to ensure that they do not play with
the appliance.
SAVE THESE INSTRUCTIONS.
This product is for household use only.
GROUNDED PLUG
As a safety feature, this product is equipped with a grounded plug, which
will only fit into a three-prong outlet. Do not attempt to defeat this safety
feature. Improper connection of the grounding conductor may result in the
risk of electric shock. Consult a qualified electrician if you are in doubt as to
whether the outlet is properly grounded.
TAMPER-RESISTANT SCREW
Warning: This appliance is equipped with a tamper-resistant screw to
prevent removal of the outer cover. To reduce the risk of fire or electric
shock, do not attempt to remove the outer cover. There are no userserviceable parts inside. Repair should be done only by authorized service
personnel.
ELECTRICAL CORD
a) A short power-supply cord (or detachable power-supply cord) is to
be provided to reduce the risk resulting from becoming entangled
in or tripping over a longer cord.
b) Longer detachable power-supply cords or extension cords are available
and may be used if care is exercised in their use.
c) If a long detachable power-supply cord or extension cord is used,
1) The marked electrical rating of the cord set or extension cord should be
at least as great as the electrical rating of the appliance, and
2) If the appliance is of the grounded type, the extension cord should be a
grounding-type 3-wire cord.
3) The cord should be arranged so that it will not drape over the
countertop or tabletop where it can be pulled on by children or tripped
over unintentionally.
Note: If the power supply cord is damaged, it should be replaced by qualified
personnel or in Latin America by an authorized service center.
ENGLISH
3
Page 3

Product may vary slightly from what is illustrated.
TOAST
GRILLAGE
FROZEN
SNACKS
MODE
REPAS
SURGEL
ÉS
BAKE
CUISSON
PIZZA
PIZZA
BROIL
RÔTISSAGE
WARM
CHAUD
ROTISSERIE
RÔTISSOIRE
REHEAT
RÉCHAUFFER
1.
Door handle
2. Digital display
3. Control panel
† 4. Slide rack (Part# 31K23-16-D-N)
† 5. Broil rack (Part# 31K23-26-D-N)
† 6. Bake/broil pan (Part# 32K23-03-N)
† 7. Rotisserie prongs (Part# 38K23-44-N)
† 8. Rotisserie rod (Part# 31K23-42-N)
† 9. Rotisserie wing nuts (Part# 33K23-01-N)
† 10. EZ fit rotisserie tool (Part# 31K23-56-D-N)
† 11. Slide-out crumb tray (Part# 31K23-11-N)
12. Curved glass door
13. Extra-deep curved interior
14. Cooking MODE control knob
15. TEMP/TIME/TOAST (
16. TEMP (
17. TIME/TOAST (
18. POWER (
) button
) button
) bu tton
19. START/STOP (I/O) button
Note: † indicates consumer replaceable/removable parts
) control knob
SURGELÉS
PIZZA
PIZZA
How to Use
TOAST
GRILLAGE
REHEAT
RÉCHAUFFER
BAKE
CUISSON
ROTISSERIE
RÔTISSOIRE
MODE
BROIL
RÔTISSAGE
FROZEN
SNACKS
REPAS
WARM
CHAUD
This product is for household use only.
CAUTION: Do not leave oven unattended when in operation. Food ignition may occur.
If this happens, unplug unit but DO NOT open door. To reduce the risk of fire, keep
oven interior completely clean and free of food residues, oil, grease and any other
combustible materials.
CAUTION: A fire may occur if the toaster oven is covered or touching flammable
materials including curtains, draperies, walls and the like when in operation or
after, when still hot. Do not place any of the following materials in the oven, on top
of the oven, or in contact with the oven sides or bottom surfaces: paper, cardboard,
plastic or the like.
CAUTION: THIS OVEN GETS HOT. WHEN IN USE, ALWAYS USE OVEN MITTS OR POT
HOLDERS WHEN TOUCHING ANY OUTER OR INNER SURFACE OF THE OVEN.
GETTING STARTED
• Remove all packing material and any stickers; peel off clear protective film from
control panel.
• Please go to www.prodprotect.com/applica.com to register your warranty.
• Wash all removable parts as instructed in CARE AND CLEANING section of this
manual.
• Select a location where this unit is to be used allowing enough space for back of the
unit and the wall to allow heat to flow without damage to cabinets and walls.
• Insert crumb tray below lower heating elements.
• Insert slide rack, making sure to insert curved end toward the back of the oven as it
is designed to fit the curved interior of the oven for cooking pizza.
• Remove tie from cord and unwind.
• Plug unit into electrical outlet. The digital display shows default temperature.
Caution: Unit gets hot. NEVER touch outer surfaces. Always use oven mitt or pot
holders.
Note: Before first use, run this oven empty for 15 minutes to remove/burn off any
possible residues from manufacturing. You may notice some slight smoke and odor
escaping from the oven. This is normal and will disappear with use of oven.
HELPFUL INFORMATION ABOUT YOUR OVEN
This oven uses infrared energy to enhance the cooking process for better browning
and, in some cases, shorter cooking time.
Note: When the oven is in use, the interior lights will cycle on and off. This is normal.
Caution: Unit gets hot. NEVER touch outer surfaces. Always use oven mitt or pot
holders.
• The oven is preset for temperature and time. These preprogrammed temperatures
and times are to be used as a suggestion. When cooking any food for the first time,
begin checking the doneness several minutes before the expected finish time.
Important: The time counts down once the Start/Stop (I/O) button is pressed and the
oven is fully preheated.
Note: Until the preheat is completed the digital display will flash and the time will not
change until the cooking begins.
Important: When the words "REDUCED COOKING TIME" are visible on the digital
display, the oven is functioning.
ENGLISH
4
5
Page 4

COOKING CYCLES
FUNCTIONS
SETTING TEMPERATURE TIME
KEEP WARM 200°F / 90°C 30 min
PIZZA 400°F / 200°C 20 min
FROZEN SNACKS 400°F / 200°C 15 min
TOAST Settings 1 – 7 -BAKE 350°F / 175°C 30 min
BROIL 450°F / 230°C 20 min
ROTISSERIE 350°F / 175°C 60 min
REHEAT 250°F / 120°C 30 min
• You can change the temperature and time anytime.
o To change the preset temperature, press the TEMP (
release the TIME/TEMP/TOAST (
• to the left (-) to decrease the temperature in 5-degree increments.
• to the right (+) to increase the temperature in 5-degree increments.
o To change the preset time, press the TIME/TOAST (
release the TIME/TEMP/TOAST (
• to the left (-) to decrease the time in 1-minute increments.
• to the right (+) to increase the time in 1-minute increments.
Note: To change the temperature or time quickly, after pressing the TEMP
(
knob in the desired position (left to decrease; right to increase).
• The oven is preset for temperature and time for medium toast (setting 4). Use this for
• Once a toast setting is selected and the START/STOP (I/O) button is pressed, the digital
• If food is browning too quickly, use a loose covering of aluminum foil. Make sure the foil
• When the oven door is opened during use, cooking is paused; the heater lights turn
• When using the rotisserie, foods should be placed into a cold oven.
• At the end of any cooking cycle there will be an audible signal.
) or TIME/TOAST ( ) button hold the TIME/TEMP/TOAST ( ) control
your first cycle then adjust lighter or darker to suit your taste.
display will change to show the estimated number of minutes the toast will take to cook.
The timer does not count down.
does not touch the heating elements.
off and the blue backlight on the digital display flashes. Once the oven door is closed,
the lights come on; the backlight on the digital display becomes constant and the oven
resumes cooking. The timer will continue to count down.
) control knob as follows:
) control knob
) button, then turn and
) button, then turn and
Power button
Start/Stop button
Temp button
Timer/Toast button
Turns the appliance on and off. This is the first
button to be pressed to bring power to the
appliance. When cooking is complete, press this
button to turn appliance off, then, unplug the
appliance.
This is the last button to be pressed to begin
and end cooking. Every time the door is opened
during cooking, the heater light turns off,
cooking pauses and the blue backlight on the
digital display flashes. Once you close the door,
cooking and the countdown resume.
Once a cooking cycle is selected, press this
button to display the preset temperature.
To change the preset temperature turn the
TIME/TEMP/TOAST (
directed below.
Once a cooking cycle and desired cooking
temperature are selected, press this button to
display the preset time. To change the preset
time turn the TIME/TEMP/TOAST
(
) control knob as directed below.
) control knob as
ENGLISH
6
7
Page 5

Temp/Time/Toast control knob
Turn this knob to change the displayed
temperature or time for food to be cooked.
• to the left (-) to decrease the temperature
in 5-degree increments or time in 1-minute
increments.
• to the right (+) to increase the temperature
in 5-degree increments or time in 1-minute
increments.
This knob is also used to select the toast shade
from 1 to 7. The oven is preset at 4. Use this for
the first toasting you do in the oven.
To change the toast shade, turn this knob:
• to the left (-) to select a lighter toast shade.
• to the right (+) to select a darker toast shade.
Note: To change the temperature or time
quickly, after pressing the TEMP
TIME/TOAST
TEMP/TOAST
( )
( )
button hold the TIME/
control knob in the
( )
or
desired position (left to decrease; right to
increase).
MODE control knob
Once the POWER
( )
button is pressed, turn
this knob to select the food to be cooked or
the function to be performed. The preset
temperature will appear in the display. It will
flash until the oven is preheated. Press the
SNACKS
REPAS
SURGELÉS
FROZEN
TOAST
GRILLAGE
BAKE
CUISSON
MODE
START/STOP (I/O) button; the digital display will
PIZZA
PIZZA
WARM
CHAUD
REHEAT
RÉCHAUFFER
RÔTISSAGE
ROTISSERIE
RÔTISSOIRE
BROIL
show the preset time for the function selected
(for example, if snack foods is selected the oven
will preheat to 400ºF and will stay on for
15 minutes unless changes are made).
Important: When the words "REDUCED COOKING TIME" are visible on the
digital display, the oven is functioning.
BUTTON SELECTION ORDER (refer to illustration C)
Note: When the START/STOP (I/O) button is pressed, the
oven will begin to preheat. The selected baking time will
TOAST
GRILLAGE
REHEAT
RÉCHAUFFER
BAKE
RÔTISSOIRE
CUISSON
ROTISSERIE
MODE
BROIL
RÔTISSAGE
FROZEN
SNACKS
REPAS
SURGELÉS
PIZZA
PIZZA
2
WARM
CHAUD
4
3
C
1
8
not begin to count down until preheat is complete. There
will be an audible signal. Open the door and insert the
food to be cooked. Close the door. The oven will begin
to cook and the count down will begin. The display will
become constant.
Note: The countdown will begin whether food has been
inserted into the oven or not.
6
Note: To cook at the preset temperature and time
for any function. Simply select the desired function
5
and press the START/STOP (I/O) button; the oven will
7
automatically begin to preheat and will count down from
the preset time once preheating is complete.
1. Press the POWER
( )
button.
2. Turn the MODE control knob to desired food to be cooked or function to be
performed. The preset temperature will be displayed.
3. To check the preset temperature, press the TEMP
( )
button; the preset
temperature will be displayed.
4. To change the temperature, turn TIME/TEMP/TOAST
( )
control knob to the
right to increase the temperature or to the left to decrease the temperature.
5. To check the preset time, press the TIME/TOAST
( )
button; the preset time
will be displayed.
6. To change the time, turn TIME/TEMP/TOAST
( )
control knob to the right to
increase the time or to the left to decrease the time.
7. Press START/STOP (I/O) button to begin preheating the oven or cooking (toast and
rotisserie do not require preheating). The display will flash.
8. Once the oven is preheated to the selected temperature, there will be an audible
signal. Open the oven door and insert the food to be cooked. Close the oven door
and the oven begins cooking.
Note: The countdown will begin whether food has been inserted into the oven or not.
9. If door is opened anytime during cooking cycle, cooking will pause. To resume
cooking, close the door.
10. When cooking is complete, remove the food, close the door and press the POWER
( )
button to turn off the appliance and unplug.
EXAMPLE FOR COOKING A FROZEN PIZZA
Note: Refer to the package directions for time and temperature.
1. Press the POWER
( )
button.
2. Turn the MODE control knob to PIZZA. The preset temperature of 400ºF will be
displayed. If this is the temperature suggested in the packaging, skip step 3.
3. If the temperature suggested is different, press the TEMP
the TIME/TEMP/TOAST
( )
control knob to change preset temperature to the
( )
button and turn
desired temperature. (See directions on pages 8 and 9.)
4. Press TIME/TOAST
( )
button. The preset time will be displayed. Press the
START/STOP (I/O) button and the oven will begin to preheat.
5. If the time suggested is different, press the TIME/TOAST
the TIME/TEMP/TOAST
( )
control knob to change preset time to the desired
( )
button and turn
time. (See directions on pages 8 and 9.)
6. Once the oven is preheated to the selected temperature, there will be an audible
signal. Open the oven door and insert the food to be cooked. Close the oven door.
Note: The countdown will begin whether food has been inserted into the oven or not.
Caution: When in use, this appliance gets hot. NEVER touch outer surfaces. Always
use oven mitt or pot holders.
7. If door is opened anytime during cooking cycle, the cooking cycle pauses and the
display will flash. Close the door to resume cooking. The display will become
constant.
8. When cooking is complete, using oven mitts or pot holders, remove the food, close
the door and press the POWER
( )
button to turn off the appliance and unplug.
Note: To cook at the preset temperature and time for any function. Simply select the
desired function and press the START/STOP (I/O) button; the oven will automatically
ENGLISH
9
Page 6

begin to preheat and will count down from the preset time once preheating is complete.
KEEP WARM FUNCTION
This function is useful to keep cooked foods warm for later service. Follow directions on
pages 8 and 9 to set the oven for this function.
Tips for using this function
• Hold cooked foods for about 10 minutes in a preheated oven set to 200ºF.
• Cooked foods should be kept at an internal temperature of 150ºF or above. Use a meat
thermometer to check the temperature.
• Always use a meat thermometer to check internal temperature of food.
• Cover cooked foods with foil to keep moist.
• You can stop this function at any time by pressing the START/STOP (I/O) button.
Important: When you open the door, the cooking function pauses and the blue backlight
on the digital display begins to flash. Close the door to resume cooking.
1. At the end of the cooking cycle, open oven door using oven mitt or pot holder and
carefully remove food.
2. Close the door and press the POWER
PIZZA FUNCTION
Caution: When in use, this appliance gets hot. NEVER touch outer surfaces. Always use
oven mitt or pot holders.
Note: Since not all pizzas bake at the same temperature or time, refer to the directions for
changing the temperature and time on page 8 and 9 when using this function.
• For a crisp crust bake the pizza directly on the oven rack.
• For a softer crust, place the pizza on the baking pan.
• Pizza should always be baked to an internal temperature of no less than 140ºF.
• Do not allow frozen pizzas to thaw before baking.
• Pizzas are fully baked when the crust is golden and the cheese is completely melted.
• The package directions for frozen pizzas vary widely; follow the directions for
temperature as the package directs.
• The baking time may vary when using a toaster oven, check baking results before
baking time listed on the package.
REHEAT FUNCTION
• Reheat will be used to warm a previously cooked food that may be at room temperature
or from the refrigerator.
• Watch food closely to avoid overcooking.
TOAST FUNCTION
Caution: When in use, this appliance gets hot. NEVER touch outer surfaces. Always use
oven mitt or pot holders.
Note: It is not necessary to preheat the oven for toasting.
1. Press the POWER
2. Place the desired number of slices of bread or bagel halves (cut side up) (up to 6) on
the oven rack.
3. Close oven door.
4. Turn the MODE control knob to TOAST.
( )
button and open oven door.
( )
button to turn off the appliance and unplug.
5. Press TIME/TOAST
preset shade is 4 (medium toast). Use this for your first cycle then adjust lighter or
darker to suite your taste.
6. To change shade level (1-7) turn the TIME/TEMP/TOAST
• to the left (-) to decrease the shade selection.
• to the right (+) to increase the shade selection.
7. Press the START/STOP (I/O) button to begin the toast cycle.
8. The digital display will change to the approximate expected time the toasting will
take.
Important: When the words "REDUCED COOKING TIME" are visible on the digital
display, the oven is functioning.
9. Once toast cycle is completed, open oven door using oven mitt or pot holder and
slide out the oven rack to remove bread or bagels.
Note: Once the oven door is opened in the toast cycle the toasting ends. To continue
toasting follow steps 3 through 8.
Tip for multiple toasting cycles
For best results when making consecutive batches of toast, allow a short cool down
period between toasting cycles or select a lighter setting.
10. When cooking is complete, using oven mitts or potholders, remove the food, close
the door and press the POWER
BAKE FUNCTION
This cycle should be used for roasting meats, baking chicken parts and fish, baking
biscuits, muffins, brownies, breakfast breads, coffeecakes, vegetables and casseroles.
Caution: When in use, this appliance gets hot. NEVER touch outer surfaces. Always
use oven mitt or pot holders.
1. Turn the MODE control knob to BAKE. The digital display shows the default
temperature of 350ºF.
2. To change the temperature, press the TEMP
directions on pages 8 and 9.
Note: You can change the time and temperature anytime during the cooking cycle.
(See directions on pages 8 and 9.)
3. Press the TIME/TOAST
of 30 minutes. To change the cooking time, press the TIME/TOAST
and follow the directions on pages 8 and 9.
4. Press START/STOP (I/O) button to begin preheating the oven. The display will flash.
5. Once the oven is preheated to the selected temperature, there will be an audible
signal. Open the oven door. Make sure oven rack is in place and insert the food
to be cooked.
Note: Use the bake pan that comes with the oven or a glass oven-proof baking dish or
metal baking pan.
Note: The countdown will begin whether food has been inserted into the oven or not.
Important: When the words "REDUCED COOKING TIME" are visible on the digital
display, the oven is functioning.
6. Close oven door.
7. You can stop the cooking at any time by pressing the START/STOP (I/O) button.
Important: When you open the door, the cooking function pauses and the blue
backlight on the digital display begins to flash. Close the door to resume cooking.
( )
( )
button. When the oven is used for the first time the
( )
( )
button to turn off the appliance and unplug.
( )
button. The digital display shows the default time
button and follow the
control knob:
( )
button
ENGLISH
10
11
Page 7

8. At the end of the cooking cycle, open oven door using oven mitt or pot holder and
carefully remove food.
9. Close the door and press the POWER
BROIL FUNCTION
Important: This oven uses closed door broiling. Do not attempt to keep door ajar while
broiling.
Note: This oven allows you to select a temperature at which to broil. For foods such as
white fish fillets, you may wish to use a lower temperature.
Caution: When in use, this appliance gets hot. NEVER touch outer surfaces. Always use
oven mitt or pot holder.
1. Turn the MODE control knob to BROIL.
2. Select the temperature and time (see directions on pages 8 and 9). Allow oven to
preheat. The display will stop flashing once the preset temperature has been reached.
There will be an audible signal.
Note: The countdown will begin whether food has been inserted into the oven or not.
Important: When the words "REDUCED COOKING TIME" are visible on the digital
display, the oven is functioning.
3. Place the broil rack in the bake pan.
4. Place food to be cooked on broil rack.
5. Open oven door.
6. Using oven mitts or pot holders, insert rack into oven.
7. Close oven door.
8. You can stop the cooking at any time by pressing the START/STOP (I/O) button.
Important: When you open the door, the cooking function pauses and the blue backlight
on the digital display begins to flash. Close the door to resume cooking.
9. Turn food over about halfway through cooking time. Return food to oven and close
oven door.
10. At the end of the cooking cycle, open oven door using oven mitt or pot holder and
carefully remove food.
11. Close the door and press the POWER
BROILING TIPS
• Placing food on rack reduces calories, allows the drippings to flow into the
bake/ broil pan and helps to eliminate or prevent smoking from the broiler.
• For best results, thaw frozen meat, poultry and fish before broiling.
• If frozen steaks and chops are broiled allow 1½ to 2 times the broiling time as required
for fresh.
• Trim excess fat from meat and score edges to prevent curling.
• Brush foods to be broiled with oil and season as desired before broiling.
• Fish fillets and steaks are delicate and should be broiled directly on bake/broil pan
placed on the rack.
• There is no need to turn fish fillets during broiling. Carefully turn thick fish steaks
midway through broiling cycle.
• If broiler “pops” during broiling, reduce the temperature in the oven and add some
water to the bake/broil pan.
• Wash broiler pan and clean inside of oven after each use with non-abrasive cleaner and
12
( )
button to turn off the appliance and unplug.
( )
button to turn off the appliance and unplug.
hot soapy water. Too much grease accumulation will cause smoking.
ROTISSERIE FUNCTION
Important: When using this function, do not preheat the oven; remove the baking
rack and bake/broil pan.
Caution: When in use, this appliance gets hot. NEVER touch outer surfaces. Always
use oven mitt or pot holders.
1. Make sure wing nut is inserted into openings at end of the prong. Do not tighten.
2. Insert pointed end of rod through one of the rotisserie prongs with pointed ends of
prong facing toward the pointed end of the rod. Slide prong close to square end of
rod and tighten the wing nut.
3. Insert rotisserie rod through center of food to be cooked pushing the food into the
sharp ends of the prong until the food is securely imbedded in the food. Tighten the
wing nut.
Note: The oven accommodates up to a 5-pound chicken.
4. Slide second prong onto pointed end of rod with pointed ends facing the food.
Continue until forks are securely imbedded into the food. Tighten the wing nut.
5. Season food as desired.
6. Make sure oven is off and the slide rack and bake pan are removed from the oven.
7. Using the EZ fit rotisserie tool, insert the pointed end of the rotisserie rod into the
opening on the right center wall of the oven.
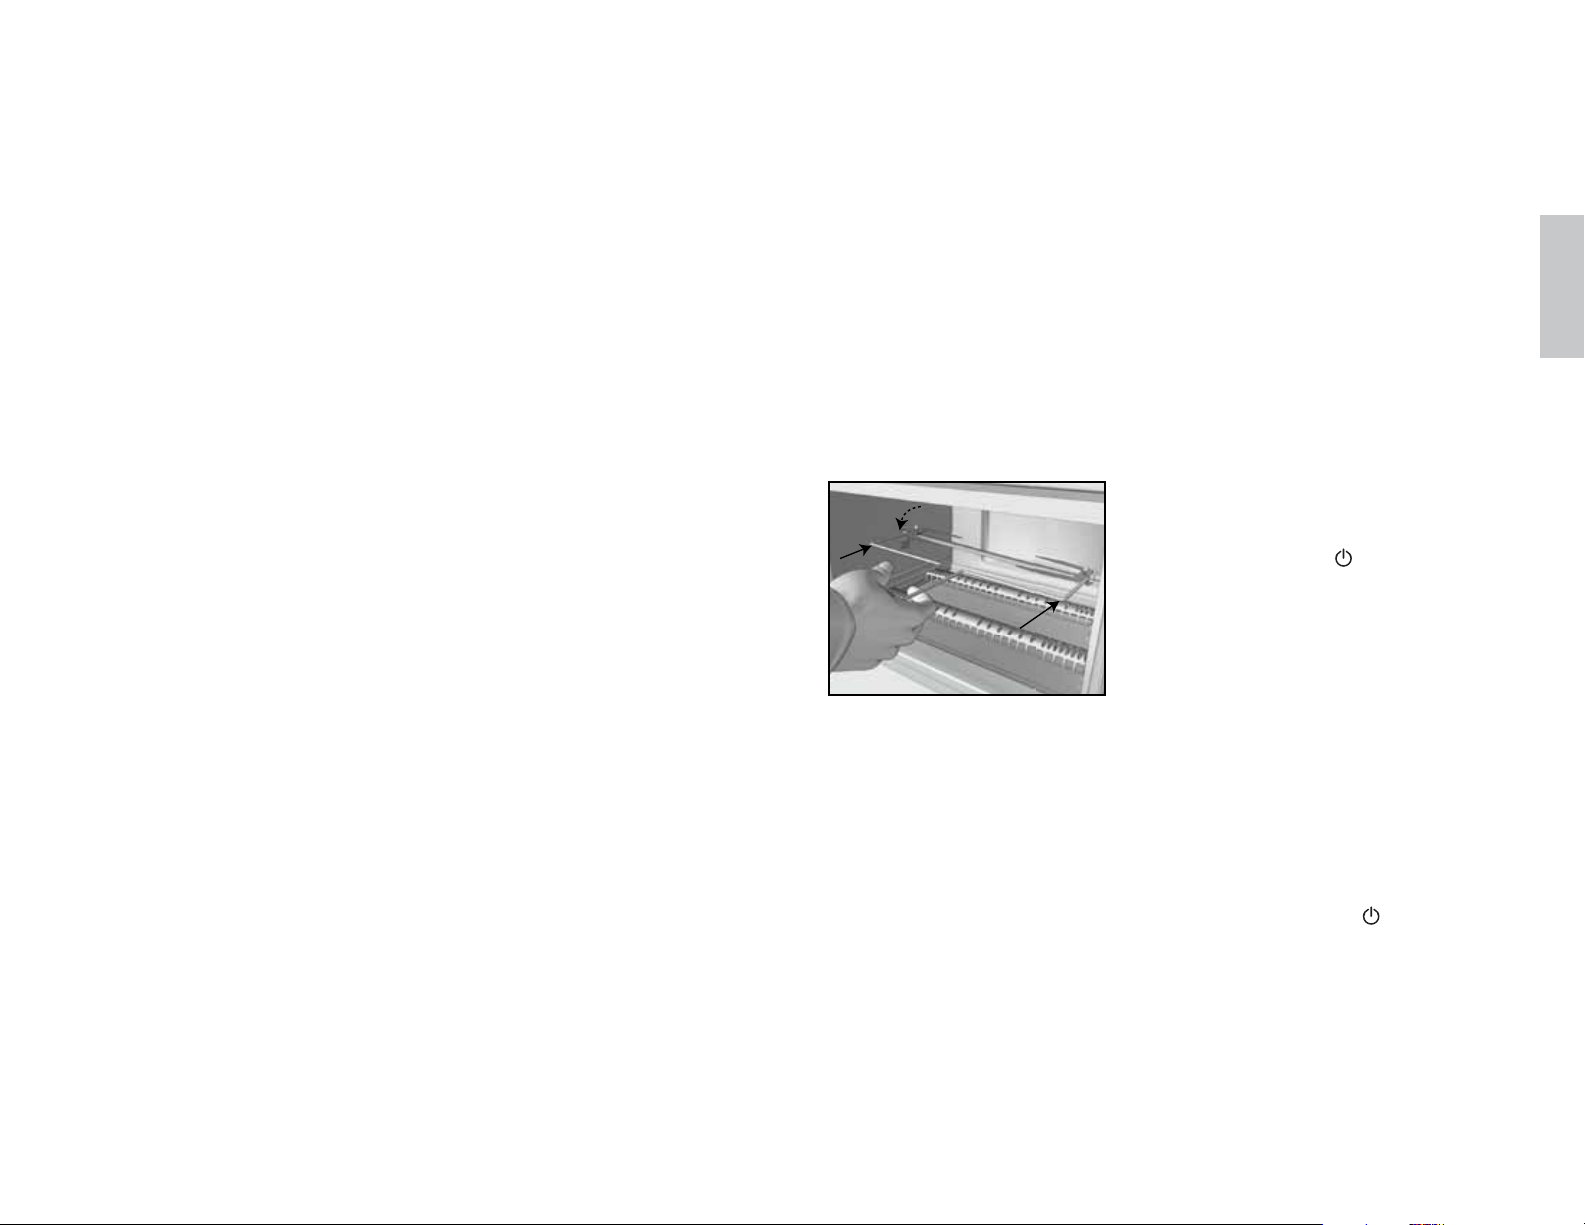
8. Next, insert the square end of the rod into the
“U” slot on the left side of the oven (D).
9. To begin cooking, press the POWER
button, then turn the MODE control knob to
ROTISSERIE. Follow directions on pages 8 and
9 to set temperature and time.
Important: When you open the door, the cooking
function pauses and the blue backlight on the
digital display begins to flash. Close the door to
D
10. You can stop the cooking at any time by pressing the START/STOP (I/O) button.
11. To remove cooked food, use the EZ fit rotisserie tool. Transfer the food to a serving
platter or cutting board. Allow food to cool several minutes before removing the
prongs and rod.
12. Close the door and press the POWER
unplug.
TIPS WHEN USING THE ROTISSERIE
• When cooking foods, such as chicken, use butchers’ twine to tie the wings and legs
close to the body of the bird.
• The oven accommodates up to a 5-pound chicken.
• When cooking foods with high fat content, pour about ¼ cup water into crumb tray
before beginning to cook.
• Allow drippings on crumb tray to cool completely before removing from oven.
• To test for doneness of the meat, a meat thermometer is the most accurate test.
This is an easy test that works well:
• Press into the center of the meat with your finger.
• Rare feels soft and yields easily to pressure.
• Medium springs back easily when pressed.
• Well done feels firm and does not yield when pressed.
resume cooking.
( )
button to turn off the appliance and
( )
ENGLISH
13
Page 8

• Always allow meat to stand for 10 minutes before serving to allow the juices to
redistribute in the meat, so every slice will be moist and tender.
FROZEN SNACKS FUNCTION
• This is a good use for this oven. Snack foods can be baked without heating up a large
oven.
Important: When you open the door, the cooking function pauses and the blue backlight
on the digital display begins to flash. Close the door to resume cooking.
• Watch food closely to avoid overcooking.
Care and Cleaning
This appliance contains no user-serviceable parts. Refer service to qualified service
personnel.
CLEANING
1. Turn off unit, unplug from wall outlet and let it cool before cleaning.
2. Clean the glass door with a nylon pad and sudsy water. Do not use a spray glass
cleaner.
3. To remove slide rack, open the door, pull the rack forward and out. Wash in warm,
sudsy water or in a dishwasher. To remove stubborn spots, use a polyester or nylon pad.
To replace the slide rack, open the door completely and slide into the rail, curved end
first, and close the door.
4. Wash the bake pan, broil rack, rotisserie rod and prongs in hot, sudsy water or in the
dishwasher. To minimize scratching, use a polyester or nylon pad.
5. To wash the covers on the heating elements, wipe with disinfectant wipes and dry with
a soft cloth.
6. To remove the crumb tray, grasp the handle at the front of the oven and slide it out.
Dispose of crumbs and wash the tray in warm, soapy water. Remove stubborn spots
with a nylon mesh pad. Be sure to dry thoroughly before inserting the tray back into the
oven.
EXTERIOR SURFACES
Caution: The oven surface gets hot; be sure the oven has cooled completely before
cleaning.
Let the oven cool completely before cleaning any outer surface. Wipe with a damp cloth or
sponge and dry with paper towel or soft cloth.
COOKING CONTAINERS
• Metal, ovenproof glass or ceramic bake ware without glass lids can be used in your
oven. Follow manufacturer’s instructions.
NEED HELP?
For service, repair or any questions regarding your appliance, call the appropriate
800 number on cover of this book. Please DO NOT return the product to the place of
purchase. Also, please DO NOT mail product back to manufacturer, nor bring it to a
service center.
You may also want to consult the website listed on the cover of this manual.
Three-Year Limited Warranty
(Applies only in the United States and Canada)
What does it cover?
• Any defect in material or workmanship provided; however, Applica’s liability will not
exceed the purchase price of product.
For how long?
• Three years from the date of original purchase with proof of such purchase.
What will we do to help you?
• Provide you with a reasonably similar replacement product that is either new
or factory refurbished.
How do you get service?
• Save your receipt as proof of date of sale.
• Check our on-line service site at www.prodprotect.com/applica, or call our
toll-free number, 1-800-231-9786, for general warranty service.
• If you need parts or accessories, please call 1-800-738-0245.
What does your warranty not cover?
• Damage from commercial use
• Damage from misuse, abuse or neglect
• Products that have been modified in any way
• Products used or serviced outside the country of purchase
• Glass parts and other accessory items that are packed with the unit
• Shipping and handling costs associated with the replacement of the unit
• Consequential or incidental damages (Please note, however, that some states do
not allow the exclusion or limitation of consequential or incidental damages, so this
limitation may not apply to you.)
How does state law relate to this warranty?
• This warranty gives you specific legal rights, and you may also have other rights that
vary from state to state or province to province.
ENGLISH
14
is a trademark of The Black & Decker Corporation,
Towson, Maryland, USA
Made and Printed in People’s Republic of China
15
Page 9

Veuillez lire et conserver ce guide d’entretien et d’utilisation
IMPORTANTES CONSIGNES
DE SÉCURITÉ
Lorsqu’on utilise des appareils électriques, il faut toujours respecter
certaines règles de sécurité fondamentales, notamment les suivantes :
❑ Lire toutes les instructions.
❑ Ne pas toucher aux surfaces chaudes; utiliser les poignées et les
boutons.
❑ Afin d’éviter les risques de choc électrique, ne pas immerger le
cordon, la fiche ou l’appareil dans l’eau ou tout autre liquide.
❑ Exercer une étroite surveillance lorsque l’appareil est utilisé par un
enfant ou près d’un enfant.
❑ Débrancher l’appareil lorsqu’il ne sert pas ou avant de le nettoyer.
Laisser l’appareil refroidir avant d’y placer ou d’en retirer des
composantes.
❑ Ne pas utiliser un appareil dont la fiche ou le cordon est abîmé, qui
fonctionne mal ou qui a été endommagé de quelque façon que ce soit.
Pour un examen, une réparation ou un réglage, rapporter l’appareil
à un centre de service autorisé. Ou composer le numéro sans frais
inscrit sur la page couverture du présent guide.
❑ L’utilisation d’accessoires non recommandés par le fabricant de
l’appareil peut occasionner des blessures.
❑ Ne pas utiliser l’appareil à l’extérieur.
❑ Ne pas laisser pendre le cordon sur le bord d’une table ou d’un
comptoir ni le laisser entrer en contact avec une surface chaude.
❑ Ne pas placer l’appareil sur le dessus ou près d’un élément chauffant
électrique ou à gaz ni dans un four chaud.
❑ Faire preuve de grande prudence pour déplacer un appareil contenant
de l’huile brûlante ou autre liquide chaud.
❑ Pour débrancher l’appareil, placer toutes les commandes à la
position « off » (arrêt) et retirer la fiche de la prise.
❑ Utiliser l’appareil uniquement aux fins pour lesquelles il a été conçu.
❑ Faire preuve de grande prudence pour déplacer le plateau ou jeter la
graisse chaude.
❑ Ne pas introduire dans l'appareil des aliments grandes dimensions
ni des ustensiles en métal qui pourraient provoquer des risques
d'incendies ou de secousses électriques.
❑ Il y a risque d'incendie lorsque le grille-pain est recouvert de
matériaux inflammables comme des rideaux, des draperies ou des
revêtements muraux, ou lorsqu'il entre en contact avec ceux-ci
alors qu'il fonctionne. Ne rien ranger sur l’appareil en service.
❑ Ne pas nettoyer l'appareil avec des tampons métalliques abrasifs.
Ces derniers peuvent s'effriter et entrer en contact avec les
composants électriques de l'appareil, ce qui présente un risque de
secousses électriques.
❑ Ne pas nettoyer l'appareil avec des tampons métalliques abrasifs.
Bien surveiller lorsqu'on utilise des plats qui ne sont pas en métal
ni en verre.
❑ Ne rien ranger d'autre que les accessoires recommandés par le
fabricant dans l'appareil lorsqu'il ne sert pas.
❑ Ne pas placer l’un des matériaux suivants dans le four : du papier,
du carton, de la pellicule plastique et d’autres matériaux du genre.
❑ Éviter de recouvrir le plateau à miettes ou toute autre pièce de
l'appareil de papier métallique car cela présente des risques de
surchauffe.
❑ Cet appareil n'est pas conçu pour être utilisé par des personnes
(notamment des enfants) dont les capacités physiques,
sensorielles ou mentales sont réduites ou qui manquent
d'expérience ou de connaissances, à moins qu'elles ne soient
supervisées ou dirigées par une personne responsable de leur
sécurité pendant l'utilisation.
❑ Les enfants doivent être supervisés afin d'éviter qu'ils ne jouent
avec l'appareil.
CONSERVER CES
INSTRUCTIONS.
L'appareil est conçu pour une utilisation domestique seulement.
FICHE MISE À LA TERRE
Par mesure de sécurité, le produit comporte une fiche mise à la terre
qui n’entre que dans une prise à trois trous. Il ne faut pas neutraliser
ce dispositif de sécurité. La mauvaise connexion du conducteur de
terre présente des risques de secousses électriques. Communiquer
avec un électricien certifié lorsqu’on se demande si la prise est bien
mise à la terre.
FRANÇAIS
16
17
Page 10

VIS INDESSERRABLE
Avertissement : L’appareil est doté d’une vis indesserrable empêchant
l’enlèvement du couvercle extérieur. Pour réduire les risques
d’incendie ou de secousses électriques, ne pas tenter de retirer le
couvercle extérieur. L’utilisateur ne peut pas remplacer les pièces de
l’appareil. En confier la réparation seulement au personnel des centres
de service autorisés.
Le produit peut différer légèrement de celui illustré.
CORDON
a) Le cordon d’alimentation de l’appareil est court afin de minimiser les
risques d’enchevêtrement ou de trébuchement.
b) Il existe des cordons d’alimentation ou de rallonge plus longs et il faut
s’en servir avec prudence.
c) Lorsqu’on utilise un cordon de rallonge, il faut s’assurer que :
1) La tension nominale du cordon d’alimentation ou de rallonge soit
au moins égale à celle de l’appareil, et que ;
2) Lorsque l’appareil est de type mis à la terre, il faut utiliser un
cordon de rallonge mis à la terre à trois broches, et que ;
3) Le cordon soit placé de sorte qu’il ne soit pas étalé sur le comptoir
ou la table d’où des enfants pourraient le tirer, ni placé de manière
à provoquer un trébuchement par inadvertance.
Note : Lorsque le cordon d’alimentation est endommagé, il faut le faire
remplacer par du personnel qualifié ou, en Amérique latine, par le
personnel d’un centre de service autorisé.
18
TOAST
GRILLAGE
FROZEN
SNACKS
MODE
REPAS
SURGEL
ÉS
BAKE
CUISSON
PIZZA
PIZZA
BROIL
RÔTISSAGE
WARM
CHAUD
ROTISSERIE
RÔTISSOIRE
REHEAT
RÉCHAUFFER
TOAST
GRILLAGE
REHEAT
RÉCHAUFFER
BAKE
CUISSON
ROTISSERIE
RÔTISSOIRE
MODE
1.
Poignée
2. Afficheur numérique
3. Tableau de commande
† 4. Grille coulissante (pièce no 31K23-16-D-N)
SURGELÉS
PIZZA
PIZZA
FROZEN
SNACKS
REPAS
WARM
CHAUD
† 5. Grille de lèchefrite (pièce no 31K23-26-D-N)
† 6. Plaque de cuisson/lèchefrite (pièce no 32K23-03-N)
† 7. Fourchons pour la fonction de rôtissoire
(pièce no 38K23-44-N)
† 8. Broche pour la fonction de rôtissoire
(pièce no 31K23-42-N)
† 9. Écrous à oreilles pour la fonction de rôtissoire
(pièce no 33K23-01-N)
† 10. Outil pratique pour la fonction de rôtissoire (pièce no 31K23-56-D-N)
† 11. Plateau à miettes coulissant (pièce no 31K23-11-N)
12. Porte en verre arrondie
13. Intérieur arrondi très profond
14. Sélecteur de MODE de cuisson
15. Sélecteur de TEMPÉRATURE/TEMPS DE CUISSON/DEGRÉ DE GRILLAGE
(
16. Touche de TEMPÉRATURE (
17. Touche de MINUTERIE/GRILLAGE (
18. Touche d’ALIMENTATION (
)
)
)
)
19. Touche MARCHE/ARRÊT (I/O)
Remarque : † indique que la pièce est remplaçable par l’utilisateur/amovible.
BROIL
RÔTISSAGE
FRANÇAIS
19
Page 11

Utilisation
Cet appareil est conçu pour un usage domestique seulement.
MISE EN GARDE : LE FOUR DEVIENT CHAUD. LORSQUE L'APPAREIL EST EN MARCHE,
TOUJOURS UTILISER DES MITAINES DE CUISINE OU DES POIGNEES POUR TOUCHER
LES SURFACES EXTERIEURES ET INTERIEURES DU FOUR.
POUR COMMENCER
• Retirer le matériau d’emballage et les autocollants; enlever la pellicule protectrice
transparente du tableau de commande.
• Aller à l'adresse www.prodprotect.com/applica pour enregistrer votre garantie.
• Laver toutes les pièces amovibles tel qu’indiqué à la section « Entretien et nettoyage »
du présent guide d'utilisation.
• Choisir un endroit où placer l’appareil en laissant suffisamment d’espace entre
l’arrière de l’appareil et le mur pour favoriser la circulation de la chaleur, sans
endommager les armoires ou les murs.
• Insérer le plateau à miettes sous les éléments chauffants inférieurs.
• Installer la grille coulissante, en s’assurant que l’extrémité arrondie est insérée vers
le fond du four, puisque la grille est conçue pour s’adapter à l’intérieur arrondi du four
pour la cuisson de pizzas.
• Détacher le cordon d'alimentation et le dérouler.
• Brancher l'appareil dans une prise de courant. L’afficheur numérique indique la
température par défaut.
Mise en garde : Le four devient chaud. NE JAMAIS toucher les surfaces extérieures.
Toujours utiliser des mitaines de cuisine ou des poignées.
Remarque : Avant d’utiliser le four pour la première fois, le faire fonctionner à vide
pendant 15 minutes pour éliminer/dissiper tout résidu de fabrication. Vous remarquerez
peut être une légère odeur et de la fumée s’échappant du four. Cette situation est tout à
fait normale et ne se produira plus après quelques utilisations.
RENSEIGNEMENTS UTILES À PROPOS DU FOUR
Le four fait appel à l’énergie infrarouge pour améliorer le processus de cuisson afin
d’obtenir un brunissage optimal et, dans certains cas, un temps de cuisson plus court.
Remarque : Durant la cuisson, les lumières intérieures suivront un cycle dans lequel elles
s'allumeront et s'éteindront. C’est normal.
Mise en garde : Le four devient chaud. NE JAMAIS toucher les surfaces extérieures.
Toujours utiliser des mitaines de cuisine ou des poignées.
• Le four comporte des températures et des temps de cuisson préréglés. Ces réglages
préréglés ne sont offerts qu’à titre de suggestions. Lorsqu’un aliment est cuit pour la
première fois avec le four, vérifier la cuisson plusieurs minutes avant la fin du temps
de cuisson programmé.
Important : Le décompte du temps de cuisson commence après que la touche Marche/
Arrêt (I/O) a été enfoncée et que le four a entièrement préchauffé.
Remarque : L’afficheur numérique clignotera pendant le préchauffage du four, et le temps
de cuisson affiché restera le même tant que la cuisson n’aura pas débuté.
Important : Lorsque la mention « TEMPS DE CUISSON RÉDUIT » (REDUCED COOKING
TIME) apparaît sur l’afficheur numérique, le four est en marche.
Remarque : L’afficheur numérique clignotera pendant le préchauffage du four, et le temps
de cuisson affiché restera le même tant que la cuisson n’aura pas débuté.
20
CYCLES DE CUISSON
RÉGLAGE TEMPÉRATURE DURÉE
CHAUD 90 °C / 200 °F 30 min
PIZZA 200 °C / 400 °F 20 min
REPAS SURGELÉS 200 °C / 400 °F 15 min
GRILLAGE Degrés de 1 à 7 -CUISSON 175 °C / 350 °F 30 min
RÔTISSAGE 230 °C / 450 °F 20 min
RÔTISSOIRE 175 °C / 350 °F 60 min
RÉCHAUFFER 120 °C / 250 °F 30 min
• Il est possible de modifier la température et le temps de cuisson à tout
moment.
o Pour changer la température préréglée, appuyer sur la touche de
TEMPÉRATURE
TEMPÉRATURE/TEMPS DE CUISSON/DEGRÉ DE GRILLAGE
de la manière suivante :
• vers la gauche (-) pour diminuer la température par tranche
de 5 degrés;
• vers la droite (+) pour augmenter la température par tranche
de 5 degrés.
o Pour changer le temps de cuisson préréglé, appuyer sur la touche de
MINUTERIE/GRILLAGE
TEMPÉRATURE/TEMPS DE CUISSON/DEGRÉ DE GRILLAGE
• vers la gauche (-) pour diminuer la durée par tranche de 1 minute;
• vers la droite (+) pour augmenter la durée par tranche de 1 minute.
Remarque : Pour modifier rapidement la température ou le temps
de cuisson, après avoir appuyé sur la touche de TEMPÉRATURE
( )
ou sur la touche de MINUTERIE/GRILLAGE
de TEMPÉRATURE/TEMPS DE CUISSON/DEGRÉ DE GRILLAGE
dans la position désirée (vers la gauche pour diminuer, vers la droite pour
augmenter).
• La température et la minuterie du four sont programmées pour une
intensité de grillage moyenne (réglage n° 4). Utiliser ce réglage la
première fois, puis modifier l’intensité pour obtenir un grillage plus ou
moins foncé, selon votre préférence.
• Lorsqu’un degré de grillage est sélectionné et que la touche MARCHE/
ARRÊT (I/O) est enfoncée, l’afficheur numérique changera pour indiquer
le nombre approximatif de minutes nécessaires pour griller le pain. La
minuterie ne décompte pas.
• Si les aliments brunissent trop rapidement, les couvrir de papier
d’aluminium. S’assurer que le papier d’aluminium ne touche pas aux
éléments chauffants.
( )
, puis tourner et relâcher le sélecteur de
( )
( )
, puis tourner et relâcher le sélecteur de
( )
( )
, tenir le sélecteur
( )
FRANÇAIS
.
21
Page 12

• Lorsque la porte du four est ouverte en cours d’utilisation, la cuisson s’arrête;
les lumières chauffantes s’éteignent et le rétroéclairage bleu de l’afficheur
numérique clignote. Une fois que la porte du four est refermée, les lumières
s’allument, le rétroéclairage de l’afficheur numérique cesse de clignoter et le
four poursuit la cuisson. Le décompte de la minuterie continue.
• Pour l’utilisation de la fonction de rôtissoire, les aliments devraient être placés
dans le four quand il est froid.
• À la fin de tout cycle de cuisson, un signal sonore sera émis.
FONCTIONS
Touche d’alimentation
Touche Marche/Arrêt
Touche de température
Touche de minuterie/grillage
La touche d’alimentation sert à mettre en
marche et à éteindre l’appareil. Il s’agit
de la première touche sur laquelle on
doit appuyer pour alimenter l’appareil en
courant. Quand la cuisson est terminée,
appuyer sur cette touche pour éteindre le
four, et débrancher celui-ci.
Il s’agit de la dernière touche sur laquelle
on doit appuyer pour démarrer et arrêter
la cuisson. Chaque fois que la porte est
ouverte pendant la cuisson, les lumières
chauffantes s’éteignent, la cuisson s’arrête
et le rétroéclairage bleu de l’afficheur
numérique clignote. Lorsque la porte
est refermée, la cuisson et le décompte
reprennent.
Une fois le cycle de cuisson choisi,
appuyer sur cette touche pour afficher la
température préréglée. Pour modifier la
température préréglée, tourner le sélecteur
de TEMPÉRATURE/TEMPS DE CUISSON/
DEGRÉ DE GRILLAGE (
) tel
qu’indiqué ci-dessous.
Après avoir choisi le cycle et la température
de cuisson désirés, appuyer sur cette
touche pour afficher le temps de cuisson
préréglé. Pour modifier cette durée, tourner
le sélecteur de TEMPÉRATURE/TEMPS DE
CUISSON/DEGRÉ DE GRILLAGE (
)
tel qu’indiqué ci-dessous.
Sélecteur de température/temps
de cuisson/niveau de grillage
Tourner ce sélecteur pour modifier la
température affichée ou le temps de
cuisson des aliments.
• Le tourner vers la gauche (-) pour
diminuer la température par tranche de
5 degrés, ou pour diminuer le temps de
cuisson par tranche de 1 minute.
• Le tourner vers la droite (+) pour
augmenter la température par tranche
de 5 degrés, ou pour augmenter le
temps de cuisson par tranche de
1 minute.
On utilise également ce sélecteur pour
choisir le degré de grillage (degrés de
1 à 7). Le four est préréglé à 4. Utiliser ce
réglage pour le premier grillage dans le
four.
Pour modifier le degré de grillage, tourner
ce sélecteur :
• vers la gauche (-) pour choisir un degré
de grillage plus faible.
• vers la droite (+) pour choisir un degré de
grillage plus élevé.
Remarque : Pour modifier rapidement
la température ou le temps de cuisson,
après avoir appuyé sur la touche de
TEMPÉRATURE (
) ou sur la
touche de MINUTERIE/GRILLAGE
(
), tenir le sélecteur de
TEMPÉRATURE/TEMPS DE CUISSON/
DEGRÉ DE GRILLAGE (
) dans
la position désirée (vers la gauche pour
diminuer, vers la droite pour augmenter).
Sélecteur de MODE
TOAST
GRILLAGE
FROZEN
SNACKS
REPAS
SURGELÉS
PIZZA
PIZZA
WARM
CHAUD
REHEAT
RÉCHAUFFER
MODE
BAKE
CUISSON
RÔTISSAGE
ROTISSERIE
RÔTISSOIRE
BROIL
Lorsque la touche d’ALIMENTATION
( )
est enfoncée, tourner ce bouton pour
sélectionner le type d’aliment à cuire ou
la fonction à exécuter. La température
préréglée apparaîtra sur l’afficheur
numérique et clignotera jusqu’à ce que
le préchauffage du four soit terminé.
Appuyer sur la touche MARCHE/ARRÊT
(I/O); l’afficheur numérique présentera le
temps de cuisson préréglé pour la fonction
sélectionnée (par exemple, si la fonction
« Repas surgelés » est sélectionnée, le
four procédera au préchauffage à 400 °F et
restera allumé pendant 15 minutes à moins
que des changements ne soient apportés).
Important : Lorsque la mention « TEMPS DE CUISSON RÉDUIT » (REDUCED
COOKING TIME) apparaît sur l’afficheur numérique, le four est en marche.
FRANÇAIS
22
23
Page 13

ORDRE DE SÉLECTION DES COMMANDES (voir l’illustration C)
Remarque : Une fois la touche MARCHE/ARRÊT (I/O) pressée, le four commencera à
préchauffer. Le décompte du temps de cuisson choisi ne
commencera pas avant la fin du préchauffage du four. Un
signal sonore sera alors émis. Ouvrir la porte et insérer
TOAST
GRILLAGE
RÉCHAUFFER
MODE
BAKE
CUISSON
BROIL
RÔTISSAGE
ROTISSERIE
RÔTISSOIRE
REHEAT
FROZEN
SNACKS
REPAS
SURGELÉS
PIZZA
PIZZA
2
WARM
CHAUD
4
les aliments à cuire. Fermer la porte. Le four commencera
à cuire les aliments et le décompte du temps de cuisson
débutera également. L’afficheur cessera alors de clignoter.
Remarque : Le décompte commencera même si les
aliments n’ont pas été insérés dans le four.
Remarque : Pour cuire à la température et au temps
6
de cuisson préréglés pour une fonction, simplement
sélectionner la fonction désirée et appuyer sur la touche
3
C
1
1. Appuyer sur la touche d’ALIMENTATION
MARCHE/ARRÊT (I/O). Le four commencera immédiatement
5
le préchauffage et le décompte du temps de cuisson
7
préréglé s’amorcera lorsque le préchauffage est terminé.
( )
.
2. Tourner le sélecteur de MODE pour choisir le type d’aliment à cuire ou la fonction
à exécuter. La température préréglée s’affichera.
3. Pour vérifier la température préréglée, appuyer sur la touche de TEMPÉRATURE
( )
et la température préréglée s’affichera.
4. Pour changer la température, tourner le sélecteur de TEMPÉRATURE/TEMPS
DE CUISSON/DEGRÉ DE GRILLAGE
( )
vers la droite pour augmenter la
température ou vers la gauche pour diminuer la température.
5. Pour vérifier le temps de cuisson préréglé, appuyer sur la touche TEMPS DE
CUISSON/DEGRÉ DE GRILLAGE
( ) et le temps de cuisson préréglé s’affichera.
6. Pour changer le temps de cuisson, tourner le sélecteur TEMPS DE CUISSON/
TEMPÉRATURE/DEGRÉ DE GRILLAGE
( )
vers la droite pour augmenter la
température ou vers la gauche pour diminuer la température.
7. Appuyer sur la touche MARCHE/ARRÊT (I/O) pour commencer le préchauffage du
four ou la cuisson (les fonctions de grillage et de rôtissoire ne nécessitent pas de
préchauffage). L’afficheur numérique clignotera.
8. Une fois le four préchauffé à la température sélectionnée, un signal sonore sera émis.
Ouvrir la porte et insérer les aliments à cuire. Fermer la porte du four pour que la
cuisson commence.
9. S’il y a ouverture de la porte à tout moment pendant le cycle de cuisson, la cuisson
sera interrompue. Pour la reprendre, fermer la porte.
10. Une fois la cuisson terminée, retirer les aliments, fermer la porte, appuyer sur la
touche d’alimentation
( )
pour éteindre l’appareil, et débrancher celui-ci.
EXEMPLE POUR LA CUISSON D’UNE PIZZA SURGELEE :
Remarque : Voir les indications sur l’emballage pour obtenir le temps de cuisson et la
température nécessaires.
1. Appuyer sur la touche d’alimentation (
)
.
2. Sélectionner PIZZA en tournant le sélecteur de MODE de cuisson. La température
préréglée de 200 °C (400ºF) s’affichera. S’il s’agit de la température suggérée sur
l’emballage, sauter l’étape 3.
3. Si la température suggérée est différente, appuyer sur la touche de TEMPÉRATURE
( )
GRILLAGE
et tourner le sélecteur de TEMPÉRATURE/TEMPS DE CUISSON/DEGRÉ DE
( )
pour modifier la température préréglée à la température voulue.
(Voir les indications à la pages 22 et 23).
24
4. Appuyer sur la touche de MINUTERIE/GRILLAGE
( )
.Le temps de cuisson
préréglé s’affichera. Appuyer sur la touche MARCHE/ARRÊT (I/O) pour activer le
préchauffage du four.
5. Si le temps de cuisson suggéré est différent, appuyer sur la touche de MINUTERIE/
GRILLAGE
CUISSON/DEGRÉ DE GRILLAGE
( )
et tourner le sélecteur de TEMPÉRATURE/TEMPS DE
( )
pour modifier le temps de cuisson
préréglé en fonction du temps désiré. (Voir les indications à la pages 22 et 23.)
6. Une fois le four préchauffé à la température sélectionnée, un signal sonore sera
émis. Ouvrir la porte et insérer les aliments à cuire. Fermer la porte du four.
Remarque : Le décompte commencera même si les aliments n’ont pas été insérés
dans le four.
Mise en garde : Le four devient chaud lorsqu’il est en fonction. NE JAMAIS toucher
les surfaces extérieures. Toujours utiliser des mitaines de cuisine ou des poignées.
7. Fermer la porte du four pour que la cuisson commence. S’il y a ouverture de la
porte à tout moment pendant le cycle de cuisson, la cuisson sera interrompue
et l’afficheur numérique clignotera. Pour reprendre la cuisson, fermer la porte.
L’afficheur cessera de clignoter.
8. Une fois la cuisson terminée, à l’aide de mitaines de cuisine ou de poignées, retirer
les aliments du four, fermer la porte, appuyer sur la touche d’alimentation
( )
pour éteindre l’appareil, et débrancher celui-ci.
Remarque : Pour cuire à la température et au temps de cuisson préréglés pour
une fonction, simplement sélectionner la fonction désirée et appuyer sur la touche
MARCHE/ARRÊT (I/O). Le four commencera immédiatement le préchauffage et le
décompte du temps de cuisson préréglé s’amorcera lorsque le préchauffage est
terminé.
FONCTION « CHAUD » (GARDE AU CHAUD)
Cette fonction est utile pour garder au chaud des aliments cuits à servir plus tard.
Suivre les indications de la pages 25 et 26 pour régler le four à cette fonction.
Conseils pour utiliser cette fonction
• Conserver les aliments cuits pendant 10 minutes dans le four préchauffé
à 90 °C (200 ºF).
• Les aliments cuits devraient être conservés à une température interne de 65 °C
(150 ºF) ou plus.
• Se servir toujours d’un thermomètre à viande pour vérifier la température interne
des aliments.
• Couvrir les aliments de papier d’aluminium pour éviter qu’ils ne s’assèchent.
• Pour mettre fin à cette fonction en tout temps, appuyer sur la touche MARCHE/
ARRÊT (I/O).
Important : Lorsque la porte du four est ouverte, la fonction de cuisson s’arrête
et le rétroéclairage bleu de l’afficheur numérique clignote. Fermer la porte pour
poursuivre la cuisson.
1. Une fois le cycle de cuisson terminé, ouvrir la porte à l’aide de mitaines de cuisine
ou de poignées, et retirer les aliments du four avec précaution.
2. Fermer la porte, appuyer sur la touche d’alimentation
( )
pour éteindre l’appareil,
et débrancher celui-ci.
FONCTION « PIZZA »
Mise en garde : Le four devient chaud lorsqu’il est en fonction. NE JAMAIS toucher
les surfaces extérieures. Toujours utiliser des mitaines de cuisine ou des poignées.
Remarque : Puisque toutes les pizzas ne cuisent ni à la même température ni pendant
la même durée, voir les indications pour modifier ces réglages à la pages 22 et 23
lorsque vous utilisez cette fonction.
FRANÇAIS
25
Page 14

• Pour une croûte croustillante, placer la pizza directement sur la grille du four.
• Pour une croûte plus moelleuse, placer la pizza sur la plaque de cuisson.
• Une pizza devrait toujours être cuite à une température interne d’au moins
60° C (140 ºF).
• Ne pas laisser dégeler la pizza avant de la cuire.
• La pizza est bien cuite lorsque sa croûte est dorée et le fromage complètement fondu.
• Les indications relatives à la cuisson des pizzas surgelées peuvent varier beaucoup;
suivre les indications de température inscrites sur l’emballage.
• Le temps de cuisson peut être différent lorsqu’il y a utilisation d’un grille pain four;
vérifier le résultat de la cuisson avant la durée maximale indiquée sur l’emballage.
FONCTION « RÉCHAUFFER »
• Utiliser cette fonction pour réchauffer des aliments cuits précédemment et qui sont
maintenant à la température ambiante ou qui sortent du réfrigérateur.
• Surveiller de près les aliments pour éviter de trop les faire cuire.
FONCTION « GRILLAGE »
Mise en garde : Le four devient chaud lorsqu’il est en fonction. NE JAMAIS toucher les
surfaces extérieures. Toujours utiliser des mitaines de cuisine ou des poignées.
Remarque : Il n’est pas nécessaire de préchauffer le four pour faire griller des aliments.
1. Appuyer sur la touche d’alimentation
2. Placer le nombre désiré de tranches de pain ou de moitiés de bagel (côté tranché vers
le haut) (jusqu’à 6 morceaux) sur la grille du four.
3. Fermer la porte.
4. Sélectionner GRILLAGE en tournant le sélecteur de MODE.
5. Appuyer sur la touche de MINUTERIE/GRILLAGE
pour la première fois, le degré de grillage est programmé à 4 (grillage moyen). Utiliser
ce réglage la première fois, puis modifier l’intensité pour obtenir un grillage plus ou
moins foncé, selon votre préférence.
6. Pour modifier le degré de grillage (de 1 à 7), tourner le sélecteur de TEMPÉRATURE/
TEMPS DE CUISSON/NIVEAU DE GRILLAGE
• vers la gauche (-) pour choisir un degré de grillage plus faible.
• vers la droite (+) pour choisir un degré de grillage plus élevé.
7. Appuyer sur la touche MARCHE/ARRÊT (I/O) pour commencer le cycle de grillage.
8. L’afficheur numérique changera pour afficher le temps approximatif prévu pour le
grillage.
Important : Lorsque la mention « TEMPS DE CUISSON RÉDUIT » (REDUCED COOKING
TIME) apparaît sur l’afficheur numérique, le four est en marche.
9. Une fois le cycle de grillage terminé, ouvrir la porte du four à l’aide de mitaines de
cuisine ou de poignées et sortir la grille du four pour retirer le pain ou les bagels.
Remarque : S’il y a ouverture de la porte du four au cours du cycle de grillage, celui ci
s’interrompt. Pour poursuivre le cycle de grillages, suivre les étapes 3 à 8.
Conseil pour optimiser le grillage en cas de cycles consécutifs
Pour obtenir de meilleurs résultats lorsque vous procédez à des cycles de grillage
consécutifs, laisser l’appareil refroidir brièvement entre chaque cycle de grillage ou
choisir un degré de grillage plus faible.
10. Une fois le cycle de grillage terminé, retirer les aliments du four à l’aide de mitaines
de cuisine ou de poignées, fermer la porte, appuyer sur la touche d’alimentation
( )
pour éteindre l’appareil, et débrancher celui-ci.
26
( )
et ouvrir la porte du four.
( )
( )
:
. Lorsque le four est utilisé
FONCTION « CUISSON »
Utiliser ce cycle pour faire rôtir des viandes, des morceaux de poulet ou de poisson,
ou pour faire cuire des biscuits, des muffins, des carrés au chocolat, du pain pour le
déjeuner, des gâteaux danois, des légumes et des plats mijotés.
Mise en garde : Le four devient chaud lorsqu’il est en fonction. NE JAMAIS toucher
les surfaces extérieures. Toujours utiliser des mitaines de cuisine ou des poignées.
1. Sélectionner CUISSON en tournant le sélecteur de MODE. L’afficheur numérique
affiche la température par défaut de 175 °C (350 ºF).
2. Pour modifier la température, appuyer sur la touche de TEMPÉRATURE
suivre les indications de la page 24.
Remarque : Il est possible de modifier le temps de cuisson et la température à tout
moment pendant le cycle de cuisson. (Voir les indications à la page 24.)
3. Appuyer sur la touche de MINUTERIE/GRILLAGE
affiche le temps de cuisson par défaut de 30 minutes. Pour modifier le temps de
cuisson, appuyer sur la touche de MINUTERIE/GRILLAGE et suivre les indications
de la page 24.
4. Appuyer sur la touche MARCHE/ARRÊT (I/O) pour activer le préchauffage du four.
L’afficheur numérique clignotera.
5. Une fois le four préchauffé à la température sélectionnée, un signal sonore sera
émis. Ouvrir la porte du four. S’assurer que la grille est en place et insérer les
aliments à cuire.
Remarque : Utiliser la plaque de cuisson fournie avec le four, un plat de cuisson en
verre allant au four ou un plat de cuisson métallique.
Remarque : Le décompte commencera même si les aliments n’ont pas été insérés
dans le four.
Important : Lorsque la mention « TEMPS DE CUISSON RÉDUIT » (REDUCED COOKING
TIME) apparaît sur l’afficheur numérique, le four est en marche.
6. Fermer la porte du four.
7. Il est possible d’interrompre le cycle de cuisson en tout temps en appuyant sur la
touche MARCHE/ARRÊT (I/O).
Important : Lorsque la porte du four est ouverte, la fonction de cuisson s’arrête
et le rétroéclairage bleu de l’afficheur numérique clignote. Fermer la porte pour
poursuivre la cuisson.
8. Une fois le cycle de grillage terminé, ouvrir la porte du four à l’aide de mitaines de
cuisine ou de poignées et retirer les aliments avec précaution.
9. Fermer la porte, appuyer sur la touche d’alimentation
et débrancher celu i-ci.
FONCTION « RÔTISSAGE »
Important : La fonction de rôtissage de ce four fonctionne lorsque la porte est
fermée. Ne pas essayer de l’utiliser lorsque la porte est ouverte.
Remarque : Ce four permet de choisir une température de rôtissage. Pour
les aliments comme les poissons à chair blanche, il est possible d’utiliser une
température plus basse.
Mise en garde : Le four devient chaud lorsqu’il est en fonction. NE JAMAIS toucher
les surfaces extérieures. Toujours utiliser des mitaines de cuisine ou des poignées.
1. Sélectionner RÔTISSAGE en tournant le sélecteur de MODE sur ROTISSAGE.
2. Choisir la température et le temps de cuisson (voir les indications à la pages 22 et
23). Faire préchauffer le four. L’afficheur numérique cessera de clignoter une fois la
température préréglée atteinte. Un signal sonore sera alors émis.
( )
( )
. L’afficheur numérique
pour éteindre l’appareil,
( )
et
FRANÇAIS
27
Page 15
Remarque : Le décompte commencera même si les aliments n’ont pas été insérés dans le
four.
Important : Lorsque la mention « TEMPS DE CUISSON RÉDUIT » (REDUCED COOKING
TIME) apparaît sur l’afficheur numérique, le four est en marche.
3. Placer la grille de lèchefrite sur la plaque de cuisson.
4. Placer les aliments à cuire sur la grille de lèchefrite.
5. Ouvrir la porte du four.
6. À l’aide de mitaines de cuisine ou de poignées, insérer la grille de lèchefrite dans
le four.
7. Fermer la porte.
8. Il est possible d’interrompre le cycle de rôtissage en tout temps en appuyant sur la
touche MARCHE/ARRÊT (I/O).
Important : Lorsque la porte du four est ouverte, la fonction de cuisson s’arrête et le
rétroéclairage bleu de l’afficheur numérique clignote. Fermer la porte pour poursuivre
la cuisson.
9. Tourner les aliments à la mi cuisson. Remettre les aliments au four et fermer
la porte.
10. Une fois le cycle de rôtissage terminé, ouvrir la porte du four à l’aide de mitaines de
cuisine ou de poignées et retirer les aliments avec précaution.
11. Fermer la porte, appuyer sur la touche d’alimentation ( ) pour éteindre l’appareil,
débrancher celui-ci.
CONSEILS DE RÔTISSAGE
• Placer les aliments sur la grille pour réduire les calories, permettre au jus de cuisson
de tomber sur la plaque de cuisson/lèchefrite et aider à éliminer la fumée produite
dans le four.
• Pour obtenir de meilleurs résultats, faire dégeler la viande, la volaille et le poisson
avant de les faire rôtir.
• Pour faire rôtir des biftecks ou des côtelettes congelés, prévoir 1½ à 2 fois plus
de temps que pour faire cuire ces mêmes aliments s’ils ont été décongelés.
• Enlever l’excès de gras de la viande et faire des entailles sur les bords pour les
empêcher de se courber.
• Badigeonner les aliments à rôtir avec de l’huile et les assaisonner au goût avant
de les faire rôtir.
• Les filets et les darnes de poisson sont des morceaux délicats et doivent être rôtis
directement sur la plaque de cuisson/lèchefrite, placée sur la grille.
• Il n’est pas nécessaire de retourner les filets de poisson pendant le rôtissage.
Retourner délicatement les darnes de poisson de bonne épaisseur à la moitié
du cycle de rôtissage.
• Si le four émet des claquements pendant le rôtissage, réduire la température du four et
ajouter un peu d’eau dans la plaque de cuisson/lèchefrite.
• Laver la plaque de cuisson/lèchefrite et nettoyer l’intérieur du four après chaque
usage à l’aide d’un produit nettoyant non abrasif et d’eau chaude. Une trop grande
accumulation de graisse entraînera la formation de fumée.
FONCTION « RÔTISSOIRE »
Important : Lors de l’utilisation de cette fonction, ne pas préchauffer le four; retirer la
grille de cuisson et la plaque de cuisson/lèchefrite.
Mise en garde : Le four devient chaud lorsqu’il est en fonction. NE JAMAIS toucher les
surfaces extérieures. Toujours utiliser des mitaines de cuisine ou des poignées.
1. S’assurer qu’un écrou à oreilles est inséré dans les ouvertures à l’extrémité du
fourchon. Ne pas le serrer.
2. Insérer l’extrémité pointue de la broche à travers l’un des fourchons en veillant
à placer l’extrémité pointue du fourchon en direction de l’extrémité pointue de la
broche. Faire glisser le fourchon à proximité de l’extrémité carrée de la broche et
serrer l’écrou à oreilles.
3. Insérer la broche à travers le centre de l’aliment à cuire en poussant ce dernier
dans les extrémités pointues du fourchon jusqu’à ce que l’aliment soit solidement
fixé sur le fourchon. Serrer l’écrou à oreilles.
Remarque : Le four permet de cuire à la rôtissoire un poulet pesant jusqu’à 2,3 kg
(5 lb).
4. Faire glisser le deuxième fourchon sur l’extrémité pointue de la broche en veillant
à placer l’extrémité pointue du fourchon en direction de l’aliment à cuire. Continuer
jusqu’à ce que les extrémités pointues du fourchon soient solidement enfoncées
dans l’aliment. Serrer l’écrou à oreilles.
5. Assaisonner les aliments au goût.
6. S’assurer que le four est éteint et que la grille coulissante et la plaque de cuisson
ont été retirées du four.
7. À l’aide de l’outil pratique pour la fonction de rôtissoire, insérer l’extrémité pointue
de la broche dans l’ouverture sur la paroi centrale droite du four.
8. Ensuite, insérer l’extrémité carrée de la tige
dans la fente en U du côté gauche du four (D).
9. Pour commencer la cuisson, appuyer sur la
touche d’alimentation
RÔTISSOIRE au moyen du sélecteur de MODE.
Suivre les indications de la page 7 pour régler
la température et le temps de cuisson.
( )
, puis sélectionner
D
Important : Lorsque la porte du four est ouverte, la fonction de cuisson s’arrête
et le rétroéclairage bleu de l’afficheur numérique clignote. Fermer la porte pour
poursuivre la cuisson.
10. Il est possible d’interrompre le cycle de cuisson en tout temps en appuyant sur la
touche MARCHE/ARRÊT (I/O).
11. Pour retirer l’aliment cuit, utiliser l’outil pratique pour la fonction de rôtissoire.
Transférer l’aliment dans un plat de service ou sur une planche à découper.
Laisser refroidir l’aliment pendant plusieurs minutes avant d’enlever les fourchons
et la broche.
12. Fermer la porte du four, appuyer sur la touche d’alimentation
l’appareil, et débrancher celui-ci.
CONSEILS POUR L’UTILISATION DE LA FONCTION DE ROTISSOIRE
• Pour cuire des aliments comme du poulet, utiliser de la ficelle de boucher pour
attacher les ailes et les pattes et pour refermer le corps de la volaille.
• Le four permet de cuire à la rôtissoire un poulet pesant jusqu’à 2,3 kg (5 lb).
• Pour la cuisson de viandes grasses, verser environ 60 ml (¼ tasse) d’eau dans le
plateau à miettes avant d‘activer la cuisson.
• Laisser refroidir complètement le jus de cuisson du plateau à miettes avant de
retirer ce dernier du four.
( )
pour éteindre
FRANÇAIS
28
29
Page 16

• Le thermomètre à viande est l’instrument le plus approprié pour vérifier le degré de
cuisson de la viande.
Voici un test facile qui fonctionne bien :
• Presser du bout du doigt le centre de la viande.
• La viande saignante est souple au toucher et s’écrase facilement sous la pression.
• La viande à point reprend facilement sa forme lorsqu’on exerce une pression.
• La viande bien cuite est ferme au toucher et ne s’écrase pas sous la pression.
• Toujours laisser reposer la viande pendant 10 minutes avant de la servir pour
permettre aux jus de se redistribuer dans la viande, de façon à ce que chaque morceau
soit moelleux et tendre.
FONCTION « REPAS SURGELÉS »
• Ce four peut très bien cuire des repas surgelés. En effet, on peut faire cuire des
grignotines sans devoir faire chauffer un four de grande taille.
Important : Lorsque la porte du four est ouverte, la fonction de cuisson s’arrête et le
rétroéclairage bleu de l’afficheur numérique clignote. Fermer la porte pour poursuivre
la cuisson.
• Surveiller de près les aliments pour éviter de trop les faire cuire
Entretien et nettoyage
L’utilisateur ne peut effectuer lui même l’entretien d’aucune pièce de cet appareil. Confier
l’entretien à un technicien qualifié.
NETTOYAGE
1. Éteindre l’appareil, le débrancher de la prise de courant et le laisser refroidir avant le
nettoyage.
2. Nettoyer la porte en verre avec un tampon en nylon et de l’eau savonneuse. Ne pas
utiliser de nettoyant à vitres en vaporisateur.
3. Pour enlever la grille coulissante, ouvrir la porte, puis tirer la grille et la sortir. La
laver dans de l’eau tiède savonneuse ou au lave vaisselle. Pour venir à bout des taches
tenaces, utiliser un tampon en nylon ou en polyester. Pour remettre la grille en place,
ouvrir complètement la porte, faire glisser la grille dans la rainure en prenant soin de
placer l’extrémité arrondie vers le fond du four, et fermer la porte.
4. Nettoyer la plaque de cuisson/lèchefrite, les fourchons et la broche dans de l’eau
chaude savonneuse ou au lave-vaisselle. Utiliser un tampon en nylon ou en polyester
pour minimiser les égratignures.
5. Pour nettoyer le revêtement des éléments chauffants, passer une lingette
désinfectante et essuyer avec un chiffon sec.
6. Pour enlever le plateau à miettes, tirer sur la poignée du plateau à l’avant du four.
Jeter les miettes et laver le plateau dans de l’eau tiède savonneuse. Enlever les taches
tenaces avec un tampon en plastique. Bien assécher le plateau avant de le remettre
dans le four.
SURFACES EXTERIEURES
Mise en garde : La surface du four devient chaude. S’assurer que le four a complètement
refroidi avant de le nettoyer.
Laisser refroidir le four complètement avant de nettoyer les surfaces extérieures. Essuyer
les surfaces au moyen d’une éponge ou d’un chiffon humide et les sécher avec un chiffon
doux ou de l’essuie-tout.
RÉCIPIENTS DE CUISSON
• Dans le four, on peut utiliser des plats en métal, des plats en verre allant au four
ou des plats en céramique, sans couvercle de verre. Suivre les instructions du
fabricant.
FRANÇAIS
30
31
Page 17

BESOIN D’AIDE?
Pour communiquer avec les services d’entretien ou de réparation, ou pour adresser toute
question relative au produit, composer le numéro sans frais approprié indiqué sur la page
couverture. Ne pas retourner le produit où il a été acheté. Ne pas poster le produit au
fabricant ni le porter dans un centre de service. On peut également consulter le site web
indiqué sur la page couverture.
GARANTIE LIMITÉE DE DEUX ANS
(Valable seulement aux États-Unis et au Canada)
Quelle est la couverture?
• Tout défaut de main-d’oeuvre ou de matériau; toutefois, la responsabilité de la société
Applica se limite au prix d’achat du produit.
Quelle est la durée?
• Deux année(s) à compter de la date d’achat initiale, avec une preuve d’achat.
Quelle aide offrons nous?
• Remplacement par un produit raisonnablement semblable nouveau ou réusiné.
Comment se prévaut-on du service?
• Conserver son reçu de caisse comme preuve de la date d’achat.
• Visiter notre site web au www.prodprotect.com/applica, ou composer sans frais le
1 800 231-9786, pour obtenir des renseignements généraux relatifs à la garantie.
• On peut également communiquer avec le service des pièces et des accessoires
au 1 800 738-0245.
Qu’est-ce que la garantie ne couvre pas?
• Des dommages dus à une utilisation commerciale.
• Des dommages causés par une mauvaise utilisation ou de la négligence.
• Des produits qui ont été modifiés.
• Des produits utilisés ou entretenus hors du pays où ils ont été achetés.
• Des pièces en verre et tout autre accessoire emballés avec le produit.
• Les frais de transport et de manutention reliés au remplacement du produit.
• Des dommages indirects (il faut toutefois prendre note que certains états ne permettent
pas l’exclusion ni la limitation des dommages indirects).
Quelles lois régissent la garantie?
• Les modalités de la présente garantie donnent des droits légaux spécifiques.
L’utilisateur peut également se prévaloir d’autres droits selon l’état ou la province qu’il
habite.
Marque de commerce déposée de la société The Black & Decker Corporation,
Towson, Maryland, É.-U.
Fabriqué et Imprimé en République populaire de Chine
© 2011 Applica Consumer Products, Inc.
2011/1-27-48E/F
 Loading...