

Page 1
Note: Keep oven unplugged when not in use.
Note: Allow at leas t 1.5” (3.81 cm) between top of food and top heating elements in t he oven.
BAKE FUNCTIO N
Preset temperature: 350°F
Preset Time: 30 minutes
Recommended Rack position: lower slot
This function is ideal for baking ca sseroles, fresh or frozen pies and roasting meats an d poultry.
1. Place rack in lower slot.
2. Turn Function Selector Knob to BA KE
.
3. Once indicator light blinks, YOU HAV E 2 MINUTES TO PROC EED.
4. Preset temperature flashes on digit al display. To change temperature press
(▲) or (▼)
(TE MPERAT URE
) button.
5. To see or change time press
(▲) or (▼)
(TIMER ) button.
6. Press START/S TOP
button to begin cook ing.
7. Oven begins preheating; the display will blink until the selected temperature i s reached; the
oven will beep 3 times, and then the timer will begin.
8. At end of cooking cycle, unit beeps and oven turns of f.
CONVECTION FUNCTION
This function uses an internal fa n to distribute the heat evenly. Follow the BAKE
instructions
above, but turn Function selector k nob to CONVECTIO N BAKE
at Step 2.
Note: Some foods will bake f aster than expected; watch cooking time.
BROIL FUNCTION
Preset temperature: 450˚ F
Preset Time: 2 0 minutes
Recommended Rack position: upper slot
1. Turn Function Selector Knob to BROIL
.
2. The digital display shows the preset temper ature 450˚ F. To change temperature press
(▲) or
(▼)
(TE MPERAT URE ).
3. To change time press
(▲) or (▼)
(TIMER ) button.
4. Place food on broil rack inserted in to bake/broil pan. Insert into oven in upper rack slo t.
5. Allow at least 1.5” (3.81 cm) bet ween top of food and top heating elements.
6. Close oven door.
7. Press START/STOP
button to begin cook ing.
8. At end of cooking cycle, unit beeps and oven turns of f.
Note: In Broil mode, only the upp er heating elements will turn on.
TOASTING BREAD
AND BAGELS
Preset : 4 – Medium Shade
Recommended Rack position: lower slot
The oven is preset for temperature and time for me dium toast (4 setting). It is r ecommended to
use this for your first cycle, then adjust lighter or dar ker to your preference.
Note: The BAG EL
function toasts the cut side a nd gently warms the outside. In BAGEL
mode, only the upper heating elements will be active. Place bag els cut-side facing up.
1. Preheating is not necessary.
2. Place slices of bread or bagel halves (cut sid e up) on slide rack.
3. Close oven door.
4. Turn Function Selector Knob to TOA ST
or BAGEL but ton.
5. The indicator light blinks and the digital display show s “4”.
6. To change the shade level press
(▲) or (▼)
(TE MPERAT URE / TOAST ) buttons.
7. Press START/STOP
button to begin toas ting.
8. At end of toasting cycle the appliance beeps a nd the oven turns off.
Tip for multiple toas ting cycles:For be st results when making consecutive batches of toas t,
allow a short cool-down perio d between toasting cycles.
REHEAT FUNCTION
Preset temperature: 325˚ F
1. Turn Function Selector Knob to REHE AT
.
2. The digital display shows the preset temper ature 325˚ F. To change temperature press
(▲) or
(▼)
(TE MPERAT URE ).
3. To change time press
(▲) or (▼)
(TIMER ) button.
4. Close oven door.
5. Press START/S TOP
button to begin cook ing.
6. At end of cooking cycle, unit beeps and oven turns of f.
KEEP-WARM FUNCTIO N
Preset temperature: 175 ˚ F
Use the Keep-Warm function to keep fo ods warm for a period of time after cooking is completed.
1. Turn Function Selector Knob to KEEP WA RM
.
2. The digital display shows the preset temper ature 175˚ F. To change temperature press
(▲) or
(▼)
(TE MPERAT URE ).
3. To change time press
(▲) or (▼)
(TIMER ) button.
4. Close oven door.
5. Press START/S TOP
button to begin cook ing.
6. At end of cooking cycle, unit beeps and oven turns of f.
ROTISSERIE FUNCTION
Setting food on t he rotisserie rack
1. Insert pointed end of the rotisserie spit t hrough one of the forks with pointed ends of the fork
facing towards the center of the spit. Slide t he fork towards the square end of the spit. Tighten
the wing nut.
2. Insert spit through center of food until the for k is securely embedded in food.
3. Slide second fork onto pointed end of spit with pointed end s facing the food. Continue until forks
are securely embedded into the food. Tight en the wing nut.
4. Check that the food is centered on spit by placing pointed end of spit int o the drive socket on
the right-hand side of the oven wall. Rest the square end o f the spit in the support on the lefthand side of the oven well.
5. Important: Insert bake pan, lined with foil, to the lowes t rack position, to catch drippings below
the rotisserie spit.
USING THE ROTISSE RIE FUNCTION
1. Turn the Cooking Function control knob to ROT ISSERIE
2. Set the Temperature control to the desired cooking temperatur e
3. When roasting is complete, remove the rotisserie spit by placing th e hooks of the rotisserie
handle under the grooves of either side of the spit . Lift the left side first by lifting upwar ds. Then
pull the right end of the spit of the drive socket. C arefully remove the roast from the oven.
4. Open the wing nuts and remove the skewers, and remove the meat from the spi t.
NOTE: Always use extreme car e when removing the rotisserie spit or the slide rack/ drip tray from
the oven. Always use the rotisserie ha ndle with oven gloves.
Note: In Rotisserie mode, only the upp er heating elements will be active.
ROTISSERIE COOKING GUIDE
FOOD
MAXIMUM
WEIGHT TO BE
COOKED
COOKING
TEMPERATURE
APPROXIMATE
COOKING
TIME
INTERNAL
TEMPERATURE
Chicken 3½ lbs. 350˚ F 1½ hours 180˚ F
Eye Round
Roast
3 to 5 lbs. 325˚ F 1½ to 2 hours 160˚ F
Round
Roast
3 to 5 lbs. 325˚F 1½ to 2 hours
160˚F for
medium
Pork Loin
with or
without
bone
2½ to 4 lbs. 325˚F 1½ to 2 hours 160˚F
Baby Back
Spare Ribs
2 to 3 lbs. 325˚F 1½ to 2 hours 160˚F
Quick tips for rotis serie cooking:
• Recommended MAX IMUM size of foods cooked on the rotiss erie: 3½ lb chicken, 4 lb roast.
• Use kitchen twine to trus s chicken wings and legs to the chicken.
• Tying roasts such as beef and pork at 1 ½-inch in tervals and wrapping the twine around the lengt h
gives a neat compact shape to roast s done on the rotisserie.
• Begin with a cold oven.
• Once spit is in place check that food is centered by le tting the rotisserie make one full turn before
cooking begins.
NEED HELP?
For service, repair or any questio ns regarding your appliance, call the appropriate 800 number
on cover of this book. Please DO NOT r eturn the product to the place of purchase. Also, please
DO NOT mail product back to manufact urer, nor bring it to a service center. You may also want to
consult the website listed on the cover of this manu al.
Two-Year Limited Warranty
(Applies only in the U nited States and Canada)
What does it cover?
• Any defect in material or workmanship pr ovided; however, Applica’s liability will not exceed the
purchase price of product.
For how long?
• Two years from the date of original purchase with pro of of such purchase.
What will we do to help you?
• Provide you with a reasonably similar replacemen t product that is either new or factory refur bished.
How do you get servic e?
• Save your receipt as proof of date of sale.
• Visit the online service website at w ww.prodprotect.com/applica , or call toll-free 1-800-231-9786,
for general warranty service.
• If you need parts or acces sories, please call 1-800-738-0245.
What does your warran ty not cover?
• Damage from commercial use
• Damage from misuse, abuse or neglect
• Products that have been modified in any way
• Products used or servi ced outside the country of purchase
• Glass parts and other a ccessory items that are packed with the unit
• Shipping and handling costs associate d with the replacement of the unit
• Consequential or incidental damages ( Please note, however, that some states do not allow the
Please Read and Save this Use and C are Book.
IMPORTANT SAFETY INSTRUCTIONS
When using electrical appliances, basic safety precautions should always be followed including the follow ing:
•Read all instructions.
•Do not touch hot surfaces. Use handles or knobs.
•To protect against electrical shock do not immerse cord, plugs or appliance in
water or other liquid.
•Close supervision is necessary when any appliance is used by or near children.
•Unplug from outlet when not in use and before cleaning. Allow to cool before
putting on or taking off parts.
•Do not operate any appliance with a damaged cord or plug, or after the appliance
malfunctions or has been damaged in any manner. return appliance to the nearest
authorized service facility for examination, repair or adjustment.
•The use of accessory attachments not recommended by the appliance
manufacturer may cause injuries.
•Do not use outdoors.
•Do not let cord hang over edge of table or counter, or touch hot surfaces.
•Do not place on or near a hot gas or electric burner, or in a heated oven.
•Extreme caution must be used when moving an appliance containing hot oil or
other hot liquids.
•Always attach plug to appliance first, then plug cord into the wall outlet. To
disconnect, turn both the Bake/Broil knob and the Toast/Timer knob to OFF, then
remove plug from wall outlet.
•Do not use appliance for other than intended use.
•Use extreme caution when removing tray or disposing of hot grease.
•Do not clean with metal scouring pads. Pieces can break off the pad and touch
electrical parts, creating a risk of electric shock.
•Oversized foods or metal utensils must not be inserted in a toaster oven, as they
may create a fire or risk of electric shock.
•A fire may occur if the toaster oven is covered or touching flammable material
including curtains, draperies, walls and the like, when in operation. Do not store
any item on top of the appliance while in operation.
•Extreme caution must be exercised when using containers constructed of other
than metal or glass.
•Do not store any materials, o ther than the manufacturer’s recommended
accessories, in this oven when not in use.
•Do not place any of the following materials in the oven: paper, cardboard, plastic
and the like.
• Do not cover crumb tray or any part of the oven with metal foil. This will cause
overheating of the oven.
SAVE THESE INSTRUCTIONS.
This product is for household use only.
GROUNDED PLUG
As a safety feature, this product is equipped with a grounded plug, which will only fit into
a three-prong outlet. do not attempt to defeat this safet y feature. Improper connection
of the grounding conductor may result in the risk of electric shock. Consult a qualified
electrician if you are in doubt as to whether the outlet is properly grounded.
TAMPER-RESISTANT SCREW
Warning: this appl iance is equipped with a tamper-r esistant screw to prevent re moval of
the outer cover. to reduce t he risk of fire or electric shoc k, do not attempt to remove th e
outer cover. There are no us er-serviceable parts in side. Repair should be done only by
authorized service personnel.
ELECTRICAL CORD
a) A short power co rd (or detachable power cord) is to be pr ovided to reduce the risk resulting from
becoming entangled in or tripping over a longer cord.
b) Longer detachable power c ords or extension cords are available and may be used if care is exercis ed in
their use.
c) If a long det achable power cord or extension cord is used,
1) The marked electrical rating of t he detachable power cord or extension cord should be at
least as great as the electric al rating of the appliance,
2) If the appliance is of the grounded t ype, the extension cord should be a grounding-type
3-wire cord, and
3) The longer cord should be ar ranged so that it will not drape over the countertop or t abletop
where it can be pulled on by children or tripped over.
Note: If the power supply is damaged, it s hould be replaced by qualified personnel.
HOW TO USE
This product is for household use only.
Caution: Do not l eave oven unattended when in ope ration. Food ignition may occur. If
this happens, unplug u nit but DO NOT open door. To reduce the risk of fire, ke ep oven
interior complet ely clean and free of food residu es, oil, grease and any other combu stible
materials.
Caution: A fire m ay occur if the toaster oven is cover ed or touching flammable material s
including curtain s, draperies, walls and the like whe n in operation or after, when still ho t.
Do not place any of the follo wing materials in the oven, on top of th e oven, or in contact
with the oven sides or bo ttom surfaces: pap er, cardboard, plastic or the like.
GETTING STARTED
• Removeallpackingmaterialandanystickers.
• WashallremovablepartsasinstructedinCA REANDCLE ANING.
• Selectalocationwherethisunitistobeused,allowingenoughspacefr ombackoftheunitand
the wall to allow heat to flow without damage to ca binets and walls.
• Plugunitintoelectricaloutlet.
HELPFUL INFORMATION ABOUT YOUR OVEN
• This oven gets hot. When in use, always use oven mit ts or potholders when touching any outer or
inner surface of the oven.
• During first few minutes of use you may notice smoke a nd a slight odor. This is normal and should
cause no concern.
• There is a 2 minute delay allowed between selecting f unctions and setting
temperature and time. If not done within this t ime the oven goes into sleep mode and
selections must be made again. Press any bu tton to wake unit up.
• Once the selected temperature has be en reached both the time and temperature can
be changed at anytime during the cooking.
• The oven is preset for temperature and time for me dium toast (4 setting). U se this for
your first cycle then adjust lighter or darker to suit e your taste.
• What is convection? Convection uses an internal fan th at provides continuous circulation of hot air
around the cooking food ; the food is more evenly cooked and in some cases, is cooked fas ter.
SLIDE RACK POSITIONS
There are 2 possible positions fo r the slide racks. There is an upper (Broil only) and a l ower slot.
USING YOUR OVEN
1. To switch between °F to °C, when selecting temperatures, pr ess and hold the two TEMP
buttons at the same time for 3 seco nds.
2. To see preset temp after selecting a function : press the TEMPER ATURE
(▲) or (▼)
. To
change temp press
(▲) or (▼)
(TE MPERAT URE ) button.
Note:
• Tap button for temperature to change in 5 degree increment s
• Press and hold to change faster.
• The minimum temperature is 150 °F.
• The maximum temperature is 450 ° F.
3. To see preset time: press the TIM ER
(▲) or (▼)
. To change time press
(▲) or (▼)
(TIMER
) button.
Note:
• Tap button up or down for time to change in 1 minute increments
• Press and hold to change faster
• The minimum time is 1 minute
• The maximum time is 2 hours
4. To cook longer than 2 hours, select STAY ON by pressing
(▼)
(TIMER ) button passed ( 0)
until the digital display shows the STAY ON symbol
is displayed on the right-hand side of the
digital display.
5. Press the START/ STOP
button to star t cooking. The oven starts pre-heating an d the display
will blink until the selected temperature is reached. T he oven will beep 3 times.
6. To see the TIME
or TEMP while cooking, press
(▲) or (▼)
or (TEMP ) buttons
7. At end of cooking cycle oven turns off and there are 2 beeps.
8. If using STAY ON turn the oven OFF when the co oking cycle is completed.
9. Time and temperature can be changed through out the cooking phase.
10. End the cooking cycle at any time by pressing the STAR T/STOP
button.
exclusion or limitation of consequential or incident al damages, so this limitation may not apply to
you.)
How does state law re late to this warranty?
• This warranty gives you speci fic legal rights. You may also have other rights that vary from s tate to
state or province to province.
Por favor lea y conserve e ste manual de instrucciones.
INSTRUCCIONES IMPORTANTES DE
SEGURIDAD
Cuando se usan aparatos eléctricos, siempre se deben respetar las siguientes
medidas básicas de seguridad:
•Lea todas las instrucciones.
•No toque las superficies calientes. Use las asas o las perillas.
•A fin de protegerse contra una descarga eléctrica, no sumerja el cable, los
enchufes ni el aparato en agua ni en ningún otro líquido.
•Todo aparato eléctrico usado en la presencia de los niños o por ellos mismos
requiere la supervisión de un adulto.
•Desenchufe el aparato del tomacorriente cuando no esté en uso y antes de
limpiarlo. Espere que el aparato se enfríe antes de instalarle o retirarle piezas.
•No use ningún aparato eléctrico que tenga el cable o el enchufe dañado, o que
presente un problema de funcionamiento. Acuda al centro de servicio autorizado
más cercano para que lo examinen, reparen o ajusten.
•El uso de accesorios no recomendados por el fabricante del aparato puede
ocasionar lesiones.
•No use este aparato a la intemperie.
•No permita que el cable cuelgue del borde de la mesa o del mostrador ni que entre
en contacto con superficies calientes.
•No coloque el aparato sobre ni cerca de las hornillas de gas o eléctricas ni adentro
de un horno caliente.
•Tome extrema precaución al mover de un lugar a otro un aparato que contenga
aceite u otros líquidos calientes.
•Para desconectar, ajuste ambos el control selector de la función de hornear/asar y
de la función de tostar/reloj automático a la posición de apagado (0) y luego retire
el enchufe del tomacorriente.
•Use este aparato solamente con el fin previsto.
•Tome extrema precaución al retirar la bandeja o al desechar la grasa caliente.
•No use almohadillas de fibras metálicas para limpiar el aparato. Las fibras
metálicas podrían desprenderse y entrar en contacto con las piezas eléctricas del
aparato, resultando en el riesgo de una descarga eléctrica.
•A fin de evitar el riesgo de incendio o descarga eléctrica, nunca introduzca
alimentos demasiado grandes, utensilios ni envolturas de metal adentro del horno.
•Existe el riesgo de incendio si el aparato permanece cubierto mientras se
encuentra funcionando o si éste llegase a entrar en contacto con cualquier material
inflamable, incluyendo las cortinas y las paredes. No coloque nada sobre el
aparato mientras éste se encuentre funcionando.
•Se debe ejercer extrema precaución al usar recipientes que no sean ni de metal ni
de vidrio.
•Cuando este aparato esté en uso, no lo utilice para almacenar ningún material,
aparte de los accesorios recomendados por el fabricante.
•No introduzca los siguientes materiales en el horno: papel, cartón, envolturas
plásticas ni materiales semejantes.
•A fin de evitar que el aparato se sobrecaliente, no cubra la bandeja de
residuos como
ninguna otra superficie del apara to con papel de aluminio.
CONSERVE ESTAS INSTRUCCIONES.
Este aparato eléctrico es para uso doméstico solamente.
ENCHUFE DE TIERRA
Como medida de seguridad, este producto cuenta con un enchufe de tierra que tiene
tres contactos. No trate de alterar est a medida de seguridad. La conexión inapropiada
del conductor de tierra puede resultar en un riesgo de descarga eléctrica. Si tiene alguna
duda, consulte con un electricista calificado para asegurarse de que el tomacorr iente sea
uno de tierra.
TORNILLO DE SEGURIDAD
Advertencia : Este aparato cuenta con u n tornillo de seguridad para evitar q ue se pueda
retirar la cubier ta exterior del mismo. A fin de re ducir el riesgo de incendio o de desc arga
eléctrica, por favo r no trate de retirar la cubier ta exterior. Este producto n o contiene
piezas reparables por el consumidor. Toda reparación se debe llevar a cabo solamente por
personal de servicio autorizado.
CABLE ELÉCTRICO
a) El producto debe ser propo rcionado con un cable eléctrico corto ( o uno separable), a fin de reducir el
riesgo de tropezar o de enredarse en un ca ble más largo.
b) Existen cables eléc tricos más largos y separables o cables de ex tensión que
se pueden utilizar si se toma el cuidado debido.
c) Si se utiliza un cable separable o de ex tensión,
1) El regimen nominal del cable separable o del cable de extens ión debe ser, como mínimo,
igual al del regimen nominal del aparato.
2) Si el aparato es de conexión a tier ra, el cable de extensión debe ser un cable de tres
alambres de conexión a tierra, y
3) Uno debe de acomodar el cable más la rgo de manera que no cuelgue del mostrador o de la
mesa, para evitar que un niño tire del mismo o que alguien se t ropiece.
Nota: Si el cable de alimentación s e ha dañado, debe ser sustituido por personal calificado.
COMO USAR
Este producto es para uso d oméstico solamente.
Precaución: Nunca deje el horno desatendido mientras esté funcionando. Esto prodria
ocasionar un incendio mientras se cocinan los alimentos. Si esto ocurriera, desenchufe el
horno pero NO abra la pu erta. Para reducir el riesg o de incendio, mantenga el interio r del
horno completam ente limpio y libre de aceite, grasa , residuos de alimentos o de cualqu ier
otro material combustible.
Precaución: Existe el riesgo de incendio si el horno permanence cubierto mientras esté
funcionando o si ést e llegase a entrar en contacto c on cualquier material inflamable,
incluyendo las cort inas y las paredes, mientras fu nciona o si está caliente. No intr oduzca
los siguientes materials en el horno: papel, cartón, envolturas plásticas o materials
similares.
PRIMEROS PASOS
• Retire todo material de empaque y cualquier etiquet a adhesiva.
• Lave todas las piezas removibles según se indica en la s instrucciones de la sección de CUIDA DO Y
LIMPIEZA.
• Escoja un lugar apropiado para el apar ato. Asegúrese de que haya suficiente espacio entre la par te
de atrás del horno y la pared para evit ar que la distribuición de calor cause daño a los gabinetes o
mostradores.
• Enchufe el aparato a un tomacorrient e.
INFORMACIÓN ÚTIL ACERCA DE SU HORNO
• Este horno se calienta cuando e stá funcionando. Asegúrese de usar siempre
guantes de cocina o agarraderas de ollas al t ocar toda superficie interior o exterior.
• El aparato podría emitir humo y un ligero olor duran te los primeros minutos de uso.
Esto es normal y no debe ser motivo de preo cupación.
• El aparato permite un retras o de 2 minutos para seleccionar las funciones
y ajustar la temperatura y el tiempo de coc ción, de lo contrario, el horno se
mantiene en modo pausado y uno debe hacer las selecci ones de nuevo. Presione cualquier botón
para activar el horno otra vez.
• Cuando se alcanza la temperatura sele ccionada, tanto el tiempo como la temperatura pueden ser
ajustados en cualquier momento durante el ciclo de c occión.
• El horno viene programado con tiempo y tempera tura para un grado de tostado de término medio
(nivel 4). Utilice e ste nivel para el primer ciclo de tostad o y luego aju ste el tost ado al gust o.
• ¿Qué es convección? El sistema por convección utiliza un ventilador interno qu proporciona aire
caliente circulando continuamente en torno a lo s alimentos; lo cual hace que los alimentos se
cocinen más uniforme y en ciertos cas os, más rápido.
POSICIONES PARA LAS PARRILLAS CORREDIZAS
Su horno cuenta con dos posicione s para las parrillas corredizas. Cuenta con una ranur a superior
(use solamente para asar ) y una ranura inferior.
CÓMO USAR SU HORN O
1. Para cambiar la temperatura de °F a °C, cuando esté selec cionado la temperatura, presione y
sostenga al mismo tiempo los dos botones d e temperatura (TEMPER ATURE
) por 3 segundos.
2. Para verificar la temperatura programada después d e seleccionar una función, presione el
botón
(▲) o (▼)
de temperatura (TE MPERATURE ). Para cambiar la temper atura, presione el
botón
(▲) o (▼)
de temperatura (TE MPERATURE ).
Nota:
• Presione ligeramente el botón
(▲) o (▼)
para cambiar la temperatura en incrementos d e 5
grados.
• Presione y sostenga el botón par a cambiar la temperatura rápidamente.
• La temperatura mínima es de 150 °F.
• La temperatura máxima es de 4 50 °F.
3. Para verificar el tiempo programado, presione el botón
(▲) o (▼)
del minutero (TIME R ).
Para cambiar el tiempo de cocción, presione el b otón
(▲) o (▼)
del minutero (TIME R ).
Nota:
• Presione el botón
(▲) o (▼)
para cambiar el tiempo en incrementos de 1 minuto.
• Presione y sostenga el botón par a cambiar el tiempo rápidamente.
• El tiempo minimo es de 1 minuto.
• El tiempo maximo es de 2 horas.
4. Para cocinar los alimentos por más de 2 horas, seleccione la f unción de funcionamiento
continuo (STAY ON) , presionando el botón
(▼)
pasado del hasta que la pan talla digital
muestre el símbolo de funcionamiento continuo en el lado d erecho de la pantalla.
5. Presione el botón de encendido/apagado par a empezar a cocinar. El horno comienza a
precalentarse y la pantalla digit al parpadea hasta que el horno alcance la temperatur a
seleccionada. El horno emitirá 3 sonido s.
6. Para verificar el tiempo o la temperatura durante el ciclo de co cción, presione los botones del
reloj minutero
(▲) o (▼)
o presione los botones de temperatur a.
7. Una vez que termine el ciclo de cocción, el horno emite 2 sonidos y se apaga.
8. Si ha estado usando la función de funcionamiento continuo ( STAY ON), apague el horno.
9. Si desea cambiar el tiempo y la temperatura, lo puede hacer en cualquier momento dur ante el
ciclo de cocción.
10. Para parar el ciclo de cocción simplemente persione el bo tón de encendido/apagado (STAR T/
STOP
).
Nota: Mantenga el horno desenchuf ado cuando no este en uso.
Nota: Asegúrese de que haya por lo menos 1.5” (3. 81 cm) entre la superficie de los alimentos y
los elementos de calor superiores.
FUNCIÓN PARA HORNEAR
Temperatura programada: 350˚F
Tiempo programado: 30 minutos
Posición recomen dada para la parrilla: ranura inferior
Esta función es ideal para co cinar cacerolas, pasteles frescos o congelados, y par a asar carnes o
aves.
1. Coloque la parrilla en la ranura inferior.
2. Gire el control selector de la función de cocción a la posició n de hornear (BAKE
).
3. La luz indicadora parpadea y USTED T IENE 2 SEGUNDOS PAR A PROCEDER.
4. La temperatura programada aparece en la pant alla digital. Para cambiar la temperatura,
presione el botón
(▲) o (▼)
de temperatura (TE MPERATURE ).
5. Para verificar o cambiar el tiempo de cocción, presione el bot ón
(▲) o (▼)
del minutero
(TIMER).
6. Para cocinar, presione el botón de encendido/apagado ( START/STOP
).
7. El horno comienza a calentarse, la pantalla digital pa rpadea hasta que la temperatura
seleccionada sea alcanzada; el hor no emitirá un sonido por 3 veces, y entonces el temporizador
se iniciará.
8. Una vez que termine el ciclo de cocción, el horno emite un sonido y se apaga.
FUNCIÓN PARA HORNEAR POR CONVECCIÓN
Esta función utiliza un ventilador inter no para distribuir el calor uniformemente. Para usar est a
función, siga las instrucciones indicada s en la sección de FUNCIÓN PAR A HORNEAR
, except
en el paso 2, gire el control selector de la f unción de cocción a la posición de hornear por
convección (CON VECTION BAK E
).
Nota: Asegúrese de superv isar el tiempo de cocción ya que ciertos alimentos se cocinarán má s
rápido de lo anticipado.
FUNCIÓN PARA ASA R
Temperatura programada: 450°F
Tiempo programado: 20 minutos
Posición recomen dada para la parrilla: ranura superior
1. Gire el control selector de la función de cocción a la posició n de asar (BROIL
).
2. La pantalla digital muestra la temperatura pr ogramada de 450˚ F. Para cambiar la temperatura,
presione el botón
(▲) o (▼)
de temperatura (TE MPERATURE ).
3. Para cambiar el tiempo de cocción, presione el botón
(▲) o (▼)
del minutero (TIME R ).
4. Coloque los alimentos sobre la parrilla de asar e inser te esta en la bandeja para hornear.
Introduzca en el horno en la ranura bandeja s uperior.
5. Asegúrese de que haya por lo menos 1.5” (3.81 cm) entre la super ficie de los alimentos y los
elementos de calor superiores.
6. Cierre la puerta del horno.
7. Para empezar a cocinar, presione el botón de encendido/apagad o (START/STOP
).
8. Al finalizar el ciclo de cocción, el horno emite un sonido y se apaga.
Nota: En este modo de c occión, solo funcionan los elementos de calor superiores.
PARA TOSTAR PAN
Y BAGELS
Nivel programado : 4 (grado de tostado medio)
Posición recomendada para la parrilla: ranura inferior
La temperatura y el tiempo del horno vienen p rogramados para un grado de tostado mediano
(número 4). Se re comienda usar este nivel para el primer ciclo de tostado y luego ajust ar el
control a su gusto.
Nota: La función de BAG EL
tuesta el lado cortado del b agel mientras que lo calienta
ligeramente por fuera. En este mod o de BAGEL
, solo funcionan los elementos de calor
superiores. Coloque los bagels con el lado c ortado hacia arriba.
1. No es necesario precalentar el horno.
2. Coloque las rebanadas de pan o las mit ades de bagels (lado cortado hacia arriba) e n la parrilla
corrediza.
3. Cierre la puerta del horno.
4. Gire el control selector de la función de c occión a la posición de tostar (TOA ST
) o bagel
(BAGEL
).
5. La luz indicadora de funcionamiento parpa dea y el número 4 aparece en la pantalla digital.
6. Para cambiar el grado de tostad o, presione el botón
(▲) o (▼)
de temperatura
(TE MPERAT URE
).
7. Presione el botón de encendido/apagado ( START/STOP
) para iniciar el ciclo de
tostado.
8. Al finalizar el ciclo de tostado, el horn o emite un sonido y se apaga.
Consejo para ciclos mú ltiples de tostado: Pa ra obtener los mejores resultados al hacer tandas
consecutivas de tostada s, permita que el horno se enfrie brevemente entre cada ciclo de tost ado.
FUNCIÓN PARA RECALENTAR
Temperatura programada: 325˚ F
1. Gire el control selector de la función de cocción a la posició n de recalentar (REHE AT
).
2. La temperatura programada de 325˚ F aparec e en la pantalla digital. Para cambiar la
temperatura, presione el botón
(▲) o (▼)
de temperatura (symbol).
3. Para cambiar el tiempo de cocción, presione el botón
(▲) o (▼)
del minutero (TIME R ).
4. Cierre la puerta del horno.
5. Para empezar a cocinar, presione el botón de encendido/apagad o (START/STOP) .
6. Al finalizar el ciclo de cocción, el horno emite un sonido y se apaga.
FUNCIÓN PARA CAL ENTAR
Temperatura programada: 175˚ F
Utilice esta función para mant ener caliente por un tiempo las comidas ya cocinadas.
1. Gire el control selector de la función de cocción a la posició n de calentar (KEEP WAR M
).
2. La temperatura programada de 175˚ F aparece en la pantalla digit al. Para cambiar la
temperatura, presione el botón
(▲) o (▼)
de temperatura (symbol).
3. Para cambiar el tiempo de cocción, presione el botón
(▲) o (▼)
del minutero (TIME R ).
4. Cierre la puerta del horno.
5. Para empezar a calentar los alimentos, presione el botó n de encendido/apagado (STAR T/STOP
).
6. Al finalizar el ciclo de calentamiento, el horno emite un sonido y se apaga .
FUNCIÓN PARA COCIN AR EN EL ASADOR
Cómo colocar los alimentos en la barr a del asador
1. Inserte el extremo puntiagudo de la barra del as ador a través de uno de los tenedores de
soporte, con los extremo s puntiagudos del tenedor orientados hacia el centro de la barr a del
asador. Deslice el tenedor hacia el extremo cuadrado de la barr a. Apriete el tornillo mariposa.
2. Inserte la barra del asador en el centro del alimento a c ocinar hasta que quede bien segura
dentro del alimento.
3. Deslice el segundo tenedor sobre el extremo puntiagudo de la barr a del asador con los
extremos puntiagudos orientad os hacia el alimento. Continúe hasta que los tenedores queden
bien seguros dentro del alimento. Apriete el t ornillo mariposa.
4. Verifique que el alimento esté centrado en la barra del asador, colocando el ex tremo puntiagudo
de la barra en el agujero localizado en la pared derecha d el horno. Descanse el extremo
cuadrado de la barra sobre el sopor te en la pared izquierda del horno.
5. Importante: Inserte la ban deja para hornear, cubierta con papel de aluminio, en la ranura más
baja para que la grasa y los jugos caigan en l a bandeja.
PARA CONCINAR EN E L ASADOR
1. Gire el control selector de la función de cocción a la posició n de asador (ROTISSE RIE ).
2. Para seleccionar la temperatura deseada, presione el b otón
(▲) or (▼)
(TE MPERAT URE ).
Para seleccionar el tiempo de cocción, pre sione el botón
(▲) or (▼)
(TIMER ).
3. Cuando el ciclo de asado haya terminado, retire la barra del asador. Posicione los ga nchos del
mango del asador debajo de las muescas loc alizadas en ambos lados de la barra. Levante
el lado izquierdo de la barra primero. Luego tire del lado dere cho de la barra para sacarla del
agujero en la pared derecha del horno. Cuidadosamen te, retire el alimento del horno.
4. Afloje los tonillos mariposa y retire el alimento de la barra.
Nota: Siempre tenga mucho cuidado al retirar la bar ra del asador, la parrilla corrediza o la bandeja
para hornear. Siempre utilice el mango del asador con guant es protectores de cocina.
Nota: En este modo de cocción, so lo funcionan los elementos de calor superiores.
GUÍA PARA COCINA R EN ASADOR
ALIMENTO
PESO MÁXIMO TEMPERATURA
TIEMPO
APROXIMADO
DE COCCIÓN
TEMPERA-
TURA
INTERNA
Pollo 3½ lbs. 350˚ F 1 hora y ½ 180˚ F
Asado de
carne
de 3 a
5 lbs.
325˚ F
de 1½ a 2
horas
160˚ F
CAUTION
THIS OVEN GETS HOT.
WHEN IN USE, ALWAYS USE OVEN MITTS OR
POT HOLDERS WHEN TOUCHING ANY OUTER
OR INNER SURFACE OF THE OVEN.
PRECAUCIÓN
ESTE HORNO SE CALIENTA CUANDO ESTÁ
EN USO. SIEMPRE USE AGARRADERAS O
GUANTES DE COCINA CUANDO TOQUE TODA
SUPERFICIE INTERNA O EXTERNA DEL HORNO.
Page 2
2013-3-5-21 E/S/F
© 2013 Applica Consumer Products, Inc.
Model/Mod elo/Modèle: TO4211SKT
Customer Care Lin e: 1-800 -231-9 786
For online customer service: w ww.prodprotect.com/applica
Línea de Atención del Cliente: 1-800 -231-9 786
Para servicio al cliente en línea : www.prodprotect.com/applica
Ligne Service à la Clientèle: 1-80 0-23 1-9786
Pour le service à la clientèle en ligne: w ww.prodprotect.com/applica
El producto puede var iar ligeramente del que aparece ilust rado.
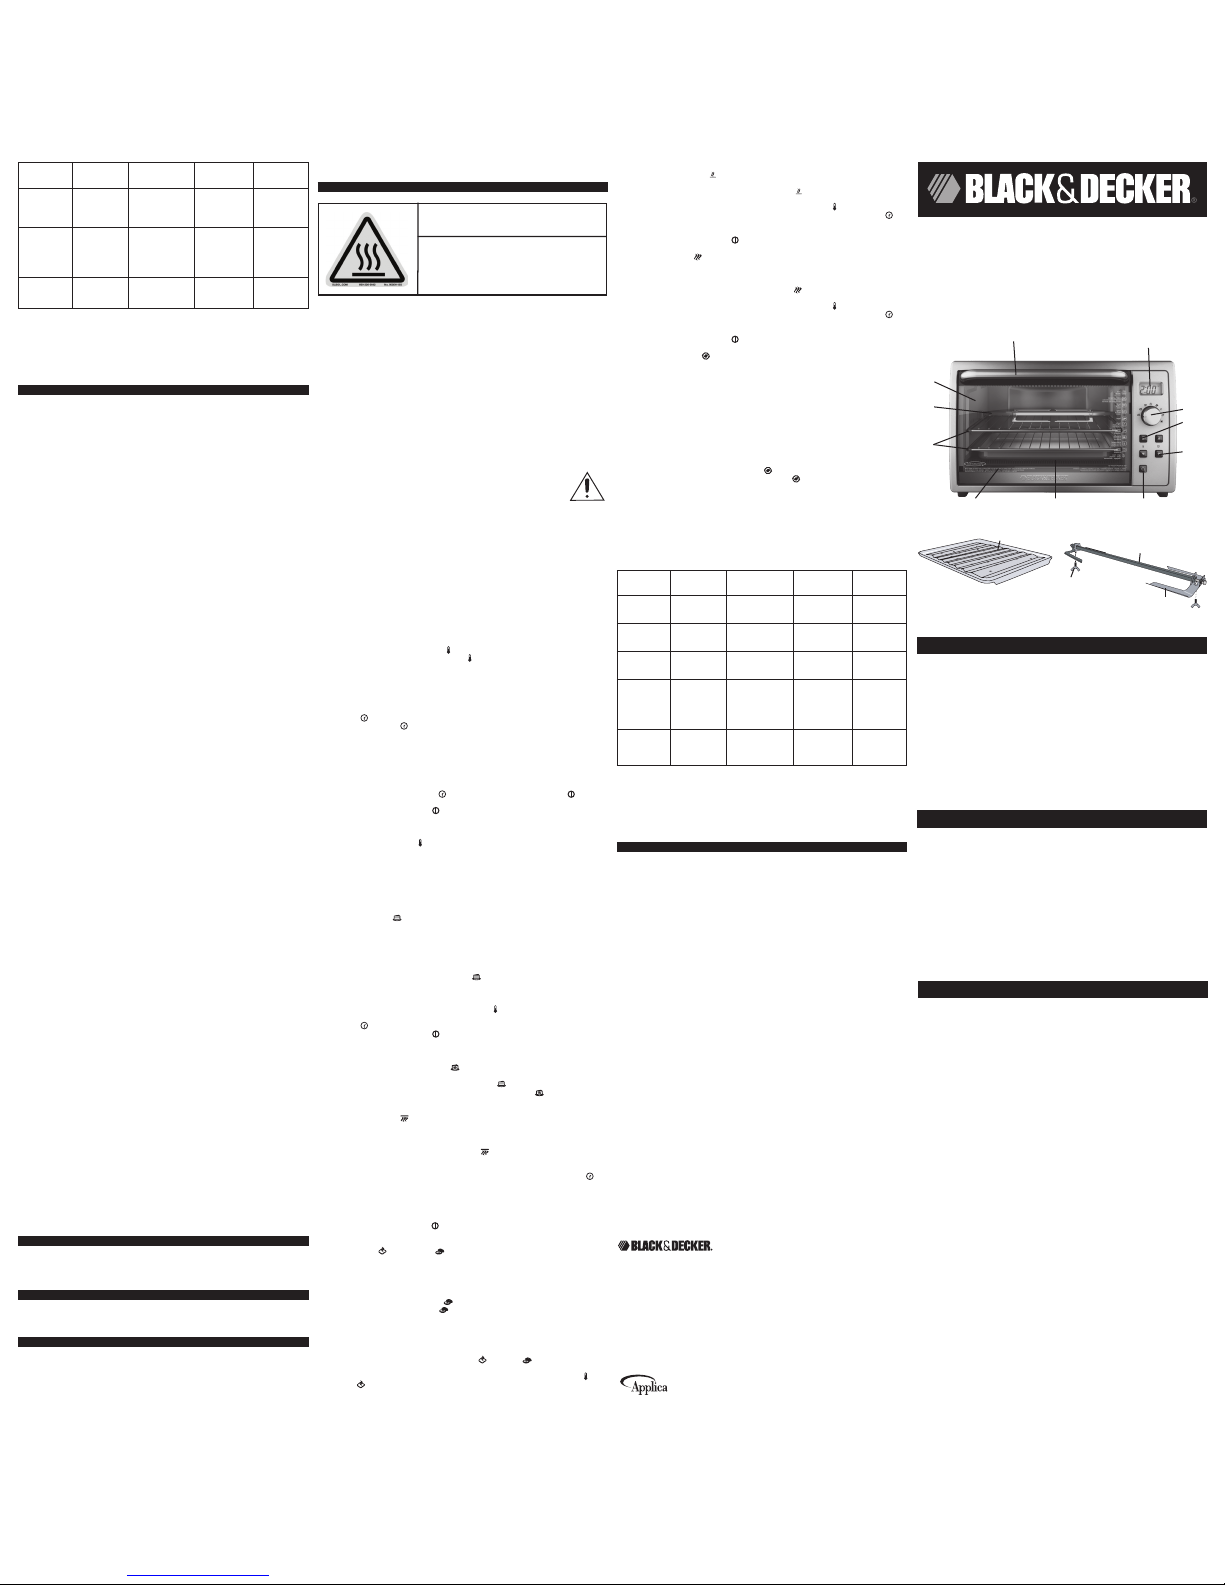
1. Asa de la puerta
2. Luz indicadora de encendido
† 3. Control selector de la f unción de cocción
(Pieza no. TO4211-01)
†4. Botones de cont rol de temperatura/grado
de tostado (Pieza no. TO 4211-02)
5. Botón de control del minutero
6. Botón de encendido / apagado
†7. 2 posiciones para las p arrillas corredizas
(Pieza no. TO4211-03)
† 8. Bandeja para hornear
(Pieza no. TO4211-04)
† 9. Parrilla para asar
(Pieza no. TO4211-05)
†10. Barra del a sador
(Pieza no. TO4211-06)
†11. Tenedores de soporte
(Pieza no. TO4211-07)
†12. Tornillos mariposa
(Pieza no. TO4211-08)
†13. Mango del asad or
(Pieza no. TO4211-09)
14. Puerta de vidrio tr ansparente
†15. Bandeja de residuo s deslizante
(Pieza no. TO4211-10)
Nota: † indica piezas re emplazables /
removibles por el consumidor
1. Poignée de la porte
2. Témoin de fonctionnement
†3. Sélecteur de fonctio n de cuisson
(pièce n° TO4211-01)
†4. Sélecteurs du degré de grillage / de
température (pièce n° TO4211-02)
5. Boutons de la minuterie
6. Bouton de démarrage / d’annulation
†7. Grilles coulissantes à deux po sitions
(pièce n° TO4211-03)
†8. Plaques de cuisson
(pièce n° TO4211-04)
†9. Grille de lèchefrite
(pièce n° TO4211-05)
†10. Broche de rôtissoire
(pièce n° TO4211-06)
†11. Fourchettes
(pièce n° TO4211-07)
†12. Écrous à oreilles
(pièce n° TO4211-08)
†13. Poignée de la rôtissoire
(pièce n° TO4211-09)
14. Porte transp arente en verre
†15. Plateau à miettes couliss ant
(pièce n° TO4211-10)
Nota: Le symbole † indique une pièc e
amovible/remplaçable par l’utilisateur
FOUR À CONVECTI ON POUR LE COMPTOIR AVEC RÔTIS SOIRE
Le produit peut dif férer légèrement de celui qui est illustr é.
HORNO ASADOR DE CONVECCIÓN PARA MOSTRADOR
is a registered trademark of The Black & De cker Corporation,
Towson, Maryland, USA
es una marca registrada de The Black & Decker C orporation,
Towson, Maryland, E.U.
Marque de commerce déposée de la société T he Black &
Decker Corporation, Towson, Maryland, É.-U.
Made and Printed in People’s Republic of China
Fabricado e Impreso en la República Popular de C hina
Fabriqué et Imprimé en République populaire de Chine.
ALIMENTO
PESO MÁXIMO TEMPERATURA
TIEMPO
APROXIMADO
DE COCCIÓN
TEMPERA-
TURA
INTERNA
Asado de
res
de 3 a
5 lbs.
325˚F
de 1½ a 2
horas
160˚F para
término
medio
Lomo de
cerdo con o
sin hueso
de 2½
a 4 lbs.
325˚F
de 1½ a 2
horas
160˚F
Costillas
tiernas
de 2 a
3 lb
325˚F 1½ a 2 horas 160˚F
Consejos práctic os para concinar en el asador
• Tamaño máximo recomendado de los alimentos para asar : Pollo de 3½ lbs.; asado de carne de 4
lbs.
• Usar hilo de cocinar para atar las ala s y piernas al pollo.
• El atar la carne y el cerdo en inter valos de 1½ pulgada de espacio y a lo largo, permite una forma
más nítida y compacta al cocinar dichos alimento s en el asador.
• Comenzar con un horno frío.
• Una vez que la barra del asador esté posici onada en su lugar, permita que el alimento gire una
vuelta completa para asegura rse que esté bien centrado.
¿NECESITA AYUDA?
Para servicio, reparaciones o p reguntas relacionadas a su producto, llame al número
800 apropiado que se encuentra en la cubie rta de este manual. Por favor NO devuelva el producto
al lugar donde lo compró. Además, favor de NO enviar el produc to por correos al fabricante, ni lo
lleve a un centro de servicio. También puede consultar el sitio web mencion ado en la cubierta de
este manual.
DOS AÑOS DE GAR ANTÍA LIMITADA
(Solo aplica en los E stados Unidos y el Canadá)
¿Qué cubre la garantía ?
• La garantía cubre cualquier defecto d e materiales o de mano de obra; sin embargo, Applica no se
responsabiliza por ningún costo que exceda el valor de compr a del producto.
¿Por cuánto tiempo e s válida la garantía?
• Por dos años a partir de la fecha or iginal de compra mientras tenga una prueba constant de ta l
compra.
¿Qué haremos para ayudarle?
• Proveer un producto similar de reemplazo que sea nuevo o res taurado en la fábrica.
¿Cómo se puede obtener servicio?
• Conserve el recibo original de compra .
• Visite el sitio web de servicio w ww.prodprotect.com/applica o llame grat is al 1-800-231-9786 para
servicio en general bajo garantía.
• Si necesita piezas o accesorios , por favor llame al 1-800-738-0245.
¿Que no cubre su garant ía?
• Los daños ocasionados por el us o comercial del producto
• Los daños ocasionados por el mal u so, el abuso o negligencia
• Los productos que han sido alter ados de alguna manera
• Los productos que han sido utilizado s en condiciones distintas a las normales
• Los productos utilizados o repa rados fuera del país original de compra
• Las piezas de vidrio y demás accesor ios empacados con el aparato
• Los gastos de tramitación y emb arque asociados al reemplazo del producto
• Los daños y perjuicios indirectos o inciden tales (Por favor tome en cuenta que algunos es tados no
permiten la exclusión o limitación de daños y perjuicios indirecto s o incidentales, así que es posible
que esta limitación no sea pertinen te a usted.)
¿Qué relación tiene l a ley estatal con esta garant ía?
• Esta garantía le otorga der echos legales específicos y el consumidor podría tener otr os derechos
que varían de un estado a otro o de una región a ot ra
Prière de lire et de cons erver ce guide d’utilisation et d’ent retien.
RÈGLES DE SÉCURITÉ IMPORTANTES
Lorsqu’on utilise des appareils électriques, il faut toujours respecter certaines
règles de sécurité fondamentales, notamment les suivantes:
•Lire toutes les instructions.
•Ne pas toucher aux surfaces chaudes. Utiliser les poignées ou les boutons de
l’appareil.
•Afin d’éviter les risques de choc électrique, ne pas immerger le cordon, la fiche ou
l’appareil dans l’eau ou dans d’autres liquides.
•Exercer une étroite surveillance lorsque l’appareil est utilisé à proximité d’un enfant
ou que ce dernier s’en sert.
•Débrancher l’appareil lorsqu’il n’est pas en marche et avant le nettoyage. Le laisser
refroidir avant d’installer ou de retirer des pièces.
•Ne pas utiliser un appareil dont la fiche ou le cordon est abîmé, qui présente un
problème de fonctionnement, ou qui est endommagé de quelque façon que ce soit.
Retourner l’appareil au centre de service autorisé le plus près pour la vérification, la
réparation ou le réglage.
•L’utilisation d’accessoires non recommandés par le fabricant présente des risques
de blessures.
•Ne pas utiliser l’appareil à l’extérieur.
•Ne pas laisser le cordon pendre du rebord d’une table ou d’un comptoir, ou toucher
une surface chaude.
•Ne pas placer l’appareil sur un brûleur au gaz ou électrique, ou à proximité, ni dans
un four chaud.
•Faire preuve d’une grande prudence au moment de déplacer un appa reil qui
contient de l’huile chaude ou d’autres liquides chauds.
•Toujours fixer la fiche à l’appareil d’abord, puis brancher le cordon dans la prise
de courant. Pour débrancher l’appareil, d’abord mettre les sélecteurs de cuisson/
rôtissage et le bouton de grillage/minuterie en position d’arrêt (OFF), puis retirer la
fiche de la prise de courant murale.
•N’utiliser cet appareil que pour les fonctions auxquelles il est destiné.
•Faire preuve d’une grande prudence au moment de retirer le plateau ou d’éliminer
la graisse chaude.
•Ne pas nettoyer l’appareil avec des tampons à récurer abrasifs. Des particules
pourraient se détacher du tampon et toucher les parties électriques, entraînant un
risque de choc électrique.
•Ne pas introduire dans le grille-pain four des aliments trop volumineux ni des
ustensiles, car ils pourraient provoquer un incendie ou un choc électrique.
•Un incendie pourrait se déclencher si le grille-pain four est couvert ou s’il touche
une matière inflammable comme des rideaux, draperies, murs, etc. pendant qu’il
fonctionne. Ne rien déposer sur l’appareil pendant qu’il fonctionne.
•Faire preuve d’une grande prudence lors de l’utilisation de contenants autres qu’en
métal ou en verre.
•Ne pas ranger d’articles, autres que les accessoires recommandés par le fabricant,
dans le four lorsqu’il n’est pas en fonction.
•Ne pas mettre dans le four : papier, carton, plastique et autres matériaux de même
type.
•Ne pas recouvrir de papier d’aluminium le plateau à miettes ou une quelconque
autre partie du four. Cela causerait une surchauffe du four.
CONSERVER CES INSTRUCTIONS.
Cet appareil est conçu pour un usage domestique seule-
ment.
FICHE DE MISE À L A TERRE
Aux fins de sécurité, cet appareil est muni d’une fiche de mise à la terre qui ne s’insère
que dans une prise à trois fentes. Ne pas tenter de contourner ce dispositif de sécurité.
La connexion inappropriée du conducteur de mise à la terre peut causer des chocs
électriques. En cas de doutes sur la mise à la terre adéquate de la prise, consulter un
électricien qualifié.
VIS INVIOLABLE
Avertissement : L’appareil est doté d’une vis inviolable empêchant l’enlèvement du
couvercle extérieur. Pour réduire les risques d’incendie ou de choc électrique, ne pas
tenter de retirer le boîtier externe. L’appareil ne contient aucune pièce réparable par
l’utilisateur. Les réparations doivent être effectuées par un technicien autorisé seulement.
CORDON D’ALIMENTATION
a) Un cordon d’alimentation court (ou amovible ) est fourni pour éviter qu’un cordon long s’emmêle
ou fasse trébucher.
b) Des cordons d’alimentation amovibles plus longs ou des rallonges peuvent ê tre utilisés avec
prudence.
c) Si vous utilisez un cordon d’alimentation amovible long ou une rallonge :
1) Le calibre indiqué du cordon électrique amovible ou de la r allonge doit être au moins aussi
élevé que celui de l’appareil.
2) Si l’appareil est mis à la terre, la rallonge doit êt re de type mise à la terre avec 3 broches.
3) Le cordon électrique l ong doit être disposé de façon à ce qu’il ne pende pas du comptoir ou
de la table, qu’il ne soit pas à la portée des enfa nts et qu’il ne fasse pas trébucher.
Remarque : Si le cordon est endommagé, le faire remplacer par un t echnicien qualifié.
UTILISATION
Cet appareil est conçu pour un usage dome stique seulement.
Mise en garde : Ne pas laiss er le four sans surveillance pen dant qu’il fonctionne. Il
est possible que les aliments s’enflamment. Si cette situation se produit, débrancher
l’appareil, mais NE PAS ouvrir la po rte. Pour réduire les risqu es d’incendie, veiller à
conserver l’intér ieur du four propre et exempt de rési dus d’aliments, d’huile, de graisse et
de toute autre mat ière combustible.
Mise en garde : Un incend ie pourrait se déclencher si le gr ille-pain four est couvert ou s’il
touche une matièr e inflammable comme des rideaux, d raperies, murs, etc. pend ant qu’il
fonctionne et lor squ’il est encore chaud. Ne placez auc une des matières suivantes dan s le
four ni sur le dessus du f our et ne les mettez pas en cont act avec les côtés ou le dessous
du four : papier, carton, em ballage plastique et autre maté riau semblable.
POUR COMMENCER
• Retirertouslesmatériauxd’emballageetlesautocollantssurleproduit.
• Lavertouteslespiècesamoviblesensuivantlesdirectivesdelasecti onENTRETIEN ET
NETTOYAGE du prés ent guide.
• Choisirunendroitoùplacerl’appareilenlaissantsuffisammentd’espaceentrel’arrièr ede
l’appareil et le mur pour favoriser la circulation de la chaleur, sans endommager les armoires et
les murs.
• Brancherl’appareildansuneprisedecourant.
RENSEIGNEMENTS UTILES SUR LE FOUR
• Le four devient chaud. Lorsque l’appareil est en marche, t oujours utiliser des gants de
cuisine ou des poignées pour toucher les surfa ces extérieures et intérieures du four.
• Durant les premières minutes d’utilisation, vous remar querez peut-être de la fumée
et une légère odeur. Cela est tout à fait normal et ne doit p as vous inquiéter.
• Un délai de 2 minutes est accordé entre la séle ction des fonctions et le réglage de
la température et du temps de cuisson. Si la sélect ion et le réglage ne sont pas
effectués dans le délai impar ti, le four entre en mode veille, et les sélections doivent être exécutées
de nouveau. Si cela se produit, appuyer sur n’importe quelle tou che pour réactiver l’appareil.
• Une fois la température programmée at teinte, vous pouvez modifier le temps de cuisson et la
température ou le temps de cuisson en tout temps pend ant la cuisson.
• La température et le temps de cuisson so nt préprogrammés pour une intensité de grillage moyenne
(réglage 4). U tiliser ce réglage la première fois, puis modifier l’intensité pour obtenir un grillage plus
ou moins foncé, selon votre préférence.
• Qu’est-ce que la cuisson par convection? Le four à c onvection répartit la chaleur uniformément à
l’aide d’un ventilateur interne, procurant une circulation d’air continuelle autour des a liments; les
aliments cuisent plus uniformément et, dans cer tains cas, plus rapidement.
POSITIONS DES GRILLES COULISSANTES
Les grilles coulissantes peuvent êtr e utilisées à 2 positions. Il y a une rainure supérieure (rôtis sage
seulement) et une rainure inférieure.
UTILISATION DU FOUR
1. Pour remplacer les degrés F par les degrés C, presser et maintenir enf oncés les deux boutons
de réglage de la température pendant 3 secondes.
2. Pour afficher la température pro grammée après la sélection d’une fonction : appuyer sur les
boutons de réglage de la TEMP ÉRATURE
(▲) ou (▼)
. Pour modifier la température, appuyer
sur les boutons de réglage de la TEMP ÉRATURE
(▲) ou (▼)
.
Remarque:
• Appuyer sur le bouton pour modifier la tempér ature de 5 degrés à la fois.
• Maintenir le bouton enfoncé pour modifi er le réglage plus rapidement.
• La température minimale est de 65 °C (150 °F ).
• La température maximale est de 2 32 °C (450 °F).
3. Pour afficher le temps de cuisson prépr ogrammé : appuyer sur les boutons de réglage de la
MINUTERIE
(▲) ou (▼)
. Pour modifier le temps de cuisson, appuyer sur les bou tons de
réglage de la MINUTE RIE
(▲) ou (▼)
.
Remarque:
• Appuyer sur le bouton vers le haut ou vers le ba s pour modifier le temps de cuisson de 1 minute à
la fois.
• Maintenir le bouton enfoncé pour modifi er le réglage plus rapidement.
• Le temps de cuisson minimal est de 1 minute.
• Le temps de cuisson maximal est de 2 heures .
4. Pour régler le temps de cuisson à plus de 2 heures, sélect ionner l’option STAY ON en pressant
le bouton de réglage de la MINU TERIE
(▼)
jusqu’à ce que le symbole STAY ON
apparaisse dans la partie dr oite de l’afficheur numérique.
5. Appuyer sur le bouton START/ STOP
(marche/arrê t) pour commencer la cuisson. Le four
commence à chauffer et l’afficheur clignotera ju squ’à ce que la température sélectionnée soit
atteinte. Le four émettr a 3 bips.
6. Pour afficher le temps de cuisson ou la tempér ature pendant l’utilisation, appuyer sur les
boutons
(▲) ou (▼)
ou (TEMP ).
7. À la fin du cycle de cuisson, le four s’éteint et émet 2 bips.
8. Si l’option STAY ON est utilisée, éteindre le four à la fin du cycle de cuisson.
9. Vous pouvez modifier le temps de cuisson ou la températur e en tout temps pendant la cuisson.
10. Vous pouvez mettre fin au cycle de cuisson en tout temps en app uyant sur le bouton START/
STOP (marche/arrêt) .
Remarque: Débrancher l’appareil quand il ne ser t pas.
Remarque: Lais ser au moins 3,81 cm (1,5 po) entre les aliments et les éléments chauff ants du
haut.
FONCTION DE CUISSON
Température préprogrammée: 176 °C (350 °F)
Temps de cuisson préprogrammé: 30 minutes
Position de la grille re commandée: rainure inférieure
Ce mode est idéal pour cuisiner des casse roles, des tartes fraîches ou congelées et pour le
rôtissage de la viande ou de la volaille.
1. Placer la grille dans la rainure inférieure.
2. Régler le sélecteur de fonction à BA KE (CUISSO N
).
3. Dès que le voyant lumineux clignote, VOUS DIS POSEZ DE 2 MINUT ES POUR FAIRE VOT RE
CHOIX.
4. La température préprogrammée clignote à l’af ficheur numérique. Pour modifier la température,
appuyer sur les boutons de réglage de la TEM PÉRATURE
(▲) ou (▼)
.
5. Pour afficher ou modifier le temps de cuiss on, appuyer sur les boutons de réglage de la
MINUTERIE
(▲) ou (▼)
.
6. Appuyer sur le bouton START/ STOP
(marche/arrêt ) pour commencer la cuisson.
7. Le four commence à chauffer; l’afficheur clignotera jusqu’à ce que la température séle ctionnée
soit atteinte. Le four émet tra 3 bips, puis la minuterie commence.
8. À la fin du cycle de cuisson, le four émet un bip et s’éteint.
FONCTION DE CUISSON PAR CONVECTION
Pour cette fonction, le four u tilise un ventilateur interne pour diffuser la chaleur de façon uniforme.
Suivre les instructions de la sec tion FONCTION DE CU ISSON
ci-dessus, mais régler le
sélecteur de fonction à CON VECTION BAK E (CUISSON PA R CONVECTION ) à l’étape 2.
Remarque: Certa ins aliments cuiront plus rapidement que prévu en mode de cuisson par
convection; vérifier le temps de cuis son.
FONCTION DE RÔTIS SAGE
Température préprogrammée: 232 ˚C (450 ˚F )
Temps de cuisson préprogrammé : 20 minutes
Position de la grille : rainure supérieure
1. Régler le sélecteur de fonction à BROIL ( RÔTISSAGE
).
2. L’afficheur numérique indique la température préprogrammée 232 ˚C (450 ˚ F). Pour modifier la
température, appuyer sur les boutons de réglage de la tempér ature
(▲) ou (▼)
.
3. Pour modifier le temps de cuisson, appuyer sur les bou tons de réglage de la MINUTERI E
(▲)
ou
(▼)
.
4. Déposer l’aliment sur la grille insérée dans la lèchefrite. Placer la lèche frite à l’intérieur du four
dans la fente panier supérieur
5. Laisser au moins 3,81 cm (1,5 po) entre les a liments et les éléments chauffants du haut.
6. Fermer la porte du four.
7. Appuyer sur le bouton START/STOP
(marche/arrêt ) pour commencer la cuisson.
8. À la fin du cycle de cuisson, le four émet un bip et s’éteint.
Remarque: En mode de rô tissage, seuls les éléments du haut fonctionnent.
GRILLAGE DE PAIN
ET DE BAGELS
Réglage préprogrammé: 4 (moyen)
Position de la grille re commandée: rainure inférieure
La température et le temps de cuisson so nt préprogrammés pour une intensité de grillage
moyenne (réglage 4). Il es t recommandé d’utiliser ce réglage au premier cycle, puis de modifier
l’intensité pour obtenir un grillage plus ou moins foncé, selon votre pré férence.
Remarque: La fo nction de grillage BAGEL
permet de griller le côté coupé et de réchauf fer
légèrement l’autre côté. En mode BAGE L
, seuls les éléments du haut fonctionnent. D époser les
bagels, le côté coupé vers le haut.
1. Il n’est pas nécessaire de préchauffer le four.
2. Placer les tranches de pain ou les moitiés de bag el (le côté coupé vers le haut) sur la grille
coulissante.
3. Fermer la porte du four.
4. Régler le sélecteur de fonction à TOA ST (GRILL AGE
) OU BAGEL .
5. Le témoin de fonctionnement commence à clignoter et l’af ficheur numérique indique « 4 ».
6. Pour modifier l’intensité de grillage, appuyer sur les bouton s de réglage TEMPÉRATUR E
/
GRILLAGE
(▲) ou (▼)
.
7. Appuyer sur le bouton START/STOP ( marche/arrêt) pour commencer le gr illage.
8. À la fin du cycle de cuisson, le four émet un bip et s’éteint.
Conseils pour les cycles de grillage consécutifs: Pour obtenir de meilleurs résultats lorsque
vous procédez à des cycles de grillage consécutif s, laisser l’appareil refroidir brièvement entre
chaque cycle de grillage.
FONCTION DE RÉCHA UFFAGE
Température préprogrammée : 162 ˚C (325 ˚F )
1. Régler le sélecteur de fonction à REHE AT (RÉCHAUF FAGE
).
2. L’afficheur numérique indique la température préprogrammée 162 ˚C (325 ˚F ). Pour modifier la
température, appuyer sur les boutons de réglage de la T EMPÉRATURE
(▲) ou (▼)
.
3. Pour modifier le temps de cuisson, appuyer sur les bou tons de réglage de la MINUTERI E
(▲)
ou
(▼)
.
4. Fermer la porte du four.
5. Appuyer sur le bouton START/ STOP
(marche/arrêt ) pour commencer la cuisson.
6. À la fin du cycle de cuisson, le four émet un bip et s’éteint.
FONCTION DE RÉCHAUD
Température préprogrammée: 80 ˚C (175 ˚F)
Utiliser cette fonction p our garder les aliments au chaud pendant une certaine période apr ès la
cuisson.
1. Régler le sélecteur de fonction à KEEP WA RM (RÉCHAU D
).
2. L’afficheur numérique indique la température préprogrammée 80 ˚C (175 ˚F) . Pour modifier la
température, appuyer sur les boutons de réglage de la T EMPÉRATURE
(▲) ou (▼)
.
3. Pour modifier le temps de cuisson, appuyer sur les bou tons de réglage de la MINUTERI E
(▲)
ou
(▼)
.
4. Fermer la porte du four.
5. Appuyer sur le bouton START/ STOP
(marche/arrêt ) pour commencer la cuisson.
6. À la fin du cycle de cuisson, le four émet un bip et s’éteint.
FONCTION DE RÔTIS SOIRE
Placer les aliments s ur la grille de rôtissoire
1. Insérer l’extrémité pointue de la broche dans l’une des fourchettes, le s extrémités pointues de la
fourchette orientées vers le cen tre de la broche. Glisser la fourchette vers l’extrémité carrée d e
la broche. Serrer l’écrou à oreilles.
2. Insérer la broche au centre de l’aliment jusqu’à ce que la fourchette tienne solidement l’aliment.
3. Glisser la deuxième fourchette sur l’extrémité pointue de la broche, les ex trémités pointues
orientées vers l’aliment. Continuer jusqu’à ce que la fourchet te tienne solidement l’aliment.
Serrer l’écrou à oreilles.
4. S’assurer que la broche est bien centrée dans l’aliment en plaçant l’extrémité pointue de la
broche dans la prise d’entraînement située sur la paroi dr oite du four. Déposer l’extrémité carrée
de la broche sur le support situé sur la par oi gauche du four.
5. Important: Insérer la plaque de cuisson enrobée de papier d’aluminium à la position la plus
basse pour recueillir les graisses qui s’égoutte nt de la broche.
UTILISATION DE LA FO NCTION DE RÔTISSOIRE
1. Régler le sélecteur de fonction de cuisson à ROTI SSERIE .
2. Régler le sélecteur de température à la position de cuisson désiré e.
3. À la fin du rôtissage, retirer la broche en plaçant les crochet s de la poignée de la rôtissoire sous
les rainures de chaque côté de la broche. Lever le côté gauche d’abord . Ensuite, retirer de la
prise l’extrémité droite de la broche. Retirer délicatemen t le rôti du four.
4. Desserrer les écrous à oreilles, retirer les brochet tes et retirer la viande de la broche.
REMARQUE: Toujours faire preuve de grande prudence au moment de retirer la br oche ou la
grille coulissante/plat eau d’égouttage du four. Toujours utiliser la poignée de la rôtissoire avec des
gants de cuisine.
Remarque: En mode Rôtiss oire, seuls les éléments du haut fonctionnent.
GUIDE DE CUISSON À L A RÔTISSOIRE
ALIMENTO
POIDS
MAXIMAL
TEMPÉRATURE DE
CUISSON
TEMPS DE
CUISSON
APPROXIMATIF
TEMPÉRATURE
INTERNE
Poulet
1,5 kg (3,5
lb)
175 ˚C (350 ˚F) 1,5 h
82 ˚C (180
˚F)
Noix de
ronde
1,5 à 2,5 kg
(3 à 5 lb)
175 ˚C (325 ˚F) 1,5 à 2 h
70 ˚C (160
˚F)
Rôti de
ronde
1,5 à 2,5 kg
(3 à 5 lb)
175 ˚C (325 ˚F) 1,5 à 2 h
70 ˚C (160
˚F) (à point)
Longe de
porc désos-
sée/non
désossée
1,2 à 2 kg
(2,5 à 4 lb)
175 ˚C (325 ˚F) 1,5 à 2 h
70 ˚C (160
˚F)
Côtes
levées de
dos
de 2 a
3 lb
1 à 1,5 kg (2 à
3 lb)
1,5 à 2 h
70 ˚C (160
˚F)
Conseils rapides po ur la cuisson à la rôtisserie :
• Poids MAX IMAL des aliments à cuire à la rôtissoire : 1,5 kg (3,5 lb ) pour de la volaille, 1,8 kg (4 lb)
pour un rôti.
• Brider les ailes et les pattes de la volaille à l’aide de ficelle.
• Ficeler les morceaux de bœuf ou de porc, à de s intervalles de 3,8 cm (1,5 po), puis les entourer de
ficelle sur la longueur pour obtenir un rôti de forme compac te à cuire à la rôtissoire.
• Commencer la cuisson dans un four froid.
• Une fois la broche en place, vérifier si l’aliment est bien centré en la issant la rôtissoire faire un tour
complet avant le début de la cuisson.
BESOIN D’AIDE?
Pour faire entretenir ou réparer l’appareil, ou pour tou te question concernant votre bouilloire, ap
-
peler au numéro 1 800 approprié qui figure sur la page co uverture du présent guide. Prière de NE
PAS retournerl’appareilàl’endroitoùilaétéacheté.Deplus,prièred eNE PAS envoyer l’appareil
par la poste au fabricant, ni l’appor ter à un centre de service. Vous pouvez aussi consulter le site
Web indiqué sur la page couverture du présent guide.
Garantie limitée de deux ans
(Valable seulement au C anada et aux États-Unis)
Que couvre la garantie ?
• La garantie couvre tout dé faut de matériaux et de fabrication. Toutefois, la respons abilité de Applica
ne dépassera pas le prix d’achat du produit.
Quelle est la période de garantie?
• Deux ans à compter de la date d’achat originale, preuve d’achat à l’appui.
Comment nous vous aiderons?
• Nous vous fournirons un appareil de rechange r aisonnablement similaire, qui sera soit neuf, soit
remis à neuf en usine.
Comment vous pouvez obtenir du service?
• Conserver votre reçu comme preuve d’achat.
• Visiter notre site Web de servic e en ligne au www.prodprotect.com/applic a, ou appeler à notre
numéro sans frais, 1 800 231-9786, p our obtenir du service général sous garantie.
• Si vous avez besoin de pièces ou d’accessoires, veuillez appeler au 1 80 0 738-0245.
Qu’est-ce qui n’est pas couver t par la garantie?
• Les dommages attribuables à l’usage commercial.
• Les dommages attribuables à une mauvais e utilisation, à l’abus ou à la négligence.
• Les appareils qui ont été modifiés de quelque faç on que ce soit.
• Les produits utilisés ou réparés à l’extérieur du p ays d’achat.
• Les pièces en verre et les accessoires qui s ont emballés avec l’appareil.
• Les coûts de manutention et d’expédition liés au remplac ement de l’appareil.
• Les dommages indirects ou accessoire s (il est toutefois à noter que certains Ét ats interdisent
l’exclusion ou la limitation des dommages indirects ou accessoires , de sorte que cette restriction
pourrait ne pas s’appliquer à vous).
Que stipule la législa tion d’État relativement à ce tte garantie?
• Cette garantie vous con fère des droits spécifiques. Vous pourriez aussi avoir d’autres dr oits, qui
peuvent varier selon l’État et la province.
T22-xxxxxxxx
o
k
l
j
n
m
1. Door handle
2. On indicator light
† 3. Cooking Function con trol knob
(Part no. TO4 211-01)
†4. Temperature/Toast Shade contr ols
(Part no. TO4 211-02)
5. Timer controls
6. Start/Cancel but ton
†7. Dual Position Slide r acks
(Part no. TO4 211-03)
† 8. Bake pans
(Part no. TO4 211-04)
† 9. Broil rack
(Part no. TO4 211-05)
†10. Rotisser ie spit
(Part no. TO4 211-06)
†11 . Fork s
(Part no. TO4 211-07)
†12. Wing nuts
(Part no. TO4 211-08)
†13. Rotis serie handle
(Part no. TO4 211-09)
14. Easy-view glass door
†15. Slide-out cr umb tray
(P art no. TO 4211-10 )
Note: † indicates consumer r eplaceable/
removable parts
ROTISSERIE CONVECTION COUNTERTOP OVEN
Product may vary slig htly from what is illustrated.
ATTENTION
LE FOUR DEVIENT CHAUD LORSQU’IL EST EN
MARCHE. TOUJOURS UTILISER DES MITAINES
DE CUISINE OU DES POIGNÉES POUR
TOUCHER LES SURFACES EXTÉRIEURES OU
INTÉRIEURES DU FOUR.
 Loading...