

Black & Decker ST7600, ST4500 User Manual
WARNING: IMPORTANT SAFETY WARNINGS AND INSTRUCTIONS
WARNING: When using gardening appliances, basic safety precautions should
always be followed to reduce risk of fire, electric shock, and personal injury, including the
following.
WARNING: Some dust created by this product contains chemicals known to the State
of California to cause cancer, birth defects or other reproductive harm. Some examples of
these chemicals are:
• compounds in fertilizers
• compounds in insecticides, herbicides and pesticides
• arsenic and chromium from chemically treated lumber
To reduce your exposure to these chemicals, wear approved safety equipment such as dust
masks that are specially designed to filter out microscopic particles.
WARNING: Wear appropriate personal hearing protection during use. Under some
conditions and duration of use, noise from this product may contribute to hearing loss.
READ ALL INSTRUCTIONS
• Before any use, be sure everyone using this garden appliance reads and understands all
safety instructions and other information contained in this manual.
• Save these instructions and review frequently prior to use and in instructing others.F
GENERAL SAFETY WARNINGS AND INSTRUCTIONS FOR ALL
APPLIANCES
• AVOID DANGEROUS ENVIRONMENT. Don’t use appliances in damp or wet locations.
Don’t use appliances in the rain.
• KEEP CHILDREN AWAY.All visitors should be kept at a distance from work area.
• STORE IDLE APPLIANCES INDOORS. When not in use, appliances should be stored
indoors in dry, and high or locked-up place – out of reach of children.
• DON’T FORCE APPLIANCE. It will do the job better and with less likelihood of a risk of
injury at the rate for which it was designed.
• USE RIGHT APPLIANCE. Do not use the appliance for any job except that for which it is
intended.
• DRESS PROPERLY. Do not wear loose clothing or jewelry. They can be caught in moving
parts. Rubber gloves and substantial, non-skid footwear are recommended when working
outdoors. Wear protective hair covering to contain long hair.
• USE SAFETY GLASSES AND OTHER SAFETY EQUIPMENT. Use safety goggles or
safety glasses with side shields, complying with applicable safety standards and, when
needed, a face shield. Also use face or dust mask if operation is dusty. This applies to all
persons in the work area. Also use a hard hat, hearing protection, gloves, safety shoes and
dust collection systems when specified or required. Safety glasses or the like are available
at extra cost at your local dealer or Black & Decker Service Center.
• DON’T ABUSE CORD. Never carry appliance by cord or yank it to disconnect from
receptacle. Keep cord from heat, oil, and sharp edges.
• DON’T OVERREACH. Keep proper footing and balance at all times.
• MAINTAIN APPLIANCE WITH CARE. Keep cutting edge sharp and clean for best
performance and to reduce the risk of injury. Follow instructions for lubricating and changing
accessories. Inspect appliance cord periodically and if damaged, have it repaired by
authorized service facility. Inspect extension cords periodically and replace if damaged.
Keep handles dry, clean, and free from oil and grease.
• DISCONNECT APPLIANCES. Disconnect the appliance from the power supply when not in
use, before servicing, and when changing accessories such as blades and the like.
• AVOID UNINTENTIONAL STARTING. Don’t carry plugged-in appliance with finger on
switch. Be sure switch is off when plugging in.
• GROUND FAULT CIRCUIT INTERRUPTER (GFCI) protection should be provided on the
circuits or outlets to be used for the gardening appliance. Receptacles are available having
built in GFCI protection and may be used for this measure of safety.
• STAY ALERT. Watch what you are doing. Use common sense. Do not operate appliance
when you are tired.
• CHECK DAMAGED PARTS. Before further use of the appliance, a guard or other part that
is damaged should be carefully checked to determine that it will operate properly and
perform its intended function. Check for alignment of moving parts, binding of moving parts,
breakage of parts, mounting and any other conditions that may affect its operation. Aguard
or other part that is damaged should be properly repaired or replaced by an authorized
service center unless otherwise indicated elsewhere in this manual.
• USE OF ACCESSORIES AND ATTACHMENTS. The use of any accessory or attachment
not recommended for use with this appliance could be hazardous. Note: Refer to the
accessory section of this manual for further details.
• EXTENSION CORDS. Make sure your extension cord is in good condition. When using an
extension cord, be sure to use one heavy enough to carry the current your product will draw.
An undersized extension cord will cause a drop in line voltage resulting in loss of power and
overheating. The table below shows the correct size to use depending on cord length and
nameplate ampere rating. If in doubt, use the next heavier gauge. The smaller the gauge
number, the heavier the cord. To reduce the risk of disconnection of the appliance from the
extension cord during operation, use the extension cord retainer described in this manual.
WARNING: OUTDOOR USE EXTENSION CORDS To reduce the risk of electric
shock, use only with an extension cord intended for outdoor use, such as an extension cord
of type SW-A, SOW-A, STW-A, STOW-A, SJW-A, SJOW-A, SJTW-A, or SJTOW-A.
• REPAIRS AND SERVICE. Repairs, maintenance and any adjustments not specified in this
manual should be performed by Black & Decker authorized service centers or other qualified
service organizations, always using identical replacement parts.
IMPORTANT WARNINGS FOR STRING TRIMMERS
1. Use the proper size and type of cutting line. Do not use metal wire, rope or the like. Do
not use cutting line heavier than that recommended by the manufacturer. See the
accessory section of this manual for more detailed information about the proper cutting
line to use.
2. Keep the cutting line trimmed to the proper length (done automatically by the appliance).
Make sure that the guard is firmly in place, in working order and positioned between
yourself and the cutting line.
3. Wear long pants and substantial footwear to protect yourself from injury caused by flying
debris. This is especially important when edging with the appliance.
SAFETY WARNINGS AND INSTRUCTIONS: POLARIZED PLUGS
To reduce the risk of electric shock, this equipment has a polarized plug (one blade is wider
than the other). This equipment must be used with a suitable polarized 2 wire or 3 wire
extension cord. Polarized connections will fit together only one way. Make sure that the
receptacle end of the extension cord has large and small blade slot widths. If the plug does
not fit fully into the extension cord, reverse the plug. If it still does not fit, obtain a suitable
extension cord. If the extension cord does not fit fully into the outlet, contact a qualified
electrician to install the proper outlet. Do not change the tool plug or extension cord in any
way.
INSTRUCTION MANUAL
Catalog Numbers
ST4500, ST7600,
ST7700
VEA EL ESPAÑOL EN LA CONTRAPORTADA.
SAVE THIS MANUAL FOR FUTURE REFERENCE.
INSTRUCTIVO DE OPERACIÓN, CENTROS DE SERVICIO Y PÓLIZADE GARANTÍA.
ADVERTENCIA: LÉASE ESTE INSTRUCTIVO ANTES DE USAR EL PRODUCTO.
CAT. NO. ST4500, ST7600, ST7700 FORM NO. 90518515 REV. 1
Copyright © 2007 Black & Decker NOV. ‘07 Printed in China
5
BEFORE RETURNING THIS PRODUCT
FOR ANY REASON PLEASE CALL
1-800-544-6986
BEFORE YOU CALL, HAVE THE CATALOG No. AND DATE CODE AVAILABLE. IN MOST CASES, A
BLACK & DECKER REPRESENTATIVE CAN RESOLVE THE PROBLEM OVER THE PHONE. IF YOU HAVE A
SUGGESTION OR COMMENT, GIVE US A CALL. YOUR FEEDBACK IS VITAL TO BLACK & DECKER.
T
T
HANK
HANK
YOU
YOU
FOR
FOR
CHOOSING
CHOOSING
B
B
LACK
LACK
&&D
D
ECKER
ECKER
!
!
G
G
OOTTOOWWW
WWW
.B
.B
LACKAND
LACKAND
D
D
ECKER
ECKER
.
.
COM
COM
/N
/N
EW
EW
O
O
WNER
WNER
TTOOREGISTER
REGISTER
YOUR
YOUR
NEW
NEW
PRODUCT
PRODUCT
.
.
KEY INFORMATION YOU SHOULD KNOW:
• Attach guard before trimming or edging.
• Angle tool slightly (10° to 30°) when trimming.
Minimum Gage for Cord Sets
Volts Total Length of Cord in Feet
120V 0-25 26-50 51-100 101-150
(0-7,6m) (7,6-15,2m) (15,2-30,4m) (30,4-45,7m)
Ampere Rating
More Not more American Wire Gage
Than Than
0-6 18 16 16 14
6 - 10 18 16 14 12
10 - 12 16 16 14 12
12 - 16 14 12 Not Recommended
(10° TO 30°)
(10° À 30°)
(10° A 30°)
6
2
1
3
4
7
8
TTTTrrrriiiimmmmmmmmeeeerrrr////EEEEddddggggeeeerr
rr
SAFETY GUIDELINES - DEFINITIONS
It is important for you to read and understand this manual. The information it contains
relates to protecting YOUR SAFETY and PREVENTING PROBLEMS. The symbols below
are used to help you recognize this information.
DANGER: Indicates an imminently hazardous situation which, if not avoided, will result
in death or serious injury.
WARNING: Indicates a potentially hazardous situation which, if not avoided, could
result in death or serious injury.
CAUTION: Indicates a potentially hazardous situation which, if not avoided, may result
in minor or moderate injury.
CAUTION: Used without the safety alert symbol indicates a potentially hazardous situation
which, if not avoided, may result in property damage.
Date Code:
CAUTION: Inspect area to be trimmed and remove any wire, cord, or string-like objects
which could become entangled in the rotating line or spool. Be particularly careful to avoid any
wire which might be bent outwardly into the path of the tool, such as barbs at the base of a
chain link fence.
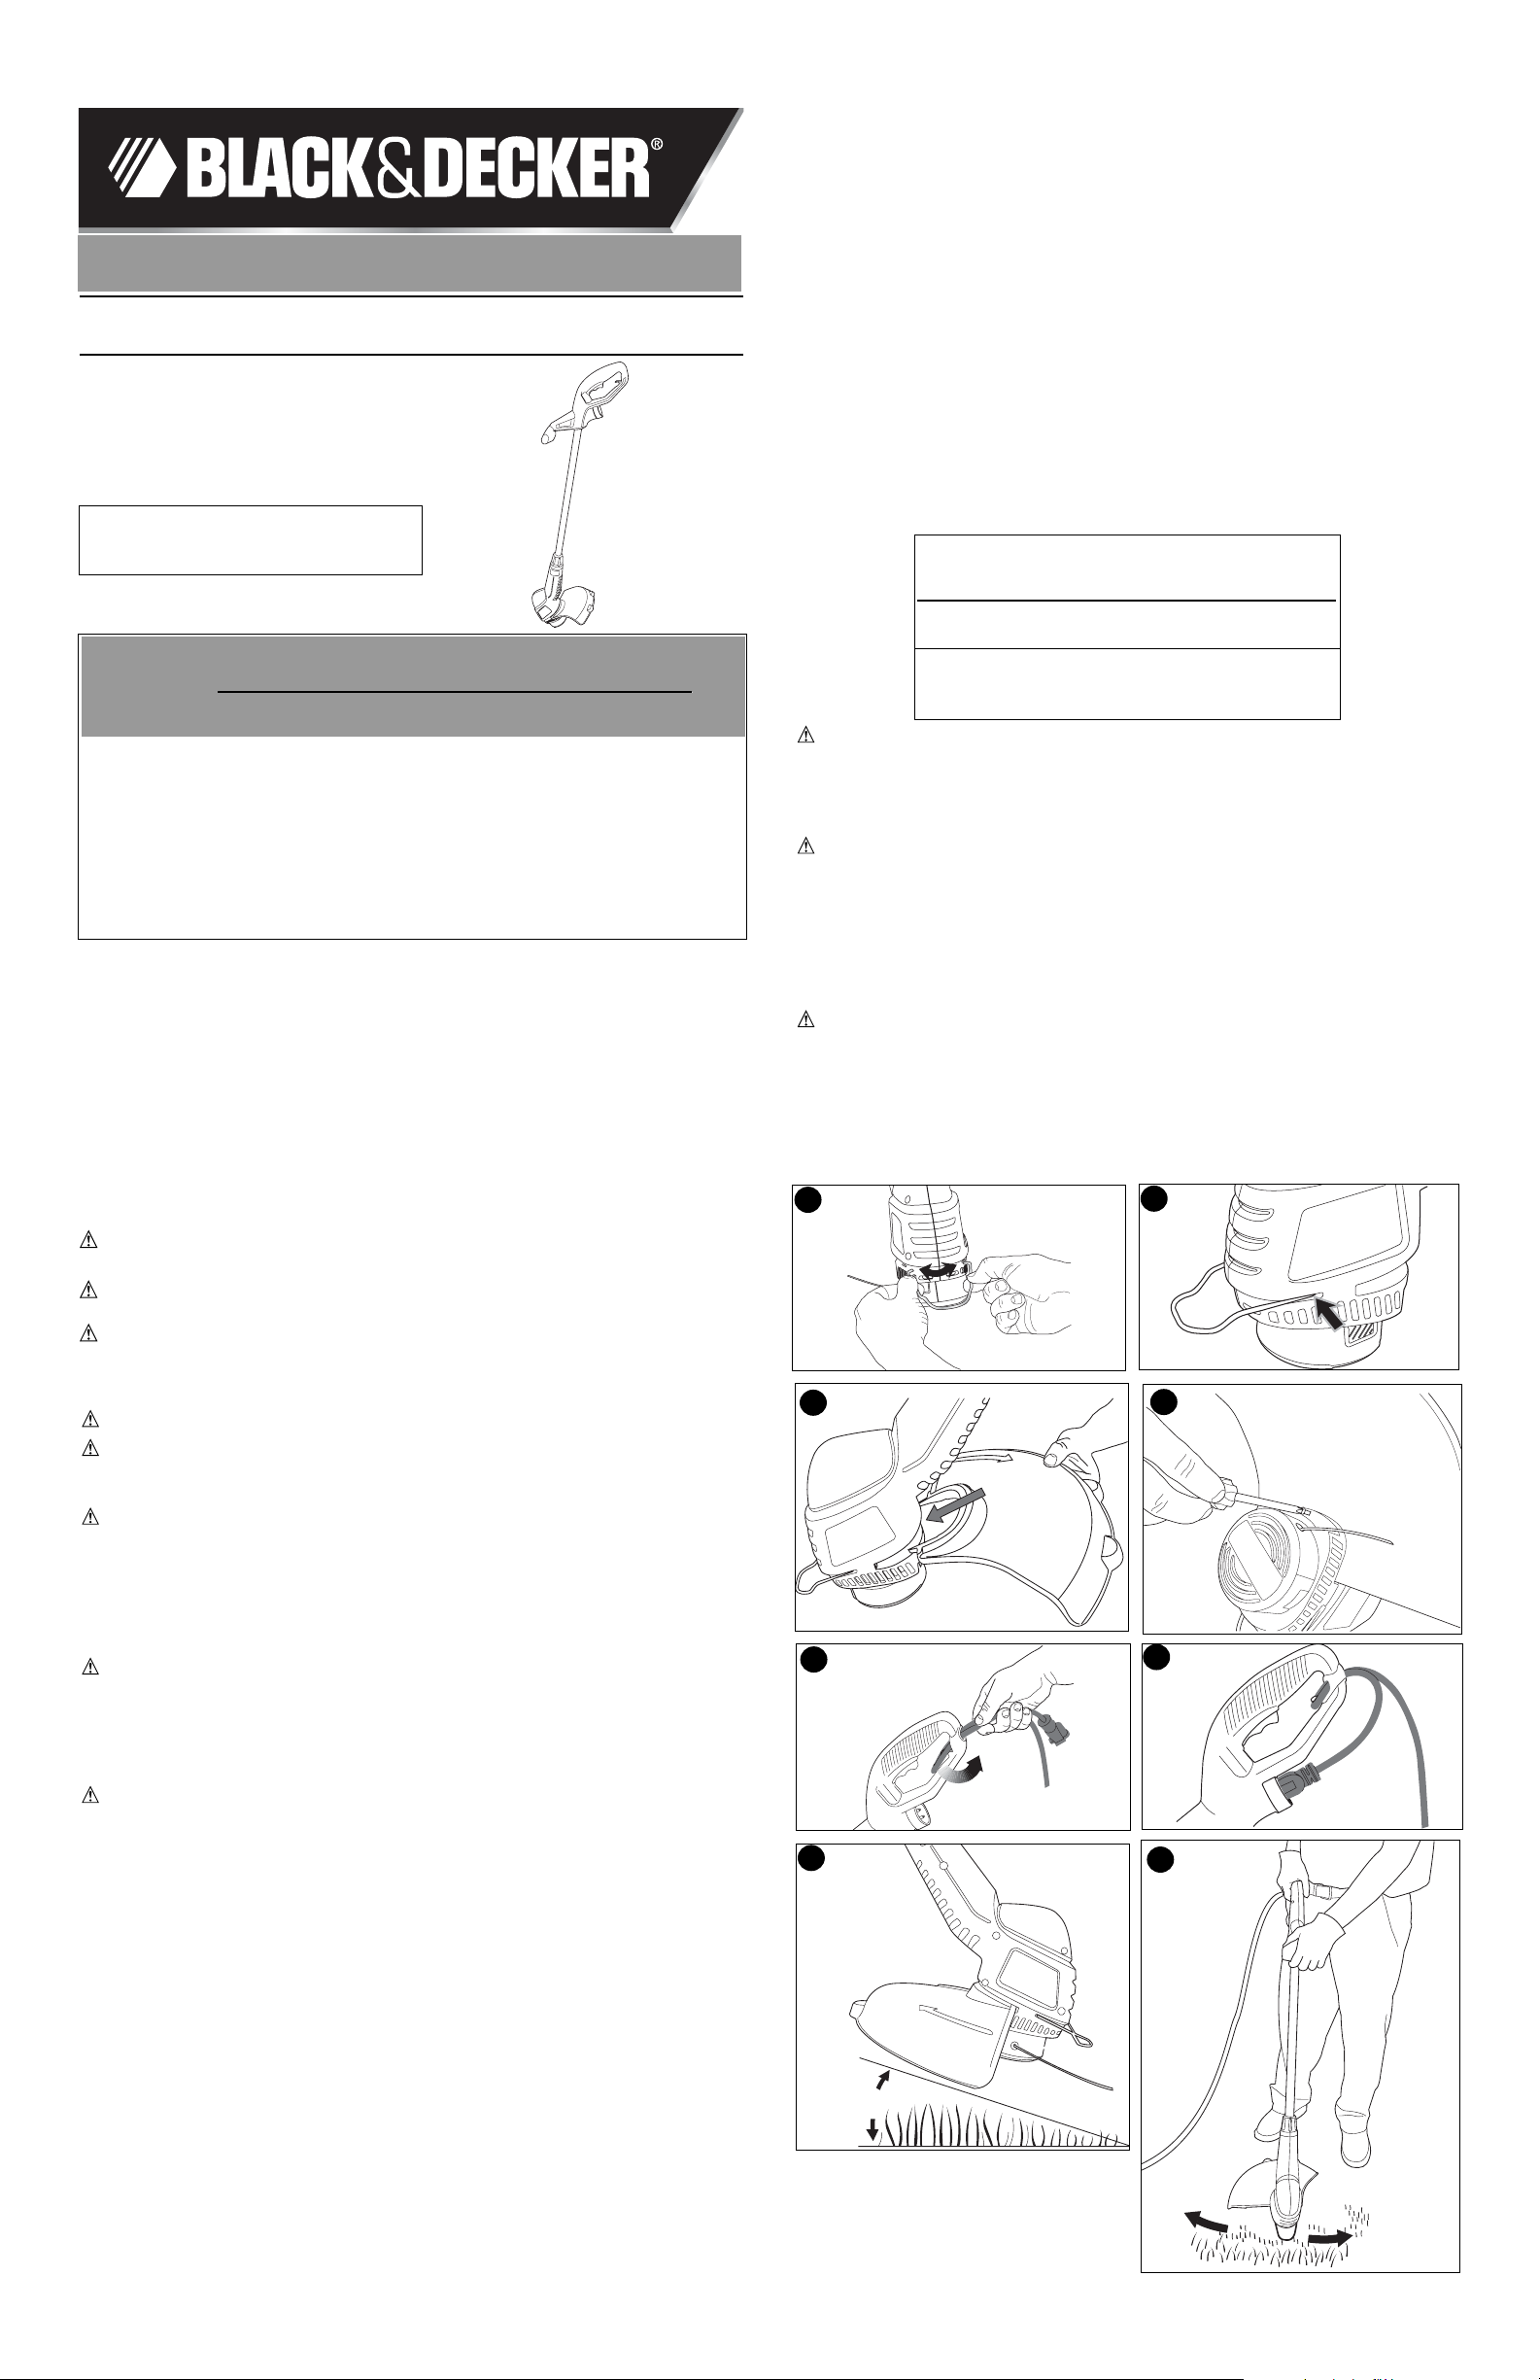
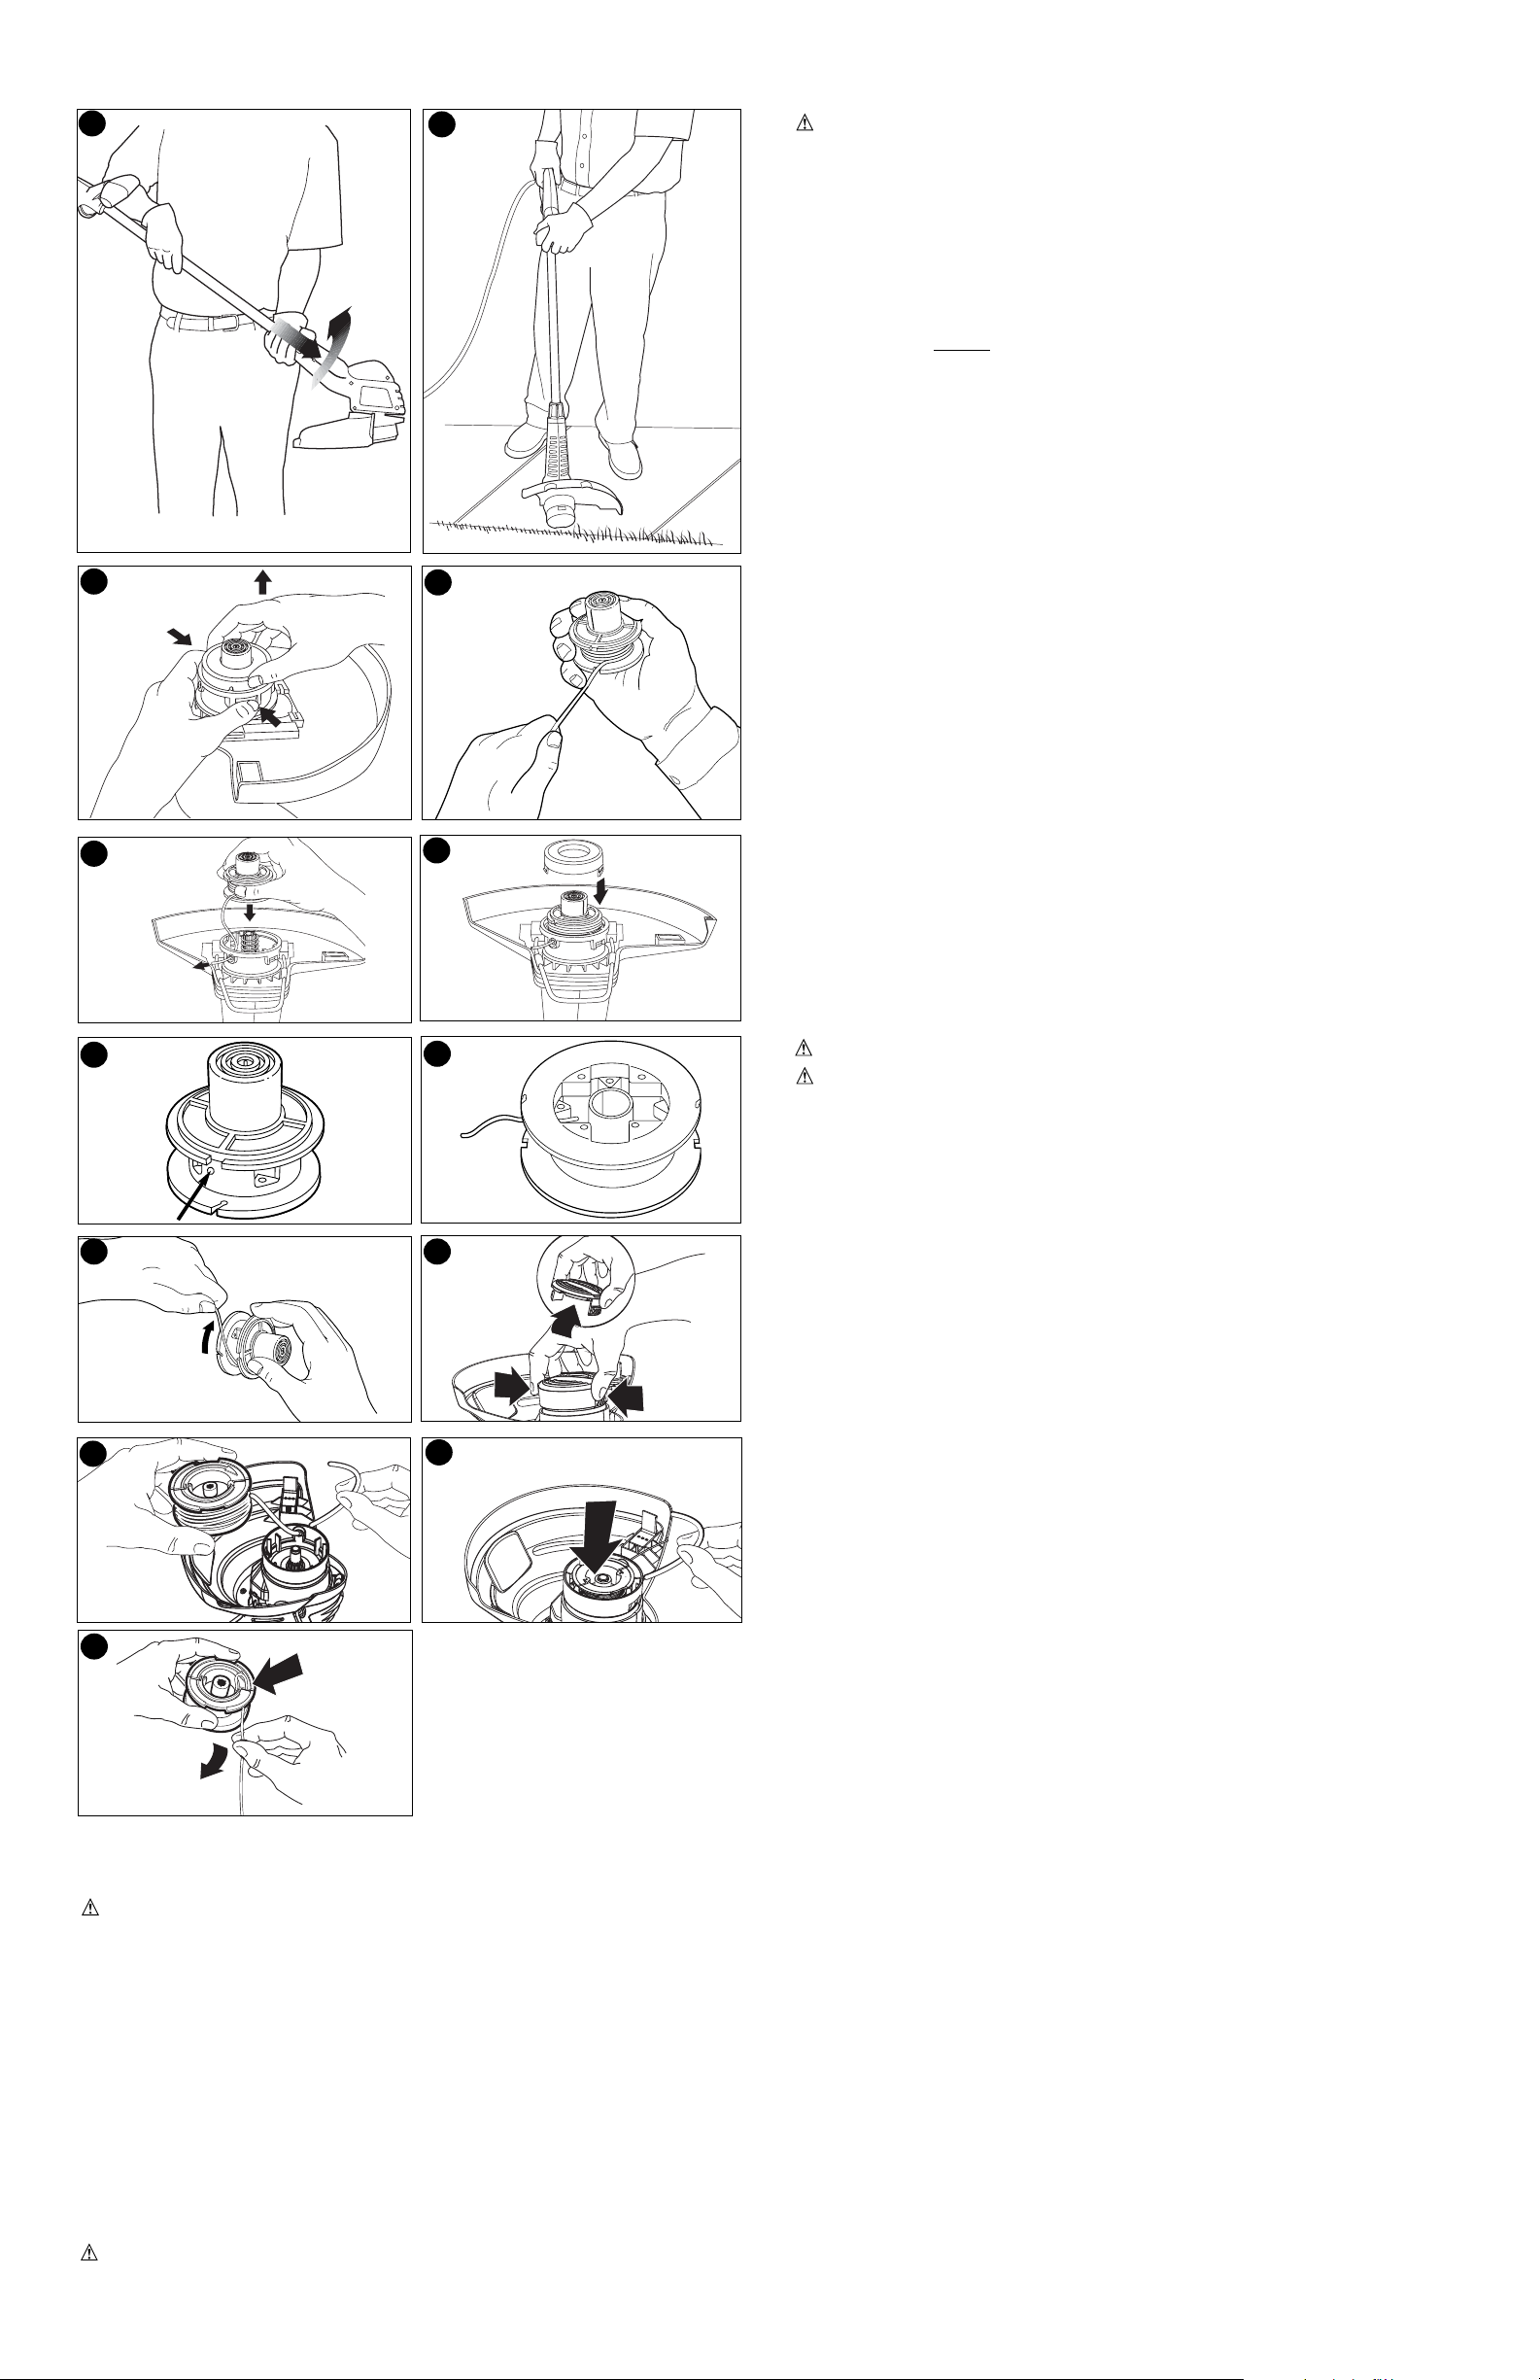
1. Angle unit as shown in figure 7.
2. Slowly swing trimmer side-to-side as shown in figure 8.
3. To convert for maintenance edging, turn off the tool. Holding the trimmer (as shown in
figure 9) with one hand by the auxiliary handle, grasp the trimmer head collar, push in
direction of arrow and rotate the trimmer head clockwise (when viewed from the switch
end) until it stops, (half turn), release your hand. The tool is locked in the edger position.
4. To operate as a maintenance edger, position trimmer above sidewalk as shown in figure 10.
5. Return to trimming position by turning the tool off, pushing in direction of arrow and rotat-
ing the trimmer head counter clockwise until it stops.
RELOADING LINE ST4500
USE ONLY .065 in. (1.65mm) DIAMETER NYLON MONOFILAMENT LINE. Heavier line
will overload the motor and cause overheating. This line is available at your local dealer or
authorized service center.
Do not use fishing line or other lines that are not recommended.
1. Unplug extension cord at trimmer.
2. Remove the bump cap by pulling up while depressing the two release tabs on the sides of
the hub at the points shown in figure 11.
NOTE: It may be necessary to pull up on the cap while depressing the release tabs one
side at a time.
3. Remove any broken cutting line, wrap the remaining line tight and reinsert spool into hub as
follows.
a.Wind the line tight enough so that it is all below the edges of the flanges on the spool. If it
extends past the flanges, it won’t fit into the hub.
b.Place the loose end of the cutting line through the gap in the spool flange as shown in
figure 12. (Either gap will do but try to leave yourself about 3 or 4 inches of line to work
with.)
c.Holding the line in the gap, insert the end through the eyelet in the hub and slip the spool
into the hub, as shown in figure 13.
Make sure the spring is still in place in the hub. If the spool does not slip into the hub easily,
press gently and pull straight out on the cutting line that protrudes through the eyelet.
4. Once the spool drops into the hub, align the release tabs on the shroud with the slots in
the hub as shown in figure 14 and press the shroud into place. Be sure that both release
tabs snap into place.
5. To replace the line on a spool, follow the steps below
a.Locate, on the empty spool, one of the two small holes shown in figure 15.
b.Insert the end of the line no more than 1/8 in. into the hole and begin winding the line
around the spool (figure 16). Be sure to wind the line in the direction of the arrow in figure 17.
Do not overfill spool. The spool holds 20 feet (6 m) of line.
c.Perform steps 3 and 4 above.
OPERATING INSTRUCTIONS FOR CATALOG # ST7600, ST7700 AUTO FEED
SYSTEM
LINE FEED
Your trimmer uses .065 in. (1.65 mm) diameter, ROUND nylon line to cut grass and weeds
quickly and easily. During use, the tip of the nylon line will become frayed and worn and the
special self feeding line hub will automatically feed and trim a fresh length of line. Cutting
line will wear faster and require more feeding if the cutting or edging is done along
sidewalks or other abrasive surfaces or heavier weeds are being cut. The advanced
automatic line feeding mechanism senses when more cutting line is needed and feeds and
trims the correct length of line whenever its required. DO NOT BUMP unit on ground in
attempt to feed line or for any other purposes.
CAUTION: ALWAYS USE EYE PROTECTION.
CAUTION: Inspect area to be trimmed and remove any wire, cord, or string-like objects
which could become entangled in the rotating line or spool. Be particularly careful to avoid any
wire which might be bent outwardly into the path of the tool, such as barbs at the base of a
chain link fence.
1. Angle unit as shown in figure 7.
2. Slowly swing trimmer side-to-side as shown in figure 8.
3. To convert for maintenance edging, turn off the tool. Holding the trimmer (as shown in
figure 9) with one hand by the auxiliary handle, grasp the trimmer head collar, push in
direction of arrow and rotate the trimmer head clockwise (when viewed from the switch
end) until it stops, (half turn), release your hand. The tool is locked in the edger position.
4. To operate as a maintenance edger, position trimmer above sidewalk as shown in figure 10.
5. Return to trimming position by turning the tool off, pushing in direction of arrow and rotat-
ing the trimmer head counter clockwise until it stops.
CLEARING JAMS AND TANGLED LINES
From time to time, especially when cutting thick or stalky weeds, the line feeding hub
may become clogged with sap or other material and the line will become jammed as a
result. To clear the jam, follow the steps listed below.
1. Press the release tabs on the line hub cap, as shown in figure 18 and remove the cap
by pulling it straight off.
2. Lift the spool of nylon line out of the hub and clear any broken line or cutting debris from
the spool area. (If you plan to replace the spool or rewind it, this is the place to do so,
otherwise, move on.)
3. Unwrap about one foot (30 cm) of line to ensure that it’s undamaged. If it is OK rewind it
and insert the line end through the eyelet in the spool hub as shown in figure 19. Pull
4 in. (10 cm) of the line through the hole and maintain tension while placing the spool
down into the hub with the arrow up, as shown in figure 20.
4. Press the spool down GENTLY and rotate it until you feel it drop into place. (When in
place, the spool will turn a few degrees left and right freely). Take care to keep the line
from becoming trapped under the spool.
5. Snap the hub cap back on, and power the tool on. In a few seconds or less you’ll hear
the nylon line being cut automatically to the proper length.
SPOOL OR LINE REPLACEMENT
USE ONLY .065 in. (1.65mm) DIAMETER NYLON MONOFILAMENT LINE. Heavier line
will overload the motor and cause overheating. This line is available at your local dealer or
authorized service center.
Do not use fishing line or other lines that are not recommended.
1. Perform step 1 above to remove cap.
2. Remove the spool from the tool and remove and discard all line on the spool.
3. Choose either OPTION 1 or OPTION 2 below for spool or line replacement. Perform
steps listed under Option 1 or Option 2, then continue with steps 4 through 6 below.
4. Insert the line end through the eyelet in the spool hub, as shown in figure 19. Pull the
line through the hole to maintain tension while placing the spool down into the hub, as
shown in figure 20.
5. Press the spool down GENTLY and rotate it until you feel it drop into place. (When in
place, the spool will turn a few degrees left and right freely). Take care to keep the line
from becoming trapped under the spool.
6. Snap the hub cap back on, and power the tool on. In a few seconds or less you’ll hear
the nylon line being cut automatically to the proper length.
OPTION 1: ACCESSORY REPLACEMENT SPOOL
Use Black & Decker replacement spool Model No. AF-100. Discard old spool.
OPTION 2: REWINDING SPOOL USING BULK LINE
Bulk line for your trimmer/edger is available at extra cost from your local dealer or
Black & Decker Service Center. To install bulk line, follow the steps below. (Use .065 in.
diameter ROUND line only)
1. Insert one end of the bulk line into the hole in the spool as shown in figure 21 about 1/2
in. (12 mm).
2. Hold the line in the hole and pull the rest of the line through the slot in the spool.
3. Snugly and evenly wind the bulk line onto the spool in the direction of the arrow on the
spool until the line builds up to the notches in the spool rim. Do not overfill spool. The
spool holds 30 feet (10 m) of line.
SAVE THESE INSTRUCTIONS
ASSEMBLY INSTRUCTIONS
ATTACHING THE GUARD AND EDGE GUIDE TO THE TRIMMER/EDGER
WARNING: The guard must always be on the tool to protect the user. NEVER
OPERATE TOOL WITHOUT GUARD FIRMLY IN PLACE.
Unplug the tool before attempting to attach the guard.
1. Locate the edge guide and spread it apart as shown in figure 1.
2. Attach the edge guide to the housing by locating the two ends into the holes in the
housing.
3. See figure 2 for edge guide assembled on the trimmer.
4. Remove the guard attachment screw from the guard. Slip the guard onto the trimmer
housing and lineup the screw hole in the guard with the screw hole in the housing
(figure 3).
5. Insert the guard attachment screw to secure the guard in place as shown in figure 4.
6. Attach extension cord to cord retainer as shown in figures 5 & 6.
OPERATING INSTRUCTIONS FOR CATALOG # ST4500 BUMP FEED TRIMMER
LINE FEED
Your trimmer uses .065 in. (1.65 mm) diameter, ROUND nylon line to cut grass and weeds
quickly and easily. Cutting line will wear faster and require more feeding if the cutting or
edging is done along sidewalks or other abrasive surfaces or heavier weeds are being cut.
As you use the trimmer, the string will get shorter due to wear. Gently bump the unit on the
ground and the line will feed.
CAUTION: ALWAYS USE EYE PROTECTION.
9
10
11
12
13
14
15
16
1817
19
20
21
 Loading...