

Page 1
www.blackanddecker.eu
4
12
12
16
13
91011
7
6
6
6
8
3
5
15
6
14
SNC3650L252
Page 2

A B
A1A2
18
6 6
16
17
C D
14
15
6 6
19
14
14
E F
2
Page 3
12
20
11
19
21
21
10
22
G H
5
5
23
I J
5
25
24
K L
3
Page 4

3
26
M N
2
4
27
O P
28
Q
4
28
Page 5

ENGLISH
(Original instructions)
Intended use
Your BLACK+DECKER SNC3650L252 Snow
thrower has been designed for Clearing snow
from areas. This appliance is intended for
consumer use only.
Safety instructions
Warning! When using cordless appliances, basic safety
precautions, including the following, should always be followed
to reduce the risk of re, electric shock, personal injury and
material damage.
Warning! When using the machine the safety rules must be
followed. For your own safety and bystanders please read
these instructions before operating the machine. Please keep
the instructions safe for later use.
u Read all of this manual carefully before operating the
appliance.
u The intended use is described in this manual. The use of
any accessory or attachment or the performance of any
operation with this appliance other than those
recommended in this instruction manual may present a
risk of personal injury.
u Be thoroughly familiar with the controls and the proper use
of the equipment.
u Know how to stop the unit and disengage the controls
quickly.
u Never allow children to operate the equipment. Never
allow adults to operate the equipment without
proper instruction.
u Keep the area of operation clear of all persons, particularly
small children, and pets.
u Exercise caution to avoid slipping or falling, especially
when operating in reverse.
u Retain this manual for future reference.
Using your appliance
Always take care when using the appliance.
u Thoroughly inspect the area where the equipment is to be
used and remove all doormats, sleds, boards, wires, and
other foreign objects.
u Disengage all clutches and shift into neutral before
starting the engine.
u Do not operate the equipment without wearing adequate
winter garments. Wear footwear, which will improve
footing on slippery surfaces.
u Use a grounded three-wire plug-in for all units with electric
drive motors or electric starting motors.
u Adjust the collector housing height to clear gravel or
crushed rock surface.
u Never attempt to make any adjustments while the engine
is running (except where specically recommended by
manufacturer).
u The operation of any powered machine can result in
foreign objects being thrown into the eyes.
u Always wear safety glasses or eye shields during
operation or while performing an adjustment or repair.
u This appliance is not intended for use by young or inrm
persons without supervision.
u The appliance is not to be used as a toy.
u Do not allow children or animals to come near the work
area or touch the appliance.
u Close supervision is necessary when the appliance is
used near children.
u Do not immerse the appliance in water.
u Do not open body casing. There are no user serviceable
parts inside.
u Do not operate the appliance in explosive atmospheres,
such as in the presence of ammable liquids, gases or
dust.
u Do not put hands or feet near or under rotating parts.
Keep clear of the discharge opening at all times.
u Exercise extreme caution when operating on or crossing
gravel drives, walks, or roads. Stay alert for hidden
hazards or trafc.
u After striking a foreign object, stop the engine, remove the
batteries from the main body, thoroughly inspect the snow
thrower for any damage, and repair the damage before
restarting and operating the snow thrower.
u If the unit should start to vibrate abnormally, stop the
engine and check immediately for the cause. Vibration is
generally a warning of trouble.
u Remove the safety key whenever you leave the operating
position, before unclogging the collector/impeller
housing or discharge guide, and when making any repairs,
adjustments, or inspections.
u When cleaning, repairing, or inspecting, make certain the
collector/impeller and all moving parts have stopped.
u Do not clear snow across the face of slopes. Exercise
extreme caution when changing direction on slopes. Do
not attempt to clear steep slopes.
u Never operate the snow thrower without proper guards,
plates or other safety protective devices in place.
u Never operate the snow thrower near glass enclosures,
automobiles, windows, etc. without proper adjustment of
the snow discharge angle. Keep children and pets away.
u Do not overload the machine capacity by attempting to
clear snow at too fast a rate.
u Never operate the machine at high transport speeds on
slippery surfaces. Use care when reversing.
u Never direct discharge at bystanders or allow anyone in
front of the unit.
u Disengage power to the collector/impeller when snow
thrower is transported or not in use.
5
5
Page 6

ENGLISH
(Original instructions)
u Use only attachments and accessories approved by the
manufacturer of snow thrower (such as wheels).
u Never operate the snow thrower without good visibility or
light. Always be sure of your footing, and keep a rm hold
on the handles. Walk; never run.
u Do not carry passengers.
u Never operate the snow thrower without good visibility or
light.
u Take all possible precautions when leaving the machine
unattended remove the safety key.
After use
u When not in use, the appliance should be stored in a dry,
well ventilated place out of the reach of children.
u Children should not have access to stored appliances.
u When the appliance is stored or transported in a vehicle it
should be placed in the boot or restrained to prevent
movement following sudden changes in speed or
direction.
Inspection and repairs
u Before use, check the appliance for damaged or defective
parts. Check for breakage of parts, damage to switches
and any other conditions that may affect its operation.
u Do not use the appliance if any part is damaged or
defective.
u Have any damaged or defective parts repaired or replaced
by an authorised repair agent.
u Never attempt to remove or replace any parts other than
those specied in this manual.
u Children must be supervised to ensure that they do not
play with the appliance.
Residual risks.
Additional residual risks may arise when using the tool which
may not be included in the enclosed safety warnings. These
risks can arise from misuse, prolonged use etc.
Even with the application of the relevant safety regulations
and the implementation of safety devices, certain residual
risks can not be avoided. These include:
u Injuries caused by touching any rotating/moving
parts.
u Injuries caused when changing any parts, blades or
accessories.
u Injuries caused by prolonged use of a tool. When
using any tool for prolonged periods ensure you take
regular breaks.
u Impairment of hearing.
u Health hazards caused by breathing dust developed
when using your tool (example:- working with wood,
especially oak, beech and MDF.)
Warning symbols
The following warning symbols are found on the appliance
along with the date code:
Warning! Read, understand and follow all
instructions in the user manual(s) before
attempting to assemble and operate.
Additional safety instructions for Snow throwers
u Mow across the face of slopes, never up and down.
Exercise extreme caution when changing direction on
slopes.
u Watch for holes, ruts, bumps, rocks or other hidden
objects. Uneven terrain could cause a slip and fall
accident. Tall grass can hide obstacles.
u Do not operate on wet grass or excessively steep slopes.
Poor footing could cause a slip and fall accident.
u Do not operate near drop-offs, ditches, or embankments.
You could lose your footing or balance.
u Do not use hands to unclog chute.
u Stop motor before removing debris.
u Do not direct discharge at bystander
Safety of others
u This appliance is not intended for use by persons
(including children) with reduced physical, sensory or
mental capabilities, or lack of experience and knowledge,
unless they have been given supervision or instruction
concerning use of the appliance by a person responsible
for their safety.
6
R
Warning! Do not expose the appliance to rain
or wet conditions. Keep dry.
Warning! Beware of sharp blades.
Always turn the machine OFF and remove the
safety key before conducting inspection,
cleaning and maintenance.
Warning! Beware of ying stones and other
foreign objects that could be thrown from the
appliance. Keep bystanders away from the
working area.
Wear hearing protection.
Wear eye protection.
Wear breathing protection.
Keep hands,feet and clothing away from the
rotating auger to avoid injury.
Page 7

(Original instructions)
ENGLISH
Danger! Cutting/dismemberment hazard - keep
feet away from the rotating auger.
Danger! Cutting/dismemberment hazard - keep
hands away from the rotating auger. Do not use
hands to unclog rotor housing. Stop motor
before removing debris.
Keep bystanders and children a safe distance
(at least 10m) away from the work area.
Wear protective gloves and non-slip footwear
when using the machine and handling debris.
Do not use hands to unclog chute.
The rotating part will continuously run for
several seconds after you turn off the machine.
Indoor use only. Only use battery charger
indoors
Directive 2000/14/EC guaranteed sound power.
Additional safety instructions for batteries and
chargers
In case of skin or eye contact, follow the instructions
below.
Warning!
damage to property. In case of skin contact, immediately rinse
with water. If redness, pain or irritation occurs seek medical
attention. In case of eye contact, rinse immediately with clean
water and seek medical attention.
Do not attempt to charge damaged batteries.
p
Chargers
Always check that the mains voltage corresponds to the
voltage on the rating plate.
Warning! Never attempt to replace the charger unit with a
regular mains plug.
Use your BLACK+DECKER charger only to charge the
battery in the appliance/tool with which it was supplied.
Other batteries could burst, causing personal injury and
damage.
Never attempt to charge non-rechargeable batteries.
If the supply cord is damaged, it must be replaced by the
manufacturer or an authorised BLACK+DECKER Service
Centre in order to avoid a hazard.
Do not expose the charger to water.
Do not open the charger.
Do not probe the charger.
The appliance/tool/battery must be placed in a well
ventilated area when charging.
Batteries
Never attempt to open for any reason.
Do not expose the battery to water.
Do not expose the battery to heat.
Do not store in locations where the temperature may
exceed 40 °C.
Charge only at ambient temperatures between 10 °C and
40 °C.
Charge only using the charger provided with the
appliance/tool. Using the wrong charger could result in
an electric shock or overheating of the battery.
When disposing of batteries, follow the instructions given
in the section "Protecting the environment".
Do not damage/deform the battery pack either by puncture
Do not charge damaged batteries.
Under extreme conditions, battery leakage may occur.
When you notice liquid on the batteries carefully wipe the
liquid off using a cloth. Avoid skin contact.
$
The charger is intended for indoor use only.
Read the instruction manual before use.
Electrical safety
Your charger is double insulated; therefore no
earth wire is required. Always check that the
#
mains voltage corresponds to the voltage on the
rating plate. Never attempt to replace the charger
unit with a regular mains plug.
If the supply cord is damaged, it must be replaced by the
manufacturer or an authorised BLACK+DECKER Service
Centre in order to avoid a hazard.
7
Page 8
ENGLISH
(Original instructions)
Charging the battery
The battery needs to be charged before rst use and
whenever it fails to produce sufcient power on jobs that were
easily done before. The battery may become warm while
charging; this is normal and does not indicate a problem.
Warning! Do not charge the battery at ambient temperatures
below 10 °C or above 40 °C. Recommended charging
temperature: approx. 24 °C.
Note: The charger will not charge a battery if the cell
temperature is below approximately 10 °C or above 40 °C.
The battery should be left in the charger and the charger
will begin to charge automatically when the cell
temperature warms up or cools down.
u Plug the charger into an appropriate outlet before inserting
the battery pack.
u Insert the battery pack into the charger.
The green LED will ash indicating that the battery is being
charged.
The completion of charge is indicated by the green LED
remaining on continuously. The pack is fully charged and
may be used at this time or left in the charger
Hot/Cold Pack Delay
When the charger detects a battery that is excessively hot or
excessively cold, it automatically starts a Hot/Cold Pack
delay, suspending charging until the battery has normalised.
After this happens, the charger automatically switches to the
Pack Charging mode. This feature ensures maximum
battery life. The red LED ashes in the pattern indicated on
the label when the Hot/Cold pack delay is detected.
State of Charge Indicator
The battery is equipped with a state of charge indicator. This
can be used to display the current level of charge in the
battery while in the trimmer and during charging. It does not
indicate appliance functionality and is subject to variation
based on product components, temperature and end user
application.
Checking State of Charge during use
u Press the state of charge indicator (A1).
u The four LEDs (A2) will illuminate indicating the percent
of charge in the battery (Fig.A.)
u If LED light does not illuminate, charge battery.
Leaving the battery in the charger
The charger and battery pack can be left connected with the
LED glowing indenitely. The charger will keep the battery
pack fresh and fully charged.
Warning! Recharge discharged batteries as
soon as possible after use or battery life may
be greatly diminished.
Charger diagnostics
This charger is designed to detect certain problems that can
arise with the battery packs or the power source. Problems
are indicated by one LED ashing in different patterns.
Bad Battery
The charger can detect a weak or damaged battery. The red
LED ashes in the pattern indicated on the label. If you see
this bad battery blink pattern, do not continue to charge the
battery. Return it to a service centre or a collection site for
recycling
8
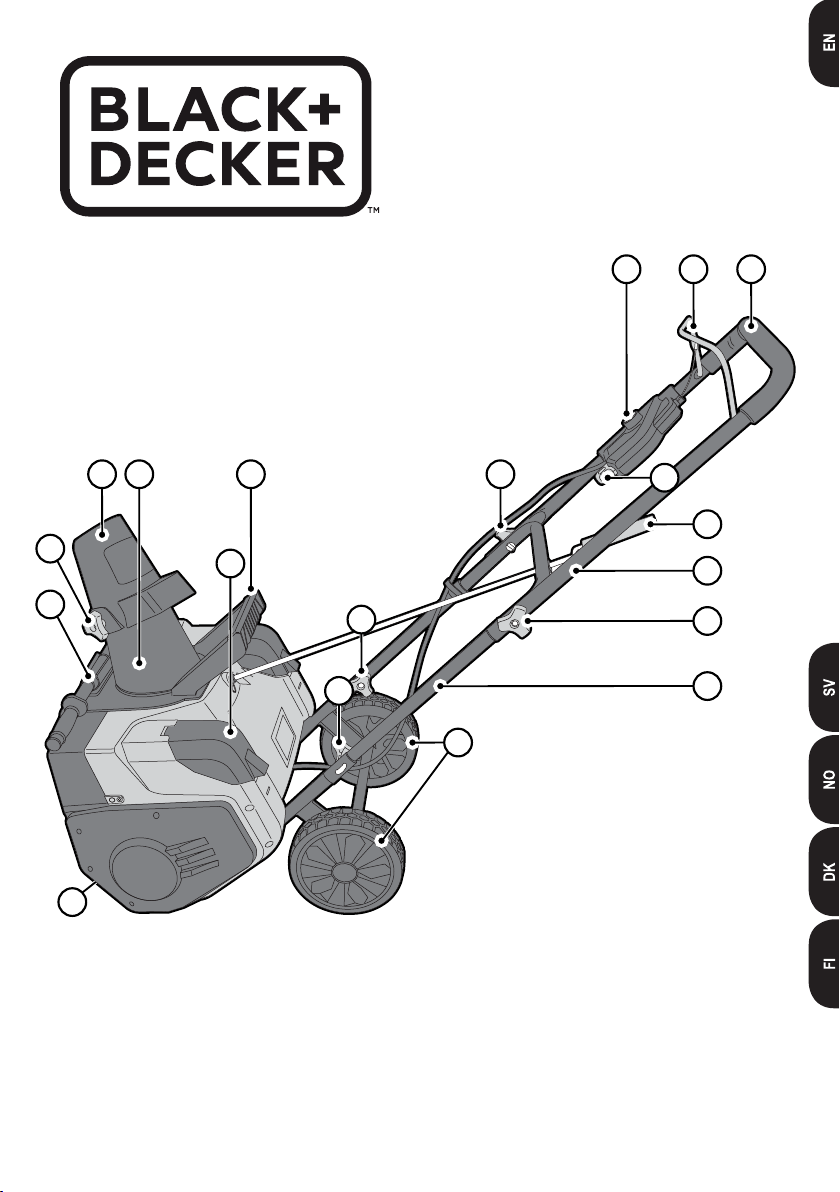
Features
This appliance includes some or all of the following features.
1. Handle bar
2. ON/OFF switch bail handle
3. Safety key
4. Safety switch button
5. Chute rotation rod
6. Frame lock/release knob (x4)
7. Battery compartment cover
8. Wheels
9. Carrying handle (For transport only)
10. Discharge chute
11. Chute deector
12. Deector knob
13. Auger
14. Middle frame
15. Upper frame
16. Cleanout stick
Page 9

ENGLISH
(Original instructions)
Assembly
Warning! Before assembly, make sure that the tool is
switched off and unplugged.
Warning! Before assembly, make sure the bail handle (2) is
released and the safety key (3) is removed.
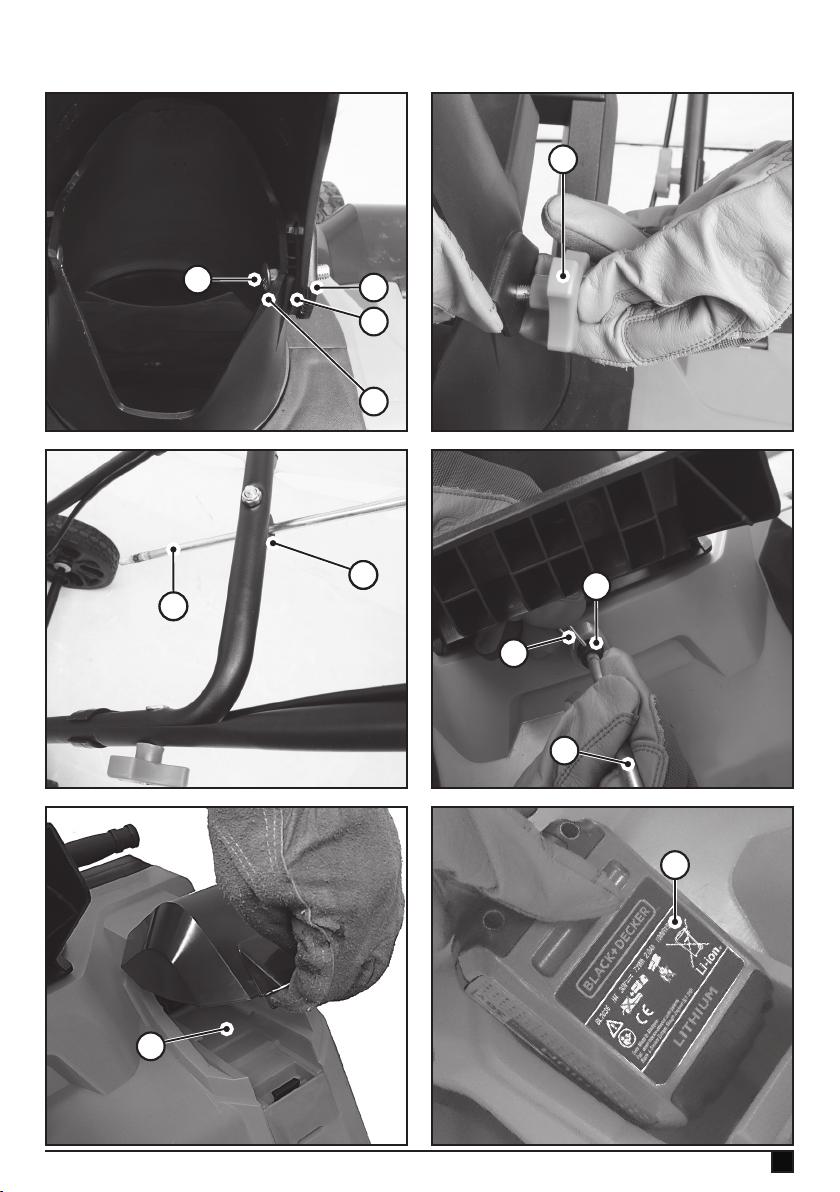
Handles
u To engage the handle bar, pull upwards on the upper
frame (15) as shown in Figure B.
u Secure the connection of the lower frame (17) to the
middle frame (14) by fastening the handle bolts (18) and
frame knobs (6) on each side as shown in Figures C & D.
u Secure the connection of the middle frame (14) to the
upper frame (15) by tightening the handle bolts and frame
knobs (6) on each side as shown in Figure E.
Discharge Chute
u Place the chute deector (11) onto the discharge chute
(10).
u Insert a chute gasket (19) in between the chute connection
and secure the assembly with a deector knob (12) and
bolt (20) on each side as shown in Figures F, G & H.
u Position the chute deector to the desired height of the
snow stream.
NOTE: Do not overtighten the deector knobs.
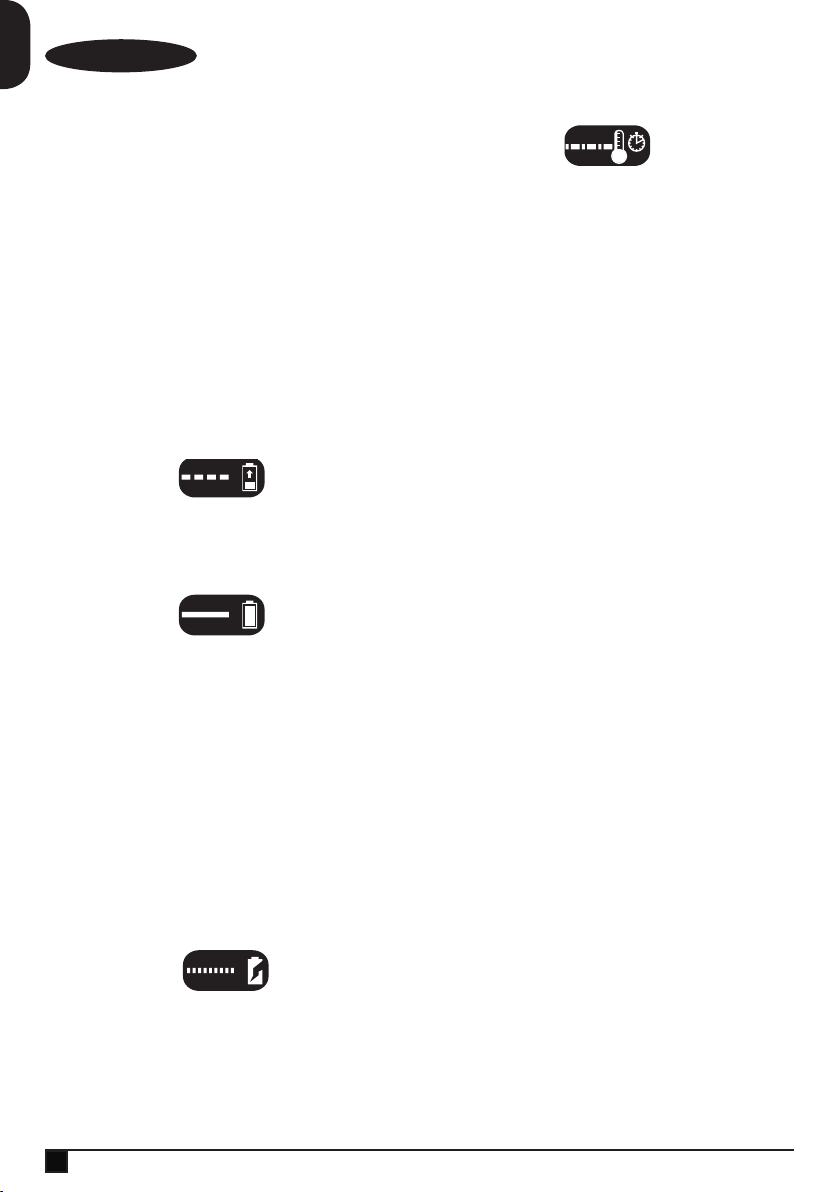
Chute rotation rod
u Insert chute rotation rod (5) through the slot in the eye
hook (21) located on the middle frame (14) as shown in
Figure I.
u Locate the chute rotation coupler (22) on the main
housing.
u Insert the chute rotation rod into the chute rotation coupler
(22) and secure the assembly with the supplied retaining
pin (23) as shown in Figure J.
Installing and removing the battery pack
Warning! Make certain the safety key is removed to prevent
actuation before removing or installing battery.
To install battery pack
u Lift up on the battery compartment cover (7) to expose the
battery compartment (24) as shown in Figure K.
u Slide the battery (25) into the battery compartment until it
is fully seated and an audible click is heard as shown in
Figure L. Make sure battery pack is fully seated and fully
latched into position.
u Close the battery compartment cover. Ensure the cover is
fully latched before starting snow thrower.
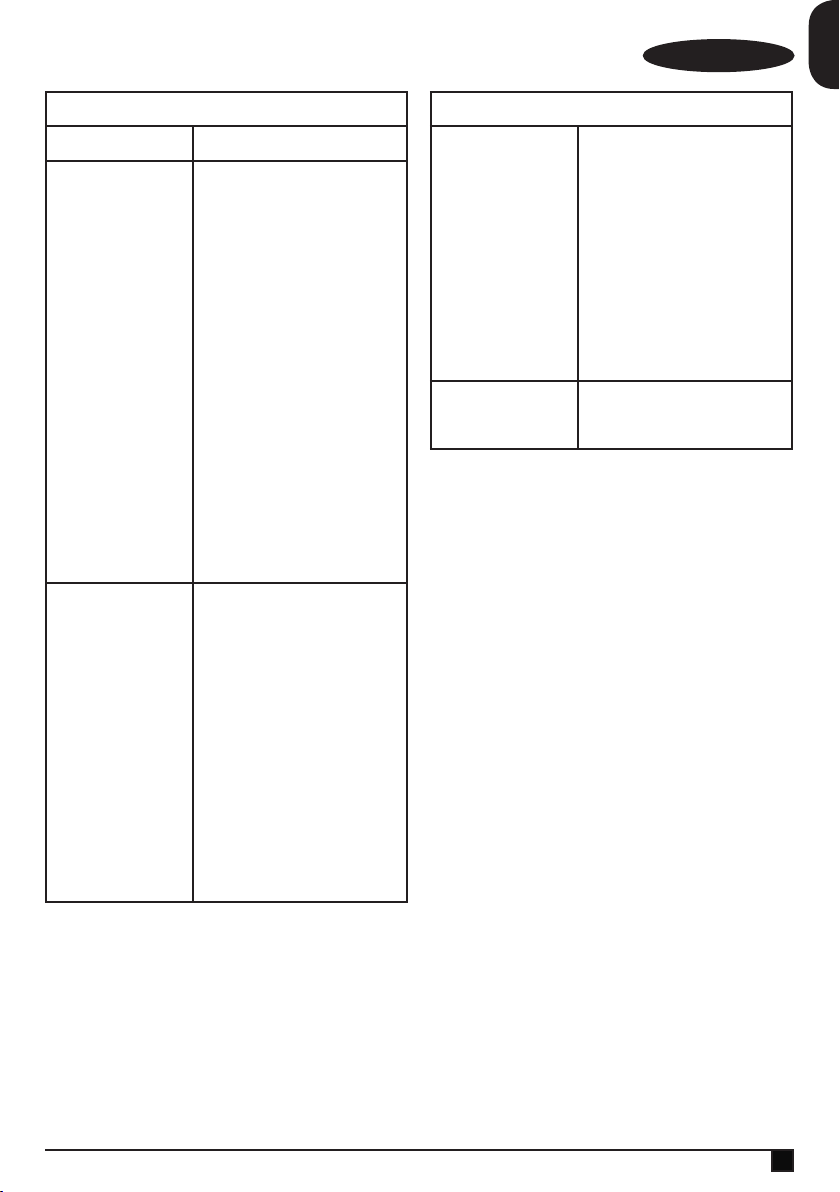
To remove battery pack
u Open the battery compartment cover (7) as described
above.
u Depress the battery release button located on the battery
pack and pull battery pack out of tool as shown in Figure
M.
Use
READ THIS INSTRUCTION MANUAL BEFORE OPERATING
YOUR SNOW THROWER. See “Functional Description” to
familiarize yourself with the location of various controls and
adjustments. Save this manual for future reference.
Warning! Let the appliance work at its own pace. Do not
overload.
u Open the battery compartment cover and slide the battery
into the battery compartment until it is fully seated and an
audible click is heard Figure L. Make sure battery pack is
fully seated and fully latched into position.
u Close the battery compartment cover. Ensure the cover is
fully latched before starting snow thrower.
u Insert safety key (3) into the key slot (26) located on the
switch housing until it is fully seated inside housing as
shown in Figure N. The snow thrower is now operational.
u This snow thrower is equipped with a special on-off switch
box. To operate the snow thrower, push the safety switch
button (4) on the switch box (27), then pull the ON/OFF
switch bail handle (2) to the handle bar as shown in Figure
O.
u To turn the snow thrower off, simply release the ON/OFF
switch bail handle (2).
Operating tips
Warning! Always inspect area where snow thrower is to be
used and remove all stones, sticks, wire, bones, and other
debris which might be thrown by the snow thrower.
Warning! Some parts of the snow thrower may freeze under
extreme temperature conditions. Do not attempt to operate the
snow thrower when parts are frozen. If a part freezes while the
snow thrower is in use, stop the snow thrower, remove the
battery, and inspect for frozen parts. Free all parts before
restarting or operating the snow thrower.
Warning! Exercise extreme caution when changing direction
on slopes. Always maintain good footing.
u Keep the area of operation free of foreign objects that can
become thrown by the auger blades. Some objects may
be hidden from view by snow cover. If the snow thrower
hits an obstruction or picks up a foreign object during use,
stop the snow thrower, remove the battery, remove the
obstruction, and inspect the unit for damage. Repair or
replace any damaged part before restarting and operating
the unit.
u Ensure children, pets, and bystanders are kept away from
the area of operation.
u When moving the snow thrower, use the wheels as the
pivot point. Slightly tilt the snow thrower on this pivot point
to move it forward or backward.
9
Page 10

ENGLISH
(Original instructions)
u Start your clearing path in the centre of the operation area.
Throw snow in a back and forth motion, each time moving
the discharge chute away from the area you are clearing.
Ensure to overlap clearing paths.
u If possible, discharge snow in the same direction as the
wind, not against the wind. This prevents snow from being
blown onto the cleared areas.
u When working on stone, gravel, or unpaved surfaces,
avoid throwing loose material along with the snow by
pushing down on the handle to raise the scraper at the
base of the unit above the stone or gravel.
Motor overload
To prevent damage due to overload conditions, do not try to
remove too much snow at one time. Do not push the snow
thrower with excessive force. Slow down, allow the snow
thrower to work at its own pace.
Clearing blockages
Warning! Release the bail handle (2), remove the safety key
(3) and remove the battery before making any adjustments,
inspecting, services, changing of accessories, cleaning the
snow thrower, and the like. Any operation should be performed
only after the revolving parts inside the snow thrower have
come to a full stop.
u Release the bail handle (2), remove the safety key (3) and
remove the battery.
u Inspect the discharge chute and auger housing for clogs
and jams.
u Use attached cleanout stick (16) to remove clogs and
jams.
Warning! DO NOT ATTEMPT TO CLEAR JAMS OR CLOGS
WITH YOUR HANDS. If a part freezes while the snow thrower
is in use, stop the snow thrower, remove the battery. Free all
parts before restarting or operating the snow thrower.
Changing throw direction and throw height
Warning! Never direct the snow discharge chute towards the
operator, bystanders, vehicles, or nearby structures. The
discharged snow and foreign objects accidentally picked up
and thrown by the snow thrower can cause serious damage
and personal injury.
Always orient the discharge chute in the opposite direction
from where the operator, bystanders, surrounding vehicles, or
structures are located.
u The discharge chute has an operating range of 180
degrees. Direct the snow discharge by rotating the chute
with the chute rotation rod (5) as shown in Figure 16.
Warning! Release the bail handle (2), remove the safety key
(3) and remove the battery before making any adjustments,
inspecting, services, changing of accessories, cleaning the
snow thrower, and the like. Any operation should be performed
only after the revolving parts inside the snow thrower have
come to a full stop.
The chute deector (11) on the top of the discharge chute (10)
controls the height of the snow discharge stream. When the
deector is up, the snow will discharge higher.When the
deector is down, the snow will discharge lower.
u Loosen the deector knobs (12) to raise or lower the
deector to the desired height. Re-tighten the deector
knobs (12) to secure the deector.
NOTE: Do not overtighten the deector knobs.
Warning! Ensure that the chute deector fully locks onto the
discharge chute. Any gap between the discharge chute and
the chute deector could allow foreign objects picked up by
the snow thrower to be thrown in the direction of the operator
causing serious bodily injury.
u Do not position the chute deector too far downward as
this can cause a gap (28) to appear between the deector
and discharge chute as shown in Figure Q.
Accessories
Warning! The use of any accessory not recommended for use
with this tool could be hazardous.
Recommended accessories for use with your snow thrower
are available from your local Black+Decker dealer or
authorized service centre.
Maintenance
Your BLACK+DECKER cordless appliance/tool has been
designed to operate over a long period of time with a minimum
of maintenance. Continuous satisfactory operation depends
upon proper tool/appliance care and regular cleaning.
Your charger does not require any maintenance apart from
regular cleaning.
Warning! Before performing any maintenance on corded/
cordless power tools:
u Switch off and unplug the appliance/tool.
u Or switch off and remove the battery from the appliance/
tool if the appliance/tool has a separate battery pack.
u Or run the battery down completely if it is integral and then
switch off.
u Unplug the charger before cleaning it. Your charger does
not require any maintenance apart from regular cleaning.
u Regularly clean the ventilation slots in your tool/appliance
and charger using a soft brush or dry cloth.
u Regularly clean the motor housing using a damp cloth. Do
not use any abrasive or solvent-based cleaner.
10
Page 11
ENGLISH
(Original instructions)
Troubleshooting
Problem Solution
Snow thrower doesn’t
run when bail handle
is activated.
Unit stops while
moving snow.
Check to make sure safety key
has been installed and is fully
seated and that button on switch
housing is being completely
depressed before pulling bail
handle.
Release bail handle to turn snow
thrower off. Remove safety key
and battery pack, and check that
auger is free to turn.
Check that the battery cavity is
free of debris and is connected
properly.
Has battery been fully charged?
Release bail handle to turn snow
thrower off. Remove safety key
and battery pack. Check that
auger is free to turn.
Check that the battery cavity is
free of debris and is connected
properly.
Has battery been fully charged?
Move charger and battery pack to
a surrounding air temperature of
above 40 degrees F (4,5°C) or
below 105 degrees F (+40,5°C).
Avoid overloading the Snow
Slow down working pace
thrower.
Troubleshooting
Snow thrower is
abnormally noisy and
vibrates.
Battery charger LEDs
not on.
Release bail handle to turn Snow
thrower off. Remove safety key
and battery pack. Check that
auger is free to turn and ensure it
has not been bent or damaged. If
damaged, return Snow thrower to
a BLACK+DECKER Authorized
service centre.
If there is no visible damage and
the snow thrower still vibrates:
Return the snow thrower to an
authorized Black+Decker
authorized service centre.
Check plug connection.
Replace charger.
Protecting the environment
Separate collection. This product must not be
disposed of with normal household waste.
Z
Should you nd one day that your BLACK+DECKER product
needs replacement, or if it is of no further use to you, do not
dispose of it with household waste. Make this product
available for separate collection.
Separate collection of used products and
packaging allows materials to be recycled and
z
used again.
Re-use of recycled materials helps prevent
environmental pollution and reduces the demand
for raw materials.
Local regulations may provide for separate collection of
electrical products from the household, at municipal waste
sites or by the retailer when you purchase a new product.
.
BLACK+DECKER provides a facility for the collection and
recycling of BLACK+DECKER products once they have
reached the end of their working life. To take advantage of this
service please return your product to any authorised repair
agent who will collect them on our behalf.
You can check the location of your nearest authorised repair
agent by contacting your local BLACK+DECKER ofce at the
address indicated in this manual. Alternatively, a list of
authorised BLACK+DECKER repair agents and full details of
our after-sales service and contacts are available on the
Internet at: www.2helpU.com
11
Page 12
ENGLISH
(Original instructions)
Batteries
At the end of their useful life, discard batteries with
due care for our environment:
Z
u Run the battery down completely, then remove it from the
tool.
u NiCd, NiMH and Li-Ion batteries are recyclable. Place the
battery(s) in a suitable packaging to ensure that the
terminals cannot be short-circuited. Take them to any
authorised repair agent or a local recycling station.
u Do not short-circuit the battery terminals.
u Do not dispose of the battery(s) in a re as this may result
in a risk of personal injury or an Explosion.
Technical data
SNC3650L252
Input Voltage
No-Load Speed
Weight
Battery BL2036
Voltage
Capacity Ah 2.0
Type
Charger 90567393 -05 typ.1
Input Voltage
Output Voltage
Current mA 1.3A
Approx. charge
time
Hand/arm weighted vibration value according to EN 786:
= < 3.175 m/s2 , uncertainty (K) = 1.5 m/s2.
LPA (sound pressure) 70.2 dB(A) uncertainty (K) = 2.5 dB(A)
VDC36
-1
min
kg
V
dc
V
AC
V
DC
h
2500
14.5
36
Li-ion
230
36
1.5
EC declaration of conformity
MACHINERY DIRECTIVE
OUTDOOR NOISE DIRECTIVE
%
SNC3650L252 Snow Thrower
Black & Decker declares that these products described under
"technical data" are in compliance with:
2006/42/EC, EN 60335-1:2012 +A11; 2014,
ISO/DIS 8437; 1989
EN 62233; 2008
2000/14/EC, ANNEX III of 2000/14/EC as amendment by
2005/88/EC,
TÜV Rheinland LGA Products GmbH;
Tillystraß 2 D-90431N
Notied Body ID No.:0197
Level of accoustic power according to 2000/14/EC
(Annex III, L ≤ 50 cm):
LWA (measured sound power) 85.18 dB(A)
uncertainty (K) = 2 dB(A)
LWA (guaranteed sound power) 89 dB(A)
uncertainty (K) = 2 dB(A)
These products also comply with directive 2004/108/EC and
For more information, please contact Black & Decker at the
following address or refer to the back of the manual.
The undersigned is responsible for compilation of the technical
le and makes this declaration on behalf of Black & Decker.
Black & Decker Europe, 210 Bath Road, Slough,
..
1r
2011/65/EU.
nberg, Germany;
R. Laverick
Engineering Manager
Berkshire, SL1 3YD
United Kingdom
28/07/2015
12
Page 13

ENGLISH
(Original instructions)
Guarantee
Black & Decker is condent of the quality of its products and
offers an outstanding guarantee. This guarantee statement is
in addition to and in no way prejudices your statutory rights.
The guarantee is valid within the territories of the Member
States of the European Union and the European Free Trade
Area.
If a Black & Decker product becomes defective due to faulty
materials, workmanship or lack of conformity, within
24 months from the date of purchase, Black & Decker
guarantees to replace defective parts, repair products
subjected to fair wear and tear or replace such products to
ensure minimum inconvenience to the customer unless:
u The product has been used for trade, professional or hire
purposes;
u The product has been subjected to misuse or neglect;
u The product has sustained damage through foreign
objects, substances or accidents;
u Repairs have been attempted by persons other than
authorised repair agents or Black & Decker service staff.
To claim on the guarantee, you will need to submit proof of
purchase to the seller or an authorised repair agent. You can
check the location of your nearest authorised repair agent by
contacting your local Black & Decker ofce at the address
indicated in this manual. Alternatively, a list of authorised
Black & Decker repair agents and full details of our after-sales
service and contacts are available on the Internet at:
www.2helpU.com
Please visit our website www.blackanddecker.co.uk to register
your new BLACK+DECKER product and to be kept up to date
on new products and special offers. Further information on the
BLACK+DECKER brand and our range of products is
available at www.blackanddecker.co.uk
13
Page 14

SVENSKA
(Översättning av originalanvisningarna)
Avsedd användning
Din BLACK & DECKER SNC3650L252 snöslunga
har designats för borttagning av snö från olika
ytor. Denna apparat är endast avsett för
konsumentbruk.
Säkerhetsinstruktioner
Varning! Vid användning av sladdlösa apparater ska
grundläggande säkerhetsanvisningar, inklusive nedanstående,
alltid följas. Detta för att minska risken för brand, elektriska
stötar, person- och materialskador.
Varning! Vid användning av maskinen ska
säkerhetsföreskrifterna följas. För din egen och närvarande
personers säkerhet bör du läsa dessa instruktioner innan du
använder maskinen. Spara instruktionerna för senare bruk.
u Läs hela den här bruksanvisningen noga innan du börjar
använda apparaten.
u Använd apparaten på det sätt som beskrivs i den här
bruksanvisningen. Använd inte apparaten med andra
tillbehör än de som rekommenderas i den här
bruksanvisningen och inte heller till andra
användningsområden eftersom det kan leda till
personskador.
u Bekanta dig med reglagen och ta reda på hur redskapet
ska användas.
u Lär dig hur enheten stoppas och kontrollerna avaktiveras
snabbt.
u Låt aldrig barn använda utrustningen. Låt aldrig vuxna
använda utrustningen utan
ordentliga instruktioner.
u Håll arbetsområdet fritt från alla personer, särskilt små
barn och husdjur.
u Var försiktig för att undvika att halka, särskilt vid arbete i
backläge.
u Spara den här bruksanvisningen för framtida bruk.
Använda apparaten
Var alltid försiktig när du använder apparaten.
u Inspektera alltid området noggrant där utrustningen ska
användas och rensa bort alla dörrmattor, kälkar, skivor,
ledningar och andra främmande föremål.
u Lägg ur alla växlar till neutralläge innan motorn startas.
u Använd inte utrustningen utan att använda adekvata
vinterkläder. Använd skor som förbättrar fotfästet på hala
ytor.
u Använd en jordad tretrådars kontakt för alla enheter med
elektriska motorer eller elektriska startmotorer.
u Ställ in uppsamlingshöljets höjd så att det grå fritt över ytor
med grus och krossad sten.
u Försök aldrig att göra några inställningar medan motorn
körs (förutom där det särskilt rekommenderas av
tillverkaren).
u Användning av motordrivna maskiner kan resultera i att
främmande föremål kastas in i ögonen.
u Använd alltid skyddsglasögon eller ögonskydd under drift
eller när inställningar eller reparationer utförs.
u Denna apparat är inte avsedd att användas av unga eller
oerfarna personer utan övervakning.
u Apparaten ska inte användas som leksak.
u Låt inte barn eller djur komma i närheten av
arbetsområdet eller röra vid apparaten.
u Om det nns barn i närheten när du använder redskapet
ska du övervaka dem noga.
u Doppa aldrig apparaten i vatten.
u Öppna inte höljet. Det nns inga servicebara delar på
insidan.
u För att undvika explosionsrisk bör du inte använda
apparaten i omgivningar med brandfarliga vätskor, gaser
eller damm.
u Håll inte händer eller fötter i närheten av eller under
roterande delar. Stå aldrig framför utmatningsöppningarna.
u Var extra försiktig när du korsar grusvägar, gångvägar och
gator. Var uppmärksam på dolda faror eller trak.
u Om ett främmande föremål träffas, stanna motorn, ta bort
batteriet från maskinens hölje. Inspektera noggrant
snöslungan om den fått några skador och reparera
skadorna innan snöslungan startas och används igen.
u Om enheten börjar vibrera onormalt, stanna motorn
omedelbart och kontrollera orsaken. Vibrationer är
vanligtvis ett tecken på problem.
u Ta bort säkerhetsnyckeln varje gång som du lämnar
driftpositionen, innan du tar bort det tilltäppta från skruven
höljet eller utkastarröret och när några reparationer,
inställningar eller inspektioner görs.
u Vid rengöring, reparation eller inspektion, se särskilt till att
skruven och alla rörliga delar har stannat.
u Ta inte bort snö tvärs över ytan på sluttningar. Var mycket
försiktig när du byter riktning vid arbete på sluttningar.
Försök inte att rensa mycket branta sluttningar.
u Använd aldrig snöslungan utan korrekta skydd, plattor
eller andra skyddande säkerhetsenheter på plats.
u Använd aldrig snöslungan i närheten av inglasningar, bilar,
fönster etc. utan att ha ställt in snöutkastaren korrekt. Håll
barn och husdjur ur vägen.
u Överbelasta inte maskinens kapacitet genom att rensa
bort snö för snabbt.
u Använd inte maskinen med hög transporthastighet på hala
ytor. Var försiktig vid backning.
u Släpp aldrig ut på åskådare eller låt inte någon stå framför
enheten.
u Koppla ifrån kraftansluting till skruven när snöslungan
transporteras eller inte används.
u Använd endast tillsatser och tillbehör som godkänts av
tillverkaren för snöslungan (såsom hjul).
14
Page 15

(Översättning av originalanvisningarna)
SVENSKA
u Använd aldrig snöslungan utan god överblick eller ljus. Se
alltid till att du har bra fotfäste och ha ett fast grepp
handtagen. Gå med produkten, spring aldrig.
u Transportera inga passagerare.
u Använd aldrig snöslungan utan god överblick eller ljus.
u Vidta alla möjliga försiktighetsåtgärder när maskinen
lämnas utan uppsikt, ta bort säkerhetsnyckeln
.
Efter användning
u När den inte används ska den förvaras på en torr plats
med god ventilation och utom räckhåll för barn.
u Barn ska inte ha tillgång till apparater under förvaring.
u När apparaten förvaras eller transporteras i en bil ska det
placeras i bagageutrymmet eller spännas fast så att det
inte rör sig vid plötsliga ändringar av hastighet eller
riktning.
Kontroll och reparationer
u Kontrollera att apparaten är helt och att inga delar är
skadade innan du använder den. Kontrollera att inga delar
är trasiga, att strömbrytaren fungerar och att inget annat
föreligger som kan påverka redskapets funktion.
u Använd inte apparaten om någon del har skadats eller
gått sönder.
u Låt en auktoriserad verkstad reparera eller byta ut
skadade eller trasiga delar.
u Försök aldrig avlägsna eller byta ut andra delar än de som
anges i den här bruksanvisningen.
Ytterligare säkerhetsanvisningar för snöslungor
u Arbeta tvärs över sluttningar, inte upp och ner. Var mycket
försiktig när du byter riktning vid arbete på sluttningar.
u Se upp för hål, hjulspår, gupp, stenar eller andra dolda
föremål. Ojämn terräng kan orsaka halk- och fallskador.
Långt gräs kan dölja hinder.
u Använd inte i vått gräs eller mycket branta sluttningar.
Dåligt fotfäste kan orsaka halk- och fallskador.
u Använd inte i närheten av branter, diken eller sluttningar.
Du kan tappa fotfästet eller balansen.
u Ta inte bort material som fastnat med händerna.
u Stoppa motorn innan skräp tas bort.
u Släpp inte ut direkt mot åskådare.
Andras säkerhet
u Denna apparat är inte avsedd att användas av personer
(inklusive barn) med reducerad fysisk, sensorisk eller
mental förmåga eller med begränsad erfarenhet eller
kunskap såvida inte de är under uppsikt eller fått
instruktioner om användning av apparaten av en person
som är ansvarig för deras säkerhet.
u Barn måste hållas under uppsikt så att de inte leker med
redskapet.
Övriga risker
Ytterligare risker som inte nns med i de bifogade
säkerhetsanvisningarna kan uppstå när verktyget används.
Dessa risker kan uppstå vid felaktig eller långvarig
användning, etc.
Även om alla relevanta säkerhetsanvisningar följs och
säkerhetsanordningar används kan vissa risker inte undvikas.
Dessa omfattar:
u Skador orsakade av att roterande/rörliga delar vidrörs.
u Skador som uppstår vid byte av delar, blad eller
tillbehör.
u Skador som orsakas av långvarig användning av ett
verktyg. Se till att regelbundet ta vilopauser när du
använder ett verktyg under en längre period.
u Hörselnedsättning.
u Hälsorisker orsakade av inandning av damm när
redskapet används (exempel: arbete med trä, särskilt
ek, bok och MDF).
Varningssymboler
Följande varningssymboler nns på redskapet, tillsammans
med datumkoden:
Varning! Läs igenom, förstå och följ alla
instruktioner i bruksanvisningen innan
redskapet monteras och används.
R
Varning! Skydda redskapet mot regn och väta.
Håll torrt.
Varning! Tänk på att bladen är vassa.
Stäng alltid AV maskinen och ta bort
säkerhetsnyckeln innan inspektion, rengöring
och underhåll genomförs.
Varning! Se upp för ygande stenar och andra
främmande föremål som kan kastas från
apparaten. Håll åskådare borta från
arbetsområdet.
Bär hörselskydd.
Bär ögonskydd.
Bär andningsskydd.
Håll händer, fötter och kläder borta från den
roterande skruven för att undvika skador.
15
Page 16

SVENSKA
(Översättning av originalanvisningarna)
Fara! Fara för skärsår/lemlästning - håll fötterna
undan från den roterande skruven.
Fara! Fara för skärsår/lemlästning - håll
händerna undan från den roterande skruven. Ta
inte bort material som fastnat med händerna.
Stoppa motorn innan skräp tas bort.
Håll åskådare och barn på säkert avstånd
(minst 10 m) från arbetsområdet.
Används skyddshandskar och halkfria skor när
maskinen används och skräp hanteras.
Ta inte bort material som fastnat med händerna.
sekunder efter att maskinen stängts av.
Endast användning inomhus. Använd endast
batteriladdare inomhus.
Garanterad ljudnivå enligt direktiv 2000/14/EG.
Ytterligare säkerhetsinstruktioner för batterier och
laddare
Följ instruktionerna nedan vid kontakt med hud eller ögon.
Varning! Batterivätskan kan orsaka person- eller
materialskador. Vid hudkontakt, skölj genast med vatten. Vid
rodnader, smärta eller irritation ska läkare uppsökas. Vid
kontakt med ögon, skölj genast med rent vatten och uppsök
läkare.
p
Försök inte ladda skadade batterier.
Laddare
Laddaren är avsedd för en viss spänning.
Kontrollera alltid att nätspänningen överensstämmer med
värdet på typskylten.
Varning! Försök aldrig byta ut kontakten till laddaren mot en
vanlig kontakt.
Använd laddaren från BLACK+DECKER endast för att
ladda batteriet i den/det apparat/verktyg som laddaren
levererades med. Andra batterier kan spricka och orsaka
personskador och andra skador.
Försök aldrig ladda batterier som inte är
uppladdningsbara.
Om nätsladden är skadad måste den bytas ut av
tillverkaren eller en auktoriserad BLACK+DECKERverkstad för att undvika fara.
Utsätt inte laddaren för vatten.
Öppna inte laddaren.
Gör ingen åverkan på laddaren.
Redskapet/verktyget/batteriet ska placeras på en plats
med god ventilation vid laddning.
.
Batterier
Försök aldrig öppna batteriet.
Utsätt inte batteriet för vatten.
Utsätt inte batteriet för värme.
Förvara inte apparaten på platser där temperaturen kan bli
högre än 40 °C.
Ladda endast vid temperaturer mellan 10 °C och 40 °C.
Ladda endast med hjälp av laddare som medföljer
apparaten/verktyget. Användning av fel laddare kan
resultera i
en elektrisk stöt eller överhettning av batteriet.
Följ instruktionerna som anges i avsnittet ”skydda miljön”
när du kastar batterierna.
Skydda batteriet från skador/deformeringar i form av slag
och stötar eftersom det kan leda till personskador eller
eldsvåda.
Ladda inte skadade batterier.
Under extrema förhållanden kan batterierna läcka. Om det
försiktigt med en trasa. Undvik hudkontakt.
16
Adaptern är endast avsedd för användning
$
inomhus.
Läs bruksanvisningen före användning.
Elsäkerhet
Eftersom laddaren är dubbelisolerad behövs
ingen jordledare. Kontrollera alltid att
#
nätspänningen överensstämmer med värdet på
typskylten. Försök aldrig byta ut kontakten till
laddaren mot en vanlig kontakt.
Om nätsladden är skadad måste den bytas ut av
tillverkaren eller en auktoriserad BLACK+DECKERverkstad för att undvika fara.
Page 17

(Översättning av originalanvisningarna)
SVENSKA
Ladda batteriet
Batteriet måste laddas innan det används för första gången
samt varje gång det inte ger tillräckligt hög effekt för arbeten
som tidigare klarades av. Batteriet kan bli varmt när det
laddas. Det är normalt och innebär inte att något är fel.
Varning! Ladda inte batteriet om temperaturen i luften är lägre
än 10 °C eller högre än 40 °C. Den rekommenderade
laddningstemperaturen är cirka 24 °C.
Notera: Laddaren laddar inte batteriet om
celltemperaturen är lägre än ungefär 10 °C eller högre än
40 °C. Batteriet får då sitta kvar i laddaren, som kommer
att börja laddningen automatiskt när celltemperaturen har
stigit eller sjunkit.
u Koppla in laddaren i lämpligt uttag innan batteripaketet
sätts i.
u Sätt i batteripaketet i laddaren.
Den gröna laddningsindikatorn kommer att blinka, vilket
visar att batteriet laddas.
Färdigställandet av laddningstillstånd indikeras av grön
lysdiod kvar på kontinuerligt. Förpackningen är fulladdad och
kan användas vid denna tidpunkt eller vänster i laddaren.
Varning! Ladda urladdade batterier så snart
som möjligt efter användning, i annat fall kan
batterilivslängden minska betydligt.
Laddardiagnostik
Denna laddare är designad att upptäcka vissa problem som
kan uppstå med batteripaketet eller strömkällan. Problemen
indikeras av en LED-blinkning i olika mönster.
Dåligt batteri
Laddaren kan upptäcka ett svagt eller skadat batteri. Den
röda LED blinkar i mönstret som anges på etiketten. Om du
ser detta blinkmönster för dåligt batteri, fortsätt då inte att
ladda batteriet. Returnera det till ett servicecenter eller lämna
det till batteriinsamlingen.
Varm/kall fördröjning
När laddaren upptäcker ett batteri som är överdrivet hett
eller överdrivet kallt, kommer den automatiskt att starta en
varm/kall fördröjning och avbryta laddningen tills batteriet
har nått en lämplig temperatur. När detta sker växlar
laddaren automatiskt till paketladdningsläget. Denna
funktion garanterar maximal batterilivslängd. Den röda LED
blinkar i mönstret som anges på etiketten när den heta/kalla
paketfördröjningen upptäcks.
Indikator laddningsstatus
Batteriet är utrustat med en indikator för laddningsstatus.
Den kan användas för att visa den aktuella laddningsnivån i
batteriet i enheten och under laddning. Den indikerar inte
apparatens funktionalitet och kan variera baserat på
produktkomponenter, temperatur och slutanvändarens
användning.
Kontrollera status på laddningen under
användning
u Tryck på status för laddningsindikator (A1).
u De fyra lysdioderna (A2) kommer att lysa för att indikera
laddningsprocenten i batteriet (g.A.)
u Om LED-lampan inte lyser, ladda batteriet.
Lämna batteriet i laddaren
Batteriet kan sitta kvar i laddaren och laddaren kan vara
ansluten till vägguttaget hur länge som helst när indikatorn
lyser. Laddaren ser till att batteriet hålls fräscht och fulladdat.
Funktioner
This appliance includes some or all of the following features.
1. Handtag
2. PÅ/AV, säkerhetsbygel
3. Säkerhetsnyckel
4. Säkerhetsomkopplarknapp
5. Stång för rotation a utkastare
6. Vred ramlås/-frigöring (x4)
7. Lucka batterifack
8. Hjul
9. Bärhandtag (endast för transport)
10. Utkastarrör
11. Utkastardeektor
12. Deektorvred
13. Skruv
14. Mellanram
15. Övre ram
16. Rensluckehandtag
17
Page 18

SVENSKA
(Översättning av originalanvisningarna)
Montering
Varning! Se till att verktyget är avstängt och att det inte är
anslutet innan monteringen börjar.
Varning! Innan montering se till att säkerhetsbygeln (2) är
lossad och säkerhetsnyckeln (3) är borttagen.
Handtag
u För att aktivera styrhandtaget, dra uppåt på den övre
ramen (15) såsom visas i gur B.
u Fäst anslutningen för nedre ramen (17) mot mellanramen
(14) genom att fästa samman handtagsbultarna (18) och
ramvredet (6) på var sida såsom visas i gurerna C och D.
u Fäst anslutningen för mellanramen (14) mot övre ramen
(15) genom att dra åt handtagsbultarna och ramvreden (6)
på var sida såsom visas i gur E.
Utkastarrör
u Placera utkastardeektorn (11) på utkastarröret (10).
u Sätt in en utkastarpackning (19) mellan
utkastaranslutningen och fäst montaget med ett
deektorvred (12) och bult (20) på var sida såsom visas i
gurerna F, G och H.
u Placera utkastardeektorn på önskad höjd för
snöströmmen.
NOTERA: Dra inte åt deektorvreden för hårt.
Stång för rotation a utkastare
u Sätt in stången för rotation av utkastare (5) genom
öppningen på lastöglan (21) som är placerad på
mellanramen (14) såsom visas i gur I.
u Leta reda på utkastarrotationskopplingen (22) på
huvudhöljet.
u Sätt in utkastarrotationsspaken i
utkastarrotationskopplingen (22) och fäst montaget med
den medföljande låspinnen (23) såsom visas i gur J.
Montering och borttagning av batteripaket
Varning! Innan du sätter i eller tar ut batterierna ska du
kontrollera att säkerhetsnyckeln är borttagen.
Installera batteripaketet
u Lyft upp batterifackets lock (7) för att exponera
batterifacket (24) såsom visas i gur K.
u Glid batteriet (25) in i batterifacket tills det sitter helt i och
ett ljudligt klick hörs, såsom visas i gur L. Se till att
batteripaketet sitter helt isatt och är låst på plats.
u Stäng luckan till batterifacket. Se till att locket är helt
fastsatt innan snöslingan startas.
Ta bort batteripaketet
u Öppna batterifackets lock (7) såsom beskrivs ovan.
18
u Tryck ned batteriets låsknapp som är placerad på
batteripaketet och dra ut batteripaketet från verktyget
såsom visas i gur M.
Användning
LÄS IGENOM BRUKSANVISNINGEN INNAN SNÖSLUNGAN
ANVÄNDS. Se "Funktionsbeskrivning” för att bekanta dig med
de olika kontrollernas och inställningarnas placering. Spara
denna manual för kommande referens.
Varning! Låt redskapet arbeta i sin egen takt. Överbelasta
inte.
u Öppna batterifackets lock och skjut in batteriet i facket tills
det sitter fast och ett ljudligt klick hörs, såsom visas i gur
L. Se till att batteripaketet sitter helt isatt och är låst på
plats.
u Stäng luckan till batterifacket. Se till att locket är helt
fastsatt innan snöslingan startas.
u Sätt i säkerhetsnyckeln (3) i nyckelöppningen (26) som är
placerat på omkopplarhöljet till den sitter helt inuti höljet
såsom visas i gur N. Snöslungan är nu klar att tas i bruk.
u Denna snöslunga är utrustad med en special på-av
omkopplingsbox. För att köra snöslungan, tryck på
säkerhetsomkopplarknappen (4) på omkopplingsboxen
(27), dra sedan PÅ/AV säkerhetsbygeln (2) till
styrhandtaget såsom visas i gur O.
u Stäng av snöslungan genom att släppa PÅ/AV
säkerhetsbygeln (2).
Hanteringstips
Varning! Inspektera alltid området där snöslungan ska
användas och rensa bort alla stenar, grenar, ledningar, ben
o.s.v. eftersom de kan kastas iväg av snöslungan.
Varning! Vissa delar av snöslungan kan frysa under extrema
temperaturförhållanden. Försök inte att köra snöslungan när
delar är frusna. Om en del fryser medan snöslungan används,
stanna snöslungan, ta bort batteriet och inspektera de frusna
delarna. Frigör alla delar innan du startar igen eller använder
snöslungan.
Varning! Var mycket försiktig när du byter riktning vid arbete
på sluttningar. Se till att alltid ha bra fotfäste.
u Håll området som skall bearbetas fritt från främmande
föremål och kan kastas iväg av snöslungan. Vissa föremål
kan vara dolda under snötäcket. Om snöslungan träffar på
ett hinder eller plockar upp ett främmande föremål, stopp
snöslungan, ta bort batteriet, ta bort hindret och inspektera
enheten efter skador. Reparera eller byt ut alla skadade
delar innan enheten startas och används igen.
u Se till att barn, djur och åskådare hålls borta från
arbetsområdet.
u När snöslungan föryttas, använd hjulen som böjaxel.
Luta snöslungan lätt på denna böjaxel för att ytta den
framåt eller bakåt.
u Starta vägen som skall rengöras i mitten av
Page 19

(Översättning av originalanvisningarna)
SVENSKA
arbetsområdet. Kasta snön i en fram- och backrörelse,
ytta varje gång utkastarröret bort från området du rengör.
Se till att du överlappar vägen som rensas.
u Om så är möjligt, kasta snön i samma riktning som vinden
blåser, inte mot vinden. Detta förhindrar att snön blåser in
på rengjorda områden.
u Vid arbete på steniga, grusade och obelagda ytor, undvik
att kasta löst material tillsammans med snön genom att
skjuta ned handtaget för att höja skrapan vid basen på
enheten över stenarna eller gruset.
Överbelastad motor
För att förhindra skador på grund av överbelastning, försök att
inte försöka ytta för mycket snö på en gång. Skjut inte
snöslungan framåt med stor kraft. Sakta ned, låt snöslungan
arbeta i sin egen takt.
Byta utkastarriktning och höjd
Varning! Rikta aldrig utkastarröret mot operatören, fordon
eller närliggande byggnader. Den utkastade snön och
främmande föremål som oavsiktligt plockats upp och kastas
med snön kan orsaka allvarliga skador och personskador.
Rikta alltid utkastarröret i motsatt riktning mot där operatören,
åskådare, omgivande fordon eller byggnader är placerade.
u Utkastarröret har ett driftområde på 180 grader. Rikta in
snöutkastaren genom att rotera röret med
utkastarrotationsspaken (5) såsom visas i gur 16.
Varning! Lossa säkerhetsbygeln (2), ta bort säkerhetsnyckeln
(3) och ta bort batteriet innan någon justering, inspektion,
service, byte av tillbehör, rengöring av snöslungan och
liknande görs. All hantering skall endast utföras efter att rörliga
delar inuti snöslungan har stannat helt och hållet.
Utkastardeektorn (11) överst på utkastarröret (10)
kontrollerar höjden på utkastade snöströmmen. När deektorn
är upp kommer snön att kastas höge upp, När deektorn är
ner kommer snön att kastas lägre.
u Lossa deektorvreden (12) för att höja eller sänka
deektorn till önskad höjd. Dra sedan åt deektorvreden
igen (12) för att fästa deektorn.
NOTERA: Dra inte åt deektorvreden för hårt.
Varning! Se till att rördeektorn är helt låst på utkastarröret.
Alla mellanrum mellan utkastarröret och utkastardeektorn
kan göra att främmande föremål som plockas upp av
snöslungan kan kastas i riktning mot operatören och orsaka
allvarliga kroppsskador.
u Placera inte utkastardeektorn för långt ned eftersom det
kan skapa ett mellanrum (28) mellan deektorn och
utkastarröret såsom visas i gur Q.
Rengöra blockeringar
Varning! Lossa säkerhetsbygeln (2), ta bort säkerhetsnyckeln
(3) och ta bort batteriet innan någon justering, inspektion,
service, byte av tillbehör, rengöring av snöslungan och
liknande görs. All hantering skall endast utföras efter att rörliga
delar inuti snöslungan har stannat helt och hållet.
u Lossa säkerhetsbygeln (2), ta bort säkerhetsnyckeln (3)
och ta bort batteriet.
u Inspektera utkastarröret och skruvarhöljet om det nns
tilltäppningar eller blockeringar.
u Använd medföljande snöröjningsstång (16) för att ta bort
tilltäppningar och blockeringar.
Varning! FÖRSÖK INTE ATT TA BORT TILLTÄPPNINGAR
ELLER BLOCKERINGAR MED HÄNDERNA. Om en del
fryser medan snöslungan används, stanna snöslungan, ta bort
batteriet. Frigör alla delar innan du startar igen eller använder
snöslungan.
Tillbehör
Varning! Det kan vara farligt att använda tillbehör som inte är
rekommenderade för användning med detta verktyg.
Rekommenderade tillbehör för användning med din snöslunga
nns tillgängliga från din lokala BLACK+DECKER
återförsäljare eller auktoriserade servicecenter.
Underhåll
Det här BLACK+DECKER sladdlösa apparat/verktyg har
konstruerats för att fungera under lång tid med minsta möjliga
underhåll. Med rätt underhåll och regelbunden rengöring
behåller verktyget/apparaten sin funktion.
Laddaren behöver inget annat underhåll än regelbunden
rengöring.
Varning! Innan något underhåll utförs på sladdanslutna/
sladdlösa elverktyg:
u Stäng av apparaten/verktyget och dra ur nätkontakten.
u Du kan också ta ut batteriet ur apparaten/verktyget om
apparaten/verktyget har ett separat batteri.
u Om batteriet är inbyggt låter du det laddas ur helt innan
avstängningen.
u Dra ur sladden till laddaren innan du rengör den. Laddaren
behöver inget annat underhåll än regelbunden rengöring.
u Rengör regelbundet verktyget/apparaten luftintag med en
mjuk borste eller torr trasa.
u Rengör motorkåpan regelbundet med en fuktig trasa.
Använd aldrig rengöringsmedel med lösnings- eller
slipmedel.
19
Page 20

SVENSKA
(Översättning av originalanvisningarna)
Felsökning
Problem Lösning
Snöslungan körs inte
när säkerhetsbygeln
är aktiverat.
Enheten stannar när
snö yttas.
Snöslungan bullrar
och vibrerar onormalt
mycket.
Kontrollera att säkerhetsnyckeln
sitter ordentligt på plats och att
låsknappen tryckts in ordentligt
innan du drar in säkerhetsbygeln.
Släpp säkerhetsbygeln för att
stänga av snöslungan. Ta ur
säkerhetsnyckeln och
batteripaketet och kontrollera att
skruven rör sig fritt.
Kontrollera att batteriet är fritt från
skräp och att det är korrekt
anslutet.
Är batteriet fulladdat?
Släpp säkerhetsbygeln för att
stänga av snöslungan. Ta ur
säkerhetsnyckeln och batteriet.
Kontrollera att skruven rör sig fritt.
Kontrollera att batteriet är fritt från
skräp och att det är korrekt
anslutet.
Är batteriet fulladdat?
Flytta laddaren och batteriet till en
plats där temperaturen i den
omgivande luften är över 4,5 °C
eller under +40,5 °C.
Undvik överbelastning av
snöslungan. Sakta ned
arbetstakten.
Stäng av snöslungan genom att
släppa upp säkerhetsbygeln. Ta
ur säkerhetsnyckeln och batteriet.
Kontrollera att skruven rör sig fritt
och se till att den inte har böjts
eller skadats. Om den är skadad,
returnera snöslungan till ett
BLACK+DECKER auktoriserat
servicecenter.
Om det inte nns några synliga
skador och snöslungan
fortfarande vibrerar: Returnera
snöslungan till ett auktoriserat
BLACK+DECKER auktoriserats
servicecente
.
Skydda miljön
Separat insamling. Denna produkt får inte
kasseras tillsammans med vanligt hushållsavfall.
Z
Tänk på miljön när du slänger denna BLACK+DECKER-
produkt. Släng den inte tillsammans med hushållsavfallet. Gör
denna produkt tillgänglig för separat insamling.
Separat insamling av använda produkter och
förpackningar möjliggör att ämnena kan återvinnas
z
och användas igen.
Återanvändning av återvunna ämnen bidrar till att
förhindra miljöföroreningar och minskar behovet av
råmaterial.
Lokala bestämmelser kan ge anvisningar för separat insamling
av elektriska produkter från hushållen, på kommunala
avfallsanläggningar eller via återförsäljaren när du köper en ny
vara.
BLACK+DECKER samlar in och återvinner uttjänta
BLACK+DECKER-produkter. För att utnyttja denna tjänst,
återsänd din vara till något behörigt reparationsombud, som
kommer att tillvarata den å dina vägnar.
För information om närmaste auktoriserade verkstad, kontakta
det lokala BLACK+DECKER-kontoret på den adress som är
angiven i bruksanvisningen. En lista över alla auktoriserade
BLACK+DECKER verkstäder samt fullständiga detaljer om
våd kundtjänst och kontakter nns tillgängliga på Internet
på:www.2helpU.com
Batterier
Kassera batterierna på ett miljövänligt sätt när de
är förbrukade:
Z
u Låt batteriet laddas ur helt och ta sedan ut det ur
verktyget.
u Batterier av typerna nickelmetallhydrid (NiMH) och
litiumjon (Li-jon) kan återvinnas. Packa in batterierna så
att polerna inte kan kortslutas. Ta med dem till en
auktoriserad verkstad eller en återvinningsstation.
u Kortslut inte batteripolerna.
u Släng aldrig batterier i elden eftersom det kan leda till
personskador eller orsaka en explosion.
.
Batteriladdarens
lysdioder lyser inte.
20
Kontrollera kontaktanslutningen.
Byte av laddare.
Page 21

(Översättning av originalanvisningarna)
SVENSKA
Tekniska data
SNC3650L252
Spänning
Obelastad
hastighet
Vikt
Batteri BL2036
Spänning
Kapacitet Ah 2.0
Typ
Laddare 90567393 -05 typ.1
Spänning
Utspänning
Strömstyrka mA 1.3A
Laddningstid
cirka
Det vägda geometriska medelvärdet av vibrationsfrekvensen
enligt EN 786: = < 3.175 m/s2 , osäkerhet (K) = 1.5 m/s2.
LPA (ljudnivå) 70,2 dB(A) osäkerhet (K) 2,5 dB(A)
VDC36
-1
min
kg
V
dc
V
AC
V
DC
h
2500
14.5
36
Li-ion
230
36
1.5
EG-deklaration om överensstämmelse
MASKINDIREKTIV
BULLERFÖRESKRIFTER, UTOMHUS
Den akustiska effekten enligt 2000/14/EG
(Annex III, L ≤ 50 cm):
LWA (uppmätt ljudnivå) 85.18 dB(A)
osäkerhet (K) = 2 dB(A)
LWA (garanterad ljudnivå) 89 dB(A)
osäkerhet (K) = 2 dB(A
De här produkterna överensstämmer även med direktiven
2004/108/EG och 2011/65/EU.
För ytterligare information, kontakta Black & Decker på
följande adress eller se baksidan av bruksanvisningen.
Undertecknad är ansvarig för sammanställningen av tekniska
data och gör denna försäkran för Black & Decker.
R. Laverick
Engineering Manager
Black & Decker Europe, 210 Bath Road, Slough,
Berkshire, SL1 3YD
Storbritannien
28/07/2015
%
SNC3650L252 Snöslunga
Black & Decker garanterar att dessa produkter som beskrivs
under Tekniska data uppfyller:
2006/42/EC, EN 60335-1:2012 +A11; 2014,
ISO/DIS 8437; 1989
EN 62233; 2008
2000/14/EC, ANNEX III av 2000/14/EG som tillägg till
2005/88/EG,
TÜV Rheinland LGA Products GmbH;
Tillystraß 2 D-90431N..1rnberg, Tyskland;
Anmält organ ID-nr.:0197
21
Page 22

NORSK
SVENSKA
(Översättning av originalanvisningarna)
Garanti
Black & Decker garanterar att produkten är fri från materialoch/eller fabrikationsfel vid leverans till kund. Garantin gäller
utöver konsumentens rättigheter enligt lag och påverkar inte
dessa. Garantin är giltig i de territorier som tillhör
medlemsstaterna i Europeiska unionen och det europeiska
frihandelsområdet.
Om en Black & Decker-produkt går sönder på grund av
material- och/eller fabrikationsfel eller brister i
överensstämmelse med specikationen, inom 24 månader
från köpet, åtar sig Black & Decker att reparera eller byta ut
produkten med minsta besvär för kunden, förutom om:
u Produkten har använts i kommersiellt, yrkesmässigt eller
uthyrningssyfte;
u Produkten har utsatts för felaktig användning eller skötsel;
u Produkten har skadats av främmande föremål eller ämnen
eller genom olyckshändelse;
u Reparation har utförts av någon annan än en
auktoriserad Black & Decker-verkstad.
Vid garantianspråk ska produkten och inköpskvittot lämnas till
återförsäljaren eller till en auktoriserad verkstad. För
information om närmaste auktoriserade verkstad, kontakta det
lokala Black & Decker-kontoret på den adress som är angiven
i bruksanvisningen. En lista över alla auktoriserade Black &
Decker verkstäder samt fullständiga detaljer om våd
kundtjänst och kontakter nns tillgängliga på Internet
på:www.2helpU.com
Besök vår webbplats www.blackanddecker.se för att registrera
din nya BLACK+DECKER-produkt samt för att få information
om nya produkter och specialerbjudanden. Mer information
om märket BLACK+DECKER och vårt produktsortiment nns
på www.blackanddecker.se
22
22
Page 23

(Oversettelse av de opprinnelige instruksjonene)
NORSK
Tiltenkt bruk
Din BLACK+DECKER SNC3650L252 Snøfreser er designet
for å fjerne snø. Apparatet er beregnet bare for privat bruk.
Sikkerhetsinstruksjoner
Advarsel! Når du bruker batteridrevne apparater, må du alltid
ta grunnleggende forholdsregler når det gjelder sikkerhet,
blant annet dem som er beskrevet nedenfor, for å redusere
risikoen for brann, elektrisk støt, personskade og materiell
skade.
Advarsel! Når du bruker maskinen, må du følge
sikkerhetsreglene. Les disse instruksjonene før du bruker
maskinen, for å ivareta sikkerheten for deg selv og personer i
nærheten. Ta vare på instruksjonene for senere bruk.
u Les hele denne bruksanvisningen nøye før du bruker
apparatet.
u Beregnet bruk er beskrevet i denne bruksanvisningen.
Hvis du bruker annet tilbehør, kobler til annet utstyr eller
bruker dette apparatet til andre oppgaver enn det som er
anbefalt i denne håndboken, kan det føre til fare for
personskade.
u Gjør deg kjent med hvordan man betjener og bruker
apparatet på riktig måte.
u Vit hvordan du stopper enheten og kobler ut kontrollen
raskt.
u Du må aldri la barn bruke verktøyet. Du må aldri la voksne
bruke verktøyet uten
tilstrekkelig opplæring.
u Hold arbeidsområdet fritt for alle personer, spesielt små
barn og kjæledyr.
u Vær forsiktig slik at du ikke sklir eller faller, spesielt når du
arbeider i revers.
u Ta vare på denne håndboken for fremtidig bruk.
Bruke produktet
Vær alltid forsiktig når du bruker apparatet.
u Kontroller nøye området der maskinen skal brukes, og
fjern alle dør matter, sleder, planker, kabler og andre
objekter.
u Koble fra alle clutcher og skift til nøytral før du starter
motoren.
u Ikke bruk utstyret uten å bruke skikkelig vintertøy. Bruk
fottøy som forhindrer at du sklir på glatte overater.
u Bruk en jordet trekabels kontakt for alle enheter med
elektrisk drevne motorer eller elektrisk startmotor.
u Juster fresehusets høyde for klaring ved grus eller knust
steinoverate.
u Du skal aldri prøve å gjøre justeringer mens motoren er i
gang (unntatt når det er anbefalt av produsenten).
u Bruk av motordrevet maskin kan resultere i at fremmede
objekter blir kastet mot øynene.
u Du skal alltid bruke vernebriller eller visir under bruk eller
mens du utfører justering eller reparasjoner.
u Det er ikke meningen at dette apparatet skal brukes av
unge eller svekkede personer uten tilsyn.
u Apparatet skal ikke brukes som leketøy.
u Pass på at barn og dyr ikke kommer i nærheten av
arbeidsområdet, og at de ikke berører apparatet.
u Pass ekstra godt på når apparatet brukes i nærheten av
barn.
u Ikke senk produktet ned i vann.
u Ikke åpne apparathuset. Verktøyet inneholder ingen deler
som kan vedlikeholdes av brukeren.
u Ikke bruk apparatet i omgivelser med eksplosjonsfare, for
eksempel på steder der det nnes brennbare væsker,
gasser eller støv.
u Ikke ha hendene eller føttene i nærheten av eller under
roterende deler. Hold deg alltid unna utkasteråpningen.
u Utøv stor forsiktighet når du bruker utstyret på eller
krysser gruslagte innkjørsler, stier eller veier. Vær
oppmerksom på skjulte farer eller trakk.
u Etter å ha kommet bort i et fremmedobjekt skal du straks
stoppe motoren, fjerne batteriene fra hovedapparatet,
inspisere snøfreseren nøye for skade og reparere skaden
før du restarter og bruker snøfreseren.
u Hvis enheten skulle begynne å vibrere unormalt, skal du
stoppe motoren og med en gang sjekke årsaken.
Vibrasjoner er vanligvis et varsel om problemer.
u Fjern sikkerhetsnøkkelen hver gang du går bort fra
driftsposisjon, før du renser oppsamleren/rotor
-huset eller utkasteren, og når du utfører reparasjoner,
justeringer eller inspeksjoner.
u Når du rengjør, reparerer eller inspiserer vær sikker på at
oppsamleren/rotoren og alle bevegelige deler har stoppet.
u Ikke fjern snø på tvers av skråninger. Vær svært forsiktig
når du endrer retning i skråninger. Ikke prøv å frese bratte
skråninger.
u Du skal aldri bruke snøfreseren uten skikkelig beskyttelse,
plater eller andre sikkerhetsbeskyttende enheter på plass.
u Du skal aldri bruke snøfreseren nær drivhus, biler, vinduer,
etc. uten skikkelig justering av vinkelen på snøutkasteren.
Hold unna barn og kjæledyr.
u Ikke overbelast maskinkapasiteten ved å prøve å fjerne
snø for fort.
u Du skal aldri bruke maskinen ved høy transportfart på
glatte overater. Ut øv forsiktighet når du rygger.
u Du skal aldri sikte utkasteren på tilskuere eller la noen stå
foran enheten.
u Koble fra strømmen til oppsamleren/rotoren når
snøfreseren transporteres eller ikke er i bruk.
u Du skal kun bruke tilbehør og tilleggsutstyr som er
godkjent av produsenten av snøfreseren (slik som hjul).
23
Page 24

NORSK
(Oversettelse av de opprinnelige instruksjonene)
u Du skal aldri bruke snøfreseren uten god sikt og
belysning. Vær alltid sikker på hvor du tråkker og hold et
hardt grep på håndtakene. Gå, løp aldri.
u Du skal ikke ha på passasjerer.
u Du skal aldri bruke snøfreseren uten god sikt og
belysning.
u Ta alle mulige forholdsregler når du forlater maskinen uten
tilsyn. Fjern sikkkerhetsnøkkelen.
Etter bruk
u Når apparatet ikke er i bruk, skal det oppbevares på et tørt
og godt ventilert sted og utilgjengelig for barn.
u Barn skal ikke ha tilgang til apparater som oppbevares.
u Når apparatet oppbevares eller transporteres i et kjøretøy,
bør det plasseres i bagasjerommet eller festes, slik at det
ikke påvirkes av raske farts- eller retningsendringer.
Kontroll og reparasjon
u Kontroller at produktet ikke er skadet eller har defekte
deler før du bruker det. Undersøk om brytere eller andre
deler er skadet, eller om det er andre forhold som kan
påvirke bruken.
u Ikke bruk verktøyet hvis noen del er skadet eller defekt.
u Overlat reparasjon eller utskifting av skadde eller defekte
deler til et autorisert serviceverksted.
u Forsøk aldri å fjerne eller bytte ut andre deler enn delene
som er oppgitt i denne bruksanvisningen.
Ytterligere sikkerhetsinstruksjoner for snøfresere
u Fres snøen på langs av skråninger, aldri opp og ned. Vær
svært forsiktig når du endrer retning i skråninger.
u Se opp for hull, spor, humper, steiner eller andre skjulte
ting. Ujevnt terreng kan føre til uhell der man sklir og faller.
Høyt gress kan skjule hindringer.
u Ikke bruk snøfreseren på vått gress eller i svært bratte
skråninger. Dårlig fotfeste kan føre til uhell der man sklir
og faller.
u Ikke bruk snøfreseren i nærheten av skrenter, grøfter eller
fyllinger. Du kan miste fotfestet eller balansen.
u Ikke bruk hendene til å rense rennen.
u Stopp motoren før du fjerner avfall.
u Ikke rett utløpet mot andre personer.
Andre personers sikkerhet
u Dette apparatet er ikke ment for bruk av personer
(inkludert barn) med redusert fysiske, sensoriske eller
mentale evner, eller mangel på erfaring og kunnskap, med
mindre de får tilsyn eller har blitt opplært i bruk av
apparatet av en person ansvarlig for deres sikkerhet.
u Barn må ha tilsyn så man sikrer at de ikke leker med
verktøyet.
Andre risikoer
Når verktøyet brukes, kan det oppstå ytterligere risikoer som
kanskje ikke er beskrevet i de medfølgende
sikkerhetsadvarslene. Disse risikoene kan bli forårsaket av feil
bruk, langvarig bruk osv.
Selv om de relevante sikkerhetsbestemmelsene blir fulgt, og
sikkerhetstiltakene blir gjennomført, kan visse gjenværende
risikoer ikke unngås. Disse inkluderer:
u Personskader som forårsakes av berøring av en
roterende/bevegelig del.
u Personskader som oppstår ved skifte av deler, blader
eller tilbehør.
u Personskader som skyldes for lang tids bruk av
verktøyet. Når du bruker et verktøy i lange perioder,
må du sørge for å ta regelmessige pauser.
u Hørselskader.
u Helsefarer forårsaket av innånding av støv som
utvikler seg når du bruker verktøyet (eksempel: arbeid
med tre, spesielt eik, bøk og MDF).
Advarselssymboler
Følgende advarselssymboler vises på verktøyet sammen med
datokoden:
Advarsel! Les, forstå og følg alle instruksjonene
i bruksanvisningen før du monterer og bruker
enheten.
R
Advarsel! Hold apparatet unna regn eller
fuktighet. Holdes tørt.
Advarsel! Se opp for skarpe blader.
Du skal alltid slå maskinen AV og fjerne
sikkerhetsnøkkelen før du utfører inspeksjon,
rengjøring og vedlikehold.
Advarsel! Vær oppmerksom på yvende stener
og andre fremmede objekter som kan kastes ut
av apparatet. Hold personer i nærheten borte
fra arbeidsområdet.
Bruk hørselsvern.
Bruk vernebriller.
Bruk pustebeskyttelse.
Hold hender, føtter og klær unna den roterende
skruen for å unngå personskader.
24
Page 25

(Oversettelse av de opprinnelige instruksjonene)
NORSK
Fare! Kutte/avkappingfare - hold føtter unna
den roterende skruen.
Fare! Kutte/avkappingfare - hold hender unna
den roterende skruen. Ikke bruk hendene til å
rense huset. Stopp motoren før du fjerner avfall.
Hold personer og barn i sikker avstand (minst
10 meter) borte fra arbeidsområdet.
Bruk arbeidshansker og sklisikkert fottøy når du
bruker maskinen og håndterer avfall.
Ikke bruk hendene til å rense rennen.
sekunder eller at du har slått av maskinen.
Kun for innendørs bruk. Batteriladeren skal kun
brukes innendørs.
Garantert lydeffekt i henhold til direktiv 2000/14/
EF.
Advarsel! Batterivæsken kan føre til personskade eller skade
på eiendom. Ved hudkontakt skyller du umiddelbart med vann.
Hvis huden blir rød eller irritert eller smerter inntreffer, søk
øyeblikkelig medisinsk hjelp. Hvis væsken kommer i kontakt
med øynene, skyller du umiddelbart med rent vann og søker
øyeblikkelig medisinsk hjelp.
p
Ikke forsøk å lade opp skadede batterier.
Ladere
Laderen er konstruert for en bestemt spenning.
Kontroller alltid at nettspenningen er i overensstemmelse med
spenningen på typeskiltet.
Advarsel! Ikke skift ut laderen med et vanlig nettstøpsel.
BLACK+DECKER-laderen skal bare brukes til å lade
batteriet i maskinen/verktøyet som laderen kom sammen
med. Andre batterier kan sprekke og føre til personskade
og materiell skade.
Prøv aldri å lade ikke-oppladbare batterier.
Hvis strømledningen blir skadet, må den byttes av
produsenten eller et autorisert BLACK+DECKERservicesenter for å unngå fare.
Ikke utsett laderen for vann.
Ikke åpne laderen.
Apparatet, verktøyet eller batteriet må plasseres på et
sted med god gjennomlufting under ladning.
Ytterligere sikkerhetsinstruksjoner for batterier og ladere
Batterier
Forsøk aldri å åpne av noen årsak.
Ikke utsett batteriene for vann.
Ikke utsett batteriet for varme.
Ikke oppbevar det på steder hvor temperaturen kan
komme over 40 °C.
Lad bare ved temperaturer mellom 10 og 40 °C.
Bruk bare laderen som følger med
apparatet/verktøyet. Bruk av feil lader kan føre til
et elektrisk sjokk eller overoppheting av batteriet.
skal kaste batterier.
Ikke skade eller deformer batteripakken ved punktering
eller støt, da dette kan føre til risiko for personskade og
brann.
Du må ikke lade skadede batterier.
Under ekstreme forhold kan batterilekkasje forekomme.
Hvis du oppdager væske på batteriene, må du tørke den
forsiktig av med en klut. Unngå kontakt med huden.
Hvis væsken kommer i kontakt med huden eller øynene,
skal du følge instruksjonene nedenfor.
$
Adapteren er bare beregnet for innendørs bruk.
Les denne håndboken før bruk.
Elektrisk sikkerhet
Denne laderen er dobbeltisolert. Jording er derfor
ikke nødvendig. Kontroller alltid at nettspenningen
#
er i overensstemmelse med spenningen på
typeskiltet. Ikke skift ut laderen med et vanlig
nettstøpsel.
Hvis strømledningen blir skadet, må den byttes av
produsenten eller et autorisert BLACK+DECKERservicesenter for å unngå fare.
25
Page 26
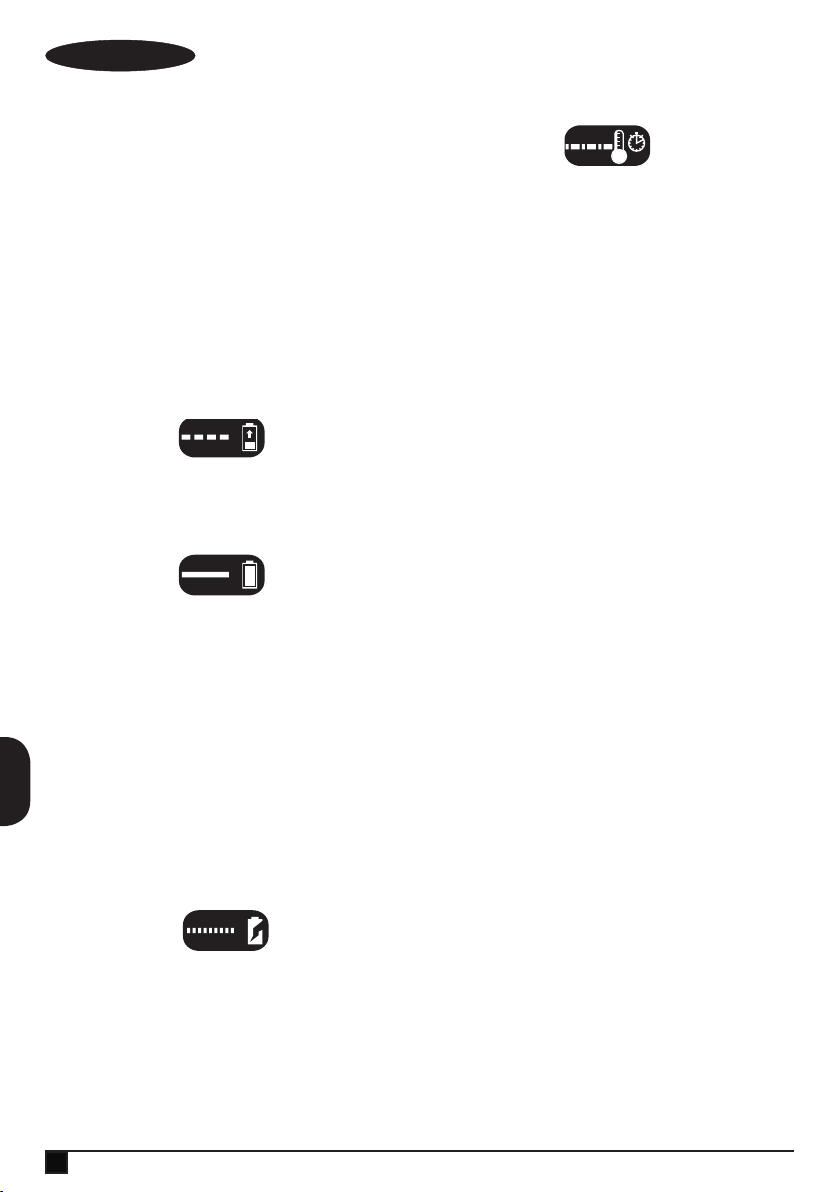
NORSK
(Oversettelse av de opprinnelige instruksjonene)
Lading av batteriet
Batteriet må lades før første gang det brukes, og hver gang
det ikke lenger gir nok strøm til oppgaver som tidligere ble
utført uten problemer. Batteriet kan bli varmt under lading.
Dette er normalt og innebærer ikke feil.
Advarsel! Ikke lad batteriet ved omgivelsestemperaturer
under 10 °C eller over 40 °C. Anbefalt ladetemperatur er ca.
24 °C.
Merk: Laderen vil ikke lade et batteri hvis
celletemperaturen er under ca. 10 °C eller over 40 °C.
Du bør la batteriet stå i laderen. Laderen begynner å lade
automatisk når celletemperaturen blir høyere eller lavere.
u Plugg inn laderen i en passende stikkontakt før du setter
inn batteripakken.
u Sett batteripakken inn i laderen.
Det grønne LED-lyset blinker for å varsle om at batteriet
lades.
Gjennomføringen av strøm som er angitt ved den grønne
LED igjen på kontinuerlig. Pakningen er helt oppladet, og
kan anvendes på dette tidspunkt eller til venstre i laderen.
Advarsel! Lad opp utladete batterier så fort
som mulig etter bruk, ellers vil batteriets
levetid forringes.
Laderdiagnose
Denne laderen er designet for å oppdage visse problemer
som kan oppstå med batteripakken eller strømkilden.
Problemer indikeres av et LED-lys som blinker i ulike mønstre.
Dårlig batteri
Laderen kan oppdage et svakt eller ødelagt batteri. LED-lyset
blinker i mønsteret som er indikert på merkelappen. Hvis du
ser dette blinkemønsteret for dårlig batteri, skal du ikke
fortsette å lade batteriet. Returner det til et servicesenter eller
et oppsamlingssted for resirkulering.
Ventetid for varm/kald pakke
Dersom laderen detekterer et batteri som er for varmt eller
for kaldt, vil den automatisk starte en "varm/kald pakke
forsinkelse", og venter med å lade til batteriet har passende
temperatur. Etter at dette har skjedd vil laderen automatisk
skifte til pakkelademodus. Denne funksjonen sikrer
maksimal levetid på batteriet. Det røde LED-lyset blinker i
mønsteret indikert på merkelappen når varm/kald
pakkeforsinkelse er oppdaget.
Status på ladeindikator
Batteriet er utstyrt med en status på ladeindikator. Denne
kan brukes til å vise batteriets ladenivå under bruk og under
ladning. Den gir ingen indikasjon på om verktøyet fortsatt
kan brukes, og kan variere med produktkomponentene,
temperatur og brukerens bruksområde.
Sjekke ladestatus under bruk
u Trykk på ladeindikatorknappen (A1) .
u De re LED-lysene (A2) vil lyse og indikere
ladeprosenten på batteriet (Figur A.)
u Hvis LED-lyset ikke lyser skal du lade batteriet.
La batteriet være i laderen
Laderen og batteripakken kan forbli tilkoblet med lysende
LED-lys i ubegrenset tid. Laderen holder batteripakken klar og
fulladet.
Funksjoner
Dette apparatet har noen av eller alle funksjonene nedenfor.
1. Håndtak
2. PÅ/AV bryterboks
3. Sikkerhetsnøkkel
4. Sikkerhetsbryterknapp
5. Roterende styrestang
6. Rammelås/utløserknott (x4)
7. Batteriromdeksel
8. Hjul
9. Bærehåndtak (Kun for transport)
10. Utløserrenne
11. Utkasterreektor
12. Reektorknott
13. Drill
14. Midtramme
15. Øvre ramme
16. Rensepinne
26
Page 27

(Oversettelse av de opprinnelige instruksjonene)
NORSK
Montering
Advarsel! Før monteringen må du passe på at verktøyet er
slått av, og at støpselet er trukket ut.
Advarsel! Før monteringen må du passe på at
sikkerhetshåndtaket (2) er utløst og at sikkerhetsnøkkelen er
tatt ut.
Håndtak
u For å aktivere håndtaket skal du dra oppover den øvre
rammen (15) som vist på gur B.
u Sikre koblingen til den nedre rammen (17) til midtrammen
(14) ved å skru til håndtaksboltene (18) og rammeknottene
(6) på hver side som vist på gurene C & D.
u Sikre koblingen til midtrammen (14) til den øvre rammen
(15) ved å fest håndtaksboltene og rammeknottene (6) på
hver side som vist på gur E.
Løsne utkaster
u Sett reektoren (11) på utkasteren (10).
Sett inn utkasterpakningen (19) mellom utkasterfestet og
sikre monteringen med en reektorknott (12) og bolt (20)
på hver side som vist på gurene F, G & H.
Posisjoner reektoren på utkasteren til den ønskede
høyden av utkastet snø.
MERK: Ikke fest reektorknottene for hardt.
Roterende styrestang
u Sett inn den roterende styrestangen (5) gjennom åpningen
i øyekroken (21) som sitter på midtrammen (14) som vist
på gur I.
u Sett det roterende utkasterfestet (22) på hovedhuset.
u Sett inn den roterende styrestangen inn i det roterende
utkasterfestet (22) og sikre festet med den tilhørende
holdepinnen (23) som vist på gur J.
Montering og fjerning av batteripakken
Advarsel! Pass på at låseknappen er fjernet for å hindre
utilsiktet aktivering av bryteren før du tar ut eller setter inn et
batteri.
Installere batteripakken
u Løft opp batterihusdekselet (7) for å åpne batterihuset (24)
som vist på gur K.
u Sett batteriet (25) inn i batterihuset til det er hekt inne og
du hører et klikk som vist på gur L. Forsikre deg om at
batteripakken sitter helt inne og er låst i posisjon.
u Steng dekselet på batterirommet. Forsikre deg om at
dekselet er helt igjen før du starter snøfreseren.
Ta ut batteripakken
u Åpne batteridekselet (7) som beskrevet ovenfor.
u Trykk på batteriets utløserknapp som sitter på
batteripakken og dra batteripakken ut av verktøyet som
vist på figur M
Bruk
LES DENNE BRUKSANVISNINGER FØR DU BRUKER
SNØFRESEREN. Se “"Funksjonell beskrivelse" for å bli kjent
med hvor ulike kontroller og justeringer er plassert. Ta vare på
denne bruksanvisning for fremtidig bruk.
Advarsel! La apparatet arbeide i sitt eget tempo. Må ikke
overbelastes.
u Åpne batterihusdekselet og sett batteriet inn i batterihuset
til det er hekt inne og du hører et klikk som vist på gur L.
Forsikre deg om at batteripakken sitter helt inne og er låst
i posisjon.
u Steng dekselet på batterirommet. Forsikre deg om at
dekselet er helt igjen før du starter snøfreseren.
u Sett inn sikkerhetsnøkkelen (3) i nøkkelhullet (26) som er
plassert på bryterhuset til den sitter helt inne i huset slik
som vist på gur N. Snøfreseren er nå klar til bruk.
u Denne snøfreseren er utstyrt med en spesiell av-på
bryterboks. For å bruke snøfreseren skal du trykke på
sikkerhetsbryterknappen (4) på bryterboksen (27), så dra i
AV/PÅ sikkerhetshåndtaksbryteren (2) til håndtaket som
vist på gur O.
u Når du skal slå snøfreseren av, slipper du på/av-bryteren
(2).
Tips for bruk
Advarsel! Sjekk alltid området der snøfreseren skal brukes,
og fjern alle steiner, pinner, tråd, bein og annet avfall som
snøfreseren kan kaste ut.
Advarsel! Noen deler på snøfreseren kan fryse til under
ekstreme temperaturforhold. Du skal ikke bruke snøfreseren
når noen deler har frosset. Hvis en del fryser til mens
snøfreseren er i bruk skal du stoppe snøfreseren, fjerne
batteriet og inspisere for frosne deler. Frigjør alle deler før du
starter opp eller bruker snøfreseren.
Advarsel! Vær svært forsiktig når du endrer retning i
skråninger. Pass på at du alltid opprettholder et godt fotfeste.
u Hold arbeidsområdet fritt for fremmede objekter som kan
kastes ut av rotorbladene. Noen objekter kan være
usynlige på grunn av snødekke. Hvis snøfreseren treffer
en hindring eller plukker opp et fremmedlegeme objekt
under bruk, skal du stoppe snøfreseren, kobel fra batteriet,
fjerne hindringen og inspisere enheten for skade. Reparer
eller bytt ut ødelagte deler før du starter opp og bruker
enheten igjen.
u Forsikre deg om at barn, kjæledyr og tilskuere holdes
borte fra arbeidsområdet.
u Når du ytter snøfreseren skal du bruke hjulene som
dreiepunkt. Tilt snøfreseren lett på dette dreiepunktet for å
bevege den fremover eller bakover.
27
Page 28

NORSK
(Oversettelse av de opprinnelige instruksjonene)
u Start fresingen i senter av arbeidsområdet. Fres snøen
med bevegelse bakover og fremover mens du hver gang
styrer utkasteren bort fra området du rydder. Forsikre deg
om at du overlapper sporene ved fresingen.
u Hvis det er mulig, prøv å mate ut snø med vindretningen,
ikke mot vinden. Dette forhindrer snø fra å bli blåst tilbake
på ryddede områder.
u Når du arbeider på stein, grus eller ikke-asfalterte
overater, unngå å kaste disse materialene sammen med
snøen. Dette gjør du ved at du presser ned håndtaket for
å løfte skraperen i bunnen av fresen over stein eller grus.
Motoroverbelastning
For å forhindre skade på grunn av overbelastning skal du ikke
prøve å fjerne for mye snø om gangen. Ikke dytt snøfreseren
med for mye makt. Ta det med ro, la snøfreseren jobbe i sitt
eget tempo.
Endre kasteretning og kastehøyde
Advarsel! Du skal aldri sikte utkasteren mot deg selv,
tilskuere, kjøretøy eller nærliggende strukturer. Den kastede
snøen og fremmedlegemer som har kommet med og kastes
av snøfreseren kan forårsake alvorlig materiell skade og
personskade.
Du skal alltid sikte utmateren i den motsatte retningen fra hvor
freseren, tilskuere, kjøretøy og strukturer benner seg.
u Utkasteren kan roteres 180 grader ved bruk. Styr snøen
ved å rotere utkasteren med styrestangen (5) som vist på
gur 16.
Advarsel! Løs ut sikkerhetshåndtaket (2), fjern
sikkerhetsnøkkelen (3) og fjern batteriet før du gjør noen
justeringer, inspeksjoner, service, endrer tilbehør, rengjør
snøfresen og lignende. Arbeid skal kun utføres etter at de
bevegelige delene inne i snøfreseren har stoppet opp
fullstendig.
Utkasterreektoren (11) øverst på utkasteren (10) kontrollerer
høyden på utstrømmende snø. Når reektoren er oppe vil
snøen kastes høyere. Når reektoren er nede vil snøen kastes
lavere.
u Løsne reektorknottene (12) for å heve eller senke
reektoren til ønsket høyde. Skru til reektorknottene (12)
igjen for å sikre reektoren.
MERK: Ikke fest reektorknottene for hardt.
Advarsel! Forsikre deg om at reektoren på utkasteren helt
fast på utkasteren. Et mellomrom mellom utkasteren og
reektoren kan føre til at fremmedlegemer plukkes opp av
snøfreseren og kastes i retningen av brukeren og kan
forårsake alvorlig personskade.
u Ikke plasser reetoren på utkasteren for langt nedover da
dette kan forårsake at et mellomrom (28) oppstår mellom
reektoren og utmateren som vist på gur Q.
Fjerne blokkeringer
Advarsel! Løs ut sikkerhetshåndtaket (2), fjern
sikkerhetsnøkkelen (3) og fjern batteriet før du gjør noen
justeringer, inspeksjoner, service, endrer tilbehør, rengjør
snøfresen og lignende. Arbeid skal kun utføres etter at de
bevegelige delene inne i snøfreseren har stoppet opp
fullstendig.
u Løsne sikkerhetshåndtaket (2), fjern sikkerhetsnøkkelen
(3) og fjern batteriet.
u Inspiser utmateren og rotorhuset for blokkeringer og
tilstoppinger.
u Bruk den medfølgende rensepinnen (16) for å fjerne
blokkeringer og tilstoppinger.
Advarsel! IKKE PRØV Å FJERNE BLOKKERINGER OG
TILSTOPPINGER MED HENDENE. Hvis en del fryser fast
mens snøfreseren er i bruk, skal du stoppe snøfreseren og
fjerne batteriet. Frigjør alle deler før du starter opp eller bruker
snøfreseren.
Tilbehør
Advarsel! Bruk av tilbehør som ikke er anbefalt for bruk
sammen med dette verktøyet, kan være farlig.
Anbefalt tilbehør for bruk med din snøfreser er tilgjengelig fra
din lokale Black+Decker forhandler eller et godkjent
servicesenter.
Vedlikehold
BLACK+DECKER-apparatet/-verktøyet med ledning/batteri er
laget for å brukes over lang tid med et minimum av
vedlikehold. Verktøyet/apparatet er avhengig av riktig stell og
regelmessig rengjøring for å fungere som det skal til enhver
tid. Laderen krever ikke annet vedlikehold enn regelmessig
rengjøring.
Advarsel! Før du utfører vedlikehold på elektriskdrevet/
batteridrevet elektroverktøy:
u Slå av apparatet/verktøyet og trekk ut støpselet.
u Eller slå av apparatet/verktøyet og fjern batteriet fra dette
hvis apparatet/verktøyet har separat batteripakke.
u Eller la batteriet gå helt tomt hvis det er innebygd, og slå
deretter av.
u Fjern laderen fra stikkontakten før du rengjør den. Laderen
krever ikke annet vedlikehold enn regelmessig rengjøring.
u Rengjør ventilasjonsåpningene i verktøy/apparat og lader
jevnlig med en myk børste eller tørr klut.
u Rengjør motorhuset regelmessig med en fuktig klut. Ikke
bruk slipende eller løsemiddelbaserte rengjøringsmidler.
28
Page 29

(Oversettelse av de opprinnelige instruksjonene)
NORSK
Feilsøking
Problem Løsning
Snøfreseren vil ikke
gå når
sikkerhetshåndtaket
er aktivert.
Enheten stopper når
jeg freser snø.
Snøfreseren bråker
unormalt og vibrerer.
Batteriladerens
LED-lys er ikke på.
Kontroller at sikkerhetsnøkkelen
er på plass og satt ordentlig inn,
og at startknappen er trykt helt
ned, før du drar i
sikkerhetshåndtaket.
Slipp sikkerhetshåndtaket for å
slå snøfreseren av. Ta ut
sikkerhetsnøkkelen og
batteripakken og kontroller at
skruen kan rotere fritt.
Kontroller at batterihullet er rent
for avfall, og at det er riktig
tilkoblet.
Er batteriet ladet helt opp?
Slipp sikkerhetshåndtaket for å
slå snøfreseren av. Ta ut
sikkerhetsnøkkelen og
batteripakken. Sjekk at skruen
kan rotere fritt.
Kontroller at batterihullet er rent
for avfall, og at det er riktig
tilkoblet.
Er batteriet ladet helt opp?
Flytt laderen og batteriet til et sted
med lufttemperatur over 4.5°C
(40°F) eller under +40.5°C
(105°F).
Unngå overbelastning av
snøfreseren. Jobb i et lavere
tempo.
Slipp sikkerhetshåndtaket for å
slå snøfreseren av. Ta ut
sikkerhetsnøkkelen og
batteripakken. Sjekk at skruen
kan rotere fritt og forsikre deg om
at den ikke er ødelagt. Hvis den
er ødelagt skal du returnere
snøfreseren til et godkjent
BLACK+DECKER servicesenter.
Hvis det ikke er noen synlig
skader og snøfreseren fremdeles
vibrerer: Returner snøfreseren til
et godkjent Black+Decker
servicesenter.
Sjekk kontaktkoblingen.
Bytt ut laderen.
Miljøvern
Separat avfallshåndtering. Dette produktet må ikke
kastes sammen med vanlig husholdningsavfall.
Z
Hvis du synes BLACK+DECKER-produktet bør skiftes ut, eller
du ikke har bruk for det lenger, må du ikke kaste det sammen
med husholdningsavfall. Lever dette produktet for separat
avfallshåndtering.
Separat innsamling av brukte produkter og
emballasje gjør at materialene kan resirkuleres og
z
brukes om igjen.
Gjenbruk av resirkulert materiale hjelper til med å
hindre miljøforurensing og reduserer
etterspørselen etter råmateriale.
Lokale forskrifter kan ha separat innsamling av elektriske
produkter fra husholdningen ved kommunale søppelfyllinger,
eller hos forhandleren der du kjøper et nytt produkt.
BLACK+DECKER har en ordning for innsamling og
resirkulering av BLACK+DECKER-produkter som ikke skal
brukes lenger. For å benytte deg av denne tjenesten, vennligst
returner produktet til en autorisert reparatør som vil samle det
inn på vegne av oss.
Du kan nne ut hvor nærmeste autoriserte serviceverksted er,
ved å kontakte din lokale BLACK+DECKER-avdeling på
adressen som er oppgitt i denne bruksanvisningen. Det nnes
også en liste over autoriserte BLACK+DECKERserviceverksteder og opplysninger om ettersalgsservice og
kontakter på Internet:www.2helpU.com
Batterier
Tenk på miljøet når batteriene er tomme og du skal
kaste dem:
Z
u La batteriet gå helt tomt og fjern det så fra verktøyet.
u NiCd-, NiMH- og litiumionebatterier kan gjenvinnes. Legg
batteriet i egnet emballasje for å sikre at terminalene ikke
kortslutter. Ta med batteriene til et autorisert
serviceverksted eller til en lokal spesialavfallsstasjon.
u Ikke kortslutt batteriterminalene.
u Ikke kast batteriet på ild. Dette kan føre til personskade
eller en eksplosjon
.
29
Page 30
NORSK
(Oversettelse av de opprinnelige instruksjonene)
Tekniske data
SNC3650L252
Inngangsspenning
Hastighet uten
belastning
Vekt
Batteri BL2036
Spenning
Kapasitet Ah 2.0
Type
Lader 90567393 -05 typ.1
Inngangsspenning
Utgangsspenning
Strøm mA 1.3A
Omtrentlig ladetid h
Vektet vibrasjonsverdi for hånd/arm i samsvar med EN 786:
= < 3.175 m/s2 , usikkerhet (K) = 1.5 m/s2.
L
(lydtrykk) 70.2 dB(A) usikkerhet (K) = 2.5 dB(A)
PA
VDC36
-1
min
kg
V
dc
V
AC
V
DC
2500
14.5
36
Li-ion
230
36
1.5
EF-samsvarserklæring
MASKINERIDIREKTIV
DIREKTIV FOR UTENDØRSSTØY
Nivå for akustisk effekt i henhold til 2000/14/EF (artikkel III, L
≤ 50 cm):
LWA (målt lydeffekt) 85.18 dB(A)
usikkerhet (K) = 2 dB(A)
LWA (garantert lydeffekt) 89 dB(A)
usikkerhet (K) = 2 dB(A)
Disse produktene er også i samsvar med direktiv 2004/108/EF
og 2011/65/EU.
Hvis du ønsker mer informasjon, kan du kontakte Black &
Decker på adressen nedenfor eller se baksiden av
bruksanvisningen.
Undertegnede er ansvarlig for utarbeidelsen av den tekniske
dokumentasjonen og gir denne erklæringen på vegne av
Black & Decker
R. Laverick
Engineering Manager
Black & Decker Europe, 210 Bath Road, Slough,
Berkshire, SL1 3YD
Storbritannia
28/07/2015
%
SNC3650L252 Snøfreser
Black & Decker erklærer at disse produktene som er
beskrevet under "Tekniske data", er i samsvar med:
2006/42/EC, EN 60335-1:2012 +A11; 2014,
ISO/DIS 8437; 1989
EN 62233; 2008
2000/14/EC, ARTIKKEL III av 2000/14/EC som lovtillegg av
2005/88/EC,
TÜV Rheinland LGA Products GmbH;
Tillystraß 2 D-90431N..1rnberg, Germany;
Notied Body ID No.:0197
30
Page 31

(Oversettelse av de opprinnelige instruksjonene)
Garanti
Black & Decker er trygg på kvaliteten av produktene sine og
tilbyr en enestående garanti. Denne garantierklæringen
kommer i tillegg til dine lovbestemte rettigheter og er ikke i
konikt med disse. Garantien er gyldig innen områdene
tilhørende medlemslandene i den Europeiske Union (EU) og
det Europeiske Frihandelsområdet (EFTA).
Hvis et Black & Decker-produkt går i stykker på grunn av
material- og/eller fabrikasjonsfeil eller har mangler i forhold til
spesikasjonene innen 24 måneder fra kjøpet, påtar Black &
Decker seg å skifte ut defekte deler, reparere produkter som
har vært utsatt for alminnelig slitasje, eller bytte ut slike
produkter med minst mulig vanskelighet for kunden, med
mindre:
u Produktet har vært brukt i yrkes-/næringsvirksomhet eller
til utleie;
u Produktet har vært utsatt for feilaktig bruk eller
forsømmelse;
u Produktet har blitt skadet av fremmede gjenstander eller
stoffer eller ved et uhell;
u Reparasjoner er forsøkt utført av andre enn autoriserte
serviceverksteder eller Black & Deckers serviceteknikere.
For å ta garantien i bruk må du vise kjøpskvittering til
forhandleren eller til et autorisert serviceverksted. Du kan
nne ut hvor nærmeste autoriserte serviceverksted er, ved å
kontakte din lokale Black & Decker-avdeling på adressen som
er oppgitt i denne bruksanvisningen. Det nnes også en liste
over autoriserte Black & Decker-serviceverksteder og
opplysninger om ettersalgsservice og kontakter på
Internet:www.2helpU.com
NORSK
Besøk våre nettsider på www.blackanddecker.no for å
registrere ditt nye BLACK+DECKER-produkt og for å holde
deg oppdatert om nye produkter og spesialtilbud. Du nner
mer informasjon om BLACK+DECKER og produktutvalget vårt
på www.blackanddecker.no
31
Page 32

DANSK
(Oversættelse af de oprindelige instruktioner)
Tilsigtet brug
Din BLACK+DECKER SNC3650L252 sneslynge
er designet til rensning af sne fra områder. Dette
apparat er kun beregnet til privat brug.
Sikkerhedsinstruktioner
Advarsel! Ved anvendelse af ledningsfri apparater skal
grundlæggende sikkerhedsforholdsregler inkl. nedenstående
altid følges, så risikoen for brand, elektrisk stød, personskade
og materiel skade undgås.
Advarsel! Sikkerhedsreglerne skal følges ved brug af
maskinen. Læs denne vejledning, før du bruger maskinen, af
hensyn til din egen og omkringståendes sikkerhed. Gem
vejledningen til senere brug.
u Læs hele vejledningen omhyggeligt, før du bruger
apparatet.
u Den tilsigtede brug er beskrevet i denne vejledning.
Brugen af ekstraudstyr eller tilbehør eller udførelse af
andet arbejde med dette apparat end det, der anbefales i
denne vejledning, kan udgøre en risiko for personskade.
u Sæt dig grundigt ind i betjeningsknapperne og korrekt
brug af udstyret.
u Du skal vide, hvordan du stopper enheden og hurtigt
deaktiverer betjeningsknapperne.
u Lad aldrig børn bruge udstyret. Lad aldrig børn bruge
udstyret uden
grundig instruktion.
u Hold driftsområdet fri for alle personer, især små børn og
kæledyr.
u Udvis forsigtighed for at undgå at glide eller falde, især når
du kører baglæns.
u Opbevar denne vejledning til senere brug.
Brug af apparatet
Vær altid opmærksom ved brugen af apparatet.
u Undersøg nøje det område, hvor udstyret skal bruges og
fjern alle dørmåtter, slæder, brætter, ledninger og andre
fremmedlegemer.
u Frakobl alle koblinger og skift til neutral, før maskinen
startes.
u Du må ikke betjene udstyret uden at bære passende
vinterbeklædning. Bær sko, som vil forbedre dit fodfæste
på glatte overader.
u Brug en jordet tredelt stikdåse til alle enheder med
elektriske drevmotorer eller elektriske startmotorer.
u Justér højden på opsamlerhuset for at fjerne en overade
med grus eller skærver.
u Forsøg aldrig at foretage justeringer, mens motoren kører
(undtagen hvor der anbefales af producenten).
u Betjening af enhver mekanisk drevet maskine kan
resultere i, at fremmedlegemer bliver kastet i øjnene.
u Bær altid sikkerhedsbriller eller øjenafskærmninger under
arbejdet eller under udførelse af en justering eller en
reparation.
u Dette apparat må ikke bruges af børn eller svagelige
personer uden opsyn.
u Apparatet må ikke bruges som legetøj.
u Lad ikke børn eller dyr komme i nærheden af
arbejdsområdet eller røre ved apparatet.
u Vær meget opmærksom, når apparatet benyttes i
nærheden af børn.
u Apparatet må ikke nedsænkes i vand.
u Kabinettet må ikke åbnes. Der er ingen dele indeni, der
kan serviceres af brugeren.
u Brug ikke apparatet i eksplosive omgivelser, f.eks. hvor
der er brændbare væsker, gasser eller støv.
u Anbring ikke hænder eller fødder i nærheden af eller
under roterende dele. Hold altid afstand til
udkaståbningen.
u Vær meget forsigtig ved kørsel på eller krydsning af
grusveje, fortorve eller veje. Vær opmærksom på skjulte
farer eller trak.
u Efter at have ramt et fremmedlegeme, stop motoren, fjern
batterierne fra hoveddelen, inspicér grundigt sneslyngen
for enhver skade og reparér skaden, før du igen starter og
arbejder med sneslyngen.
u Hvis enheden skulle begynde at vibrere unormalt, stop
motoren og undersøg straks årsagen. Vibration er generelt
en advarsel om et problem.
u Fjern sikkerhedsnøglen når du forlader driftspositionen,
før du renser opsamleren/kompressorhjul-
huset eller udtømningsstyret, og når du foretager
reparationer, justeringer eller inspektioner.
u Vær under rensning, reparation eller inspektion sikker på,
at opsamleren/kompressorhjulet er blevet stoppet.
u Rens ikke for sne på tværs af skråninger. Vær især
forsigtig, når du ændrer retning på skråninger. Forsøg ikke
at rense stejle skråninger.
u Arbejd aldrig med sneslyngen uden ordentlige
afskærmninger, plader eller andre sikkerhedsmæssige
beskyttelsesanordninger.
u Arbejd aldrig med sneslyngen tæt ved glasindhegninger,
biler, vinduer osv. uden korrekt justering af
sneudkastningsvinklen. Hold børn og kæledyr på afstand.
u Overbelast ikke maskinens kapacitet ved at forsøge at
rydde sne med en for hurtigt hastighed.
u Kør aldrig maskinen med høje transporthastigheder på
glatte overader. Vær forsigtig når du drejer.
u Ret aldrig udledning direkte mod omkringstående eller
tillad nogen person foran enheden.
u Frakobl strømmen til opsamleren/kompressorhjulet når
sneslyngen transporteres eller ikke er i brug.
32
Page 33

(Oversættelse af de oprindelige instruktioner)
DANSK
u Brug kun ekstraudstyr og tilbehør, der er godkendt af
sneslyngeproducenten (såsom hjul).
u Anvend aldrig sneslyngen uden god sigtbarhed eller lys.
Vær altid opmærksom på, hvor du sætter dine fødder og
hold et fast greb om håndtagene. Gå, løb aldrig.
u Tag aldrig passagerer med.
u Anvend aldrig sneslyngen uden god sigtbarhed eller lys.
u Træf alle mulige forholdsregler, når du forlader maskinen
uden opsyn, fjern.
Efter brug
u Opbevar apparatet på et tørt, godt ventileret sted uden for
børns rækkevidde, når det ikke er i brug.
u Børn må ikke have adgang til opbevarede apparater.
u Når apparatet opbevares eller transporteres i et køretøj,
skal det anbringes i bagagerummet eller fastgøres for at
forhindre bevægelse som følge af pludselige ændringer i
hastighed eller retning.
Eftersyn og reparationer
u Kontroller apparatet for beskadigede eller defekte dele før
brug. Se efter knækkede dele, skader på kontakter og
eventuelle andre tilstande, der kan påvirke apparatets
funktion.
u Brug ikke apparatet med beskadigede eller defekte dele.
u Få beskadigede eller defekte dele repareret eller udskiftet
på et autoriseret værksted.
u Forsøg aldrig at fjerne eller udskifte dele ud over dem, der
er beskrevet i denne vejledning.
Yderligere sikkerhedsvejledning for sneslynger
u Arbejd på tværs af skråninger, aldrig op og ned. Vær især
forsigtig, når du ændrer retning på skråninger.
u Hold øje med huller, hjulspor, sten og andre skjulte
genstande. Du skan skride eller falde i ujævnt terræn og
komme til skade. Højt græs kan dække over forhindringer.
u Slå ikke vådt græs eller græs på meget stejle skråninger.
Et dårligt fodfæste kan få dig til at skride eller falde, så du
kommer til skade.
u Slå ikke græs i nærheden af skrænter, grøfter eller volde.
Du kan miste fodfæstet eller balancen.
u Brug ikke hænderne til at rense slisken.
u Stop motoren før du fjerner snavs.
u Ret ikke udledningen direkte mod en tilskuer.
Andres sikkerhed
u Dette udstyr er ikke beregnet til anvendelse af personer
(inklusive børn) med nedsatte fysiske, sensoriske eller
mentale handicaps eller med mangel på erfaringer eller
viden, medmindre de er under overvågning eller har fået
instruktioner i brugen af udstyret af en person, der er
ansvarlig for deres sikkerhed.
u Børn skal holdes under opsyn, så det sikres, at de ikke
leger med apparatet.
Restrisici
Der kan opstå yderligere restrisici under brugen af værktøjet,
som ikke kan medtages i vedlagte sikkerhedsadvarsler. Disse
risici kan opstå pga. forkert anvendelse, langvarig brug etc.
Selv ved overholdelse af relevante sikkerhedsforskrifter og
anvendelse af sikkerhedsudstyr kan visse restrisici ikke
undgås. Disse omfatter:
u Tilskadekomst forårsaget af berøring af roterende/
bevægelige dele.
u Tilskadekomst forårsaget af udskiftning af dele,
klinger eller tilbehør.
u Tilskadekomst forårsaget af langvarig brug af et
værktøj. Husk at holde pause jævnligt ved brug af et
værktøj i længere tid.
u Hørenedsættelse.
u Sundhedsrisici forårsaget af indånding af støv, der
genereres ved brug af værktøjet (eksempel: arbejde
med træ, især, eg, bøg og MDF).
Advarselssymboler
Følgende advarselssymboler ndes på apparatet sammen
med datokoden:
Advarsel! Læs, forstå og følg alle
instruktionerne i brugervejledningen(er) forsøg
på at samle og arbejde med apparatet.
R
Advarsel! Værktøjet må ikke udsættes for regn
eller fugt. Hold det tørt.
Advarsel! Pas på skarpe klinger.
Sluk altid for maskinen og tag sikkerhedsnøglen
ud før udførelse af inspektion, rengøring og
vedligeholdelse.
Advarsel! Pas på yvende sten og andre
fremmedlegemer, der kunne blive udkastet fra
apparatet. Hold tilskuere på afstand af
arbejdsområdet.
Bær høreværn.
Bær beskyttelsesbriller.
Bær åndedrætsværn.
33
Page 34

DANSK
(Oversættelse af de oprindelige instruktioner)
Hold hænder, fødder og tøj væk fra den
roterende snegl til at undgå skader.
Fare! Risiko for skæring/amputation - hold
fødderne på afstand af den roterende snegl.
Fare! Risiko for skæring/amputation - hold
hænderne på afstand af den roterende snegl.
Brug ikke hænderne til at rense rotorhuset. Stop
motoren før du fjerner snavs.
Hold tilskuere og børn i en sikker afstand
(mindst 10m) fra arbejdsområdet.
Bær beskyttelseshandsker og skridsikkert fodtøj
under brug af maskinen og ved håndtering af
restmaterialer.
Brug ikke hænderne til at rense slisken.
i sekunder efter, du har slukket for maskinen.
Kun indendørs brug. Brug kun batteriopladeren
indendørs
Direktiv 2000/14/EF garanteret lydeffekt.
Yderligere sikkerhedsvejledninger for batterier og
ladere
Batterier
Forsøg aldrig at åbne den af en eller anden grund.
Batteriet må ikke udsættes for vand.
Batteriet må ikke udsættes for varme.
Må ikke opbevares på steder, hvor temperaturen kan
overstige 40°C.
Foretag kun opladning ved omgivelsestemperaturer
mellem 10 °C og 40 °C.
Oplad kun med den oplader, der blev leveret sammen
med
apparatet/værktøjet. Brug af en forkert oplader kan
resultere i
et elektrisk chok eller overophedning af batteriet.
Ved bortskaffelse af batterierne, skal du følge
anvisningerne i afsnittet "Beskyttelse af miljøet".
Undgå at beskadige/deformere batteripakken ved at
punktere den eller slå på den, da dette kan forårsage
risiko for tilskadekomst eller brand.
Beskadigede batterier må ikke oplades.
Under ekstreme forhold kan der forekomme batterilækage.
Hvis du bemærker væske på batterierne, skal du
omhyggeligt tørre den af med en klud. Undgå kontakt med
huden.
I tilfælde af kontakt med hud eller øjne skal nedenstående
instruktioner følges.
Advarsel! Batterivæsken kan forårsage personskader eller
materielle skader. I tilfælde af kontakt med huden skylles
straks med vand. Søg læge, hvis der opstår rødme, smerte
eller irritation. Skyl straks med rent vand, og søg læge i
tilfælde af kontakt med øjnene.
Forsøg ikke at oplade beskadigede batterier.
p
Opladere
Kontroller altid, at netspændingen svarer til spændingen på
typeskiltet.
Advarsel! Forsøg aldrig at erstatte laderenheden med et
almindeligt netstik.
Brug kun din LACK+DECKER oplader til at oplade
batteriet i det apparat/værktøj, som den blev leveret
sammen med. Andre batterier kan eksplodere og
forårsage personskader og materielle skader.
Forsøg aldrig at oplade ikke-genopladelige batterier.
Hvis netledningen beskadiges, skal den udskiftes af
producenten eller et autoriseret BLACK+DECKERværksted, så farlige situationer undgås.
Opladeren må ikke udsættes for fugt.
Opladeren må ikke åbnes.
Undersøg ikke opladeren.
Apparatet/værktøjet/batteriet skal anbringes et sted med
god udluftning, når det oplades.
$
Opladeren er kun beregnet til indendørs brug.
Læs brugervejledningen, før værktøjet tages i
brug.
34
Page 35

(Oversættelse af de oprindelige instruktioner)
DANSK
Elektricitet og sikkerhed
Laderen er dobbelt isoleret. Derfor er en
jordledning ikke nødvendig. Kontroller altid, at
#
netspændingen svarer til spændingen på
typeskiltet. Forsøg aldrig at erstatte laderenheden
med et almindeligt netstik.
u Hvis netledningen beskadiges, skal den udskiftes af
producenten eller et autoriseret BLACK+DECKERværksted, så farlige situationer undgås.
Opladning af batteriet
Batteriet skal oplades inden ibrugtagningen, og når det ikke
leverer strøm nok til opgaver, der tidligere kunne udføres
ubesværet. Batteriet kan blive varmt under opladningen. Det
er normalt og ikke tegn på problemer.
Advarsel! Oplad ikke batteriet ved omgivende temperaturer
på under 10 °C eller over 40 °C. Den anbefalede
opladningstemperatur er ca. 24 °C.
Bemærk: Opladeren oplader ikke et batteri, hvis dets
temperatur er under ca. 10° C eller over 40° C.
Batteriet bør blive siddende i laderen, som automatisk
begynder opladningen, når batteriet opvarmes/afkøles.
u Indsæt opladeren i en passende udgang, før batteripakken
indsættes.
u Indsæt batteripakken i opladeren.
Den grønne LED blinker for at vise, at batteriet oplades.
Dårligt batteri
Opladeren kan registrere et svagt eller beskadiget batteri. Det
røde LED blinker i det mønstre, der er angivet på mærkaten.
Hvis du ser dette dårlige batteriblinkmønster, forsæt ikke med
at oplade batteriet. Returnér det til et servicecenter eller til et
indsamlingssted til genbrug.
Varm/kold pakkeforsinkelse
Når opladeren registrerer et batteri, der er alt for varmt eller
alt for koldt, starter den automatisk en varm/kold
pakkeforsinkelse og indstiller opladningen, indtil batteriet er
blevet normaliseret. Efter dette er sket, skifter opladeren
automatisk til pakkeopladningsfunktionen. Denne funktion
sikrer maksimal batterilevetid. Det røde LED blinker i det
mønstre, der er angivet på mærkaten, når varm/kold
pakkeforsinkelsen registreres.
Ladeindikatortilstand
Batteriet er udstyret med en ladetilstandsindikator. Den kan
bruges til at vise det nuværende opladningsniveau i batteriet
i trimmeren og under opladning. Den angiver ikke apparatets
funktionalitet og er underlagt variation baseret på
produktkomponenter, temperatur og slutbrugeranvendelse.
Kontrol af ladetilstand under brug
u Tryk på ladetilstandsindikator (A1).
u De re LEDs (A2) vil lyse og angive
opladningsprocenten i batteriet (Fig.A.)
u Hvis LED lyset ikke lyser, oplad batteriet.
Færdiggørelsen beregning er angivet ved den grønne
lysdiode forbliver på kontinuerligt. Pakken er fuldt opladet og
kan bruges på dette tidspunkt, eller efterlades i opladeren.
Advarsel! Genoplad aadede batterier så
hurtigt som muligt efter brug, da batteriets
levetid ellers kan blive stærkt formindsket..
Fejlnding af opladeren
Denne oplader er udviklet til at registrere visse problemer, der
kan opstå med batteripakker eller strømkilden. Problemerne
angives med et LED blink i forskellige mønstre.
Lad batteriet blive siddende i opladeren
Du kan lade batteripakken sidde i laderen med tændt lysdiode,
så længe det ønskes. Opladeren holder batteripakken klar og
fuldt opladet.
Funktioner
Dette apparat leveres med nogle af eller alle de følgende
komponenter.
1. Håndtagsbøjle
2. ON/OFF kontakt båndhåndtag
3. Sikkerhedsnøgle
4. Knap til sikkerhedskontakt
5. Rotationsstang til sliske
6. Rammelås/udløsningsknap (x4)
7. Dæksel til batterirum
35
Page 36

DANSK
(Oversættelse af de oprindelige instruktioner)
8. Hjul
9. Bærehåndtag (kun til transport)
10. Udladningssliske
11. Sliskedeektor
12. Deektorknap
13. Snegl
14. Midterramme
15. Øverste ramme
16. Stok til renselem
Samling
Advarsel! Kontroller før samling, at værktøjet er slukket, og at
stikket er taget ud af stikkontakten.
Advarsel! Før montering, skal du sørge for båndhåndtaget (2)
er udløst og sikkerhedsnøglen (3) er taget ud.
Håndtag
u Du aktiverer håndtaget ved at trække det opad på den
øverste ramme (15) som vist i gur B.
u Fastgør tilslutning af den nederste ramme (17) til
midterrammen (14) ved at fastgøre håndtagsboltene (18)
og rammeknapperne (6) på hver side som vist i gurerne
C & D.
u Fastgør tilslutning af midterrammen (14) til den øverste
ramme (15) ved at stramme håndtagsboltene (6) og
rammeknapperne på hver side som vist i gur E.
Udledningssliske
u Anbring sliskedeektor (11) på udledningssliske (10).
u Indsæt en sliskepakning (19) mellem slisketilslutningen og
fastgør samlingen med en deektorknap (12) og bolten
(20) på hver side som vist i gurerne F, G & H.
u Placér sliskedeektoren i den ønskede snestrømshøjde.
BEMÆRK: Undgå at overspænde deektorknapperne.
Rotationsstang til sliske
u Indsæt rotationsstangen til slisken (5) gennem rillen i
øjekrogen (21) placeret på midterrammen (14) som vist i
gur I.
u Anbring sliskens rotationskobling (22) på hovedhuset.
u Indsæt sliskens rotationsstang i sliskens rotationskobling
(22) og fastgør samlingen med den leverede holdestift
(23) som vist i gur J.
På- og afmontering af batteripakken
Advarsel! Kontrollér at sikkerhedsnøglen er fjernet for at
forhindre aktivering, før du fjerner eller installerer batteriet.
Sådan installeres batteripakken
u batteridækslet (7) op for at se batterirummet (24) som vist
i gur K.
u Skub batteriet (25) ind i batterirummet, indtil det er helt på
plads, og der høres et klik som vist i gur L. Sørg for at
batteripakken sidder korrekt og er låst i position.
u Luk dækslet til batterirummet. Kontrollér at dækslet er låst,
før du starter sneslyngen.
Sådan udtages batteripakken
u Åbn dækslet til batterirummet (7) som beskrevet ovenfor.
u Tryk batteriets udløserknap ned, der er placeret på
batteripakken og træk batteriet ud af værktøjet som vist i
figur M.
Anvendelse
LÆS DENNE INSTRUKTIONSVEJLEDNING FØR DU
ARBEJDER MED SNESLYNGEN. Se "Funktionsbeskrivelse"
for at gøre dig bekendt med placeringen af forskellige
betjeningshåndtag og justeringer. Gem denne
betjeningsvejledning til fremtidig reference.
Advarsel! Lad apparatet arbejde i dets eget tempo. Det må
ikke overbelastes.
u Åbn dækslet til batterirummet og skub batteriet ind i
batterirummet, indtil det er helt på plads, og der høres et
klik som vist i gur L. Sørg for at batteripakken sidder
korrekt og er låst i position.
u Luk dækslet til batterirummet. Kontrollér at dækslet er låst,
før du starter sneslyngen.
u Sæt sikkerhedsnøglen (3) ind i nøglespalten (26) på
omskifterhuset, indtil den er helt på plads inde i huset som
vist i gur N. Sneslyngen er nu driftsklar.
u Denne sneslynge er udstyret med en speciel on-off
omskifterboks. Du starter sneslyngen ved at skubbe
sikkerhedsafbryderknappen (4) på omskifterboksen (27),
og derefter trække i ON/OFF båndhåndtaget (2) til
håndtaget som vist i gur O.
u Du slår sneslyngen fra ved at udløse ON/OFF kontaktens
båndhåndtag (2).
Tips til betjening
Advarsel! Kontrollér altid de steder, hvor sneslyngen skal
bruges og fjern alle sten, pinde, ledninger, knogler og andet
snavs, som kan blive slynget af sneslyngen.
Advarsel! Nogle dele af sneslyngen kan fryse under ekstreme
temperaturforhold. Forsøg ikke at arbejde med sneslyngen,
hvis nogle dele er frosne. Hvis en del fryser, mens sneslyngen
er i brug, stop sneslyngen, fjern batteriet og inspicér for frosne
dele. Optø alle dele før genstart eller arbejde med sneslyngen.
Advarsel! Vær især forsigtig, når du ændrer retning på
skråninger. Sørg altid for et godt fodfæste.
36
Page 37

(Oversættelse af de oprindelige instruktioner)
DANSK
u Hold arbejdsområdet fri for fremmedlegemer, som kan
blive kastet af sneglens klinger. Nogle genstande kan
være skjult af sne. Hvis sneslyngen rammer en forhindring
eller opsamler et fremmedlegeme under brug, stop
sneslyngen, tag batteriet ud, fjern forhindringen og
inspicér enheden for beskadigelse. Reparér eller udskift
alle beskadigede dele før genstart og betjening af
enheden.
u Kontrollér at børn, kæledyr og tilskuere er på afstand af
arbejdsområdet.
u Når du ytter sneslyngen, bruge hjulene som
omdrejningspunkt. Vip sneslyngen lidt på dette
omdrejningspunkt at ytte den frem eller tilbage.
u Start din rydningssti i midten af arbejdsområdet. Kast
sneen i en fremadrettet og tilbage bevægelse, og yt hver
gang sneudkasteren væk fra det område, du har ryddet.
Sørg for at overlappe rydningsstierne.
u Hvis muligt kast sneen ud i vindretningen, ikke imod
vinden. Dette forhindrer, at sneen blæses ud på ryddede
områder.
u Under arbejde på sten, grus eller asfalterede overader,
undgå at smide løst materiale sammen med sneen ved at
trykke ned på håndtaget for at hæve skraberen i bunden
af enheden over sten eller grus.
Overbelastning af motoren
For at undgå skader på grund af overbelastning, skal du ikke
forsøge at fjerne alt for meget sne på én gang. Skub ikke
sneslyngen med stor kraft. Sæt farten ned og lad sneslyngen
arbejde i sit eget tempo.
u Løsn deektorknapperne (12) for at hæve eller sænke
deektoren til den ønskede højde. Stram igen
deektorknapperne (12) for at fastgøre deektoren.
BEMÆRK: Undgå at overspænde deektorknapperne.
Advarsel! Kontrollér at sliskedeektoren er låst helt fast på
udledningsslisken. Alle mellemrum mellem udledningsslisken
og sliskedeektoren kan medføre, at fremmedlegemer
opsamlet af sneslyngen bliver smidt i retning af operatøren, og
det kan medføre alvorlige legemsbeskadigelser.
u Anbring ikke sliskedeektoren for langt nede, da dette kan
oprette et mellemrum (28), der opstår mellem deektoren
og udledningsslisken som vist i gur Q.
Afhjælpning af blokeringer
Advarsel! Slip båndhåndtaget (2), fjern sikkerhedsnøglen (3),
og fjern batteriet, før du foretager justeringer, inspektion,
service, skift af tilbehør, rengøring af sneslyngen og lignende.
Enhver handling bør først udføres, når de roterende dele inde
i sneslyngen er helt stoppet.
u Udløs båndhåndtaget (2), fjern sikkerhedsnøglen (3) og
tag batteriet ud.
u Inspicér udledningsslisken og sneglehuset for tilstopninger
og blokeringer.
u Brug vedlagte udrensningsstang (16) for at fjerne
tilstopninger og blokeringer.
Advarsel! FORSØG ALDRIG AT RENSE FOR
TILSTOPNINGER ELLER BLOKERINGER MED DINE
HÆNDER. Hvis en del fryser, mens sneslyngen er i brug, stop
sneslyngen, fjern batteriet. Optø alle dele før genstart eller
arbejde med sneslyngen.
Ændring af kasteretning og kastehøjde
Advarsel! Ret aldrig sneudledningsslisken mod operatøren,
tilskuere, køretøjer eller bygninger i nærheden. Den udledte
sne og fremmedlegemer opsamlet ved et uheld og kastet op
af sneslyngen kan forårsage alvorlige skader og
personskader.
Ret altid udledningsslisken i den modsatte retning væk fra det
sted, hvor operatøren, tilskuere, køretøjer eller bygninger
bender sig.
u Udledningsslisken har et driftsområde på 180 grader.
Dirigér sneudledningen ved at dreje slisken med sliskens
rotationsstang (5) som vist i gur 16.
Advarsel! Slip båndhåndtaget (2), fjern sikkerhedsnøglen (3),
og fjern batteriet, før du foretager justeringer, inspektion,
service, skift af tilbehør, rengøring af sneslyngen og lignende.
Enhver handling bør først udføres, når de roterende dele inde
i sneslyngen er helt stoppet.
Sliskedeektor (11) øverst på udledningsslisken (10) styrer
højden af sneudledningsstrømmen. Når deektoren er oppe,
vil sneen blive udledt højere oppe. Når deektoren er nede, vil
sneen blive udledt længere nede.
Tilbehør
Advarsel! Brugen af tilbehør, som ikke anbefales sammen
med dette værktøj, kan være farligt.
Anbefalet tilbehør til brug sammen med din sneslynge kan fås
hos din lokale BLACK+DECKER forhandler eller autoriseret
servicecenter.
Vedligehold
Dit BLACK+DECKER ledningsfrie apparat/værktøj er designet
til at fungere i lang tid med minimal vedligeholdelse. Fortsat
tilfredsstillende drift afhænger af korrekt behandling af
apparatet samt regelmæssig rengøring.
Laderen kræver ingen vedligeholdelse, men skal rengøres
jævnligt.
Advarsel! Før udførelse af nogen form for vedligeholdelse på
elværktøj med/uden ledning:
u Sluk og tag apparatets/værktøjets stik ud af stikkontakten.
u Eller sluk og fjern batteriet fra apparatet/værktøjet, hvis
det har en separat batteripakke.
u Eller aad batteriet helt, hvis det er indbygget, og sluk
derefter.
u Træk laderen ud af stikkontakten, før den rengøres.
37
Page 38

DANSK
(Oversættelse af de oprindelige instruktioner)
Laderen kræver ingen vedligeholdelse, men skal rengøres
jævnligt.
u Rengør jævnligt værktøjets/apparatets og laderens
ventilationshuller med en blød børste eller en tør klud.
u Rengør med jævne mellemrum motorhuset med en fugtig
klud. Der må ikke bruges skuremidler eller
opløsningsmidler.
Problemløsning
Problem Løsning
Snekasteren virker
ikke, når
båndhåndtaget
aktiveres.
Enhed stopper under
ytning af sne.
Kontrollér, at sikkerhedsnøglen er
blevet installeret og er helt på
plads, og at knappen på
omskifterhuset er helt trykket ned,
inden du trækker i
båndhåndtaget.
Udløs båndhåndtaget for at slå
sneslyngen fra. Fjern
sikkerhedsnøglen og
batteripakken og kontrollér at
sneglen kan dreje frit.
Kontrollér, at batteriets hulrum er
fri for snavs og er korrekt tilsluttet.
Er batteriet ladet helt op?
Udløs båndhåndtaget for at slå
sneslyngen fra. Fjern
sikkerhedsnøglen og
batteripakken. Kontrollér at
sneglen kan dreje frit.
Kontrollér, at batteriets hulrum er
fri for snavs og er korrekt tilsluttet.
Er batteriet ladet helt op?
Flyt opladeren og batteripakken til
en omgivende lufttemperatur på
over 40 grader F (4,5°C) eller
under 105 grader F (+40,5°C).
Undgå overbelastning af
sneslyngen. Nedsæt
arbejdshastigheden
Problemløsning
Sneslyngen støjer
unormalt meget og
vibrerer.
Batteriopladerens
LEDs er ikke tændt.
Udløs båndhåndtaget for at slå
sneslyngen fra. Fjern
sikkerhedsnøglen og
batteripakken. Kontrollér at
sneglen kan dreje frit, og
kontrollér at den ikke er blevet
bøjet eller beskadiget. Hvis
beskadiget returnér sneslyngen til
et BLACK+DECKER autoriseret
servicecenter.
Hvis der ikke er nogen synlige
skader, og sneslyngen stadig
vibrerer: Returnér sneslyngen til
et autoriseret Black+Decker
servicecenter.
Kontrollér stikforbindelsen.
Udskift oplader.
Miljøbeskyttelse
Særskilt bortskaffelse. Dette produkt må ikke
bortskaffes sammen med almindeligt
Z
husholdningsaffald.
Når dit BLACK+DECKER-produkt en dag er udtjent, eller du
ikke længere har brug for det, må du ikke smide det ud
sammen med det almindelige affald. Sørg for, at dette produkt
bortskaffes særskilt.
Særskilt bortskaffelse af brugte produkter og
emballage gør det muligt at genbruge materialer
z
og anvende dem på ny.
Genanvendelse af genbrugsmaterialer bidrager til
at forhindre forurening af miljøet og reducerer
behovet for råmaterialer.
Lokale forskrifter muliggør i nogen tilfælde særskilt
bortskaffelse af elektriske produkter fra husholdningen, ved
kommunale affaldsdepoter eller hos forhandleren i forbindelse
med køb af et nyt produkt.
BLACK+DECKER sørger for at indsamle og genanvende
BLACK+DECKER-produkter, når disse ikke længere kan
bruges. For at benytte sig af denne service kan du returnere
produktet til et hvilket som helst autoriseret serviceværksted,
der modtager det på vores vegne.
38
Page 39

(Oversættelse af de oprindelige instruktioner)
DANSK
Kontakt det lokale BLACK+DECKER-kontor på den adresse,
der er angivet i denne vejledning, for at få oplysninger om
nærmeste autoriserede værksted. Alternativt ndes der en
liste over autoriserede BLACK+DECKER serviceværksteder
og detaljerede oplysninger om vores eftersalgsservice og
kontakter på følgende internetadresse: www.2helpU.com
Batterier
Når batterier er udtjente, skal de bortskaffes under
passende hensyntagen til miljøet:
Z
u Aad batteriet helt, og tag det derefter ud af værktøjet.
u NiCd-, NiMH- og Li-Ion-batterier kan genbruges. Anbring
batteriet/batterierne i en egnet emballage, så polerne ikke
kortsluttes. Aever dem på et autoriseret værksted eller en
lokal genbrugsstation.
u Kortslut ikke batteriterminalerne.
u Batteriet/batterierne må ikke kastes på ild, da dette kan
medføre personskade eller eksplosion.
Tekniske data
SNC3650L252
Indgangsspænding
Ubelastet hastighed
Vægt
Batteri BL2036
Spænding
Kapacitet Ah 2.0
Type
Oplader 90567393 -05 typ.1
Indgangsspænding
Udgangsspænding
Strømstyrke mA 1.3A
Ladetid ca. h
Vægtet vibrationsværdi for hånd/arm i henhold til EN 786:
= < 3,175 m/s2 , usikkerhed (K) = 1,5 m/s2.
LPA (lydtryk) 70,2 dB(A) usikkerhed (K) = 2,5 dB(A)
V
min
kg
V
V
V
36
DC
-1
2500
14.5
36
dc
Li-ion
230
AC
36
DC
1.5
EF-overensstemmelseserklæring
MASKINDIREKTIV
DIREKTIV OM STØJEMISSION FRA MASKINER TIL
UDENDØRS BRUG
%
SNC3650L252 sneslynge
Black & Decker erklærer, at produkterne beskrevet under
"Tekniske data" er i overensstemmelse med:
2006/42/EC, EN 60335-1:2012 +A11; 2014,
ISO/DIS 8437; 1989
EN 62233; 2008
2000/14 / EF, BILAG III af 2000/14 / EF, ligesom ændring i
2005/88 / EF,
TÜV Rheinland LGA Products GmbH;
Tillystraß 2 D-90431N..1rnberg, Tyskland;
Bemyndiget organ ID nr.: 0197
Lydintensitetsniveau i henhold til 2000/14/EF
(BILAG III, L ≤ 50 cm):
LWA (målt lydeffekt) 85.18 dB(A)
usikkerhed (K) = 2 dB(A)
LWA (garanteret lydeffekt) 89 dB(A)
usikkerhed (K) = 2 dB(A)
Disse produkter er endvidere i overensstemmelse med direktiv
2004/108/EF og 2011/65/EU.
Kontakt Black & Decker på nedenstående adresse eller se
vejledningens bagside for at få ere oplysninger.
Undertegnede er ansvarlig for udarbejdelsen af de tekniske
data og fremsætter denne erklæring på vegne af Black &
Decker.
R. Laverick
Engineering Manager
Black & Decker Europe, 210 Bath Road, Slough,
Berkshire, SL1 3YD
Storbritannien
28/07/2015
39
Page 40

DANSK
(Oversættelse af de oprindelige instruktioner)
Garanti
Black & Decker garanterer, at produktet er fri for skader og
fejl, og tilbyder en fremragende garanti. Garantien er et tillæg
til forbrugerens lovsikrede rettigheder og påvirker ikke disse.
Garantien er gyldig inden for medlemsstaterne af Den
Europæiske Union og Det Europæiske Frihandelsområde.
Hvis et Black & Decker-produkt går i stykker på grund af
materiel skade og/eller fabrikationsfejl eller på anden måde
ikke fungerer i overensstemmelse med specikationen inden
for 24 måneder fra købsdatoen, påtager Black & Decker sig at
reparere eller ombytte produktet med mindst mulig ulempe for
kunden. Garantien gælder ikke for fejl og mangler, der er sket
i forbindelse med:
u Produktet har været anvendt erhvervsmæssigt eller til
udlejning;
u Produktet har været anvendt forkert eller er ikke
vedligeholdt;
u Produktet er beskadiget af fremmedlegemer, substanser
eller pga. uheld;
u Garantien gælder ikke, hvis reparationer er udført af andre
end et autoriseret Black & Decker-værksted.
For at udnytte garantien skal produktet og købskvitteringen
indleveres til forhandleren eller til et autoriseret værksted.
Kontakt det lokale Black & Decker-kontor på den adresse, der
er angivet i denne vejledning, for at få oplysninger om
nærmeste autoriserede værksted. Alternativt ndes der en
liste over autoriserede Black & Decker serviceværksteder og
detaljerede oplysninger om vores eftersalgsservice og
kontakter på følgende internetadresse: www.2helpU.com
Gå venligst ind på vores website www.blackanddecker.co.uk
for at registrere dit nye BLACK+DECKER produkt og for at
blive holdt ajour om nye produkter og specialtilbud. Der ndes
yderligere oplysninger om mærket BLACK+DECKER og vores
produktsortiment på adressen www.blackanddecker.co.uk
40
Page 41

(Alkuperäisten ohjeiden käännös)
SUOMI
Käyttötarkoitus
BLACK+DECKER SNC3650L252 -lumilinko on
suunniteltu lumen poistamiseen alueilta. Laite on
tarkoitettu vain yksityiskäyttöön.
Turvaohjeet
Varoitus! Johdottomia laitteita käytettäessä on aina
noudatettava asianmukaisia turvaohjeita, jotta tulipalojen,
sähköiskujen, henkilövahinkojen ja materiaalivaurioiden riski
olisi mahdollisimman pieni.
Varoitus! Laitetta käytettäessä on noudatettava
turvallisuussääntöjä. Lue tämä opas huolellisesti läpi ennen
koneen käyttöä oman ja muiden turvallisuuden takia. Säilytä
ohjeet myöhempää tarvetta varten.
u Lue nämä ohjeet huolellisesti ennen laitteen käyttöä.
u Käyttötarkoitus kuvataan ohjeissa. Muiden kuin ohjeissa
suositeltujen lisävarusteiden tai -osien käyttö sekä laitteen
käyttö muuhun kuin oppaassa suositeltuun tarkoitukseen
voi aiheuttaa henkilövahingon vaaran.
u Tutustu hallintalaitteisiin perusteellisesti ja opettele
laitteiston oikea käyttö.
u Opettele pysäyttämään laite ja kytkemään ohjaimet pois
nopeasti.
u Älä koskaan anna lasten käyttää laitteistoa. Älä koskaan
anna aikuisten käyttää laitteistoa
ilman asianmukaista ohjeistusta.
u Pidä käyttöalue vapaana: henkilöt ja erityisesti pikkulapset
sekä kotieläimet on pidettävä poissa.
u Toimi varoen liukastumisen ja kaatumisen välttämiseksi,
erityisesti taaksepäin liikkuessa.
u Säilytä tämä käyttöohje tulevaa tarvetta varten.
Laitteen käyttö
Ole aina huolellinen käyttäessäsi laitetta.
u Tarkasta laitteen käyttöalue perusteellisesti ja poista kaikki
ovimatot, kelkat, laudat, johdot ja muut vieraat esineet.
u Kytke kaikki kytkimet pois ja kytke vaihde vapaalle ennen
moottorin käynnistämistä.
u Laitteistoa ei saa käyttää ilman asianmukaista
talvivaatetusta. Käytä jalkineita, jotka parantavat pitoa
liukkaalla alustalla.
u Käytä maadoitettua kolmijohtoista plug-in-pistoketta
kaikissa tuotteissa, joissa on sähkötoimiset käyttömoottorit
tai sähkötoimiset käynnistysmoottorit.
u Säädä kollektorin kotelon korkeus soran tai
murskautuneen kivipinnan poistamiseksi.
u Älä koskaan yritä tehdä säätöjä moottorin ollessa
käynnissä (ellei valmistaja sitä erikseen suosittele).
u Sähkötoimisen koneen käyttö voi johtaa vieraiden
esineiden sinkoutumiseen silmiin.
u Käytä aina suojalaseja tai silmäsuojia käytön ja säätöjen
tai korjauksien aikana.
u Tätä laitetta ei ole tarkoitettu nuorten tai lihasvoimaltaan
heikkojen henkilöiden käyttöön ilman valvontaa.
u Laitetta ei saa käyttää leluna.
u Älä anna lasten tai eläinten tulla lähelle työskentelyaluetta
tai koskea laitteeseen.
u Jos laitetta käytetään lasten läheisyydessä, on oltava
tarkkaavainen.
u Älä upota laitetta veteen.
u Älä avaa laitteen koteloa. Sisällä ei ole mitään huollettavia
osia.
u Älä käytä laitetta räjähdysalttiissa ympäristössä, jossa on
syttyvää nestettä, kaasua tai pölyä.
u Älä aseta käsiä tai jalkoja lähelle pyöriviä osia tai niiden
alle. Pysy aina loitolla laitteen poistoaukosta.
u Sovella erityistä varovaisuutta käyttäessä konetta tai
ylittäessä sorateitä tai polkuja. Huomaa piilevät vaarat ja
liikenne.
u Kun osut vieraaseen esineeseen, sammuta moottori,
poista akut päärungosta, tarkista lumilinko huolellisesti
vaurioiden varalta ja korjaa vauriot ennen uudelleen
käynnistystä ja lumilingon käyttöä.
u Jos tuote alkaa tärisemään poikkeavasti, sammuta
moottori ja tarkista se välittömästi tärinän syy. Tärinä on
yleensä merkki ongelmasta.
u Poista turva-avain aina käyttöasemasta poistuessa ja
ennen kollektorin/juoksupyörän
kotelon tai tyhjennysohjaimen irrottamista, sekä
korjauksien, säätöjen tai tarkastuksien aikana.
u Varmista, että kollektori/juoksupyörä sekä kaikki liikkuvat
osat ovat pysähtyneet ennen puhdistusta, korjausta tai
tarkastuksia.
u Älä poista lumea rinteistä. Ole erityisen varovainen
vaihtaessasi suuntaa rinteessä. Älä yritä poistaa lumea
jyrkistä rinteistä.
u Älä koskaan käytä lumilinkoa ilman asianmukaisia suojia,
levyjä tai muita suojavarusteita.
u Älä koskaan käytä lumilinkoa lasisten kohteiden, autojen,
ikkunoiden, jne. lähellä säätämättä lumenpoistokulmaa
oikein. Pidä lapset ja kotieläimet kaukana.
u Koneen kapasiteettia ei saa ylikuormittaa yrittämällä
poistaa lunta liian nopeasti.
u Älä koskaan käytä konetta suurilla nopeuksilla liukkailla
pinnoilla. Ole varovainen kääntyessä.
u Älä koskaan suuntaa poistoaukkoa sivullisiin tai päästä
ketään laitteen eteen.
u Katkaise kollektorin/vauhtipyörän virta, kun lumilinkoa
kuljetetaan tai kun se on pois käytöstä.
u Käytä ainoastaan lumilingon valmistajan hyväksymiä
lisäosia ja lisävarusteita (esim. pyöriä).
u Älä koskaan käytä lumilinkoa, jos näkyvyys tai valaistus ei
ole hyvä. Varmista aina hyvä jalansija ja pidä tiukasti kiinni
kahvoista. Kävele, älä juokse koskaan.
u Älä kuljeta matkustajia.
41
Page 42

SUOMI
(Alkuperäisten ohjeiden käännös)
u Älä koskaan käytä lumilinkoa, jos näkyvyys tai valaistus ei
ole hyvä.
u Suorita kaikki mahdolliset varotoimet ja poista turva-avain,
kun jätät koneen ilman valvontaa.
Käytön jälkeen
u Kun laitetta ei käytetä, säilytä sitä kuivassa, hyvin
tuuletetussa paikassa poissa lasten ulottuvilta.
u Pidä laite lasten ulottumattomissa.
u Kun laitetta säilytetään tai kuljetetaan ajoneuvossa, sijoita
se tavaratilaan tai kiinnitä se kunnolla, ettei se matkan
aikana pääse liikkumaan.
Tarkastus ja korjaus
u Tarkista ennen laitteen käyttöä, ettei laitteessa ole
vahingoittuneita tai viallisia osia. Tarkista osien ja
kytkimien kunto sekä muut seikat, jotka voivat vaikuttaa
laitteen toimintaan.
u Älä käytä laitetta, jos jokin osa on vahingoittunut tai
viallinen.
u Korjauta tai vaihdata vaurioituneet tai vialliset osat
valtuutetussa huoltoliikkeessä.
u Älä yritä korjata tai vaihtaa muita kuin tässä
käyttöohjeessa erikseen määriteltyjä osia.
Lumilinkojen lisäturvaohjeet
u Leikkaa ruoho rinteen korkeussuuntaan nähden poikittain,
älä koskaan ylhäältä alas tai päinvastoin. Ole erityisen
varovainen vaihtaessasi suuntaa rinteessä.
u Varo koloja, kumpuja, kiviä tai muita näkymättömiä
esineitä. Epätasainen maasto voi aiheuttaa liukastumisen
tai kaatumisen. Pitkä ruoho voi peittää esteitä.
u Älä käytä märällä ruoholla tai liian jyrkissä rinteissä.
Epävakaa asento voi aiheuttaa liukastumisen tai
kaatumisen.
u Älä käytä aivan kuopan, ojan tai pengerryksen lähellä. Voit
menettää tasapainon tai jalka voi luistaa.
u Älä poista kourun tukoksia käsillä.
u Sammuta moottori ennen jäämien poistamista.
u Älä kohdista poistoaukkoa itseesi tai muihin päin.
Muut riskit
Myös muut kuin turvavaroituksissa mainitut riskit ovat
mahdollisia työkalua käytettäessä. Nämä riskit voivat liittyä
muun muassa virheelliseen tai pitkäaikaiseen käyttöön.
Tiettyjä jäännösriskejä ei voi välttää, vaikka noudatat kaikkia
turvamääräyksiä ja käytät turvalaitteita. Näitä ovat:
u Pyörivien tai liikkuvien osien koskettamisen aiheuttamat
vahingot.
u Osia, teriä tai lisävarusteita vaihdettaessa aiheutuneet
vahingot.
u Työkalun pitkäaikaisen käytön aiheuttamat vahingot.
Varmista, että pidät säännöllisesti taukoja työkalun
pitkäaikaisen käytön aikana.
u Kuulon heikkeneminen.
u Työkalua käytettäessä (esimerkiksi puuta, erityisesti
tammea, pyökkiä ja MDF-levyjä, käsiteltäessä) syntyneen
pölyn sisäänhengityksen aiheuttamat terveysriskit)
Varoitusmerkit
Työkaluun on merkitty päivämääräkoodi sekä seuraavat
varoitusmerkit:
Varoitus! Käyttöohjeiden ohjeet tulee lukea,
ymmärtää ja niitä tulee seurata ennen osien
asennusta ja käyttöä.
R
Varoitus! Älä käytä sähkötyökalua sateessa tai
märissä olosuhteissa. Pidä kuivana.
Varoitus! Varo teräviä teriä.
Kytke virta aina pois päältä ja poista turva-avain
ennen tarkistuksia, puhdistusta ja ylläpitoa.
Varoitus! Varo sinkoavia kiviä ja muita vieraita
esineitä, jotka voivat singota laitteesta. Pidä
sivulliset poissa työalueelta.
Muiden henkilöiden turvallisuus
u Tämä laite ei ole tarkoitettu henkilöiden (mukaan lukien
lapset) käytettäväksi, joiden fyysiset, sensoriset tai
henkiset kyvyt tai kokemus ja tietämys ovat rajalliset.
Heidän turvallisuudestaan tulee huolehtia heistä
vastuussa oleva henkilö tai paikalla tulee olla henkilö, joka
neuvoo miten laitetta tulee käyttää.
u Lapsia on valvottava ja estettävä leikkimästä laitteella.
42
Käytä kuulonsuojaimia.
Käytä suojalaseja.
Käytä hengityssuojainta.
Pidä kädet, jalat ja vaatetus pois pyörivästä
kairasta henkilövahinkojen välttämiseksi.
Vaara! Leikkautumis-/silppoutumisvaara - pidä
jalat pois pyörivästä karasta.
Page 43

(Alkuperäisten ohjeiden käännös)
SUOMI
Vaara! Leikkautumis-/silppoutumisvaara - pidä
kädet pois pyörivästä karasta. Älä poista
roottorin kotelon tukoksia käsillä. Sammuta
moottori ennen jäämien poistamista.
Pidä sivulliset ja lapset turvallisen etäisyyden
(vähintään 10 m) päässä työskentelyalueesta.
Käytä suojalaseja ja hyvin pitäviä jalkineita
koneen käytön ja jäämien käsittelyn aikana.
Älä poista kourun tukoksia käsillä.
Pyörivä osa pyörii keskeytyksettä usean
sekunnin ajan, kun kone on sammutettu.
Tarkoitettu vain sisäkäyttöön. Käytä akkulaturia
vain sisätilassa.
Direktiivin 2000/14/EY mukainen taattu
ääniteho.
Akkuja ja laturia koskevat lisäturvaohjeet
Akkua
Älä koskaan yritä avata mistään syystä.
Älä anna akun kastua.
Älä altista akkua kuumuudelle.
Älä säilytä paristoja tiloissa, joissa lämpötila voi nousta yli
40 °C:een.
Lataa akku paikassa, jonka lämpötila on vähintään 10 °C
ja enintään +40 °C.
Lataa akku ainoastaan työkalun mukana toimitetulla
laturilla. Virheellisen laturin käyttö voi johtaa
sähköiskuun tai akun ylikuumenemiseen.
Noudata paristoja hävittäessäsi kohdassa
”Ympäristönsuojelu” annettuja ohjeita.
Suojaa akkua vahingoittumiselta niin, ettei sen kotelo
rikkoudu eikä siihen kohdistu iskuja, sillä muutoin voi
syntyä henkilövahinkojen ja tulipalon vaara.
Älä lataa viallisia akkuja.
Vaativissa oloissa voi ilmetä paristovuotoja. Jos havaitset
akkujen pinnalla nestettä, pyyhi se huolellisesti pois. Vältä
ihokosketusta.
Jos nestettä joutuu silmiin tai iholle, noudata alla olevia
ohjeita.
Varoitus! Akkuneste voi aiheuttaa aineellisia vahinkoja tai
henkilövahinkoja. Jos nestettä joutuu iholle, se on välittömästi
huuhdeltava pois vedellä. Jos ihoa kirvelee tai se punottaa tai
on muuten ärtynyt, kysy lisäohjeita lääkäriltä. Jos nestettä
joutuu silmiin, huuhdo välittömästi puhtaalla vedellä ja mene
lääkäriin.
p
Älä koskaan yritä ladata viallisia akkuja.
Laturit
Laturi on tarkoitettu tietylle jännitteelle.
Tarkista aina, että verkkojännite vastaa arvokilvessä
ilmoitettua jännitettä.
Varoitus! Älä yritä vaihtaa laturiin tavallista verkkovirran
pistoketta.
Käytä BLACK+DECKERin laturia vain laitteen/työkalun
mukana toimitetun akun lataamiseen. Muut akut voivat
räjähtää ja aiheuttaa henkilövahinkoja tai aineellisia
vahinkoja.
Älä koskaan yritä ladata paristoja, joita ei ole tarkoitettu
ladattavaksi.
Jos virtajohto vahingoittuu, sen vaihtaminen on
turvallisuussyistä jätettävä valmistajan tai valtuutetun
BLACK+DECKER -huollon tehtäväksi.
Suojaa laturi vedeltä.
Älä avaa laturia.
Älä työnnä mitään laturin sisään.
Lataa laite/työkalu/akku paikassa, jossa on kunnollinen
ilmanvaihto.
$
Laturi on tarkoitettu ainoastaan sisäkäyttöön.
Lue käyttöohjeet huolellisesti ennen laitteen
käyttöä.
Sähköturvallisuus
Laturi on kaksoiseristetty, joten erillistä
maadoitusta ei tarvita. Tarkista aina, että
#
verkkojännite vastaa arvokilvessä ilmoitettua
jännitettä. Älä yritä vaihtaa laturiin tavallista
verkkovirran pistoketta.
Jos virtajohto vahingoittuu, sen vaihtaminen on
turvallisuussyistä jätettävä valmistajan tai valtuutetun
BLACK+DECKER -huollon tehtäväksi.
43
Page 44

SUOMI
(Alkuperäisten ohjeiden käännös)
Akun lataaminen
Lataa akku ennen ensimmäistä käyttökertaa ja aina, kun se ei
enää tuota riittävästi virtaa toimintoihin, jotka aiemmin sujuivat
helposti. Akku voi lämmetä ladattaessa. Tämä on normaalia,
eikä se ole merkki mistään viasta.
Varoitus! Älä lataa akkua alle 10 °C tai yli 40 °C asteen
lämpötilassa. Suositeltava latauslämpötila on 24 °C.
Huomautus: Laturi ei lataa akkua, jos akun kennon
lämpötila on alle 10 °C tai yli 40 °C.
Akku tulee kuitenkin jättää laturiin. Laturi aloittaa
lataamisen automaattisesti, kun kennon lämpötila nousee
tai laskee riittävästi.
u Yhdistä laturi sopivaan pistorasiaan ennen kuin laitat
siihen akun.
u Aseta akku laturiin.
Vihreä LED-merkkivalo vilkkuu käynnissä olevan latauksen
merkiksi.
Loppuun maksu osoitetaan vihreä LED jäljellä jatkuvasti.
Pakkaus on ladattu täyteen ja sitä voidaan käyttää tällä
kertaa tai jättää laturiin.
Varoitus! Lataa tyhjennetyt akut
mahdollisimman pian käytön jälkeen, muutoin
akun käyttöikä voi lyhentyä.
Laturin vianmääritys
Tämä laturi on tarkoitettu havaitsemaan joitakin akkuun tai
virtalähteeseen liittyviä ongelmia. Ongelmista ilmoittaa yksi eri
tahtiin vilkkuva LED-merkkivalo.
Viallinen akku
Laturi voi havaita heikkokuntoisen tai vaurioituneen akun.
Punainen LED-merkkivalo vilkkuu merkissä ilmoitetulla
tavalla. Jos näet tämän heikosta akun kunnosta ilmoittavan
vilkkumisen, lopeta akun lataus. Vie se huoltopalveluun tai
kierrätyspisteeseen.
Akun kuuma-/kylmäviive
Kun laturi tunnistaa liian kuuman tai kylmän akun, se
käynnistää automaattisesti akun kuuma-/kylmäviiveen,
jolloin lataus käynnistyy vasta sitten, kun akku on
saavuttanut oikean lämpötilan. Tämän jälkeen laturi
kytkeytyy automaattisesti akun lataustilaan. Tämä toiminto
takaa akun maksimaalisen käyttöiän. Punainen LEDmerkkivalo vilkkuu merkissä ilmoitetulla tavalla, kun kuuma-/
kylmäviive on havaittu.
Varaustilan merkkivalo
Akussa on varaustilan merkkivalo. Voit tarkistaa sen avulla
akun nykyisen varaustilan, latauksen tai käytön aikana. Se
ei osoita laitteen toiminnallisuutta ja se voi vaihdella
tuoteosien, lämpötilan ja loppukäyttäjän käytön mukaan.
Varaustilan tarkistus käytön aikana
u Paina varaustilan ilmaisinta (A1).
u Neljä LED-merkkivaloa (A2) syttyy ilmoittaen akun
lataustilan prosenttilukuna (kuva A).
u Jos LED-merkkivalo ei syty, lataa akku.
Akun jättäminen laturiin
Akku voidaan jättää laturiin, kun merkkivalo palaa. Laturi pitää
akun käyttövalmiina ja ladattuna.
Yleiskuvaus
Tässä laitteessa on kaikki tai joitakin seuraavista
ominaisuuksista
1. Työntöaisa
2. Virtakytkimen työntöaisa
3. Turva-avain
4. Turvakytkimen painike
5. Kourun kiertotanko
6. Kehyksen lukitus-/vapautusnuppi (x4)
7. Akkutilan kansi
8. Pyörät
9. Kantokahva (vain kuljetukseen)
10. Poistokouru
11. Kourun ohjain
12. Ohjaimen säädin
13. Kaira
14. Keskikehys
15. Yläkehys
16. Puhdistuskeppi
Asennus
Varoitus! Varmista ennen kokoamista, että virta on katkaistu
ja että virtajohto on irti pistorasiasta.
44
Page 45

(Alkuperäisten ohjeiden käännös)
SUOMI
Varoitus! Varmista ennen osien kokoamista, että työntöaisan
kahva (2) on vapautettu ja että turva-avain (3) on irrotettu.
Kahvat
u Kytke työntöaisa, vedä yläkehyksestä (15) ylöspäin kuvan
B mukaisesti.
u Kiinnitä alakehyksen (17) liitäntä keskikehykseen (14)
kiinnittämällä kahvan pultit (18) ja kehyksen säätimet (6)
kaikilla puolilla kuvien C ja D mukaisesti.
u Kiinnitä keskikehyksen (14) liitäntä yläkehykseen (15)
kiinnittämällä kahvan pultit ja kehyksen säätimet (6)
kaikilla puolilla kuvan E mukaisesti.
Poistokouru
u Aseta kourun ohjain (11) poistokouruun (10).
u Aseta kourun tiiviste (19) kourun liitännän väliin ja kiristä
kokoonpano ohjaimen säätimellä (12) sekä pultilla (20)
kaikilla puolilla kuvien F, G ja H mukaisesti.
u Aseta kourun ohjain haluamallesi lumilingon korkeudelle.
HUOMAA: Ohjaimen säätimiä ei saa kiristää liikaa.
Kourun kiertotanko
u Aseta kourun kiertotanko (5) rengaskoukun (21) läpi
keskikehyksessä (14) kuvan I mukaisesti.
u Paikanna kourun kiertoliitin (22) pääkotelossa.
u Aseta kourun kiertotanko kourun kiertoliittimeen (22) ja
kiinnitä kokoonpano pakkaukseen kuuluvalla
kiinnitystapilla (23) kuvan J mukaisesti.
Akun asentaminen ja poistaminen
Varoitus! Varmista ennen akun irrottamista tai asentamista,
että turva-avain on poistettu.
Akun asentaminen
u Nosta akkukotelon kansi (7) pois akkukotelon (24)
avaamiseksi kuvan K mukaisesti.
u Liu'uta akku (25) akkukoteloon, kunnes se on kokonaan
paikoillaan ja kuulet napsahduksen kuvan L mukaisesti.
Varmista, että akku on hyvin paikoillaan ja lukittu
paikoilleen.
u Sulje akkukotelon kansi. Varmista, että kansi on lukittunut
hyvin ennen lumilingon käynnistämistä.
Akun poistaminen
u Avaa akkukotelon kansi (7) yllä kuvatulla tavalla.
u Paina akun vapautuspainiketta akussa ja vedä akku irti
kuvan M mukaisesti.
Käyttö
TÄMÄ OHJEKIRJA TULEE LUKEA ENNEN LUMILINGON
KÄYTTÄMISTÄ. Lue “Toiminnallinen kuvaus” tutustuaksesi
ohjaimien sijaintiin ja säätöihin. Säilytä käyttöohjeet
myöhempää käyttöä varten.
Varoitus! Anna laitteen käydä omaan tahtiinsa. Älä ylikuormita
sitä.
u Avaa akkukotelon kansi ja liu'uta akku akkukoteloon,
kunnes se on kokonaan paikoillaan ja kuulet
napsahduksen kuvan L mukaisesti. Varmista, että akku on
hyvin paikoillaan ja lukittu paikoilleen.
u Sulje akkukotelon kansi. Varmista, että kansi on lukittunut
hyvin ennen lumilingon käynnistämistä.
u Aseta turva-avain (3) avainpaikkaan (26) kytkinkotelossa,
kunnes se on kokonaan kotelon sisällä kuvan N
mukaisesti. Lumilinko on nyt käyttövalmis.
u Tässä lumilingossa on erityinen kytkinrasia. Käytä
lumilinkoa painamalla turvakytkimen painiketta (4)
kytkinkotelossa (27), vedä sitten virtakytkimen työntöaisan
kahva (2) työntöaisaan kuvan O mukaisesti.
u Kytke lumilinko pois päältä vapauttamalla virtakytkimen
työntöaisan kahva (2).
Käyttövinkkejä
Varoitus! Tarkasta lumilingon aiottu käyttöalue ja poista siitä
kivet, puunpalaset, johdot, luut ja muut esineet, joita lumilinko
voi singota.
Varoitus! Jotkin lumilingon osat voivat jäätyä
äärilämpötiloissa. Älä yritä käyttää lumilinkoa, jos sen osat
ovat jäätyneet. Jos jokin osa jäätyy lumilingon ollessa
käytössä, pysäytä lumilinko, poista akku ja tarkista se
jäätyneiden osien varalta. Vapauta kaikki osat ennen
lumilingon uudelleen käynnistystä tai käyttöä.
Varoitus! Ole erityisen varovainen vaihtaessasi suuntaa
rinteessä. Varmista aina tukeva asento.
u Pidä käyttöalue puhtaana vieraista esineistä, jotka kairan
terät voivat singota. Joitakin esineitä voi olla piilossa
lumen alla. Jos lumilinko osuu vieraaseen kohteeseen tai
sinkoaa vieraita esineitä käytön aikana, pysäytä lumilinko,
irrota akku, poista este ja tarkista laite vaurioiden varalta.
Korjaa tai vaihda vaurioituneet osat ennen laitteen
uudelleen käynnistystä tai käyttöä.
u Varmista, että lapset, kotieläimet ja sivulliset pysyvät pois
toiminta-alueelta.
u Käytä pyöriä ohjauspisteenä lumilingon siirtämisen aikana.
Kallista lumilingoa kevyesti kyseisessä ohjauspisteessä
sen siirtämiseksi eteen- tai taaksepäin.
u Aloita lumen poisto toiminta-alueen keskeltä. Poista lunta
taakse- ja eteenpäin edeten, siirrä aina poistokouru
puhdistetulta alueelta poispäin. Varmista, että poistoreitit
menevät limittäin.
u Poista lumi mahdollisesti tuulen suuntaan, älä poista sitä
tuulen vastaisesti. Tämä estää lumen sinkoamisen
puhdistetuille alueille.
u Kun työskentelet kivisillä, soraisilla tai päällystämättömillä
pinnoilla, vältä irtonaisen materiaalin sinkoamista lumen
ohella painamalla kahva alas laitteen alla olevan
kaapimen nostamiseksi kivien tai saran yläpuolelle.
45
Page 46

SUOMI
(Alkuperäisten ohjeiden käännös)
Moottorin ylikuormitus
Jotta ylikuormittumisen aiheuttamilta vaurioilta vältyttäisiin, älä
yritä poistaa liikaa lunta yhdellä kertaa. Lumilinkoa ei saa
painaa liian suurella voimalla. Hidasta, anna lumilingon toimia
omaan tahtiin.
Linkoamissuunnan ja -korkeuden vaihto
Varoitus! Älä koskaan suuntaa lumen poistokourua
käyttäjään, sivullisiin, ajoneuvoihin tai lähellä oleviin
rakenteisiin päin. Poistettu lumi ja vahingossa singotut vieraat
esineet voivat aiheuttaa vakavia omaisuus- ja
henkilövahinkoja.
Suuntaa poistokouru aina vastakkaiseen suuntaan käyttäjään,
sivullisiin, ajoneuvoihin tai rakenteisiin nähden.
u Poistokourun toimintasäde on 180 astetta. Suuntaa lumen
poistokourua kiertämällä kourua kourun kiertotangolla (5)
kuvan 16 mukaisesti.
Varoitus! Vapauta työntöaisan kahva (2), poista turva-avain
(3) ja irrota akku ennen säätöjä, tarkastuksia, huoltoa,
lisävarusteiden vaihtoa, lumilingon puhdistusta, jne.
Toimenpiteet tulee suorittaa vasta sitten, kun lumilingon sisällä
olevat pyörivät osat ovat pysähtyneet kokonaan.
Kourun ohjain (11) poistokourun (10) yläosassa säätää lumen
poistokorkeutta. Kun ohjain on yläasennossa, lumi poistuu
korkeammalle. Kun ohjain on alhaalla, lumi poistuu
matalammalle.
u Löysää ohjaimen säätimiä (12) ohjaimen nostamiseksi tai
laskemiseksi haluamallesi korkeudelle. Kiristä ohjaimen
säätimet (12) uudelleen ohjaimen kiinnittämiseksi.
HUOMAA: Ohjaimen säätimiä ei saa kiristää liikaa.
Varoitus! Varmista, että kourun ohjain on lukittunut
poistokouruun. Jos poistokourun ja ohjaimen välissä on tilaa,
lumilinko voi singota vieraita esineitä käyttäjän suuntaan ja
aiheuttaa vakavia henkilövahinkoja.
u Älä aseta kourun ohjainta liikaa alaspäin, muutoin
ohjaimen ja poistokourun väliin voi muodostua väli (28)
kuvan Q mukaisesti.
Tukoksien poistaminen
Varoitus! Vapauta työntöaisan kahva (2), poista turva-avain
(3) ja irrota akku ennen säätöjä, tarkastuksia, huoltoa,
lisävarusteiden vaihtoa, lumilingon puhdistusta, jne.
Toimenpiteet tulee suorittaa vasta sitten, kun lumilingon sisällä
olevat pyörivät osat ovat pysähtyneet kokonaan.
u Vapauta työntöaisan kahva (2), poista turva-avain (3) ja
irrota akku.
u Tarkista poistokouru ja kairan kotelo tukoksien varalta.
u Käytä pakkauksen poistokeppiä (16) tukoksien
poistamiseksi.
Varoitus! ÄLÄ YRITÄ POISTAA TUKOKSIA KÄSILLÄ. Jos
jokin osa jäätyy lumilingon ollessa käytössä, pysäytä lumilinko
ja poista akku. Vapauta kaikki osat ennen lumilingon
uudelleen käynnistystä tai käyttöä.
46
Lisävarusteet
Varoitus! Sellaisten lisävarusteiden käyttö, joita ei ole
suositeltu käytettäväksi laitteen kanssa, saattaa johtaa
vaaratilanteeseen.
Lumilinkoon suositeltavat lisävarusteet ovat saatavilla
paikalliselta Black+Decker -jälleenmyyjältä tai valtuutetusta
huoltopalvelusta.
Huolto
Langaton BLACK+DECKER-laite on suunniteltu toimimaan
mahdollisimman kauan mahdollisimman vähällä huollolla.
Oikealla huollolla ja säännöllisellä puhdistuksella työkalu/laite
säilyttää suorituskykynsä.
Laturi ei tarvitse säännöllisen puhdistamisen lisäksi mitään
muuta huoltoa.
Varoitus! Ennen verkkojohdolla varustetun tai
verkkojohdottoman sähkötyökalun huoltoa toimi seuraavasti:
u Sammuta laite/työkalu ja irrota se verkkovirrasta.
u Jos laitteessa/työkalussa on erillinen akku, sammuta laite/
työkalu ja irrota sen akku.
u Jos akku on kiinteä, käytä akku täysin loppuun ja
sammuta laite sitten.
u Irrota laturi pistorasiasta ennen laturin puhdistamista.
Laturi ei tarvitse säännöllisen puhdistamisen lisäksi mitään
muuta huoltoa.
u Puhdista työkalun, laitteen ja laturin ilma-aukot
säännöllisesti pehmeällä harjalla tai kuivalla kangasliinalla.
u Puhdista moottorikotelo säännöllisesti kostealla liinalla.
Älä käytä hankaavia tai liuotinpohjaisia puhdistusaineita.
Vianetsintä
Ongelma Ratkaisu
Lumilinko ei toimi, kun
työntöaisan kahva on
aktivoitu.
Check to make sure safety key
Varmista ennen työntöaisan
liikuttamista, että turva-avain on
oikein paikoillaan ja että
kytkinkotelon painike on
kokonaan ylhäällä.
Sammuta lumilinko vapauttamalla
työntöaisa. Irrota turva-avain ja
akku, tarkista kairan esteetön
pyöriminen.
Tarkista, että akkukotelo on
puhdas ja että akku on kiinnitetty
kunnolla.
Onko akku on täysin latautunut?
Page 47

(Alkuperäisten ohjeiden käännös)
SUOMI
Vianetsintä
Laite pysähtyy lumen
linkoamisen aikana.
Lumilinko on
normaalia
äänekkäämpi ja
tärise.
Akkulaturin
LED-merkkivalot eivät
pala.
Sammuta lumilinko vapauttamalla
työntöaisa. Irrota turva-avain ja
akku. Tarkista kairan esteetön
pyöriminen.
Tarkista, että akkukotelo on
puhdas ja että akku on kiinnitetty
kunnolla.
Onko akku on täysin latautunut?
Siirrä laturi ja akku ympäristöön,
jonka lämpötila on yli 4,5 °C ja
alle +40,5 °C.
Vältä lumilingon ylikuormitusta.
Hidasta työskentelyä.
Sammuta lumilinko vapauttamalla
työntöaisa. Irrota turva-avain ja
akku. Tarkista kairan esteetön
kierto ja varmista, ettei se ole
taittunut tai vaurioitunut. Jos se
on vaurioitunut, palauta lumilinko
valtuutettuun BLACK+DECKER
-huoltopalveluun.
Jos näkyviä vaurioita ei ole
havaittavissa, mutta lumilinko silti
tärisee: Palauta lumilinko
valtuutettuun Black+Decker
-huoltopalveluun.
Tarkista pistokeliitäntä.
Vaihda laturi.
Ympäristönsuojelu
Toimita tämä laite erilliskeräykseen. Tätä tuotetta
ei saa hävittää kotitalousjätteen mukana.
Z
Kun BLACK+DECKER -laitteesi aikanaan täytyy vaihtaa tai ei
kelpaa enää käyttöön, älä hävitä laitetta kotitalousjätteen
mukana. Toimita se kierrätykseen.
Kierrätykseen toimitetut käytetyt tuotteet ja
pakkaus voidaan käyttää uudelleen.
z
Tämä suojelee ympäristöä ja vähentää raaka-
aineiden tarvetta.
Paikallisissa määräyksissä voidaan edellyttää, että
sähkölaitteet on toimitettava kierrätysasemalle tai
jälleenmyyjälle, jolta ostit uuden tuotteen.
Kun laitteesi on käytetty loppuun, älä hävitä sitä tavallisten
roskien mukana, Voit käyttää tätä palvelua palauttamalla
tuotteen valtuutettuun huoltokorjaamoon.
Saat valtuutettujen huoltoliikkeiden yhteystiedot ottamalla
yhteyden BLACK+DECKER Oy:hyn tässä käyttöoppaassa
ilmoitetussa osoitteessa. Internet-osoitteesta www.2helpU.
com löydät listan valtuutetuista BLACK+DECKER
-huoltoliikkeistä, tietoja palveluista sekä yhteystiedot.
Akut
Hävitä loppuun kuluneet akut
ympäristöystävällisesti:
Z
u Käytä akku täysin loppuun ja irrota se sitten työkalusta.
u NiCd-, NiMH- ja Li-Ion-akut ovat kierrätettäviä. Pakkaa
akut niin, että navat eivät aiheuta oikosulkua. Voit viedä
akut mihin tahansa valtuutettuun huoltoliikkeeseen tai
paikalliselle jätehuoltoasemalle kierrätystä varten.
u Käsittele akkua niin, että navat eivät joudu oikosulkuun.
u Älä yritä polttaa akkua, sillä se voi aiheuttaa
henkilövahinkoja tai räjähtää.
Tekniset tiedot
SNC3650L252
Tulojännite
Kuormittamaton nopeus
Paino
Akku
Jännite
Teho
Tyyppi
Laturi
Tulojännite
Lähtöjännite
Virta
Arvioitu latausaika h
Käteen/käsivarteen kohdistuva painotettu tärinäarvo
standardin EN 786 mukaisesti: = < 3,175 m/s2 , epävarmuus
(K) = 1,5 m/s2.
LPA (äänenpaine) 70.2 dB(A) epävarmuus (K) = 2.5 dB(A)
VDC36
-1
min
2500
kg
14.5
BL2036
V
36
dc
Ah 2.0
Li-ion
90567393 -05 typ.1
V
230
AC
V
36
DC
mA 1.3A
1.5
47
Page 48

SUOMI
(Alkuperäisten ohjeiden käännös)
EY-vaatimustenmukaisuusvakuutus
KONEDIREKTIIVI
ULKOILMAMELUDIREKTIIVI
%
SNC3650L252 Lumilinko
Black & Decker ilmoittaa, että tuotteet, jotka on kuvattu
kohdassa Tekniset tiedot, täyttävät seuraavien direktiivien
vaatimukset:
2006/42/EC, EN 60335-1:2012 +A11; 2014,
ISO/DIS 8437; 1989
EN 62233; 2008
2000/14/EC, LIITE III 2000/14/EY muutettu direktiivillä
2005/88/EY,
TÜV Rheinland LGA Products GmbH;
Tillystraß 2 D-90431N..1rnberg, Saksa;
Ilmoitetun elimen tunnusnumero: 0197
Akustisen tehon taso direktiivin 2000/14/EY
(liite III, L ≤ 50 cm) mukaisesti:
LWA (mitattu ääniteho) 85,18 dB(A)
epävarmuus (K) = 2 dB(A)
LWA (taattu ääniteho) 89 dB(A)
epävarmuus (K) = 2 dB(A)
Allekirjoittanut vastaa teknisten tietojen kokoamisesta tehden
tämän ilmoituksen Black & Deckerin puolesta.
R. Laverick
Engineering Manager
Black & Decker Europe, 210 Bath Road, Slough,
Berkshire, SL1 3YD
Iso-Britannia
28/07/2015
Nämä tuotteet täyttävät myös direktiivien 2004/108/EY ja
2011/65/EU vaatimukset.
Lisätietoja saa ottamalla yhteyden BLACK+DECKERiin
seuraavassa osoitteessa. Tiedot ovat myös käyttöohjeen
takakannessa.
48
Page 49

Takuu
Black & Decker takaa, ettei tuotteessa ole materiaali- ja/tai
valmistusvikaa silloin, kun se toimitetaan ostajalle. Takuu on
lisäys kuluttajan laillisiin oikeuksiin eikä vaikuta niihin. Tämä
takuu on voimassa kaikissa EU- ja ETA-maissa.
Mikäli Black & Decker -tuotteessa ilmenee vika materiaali- ja/
tai valmistusvirheen tai teknisten tietojen epätarkkuuden
vuoksi 24 kk:n kuluessa ostopäivästä, Black & Decker takaa
vaihtavansa vialliset osat, korjata tuotteet, jotka ovat
altistuneet normaalille kulumiselle, tai vaihtaa tällaiset tuotteet
varmistaakseen mahdollisimman vähäisen haitan syntymisen
asiakkaalle:
u on käytetty kaupallisesti, ammattimaisesti tai
vuokraukseen.
u Tuote on altistunut väärinkäytölle tai sen huolto on
laiminlyöty.
u Tuotteessa on vieraan esineen, vieraan aineen tai
onnettomuustapauksen aiheuttamaa vahinkoa.
u Takuu ei ole voimassa, mikäli laitetta on korjannut joku
muu kuin Black & Deckerin valtuuttama huoltoliike.
Edellytyksenä takuun saamiselle on, että ostaja jättää koneen
ja ostokuitin jälleenmyyjälle tai valtuutetulle huoltoliikkeelle.
Saat valtuutettujen huoltoliikkeiden yhteystiedot ottamalla
yhteyden Black & Decker Oy:hyn tässä käyttöoppaassa
ilmoitetussa osoitteessa. Internet-osoitteesta www.2helpU.
com löydät listan valtuutetuista Black & Decker
-huoltoliikkeistä, tietoja palveluista sekä yhteystiedot.
(Alkuperäisten ohjeiden käännös)
SUOMI
Käy verkkosivuillamme osoitteessa www.blackanddecker. ja
rekisteröi uusi BLACK+DECKER -tuotteesi. Sivuilta saat myös
tietoa uusista tuotteista ja erikoistarjouksista. Lisätietoja
BLACK+DECKERin tavaramerkistä ja tuotevalikoimastamme
on osoitteessa www.blackanddecker.
49
Page 50

Page 51

Page 52

Danmark Black & Decker kundeservice.dk@sbdinc.com
Roskildevej 22 www.blackanddecker.dk
2620 Albertslund
Helvetia ROFO AG Tel. 026-6749393
www.blackanddecker.ch Gewerbezone Seeblick Fax 026-6749394
service@rofoag.ch 3213 Kleinbösingen
Norge Black & Decker kundeservice.no@sbdinc.com
Postboks 4613, Nydalen www.blackanddecker.no
0405 Oslo
Suomi Black&Decker asiakaspalvelu.@sbdinc.com
PL47 www.blackanddecker.
00521, Helsinki
Sverige Black & Decker AB kundservice.se@sbdinc.com
Box 94, 431 22 Mölndal www.blackanddecker.se
United Kingdom & Black & Decker Tel. 01753 511234
Republic Of Ireland 210 Bath Road Fax 01753 512365
www.blackanddecker.co.uk Slough, Berkshire SL1 3YD
emeaservice@sbdinc.com
90627990 REV-0
07/2015
 Loading...