


SL3000
Slice ‘N Dice
™
1

Thank you for your purchase!
Gracias por su compra!
www.prodprotect.com/blackanddecker
Should you have any questions or concerns with your new product,
please call our Customer Service Line at 1-800-465-6070 (US and
Canada). Please do not return to the store.
Si usted tiene alguna inquietud o pregunta con su producto, por
favor llame a nuestra línea de servicio al cliente una atención
inmediata 1-800-465-6070 (EE.UU/Canadá) 01-800-714-2503
(México). No devuela a la tienda.
2

WELCOME!
Welcome! Congratulations on your purchase of the Black+Decker™ MultiPrep™
processor. We have developed this Use and Care Guide to ensure optimal
performance and your satisfaction. Save this Use and Care Guide and register
your appliance online at www.prodprotect.com/blackanddecker.
CONTENTS
IMPORTANT SAFEGUARDS ........................................... 4
GETTING TO KNOW YOUR MULTIPREP™ PROCESSOR ..................... 5
GETTING STARTED ................................................. 6
USING YOUR MULTIPREP™ PROCESSOR ................................6
USING THE FEED CHUTE AND PUSHER ................................. 7
USING THE POWER DIAL ............................................ 7
USING THE DICING DISC............................................. 8
HELPFUL TIPS WHEN USING THE DICING DISC .......................... 9
USING THE SLICING DISC ...........................................10
USING THE SHREDDING DISC ........................................11
HELPFUL TIPS WHEN SHREDDING ....................................11
USING THE JULIENNE DISC ..........................................12
GENERAL TIPS FOR USING THE MULTIPREP™ PROCESSOR ................12
CARE AND CLEANING ..............................................13
STORAGE .........................................................14
TROUBLESHOOTING................................................14
RECIPES .........................................................15
WARRANTY AND CUSTOMER SERVICE INFORMATION ....................16
SAVE THESE INSTRUCTIONS.
This product is for household use only.
3

PLEASE READ AND SAVE THIS USE AND CARE GUIDE.
IMPORTANT SAFEGUARDS.
When using electrical appliances, always follow basic safety precautions to reduce the
risk of fire, electric shock, and/or injury, including the following:
• Read all instructions.
• To protect against risk of electrical shock, do not put
motor base, cord or plug in water or other liquid.
• Close supervision is necessary when any appliance is
used by or near children.
• Unplug from outlet when not in use, before putting
on or taking off parts, and before cleaning.
• Avoid contacting blades and moving parts.
• Do not operate any appliance with a damaged cord
or plug, or after the appliance malfunctions, or has
been dropped or damaged in any manner. Contact
the Consumer Service line listed in this manual.
• This appliance has important markings on the plug
blade. The attachment plug or entire cord set (if plug
is molded onto cord) is not suitable for replacement.
If damaged, the appliance shall be replaced.
• The use of attachments not recommended by the
appliance manufacturer may cause fire, electric
shock, or injury.
• Do not use outdoors.
• Do not let the cord hang over the edge of table or
counter, or touch hot surfaces.
• Keep hands and utensils away from moving blades
or discs while processing to reduce the risk of severe
injury to persons or damage to the appliance.
• Never feed food by hand. Always use food pusher.
• Blades are sharp. Handle carefully.
• To reduce the risk of injury, never place cutting
blades or discs on base without first putting the
processing basin properly in place.
• Be certain the lid is securely locked in place before
operating appliance.
• This appliance has a protection system and will
not operate unless the processing basin is securely
locked onto base and the lid is securely locked onto
the processing basin.
• Do not place on or near a hot gas or electric burner
or in a heated oven.
• Do not attempt to defeat the lid interlock
mechanism.
• Do not use appliance for other than intended use.
• This product is designed for household use only.
• Do not open lid until blade or disc stops completely.
• This appliance is not intended for use by persons
(including children) with reduced physical, sensory,
or mental capabilities, or lack of experience and
knowledge, unless they have been given supervision
or instruction concerning use of the appliance by a
person responsible for their safety.
• Children should be supervised to ensure that they do
not play with the appliance.
• It is not recommended to dice frozen cheese or other
frozen products.
SAVE THESE INSTRUCTIONS.
This product is for household use only.
POLARIZED PLUG (120V models only)
This appliance has a polarized plug (one
blade is wider than the other). To reduce
the risk of electric shock, this plug is
intended to fit into a polarized outlet only
one way. If the plug does not fit fully into
the outlet, reverse the plug. If it still does
not fit, contact a qualified electrician. Do
not attempt to modify the plug in any way.
TAM PER-RESISTAN T SCREW
Warning: This appliance is equipped
with a tamper-resistant screw to prevent
removal of the outer cover. To reduce
the risk of fire or electric shock, do not
attempt to remove the outer cover. There
are no user-serviceable parts inside.
Repair should be done only by authorized
service personnel.
4
ELECTRICAL CORD
1)
A short power-supply cord is provided to
reduce the risk resulting from becoming
entangled in or tripping over a longer cord.
2) Extension cords are available and may
be used if care is exercised in their use.
3) If an extension cord is used,
a) The marked electrical rating of the
extension cord should be at least as
great as the electrical rating of the
appliance,
b) If the appliance is of the grounded
type, the extension cord should be a
grounding-type 3-wire cord, and
c) The cord should be arranged so that
it will not drape over the countertop or
tabletop where it can be pulled on by
children or tripped over unintentionally.
Note: If the power cord is damaged,
please contact the warranty department
listed in these instructions.
GETTING TO KNOW YOUR MULTIPREP™ PROCESSOR
9
1
2
3
4
5
6
7
8
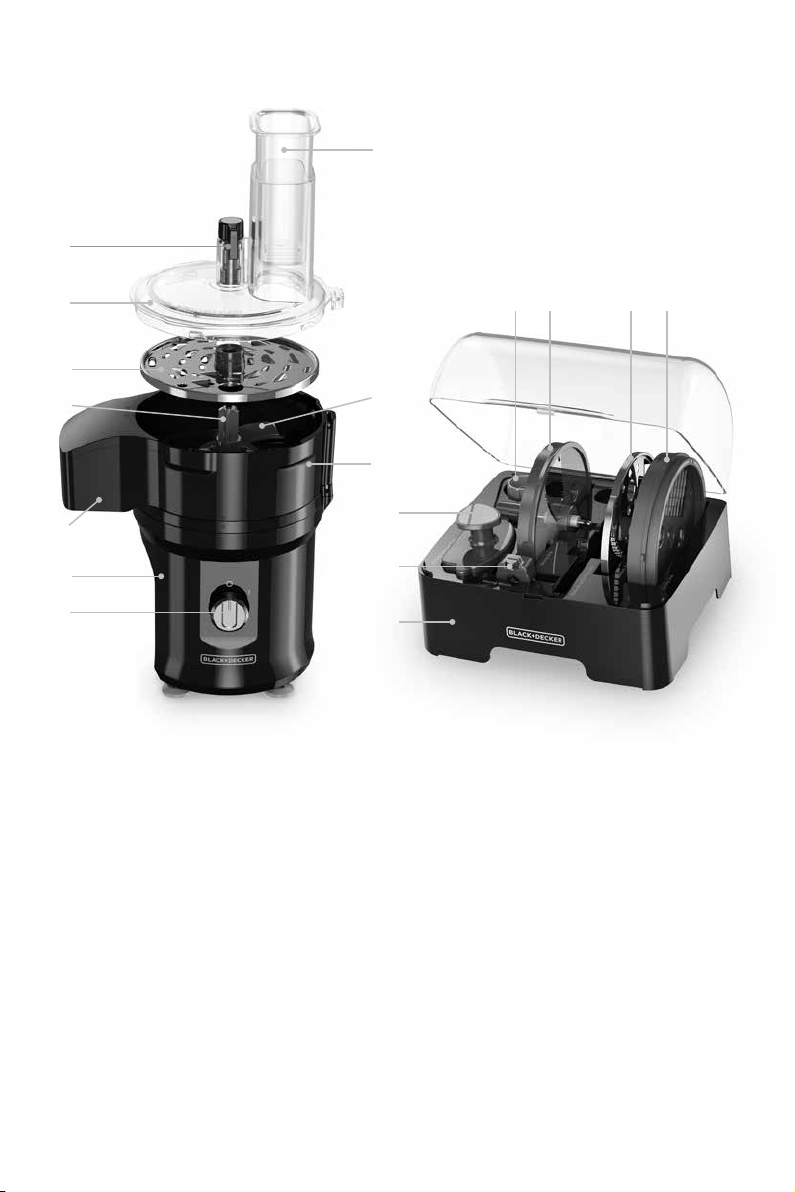
1. Adjustable Slicing Lever*
2. Lid with Feed Chute
(Part # SL3000-01)
3. Shredding/Grating Disc (reversible)
(Part # SL3000-02)
4. Blade Shaft (Part # SL3000-03)
5. Continuous Flow Chute
6. Motor Base
7. Power Dial (O-OFF), (I-ON)
8. Suction Cup Feet
9. Food Pusher (Part # SL3000-04)
10. Sweeper
11. Processing Basin (Part # SL3000-05)
15 16 17 18
10
11
12
13
14
12. Dicing Clean-out Tool**
(Part # SL3000-06)
13. Dicing Blade** (Part # SL3000-07)
14. Storage Case (Part # SL3000-08)
15. Dicing Shaft**
(Part # SL3000-09)
16. Adjustable Slicing Disc*
(Part # SL3000-10)
17. Julienne Disc (reversible)
(Part # SL3000-11)
18. Dicing Disc**
(Part # SL3000-12)
19. Power Cord (not shown)
*Color coded green to match the Adjustable Slicing Disc
**Color coded orange to match the required Dicing parts
Product may vary slightly from what is illustrated.
5

HOW TO USE
This product is for household use only.
GETTING STARTED
• Remove all packing material, any stickers, and the plastic band around
the power plug.
• Remove and save literature.
• Please visit www.prodprotect.com/blackanddecker to register your warranty.
• Wash all removable parts as instructed in CARE AND CLEANING
section of this manual.
CAUTION: Handle blades and discs very carefully. They are very sharp.
• Select a level, dry countertop where the appliance is to be used, allowing
air space on all sides to provide proper ventilation for the motor.
USING YOUR MULTIPREP™ PROCESSOR
1. Determine whether you will be using the Dicing Disc, Adjustable Slicing Disc,
Shredding/Grating Disc or Julienne Disc.
SHREDDING/
GRATI N G
DISC
SHRED,
GRATE
JULIENNE
3 mm, 6mm
DISC
A
DICING
DISC
DICE
¼” x ¼”
Important: Always make sure your appliance is unplugged, placed on a flat,
level surface, and the power dial is in the O (OFF)
position, before starting to assemble.
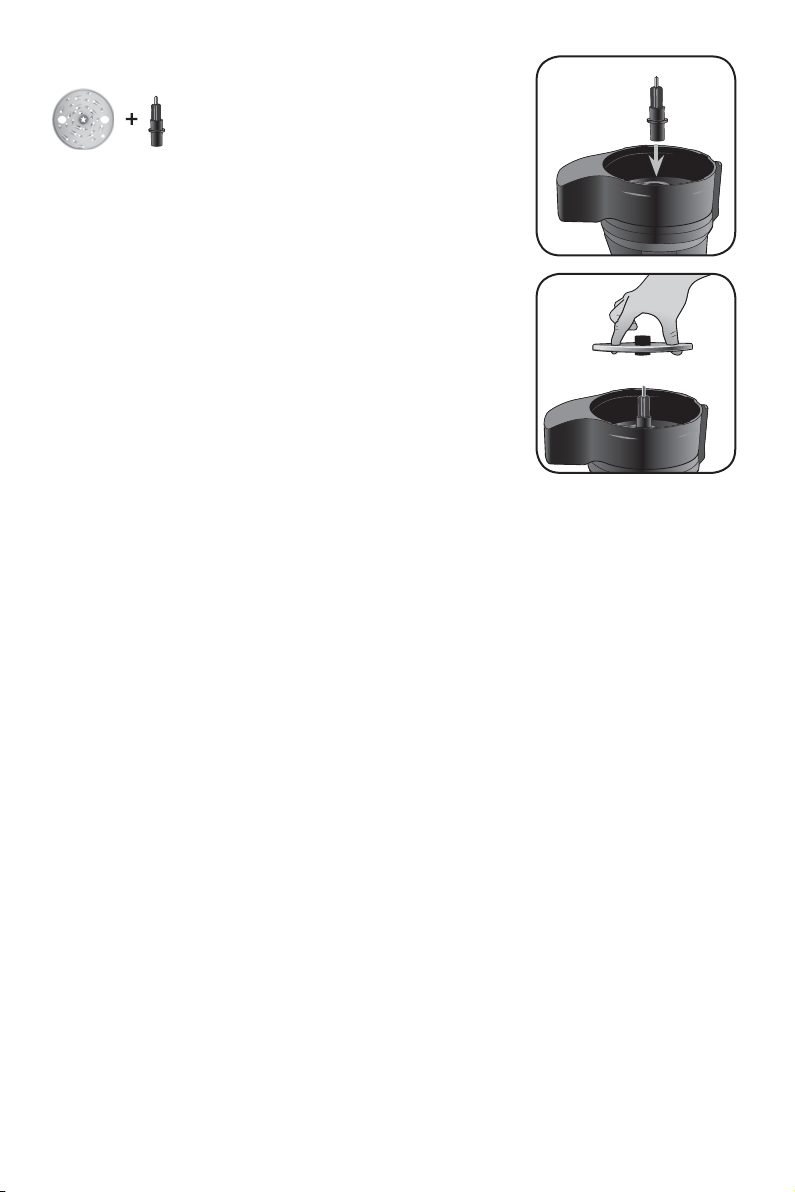
2. Place the processing basin on the base, with
arrow aligning with the “unlocked” symbol on
the base.
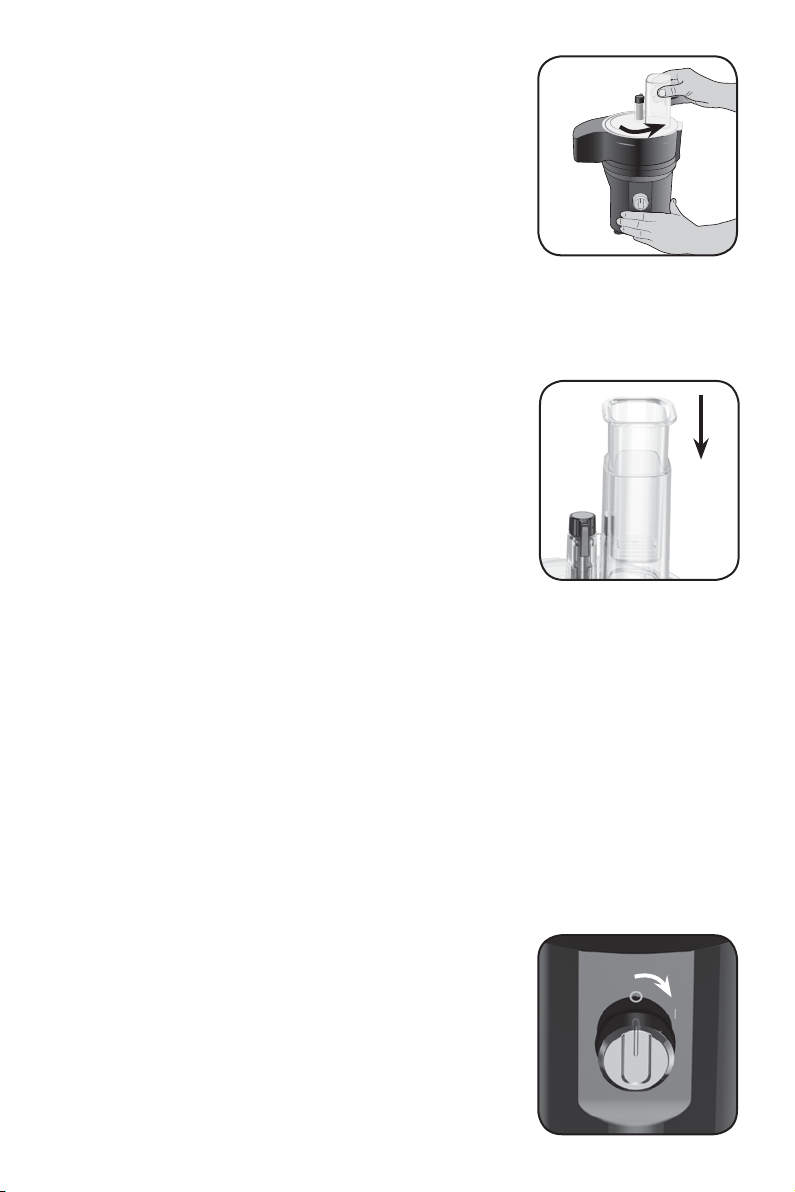
3. Hold the processing basin by the continuous flow
chute. Turn the processing basin counterclockwise
until it locks on the base (the arrow will be aligned
with the “locked” symbol).
lock when it is securely attached.
6
SLICING
DISC
SLICE
(var. thickness
1-5 mm)
(A) You will feel it
4. After selecting the disc you wish to use, place
the appropriate shaft on the center coupling in
the bottom of the processing basin (instructions
for individual discs follow in this manual) then
attach the appropriate disc.
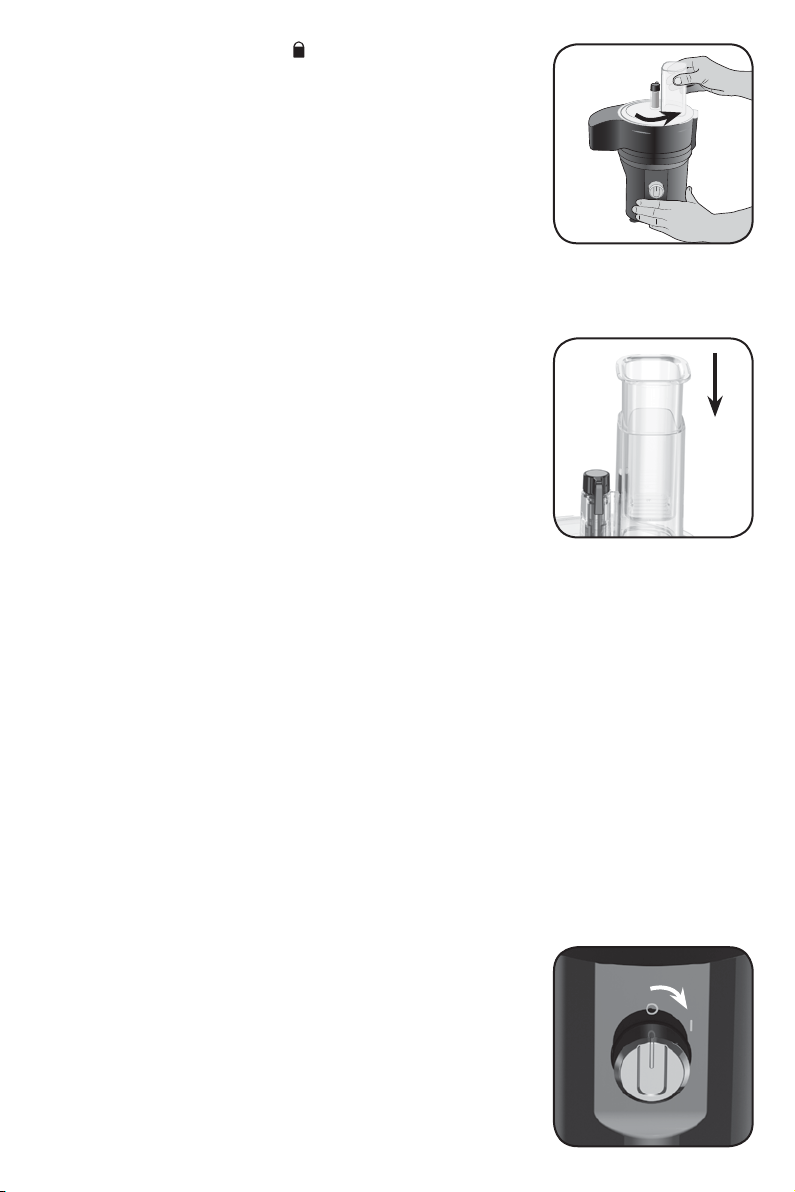
5. Place the lid with feed chute on top of the
processing basin, aligning the tabs and locking
it into place by turning counterclockwise. The lid
is locked when it clicks firmly into place. The lid
will always, and only, lock when the feed chute is
aligned opposite the continuous flow chute. (B)
Note: Be sure to lock the processing basin in place before attaching the
shafts, discs, or lid.
6. Insert the food pusher into the feed chute of the
lid. (C)
7. Plug in the appliance. If the appliance is properly
assembled, the appliance will turn on when the
power dial is turned clockwise. If it does not turn
on, the interlocks are not properly engaged.
Important: For your protection this appliance has
an interlock system. The appliance will not operate
unless the processing basin and lid are properly
locked in place.
B
C
USING THE FEED CHUTE AND PUSHER
Note: Before operating the appliance, be sure the processing basin, discs and
lid are properly assembled on the appliance base.
1. Place food to be processed in the feed chute. Use the food pusher to guide
food through the feed chute.
USING THE POWER DIAL
Note: If the appliance does not operate, make sure the processing basin and
lid are properly locked on the base. There is an automatic safety lock that
causes the appliance to stop working if the processing basin and/or lid are
not properly locked in place.
The one-speed power dial is located on the front of the
appliance base.
1. Make sure the power dial is in the O (OFF) position.
2. Plug in the appliance to turn it on.
3. Turn the power dial clockwise to I (ON) position. (D)
4. To stop, turn the power dial counterclockwise to
O (OFF) position.
5. Always unplug the appliance when not in use.
D
7
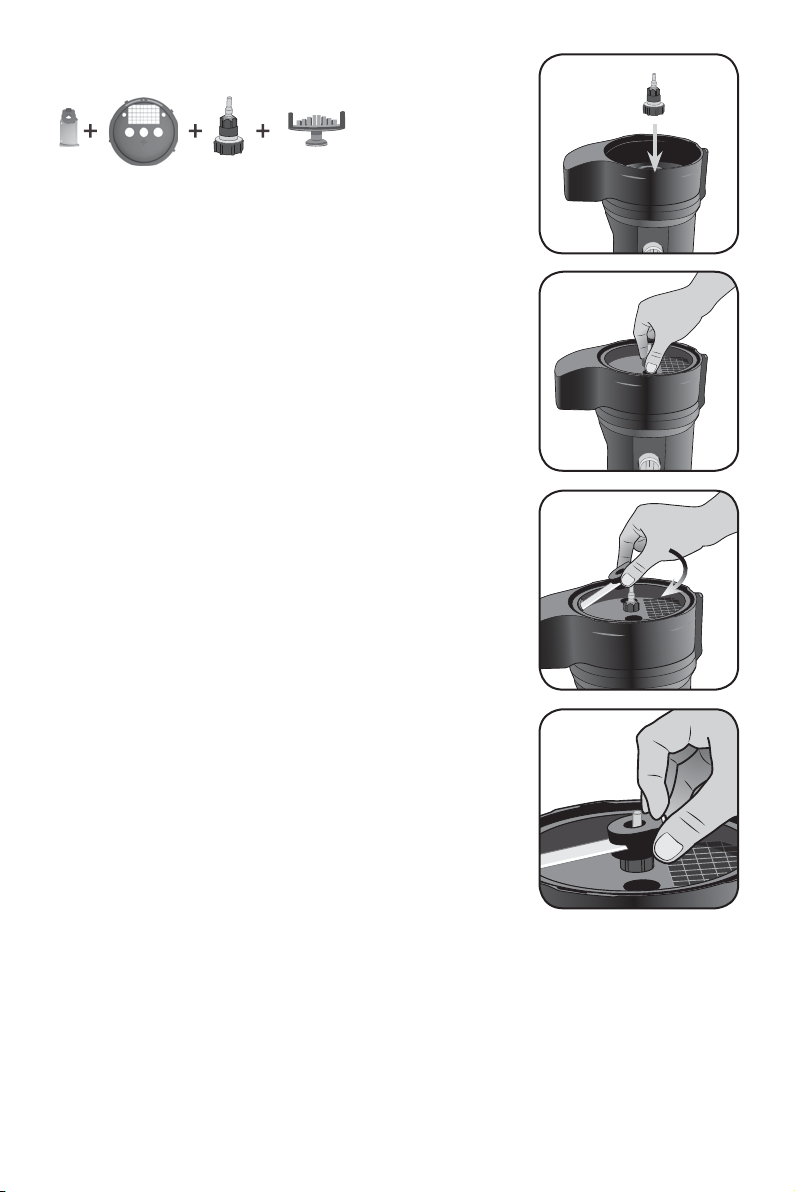
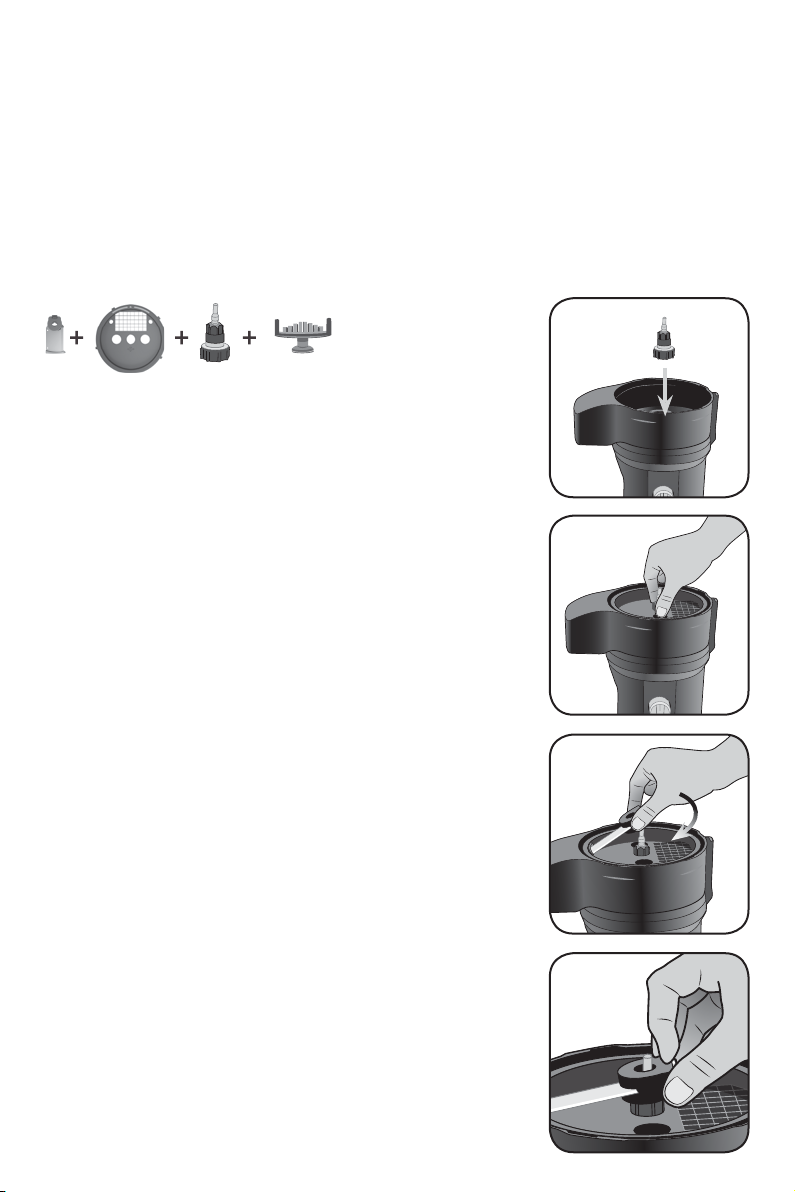
USING THE DICING DISC (ORANGE)
Important: All parts related to dicing are color coded
ORANGE for ease of use.
1. Lock the processing basin onto the base.
2. Place the dicing shaft in the processing basin
over the center coupling. (E)
3. Carefully pick up the dicing disc using the
finger holes in the top of the disc.
4. Place dicing disc into the processing basin
and onto the dicing shaft with the grid facing
opposite the continuous flow chute (facing
right). The dicing disc can only be properly
installed when the dicing grid faces opposite
the continuous flow chute. (F)
5. Grasp the dicing blade by the center using the
finger grips. Do not touch the blade edge.
6. Insert the curved plastic edge under the outer
edge of the dicing disc. (G)
7. Pull the dicing blade lock into “open” position
in the center of the blade by using the metal
tab. (H)
8. Place the center of the blade down onto the
orange top of the dicing shaft.
9. Release blade lock tab once the center of the
dicing blade lies flat against the dicing disc.
10. Place lid on processing basin and lock into
place by rotating counterclockwise.
Important: Be sure to only handle blade with the
safe finger grips.
Important: Always place the curved end of the
blade under the lip of the dicing disc FIRST then
place the center of the blade on the center shaft of the disc.
11. After dicing, turn the appliance off, unplug, and then remove lid.
12. Carefully pull the dicing blade lock into “open” position using the metal
tab. (H)
E
F
G
H
8

13. Lift the blade off the blade shaft first and then
pull the curved edge up and away from the edge
of the dicing disc. (I)
Important: You must remove the dicing blade from
the dicing disc before using the dicing cleanout tool.
Do not use the cleanout tool if the dicing disc is not
in the processing basin.
14. Prior to removing the dicing disc from the
processing basin, place the dicing cleanout
tool in the holes on the dicing disc, aligning
the outer posts with the outer notches. (J) The
curved edge of the cleanout tool aligns with the
curved edge of the disc. Push cleanout tool into
the dicing grid. This will push remaining food
out of the grid, enabling you to wash the disc
more efficiently.
Note: Hard foods like carrots may require more
force to remove with the dicing cleanout tool. It is
normal for some foods to remain in the grid until
grid is washed.
15. Remove the dicing disc by using the two finger holes to lift the disc
straight up and out of the processing basin.
16. Remove the dicing shaft from the processing basin by turning
counterclockwise and lifting straight up out of the processing basin.
17. Unlock the processing basin by turning it clockwise off base.
I
J
HELPFUL TIPS WHEN USING THE DICING DISC
• The dicing blade must be removed from the top of the disc before using
the cleanout tool.
• Cut off the ends of food to be diced for the most uniform dice.
• When dicing multiple ingredients, dice softer foods first and end with
hardest food.
• When dicing soft cheese, chill or freeze for 10 minutes prior to dicing.
• Not recommended for dicing corned beef, raw meat, or chicken.
• Firm, seedless cucumbers work best.
9
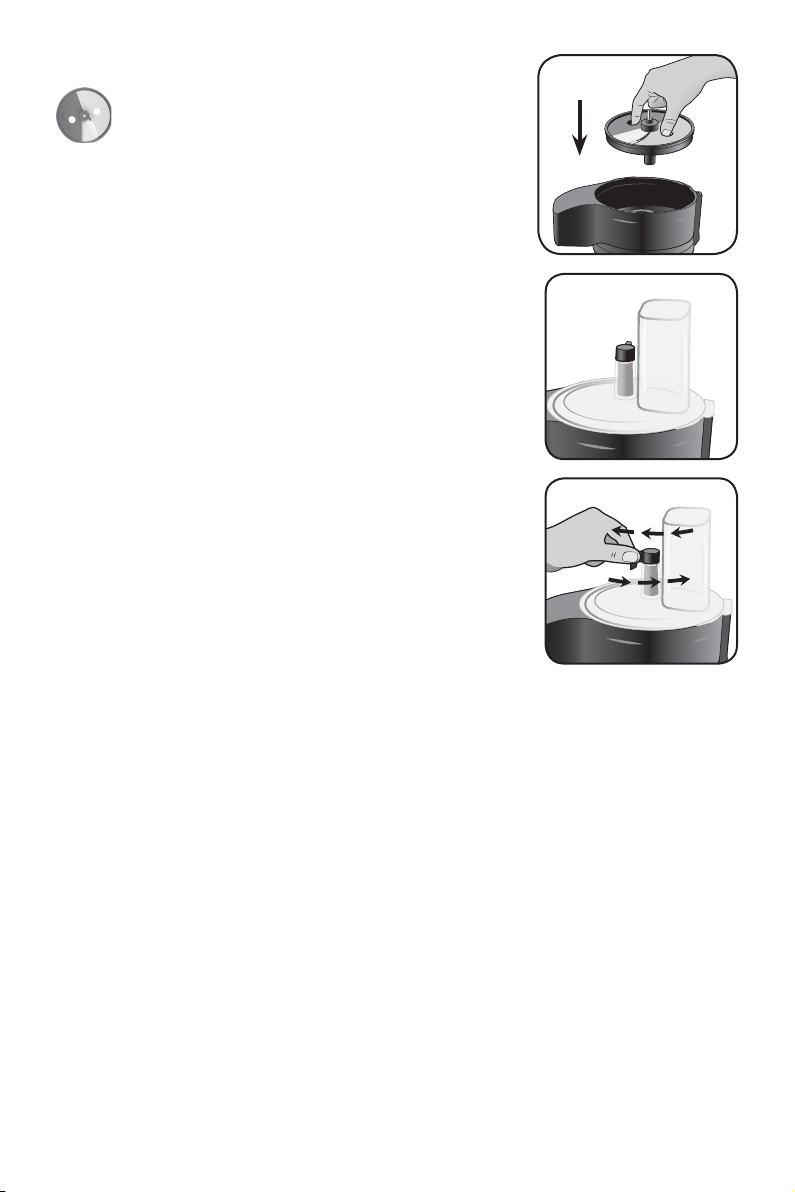
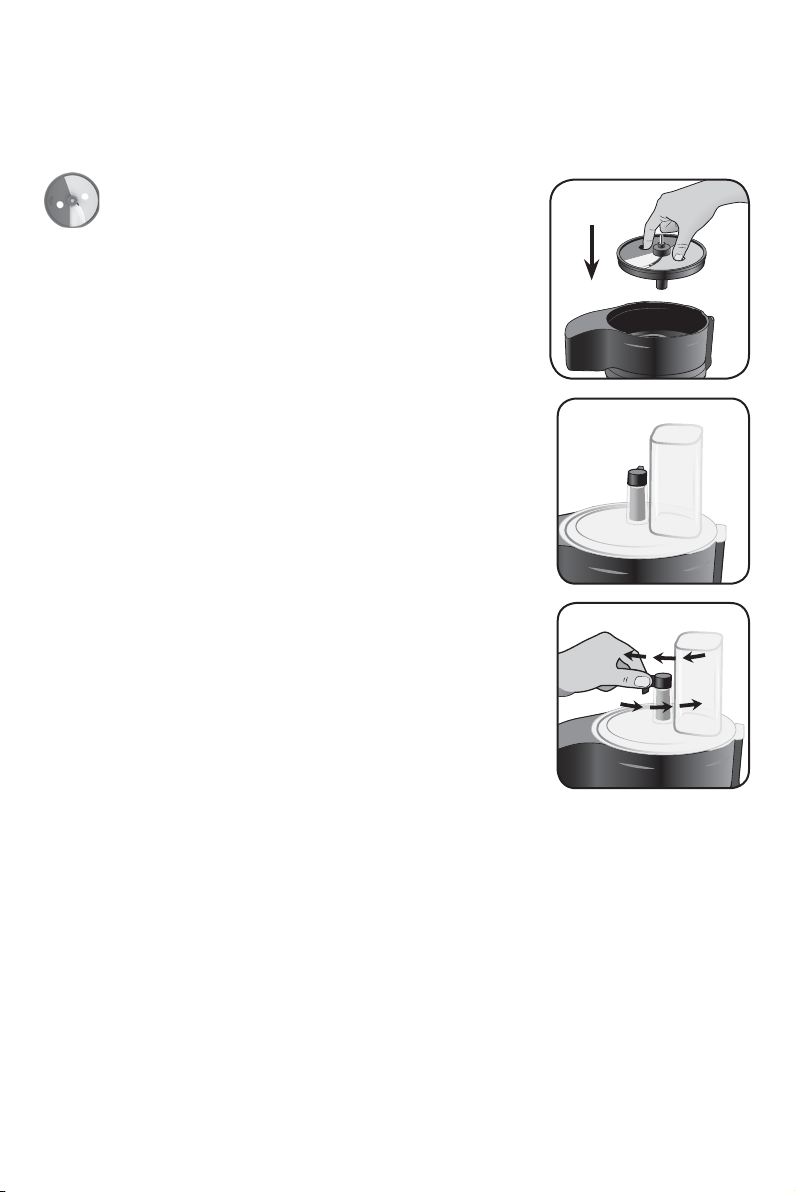
USING THE SLICING DISC (GREEN)
1. Lock the processing basin onto the base.
2. Place the slicing disc in the processing basin
over the center coupling. (K)
Note: Position slicing disc blade just to the right of
the feed chute. This allows the blade a full rotation
before contacting the food.
Important: Ensure that the adjustable slicing lever is
set to thin/minimum before assembling the lid. (L)
3. Place lid onto processing basin and lock into
place by rotating counterclockwise.
4. To adjust slicing thickness, move the lever
at the base of the feed chute forward and
backward to desired thickness (1-5 mm). Turn
the lever counterclockwise towards the front of
the appliance for thicker slices and clockwise
towards the back of the appliance for thinner
slices. Slice thickness may be adjusted while the
appliance is running. (M)
5. Turn appliance on; press firmly, but do not force,
food pusher to guide food through the slicing disc.
Note: Heavy pressure on the pusher does not speed
the work; use the pusher only as a guide. Let the
appliance do the work. Pushing too hard may result in inconsistent slicing
thickness.
Note: Slight variances in slice thickness may occur due to the pressure
applied to food when guiding it through the feed chute.
Note: Changing thickness settings with other discs or blades installed will
have no effect on the operation.
6. When finished, turn the appliance off and allow the disc to stop revolving
completely. Unplug the appliance and remove the lid.
7. Carefully remove the slicing disc using the two finger holes to lift the disc
straight up and out of the processing basin.
8. Unlock the processing basin by turning it clockwise and lift off the base.
K
L
M
10
USING THE SHREDDING DISC
1. Lock the processing basin onto the base.
2. Place the blade shaft in the processing basin
over the center coupling. (N)
3. Insert your fingers into the two large holes on
the disc with the desired side up (small holes
for fine grating and large holes for coarse
shredding) and place disc onto blade shaft in
processing basin. (O) You may need to rotate
disc slightly until it fits onto shaft.
4. Place lid on processing basin and lock into place
by rotating counterclockwise.
5. Place food in feed chute and use food pusher to
guide foods towards shredding/grating disc.
6. Turn appliance on; press firmly, but do not force, food pusher to guide
food through the shredding/grating disc.
Note: Heavy pressure on the pusher does not speed the work; use the pusher
only as a guide. Let the appliance do the work.
7. When finished, turn the appliance off and allow the disc to stop revolving
completely. Unplug the appliance and remove the lid.
8. Carefully remove the disc using the two finger holes to lift it straight up
and out of the processing basin.
9. Pull blade shaft out of the processing basin.
10. Unlock the processing basin by turning it clockwise off base.
N
O
HELPFUL TIPS WHEN SHREDDING
• Before shredding or grating round fruits and vegetables with the
appliance, cut a thin slice from the bottom so food will be more stable.
Place food cut side down in the feed chute.
• Always remove seeds, cores and pits before processing.
• Select foods that are firm and not over ripe.
• Remove the core from hard vegetables, such as cabbage.
• When shredding thinner vegetables, cut them just short of the length of
the feed chute; stand them vertically in the feed chute so they are solidly
packed and cannot turn or tilt.
• A few large pieces of food may remain on top of the disc after shredding
or grating. If desired, cut these by hand and add to mixture.
• Soft and semi-hard cheeses should be well chilled before shredding. For best
results with soft cheeses like mozzarella, freeze 10–15 minutes before processing
to firm the cheese. Cut to fit feed tube and process using even pressure.
11

USING THE JULIENNE DISC
1. Lock the processing basin onto the base.
2. Place the blade shaft in the processing basin
over the center coupling. (P)
3. Insert your fingers into the two large holes on
the disc with the desired side up (6mm large or
3mm small) and place Julienne disc onto blade
shaft in processing basin. (Q) You may need to
rotate disc slightly until it fits onto shaft.
4. Place lid on processing basin and lock into place.
5. Turn appliance on; press firmly, but do not
force, food pusher to guide food through the
Julienne disc.
Note: Heavy pressure on the pusher does not speed
the work; use the pusher only as a guide. Let the appliance do the work.
6. When finished, turn the appliance off and allow the disc to stop
revolving completely. Unplug the appliance and remove the lid.
7. Carefully remove the disc using the two finger holes to lift it straight up
and out of the processing basin.
8. Pull blade shaft out of the processing basin.
9. Unlock the processing basin by turning it clockwise off base.
P
Q
GENERAL TIPS FOR USING THE MULTIPREP™ PROCESSOR
• Organize processing tasks to avoid multiple cleanups of the processing
basin; process dry before wet.
• To keep slender foods, such as carrots or celery, from falling over in the feed
chute, cut food into several pieces and pack the feed chute with the food.
• Apply light pressure on the pusher for soft foods (cucumber, zucchini,
and tomatoes) and slightly more pressure for hard foods (onions, carrots,
and potatoes).
• Do not process foods that are so frozen or hard that the tip of a knife
cannot be inserted into the food.
• If a piece of hard food, such as a carrot, becomes wedged or stuck on
the blade, stop the appliance and unplug, then remove the blade. Gently
remove food from the blade.
12

CARE AND CLEANING
This product contains no user serviceable parts. Refer service to qualified
service professional.
Important: Always unplug your appliance from the outlet before cleaning.
CLEANING
Important: Blades are sharp. Handle blades and discs carefully.
• Completely disassemble appliance parts before washing.
• Rinse parts immediately after use for easier cleaning.
• Wipe base and feet with a damp cloth and dry thoroughly. Stubborn
spots can be removed by rubbing with a damp cloth and a mild,
nonabrasive cleaner.
• Do not immerse base in liquid.
• All removable parts can be washed by hand. Hand-washing of plastic
parts will help to maintain the appliance’s appearance.
• All removable parts can be washed in the dishwasher, top rack only.
• Some staining of parts may occur. If so, make a paste of 2 tablespoons
of baking soda and 1 tablespoon of water. Apply to stains and let stand
overnight. Rinse and dry.
• Do not use rough scouring pads or cleansers on any plastic or metal
parts to clean.
• Do not allow blades or discs to soak in water for long periods of time.
• If you are having trouble attaching the lid over the processing basin,
apply a small amount of vegetable oil to the rim of the lid and
processing basin. This should make the pieces work smoother when
attaching the lid to the processing basin.
Important: Do not place the appliance parts in boiling liquids.
13

STORAGE:
Caution: Blades are sharp. Handle carefully.
Store all the accessories in the convenient storage case. All blades, disc
shafts and accessories sit in the storage case, as indicated by outlined
shapes that correspond with each individual accessory.
Important: Keep storage case in a location out of the reach of children.
TROUBLESHOOTING:
PROBLEM SOLUTION
Appliance
doesn’t run
Appliance is not
shredding or slicing properly
If you are getting
an inconsistent
dice
Appliance is
jamming
• Make sure the processing basin and lid are properly
aligned and locked in place.
• Check to make sure the appliance is plugged in.
• If you have a circuit breaker box, be sure the circuit is
closed.
• Unplug the appliance, and then plug it back into the
outlet.
• Make sure the disc is installed properly.
• If using the adjustable slicing blade, make sure it is
set to the correct thickness.
• Make sure ingredients are suitable for slicing or
shredding.
• Make sure the processing basin and lid are aligned
and locked in place.
• Ensure there are no clogs in dicing grid and that food
is lined up evenly with flat ends.
• Switch the appliance off and unplug it. Dismantle the
appliance, clean it, assemble it and start again.
If the problem is not due to one of the above items, see the “Warranty and
Service” section of this Use and Care Guide. Do not return the MultiPrep™
processor to the retailer. Retailers do not provide service.
14

RECIPES
CUCUMBER VINEGAR SALAD
2 cucumbers
1 small fresh white onion
½ tsp. salt
¼ cup vinegar
¼ cup water
Insert slicing disc into processing basin and adjust external slicing
lever to thin slice.
Process the cucumbers and onion. When finished slicing, place sliced
cucumbers and onions into a bowl and sprinkle with salt.
Mix remaining ingredients in a separate bowl with a fork. Pour over
cucumber/onion mixture and toss lightly.
Refrigerate for 30 minutes, stir before serving.
VEGGIE TORTELLINI SOUP
1 medium white onion, diced
1 garlic clove, minced
1 Tbsp. vegetable oil
4 cups vegetable broth
1 can (28 oz.) crushed tomatoes
1 tsp. dried basil
1 tsp. dried oregano
1 tsp. sea salt
1 Tbsp. sugar
½ tsp. dill weed
¼ tsp. black pepper
1 dash cayenne pepper
2 small yellow squash, thinly
sliced
2 small zucchini squash, julienned
3 plum tomatoes, seeded and
diced
2 cups loosely packed baby
spinach
1 (9 oz.) pkg. refrigerated cheese
tortellini
Heat oil in stockpot on medium heat. Add onions and garlic; cook and
stir until tender crisp.
Stir in vegetable broth, crushed tomatoes and spices and bring to a boil.
Add squash and diced tomatoes; simmer on medium-low heat until
squash is tender, stirring occasionally.
Stir in spinach and tortellini. Cook an additional 3 to 5 min. or until
pasta is cooked and tender.
Top with shredded Parmesan cheese, if desired.
Tip: Serve with a crisp green salad and a slice of crusty bread.
Makes: 12 (1 cup) servings
15

WARRANTY AND CUSTOMER
SERVICE INFORMATION
For support or any questions regarding your appliance, call the appropriate
800 number listed within this section. Please DO NOT return the product
to the place of purchase. Also, please DO NOT mail product back to
manufacturer, nor bring it to a service center. You may also want to consult
our Product Protection Center at www.prodprotect.com/blackanddecker.
Two-Year Limited Warranty
(Applies only in the United States and Canada)
What does my warranty cover?
• Your warranty covers any defect in material or workmanship provided; however, the
liability of Spectrum Brands Inc. will not exceed the purchase price of product.
How long is the warranty period?
• Your warranty extends two years from the date of original purchase with proof of
purchase.
What support does my warranty provide?
• Your warranty provides you with a reasonably similar replacement product that is
either new or factory refurbished.
How do you get support?
• Save your receipt as proof of date of sale.
• Visit the online service website at www.prodprotect.com/blackanddecker, or call
toll-free
1-800-465-6070, for general warranty service.
• If you need parts or accessories, please call 1-800-738-0245.
What does my warranty not cover?
• Damage from commercial use
• Damage from misuse, abuse or neglect
• Products that have been modified in any way
• Products used or serviced outside the country of purchase
• Glass parts and other accessory items that are packed with the unit
• Shipping and handling costs associated with the replacement of the unit
• Consequential or incidental damages (Please note, however, that some states do
not allow the exclusion or limitation of consequential or incidental damages, so
this limitation may not apply to you.)
How does state law affect my warranty?
• This warranty gives you specific legal rights. You may also have other rights that
vary from state to state or province to province.
16

¡BIENVENIDO!
¡Felicitaciones por su compra del procesador MultiPrep™ Black+Decker™. Hemos
desarrollado este manual de uso y cuidado para asegurar rendimiento óptimo y
su satisfacción. Conserve este manual de uso y cuidado y registre su producto
en línea, visitando www.prodprotect.com/blackanddecker.
ÍNDICE
INSTRUCCIONES IMPORTANTES DE SEGURIDAD.........................18
CONOZCA SU PROCESADOR MULTIPREP™ .............................20
COMO USAR.......................................................21
USO DE SU PROCESADOR MULTIPREP™ ................................21
USO DEL TUBO DE ALIMENTACIÓN Y EL EMPUJADOR DE ALIMENTOS...... 22
USO DEL DIAL DE FUNCIONAMIENTO................................. 22
USO DEL DISCO PARA CORTAR EN CUBOS ............................ 23
CONSEJOS ÚTILES PARA EL USO DEL DISCO PARA CORTAR EN CUBOS .... 24
USO DEL DISC O PARA REBANAR ................................... 25
USO DEL DISCO PARA DESMENUZAR ................................. 26
CONSEJOS ÚTILES PARA DESMENUZAR .............................. 27
USO DEL DISCO PARA CORTE EN JULIANA ............................ 28
CONSEJOS GENERALES PARA EL USO DEL PROCESADOR MULTIPREP™ .... 29
CUIDADO Y LIMPIEZA.............................................. 29
ALMACENAMIENTO................................................ 30
RESOLUCIÓN DE PROBLEMAS ....................................... 30
REC E TA S .........................................................31
GARANTÍA E INFORMACIÓN DE SERVICIO PARA EL CLIENTE ............. 45
CONSERVE ESTAS INSTRUCCIONES.
Este aparato eléctrico es para uso doméstico únicamente.
17

POR FAVOR LEA ESTE INSTRUCTIVO ANTES DE USAR EL PRODUCTO.
INSTRUCCIONES
IMPORTANTES DE SEGURIDAD
Cuando se utilizan aparatos eléctricos, siempre se debe respetar ciertas medidas de
seguridad, incluyendo las siguientes:
• Lea todas las instrucciones.
• Para protegerse contra el riesgo de descargas
eléctricas, no coloque la base del motor en agua ni
en otro líquido.
• Se requiere la supervisión de un adulto cuando
algún electrodoméstico está siendo utilizado cerca
de los niños.
• Desenchufe el tomacorriente cuando no esté en uso,
antes de instalar o retirar piezas y antes de limpiar.
• Evite el contacto con las cuchillas y las piezas
móviles.
• No opere ningún aparato que tenga el cable o
enchufe dañado o después de ocurrir una falla de
funcionamiento o si se ha dejado caer o dañado de
cualquier manera. Llame al número de servicio para
el consumidor que aparece en este manual.
• Este aparato tiene marcas importantes en la clavija
del enchufe. Ni el enchufe accessorio ni el conector
del cable (si el enchufe está moldado en el cable)
son aptos para reemplazamiento. Si se daña, el
aparato debe ser reemplazado.
• El uso de accesorios no recomendados por el
fabricante puede provocar incendios, descargas
eléctricas o lesiones.
• No utilice el aparato a la intemperie.
• No deje que el cable cuelgue del borde de la mesa
o mostrador ni que toque superficies calientes.
• Mantenga las manos y los utensilios lejos de las
cuchillas o los discos durante el procesamiento para
reducir el riesgo de una lesón severa a las personas
o daños al aparato.
• Nunca introduzca los alimentos con la mano.
Siempre utilice el empujador de alimentos.
• Las cuchillas están afiladas. Manéjelas
cuidadosamente.
• Para reducir el riesgo de lesión, nunca coloque las
cuchillas ni los discos en la base sin primero colocar
el recipiente de procesamiento adecuadamente en
su lugar.
• Asegúrese de que la tapa esté asegurada en su lugar
antes operar el aparato.
• Este aparato tiene un sistema de protección
y no funcionará a no ser que el recipiente de
procesamiento esté colocado sobre la base de
forma segura y la tapa esté asegurada sobre el
recipiente de procesamiento.
• No coloque sobre ni cerca de una hornilla caliente
de gas o eléctrica ni en un horno que esté calentado.
• No trate de anular el mecanismo de entrecierre de la
tapa.
• No utilice el aparato para otro fin que no sea para el
que ha sido diseñado.
• Este producto está diseñado para uso doméstico
solamente.
• No abra la tapa hasta que la cuchilla o el disco se
detenga por completo.
• Este aparato no está diseñado para ser usado por
personas (incluído niños) con capacidad limitada física,
mental o sensoriales disminuidas y falta de experiencia
o conocimiento que les impida utilizar el aparato con
toda seguridad sin supervisión o instrucción.
• Los ninos deben ser supervisados para asegurar que
no jueguen con el aparato.
• No es recomendado cortar en cubos el queso
congelado ni otro productos congelados.
18

CONSERVE ESTAS INSTRUCCIONES
Este aparato eléctrico es para uso doméstico únicamente.
CARACTERÍSTICAS DE SEGURIDAD
ENCHUFE POLARIZADO (Solamente
para los modelos de 120V)
Este aparato cuenta con un enchufe
polarizado (un contacto es más ancho
que el otro). A fin de reducir el riesgo de
un choque eléctrico, este enchufe encaja
en un tomacorriente polarizada en un
solo sentido. Si el enchufe no entra en
el tomacorriente, inviértalo y si aun así no
encaja, consulte con un electricista. Por favor
no trate de alterar esta medida de seguridad.
TORNILLO DE SEGURIDAD
Advertencia: Este aparato cuenta con un
tornillo de seguridad para
evitar la remoción de la cubierta exterior
del mismo. A fin de reducir el riesgo de
incendio o de choque eléctrico, por favor no
trate de remover la cubierta exterior. Este
producto no contiene piezas reparables por
el consumidor. Toda reparación se debe
llevar a cabo únicamente por personal de
servicio autorizado.
CABLE ÉLECTRICO
1. El producto se debe de proporcionar con
un cable eléctrico corto, a fin de reducir el
riesgo de tropezar o de enredarse en un
cable más largo.
2. Existen cables de extensión disponibles
y estos pueden ser utilizados si se toma
el cuidado debido en su uso.
3. Si se utiliza un cable separable o de
extensión,
a) El régimen nominal del cable
separable o del cable de extensión debe
ser, como mínimo, igual al del régimen
nominal del aparato.
b) Si el aparato es de conexión a tierra, el
cable de extensión debe ser un cable de
tres alambres de conexión a tierra.
c) Uno debe de acomodar el cable más
largo de manera que no cuelgue del
mostrador o de la mesa, para evitar
que un niño tire del mismo o que
alguien se tropiece.
Nota: Si el cable de alimentación está
dañado, por favor llame al número de
Servicios para el Cliente que aparece en
estas instrucciones.
19

CONOZCA SU PROCESADOR MULTIPREP™
9
1
2
3
4
5
6
7
1. Palanca para rebanar ajustable*
2. Tapa con tubo de alimentación
(Pieza No. SL3000-01)
3. Disco para desmenuzar/rallar
(reversible) (Pieza No. SL3000-02)
4. Vástago de la cuchilla
(Pieza No. SL3000-03)
5. Tubo de flujo continuo
6. Base del motor
7. Dial de funcionamiento
(0-Apagado), (I-Encendido)
8. Pies de succión
9. Empujador de alimentos (Pieza No.
SL3000-04)
10. Dispositivo colector de alimentos
11. Recipiente de precesamiento (Pieza
No. SL3000-05)
15 16 17 18
10
11
12
13
14
12. Herramienta de limpieza para corte
en cubos** (Pieza No. SL3000-06)
13. Cuchilla para cortar en cubos**
(Pieza No. SL3000-07)
14. Estuche de almacenamiento (Pieza
No. SL3000-08)
15. Vástago para cortar en cubos**
(Pieza No. SL3000-09)
16. Disco para rebanar ajustable*
(Pieza No. SL3000-10)
17. Disco para cortar en juliana
(reversible) (Pieza No. SL3000-11)
18. Disco para cortar en cubos**
(Pieza No. SL3000-12)
19. Cable de alimentación (no
mostrado)
*Codificado por el color verde para que coincida con el disco para rebanar ajustable
**Codificado por el color naranja para que coincida con las piezas de corte en cubos requeridas
El producto puede variar ligeramente del que aparece ilustrado.
20

COMO USAR
Este producto es para uso doméstico solamente.
PRIMEROS PASOS
• Retiere todo material de empaque, etiquetas y la tira plástica alrededor
del enchufe.
• Retire y conserve la literatura.
• Por favor, visite www.prodprotect.com/blackanddecker para registrar su
garantía.
• Lave todas las piezas removibles según las instrucciones en la sección
de CUIDADO Y LIMPIEZA de este manual.
PRECAUCIÓN: Maneje las cuchillas y los discos con mucho cuidado.
Estos están muy afilados.
• Seleccione una superficie del mostrador nivelada y seca donde utilizar el
aparato, dejando suficiente espacio para circulación de aire en todos los
lados para así proveer la ventilación adecuada para el motor.
USO DE SU PROCESADOR MULTIPREP™
1. Determine si va a utilizar el disco para cortar en cubos, el disco para rebanar
ajustable, el disco para desmenuzar/rallar o el disco para cortar en Juliana.
DISCO PARA
CORTAR EN
CUBOS
CORTAR EN
CUBOS de ¼” x ¼”
Importante: Siempre asegúrese de que su aparato esté desenchufado,
colocado sobre un superficie plana, nivelada y que
el dial de funcionamiento esté en la posición de
apagado (0) antes de comenzar a ensamblar.
2. Coloque el recipiente de procesamiento en la
base, con la flecha alineada con el símbolo de
“abierto” en la base.
3. Sostenga el recipiente de procesamiento por
el tubo de flujo continuo. Gire el recipiente de
procesamiento hacia la izquierda hasta que se
asegure en la base (la flecha se alineará con el
DISCO PARA
REBANAR
REBANAR (grosor
variable de 1 a 5 mm)
DISCO PARA
DESMENUZAR/
RALLAR
DESMENUZAR,
RALLAR
DISCO PARA
CORTAR EN
JULIANA
3 mm, 6mm
A
21
símbolo de “asegurado”). (A) Usted sentirá que se
asegura cuando esté conectado de forma segura.
4. Después de seleccionar el disco que desea utilizar,
coloque el vástago apropiado en el poste central en el
fondo del recipiente de procesamiento (instrucciones
para discos individuales aparecen a continuación en
este manual) inserte el disco apropiado.
5. Coloque la tapa con el tubo de flujo continuo
arriba del recipiente de procesamiento, alineando
las lengüetas y girándola hacia la iquierda para
asegurar en su lugar. La tapa está asegurada cuando emite un sonido de
click al caer firmemente en su lugar. La tapa solamente se cerrará cuando
el tubo de alimentación esté alineado en posición
opuesta al tubo de flujo continuo. (B)
Nota: Cerciórese de asegurar el recipiente de
procesamiento en su lugar antes de conectar los
vástagos, discos o la tapa.
6. Inserte el empujador de alimentos dentro del tubo de
alimentación de la tapa. (C)
7. Enchufe el aparato. Si el aparato está ensamblado
correctamente, éste se activará cuado el dial
de funcionamiento es girado hacia la derecha.
Si el aparato no se activa, los entrecierres no están conectados
correctamente.
Importante: Para su protección, este aparato cuenta con un sistema de entrecierre.
El aparato no funcionará a no ser que que el recipiente de procesamiento y la tapa
estén asegurados correctamente en posición.
B
C
USO DEL TUBO DE ALIMENTACIÓN Y EL EMPUJADOR
DE ALIMENTOS
Nota: Antes de operar el aparato, asegúrese de que el recipiente de
precesamiento, los discos y la tapa estén ensamblados correctamente sobre la
base del aparato.
1. Coloque los alimentos a procesar en el tubo de alimentación. Utilice el
empujador de alimentos para guiar los alimentos a través del tubo de alimentación.
USO DEL DIAL DE FUNCIONAMIENTO
Nota: Si el aparato no funciona, asegúrese de que
el recipiente de procesamiento y la tapa estén
asegurados correctamente en la base. Un cierre
automático de seguridad causa que el aparato pare de
funcionar si el recipiente de procesamiento y/o la tapa
no están asegurados correctamente en su lugar.
El dial de funcionamiento de una velocidad está
localizado en el frente de la base del aparato.
22
D
1. Asegúrese de que el dial de funcionamiento esté en la posición de
encendido (0).
2. Enchufe el aparato para encenderlo.
3. Gire el dial de funcionamiento hacia la derecha a la posición de encendido (I). (D)
4. Para detener el funcionamiento, gire el dial de funcionamiento hacia la
izquierda a la posición de apagado (0).
5. Siempre desenchufe el aparato cuando no esté en uso.
USO DEL DISCO PARA CORTAR EN CUBOS (NARANJA)
E
Importante: Todas la piezas relacionadas con el corte
en cubos están codificadas por el color NARANJA para
facilitar su uso.
1. Asegure el recipiente de procesamiento en la base.
2. Coloque el vástago para cortar en cubos en el
recipiente de procesamiento sobre el poste central. (E)
3. Sujete el disco para rebanar cuidadosamente,
utilizando los orificios diseñados para los dedos,
localizados en la parte superior del disco.
4. Coloque el disco para cortar en cubos dentro del
recipiente de procesamiento y sobre el vástago para
cortar en cubos con el lado de rejilla cuadricular
mirando hacia el lado opuesto del tubo de flujo
continuo (mirando hacia la derecha). El disco para
cortar en cubos puede ser instalado correctamente
sólo cuando el lado con la rejilla está mirando en
dirección opuesta al tubo de flujo continuo. (F)
5. Sujete la cuchilla para cortar en cubos por el
centro, utilizando los sujetadores para los dedos.
No toque el borde de la cuchilla.
6. Inserte el borde plástico curvo debajo del borde
exterior del disco para cortar en cubos. (G)
7. Hale el seguro de la cuchilla para cortar en cubos
hacia la posición de “abierto” en el centro de la
cuchilla, utilizando la lengüeta de metal. (H)
8. Coloque el centro de la cuchilla hacia abajo sobre la
parte superior naranja del eje para cortar en cubos.
9. Suelte la lengüeta del seguro de la cuchilla una vez que
el centro de la cuhilla para cortar en cubos descanse
plana contra el disco para cortar en cubos.
F
G
H
23

10. Coloque la tapa sobre el recipiente de
procesamiento y asegúrela en su lugar, girándola
hacia la izquierda
Importante: Asegúrese de solamente manipular la
cuchilla utilizando los sujetadores para los dedos.
Importante: Siempre coloque PRIMERO el extremo
curvo de la cuchilla debajo de la parte saliente del disco
para cortar en rebanadas y luego coloque el centro de la
cuchilla sobre el vástago central del disco.
11. Una vez que haya terminado de cortar en cubos,
apague el aparato, desenchúfelo y luego retire la tapa.
12. Hale con cuidado el seguro de la cuchilla para cortar
en cubos hacia la posición de “abierto”, utilizando la
lengüeta de metal. (H)
13. Primero alce la cuchilla fuera del eje y luego hale el
borde curvo hacia arriba y lejos del borde del disco
para cortar en cubos. (I)
Importante: Es necesario retirar la cuchilla para cortar
en cubos del disco antes de utilizar la herramienta de
limpieza. No utilice la herramienta de limpieza si el disco para cortar en cubos
no está en el recipiente de procesamiento.
14. Antes de retirar el disco para cortar en cubos del recipiente de
procesamiento, coloque la herramienta de limpieza en los orificios del
disco, alineando las barras exteriores con las muescas exteriores. (J) El
borde curvo de la herramienta de limpieza se alinea con el borde curvo del
disco. Empuje la herramienta de limpieza dentro de la rejilla cuadricular
para cortar en cubos. Esto empujará los residuos de alimentos fuera de la
rejilla cuadricular, permitiendole lavar el disco con más eficiencia.
Nota: Los alimentos duros como las zanahorias pueden requerir que se ejerza
más fuerza para removerlos con la herramienta de limpieza. Es normal que
algunos alimentos se queden en la rejilla cuadricular hasta que la rejilla se lave.
15. Retire el disco para cortar en cubos, utilizando los dos orificios para los dedos
para alzar el disco directo hacia arriba y fuera del recipiente de procesamiento.
16. Retire el eje para cortar en cubos del recipiente de procesamiento,
girándolo hacia la izquierda y alzándolo directo hacia arriba y fuera del
recipiente de procesamiento.
17. Libere el recipiente de procesamiento fuera de la base, girándolo hacia la derecha.
I
J
CONSEJOS ÚTILES PARA EL USO DEL DISCO PARA
CORTAR EN CUBOS
• La cuchilla para cortar en cubos debe ser retirada de la parte superior del
disco antes de utilizar la herramienta de limpieza.
• Corte los extremos de los alimentos a cortar en cubos para lograr el más
uniforme corte en cubos.
• Cuando corte en cubos múltiples ingredientes, primero corte los
alimentos más suves y termine con los alimentos más duros.
• Cuando corte en cubos queso suave, enfríe o congele por 10 minutos
antes de cortarlo.
24
• Este disco no es remendado para cortar en cubos carne curada, carne
cruda ni pollo.
• Los pepinos firmes sin semillas son los que trabajan mejor.
USO DEL DISCO PARA REBANAR (VERDE)
K
1. Asegure el recipiente de procesamiento en la base.
2. Coloque el disco para rebanar en el recipiente de
procesamiento sobre el poste central. (K)
Nota: Posicione el disco para rebanar justo a la derecha
del tubo de alimentación. Esto permite que la cuchilla
realice un giro completo antes de hacer contacto con
los alimentos.
Importante: Asegúrese de que la palanca para rebanar
ajustable esté en el ajuste de fino/mínimo antes
ensamblar la tapa. (L)
3. Coloque la tapa sobre el recipiente de procesamiento
y asegure en su lugar, girándola hacia la izquierda.
4. Para ajustar el grosor del rebanado, mueva la palanca en la
base del tubo de alimentación hacia delante y hacia atrás
hasta llegar al ajuste del grosor deseado (1 a 5 mm). Gire
la palanca hacia la izquierda, hacia el frente del aparato
para cortar rebanadas más gruesas, hacia la derecha
hacia la parte posterior del aparato para rebanadas
más finas. El grosor de las rebanadas puede ser ajustado
mientras que el aparato está funcionando. (M)
5. Encienda el aparato; presione firmemente, pero no
fuerce el empujador de alimentos para guiar los
alimentos a través del disco para cortar en rebanadas.
Nota: La presión fuerte sobre el empujador de alimentos
no acelera el procesamiento; utilice el empujador sólo como una guía. Deje
que el aparato haga su trabajo. Empujar demasiado fuerte puede resultar en
rebanadas de grosor inconsistente.
Nota: Puede ocurrir que hayan diferencias en el grosor de las rebanadas
como resultado de la presión utilizada en los alimentos al guiarlos a través del
tubo de alimentación.
Nota: El cambio de los ajustes de grosor con otros discos o cuchillas
instaladas no tendrá ningún efecto en la operación del aparato.
6. Cuando haya terminado, apague el aparato y permita que los discos
paren de girar completamente. Desenchufe el aparato y retire la tapa.
7. Retire cuidadosamente el disco para rebanar, utilizando los dos orificios
para los dedos para alzarlo directo hacia arriba y fuera del recipiente de
procesamiento.
L
M
25

8. Libere el recipiente de procesamiento girándolo hacia la derecha y
alzándolo fuera de la base.
USO DEL DISCO PARA DESMENU-
N
ZAR
1. Asegure el recipiente de procesamiento sobre
la base.
2. Coloque el vástago de la cuchilla en el recipiente
de procesamiento sobre el poste central. (N)
3. Inserte sus dedos en los dos orificios grandes en
el disco con el lado deseado mirando hacia arriba
(los orificios pequeños son para rallado fino y los
orificios grandes para desmenuzado grueso) y
coloque el disco sobre el vástago de la cuchilla
en el recipiente de procesamiento. (O) Puede ser
necesario girar el disco ligeramente hasta que
encaje sobre el eje.
4. Coloque la tapa sobre el recipiente de
procesamiento y asegure en su lugar girándola hacia la izquierda.
5. Coloque los alimentos en el tubo de alimentación y utilice el empujador
de alimentos para guiar los alimentos hacia el disco para desmenuzar/
rallar.
6. Encienda el aparato; presione firmemente, pero no fuerce el empujador de
alimentos para guiar los alimentos a través del disco para desmenuzar/rallar.
O
Nota: La presión fuerte sobre el empujador no acelera el procesamiento;
utilice el empujador sólo como una guía. Deje que el aparato haga su trabajo.
7. Cuando haya terminado, apague el aparato y permita que el disco pare
de girar completamente. Desenchufe el aparato y retire la tapa.
8. Retire cuidadosamente el disco, utilizando los dos orificios para los dedos
para alzarlo directo hacia arriba y fuera del recipiente de procesamiento.
9. Hale el vástago de la cuchilla fuera del recipiente de procesamiento.
10. Libere el recipiente de procesamiento fuera de la base, girándolo hacia
la derecha.
26

CONSEJOS ÚTILES PARA DESMENUZAR
• Antes de desmenuzar o rallar frutas y vegetales redondos, corte una
rebanada fina de la parte inferior para que el alimento sea más estable.
Coloque los alimentos con el lado cortado hacia abajo en el tubo de
alimentación.
• Siempre remueva las semillas, el centro y las semillas grandes antes de
comenzar a procesar.
• Escoja alimentos que estén firmes y no demasiado maduros.
• Remueva el centro de los vegetales duros, como la col.
• Cuando vaya a desmenuzar vegetales más finos, córtelos a un largo
más corto que el tubo de alimentación; colóquelos en posición vertical
en el tubo de alimentación para que queden compactos y no se giren o
inclinen.
• Unos pocos pedazos grandes de alimentos pueden quedan arriba del
disco después de desmenuzar o rallarlos. Si es deseado, córtelos a mano
y añada a la mezcla.
• Los queso suaves y semi duros deben ser enfriados antes de
desmenuzarlos. Para mejores resultados con los quesos suaves, como el
queso mozzarella, congele por 10 a 15 minutos antes de procesar para
que el queso se ponga firme. Córtelo de manera que se pueda acomodar
en el tubo de alimentación y procese utilizando una presión uniforme.
27

USO DEL DISCO PARA CORTE EN JULIANA
P
1. Asegure el recipiente de procesamiento en la
base.
2. Coloque el vástago de la cuchilla en el recipiente
de procesamiento sobre el poste central. (P)
3. Inserte sus dedos en los dos orificios grandes en
el disco con el lado deseado mirando hacia arriba
(grande 6 mm o pequeño 3 mm) y coloque el
disco para cortar en Juliana sobre el vástago de
la cuchilla en el recipiente de procesamiento. (Q)
Puede ser necesario girar el disco un poco hasta
que encaje sobre el vástago.
4. Coloque la tapa sobre el recipiente de
procesamiento y asegure en su lugar.
5. Encienda el aparato; presione firmemente, pero no
fuerce el empujador de alimentos para guiar los
alimentos a través del disco para cortar en juliana.
Nota: La presión fuerte sobre el empujador no acelera el tiempo de
procesamiento; utilice el empujador sólo como una guía. Deje que el aparato
haga su trabajo.
6. Cuando haya terminado, apague el aparato y permita que el disco pare
de girar completamente. Desenchufe el aparato y retire la tapa.
7. Retire cuidadosamente el disco, utilizando los dos orificios para
los dedos para alzarlo directo hacia arriba y fuera del recipiente de
procesamiento.
8. Hale el vástago de la cuchilla fuera del recipiente de procesamiento.
9. Libere el recipiente de procesamiento fuera de la base, girándolo hacia
la derecha.
Q
28

CONSEJOS GENERALES PARA EL USO DEL
PROCESADOR MULTIPREP™
• Organice las tareas de procesado para evitar que el recipiente se limpie
varias veces; procese los alimentos secos antes que los mojados.
• Para reducir el riesgo de que los alimentos finos, como la zanahoria o
el apio, caigan en el tubo de alimentación, corte los alimentos en varios
pedazos y llene el tubo de alimentación por completo con alimento.
• Aplique una presión leve sobre el empujador cuando trabaje con
alimentos blandos (pepinos, calabacín verde y tomates) y un poco más
intensa si se trata de alimentos duros (cebollas, zanahorias y papas).
• No procese alimentos que están tan congelados o tan duros que no se
puede insertar la punta de un cuchillo en ellos.
• Si un pedazo de alimento duro, como la zanahoria, se traba en la cuchilla,
detenga el aparato y desenchúfelo. Remueva suavemente el alimento de
la cuchilla.
CUIDADO Y LIMPIEZA
Este producto no contiene piezas que deban ser reparadas por el usuario. Si
necesita servicio, acuda a personal de servicio calificado.
Importante: Siempre desenchufe su aparato del tomacorriente antes de limpiarlo.
LIMPIEZA
Importante: Las cuchillas están afiladas. Maneje cuidadosamente las cuchillas
y los discos.
• Desemsamble por completo la piezas del aparato antes de lavarlas.
• Para facilitar la limpieza, enjuague las piezas del aparato inmediatamente
después de utilizarlas.
• Limpie la base y los pies de succión con un paño humedecido y séquelos
bien. Las manchas persistentes pueden ser eliminadas, frotándolas con un
paño humedecido con un limpiador suave, no abrasivo.
• No sumerja la base en ningún líquido.
• Todas las piezas removibles pueden ser lavadas a mano. El lavar a mano
las piezas plásticas ayudará a mantener la buena apariencia del aparato.
• Todas las piezas removibles pueden ser lavadas en la máquina lavaplatos,
en la rejilla superior solamente.
• Es posible que aparezcan manchas en algunas piezas. Si esto ocurre, haga
una pasta compuesta de 2 cucharadas de bicarbonato y 1 cucharada de
agua. Aplique a las manchas y deje reposar de un día para otro. Enjuague
y seque.
• No utilice almohadillas de fibras abrasivas ni limpiadores en las piezas
plásticas o metálicas para limpiarlas.
• No permita que las cuchillas ni los discos estén sumerjidos en agua por
mucho tiempo.
• Si se le dificulta conectar la tapa sobre el recipiente de procesamiento,
aplique un poco de aceite vegetal en el borde de la tapa y del recipiente
de procesamiento. Esto hace que las piezas trabajen con más suavidad
cuando se instala la tapa al recipiente de procesamiento.
Importante: No coloque las piezas del aparato en líquidos que están hirviendo.
29

ALMACENAMIENTO
Precaución: La cuchillas están afiladas. Menéjelas cuidadosamente.
Almacene todos los accesorios en el conveniente estuche de
almacenamiento. Todas las cuchillas, los vástagos de los discos y los
accesorios se acomodan en el estuche, según es indicado por las formas
delineadas correspondientes a cada accesorio individual.
Importante: Mantenga el estuche de almacenamiento en un lugar que esté
fuera del alcance de los niños.
RESOLUCIÓN DE PROBLEMAS
PROBLEMA SOLUCIÓN
El aparato
no funciona.
El aparato
no desmenuza
o rebana
adecuadamente.
Si el corte
produce cubos
inconsistentes
El aparato
se traba.
• Asegúrese de que el recipiente de procesamiento y
la tapa estén alineados correctamente y asegurados
en su lugar.
• Verifique que el aparato esté enchufado.
• Si usted tiene una caja de cortacircuitos, asegúrese
de que el circuito esté cerrado.
• Desenchufe el aparato y luego enchúfelo de nuevo al
tomacorriente.
• Asegúrese de que el disco esté instalado
correctamente.
• Si va a utilizar la cuchilla para rebanar ajustable,
asegúrese de que esté ajustada en el grosor correcto.
• Asegúrese de los ingredientes sean apropiados para
rebanar o desmenuzar.
• Asegúrese de que el recipiente de procesamiento y
la tapa estén alineados y asegurados en su lugar.
• Cerciórese de que no haya tupición en la rejilla para
cortar en cubos y que el alimento esté alineado de
manera uniforme con los extremos planos.
• Apague el aparato y desenchúfelo. Desensamble el
aparato, límpielo, ensámblelo y comience de nuevo.
Si el problema no se debe a uno de los mencionados anteriormente, consulte
la sección de Garantía y Servicio de esta guía de Uso y Cuidado. No devuelva
el procesador MultiPrep™ al lugar donde lo compró. Los minoristas no
proveen servicio.
30

RECETAS
ENSALADA DE PEPINOS Y VINAGRE
2 pepinos
1 cebolla blanca pequeña, fresca
½ cucharadita de sal
¼ taza de vinagre
¼ taza de agua
Inserte el disco para rebanar en el recipiente de procesamento y ajuste la
palanca para rebanar externa al ajuste de rebanada fina.
Procese los pepinos y la cebolla. Cuando haya terminado de rebanar, coloque
los pepinos y las cebollas rebanados en un recipiente y espolvoree con sal.
En un recipiente separado, mezcle los ingredientes restantes con un tenedor.
Vierta la mezcla sobre los pepinos/cebolla y revuelva ligeramente.
Refrigere por 30 minutos, revuelva antes de servir.
SOPA DE TORTELLINI Y VEGETALES
1 cebolla blanca mediana,
cortada en cubos
1 diente de ajo, picadito
1 cucharada de aceite vegetal
4 tazas de caldo vegetal
1 lata (28 onzas) de tomates
triturados
1 cucharadita de albahaca seca
1 cucharadita de oregano seco
1 cucharadita de sal marina
1 cucharada de azúcar
½ cucharadita de eneldo
¼ cucharadita de pimienta negra
1 pizca de pimienta de cayena
2 calabacines amarillos
pequeños, cortados en
rebanadas finas
2 calabacines verdes pequeños,
cortados en Juliana
3 tomates ovalados, sin semillas
y cortados en cubos
2 tazas de espinaca tierna,
empacada suelta
1 paquete (9 onzas) de tortellini
con queso, refrigerado
Caliente el aceite en una olla en temperatura mediana. Añada las cebollas y el
ajo; cocine y revuelva hasta que estén tienos y crujientes.
Incorpore y revuelva el caldo vegetal, los tomates triturados y las especias, y
deje hervir.
Añada los calabacines y los tomates picados en cubos, cocine a fuego lento
en temperatura mediana a baja hasta que los calabacines estén blandos,
revolviendo de vez en cuando.
Incorpore y revuelva la espinaca y el tortellini. Cocine unos 3 a 5 minutos
adicionales o hasta que la pasta esté cocinada y blanda.
31

PÓLIZA DE GARANTÍA
(Válida sólo para México)
DURACIÓN
Spectrum Brands de México, SA de CV garantiza este producto por 2 años a
partir de la fecha original de compra.
¿Qué cubre esta garantía?
• Esta Garantía cubre cualquier defecto que presenten las piezas,
componentes y la mano de obra contenidas en este producto.
• Requisitos para hacer válida la garantía
• Para reclamar su Garantía deberá presentar al Centro de Servicio Autorizado
la póliza sellada por el establecimiento en donde adquirió el producto. Si no
la tiene, podrá presentar el comprobante de compra original.
¿Donde hago válida la garantía?
• Llame sin costo al teléfono 01 800 714 2503, para ubicar el Centro de
Servicio Autorizado más cercano a su domicilio en donde usted podrá
encontrar partes, componentes, consumibles y accesorios.
Procedimiento para hacer válida la garantía
Acuda al Centro de Servicio Autorizado con el producto con la póliza de
Garantía sellada o el comprobante de compra original, ahí se reemplazará
cualquier pieza o componente defectuoso sin cargo alguno para el usuario
final. Esta Garantía incluye los gastos de transportación que se deriven de su
cumplimiento.
Excepciones
Esta Garantía no será válida cuando el producto:
A) Se hubiese utilizado en condiciones distintas a las normales.
B) No hubiese sido operado de acuerdo con el instructivo de uso
que le acompaña.
C) Cuando el producto hubiese sido alterado o reparado por personas
no autorizadas por Spectrum Brands de México, SA de CV.
Nota: Usted podra encontrar partes, componentes, consumibles y
accesorios en los centros de servicios autorizados. Esta garantía incluyen los
gastos de transportación que se deriven de sus cumplimiento dentro de sus
red de servicio.
32

¿NECESITA AYUDA?
Para servicio, reparaciones o preguntas relacionadas al producto, por favor
llame al número del centro de servicio que se indica para el país donde
usted compró su producto. NO devuélva el producto al fabricante. Llame o
lleve el producto a un centro de servicio autorizado.
DOS AÑOS DE GARANTÍA LIMITADA
(No aplica en México, Estados Unidos y Canada)
¿Qué cubre la garantía?
• La garantía cubre cualquier defecto de materiales o de mano de obra que no haya
sido generado por el uso incorrecto del producto.
¿Por cuánto tiempo es válida la garantía?
• Por dos años a partir de la fecha original de compra mientras que tenga una prueba
de la compra.
¿Cómo se obtiene el servicio necesario?
• Conserve el recibo original como comprobante de la fecha de compra,
comuníquese con el centro de servicio de su país y haga efectiva su garantía si
cumple lo indicado en el manual de instrucciones.
¿Cómo se puede obtener servicio?
• Conserve el recibo original de compra.
• Por favor llame al número del centro de servicio autorizado.
¿Qué aspectos no cubre esta garantía?
• Los productos que han sido utilizados en condiciones distintas a las normales.
• Los daños ocasionados por el mal uso, el abuso o negligencia.
• Los productos que han sido alterados de alguna manera.
• Los daños ocasionados por el uso comercial del producto.
• Los productos utilizados o reparados fuera del país original de compra.
• Las piezas de vidrio y demás accesorios empacados con el aparato.
• Los gastos de tramitación y embarque asociados al reemplazo del producto.
• Los daños y perjuicios indirectos o incidentales.
¿Qué relación tiene la ley estatal con esta garantía?
• Esta garantía le otorga derechos legales específicos y el consumidor podría
tener otros derechos que varían de una región a otra.
33

Por favor llame al número correspondiente que aparece en la lista a continuación
para solicitar que se haga efectiva la garantía y donde Ud. puede solicitar servicio,
reparaciones o partes en el país donde el producto fué comprado.
Argentina
Atención al consumidor
0800 444 7296
Horario de atención:
Lunes a viernes de 9 a 13 hs
y de 14.30 a 17 hs.
email: servicios@spectrumbrands.com
Humboldt 2495 piso 3
C.A.B.A. – Argentina
Chile
Servicios Tecnico Hernandez.
Av. Providencia 2529, Local 26.
Santiago-Chile.
Tlf: 56 222333271
Email:
servicioblackanddecker@gmail.com
Colombia
Spectrum Brands Colombia SA
Carrera 17 No. 89-40
Bogotá, Colombia
Linea de atencion al
Cliente: 018000510012
Costa Rica
Aplicaciones Electromecanicas
Calle 22 y 24 en Avenida 3 BLV de la torre
Mercedes Benz
200 mts norte y 50 mts este
San José, Costa Rica
Tel. (506) 2257-5716
Ecuador
Servicio Master
Dirección: Capitán Rafael
Ramos OE 1-85 y Galo plaza lasso.
Tel (593) 2281-3882 / 2240-9870
El Salvador
Sedeblack
Calle San Antonio Abad, Colonia Lisboa
No 2936
San Salvador, Depto. de San Salvador
Tel. (503) 2284-8374
Guatemala
Kinal
17 avenida 26-75, zona 11 Centro
comercial Novicentro,
Local 37 - Ciudad
Guatemala
Tel. (502)-2476-7367
Honduras
Serviteca
San Pedro Sula, B Los Andes, 2 calleentre 11-12 Avenida
Honduras
Tel. (504) 2550-1074
México
Articulo 123 # 95 Local 109 y 112
Col. Centro, Cuauhtemoc,
México, D.F.
Tel. 01 800 714 2503
Nicaragua
LRM ELECTRONICA
Managua - Sinsa Altamira 1.5
kilómetros al norte
Nicaragua
Tel. (505) 2270-2684
Panamá
Supermarcas
Centro comercial El dorado, Plaza
Dorado, Local 2.
Panama
Tel. (507) 392-6231
Perú
Servicio Central Fast Service
Av. Angamos Este 2431
San Borja, Lima Perú
Tel. (511) 2251 388
Puerto Rico
Buckeye Service
Jesús P. Piñero #1013
Puerto Nuevo, SJ PR 00920
Tel.: (787) 782-6175
Republica Dominicana
Prolongación Av. Rómulo
Betancourt
Zona Industrial de Herrera
Santo Domingo, República
Dominicana
Tel.: (809) 530-5409
Venezuela
Inversiones BDR CA
Av. Casanova C.C.
City Market Nivel Plaza Local 153
Diagonal Hotel Melia,
Caracas.
Tel. (582) 324-0969
34

Sello del Distribuidor:
Fecha de compra:
Modelo:
Código de fecha / Date Code / Le code de date:
SL3000 - 150W 120V 60Hz.
Comercializado por:
Spectrum Brands de México, SA de C.V
Avenida 1° de Mayo No. 120
Piso 7, Oficina 702.
Colonia San Andres Atoto, C.P. 53500
Naucalpan de Juárez, Estado de México,
México
Servicio y Reparación
Art. 123 No. 95
Col. Centro, C.P. 06050
Deleg. Cuauhtemoc
Servicio al Consumidor,
Venta de Refacciones
y Accesorios
01 800 714 2503
Importado y Distribuido por:
RAYOVAC ARGENTINA S.R.L. Humboldt
2495 Piso# 3 C1425FUG) C.A.B.A.
Argentina C.U.I.T NO. 30-70706168-1
Importado por / Imported by:
Spectrum Brands de México, SA de C.V
Avenida 1° de Mayo No. 120
Piso 7, Oficina 702.
Colonia San Andres Atoto, C.P. 53500
Naucalpan de Juárez, Estado de México,
México
Para atención de garantía marque:
01 (800) 714 2503
Importado por / Imported by:
Household Products Chile Commercial
Ltda
Av. Del Valle 570, Ofic. 704
Ciudad Empresarial, Huechuraba
Santiago - Chile
Fono: (562) 2571 3700
Importado por / Imported by:
Spectrum Brands Colombia S.A.
Carrera 17 No.89-40
Bogotá, Colombia
Línea de atención al cliente:
018000510012
35

BLACK+DECKER and the BLACK+DECKER logos and product names are trademarks of
The Black & Decker Corporation, used under license. All rights reserved.
BLACK+DECKER y los logos y nombres de productos de BLACK+DECKER son marcas registradas
de The Black & Decker Corporation, usados bajo licencia. Todos los derechos reservados.
All other marks are Trademarks of Spectrum Brands , Inc.
Todas la demás marcas son Marcas Registradas de Spectrum Brands , Inc.
Made in China.
Fabricado en China.
© 2019 The Black & Decker Corporation and Spectrum Brands, Inc., Middleton, WI 53562
36
T22-5002994-B
26432-009 E/S
 Loading...