

Page 1

LEAN GREEN
PREP MACHINE
Use & Care Manual
SL1050
TM
Page 2

PLEASE READ AND SAVE THIS USE AND CARE BOOK.
IMPORTANT SAFEGUARDS.
When using electrical appliances, basic safety precautions should always be followed to
reduce the risk of fire, electric shock, and/or injury, including the following:
• Read and save all instructions.
• To protect against risk of electrical shock, do not immerse
base, motor, cord or plug in water or other liquid. Do not use
the appliance in the bathroom, near water, or outdoors.
• Close supervision is necessary when any appliance is used by
or near children.
• This appliance should not be used by children.
• Unplug cord from outlet when not in use, before putting on or
taking off parts, and before cleaning.
• Do not use the appliance if the cable is damaged or if the
appliance has been dropped or damaged in any way. Do not
use the appliance if any part is broken. Contact our toll-free
customer service number for information on examination,
repair, electrical or mechanical adjustment.
• Do not touch moving parts or blades. The blades are sharp;
store out of reach of children.
• Don’t use fingers or cutlery to push food down the feed chute
– only use the pusher. Any utensils to move the food may be
used ONLY when the appliance is not running.
• Don’t use the appliance for any purpose other than those
described in these instructions.
• The use of attachments not recommended or sold by
the appliance manufacturer may cause fire, electric shock
or injury.
• Do not let the cord hang over edge of table or counter, or
touch hot surfaces.
• Don’t run the motor continuously for more than 10 minutes as
it may overheat. After 10 minutes, switch off the appliance for
at least 10 minutes to recover.
• Make sure the cones have come to a full stop before
removing.
• Always use the pusher to clear the food chute. When
this method is not possible, unplug cord from outlet and
disassemble unit to remove the remaining food.
• This appliance is not intended for commercial, professional
or industrial use. It is designed and built exclusively for
household use only.
• Do not place on or near a hot gas or electric burner or in a
heated oven.
• Unplug the appliance before fitting or removing attachments.
• Do not use the appliance other than for intended use.
• This appliance is not intended for use by persons (including
children) with reduced physical, sensory or mental
capabilities, or lack of experience and knowledge, unless they
have been given supervision or instruction concerning use of
the appliance by a person responsible for their safety.
• Children should be supervised to ensure that they do not play
with the appliance.
SAVE THESE INSTRUCTIONS.
This product is for household use only.
SAFETY FEATURES
POLARIZED PLUG (120V models only)
This appliance has a polarized plug (one
blade is wider than the other). To reduce
the risk of electric shock, this plug is
intended to fit into a polarized outlet only
one way. If the plug does not fit fully into
the outlet, reverse the plug. If it still does
not fit, contact a qualified electrician. Do
not attempt to modify the plug in any way.
TAM PER -RE SISTAN T S CR EW
Warning: This appliance is equipped
with a tamper-resistant screw to prevent
removal of the outer cover. To reduce
the risk of fire or electric shock, do not
attempt to remove the outer cover. There
are no user-serviceable parts inside.
Repair should be done only by authorized
service personnel.
ELECTRICAL CORD
1)
A short power cord is provided to reduce
the risk resulting from becoming entangled
in or tripping over a longer cord.
2) Longer detachable power cords or
extension cords are available and may
be used if care is exercised in their use.
3) If a long detachable power cord or
extension cord is used,
a) The marked electrical rating of the
extension cord should be at least as
great as the electrical rating of the
appliance,
b) If the appliance is of the grounded
type, the extension cord should be a
grounding-type 3-wire cord.
c) The longer cord should be arranged so
that it will not drape over the countertop
or tabletop where it can be pulled on by
children or tripped over unintentionally.
Note: If the power cord is damaged,
please contact the warranty department
listed in these instructions.
2
Page 3
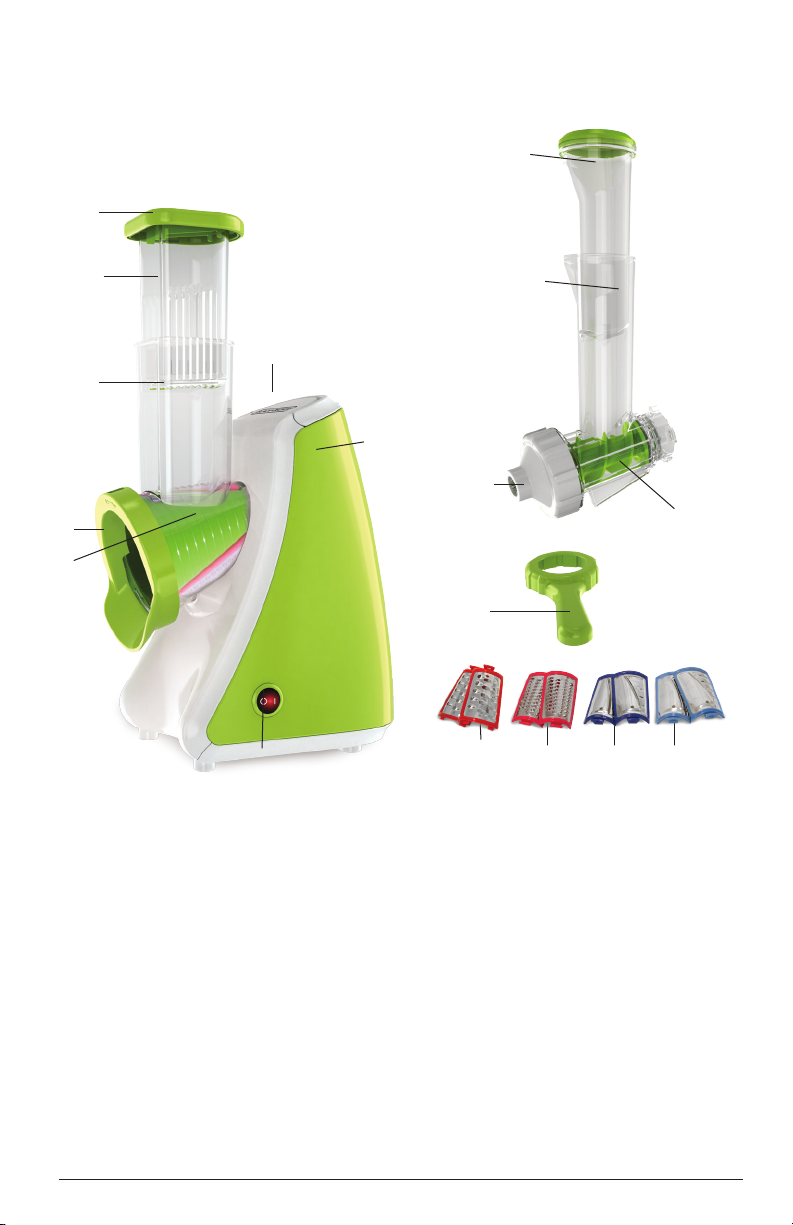
GETTING TO KNOW YOUR
LEAN GREEN PREP MACHINE
Congratulations on the purchase of your Lean Green
Prep Machine! We hope you will love making salads
and desserts in one easy and convenient appliance!
1
9
2
6
3
4
5
8
Food processor attachment
1. Food pusher lid (Part# SL1050-01)
2. Food pusher & blade storage
(Part# SL1050-02)
3. Wide-mouth food chute
(Part# SL1050-03)
4. Twist-lock ring
5. Blade cone
6. Handle
7. Base
8. On/off power switch
(Part# SL1050-04)
(Part# SL1050-05)
10
7
12
13
11
14
15 16
17
Frozen dessert attachment
9. Pusher (Part# SL1050-06)
10. Food Chute (Part# SL1050-07)
11. Wrench (Part# SL1050-09)
12. Nozzle (Part# SL1050-08)
13. Auger (Part# SL1050-10)
Blades
14. Coarse shredding blade
(Part# SL1050-13)
15. Fine shredding blade
(Part# SL1050-14)
16. Thick slicing blade (Part# SL1050-11)
17. Thin slicing blade (Part# SL1050-12)
3
Page 4

HOW TO USE
This product is for household use only.
GETTING STARTED
• Remove all packing material and any stickers from the product.
• Remove and save literature.
• Please visit www.prodprotect.com/applica to register your warranty.
• Handle blades carefully; they are very sharp. Wash all parts except base in hot
soapy water. Rinse; then dry.
USING THE FOOD PROCESSOR
ATTACHMENT
1. Make sure appliance is OFF and unplugged.
2. Remove twist-lock ring from food chute mouth
by turning clockwise (A). Carefully remove blade
cone.
3. Choose appropriate blade set for food you will be
slicing or shredding.
Note: Use the same 2 blades on each side of cone.
4. To place the blades in cone opening, insert the
small tabs on base of blade fitting into the bottom
of the opening. Push top tab in until blade locks in
place. (B)
5. Insert blade cone into food chute mouth (C)
and place twist-lock ring over it. Twist ring
counterclockwise to lock ring into place. (D)
6. Insert food chute assembly into base with the end
angled up and to the right (the food chute mouth
will be angled down towards counter). Turn the
chute assembly counterclockwise until it locks
into base and top of chute is pointing straight up.
(E)
7. Place a bowl under chute mouth to catch prepped
food.
8. Cut food to fit inside the chute and place food in
the top of the food chute.
Tip: For best results, fill so the food does not spill
over. Do not overpack food into chute.
9. Switch on the appliance and gently push food
down towards the blade using the food pusher.
(F)
Note: Always use food pusher to feed food into food
chute. Never push food through chute with hands
or other objects.
A
B
C
D
E
F
4
Page 5

DISASSEMBLING YOUR LEAN
GREEN PREP MACHINE
1. When completed prepping food, switch the
appliance to off and unplug it.
2. Turn the food chute clockwise to unlock and
remove off the motor base.
3. Turn the twist-lock ring clockwise to unlock it, and
lift it off the food chute mouth. (G)
4. Remove the blade cone from the chute mouth (H)
and carefully remove each blade by pressing down
on the top tab and pulling out away from the cone.
Lift blade out of cone opening, wash and store in
the top of the food chute. (I)
WARNING
DO NOT PUT YOUR FINGERS OR OTHER BODY PARTS
INSIDE THE CHUTE OR BLADES.
USING THE FROZEN DESSERT
ATTACHMENT:
1. Make sure appliance is OFF and unplugged.
2. Remove the food processor attachment, if on base.
3. Attach the frozen dessert attachment by
inserting into base at an upward right angle. Turn
counterclockwise to lock. (J)
4. Add frozen fruit to the food chute, switch on
appliance and gently press down with the pusher.
(K)
Tip: Let frozen fruit thaw about 10 minutes before
blending.
5. Stir fruit in bowl to mix flavors.
6. Turn the appliance to off.
C
G
H
I
J
K
DISASSEMBLING THE FROZEN
DESSERT ATTACHMENT:
1. When completed prepping food, switch the
appliance to off and unplug it.
2. Turn the dessert attachment clockwise to unlock
and pull it off the motor base. (L)
3. Turn the nozzle clockwise to unlock it, and remove
the dessert attachment from the base.
5
L
Page 6

Note: Use the provided wrench to loosen nozzle if difficult to unscrew
4. Remove the auger from inside the dessert attachment and wash all parts as
indicated in CARE AND CLEANING section of this manual.
PROCESSING CHART
Attachment Food
Dark blue
thick slicing
Celery, apples, carrots, potatoes, sweet potatoes, cabbage,
peppers, radishes, jicama, cucumbers
Light blue
thin slicing
Red
coarse
shredding
Pink
fine shredding
Dessert
attachment
Zucchini, yellow squash, beets, strawberries
Firm-chilled cheeses, potatoes, carrots, squash, zucchini,
radishes, leeks, cabbage
Firm-chilled cheeses, cabbage, chocolate, graham crackers
Raspberries, strawberries, blackberries, bananas, blueberries,
chocolate pieces, hard shelled chocolate candies, juice
concentrate, crushed mints, frozen yogurt, sandwich
cookies, etc.
TIPS AND TECHNIQUES
• The Lean Green Prep Machine is excellent to slice and shred most foods. For
best results, do not use your food processor for grinding grain, coffee beans,
or spices; or slicing meat or frozen foods.
• Operating time will depend on quantity of food being processed. Most foods
can be sliced, grated, or shredded in seconds. If unit is operated continuously
for an extended period of time, let the processor rest about 10 minutes
before continuing.
• Cut bottoms of food so they are flat in the food chute, helping to slice and
shred the food more evenly
• To slice or shred cheese, use only firm cheese like Cheddar or Swiss that
has been chilled for at least 30 minutes. Cheese should be processed
immediately after being removed from the refrigerator. Soft cheese like
mozzarella should be placed in the freezer for 30 minutes prior to processing
to ensure it is firm enough for shredding.
• Use gentle pressure when processing foods as pushing the pusher too hard
may make foods become soft or not properly slice/shred.
• To prevent browning of some sliced fruits, mix 1 Tablespoon lemon juice
with one cup of water. Soak 3-5 minutes; drain fruit and pat dry with a paper
towel. Refrigerate fruit immediately.
6
Page 7

FROZEN DESSERT ATTACHMENT
• For best results when using the frozen dessert attachment:
• To prep bananas or frozen fruit, peel the fruit and freeze in zip top bag
for 24 hours prior to use. Spotted bananas work best.
• Use frozen fruit that has been thawed for 8-12 minutes or that has been
microwaved for twenty seconds. Microwave results may vary depending
on settings and amount of fruit. Do not use fruit with pits. Do not use ice.
• When using bananas with additional frozen fruit, alternate between
banana halves and other fruit for a more even mixture.
• Gently rotate the bowl while processing to create a frozen swirl.
• For an indulgence, add candy pieces to bananas only.
• For an ice cream blend, add your favorite flavor of ice cream or frozen
yogurt and ice cream toppings to the chute, starting with a scoop of ice
cream, followed by topping and repeat.
CARE AND CLEANING
This product contains no user serviceable parts. Refer service to qualified
service personnel.
1. Switch the appliance off and unplug it. Wipe the outside of the motor unit
with a clean damp cloth. Do not immerse the motor base in water.
2. Wash the removable parts in warm soapy water, rinse well, drain and
air dry. You may also wash these parts in the upper rack of the dish a
dishwasher.
CLEANING TIPS:
• Carotenoids, which are found in carrots and many other vegetables as
well as
carrots, can cause staining.
• Don’t worry about the actual stains; they will not affect the operation of
the appliance.
• Rubbing or spraying the stains with cooking oil immediately before
washing helps remove the stains.
• If you use a dishwasher, the harsh environment inside the dishwasher may
affect the surface finishes over time.
7
Page 8

TROUBLESHOOTING
Problem Possible Cause / Solution
Product is
jamming
Switch the appliance off and unplug it. Dismantle the
appliance, clean it, assemble it and start again.
Food is not
sliced or
shredded
uniformly
Unit stops and
will not come
back on
Unit has a
burning smell
Cheese is not
shredded well
Fruits or
vegetables are
not slicing or
shredded
Frozen dessert
flow contains
chunks and/or
ice chips
Motor Slows
Down
Packing too much food in the food chute or pushing
too hard on the food pusher may cause the food to be
irregularly sliced or grated.
Is the outlet still working? You may have overloaded the
circuit and blown a fuse or tripped the circuit breaker.
Unplug unit, allow to stand for 10 minutes and then
press ON. Check by plugging in a working lamp or other
appliance. If none of these suggestions correct the problem,
DO NOT attempt to repair the unit. Call Customer Service
number at 1-800 -231-9786
There may be a residue left on the motor from the
manufacturing process, causing a slight odor during the
initial use. This will go away. If a strong odor or any visible
smoke appears, unplug unit IMMEDIATELY and call the
Customer Service Number
Cheese should be processed immediately after being
removed from the refrigerator. Soft cheese like mozzarella
should be placed in the freezer for 30 minutes prior to
processing to ensure it is firm enough for grating
Fruits or vegetables should be firm and not overripe. Store
vegetables with high water content in the refrigerator prior
to processing. Room–temperature vegetables are less firm
and do not perform as well.
Defrost fruit/contents for several more seconds
Contents exceed normal load limit or are too thick in
consistency
Unit will not turn on Chute (blades or frozen dessert attachment) is not fully
engaged with interlock mechanism; unit is not plugged in.
ENVIRONMENTAL PROTECTION
To avoid environmental and health problems due to hazardous substances in
electrical and electronic goods, appliances marked with this symbol must not
be disposed of with unsorted municipal waste, but recovered, reused or recycled.
8
Page 9

SLICING & SHREDDING RECIPES
CUCUMBER VINEGAR SALAD
2 cucumbers
½ teaspoon salt
1 small fresh white onion
¼ cup vinegar
¼ cup water
1. Using the thin slicing blade, insert cucumber slices into the food chute.
Sprinkle with salt.
2. Insert one into the food chute. Stir
3. In a separate bowl, combine remaining ingredients and mix with a fork.
4. Pour over cucumbers and onions and toss lightly
5. Refrigerate for 30 minutes, stir before serving.
SUNSHINE CARROT SALAD
Vinaigrette
1/3 cup orange juice
1 Tbsp. cider vinegar
1 tsp. orange zest
1. Combine orange juice , orange zest and cider vinegar in medium bowl.
Whisk in olive oil.
2. Add carrots, raisins and green onions; toss to combine.
3. Cover and refrigerate at least one hour before serving.
Makes: 6 (½ cup) serving
1 tablespoon sugar
½ teaspoon dill weed
¼ teaspoon black pepper
1 dash cayenne pepper
2 Tbsp. olive oil
4 cups shredded carrots
½ cup raisins
4-6 green onions, thinly sliced
9
Page 10

FROZEN DESSERT RECIPES
BANANA MIXED BERRY FROZEN DESSERT
2 frozen ripe bananas
¾ cup frozen mixed berries
1. Insert one frozen banana
2. Add frozen mixed berries
3. Insert second frozen banana
4. Stir in bowl to combine
TROPICAL DREAM FROZEN DESSERT
2 frozen ripe bananas
½ cup frozen pineapple chunks
½ cup frozen mango chunks
1. Insert one frozen banana
2. Add frozen mango
3. Add frozen pineapple
4. Insert second frozen banana
5. Stir in bowl to combine
STRAWBERRY PINEAPPLE BREEZE DESSERT
¾ cup frozen pineapple
¾ cup frozen strawberries
1. Insert ½ cup frozen pineapple
2. Insert½ cup frozen strawberries
3. Insert remaining pineapple
4. Insert remaining strawberries
5. Stir to combine
PEACH CHERRY DESSERT
½ cup frozen peaches
½ cup frozen cherries
1. Insert frozen peaches
2. Insert frozen cherries
3. Stir in bowl to combine
10
Page 11

WARRANTY AND CUSTOMER
SERVICE INFORMATION
For service, repair or any questions regarding your appliance, call the
appropriate 800 number listed within this section. Please DO NOT return the
product to the place of purchase. Also, please DO NOT mail product back to
manufacturer, nor bring it to a service center. You may also want to consult
the website listed in this document.
Two-Year Limited Warranty
(Applies only in the United States and Canada)
What does it cover?
• Any defect in material or workmanship provided; however, Spectrum Brands Inc’s
liability will not exceed the purchase price of product.
For how long?
• Two years from the date of original purchase with proof of purchase.
What will we do to help you?
• Provide you with a reasonably similar replacement product that is either new or
factory refurbished.
How do you get service?
• Save your receipt as proof of date of sale.
• Visit the online service website at www.prodprotect.com/applica, or call toll-free
1-800-231-9786, for general warranty service.
• If you need parts or accessories, please call 1-800-738-0245.
What does your warranty not cover?
• Damage from commercial use
• Damage from misuse, abuse or neglect
• Products that have been modified in any way
• Products used or serviced outside the country of purchase
• Glass parts and other accessory items that are packed with the unit
• Shipping and handling costs associated with the replacement of the unit
• Consequential or incidental damages (Please note, however, that some states do
not allow the exclusion or limitation of consequential or incidental damages, so
this limitation may not apply to you.)
How does state law relate to this warranty?
• This warranty gives you specific legal rights. You may also have other rights that
vary from state to state or province to province.
11
Page 12

TM
BLACK & DECKER and the BLACK & DECKER Logo are registered trademarks of
The Black & Decker Corporation, or one of its affiliates, and used under license.
© 2014 The Black & Decker Corporation
and Spectrum Brands, Inc.,
T22-5001170
Middleton, WI 53562
Made and Printed in People’s Republic of China
1055 1-00 E
12
 Loading...