

Page 1

USA/Canada 1-800-231-9786
www.prodprotect.com/applica
Accessories/Parts (USA/Canada)
Accesorios/Partes (EE.UU/Canadá)
1-800-738-0245
Please Read and Save this Use and Care Book
Por favor lea este instructivo antes de usar el producto
™
†
8-CUP THERMAL
UNDER-THE-CABINET
COFFEEMAKER
CAFETERA TÉRMICA
DE 8 TAZAS
PARA INSTALAR DEBAJO DEL GABINETE
Register your product online at www.
prodprotect.com/applica, for
a chance to WIN $100,000!
For US residents only
Registre su producto por Internet en
www.prodprotect.com/applica y tendrá la
oportunidad de GANAR $100,000!
Solamente para residentes de EE.UU
Model
Modelo
❑
SDC850
❑
SDC850Q
Page 2

IMPORTANT SAFEGUARDS
When using electrical appliances, basic safety precautions should always
be followed, including the following:
❑
Read all instructions.
❑
Do not touch hot surfaces. Use handles or knobs.
❑
To protect against fire, electric shock and injury to persons do not
immerse cord, plugs or appliance in water or other liquid.
❑
Close supervision is necessary when any appliance is used by or near
children.
❑
Unplug from outlet when not in use and before cleaning. Allow to cool
before putting on or taking off parts, and before cleaning the appliance.
❑
Do not operate any appliance with a damaged cord or plug, or after the
appliance malfunctions or has been damaged in any manner. Return
appliance to the nearest authorized service facility for examination,
repair or adjustment. Or, call the appropriate toll-free number on the
cover of this manual.
❑
The use of accessory attachments not recommended by the appliance
manufacturer may result in fire, electric shock or injury to persons.
❑
Do not use outdoors.
❑
Do not let cord hang over edge of table or counter, or touch hot
surfaces.
❑
Do not place on or near a hot gas or electric burner, or in a heated
oven.
❑
To disconnect, turn any control to OFF, then remove plug from wall
outlet.
❑
Do not use this appliance for other than intended use.
❑
Keep lid on the carafe when in use.
❑
Scalding may occur if the lid is removed during the brewing cycles.
❑
To reduce the risk of fire, do not place any heating or cooking appliance
beneath the appliance.
❑
To reduce the risk of fire, do not mount unit over or near any portion of
a heating or cooking appliance.
❑
To reduce the risk of electric shock, do not mount over a sink.
❑
To reduce the risk of fire, do not store anything directly on top of the
appliance surface when the appliance is in operation.
SAVE THESE INSTRUCTIONS.
This product is for household use only.
Page 3

GROUNDED PLUG
As a safety feature, this product is equipped with a grounded plug, which will only
fit into a three-prong outlet. Do not attempt to defeat this safety feature. Improper
connection of the grounding conductor may result in the risk of electric shock. Consult a
qualified electrician if you are in doubt as to whether the outlet is properly grounded.
ELECTRICAL CORD
a) A short power-supply cord is to be provided to reduce the risk resulting from
becoming entangled in or tripping over a longer cord.
b) Longer extension cords are available and may be used if care is exercised in
their use.
c) If an extension cord is used,
1) The marked electrical rating of the cord set or extension cord should be
at least as great as the electrical rating of the appliance, and
2) The cord should be arranged so that it will not drape over the countertop
or tabletop where it can be pulled on by children or tripped over
unintentionally.
If the appliance is of the grounded type, the extension cord should be a
grounding-type 3-wire cord.
TAMPER-RESISTANT SCREW
Warning: This appliance is equipped with a tamper-resistant screw to prevent
removal of the outer cover. To reduce the risk of re or electric shock, do not
attempt to remove the outer cover. There are no user-serviceable parts inside.
Repair should be done only by authorized service personnel.
Note: If the power supply cord is damaged, it should be replaced by qualied
personnel. In Latin America, by an authorized service center.
Product may vary slightly from what is illustrated.
† . Brew basket (Part # SDC00)
. Sneak-A-Cup® interrupt feature
† . Thermal carafe with lid (Part # SDC006)
† . Illuminated water reservoir with water-level markings (Part # SDC008)
. Reservoir lid (not shown)
6. Digital display
7. Control panel
8. Cord management hook (not shown)
9. Plug receptacle (not shown)
† 0. Mounting kit (Part # SDC009-0) black,
Mounting bracket (Part # SDC0) black (not shown)
Note: † indicates consumer replaceable/removable parts
A
Page 4

6
7
† . Mounting Parts
(Part # SDC-MOUNTING KIT)
A. 6 Spacers
½"
¼"
/6"
/6"
B. Screws
"
½"
¼"
C. Washers
. Mounting Template (in box)
You will also need:
• Tape
• Ruler (or you may cut out the ruler provided on the template)
• Electric drill with a ¼” drill bit
A
A
C
B
GETTING STARTED
• Remove all packing material, labels and any stickers.
• Remove and save literature.
• Unpack mounting parts and set them aside in a safe place where they will not
roll away or get lost.
Important: Do not attempt to operate appliance until it is properly installed.
CHOOSE A LOCATION
When choosing your location, consider the following:
• DO make sure to mount within reach of an electrical outlet.
• DO consider your normal work patterns in the kitchen when choosing
location.
• DO NOT mount over any heating or cooking appliance such as your range or
oven.
• DO NOT mount over or near a sink.
• DO NOT mount under, in front of or behind any under-cabinet light fixtures.
Note: If mounting multiple †SpaceMaker™ appliances and you are installing your
appliance next to the SpaceMaker™ oven (Fig. A.):
• Allow at least 1” between the control panel side of the oven and the appliance.
• Allow at least 4” between the side opposite the control panel of your oven and
adjacent wall or other appliance. You can mount the other appliances flush to
one another.
A.
4”
1”
4”
1”
Page 5

8
9
Caution: This appliance features a Save-A-Plug™ outlet receptacle to connect
smaller †SpaceMaker™ appliances such as the mini food processor / grinder or
can opener. Do not use this outlet for any other appliance!
Caution: When selecting a location for your coffeemaker, make sure you have
adequate room to reach the receptacle.
Note: If you are connecting another †SpaceMaker™ appliance into the Save-A-
Plug™ outlet, make sure you can easily unplug the appliance after each use.
DETERMINE CABINET TYPE
Prior to installation, determine if your cabinet has a flat bottom (B) or
an overhanging molding (C). If your cabinet is flat, follow STANDARD
INSTALLATION; if the cabinet has an overhang molding, refer to OVERHANG
MOLDING INSTALLATION.
STANDARD INSTALLATION (FLAT CABINET)
Important: Always wear protective glasses or goggles to prevent injury when
drilling.
1. Clear countertop under installation area to avoid getting dust or debris on other
appliances or items. Open cabinets and remove contents to make mounting
easier.
2. Clean both the underside and topside of the bottom panel of the cabinet.
3. With cabinet doors open, place mounting template flush against the surface of
the underside of your cabinet, making sure to align thick line on template with
bottom front edge of your cabinet (D).
Important: Do not align screw holes on template directly under the partition
between cabinets, as this will prevent you from installing the appliance properly.
Pay close attention to where the drill holes will be set so as not to damage your
cabinets during mounting. Drilling through your cabinet’s partition may cause
damage to cabinets and prevent proper installation.
B
C
D
4. Fold the template along the edge of your cabinet so the thick line is straight
with bottom front edge; pull template tight and tape down to hold in place.
5. Drilling from under the cabinet up, drill holes through the 4 places marked on
the template, using a ¼-inch drill bit (E).
Important: Always ensure you are drilling straight up through the marked
mounting hole on the template. Drilling at an angle may prevent proper
installation and may damage cabinets if the drill bit pierces the partition.
6. Once holes are drilled, remove tape and mounting template.
7. Wipe dust and debris off the topside and underside of the cabinet surface.
8. Place a washer inside the cabinet over each of the 4 holes you drilled.
Important: Top panel of coffeemaker is removable to make installation easier.
Simply grip the panel at the rear and pull back to remove (Fa) or insert a flathead
screwdriver at the front of the panel by one of the mounting holes and twist to
pop open (Fb). Once removed, mount panel in place following the directions
below and then slide coffeemaker back on the panel track to reattach appliance
once the panel has been mounted.
9. Hold panel in place; drilled holes on cabinet should be aligned with mounting
holes on the panel.
10. From inside of the cabinet down into panel holes, drop 4 screws in place.
Place a nut on each screw and tighten.
Note: To determine which screws to use, you must have enough of the screw
exposed underneath the cabinet to properly thread the screw into the nut.
Note: Always tighten nuts to ensure the appliance does not move or shake during
operation.
Fa Fb
E
Page 6
0
11. Once the panel is secure, reattach coffeemaker to panel by lifting appliance
up, aligning it with the track on the panel and then sliding it back into place.
12. Plug into standard electrical outlet. Extra cord can be hung over cord
management hook behind unit (G).
Caution: This appliance features a Save-A-Plug™ outlet receptacle to connect
smaller †SpaceMaker™ appliances such as the mini food processor / grinder or
can opener. Do not use this outlet for any other appliance!
Note: If you are connecting another †SpaceMaker™ appliance into the
Save-A-Plug™ outlet, make sure you can easily unplug the appliance after
each use.
13. Your †SpaceMaker™ appliance is now ready for use!
OVERHANG MOLDING INSTALLATION
For cabinets with an overhang molding (see Illustration C)
Important: Always wear protective glasses or goggles to prevent injury when
drilling.
Note: Spacers are provided in case your cabinet has an overhang molding at the
front edge. Only use spacers on the rear screws of the appliance to ensure it is
level with the front.
1. Clear countertop under installation area to avoid getting on other appliances or
items. Open cabinets and remove contents to make mounting easier.
2. Clean both the underside and topside of the bottom panel of the cabinet.
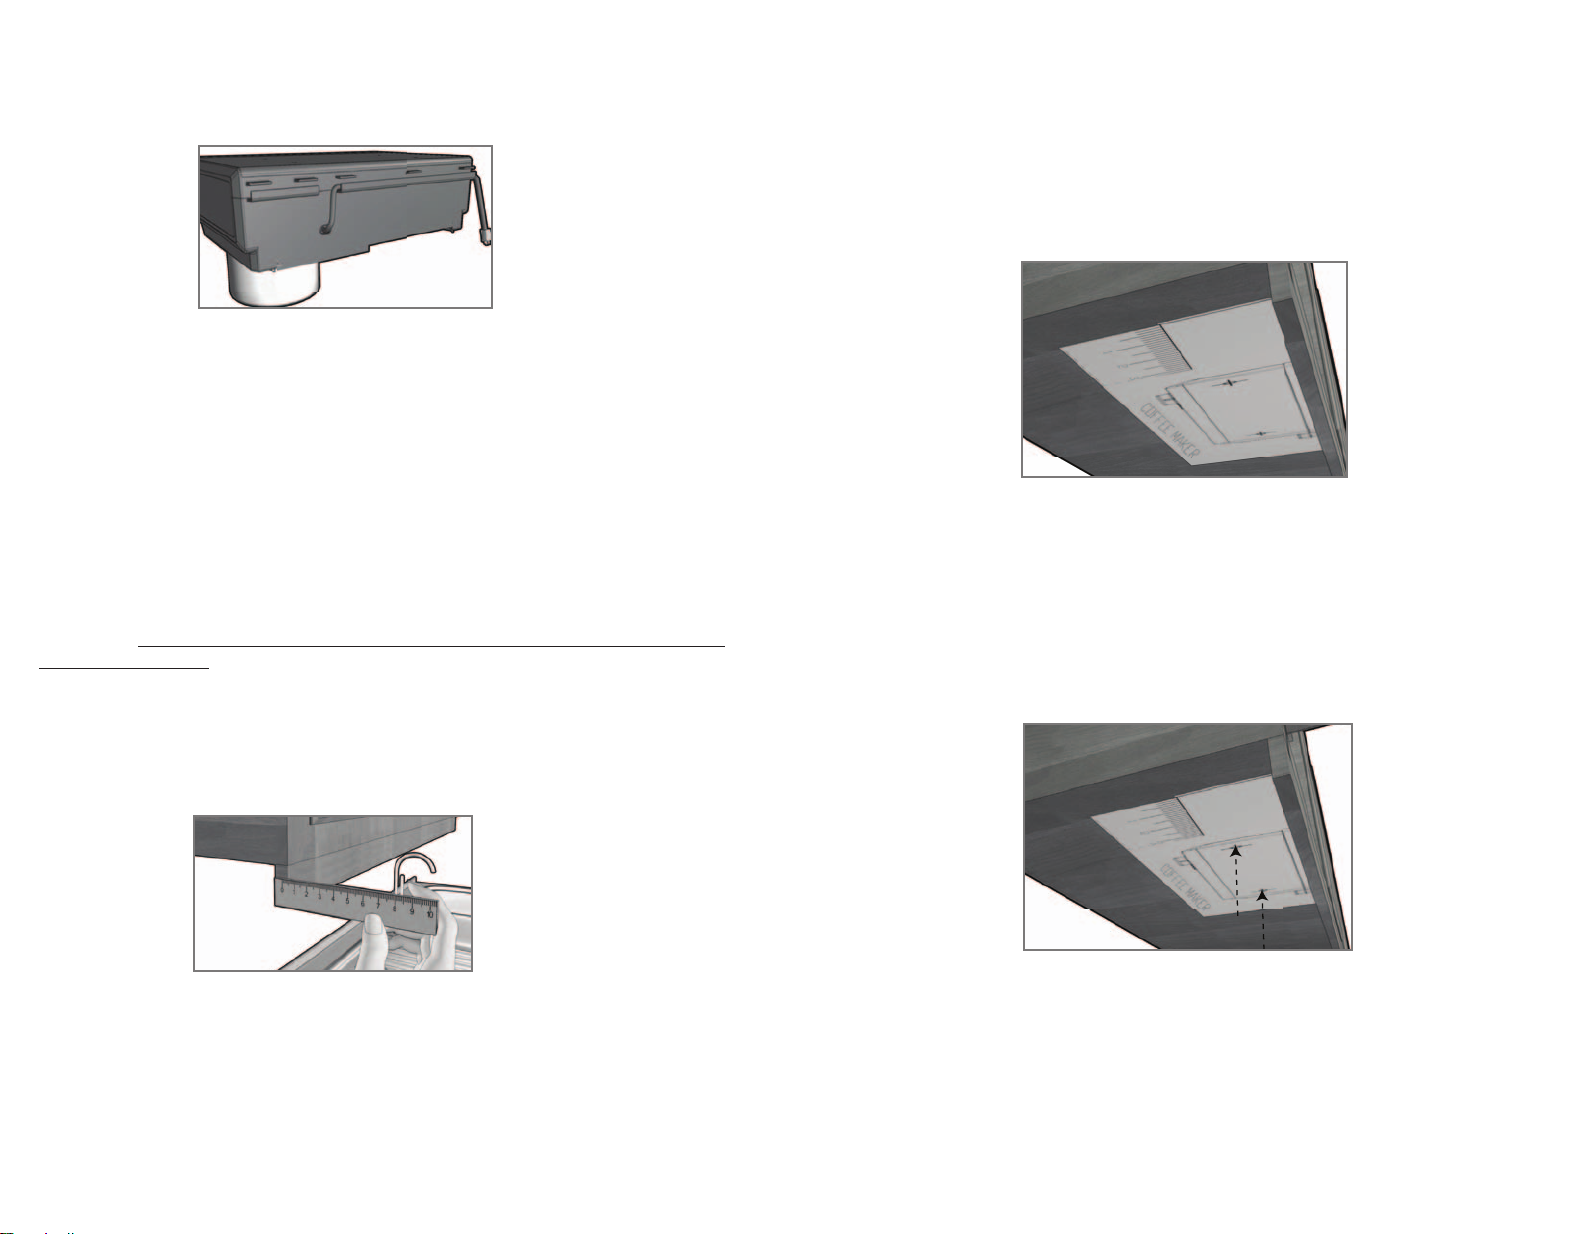
3. Using a ruler, measure the thickness of the overhang molding (H), accurately
noting the number for use in the following step.
Note: If you do not have a ruler, you may use the paper ruler provided on the
edge of your mounting template.
G
H
4. After measuring the overhang molding thickness as shown in Illustration
H, look at the dashed lines on the mounting template; each line has a
measurement next to it that indicates the thickness of the overhang molding
used with that line. For example, if your cabinet has an overhang molding
thickness of ½”, you will use the ½” dashed line on the template.
5. Fold the template along the dashed line that matches the thickness of your
overhang molding.
6. Place the folded template against the back edge of the overhang molding,
making sure the side with the drill hole marks is facing down (J).
Important: Do not align screw holes on template directly under the partition
between cabinets, as this will prevent you from installing the appliance properly.
Pay close attention to where the drill holes will be set so as not to damage your
cabinets during mounting. Drilling through your cabinet’s partition may cause
damage to cabinets and prevent proper installation.
7. Making sure to keep the fold line straight against the back edge of the overhang
molding, tape the template securely in place.
8. Drilling from under the cabinet up, drill holes through the 4 places marked on
the template using a ¼-inch drill bit (K).
Important: Always ensure you are drilling straight up through the marked
mounting hole on the template. Drilling at an angle may prevent proper
installation and may damage cabinets if the drill bit pierces the partition.
9. Once holes are drilled, remove tape and mounting template.
10. Wipe dust and debris off underside and topside of cabinet surface.
11. Place a washer inside the cabinet over each of the 4 holes you drilled.
J
K
Page 7

12. Now, use your ruler or the paper ruler provided to measure the overhang
molding height, placing your ruler vertically against the underside of the
cabinet behind the overhang molding. This number determines the number of
spacers you need, using a number of spacers equal to the overhang molding
height. For example, a 1” overhang molding would use 2, ½” spacers on each
of the rear holes (L).
13. Drop one of your screws through each of the washers covering the holes in the
cabinet, from inside the cabinet down.
Note: To determine which screws to use, you must have enough of the screw
exposed underneath the cabinet to properly thread the screw into the nut.
14. Place the appropriate number of spacers determined in step 12 on both of the
rear screws so the appliance will be even (M).
Note: If the height of your overhang molding is too tall to be accommodated by
the number of spacers provided, you may call, toll-free, at 1-800-231-9786 to
order additional spacers at no charge.
Note: For spacer installation, you may require assistance (in mounting) in order to
hold spacers in place while securing the appliance at the same time. If assistance
is not available, use a small clamp to hold the spacers in place while you position
the appliance.
Important: Top panel of coffeemaker is removable to make installation easier.
Simply grip the panel at the rear and pull back to remove (see Illustration Fa)
or insert a flathead screwdriver at the front of the panel by one of the mounting
holes and twist to pop open (see Illustration Fb). Once removed, mount in place
following the directions below and then slide coffeemaker back on the panel
track to reattach appliance once the panel has been mounted.
L
M
15. Once spacers are set, hold panel up and tighten nuts onto each of the screws
to secure.
Note: Always tighten nuts to ensure the appliance does not move or shake during
operation.
16. Once the panel is secure, reattach coffeemaker to panel by lifting appliance
up, aligning it with the track on the panel and then sliding it back into place.
17. Plug into standard electrical outlet. Extra cord can be hung over cord
management hook behind unit (see Illustration G).
Caution: This appliance features a Save-A-Plug™ outlet receptacle to connect
smaller †SpaceMaker™ appliances such as the mini food processor / grinder or
can opener. Do not use this outlet for any other appliance!
Note: If you are connecting another †SpaceMaker™ appliance into the Save-A-
Plug™ outlet, make sure you can easily unplug the appliance after each use.
18. Your †SpaceMaker™ appliance is now ready for use!
Page 8

• To place brew-through lid on carafe, press the side buttons and press the lid into
place securely on the thermal carafe with the spout facing away from the handle
(Q).
Note: Once cover is securely in place the side buttons will return to their original
position on the brew-through cover.
• Insert carafe securely along slots of carafe holder. Make sure carafe is fully inserted.
• Plug power cord into standard electrical outlet. Water reservoir light will be
illuminated and remain on as long as the appliance is plugged in.
• Brew water through appliance following the BREWING COFFEE instructions without
adding coffee grounds. This removes any dust or residue that may remain in the
system during the manufacturing process.
• When brewing is complete, discard the water from the carafe and paper filter from
brew basket.
• Turn off the appliance; unplug it and allow appliance to cool down.
SETTING THE CLOCK
You may set the clock before, during or after the brewing cycle.
To set current time: Press the HOUR, then MIN buttons until you reach the current
time. Hold down buttons to advance quickly.
SETTING THE AUTO BREW FUNCTION
1. Plug appliance into standard electrical outlet. Water reservoir light will be
illuminated.
2. The digital clock display flashes 12:00 (R).
How to Use
This appliance is for household use only.
BEFORE FIRST USE
• For warranty verification, do not remove line cord tag.
• Please go to www.prodprotect.com/applica to register your warranty.
• Wash all removable parts in hot soapy water, rinse and dry thoroughly as directed
in the CARE AND CLEANING section of this manual.
• Grasp the integrated handle on the water reservoir and remove it from the
coffeemaker.
• If desired, remove the cover from the reservoir to make filling the reservoir easier.
• Pour fresh cold water up to 8-cup level mark into the water reservoir (N).
• Replace cover, if removed. Replace water reservoir into coffeemaker; make sure
it snaps into place securely.
• Grasp the integrated handle on the removable brew basket and remove brew
basket.
• Place empty 8 to 12 cup basket style paper filter into removable brew basket (P).
• Replace brew basket; make sure it snaps into place securely.
N
P
Q
R
Page 9

6
7
6. Insert brew basket into brew basket holder, snapping into place securely.
7. Place brew-through lid on empty carafe.
Note: Coffee may overflow if brew-through lid is not properly aligned.
8. Insert carafe securely along slots of carafe holder. Make sure carafe is fully inserted
(U).
9. Plug cord into standard electrical outlet.
10. Press ON/OFF button; power light is illuminated. Brewing begins OR – to delay
brewing – set the auto function (V). (See DELAYED BREWING).
11. When coffee stops flowing into carafe the brew cycle is complete.
12. Once coffee grounds have cooled, carefully remove carafe and brew basket.
Discard grounds and paper filter. Replace brew basket and carafe.
13. The thermal carafe will keep brewed coffee hot for 2 hours.
14. Freshness indicator LED will turn on and remain on for 20 minutes. When
indicator turns off it is a signal that the coffee is no longer fresh.
15. Coffee maker will turn off when coffee has finished brewing or to turn off the
coffee maker press the ON/OFF button.
16. Unplug appliance when not in use.
SNEAK-A-CUP® INTERRUPT FEATURE
The Sneak-A-Cup® Interrupt Feature lets you pour a cup of coffee before brewing is
complete. When the carafe is removed, the coffee flow will be paused for 20 seconds.
After 20 seconds, the drip flow will start again.
Important: Carafe must be replaced in less than 0 seconds to prevent water from
overflowing the brew basket.
Caution: Do not pull out brew basket when using this feature, as it is filled with hot
coffee.
S
T
Note: You must set the clock in order to use the Delayed Brewing feature.
3. To change the time, press HOUR button until the correct time appears (S).
Note: When the time passes noon, the letters “PM” will be displayed to the left of the
time. Once the time is changed past midnight the digital display will display “AM”.
4. Repeat with the MIN button (T).
Tip: Hold the button down to make the hours and minutes change rapidly after a short
delay. To change the time in 1 minute or 1 hour increments, press and release the
button.
Note: If the unit is unplugged or power is interrupted even momentarily, the time may
need to be reset.
BREWING COFFEE
Note: It is not necessary to set the clock to brew coffee unless you want to use
Delayed Brewing.
1. Grasp the integrated handle on the water reservoir and remove it from the
coffeemaker. If desired, remove the cover from the reservoir to make filling the
reservoir easier.
2. Fill water reservoir with desired amount of cold tap water using water markings on
water reservoir window. Do not exceed the 8-cup maximum level.
3. Replace cover, if removed. Replace water reservoir into coffee maker; make sure it
snaps into place securely.
4. Grasp the integrated handle on the removable brew basket and remove brew
basket. Place empty 8 to 12 cup basket style paper filter into removable brew basket
making sure filter is centered in brew basket.
5. Add desired amount of ground coffee (usually 1 heaping tablespoon or coffee
measure per cup).
U
V
Page 10

8
9
DELAYED BREWING
1. Follow steps 1 through 9 under BREWING COFFEE.
2. Make sure clock has been set to correct time of day.
3. Press the PROG button (the word PROGRAM appears above the time on the LCD);
the AUTO light flashes.
4. To select the time for delayed brewing: Press HOUR button until the correct time
appears on the display. Repeat with the MIN button. Press the PROG button again.
The delayed brewing time is set.
5. Press the AUTO button to activate the delayed brewing. The AUTO button light is
displayed on the LCD. It will flash several times then remain constant. The word
AUTO appears above the time.
6. To check the preset auto time, press PROG button and it will display the time
selected for delay brewing to begin. (The AUTO light will blink until the AUTO
button is pressed.)
7. When programmed time is reached, the blue light next to the PROG light comes on
and brewing begins.
8. To cancel the AUTO brew, press the ON/OFF button. All lights are off.
COFFEE BREWING TIPS
• Stir coffee in carafe before serving to evenly distribute the flavor and temperature.
• Coffee that is poured during brewing cycle may vary in strength and temperature
from the finished brew.
• Not sure how much coffee to use – begin by using 1 rounded scoop of medium
grind coffee for each cup of coffee to be brewed.
• Never reuse coffee filters; they absorb flavors from the brewed coffee and will give
the newly brewed coffee a stale flavor. They may also tear and allow grinds.
• Freshly ground coffee beans give the best flavor. Grind what is needed just before
brewing.
• If carafe filled with coffee is left in the appliance, be sure to remove the coffee
grounds from the filter basket as soon as they have cooled slightly. This will keep
the coffee from developing a bitter taste.
• For a special occasion, whip some heavy cream with 1 or 2 tablespoons of hazel
nut, chocolate or almond liqueur. Use to top off each cup of coffee.
• Add a 2-inch piece of vanilla bean to the sugar bowl. You’ll be surprised at how it
flavors the coffee.
• Keep your coffeemaker very clean; you’ll be pleased with the flavor.
• For iced coffee brew the coffee with twice the normal amount of grounds. The ice
dilutes the coffee flavor. Or make coffee ice cubes from left over coffee and brew
your coffee at its normal strength.
• Remember when pouring hot liquid into a glass, always put a spoon in the glass
before adding the hot liquid. The spoon absorbs the heat and the glass will not
break.
• Rinse both the carafe and the brew basket holder with warm water immediately
after each use to maintain good coffee flavor.
Care and Cleaning
This product contains no user serviceable parts. Refer service to qualified service
personnel.
Caution: Do not expose the control panel to water. Water may cause permanent
damage and make the coffeemaker inoperable.
1. Make sure the unit is unplugged and cooled before cleaning.
2. Remove filter basket by grasping the integrated handle and pulling out.
3. Discard the paper filter with the grounds.
4. Clean parts as follows:
• Filter basket and carafe are top-rack dishwasher-safe; or they may be hand
washed in warm, sudsy water.
• Wipe the exterior and “Keep Hot” carafe plate with a soft damp cloth. Do not use
abrasive cleansers or scouring pads.
TREAT CARAFE WITH CARE
A damaged carafe may result in possible burns from a hot liquid. To avoid breaking:
• Do not allow all liquid to evaporate from the carafe while on the “Keep Hot” carafe
plate or heat the carafe when empty.
• Discard the carafe if damaged in any manner. A chip or crack could result in
breakage.
• Never use abrasive scouring pads or cleansers; they will scratch and weaken
the glass.
• Do not place the carafe on or near a hot gas or electric burner, in a heated oven or
in a microwave.
• Avoid rough handling and sharp blows.
MINERAL DEPOSITS AND CLOGGING
Mineral deposits left by hard water can clog your coffeemaker. Excessive steaming
and/or a prolonged brewing cycle are signs that cleaning is needed. The frequency of
cleaning out deposits is affected by the regularity of usage and water hardness. During
cleaning, more steaming occurs than when brewing coffee and may emit spurts of
steam. Cleaning is recommended every 60 brewing cycles.
1. Fill carafe with white vinegar up to 6-cup water line. Add water up to 8-cup line.
Remove the water reservoir and fill with vinegar mixture. Replace reservoir.
Caution: Do not overfill water reservoir.
2. Put a paper filter in the filter basket and replace. Set empty carafe on the “Keep
Hot” carafe plate.
3. Turn on coffeemaker and let half the cleaning solution brew into carafe (until water
level is around the 3-cup line in the carafe). Turn coffeemaker off and let it soak for
at least 15 minutes to soften the deposits.
4. Turn on coffeemaker and brew remaining cleaning solution into carafe.
5. Turn off coffeemaker, empty carafe and discard filter.
Page 11

0
6. Use the carafe to fill water reservoir with fresh water to 6-cup line, replace empty
carafe on the “Keep Hot” carafe plate and then turn on coffeemaker for a complete
brew cycle to flush out remaining cleaning solution. You may wish to repeat this
step again to eliminate any remaining vinegar smell/taste.
7. Wash the filter basket and carafe as instructed for normal cleaning.
TROUBLESHOOTING
PROBLEM POSSIBLE CAUSE SOLUTION
Coffeemaker does not
turn on.
Coffeemaker is
leaking.
Brewing takes too
long.
Coffee is not brewing.
The coffeemaker
brews clear water.
Brew basket
overows.
Grounds in the
brewed coffee.
Coffeemaker is
brewing slowly;
brewed coffee tastes
bad.
Coffeemaker is not
plugged in.
Water reservoir may be
overlled or not inserted
properly OR carafe may
not be correctly placed on
“Keep Hot” carafe plate.
The coffeemaker may need
cleaning.
Water reservoir might be
empty.
There may be no coffee
grounds in the brew basket.
Carafe may be improperly
placed on the “Keep Hot”
carafe plate.
The lter and/or the brew
basket are not properly
placed.
Coffeemaker needs
cleaning; wrong grind
being used.
Check to be sure appliance is
plugged into a working outlet
and the ON/OFF (I/O) button
has been pressed.
Make sure the water reservoir
has not been lled beyond the
MAX ll line OR make sure
carafe is placed correctly on
“Keep Hot” carafe plate and
is centered under the lter
basket holder.
Follow procedures in CARE
AND CLEANING.
Make sure water reservoir
has sufcient water to brew
desired number of cups of
coffee.
Add sufcient amount of
coffee grounds to lter lined
brew basket.
Remove carafe and insert so
that carafe rests comfortably
within the grooves on the
“Keep Hot” carafe plate.
Insert paper liner into brew
basket and insert basket
properly into brew basket.
Follow directions in CARE
AND CLEANING. Use only
coffee ground for automatic
drip coffeemakers.
Page 12

INSTRUCCIONES IMPORTANTES
DE SEGURIDAD
Cuando se usan aparatos eléctricos, siempre se deben respetar las
siguientes medidas básicas de seguridad:
❑
Por favor lea todas las instrucciones.
❑
No toque las superficies calientes. Use las asas o las perillas.
❑
A fin de protegerse contra un choque eléctrico y lesiones a las personas,
no sumerja el cable, los enchufes ni el aparato en agua ni en ningún
otro líquido.
❑
Todo aparato eléctrico usado en la presencia de los niños o por ellos
mismos requiere la supervisión de un adulto.
❑
Desconecte el aparato del tomacorriente cuando no esté en uso y
antes de limpiarlo. Espere que el aparato se enfríe antes de instalarle o
retirarle piezas y antes de limpiarlo.
❑
No use ningún aparato eléctrico que tenga el cable o el enchufe
averiado, que presente un problema de funcionamiento o que esté
dañado. Acuda a un centro de servicio autorizado para que lo
examinen, reparen o ajusten o llame gratis al número correspondiente
en la cubierta de este manual.
❑
El uso de accesorios no recomendados por el fabricante del aparato
puede ocasionar incendio, choque eléctrico o lesiones a las personas.
❑
No use este aparato a la intemperie.
❑
No permita que el cable cuelgue del borde de la mesa o del mostrador
ni que entre en contacto con las superficies calientes.
❑
No coloque el aparato sobre ni cerca de las hornillas de gas o eléctricas
ni adentro de un horno caliente.
❑
Para desconectar, ajuste todo control a la posición de apagado (OFF) y
después, retire el enchufe de la toma de corriente.
❑
Este aparato se debe usar únicamente con el fin previsto.
❑
La tapa debe permanecer sobre la jarra cuando el aparato está en uso.
❑
El retirar la tapa durante los ciclos de colado puede ocasionar
quemaduras.
❑
Para reducir el riesgo de incendio, no coloque ningún aparato de
calentar ni de cocinar debajo de este artefacto.
❑
Para reducir el riesgo de incendio, no instale el aparato sobre ni cerca
de ninguna superficie de un aparato de calentar ni de cocinar.
❑
Para reducir el riesgo de un choque eléctrico, no instale este aparato
sobre un fregadero.
❑
Para reducir el riesgo de incendio, cuando el aparato esté en uso, nunca
coloque nada directamente sobre la superficie del aparato.
CONSERVE ESTAS
INSTRUCCIONES.
Este aparato eléctrico es para uso doméstico únicamente.
Page 13

ENCHUFE DE TIERRA
Como medida de seguridad, este producto cuenta con un enchufe de tierra que
tiene tres contactos. No trate de alterar esta medida de seguridad. La conexión
inapropiada del conductor de tierra puede resultar en un riesgo de choque
eléctrico. Si tiene alguna duda, consulte con un electricista calicado para
asegurarse de que la toma de corriente sea una de tierra.
CABLE ELÉCTRICO
a) El producto debe proporcionarse con un cable corto para reducir el riesgo de
enredarse o de tropezar con un cable largo.
b) Se encuentran disponibles cables de extensión más largos, que es posible
utilizar si se emplea el cuidado debido.
c) Si se utiliza un cable de extensión,
1) El voltaje eléctrico del cable o del cable de extensión debe ser, como
mínimo, igual al del voltaje del aparato, y
2) El cable debe acomodarse de modo que no cuelgue del mostrador
o de la mesa, para evitar que un niño tire del mismo o que alguien se
tropiece accidentalmente.
Si el aparato es del tipo que es conectado a tierra, el cable de extensión deberá
ser un cable de tres alambres conectado a tierra.
TORNILLO DE SEGURIDAD
Advertencia: Este aparato cuenta con un tornillo de seguridad para evitar
la remoción de la cubierta exterior del mismo. A n de reducir el riesgo de
incendio o de choque eléctrico, por favor no trate de remover la cubierta
exterior. Este producto no contiene piezas reparables por el consumidor. Toda
reparación se debe llevar a cabo únicamente por personal de servicio autorizado.
Nota: Si el cordón de alimentación esta dañado, en América Latina debe
sustituirse por personal calicado o por el centro de servicio autorizado.
PATA DE CONEXIÓN
A TIERRA
ADAPTADOR
MEDIO DE CONEXIÓN
A TIERRA
TORNILLO METÁLICO
TAPA DEL TOMACORRIENTE
CON CONEXIÓN A TIERRA
El producto puede variar ligeramente del que aparece ilustrado.
† . Cesto de colar (Pieza No SDC00)
. Dispositivo de interrupción de colado Sneak-A-Cup®
† . Jarra térmica con tapa (Pieza No SDC006)
† . Tanque de agua iluminado con indicador del nivel de agua (Pieza No SDC008)
. Tapa del tanque (no ilustrada)
6. Pantalla digital
7. Panel de control
8. Gancho para manejo del cable (no ilustrada)
9. Receptor del enchufe (no ilustrada)
† 0. Juego de piezas de montaje (Pieza No SDC009-0) negro
Soporte de montaje (Pieza No SDC0) negro (no ilustrada)
Nota: † indica piezas desmontables/reemplazables por el consumidor
A
Page 14

6
7
A
† . Piezas para el ensamblaje
(Pieza Nº SDC-MOUNTING KIT)
A. 6 Separadores
½"
¼"
/6"
/6"
B. Tornillos
"
½"
¼"
C. Arandelas
. Plantilla para el ensamblaje (en caja)
También necesitará:
• Cinta adhesiva
• Regla (o puede también cortar la regla que se proporciona con la plantilla)
• Taladro eléctrico con broca de ¼”
A
C
B
PASOS PRELIMINARES
• Retire todo el material de empaque, etiquetas y calcomanías.
• Retire y conserve toda literatura.
• Desempaque las partes de montaje, y apártelos en un lugar seguro para no
perderlos.
Importante: No trate de operar el aparato sin antes haberlo instalado
debidamente.
ESCOJA EL LUGAR ADECUADO
Cuando escoja un lugar de montaje, tome en cuenta lo siguiente:
• ASEGÚRESE de instalar el aparato con alcance a una toma de corriente.
• TOME EN CUENTA su patrón normal de trabajo en la cocina.
• NO instale el aparato sobre ningún aparato de cocinar ni de calentamiento, tal
como la estufa o el horno.
• NO instale el aparato sobre el fregadero.
• NO instale el aparato detrás, debajo ni enfrente de los aparatos de iluminación
con montaje debajo de los gabinetes.
Nota: Si usted instala múltiples aparatos †SpaceMaker™ y va a instalar su aparato
al lado del horno SpaceMaker™ (Fig. A.):
• Deje por lo menos 1” entre el lado donde se encuentra el panel de controles de
su horno y la pared o el otro aparato que va a instalar.
• Deje por lo menos 4” entre el lado opuesto al panel de controles de su horno
y la pared o el otro aparato que va a instalar. Los demás aparatos los puede
instalar cada uno junto a otro.
A.
4”
1”
4”
1”
Page 15

8
9
4. Doble la plantilla alrededor del borde del gabinete de forma que la línea gruesa
quede alineada con el borde inferior delantero, estire la plantilla y pegue las 4
esquinas para fijarla en su lugar.
5. Use un taladro con broca de 6,3 mm (¼ pulg) y perfore desde abajo del
gabinete, atravesando los 4 agujeros marcados en la plantilla (E).
Importante: Siempre asegúrese de perforar derecho a través de de los agujeros
marcados en la plantilla. El perforar angularmente puede evitar la instalación
correcta del aparato y dañar los gabinetes si la broca llegase a perforar la
partición.
6. Una vez que haya perforado los agujeros, despegue la cinta adhesiva y la
plantilla de montaje.
7. Limpie el polvo y el sucio de la superficie del interior del gabinete, por la parte
de arriba y de abajo.
8. Por dentro del gabinete, coloque una arandela sobre cada uno de los 4 agujeros
que ha perforado.
Importante: El panel superior de la cafetera es removible para facilitar la
instalación del aparato. Simplemente sujete el panel por la parte de atrás y
hale para retirarlo (Fa) o inserte un destornillador plano a través de uno de los
agujeros de montaje en la parte delantera y gire para abrirlo (Fb). Una vez que
retire el panel, móntelo en su lugar siguiendo las instrucciones a continuación.
Luego, deslice la cafetera nuevamente sobre el carril del panel, para sujetar el
aparato después que lo instale.
9. Sujete el panel en su lugar; los agujeros perforados en el gabinete deben
coincidir con los agujeros de montaje trazados en el panel.
10. Inserte un tornillo en cada agujero del panel por dentro del gabinete. Coloque
una tuerca en cada tornillo y apriete hasta quedar bien afianzados.
Precaución: Este aparato cuenta con un receptáculo tomacorriente Save-A-Plug™
para conectar aparatos †SpaceMaker™ más pequeños, como un miniprocesador
de alimentos/un molino o un abrelatas. ¡No utilice este tomacorriente para
ningún otro aparato!
Precaución: Al elegir un lugar para su cafetera, asegúrese de tener el espacio
suficiente para llegar al receptáculo tomacorriente en la parte de atrás.
Nota: Si conecta otro aparato †SpaceMaker™ en el tomacorriente Save-A-Plug™,
asegúrese de poder desenchufar el aparato después de cada uso.
DETERMINE EL TIPO DE GABINETE
Antes de instalar el aparato, verifique si el gabinete tiene inferior plano (B) o
saliente (C). Si el gabinete es de inferior plano, siga las instrucciones de MONTAJE
ESTÁNDAR, y si el gabinete tiene saliente, consulte la sección de MONTAJE
SOBRESALIENTE.
MONTAJE ESTÁNDAR (GABINETES DE INFERIOR PLANO)
Advertencia: Siempre use gafas de protección, a fin de evitar lesiones al perforar.
1. Despeje la superficie debajo del área de instalación para evitar que caiga polvo
o sucio sobre los aparatos y demás artículos. Abra los gabinetes y vacíelos para
facilitar el proceso de montaje.
2. Limpie el panel inferior del gabinete por la parte de arriba y de abajo.
3. Abra las puertas de los gabinetes y coloque la plantilla, a ras contra la
superficie debajo del gabinete, asegurándose de que la línea gruesa de la
plantilla quede alineada con el borde inferior delantero de gabinete (D).
Importante: No alinee los agujeros de los tornillos de la plantilla debajo de
la partición entre los gabinetes; el hacerlo evita la instalación apropiada del
aparato. Preste atención adónde desea fijar los agujeros, de manera que no haya
daño a los gabinetes durante el proceso de montaje. El perforar a través de la
partición del gabinete puede ocasionar daño y evitar la instalación debida.
B
C
D
E
Fa Fb
Page 16

0
Nota: Si no tiene una regla, corte la regla de papel provista en el borde de la
plantilla de montaje.
4. Luego de medir el grosor del labio saliente, como se indica en la Ilustración H,
observe las líneas discontinuas en la plantilla de montaje; cada línea tiene una
medida al lado que indica el grosor del labio saliente que se usa para esa línea.
Por ejemplo, si su gabinete tiene un saliente de ½”, usted debe usar la línea
marcada ½” en la plantilla.
5. Doble la plantilla por la línea discontinua que coincide con el grosor del labio
saliente de su gabinete.
6. Apoye la plantilla doblada contra el borde trasero del labio saliente,
asegurando que los agujeros para taladrar queden de cara hacia abajo (J).
Importante: No alinee los agujeros de los tornillos de la plantilla debajo de
la partición entre los gabinetes; el hacerlo evita la instalación apropiada del
aparato. Preste atención adónde desea fijar los agujeros, de manera que no haya
daño a los gabinetes durante el proceso de montaje. El perforar a través de la
partición del gabinete puede ocasionar daño y evitar la instalación debida.
7. Pegue la plantilla con la cinta adhesiva, asegurándose de que el borde de la
plantilla quede derecho, contra el borde trasero del labio saliente del gabinete.
8. Use un taladro con broca de 6,3 mm (¼ pulg) y perfore desde abajo del
gabinete, atravesando los 4 agujeros marcados en la plantilla (K).
Importante: Siempre asegúrese de perforar derecho a través de de los agujeros
marcados en la plantilla. El perforar angularmente puede evitar la instalación
correcta del aparato y dañar los gabinetes si la broca llegase a perforar la
partición.
Nota: Para determinar que tornillos debe usar, tenga en cuenta que cada tornillo
debe sobresalirse del gabinete lo suficiente para que pueda asegurarse con una
tuerca.
Nota: Asegúrese de apretar bien las tuercas para evitar la vibración del aparato
mientras está en funcionamiento.
11. Una vez que el panel esté bien afianzado, alce la cafetera y alinéela con el
carril en el panel para engancharla nuevamente en su lugar.
12. Enchufe el aparato a un tomacorriente estándar. El cable sobrante se puede
colgar sobre el gancho para manejo del cable, detrás del aparato (G).
Precaución: Este aparato cuenta con un receptáculo tomacorriente Save-A-Plug™
para conectar aparatos †SpaceMaker™ más pequeños, como un miniprocesador
de alimentos/un molino o un abrelatas. ¡No utilice este tomacorriente para
ningún otro aparato!
Nota: Si conecta otro aparato †SpaceMaker™ en el tomacorriente Save-A-Plug™,
asegúrese de poder desenchufar el aparato después de cada uso.
13. ¡Su aparato †SpaceMaker™ está listo para usar!
MONTAJE SOBRESALIENTE
Para gabinetes con labio saliente (vea la Ilustración C)
Advertencia: Siempre use gafas de protección, a fin de evitar lesiones al perforar.
Note: Se han provisto separadores en caso de que el gabinete tenga saliente en el
borde delantero. Solamente use los separadores con los tornillos en la parte trasera
del aparato, para asegurar que quede nivelada con la parte del frente.
1. Despeje la superficie debajo del área de instalación para evitar que caiga polvo
o sucio sobre los aparatos y demás artículos. Abra los gabinetes y vacíelos para
facilitar el proceso de montaje.
2. Limpie el panel inferior del gabinete por la parte de arriba y de abajo.
3. Use una regla para medir el grosor del labio saliente (H), anotando con
precisión el número para uso en el siguiente paso.
G
J
H
K
Page 17

9. Una vez que haya perforado los agujeros, despegue la cinta adhesiva y la
plantilla de montaje.
10. Limpie el polvo y el sucio de la superficie del interior del gabinete, por la
parte de arriba y de abajo.
11. Por dentro del gabinete, coloque una arandela sobre cada uno de los 4
agujeros que ha perforado.
12. Mida la altura del saliente con una regla o con la regla de papel provista,
colocándola verticalmente contra la parte de abajo del gabinete, detrás
del saliente. Este número determina cuántos separadores se necesitan, que
equivalen a la altura del saliente. Por ejemplo, un saliente de 1 pulg. requiere
dos separadores de ½ pulg. en cada agujero (L).
13. Por dentro del gabinete, introduzca los tornillos sobre cada arandela en los
agujeros ya perforados.
Nota: Para determinar que tornillos debe usar, tenga en cuenta que cada tornillo
debe sobresalirse del gabinete lo suficiente para que pueda asegurarse con una
tuerca.
13. Según el paso No. 12, coloque el número de separadores necesarios en cada
tornillo trasero para asegurar que el aparato quede nivelado (M).
Nota: Si el saliente de su gabinete es demasiado alto para que pueda acomodarse
con la cantidad de separadores proporcionados, usted puede llamar al
1-800-231-9786 totalmente gratis y ordenar separadores adicionales, sin costo
alguno.
L
M
Nota: Para la instalación de los separadores, es probable que se requiera
asistencia, a fin de sostener los separadores en su lugar mientras uno afianza
el aparato al mismo tiempo. Si no tiene asistencia disponible, use una prensa
pequeña para sujetar los separadores en su lugar mientras usted instala el aparato.
Importante: El panel superior de la cafetera es removible para facilitar la
instalación del aparato. Simplemente sujete el panel por la parte de atrás y
hale para retirarlo (vea Fa) o inserte un destornillador plano a través de uno
de los agujeros de montaje en la parte delantera y gire para abrirlo (vea Fb).
Una vez que retire el panel, móntelo en su lugar siguiendo las instrucciones a
continuación. Luego, deslice la cafetera nuevamente sobre el carril del panel,
para sujetar el aparato después que lo instale.
15. Una vez que los separadores hayan sido afianzados, eleve el panel y apriete
bien las tuercas de cada tornillo.
Nota: Siempre apriete los tornillos para asegurar que no haya vibración mientras
el aparato está en funcionamiento.
16. Una vez que el panel esté bien afianzado, alce la cafetera y alinéela con el
carril en el panel para engancharla nuevamente en su lugar.
17. Enchufe el aparato a un tomacorriente estándar. El cable sobrante se puede
colgar sobre el gancho para manejo del cable, detrás del aparato (vea G).
Precaución: Este aparato cuenta con un receptáculo tomacorriente SaveA-Plug™ para conectar aparatos †SpaceMaker™ más pequeños, como un
miniprocesador de alimentos/un molino o un abrelatas. ¡No utilice este
tomacorriente para ningún otro aparato!
Nota: Si conecta otro aparato †SpaceMaker™ en el tomacorriente Save-A-Plug™,
asegúrese de poder desenchufar el aparato después de cada uso.
18. ¡Su aparato †SpaceMaker™ está listo para usar!
Page 18

• Para colocar la tapa de la jarra, presione los botones laterales y presione la tapa
hasta que quede bien colocada, con la boquilla en posición opuesta al mango (Q).
Nota: Una vez que la tapa esté en su lugar, los botones laterales regresarán a su
posición original en la tapa.
• Inserte la jarra a lo largo de las ranuras de su soporte. Asegúrese de que la jarra
esté completamente insertada.
• Conecte el cable a una toma de corriente estándar. La luz del tanque de agua se
iluminará y permanecerá encendida mientras el aparato esté conectado.
• Cuele el agua según las instrucciones de la sección PREPARACIÓN DEL CAFÉ sin
agregar café molido. Este procedimiento elimina el polvo o residuos que pueden
quedar en el sistema durante el proceso de fabricación.
• Cuando el colado culmine, deseche el agua de la jarra y el filtro de papel.
• Apague el aparato, desconéctelo y permita que se enfríe.
PROGRAMACIÓN DEL RELOJ
1. Conecte el aparato a una toma de corriente estándar. La luz del tanque de agua se
iluminará.
2. La pantalla del reloj digital parpadea e indica 12:00 (R).
Nota: Es necesario programar el reloj para poder utilizar la función de colado
retrasado.
Como usar
Este producto es para uso doméstico solamente.
ANTES DEL PRIMER USO
• Para verificar la garantía, no retire la etiqueta del cable eléctrico.
• Visite la página web www.prodprotect.com/applica para registrar su garantía.
• Lave todas las piezas desmontables en agua caliente y jabonosa, enjuáguelas y
séquelas bien según las instrucciones de la sección CUIDADO Y LIMPIEZA de este
manual.
• Tome el tanque de agua por el mango y retírelo de la cafetera.
• Si lo desea, retire la tapa del tanque para poder llenarlo más fácilmente.
• Vierta agua potable fría en el tanque de agua hasta el nivel que indica 8 tazas (N).
• Si retiró la tapa, vuelva a colocarla. Vuelva a colocar el tanque de agua en la
cafetera y asegúrese de que encaje en su lugar.
• Tome el cesto de colar por el mango y retírelo.
• Coloque un filtro de papel de tipo cesto vacío, de 8 a 12 tazas de capacidad, en el
cesto de colar (P).
• Vuelva a colocar el cesto de colar; asegúrese de que encaje en su lugar.
N
P
R
Q
Page 19

6
7
5. Agregue la cantidad deseada de café molido (por lo general 1 cucharada o medida
de café llena por taza).
6. Coloque el cesto de colar dentro de su soporte. Asegúrese de que quede bien
encajado.
7. Coloque la tapa sobre la jarra vacía.
Nota: El café puede rebosar si la tapa no está debidamente alineada.
8. Inserte la jarra a lo largo de las ranuras de su soporte. Asegúrese de que la jarra
esté completamente insertada (U).
9. Conecte el cable a una toma de corriente estándar.
10. Presione el botón ON/OFF (encendido/apagado); la luz de encendido se ilumina.
El ciclo de colado comienza O BIEN, para retrasarlo, configure la función de
colado automático (V). (Consulte la sección COLADO RETRASADO.)
11. Cuando el café deja de fluir hacia la jarra, el ciclo de colado ha culminado.
12. Cuando el café molido se enfríe, retire la jarra cuidadosamente el cesto de colar.
Deseche el café molido y el filtro de papel. Vuelva a colocar el cesto de colar
y la jarra.
13. La jarra térmica mantiene el café caliente durante 2 horas.
14. El indicador LED de frescura se enciende y permanece así por 20 minutos.
Cuando el indicador se apaga es señal de que el café ya no está fresco.
15. La cafetera se apaga cuando el ciclo de colado termina, o para apagarla presione
el botón ON/OFF (encendido/apagado).
16. Desenchufe el aparato cuando no esté en funcionamiento.
3. Para cambiar la hora: Presione el botón HOUR (hora) hasta que aparezca la hora
correcta (S).
Nota: Cuando la hora pasa el mediodía, aparecerán las letras “PM” a la izquierda de
la hora. Cuando pasa la medianoche, la pantalla indicará “AM”.
4. Repita este procedimiento con el botón MIN (minutos) (T).
Sugerencia: Mantenga el botón presionado y las horas y minutos cambiarán
rápidamente después de un breve retraso. Para cambiar la hora en incrementos de
1 minuto o 1 hora, presione y suelte el botón.
Nota: Si el aparato se desconecta o se interrumpe la alimentación, aun cuando esto
sea momentáneo, será necesario volver a configurar la hora.
PREPARACIÓN DEL CAFÉ
Nota: No es necesario configurar la hora para preparar café, a menos que se desee
utilizar la función de colado retrasado.
1. Tome el tanque de agua por el mango y retírelo de la cafetera. Si lo desea, retire la
tapa del tanque para poder llenarlo más fácilmente.
2. Llene el tanque de agua con la cantidad deseada de agua fría del grifo. Guíese por
los niveles de agua de la ventana. No llene más del nivel máximo de 8 tazas.
3. Si retiró la tapa, vuelva a colocarla. Vuelva a colocar el tanque de agua en la
cafetera y asegúrese de que encaje en su lugar.
4. Tome el cesto de colar por el mango y retírelo. Coloque un filtro de papel de tipo
cesto vacío, de 8 a 12 tazas de capacidad, en el cesto de colar. Asegúrese del que
el filtro esté en el centro del cesto.
T
S
U
V
Page 20

8
9
DISPOSITIVO DE INTERRUPCIÓN DE COLADO SNEAK-A-CUP®
La función de interrupción de colado Sneak-A-Cup® permite servirse una taza de café
antes de que el ciclo de colado termine. Cuando se retira la jarra, el flujo de café se
interrumpe por 20 segundos. Al cabo de 20 segundos el flujo se reanuda.
Importante: La jarra debe volver a colocarse en menos de 0 segundos para evitar
que el agua rebose del cesto de colar.
Precaución: No retire el cesto de colar al usar esta función porque estará lleno de
café caliente.
COLADO RETRASADO
1. Siga los pasos 1 a 9 de la sección PREPARACIÓN DEL CAFÉ.
2. Asegúrese de que el reloj esté debidamente configurado.
3. Presione el botón PROG (programar). La palabra PROGRAM aparece encima de la
hora en la pantalla LCD. La luz de AUTO parpadea.
4. Para seleccionar la hora del colado retrasado: Presione el botón HOUR (hora)
hasta que aparezca la hora correcta en la pantalla. Repita este procedimiento con
el botón MIN (minutos). Presione el botón PROG (programar) otra vez. La hora de
colado retrasado queda configurada.
5. Presione el botón AUTO (colado automático) para activar el colado retrasado. La
luz del botón AUTO aparece en la pantalla LCD. Parpadea varias veces y luego
permanece constante. La palabra AUTO aparece encima de la hora.
6. Para verificar la hora, presione el botón PROG (programar) y aparecerá la hora
seleccionada para que empiece el colado retrasado. La luz de AUTO parpadeará
hasta que se presione el botón AUTO (colado automático).
7. Cuando llega la hora programada, la luz azul al costado de la luz de PROG se
enciende y el colado comienza.
8. Para cancelar el colado automático, presione el botón ON/OFF (encendido/
apagado). Todas las luces se apagan.
SUGERENCIAS PARA PREPARAR CAFÉ
• Revuelva el café en la jarra antes de servirlo para distribuir el sabor y la
temperatura de forma pareja.
• El café que se sirve durante el ciclo de colado puede variar en concentración y
temperatura del que se sirve al final.
• Si no está seguro de cuánto café debe utilizar, comience por usar 1 cucharada
colmada de café de molido mediano por cada taza.
• No vuelva a utilizar los filtros de café ya que absorben los sabores del café colado
y le darán al último café un mal sabor. Tamién pueden romperse y dejar pasar los
granos de café.
• Los granos de café recién molido dan el mejor sabor. Muela el café necesario justo
antes de colarlo.
• Si deja la jarra llena de café en el aparato, asegúrese de retirar el café molido
del cesto de colar tan pronto se haya enfriado. Esto evitará que el café se ponga
amargo.
• Para una ocasión especial, bata crema de leche con 1 ó 2 cucharadas de licor de
avellanas, chocolate o almendras. Coloque un poco de esta mezcla sobre cada taza
de café.
• Agregue un trozo de 5 cm (2 pulg) de vainilla al recipiente de azúcar. Se
sorprenderá al ver cómo le da sabor al café.
• Mantenga su cafetera bien limpia para que el sabor del café sea satisfactorio.
• Para hacer café helado, prepare el café con el doble de café molido. El hielo diluye
el sabor del café. O haga cubos de hielo de café con café que haya sobrado y
prepare el café normalmente.
• Recuerde colocar una cuchara en un vaso antes de servir líquidos calientes. La
cuchara absorbe el calor y el vaso no se romperá.
• Enjuague la jarra y el soporte del cesto de colar con agua tibia inmediatamente
después de cada uso para mantener el buen sabor del café.
Page 21

0
Cuidado y limpieza
Este aparato no contiene piezas reparables por el consumidor. Todo servicio que
requiera desarmar el aparato debe llevarse a cabo por personal técnico especializado.
Advertencia: No exponer el panel de control al agua. El agua puede ocasionar daño
permanente al aparato y dejarlo inservible.
1. Asegúrese que el aparto esté desenchufado y que se haya enfriado antes de
limpiarlo.
2. Retire el cesto de colar, sujetándolo por el mango y levantándolo derecho para
arriba.
3. Deseche el filtro de papel con el café molido.
4. Limpie las piezas de la siguiente manera:
• El cesto de colar y la jarra pueden ser lavados a mano con agua tibia jabonada
o pueden ser introducidos en la bandeja superior de la máquina lavaplatos.
• Limpie el exterior de la cafetera y la placa de calentamiento con un paño suave
humedecido. No use limpiadores abrasivos ni almohadillas de fregar.
CUIDADO DE LA JARRA
Una jarra dañada puede resultar en posibles quemaduras debido al líquido caliente.
Para evitar que la jarra se rompa:
• No permita que se evapore toda el agua mientras la jarra permanece sobre la placa
de calentamiento, y jamás caliente la jarra estando vacía.
• Deseche la jarra si se encuentra dañada en cualquier forma. Una astilla o rajadura
puede causar que esta se rompa.
• Para no rallar ni debilitar el vidrio de la jarra, nunca utilice limpiadores fuertes ni
almohadillas abrasivas.
• No coloque la jarra sobre ni cerca de una hornilla de gas o eléctrica, ni adentro de
un horno caliente ni en uno de microonda.
• Evite el manejo brusco y los golpes.
DEPÓSITOS MINERALES Y OBSTRUCCIONES
Los depósitos minerales que provienen del agua dura pueden obstruir la cafetera. El
exceso de vapor o los ciclos de colado prolongados, indican que la cafetera requiere
limpieza. La frecuencia de las limpiezas depende del uso y del agua que se utiliza.
La cafetera produce más vapor durante el ciclo de limpieza que durante un ciclo de
colado normal. Se recomienda una limpieza después de 60 ciclos de colado.
1. Llene la jarra con vinagre blanco hasta la línea indicadora de 6 tazas. Agregue
agua hasta la línea indicadora de 8 tazas. Vierta la solución de agua y vinagre en el
tanque de agua.
Advertencia: No exceda el nivel de llenado.
2. Introduzca un filtro de papel en el cesto de colar e instale el cesto en su lugar.
Coloque la jarra vacía sobre la placa de calentamiento.
3. Encienda la cafetera y permita que cuele la mitad de la solución (hasta la línea
indicadora de 3 tazas en la jarra). Apague la cafetera y deje reposar por lo menos
15 minutos para ablandar los depósitos minerales.
4. Encienda la cafetera y permita que se cuele el resto de la solución adentro de la
jarra.
5. Apague la cafetera y deseche el contenido de la jarra y el filtro.
6. Use la jarra para llenar el tanque con agua fría hasta el nivel 6, coloque la jarra
vacía sobre la placa de calentamiento, y encienda la cafetera para colar un ciclo
completo con el fin de eliminar todo residuo de la solución de limpieza. Tal vez
deba repetir esto para eliminar el sabor y olor del vinagre.
7. Lave el cesto de colar, y la jarra según las instrucciones en la sección de limpieza
de la cafetera.
Page 22

Detección de fallas
PROBLEMA CAUSA POSIBLE SOLUCIÓN
La cafetera La cafetera no está enchufada. Verifique que la cafetera
no enciende. esté conectada a un enchufe
que funciona y asegúrese de
presionar el botón de
encendido/apagado
(ON/OFF).
La cafetera está El tanque de agua puede Verique que el agua en
goteando. estar muy lleno. La jarra no el tanque no sobrepase
ha sido colocada la marca del nivel MAX.
correctamente sobre la placa Verique que la jarra esté
de calentamiento. colocada correctamente
sobre la placa de
calentamiento y centrada
bajo el cesto de colar.
El colado demora La cafetera puede necesitar Siga los pasos indicados
mucho. limpieza. bajo CUIDADO Y
LIMPIEZA.
El café no se El tanque de agua puede Verique que el tanque
cuela. estar vacío. de agua tenga la cantidad
necesaria para el número
de tazas deseadas.
La cafetera cuela No se le agregó café molido Agregue suciente café
agua limpia. al cesto de colar. molido al ltro adentro del
cesto de colar.
El cesto de colar La jarra podría no estar Retire la jarra e
se rebalsa. bien colocada sobre la introdúzcala de manera
placa de calentamiento. que se acomode sobre las
ranuras de la placa de
calentamiento.
El café molido El ltro y (o) el cesto de Inserte un ltro de papel
adentro del café colar no están colocados adentro del cesto de
colado. correctamente. colar y coloque el cesto
correctamente en su lugar.
La cafetera cuela La cafetera necesita Siga las instrucciones
lentamente; el limpieza; se usó un tipo. CUIDADO Y LIMPIEZA.
café colado tiene de café molido equivocado. Use únicamente café
mal sabor. molido para cafeteras de
goteo automáticas.
NOTES/NOTAS
Page 23

NEED HELP?
For service, repair or any questions regarding your appliance, call the appropriate
800 number on the cover of this book. DO NOT return the product to the place
of purchase. Also, please DO NOT mail product back to the manufacturer, nor
bring it to a service center. You may also want to consult the website listed on the
cover of this manual.
Two-Year Limited Warranty
(Applies only in the United States and Canada)
What does it cover?
• Any defect in material or workmanship; provided; however, Applica’s liability
will not exceed the purchase price of the product.
For how long?
• Two years after the date of original purchase
What will we do to help you?
• Provide you with a reasonably similar replacement product that is either new or
factory refurbished
How do you get service?
• Save your receipt as proof of the date of sale.
• Check our on-line service site at www.prodprotect.com/applica, or call our
toll-free number, 1-800-231-9786, for general warranty service
• If you need parts or accessories, please call 1-800-738-0245.
What does your warranty not cover?
• Damage from commercial use
• Damage from misuse, abuse or neglect
• Products that have been modified in any way
• Products used or serviced outside the country of purchase
• Glass parts and other accessory items that are packed with the unit
• Shipping and handling costs associated with the replacement of the unit
• Consequential or incidental damages (Please note, however, that some states do
not allow the exclusion or limitation of consequential or incidental damages, so
this limitation may not apply to you.)
How does state law relate to this warranty?
• This warranty gives you specific legal rights, and you may also have other rights
that vary from state to state or province to province.
NOTES/NOTAS
Page 24

6
7
¿NECESITA AYUDA?
Para servicio, reparaciones o preguntas relacionadas al producto, por favor llame
gratis al número “800” que aparece en la cubierta de este manual. No devuelva
el producto al establecimiento de compra. No envíe el producto por correo al
fabricante ni lo lleve a un centro de servicio. También puede consultar el sitio web
que aparece en la cubierta de este manual.
Dos años de garantía limitada
(Aplica solamente en Estados Unidos o Canadá)
¿Qué cubre la garantía?
• La garantía cubre cualquier defecto de materiales o de mano de obra. Applica
no se responsabiliza por ningún costo que exceda el valor de compra del
producto.
¿Por cuánto tiempo es válida la garantía?
• Por dos años a partir de la fecha original de compra.
¿Qué clase de asistencia recibe el consumidor?
• El consumidor recibe un producto de reemplazo nuevo o restaurado de fábrica,
parecido al original.
¿Cómo se obtiene el servicio necesario?
• Conserve el recibo original como comprobante de la fecha de compra.
• Se puede visitar el sitio web de asistencia al consumidor www.prodprotect.
com/applica, o se puede llamar gratis al número 1-800-231-9786, para obtener
información relacionada al servicio de garantía.
• Si necesita piezas o accesorios, por favor llame gratis al 1-800-738-0245.
¿Qué aspectos no cubre esta garantía?
• Los daños al producto ocasionados por el uso comercial
• Los daños ocasionados por el mal uso, abuso o negligencia
• Los productos que han sido alterados de cualquier manera
• Los productos utilizados o reparados fuera del país original de compra
• Las piezas de vidrio y demás accesorios empacados con el aparato
• Los gastos de tramitación y embarque relacionados con el reemplazo del
producto
• Los daños y perjuicios indirectos o incidentales (sin embargo, por favor observe
que algunos estados no permiten la exclusión ni la limitación de los daños y
perjuicios indirectos ni incidentales, de manera que esta restricción podría no
aplicar a usted).
¿Qué relación tiene la ley estatal con esta garantía?
• Esta garantía le otorga derechos legales específicos y el consumidor podría
tener otros derechos que varían de una región a otra.
is a trademark of The Black & Decker Corporation, Towson, Maryland, USA
Marca registrada de The Black & Decker Corporation, Towson, Maryland, E.U.
R22008/2-28-70E/S
†Spacemaker is a registered trademark of General Electric Company, USA.
†Spacemaker es una marca registrada de General Electric Company, EE.UU.
Printed on recycled paper.
Impreso en papel reciclado.
Copyright © 2008 - 2009 Applica Consumer Products, Inc.
Made in People’s Republic of China
Printed in People’s Republic of China
Fabricado en la República Popular de China
Impreso en la República Popular de China
Page 25

8
Save space and regain your counters in any kitchen with
our full-line of space-saving appliances.
†
SpaceMaker™ appliances can help tackle all your
kitchen tasks while keeping your counters free of clutter!
Visit www.bdspacemaker.com to learn more about
†
SpaceMaker™ appliances and see our latest promotional offers.
Your countertops will thank you!
Horno tostador Abrelatas Cafetera Mini procesador de alimentos / Molino
Ahorre espacio y recupere sus mostradores en
cualquier cocina con nuestra línea completa de
electrodomésticos que ahorran espacio.
¡†SpaceMaker™ puede ayudarlo con todas las
tareas de la cocina sin ocupar mucho espacio!
Visite www.bdspacemaker.com para obtener más
información sobre los electrodomésticos †SpaceMaker™
y enterarse de nuestras promociones más recientes.
¡Sus mostradores se lo agradecerán!
Toaster Oven Can Opener Coffeemaker Mini Food Processor / Grinder
™
†
 Loading...