

Black & Decker Sb500 Instruction Manual

SB500
SB500W
SB500F
SB2200
SB3200
SB3220
www.blackanddecker.co.uk
SB3240
5
1
2
3
4
7
6
8
13
10
9
11
14
15
12
2
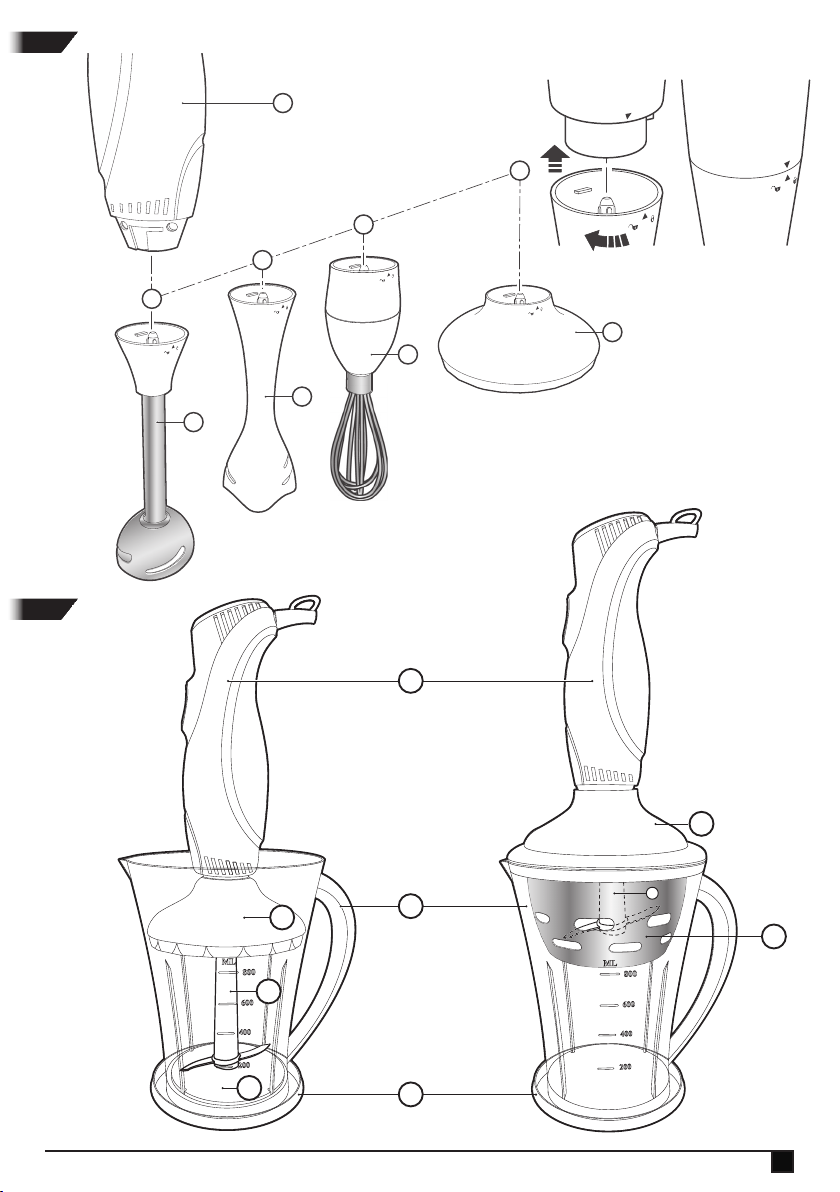
Fig.1
Fig.2
2
8
8
8
8
13
6
4
3
12
2
13
10
13
9
15
11
14
3

ENGLISH
(Original instructions)
Intended use
Your BLACK+DECKER stick blender has been designed for
blending, mixing, beating, whipping, whisking and chopping
food and beverage ingredients depending on the product. Do
not use this appliance for any other purpose. This product is
intended for household use only.
Safety instructions
Warning! When using mains-powered appliances,
basic safety precautions, including the following, should
always be followed to reduce the risk of re, electric
shock, personal injury and material damage.
u Read all of this manual carefully before using the
appliance.
u The intended use is described in this manual. The use of
any accessory or attachment or the performance of any
operation with this appliance other than those recomended
in this instruction manual may present a risk of personal
injury.
u Retain this manual for future reference.
Using your appliance
u Make sure that the appliance is switched off before
connecting to or disconnecting from the power supply.
u Always take care when using the appliance.
u Do not use the appliance outdoors.
u Always protect the motor unit from water or excessive
humidity.
u Do not operate the appliance if your hands are wet.
u Do not operate the appliance if you are barefoot.
u Do not touch moving parts. Keep long hair and loose
clothing out of the way of the moving parts.
u Guide the power supply cord neatly so it does not hang
over the edge of a worktop and cannot be caught
accidentally or tripped over.
u Never pull the power supply cord to disconnect the plug
from the socket. Keep the power supply cord away from
heat, oil and sharp edges.
u Switch off and wait for the motor to stop running before
disconnecting the appliance from the power supply.
u Never detach any part or accessory while the appliance
is still connected to the power supply. Always
disconnect the appliance from the power supply rst.
u If the power supply cord is damaged during use,
disconnect the appliance from the power supply
immediately. Do not touch the power supply cord before
disconnecting from the power supply.
u Do not operate the appliance if it is damaged in any
manner. Return the complete appliance to your nearest
authorized service facility for examination, electrical
repair, mechanical repair or adjustments to avoid any
hazard.
u The use of attachments or accessories not recommended
or sold by this appliance manufacturer may result in re,
electric shock or personal injury.
u Disconnect the appliance from the power supply when
not in use, before tting or removing parts and before
cleaning.
u Misuse could cause an injury.
u Keep loose clothing, hair, jewellery etc. away from
moving parts.
u Care is needed when handling cutting blades,
especially when removing the blades and during
cleaning.
Safety of others
u Do not allow children or any person unfamiliar with
these instructions to use the appliance.
u Do not allow children or animals to come near the work
area or to touch the appliance or power supply cord.
Close supervision is necessary when the appliance is
used near children.
u This appliance is not intended for use by persons
(including children) with reduced physical, sensory or
mental capabilities, or lack of experience and
knowledge, unless they have been give supervision or
instruction concerning use of the appliance by a person
responsible for their safety.
u Children must be supervised to make sure that they do
not play with the appliance.
After use
u Switch off the appliance before cleaning, changing
accessories or approaching parts which move in use.
u Switch off and remove the plug from the socket before
leaving the appliance unattended and before changing,
cleaning or inspecting any parts of the appliance.
u When not in use, the appliance should be stored in a dry
place. Children should not have access to stored
appliances.
Inspection and repairs
u Before use, check the appliance for damaged or
defective parts. Check for breakage of parts, damage to
switches and any other conditions that may affect its
operation.
u Do not use the appliance if any part is damaged or
defective.
u Have any damaged or defective parts repaired or
replaced by an authorised repair agent.
u Before use, check the power supply cord for signs of
damage, ageing and wear.
4
(Original instructions)
ENGLISH
u Do not use the appliance if the power supply cord or
mains plug is damaged or defective.
u If the supply cord is damaged, it must be replaced by the
manufacturer or an authorised BLACK+DECKER Service
Centre in order to avoid a hazard.
u Never attempt to remove or replace any parts other than
those specied in this manual.
Electrical safety
Your charger has been designed for a specic voltage. Always
check that the mains voltage corresponds to the voltage on
the rating plate. Never attempt to replace the charger unit with
a regular mains plug.
This tool is double insulated in accordance
with EN 60335; therefore no earth wire is
required. Always check that the power supply
#
corresponds to the voltage on the rating
plate.
To avoid the risk of electric shock, do not
immerse the cord, plug or motor unit in water
!
or other liquid.
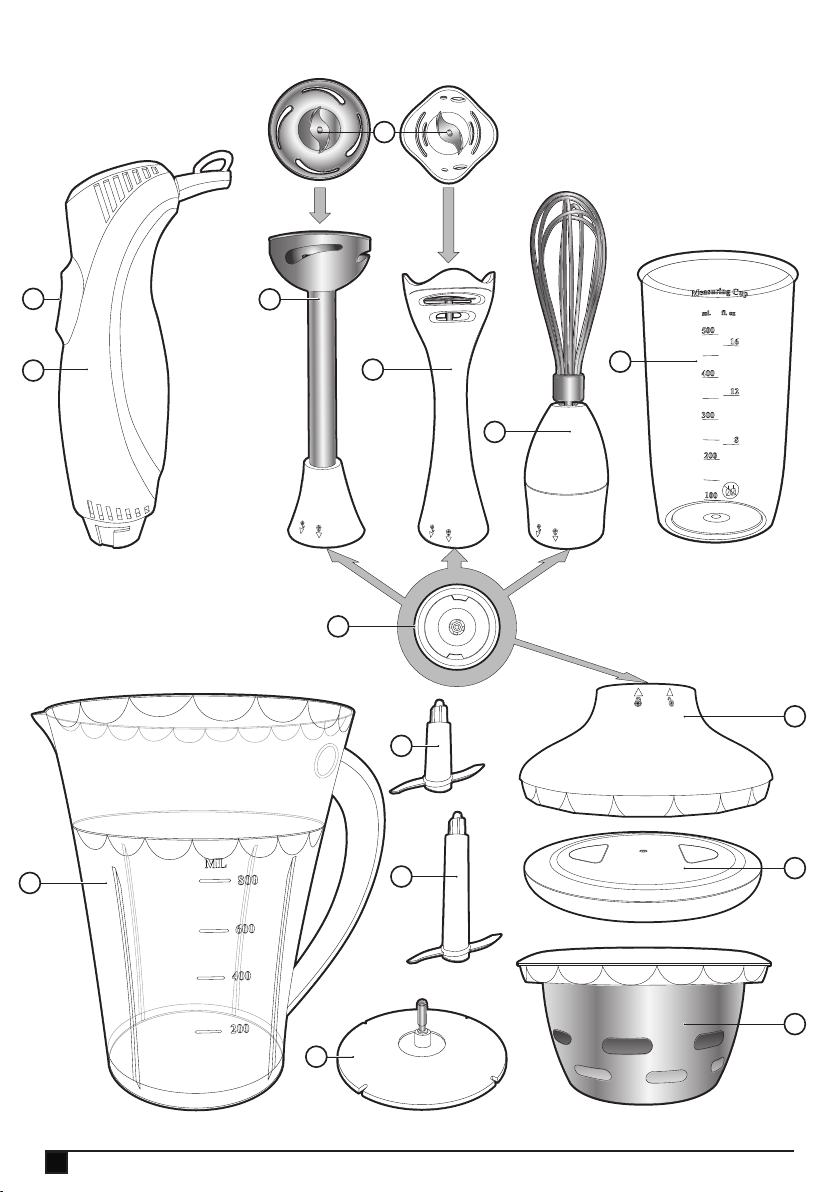
Features
This tool may include some or all of the following features
Feature
1. On/Off switch
2. Motor housing
Stainless steel
3.
stem
4. Plastic stem
All purpose
5.
cutting blade
Whisk attachment
6.
7. Measuring cup
Attachment
8.
connector
9. Measuring jug
Ice chopping
10.
blade
Chopping blade
11.
Blade mounting
12.
base
13. Gearbox
Lid/Base
14.
Ice chopping
15.
bowl
SB500
SB500W
SB500F
SB2200
SB3200
SB3220
SB3240
Unpacking
u Remove all packaging from the appliance.
u Clean the appliance before rst use.
Assembly
Warning! Before assembly, make sure that the appliance is
switched off and unplugged.
Fitting and removing an attachment (Fig.1)
u Use the blending attachment (3 or 4) for blending liquids
or mashing solids.
u Use the whisk attachment (6) for mixing, beating,
whipping and creaming liquids.
u Use the chopping blade (11), Measuring jug (9), blade
mounting base (12) and blade housing (13) for chopping
vegetables etc.
u Use the ice chopping blade (15), Measuring jug (9), Ice
chopping bowl (12) and blade housing (13) for chopping
ice etc.
Use
Blending
u Place the ingredients into a measuring jug or a suitable
container.
u Using a stabbing motion, push the blades (3 or 4) into
the ingredients until the correct consistency is reached.
u When blending liquids or uid ingredients, use short
pulses to prevent spillages.
u Keeping the blades (3 or 4) submerged will help to
prevent spillages. Take extra care when blending hot
ingredients.
Mixing
u Place the ingredients into a measuring jug or a suitable
container.
u Mix the ingredients until the correct consistency is
reached.
u Keeping the beater submerged will help to prevent
spillages. Take extra care when mixing hot ingredients.
Chopping (Fig. 2)
Warning! The measuring jug (9) must be used with the
chopping blade (11). Do not use the chopping blade with
any other bowl. Do not use the chopping Blade without the
supplied measuring bowl tted.
u Place blade mounting base (12) in the measuring bowl (8)
Then place the chopping (11) onto blade mounting base
(12).
5
 Loading...