

Page 1
How to use
Before First Use and Tips
• The battery is not fully charged when packed in the carton. Charge the battery for at least
16 hours before first use. See “Charging the Battery”.
Charging the Battery- Fig.
When disconnecting the ScumBuster from the charger, be sure to unplug the charger from
the outlet first then disconnect the charger cord from the ScumBuster. The tool can be left on
charge for as long as you desire, a minimum charge of 16 hours is required to recharge a
completely discharged tool.
1. Remove the Charging Port Plug on the end of the handle. Plug in the Output cord of
the Charger into the socket in the back of the ScumBuster (See 6 & 7 in Fig. B ).
2. Plug the battery charger into a wall plug. The red indicator light on the charger plug will
come ON indicating that the battery is charging. The red light indicates that the charger is
connected to the battery and is charging. This light will remain Red as long as the unit is
connected to the charger. While charging, the Charger may hum and feel warm to touch.
This is normal.
3. If a battery does not charge properly:
• check the current at the outlet by plugging in a lamp or other appliance there to
see if it will work,
• see if the outlet is connected to a wall switch which controls the power,
• move the Charger and battery to a surrounding air temperature of +40°F (5°C)
to 105°F (40°C).
4. After charging replace the Charging Port Plug.
5. DO NOT CONTINUE TO USE THE SCUMBUSTER with a depleted battery.
The user should never attempt to remove the Battery Cap except for Battery recycle.
To remove the Battery Cap will destroy the operation of the unit.
Hanging the Wallmount:
NOTE: The wall mount may not be included in your model. Refer to product
packaging for contents.
Use the hardware provided only if hanging on conventional sheet rock or plaster walls. If not
hanging on conventional sheet rock or plaster walls, please use the appropriate
fasteners for that material.
1. Locate the wall mount within reach of an electrical outlet. Firmly attach it to the wall so it
will not pull out. Use the hardware provided only if hanging on conventional hollow wall
construction such as sheetrock over studs. If not, use the appropriate fasteners for that
wall material.
2. Insert the charger cord into the groove (see Fig C) on the bottom of the wall mount to
keep the cord from falling when the ScumBuster is not on the mount.
3. Plug in and place the product in position. Always mount the ScumBuster in an upright
(handle down/nozzle up) position (see Fig C).
Operation
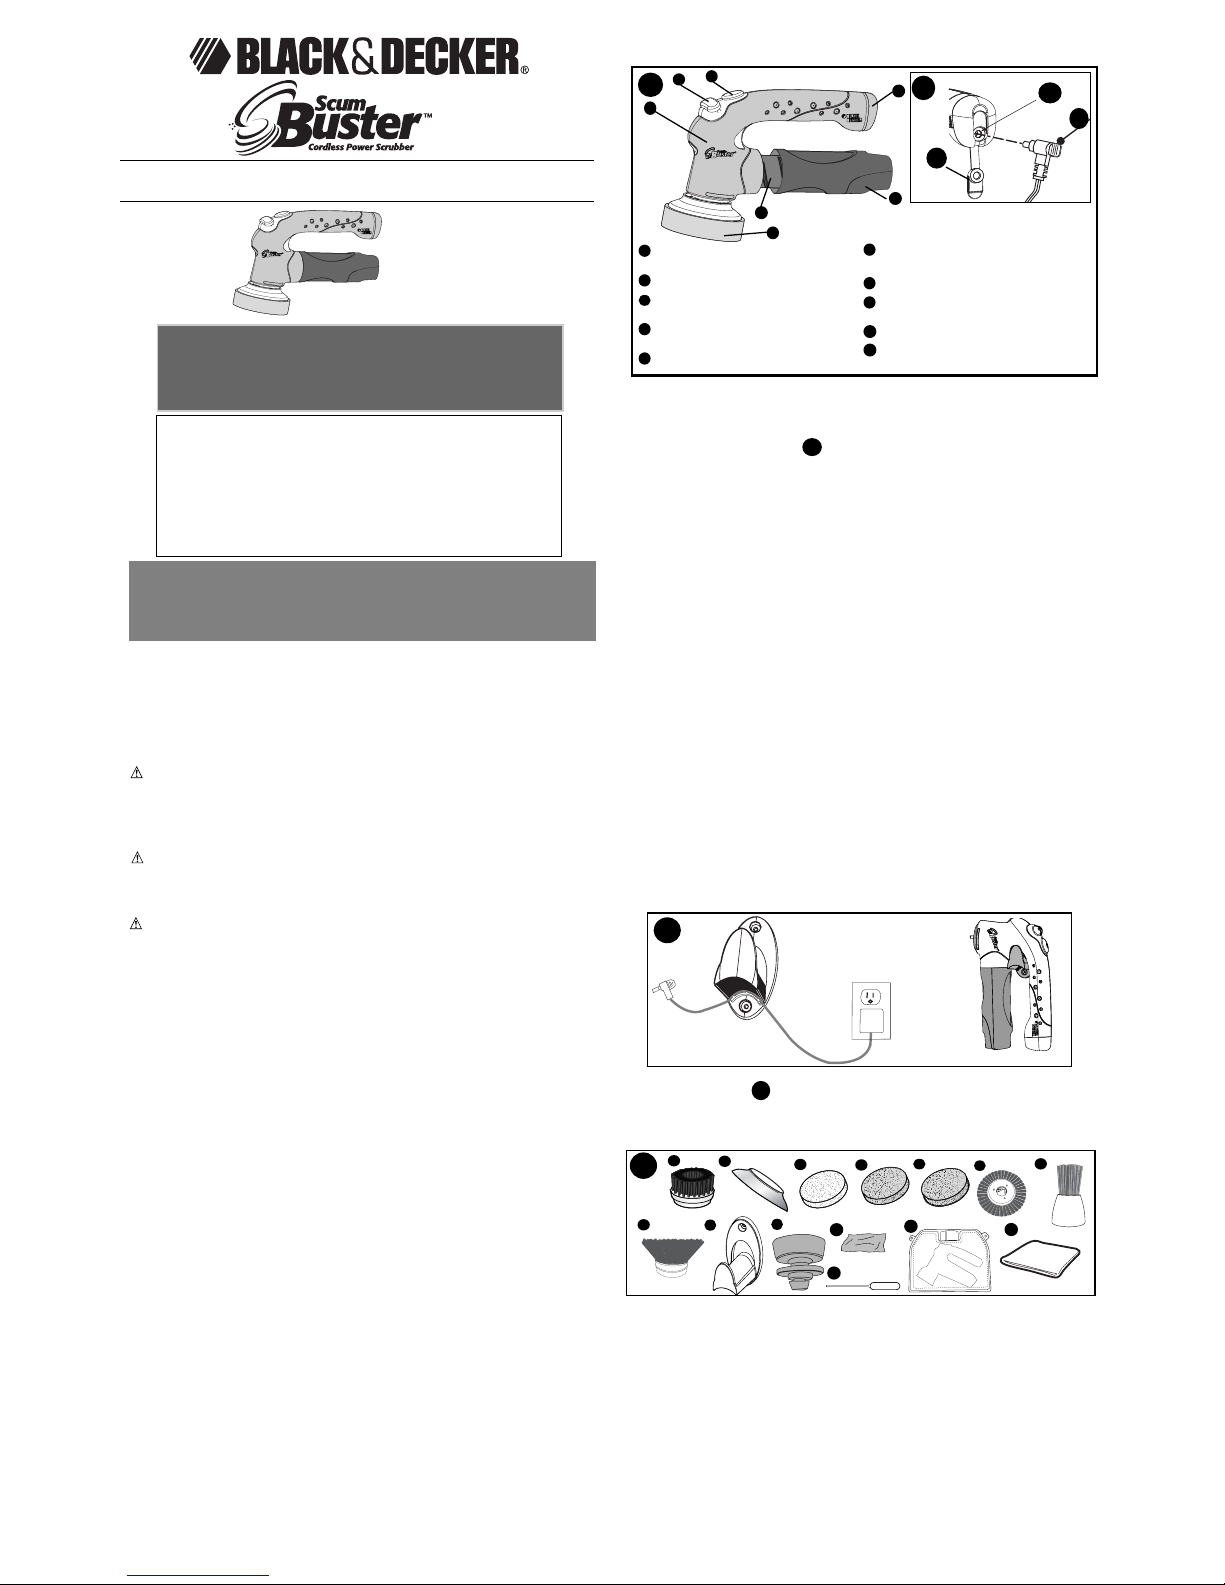
Accessories - Fig.
Do not attach/remove accessory when unit is running.
NOTE: Some accessories may not be included in your model. Refer to product
packaging for contents. Additional accessories are available at local retailers or by
calling, toll-free 1-800-544-6986.
1. 3 inch Bristle Brush – For aggressive area cleaning on ceramic tile walls,
floors, backsplash, fiberglass and hard plastic surfaces.
2. Disc Attachment – Adapter to be used with scrub and sponge pads.
3. Mild Pad Scrubber– (white) – For milder scrubbing of large areas such as
ceramic tile walls, floors and outdoor patio furniture.
4. Coarse Pad Scrubber– (light blue) – For aggressive scrubbing of larger
surfaces such as ceramic tile and porcelain or enamel tubs and sinks.
5. Heavy Pad Scrubber – (green) – For aggressive scrubbing on large surfaces
such as barbecue grill grates.
6. Radial Brush – For scrubbing grout lines and other long, narrow spaces.
7. Narrow Brush – For cleaning tub / shower corners and other hard to reach areas.
8. Shampoo Brush – For carpet cleaning.
9. Wall Mount – For storing your scrubber while it is charging.
10. Flexible Attachment – Helps get to the curves of your tub, sink, etc.
11. Hardware Bag
12. Cleaning Stick - For unclogging of the dispensing system.
13. Carrying Kit Box – For portable, convenient storage of unit, attachments, and
accessories.
14. Accessory Storage Bag
B
A
WARNING: Important Safety Warnings and Instructions
When using electrical appliances, basic safety precautions should always be followed,
including the following:
PLEASE READ AND UNDERSTAND ALL INSTRUCTIONS CAREFULLY BEFORE USING
THE UNIT.
WARNING: Some cleaning products contain chemicals known to the State of
California to cause cancer, birth defects or other reproductive harm.
When using ScumBuster, be sure to read cleaning product labels for
any Proposition 65 warnings. Follow directions on containers of all such
products.
WARNING: To reduce the risk of fire, electrical shock or injury:
• Close supervision is necessary when any appliance is used by or near children.
Do not allow to be used as a toy.
• Never spray towards your face or in the direction of another person.
• Never place your mouth on the nozzle or attempt to prime the sprayer by sucking through
the nozzle.
• DO NOT SPRAY GASOLENE, SOLVENTS, ACIDS, CAUSTICS, POISONS, OILS,
FLAMMABLE LIQUIDS OR SIMILAR PRODUCTS. Personal injury could result from burns,
fire, or inhalation of or contact with such liquids.
• To protect against risk of electrical shock, do not put Battery Charger in water or other liquid.
• Do not operate in the presence of explosives and/or flammable fumes or liquids.
• Always wear eye protection when using the Scrubber with irritating substances.
You may also want to use rubber gloves. Read and follow manufacturer’s instructions on
the cleaning agent you use.
• Always store unit indoors.
• Keep hair, loose clothing, and all parts of body away from moving parts.
• Do not insert attachments/accessories when unit is running.
• Do not use or immerse unit without Charger Hole Cover in place.
• Store out of reach of children.
• This appliance is intended for household use only and not for commercial or
industrial use.
• Use only as described in this manual. Use only Black & Decker recommended attachments.
Important Safety Instructions for the Battery And Charger
• Do not charge a battery if it is wet or shows any evidence of corrosion.
• Do not incinerate the battery. It can explode in a fire. Asmall leakage from the battery cell
may occur under extreme usage, charging, or temperature conditions. This does not
indicate a failure. However, if the outer seal is broken and this leakage gets on your skin:
(1) wash quickly with soap and water or (2) neutralize with a mild acid such as lemon juice
or vinegar, (3) if the liquid gets into the eyes, flush them immediately with clean water for a
minimum of 10 minutes. Seek medical attention.
NOTE: The liquid is a 20-35% solution of potassium hydroxide.
• Do not use an extension cord. Plug the Charger directly into an electrical outlet.
• Use the Charger only in a standard electrical outlet (120V/60Hz).
• Do not attempt to use this charger with any other product; do not attempt to charge this
product with any other charger. Use only the charger supplied by the manufacturer to
recharge. (charger #598322-00)
• Do not use Charger in wet or damp conditions. It is intended for indoor use only. Do not use
the Charger near sinks, or tubs. Do not immerse in water.
• Do not allow the cord to hang over the edge of a table or counter or touch hot surfaces.
The Charger should be placed away from sinks and hot surfaces.
• Do not operate Charger with damaged cord or plug — have them replaced immediately.
• Do not operate Charger if it has received a sharp blow, been dropped, or otherwise
damaged in any way. Return the appliance to any authorized service facility for
examination, repair, or electrical or mechanical adjustment. Do not disassemble Charger.
• For best results, do not charge a battery when it or air temperature is BELOW 40°F (5°C) or
above 105°F (40°C).
• Unplug the Charger when not in use and before cleaning or maintenance.
• Do not abuse the cord. To reduce the risk of damage to the electric plug or cord, never carry
the Charger by its cord or yank the cord to disconnect; instead, grasp the Charger plug and
pull to disconnect. Keep Charger cord away from heat, oil, and sharp edges.
Catalog Numbers: S600, S600B FORM NO. 90500564-PDF1 PRINTED IN CHINA
Copyright © 2005 Black & Decker DEC. ‘05
VEA EL ESPAÑOL EN LA CONTRAPORTADA.
SAVE THIS MANUAL FOR FUTURE REFERENCE.
INSTRUCTIVO DE OPERACIÓN, CENTROS DE SERVICIO Y PÓLIZA DE GARANTÍA.
ADVERTENCIA: LÉASE ESTE INSTRUCTIVO ANTES DE USAR EL PRODUCTO.
INSTRUCTION MANUAL
Scrub Pad & Disc/ Tampon et disque à
récurer/Almohadilla y disco para restregar
Scrubber/Récureur/Restregadora
On/Off Switch/Interrupteur/Conmutador de
encendido y apagado
Internal Battery Cap/Couvercle de la pile
interne/Tapa interna de la batería
Fluid Button/Bouton du liquide/Botón de
líquido
5
4
3
2
1
1
2
3
7
Catalog Numbers:
S600, S600B
B
CONSERVER LE PRÉSENT GUIDE À TITRE DE RÉFÉRENCE.
6
4
SAVE THESE INSTRUCTIONS
5
Charging Port/Orifice de chargement /Puerto
de carga
Output Cord/Cordon de sortie/Cable de salida
Charging Port Plug/Fiche de l’orifice de
chargement/Tapón del puerto de carga
Liquid Reservoir/Réservoir/Depósito de líquido
Liquid Reservoir Cap (Removable)/Tapa del
depósito de líquido (destapable)
10
9
8
7
6
Key Information You Should Know
• Use only Household Cleaners that are available in Hand Pump Dispensers.
• When immersing scrubber in water, DO NOT cover the unit with more than
1 meter (3 Feet) of water. Do not leave the Scrubber immersed for more
than 30 minutes.
10
9
3
4
10
9
8
5
1
6
7
D
8
BEFORE RETURNING THIS PRODUCT
FOR ANY REASON PLEASE CALL
1-800-54-HOW-TO (544-6986)
IF YOU SHOULD EXPERIENCE APROBLEM
WITH YOUR BLACK & DECKER PRODUCT,
CALL 1-800-54-HOW-TO (544-6986)
BEFORE YOU CALL, HAVE THE FOLLOWING INFORMATION AVAILABLE, CATALOG NO.,
TYPE NO., AND DATE CODE. IN MOSTCASES, A BLACK & DECKER REPRESENTATIVE CAN
RESOLVE YOUR PROBLEM OVER THE PHONE. IF YOU HAVE ASUGGESTION OR
COMMENT, GIVE US A CALL. YOUR FEEDBACK IS VITAL TO BLACK & DECKER.
C
13
14
2
12
11
D
Page 2
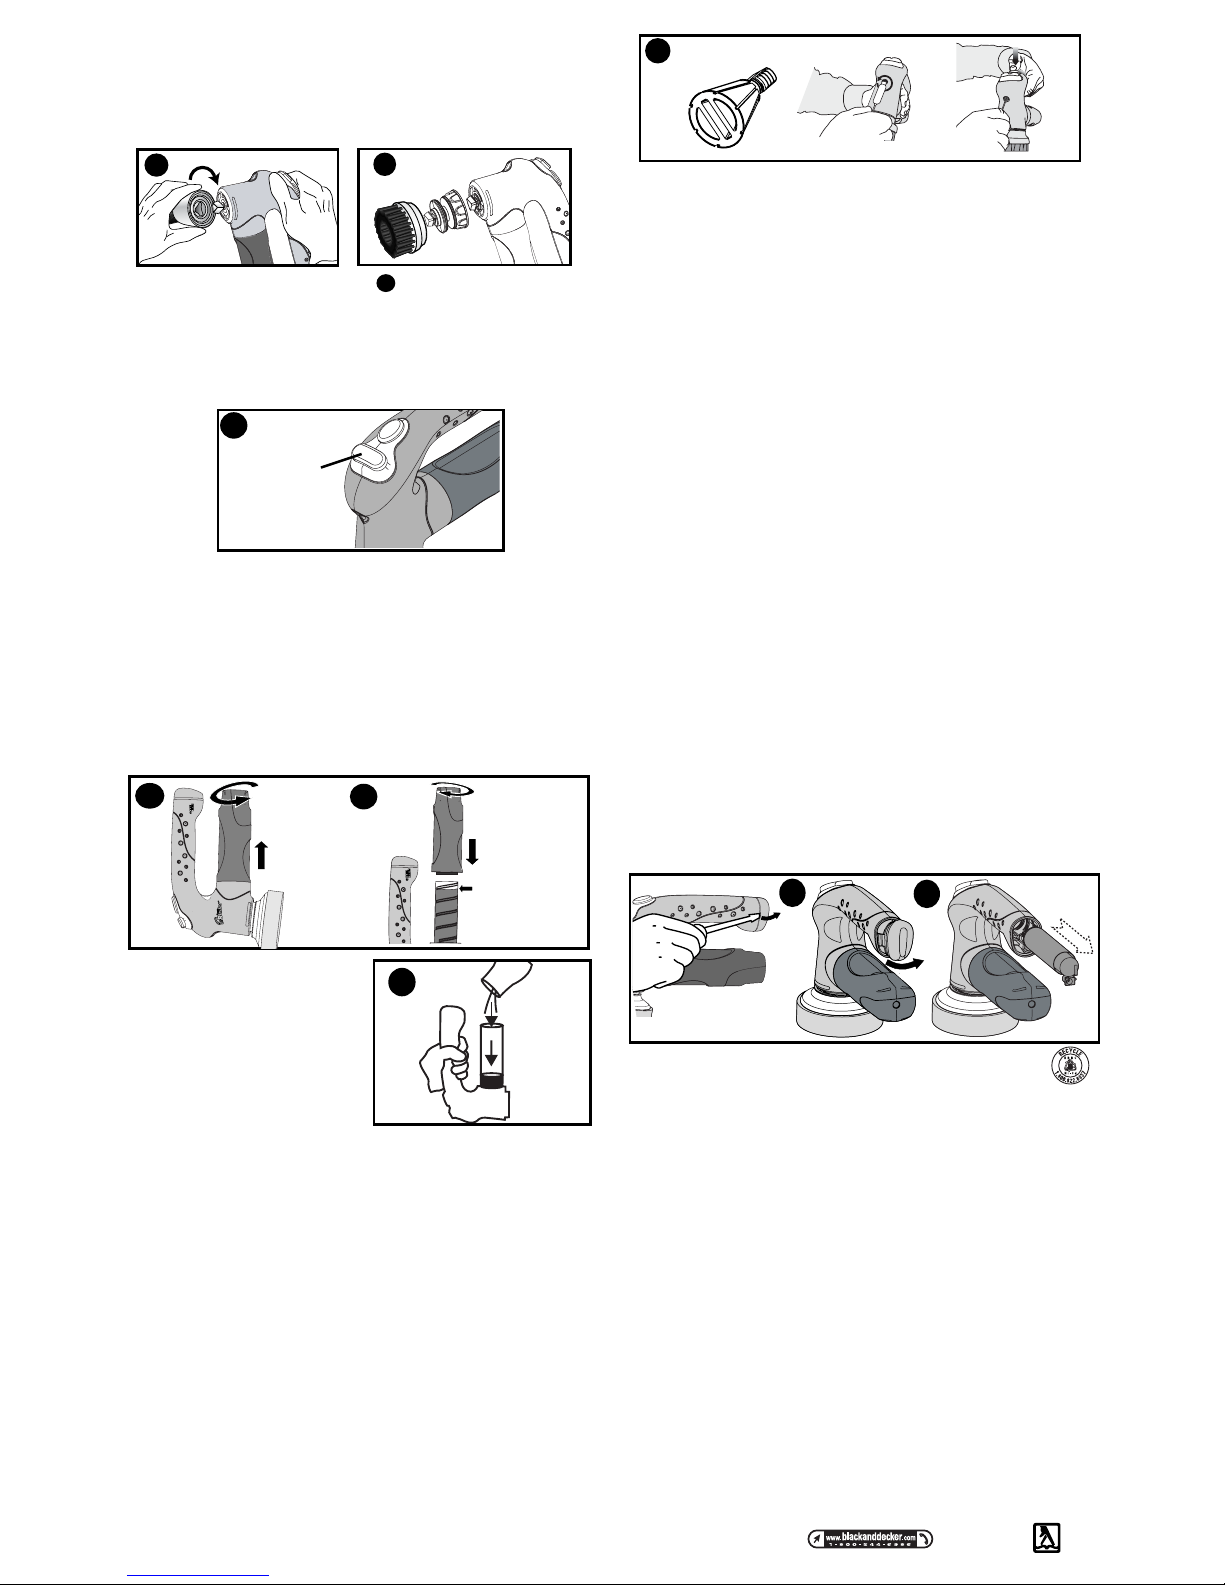
Attaching Accessories
1. To connect an accessory, turn off unit, line up the triangular notch on the accessory over
the triangular shaft, push it on, and snap twist it quickly, clockwise into place. (Fig. E)
The disc accessory must always be used with a Scrub Pad attached.
2. To remove an Accessory, turn off unit, snap twist accessory quickly in
counter-clockwise direction, then pull it off.
Because this Scrubber is powerful, you don’t have to apply excessive pressure while
operating. Use a circular motion on large areas.
Attaching the Flexible Accessory Fig.
Never use the flexible attachment by itself. Always attach a brush or
pad accessory.
Note
! Flexible attachment should not be used for carpet cleaning
applications.
1. Attach the Flexible Accessory to the ScumBuster® as shown in Fig F.
2. The accessories can be connected to the Flexible Accessory as shown in Fig F.
How to Operate the Switch
The S600 ScumBuster® has a 2 speed switch. (Fig G) To operate, push the left side of
the switch for LOW speed OR the right side of the switch for HIGH speed. Return the
switch to the center position to turn OFF. To avoid splatter from a Brush or Pad, turn the
Scrubber off while the attachment is still in contact with the surface. Use low speed to
reduce throw off.
Important:
If some water leaks into the unit, it will not affect performance. However,
should the unit accidentally fall into water without the charging port plug in place,
shake out loose liquid and allow to air dry overnight.
Filling the Unit
You should always fill and empty the Liquid Reservoir over a sink in
case of spillage.
Clean exterior of the unit and flush the liquid delivery system with
clear water before filling with a different cleaning solution. DO NOT
MIX Cleaning Solutions.
NOTE!
Only fill liquid reservoir with “water like”
household approved cleaning solutions that can
be used in hand pump dispensers. Other
thicker cleaning products such as Gels and Soft
Scrubs can be applied directly to the surface
being cleaned from the container they were
purchased in but can not be dispensed from
the ScumBuster as they will clog the
liquid delivery system.
• When filling the liquid reservoir make sure to
hold the ScumBuster with the liquid reservoir
cap facing up and the nozzle facing down. (Fig J) Screw the “Liquid Reservoir Cap” off the
unit by turning it counter clockwise as shown in Fig H.
• Fill the Liquid Reservoir to the “MAX Fill Line” with the desired cleaning solution. (Fig I)
• Replace the “Liquid Reservoir Cap”. Screw the cap clockwise to the right as shown until the
Liquid Reservoir Cap is flush with the unit.
NOTE!
The Liquid Reservoir Cap has a double thread and can be assembled in two positions,
each being 180° from each other. The unit will function correctly in either position.
To Dispense Solution
The fluid contained in the ScumBuster® is under pressure. To dispense the solution, press
the fluid button (Fig A,#5) and the fluid will squirt out the nozzle. The fluid will continue to
dispense as long as the fluid button is held down or until the Liquid Reservoir is empty.
Cleaning and Storage
NOTE!
For best performance, empty and thoroughly rinse the delivery system before storing.
Do this by filling reservoir with water and emptying as normal 1 or 2 times. Thoroughly clean the
Brushes and/or Scrub Pads after each use.
1. Clean the Brushes and Scrub Pads in a mild detergent, rinse with water and air dry.
2. To clean the Scrubber unit, wipe with a damp sponge and a mild soap.
3. Store the Scrubber and attachments/accessories indoors.
Care Guide
Cleaning the Nozzle
• Remove the nozzle by unscrewing it counter clockwise using a flat head screw driver or
small coin or supplied cleaning stick. (See Fig K)
• Soak the nozzle for 1/2 hour in clear warm water to clean. Make sure the nozzle grooves
and threads are clean. If not, it may be necessary to lightly brush clean with a fine synthetic
bristle brush.
• Replace the nozzle by screwing the nozzle clockwise into the unit being careful not to over
tighten. Run 1 or 2 loads of clear water through the unit.
F
Unclogging the Liquid Delivery System
A cleaning stick is provided in case the tubing inside of the ScumBuster clogs. In
the event clogging does occur, follow the steps below:
1. Remove all chemical from the ScumBuster and replace it with warm water.
2. Remove nozzle by using the wide end of the cleaning stick. (see Fig K)
3. Hold ScumBuster so nozzle is pointing away from face. While pressing down on the
fluid button, insert the slender end of the cleaning stick repeatedly until ScumBuster is
unclogged. (see Fig K)
Note: ScumBuster is unclogged when pressure release sound is heard, followed by
water exiting the nozzle.
4. Remove cleaning stick. Press the fluid button until the reservoir is empty.
Note: It may be necessary to repeat steps 1 - 4 to restore full flow.
5. Reattach the nozzle. Be careful not to overtighten.
Note: Place cleaning stick back in carrying case for future use.
Cleaning of the Liquid Reservoir
Over time, a film of cleaning solution may build up on the inside of the Liquid Reservoir.
This may be apparent by excessive pulsation of the fluid spray. To clean, simply wipe the
internal surface of the Liquid Reservoir with a soft damp cloth and flush with water.
Tips on Cleaning Agents
NOTE!
Only fill liquid reservoir with “water like” household cleaning solutions that are
available in hand pump dispensers. Other thicker cleaning products such as Gels and Soft
Scrubs can be applied directly to the surface being cleaned from the container they were
purchased in, but can not be dispensed from the ScumBuster as they will clog the
components of the liquid delivery system.
IMPORTANT:
ScumBuster®Cordless Scrubbers have been designed for easy, powerful
cleaning. If you are uncertain about its use on a surface, test an attachment on a small
inconspicuous area before cleaning larger areas.
• Always follow manufacturer’s recommendations when using a chemical cleaner such as
sprays, foams, rub-on gels, liquid detergents, or bleach solutions.
• Do not use with abrasive cleaners on any surface or in the unit.
• Always wear rubber gloves and protective eye wear (to avoid splatter) when using irritating
cleaners.
Tips on Carpet Cleaning
• Before cleaning your carpet, thoroughly vacuum the surface.
• For soiled carpets dip shampoo brush in cleaning solution and begin to shampoo soiled
area, continuously moving the unit in a circular pattern. Do not hold the unit, while running,
in one place. Once the foam has disappeared, let dry, then vacuum.
Battery Removal and Disposal
This product uses a nickel-cadmium (Ni-Cad) rechargeable and recyclable battery.
When it can no longer be recharged, it should be removed from the unit and recycled.
The battery must not be incinerated or composted. The battery can be taken for disposal to
a Black & Decker Inc.,Company-Owned or Authorized Service center. There are also some
local retailers who are participating in a national recycling program (see “RBRC Seal“).
Call your local retailer for details. If you bring the old battery to a Black & Decker Company
Owned or Authorized Service Center, the Center will arrange for recycling it. Or, if you
wish, contact your local municipality for proper disposal instructions in your city/town.
Battery Removal
To remove the battery pack for disposal, insert a flat Screw driver at the split between the
handle cap and the handle as shown in Fig L. Snap the cap off by prying in the direction
shown by the arrow in Fig L. Additional prying may be needed at the opposite side of the
handle. Slide the battery out of the tool as shown in Fig M and dispose of battery as noted
above. Once removed the battery pack can not be refitted.
The RBRC™ Seal
The RBRC™ (Rechargeable Battery Recycling Corporation) Seal on the
nickel-cadmium battery (or battery pack) indicates that the costs to recycle the
battery (or battery pack) at the end of its useful life have already been paid by
Black & Decker. In some areas, it is illegal to place spent nickel-cadmium batteries in the
trash or municipal solid waste stream and the RBRC program provides an environmentally
conscious alternative.
RBRC in cooperation with Black & Decker and other battery users, has established
programs in the United States and Canada to facilitate the collection of spent
nickel-cadmium batteries. Help protect our environment and conserve natural resources by
returning the spent nickel-cadmium battery to an authorized Black & Decker service center
or to your local retailer for recycling.You may also contact your local recycling center for
information on where to drop off the spent battery, or call 1-800-8-BATTERY.
Service Information
Black & Decker offers a full network of company-owned and authorized service locations
throughout North America. All Black & Decker Service Centers are staffed with trained
personnel to provide customers with efficient and reliable power tool service.
Whether you need technical advice, repair, or genuine factory replacement parts, contact
the Black & Decker location nearest you.
To find your local service location, refer to the yellow page directory under “Tools—Electric”
or call: 1-800-54-HOW-TO.
Full Two-Year Home Use Warranty
Black & Decker (U.S.) Inc. warrants this product for two years against any defects in
material or workmanship. The defective product will be replaced or repaired at no charge
in either of two ways:
The first, which will result in exchanges only, is to return the product to the retailer from
whom it was purchased (provided that the store is a participating retailer). Returns should
be made within the time period of the retailer’s policy for exchanges (usually 30 to 90 days
after the sale). Proof of purchase may be required. Please check with the retailer for their
specific return policy regarding returns that are beyond the time set for exchanges. The
second option is to take or send the product (prepaid) to a Black & Decker owned or
authorized Service Center for repair or replacement at our option. Proof of purchase may
be required.
Black & Decker owned and authorized service centers are listed under “Tools-Electric” in
the yellow pages of the phone directory.
This warranty does not apply to accessories. This warranty gives you specific legal rights
and you may have other rights which vary from state to state. Should you have any
questions, contact the manager of your nearest Black & Decker Service Center.
This product is not intended for commercial use.
See ‘Tools-Electric’
– Yellow Pages –
for Service & Sales
Black & Decker (U.S.) Inc.,
701 E. Joppa Rd.
Towson, MD 21286 U.S.A.
K
H
I
MAX Fill Line
(hauteur limite de
remplissage
Línea de llenado MÁX
1
0
2
G
2 Speed switch
Interrupteur à 2
vitesses
Conmutador de 2
velocidades
J
E
F
M
L
Page 3

AVERTISSEMENT : Directives et consignes de sécurité
importantes.
Lors de l’utilisation de tout appareil électrique, toujours suivre des précautions
élémentaires, y compris les suivantes :
LIRE ET COMPRENDRE TOUTES LES INSTRUCTIONS SUIVANTES AVANT TOUTE
UTILISATION DE L’APPAREIL.
AVERTISSEMENT : Certains produits de nettoyage contiennent des produits
chimiques reconnus par l'état californien pour provoquer
cancers, malformations congénitales ou être nocifs au
système reproductif. Avant toute utilisation du
ScumBuster, s’assurer de bien lire, sur les étiquettes
apposées sur les produits de nettoyage, les
avertissements relatifs à la Proposition 65. Suivre
attentivement toute spécification apposée sur ces produits.
AVERTISSEMENT : Pour réduire tout risque d'incendie, de choc électrique ou
de blessure :
• Faire extrêmement attention lorsqu’un appareil est utilisé par des enfants ou à proximité
d’enfants. Ne jamais permettre qu’il soit utilisé comme un jouet.
• Ne jamais vaporiser en direction du visage ou en direction de toute autre personne.
• Ne jamais mettre l’embout à la bouche ou tenter d’amorcer le vaporisateur en aspirant par
l’embout.
• NE PAS VAPORISER DE L’ESSENCE, DES SOLVANTS, ACIDES, PRODUITS
CAUSTIQUES, POISONS, HUILES, LIQUIDES INFLAMMABLES OU TOUT AUTRE
PRODUIT SIMILAIRE. De sérieuses blessures pourraient résulter de brûlures,
d’incendies ou de l’inhalation de ces produits ou de tout contact avec ces derniers.
• Pour se protéger contre tout risque de chocs électriques, ne pas immerger le chargeur de
pile dans l’eau ou tout autre liquide.
• Ne pas utiliser en présence de liquides ou vapeurs explosives ou inflammables.
• Toujours porter des lunettes de protection lors de l’utilisation du Récureur avec des
substances irritantes. Il est conseillé de porter des gants de caoutchouc. Lire et suivre le
mode d’emploi du fabricant du produit de nettoyage utilisé.
• Toujours ranger l’appareil à l’intérieur.
• Maintenir les cheveux, les vêtements, et toute partie du corps éloignés des pièces
mobiles.
• Ne pas insérer d’accessoires alors que l’appareil est en marche.
• Ne pas utiliser ou immerger l’appareil sans que le capuchon de l’orifice de chargement
soit en place.
• Le ranger hors de la portée des enfants.
• Cet appareil a été conçu pour l’usage du particulier et non pour un usage commercial ou
industriel.
• N’utiliser l’appareil que comme décrit dans ce manuel. N’utiliser que des accessoires
recommandés par Black & Decker.
Regles de sécurité importantes relatives aux piles et au
chargeur
• Ne pas recharger une pile humide ou affichant toute évidence de corrosion.
• Ne pas incinérer les piles. Elles peuvent exploser si jetées au feu. Les cellules des piles
peuvent fuir légèrement dû à un usage, une recharge ou des conditions climatiques
extrêmes. Cela ne représente en aucun cas une défaillance du produit. Il faut cependant,
si le joint d’étanchéité externe est endommagé et que la peau entre en contact avec toute
perte : (1) laver rapidement à l’eau et au savon, ou (2) neutraliser avec un acide doux tel
que du jus de citron ou du vinaigre, (3) en cas de contact direct avec les yeux : les rincer
immédiatement à l’eau claire pendant une dizaine de minutes, puis voir un médecin.
REMARQUE : Le liquide représente une solution de 20 à 35% d’hydroxyde de potassium.
• Ne pas utiliser de rallonge. Brancher le chargeur directement dans une prise électrique.
• N’utiliser le chargeur qu’avec une prise électrique standard (120V/60Hz).
• Ne pas utiliser ce chargeur avec tout autre appareil; ne pas essayer de charger cet
appareil avec tout autre chargeur. N’utiliser que le chargeur fourni par le fabricant pour
toute recharge. (chargeur nº #598322-00)
• Ne pas utiliser le chargeur dans un environnement humide ou détrempé. Il a été conçu
pour un usage intérieur seulement. Ne pas utiliser le chargeur à proximité de
lavabos/éviers ou baignoires. Ne pas immerger dans l’eau.
• Ne pas laisser le cordon pendre au bord d’une table ou d’un comptoir ou toucher toute
surface chaude. Tenir le chargeur à l’écart de tout lavabo/évier ou surface chaude.
• Ne pas utiliser le chargeur avec un cordon ou une fiche endommagé; les faire changer
immédiatement.
• Ne pas utiliser le chargeur s’il a reçu un coup, fait une chute ou a été endommagé de
quelque façon que ce soit. Retourner l’appareil aux services autorisés pour examen,
réparation ou réglage électrique ou mécanique. Ne pas démonter le chargeur.
• Pour des résultats optimum, ne pas recharger les piles lorsque leur température ou la
température ambiante est INFÉRIEURE à 5°C (40°F) ou supérieure à 40°C (105°F).
• Débrancher le chargeur après utilisation et avant tout nettoyage ou entretien.
• Ne pas utiliser le cordon de façon abusive. Pour réduire tout risque d’endommager le
cordon ou sa fiche, ne jamais transporter le chargeur par son cordon, ou arracher ce
dernier pour le déconnecter. Saisir plutôt la fiche du chargeur puis la tirer pour la
déconnecter. Maintenir le cordon du chargeur à l'abri de la chaleur, de l'huile et de tout
objet coupant.
CONSERVER CES DIRECTIVES
Utilisation
Conseils pratiques pré-utilisation
• La pile n’est pas complètement chargée avant emballage. Recharger la pile pendant au
moins 16 heures avant toute utilisation. Voir la section « Recharger la pile ».
Recharger la pile – Fig.
Avant de déconnecter le Scumbuster du chargeur, s’assurer de débrancher d’abord le
chargeur du secteur puis déconnecter le cordon du chargeur du Scumbuster. L’appareil
peut être chargé aussi longtemps que désiré, un minimum de 16 heures est requis pour
recharger à fond un appareil déchargé.
1. Retirer la fiche de l’orifice de chargement au bout de la poignée. Brancher le cordon de
sortie du chargeur dans la prise à l’arrière du Scumbuster (Fig. B, nº 6 et 7 ).
2. Brancher le chargeur dans une prise murale. Le voyant rouge sur la fiche du chargeur
s’allumera indiquant que la pile est en train de se charger. Le voyant rouge indique que
le chargeur est connecté à la pile et est en train de recharger. Le voyant restera rouge
tant que l’appareil restera connecté au chargeur. Pendant la recharge, le chargeur peut
émettre un bourdonnement et être chaud au toucher. C’est tout à fait normal.
3. Si la pile ne se recharge pas correctement :
• Vérifier que la prise de courant fonctionne bien en y branchant une lampe ou
tout autre appareil.
• Vérifier si la prise n’est pas connectée à un interrupteur contrôlant son activité.
• Déplacer le chargeur et la pile dans un endroit à température ambiante située
entre 5°C (+40°F) et 40°C (105°F).
4. Après recharge, remettre en place la fiche de l’orifice de chargement.
5. NE PAS CONTINUER À UTILISER LE SCUMBUSTER lorsque sa pile est à plat.
L’utilisateur ne doit jamais tenter de retirer le couvercle des piles sauf au moment
du recyclage de la pile. Le fait de retirer ce couvercle rend le produit inopérant.
Installation du dispositif de fixation murale :
REMARQUE : le support mural pourrait ne pas être compris avec votre modèle. Se
reporter au contenu de l’emballage du produit.
N’utiliser la quincaillerie fournie à cet effet que pour accrocher l’appareil sur panneau de
plâtre ou placoplâtre conventionnel. Si l’appareil n’est pas accroché sur panneau de plâtre
ou placoplâtre conventionnel, utiliser les dispositifs de fixation appropriés au matériau.
1. Fixer la fixation murale à proximité d’une prise électrique. L’arrimer solidement au mur
de façon à ce qu’elle ne se décroche pas. N’utiliser la quincaillerie fournie à cet effet
que pour accrocher l’appareil sur une paroi creuse conventionnelle comme un panneau
de plâtre monté sur montants. Dans le cas contraire, utiliser les dispositifs de fixation
appropriés au matériau.
2. Insérer le cordon du chargeur dans l’interstice (Fig. C) sur la partie inférieure de la
fixation murale pour prévenir la chute du cordon lorsque le ScumBuster ne repose pas
sur la fixation.
3. Brancher et mettre l’appareil en place. Toujours disposer le ScumBuster verticalement
(poignée en bas/embout en haut) (Fig. C).
Fonctionnement
Accessoires – Fig.
Ne pas insérer ou retirer tout accessoire alors que l’appareil est en marche.
REMARQUE : Certains accessoires pourraient ne pas être compris avec votre
modèle. Se reporter au contenu de l’emballage du produit. Un choix d’accessoires
est à votre disposition chez les revendeurs locaux ou en téléphonant au
1-800-544-6986.
1. Brosse de soie de porc de 76 mm (3 po) – Pour le nettoyage en profondeur des murs
en céramique, des sols, dosserets ou toute surface en fibre de verre ou plastique dur.
2. Disque – Adaptateur à utiliser avec les tampons à récurer ou éponge.
3. Tampon à récurer doux (blanc) – Pour un récurage en douceur de larges surfaces tels
murs et sols carrelés ou meubles de jardin.
4. Tampon à récurer à grains moyens (bleu clair) – Pour récurer en profondeur de larges
surfaces tels carrelages, baignoires et lavabos en porcelaine ou émaillés.
5. Tampon à récurer à gros grains (vert) – Pour récurer en profondeur de larges surfaces
telles les grilles de barbecues.
6. Brosse radiale – Pour frotter les joints ou tout autre espace long et étroit.
7. Brosse étroite – Pour le nettoyage des coins de baignoires ou douches de tout autre
endroit difficile à atteindre.
8. Brosse à shampoing – Pour le nettoyage des moquettes/tapis.
9. Fixation murale – Pour ranger votre récureur pendant qu'il se charge.
10.Accessoire flexible – Permet de nettoyer les parties arrondies des baignoires, lavabos,
etc.
11. Sac d’outil
12. Bâtonnet de nettoyage - Pour la désobstruction du système de distribution.
13.Boîte de rangement – Pratique pour le transport et le rangement de l’appareil et ses
accessoires.
14. Sac de rangement
Fixation des accessoires
1. Pour fixer un accessoire, arrêter l’appareil, aligner l’encoche triangulaire de l’accessoire
avec l'axe triangulaire de l’appareil, appuyer, et enclencher rapidement, en tournant
vers la droite. (Fig. E) Toujours utiliser un disque avec tout tampon à récurer.
2. Pour retirer un accessoire, arrêter l’appareil, désenclencher rapidement l’accessoire en
tournant vers la gauche, puis le retirer.
Parce que ce récureur est puissant, il est inutile d’appliquer une pression excessive
pendant son utilisation. Utiliser une motion circulaire sur de larges surfaces.
Fixation des accessoires flexibles Fig.
Ne jamais utiliser l’accessoire flexible par lui-même. Toujours y rattacher une
brosse ou un tampon.
REMARQUE : Ne pas utiliser l’accessoire flexible pour le
nettoyage des moquettes/tapis.
1. Fixer tout accessoire flexible au ScumBuster® comme illustré en Fig. F.
2. Les autres accessoires peuvent être connectés aux accessoires flexibles comme
illustré en Fig. F.
Utilisation de l’interrupteur
Le ScumBuster® S600 comporte un interrupteur à deux vitesses (Fig. G). Pour le faire
fonctionner à FAIBLE vitesse, pousser le côté gauche de l’interrupteur, ou le côté droit
pour une vitesse RAPIDE. Pousser l’interrupteur vers le centre pour ARRÊTER
l’appareil. Pour prévenir toute éclaboussure projetée par une brosse ou un tampon,
arrêter le récureur alors que l’accessoire est toujours en contact avec la surface à
nettoyer. Utiliser la vitesse lente pour réduire toute projection.
Important :
Une pénétration légère d’eau dans l’appareil n’affectera pas ses
performances. Par contre, dans l’éventualité ou l’appareil tomberait dans l’eau sans la
fiche de l’orifice de chargement en place, secouer le pour éliminer tout liquide puis
laisser sécher toute une nuit à l’air libre.
Remplissage de l’appareil
Toujours remplir ou vider le réservoir au-dessus d’un lavabo pour
prévenir tout débordement.
Nettoyer l’extérieur de l’appareil et vider le système de délivrance du
liquide à l’eau claire avant de le remplir d’une solution de nettoyage
différente. NE PAS MÉLANGER les solutions de nettoyages.
REMARQUE :
Ne remplir le réservoir qu’avec des solutions de nettoyage approuvées,
liquides comme l’eau et pouvant être utilisées en vaporisateur. Les autres produits plus
épais tels les Gels ou les récurants liquides peuvent être appliqués directement sur la
surface à nettoyer à partir de leur flacon d’origine mais ne peuvent être dispensés par le
ScumBuster car ils pourraient boucher le système de délivrance du liquide.
• Lors du remplissage du réservoir s’assurer de maintenir le ScumBuster et le capuchon du
réservoir tourné vers le haut et l’embout tourné vers le bas (Fig. J). Dévisser le «
capuchon du réservoir » en le tournant vers la gauche comme illustré en Fig. H.
• Remplir le réservoir jusqu’à « MAX Fill Line » (hauteur limite de remplissage) avec la
solution de nettoyage désirée. (Fig. I)
• Remettre le « capuchon du réservoir ». Visser le capuchon vers la droite comme illustré
jusqu’à ce qu’il soit au raz de l’appareil.
REMARQUE :
Le capuchon du réservoir possède un filetage double et peut prendre deux
positions, chacune étant à 180° de l’autre. L’appareil fonctionnera correctement dans l’une
ou l’autre position.
Distribution de la solution
Le liquide contenu par le ScumBuster®est sous pression. Pour distribuer la solution,
appuyer sur le bouton du liquide (Fig. A, nº5) et ce dernier sera projeté par l’embout. Le
liquide continuera d’être projeté tant que le bouton sera maintenu appuyé ou tant que le
réservoir ne sera pas vide.
Entretien et rangement
REMARQUE :
Pour des résultats optimum, vider et rincer abondamment le système de
délivrance avant de ranger l’appareil. Pour ce, remplir normalement la cuve d’eau et la
vider 1 à 2 fois. Nettoyer soigneusement les brosses et/ou tampons après chaque usage.
GUIDE D’UTILISATION
RRRRééééccccuuuurrrreeeeuuuurrrr iiiinnnndddduuuussssttttrrrriiiieeeellll ssssaaaannnnssss ffffiiiillllssss SSSSccccuuuummmm BBBBuuuusssstttteeeerr
rr
Numéro de catalogue : S600, S600B
AAAAVVVVAAAANNNNTTTT DDDDEEEE RRRREEEETTTTOOOOUUUURRRRNNNNEEEERRRR LLLLEEEE PPPPRRRROOOODD
DDUUUUIIIITTTT
PPPPOOOOUUUURRRR QQQQUUUUEEEELLLLQQQQUUUUEEEE RRRRAAAAIIIISSSSOOOONNNN QQQQUU
UU
EEEE CCCCEEEE SSSSOOOOIIIITTTT,,,,
CCCCOOOOMMMMPPPPOOOOSSSSEEEERRRR LLLLEE
EE
1111 888800000000 555544444444----66669999888866
66
IMPORTANTS RENSEIGNEMENTS
• N’utiliser que des produits de nettoyage disponibles en distributeur à pompe .
• Si le récureur est immergé dans l’eau, NE PAS le recouvrir de plus d’un mètre
(3 pieds) d’eau. Ne pas laisser le récureur immergé plus de 30 minutes.
B
D
F
Page 4

1. Nettoyer les brosses et tampons à récurer avec un détergent léger, rincer à l’eau claire
et sécher à l’air libre.
2. Pour nettoyer le récureur lui-même, utiliser une éponge humide et un savon doux.
3. Ranger le récureur et ses accessoires à l’intérieur.
Guide d’entretien
Nettoyage de l’embout
• Retirer l’embout en le dévissant vers la droite à l’aide d’un tournevis ordinaire ou une petite
pièce de monnaie ou le bâtonnet de nettoyage. L’embout est illustré en Fig. K.
• Pour nettoyer l’embout, le faire tremper une 1/2 heure dans de l’eau claire et tiède.
S’assurer que le filetage de l’embout est bien propre. Dans le cas contraire, il peut s’avérer
nécessaire d’utiliser une petite brosse synthétique.
• Remettre l’embout sur l’appareil en le vissant vers la droite en faisant attention à ne pas
trop serrer. Utiliser l’appareil en remplissant le réservoir 1 à 2 fois à l’eau claire.
Débouchage du système de délivrance du liquide
Un bâtonnet de nettoyage est fourni pour déboucher la tubulure logée à l'intérieur du
ScumBuster. En cas de bouchage, suivre les étapes suivantes :
1. Enlever le produit chimique du ScumBuster et le remplacer par de l'eau tiède.
2. Enlever le bec au moyen de l'extrémité large du bâtonnet. (voir fig. K)
3. Tenir le ScumBuster de manière à ce que le bec soit éloigné du visage. Tout en
enfonçant le bouton du liquide, insérer l'extrémité effilée du bâtonnet à plusieurs reprises
de manière à déboucher l'appareil. (voir fig. K)
Remarque : Le ScumBuster est débouché lorsque la pression est relâchée et que de l'eau
sort du bec.
4. Enlever le bâtonnet de nettoyage. Actionner le bouton de liquide de manière à vider le
réservoir.
Remarque : Il peut être nécessaire de refaire les étapes 1-4 pour revenir au débit normal.
5. Fixer de nouveau le bec. Faire attention de ne pas trop serrer.
Remarque : Remettre le bâtonnet de nettoyage dans le boîtier de transport pour un
usage ultérieur.
Nettoyage de la cuve
Après un certain temps, un résidu de la solution de nettoyage peut s’accumuler sur les parois
de la cuve. Une utilisation excessive du vaporisateur en est un signe. Pour le nettoyer, passer
simplement un chiffon doux humide sur les parois internes de la cuve puis rincer à l’eau claire.
Conseils pratiques sur les produits de nettoyages
REMARQUE :
Ne remplir le réservoir qu’avec des solutions de nettoyage liquide comme
l’eau et disponibles en vaporisateur. Les autres produits plus épais tels les Gels ou les récurants liquides peuvent être appliqués directement sur la surface à nettoyer à partir de leur
flacon d’origine mais ne peuvent être dispensés par le ScumBuster car ils pourraient boucher le système de délivrance du liquide.
IMPORTANT :
Les Récureurs sans fils ScumBuster® ont été conçus pour effectuer un nettoyage facile et en profondeur. Si vous n’êtes pas sûr de pouvoir l’utiliser sur une
surface quelconque, faire un test avec l’un des accessoires sur un endroit caché avant de
nettoyer plus avant.
• Toujours suivre les recommandations du fabricant lors de l’utilisation de produits nettoyants
chimiques tels les vaporisateurs, mousses, gels, détergents liquides ou solutions javellisées.
• Ne jamais utiliser de nettoyants abrasifs sur la surface à nettoyer ou dans l’appareil.
• Toujours porter des gants de caoutchouc et des lunettes de protection (pour se protéger des
éclaboussures) lors de l’utilisation de nettoyant irritant.
Conseils pratiques pour le nettoyage des moquettes/tapis
• Avant de nettoyer votre moquette/tapis, passer soigneusement l’aspirateur.
• Pour les moquettes tachées, tremper la brosse à shampoing dans une solution de
nettoyage et nettoyer l’endroit taché en mouvements circulaires continus. Ne pas maintenir
l’appareil sur place. Lorsque la mousse a disparu, laisser sécher puis passer l’aspirateur.
Retrait et mise au rebut des piles
Cet appareil utilise une pile rechargeable et recyclable au nickel-cadmium (Ni-Cad).
Lorsqu’elle ne peut plus être rechargée, la retirer de l’appareil pour la recycler.
Ne pas incinérer ou mettre la pile au compost. Les piles peuvent être rapportées à un
centre Black & Decker Inc. ou à l’un de ses centres de service autorisés pour y être
recyclées. Certains détaillants locaux participent aussi au programme national de
recyclage (se reporter au Sceau RBRC).
Appeler votre détaillant local pour plus d’informations. Si l’on rapporte une pile usagée à un
centre Black & Decker ou à l’un de ses centres de service autorisés, ces derniers
prendront en charge le recyclage. Il est aussi possible de contacter sa municipalité locale
pour obtenir des instructions relatives à la mise au rebut des piles.
Retrait De La Pile
Pour retirer le bloc-piles pour le mettre au rebut, insérer un tournevis ordinaire dans la fente
située entre le capuchon de la poignée et cette dernière comme illustré en Fig. L.
Désemboîter le capuchon en le forçant légèrement dans la direction de la flèche en Fig. L.
Il peut s’avérer nécessaire de faire de même sur le côté opposé de la poignée. Sortir la pile
de l’appareil comme illustré en Fig. M et mettre au rebut comme indiqué ci-dessus. Une fois
enlevé, le bloc-piles ne peut être réinstallé.
Le sceau RBRC
mc*
Le sceau RBRCmc*de la pile au nickel-cadmium indique que Black & Decker
défraie le coût du recyclage de la pile à la fin de sa durée utile. Le programme
RBRC
mc*
offre une solution de rechange pratique à la mise au rebut des piles au
nickel-cadmium usées, que ce soit à la poubelle ou dans le système municipal car cette
mise au rebut est illégale à certains endroits.
L’organisme RBRC en collaboration avec Black & Decker et d’autres utilisateurs de piles a
mis sur pied des programmes aux États-Unis afin de faciliter la collecte des piles au
nickel-cadmium usées. Pour aider à préserver l’environnement et à conserver les
ressources naturelles, il suffit de retourner les piles au nickel-cadmium usées à un centre de
service Black & Decker ou chez le détaillant de la région pour qu’elles soient recyclées. On
peut également communiquer avec le centre de recyclage de la région afin de savoir où
déposer les piles usées, ou composer sans frais le 1 800 822-8837.
*RBRC est une marque de commerce de l’organisme américain Rechargeable Battery
Recycling Corporation.
Renseignements relatifs au service
Black & Decker exploite un réseau complet de centres de service et d'ateliers d'entretien
autorisés par toute l'Amérique du Nord. Le personnel de tous les centres de service
Black & Decker a reçu la formation voulue pour assurer l'entretien efficace et fiable des
outils électriques.
Pour obtenir des renseignements d'ordre technique, des conseils relatifs aux réparations ou
des pièces de rechange d'origine, communiquer avec le centre de service Black & Decker
de la région.
On peut trouver l'adresse du centre de service de la région dans l'annuaire des Pages
Jaunes à la rubrique «Outils électriques» ou en composant le numéro suivant :
1 800 544-6986.
Garantie complète de deux ans pour utilisation domestique
Black & Decker garantit le produit pour une période de deux ans contre tout vice de matière
ou de fabrication. Le produit défectueux sera réparé ou remplacé sans frais en vertu de
l'alternative suivante.
Le premier choix ne donne droit qu'à un échange; il s'agit de retourner le produit chez le
détaillant d'où il provient (si celui-ci participe au programme d'échange). Il faut alors
retourner le produit dans le délai imparti par le détaillant (habituellement, entre 30 et 90
jours de la date d'achat). Le détaillant peut exiger une preuve d'achat. Prière de vérifier
avec le détaillant quant à sa politique relative aux retours au-delà des délais accordés pour
l'échange.
Le second choix consiste à retourner le produit (port payé) à un centre de service Black &
Decker où il sera réparé ou remplacé, à notre gré. Une preuve d'achat peut être exigée.
Les coordonnées des centres de service Black & Decker se trouvent à la rubrique «Outils
électriques» des Pages Jaunes.
La présente garantie ne couvre pas les accessoires. Les modalités de la présente garantie
donnent des droits légaux spécifiques. L'utilisateur peut se prévaloir d'autres droits selon
l'état ou la province qu'il habite. Pour obtenir de plus amples renseignements,
communiquer avec le directeur du centre de service Black & Decker de la région.
Le produit n'est pas conçu pour une utilisation commerciale.
ADVERTENCIA: Advertencias e instrucciones
importantes de seguridad
Siempre deberían seguirse precauciones básicas de seguridad cuando se utilicen
aparatos eléctricos, incluyendo las siguientes:
ANTES DE UTILIZAR LA UNIDAD, LEA DETENIDAMENTE TODAS LAS
INSTRUCCIONES HASTA COMPRENDERLAS.
ADVERTENCIA: Algunos productos de limpieza contienen químicos que el
estado de California sabe causan cáncer, defectos de
nacimiento u otros daños reproductivos. Cuando utilice
ScumBuster, asegúrese de leer las etiquetas de los productos
de limpieza para ver si contienen advertencias bajo la Ley 65.
Siga las instrucciones del envase para todos estos productos.
ADVERTENCIA: Para reducir el riesgo de incendio, descarga eléctrica o lesión:
• Es necesario supervisar de cerca la utilización de cualquier aparato eléctrico si es
utilizado por o en proximidad de niños. No permita que se juegue con él.
• Nunca rocíe hacia su cara o hacia otros.
• Nunca ponga su boca sobre la boca del dispositivo ni succione por la boca del dispositivo
con el propósito de preparar el rociador.
• NO ROCÍE GASOLINA, SOLVENTES, ÁCIDOS, AGENTES CÁUSTICOS, VENENOS,
ACEITES, LÍQUIDOS INFLAMABLES O PRODUCTOS SIMILARES. El fuego, la
inhalación de o el contacto con estos líquidos podría resultar en quemaduras y otras
lesiones corporales.
• Para protegerse contra el riesgo de descargas eléctricas, no sumerja el cargador de la
batería en agua u otros líquidos.
• No opere el dispositivo en la presencia de explosivos o humos y líquidos inflamables.
• Siempre use protección ocular cuando utilice la restregadora con sustancias irritantes.
Sería una buena idea usar guantes de goma también. Lea y siga las instrucciones del
fabricante del agente de limpieza que utilice.
• Siempre guarde la unidad bajo techo.
• Mantenga el pelo, ropa suelta y todas las partes del cuerpo alejados de piezas móviles.
• No inserte accesorios cuando la unidad esté encendida.
• No utilice ni sumerja la unidad si no tiene puesto el tapón en el orificio del cargador.
• Guardar fuera del alcance de niños.
• Este aparato eléctrico ha sido diseñado sólo para uso doméstico y no para uso comercial
o industrial.
• Úselo sólo como se describe en este manual. Use sólo los accesorios recomendados por
Black & Decker.
Instrucciones de seguridad importantes para la batería y
el cargador
• No cargue una batería si está mojada o si muestra señales de corrosión.
• No incinere la batería. Puede explotar en el fuego. Puede que ocurra una pequeña fuga
del elemento de la batería bajo condiciones de uso, carga o temperaturas extremas. Esto
no indica una falla. Sin embargo, si el sello externo está roto y el líquido de la fuga hace
contacto con su piel: (1) lávese rápidamente el área con agua y jabón o (2) neutralícela
con un ácido suave, como jugo de limón o vinagre; (3) si el líquido le entra a los ojos,
enjuágeselos inmediatamente con agua limpia por un mínimo de 10 minutos. Busque
atención médica.
NOTA: El líquido es una solución de 20-35% de hidróxido de potasio.
• No use alargadores. Enchufe el cargador directamente a la toma de corriente.
• Use el cargador solamente en una toma de corriente estándar (120V/60Hz).
• No intente utilizar este cargador con ningún otro producto; no intente cargar este producto
con ningún otro cargador. Use sólo el cargador incluido por el fabricante para recargar
(cargador #598322-00).
• No utilice el cargador en condiciones de agua o humedad. El cargador ha sido diseñado
sólo para uso interior. No utilice el cargador cerca de lavatorios o tinas. No lo sumerja en
agua.
• No permita que el cable cuelgue del borde de una mesa o mesón o que toque superficies
calientes. El cargador debería colocarse lejos de lavatorios y superficies calientes.
• No opere el cargador con un cable o enchufe dañado - cámbielos de inmediato.
• No opere el cargador si ha recibido un golpe agudo, si se ha caído o ha sido dañado de
alguna otra forma. Devuelva el aparato eléctrico a cualquier instalación de servicio
autorizada para que sea examinada, reparada o para que se le realicen ajustes eléctricos
o mecánicos. No desarme el cargador.
• Para un resultado óptimo, no cargue una batería cuando su temperatura o la temperatura
ambiental se encuentra BAJO 5 ºC (40 °F) o SOBRE 40 ºC (105 °F).
• Desenchufe el cargador cuando no lo esté utilizando y antes de limpiarlo o hacer
mantenimiento.
• No maltrate el cable. Para reducir el riesgo de daños al enchufe o cable, nunca tome el
cargador por el cable ni tire de su cable para desconectarlo; en vez, tome y tire del
enchufe del cargador para desconectarlo de la toma de corriente. Mantenga el cargador
alejado de fuentes de calor, aceite y bordes afilados.
CONSERVE ESTAS INSTRUCCIONES
Utilización
Algunos consejos antes de utilizarlo por primera vez
• La batería no viene completamente cargada en el cartón. Cargue la batería por al menos
16 horas antes de utilizarlo por primera vez. Ver “Cómo cargar la batería”.
Cómo cargar la batería - Fig.
Cuando desconecte el Scumbuster del cargador, asegúrese de desenchufar el cargador
de la toma de corriente primero y luego desconecte el cable del cargador del Scumbuster.
La herramienta puede dejarse en el cargador por el tiempo que desee. Se requiere una
carga mínima de 16 horas para recargar una herramienta que está completamente
descargada.
1. Retire el tapón del puerto de carga que se encuentra en el extremo del mango.
Enchufe el cable de salida del cargador en la toma que se encuentra en la parte de
atrás del Scumbuster (Ver 6 y 7 en la Fig. B).
2. Enchufe el cargador de la batería en la toma de corriente en la pared. La luz roja del
indicador en el enchufe del cargador se encenderá para indicar que la batería se está
cargando. La luz roja indica que el cargador está conectado a la batería y que se está
cargando. Esta luz se mantendrá roja mientras la unidad esté conectada al cargador.
Mientras se esté cargando, el cargador puede emitir un zumbido y sentirse caliente al
tacto. Esto es normal.
SSSSccccuuuummmm BBBBuuuusssstttteeeerrrr®®®® RRRReeeessssttttrrrreeeeggggaaaaddddoooorrrraaaa eeeellllééééccccttttrrrriiiiccccaaaa iiiinnnnaaaalllláááámmmmbbbbrrrriiiiccccaa
aa
Número de catálogo: S600, S600B
MANUAL DE INSTRUCCIONES
AAAANNNNTTTTEEEESSSS DDDDEEEE DDDDEEEEVVVVOOOOLLLLVVVVEEEERRRR EEEESSSSTTTTEEEE PPPPRRRROOOODDDDUUUUCCCCTTTTOOOO PPPPOOOORR
RR
CCCCUUUUAAAALLLLQQQQUUUUIIIIEEEERRRR RRRRAAAAZZZZOOOONNNN LLLLEEEE RRRROOOOGGGGAAAAMMMMOOOOSSSS LLLLLLLLAAAAMMMMEEEE AAAALLLL
((((55555555)))) 55
55333322226666----7777111100000000
Información clave que debe conocer
• Use sólo limpiadores domésticos que vengan en envases con
bombas de mano.
• Cuando sumerja la restregadora en agua, NO la sumerja a más de
1 metro (3 pies). No deje la restegadora sumergida por más de
30 minutos.
B
Imported by / Importé par
Black & Decker Canada Inc.
100 Central Ave.
Brockville (Ontario) K6V 5W6
Voir la rubrique “Outils électriques”
des Pages Jaunes
pour le service et les ventes.
Page 5

3. Si una batería no se carga debidamente:
• enchufe una lámpara u otro dispositivo en la misma toma de corriente para ver
si está funcionando debidamente,
• vea si la toma de corriente está conectada a un interruptor en la pared que
controle la corriente,
• mueva el cargador y la batería a un lugar donde la temperatura ambiental se
encuentre entre 5 ºC (+40 °F) y 40 ºC (105 °F).
4. Luego de que termine de cargarse, reponga el tapón del puerto de carga.
5. NO SIGA UTILIZANDO EL SCUMBUSTER si la batería está gastada.
El usuario jamás debería intentar retirar la tapa de la batería, a no ser que sea para
reciclar la batería. Si retira la tapa de la batería, destruirá el funcionamiento de la
unidad.
Cómo colgar el dispositivo de montaje para la pared:
NOTA: Su modelo puede no incluir el accesorio para montaje en la pared. Para
conocer los contenidos consulte el embalaje del producto.
Use la quincallería incluida sólo si lo colgará en una pared de panel de yeso o yeso
tradicional. Si no lo colgará en una pared de panel de yeso o yeso tradicional, por favor
utilice los tornillos apropiados para el material de la pared.
1. Ubique el soporte de montaje cerca de una toma de corriente. Fíjelo firmemente a la
pared de modo que no se salga. Use la quincallería incluida sólo si lo colgará en una
pared de construcción hueca tradicional, tal como panel de yeso sobre pies derechos. Si
no, use los tornillos apropiados para el material de la pared.
2. Inserte el cable del cargador a la hendidura (ver Fig. C) en la parte de abajo del soporte
de montaje para evitar que el cable se caiga cuando el ScumBuster no esté en el
soporte de montaje.
3. Enchufe y ponga el producto en su lugar. Monte siempre el ScumBuster en posición
recta (con el mango abajo y la boca arriba) (ver Fig. C).
Funcionamiento
Accesorios - Fig.
No conecte ni retire accesorios mientras la unidad esté encendida.
NOTA: Su modelo puede no incluir algunos accesorios. Para conocer los contenidos
consulte el embalaje del producto. Puede encontrar accesorios adicionales en su
distribuidor local o llamando gratuitamente al 1-800-544-6986.
1. Escobilla de cerdas de 76 mm (3 pulg.) – Para la limpieza agresiva en áreas cubiertas con
cerámica en paredes y pisos, y superficies de fibra de vidrio y plástico rígido.
2. Accesorio de disco – Adaptador para utilizar con almohadillas de fibra y esponja.
3. Almohadilla para restregado suave – (blanca) – Para el restregado más suave de áreas
grandes, como azulejos, baldosas y muebles de terraza.
4. Almohadilla para restregado fuerte – (celeste) – Para el restregado agresivo de
superficies más grandes, como azulejos, baldosas y tinas y lavatorios de porcelana o
esmalte.
5. Almohadilla para restregado pesado – (verde) – Para el restregado agresivo de
superficies más grandes como rejillas de parrillas.
6. Escobilla radial – Para fregar líneas de lechada entre cerámicas y otros espacios largos
y angostos.
7. Escobilla angosta – Para limpiar esquinas de tinas y duchas, y otras áreas de difícil
acceso.
8. Escobilla de champú – Para limpiar alfombras.
9. Soporte para la pared – Para almacenar su fregadora mientras se está cargando.
10.Accesorio flexible – Para limpiar las curvas de su tina, fregadero, etc.
11. Bolsa para el equipo
12. Barra de limpieza - Para limpiar el sistema de suministro.
13. Caja de herramientas de transporte - Para un almacenamiento conveniente y portátil
de la unidad y los accesorios.
14. Bolsa para almacenamiento de accesorios
Conexión de accesorios
1. Para conectar un accesorio, apague la unidad, alinee la muesca triangular del accesorio
sobre el eje triangular, empújelo para conectarlo y gírelo rápidamente en dirección de las
manillas del reloj para asegurarlo. (Fig. E) El accesorio de disco debe utilizarse siempre
con una almohadilla de restregado puesta.
2. Para retirar un accesorio, apague la unidad, gire el accesorio rápidamente en dirección
contraria a las manillas del reloj, y tire de él.
Como esta restregadora es tan potente, no es necesario que aplique demasiada fuerza
cuando está funcionando. Use un movimiento circular cuando trabaje en áreas grandes.
Conexión del accesorio flexible Fig.
Nunca use el accesorio flexible solo. Siempre conecte una escobilla
o accesorio con almohadilla.
¡Nota! El accesorio flexible no debería ser utilizado para limpiar
alfombras.
1. Conecte el accesorio flexible al ScumBuster®, como lo muestra la Fig. F.
2. Los accesorios se pueden conectar al accesorio flexible como lo muestra la Fig. F.
Cómo usar el conmutador
El ScumBuster® S600 tiene un conmutador de 2 velocidades (Fig. G). Para usarlo,
empuje el lado izquierdo del conmutador para una velocidad BAJA O el lado derecho del
conmutador para una velocidad ALTA . Ponga el conmutador nuevamente en la posición
del medio para APAGARLO. Para evitar que una escobilla o almohadilla salpique, apague
la restregadora cuando el accesorio todavía está en contacto con la superficie. Use la
velocidad baja para reducir salpicadura.
Importante:
Si le entra agua a la unidad, no afectará su rendimiento. Sin embargo, si la
unidad se cae accidentalmente al agua sin el tapón del puerto de carga puesto, sacuda el
exceso de líquido y permita que se seque de un día para otro.
Llenado de la unidad
Siempre debería llenar y vaciar el depósito de líquido sobre un
lavatorio para evitar derramar sobre el suelo.
Limpie el exterior de la unidad y enjuague el sistema de liberación
del líquido con agua limpia antes de llenarlo con una solución de
limpieza diferente. NO MEZCLE soluciones de limpieza.
¡NOTA!
Sólo llene el depósito de líquido con soluciones líquidas aprobadas de limpieza
doméstica, que puedan ser utilizadas en envases con bombas de mano. Otros productos
de limpieza más gruesos como geles y cremas de restregado pueden ser aplicados
directamente sobre la superficie a limpiar, desde su propio envase pero no desde el
ScumBuster pues taparán el sistema de liberación de líquido.
• Cuando llene el depósito de líquido, asegúrese de sostener el ScumBuster con la tapa del
depósito de líquido mirando hacia arriba y la boca del depósito hacia abajo (Fig. J).
Desatornille la tapa del depósito de líquido para quitársela a la unidad, girándola en
dirección contraria a las manillas del reloj, como lo muestra la Fig. H.
• Llene el depósito de líquido hasta la “línea de llenado MÁX” con la solución de limpieza
deseada. (Fig. I)
• Reponga la "tapa del depósito de líquidos". Enrosque la tapa en dirección de las manillas
del reloj, hacia la derecha, como aparece ilustrado, hasta que la tapa del depósito de
líquidos quede ajustada a la unidad
¡NOTA!
La tapa del depósito de líquido tiene un hilo doble y puede ser enroscada en dos
posiciones, cada una a 180
º
de la otra. La unidad funcionará debidamente en ambas
posiciones.
D
F
Para liberar la solución
El líquido contenido en el ScumBuster® se encuentra bajo presión. Para liberar la
solución, presione el botón de líquido (Fig. A, #5) y el líquido será rociado por la boca. El
líquido seguirá siendo liberado mientras el botón de líquido se mantenga apretado o hasta
que el depósito de líquido esté vacío.
Limpieza y almacenamiento
NOTA:
Para un mejor rendimiento, vacíe y enjuague bien el sistema de liberación antes de
guardarlo. Para hacer esto, llene el depósito con agua y vacíelo como de costumbre 1 ó 2
veces. Limpie bien las escobillas y las almohadillas de restregado después de cada uso.
1. Limpie las escobillas y almohadillas de restregado con un detergente suave, enjuague
con agua y deje secar.
2. Para limpiar la unidad de restregado, pásele una esponja húmeda con un jabón suave.
3. Guarde la restregadora y sus accesorios bajo techo.
Guía de cuidado
Limpieza de la boca
• Gire la boca en dirección contraria a las manillas del reloj para retirarla, con un destornillador
de cabeza plana, moneda pequeña o con la barra de limpieza suministrada (Vea la Figura K).
• Deje remojando la boca por 1/2 hora en agua limpia y tibia para limpiarla. Asegúrese que
las hendiduras y los hilos de la boca estén limpios. Si no, puede que sea necesario
escobillarla ligeramente con una escobilla de cerdas sintéticas finas.
• Atornille devuelta la boca en la unidad, girándola en dirección contraria a las manillas del
reloj, con cuidado de no ajustarla demasiado. Pase 1 ó 2 cargas de agua limpia por la unidad.
Cómo destapar el sistema de liberación del líquido
Se suministra una barra de limpieza en caso de que la tubería dentro del ScumBuster
se atasque. Si esto ocurre, siga los pasos a continuación:
1. Quite las sustancias químicas del ScumBuster y reemplácelas por agua tibia.
2. Retire la boca utilizando el extremo ancho de la barra de limpieza. (Vea la Figura K)
3. Sujete el ScumBuster de modo que la boca apunte hacia afuera de la cara. Presione el
botón de fluidos e inserte el extremo delgado de la barra de limpieza hasta que el
ScumBuster se destape. (Vea la Figura K)
Nota: El ScumBuster se destapa cuando se escucha un sonido de liberación de
presión, seguido de agua que sale de la boca.
4. Retire la barra de limpieza. Presione el botón de fluidos hasta que el contenedor esté
vacío.
Nota: Puede ser necesario repetir los pasos 1 a 4 para restaurar el flujo en su totalidad.
5. Vuelva a colocar la boca. Asegúrese de no ajustarla demasiado.
Nota: Coloque la barra de limpieza nuevamente en el estuche de transporte para
utilizarla más adelante.
Limpieza del depósito de líquidos
Con el tiempo, puede acumularse una película de la solución de limpieza en el interior del
depósito. Esto puede hacerse aparente cuando necesite pulsar excesivamente el espray de
líquidos. Para limpiarlo, simplemente pásele un paño suave y húmedo a la superficie interior
del depósito y enjuágelo con agua.
Consejos para agentes de limpieza
¡NOTA!
Sólo llene el depósito de líquido con soluciones líquidas de limpieza doméstica,
que vengan en envases con bombas de mano. Otros productos de limpieza más gruesos
como geles y cremas de restregado pueden ser aplicados directamente sobre la superficie
a limpiar, desde su propio envase pero no desde el ScumBuster pues taparán el sistema de
liberación de líquido.
IMPORTANTE:
Los restregadores inalámbricos ScumBuster® han sido diseñados para
realizar una limpieza fácil pero poderosa. Si no está seguro de utilizarlo sobre una
superficie particular, pruebe un accesorio en un lugar pequeño y poco notorio antes de
limpiar un área más grande.
• Siempre siga las recomendaciones del fabricante cuando use un limpiador químico como
líquidos en atomizadores, espumas, geles de frotado, detergentes líquidos o soluciones
con cloro.
• No use con limpiadores abrasivos en ninguna superficie ni dentro de la unidad.
• Siempre use guantes de goma y protección ocular (para evitar salpicaduras) cuando use
limpiadores irritantes.
Consejos para la limpieza de alfombras
• Antes de limpiar su alfombra, aspire bien la superficie.
• Para alfombras manchadas, unte la escobilla para champú en la solución de limpieza y
comience a aplicar el champú al área manchada, moviendo la unidad continuamente en
círculos. No mantenga la unidad en un sólo lugar mientras esté encendida.
Una vez que la espuma haya desaparecido, deje que se seque y luego pase la
aspiradora.
Retiro y disposición de la batería
Este producto usa una batería de níquel cadmio (Ni-Cad) recargable y reciclable.
Cuando ya no pueda ser recargada, debería ser retirada de la unidad y reciclada.
La batería no debe ser incinerada o desechada para compostaje. La batería puede ser
llevada a un centro de servicio autorizado por o perteneciente a Black & Decker Inc. para
ser desechada. También existen algunos vendedores locales que participan en un
programa nacional de reciclaje (ver "Sello RBRC").
Llame a su vendedor local para mayor información. Si trae su batería vieja a un centro de
servicio autorizado por o perteneciente a Black & Decker, el centro se encargará de
reciclarla. O, si así lo desea, contacte a su municipalidad local para que le informen de las
instrucciones correctas para desechar baterías en su ciudad o pueblo.
Cómo extraer la batería
Para extraer la unidad de alimentación y disponer de ella, inserte un destornillador de cabeza
plana en la ranura entre la tapa del mango y el mango, como lo muestra la Fig. L. Retire la
tapa haciendo palanca con el destornillador en la dirección ilustrada por la flecha de la Fig. L.
Puede que tenga que hacer palanca también en el lado opuesto del mango. Deslice la batería
hacia afuera, como lo muestra la Fig. M y disponga de la batería como se indicó
anteriormente. Una vez que la unidad de alimentación haya sido extraída, no podrá ser
reinsertada.
El sello RBRC™
El sello RBRC™ en las baterías de níquel-cadmio indica que Black & Decker
participa voluntariamente en un programa industrial para recolectar y reciclar estas baterías
al término de su vida útil, cuando se retiran de servicio dentro de los Estados Unidos.
El programa RBRC™ proporciona una conveniente alternativa para el depósito en los lotes
de basura municipales de las baterías de níquel-cadmio desgastadas, hecho que es ilegal
en algunas regiones.
Los pagos de Black & Decker a RBRC™ hacen más sencillo para usted deshacerse de sus
baterías desgastadas con los distribuidores de baterías de níquel-cadmio de su
localidad, o en los centros de servicio autorizado Black & Decker. También puede
comunicarse al centro de reciclaje de su localidad para que le informen de los lugares a los
que puede regresar las baterías desgastadas. La entrada de Black & Decker a este
programa es parte de su compromiso para proteger nuestro medio ambiente y conservar
los recursos naturales.
Información de servicio
Black & Decker ofrece una red completa de centros de servicio propiedad de la compañía y
franquiciados a través de toda Norteamérica. Todos los centros de servicio Black & Decker
cuentan con personal capacitado para proporcionar el servicio a herramientas más
eficiente y confiable.
Siempre que necesite consejo técnico, reparaciones o partes de repuesto genuinas,
comuníquese con el centro Black & Decker más cercano a usted.
Para encontrar su centro de servicio local, consulte la sección amarilla bajo "Herramientas
eléctricas", o llame al: (55) 5326-7100
Page 6

CULIACAN, SIN
Av. Nicolás Bravo #1063 Sur
(667) 7 12 42 11
Col. Industrial Bravo
GUADALAJARA, JAL
Av. La Paz #1779
(33) 3825 6978
Col. Americana Sector Juarez
MEXICO, D.F.
Eje Central Lázaro Cardenas
No. 18
(55) 5588 9377
Local D, Col. Obrera
MERIDA, YUC
Calle 63 #459-A
(999) 928 5038
Col. Centro
MONTERREY, N.L.
Av. Francisco I. Madero
No.831
(81) 8375 2313
Col. Centro
PUEBLA, PUE
17 Norte #205
(222) 246 3714
Col. Centro
QUERETARO, QRO
Av. Madero 139 Pte.
(442) 214 1660
Col. Centro
SAN LUIS POTOSI, SLP
Av. Universidad 1525
(444) 814 2383
Col. San Luis
TORREON, COAH
Blvd. Independencia, 96 Pte.
(871) 716 5265
Col. Centro
VERACRUZ, VER
Prolongación Díaz Mirón #4280
(229)921 7016
Col. Remes
VILLAHERMOSA, TAB
Constitución 516-A
(993) 312 5111
Col. Centro
PARA OTRAS LOCALIDADES LLAME AL: (55) 5326 7100
Para reparación y servicio de sus herramientas eléctricas, favor de dirigirse
al Centro de Servicio más cercano:
Especificación S600, S600B
entrada del cargador: 120 V salida del cargador: 4,35 V DC
60 Hz 130 mA
3 W
voltaje de la batería: 3,6 V DC
Garantía completa para uso domestico por dos años
Black & Decker (U.S.) garantiza este producto por dos años completos contra cualquier
falla originada por materiales o mano de obra defectuosos. El producto defectuoso será
reemplazado o reparado sin cargo alguno en cualquiera de las siguientes dos maneras:
La primera, que resulta únicamente en cambios, es regresar el producto al vendedor al
que se compró (en la suposición que es un distribuidor participante). Las devoluciones
deberán hacerse dentro del tiempo estipulado por la política de cambios del distribuidor
(usualmente de 30 a 90 días después de la venta). Se puede requerir prueba de compra.
Por favor verifique con el vendedor las políticas específicas de devolución relacionadas a
las devoluciones en tiempo posterior al estipulado para cambios.
La segunda opción es llevar o enviar el producto (con porte pagado) a los centros de
servicio Black & Decker propios o autorizados, para que la reparemos o reemplacemos a
nuestra opción. Se puede requerir prueba de compra. Los centros de servicio
Black & Decker propios y autorizados están enlistados bajo “Herramientas eléctricas” en la
sección amarilla del directorio telefónico.
Este producto no está diseñado para uso comercial.
Para servicio y ventas consulte
“HERRAMIENTAS ELECTRICAS”
en la sección amarilla.
IMPORTADOR: BLACK & DECKER S.A. DE C.V.
BOSQUES DE CIDROS ACCESO RADIATAS NO. 42
BOSQUES DE LAS LOMAS, 05120 MEXICO, D.F.
(55) 5326-7100
 Loading...