

Page 1

General Safety Rules
WARNING! READ AND UNDERSTAND ALL INSTRUCTIONS. Failure to follow all
instructions listed below may result in electric shock, fire and/or serious personal injury.
SAVE THESE INSTRUCTIONS
WORK AREA
• Keep your work area clean and well lit. Cluttered benches and dark areas invite accidents.
• Do not operate power tools in explosive atmospheres, such as in the presence of
flammable liquids, gases, or dust. Power tools create sparks which may ignite the dust
or fumes.
• Keep bystanders, children, and visitors away while operating a power tool.
Distractions can cause you to lose control.
ELECTRICAL SAFETY
• Grounded tools must be plugged into an outlet properly installed and grounded in
accordance with all codes and ordinances. Never remove the grounding prong or mod-
ify the plug in any way. Do not use any adapter plugs. Check with a qualified electrician if
you are in doubt as to whether the outlet is properly grounded. If the tools should electrically malfunction or break down, grounding provides a low resistance path to carry electricity away from the user. Applicable only to Class I (grounded) tools.
• Double insulated tools are equipped with a polarized plug (one blade is wider than
the other.) This plug will fit in a polarized outlet only one way. If the plug does not fit fully
in the outlet, reverse the plug. If it still does not fit, contact a qualified electrician to install a
polarized outlet. Do not change the plug in any way. Double insulation eliminates the
need for the three wire grounded power cord and grounded power supply system.
Applicable only to Class II (double insulated) tools.
• Avoid body contact with grounded surfaces such as pipes, radiators, ranges and
refrigerators. There is an increased risk of electric shock if your body is grounded.
• Don’t expose power tools to rain or wet conditions. Water entering a power tool will
increase the risk of electric shock.
• Do not abuse the cord. Never use the cord to carry the tools or pull the plug from an outlet. Keep cord away from heat, oil, sharp edges or moving parts. Replace damaged cords
immediately. Damaged cords increase the risk of electric shock.
• When operating a power tool outside, use an outdoor extension cord marked “W-A”
or “W.” These cords are rated for outdoor use and reduce the risk of electric shock. When
using an extension cord, be sure to use one heavy enough to carry the current your product will draw. An undersized cord will cause a drop in line voltage resulting in loss of power
and overheating. The following table shows the correct size to use depending on cord
length and nameplate ampere rating. If in doubt, use the next heavier gage. The smaller
the gage number, the heavier the cord.
Minimum Gage for Cord Sets
Volts Total Length of Cord in Feet
120V 0-25 26-50 51-100 101-150
240V 0-50 51-100 101-200 201-300
Ampere Rating
More Not more AWG
Than Than
0-6 18161614
6 - 10 18 16 14 12
10-1216161412
12 - 16 14 12 Not Recommended
PERSONAL SAFETY
• Stay alert, watch what you are doing and use common sense when operating a
power tool. Do not use tool while tired or under the influence of drugs, alcohol, or med-
ication. A moment of inattention while operating power tools may result in serious personal injury.
• Dress properly. Do not wear loose clothing or jewelry.Contain long hair. Keep your hair,
clothing, and gloves away from moving parts. Loose clothing, jewelry, or long hair can be
caught in moving parts. Air vents cover moving parts and should be avoided.
• Avoid accidental starting. Be sure switch is off before plugging in. Carrying tools with your
finger on the switch or plugging in tools that have the switch on invites accidents.
• Remove adjusting keys or switches before turning the tool on. A wrench or key that is
left attached to a rotating part of the tool may result in personal injury.
• Do not overreach. Keep proper footing and balance at all times. Proper footing and balance enables better control of the tool in unexpected situations.
• Use safety equipment. Always wear eye protection. Dust mask, non-skid safety shoes,
hard hat, or hearing protection must be used for appropriate conditions.
TOOL USE AND CARE
• Use clamps or other practical way to secure and support the workpiece to a stable
platform. Holding the work by hand or against your body is unstable and may lead to a
loss of control.
• Do not force tool. Use the correct tool for your application. The correct tool will do the job
better and safer at the rate for which it is designed.
• Do not use tool if switch does not turn it on or off.Any tool that cannot be controlled with the
switch is dangerous and must be repaired.
• Disconnect the plug from the power source before making any adjustments, changing
accessories, or storing the tool. Such preventative safety measures reduce the risk of starting
the tool accidentally.
• Store idle tools out of reach of children and other untrained persons. Tools are dangerous in the hands of untrained users.
• Maintain tools with care. Keep cutting tools sharp and clean. Properly maintained tools,
with sharp cutting edges are less likely to bind and are easier to control.
• Check for misalignment or binding of moving parts, breakage of parts, and any other
condition that may affect the tools operation. If damaged, have the tool serviced before
using. Many accidents are caused by poorly maintained tools.
• Use only accessories that are recommended by the manufacturer for your model.
Accessories that may be suitable for one tool, may become hazardous when used on
another tool.
SERVICE
• Tool service must be performed only by qualified repair personnel. Service or maintenance performed by unqualified personnel could result in a risk of injury.
• When servicing a tool, use only identical replacement parts. Follow instructions in the
Maintenance section of this manual. Use of unauthorized parts or failure to follow
Maintenance Instructions may create a risk of electric shock or injury.
SPECIFIC SAFETY RULES
• Hold tool by insulated gripping surfaces when performing an operation where the
tool may contact hidden wiring or its own cord. Contact with a “live” wire will make
exposed metal parts of the tool “live” and shock the operator.
WARNING: Some dust created by power sanding, sawing, grinding, drilling, and other construction activities contains chemicals known to cause cancer, birth defects or other reproductive harm. Some examples of these chemicals are:
• lead from lead-based paints,
• crystalline silica from bricks and cement and other masonry products, and
• arsenic and chromium from chemically-treated lumber (CCA).
Your risk from these exposures varies, depending on how often you do this type of work. To
reduce your exposure to these chemicals: work in a well ventilated area, and work with
approved safety equipment, such as those dust masks that are specially designed to filter out
microscopic particles.
• Avoid prolonged contact with dust from power sanding, sawing, grinding, drilling, and
other construction activities. Wear protective clothing and wash exposed areas with
soap and water. Allowing dust to get into your mouth, eyes, or lay on the skin may promote
absorption of harmful chemicals.
CAUTION: Wear appropriate hearing protection during use. Under some conditions
and duration of use, noise from this product may contribute to hearing loss.
CAU-
TION: Do not touch the bit or collet nut during or immediately after cutting material. The bit
and collet nut may be hot enough to burn bare skin.
WARNING: After changing bits or making any adjustments, make sure the collet nut is securely
tightened to avoid injury.
WARNING: Do not press spindle lock while motor is running. The operator may lose control and
drop the tool. Personal injury or serious tool damage may result.
WARNING:
Shut off all live electric circuits to any areas where cut outs will be made, to
avoid fire or serious personal injury.
• Always wear eye protection. Dust mask or hearing protection must be used for appropriate
conditions. Using personal safety devices is recommended. WORK SAFE.
• Always operate the tool with the depth guide in place. The guide keeps the bit from
plunging too deeply through the material. A minimum of penetration should be maintained
to eliminate the danger of cutting into electric wiring.
• Do not use this tool with drill, screwdriver or router bits. This tool is not intended to be
used as a drill, screwdriver or router.
• Do not lay the tool down until the motor has come to a complete stop. The spinning
motor may cause the tool to roll off a table or into a piece of material damaging the bit.
• Be sure your cutting bits are sharp and in good condition. Damaged bits can cause
the tool to jump injuring the operator.
•If your tool fails to function properly, take it to an authorized service center. There
are no user serviceable parts inside this tool and it should only be opened by trained service personnel.
CAT. NO. RS150 FORM NO. 609066-00 PRINTED IN CHINA (FEB-03-2)
VEA EL ESPAÑOL EN LACONTRAPORTADA.
SAVE THIS MANUALFOR FUTURE REFERENCE.
INSTRUCTIVO DE OPERACIÓN, CENTROS DE SERVICIO YPÓLIZA DE GARANTÍA.
ADVERTENCIA: LÉASE ESTE INSTRUCTIVO ANTES DE USAR ELPRODUCTO.
CATALOG NUMBER - RS150
INSTRUCTION
MANUAL
RRRRoooottttaaaarrrryyyy
SSSSaaaaww
ww
BEFORE RETURNING THIS PRODUCT
FOR ANY REASON PLEASE CALL
1-800-544-6986
IF YOU SHOULD EXPERIENCE APROBLEM
WITH YOUR BLACK &DECKER PRODUCT,
CALL 1-800 -544-6986
BEFORE YOU CALL, HAVE THE FOLLOWING INFORMATION AVAILABLE, CATALOG No.,
TYPE No., AND DATE CODE (e.g. 0130M). IN MOSTCASES, ABLACK & DECKER REPRE-
SENTA TIVE CAN RESOLVE YOUR PROBLEM OVER THE PHONE. IF YOU HAVE ASUGGES-
TION OR COMMENT, GIVE US ACALL. YOUR FEEDBACK IS VITALTO BLACK & DECKER.
FIG. 1
FIG. 2
“O”
“I”
FIG. 4
Locator
Positionneur
Localizador
Depth Guide
Guide de profondeur
Guía de profundidad
FIG. 3
Collet nut (C)
Écrou de la douille
Tuerca de la
mordaza
Spindle Lock (B)
Dispositif de verrouillage
de l’arbre
Seguro de la flecha
On/Off Switch (A)
Interrupteur
Interruptor de encendido y
apagado
Collet(D)
Douille
Mordaza
Collet nut (C)
Écrou de la douille
Tuerca de la
mordaza
Page 2
The label on your tool may include the following symbols.
V ..........................volts A..........................amperes
Hz ........................hertz W ........................watts
min ........................minutes ......................alternating current
......................direct current
n
o........................no load speed
..........................
Class II Construction
........................earthing terminal
..........................safety alert symbol .../min ..................revolutions or
reciprocations
per minute
TO MAINTAIN SAFE TOOL CONTROL
• Make sure the work surface is free of nails or screws. Cutting into a nail or screw may
cause the tool to jump, damaging the bit.
• Never operate the tool with one hand while holding the workpiece with the other hand.
Always clamp the material and guide the tool with both hands.
• Do not cut material lying on a hard surface. Clearance behind material to be cut must be
allowed for protruding bit.
• Disconnect plug from power supply before making adjustments, changing bits, or
cleaning tool.
• Do not start the tool with bit engaged in the material. The bit may grab the material.
Motor
Be sure your power supply agrees with nameplate marking. 120 volts AC means your tool
may be operated only with alternating current and never with direct current.
SWITCH
To start the motor, depress the switch (A) to “I” position. To stop the motor, depress the
switch to “O” position. (See FIG. 1)
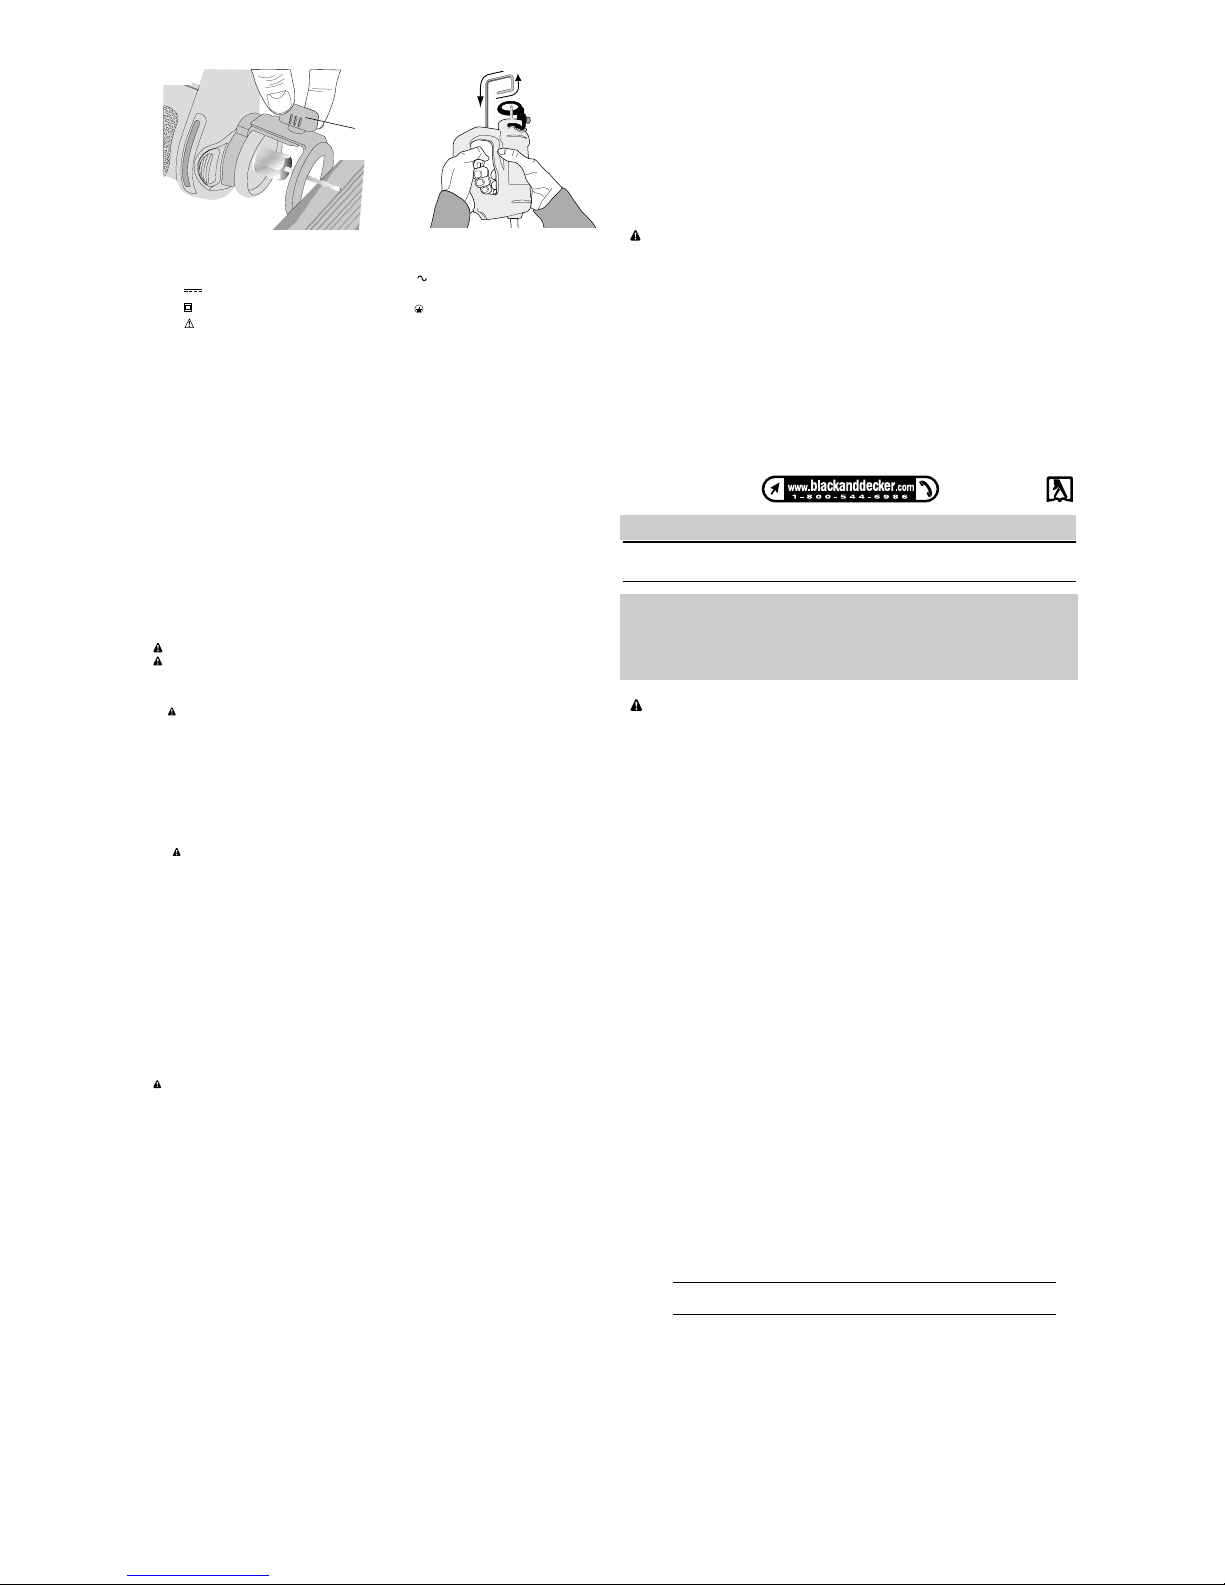
INSTALLING AND REMOVING THE BIT (FIG. 2)
To change bits, FIRSTturn off the tool and disconnect from power supply.
1. To replace bit, depress and hold down spindle lock (B) and turn collet nut (C) counter
clockwise with the wrench provided.
2. Remove old bit.
3. Insert new bit.
WARNING: The bits are sharp and should be handled with great care.
CAUTION: When replacing bits, do not insert cutting flutes into the collet. This may
result in broken bits.
4. While depressing spindle lock, turn the collet nut clockwise with the wrench to firmly tighten the collet.
CAUTION: Never tighten the collet without a bit installed.
CHANGING THE COLLET
Some accessories require different sized collets. The two collets used with Black & Decker
accessories are 1/8" and 1/4". Ensure your collet size matches your accessory.
To change the collet:
1. Turn off tool, allow it to come to a complete stop and disconnect from power supply.
2. Depress and hold down spindle lock (B) and turn collet nut (C) counterclockwise with
the wrench provided.
3. Remove the collet nut and the collet (D) from the threaded spindle (see Fig. 3).
4. Insert the new collet into the spindle.
5. Screw on the collet nut, insert proper bit and securely tighten collet nut with wrench.
CAUTION: Never tighten the collet without a bit installed.
DEPTH GUIDE (FIG. 4 & 5)
To attach depth guide to the motor unit
TURN OFF TOOL AND DISCONNECT FROM POWER SUPPLY.
Depth guide snaps onto locators as shown. Keep depth guide in place at all times during
operation of the tool. For best results, adjust the guide using knob (E) to allow the bit to protrude a minimum of 1/8" past the material to be cut.
Operation
GENERAL CUTTING
When plunge cutting, hold the tool firmly with both hands, insert the bit into the material at
a 45º angle. Slowly bring the tool to a 90º angle to start the cut. When cutting from the edge
of the workpiece, hold the tool 90º to the work surface. With depth guide in contact with work
surface, slowly bring bit into contact with with edge. The depth guide should be kept in contact with the material being cut at all times. Move the tool in a clockwise direction using slow
steady pressure to continue the cut. When the cut is completed allow the tool to come to a
complete stop before lifting it from the material.
CUTTING A HOLE FOR AN ELECTRICAL OUTLET (FIG.6)
WARNING: Shut off all live electric circuits to any areas where cut outs will be made.
1. Push any wiring deeply into the outlet box to avoid damage from the cutting bit.
2. Before hanging the sheet covering the outlet, mark the approximate location of the center of the outlet on the wall board. Check the cutting bit depth against the side of the
board to be sure it will cut entirely through the material.
3. Tack the sheet in place with a few fasteners avoiding the stud holding the outlet. This
allows the wall board to flex slightly around the protruding fixture box.
4. Turn the rotary saw on. Holding the tool firmly with both hands, (Fig. 6) plunge the bit
straight into the center of the outlet.
5. Cut to the right until the edge of the box is touched. Pull out just enough for the bit to
clear the edge of the box. Plunge in again holding the bit gently against the outside of
the box.
6. Follow the outside of the box (counterclockwise) as shown keeping slight pressure
against the box. This will minimize wandering and give you a clean precise cut.
NOTE: This is opposite of the recommended clockwise direction for general cutting.
7. Remove the waste and dust from the outlet. Finish fastening the sheet of wall board.
Maintenance
The tool should be cleaned with a blast of air often, to eject as much dust as possible. This
will increase the life of the brushes and bearings inside the motor. Always use appropriate
safety equipment when using compressed air to clean a tool.
Although the tool’s plastic case is solvent resistant, you should never use solvents or harsh
chemicals to clean it. Wipe the non-metallic parts of the tool with a dry cloth.
IMPORTANT: To assure product SAFETY and RELIABILITY, repairs, maintenance and
adjustment should be performed by authorized service centers or other qualified service
personnel, always using identical replacement parts.
Lubrication
All bearings are factory lubricated for the life of the tool.
Service Information
Black & Decker offers a full network of company-owned and authorized service locations
throughout North America. All Black & Decker Service Centers are staffed with trained personnel to provide customers with efficient and reliable power tool service.
Whether you need technical advice, repair, or genuine factory replacement parts, contact
the Black & Decker location nearest you.
To find your local service location, refer to the yellow page directory under “Tools—Electric”
or call: 1-800-544-6986
Available Black and Decker Accessories
Always use appropriate bit for the application and material being cut. Do not use this tool
with drill, screwdriver or router bits. Available bits are:
GENERAL PURPOSE BITS - for wood, plywood, laminates and foam.
DRYWALL BITS - for use in drywall only. Using on wood will rapidly dull the bit.
TILE BITS - for ceramic tile.
Accessories
Recommended accessories for use with your tool are available from your local dealer or
authorized service center. If you need assistance regarding accessories, please call:
1-800-544-6986
WARNING: The use of any accessory not recommended for use with this tool could be
hazardous.
Full Two-Year Home Use Warranty
Black & Decker (U.S.) Inc. warrants this product for two years against any defects in material or workmanship. The defective product will be replaced or repaired at no charge in either
of two ways.
The first, which will result in exchanges only, is to return the product to the retailer from whom
it was purchased (provided that the store is a participating retailer). Returns should be made
within the time period of the retailer’s policy for exchanges (usually 30 to 90 days after the
sale). Proof of purchase may be required. Please check with the retailer for their specific
return policy regarding returns that are beyond the time set for exchanges.
The second option is to take or send the product (prepaid) to a Black & Decker owned or
authorized Service Center for repair or replacement at our option. Proof of purchase may be
required. Black & Decker owned and authorized Service Centers are listed under “ToolsElectric” in the yellow pages of the phone directory.
This warranty does not apply to accessories. This warranty gives you specific legal rights and
you may have other rights which vary from state to state and province to province. Should
you have any questions, contact the manager of your nearest Black & Decker Service
Center. This product is not intended for commercial use
Mesures de sécurité - Généralités
AVERTISSEMENT!Lire et comprendre toutes les directives, car le non-respect des direc-
tives suivantes pourrait entraîner un choc électrique, un incendie ou des blessures graves.
CONSERVER CES DIRECTIVES
ZONE DE TRAVAIL
• Garder la zone de travail propre et bien éclairée; les établis encombrés et les endroits som-
bres sont propices aux accidents.
• Ne pas utiliser les outils électriques dans une atmosphère explosive, comme à proximité
de liquides, de gaz ou de poussières inflammables; le moteur peut créer des étincelles et
enflammer les vapeurs ou les poussières environnantes.
• Tenir les enfants, les visiteurs ou toute autre personne à l’écart lorsqu’on utilise un outil
électrique; les distractions peuvent faire perdre la maîtrise de ce dernier.
MESURES DE SÉCURITÉ - ÉLECTRICITÉ
• Les outils mis à la terre doivent être branchés dans une prise bien installée et mise à la
terre conformément à tous les codes et règlements en vigueur. Ne jamais retirer la
broche de terre ni modifier la fiche. Ne pas utiliser d’adaptateur. Vérifier auprès d’un électricien qualifié en cas de doute quant à la mise à la terre de la prise. En cas de défaillance
électrique ou de bris de l’outil, la mise à la terre procure un chemin de faible résistance au
courant qui autrement traverserait l’utilisateur. Cette protection ne s’applique qu’aux outils de
classe I (mis à la terre).
• Les outils à double isolation sont munis d’une fiche polarisée (c’est-à-dire que l’une des
lames est plus large que l’autre), laquelle ne peut être raccordée qu’à une prise polarisée
et ce, dans un seul sens; on doit l’inverser si on est incapable de l’enfoncer complètement. Si
la fiche ne s’adapte toujours pas, on doit demander à un électricien qualifié d’installer la prise
appropriée. On ne doit jamais modifier la fiche. La double isolation élimine le besoin d’installer
un cordon d’alimentation trifilaire et un système d’alimentation électrique pourvus d’une mise à
la terre; seuls les outils de classe II (à double isolation) sont munis d’une telle protection.
• Éviter tout contact entre le corps et les éléments mis à la terre, comme les tuyaux, les
radiateurs, les cuisinières et les réfrigérateurs, afin de réduire les risques de choc électrique.
• Ne pas utiliser l’outil électrique dans des endroits mouillés, ni l’exposer à la pluie; l’infiltration d’eau à l’intérieur de l’outil augmente les risques de choc électrique.
• Ne pas utiliser le cordon de manière abusive; on ne doit pas transporter l’outil en le tenant
par le cordon, ou utiliser ce dernier pour le débrancher. On doit tenir le cordon à l’écart des
sources de chaleur, de l’huile, des bords tranchants ou des pièces mobiles. Remplacer immédiatement les cordons endommagés, car ces derniers augmentent les risques de choc électrique.
• Lorsqu’on utilise un outil électrique à l’extérieur, on ne doit utiliser que des rallonges
conçues pour cet usage, comme celles de type W-A ou W, afin de réduire les risques de
choc électrique. Si on utilise une rallonge, s’assurer d’en choisir une qui soit en mesure de porter
le courant nécessaire à l’outil. Une rallonge de calibre inférieur entraînera une chute de tension
se traduisant par une perte de puissance et une surchauffe. Le tableau ci-dessous illustre les
calibres que l’on doit utiliser selon la longueur de la rallonge et l’intensité nominale indiquée sur
la plaque signalétique. En cas de doute, utiliser le calibre suivant. Plus le calibre est petit, plus
la rallonge peut porter de courant.
Calibres minimaux des rallonges
Longueur totale du cordon
25 ft. 50 ft. 75 ft. 100 ft. 125 ft. 150 ft. 175 ft.
7.6 m 15.2 m 22.9 m 30.5 m 38.1 m 45.7 m 53.3 m
Intensité
18 AWG18 AWG 16 AWG 16 AWG 14 AWG 14 AWG 12 AWG
SÉCURITÉ PERSONNELLE
• Rester vigilant en tout temps et faire preuve de jugement lorsqu’on utilise un outil électrique; ne pas utiliser l’outil lorsqu’on est fatigué ou sous l’influence de drogues, d’alcool ou de
médicaments, car un moment d’inattention pourrait entraîner des blessures graves.
• Porter des vêtements appropriés; ne pas porter de vêtements amples ni de bijoux. Couvrir ou
attacher les cheveux longs. Garder les cheveux, les vêtements, les bijoux et les gants éloignés
des pièces mobiles, car ceux-ci peuvent s’y coincer.
• Éviter les démarrages accidentels; s’assurer que l’interrupteur soit en position d’arrêt avant
de brancher l’outil. Ne pas transporter l’outil en laissant le doigt sur l’interrupteur ni le brancher
lorsque l’interrupteur est en position de marche, car cela pourrait causer un accident.
• Retirer les clés de réglage avant de démarrer l’outil; une clé laissée sur une pièce rotative
pourrait entraîner des blessures.
• Ne pas trop étendre les bras; les pieds doivent rester ancrés fermement sur le sol afin de
maintenir son équilibre en tout temps et de mieux maîtriser l’outil dans des situations imprévues.
See ‘Tools-Electric’
– Yellow Pages –
for Service & Sales
Black & Decker (U.S.) Inc.,
701 E. Joppa Rd.
Towson, MD 21286 U.S.A.
AVANT DE RETOURNER LE PRODUIT, PEU IMPORTE LARAISON
PRIÈRE DE COMPOSER
1 800 544-6986
FIG. 6FIG. 5
Lock Knob (E)
Bouton de verrouillage
Perilla de bloqueo
SSSScccciiiieeee cccciiiirrrrccccuuuullllaaaaiiiirrrree
ee
GUIDE D’UTILISA TION
Page 3

• Utiliser le matériel de sécurité approprié;toujours porter des lunettes de protection. Porter un
masque anti-poussières, des chaussures antidérapantes, un casque de sécurité ou des protecteurs auditifs lorsque la situation le requiert.
UTILISATION ET ENTRETIEN DE L’OUTIL
• Fixer et soutenir l’ouvrage sur une plate-forme stable au moyen d’un étau ou de tout
autre dispositif de serrage semblable; l’ouvrage est instable lorsqu’on le retient manuellement
ou qu’on l’appuie contre le corps, ce qui pourrait faire perdre la maîtrise de l’outil.
• Ne pas forcer l’outil ni l’utiliser pour des travaux autres que ceux pour lesquels il a été
conçu. Pour obtenir de meilleurs résultats et prévenir les risques de blessure, laisser l’outil
couper à la vitesse pour laquelle il a été conçu.
• Ne pas utiliser l’outil lorsque l’interrupteur marche-arrêt ne fonctionne pas; tout outil qui
ne peut être commandé au moyen de l’interrupteur est dangereux et doit être réparé.
• Débrancher l’outil avant d’effectuer un réglage, de changer les accessoires ou de ranger
l’outil; ces mesures de sécurité préventives réduisent les risques de démarrage accidentel.
• Lorsqu’on n’utilise pas l’outil, le ranger hors de la portée des enfants ou des personnes
non qualifiées; les outils sont dangereux entre les mains de personnes inexpérimentées.
• Bien entretenir l’outil; s’assurer qu’il soit toujours bien propre et aiguisé. Les outils bien
entretenus et dont les bords sont bien tranchants sont moins susceptibles de rester coincés et
sont plus faciles à maîtriser.
• Vérifier les pièces mobiles afin de s’assurer qu’elles soient bien alignées et qu’elles ne
restent pas coincées; vérifier également les pièces afin de s’assurer qu’il n’y ait ni bris ni
aucune autre condition susceptible de nuire au bon fonctionnement de l’outil. Faire réparer l’outil
si ce dernier est endommagé avant de s’en servir à nouveau, car les accidents sont souvent
causés par des outils mal entretenus.
• N’utiliser que les accessoires recommandés par le fabricant pour le modèle concerné; un
accessoire destiné à un outil particulier peut devenir dangereux lorsqu’il est utilisé avec un autre.
ENTRETIEN
• L’outil doit être entretenu par le personnel qualifié seulement; toute maintenance ou répa-
ration effectuée par une personne non qualifiée pourrait entraîner des risques de blessure.
• Lors de l’entretien, n’utiliser que des pièces de rechange identiques et suivre les direc-
tives de la section «Entretien» du présent manuel afin de prévenir les risques de choc électrique
ou de blessure.
Régles de Sécurité Additionelles Concernant L’outil à Decouper
Tenir l’outil par les surfaces isolées prévues à cette fin lorsqu’il risque d’entrer en contact
avec des fils cachés, car de tels contacts peuvent mettre les pièces métalliques de l’outil
sous tension, engendrant des risques de choc électrique.
AVERTISSEMENT : certains outils électriques, tels que les sableuses, les scies, les
meules, les perceuses ou certains autres outils de construction, peuvent produire de la poussière contenant des produits chimiques susceptibles d’entraîner le cancer, des malformations
congénitales ou pouvant être nocifs pour le système reproductif. Parmi ces produits chimiques, on retrouve :
• le plomb dans les peintures à base de plomb,
• la silice cristalline dans les briques et le ciment et autres produits de maçonnerie,
• l’arsenic et le chrome dans le bois de sciage ayant subi un traitement chimique (comme
l’arséniate de cuivre et de chrome).
Le risque associé à de telles expositions varie selon la fréquence avec laquelle on effectue
ces travaux. Pour réduire l’exposition à de tels produits, il faut travailler dans un endroit bien
aéré et utiliser le matériel de sécurité approprié, tel un masque anti-poussières spécialement
conçu pour filtrer les particules microscopiques.
• Éviter tout contact prolongé avec la poussière soulevée par cet outil ou autres outils
électriques. Porter des vêtements de protection et nettoyer les parties exposées du
corps avec de l’eau savonneuse. S’assurer de bien se protéger afin d’éviter d’absorber
par la bouche, les yeux ou la peau des produits chimiques nocifs.
MISE EN GARDE : porter un dispositif de protection personnel anti-bruit approprié
durant l’utilisation. Sous certaines conditions et pendant toute la durée de l’utilisation,
le bruit émanant de ce produit pourrait contribuer à la perte d’audition.
MISE EN GARDE : ne pas toucher à la mèche ni à l’écrou de la douille de serrage pendant l’utilisation de l’outil ni immédiatement après; ces pièces peuvent être suffisamment
chaudes pour causer des brûlures sur la peau.
AVERTISSEMENT : puisque cet outil peut soulever de la poussière contenant des produits chimiques susceptibles d’entraîner le cancer, des malformations congénitales ou pouvant être nocifs pour le système reproductif, on recommande le port d’un appareil de protection respiratoire approprié.
AVERTISSEMENT : après avoir changé une mèche ou avoir fait quelque réglage que ce
soit, s’assurer que l’écrou de la douille de serrage soit bien serré.
AVERTISSEMENT : ne pas appuyer sur les boutons de verrouillage de la broche et de la
douille de serrage lorsque le moteur est en marche; l’utilisateur pourrait perdre la maîtrise de
l’outil et l’échapper, risquant ainsi de subir des blessures ou d’endommager gravement
l’outil.
AVERTISSEMENT : couper le courant de tous les circuits électriques situés à proximité
de la zone où on prévoit effectuer des découpes.
• NE JAMAIS serrer l’écrou de la douille de serrage sans y avoir d’abord inséré une mèche afin
d’éviter d’endommager la douille.
• S’assurer que la surface de travail soit exempte de clou ou de vis; si l’outil passe sur une
ferrure de ce genre, cela pourrait le faire sauter et endommager la mèche.
• Ne jamais tenir l’outil d’une main et l’ouvrage de l’autre; l’ouvrage doit être maintenu au
moyen de dispositifs de serrage permettant ainsi de guider l’outil des deux mains. S’assurer de
toujours garder la maîtrise de l’outil.
• Ne jamais couper un ouvrage lorsque ce dernier est appuyé contre une surface rigide; on
doit prévoir derrière l’ouvrage un espace suffisamment grand pour permettre à la mèche de sortir librement.
• T oujours débrancher la fiche de l’outil avant d’effectuer un réglage,de changer une mèche
ou de nettoyer l’outil.
• Toujours porter des lunettes de protection; on recommande à l’utilisateur de porter les dis-
positifs de sécurité appropriés, comme un protecteur auditif ou un masque anti-poussières, si la
situation le requiert afin QU’IL PUISSE TRAVAILLER EN TOUTE SÉCURITÉ.
• Cet outil ne contient aucune pièce pouvant être réparée par l’utilisateur. Si l’outil ne fonc-
tionne pas correctement, on doit l’emporter à un centre de service Black & Decker qualifié afin
qu’il puisse y être réparé.
• Ne jamais faire démarrer l’outil lorsque la mèche est déjà engagée dans un ouvrage; celle-
ci pourrait mordre dans le matériau et provoquer la perte de maîtrise de l’outil.
• Sens de rotation: lorsqu’on regarde l’outil de l’arrière, la mèche tourne vers la droite. Lorsqu’on
effectue une découpe à l’intérieur d’une boîte à prises, la mèche doit tourner vers la droite; si on
taille autour d’une boîte à prises, à l’extérieur de celle-ci, on doit faire en sorte qu’elle tourne vers
la gauche.
• On doit toujours s’assurer que le guide de profondeur soit en place avant d’utiliser l’outil;
ce dispositif empêche la mèche de trop s’enfoncer dans l’ouvrage, éliminant les risques d’entrer en contact avec un fil électrique.
• Ne pas utiliser l’outil avec des mèches pour perceuses ou tournevis; l’outil n’est pas conçu
pour cet usage.
• Ne jamais déposer l’outil sur une table ou toute autre surface avant que le moteur ne se
soit arrêté complètement; la vibration du moteur pourrait faire tomber l’outil ou le pousser contre l’ouvrage, ce qui pourrait endommager la mèche.
•Toujours s’assurer que les mèches soient bien aiguisées et en bon état; une mèche
endommagée pourrait faire sauter l’outil et causer des blessures.
• TOUJOURS fixer le guide sur l’outil avant d’utiliser ce dernier.
• Si l’outil ne fonctionne pas correctement, on doit l’emporter à un centre de service
autorisé. Cet outil ne contient aucune pièce pouvant être réparée par l’utilisateur et ne doit donc
être ouvert que par le personnel qualifié.
• L’étiquette de l’outil peut comporter les symboles suivants.
V ................volts A ..............ampères
Hz ..............hertz W..............watts
min ..............minutes ............courant alternatif
............courant continu
n
o..............sous vide
................
Construction de classe II
..............borne de mise à la minute
................symbole d´avertissement .../min ........tours à la minute
Moteur
S’assurer que la prise employée corresponde à celle de la plaque signalétique.
La présence d’une étiquette comportant la mention «120 V c.a.» signifie qu’on doit
toujours brancher l’outil dans une prise de courant alternatif et jamais dans une
prise de courant continu.
INTERRUPTEUR
Pour faire démarrer le moteur, appuyer sur l’interrupteur (A) afin de le mettre à la position
«I»; pour l’arrêter, le mettre à la position «O» (fig.1).
INSTALLATION ET RETRAIT DES MÈCHES (FIG. 2)
AVANT de procéder, arrêter et débrancher l’outil.
1. Pour remplacer une mèche, enfoncer le bouton de verrouillage de la broche (B), puis
tourner l’écrou de la douille de serrage (C) vers la gauche au moyen de la clé fournie.
2. Retirer la mèche.
3. Insérer la nouvelle mèche.
AVERTISSEMENT : les mèches sont coupantes et doivent donc être manipulées avec
soin.
MISE EN GARDE : s’assurer de ne pas insérer les cannelures tranchantes de la mèche
dans la douille de serrage; cela pourrait briser la mèche.
4. Le bouton de verrouillage de la broche étant toujours enfoncé, tourner l’écrou de la douille
de serrage vers la droite au moyen de la clé fournie afin de bien la serrer.
MISE EN GARDE : ne jamais serrer la douille sans y avoir d’abord inséré une mèche.
REMPLACEMENT DE LA DOUILLE DE SERRAGE
Les accessoires requièrent des douilles de dimensions diverses; ceux de Black & Decker
doivent être utilisés avec les deux douilles de serrage de 3,2 mm (1/8 po) ou de 6,4 mm (1/4
po). S’assurer que la douille utilisée correspond à l’accessoire voulu.
Pour remplacer la douille :
1. Arrêter l’outil, puis attendre qu’il s’arrête complètement avant de le débrancher de la
source d’alimentation électrique.
2. Enfoncer le bouton de verrouillage de la broche (B), puis tourner l’écrou de la douille de
serrage (C) vers la gauche au moyen de la clé fournie.
3. Retirer l’écrou et la douille (D) de la broche filetée (fig. 3).
4. Insérer la nouvelle douille dans la broche.
5. Placer l’écrou sur la douille de serrage, insérer la mèche voulue, puis bien serrer l’écrou
au moyen de la clé.
MISE EN GARDE : ne jamais serrer la douille sans y avoir d’abord inséré une mèche.
GUIDE DE PROFONDEUR (FIG. 4 ET 5)
Pour fixer le guide de profondeur au bloc moteur, ARRÊTER ET DÉBRANCHER
L’OUTIL AVANT DE PROCÉDER.
Le guide s’enclenche sur les positionneurs, tel qu’illustré. Le guide doit toujours rester fixé
sur l’outil lorsqu’on utilise ce dernier. Pour obtenir de meilleurs résultats, régler le guide au
moyen du bouton prévu à cet effet (E), de manière à laisser dépasser la mèche d’environ 3
mm (1/8 po) derrière la pièce.
Fonctionnement
COUPES ORDINAIRES
Pour réaliser une coupe en plongée, tenir fermement l’outil des deux mains, puis insérer la
mèche dans le matériau à un angle de 45 º. Ramener lentement l’outil à un angle de 90 º
afin d’amorcer la coupe. Lorsqu’on coupe le matériau à partir du bord de la pièce, on doit
tenir l’outil à un angle de 90 º par rapport à la surface de travail. En maintenant le guide de
profondeur appuyé contre le matériau, exercer une légère pression afin que la mèche entre
en contact avec la surface de la pièce. Le guide de profondeur doit resté appuyé contre la
surface en tout temps. Déplacer l’outil vers la droite en exerçant une légère pression uniforme. Une fois la coupe terminée, attendre que l’outil s’arrête complètement avant de le
soulever hors du matériau.
DÉCOUPE D’UN TROU POUR UNE PRISE ÉLECTRIQUE (FIG. 6)
AVERTISSEMENT : couper le courant de tous les circuits électriques situés à proximité
de la zone où on prévoit effectuer une telle coupe.
1. Pousser les fils électriques au fond de la boîte à prises afin d’éviter de les endommager,
le cas échéant.
2. Avant d’installer le panneau de plâtre sur la boîte à prises, indiquer l’emplacement approx-
imatif du centre de la boîte sur le panneau. Vérifier l’épaisseur du matériau afin de s’assurer que la mèche utilisée est suffisamment longue pour le traverser complètement.
3. Fixer le panneau au moyen de quelques attaches, en prenant soin d’éviter le montant
auquel est fixée la boîte à prises, afin de permettre au panneau de plâtre de fléchir légèrement autour de la boîte en saillie.
4. Mettre l’outil en marche puis, en le tenant fermement des deux mains (fig. 6), enfoncer la
mèche directement au centre de la boîte à prises.
5. Diriger la mèche vers la droite, jusqu’à ce qu’elle atteigne le côté de la boîte; retirer la
mèche suffisamment pour passer par dessus la boîte, puis l’enfoncer de nouveau dans le
matériau en l’accotant légèrement sur l’extérieur de la boîte.
6. Suivre le contour de la boîte (vers la gauche), tel qu’illustré, en exerçant une légère pres-
sion contre celle-ci afin d’éviter de faire dévier l’outil et de s’assurer d’obtenir une coupe précise.
REMARQUE : il s’agit du sens contraire à celui recommandé (vers la droite) pour les coupes
ordinaires.
7. Retirer les retailles et la poussière de la boîte. Fixer le panneau de plâtre de façon défini-
tive.
ACCESSOIRES OFFERTS PAR BLACK & DECKER
Toujours utiliser la mèche qui convient aux travaux à effectuer et au matériau à couper. Les
mèches offertes sont les suivantes :
MÈCHES UNIVERSELLES : bois, contreplaqué, stratifié et mousse
MÈCHES POUR PLACOPLÂTRE : cloisons sèches seulement; ne pas utiliser pour couper
le bois afin d’éviter d’user prématurément la mèche.
MÈCHES POUR TUILES : tuiles en céramique
Entretien
L’outil doit être nettoyé au moyen d’un jet d’air comprimé au moins une fois par semaine de
manière à en retirer le plus de poussière possible et d’améliorer la durée de vie des balais
et des roulements du moteur. On doit toujours porter le matériel de sécurité approprié
lorsqu’on nettoie un outil à l’air comprimé.
Bien que le boîtier en plastique de l’outil soit résistant aux solvants, ne jamais utiliser ce produit, ni toute autre solution chimique, pour le nettoyer. Essuyer les pièces non métalliques de
l’outil au moyen d’un linge sec.
Tous les roulements ont été lubrifiés en usine pour la
durée de vie de l’outil.
ACCESSOIRES
Les accessoires recommandés pour cet outil sont offerts au centre de service autorisé ou
chez le dépositaire local; pour obtenir de plus amples renseignements sur ces accessoires,
composer le 1 800 544-6986.
AVERTISSEMENT : il pourrait s'avérer dangereux d'utiliser des accessoires autres que
ceux recommandés pour cet outil.
Renseignements relatifs au service
Black & Decker exploite un réseau complet de centres de service et d'ateliers d'entretien
autorisés par toute l'Amérique du Nord. Le personnel de tous les centres de service Black
& Decker a reçu la formation voulue pour assurer l'entretien efficace et fiable des outils électriques.
Pour obtenir des renseignements d'ordre technique, des conseils relatifs aux réparations ou
des pièces de rechange d'origine, communiquer avec le centre de service Black & Decker
de la région. On peut trouver l'adresse du centre de service de la région dans l'annuaire des
Pages Jaunes à la rubrique «Outils électriques» ou en composant le numéro suivant :
Page 4

1 (800) 544-6986.
Garantie complète de deux ans pour utilisation domestique
Black & Decker garantit le produit pour une période de deux ans contre les vices de matière
ou de fabrication. Le produit défectueux sera réparé ou remplacé sans frais conformément
à l'une des conditions suivantes.
Pour échanger l'outil, il suffit de le retourner au détaillant (si le détaillant participe au programme d'échange rapide Black & Decker). Le retour doit être effectuer dans les délais
impartis par la politique de retour du détaillant (habituellement entre 30 et 90 jours suivant
la date d'achat). Le détaillant peut exiger une preuve d'achat. Prière de vérifier la politique
de retour du détaillant au-delà des délais impartis.
On peut également retourner l'outil (port payé) à un centre de service Black & Decker ou à
tout autre atelier d'entretien accrédité pour y être remplacé ou réparé, à notre gré. On peut
exiger une preuve d'achat. Les adresses des centres de service Black & Decker se trouvent à la rubrique «Outils électriques» des Pages Jaunes.
La présente garantie ne vaut pas pour les accessoires. Les modalités de la présente
garantie donnent des droits légaux spécifiques. L'utilisateur peut également se prévaloir
d'autres droits selon l'état ou la province qu'il habite. Pour obtenir de plus amples renseignements, communiquer avec le directeur du centre de service Black & Decker de la
région. Le produit n'est pas conçu pour un usage commercial.
Instrucciones generales de seguridad
¡ADVERTENCIA! LEA Y ASEGÚRESE DE ENTENDER TODAS LAS INSTRUC-
CIONES. El no hacerlo puede originar riesgos de choque eléctrico, incendio y lesiones per-
sonales de gravedad.
CONSERVE ESTAS INSTRUCCIONES
ÁREA DE TRABAJO
• Conserve su área de trabajo limpia y bien iluminada. Las bancas amontonadas y las zonas
oscuras propician los accidentes.
• No utilice herramientas eléctricas en atmósferas explosivas, como en presencia de líqui-
dos, gases o polvos inflamables. Las herramientas eléctricas producen chispas que pueden
originar la ignición de los polvos o los vapores.
• No permita a ningún observador, niño o visitante acercarse mientras pone en fun-
cionamiento una herramienta eléctrica. Las distracciones pueden hacerle perder a usted el
control.
SEGURIDAD ELÉCTRICA
• Las herramientas con polo a tierra deben ser conectadas en una toma de corriente instalada adecuadamente y con polo a tierra, según todos los códigos y reglamentos. Nunca
retire el borne a tierra ni modifique el clavijero de ninguna manera. No utilice ningún adap-
tador para el clavijero. Si tiene dudas acerca de la correcta conexión a tierra de su toma de corriente, consulte a un electricista calificado. En caso de que una herramienta presente un funcionamiento deficiente o falle, la conexión a tierra proporcionaría una baja resistencia, evitando
así un choque eléctrico al usuario. Aplicable únicamente a herramientas Clase I (con polo a tierra).
• Las herramientas con doble aislamiento están equipadas con una clavija polarizada (un
borne es más ancho que el otro). Esta clavija se acoplará tan sólo de una manera en una
toma de corriente polarizada. Si la clavija no se acopla correctamente en la toma de corri-
ente, inviértalo. Si, aún así, no se ajusta, comuníquese con un electricista calificado para que
le instalen una toma de corriente polarizada apropiada. No altere la clavija de ninguna manera.
El doble aislamiento elimina la necesidad de utilizar cables con tres hilos y sistemas de alimentación con conexión a tierra. Aplicable únicamente a herramientas Clase II (con doble aislamiento).
• Evite el contacto de su cuerpo con superficies con polo a tierra como tubos, radiadores,
estufas y refrigeradores. Existe un mayor riesgo de choque eléctrico si su cuerpo se encuentra haciendo polo a tierra.
• No exponga las herramientas eléctricas a la lluvia o a condiciones de humedad. El agua
que se introduce en las herramientas aumenta el riesgo de descargas eléctricas.
• No maltrate el cable. Nunca tome el cable para transportar una herramienta ni para
desconectarla de la toma de corriente. Consérvelo alejado del calor, del aceite, de bordes afilados o de piezas móviles. Cambie inmediatamente los cables dañados, dado que éstos
aumentan el riego de choque eléctrico.
• Cuando utilice una herramienta eléctrica a la intemperie, utilice una extensión de tipo
“W-A” o “W”. Estas extensiones están concebidas para su uso a la intemperie y para reducir
el riesgo de choque eléctrico. Cuando utilice una extensión, asegúrese de que su calibre sea
adecuado para soportar la corriente necesaria para su herramienta. Una extensión cuyo calibre sea inferior al requerido causará una caída en el voltaje de la línea, provocando así una
pérdida de potencia y el recalentamiento. La siguiente tabla presenta el calibre que debe utilizarse según la longitud de la extensión y el amperaje mencionado en la placa de identificación. Si tiene dudas, utilice el siguiente calibre. Mientras más pequeño sea el número del calibre, mayor será su capacidad.
Calibre mínimo requerido (AWG) para cables de extensión
Longitud total del cable de extensión
25 ft. 50 ft. 75 ft. 100 ft. 125 ft. 150 ft. 175 ft.
7.6 m 15.2 m 22.9 m 30.5 m 38.1 m 45.7 m 53.3 m
Calibre promedio del alambre
18 AWG 18 AWG 16 AWG 16 AWG 14 AWG 14 AWG 12 AWG
SEGURIDAD PERSONAL
• Esté siempre alerta, concéntrese en lo que está haciendo y recurra al sentido común
cuando utilice una herramienta eléctrica. No utilice ninguna herramienta si se encuentra
fatigado o bajo la influencia de drogas, alcohol o medicamentos. Un descuido de su parte mientras utiliza una herramienta eléctrica puede ocasionarle lesiones graves.
• Vístase adecuadamente. No utilice ropa floja o joyas. Cubra su cabello si lo tiene largo.
Conserve su cabello, ropas y guantes alejados de las piezas móviles. Las piezas de vestir flojas, las joyas y el cabello largo pueden resultar atrapados por las piezas móviles.
• Evite el encendido accidental.Asegúrese de que el interruptor esté apagado antes de conec-
tar el aparato. Sostener una herramienta con su dedo colocado en el interruptor o conectarla sin
fijarse si el interruptor está encendido, puede provocar accidentes.
• Retire las llaves de ajuste o presión antes de encender la herramienta. El dejar una llave
en una pieza giratoria puede ocasionar lesiones personales.
• No se incline demasiado. Conserve siempre los pies bien apoyados, al igual que su equilibrio.
La posición correcta de los pies y el equilibrio permiten controlar mejor la herramienta en situaciones inesperadas.
• Utilice equipo de seguridad. Proteja siempre sus ojos. Las mascarillas contra el polvo, los
zapatos de seguridad antideslizantes, el casco o los protectores auditivos deben ser utilizados
con el fin de trabajar en condiciones apropiadas.
USO Y MANTENIMIENTO DE LA HERRAMIENTA
• Utilice prensas u otros medios prácticos para asegurar y apoyar la pieza de trabajo a una
plataforma estable. El sujetar las piezas con la mano o contra su cuerpo es inestable y puede
originar la pérdida de control.
• No fuerce la herramienta. Utilice la herramienta adecuada según la situación. Esto le permi-
tirá ejecutar mejor el trabajo, de manera más segura y al ritmo para el cual ha sido diseñada.
• No utilice la herramienta si el interruptor no enciende y apaga. Cualquier herramienta que
no pueda controlarse por medio del interruptor es peligrosa y debe ser reparada.
• Desconecte el clavijero de la toma de corriente antes de realizar cualquier ajuste, cam-
bio de accesorios o antes de guardar la herramienta. Estas medidas de seguridad preventivas reducirán el riesgo de un encendido accidental de la herramienta.
• Mantenga las herramientas que no estén en uso fuera del alcance de niños y personas
no capacitadas. Las herramientas son peligrosas en manos de personas no capacitadas.
• Mantenga adecuadamente sus herramientas.Aquellas herramientas con piezas de corte afi-
ladas que reciben un mantenimiento adecuado, difícilmente se atascan y son más fáciles de
controlar.
• Verifique la correcta alineación de las piezas móviles, la presencia de roturas en las
piezas y cualquier otra anomalía que pueda afectar el funcionamiento adecuado de las
herramientas. Si su herramienta se encuentra dañada, llévela al servicio de mantenimiento
antes de utilizarla. La falta de un mantenimiento adecuado puede ser la causa de muchos accidentes.
• Utilice solamente aquellos accesorios recomendados por el fabricante para el modelo de
la herramienta que usted posee. Los accesorios diseñados para una herramienta pueden
resultar peligrosos el emplearse en otra para la cual no han sido diseñados.
SERVICIO DE MANTENIMIENTO Y REPARACIÓN
• El servicio de mantenimiento y reparación de las herramientas debe ser efectuado únicamente por personal calificado para su reparación. El mantenimiento realizado por per-
sonal no calificado puede provocar riesgos de lesiones.
• Cuando efectúe el mantenimiento de una herramienta, utilice únicamente accesorios
originales. Siga las instrucciones presentadas en la sección Mantenimiento de este manual. El
empleo de piezas no autorizadas o el no seguir las instrucciones de mantenimiento puede originar riegos de choque eléctrico o lesiones.
Reglas adicionales de seguridad para recortadoras
Cuando realice un trabajo en el cual la herramienta de corte pueda tener contacto con cables
ocultos o con su propio cable, tome la herramienta por las superficies aislantes de sujeción.
El contacto con un cable “vivo” hará que las partes metálicas de la herramienta puedan
transmitir una descarga eléctrica al operario.
ADVERTENCIA: El polvo creado al lijar, aserrar, pulir, taladrar o realizar otras actividades
de la construcción, contiene substancias químicas que se sabe producen cáncer, defectos de
nacimiento u otros defectos del sistema reproductor. Algunos ejemplos de esos productos
químicos son:
• El plomo de las pinturas a base de plomo,
• La sílice cristalina de los ladrillos, del cemento y de otros productos de albañilería, y
• El arsénico y el cromo de la madera tratada químicamente (CCA).
El riesgo que se corre a causa del contacto con esos productos varía según la frecuencia con
que usted realice este tipo de trabajos. Con el fin de reducir su exposición a esas substancias
químicas, trabaje en un área bien ventilada y utilice un equipo de seguridad reglamentario, tal
como una máscara contra el polvo especialmente diseñada para filtrar partículas microscópicas.
• Evite el contacto prolongado con el polvo proveniente del lijado, aserrado, amolado
y taladrado eléctrico y otras actividades de construcción. Use vestimenta protectora
y lave todas las áreas expuestas con agua y jabón. De entrar polvo en sus ojos, boca,
o que este permanezca sobre su piel puede promover la absorción de químicos dañinos.
ATENCIÓN: Use protección auditiva apropiada cuando usa la herramienta. Bajo ciertas condiciones y el tiempo que se usa la herramienta, el ruido proveniente de este producto podría contribuir a pérdida auditiva.
PRECAUCIÓN: No toque la broca o la tuerca del collar durante que realiza un corte o
inmediatamente después de hacerlo. Éstos puede estar suficientemente calientes para producirle una seria quemadura en la piel.
ADVERTENCIA: La utilización de esta herramienta puede generar polvo con contenidos
químicos que pueden producir cáncer, defectos de nacimiento u otros defectos en el sistema
reproductor. Utilice la protección respiratoria adecuada.
ADVERTENCIA: Después de cambiar las brocas o realizar cualquier ajuste, asegúrese
de que la tuerca del collar se encuentre firmemente asegurada.
ADVERTENCIA: No apriete el botón del seguro del eje o del seguro de collar mientras
el motor se encuentre en marcha. El usuario podría perder el control y dejar caer la herramienta. Esto puede causar lesiones personales o serias averías en la herramienta.
ADVERTENCIA: Apague todos los circuitos eléctricos de todas las áreas donde vaya a
realizar un corte.
• NUNCA apriete la tuerca del collar sin haber instalado la broca. Esto provocará un daño en col-
lar.
• Asegúrese de que la superficie de trabajo se encuentre libre de puntillas o tornillos. Si usted
corta una puntilla o tornillo puede hacer que la herramienta salte y dañe la broca.
• Nunca haga funcionar la herramienta con una sola mano mientras sostiene la pieza de trabajo
con la otra mano. Sujete siempre el material y guíe la herramienta con las dos manos. Mantenga
siempre el control de su herramienta.
• No corte material que se encuentre sobre una superficie dura. Es necesario prever un espacio
detrás del material que va a ser cortado para permitir el movimiento sobresaliente de la broca.
• Desconecte el clavijero de la toma de corriente antes de realizar cualquier ajuste, cambiar las
brocas o limpiar la herramienta.
• Utilice siempre protección para sus ojos. Si las condiciones lo exigen, utilice una máscara para
el polvo o un protector auditivo. Es recomendable utilizar dispositivos para su seguridad personal. TRABAJE BAJO CONDICIONES DE SEGURIDAD.
• Esta herramienta no contiene partes utilizables por el usuario. En caso de que la herramienta
no funcione adecuadamente, llévela al centro D
EWALT de servicio certificado más cercano para
su reparación.
• No inicie el funcionamiento de la herramienta cuando la broca se encuentre dentro del materi-
al. La broca puede atascarse causando la pérdida de control.
• Inserción de la broca: (Vista posterior de la herramienta). La broca enrosca en el sentido de las
manecillas del reloj. Al cortar al interior de una caja de la toma de corriente, la herramienta
deberá girar en el sentido de las manecillas del reloj. Al cortar alrededor del exterior de la caja
de la toma de corriente, la herramienta deberá girar en el sentido opuesto al de las manecillas
el reloj.
• Utilice siempre la herramienta con ayuda de la guía de profundidad. La guía evita que la broca
se introduzca con demasiada profundidad dentro del material. Con el fin de eliminar el peligro
de cortar un cable eléctrico, debe mantenerse una penetración mínima.
• No utilice esta herramienta con brocas para taladro o destornillador. Esta herramienta no ha sido
diseñada como taladro o destornillador.
• No coloque la herramienta de costado antes de que el motor se haya detenido completamente.
Si el motor se encuentra girando puede hacer que la herramienta se caiga de la mesa, o si se
encuentra dentro de un pedazo de material puede ocasionar el daño de la broca.
• Asegúrese de que sus brocas de corte se encuentren afiladas y en buenas condiciones. Las
brocas averiadas pueden hacer que la herramienta salte y cause lesiones al usuario.
• Instale SIEMPRE la guía en la herramienta antes de utilizarla.
• Si su herramienta no funciona adecuadamente, llévela a un centro de servicio autorizado. Al
ANTES DE DEVOLVER ESTE PRODUCTO POR CUALQUIER
RAZON POR FAVOR LLAME
326-7100
MANUAL DE INSTRUCCIONES
SSSSiiiieeeerrrrrrrraaaa RRRRoooottttaaaattttoooorrrriiiiaaaa
Imported by / Importé par
Black & Decker Canada Inc.
100 Central Ave.
Brockville (Ontario) K6V 5W6
Voir la rubrique “Outils électriques”
des Pages Jaunes
pour le service et les ventes.
Page 5

interior de esta herramienta no hay partes útiles para el usuario y ésta debe ser abierta tan solo
por personal autorizado.
• La etiqueta de su herramienta puede incluir los siguientes símbolos.
V ..................volts A................amperes
Hz ................hertz W ..............watts
min ..............minutos ..............corriente alterna
..............corriente directano ..............velocidad sin carga
..................construcción clase II
................terminales de conexión a tierre
................símbolo de alerta .../min ........revoluciones o minuto
................seguridad
Motor
Asegúrese de que el suministro de energía eléctrica corresponde a la indicada en la placa
de seguridad. 120 volt AC indica que su herramienta funciona tan sólo con corriente alterna y nunca con corriente directa.
INTERRUPTOR
Para prender el motor, oprima el interruptor (A) a la posición “I”. Para parar el motor, oprima el interruptor a la posición “O”. (Vea FIG. 1)
INSTALACIÓN Y REMOCIÓN DE LA BROCA (FIG. 2)
Para cambiar brocas, PRIMERO apague la herramienta y desconéctela del tomacorriente.
1. Para cambiar la broca, oprima y mantenga el seguro de la flecha hacia abajo (B) y gire
la tuerca de mordaza (C) en sentido antihorario con la llave suministrada.
2. Saque la broca vieja.
3. Inserte la broca nueva
ADVERTENCIA: Las brocas son afiladas y deben manejarse con gran cuidado.
ATENCIÓN: Al cambiar brocas, no insertar en la mordaza las brocas para corte.
Esto puede ocasionar su rotura.
4. Mientras oprime el seguro de la flecha, gire la tuerca de mordaza en sentido horario con
la llave, a fin de que la mordaza quede bien apretada.
ATENCIÓN: Nunca apriete la mordaza sin la broca instalada.
CAMBIO DE MORDAZA
Algunos accesorios necesitan diferentes tamaños de mordaza. Las dos mordazas que se
utilizan con los accesorios Black & Decker son de 1/8" y 1/4". Verifique que el tamaño de
su mordaza se ajuste a su accesorio.
Para cambiar la mordaza:
1. Apague la herramienta, deje que la misma se haya detenido por completo y
desconéctela del tomacorriente.
2. Oprima y mantenga hacia abajo el seguro de la flecha (B) y gire la tuerca de mordaza
(C) en sentido antihorario con la llave suministrada.
3. Saque la tuerca de mordaza (D) de la flecha roscada (vea Fig. 3).
4. Inserte la nueva mordaza en la flecha.
5. Atornille la tuerca de mordaza, inserte la broca adecuada y mediante la llave, apriete
muy bien la tuerca de mordaza.
ATENCIÓN: Nunca apriete la mordaza sin la broca instalada.
GUÍA DE PROFUNDIDAD (FIG. 4 & 5)
Para fijar la guía de profundidad a la unidad del motor
APAGUE LA HERRAMIENTA Y DESCONÉCTELA DEL TOMACORRIENTE.
La guía de profundidad se encaja a presión en los localizadores según se ilustra. Mantenga
la guía de profundidad en su lugar en todo momento mientras la herramienta esté funcionando. Para mejor resultado, ajuste la guía usando la perilla (E) para dejar que la broca
sobresalga un mínimo de 1/8" más allá del material a cortarse.
Operación
CORTES EN GENERAL
En pasadas penetrantes para rehundir, mantenga la herramienta firme sujetándola con las
dos manos, e inserte la broca en el material a un ángulo de 45º. Lleve la herramienta lentamente hasta un ángulo de 90º para comenzar el corte. Al cortar desde el borde de la pieza,
mantenga la herramienta a 90º respecto a la superficie de la pieza. Con la guía de profundidad en contacto con la superficie de la pieza, aproxime la broca lentamente hasta hacer
contacto con el borde. La guía de profundidad debe mantenerse en todo momento en contacto con el material que se está cortando. Mueva la herramienta en dirección horaria mediante presión lenta y continua para seguir cortando. Al finalizar el corte, deje que la herramienta se detenga completamente antes de levantarla del material.
CORTE DE HUECO PARA UN TOMACORRIENTE (FIG.6)
ADVERTENCIA: Apague todos los circuitos eléctricos activos en el área donde se van
a cortar los huecos.
1. De haber cableado, empújelo a lo más profundo dentro de la caja de la toma de corriente
para evitar dañarla con la broca cortante.
2. Antes de colgar la lámina que cubre la caja, marque la ubicación aproximada del centro
de la caja en la lámina de cartón de yeso o fibra prensada. Verifique la profundidad de corte
de la broca contra el lado de la lámina para asegurar que ésta cortará por completo a través
del material.
3. Fije la lámina en su lugar con algunos sujetadores evitando el del entramado que sujeta
la caja. Esto permite que la lámina pueda flexionarse un poco alrededor de la caja haciéndola sobresalir.
4. Encienda la sierra rotatoria. Sujetando firmemente la herramienta con ambas manos,
(Fig. 6) penetre la broca en forma recta en el centro de la caja.
5. Corte hacia la derecha hasta tocar el borde de la caja. Saque la broca lo justo para que
ésta quede apenas sin tocar el borde de la caja. Húndala otra vez manteniendo la broca
suavemente contra la parte exterior de la caja.
6. Siga la parte exterior de la caja (sentido antihorario) según se ilustra, manteniendo una
leve presión contra la caja. Esto minimizará el desplazamiento y le dará un corte limpio y
preciso.
NOTA: Esto es lo opuesto a la recomendación para cortes en general, de cortar en sentido
horario.
7. Quite los desechos y el polvo de la caja. T ermine la fijación de la lámina de cartón de yeso
o fibra prensada.
ACCESORIOS BLACK AND DECKER DISPONIBLES
Utilice siempre la broca adecuada según la aplicación y el material a cortar. Brocas
disponibles a saber:
BROCAS PARA USO GENERAL – para madera, madera contraenchapada, laminados, y
espuma.
BROCAS PARAMAMPOSTERÍA EN SECO – usar únicamente para mampostería en seco.
Si se usa en madera la broca quedará desafilada.
BROCAS PARABALDOSAS – para baldosas de cerámica.
Los accesorios recomendados para emplearse con su herramienta, están a su disposición
con el distribuidor o centro de servicio autorizado de su localidad. Si necesita ayuda en
relación con los accesorios, por favor llame: 326-7100
ADVERTENCIA: El uso de cualquier accesorio no recomendado para emplearse con esta
herramienta puede ser peligroso.
io local, consulte la sección amarilla bajo “Herramientas eléctricas”, o llame al: 326-7100.
INFORMACIÓN DE SERVICIO
Black & Decker ofrece una red completa de centros de servicio propiedad de la compañía y
franquiciados a través de toda Norteamérica. Todos los centros de servicio Black & Decker
cuentan con personal capacitado para proporcionar el servicio a herramientas más eficiente y
confiable.
Siempre que necesite consejo técnico, reparaciones o partes de repuesto genuinas,
comuníquese con el centro Black & Decker más cercano a usted.
Para encontrar su centro de servicio local, consulte la sección amarilla bajo "Herramientas eléctricas", o llame al: 326-7100
GARANTÍA PARA USO DOMÉSTICO POR DOS AÑOS COMPLETOS
Black & Decker (U.S.) garantiza este producto por dos años completos contra cualquier falla
originada por materiales o mano de obra defectuosos. El producto defectuoso será reemplazado o reparado sin cargo alguno en cualquiera de las siguientes dos maneras:
La primera, que resulta únicamente en cambios, es regresar el producto al vendedor al que se
compró (en la suposición que es un distribuidor participante). Las devoluciones deberán hacerse dentro del tiempo estipulado por la política de cambios del distribuidor (usualmente de 30
a 90 días después de la venta). Se puede requerir prueba de compra. Por favor verifique con
el vendedor las políticas específicas de devolución relacionadas a las devoluciones en tiempo
posterior al estipulado para cambios.
La segunda opción es llevar o enviar el producto (con porte pagado) a los centros de servicio
Black & Decker propios o autorizados, para que la reparemos o reemplacemos a nuestra
opción. Se puede requerir prueba de compra. Los centros de servicio Black & Decker propios
y autorizados están enlistados bajo “Herramientas eléctricas” en la sección amarilla del directorio telefónico.
Esta garantía no se aplica a los accesorios. Esta garantía le otorga derechos legales específicos, y usted puede tener otros que varíen de estado a estado. Si tiene usted cualquier pregunta, comuníquese con el gerente del centro de servicio Black & Decker más cercano.
Este producto no está destinado a uso comercial.
PARA REPARACION Y SERVICIO DE SUS HERRAMIENTAS ELECTRICAS FAVOR DE
DIRIGIRSE AL CENTRO DE SERVICIO MAS CERCANO
CULIACAN Av. Nicolas Bravo #1063 Sur (56 77) 12 42 10
GAUDALAJARA Av. La Paz #1770 (33 38) 26 69 78
LEON Polara #32 (47 77) 13 14 56
MEXICO Sonora #134 Hiprodromo Condesa (55 55) 53 99 79
MERIDA Calle 63 #459 (99 99) 23 54 90
MONTERREY Av. Francisco I. Madero Pte. 1820-A (81 83) 72 11 25
PUEBLA 17 Norte #2057 (22 22) 46 90 20
QUERETARO Av. Madero 139 Pte. (44 22) 14 60 60
SAN LOUIS POTOSI Pedro Moreno #408 Fracc. la Victoria (44 48) 14 25 67
TORREON Blvd. Independencia, 96 pte. (87 17) 16 52 65
VERACRUZ Prolongación Diaz Miron #4280 (29 99) 21 70 18
VILLAHERMOSA Zaragoza #105 (99 33) 12 53 17
PARAOTRAS LOCALIDADES LLAME AL: 326 7100
CONSERVE ESTAS INSTRUCCIONES
Epecificaciones
RS150
Tensión de alimentación 120 V CA
Potencia nominal: 391 W
Consumo de corriente: 3,5 A
Frecuencia de operación: 60 Hz
Revoluciones o porminuto 30,000
IMPORTADO: BLACK & DECKER S.A. DE C.V.
BOSQUES DE CIDROS ACCESO RADIATAS NO. 42
COL. BOSQUES DE LAS LOMAS.
05120 MÉXICO, D.F
TEL. 3-26-71-00
Para servicio y ventas consulte
“HERRAMIENTAS ELECTRICAS”
en la sección amarilla.
 Loading...