

Page 1

AR PT FR EN
www.blackanddecker.ae
RPC1800
Page 2

ENGLISH
(Original instructions)
1
2
3
4
5
9
10 11
2
6
7
8
Page 3

(Original instructions)
ENGLISH
Intended use
Your BLACK+DECKER Pasta and rice
Cooker has been designed for making rice
and pasta.This appliance is intended for
indoor household use only.
This appliance is not intended to be used in:
• staff kitchen areas in shops, offices and
other working environments;
• farm houses;
• by clients in hotels, motels and other
residential type environments;
• bed and breakfast type environments or
any other non-household environments.
Thank you for choosing BLACK+DECKER.
We hope that you will enjoy using this
product for many years.
Safety instructions
Warning! When using mains-powered
appliances, basic safety precautions,
including the following, should always be
followed to reduce the risk of fire, electric
shock and personal injury.
• Read all of this manual carefully before
using the appliance.
• The intended use is described in this
manual. The use of any accessory or
attachment or the performance of any
operation with this appliance other than
those recommended in this instruction
manual may present a risk of personal
injury.
• Retain this manual for future reference.
Using your appliance
• Always take care when using the
appliance.
• Surface may become hot during use.
• The cooking bowl and accessories will
become hot during use, care is required
when handling them.
• Steam may escape from the appliance
during use.
• Do not use the appliance outdoors.
• Do not operate the appliance if your
hands are wet. Do not operate the
appliance if you are barefoot.
• Guide the power supply cord neatly so it
does not hang over the edge of a
worktop and cannot be caught
accidentally or tripped over.
• Do not immerse the appliance in liquid.
• Never pull the power supply cord to
disconnect the plug from the socket.
Keep the power supply cord away from
heat, oil and sharp edges.
• If the power supply cord is damaged
during use, disconnect the appliance from
the power supply immediately. Do not
touch the power supply cord before
disconnecting from the power supply.
• Disconnect the appliance from the power
supply when not in use and before
cleaning.
Safety of others
• “This appliance is not intended for use by
persons (including children) with reduced
physical, sensory or mental capabilities,
or lack of experience and knowledge,
unless they have been given supervision
or instruction concerning the use of the
appliance by a person responsible for
their safety.”
• “Children should be supervised to ensure
that they do not play with the appliance.”
• Keep the appliance and its cord out of
reach of children less than 8 years.
• Always route the power cord carefully so
it does not create a tripping hazard.
• Children should be supervised to ensure
that they do not play with the appliance.
• The temperature of accessible surfaces
may be high when the appliance is
operating and for some time afterwards.
3
Page 4

ENGLISH
(Original instructions)
After use
• Switch off, remove the plug from the
socket and let the appliance cool down
before leaving it unattended and before
changing, cleaning or inspecting any
parts of the appliance.
• When not in use, the appliance should be
stored in a dry place. Children should not
have access to stored appliances.
Inspection and repairs
• Before use, check the appliance for
damaged or defective parts. Check for
breakage of parts, damage to switches
and any other conditions that may affect
its operation.
• Do not use the appliance if any part is
damaged or defective.
• Have any damaged or defective parts
repaired or replaced by an authorised
repair agent.
• Before use, check the power supply cord
for signs of damage, ageing and wear.
• Do not use the appliance if the power
supply cord or mains plug is damaged or
defective.
• If the power supply cord or mains plug is
damaged or defective it must be
repaired by an authorised repair agent in
order to avoid a hazard. Do not cut the
power supply cord and do not attempt
to repair it yourself.
• Never attempt to remove or replace any
parts other than those specified in this
manual.
Additional safety instructions for
pasta and rice Cookers
Warning! Do not place near a hot Gas or
electric oven.
• Use the original inner pot only.
• Always position the unit so that the
steam vent is always away from the user.
• Do not use this cooker to boil acid and
alkaline foodstuff, or for other purposes.
• Be sure to keep the space between the
inner pot and the heating plate clean and
free of water, dust, rice grains or any
other foreign matter. If not, the cooker’s
performance will be affected and in
serious case, its element will burn out.
• Do not use this Rice Cooker to boil water.
• Do not slant the inner pot, otherwise its
bottom will not be in full contact with the
heating plate and its element will burn
out.
• Do not Immerse in liquid.
Electrical safety
Before use, check that the mains voltage
corresponds to the voltage on the rating
plate.
This product must be earthed.
Always check that the mains voltage
corresponds to the voltage on the
rating plate
• Appliance plugs must match the outlet.
Never modify the plug in any way.
• Do not use any adapter plugs with
earthed (Class 1) appliances. Unmodified
plugs and matching outlets will reduce
the risk of electric shock.
• To avoid the risk of electric shock, do not
immerse the cord, plug or appliance in
water or other liquid.
Extension cables & class 1 product
• A 3 core cable must be used as your tool
is earthed and of class 1 construction.
• Up to 30m (100 ft) can be used without
loss of power.
• If the supply cord is damaged, it must be
replaced by the manufacturer or an
authorised BLACK+DECKER Service
Centre in order to avoid a hazard.
Labels on Appliance
The following pictograms along with the
date code are shown on the tool:
Warning! Hot surface.
Warning! Before assembling, switch the
appliance off and remove the plug from the
socket.
4
Page 5

(Original instructions)
ENGLISH
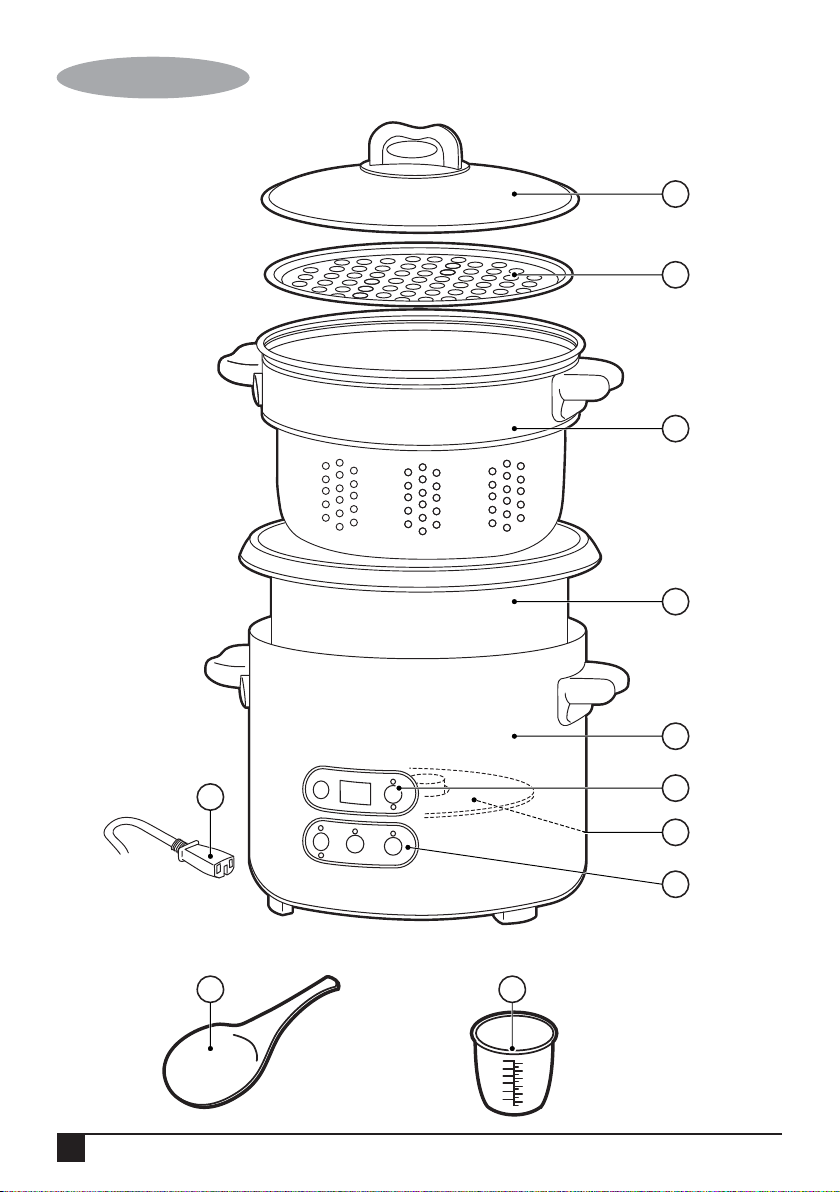
Features
1. Lid
2. Steaming plate
3. Pasta basket
4. Inner pot
5. Main body
6. Timer
7. Heating plate
8. Control panel
9. Power cord
10. Scoop
11. Measuring cup
Use
About the control panel
4 function design:
• White rice.
• Brown rice.
• Steam with delay timer.
• Pasta with cooking timer.
For cooking white rice
• Measure the volume of rice correctly.
• Wash the rice well if needed, then
transfer to the inner pot.
Note: Do not use the Inner pot to wash raw
rice. Handle the Inner pot with care.
• Adjust water level using the scale on the
inner pot. For example: To cook 3 cups of
rice, transfer the washed rice to the inner
pot, then add water to the level “3” mark.
Note: Since the proportion is for standard
white rice only, you may adjust the water
volume according to your own choice.
• Put the inner pot in the main body.
• Place the inner pot on the heating plate
correctly by turning it left and right,
positioning it at the center of cooker
body.
• Cover the Inner pot with the lid.
• Insert the power cord into a power
supply and switch on.
• The control panel will illuminate and will
display 'Stand By'.
• Select the 'White Rice' mode and set the
timer (6) by pressing the advance button
to the required time.
• Start cooking.
For cooking brown rice
Note: Brown rice requires longer to cook
than white rice. To cook brown rice, follow
the steps for white rice, except the
following:
• The water volume is different than White
rice, please refer to packing or Recipe
book.
• Select “Brown Rice” mode and set the
timer
• Start the cooker.
For cooking pasta
• Remove lid and place water into Inner
pot. Then replace lid.
• Select 'Pasta' function and start the
cooker.
• When the water is boiling, a beep sound
will be heard. Remove the lid, place the
pasta basket with pasta inside into the
Inner pot, make sure the water covers
the pasta entirely. Close the lid on the
pasta basket.
• Press 'Timer' key to set the cooking time
from 5 to 20 minutes.
• The timer will count down in minutes,
and the cooker will stop cooking when
the timer reaches 0, and a beeping
sound will be heard.
• When the pasta is cooked, open the lid
carefully, and take out the pasta basket.
5
Page 6

ENGLISH
(Original instructions)
Steaming function
• Put the water into the inner pot, place
the pasta basket into the Inner pot, then
place steaming plate onto the pasta
basket. Place raw food for cooking on
the Steaming plate. Do not exceed the
max capacity.
• Close the lid.
• Select the 'Smart Steam' function.
• Press 'Start/Stop' key to start the unit.
• The steam mode will cook the food for 2
hours maximum or until the water dies
out and will automatically switch to
'Keep warm' mode.
Warming function
The 'Keep warm' mode lasts 3 hours max,
then the unit will stop automatically and
come back to Standby mode.
Cleaning and maintenance
Warning! Before cleaning and maintenance,
switch the appliance off and remove the
plug from the socket.
• Do not immerse appliance, cord set or
plug in liquids.
• Never use diluent or benzene, chemical
wiping cloths, plastic brush or metal
brush.
• Put the pot and the lid into water, use a
sponge to, clean them, and wipe them
dry.
Note: Be sure to clean the inner pot entirely
after using salt for cooking, otherwise it
may cause corrosion.
• Handle the inner pot with care, never
deform it.
• External surfaces should be cleaned with
a damp cloth & thoroughly dried before
re-use.
• Wash removable parts with mild
detergent, rinse thoroughly.
• Rinse thoroughly after cleaning.
• Keep the power cord, control panel clean
and dry, otherwise it may cause
problems.
• Clean the heating plate and temperature
limiting component with a well-wrung
wet cloth.
Mains plug replacement
If a new mains plug needs to be fitted:
• Safely dispose of the old plug.
• Connect the brown lead to the live
terminal in the new plug.
• Connect the blue lead to the neutral
terminal.
• If the product is class I (earthed),
connect the green/yellow lead to the
earth terminal
Note! If your product is class II double
insulated (only 2 wires in the cord set), no
connection is to be made to the earth
terminal. Follow the fitting instructions
supplied with good quality plugs. Any
replacement fuse must be of the same
rating as the original fuse supplied with the
product.
Warning! The above section on mains plug
replacement is for authorized service centre
persons.
Technical data
RPC1800
Input voltage V
Power input W 588-700
Weight kg 3
220-240
AC
6
Page 7

(Original instructions)
ENGLISH
Protecting the environment
Separate collection. This product must
not be disposed of with normal
household waste.
Should you find one day that your
Black+Decker product needs replacement,
or if it is of no further use to you, do not
dispose of it with other household waste.
Make this product available for separate
collection.
• Black+Decker provides a facility for
recycling Black+Decker products once
they have reached the end of their
working life. This service is provided free
of charge. To take advantage of this
service please return your product to any
authorised repair agent who will collect
them on our behalf.
• You can check the location of your
nearest authorised repair agent by
contacting your local Black+Decker
office at the address indicated in this
manual. Alternatively, a list of authorized
Black+Decker repair agents and full
details of our after-sales service and
contact are available on the Internet at:
www.2helpU.com.
Warranty
Black+Decker is confident of the quality of
its products and offers an outstanding
warranty.
This warranty statement is in addition to and
in no way prejudices your statutory rights.
The warranty is valid within the territories of
the Member States of the European Union
and the European Free Trade Area.
If a Black+Decker product becomes
defective due to faulty materials,
workmanship or lack of conformity, within
24 months from the date of purchase,
Black+Decker warranty to replace defective
parts, repair products subjected to fair wear
and tear or replace such products to ensure
minimum inconvenience to the customer
unless:
The product has been subjected to
The product has sustained damage
Repairs have been attempted by
To claim on the warranty, you will need to
submit proof of purchase to the seller or an
authorised repair agent. You can check the
location of your nearest authorised repair
agent by contacting your local
Black+Decker office at the address
indicated in this manual.
Alternatively, a list of authorised
Black+Decker repair agents and full details
of our after-sales service and contacts are
available on the Internet at:
www.2helpU.com.
The product has been used for
trade, professional or hire
purposes;
misuse or neglect;
through foreign objects,
substances or accidents;
persons other than authorised
repair agents or Black+Decker
service staff.
7
Page 8
FRANÇAIS
(Traduction des instructions d'origine)
1
2
3
4
5
9
10 11
8
6
7
8
Page 9

(Traduction des instructions d'origine)
FRANÇAIS
Usage prévu
Votre centrifugeuse BLACK+DECKER
CJ800 est conçue pour extraire le jus des
agrumes. Cet appareil est destiné à une
utilisation domestique, en intérieur
uniquement.
Cet appareil n'est pas destiné à une
utilisation dans :
• cuisine pour les employés d'une
boutique, de bureaux et d'autres
environnements professionnels ;
• les fermes ;
• par les clients d'hôtels, motels et autres
environnements de type résidentiel ;
• environnements de type Maison d'hôte
Merci d'avoir choisi BLACK+DECKER. Nous
espérons que vous profiterez de ce produit
pendant de nombreuses années.
Consignes de sécurité
Avertissement ! L'utilisation d'appareils
électriques requiert le respect de consignes
de sécurité de base, notamment celles
indiquées ci-après, afin de réduire le risque
d'incendie, d'électrocution et de blessure.
• Lisez attentivement ce manuel dans son
intégralité avant d'utiliser l'appareil.
• L'usage prévu est décrit dans le présent
manuel. L'utilisation d'accessoires ou
pièces rajoutées et de l'appareil en
lui-même doit se faire uniquement selon
les recommandations de ce manuel
d'instructions. Dans le cas contraire, il
existe un risque de blessure.
• Conservez ce manuel de sorte à pouvoir
vous y reporter plus tard.
Utilisation de votre appareil
• Utilisez toujours l'appareil avec
précaution.
• La surface peut être chaude durant
l'utilisation.
• Le bol de cuisson et les accessoires
peuvent être chauds lors de l'utilisation,
manipulez-les avec soin.
• De la vapeur peut s'échapper de l'appareil
pendant l'utilisation.
• N'utilisez pas l'appareil à l'extérieur.
• N'utilisez pas l'appareil avec les mains
mouillées. Ne manipulez pas l'appareil
pieds nus.
• Positionnez correctement le cordon
d'alimentation de sorte qu'il ne pende pas
sur le bord d'un plan de travail et pour
éviter tout accrochage et piétinement
accidentels.
• N'immergez pas l'appareil dans du
liquide.
• Ne tirez jamais le cordon d'alimentation
pour débrancher la fiche de la prise.
• Maintenez le cordon d'alimentation à
l'écart des sources de chaleur, de l'huile et
des bords tranchants.
• Si le cordon d'alimentation est
endommagé pendant l'utilisation,
débranchez immédiatement l'appareil. Ne
touchez pas le cordon d'alimentation
avant de le débrancher de l'alimentation.
• Débranchez l'appareil de l'alimentation
électrique en cas de non utilisation et
avant de le nettoyer.
Sécurité d'autrui
• "Cet appareil n'est pas destiné à être
utilisé par des personnes (y compris les
enfants) présentant des capacités
physiques, sensorielles ou mentales
réduites, ou sans expérience, ni
connaissances, à moins qu'elles soient
surveillées ou qu'elles aient été instruites
à l'utilisation de l'appareil par une
personne responsable de leur sécurité."
• "Les enfants doivent être surveillés pour
s'assurer qu'ils ne jouent pas avec
l'appareil."
• Gardez l'appareil et son cordon hors de
portée des enfants âgés de moins de 8
ans
• Installez toujours le cordon avec
précaution pour éviter un risque de
trébuchement.
• Les enfants doivent être surveillés pour
s'assurer qu'ils ne jouent pas avec
l'appareil.
9
Page 10

FRANÇAIS
(Traduction des instructions d'origine)
• La température des surfaces accessibles
peut être élevée pendant l'utilisation de
l'appareil et un certain temps après.
Après utilisation
• Éteignez, débranchez la prise et laissez
l'appareil refroidir avant de le laisser sans
surveillance et avant d'en changer,
nettoyer ou inspecter les pièces.
• Lorsqu'il n'est pas utilisé, l'appareil doit
être rangé à un endroit sec. Les enfants
ne doivent pas avoir accès aux appareils
rangés.
Inspection et réparations
• Avant d'utiliser l'appareil, vérifiez
qu'aucune pièce n'est endommagée ou
défectueuse. Vérifiez l'absence de pièces
cassées, d'interrupteurs endommagés ou
d'autres éléments pouvant aecter son
fonctionnement.
• N'utilisez pas l'appareil si une pièce est
endommagée ou défectueuse.
• Les pièces endommagées ou
défectueuses doivent être réparées ou
remplacées par un agent de réparation
agréé.
• Avant d'utiliser l'appareil, contrôlez
l'absence de signes d'endommagement,
de vieillissement et d'usure au niveau du
cordon d'alimentation.
• N'utilisez pas l'appareil si la prise ou le
cordon d'alimentation est endommagé
ou défectueux.
• Si la prise ou le cordon d'alimentation est
endommagé ou défectueux, sa
réparation doit être eectuée par un
agent de réparation agréé afin d'éviter
tout danger. Ne coupez pas le cordon
d'alimentation et n'essayez pas de le
réparer par vos propres moyens.
• N'essayez jamais de retirer ou de
remplacer des pièces diérentes de
celles indiquées dans le présent manuel.
Consignes de sécurité
supplémentaires pour les cuiseurs
à pâtes et riz
Avertissement ! Ne le placez pas à
proximité de gaz chaud ou d'un four
électrique.
• Utilisez uniquement la cuve intérieure
d'origine.
• Placez toujours l'unité de manière à
éloigner la bouche d'évacuation de la
vapeur de l'utilisateur.
• N'utilisez pas ce cuiseur pour faire bouillir
des aliments acides et alcalins, ou dans
d'autres buts.
• Veillez à ce que l'espace entre la cuve
intérieure et la plaque chauffante reste
propre et ne contienne pas d'eau, de
poussière, de grains de riz ou d'autres
matières étrangères. Dans le cas
contraire, les performances du cuiseur en
seraient aectées et dans un cas extrême
l'élément chauffant se consumerait.
• N'utilisez pas le cuiseur à riz pour faire
bouillir de l'eau.
• N'inclinez pas la cuve intérieure,
autrement le fond se serait pas
entièrement en contact avec la plaque
chauffante et son élément chauffant se
consumerait.
• Ne pas immerger dans du liquide.
Sécurité électrique
Avant d'utiliser l'appareil, vérifiez que la
tension secteur correspond à celle de la
plaque signalétique.
Ce produit doit être relié à la terre.
Vérifiez toujours que la tension
secteur correspond à celle de la
plaque signalétique.
• Les fiches de l’appareil doivent
correspondre à la prise secteur. Ne
modifiez jamais la prise, de quelque
manière que ce soit.
• N'utilisez pas d'adaptateurs sur la prise
des appareils reliés à la terre (classe 1).
L'utilisation de prises non modifiées et de
prises murales correspondantes réduira le
risque d'électrocution.
• Pour éviter le risque d'électrocution, ne
plongez pas le cordon, la prise ou le
groupe moteur dans l'eau ou d'autres
liquides.
10
Page 11

(Traduction des instructions d'origine)
FRANÇAIS
Rallonges électriques et produit
de classe 1
• Vous devez utiliser un câble à 3
conducteurs car l’appareil doté de mise à
terre et est de construction de classe 1.
• Vous pouvez utiliser jusqu'à 30 m (100
pi) de câble sans perte de puissance.
• Si le cordon d'alimentation est abîmé, il
doit être remplacé par le fabricant ou un
Centre de service agréé BLACK+DECKER
afin d'éviter tout danger.
Étiquettes sur l'appareil
Les pictogrammes suivants ainsi que le
code de date apparaissent sur l'appareil :
Avertissement ! Surface chaude.
Avertissement ! Avant l'assemblage,
éteignez l'appareil et débranchez la fiche de
la prise.
Caractéristiques
1. Couvercle
2. Plaque de cuisson à la vapeur
3. Panier à pâtes
4. Cuve intérieure
5. Corps principal
6. Temporisateur
7. Plaque chauffante
8. Panneau de commande
9. Cordon d'alimentation
10. Pelle
11. Gobelet à mesurer
Mode d'emploi
À propos du panneau de commande
Conception à 4 fonctions :
• Riz blanc
• Riz complet
• Vapeur avec minuteur
• Pâtes avec minuteur de cuisson
Pour la cuisson du riz blanc
• Mesurez le volume de riz correctement.
• Nettoyez le riz, au besoin, avant de le
transférer dans la cuve intérieure.
Remarque : N'utilisez pas la cuve intérieure
pour laver le riz cru. Manipulez la cuve
intérieure avec soin.
• Réglez le niveau d'eau à l'aide de la
graduation sur la cuve intérieure. Par
exemple : Pour cuire 3 tasses de riz,
transférez le riz nettoyé dans la cuve
intérieure, puis ajoutez de l'eau jusqu'au
niveau 3.
Remarque : La proportion ne s'appliquant
qu'au riz blanc standard, vous pouvez
adapter le volume d'eau en fonction de votre
choix.
• Placez la cuve intérieure dans la structure
principale.
• Placez la cuve intérieure sur la plaque
chauffante correctement en la tournant
vers la gauche et la droite, la positionnant
au centre de la structure de cuisson.
• Posez le couvercle sur la cuve intérieure.
• Branchez le câble d'alimentation dans
une prise et mettez l'appareil sous
tension.
• Le panneau de commande s'allume et
affiche "Veille".
• Sélectionnez le mode "Riz blanc" et
configurez le minuteur (6) en appuyant
sur le bouton d'avance au moment
opportun.
• Démarrez la cuisson.
Pour la cuisson du riz complet
Remarque : Le riz complet nécessite un
temps de cuisson supérieur au riz blanc.
Pour cuire le riz complet, suivez les
étapes de cuisson du riz blanc, avec les
exceptions suivantes :
• Le volume d'eau diffère de la cuisson du
riz blanc, veuillez consulter l'emballage ou
le livre de recettes.
• Sélectionnez le mode "Riz complet" et
configurez le minuteur.
11
Page 12

FRANÇAIS
(Traduction des instructions d'origine)
• Démarrez le cuiseur.
Pour la cuisson des pâtes
• Retirez le couvercle et mettez de l'eau
dans la cuve intérieure. Remettez le
couvercle.
• Sélectionnez le mode "Pâtes" et
démarrez la cuisson.
• Lorsque l'eau est à ébullition, un signal
sonore retentit. Retirez le couvercle,
placez la panier rempli de pâtes dans la
cuve intérieure et vérifiez que les pâtes
sont entièrement recouvertes par l'eau.
Fermez le couvercle sur la panier.
• Appuyez sur le bouton Minuteur pour
régler le temps de cuisson de 5 à 20
minutes.
• Le minuteur affiche le temps en minutes,
le cuiseur s’arrête une fois que le compte
à rebours atteint 0 et un signal sonore
retentit.
• Une fois la cuisson des pâtes terminée,
ouvrez la couvercle avec précaution et
retirez les pâtes du panier.
Fonction de cuisson à la vapeur
• Remplissez la cuve intérieure avec l’eau
et placez-y le panier à pâtes. Posez
ensuite la plaque de cuisson à la vapeur
sur le panier. Posez les aliments à cuire
sur la plaque de cuisson à la vapeur. Ne
dépassez pas la capacité maximale
• Fermez le couvercle.
• Sélectionnez la fonction de cuisson à la
vapeur intelligente.
• Appuyez sur le bouton Marche/Arrêt
pour démarrer l’appareil.
• Le mode de cuisson à la vapeur cuit les
aliments pendant 2 heures maximum ou
jusqu’à ce que l’eau se soit totalement
évaporée. Il passe ensuite en mode de
conservation de la chaleur.
Fonction chauage
Le mode de conservation de la chaleur dure
3 heures maximum, après quoi l'unité
s’arrête automatiquement et revient au
mode Veille.
Nettoyage et entretien
Avertissement ! Avant le nettoyage et
l'entretien, éteignez l'appareil et débranchez
la prise.
• Ne plongez pas l'appareil, le cordon
d'alimentation ou la prise dans des
liquides.
• N'utilisez jamais de diluant ou du
benzène, des chiffons de nettoyage
imbibés de produits chimiques, ou de
brosses en plastique ou en métal.
• Placez la cuve et le couvercle dans l’eau,
nettoyez-les avec une éponge et
essuyez-les.
Remarque : veillez à nettoyer complètement
la cuve intérieure si vous avez utilisé du sel
pour la cuisson, afin d'éviter la formation de
corrosion.
• Manipulez toujours la cuve intérieure avec
soin afin de ne pas la déformer.
• L’extérieur doit être nettoyé avec un
chiffon humide et bien essuyé avant la
prochaine utilisation.
• Nettoyez les parties amovibles avec un
produit nettoyant doux et rincez
complètement.
• Rincez soigneusement après le nettoyage.
• Gardez le cordon d'alimentation et le
panneau de commande propres et secs
pour éviter tout problème.
• Nettoyez la plaque chauffante et le
dispositif de limitation de la température
avec un chiffon humide bien essoré.
Changement de la prise
En cas de besoin de montage d'une nouvelle
prise :
• Mettez dûment l'ancienne prise au rebut.
• Connectez le fil marron à la borne sous
tension de la nouvelle prise.
• Connectez le fil bleu à la borne neutre.
• S'il s'agit d'un produit de classe I (relié à
la terre), connectez le fil vert/jaune à la
borne de terre.
12
Page 13

(Traduction des instructions d'origine)
FRANÇAIS
Remarque ! Si vous disposez d'un produit à
double isolation de classe II (2 fils
uniquement dans le cordon), aucune
connexion ne doit être faite à la borne de
terre. Suivez les consignes d'installation
fournies avec les prises de bonne qualité.
Tout fusible de rechange doit avoir les
mêmes caractéristiques nominales que le
fusible d'origine fourni avec le produit.
Avertissement ! La section ci-dessus
concernant le remplacement de la prise
électrique s'adresse aux personnes des
centres de service agréés.
Caractéristiques techniques
RPC1800
Tension d'entrée VCA 220-240
Puissance absorbée W 588-700
Poids kg 3
Protection de l'environnement
Collecte séparée. Ce produit ne doit
pas être jeté avec les déchets
domestiques normaux.
Si vous décidez de remplacer ce produit
Black & Decker, ou si vous n'en avez plus
l'utilité, ne le jetez pas avec vos déchets
domestiques Rendez-le disponible pour une
collecte séparée.
• Black+Decker fournit un dispositif
permettant de collecter et de recycler les
produits Black & Decker lorsqu'ils ont
atteint la fin de leur cycle de vie. Pour
pouvoir profiter de ce service, veuillez
retourner votre produit à un réparateur
agréé qui se chargera de le collecter pour
nous.
• Pour connaître l'adresse du réparateur
agréé le plus proche de chez vous,
contactez le bureau Black & Decker à
l'adresse indiquée dans ce manuel. Vous
pourrez aussi trouvez un liste des
réparateurs agréés de Black & Decker et
de plus amples détails sur notre service
après-vente sur le site Internet à l'adresse
suivante : www.2helpU.com
13
Page 14

FRANÇAIS
(Traduction des instructions d'origine)
Garantie
Black+Decker est confiant dans la qualité de
ses produits et vous ore une garantie très
étendue.
Ce certificat de garantie est un document
supplémentaire et ne peut en aucun cas se
substituer à vos droits légaux.
La garantie est valable sur tout le territoire
des Etats Membres de l'Union Européenne
et de la Zone de Libre Echange Européenne.
Si un produit Black+Decker s'avère
défectueux en raison de matériaux en
mauvaises conditions, d'une erreur humaine,
ou d'un manque de conformité dans les 24
mois suivant la date d'achat, Black+Decker
garantit le remplacement des pièces
défectueuses, la réparation des produits
usés ou cassés ou remplace ces produits à la
convenance du client, sauf dans les
circonstances suivantes :
Le produit a été utilisé dans un but
commercial, professionnel, ou a été
loué.
Le produit a été mal utilisé ou avec
négligence.
Le produit a subi des dommages à
cause d'objets étrangers, de
substances ou à cause d'accidents.
Des réparations ont été tentées par
des techniciens ne faisant pas partie
du service technique de Black &
Decker.
Pour avoir recours à la garantie, il est
nécessaire de fournir une preuve d'achat au
vendeur ou à un réparateur agréé. Pour
connaître l'adresse du réparateur agréé le
plus proche de chez vous, contactez le
bureau Black+Decker à l'adresse indiquée
dans ce manuel.
Vous pourrez aussi trouver une liste des
réparateurs agréés de Black+Decker et de
plus amples détails sur notre service
après-vente sur le site Internet à l'adresse
suivante : www.2helpU.com
14
Page 15

(Tradução das instruções originais)
PORTUGUÊS
1
2
3
4
9
10 11
5
6
7
8
15
Page 16

PORTUGUÊS
(Tradução das instruções originais)
Uso previsto
O seu espremedor CJ800 BLACK+DECKER
foi desenhado para a extração de sumo de
cítricos. Este aparelho destina-se apenas
para utilização doméstica interna.
Este aparelho não se destina a ser utilizado
em:
• áreas de cozinha de empregados em
lojas, escritórios e outros ambientes de
trabalho;
• casas rurais;
• por clientes em hotéis, motéis e outros
ambientes de tipo residencial;
• ambientes do tipo alojamento e
pequeno-almoço
Obrigado por escolher a BLACK+DECKER.
Esperamos que aprecie a utilização deste
produto durante muitos anos.
Instruções de segurança
Aviso! Quando utilizar aparelhos elétricos,
as advertências básicas de segurança,
incluindo estas instruções, deverão ser
sempre respeitadas para reduzir o risco de
incêndio, choque elétrico e lesões pessoais.
• Leia este manual inteiro atentamente
antes de utilizar o aparelho.
• O uso previsto está descrito neste
manual. A utilização de qualquer
acessório ou a realização de qualquer
operação com este aparelho que não
seja a recomendada neste manual de
instruções pode representar um risco de
lesão pessoal.
• Guarde este manual para referência
futura.
Utilização do aparelho
• Tenha sempre cuidado enquanto estiver
a utilizar o aparelho.
• A superfície pode ficar quente durante a
utilização.
• O recipiente de cozinhar e acessórios
ficam quentes durante a utilização, é
necessário ter cuidado ao manuseá-los.
• Pode sair vapor quente do aparelho
durante a utilização.
• Não utilize o aparelho no exterior.
• Não opere o aparelho se tiver as mãos
molhadas. Não opere o aparelho se
estiver descalço.
• Guie o cabo de alimentação com cuidado
de modo a não ficar pendurado na
extremidade da bancada e não ser preso
acidentalmente ou fazer alguém tropeçar.
• Não mergulhe a unidade em nenhum
líquido.
• Nunca puxe o cabo de alimentação para
desligar a ficha da tomada.
• Mantenha o cabo de alimentação longe
do calor, óleo e objetos cortantes.
• Se o cabo de alimentação for danificado
durante a utilização, desligue o aparelho
da rede elétrica imediatamente. Não
toque no cabo de alimentação antes de
desligá-lo da rede elétrica.
• Desligue o aparelho da rede elétrica
quando não o estiver a utilizar e antes de
limpar.
Segurança de terceiros
• "Este aparelho não pode ser utilizado por
pessoas (incluindo crianças) com
capacidades físicas, sensoriais ou
psíquicas diminuídas ou com falta de
experiência e conhecimentos, a não ser
que se encontrem sob vigilância ou a
utilização segura do aparelho lhes tenha
sido ensinada por uma pessoa
responsável da sua segurança."
• As crianças devem ser supervisadas para
garantir que não brincam com o aparelho.
.
• Mantenha o aparelho e o fio fora do
alcance de crianças menores de 8 anos.
• Posicione sempre o cabo de alimentação
cuidadosamente para não causar o risco
de tropeçar.
• As crianças devem ser supervisadas para
garantir que não brincam com o aparelho.
16
Page 17

(Tradução das instruções originais)
PORTUGUÊS
• Durante o funcionamento do aparelho e
até algum tempo depois, a temperatura
das superfícies acessíveis pode ser
elevada.
Após a utilização
• Desligue, retire a ficha da tomada e deixe
o aparelho arrefecer antes de o deixar
sem vigilância e antes de trocar, limpar
ou inspecionar qualquer peça do
aparelho.
• Quando não estiver em uso, o aparelho
deve ser armazenado em local seco. As
crianças não devem ter acesso a
eletrodomésticos guardados.
Inspeção e reparações
• Antes de utilizar, verifique se o aparelho
apresenta quaisquer danos ou peças
defeituosas. Verifique se tem as peças
quebradas, danos nas ligações e
quaisquer outras condições que possam
afetar a operação.
• Não utilize o aparelho se encontrar
qualquer peça danificada ou defeituosa.
• Quaisquer peças danificadas ou
defeituosas devem ser reparadas ou
substituídas por um agente de
reparações autorizado.
• Antes da utilização, verifique se o cabo
de alimentação apresenta sinais de
danos, envelhecimento ou desgaste.
• Não utilize o aparelho se o cabo de
alimentação ou a ficha principal
apresentar danos ou defeitos.
• Se o cabo de alimentação ou a ficha
principal apresentar danos ou defeitos,
deverá ser reparado por um agente
autorizado para evitar possíveis riscos.
Não corte o cabo de alimentação nem
tente repará-lo por si mesmo.
• Nunca tente remover ou substituir
quaisquer peças que não estejam
especificadas no manual.
Instruções adicionais de
segurança para o Cozedor de
massa e arroz
Aviso! Não coloque perto de um forno
elétrico ou a gás quente.
• Utilize apenas o recipiente interno.
• Posicione sempre a unidade de modo que
a saída de vapor esteja afastada do
utilizador.
• Não utilize este cozedor para ferver
alimentos ácidos e alcalinos ou para
outros fins.
• Certifique-se de que deixa o espaço entre
o recipiente interno e a placa de
aquecimento limpo e sem água, pó,
restos de comida ou outras substâncias
estranhas. Caso contrário, o desempenho
do aparelho será afetado e, em último
caso, pode fazer com que o elemento
queime.
• Não utilize o Cozedor de arroz para ferver
água.
• Não incline o recipiente interno, caso
contrário, o seu fundo não está
completamente em contacto com a placa
de aquecimento e o seu elemento poderá
queimar.
• Não mergulhe em líquido.
Segurança elétrica
Antes de utilizar, verifique sempre se a
tensão elétrica corresponde à tensão que
figura na chapa de características.
O produto deve ser ligado à terra.
Verifique sempre se a tensão elétrica
corresponde à tensão que figura na
chapa de características.
• As fichas do aparelho devem
corresponder à tomada. Nunca, de forma
alguma, modifique uma ficha.
• Não utilize quaisquer adaptadores de
tomadas com aparelhos ligados à terra
(Classe 1). Tomadas não modificadas e
fichas certas irão reduzir o risco de
choques elétricos.
• Para evitar riscos de choque elétrico, não
mergulhe o cabo, ficha ou o aparelho em
água ou outro líquido.
17
Page 18

PORTUGUÊS
(Tradução das instruções originais)
Cabos de extensão e produto
classe 1
• Deve ser utilizado um cabo de 3 núcleos,
pois a sua ferramenta está ligada à terra
e de construção classe 1.
• Pode ser utilizado até 30 m (100 pés)
sem perda de potência.
• Se o cabo de alimentação estiver
danificado, deverá ser substituído pelo
fabricante ou por um Centro de Serviços
da BLACK+DECKER autorizado, para
evitar possíveis riscos.
Etiquetas no aparelho
Os seguintes pictogramas juntamente com
o código da data são apresentados no
aparelho:
Aviso! Superfície quente.
Aviso! Antes da montagem, desligar o
aparelho e retirar a ficha da tomada.
Funcionalidades
1. Tampa
2. Placa de vapor
3. Cesta para massa
4. Recipiente interno
5. Corpo da máquina
6. Temporizador
7. Placa de aquecimento
8. Painel de controlo
9. Fio de corrente
10. Concha
11. Copo de medição
Utilização
Sobre o painel de controlo
Design de 4 funções:
• Arroz branco.
• Arroz integral.
• Vapor com temporizador.
• Massa com temporizador.
Para cozinhar arroz branco
• Meça a quantidade de arroz
corretamente.
• Lave bem o arroz, se necessário, de
seguida, transfira para o recipiente
interno.
Nota: Não utilize o recipiente interno para
lavar o arroz cru. Manuseie o recipiente
interno com cuidado.
• Utilize a escala no recipiente interno para
ajustar o nível de água. Por exemplo: Para
cozinhar 3 copos de arroz, coloque o
arroz lavado no recipiente interno, de
seguida, adicione água até o nível da
marca “3”.
Nota: Como a proporção é apenas para o
arroz branco normal, o volume de água pode
ser ajustado de acordo com a sua própria
preferência.
• Coloque o recipiente interno no corpo da
máquina.
• Coloque o recipiente interno na placa de
aquecimento corretamente, rodando-o
para a esquerda e para a direita,
posicionando-o no centro do corpo do
cozedor.
• Cubra o recipiente interno com a tampa.
• Introduza o fio de alimentação na rede
elétrica e ligue.
• O painel de controlo acenderá e exibirá
"Em espera".
• Selecione o modo "Arroz branco" e defina
o temporizador (6), prima o botão
avanço para o tempo desejado.
• Comece a cozinhar.
Para cozinhar arroz integral
Nota: O arroz integral requer mais tempo
para cozinhar do que o arroz branco. Para
cozinhar o arroz integral, siga os passos para
arroz branco, exceto o seguinte:
18
Page 19

(Tradução das instruções originais)
PORTUGUÊS
• O volume de água é diferente do que
para o arroz branco, por favor consulte a
embalagem ou livro de receitas.
• Selecione o modo "Arroz integral" e
defina o temporizador
• Inicie o cozedor.
Para cozinhar massa
• Retire a tampa e coloque água no
recipiente interno. De seguida, coloque a
tampa novamente.
• Selecione a função "Massa" e inicie o
cozedor.
• Quando a água estiver a ferver, soa um
sinal sonoro. Retire a tampa, coloque o
cesto para massa com a massa dentro do
recipiente interno, assegure-se que a
água cobre totalmente a massa. Feche a
tampa do cesto de massa.
• Prima a tecla "Temporizador" para definir
o tempo de cozedura entre 5 a 20
minutos.
• O temporizador fará a contagem
regressiva em minutos e o cozedor irá
parar de cozinhar quando o
temporizador chegar a 0, soando um
sinal sonoro.
• Quando a massa estiver cozida, abra a
tampa com cuidado e tire o cesto de
massas.
Função de vapor
• Ponha água no recipiente interno,
coloque o cesto de massa dentro do
recipiente interno, de seguida, coloque a
placa de vapor no cesto de massas.
Coloque os alimentos crus para cozinhar
na placa de vapor. Não exceda a
capacidade máxima.
• Feche a tampa.
• Selecione a função "Vapor inteligente".
• Prima a tecla "Start/Stop" para iniciar a
unidade.
• O modo a vapor irá cozinhar o alimento,
no máximo, por 2 horas ou até que a
água seque, passando automaticamente
para o modo "Manter aquecido".
Função de aquecimento
O modo "Manter aquecido" tem uma
duração de 3 horas, no máximo, de seguida,
a unidade irá parar automaticamente e voltar
ao modo Em espera.
Limpeza e manutenção
Aviso! Antes da limpeza e manutenção,
desligue a alimentação do aparelho e retire a
ficha da tomada.
• Não mergulhe o aparelho, o conjunto do
cabo ou a ficha em líquidos.
• Não utilize diluente ou benzeno, panos
com produtos químicos, escova de
plástica ou escova de metal.
• Coloque o recipiente e a tampa em água,
utilize uma esponja para limpá-los e
seque-os.
Nota: Após a utilização de sal para cozinhar,
certifique-se de que limpa completamente o
recipiente interior, caso contrário pode
provocar corrosão.
• Manuseie o recipiente interno com
cuidado, nunca o deforme.
• Limpe as superfícies externas com um
pano húmido e seque completamente
antes de reutilizar.
• Lave as peças removíveis com detergente
neutro, enxague abundantemente.
• Após a lavagem, enxagúe
completamente.
• Mantenha o cabo de alimentação e o
painel de controlo limpos e secos, caso
contrário pode provocar problemas.
• Limpe a placa de aquecimento e o
componente para limitar a temperatura
com um pano húmido bem torcido.
Substituição da ficha principal
Se um ficha principal necessita ser
substituída:
• Elimine de forma segura a ficha antiga.
19
Page 20

PORTUGUÊS
(Tradução das instruções originais)
• Una o fio castanho ao terminal positivo
da nova ficha.
• Una o fio azul ao terminal neutro.
• Se o produto for da classe I (à terra), una
o fio verde/amarelo ao terminal de terra
Nota! Se o seu produto for da classe II com
isolamento duplo (apenas 2 fios no conjunto
de cabos), não se faz a ligação à terra. Siga
as instruções de montagem fornecidas
usando fichas de boa qualidade. Qualquer
fusível de substituição deve ser da mesma
classificação que o fusível original fornecido
com o produto.
Aviso! A secção acima sobre substituição
de ficha principal está dirigida apenas ao
pessoal de centros de serviços autorizados.
Dados técnicosa
RPC1800
Tensão de entrada VCA 220-240
Potência de entrada W 588-700
Peso kg 3
Proteção do ambiente
Recolha separada. Este produto não
deve ser eliminado com o lixo
doméstico.
Se considerar que o seu produto da
Black+Decker necessita ser substituído ou
se já não lhe for útil, não o elimine com
outros lixos domésticos. Leve-o para ser
reciclado.
• A Black+Decker proporciona um local
para reciclar produtos Black+Decker
quando atingirem o final da sua vida útil.
Este serviço é gratuito. Para aproveitar
este serviço, devolva o produto a
qualquer agente de reparação
autorizado que o reciclará por nós.
• Informe-se sobre a localização do agente
de reparação autorizado mais próximo a
si entrando em contacto com uma filial
da Black+Decker na morada indicada
neste manual. De forma alternativa, uma
lista de agentes de reparação
autorizados da Black+Decker e os
pormenores completos do nosso serviço
de atendimento pós-venda estão
disponíveis na Internet em:
www.2helpU.com.
20
Page 21

(Tradução das instruções originais)
Garantia
A Black+Decker acredita na qualidade dos
seus produtos e oferece uma garantia
excelente.
Esta declaração de garantia é um
complemento aos seus direitos estatutários
e não os compromete em caso algum.
A garantia é válida nos territórios dos
Estados Membros da União Europeia e na
Associação Europeia de Comércio Livre.
Se um produto Black+Decker se avariar
devido a materiais com defeito, problemas
de fabrico ou faltas de conformidade no
período de 24 meses a partir da data de
compra, a Black+Decker garante a
substituição das peças avariadas, a
reparação de produtos sujeitos a desgaste
normal ou a substituição de tais produtos,
no sentido de de minimizar o inconveniente
causado ao cliente, salvo se:
O produto for utilizado para fins
comerciais, profissionais ou de
aluguer;
O produto for sujeito a má utilização
ou negligência;
O produto tiver sido danificado por
objetos, substâncias ou acidentes
estranhos;
Forem tentadas reparações por
pessoas que não os agentes
reparadores autorizados ou o pessoal
da assistência técnica da
Black+Decker .
Para reclamar a garantia, terá de apresentar
o comprovativo da compra ao vendedor ou
agente reparador autorizado. Pode verificar
a localização do agente reparador mais
próximo, contactando os escritórios locais
Black+Decker através do endereço indicado
neste manual.
Como alternativa, está disponível na Internet
uma lista de agentes reparadores
Black+Decker, dados completos do serviço
de pós-venda e contactos em:at:
www.2helpU.com.
PORTUGUÊS
21
Page 22

ﺔـﻴـﺑﺮـﻌـﻟﺍ
(ﺔﻴﺴﻴﺋﺮﻟﺍ ﺕﺎﻤﻴﻠﻌﺘﻟﺍ)
ﻥﺎﻤﻀﻟﺍ
ﺎﹰﻧﺎﻤﺿ ﺽﺮﻌﺗﻭ ﺎﻬﺗﺎﺠﺘﻨﻣ ﺓﺩﻮﺟ ﻲﻓ ﺮﻜﻳﺩ ﺪﻧﺁ ﻙﻼﺑ ﻖﺜﺗ
.ﻞﺟﻷﺍ ﻞﻳﻮﻃ
ﻲﺘﻟﺍ ﻚﻗﻮﻘﺣ ﻰﻟﺇ ﺔﻓﺎﺿﻹﺎﺑ ﻥﻮﻜﻳ ﺍﺬﻫ ﻥﺎﻤﻀﻟﺍ ﻥﺎﻴﺑ
.ﻝﺍﻮﺣﻷﺍ ﻦﻣ ﻝﺎﺣ ﻱﺄﺑ ﺎﻬﺑ ﻞﺨﻳ ﻻﻭ ﻥﻮﻧﺎﻘﻟﺍ ﺎﻬﺤﻨﳝ
ﺩﺎﲢﻻﺍ ﻲﻓ ﺀﺎﻀﻋﻷﺍ ﻝﻭﺪﻟﺍ ﻢﻴﻟﺎﻗﺃ ﻲﻓ ﻥﺎﻤﻀﻟﺍ ﻱﺮﺴﻳ
.ﺔﻴﺑﻭﺭﻭﻷﺍ ﺓﺮﳊﺍ ﺓﺭﺎﺠﺘﻟﺍ ﺔﻘﻄﻨﻣﻭ ﻲﺑﻭﺭﻭﻷﺍ
ﺐﺒﺴﺑ ﺮﻜﻳﺩ ﺪﻧﺁ ﻙﻼﺑ ﺞﺘﻨﻣ ﻲﻓ ﻞﻠﺧ ﺩﻮﺟﻭ ﺔﻟﺎﺣ ﻲﻓ
،ﺮﻴﻳﺎﻌﳌﺍ ﻊﻣ ﻖﻓﺍﻮﺘﻟﺍ ﻡﺪﻋ ﻭﺃ ﺔﻋﺎﻨﺼﻟﺍ ﻭﺃ ﺩﺍﻮﳌﺍ ﻲﻓ ﺐﻴﻋ
ﺪﻧﺁ ﻙﻼﺑ ﻦﻤﻀﺗ ،ﺀﺍﺮﺸﻟﺍ ﺦﻳﺭﺎﺗ ﻦﻣ ﺍﹰﺮﻬﺷ 24 ﻝﻼﺧ
ﻊﻣ ﺕﺎﺠﺘﻨﳌﺍ ﺡﻼﺻﺇﻭ ﺔﺒﻴﻌﳌﺍ ﺀﺍﺰﺟﻷﺍ ﻝﺍﺪﺒﺘﺳﺍ ﺮﻜﻳﺩ
ﻩﺬﻫ ﻝﺍﺪﺒﺘﺳﺍ ﻭﺃ ﻲﻌﻴﺒﻄﻟﺍ ﻰﻠﺒﻟﺍﻭ ﻞﻛﺂﺘﻟﺍ ﺓﺎﻋﺍﺮﻣ
:ﻢﻟ ﺎﻣ ﻞﻴﻤﻌﻠﻟ ﺝﺎﻋﺯﺇ ﻞﻗﺃ ﻥﺎﻤﻀﻟ ﺕﺎﺠﺘﻨﳌﺍ
؛ﺮﻴﺟﺄﺗ ﺽﺍﺮﻏﺃ ﻭﺃ ﺔﻴﻨﻬﻣ
؛ﺙﺩﺍﻮﺣ ﻭﺃ ﺔﺒﻳﺮﻏ
ﻭﺃ ﻦﻳﺪﻤﺘﻌﳌﺍ ﺔﻧﺎﻴﺼﻟﺍ ﺀﻼﻛﻭ ﺮﻴﻏ ﺹﺎﺨﺷﺃ
.ﺮﻜﻳﺩ ﺪﻧﺁ ﻙﻼﺑ ﺔﻛﺮﺸﻟ ﻊﺑﺎﺘﻟﺍ ﺔﻧﺎﻴﺼﻟﺍ ﻖﻳﺮﻓ
ﺔﺌﻴﺒﻟﺍ ﺔﻳﺎﻤﺣ
ﻦﻣ ﺺﻠﺨﺘﻟﺍ ﻡﺪﻋ ﻡﺰﻠﻳ .ﻞﺼﻔﻨﳌﺍ ﻊﻤﳉﺍ
.ﺔﻳﺩﺎﻌﻟﺍ ﺔﻴﻟﺰﻨﳌﺍ ﺔﻣﺎﻤﻘﻟﺍ ﻊﻣ ﺞﺘﻨﳌﺍ ﺍﺬﻫ
ﺪﻧﺁ ﻙﻼﺑ ﺞﺘﻨﻣ ﻝﺍﺪﺒﺘﺳﺍ ﻡﺎﻳﻷﺍ ﻦﻣ ﻡﻮﻳ ﻲﻓ ﻡﺰﻟ ﺍﺫﺇ
ﻼﻓ ،ﻪﻣﺪﺨﺘﺴﺗ ﺪﻌﺗ ﻢﻟ ﺍﺫﺇ ﻭﺃ ،ﻚﺑ ﺹﺎﳋﺍ ﺮﻜﻳﺩ
ﺪﻛﺄﺗ ﻞﺑ ،ﻯﺮﺧﻷﺍ ﺔﻴﻟﺰﻨﳌﺍ ﺔﻣﺎﻤﻘﻟﺍ ﻊﻣ ﻪﻨﻣ ﺺﻠﺨﺘﺗ
.ﻞﺼﻔﻨﳌﺍ ﻊﻤﺠﻠﻟ ﺞﺘﻨﳌﺍ ﺍﺬﻫ ﺔﺣﺎﺗﺇ ﻦﻣ
ﺮﻳﻭﺪﺗ ﺓﺩﺎﻋﻹ ﻖﻓﺮﻣ ﺮﻜﻳﺩ ﺪﻧﺁ ﻙﻼﺑ ﺔﻛﺮﺷ ﺮﻓﻮﺗ •
ﻰﻟﺇ ﺎﻬﻟﻮﺻﻭ ﺩﺮﺠﲟ ﺮﻜﻳﺩ ﺪﻧﺁ ﻙﻼﺑ ﺕﺎﺠﺘﻨﻣ
ﻢﺘﻳﻭ .ﻞﻤﻌﻠﻟ ﺎﻬﺘﻴﺣﻼﺻ ﻡﺪﻋﻭ ﺎﻫﺮﻤﻋ ﺔﻳﺎﻬﻧ
ﻩﺬﻫ ﻦﻣ ﺓﺩﺎﻔﺘﺳﻼﻟ .ﺎﹰﻧﺎﺠﻣ ﺔﻣﺪﳋﺍ ﻩﺬﻫ ﱘﺪﻘﺗ
ﺔﻧﺎﻴﺻ ﻞﻴﻛﻭ ﻱﺃ ﻰﻟﺇ ﺞﺘﻨﳌﺍ ﺓﺩﺎﻋﺇ ﻰﺟﺮﻳ ،ﺔﻣﺪﳋﺍ
ﻊﻤﺟ ﻩﺭﻭﺪﺑ ﻰﻟﻮﺘﻳ ﻑﻮﺳ ﻱﺬﻟﺍﻭ ﺪﻤﺘﻌﻣ
.ﺎﻨﻋ ﺔﺑﺎﻴﻧ ﺕﺎﺠﺘﻨﳌﺍ
ﻭﺃ ﺔﻳﺭﺎﲡ ﺽﺍﺮﻏﺃ ﻲﻓ ﺞﺘﻨﳌﺍ ﻡﺍﺪﺨﺘﺳﺍ ﻢﺘﻳ
ﺔﻧﺎﻴﺻ ﻞﻴﻛﻭ ﺏﺮﻗﺃ ﻊﻗﻮﻣ ﻰﻠﻋ ﻑﺮﻌﺘﻟﺍ ﻚﻨﻜﳝ •
ﺪﻧﺁ ﻙﻼﺑ ﺐﺘﻜﻣ ﻰﻠﻋ ﻝﺎﺼﺗﻻﺍ ﻝﻼﺧ ﻦﻣ ﺪﻤﺘﻌﻣ
؛ﻝﺎﻤﻫﻹﺍ ﻭﺃ ﻡﺍﺪﺨﺘﺳﻻﺍ ﺀﻮﺴﻟ ﺞﺘﻨﳌﺍ ﺽﺮﻌﺘﻳ
ﺩﺍﻮﻣ ﻭﺃ ﺀﺎﻴﺷﺃ ﺔﺠﻴﺘﻧ ﻒﻠﺘﻠﻟ ﺞﺘﻨﳌﺍ ﺽﺮﻌﺘﻳ
ﺔﻄﺳﺍﻮﺑ ﺞﺘﻨﳌﺍ ﺡﻼﺻﺇ ﺔﻟﻭﺎﺤﻣ ﻢﺘﻳ
ﺍﺬﻫ ﻲﻓ ﺢﺿﻮﳌﺍ ﻥﺍﻮﻨﻌﻟﺍ ﻲﻓ ﻲﻠﶈﺍ ﺮﻜﻳﺩ
ﺀﻼﻛﻮﺑ ﺔﻤﺋﺎﻗ ﺪﺟﻮﺗ ،ﻚﻟﺫ ﻦﻣ ﹰﻻﺪﺑﻭ .ﻞﻴﻟﺪﻟﺍ
ﺪﻧﺁ ﻙﻼﺑ ﺔﻛﺮﺸﻟ ﲔﻌﺑﺎﺘﻟﺍ ﻦﻳﺪﻤﺘﻌﳌﺍ ﺔﻧﺎﻴﺼﻟﺍ
ﻊﻴﺒﻟﺍ ﺪﻌﺑ ﺎﻣ ﺕﺎﻣﺪﳋ ﺔﻠﻣﺎﻜﻟﺍ ﻞﻴﺻﺎﻔﺘﻟﺍﻭ ﺮﻜﻳﺩ
ﻰﻠﻋ ﺖﻧﺮﺘﻧﻹﺍ ﻰﻠﻋ ﺎﻨﺑ ﺔﺻﺎﳋﺍ ﻝﺎﺼﺗﻻﺍ ﻞﺋﺎﺳﻭﻭ
.www.2helpU.com :ﻲﻧﻭﺮﺘﻜﻟﻹﺍ ﻊﻗﻮﳌﺍ
ﻰﻟﺇ ﺝﺎﺘﲢ ﻑﻮﺳ ،ﻥﺎﻤﻀﻟﺍ ﺐﺟﻮﲟ ﺔﺒﻟﺎﻄﻣ ﱘﺪﻘﺘﻟ
.ﺪﻤﺘﻌﳌﺍ ﺔﻧﺎﻴﺼﻟﺍ ﻞﻴﻛﻭ ﻭﺃ ﻊﺋﺎﺒﻠﻟ ﺀﺍﺮﺸﻟﺍ ﻞﻴﻟﺩ ﱘﺪﻘﺗ
ﺔﻧﺎﻴﺻ ﻞﻴﻛﻭ ﺏﺮﻗﺃ ﻊﻗﻮﻣ ﻰﻠﻋ ﻑﺮﻌﺘﻟﺍ ﻚﻨﻜﳝﻭ
ﺮﻜﻳﺩ ﺪﻧﺁ ﻙﻼﺑ ﺐﺘﻜﻣ ﻰﻠﻋ ﻝﺎﺼﺗﻻﺍ ﻝﻼﺧ ﻦﻣ ﺪﻤﺘﻌﻣ
.ﻞﻴﻟﺪﻟﺍ ﺍﺬﻫ ﻲﻓ ﺢﺿﻮﳌﺍ ﻥﺍﻮﻨﻌﻟﺍ ﻲﻓ ﻲﻠﶈﺍ
ﻦﻳﺪﻤﺘﻌﳌﺍ ﺔﻧﺎﻴﺼﻟﺍ ﺀﻼﻛﻮﺑ ﺔﻤﺋﺎﻗ ﺪﺟﻮﺗ ،ﻚﻟﺫ ﻦﻣ ﹰﻻﺪﺑﻭ
ﺔﻠﻣﺎﻜﻟﺍ ﻞﻴﺻﺎﻔﺘﻟﺍﻭ ﺮﻜﻳﺩ ﺪﻧﺁ ﻙﻼﺑ ﺔﻛﺮﺸﻟ ﲔﻌﺑﺎﺘﻟﺍ
ﺎﻨﺑ ﺔﺻﺎﳋﺍ ﻝﺎﺼﺗﻻﺍ ﻞﺋﺎﺳﻭﻭ ﻊﻴﺒﻟﺍ ﺪﻌﺑ ﺎﻣ ﺕﺎﻣﺪﳋ
:ﻲﻧﻭﺮﺘﻜﻟﻹﺍ ﻊﻗﻮﳌﺍ ﻰﻠﻋ ﺖﻧﺮﺘﻧﻹﺍ ﻰﻠﻋ
.www.2helpU.com
22
Page 23

(ﺔﻴﺴﻴﺋﺮﻟﺍ ﺕﺎﻤﻴﻠﻌﺘﻟﺍ)
ﺔـﻴـﺑﺮـﻌـﻟﺍ
™e ≥aôŸG »∏°UC’G ô¡°üŸG ≤e ¢ùØf ∫óÑà°ùe ô¡°üe …C’
.èàæŸG
πHɵdG ¢ùHÉb ∫GóÑà°SG ¢Uƒ°üîH á≤HÉ°ùdG äɪ«∏©àdG !ôjò–
.§≤a óªà©ŸG áeóÿG õcôe »ØXƒÃ á°UÉN ¢ù«FôdG
á«æØdG äÉfÉ«ÑdG
RPC1800
240-220
700-588 äGh ábÉ£dG πNO
3 ΩGôZ ƒ∏«c ¿RƒdG
V
AC
πNódG á«£∏a
áfÉ«°üdGh ∞«¶æàdG
RÉ¡÷G 𫨰ûJ ±É≤jEÉH ºb ,áfÉ«°üdGh ∞«¶æàdG πÑb !ôjò–
.¢ùÑ≤ŸG øe ¢ùHÉ≤dG ádGREGh
‘ ¢ùHÉ≤dG hCG ∑Ó°SC’G áYƒª› hCG RÉ¡÷G ¢ùª¨J ’ •
.πFGƒ°S …CG
IЙ°Tфa hCG шjхжСdG hCG дЙШШоŸG Йk≤∏£e πª©а°щJ ’ •
hCG »FÉ«ª«µdG í°ùŸG ™£b hCG ᫵«à°SÓÑdG ∞«¶æàdG
.á«fó©ŸG IÉ°TôØdG
áéæØ°SEG Ωóîà°SGh AÉŸG ‘ AÉ£¨dGh AÉYƒdG ™°V •
.ÉØéj ≈àM ɪ¡ë°ùeG ºK ɪ¡Ø«¶æàd
ó©H ¬∏ªcCÉH »∏NGódG AÉYƒdG ∞«¶æJ n¢ùæJ ’ :á¶MÓe
¤EG Gòg …ODƒj ¿CG øµÁ ’EGh ,»¡£dG ‘ í∏ŸG ΩGóîà°SG
.¬∏cBÉJ
Ék≤∏£e º≤J ’h »∏NGódG AÉYƒdG ádhÉæe óæY QòMG •
.¬∏µ°T Ò«¨àH
¢Tɪ≤dG øe á©£≤H á«LQÉÿG í£°SC’G ∞«¶æJ »¨Ñæj •
.ΩGóîà°S’G IOÉYEG πÑb Gkó«L É¡Ø«ØŒh π∏ÑŸG
,õ«cÎdG ∫óà©e ∞¶æà ádGREÓd á∏HÉ≤dG AGõLC’G π°ùZG •
.Gkó«L É¡Ø£°TGh
.∞«¶æàdG ó©H Gkó«L RÉ¡÷G ∞£°TG •
ºµëàdG áMƒdh ábÉ£dG ∂∏°S ¿ƒµj ¿CG ≈∏Y ¢UôMG •
.äÓµ°ûe çó– ¿CG øµÁ ’EGh ,ÚaÉLh ÚØ«¶f
IQGô◊G áLQO ójó– öüæYh Úî°ùàdG ìƒd ∞q¶f •
.Gkó«L Qƒ°ü©e π∏Ñe ¢Tɪb á©£≤H
»°ù«FôdG »FÉHô¡µdG Qó°üŸG ¢ùHÉb ∫GóÑà°SG
Qó°üª∏d ójóL ¢ùHÉb Ö«côJ ¤EG áLÉ◊G ádÉM ‘
:»°ù«FôdG »FÉHô¡µdG
.¢UôëH Ëó≤dG ¢ùÑ≤ŸG øe ¢ü∏îJ •
¢ùHÉ≤dG ‘ »◊G ±ô£∏d »æÑdG ∂∏°ùdG π«°UƒàH ºb •
.ójó÷G
π°UƒŸG ±ô£dÉH ¿ƒ∏dG »æÑdG π«°UƒàdG ∂∏°S π°U •
.ójó÷G ¢ùHÉ≤dG øe QÉ«àdÉH
∂∏°ùdG π«°UƒàH ºb ,( kÉ°VQDƒe) 1 áÄØdG èàæŸG ¿Éc GPEG •
.»°VQC’G ±ô£dÉH ôØ°UC’G /ö†NC’G
Úà≤Ñ£H kGOhõe á«fÉãdG áLQódG øe RÉ¡÷G ¿Éc GP !á¶MÓe
’ ,(§≤a ¿ÉæKG ¿ÉaôW ’EG πHɵdG πNGO óLƒj ’ ) ÚàdRÉY
äɪ«∏©J ™ÑJG .»°VQC’G ±ô£dÉH ɪ¡æe …CG π«°UƒJ ºàj
¿ƒµj ¿CG Öéj IOƒ÷G á«dÉY ¢ùHGƒ≤dG ™e á≤aôŸG Ö«cÎdG
23
Page 24

ﺔـﻴـﺑﺮـﻌـﻟﺍ
(ﺔﻴﺴﻴﺋﺮﻟﺍ ﺕﺎﻤﻴﻠﻌﺘﻟﺍ)
≈Lôoj Gòd ;¢†«HC’G RQC’G øY AÉŸG ᫪c ∞∏àîJ •
.äÉØ°UƒdG ÜÉàc hCG IƒÑ©dG ≈∏Y ´ÓW’G
.âbƒdG §Ñ°V RÉ¡L qÚY ºK "»æÑdG RQC’G" ™°Vh OóM •
.»¡£dG RÉ¡L πq¨°T •
áfhôµ©ŸG »¡£d
™°V ºK .»∏NGódG AÉYƒdG ‘ AÉŸG ™°Vh AÉ£¨dG ∫RCG •
.iôNCG Iôe AÉ£¨dG
.»¡£dG RÉ¡L πq¨°Th (áfhôµ©ŸG) Pasta áØ«Xh OóM •
,AÉ£¨dG ∫RCG .ÒØ°U 䃰U ≥∏£æ«°S ,AÉŸG »∏¨j ÉeóæY •
,»∏NGódG AÉYƒdG ‘ áfhôµ©ŸG É¡∏NGóHh á∏°ùdG ™°V ºK
™°V .πeɵdÉH áfhôµ©ŸG »£¨j AÉŸG ¿CG øe ócCÉJh
.áfhôµ©ŸG á∏°S ≈∏Y AÉ£¨dG
(âbƒdG §Ñ°V RÉ¡L) "Timer" ìÉàØe ≈∏Y §¨°VG •
.á≤«bO 20 ¤EG 5 øe »¡£dG âbh Ú«©àd
,≥FÉbódÉH ‹RÉæàdG ó©dG ‘ âbƒdG §Ñ°V RÉ¡L CGóÑ«°S •
âbƒdG π°üj ÉeóæY 𫨰ûàdG øY »¡£dG RÉ¡L ∞bƒà«°Sh
.ÒØ°U 䃰U ≥∏£æ«°S ºK ,0 ¤EG
ºK ¢UôëH AÉ£¨dG íàaG ,áfhôµ©ŸG »¡W πªàµj ÉeóæY •
.áfhôµ©ŸG á∏°S êôNCG
(QÉîÑdÉH »¡£dG) Steaming áØ«Xh
áfhôµ©ŸG á∏°S πNOCG ºK ,»∏NGódG AÉYƒdG ‘ AÉŸG ™°V •
≈∏Y A»ædG ΩÉ©£dG ™°V .á∏°ùdG ¥ƒa Úî°ùàdG ìƒdh ¬«a
≈°übC’G ó◊G RhÉéàJ ’ .¬«¡W ºà«d QÉîÑdÉH »¡£dG ìƒd
.AÉYƒdG á©°ùd
.AÉ£¨dG ≥∏ZCG •
.(QÉîÑdÉH »còdG »¡£dG) Smart Steam áØ«Xh OóM •
(±É≤jEG/𫨰ûJ) Start/Stop ìÉàØe ≈∏Y §¨°VG •
.IóMƒdG 𫨰ûàd
’ IóŸ ΩÉ©£dG »¡W ≈∏Y QÉîÑdÉH »¡£dG ™°Vh 𪩫°S •
πjóÑàdG ºà«°Sh AÉŸG óØæj ≈àM hCG ÚàYÉ°S ió©àJ
≈∏Y ®ÉØ◊G) Keep Warm ™°VƒdG ¤EG Ék«FÉ≤∏J
.(áfƒî°ùdG
(Úî°ùàdG) Warming áØ«Xh
3 ÉgÉ°übCG IóŸ "áfƒî°ùdG ≈∏Y ®ÉØ◊G" ™°Vh ôªà°ùj
™LôJh Ék«FÉ≤∏J 𫨰ûàdG øY IóMƒdG ∞bƒàà°S ºK ,äÉYÉ°S
.(ó©à°ùe) Standby ™°VƒdG ¤EG
ΩGóîà°S’G
ºµëàdG áMƒd ∫ƒM
:∞FÉXƒdG »YÉHQ º«ª°üJ
.¢†«HCG RQCG •
.»æH RQCG •
.»¡£dG π«LCÉJ âbh §Ñ°V RÉ¡Lh QÉîÑdÉH »¡£dG •
.»¡£dG âbh §Ñ°V RÉ¡Lh áfhôµ©ŸG •
¢†«HC’G RQC’G »¡£d
.í«ë°U πµ°ûH RQC’G ᫪c ¢SÉ«≤H ºb •
AÉYƒdG ‘ ¬∏≤fG ºK ,ôeC’G Ωõd GPEG Gkó«L RQC’G π°ùZG •
.»∏NGódG
.A»ædG RQC’G π°ù¨d »∏NGódG AÉYƒdG ΩGóîà°SG ÖqæŒ :á¶MÓe
.»∏NGódG AÉYƒdG ádhÉæe óæY QòMG
‘ OƒLƒŸG ¢SÉ«≤ŸG ΩGóîà°SÉH AÉŸG iƒà°ùe §Ñ°VG •
øe ÜGƒcCG 3 »¡£d :∫ÉãŸG π«Ñ°S ≈∏Y .»∏NGódG AÉYƒdG
ºK ,»∏NGódG AÉYƒdG ¤EG ∫ƒ°ù¨ŸG RQC’G π≤fG ,RQC’G
."3" ºbQ iƒà°ùŸG áeÓY ¤EG π°üj ≈àM AÉŸG ∞°VCG
,§≤a …OÉ©dG ¢†«HC’G RQC’ÉH ≥∏©àJ áÑ°ùædG ¿CG Éà :á¶MÓe
.¢UÉÿG ∑QÉ«àNG Ö°ùM AÉŸG ᫪c ójó– ∂æµÁ
.»°SÉ°SC’G º°ù÷G ‘ »∏NGódG AÉYƒdG ™°V •
í«ë°U πµ°ûH Úî°ùàdG ìƒd ≈∏Y »∏NGódG AÉYƒdG ™°V •
∞°üàæe ‘ ¬©°Vh ºK Ékæ«Áh GkQÉ°ùj √ôjhóJ ≥jôW øY
.RÉ¡÷G º°ùL
.¬H ¢UÉÿG AÉ£¨dÉH »∏NGódG AÉYƒdG á«£¨àH ºb •
ºb ºK »FÉHô¡c QÉ«J Qó°üà QÉ«àdG ∂∏°S πq°Uh •
.𫨰ûàdÉH
Stand By ™°VƒdG ¢Vô©Jh ºµëàdG áMƒd A»°†à°S •
.(ó©à°ùe)
âbƒdG §Ñ°V RÉ¡L qÚYh "¢†«HC’G RQC’G" ™°Vh OóM •
¤EG ∫ƒ°Uƒ∏d »eÉeC’G QõdG ≈∏Y §¨°†dG ≥jôW øY "6"
.܃∏£ŸG âbƒdG
.»¡£dG CGóHG •
»æÑdG RQC’G »¡£d
RQC’G øe ∫ƒWCG âbh ¤EG »æÑdG RQC’G »¡W êÉàëj :á¶MÓe
RQC’ÉH á°UÉÿG äGƒ£ÿG ™ÑJG ,»æÑdG RQC’G »¡£d .¢†«HC’G
:»∏j Ée GóY Ée ,¢†«HC’G
24
Page 25

(ﺔﻴﺴﻴﺋﺮﻟﺍ ﺕﺎﻤﻴﻠﻌﺘﻟﺍ)
ﺔـﻴـﺑﺮـﻌـﻟﺍ
Qó°üe ™e RÉ¡÷ÉH »FÉHô¡µdG QÉ«àdG ¢ùHGƒb ≥aGƒJ Ωõ∏j •
.á≤jôW …CÉH ¢ùHÉ≤dG πjó©J ô¶ëoj .»FÉHô¡µdG QÉ«àdG
IôFGódG äGP Iõ¡LC’G ™e ÅjÉ¡e ¢ùHGƒb …CG Ωóîà°ùJ ’ •
¢ùHÉ≤dG πjó©J ΩóY .(1 áÄØdG) á°VQDƒŸG á«FÉHô¡µdG
ôWÉfl øe óëj áÑ°SÉæŸG AÉHô¡µdG äÉëàa ΩGóîà°SGh
∂∏°ùdG ôª¨J ’ ,á«FÉHô¡c áeó°üd ¢Vô©àdG ô£N Öæéàd •
.ôNBG πFÉ°S …CG hCG AÉŸG ‘ RÉ¡÷G hCG ¢ùHÉ≤dG hCG
.á«Hô¡µdG äÉeó°üdG
"1" áÄØdG èàæeh ójóªàdG äÓHÉc
øe RÉ¡÷G Gòg ¿C’ ±GôWC’G »KÓK πÑc ΩGóîà°SG Ú©àj •
."1" бДШdG дЙйажe шeh ¢†jQCЙJ Й¡H »аdG Iх¡LC’G
(Ωób 100) kGÎe 30 ¤EG πHɵdG ∫ƒW π°üj ¿CG øµÁ •
øe ¬dGóÑà°SG Öéj ,AÉHô¡µdG π«°UƒJ ∂∏°S ∞∏J ádÉM ‘ •
øe óªà©e áeóN õcôe …CG hCG ™«æ°üàdG á¡L πÑb
.ôWÉîŸG Öæéàd
.ábÉ£∏d ó≤a ¿hO
BLACK+DECKER
RÉ¡÷G ≈∏Y IOƒLƒŸG äÉ≤°ü∏ŸG
≈∏Y ¿GOƒLƒe ïjQÉàdG Oƒc ™e á«dÉàdG Iô¨°üŸG Qƒ°üdG
.øNÉ°ùdG í£°ùdG !ôjò–
ádGREGh RÉ¡÷G 𫨰ûJ ±É≤jEÉH ºb ,™«ªéàdG πÑb !ôjò–
.¢ùÑ≤ŸG øe ¢ùHÉ≤dG
QÉîÑdÉH »¡£dG ìƒd .2
áfhôµ©ŸG á∏°S .3
»∏NGódG AÉYƒdG .4
»°SÉ°SC’G º°ù÷G .5
âbƒdG §Ñ°V RÉ¡L .6
Úî°ùàdG ìƒd .7
ºµëàdG áMƒd .8
IôjÉ©e ܃c .11
:IGOC’G
¢UGƒÿG
AÉ£¨dG .1
QÉ«àdG ∂∏°S .9
áaô¨pe .10
AõL …CG ‘ ÉkØ∏J hCG ÉkÑ«Y äóLh GPEG RÉ¡÷G Ωóîà°ùJ ’ •
.¬FGõLCG øe
∫GóÑà°SG hCG ìÓ°UEÉH óªà©e π«ch Ωƒ≤j ¿CG Öéj •
.áØdÉàdG hCG IQƒ°ùµŸG AGõLC’G
hCG áØdÉJ AGõLCG OƒLh ΩóY øe ≥≤– ,ΩGóîà°S’G πÑb •
.∂∏°ùdG ‘ á∏cBÉàe hCG á«dÉH
hCG AÉHô¡µdG ∂∏°S ∞∏J ádÉM ‘ RÉ¡÷G Ωóîà°ùJ ’ •
.ɪ¡æe …CÉH Ö«Y OƒLh hCG »°ù«FôdG ¢ùHÉ≤dG
Öéj ,»°ù«FôdG ¢ùHÉ≤dG hCG AÉHô¡µdG ∂∏°S ∞∏J ádÉM ‘ •
Öæéàd óªà©e áfÉ«°U π«ch áaô©Ã É¡dGóÑà°SG
¬MÓ°UEG ∫hÉ– ’h AÉHô¡µdG ∂∏°S ™£≤J ’ .ôWÉîŸG
.∂°ùØæH
∂∏J ÒZ AGõLCG …CG ∫GóÑà°SG hCG ádGREG kÉ≤∏£e ∫hÉ– ’ •
.π«dódG Gòg ‘ É¡«dEG QÉ°ûŸG
áfhôµ©ŸG »¡W Iõ¡LC’ á«aÉ°VEG áeÓ°S äɪ«∏©J
RQC’Gh
¿Éc AGƒ°S øNÉ°S óbƒe øe Üô≤dÉH RÉ¡÷G ™°†J ’ !ôjò–
.AÉHô¡µdÉH hCG RɨdÉH πª©j
.»∏°UC’G »∏NGódG AÉYƒdG ’EG Ωóîà°ùJ ’ •
QÉîÑdG ¢ù«ØæJ áëàa ¿ƒµJ å«ëH ÉkªFGO IóMƒdG ™°V •
.Ωóîà°ùŸG øe ÉkªFGO Ió«©H
á«°†ª◊G ᪩WC’G »∏¨d RÉ¡÷G Gòg Ωóîà°ùJ ’ •
.iôNCG ¢VGôZCG …C’ hCG ájƒ∏≤dGh
»∏NGódG AÉYƒdG ÚH áaÉ°ùŸG ¿ƒµJ ¿CG ≈∏Y ¢UôMG •
hCG QÉѨdG hCG AÉŸG øe á«dÉNh áØ«¶f Úî°ùàdG ìƒdh
∂dP ≥≤ëàj ⁄ GPEG .áÑjôZ ΩÉ°ùLCG …CG hCG RQC’G ÉjÉ≤H
¥ôëoà°S iƒ°ü≤dG ä’É◊G ‘h RÉ¡÷G AGOCG ôKCÉà«°ùa
.√DhGõLCG
.AÉŸG »∏¨d RQC’G »¡W RÉ¡L ΩGóîà°SG ÖæŒ •
¬JóYÉb íÑ°üJ ø∏a ’EGh »∏NGódG AÉYƒdG ádÉeEÉH º≤J ’ •
¥ôëoà°Sh Úî°ùàdG ìƒd ™e »∏c ¢ùeÓJ ™°Vh ‘
.√DhGõLCG
.πFÉ°S …CG ‘ ¬°ùªZ ÖqæŒ •
AÉHô¡µdG ôWÉfl øe áeÓ°ùdG
QÉ«àdG Qó°üe ó¡L ≥aGƒJ øe ócCÉàdG ΩGóîà°S’G πÑb »¨Ñæj
.Úæ≤àdG áMƒd ≈∏Y í°VƒŸG ó¡÷G ™e »FÉHô¡µdG
kɪFGO ócCÉàdG »¨Ñæjh .èàæŸG Gòg ¢†jQCÉJ Öéj
ó¡÷G ™e »FÉHô¡µdG QÉ«àdG Qó°üe ó¡L ≥aGƒJ øe
Úæ≤àdG áMƒd ≈∏Y í°VƒŸG
25
Page 26

ﺔـﻴـﺑﺮـﻌـﻟﺍ
(ﺔﻴﺴﻴﺋﺮﻟﺍ ﺕﺎﻤﻴﻠﻌﺘﻟﺍ)
.πFÉ°S …CG ‘ RÉ¡÷G ¢ùª¨J ’ •
øY ¢ùHÉ≤dG π°üØd AÉHô¡µdG ∂∏°S ó°T kÉ≤∏£e ∫hÉ– ’ •
.¢ùÑ≤ŸG
IQGô◊G øY kGó«©H AÉHô¡µdG ∂∏°S ™°Vh ≈∏Y ¢UôMGh •
.IOÉ◊G ±Gƒ◊Gh âjõdGh
π°üaÉa ,ΩGóîà°S’G AÉæKCG AÉHô¡µdG ∂∏°ùd ∞∏J çóM GPEG •
∂∏°S ¢ùª∏J ’ .QƒØdG ≈∏Y AÉHô¡µdG Qó°üe øY RÉ¡÷G
.AÉHô¡µdG Qó°üe øY ¬∏°üa πÑb AÉHô¡µdG
ádÉM ‘ »FÉHô¡µdG QÉ«àdG Qó°üe øY RÉ¡÷G π°üaG •
.∞«¶æàdG πÑbh ΩGóîà°S’G ΩóY
øjôNB’G áeÓ°S
‘ ÉÃ) ¢UÉî°TC’G ¬eóîà°ù«d ºª°üe ÒZ RÉ¡÷G Gòg" •
äGQó≤dG ‘ Qƒ°üb øe ¿ƒfÉ©j øjòdG (∫ÉØWC’G ∂dP
¿hô≤àØj øjòdG ∂ÄdhCG hCG á«∏≤©dG hCG á«°ù◊G hCG á«fóÑdG
¬«LƒJ hCG ±GöTEG ÒaƒJ •öûH ’EG ,áaô©ŸGh IÈÿG ¤EG
øY ∫hDƒ°ùe ¢üî°T πÑb øe RÉ¡÷G ΩGóîà°SÉH ≥∏©àj
."º¡àeÓ°S
."RÉ¡÷ÉH º¡ãÑY ΩóY ¿Éª°†d ∫ÉØWC’G áÑbGôe Ωõ∏j" •
∫hÉæàe øY Gkó«©H ¬H ¢UÉÿG ∂∏°ùdGh RÉ¡÷G ßØMG •
.äGƒæ°S 8 øe πbC’G ∫ÉØWC’G
πbô©àdG ô£N …OÉØàd ájÉæ©H QÉ«àdG ∂∏°S QÉ°ùe §Ñ°VG •
.¬H
.RÉ¡÷ÉH º¡ãÑY ΩóY ¿Éª°†d ∫ÉØWC’G áÑbGôe Ωõ∏j •
RÉ¡÷G ‘ IôgɶdG í£°SC’G IQGôM áLQO ¿ƒµJ ób •
¢†©Ñd ¬∏«¨°ûJ ±É≤jEG ó©Hh RÉ¡÷G 𫨰ûJ AÉæKCG á«dÉY
.âbƒdG
ΩGóîà°S’G ó©H
òNCÉe øe ¢ùHÉ≤dG ´õfGh RÉ¡÷G 𫨰ûJ ±É≤jEÉH ºb �
πÑbh áÑbGôe ¿hO ¬côJ πÑb OÈj RÉ¡÷G ∑ôJGh AÉHô¡µdG
.É¡°üëa hCG É¡Ø«¶æJ hCG RÉ¡÷G AGõLCG øe …CG Ò«¨J
¿Éµe ‘ ¬æjõîJ Öéj ,RÉ¡÷G ΩGóîà°SG ΩóY ádÉM ‘ �
∫hÉæàe øY kGó«©H Iõ¡LC’G ™«ªL ßØM Öéj .±ÉL
.∫ÉØWC’G
ìÓ°UE’Gh ¢üëØdG
ΩóY øe ≥≤ëà∏d RÉ¡÷G ¢üëa Öéj ,ΩGóîà°S’G πÑb •
OƒLh ΩóY øe kÉ°†jCG ócCÉJ .áÑ«©e hCG áØdÉJ AGõLCG OƒLh
Ö«Y …CG hCG QGQRC’G ‘ ∞∏J OƒLh hCG ,AGõLC’G ‘ Qƒ°ùc
.RÉ¡÷G 𫨰ûJ ≈∏Y ôKDƒj ób
Oƒ°ü≤ŸG ΩGóîà°S’G
BLACK+DECKER ácöT øe CJ800 IQÉ°üY ⪪o°U
Gòg ºªo°U .ájQÉ°üo©dG ácGƒØdG øe Ò°ü©dG ¢UÓîà°S’
•É°ShCGh ÖJɵŸGh ôLÉàŸG ‘ ∫ɪ©dG ïHÉ£e ≥WÉæe •
IÒ¨°üdG ¥OÉæØdGh ¥OÉæØdG ‘ AÓª©dG πÑb øe •
¿CG ∂d ≈æªàfh .
.§≤a ∫õæŸG πNGO ΩGóîà°SÓd RÉ¡÷G
:‘ ΩGóîà°SÓd ¢ü°üfl ÒZ RÉ¡÷G Gòg
;iôNC’G πª©dG
,ÚMÓØdG 䃫H •
,iôNC’G áeÉbE’G øcÉeCGh
QÉ£aE’Gh ΩƒædG øcÉeCG •
BLACK+DECKER èàæe ∑QÉ«àN’
.IóY äGƒæ°ùd èàæŸG Gòg ΩGóîà°SÉH ™àªà°ùJ
Gôµ°T
k
áeÓ°ùdG äɪ«∏©J
kɪFGO Ú©àj ,á«FÉHô¡µdG Iõ¡LC’G ΩGóîà°SG óæY !ôjò–
;»∏j Ée ∂dP ‘ Éà ᫰SÉ°SC’G áeÓ°ùdG äÉWÉ«àMG IÉYGôe
áeó°üd ¢Vô©àdG hCG ≥jôM ܃°ûf ä’ɪàMG øe óë∏d ∂dPh
.RÉ¡÷G 𫨰ûJ πÑb ájÉæ©H πeɵdÉH π«dódG Gòg CGôbG •
.¬d RÉ¡÷G ºª°üŸG ΩGóîà°S’G π«dódG Gòg Oóëj •
™e IOƒLƒŸG ÒZ á≤ë∏e hCG á«dɪc ™£b …CG ΩGóîà°SG
¢Uƒ°üæŸG ÒZ ¢VôZ ‘ RÉ¡÷G ΩGóîà°SG hCG RÉ¡÷G
¤EG …ODƒj hCG kGô£N πµ°ûj ób π«dódG Gòg ‘ ¬«∏Y
.áLÉ◊G óæY ¬«dEG ´ƒLô∏d π«dódG Gò¡H ßØàMG •
.á«°üî°T áHÉ°UEG hCG á«FÉHô¡c
.áHÉ°UEG çhóM
RÉ¡÷G ΩGóîà°SG
.RÉ¡÷G ΩGóîà°SG óæY kGQòM øc •
.ΩGóîà°S’G AÉæKCG ÉkæNÉ°S í£°ùdG íÑ°üj ¿CG øµÁ •
AÉæKCG áæNÉ°S á«dɪµdG ™£≤dGh »¡£dG AÉYh íÑ°ü«°S •
.É¡àdhÉæe óæY Qò◊G »NƒJ Ωõ∏j Gòd ;ΩGóîà°S’G
.ΩGóîà°S’G AÉæKCG RÉ¡÷G øe QÉîH êôîj ¿CG øµÁ •
.≥∏£dG AGƒ¡dG ‘ RÉ¡÷G Ωóîà°ùJ ’ •
¬∏¨°ûJ ’h .Úà∏àÑe ∑Gój ¿ƒµJ ÉeóæY RÉ¡÷G π¨°ûJ ’ •
¥ƒa ≥∏©àj ’ å«ëH ábóH »FÉHô¡µdG QÉ«àdG ∂∏°S OôaG •
¿hO ¬H Ì©àdG ºàj ’ å«ëHh πª©dG í£°S ±GƒM
.Úeó≤dG ‘ÉM ¿ƒµJ ÉeóæY
.ó°üb
26
Page 27

(ﺔﻴﺴﻴﺋﺮﻟﺍ ﺕﺎﻤﻴﻠﻌﺘﻟﺍ)
ﺔـﻴـﺑﺮـﻌـﻟﺍ
١
٢
٣
٤
٩
١٠ ١١
٥
٦
٧
٨
27
Page 28

Page 29

Page 30

N a m e s & A dd re ss e s f or B l a ck & D ec k e r S er v i c e C o n c es si on ar i e s
ALGERIA: Sarl Outillage Corporation, DW, B&D Pet, HHD, 08, Rue Med Boudiaf (ex TELLA Achen) Cheraga, Alger, Tel:
00213-0 -213 7513 0/ 0021 3-0- 2137 51 31, F ax: 0 0213-0- 2136 9667 , E mail : hakim .mer djad i@ outillage -dz. co m;
nefissa.merdjadi@outillage-dz.com; sidahmed.merdjadi@outillage-dz.com. AZERBAIJAN: Kontakt - NN LLC, HHD, M.Qashqay 43, Baku
Azerbaijan Az1000, Tel: 00994 12 408 20 50, Mob: +994503442204, Fax: 00994 12 411 70 90, eganjaly@hotmail.com. BAHRAIN: Alfouz
Services Co. WLL, Tubli, DW, B&D PET, HHD, P.O. Box 26562, Tubli, Manama, Tel: +973-17783562/ 17879987, Fax: 17783479, Email:
alfouz@batelco.com.bh. EGYPT: Anasia Egypt for Trading S.A.E. (Mentrade), HHD, P.O. Box 2443, 9, Mostafa Refaat Street, Sheraton
Heliopolis 11361, Cairo, Tel: 00202 22684159, Fax: 00202 22684169, Email: wael.salah@anasia.com; nevien.elbeshbishy@anasia.com.
ETHIOPIA: Seif Tewfik Sherif, DW, B&D PET, HHD, Arada Sub City, Kebele 01/02, Global Insurance Bldg, 2nd Flr, Room 43, P.O. Box
2525, Addis Ababa, Tel: 00-251-11-1563968/ 1563969, Fax: 00-251-11-1558009, Email: seif@ethionet.et; nawanag@ethionet.et;
seifudint@hotmail.com. IRAQ: Financial Links, B&D PET, HHD, Kazzaz Building Arasat Al-Hindia, Block No: 629, Street: 31, Building No:
1, Baghdad, Iraq, Tel: 00964-(0)780-195-2223/ +964-(0)781-3763044, Email: info@financiallinks-truevalue.com. JORDAN: Bashiti
Hardware (Palestine), B&D pet, HHD, "93 King Abdullah, 2nd St., Opp ELBA House, P.O. Box 3005, Amman 11953, Tel:
00962-6-53 49098, ext.11, Fax: 00 962-6-5330731, Ema il: mana l@bashitih ardware.co m; info@ bashitihar dware.com;
rami@bashitihardware.com. KENYA: Zylog Enterprises Ltd. (T/A Leading Concepts), HHD, IPS Building,Kaunda Street, P.O. Box
40877-00100, Nairobi, Tel: 0 02 54-20-6905000 , F ax : 00254-2 0-6905 111, Ema il : admin@ali bhaish ariff. co.k e;
leading@alibhaishariff.co.ke; info@alibhaishariff.co.ke. LEBANON: Aces Service Centre (Est. F.A.Ketaneh SA), HHD, P.O. Box 90-102,
Nahr El Mot, Seaside Highway, Pharaon Building, Beirut, Tel: 00961-1-898989/ + 961-(1)-262626, Fax: 0096-1-1245880, Email:
Nissrine.hajj@aces.com.lb; Nassim.aziz@Aces.com.lb; Johnny.sailian@Aces.com.lb; Paul.tahan@aces.com.lb. LIBYA: North Africa
Trading (El Ghoul Brothers), DW, B&D Pet, HHD, P.O. Box 348, 7 October Street 11, Benghazi, Tel: 00218-061-3383994, Fax:
00218-092-7640688, Email: nagte.ly@gmail.com; CC: nagte.dpt@gmail.com; elghol@technpower.com. North Africa Trading ( El Ghoul
Brothers), DW, B&D Pet, HHD, AlBarniq Dewalt Center, Mokhazin-elsukar St., ElFallah, Tripoli, Tel: 00218-021-3606430, Fax:
00218-092-6514813, Email: nagte.ly@gmail.com; cc: (nagte.dpt@gmail.com; elghol@technpower.com. Homeworld Co., HHD, Senidal St.
Amr Ibn Elaas Road, Benghazi, Libya, P.O. Box 18182, Salmany, Tel: 00218-61-9094183, ext. 103, Fax: 00218.61.9094123, ext. 108,
Email: nagte.ly@gmail.com. MAURITIUS: J.M. Goupille & Co.Ltd. The Brandhouse Ltd., HHD, Rogers Industrial Park 1, Riche Terre,
Mauritius, Tel: 00230-2069450/ +230-207-1700, Fax: 00230-2483188/ 00230-2069474, Email: claims(service.centre@goupille.mu;
stephanie.bijou@gmail.c om; beatrice.li@gma il.com; sharon.lapr ovid ence.jmg@gmail.com, tim.moszuti@goupille.m u; Cc.
Jfrancois.dromart@goupille.mu; mario.catherine@goupille.mu; gerard.gouges@goupille.mu. MOROCCO: UATS, HHD, "No. 37,
Lotissement KADIRIA, km 10 Route, Eljadida, LISASSFA, Casablanca, Morocco, Tel: 00212-522652602, Fax: 00212-522652603, Email:
farah1406@yahoo.fr; noureddine.uats@gmail.com. OMAN: Oman Marketing & Service Co.(Omasco), Wattayah/ Muscat, HHD, B&D
PET, P.O. Box 2734, Behind Honda Showroom, Wattayah, Oman, Tel: +968 24560232/ 24560255, Fax: 24560993, Email:
npservice@omasco.com.om; Cc. ashok.balan@omasco.com.om, damodaran.pillai@omasco.com.om; unnikrishnan@omasco.com.om.
Oman Marketing & Service Co.(Omasco), Sohar, HHD, B&D PET, Al Ohi, Sohar, Oman, Tel: +968 26846379, Fax: 26846379, Email:
sooraj.neeran@omasco.com.om. Oman Marketing & Service Co.(Omasco), Salalah, HHD, B&D PET, Sanaya, Salalah, Oman, Tel: +968
23212290, Fax: 23210936, Email: rajagopal.pr@omasco.com.om. Omar Mohammed Ali Bawain Trading Co., Salalah, Al-Awqadain, PC
217, P.O.Box 112, Salalah, Sultanate of Oman, Tel: +968 23214874, Fax: 23214874/ 23211878, Email: jithin@omartrad.com. PAKISTAN:
Ammar Service & Spares, B&D PET, HHD, Office No 6068, 6th Floor Central Plaza, Behind Gul Plaza Marston Road, Karachi, Tel:
0092-21-32426905/ 021-32775252, Fax: 0092-21-32427214, Email: babji93@yahoo.com. QATAR: Al Muftah Service Centre, Doha,
HHD, B&D PET, Al Wakrah, Road, P.O. Box 875, Doha, Qatar, Tel: +974 44650880/ 44650110/ 44446868, Fax: 44441415/ 44662599,
Email: service@almuftah.com; almuftah@almuftah.com. SAUDI ARABIA: Fawaz Ebrahim Al Zayani Trading Est., Dammam, DW, B&D
PET, HHD, P.O. Box 76026, Al Raka: 31952, Tel: +966-3-8140914, Fax: 8140824, Email: dewaltdammam@hotmail.com;
(vinoderakatyil@yahoo.com); Website: www.fawazalzayanigroup.com. Fawaz Ebrahim Al Zayani Trading Est., Makkah, DW, B&D PET,
HHD, 4753-Wali Alahed, Makkah, 9130-24353 Tel: +966-12-8140914/ 581121778, Fax: 128140914, Email: meraj2515@gmail.com.
Banaja Trading Co. Ltd., Riyadh, HHD, P.O. Box 566, Riyadh-11421, Tel: +966-1-4124444, Fax: 4033378, Email: jijophilip@hotmail.com.
Banaja Trading Co. Ltd, Jeddah, HHD P.O. Box 366, Jeddah-21411, Tel: +966-2-6511111, Fax: 6503668, Email: afouad@banaja.com;
jijophilip@hotmail.com. SOUTH AFRICA: Benray Tool Wholesalers C.C., B&D PET, HHD, 460 Koeberg Road, Cape Town, South Africa,
Tel: 021-551-7244, Fax: 021-552-6395, Email: dewaltct@benray.co.za. Stanley Black & Decker-RSA, BED, PET, HHD, 199 Winze Drive
Stormill Ext 9 Roodepoort Tel: (2711) 472-0454, Fax: (2711) 472-0482, Email: service@sbdinc.co.za; vincent.roets@sbdinc.co.za;
jacquesvincent.roets@sbdinc.com. SRI LANKA: Delmege Forsyth & Co. Ltd, DW, B&D Pet, HHD, Delmege Forsyth & Co. Ltd, Lifestyle
Cluster, 101, Vinayalankara Mawatha, Colombo 10, Sri Lanka, Tel: +94-11-2688462/ +94-11-2, Email: dgeservice@delmege.com;
Samith.lifestyle@delmege.com cc: Jayantha.lifestyle@delmege.com. TUNISIA: Societe Tunisienne De Maintenance (STM), B&D Pet,
HHD, Rue De La Physique. Nouvelle Zone Industrielle Ben Arous.2013 Ben Arous, TUNISIA. Tel: +216-79-389687, Fax: +216-71-385154,
Email: importa@stqu.com. UAE: (Abu Dhabi) Galaxy Equipment Trading, Abu Dhabi, DW, B&D PET, HHD, Madinath Zayed (Baada
Zaid), Abu Dhabi P.C. 58910, Tel: +971-2-8844279, Fax: 8844297, Email: galaxyeq@eim.ae; galaxyeq@emirates.net.ae. Light House
Electrical, Abu Dhabi, DW, B&D PET, HHD, P.O. Box 120, Abu Dhabi, Tel: +971-2-6726131, Fax: 6720667, Email:
dewalt_lhe@hotmail.com. Light House Electrical, Musaffah, DW, B&D PET, HHD, P.O. Box 120, Abu Dhabi, Tel: +971-2-5548315, Fax:
5540461, Email: dewalt_lhe@hotmail.com. (Al Ain) Zillion Equipment and Spare Parts Trading LLC. Al Ain, DW, B&D PET, HHD, P.O. Box
19740, Opp. Bin Sadal/ Trimix Redymix Sanaiya, Al Ain Tel: +971-3-7216690, Fax: 7216103, Email: zilliontrdg@gmail.com. (Dubai)
BLACK & DECKER (OVERSEAS) GmbH, Dubai, DW, B&D PET, HHD, P.O. Box 5420, Dubai, Tel: +971-4-8127400/ 8127406, Fax:
2822765, Email: service.mea@sbdinc.com. (Ras Al Khaimah) Mc Coy Middle East LLC, Ras Al Khaimah, DW, B&D PET, HHD, P.O. Box
10584, Ras Al Khaimah, Tel: +971-7-2277095, Fax: 2277096, Email: mccoyrak@gmail.com. (Sharjah) Mc Coy Middle East LLC, Sharjah,
DW, B&D PET, HHD, P.O. Box 25793, Sharjah, Tel: +971-6-5395931, Fax: 5395932, Email: mccoy@emirates.net.ae;
mccoydewalt@gmail.com. UGANDA: Anisuma Investment & Service Ltd. (Jacky's Electronics), HHD, J.R Comples, Ware house No.5,
Plot No.101. 3rd Industrial Area, Jinja Rd, Kam pala, Tel: 00 256-414237106, Mob: 00256 779429501, Em ail:
ha.service.uganda@anisuma.com. YEMEN: Middle East Trading Co. (METCO) DW, B&D Pet, HHD, 5th Flr. Hayel Saeed Anam Bldg.
Al-Mugamma St. Taiz, Yemen, Tel: +00967-4-213455, Fax: 00967-4-219869, Email: metco@metcotrading.com; sami@metcotrading.com.
Middle East Trading Co. (METCO) DW, B&D Pet, HHD, Mualla Dakka, Aden, Tel: 00967-2-222670, Fax: 00967-2-222670,
metco@metcotrading.com; sami@metcotrading.com. Middle East Trading Co. (METCO), DW, B&D Pet, HHD, Hayel st., Sana'a, Yemen,
Tel: 00967-1-204201, Fax: 00967-1-204204, Email: metco@metcotrading.com; sami@metcotrading.com.
Page 31

Page 32

WARRANTY REGISTRATION CARD
YOUR NAME/
YOUR ADDRESS
POSTCODE
DATE OF PURCHASE
DEALER'S NAME & ADDRESS/
«ùßr
«∞FMu«Ê
«∞d±e «∞∂d¥bÍ
¢U¸¥a «∞Ad«¡
≈ßr Ë ´Mu«Ê «∞∂Uzl
PRODUCT MODEL NO.
RPC1800
 Loading...