

Page 1
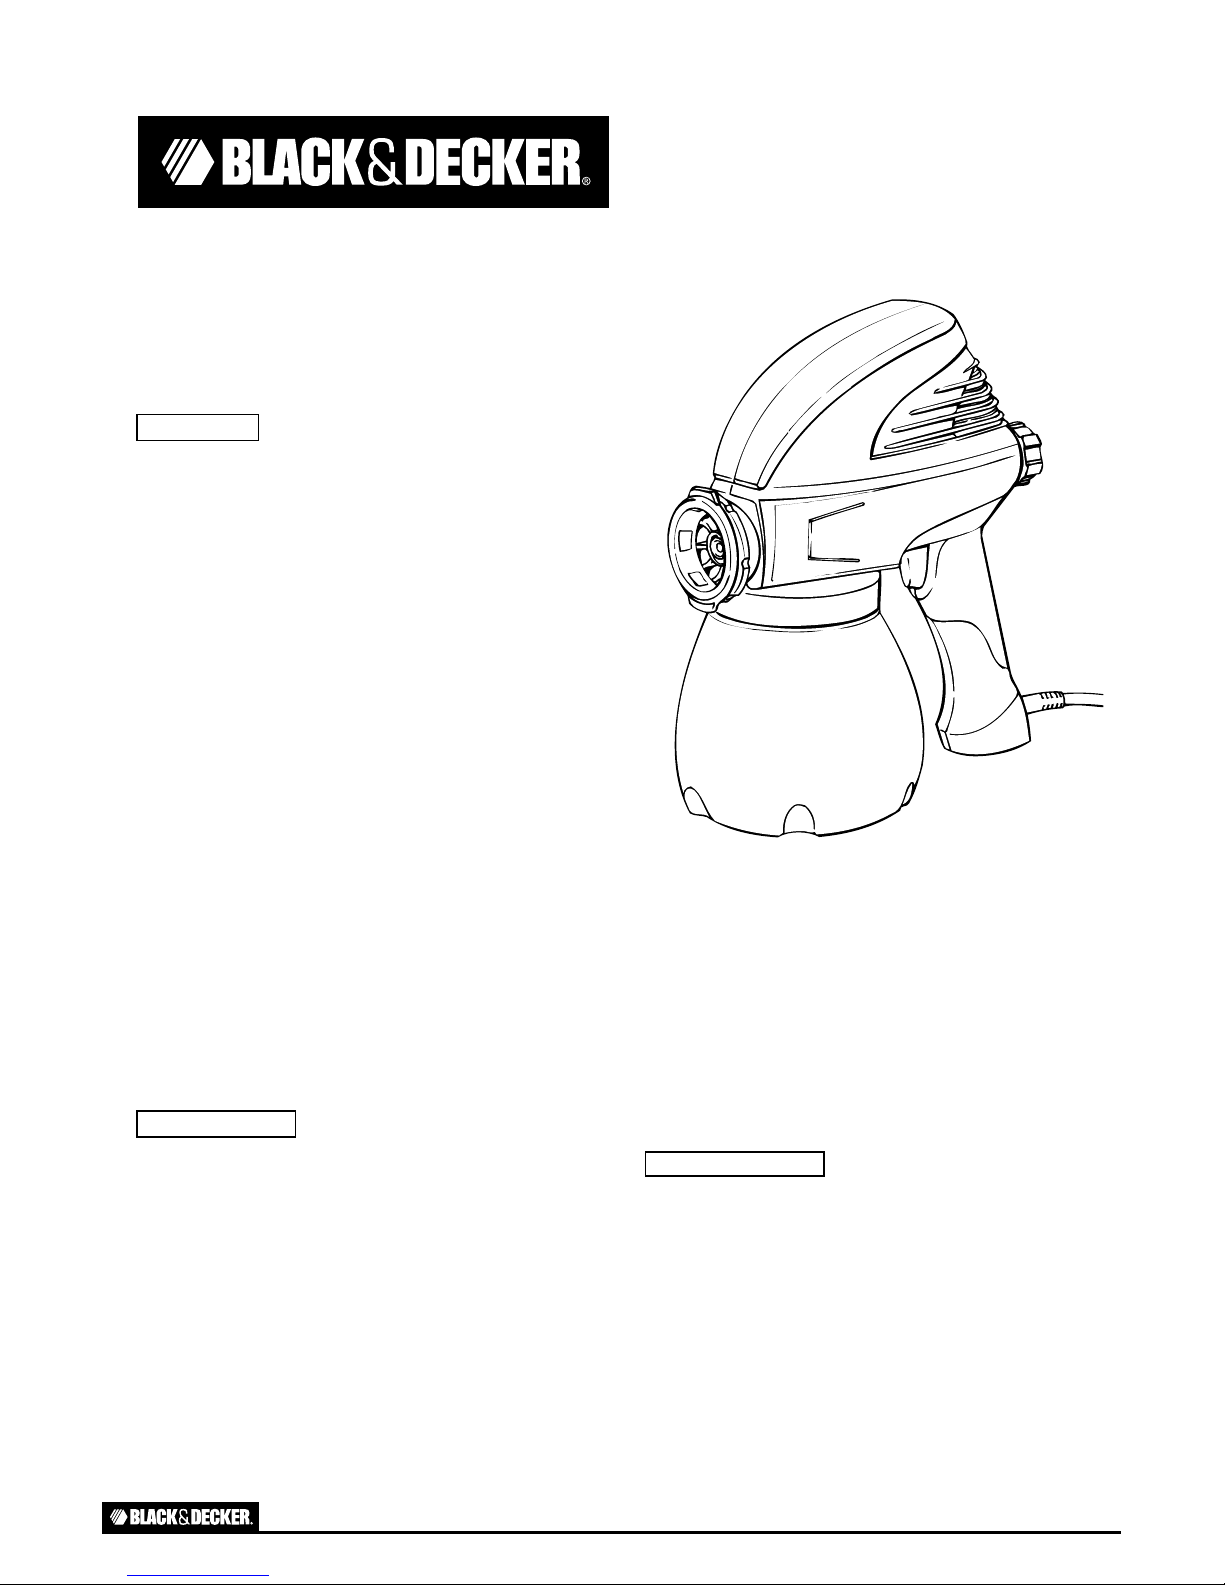
AIRLESS SPRAYERS PRO 6.8, PRO 6.8 PLUS ENGLISH • ESPAÑOL • FRANÇAIS 1
PLEASE READ AND SAVE THIS INSTRUCTION MANUAL
Airless Sprayers
MODE LS P R O 6.8, PR O 6.8 P LUS
POWER PAINT S P R AYER
WARNING TO RE DUCE TH E R I S K OF I N J U RY,
USE R M U ST R EAD I N STR UCTION MAN UAL.
FOR HOUSE HOLD U S E ON LY.
KEEP CH I LDR E N AWAY FROM WORKING AREA.
For Customer Service, call:
1-800-264-5442 or 763-780-5115,
8 a.m. to 5 p.m. CST.
Made in Taiwan
Rociadores sin aire
ROCIAD OR E S DE P I NTU RA
ELÉC TRI COS MOD E LOS PRO 6.8,
PRO 6.8 P LUS
ADVERTENCIA PARA DIS M I N U I R LOS RIE SGOS DE
LESION E S, E L U S UARIO DE B E LE E R E L MAN UAL DE
INSTRUCCIONES.
SÓLO PARA USO DOM É STICO.
MANTENGA A LOS NIÑOS LEJOS DEL ÁR EA DE
TRABAJO.
Para comunicarse con el departamento de servicio al
cliente, llame al:
1-800-264-5442 ó 763-780-5115,
8 a. m. a 5 p. m. hora del Centro de los
Estados Unidos.
Hecho en Taiwán
Pulvérisateurs sans air
comprimé
PULVÉRISATEURS À PEINTURE
ÉLECTRIQUES MODÈLES PRO 6.8
ET PR O 6.8 PLU S
AVERTISS E ME NT POU R R ÉDU I R E LE S R I SQU E S DE
BLESS U R E, L’UTILISATEUR DOIT LIR E LE MAN U E L
D’INSTRUCTION.
DESTIN É À U N U SAGE DOM E STIQU E S E U LE M E NT.
TENEZ LE S E N FANTS ÉLOIGNÉS DE L’AIRE DE TR AVAIL.
Pour le service à la clientèle, appelez au :
1-800-264-5442 ou 763-780-5115,
8 h à 17 h, heure normale du Centre.
Fabriqué à Taïwan
Page 2

AIRLESS SPRAYERS PRO 6.8, PRO 6.8 PLUS ENGLISH 2
IMPORTANT SAFEGUARDS ..........................................................................................................................................................................3
Warnings.............................................................................................................................................................................................3
PROP 65 Warning....................................................................................................................................................................................3
Hazard: Injection Injury............................................................................................................................................................................3
Hazard: Explosion or Fire .........................................................................................................................................................................3
Hazard: Hazardous Vapors.......................................................................................................................................................................4
Grounding Instructions............................................................................................................................................................................4
Extension Cords.......................................................................................................................................................................................4
Storage ....................................................................................................................................................................................................4
FAST START QUICK REFERENCE GUIDE......................................................................................................................................................5
PARTS LIST..................................................................................................................................................................................................6
HOW TO USE................................................................................................................................................................................................7
Practice First............................................................................................................................................................................................7
Thinning Materials ...................................................................................................................................................................................7
Spray Tip and Fan Tip ..............................................................................................................................................................................7
Spray Tip Selection Chart.........................................................................................................................................................................7
Two-Speed Control...................................................................................................................................................................................8
Spraying Instructions...............................................................................................................................................................................8
USING THE BACKPACK.................................................................................................................................................................................9
Using the Backpack..................................................................................................................................................................................9
Cleaning the Backpack .............................................................................................................................................................................9
QUICK RELEASE CLEAN UP, LUBRICATION & MAINTENANCE..................................................................................................................10
Step One: Clean Up Instructions............................................................................................................................................................10
Step Two: Clean Up Instructions for the Cylinder Housing ....................................................................................................................10
Lubrication.............................................................................................................................................................................................10
TROUBLESHOOTING ..................................................................................................................................................................................11
TWO-YEAR LIMITED WARRANTY ..............................................................................................................................................................36
Table of Contents
Page 3
IMPORTANT SAFEGUARDS
READ AND FOLLOW ALL SAFEGUARDS.
Like other power tools, airless sprayers are safe when properly
used but can be dangerous if misused. It is the responsibility of
the user to read and understand all instructions, IMPORTANT
SAFEGUARDS, and safety precautions before operating the unit
and also to use the unit properly. Failure to do so may result in
personal injury or loss of life and product damage.
Do not try to repair (or disassemble) the unit yourself. Repairs
should be performed by a qualified shop familiar with this unit or
returned to HomeRight. See warranty. This unit is to be used with
authorized parts only. When using parts that do not comply with
the specifications and safety devices of the manufacturer, the user
assumes all risks and liabilities.
• DO NOT aim sprayer at yourself or anyone else; in the event of
injury, seek expert medical advice immediately.
• DO NOT operate sprayer without paint or fluid in it, the sprayer
force can cause injuries to people and animals.
• DO NOT cover the nozzle with any part of your body, high
velocity jet can cause accidental injuries.
• DO NOT leave your sprayer unclean or allow paint to dry in the
pump. An unclean sprayer will not work next time and you
could void the warranty.
• DO NOT spray textured materials containing asbestos fibers.
• DO NOT spray any textured materials containing particles or
fibers such as metallic paints, fire retardant paints.
• DO NOT spray flammable liquid.
• DO NOT use the spray gun outside when it’s raining.
• DO NOT use sprayer below garage floor or grade level.
• DO NOT disassemble the sprayer without reading directions to
avoid danger.
• DO NOT allow any part of the body to come into contact with
the fluid stream.
• DO use a three-pronged extension cord that is at least 18 gage.
• DO only plug the cord or extension cord into a three-pronged
grounded power supply.
• DO keep the sprayer out of the reach of children.
• ALWAYS place the sprayer upright (do not place the sprayer
upside down or on its side) to prevent liquid entering internal
wiring and causing electric shock.
• ALWAYS clean and lubricate piston and cylinder after spraying
water or paint.
• ALWAYS wear mask, goggles, and ear and eye protection while
operating the sprayer.
• ALWAYS unplug the cord to prevent accidental spraying when
you stop spraying.
• NEVER immerse the sprayer gun into water or other liquids to
prevent electrical shock.
1. HAZARD: Solvent and paint fumes can explode or ignite,
causing property damage and severe injury, avoid all low
ignition sources such as static electricity sparks and open
flames.
2. HAZARD: Paints, solvents, insecticides, and other materials may
be harmful if inhaled, causing severe nausea, fainting, or
poisoning.
3. HAZARD: Do not hold cord at plug connections to support cord.
Failure to observe may result in electrical shock.
PROP 65 WARNING
Handling the coated electrical wires of this product exposes you to
lead, a chemical known to the State of California to cause birth
defects or other reproductive harm. Wash hands after use.
HAZARD: INJECTION INJURY
The airless sprayer pumps materials at high pressure and can
pierce skin and underlying tissue, leading to serious injury or
amputation.
Do not treat injection injuries as simple cuts. Injection injuries can
lead to amputation. Seek a physician’s help immediately.
• Never put hand in front of gun. Gloves will not prevent injection
injuries.
• Never leave sprayer unattended.
• Never leave sprayer plugged in while cleaning.
• Never remove tip guard while spraying.
HAZARD: EXPLOSION OR FIRE
Paint, stain and solvent fumes can explode or ignite, causing
property damage and/or severe injury.
• Keep area well ventilated. Exhaust and introduce fresh air to
keep fumes from accumulating in work area.
• Do not spray in areas where there are ignition sources, static
electricity sparks, pilot lights, heaters, hot objects, cigarettes,
open flames.
• Have fire extinguishing equipment present and in good working
order.
• Follow safety instructions and IMPORTANT SAFEGUARDS of
material manufacturers.
WARNINGS
CAUTION
AIRLESS SPRAYERS PRO 6.8, PRO 6.8 PLUS ENGLISH 3
Page 4
HAZARD: HAZARDOUS VAPORS
Paint, stain and solvents, insecticides, varnishes, and other
materials may be harmful if inhaled, causing severe nausea,
fainting, or poisoning.
• Use a mask or respirator when spraying when there is a chance
of inhaling vapors.
• Use protective eyewear.
GROUNDING INSTRUCTIONS
The product must be grounded. In the event of an electrical short
circuit, grounding reduces the risk of electrical shock by providing
an escape wire for the electric current. This product is equipped
with a cord having a grounding wire with an appropriate
grounding plug. The plug must be plugged into an appropriate
outlet that is properly installed and grounded in accordance with
all local codes and ordinances.
DANGER - Improper use of the grounding plug can result in a risk
of electric shock.
If repair or replacement of the cord or plug is necessary, do not
connect the grounding wire to either flat blade terminal. The
grounding wire has green insulation, with or without yellow
stripes.
Check with a qualified electrician or serviceman if the grounding
instructions are not completely understood or if in doubt as to
whether the product is properly grounded. Do not modify the plug
provided. If it will not fit the outlet, have a qualified electrician
install a proper outlet.
This product is for use on a nominal 120 volt circuit and has a
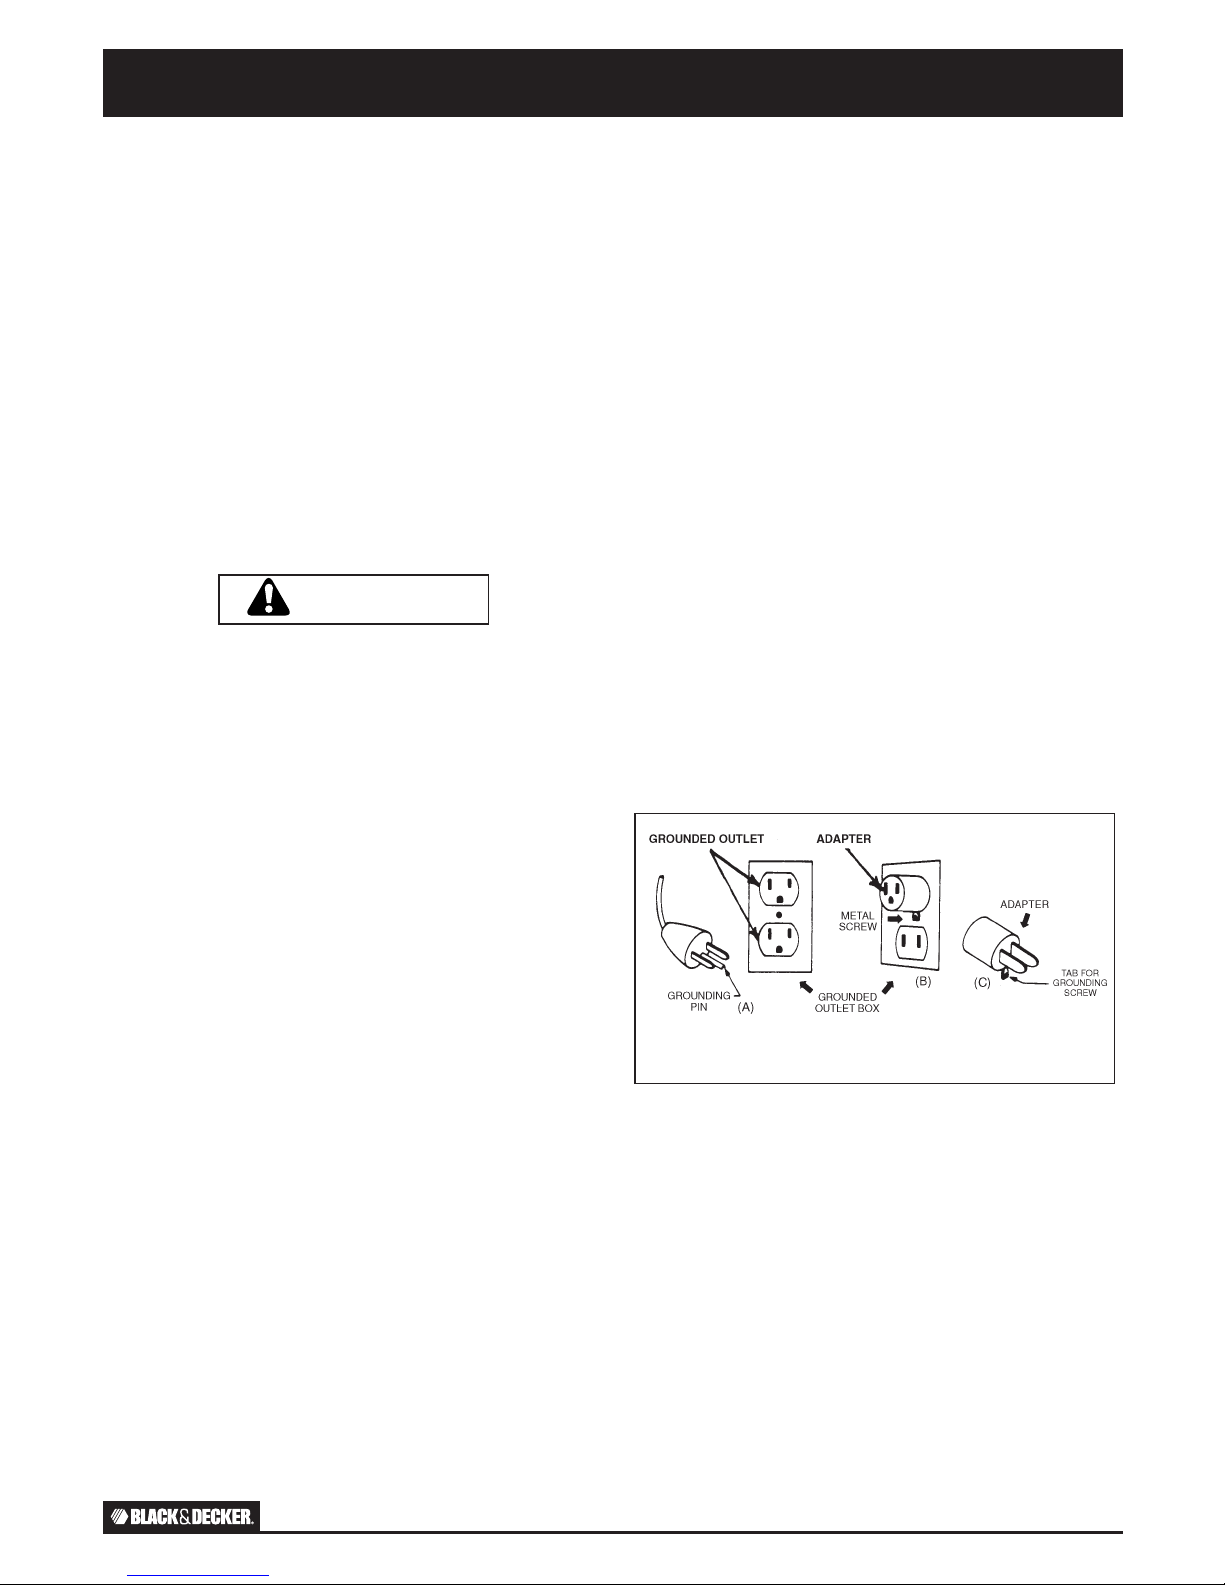
grounding plug that looks like the plug illustrated in Figure A.
Make sure the product is connected to an outlet having the same
configuration as the plug. A temporary adapter which looks like
the adapter illustrated in Figures B and C may be used to connect
the plug to a two-pole receptacle as shown in Figure B if a
properly grounded outlet is not available. The temporary adapter
should only be used until a properly grounded outlet (Figure A)
can be installed by a qualified electrician. The green colored rigid
ear lug or the like extending from the adapter must be connected
to a permanent ground such as a properly grounded outlet box
cover. Whenever the adapter is used, it must be held in place by
a metal screw.
EXTENSION CORDS
Use only a three-pronged extension cord that has a 3-blade
grounding plug and a 3-slot receptacle that will accept the plug on
the product. Make sure your extension cord is UL/ETL/CSA listed
and is in good condition. When using an extension cord, be sure
to use one heavy enough for the current - for lengths less than
18 feet, use a No. 18 AWG. or heavier; for lengths more than 18
feet, use No. 16 AWG. If in doubt, use a heavier gauge. An
undersized cord will cause a drop in line voltage resulting in loss
of power and overheating.
STORAGE
Make sure unit is clean and dry before storing. Store in a dry
location. To prevent damage, the electrical cord should not be
crimped during storage
.
Attention: The temporary adapter shown in sketch B and C is not for use in
Canada. Use only a grounded outlet with this unit.
Grounding Method
AIRLESS SPRAYERS PRO 6.8, PRO 6.8 PLUS ENGLISH 4
IMPORTANT SAFEGUARDS
WARNING
Page 5
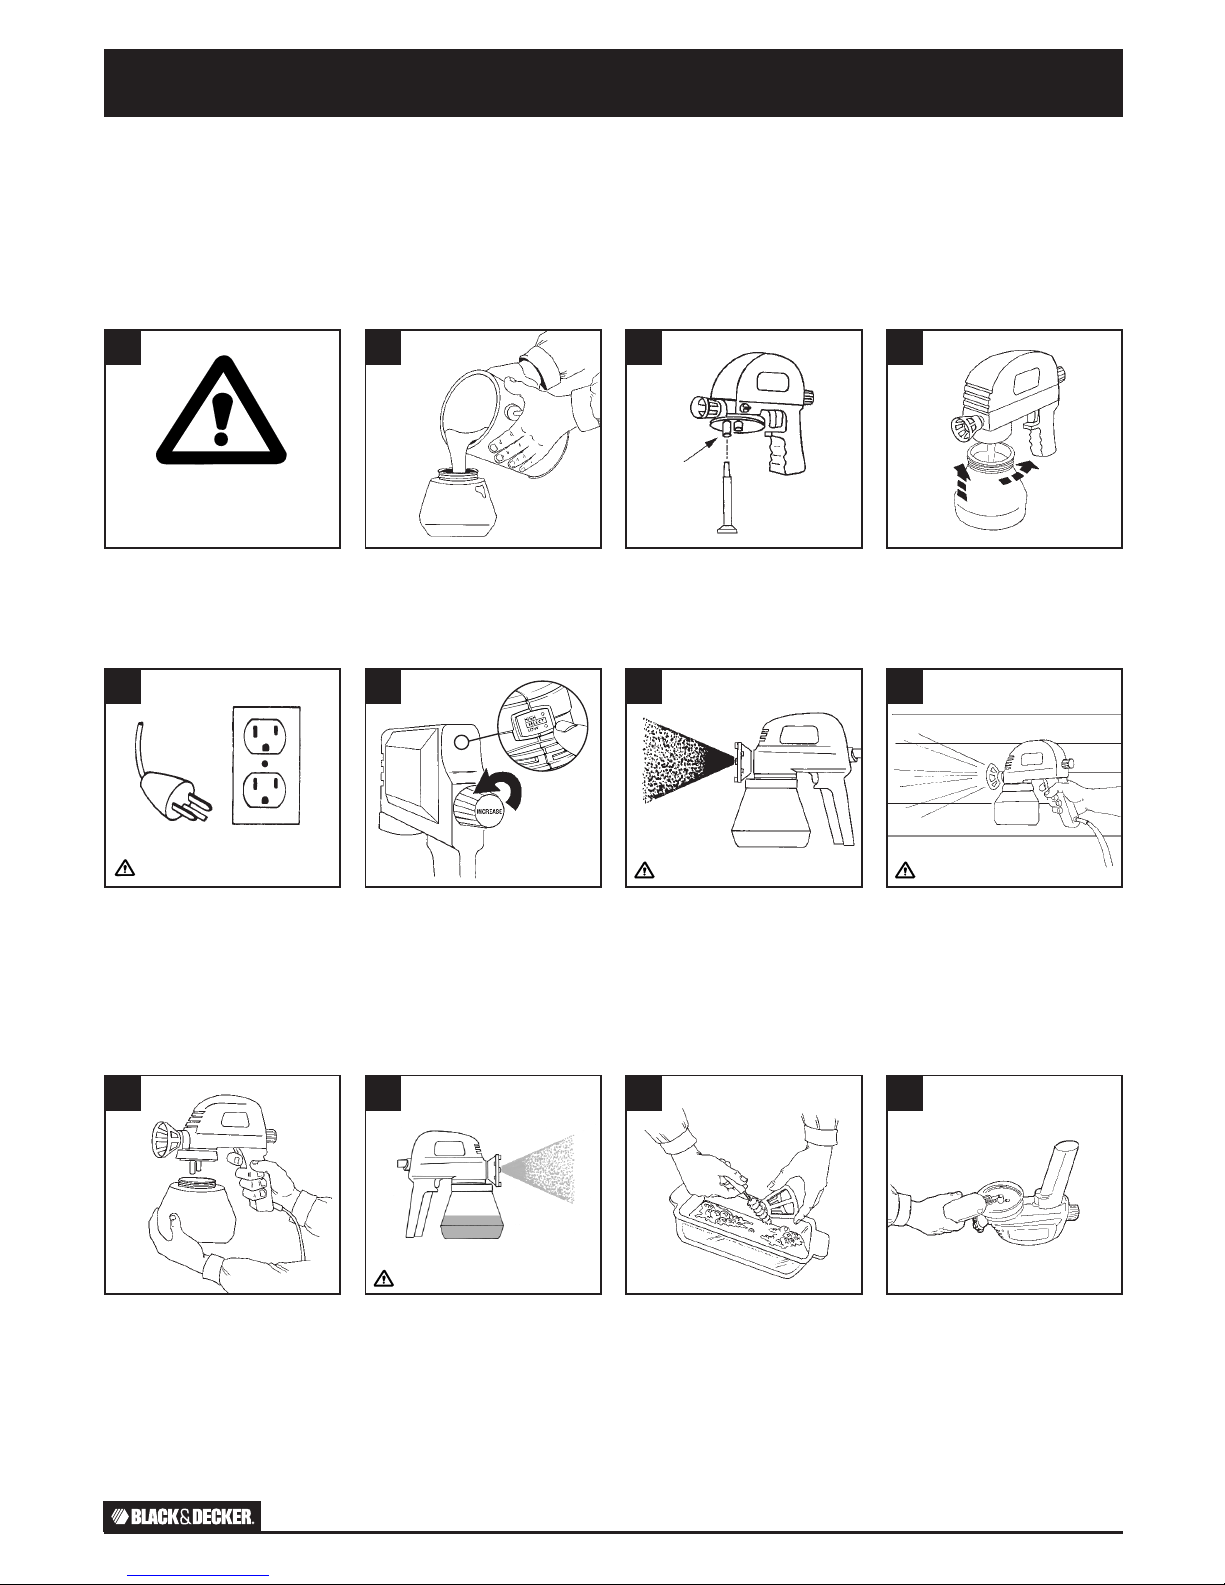
Plug sprayer into outlet. Set flow to maximum setting. Set
speed control to desired setting.
Adjust spray pattern by turning
knob.
Spray surface, keeping sprayer
level and 10" to 12" from surface.
Use a sweeping and overlapping
motion.
5 6 7 8
FAST START QUICK REFERENCE GUIDE
Cleaning Instructions
Spraying Instructions
SKIN INJECTION HAZARD
RISK OF EXPLOSION OR FIRE
HAZARDOUS VAPORS
INJECTION HAZARD HAZARDOUS VAPORS
This is only a quick reference.
Read the entire instruction manual prior to using the product.
Read all warnings and safety
instructions in the owner’s manual
before use.
Thin material as necessary. Remove
and fill container with material. Use
a filter to strain material if it is old.
Attach pick-up tube to the longer
port of the cylinder housing. Make
sure it is securely fastened.
Attach container to sprayer.
1 2 3 4
Unplug sprayer, remove container
and empty contents.
Fill sprayer with cleaning solution
and operate trigger until solution
comes through nozzle.
Remove parts. Clean and dry
thoroughly according to Step Two
Clean Up instructions. See page 10.
Lubricate sprayer before storing.
1 2 3 4
See warnings in manual
See manual for grounding
instructions
AIRLESS SPRAYERS PRO 6.8, PRO 6.8 PLUS ENGLISH 5
Page 6
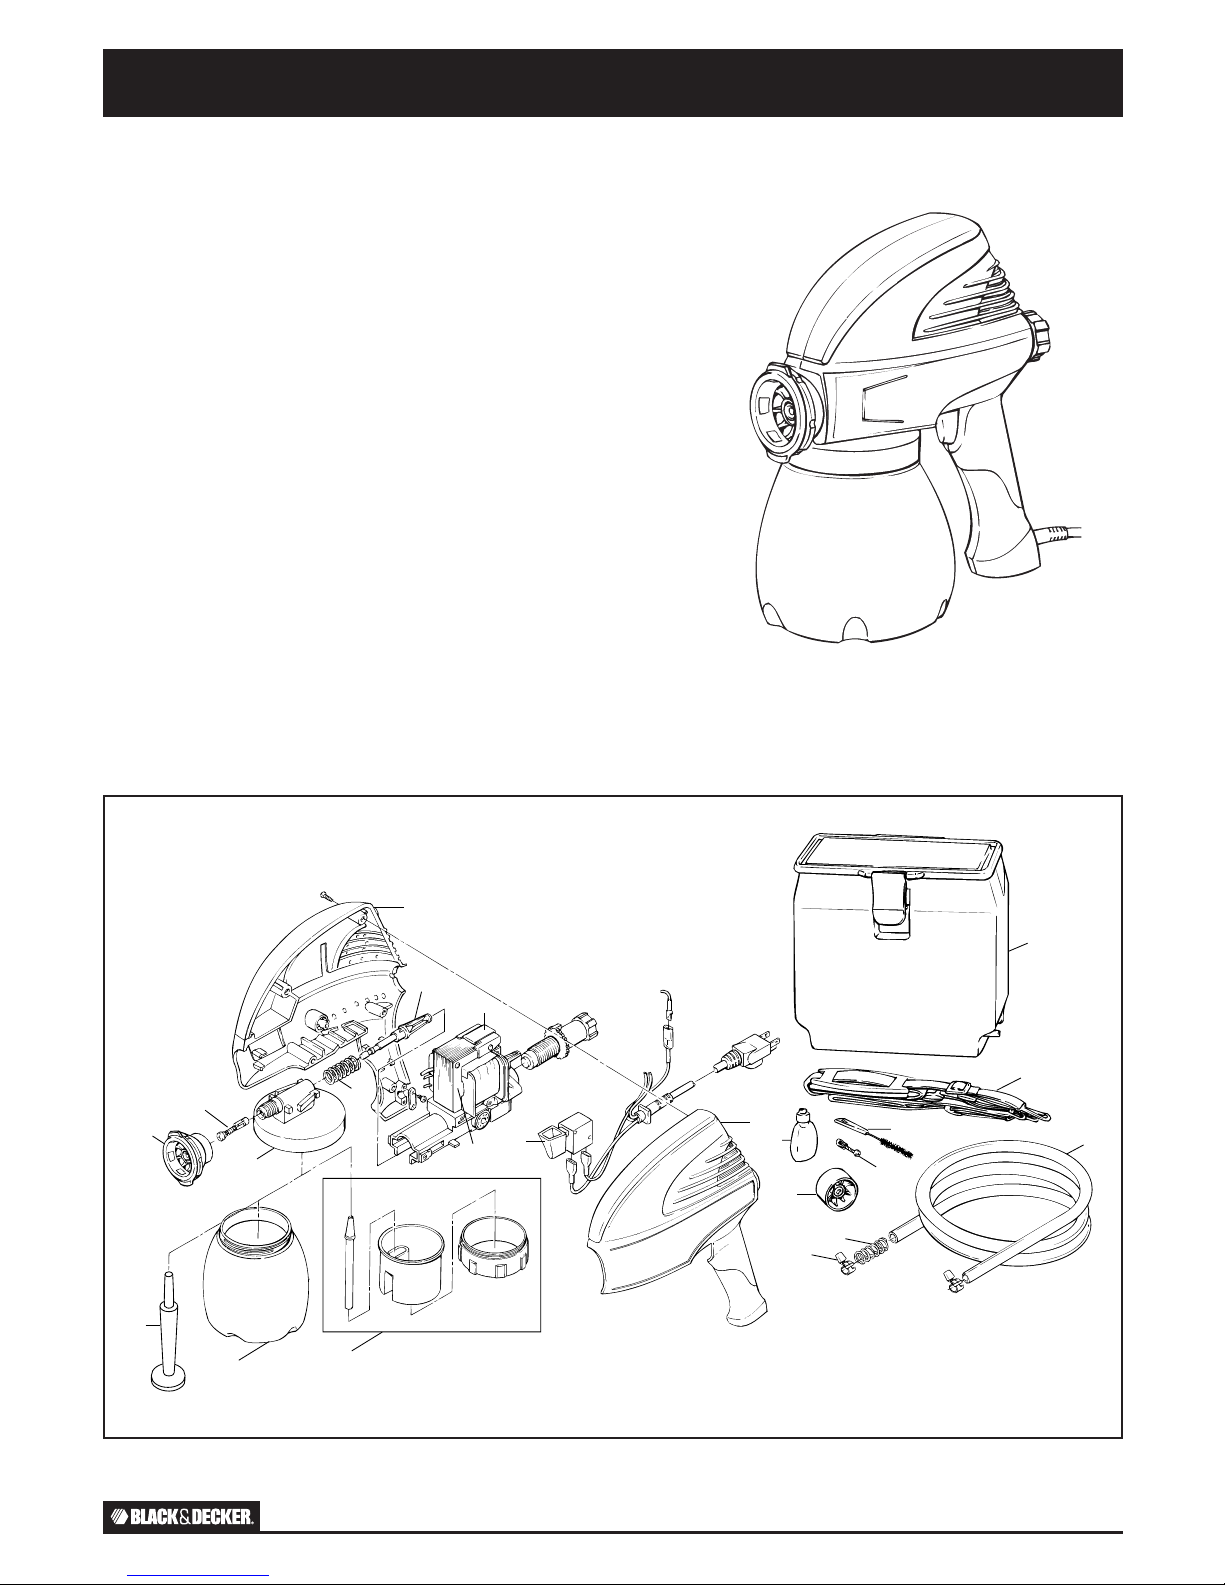
Parts List
Item Part No. Description Quantity
Pro 6.8 Pro 6.8 Plus
1 C817029 Spray Tip, 0.8mm Fan 1 1
2 C817027 Spray Tip, 0.8mm Cone — 1
3 C817030 Atomizer Valve (Orange) Fan 3 —
4 C817028 Atomizer Valve (Black) Cone 1 2
5 C806022 Cylinder Housing 1 1
6 C816550 Piston Spring 1 1
7 C816551 Piston 1 1
8 — Electric Drive Unit 1 1
9 — Housing 1 1
10 — Armature 1 1
11 — Spring Armature 1 1
12 — Volume Control Knob 1 1
13 C806024 Pick-up Tube 1 1
14 C806023 Container (1 qt.) 1 1
15 — Switch 1 1
16 — Cord 1 1
17 C816737 Petroleum Oil 1 1
18 C816545 Cleaning Brush 1 1
19 C817026 Backpack 1 1
20 C806026 Hose 1 1
21 — Hose Clamps 2 2
22 — Relief Spring 1 1
23 C806025 Backpack Strap 2 2
24 C806027 Inlet Cup Assembly 1 1
(for use with backpack)
If you cannot obtain parts and accessories at your local retailer, call or write:
HOME RIGHT, 1661 94th Lane N.E., Minneapolis, Minnesota 55449-4324,
Phone 763-780-5115 or 1-800-264-5442, 8:00 a.m. to 5:00 p.m. CST.
PARTS LIST
13
9
15
17
21
22
2
8
4
9
19
23
20
18
11
5
6
1
3
7
24
14
AIRLESS SPRAYERS PRO 6.8, PRO 6.8 PLUS ENGLISH 6
Page 7
PRACTICE FIRST
Practice spraying water on newspaper or cardboard. This will give you the feel of the
sprayer and all of its features. Follow the instructions for adjusting to the proper spray
pattern.
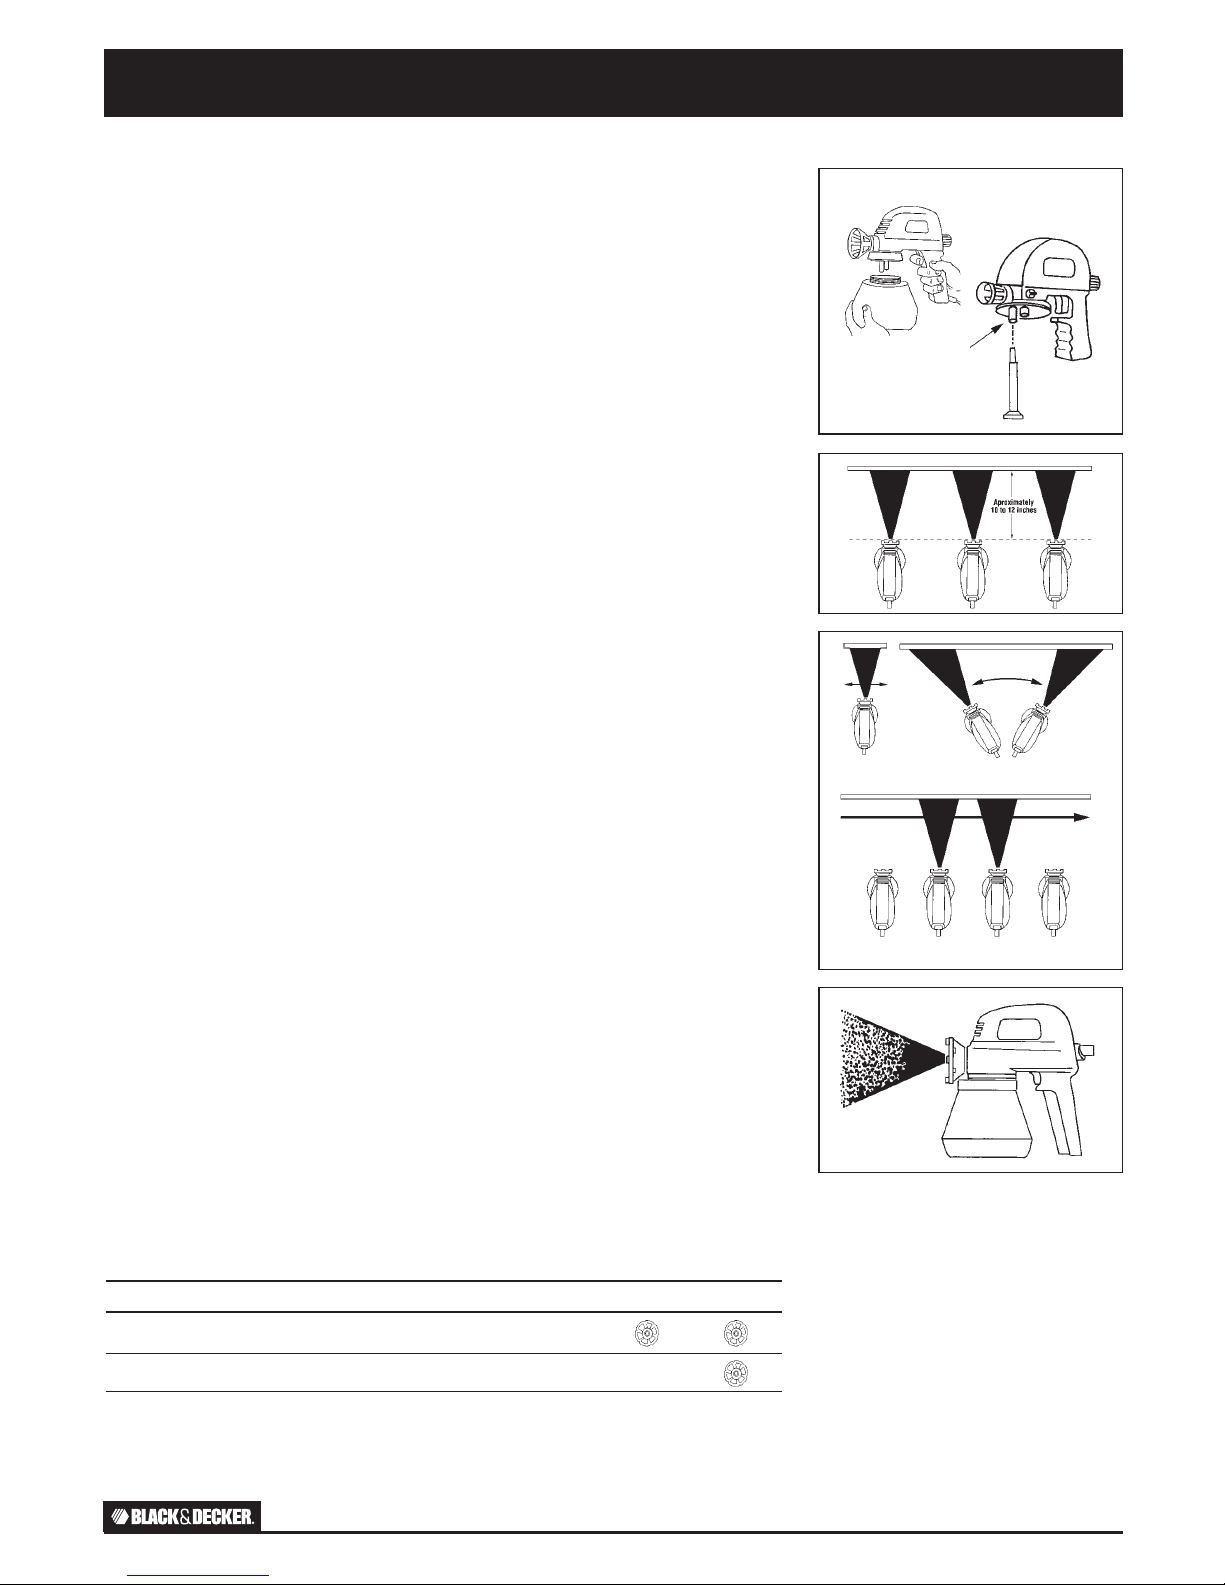
1. Check the following: (See Figure A.)
• Spray tip is screwed on tightly.
• Remove container from cylinder housing.
• Pick-up tube inserted tightly into the longer port of the cylinder housing.
2. Fill container with water. Refasten container to cylinder housing.
3. Plug in the sprayer.
4. Press switch. Allow a few seconds for the unit to spray water.
5. As you spray, adjust the volume control knob and notice the difference in spray volume
and spray pattern. Adjust the volume control knob until you get the best possible spray
pattern.
NOTE: The best distance for spraying is 10 in. to 12 in. Too far away may cause
excessive overspraying and too close may cause excessive spray build-up (runs). See
Figure B.
6. Keep a stiff wrist. Do not arch your wrist at the beginning or the end of the stroke. Do
not stop the motion of the unit while spraying. The path of the sprayer must pass
beyond the area being sprayed, and the switch must be triggered on and off as the
sprayer passes into and out of the spraying area. See Figure C.
NOTE: Stopping the motion of the sprayer or swinging into a new stroke pattern while
spray is being delivered will result in heavy spray build-up at the edges of the stroke.
THINNING MATERIALS
In order for your sprayer to operate properly it is important to make sure the stain or paint
is thin enough to be sprayed. Thinning should be followed per the stain or paint
manufacturer’s guidelines. Because materials differ from brand to brand, this guide can
offer only general information. The final guide to correctly thinned stain or paint is
achieving the proper spray pattern as shown in Figure D. Always follow the coverage rate
recommended by the manufacturer regardless of the thinning required. Because there is a
variance in viscosity between paint and stain brands, it might be necessary to thin five to
15 percent to achieve optimum spray pattern.
NOTES:
• Use the correct spray tip for the material being used. (See spray tip selection chart
below.)
• Be sure pick-up tube is tightly inserted in correct intake port.
• Thin material to proper viscosity, per manufacturer’s requirements.
• Before each use, check spray tip and atomizer valve for wear.
• Always thoroughly clean and oil the sprayer after each use.
• If you hear a low humming sound, immediately stop pressing the trigger.
See TROUBLESHOOTING.
• Thin material may spray better at low power setting.
• Old stain or paint should be strained before using.
• Stir stain or paint slowly. To prevent air bubbles, do not shake stain or paint.
HOW TO USE
A
B
Start Trigger Release End
C
D
Correct Incorrect
SPRAY TIP SELECTION CHART Airless Sprayer Model
Size Duty Materials Part Number PRO 6.8 PRO 6.8 Plus
0.8mm Heavy Duty Fan Premium Latex C816036
0.8mm Heavy Duty Cone Premium Latex C816697
AIRLESS SPRAYERS PRO 6.8, PRO 6.8 PLUS ENGLISH 7
Page 8
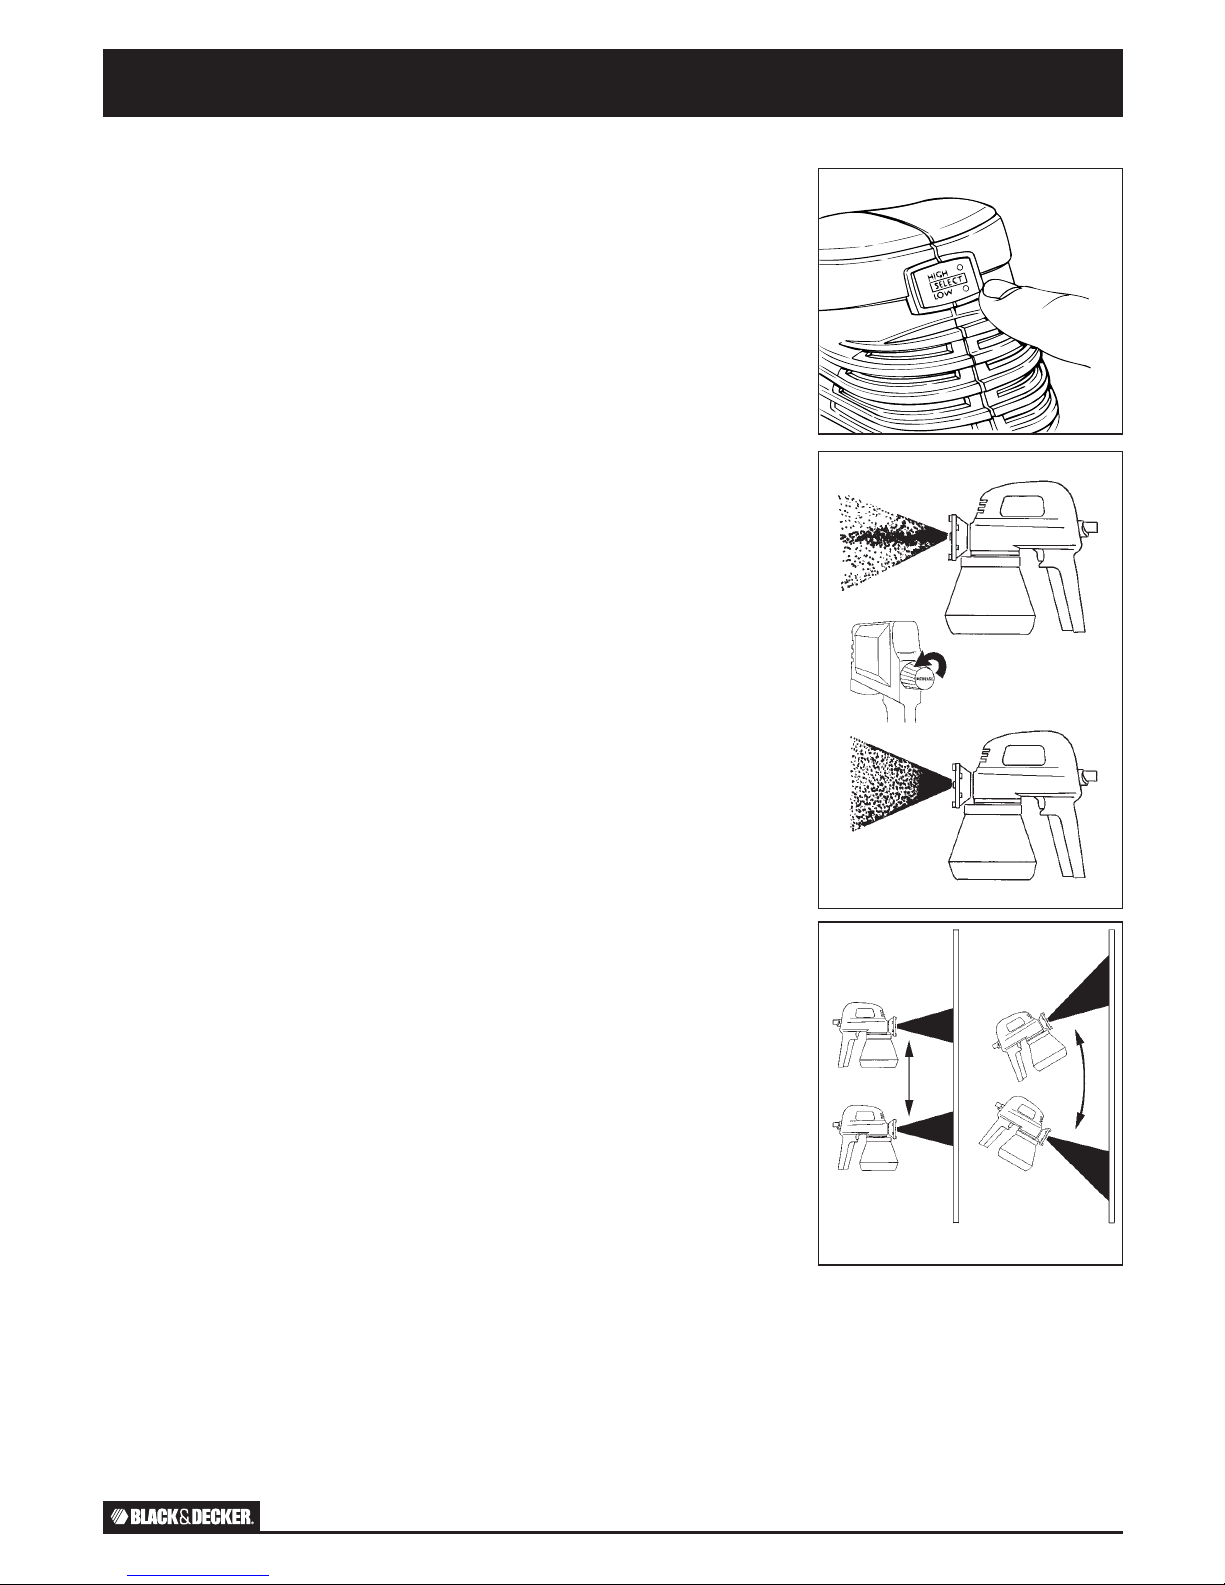
TWO-SPEED CONTROL
“Low” is the better setting when you need to paint slowly—doing tighter, detail work,
for example, when you are spraying thin materials (e.g., semi-transparent stain). The
“High” setting sprays more paint, so use this to quickly paint larger, more open areas.
(See Figure E.)
SPRAYING INSTRUCTIONS
Caution: Do not twist electrical cord. Make sure heavy objects are not placed on it. Keep
electrical cord away from heat and sharp objects. To avoid a tripping hazard, make sure
cord is not in a heavy traffic area. Do not use the cord if it is damaged.
Use appropriate breathing protection, eye protection, gloves and clothing.
1. Empty container thoroughly and ensure the container is dry.
2. Deposit the stain or paint material into container.
3. Begin spraying by pressing the switch. Adjust the volume control knob to get the best
spray pattern. A pattern with heavy spray in center (Figure F1) means the pressure is
too low. Adjust the volume control knob by turning counterclockwise to increase
pressure. A correct spray pattern looks like the one shown in Figure F2. The stain or
paint should be evenly spread over the surface.
4. If the spray pattern is still not correct, refer to TROUBLESHOOTING.
5. Hold the sprayer 10 to 12 inches from the surface to be stained or painted. Keep the
sprayer parallel to the ground without pointing it up or down. See Figure G.
NOTE: TILTING THE SPRAYER IS NOT RECOMMENDED.
NOTE: TO AVOID RUNS AND SAGS, DO NOT SPEED UP OR SLOW DOWN WHILE
MOVING THE SPRAYER.
6. Overlap each stroke about 1/3 of the spray pattern.
7. To spray inside corners, spray the adjoining walls or surface first. The overspray will
stain or paint the corner.
8. When you spray an outside corner, point the spray tip of the sprayer towards the
surface. This will prevent stain or paint from being sprayed past the corner and onto
surfaces you do not want stained or painted.
IMPORTANT
Should a low humming sound and/or irregular spray pattern occur while spraying,
immediately remove plug from electrical source and thoroughly clean the sprayer. This will
prevent the motor from overheating and causing damage to the sprayer. See CLEAN UP
INSTRUCTIONS.
NOTE: If you stop spraying for 30 minutes or longer; before continuing, retest the spray
pattern by spraying on newspaper or cardboard. If you are unable to adjust the spray
pattern properly, it is possible the stain or paint material has started to dry. If this
happens, clean the sprayer. See CLEAN UP INSTRUCTIONS.
NOTE: The small vent hole on the top of the cylinder housing must be kept clean. If the
stain or paint material should dry and clog the hole in the cylinder housing, your
sprayer will not function properly. See CLEAN UP INSTRUCTIONS.
NOTE: If the spray pattern is still not correct, a thorough cleaning of the spray tip,
atomizer valve assembly, and pick-up tube may be required. To maintain correct
spraying, it may be necessary to clean the unit after dispensing five to nine gallons of
paint or stain. After cleaning, reassemble the parts.
HOW TO USE (CONTINUED)
Correct Incorrect
F2
F1
G
E
AIRLESS SPRAYERS PRO 6.8, PRO 6.8 PLUS ENGLISH 8
Page 9
USING THE BACKPACK
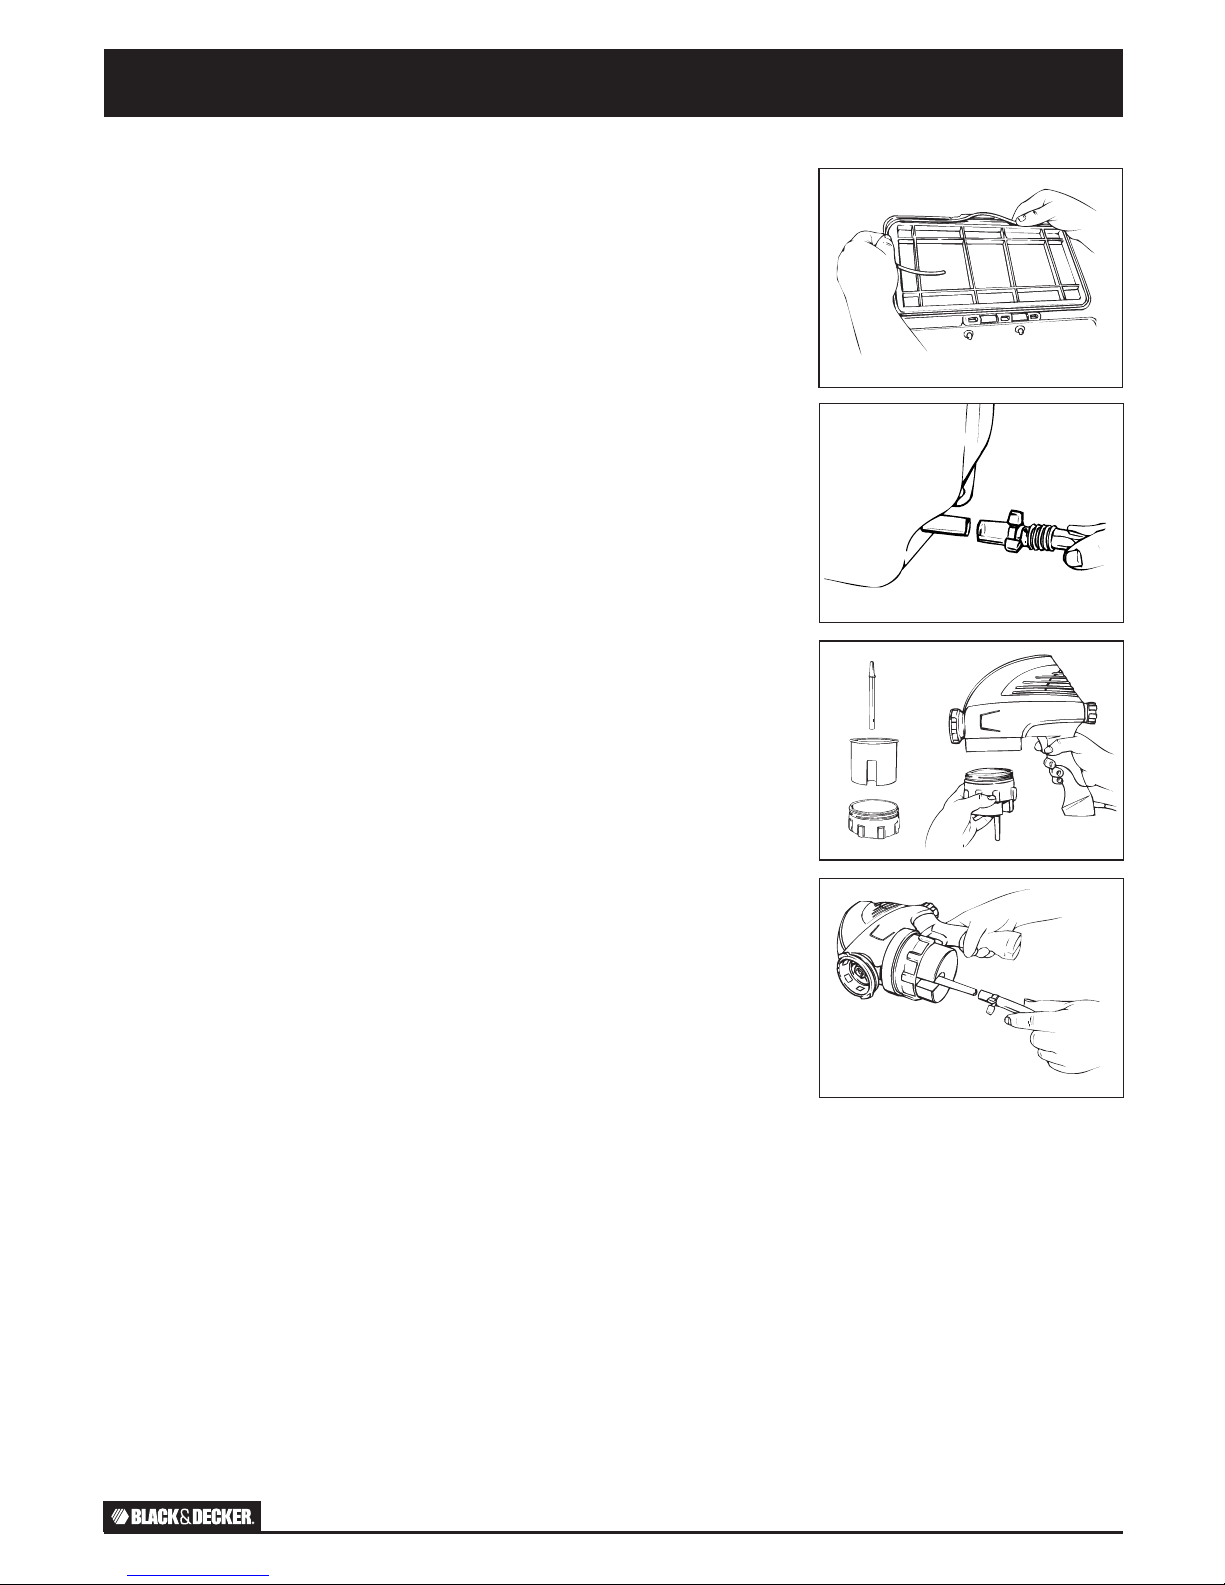
NOTE: First, if it is not already installed, install the o-ring in the channel in the backpack
lid. (See Figure H).
NOTE: To maximize performance when using the backpack, some thicker latex paints may
require thinning of five to 15 percent.
1. Connect the hose to the backpack with the clamp and relief spring provided (Figure I).
2. Assemble the Inlet Kit as shown in Figure J and connect to the sprayer.
3. Attach the other end of the hose to the Inlet Kit (Figure K).
4. Attached the straps to both sides of the backpack.
5. Pour up to one gallon of paint in the backpack. Do not overfill.
6. Strap on the backpack.
7. Follow the earlier instructions to begin painting.
CLEANING THE BACKPACK
1. Disassemble all sprayer parts and clean as described earlier. (See Clean Up Instructions
on page 10.)
2. Pour any remaining paint from the backpack back into the can.
3. Disconnect the hose from the backpack. Clean both with water or mineral spirits,
depending on the paint or stain you’ve used. See the manufacturer’s instructions on
the can.
USING THE BACKPACK
I
J
K
H
AIRLESS SPRAYERS PRO 6.8, PRO 6.8 PLUS ENGLISH 9
Page 10
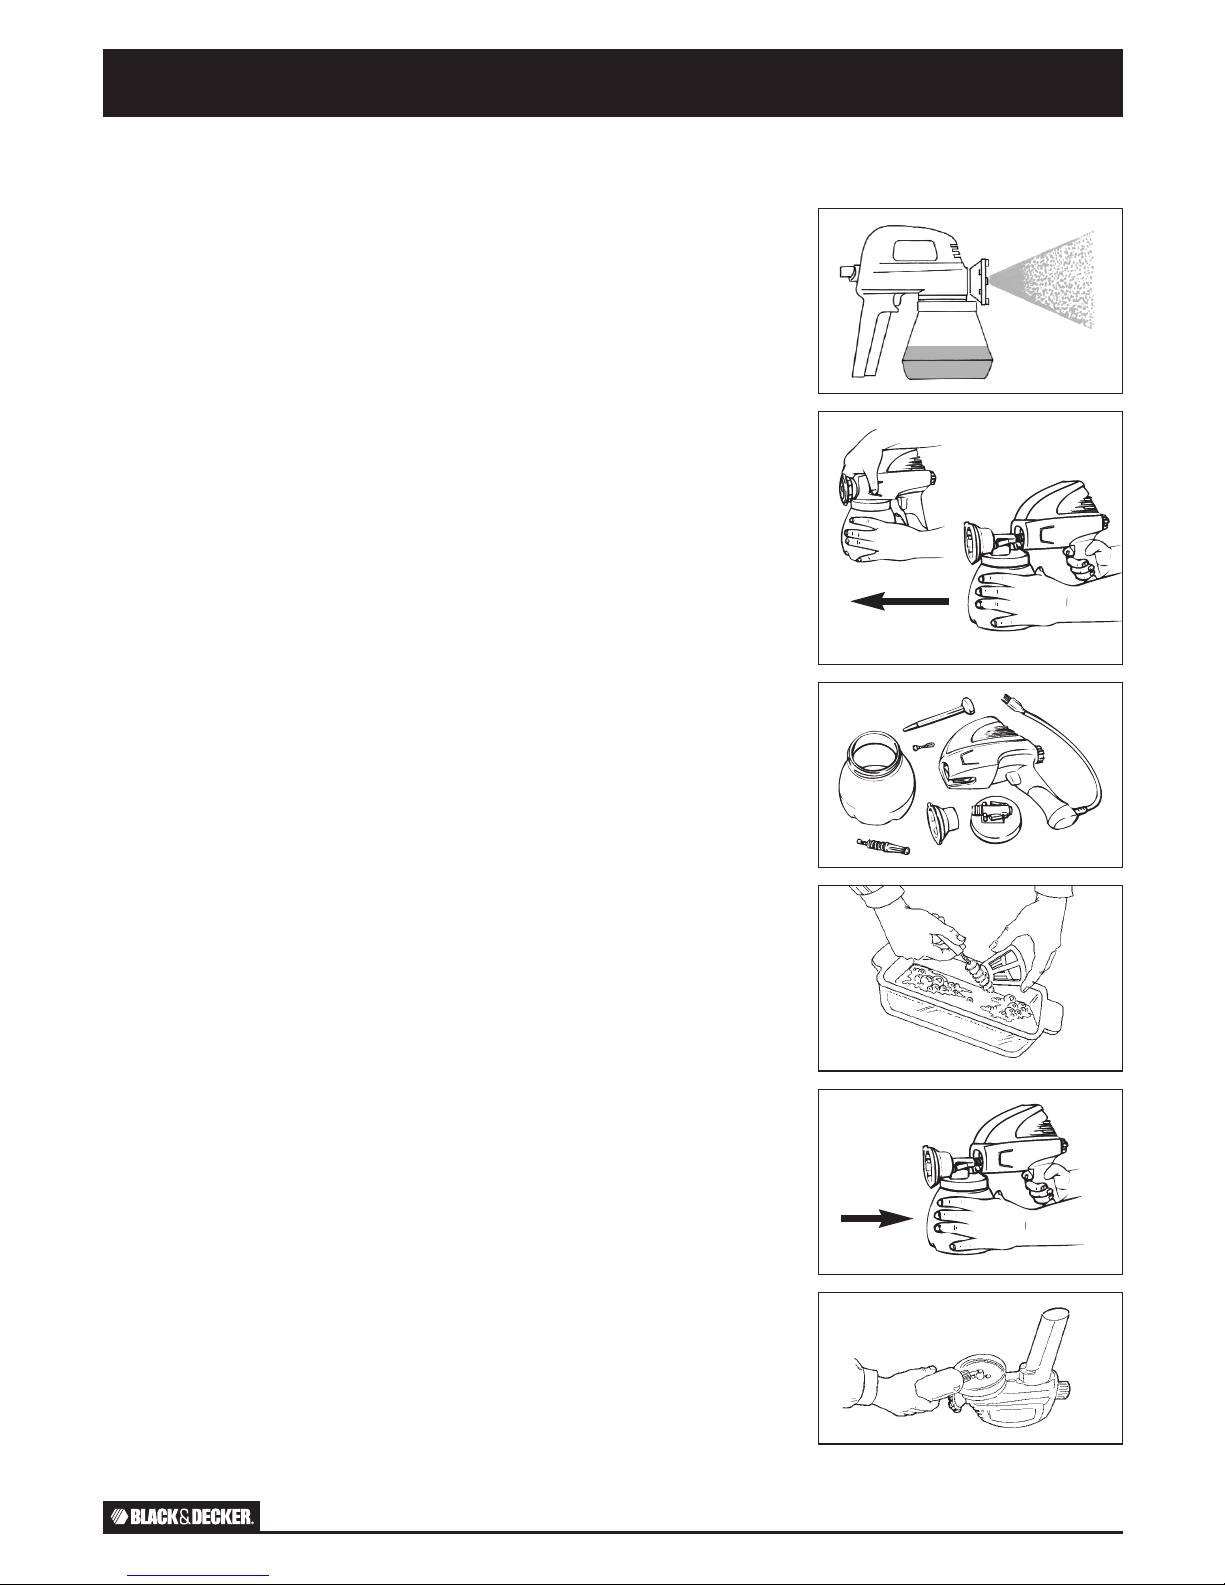
STEP ONE: CLEAN UP INSTRUCTIONS
NOTE: Proper clean up is essential to keep your sprayer in optimum working condition.
Dried by-products act like glue and will cause moving parts to stick. Failure to properly
clean your sprayer will damage the unit. Taking the time to clean your sprayer
immediately after use will help your sprayer last longer and work correctly. If you are
finished with the project or are not going to use the sprayer within the day, you must
follow these instructions for proper clean up. Never store the sprayer longer than 30
minutes without cleaning.
1. Unplug your sprayer from the electrical outlet.
2. Empty any remaining (stain or paint) material from the container.
3. Fill container approximately 1/2 full with appropriate cleaning solution. For latex, use
warm soapy water; for oil-based, use a cleaning solution recommended by the material
manufacturer. See Figure L.
4. Plug sprayer into an electrical outlet.
5. Press the switch of the sprayer until the cleaning solution passes through the spray
nozzle for several seconds.
6. Remove container and properly discard the cleaning solution.
7. Unplug the sprayer from the electrical outlet.
STEP TWO: CLEAN UP INSTRUCTIONS FOR THE CYLINDER HOUSING
1. Unplug your sprayer from the electrical outlet.
2. Press the QUICK RELEASE buttons on both sides of the sprayer. Grasp the container
with one hand and, with the other hand, slide out the QUICK RELEASE cartridge. See
Figure M.
3. Pull out pick-up tube.
4. Remove all the parts from the QUICK RELEASE pump housing cartridge. See Figure N.
5. Depending on the material used, some residue may remain on the sprayer parts.
Remove any remaining residue with the cleaning brush. See Figure O.
6. Lubricate all moving parts with lightweight oil. (Included, or use WD40
®
, 3-in-One®oil,
or similar product.)
7. Reassemble the QUICK RELEASE pump housing cartridge parts.
8. Reinsert the cylinder housing into the housing. You will hear a click when the cylinder
housing is engaged into the housing. See Figure P.
9. Reassemble the pick-up tube and the container.
LUBRICATION INSTRUCTIONS
Lubricating the sprayer prior to storage is extremely important to maximize the life of the
cylinder housing and its components.
1. Unplug your sprayer from the electrical outlet.
2. Empty any remaining (stain or paint) material from the container, remove the pick-up
tube and clean.
3. Plug the sprayer into the electrical outlet.
4. Turn the sprayer upside down.
5. Squeeze a small amount of petroleum oil into the pick-up tube port and on the cylinder
pump housing, See Figure Q.
6. Press the switch of the sprayer for three to five seconds while the sprayer is still turned
upside down. This will force the petroleum oil onto the piston and will protect the
sprayer from drying and the piston from seizing.
7. Turn the sprayer right side up and reinstall the pick-up tube and container.
8. Unplug your sprayer from the electrical outlet. Store the unit.
QUICK RELEASE CLEAN UP, LUBRICATION, & MAINTENANCE
Q
M
N
O
P
L
AIRLESS SPRAYERS PRO 6.8, PRO 6.8 PLUS ENGLISH 10
Page 11
TROUBLESHOOTING
PROBLEM CAUSE REMEDY
Motor does not run A. No power to motor. A. Check wall outlet and extension cord.
B. Loose electrical connection. B. Discontinue use, call Customer Service.
C. Defective motor or switch. C. Call Customer Service.
Motor makes muffled A. The volume control knob is screwed in all the way. A. Adjust the volume control knob.
humming sound B. Seized piston. B. Remove piston and cylinder housing. Clean, then add
petroleum oil.
C. Plugged atomizer valve or spray tip. C. Replace atomizer valve and clean hole in spray tip.
D. Atomizer valve assembly is not seated properly. D. Replace Atomizer Valve.
Stain or paint is spitting A. Pick-up tube is not tight in cylinder housing. A. Clean and firmly insert into intake opening on pump housing.
B. Container volume is low. B. Refill container.
C. Improper adjustment. C. Adjust volume control knob.
D. Stain or paint material is too thick. D. Thin according to stain/paint manufacturer’s requirements.
E. Loose spray tip. E. Tighten spray tip.
F. Stain or paint material has impurities. F. Pour stain/paint material through strainer.
G. Worn atomizer valve. G. Replace with new atomizer valve.
H. Worn piston. H. Replace piston. Call Customer Service.
Excessive overspray (fogging) A. Sprayer too far from surface. A. Move sprayer closer to to surface.
B. Pressure too high. B. Adjust volume control knob.
C. Worn spray tip. C. Replace with new spray tip.
D. Stain or paint material is too thick. D. Thin according to stain/paint manufacturer’s requirements.
Uneven spray pattern A. One or more holes in the atomizer valve are clogged. A. Clean atomizer valve.
B. Partial blockage in spray tip. B. Clean spray tip.
C. Worn atomizer valve. C. Replace with new atomizer valve.
Material leaks into head A. Operating sprayer with an upward tilt. A. Keep sprayer level.
of cylinder housing B. Piston or cylinder housing scored. B. Replace piston or cylinder housing.
Material dripping A. Spray tip loose. A. Tighten spray tip.
B. Operating sprayer at more than a 40° angle. B. Keep sprayer upright.
Motor overheats A. Seized piston. A. Clean piston.
B. Operating sprayer for a prolonged period of time. B. Let sprayer cool.
C. Extension cord too long. C. Replace with proper size.
Stain or paint will not draw A. Sprayer not lubricated. A. Lubricate sprayer parts.
into the sprayer B. Hole between inlet and cylinder housing plugged. B. Make sure pick-up tube is in the correct port (longer one)
and then tighten the nozzle.
C. Suction tube is not tight on cylinder housing. C. Clean and firmly insert into intake opening on pump housing.
Motor is running, but A. Atomizer valve plugged. A. Ensure that atomizer valve is clean and free from debris.
sprayer will not spray B. Atomizer valve not properly seated. B. Ensure the atomizer valve is properly seated within the
cylinder housing and inserted correctly.
C. Stain or paint material is too thick. C. Thin stain/paint according to manufacturer’s requirements.
D. Pick-up tube is not tight to cylinder housing. D. Reattach pick-up tube to cylinder housing.
E. Failure to prime with backpack tube. E. Thin stain/paint according to manufacturer’s requirements.
Hold sprayer below level of paint can when priming.
F. Loose or damaged backpack tube. F. Tighten or replace.
G. Spray tip plugged. G. Thoroughly clean or replace spray tip.
H. Worn piston. H. Replace piston. Call Customer Service.
Sags and runs in painted A. Movement of arm too slow, holding sprayer A. See SPRAYING INSTRUCTIONS page 8.
surface too close to work surface or applying too much paint.
Quick release cartridge will A. Seized piston. A. Clean quick release cartridge thoroughly and reassemble.
not lock into place B. Locking device defective. B. Call Customer Service.
ROCIADORES SIN AIRE PRO 6.8, PRO 6.8 PLUS ENGLISH 11
 Loading...