

Black+Decker MFP200T Use And Care Book Manual

Please Read and Save this Use and Care Book
Por favor lea este instructivo antes de usar el producto
Veuillez lire et conserver ce guide d’entretien et d’utilisation
Model
Modelo
Modèle
❑
MFP200T
MiniPro
™
Mini Food Processor
Miniprocesador
de alimentos
Minirobot culinaire
Accessories/Parts (USA/Canada)
Accesorios/Partes (EE.UU/Canadá)
Accessoires/Pièces (É.-U./Canada)
1-800-738-0245
USA/Canada 1-800-231-9786
Mexico 01-800-714-2503
www.applicaconsumerproductsinc.com
Register your product online at www.prodprotect.com/applica,
for a chance to WIN $100,000!
Registre su producto en la Internet en el sitio Web www.prodprotect.com/applica
y tendrá la oportunidad de GANAR $100,000!
Inscrivez votre produit en ligne à l'adresse www.prodprotect.com/applica
et courez la chance de GAGNER 100 000 $!
MFP200T 1/18/07 8:03 AM Page 1

2
1
IMPORTANT SAFEGUARDS
POLARIZED PLUG
This appliance has a polarized plug (one blade is wider than the other). To reduce the
risk of electric shock, this plug is intended to fit into a polarized outlet only one way. If
the plug does not fit fully into the outlet, reverse the plug. If it still does not fit, contact
a qualified electrician. Do not attempt to modify the plug in any way.
TAMPER-RESISTANT SCREW
Warning : This appliance is equipped with a tamper-resistant screw to prevent removal
of the outer cover. To reduce the risk of fire or electric shock, do not attempt to
remove the outer cover. There are no user-serviceable parts inside. Repair should be
done only by authorized service personnel.
Note: If the power supply cord is damaged, it should be replaced by qualified
personnel or in Latin America by an authorized service center.
SAVE THESE INSTRUCTIONS.
When using electrical appliances, basic safety precautions should always be
followed, including the following.
❑ Read all instructions.
❑ To protect against risk of electrical shock, do not put base, cord, or plug
in water or other liquid.
❑ Close supervision is necessary when any appliance is used by or near
children.
❑ Unplug from outlet when not in use, before putting on or taking off parts,
and before cleaning.
❑ Avoid contacting moving parts.
❑ Do not operate any appliance with a damaged cord or plug or after the
appliance malfunctions or is dropped or damaged in any manner.
❑ Return the appliance to the nearest authorized service facility for
examination, repair, or electrical or mechanical adjustment. Or, call the
appropriate toll-free number listed on the cover of this manual.
❑ The use of attachments not recommended or sold by the appliance
manufacturer may cause fire, electric shock, or injury.
❑ Do not use outdoors.
❑ Do not let cord hang over edge of table or counter.
❑ Keep hands and utensils away from moving blades or discs while
processing food to prevent the possibility of severe personal injury or
damage to the food processor. A scraper may be used, but it must be used
only when the food processor is not running.
❑ Blades are sharp. Handle carefully.
❑ To reduce the risk of injury, never place cutting blade or discs on base
without first putting bowl properly in place.
❑ Be certain cover is securely locked in place before operating appliance.
❑ Never feed food into chute by hand. Always use food pusher.
❑ Do not attempt to defeat the cover interlock mechanism.
❑ Do not use appliance for other than intended use.
MFP200T 1/18/07 8:03 AM Page 2
4
3
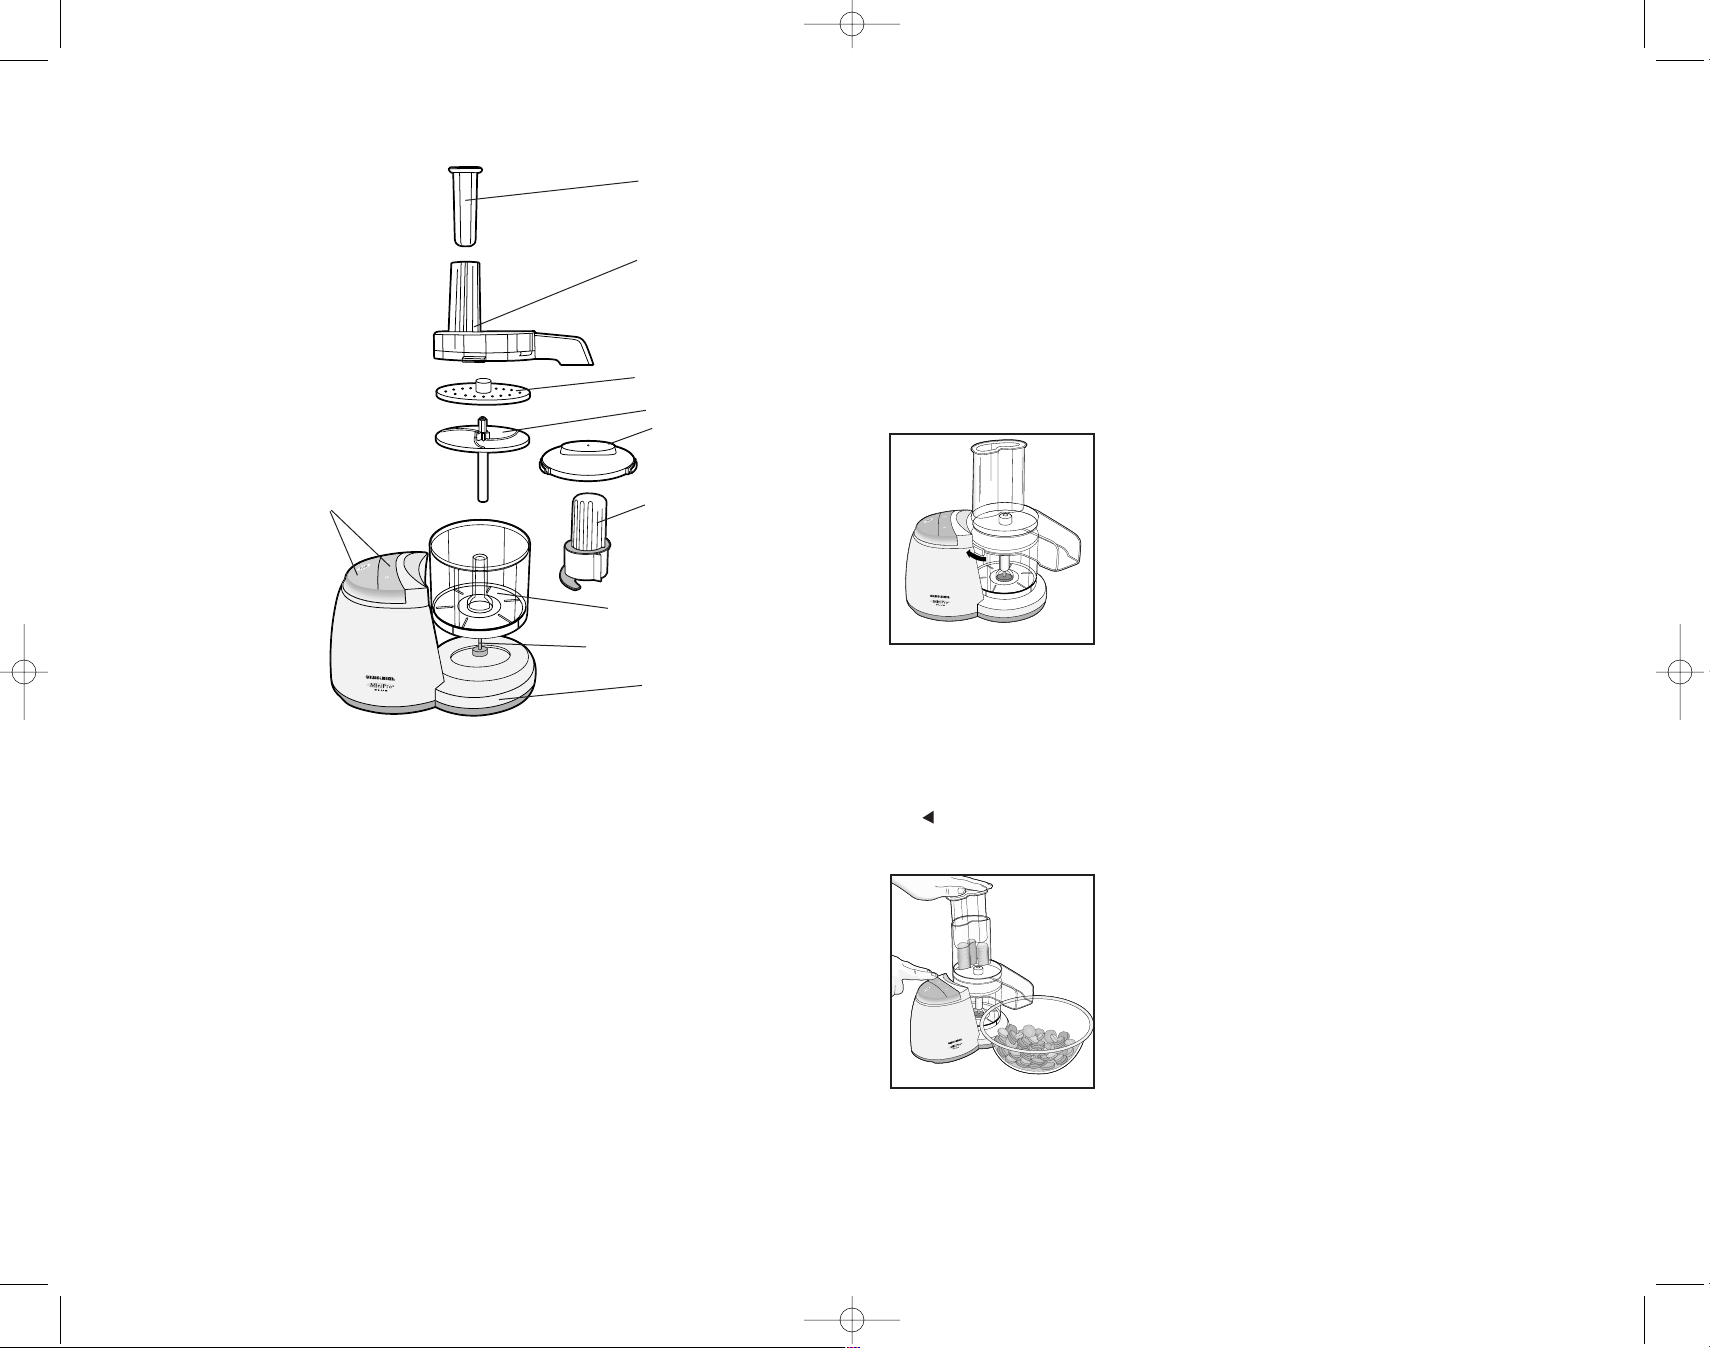
Product may vary slightly from what is illustrated.
How to Use
This product is for household use only.
• Before first use, unpack the product and remove packing material. Handle sharp
chopping blade and slice/shred discs carefully.
• Wash all parts except base.
Note: Do not attempt to chop ice in this food processor; it will damage container and dull
chopping blade. This unit will not whip cream, beat egg whites to a desirable volume,
grind coffee beans or spices with a high oil content, or slice or shred hard-cooked eggs,
marshmallows, or soft cheeses.
CONTROLS
OFF — Processor should always be left in OFF position when unit is not in use.
PULSE — PULSE button must be pressed and held for unit to operate. When released, unit
will stop. Use PULSE for short processing tasks, such as chopping nuts, raw meats, or
vegetables. This lets you check processed results and control the fineness.
Using the Food Processor
IMPORTANT: For your protection this unit has an interlock
system. When you slip the bowl over the post, turn it toward
the base so that it locks into place. Be sure to turn the cover
(or chopping lid, depending on use) toward the lock position so
that the Tab locks into the slot on the Base (A). This unit will
not operate unless the cover (or chopping lid) is locked into
place.
How to slice or shred
1. Slip the bowl over the center post and twist it toward the base so that the bowl locks
into place.
2. Carefully grasp the slice/shred disc by the hub or its edges with the desired side (slice or
shred) up, and push it down onto the top of the discharge disc. Slip the discharge disc
(with slice/shred disc) over the center post.
3. Place the cover with continuous flow chute onto the bowl and twist it toward the base
() until you hear it click into place (A). Position a large, low serving/preparation
bowl under the continuous flow chute to catch food and spatter. Rimless bowls work
better than bowls with a lip.
4. Plug the cord into an electrical outlet.
5. Use the food guide to help you prepare food for slicing or
shredding. Fill the food chute and position the food pusher
over the food.
6. Push down with a light but steady pressure on the food
pusher while pressing the desired speed: Hi, Low (B). Press
and hold the pulse position for short processing tasks, such
as slicing a cucumber. The unit will stop when you release
the pulse button. Use the Hi, Low, position for continuous,
longer processing tasks, such as shredding cabbage
or carrots.
NOTE: Let the processor do the work. Heavy pressure will not speed up operation. Do not
use the processor continuously for more than 3 minutes at a time. Occasionally turn the
serving bowl during processing to prevent food build up in the continuous flow chute that
could fall out of the bowl. Be sure the processor and bowl are far enough back on the
counter to prevent bits from falling on the floor.
†1.Food pusher (Part# MFP200T-01)
†2.Cover with continuous flow chute (Part# MFP200T-02)
†3.Slice/shred disc with hub (Part# MFP200T-03)
†4.Discharge disc (Part# MFP200T-04)
†5.Chopping lid (Part# MFP200T-05)
†6.Chopping blade (Part# MFP200T-06)
†7.2-Cup (480 ml) Bowl (Part# MFP200T-07)
8. Post
9. Base
10. High/Low/Off/Pulse Control
†Consumer replaceable/removable parts
A
B
MFP200T 1/18/07 8:03 AM Page 4
LOCK

6
5
7. After processing food, turn the unit “off” by pressing on the elevated end of the rocker
“lever” so that it will be even with the top of the unit in the “Off” position or release
the pulse button. Allow the disc to stop spinning completely before you remove the
cover with Continuous flow chute by turning it toward the ( ) position and
lifting it off.
Chopping Blade
The chopping blade speeds up many everyday tasks and is designed to chop, crumb, grind,
mince and mix quickly.
1. Slip the bowl over the center post and twist it toward the
base to be sure the bowl locks into place.
2. Grasp the chopping blade by its center hub and slide it
down onto the post (C).
3. Use the food guide to help you prepare food for chopping/
mincing/mixing and crumbing, then place the food into the
bowl. Place the chopping lid onto the bowl and twist it
toward the base until you hear it click into place.
4. Plug the cord into an electrical outlet.
5. Use the Hi or Low for longer processing tasks to make salad dressing, dips, or baby
food. Use the pulse position for short processing like chopping nuts or crumbing bread.
Hold the pulse position for about 2-3 seconds: check results; repeat for desired
consistency. It is better to use several short pulses rather than a single long one unless
mixing ingredients that require longer processing times.
6. After processing food, turn the unit “off” by pressing on the elevated end of the rocker
“lever” so that it will be even with the top of the unit in the “Off” position or release
the pulse button. Let the chopping blade stop spinning before you twist the chopping
lid off.
7. Grasp the chopping blade by its hub and remove. Unlock the bowl by twisting it off the
base. Empty the processed food.
FOOD PROCESSING TIPS
Liquids
• Hot liquids (not boiling) and hot foods can be processed in container.
• Be sure to process small amounts of liquids — 2 cups or less at a time. Larger amounts
will leak from container.
Food Size, Preparation and Loading
• When preparing cookie, cake batter or quick bread, use the chopping blade to cream
butter or shortening and sugar first. Add dry ingredients last. Place nuts and fruits on top
of dry ingredients to prevent over-chopping. Process using short pulses until blended.
Do not overprocess.
Meat
• When using the chopping blade for processing meat, cut the meat into 1" (2.54cm)
cubes. Do not put more than 1/2 lb. (230g) of meat into the container at a time. Chop
on pulse to the size desired.
Dry Ingredients
• When using different foods in a recipe, process dry ingredients first and moist
ingredients later. This reduces the number of times container must be washed and dried.
Care and Cleaning
This appliance contains no user-serviceable parts. Refer service to qualified service
personnel.
NOTE: Do not attempt to sharpen the cutting edges of the chopping blade or the reversible
slice/shred disc. They are permanently sharpened at the factory and will be ruined by
attempted sharpening.
Cleaning
1. Before cleaning, be sure the unit is Off and unplugged.
2. Rinse parts immediately after processing for easy cleanup. Removable parts can be
washed by hand or in a dishwasher, top rack.
• If washing by hand, use warm soapy water, rinse, and dry thoroughly. If necessary, use
a small bristle brush to thoroughly clean the bowl, cover with continuous flow chute,
chopping blade, and slice/shred disc.
• In a dishwasher, place removable parts on the top rack only — not in or near the utensil
basket.
3. Wipe the base with a damp sponge or cloth and dry thoroughly. Remove stubborn spots
with a damp cloth and a mild, non-abrasive cleaner. Do not immerse the base in liquid.
4. Do not use rough scouring pads, abrasives, or cleansers on any parts.
5. Do not fill the bowl with boiling water or place any parts in boiling water. Some foods,
such as carrots, may temporarily stain the bowl. To remove stains, make a paste of
1 tablespoon baking soda and two tablespoons warm water. Apply the paste to the
stains and rub with a cloth. Rinse in sudsy water and dry.
C
MFP200T 1/18/07 8:03 AM Page 6
UNLOCK

8
7
Food Guide
FOOD ATTACHMENT COMMENTS
APPLES Disc, Slicing Side Stack 2 quarters horizontally in chute.
Use moderate pressure.
BANANAS Disc, Slicing Side Peel and cut in half; use light pressure.
CABBAGE Disc, Shredding Side Cut to fit chute; shred into bowl.
Add slaw ingredients (mayo, vinegar,
salt, etc.)
CARROTS Disc, Slicing Side Cut into 4” (10.2 cm) lengths and pack
(Sliced, shredded) in chute, alternating thick and thin
Shredding Side ends. Position in chute & shred.
CELERY, CHOPPED Chopping Blade Up to 1 cup cut into 1/2” (1.27 cm)
Chopping Lid lengths. Pulse to desired texture.
CUCUMBER Disc, Slicing Side Cut to fit chute; use light pressure.
CHEESE, PARMESAN Chopping Blade Cut into 1/2” (1.27 cm) cubes and
Chopping Lid pulse up to 1/2 cup at a time.
CHEESE, CHEDDAR Disc, Shredding Side Cut chilled cheese to fit chute/shred.
EGGS Chopping Blade Quarter up to 3 eggs and pulse to
(HARD COOKED) Chopping Lid desired texture. Add mayo, salt, and
seasoning for egg salad.
NUTS, CHOPPED Chopping Blade Add up to 1 cup; pulse to desired
Chopping Lid fineness.
ONIONS Chopping Blade Quarter or cut large onions into
Chopping Lid 8 pieces. Add to bowl. Pulse. For even,
coarse results, only chop 2 quarters
at a time.
BREAD Chopping Blade Use up to 2 slices/broken into pieces.
Chopping Lid Pulse speed.
PARSLEY, OTHER Chopping Blade Add up to 1 cup; pulse to desired
HERBS Chopping Lid fineness.
PEPPERONI Disc, Slicing Side Cut into 4” (10 cm) lengths. Slice 1
piece at a time using firm pressure.
POTATOES Disc, Shredding Side Cut to fit chute. After shredding, place
in cold water to prevent darkening
before frying.
SQUASH (SHREDDED) Disc, Shredding Side Cut to fit chute; shred, salt and drain.
Fries well in butter or oil.
Cuando se usan aparatos eléctricos, se debe de tomar ciertas precauciones
incluyendo las siguientes:
❑
Por favor lea todas las instrucciones.
❑
A fin de protegerse contra el riesgo de un choque eléctrico, no coloque la
base, el cable, ni el enchufe en agua ni en ningún otro líquido.
❑
El uso de todo aparato eléctrico utilizado por o en la presencia de los niños
requiere la supervisión de un adulto.
❑
Desconecte el aparato de la toma de corriente cuando no esté en uso,
cuando le quite o le ponga piezas y antes de limpiarlo.
❑
Evite el contacto con las piezas móviles.
❑
No utilice ningún aparato eléctrico si el cable o el enchufe están da.ados,
si el aparato no funciona, si este se ha dejado caer o presenta cualquier
daño. Devuelva el producto al centro de servicio autorizado más cercano
a fin de que lo examinen, reparen o realicen cualquier ajuste electrónico
o mecánico. Puede también llamar al número gratis correspondiente que
aparece en la portada de este manual.
❑
El uso de accesorios no recomendados ni a la venta por el fabricante puede
ocasionar incendio, choque eléctrico o lesiones personales.
❑
No utilice este aparato a la intemperie.
❑
No permita que el cable cuelgue del borde de la mesa o del mostrador.
❑
Mantenga las manos y los utensilios alejados de las cuchillas o de los discos
en movimiento mientras procesa los alimentos, a fin de prevenir serias
lesiones personales o da.o al mismo procesador. Uno puede utilizar
utensilios siempre que el aparato no se encuentre en funcionamiento.
❑
Las cuchillas tienen filo y uno debe manejarlas con cuidado.
❑
A fin de reducir el riesgo de lesiones, nunca coloque la cuchilla de cortar
ni los discos sobre la base, sin antes haber instalado bien el recipiente
en su lugar.
❑
Asegúrese que la tapa esté cerrada debidamente antes de utilizar el aparato.
❑
Nunca introduzca los alimentos adentro del conducto con la mano. Utilice el
empujador de alimentos.
❑
No trate de alterar el mecanismo de entrecierre de la tapa.
❑
Este aparato se deberá utilizar solamente con el fin previsto.
INSTRUCCIONES DE SEGURIDAD
CONSERVE ESTAS
INSTRUCCIONES.
MFP200T 1/18/07 8:03 AM Page 8
 Loading...