

1
VEA EL ESPAÑOL EN LA CONTRAPORTADA.
POUR LE FRANÇAIS, VOIR LA COUVERTURE ARRIÈRE.
SAVE THIS MANUAL FOR FUTURE REFERENCE.
INSTRUCTIVO DE OPERACIÓN, CENTROS DE SERVICIO Y
PÓLIZA DE GARANTÍA. ADVERTENCIA: LÉASE ESTE
INSTRUCTIVO ANTES DE USAR EL PRODUCTO.
INSTRUCTION MANUAL
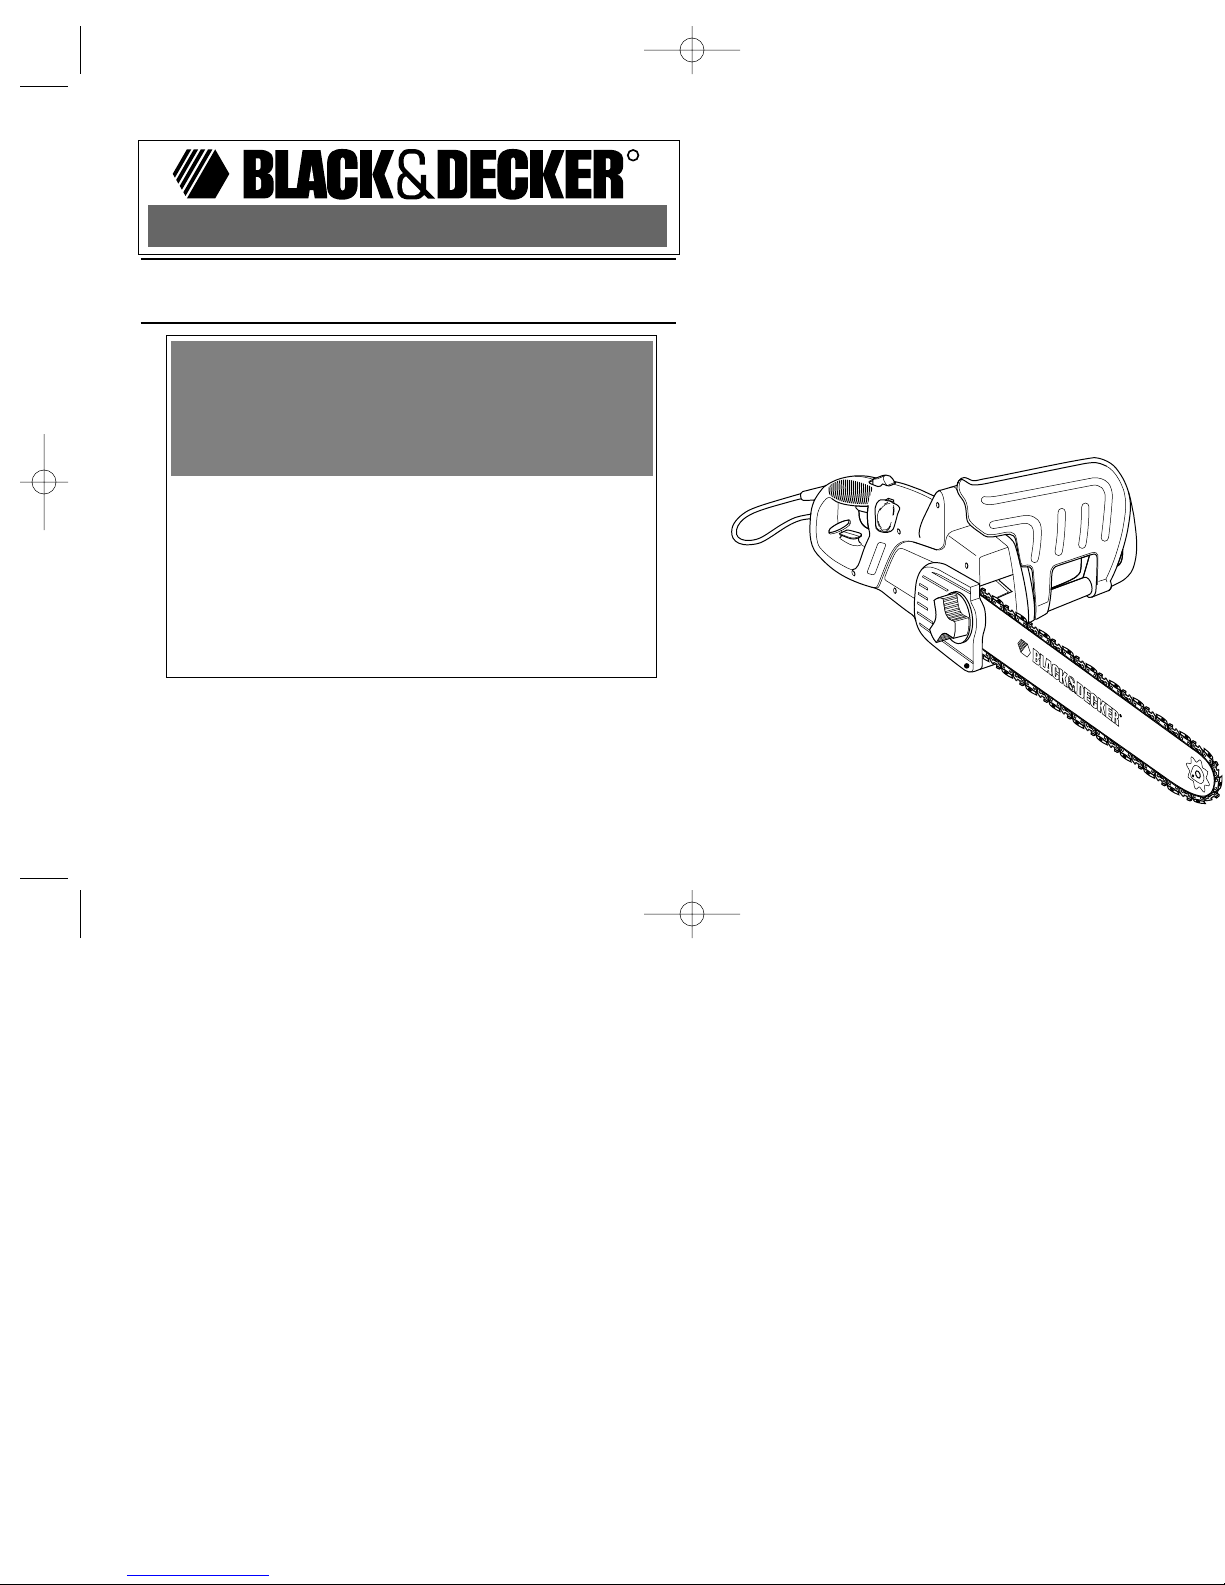
LLLLHHHH1111666600000000 EEEElllleeeeccccttttrrrriiiicccc CCCChhhhaaaaiiiinnnn SSSSaaaaww
ww
KEY INFORMA TION YOU SHOULD KNOW:
•Hand guard must be in the "set" position or saw will not
operate. Refer to "AUTO STOP CHAIN BRAKING SYSTEM
page 11.
•DO NOT OVER-TENSION CHAIN. Refer to "ASSEMBLY OF
GUIDE BAR AND CHAIN" on page 10 for proper method o
tensioning chain.
•Retighten chain frequently during first two hours of use.
chainsaw booklet 1/19/00 1:44 PM Page 1
BEFORE RETURNING THIS PRODUCT
FOR ANY REASON PLEASE CALL
R
1-800-54-HOW-TO
IF YOU SHOULD EXPERIENCE A PROBLEM
WITH YOUR BLACK & DECKER PURCHASE,
(544-6986)
CALL 1-800-54-HOW-TO (1-800-544-6986).
IN MOST CASES, A BLACK & DECKER REPRESENTATIVE
CAN RESOLVE YOUR PROBLEM OVER THE PHONE.
IF YOU HAVE A SUGGESTION OR COMMENT,
GIVE US A CALL. YOUR FEEDBACK IS VITAL
TO THE SUCCESS OF BLACK & DECKER'S QUALITY
IMPROVEMENT PROGRAM.

2
5
4
3
2
1
11
10
9
8
7
4a
6
14
13
12
1
16
2
A
12
15
16
17
13
B1
B
B3
C1
C2
13A
13A
1
chainsaw booklet 1/19/00 1:44 PM Page 2
3
17
4
8
7
C3
C4
D
E1
E2
F1
C5
C6
chainsaw booklet 1/19/00 1:44 PM Page 3
4
45°
45°
45°
H1
H2
H3
J2
J3
1
1
2
10
11
F2
F3
G1
J1
LOG
HOG
R
G2
chainsaw booklet 1/19/00 1:44 PM Page 4
5
If you have any questions, call 1-800-54-HOW
CHAIN SAW NAMES AND TERMS
• Bucking - The process of cross cutting a felled tree or log into
lengths.
• Chain Brake - A device used to stop the chain saw.
• Chain Saw Powerhead - A chain saw without the saw chain and
guide bar.
• Clutch - A mechanism for connecting and disconnecting a driven
member to and from a rotating source of power.
• Drive Sprocket or Sprocket - The toothed part that drives the
saw chain.
• Felling - The process of cutting down a tree.
• Felling Back Cut - The final cut in a tree felling operation made
the opposite side of the tree from the notching cut.
• Front Handle - The support handle located at or toward the fron
of the chain saw.
• Front Handle Guard - A structural barrier between the front
handle of a chain saw and the guide bar, typically located close t
the hand position on the front handle and sometimes employed a
an activating lever for a chain brake.
• Guide Bar - A solid railed structure that supports and guides the
saw chain.
• Guide Bar Scabbard - Enclosure fitted over guide bar to preven
tooth contact when saw is not in use.
• Kickback - The backward or upward motion, or both of the guide
bar occurring when the saw chain near the nose of the top area o
the guide bar contacts any object such as a log or branch, or whe
the wood closes in and pinches the saw chain in the cut.
• Kickback, Pinch - The rapid pushback of the saw which can
occur when the wood closes in and pinches the moving saw cha
in the cut along the top of the guide bar.
• Kickback, Rotational - The rapid upward and backward motion
the saw which can occur when the moving saw chain near the
upper portion of the tip of the guide bar contacts an object, such
a log or branch.
• Low-Kickback Chain - A chain that complies with the kickback
6
180°
2
18
K2
L1
L2
J4
1
2
K1
60°
.025"
M1
M2
A
B
A=B
M3
chainsaw booklet 1/19/00 1:45 PM Page 5

6
ENGLISH
If you have any questions, call 1-800-54-HOW-TO
6. Sprocket Lubrication Hole
7. Oil Level Indicator
8. Oil Filler Cap
9. Front Guard / Chain Brake
10. Lock Off Button
11. Trigger
FIG. B1 12. Bar Mounting Studs
13. Drive Sprocket
13a. Embossed Graphic
14. Chain Catcher
15. Spiked Bumper
FIG. B2 16. Slider Tensioner
FIG. B3 17. Cam
FIG. L2 18. Oil Hole
Important Safety Instructions
WARNING: When using an electric chain saw, basic safe
precautions should always be followed to reduce risk of fir
electric shock, and personal injury , including the following:
READ ALL INSTRUCTIONS.
Safety Warnings: Double Insulation
Double insulated tools are constructed throughout with tw
separate layers of electrical insulation or one double thickne
of insulation between you and the tool’s electrical system
Tools built with this insulation system are not intended to b
grounded. As a result, your tool is equipped with a two pro
plug which permits you to use extension cords without conce
for maintaining a ground connection.
NOTE: Double insulation does not take the place of norm
performance requirements of ANSI B175.1-1991 (when tested on a
representative sample of chain saws.)
• Normal Cutting Position - Those positions assumed in performing
the bucking and felling cuts.
• Notching Undercut - A notch cut in a tree that directs the tree’s
fall.
• Oiler Control - A system for oiling the guide bar and saw chain.
• Rear Handle - The support handle located at or toward the rear of
the saw.
• Reduced Kickback Guide Bar - A guide bar which has been
demonstrated to reduce kickback significantly.
• Replacement Saw Chain - A chain that complies with kickback
performance requirements of ANSI B175.1-1991 when tested with
specific chain saws. It may not meet the ANSI performance
requirements when used with other saws.
• Saw Chain - A loop of chain having cutting teeth, that cut the wood,
and that is driven by the motor and is supported by the guide bar.
• Spiked Bumper (Spike) - The pointed tooth or teeth for use when
felling or bucking to pivot the saw and maintain position while
sawing.
• Switch - A device that when operated will complete or interrupt an
electrical power circuit to the motor of the chain saw.
• Switch Linkage - The mechanism that transmits motion from a
trigger to the switch.
• Switch Lockout - A movable stop that prevents the unintentional
operation of the switch until manually actuated.
Parts Description (Figs. A,B & J)
FIG. A 1. Saw Chain
2. Guide Bar
3. Chain Cover
4. Chain Tensioner Knob and Cover Screw
4a. Guide Bar Scabbard
5. Sprocket Nose
chainsaw booklet 1/19/00 1:45 PM Page 6

7
Safety Instructions and Warnings for Chain Saws
• Keep Work Area Clean
Cluttered areas invite injuries. Do not start cutting until y
have a clear work area, secure footing, and a planned retre
path from the falling tree.
• Consider Work Area Environment
Use extreme caution when cutting small size brush a
saplings because the slender material may catch the sa
chain and be whipped toward you or pull you off balance.
not operate a chain saw in a tree unless specifically trained
do so. When cutting a limb that is under tension be alert
spring back so that you will not be struck when the tension
the wood fibers is released. Do not expose chain saw to ra
Do not use chain saw in damp or wet locations.
Do not use chain saw in the presence of flammable liquids
gases or enclosed concentrations of dust.
• Guard Against Electric Shock
Prevent body contact with grounded surfaces. For examp
metal pipes, wire fences.
If you have any questions, call 1-800-54-HOW
safety precautions when operating this tool. The insulation
system is for added protection against injury resulting from a
possible electrical insulation failure within the tool.
REPLACEMENT PARTS: When servicing all tools, USE
IDENTICAL REPLACEMENT PARTS. Repair or replace
damaged cords.
Safety Instructions: Polarized Plugs
To reduce the risk of electric shock, this equipment has a
polarized plug (one blade is wider than the other). This
equipment must be used with a suitable polarized 2 wire or 3
wire extension cord. Polarized connections will fit together only
one way. Make sure that the receptacle end of the extension
cord has large and small blade slot widths. If the plug does not
fit fully into the extension cord, reverse the plug. If it still does
not fit, obtain a suitable extension cord. If the extension cord
does not fit fully into the outlet, contact a qualified electrician to
install the proper outlet. Do not change the tool plug or
extension cord in any way .
WARNING:T o reduce the risk of electric shock use only with
an extension cord intended for outdoor use, such as SW-A,
S0W-A, STW-A, STOW-A, SJW-A, SJOW-A, SJTW-A or
SJTOW-A.
Extension Cord
Make sure your extension cord is in good condition. When
using an extension cord be sure it is heavy enough to carry the
current your product will draw. An undersized extension cord
will cause a drop in line voltage resulting in loss of power and
overheating. The following table shows the correct size to use
depending on cord length and nameplate ampere rating. If in
doubt, use the next heavier gage. The smaller the gage
number, the heavier the cord.
Minimum Gage for Cord Sets
Volts Total Length of Cord in Feet
120V 0-25 26-50 51-100 101-150
240V 0-50 51-100 101-200 201-300
Ampere Rating
More Not more American Wire Gage
Than Than
0-6 18 16 16 14
6 - 10 18 16 14 12
10 - 12 16 16 14 12
12 - 16 14 12 Not Recommended
chainsaw booklet 1/19/00 1:45 PM Page 7

8
if damaged. Keep tools sharp and clean for better and sa
performance. Follow instructions for lubricating and changi
accessories. Keep handles dry, clean, and free from oil a
grease.
• Disconnect Chain Saw
Disconnect chain saw when not in use, before servicing, wh
tensioning chain, and when changing accessories a
attachments, such as saw chain and guard.
• Outdoor Use Extension Cords
Use only extension cords intended for use outdoors and
marked.
• Stay Alert
Watch what you are doing. Use common sense. Do n
operate chain saw when you are tired. Keep all parts of t
body away from the saw chain when the motor is operatin
Before you start the saw, make sure the saw chain is n
contacting anything. When cutting through wood, rememb
the chain saw cuts quickly and will continue its downward
upward path. Stay out of its path.
• Check Damaged Parts
Before further use of the chain saw, any part that is damag
should be carefully checked to determine that it will opera
properly and perform its intended function. Check f
alignment of moving parts, binding of moving parts, breaka
of parts, mounting, and any other conditions that may affect
operation. A guard or other part that is damaged should
properly repaired or replaced by an authorized service cen
unless otherwise indicated elsewhere in this instructi
manual. Have defective switches replaced by authoriz
service center. Do not use chain saw if switch does not turn
on and off. Do not operate a chain saw that is damage
improperly adjusted, or is not completely and securely
ENGLISH
If you have any questions, call 1-800-54-HOW-TO
• Keep Children Away
Do not let visitors contact chain saw or extension cord. All
visitors should be kept away from work area.
• Store Idle Chain Saw
When not in use, chain saws should be stored in a dry, and
high or locked-up place - out of the reach of children. When
storing saw, use a scabbard or carrying case.
• Don't Force Chain Saw
It will do the job better and safer at the rate for which it was
intended.
• Use Right T ool
Cut wood only. Don't use chain saw for purpose not intended for example - Don't use chain saw for cutting plastic, metal,
masonry , non-wood building materials.
• Dress Properly
Do not wear loose clothing or jewelry. They can get caught in
moving parts. Rubber gloves and non-skid footwear are
recommended when working outdoors. Wear protective hair
covering to contain long hair.
• Use Safety Glasses
Also use safety footwear; snug fitting clothing; protective
gloves; hearing and head protection.
• Carrying Saw
Carry the chain saw by the front handle with the saw stopped,
finger off the switch, the guide bar and saw chain to the rear.
Use scabbard when transporting saw.
• Maintain Chain Saw With Care
Inspect chain saw cords periodically and if damaged, have
repaired by authorized service facility. Keep cord clear of the
chain and operator at all times. Never carry saw by the cord or
pull it to disconnect from receptacle. Keep cord from oil and
sharp edges. Inspect extension cords periodically and replace
chainsaw booklet 1/19/00 1:45 PM Page 8

9
any obstruction that your saw chain could hit while you ar
cutting through a particular log or branch.
(10.) Keep your saw chain sharp and properly tensioned. A
loose or dull chain can increase the chance of kickback
Check tension at regular intervals with the motor stopped
never with the motor running.
(1 1.) Begin and continue cutting only with the chain moving a
full speed. If the chain is moving at a slower speed, there is
greater chance for kickback to occur.
(12.) Cut one log at a time.
(13.) Use extreme caution when re-entering a previous c
Engage spiked bumpers into wood and allow chain to reach f
speed before proceeding with cut.
(14.) Do not attempt plunge cuts or bore cuts.
(15.) Watch for shifting logs or other forces that could close
cut and pinch or fall into chain.
• Power Supply
Connect chain saw to correct voltage, that is, be sure that t
voltage supplied is the same as that specified on th
nameplate of the tool.
Kickback Safety Features
Warning: The following features are included on your sa
to help reduce the hazard of kickback; however such featur
will not totally eliminate this dangerous reaction. As a cha
saw user do not rely only on safety devices. You must follo
all safety precautions, instructions, and maintenance in th
manual to help avoid kickback and other forces which c
result in serious injury.
• Reduced-Kickback Guide Bar, designed with a sm
radius tip which reduces the size of the kickback danger zo
on bar tip. A reduced- kickback guide bar is one which h
assembled. Be sure that the saw chain stops moving when the
trigger is released.
• Guard Against Kickback
WARNING: KICKBACK may occur when the nose or tip of
the guide bar touches an object, or when the wood closes in
and pinches the saw chain in the cut. Tip contact in some
cases may cause a lightning fast reverse reaction, kicking the
guide bar up and back towards the operator. Pinching the saw
chain along the top of the guide bar may push the guide bar
rapidly back towards the operator. Either of these reactions
may cause you to lose control of the saw which could result in
serious injury to user.
The following precautions should be followed to minimize
kickback:
(1.) Grip Saw Firmly .
Hold the chain saw firmly with both hands when the motor is
running. Use a firm grip with thumbs and fingers encircling the
chain saw handles.
(2.) Do not over reach.
(3.) Keep proper footing and balance at all times.
(4.) Don't let the nose of the guide bar contact a log, branch,
ground or other obstruction.
(5.) Don't cut above shoulder height.
(6.) Use devices such as low kickback chain, chain braking
system and special guide bars that reduce the risks associated
with kickback.
(7.) Only use replacement bars and chains specified by the
manufacturer or the equivalent.
(8.) Never let the moving chain contact any object at the tip of
the guide bar.
(9.) Keep the working area free from obstructions such as other
trees, branches, rocks, fences, stumps, etc. Eliminate or avoid
If you have any questions, call 1-800-54-HOW-T
chainsaw booklet 1/19/00 1:45 PM Page 9

10
on wet or slippery surfaces, or during snow storms, ra
storms, or other adverse weather conditions.
• Keep the handles dry , clean, and free of oil or grease.
• Do not allow dirt, debris, or sawdust to build up on the mo
or outside air vents
SAVE THESE INSTRUCTIONS
Preparing Your Chain Saw for Use
Chain oiling
• Chain oiling is recommended whenever you use a new chain
the first time. Take the new chain and soak it in chain oil for
least an hour before using it.
• Oiling during use is automatic and is not adjustable.
• We recommend that you use only one brand of oil during t
lifetime of your chain saw because mixtures of different o
could lead to the oil becoming degraded, which can drastica
shorten the lifetime of the saw chain.
• Never use waste oil, thick oil or very thin sewing machine
These may damage your chain saw.
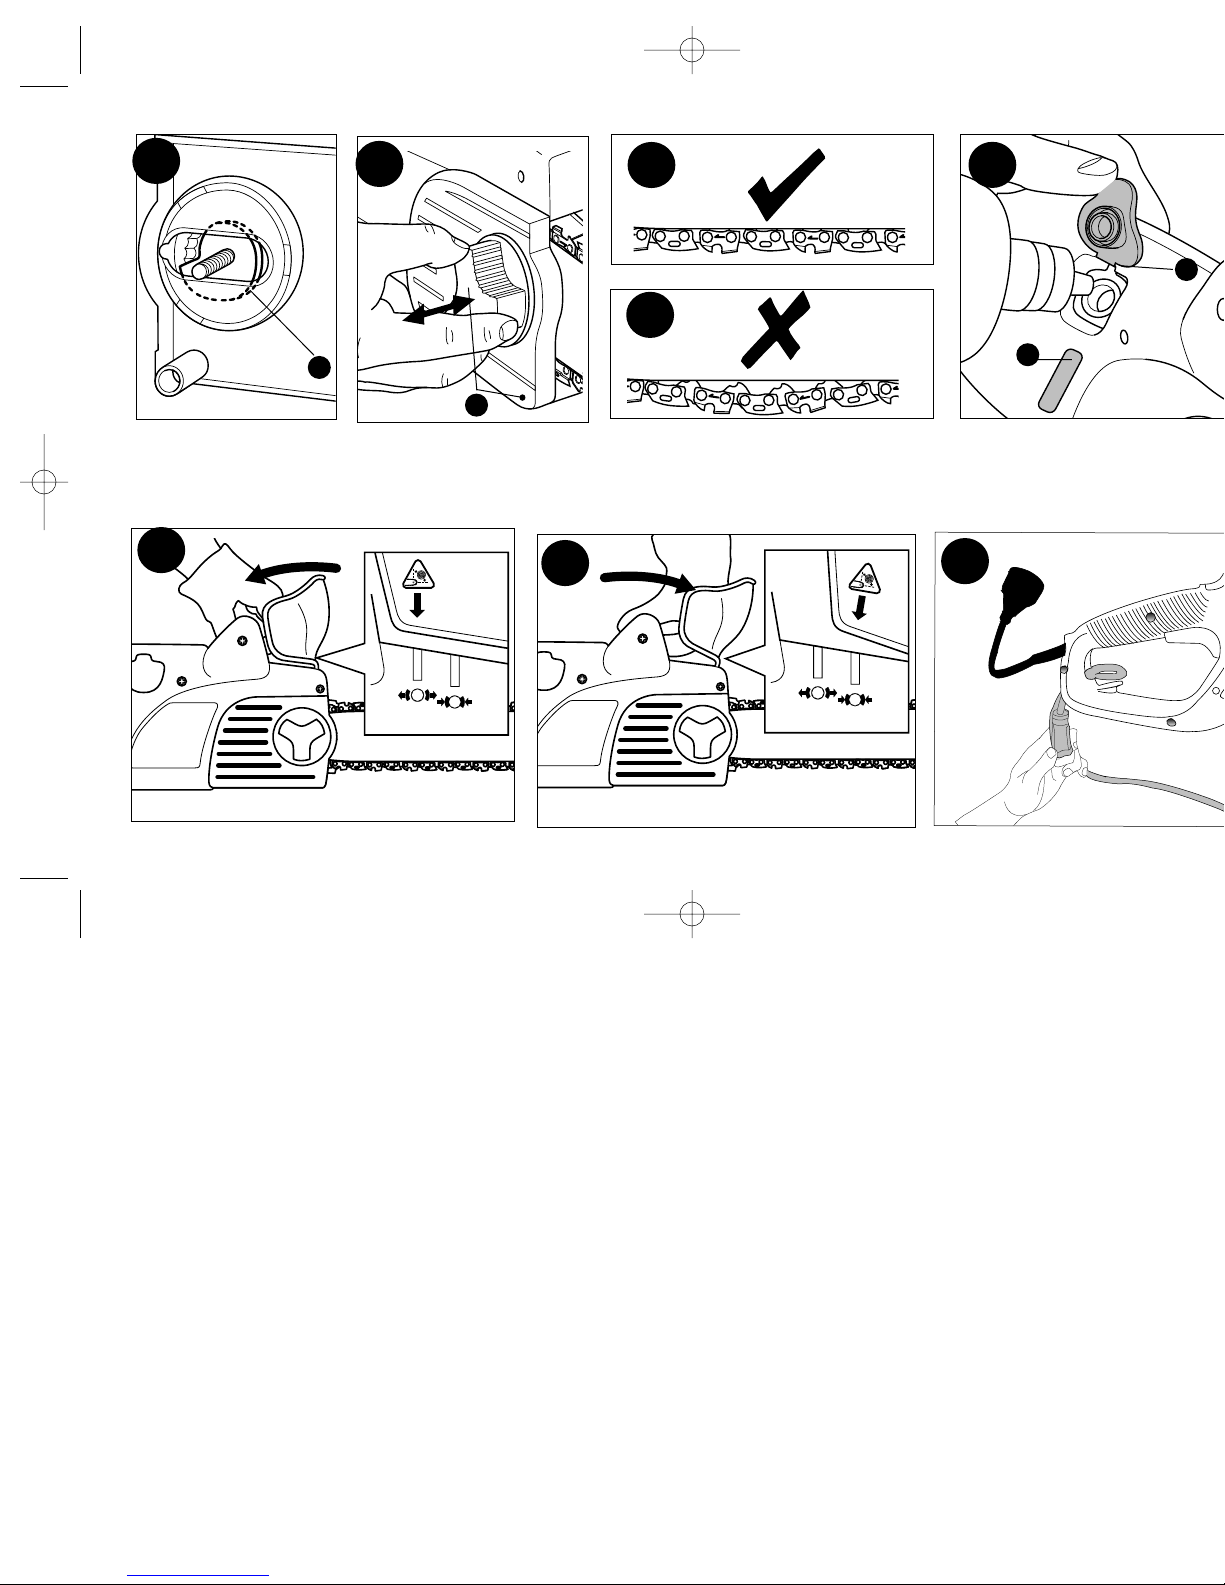
Assembly of guide bar and chain (Fig. C)
Warning: Always unplug the saw from the power sour
before installing a bar and/or a chain.
Caution: Always wear protective gloves when working on
your chain saw. The chain is sharp and can cut you when it
not running.
• (Fig. C1) Fit the saw chain (1) over the guide bar (2), mak
sure that the cutters are facing the right way and that the slid
tensioner (16) is facing towards you.
• (Fig. C2) Remove the chain tensioner knob (4) and the cov
screw located just below it. With your chain saw horizontal on
ENGLISH
If you have any questions, call 1-800-54-HOW-TO
been demonstrated to significantly reduce the number and
seriousness of kickbacks when tested in accordance with
safety requirements for electric chain saws.
• Low-Kickback Chain, designed with a contoured depth
gauge and guard link which deflect kickback force and allow
wood to gradually ride into the cutter. A low-kickback chain is
a chain which has met kickback performance requirements
of ANSI B175.1-1991.
• Hand guard, designed to reduce the chance of your left
hand contacting the chain if your hand slips off the front
handlebar.
• Position of front and rear handlebars, designed with
distance between handles which provides better control,
balance, and resistance if kickback occurs.
Additional Safety Rules: Chain Saws
CAUTION: Some wood contains preservatives such as
copper chromium arsenate (CCA) which can be toxic. When
cutting these materials extra care should be taken to avoid
inhalation and minimize skin contact.
WARNING: Use of this tool can generate dust containing
chemicals known to cause cancer, birth defects or other
reproductive harm. Use appropriate respiratory protection.
• Do not operate chain saw that is damaged, improperly
adjusted, or not completely and securely assembled. Be sure
that the saw chain stops moving when the trigger is released.
• Do not attempt operations beyond your capacity or
experience.
• Do not operate a chain saw with one hand! Serious injury to
the operator, helpers, or bystanders may result from onehanded operation. A chain saw is intended for two-handed
use only .
• To reduce potential for electric shock, do not operate the saw
chainsaw booklet 1/19/00 1:45 PM Page 10

11
Oiling (Fig. D)
• (Fig. D) Fill the reservoir via the oil filler cap (8) with standar
chain saw oil. If chain saw oil is not available SAE#30 motor o
can be substituted. Note: For temperatures below 30°F, u s
SAE#10 oil. For temperatures above 75°F, use SAE#40 o
The level of oil is checked through the oil level indicator slot (7
• Periodically switch off and check the oil in the indicator; if it
less than a quarter full, disconnect your chain saw from th
power supply and refill with the correct oil.
Auto-Stop Chain Braking System (Fig. E)
Your chain saw is fitted with an auto-stop chain braking system wh
will stop the chain within a fraction of a second each time you relea
the rear trigger, or if kickback should occur. This system should
tested before every use.
How to set your auto stop hand guard
•Ensure that your chain saw is disconnected from the power supp
•(Fig. E1) Pull the front guard (9) back into the "set"
position .Your chain saw is now ready to use.
How the anti-kickback chain braking system works
In the event of kickback, your left hand comes in contact with the fro
guard, pushing it forward and stops your chain saw within a f
fractions of a second.
How the inertia activated chain braking system works
The brake is activated when the front hand guard is pushed forwa
either manually, by the back of the user’s hand or by its own weig
The advantage of the inertia brake is that it is activated by a seve
kickback, eg. when the chain hits metal, even if the user’s hand do
not contact the hand guard, ie. when the saw is in the felling positio
How to test the anti-kickback chain braking system
• Grip your chain saw firmly in both hands on a firm surfac
stable surface, put the bar and chain onto the bar mounting
studs (12), ensuring the chain is around the drive sprocket (13).
Ensure that the cutters are pointing in the same direction as the
embossed graphic (13a) above and below the drive sprocket
(13).
• (Fig. C3) Before fitting the chain cover check that the cam (17) is
in the correct position. The flat section of the metal cam should
be visible through the opening in the chain cover. If necessary,
press and turn the control knob (4) clockwise to rotate the cam
into the correct position.
• (Fig. C4) Fit the chain cover by locating the bolt and using the
control knob (4) to tighten the chain cover finger tight. To tension
the chain, loosen the control knob (4) one full turn, press in
firmly and rotate clockwise. As the bar moves forward ensure
the chain links feed into the guide bar. When the control knob
stops rotating, apply further light pressure. Do not over-
tension. Allow the control knob to spring back to the "out"
position and rotate further clockwise to tighten the guide bar.
Apply moderate pressure to tighten. Replace the cover screw.
• (Fig. C5/C6) Check the chain tension by placing the saw on a
firm surface. The tension is correct when the chain snaps back
after being pulled 1/8" (3mm) away from the chain bar with light
force from the middle finger and thumb. There should be no
"sag" between the guide bar and chain on the underside as
shown in Fig.C5. Fig C6 illustrates a sagging improperly
tensioned chain.
Note: Do not over-tension the chain as this will lead to excessive wear
and will reduce the life of the bar and chain.
Note: When the chain is new check the tension frequently (after
disconnecting from power supply) during the first 2 hours of use as a
new chain stretches slightly.
If you have any questions, call 1-800-54-HOW-TO
chainsaw booklet 1/19/00 1:45 PM Page 11

12
Switch
• (Fig. G1) Always be sure of your footing and grip the chain sa
handles firmly with both hands with the thumb and finge
encircling the handle. Push the lock-off button (10) forward a
then pull the trigger (11) to start as shown in Figure G2. To sto
release the trigger.
• When the motor starts remove your thumb from the lock butt
and grip the handle firmly.
Do not force your chain saw It will do a better and safer job at t
speed for which it is designed. Excessive force will stretch the chai
If the saw chain or bar becomes jammed:
• Switch off.
• Disconnect from the power supply.
• Open the cut with wedges to relieve the strain on the guide b
Do not try to wrench the saw free. Start a fresh cut.
COMMON CUTTING TECHNIQUES
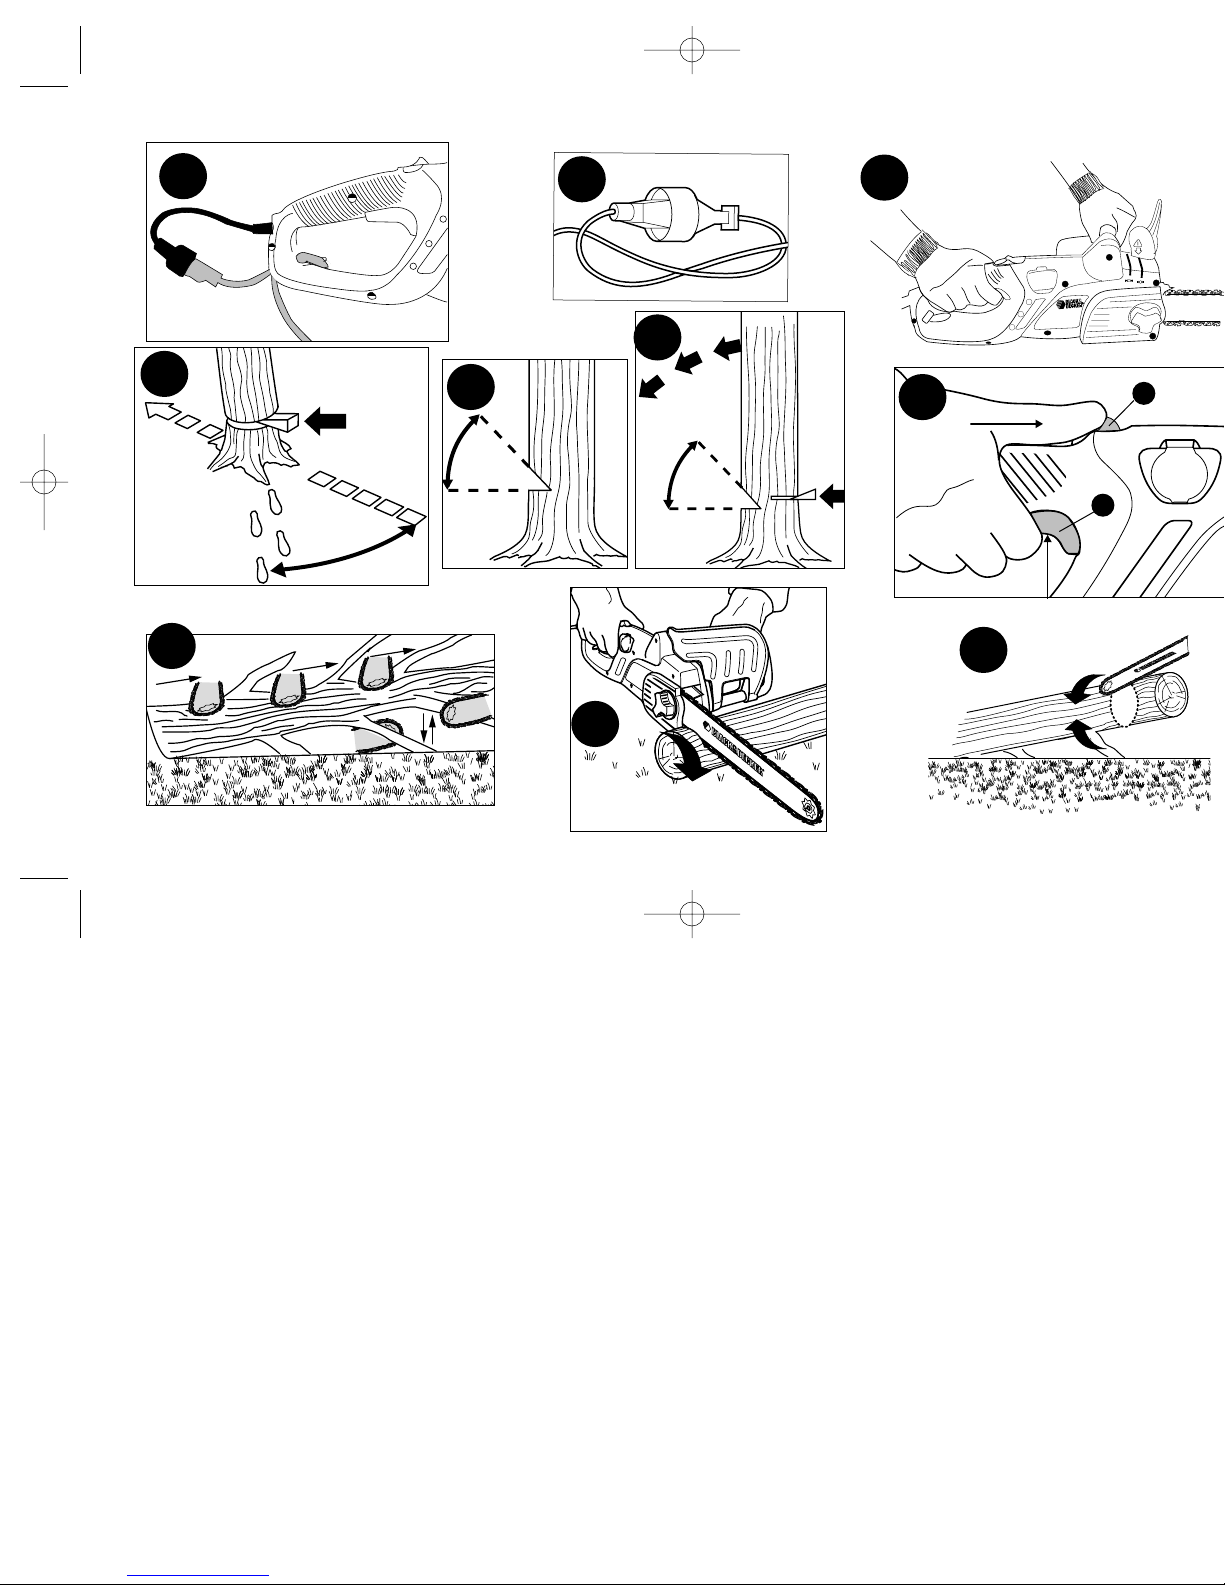
Felling (Fig. H)
• Felling is the process of cutting down a tree. Bucking is t
process of cutting a log into lengths. When bucking and felli
operations are being performed by two or more persons, at t
same time, the felling operation should be separated from t
bucking operation by a distance of at least twice the height
the tree being felled. Trees should not be felled in a manner th
would endanger any person, strike any utility line or cause a
property damage. If the tree does make contact with any uti
line, the utility company should be notified immediate
Scrutinize the surrounding overhead for dead or broken limbs
branches which may fall during the felling process.
The chain saw operator should keep on the uphill side of t
terrain as the tree is likely to roll or slide downhill after it is felle
• (Fig. H1) A retreat path should be planned and cleared
If you have any questions, call 1-800-54-HOW-TO
make sure the chain is clear of the ground and switch on (see
"Using Your Chain Saw").
• (Fig. E2)Rotate your left hand forward around the front handle
so that the back of your hand comes in contact with the front
guard and pushes it forward. The chain should stop within a few
fractions of a second.
To reset after the operation of the chain braking system
Follow the instructions for setting the chain braking system.
Notes:
• It will not be possible to switch on your chain saw if the front
guard/chain brake is not in the "set" position .
• Avoid re-starting your chain saw until you hear the motor come
to a complete stop.
• If your chain does not come to rest within a few fractions of a
second it is an indication that it needs tensioning (see Fig. C "Assembly of guide bar and chain").
Using Your Chain Saw (Fig. F)
AT TACHING EXTENSION CORD TO CHAIN SA W
An extension cord retainer is built into the switch handle that
prevents the extension cord from pulling out of the handle. To use
this feature, simply double the extension cord as shown in Figure F1,
about a foot from the end, and insert it into the end of the handle.
Hook the loop formed by doubling the cord over the tab, as shown in
Figure F2. Gently tug on the cord to ensure that it is firmly retained in
the saws handle. Plug the receptacle end of the extension cord into
the tool's power supply cord. Figure F3 illustrates an alternate
method for securing the extension cord to the saw power supply
cord
.
NOTE: Always keep the cord away from the cutting area and and
position the cord so that it will not be caught on branches, and the
like, during cutting.
ENGLISH
chainsaw booklet 1/19/00 1:45 PM Page 12

13
small limbs in one cut. Branches under tension should be cut from
the bottom up to avoid binding the chain saw. T rim limbs from
opposite side keeping tree stem between you and saw. Never mak
cuts with saw between your legs or straddle the limb to be cut.
Bucking
Bucking is cutting a log into lengths. How you should cut depend
on how the log is supported. Use a saw horse whenever possible
Always start a cut with the chain running at full speed and the spik
bumper (15) in contact with the wood. To complete the cut us
pivoting action of the spiked bumper against the wood.
(Fig. J2) When supported along its whole length
Make a cut from the top (overbuck), but avoid cutting the earth as t
will dull your saw quickly.
(Fig. J3) When supported at one end
First, cut 1/3 the diameter from the underside (underbuck). Th
make the finished cut by overbucking to meet the first cut.
(Fig. J4) When supported at both ends
First, cut 1/3 down from the top overbuck. Then make the finished
by underbucking the lower 2/3 to meet the first cut. second, cut ag
to meet the first cut.
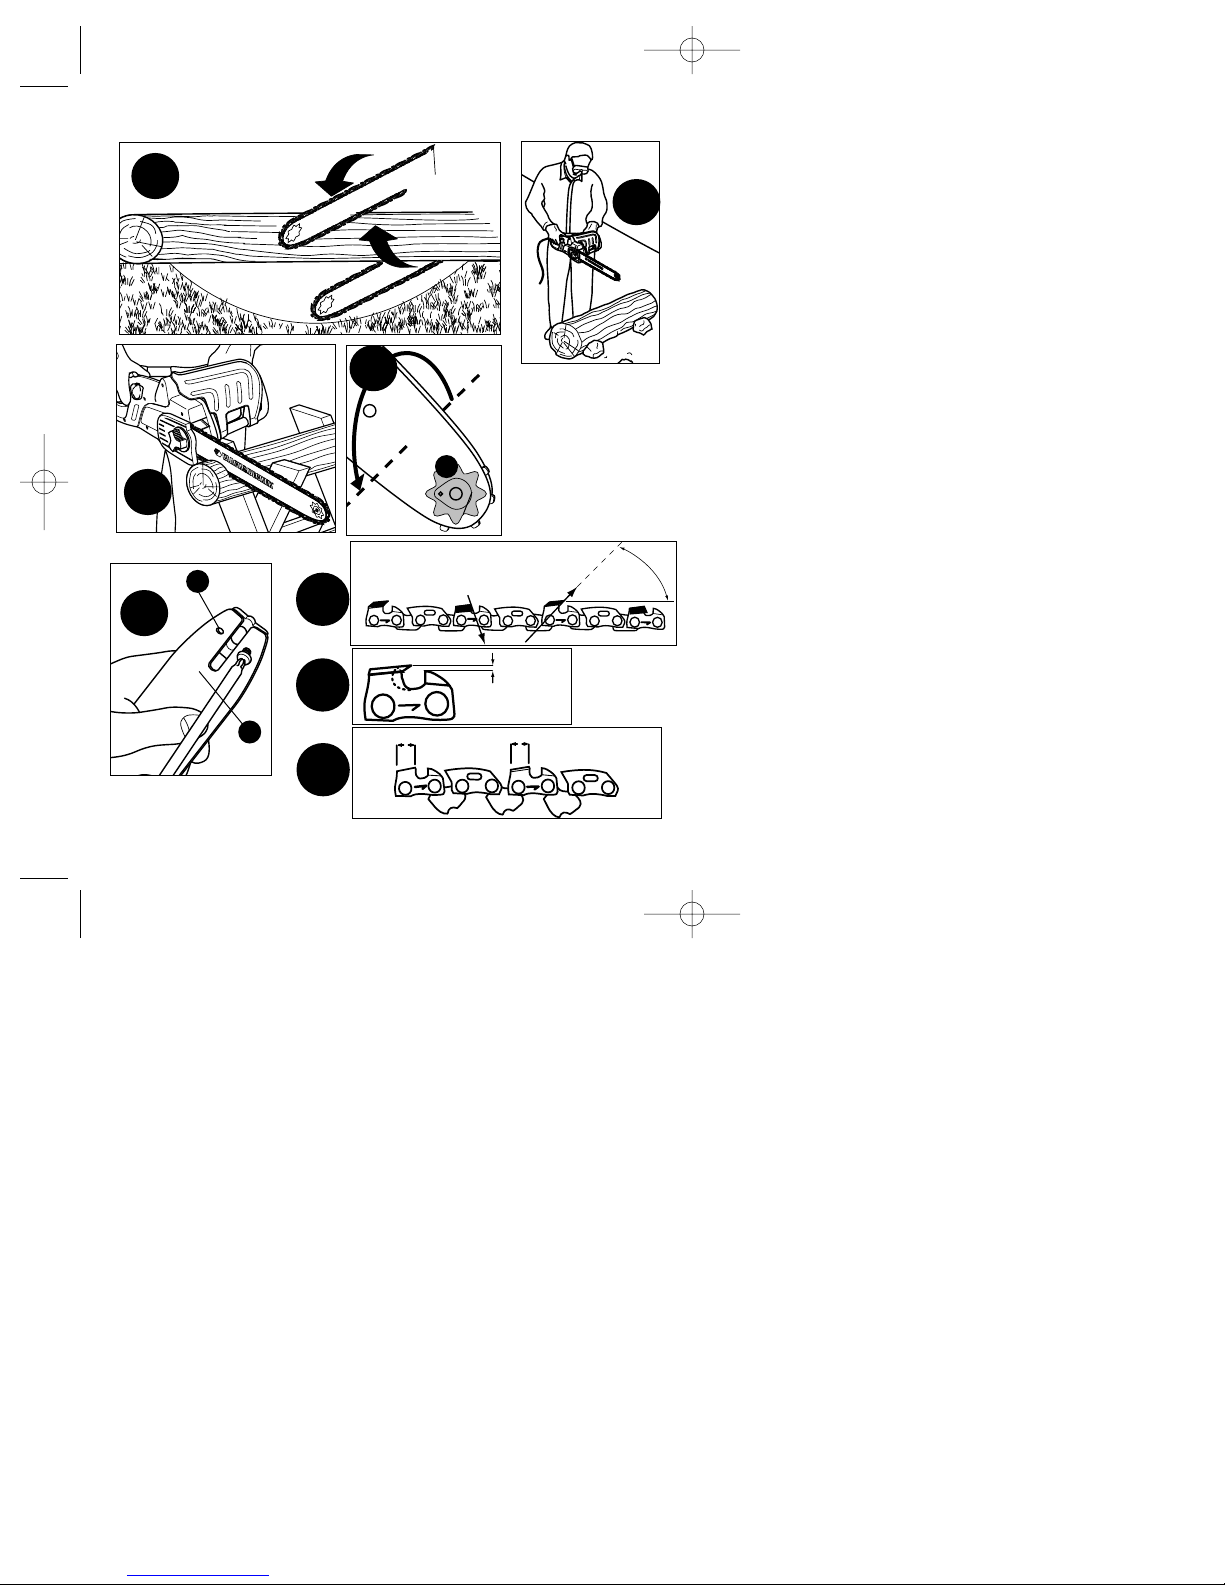
(Fig. K1) When on a slope
Always stand on the uphill side of the log. When "cutting through"
maintain complete control release the cutting pressure near the end
the cut without relaxing your grip on the chain saw handles. Don't
the chain contact the ground. After completing the cut, wait for the s
chain to stop before you move the chain saw. Always stop the mo
before moving from tree to tree.
(Fig. K2) When using a saw horse
This is strongly recommended whenever possible. Position the log
a stable position. Always cut on the outside of the saw horse arms.
necessary before cuts are started. The retreat path should extend
back and diagonally to the rear of the expected line of fall.
• Before felling is started, consider the natural lean of the tree, the
location of larger branches and the wind direction to judge which
way the tree will fall. Have wedges (wood, plastic or aluminum)
and a heavy mallet handy.
Remove dirt, stones, loose bark, nails, staples, and wire from
the tree where the felling cuts are to be made.
• (Fig. H2) Notching Undercut - Make the notch 1/3 of t he
diameter of the tree, perpendicular to the direction of the fall.
Make the lower horizontal notching cut first. This will help to
avoid pinching of either the saw chain or the guide bar when the
second notch is being made.
• (Fig. H3) Felling Back Cut - Make the felling back cut at least 2
inches higher than the horizontal notching cut. Keep the felling
back cut parallel to the horizontal notching cut. Make the felling
back cut so enough wood is left to act as a hinge. The hinge
wood keeps the tree from twisting and falling in the wrong
direction. Do not cut through the hinge.
• (Fig. H3) As the felling cut gets close to the hinge the tree
should begin to fall. If there is any chance that the tree may not
fall in the desired direction or it may rock back and bind the saw
chain, stop cutting before the felling cut is complete and use
wedges to open the cut and drop the tree along the desired line
of fall.
When the tree begins to fall remove the chain saw from the cut,
stop the motor, put the chain saw down, then use the retreat
path planned. Be alert for overhead limbs falling and watch your
footing.
Limbing (Fig.J1)
Limbing is removing the branches from a fallen tree. When limbing,
leave larger lower limbs to support the log off the ground. Remove the
If you have any questions, call 1-800-54-HOW-TO
chainsaw booklet 1/19/00 1:45 PM Page 13

14
Care and Maintenance
Regular maintenance ensures a long effective life for your chain saw.
We recommend you make the following checks on a regular basis:
Oil level
The level in the reservoir should not be allowed to fall below a
quarter full.
Chain and bar
After every few hours of use, remove the guide bar and chain and
clean thoroughly.
(Fig. L2) Ensure the hole between the tensioning/oil hole (18) and the
bar groove is clear.
(Fig. L1) On reassembling, the guide bar should be turned 180˚ and
the sprocket nose oiled via the sprocket lubrication hole (6). This
ensures an even distribution of wear around the guide bar rails.
(Fig. L2) To turn the guide bar through 180˚, remove the small screw
from the slider and re-fasten to the opposite side of the bar.
Saw chain sharpening
To get the best possible performance from your chain saw it is
important to keep the teeth of the chain sharp. Follow these helpful
tips for proper saw chain sharpening:
1.) For best results use a file holder or filing guide to sharpen your
chain. This will ensure you always get the correct sharpening
angles.
2.) Place the file holder flat on the top plate and depth gauge of the
cutter.
3.) (Fig. M1) Keep the correct top plate filing angle line of 30° on
your file guide parallel with your chain (file at 60° from chain
viewed from above).
4.) (Fig. M2) Sharpen cutters on one side of the chain first. File from
the inside of each cutter to the outside. Then turn your saw
around and repeat the processes (2,3,4) for cutters on the other
side of the chain. Use a flat file to file the tops of the rakers
(portion of chain link in front of the cutter) so that they are abo
.025” below the tips of the cutters.
5.) (Fig. M3) Keep all cutter lengths equal.
6.) If damage is present on the chrome surface of the top plates o
side plates, file back until such damage is removed.
CAUTION: After filing, the cutter will be sharp, use extra cauti
during this process
Fault Finding
If your chain saw does not operate correctly check the following:
Fault
Possible Cause Action
Chain saw Blown fuse. Replace fuse.
will not start. Tripped GFCI. Check GFCI.
Power supply Check power supply.
not connected.
Chain saw Front guard/ Reset front guard/
will not start - chain brake in chain brake
lock button the ON (see "Auto-stop
will not slide. position. chain brake" section).
Chain does not Chain tension Check chain tension
not stop within a is too slack. (see "Assembly"
fraction of a sec- section).
ond when saw is
switched off.
Bar/chain Oil tank empty. Check oil tank level
appear hot/ Chain tension (see "Oil level" section).
smoking. is too tight. Check chain tension
Guide bar (see "Assembly"
sprocket nose section).
needs greasing.
ENGLISH
If you have any questions, call 1-800-54-HOW-TO
chainsaw booklet 1/19/00 1:45 PM Page 14

15
Saw chain sharpness
The cutters will dull immediately if they touch the ground or a nail while
cutting.
Saw chain tension
This should be done regularly.
Oil level
Top off if low.
Maintenance
Use only mild soap and damp cloth to clean the chain saw. Never let
any liquid get inside the tool; never immerse any part of the tool into a
liquid.
Drain oil from saw when unit will not be used for long periods time.
IMPORTANT: To assure product SAFETY and RELIABILITY, repairs,
maintenance and adjustment should be performed by authorized
service centers or other qualified service organizations, always using
identical replacement parts.
Accessories
Replacement chain and bar are available from your nearest Black &
Decker service center.
Replacement chain # 323175-00
Replacement bar # 570580-00
The use of accessories not recommended in this manual may be
hazardous.
Service Information
Whether you need technical advice, repair, or genuine factory
replacement parts, contact the Black & Decker location nearest you.
To find your local service location, refer to the yellow page directory
under "Tools–Electric" or call: 1-800-54-HOW TO.
Full T wo-Year Home Use Warranty
Black & Decker (U.S.) Inc. warrants this product for two years agai
any defects in material or workmanship. The defective product will
replaced or repaired at no charge in either of two ways:
The first, which will result in exchanges only, is to return the produc
the retailer from whom it was purchased (provided that the store i
participating retailer). Returns should be made within the time per
of the retailer’s policy for exchanges (usually 30 to 90 days after t
sale). Proof of purchase may be required. Please check with t
retailer for their specific return policy regarding returns that a
beyond the time set for exchanges.
The second option is to take or send the product (prepaid) to a Blac
Decker owned or authorized Service Center for repair or replacem
at our option. Proof of purchase may be required. Black & Dec
owned and authorized service centers are listed und
"Tools–Electric" in the yellow pages of the phone directory .
This warranty does not apply to accessories. This warranty gives y
specific legal rights and you may have other rights which vary fr
state to state. Should you have any questions, contact the manage
your nearest Black & Decker Service Center.
This product is not intended for commercial use.
See ‘Tools-Electric’
– Yellow Pages –
for Service & Sales
Black & Decker (U.S.) Inc.,
701 E. Joppa Rd.
Towson, MD 21286 U.S.A.
chainsaw booklet 1/19/00 1:45 PM Page 15
YOU'VE GOT THE TOOL
http://www.blackanddecker.com
NOW GET THE KNOW-HOW

utilisée.
• Rebond - Mouvement vers l'arrière ou vers le haut, ou dans les
deux directions, du guide-chaîne qui se produit quand la chaîne
touche un objet comme une bûche ou une branche près de
l'extrémité avant, sur le dessus du guide, ou quand le bois se referm
et pince la chaîne dans la fente.
• Rebond, pincement - Mouvement arrière rapide de la scie qui se
produit quand le bois se referme et pince la chaîne en mouvement
dans la fente de coupe sur le dessus du guide-chaîne.
• Rebond, rotatif - Mouvement rapide vers le haut et vers l'arrière d
la scie qui se produit quand la chaîne en mouvement touche un obj
comme une bûche ou une branche près de l'extrémité avant, sur le
dessus du guide.
• Chaîne à faible rebond - Chaîne conforme aux exigences relativ
au rebond de l'ANSI B175.1-1991 (avec essais d'un échantillon
représentatif de la tronçonneuse).
• Position de coupe normale - Position à prendre pour faire les
coupes de tronçonnage et d'abattage.
• Entaille de direction - Entaille effectuée dans l'arbre pour diriger
chute.
• Commande d'huilage - Système destiné à huiler le guide-chaîne
la chaîne.
• Poignée arrière - Poignée de support qui se trouve à l'arrière ou
avant de l'extrémité arrière de la scie.
• Guide-chaîne à faible rebond - Guide-chaîne qui réduit
considérablement le rebond.
• Chaîne de rechange - Chaîne qui est conforme aux exigences
relatives au rebond de l'ANSI B175.1-1991 avec essais d'un
échantillon d'une tronçonneuse donnée. Cette chaîne n'est pas
nécessairement conforme aux exigences de l'ANSI lorsqu'elle est
utilisée sur d’autres tronçonneuses.
• Chaîne de scie - Chaîne en boucle munie de dents de coupe et q
est entraînée par moteur et supportée par le guide-chaîne.
16
Pour obtenir de plus amples renseignements, composer le 1 800 544-6986.
RENSEIGNEMENTS IMPORT ANTS
•Le protège-main doit être en position , sinon la scie ne
fonctionne pas. Consulter la rubrique page 21.
•NE P AS TROP TENDRE LA CHAÎNE. Consulter la
rubrique à la page 22 pour tendre la chaîne.
•Retendre la chaîne fréquemment au cours des deux
premières heures de fonctionnement.
NOMS ET TERMES RELATIFS AUX TRONÇONNEUSES
• Tronçonnage - Processus consistant à débiter un arbre abattu en
tronçons ou billots.
• Frein de chaîne - Dispositif servant à arrêter la tronçonneuse.
• Ensemble moteur de la tronçonneuse - Tronçonneuse sans
guide-chaîne ni chaîne.
• Pignon d'entraînement - Roue dentée qui entraîne la chaîne.
• Abattage - Processus consistant à couper un arbre pour le faire
tomber.
• Trait d'abattage - Dernier trait de scie du processus d'abattage
effectué du côté opposé de l'arbre par rapport à l'entaille.
• Poignée avant - Poignée de support située à l'avant ou vers l'avant
de la tronçonneuse.
• Protège-main avant - Dispositif de protection structurel qui se
trouve entre la poignée avant et le guide-chaîne de la tronçonneuse,
en général proche de la position de la main sur la poignée avant et
servant parfois de levier d'activation du frein de chaîne.
• Guide-chaîne - Structure pleine rainurée qui soutient et guide la
chaîne.
• Fourreau de guide-chaîne - Enveloppe se glissant sur le guide-
chaîne pour éviter le contact avec les dents lorsque la scie n'est pas
FRANÇIAS
chainsaw booklet 1/19/00 1:45 PM Page 16

17
• Butoir à crocs - Dispositif ayant un ou plusieurs crocs servant à
faire pivoter la tronçonneuse lors de l'abattage ou du tronçonnage et
à maintenir la position lors du sciage.
• Interrupteur - Dispositif qui ouvre ou ferme le circuit d’alimentation
électrique du moteur de la tronçonneuse.
• Tringlerie d'interrupteur - Mécanisme qui transmet le mouvement
de la gâchette à l'interrupteur .
• Verrouillage d'interrupteur - Blocage mobile qui empêche la mise
en marche accidentelle de l'interrupteur tant qu'il n'est pas actionné
manuellement.
Description des pièces (Figures. A, B et J)
FIG. A 1. Chaîne
2. Guide-chaîne
3. Couvre-chaîne
4. Bouton du tendeur de chaîne et vis d’obturation
4a. Fourreau du guide-chaîne
5. Extrémité du pignon
6. Trou de graissage du pignon
7. Indicateur de niveau d'huile
8. Bouchon de remplissage d'huile
9. Protège-main avant/frein de chaîne
10. Bouton de verrouillage
11. Gâchette
FIG. B1 12. Goujons de montage du guide
13. Pignon d’entraînement
13a. Graphique gaufré
14. Retenue de chaîne
15. Butoir à crocs
FIG. B2 16. Tendeur à glissement
FIG. B3 17. Came
FIG. L2 18. Trou d'huile
Pour obtenir de plus amples renseignements, composer le 1 800 544-69
Instructions de sécurité importantes
AVERTISSEMENT: Lors de l’utilisation d’une tronçonneu
électrique, toujours suivre les mesures de sécurité de base po
diminuer le risque d’incendie, d’électrocution et de blessure
compris les points suivants :
LIRE TOUTES LES INSTRUCTIONS
Avertissements concernant la sécurité : Double isolation
Les outils à double isolation comprennent deux couches d'isolant
électrique (ou une double épaisseur d'isolant) qui séparent
l'utilisateur du système électrique de l'appareil dans toute la
construction. Les outils ainsi isolés n'ont pas besoin de prise de
masse et leur fiche d'alimentation ne comporte que deux broches q
permettent l'usage d'une rallonge électrique sans mise à la terre.
NOTE : Cette double isolation ne remplace pas les précautions de
sécurité normales pour l'utilisation de cet outil. Ce système
d'isolation ajoute une protection contre les risques de blessure
résultant d'une défectuosité possible de l'isolation électrique de l'ou
Pièces de rechange : Pour la réparation de l'outil, il faut UTILISER
DES PIÈCES DE RECHANGE IDENTIQUES. Réparer ou remplac
les cordons endommagés.
Instructions de sécurité : Fiches polarisées
Afin de réduire le risque d'électrocution, cet équipement dispose
d'une fiche polarisée (une broche est plus large que l'autre) et doit
être utilisé avec une rallonge polarisée appropriée de 2 à 3 fils. Un
connexion polarisée ne peut se faire que d'une seule façon.
S'assurer que l'extrémité de la prise de la rallonge a une fente long
et une fente courte. Si la fiche ne rentre pas complètement dans la
prise, la retourner. Si elle ne rentre toujours pas, se procurer une
rallonge appropriée. Si celle-ci n'entre pas dans la prise, demande
un électricien qualifié d'installer la prise qui convient. Ne pas chang
la fiche de l'outil ou la rallonge.
chainsaw booklet 1/19/00 1:45 PM Page 17

l'utilisateur qui risque alors de perdre d’équilibre. Il ne faut pas utilis
la tronçonneuse dans un arbre à moins d'être entraîné pour cela.
Quand on coupe une branche soumise à une tension il faut s'assur
qu'elle ne frappe pas l'utilisateur quand elle est libérée. La
tronçonneuse ne doit pas être exposée à la pluie ou à l'humidité.
Il ne faut pas utiliser la tronçonneuse en présence de liquides ou de
gaz inflammables ou dans un endroit fermé contenant une forte
concentration de poussière.
• Attention aux risques d'électrocution
Éviter que le corps touche des surfaces à la terre comme la
tuyauterie métallique ou les clôtures en grillage.
• Garder les enfants à distance
Ne pas laisser les visiteurs toucher la tronçonneuse ou la rallonge.
Tous les visiteurs doivent rester loin de la zone de travail.
• Rangement de la tronçonneuse
Quand elles ne sont pas utilisées, les tronçonneuses doivent être
rangées dans un endroit sec et en hauteur ou verrouillé hors de la
portée des enfants. La tronçonneuse doit être placée dans un
fourreau ou un étui de transport.
• Il ne faut pas forcer la tronçonneuse
La tronçonneuse effectue mieux le travail et de façon plus sûre à la
vitesse pour laquelle elle a été conçue.
• Utilisation appropriée de la tronçonneuse
Ne couper que du bois. Ne pas utiliser la tronçonneuse à des fins
pour lesquelles elle n'a pas été prévue comme : couper du plastiqu
du métal, de la maçonnerie, des matériaux de construction autres
que le bois.
• Porter des vêtements appropriés
Ne pas porter de vêtements ou de bijoux lâches. Ils peuvent se
prendre dans des pièces mobiles. Des gants de caoutchouc et des
chaussures antidérapantes sont recommandés pour le travail
extérieur. Couvrir les cheveux longs.
18
AVERTISSEMENT : Pour réduire le risque d'électrocution,
n'utiliser qu'une rallonge appropriée pour l'usage extérieur : SW-A,
S0W-A, STW-A, STOW-A, SJW -A, SJOW -A, SJTW-A ou SJT OW-A.
Rallonge
S'assurer que la rallonge est en bon état. Lorsqu'on utilise une
rallonge, il faut s'assurer qu'elle est d'un calibre suffisant pour le
courant alimentant l'outil. Une rallonge d'un calibre trop faible
entraînera une chute de tension, une perte de puissance et une
surchauffe. Le tableau suivant montre le calibre à utiliser selon la
longueur de la rallonge et l'intensité nominale de la fiche signalétique.
En cas de doute, il faut prendre le calibre supérieur. Plus le nombre
indiquant le calibre est bas, plus la rallonge est épaisse.
Calibre minimal des cordons de rallonge
Tension Longueur totale du cordon en pieds
120 V De 0 à 25 De 26 à 50 De 51 à 100 De 101 à 150
240 V De 0 à 50 De 51à 100 De 101 à 200 De 201 à 300
Intensité (A)
Au Au Calibre moyen de fil
moins plus
0- 6 18 16 16 14
6 - 10 18 16 14 12
10 - 12 16 16 14 12
12 - 16 14 12 Non recommandé
Instructions de sécurité et avertissements concernant les
tronçonneuses
• Garder l’espace de travail propre.
Les endroits encombrés sont propices aux blessures. Il ne faut pas
commencer à couper tant que la zone de travail n'est pas dégagée,
qu'on n'est pas bien d'aplomb sur ses jambes et qu'on ne dispose
pas d'un chemin de retraite quand l'arbre tombe.
• Examiner la zone de travail
Il faut faire bien attention lorsqu'on coupe des broussailles et des
arbustes parce qu'ils peuvent être accrochés par la scie et fouetter
Pour obtenir de plus amples renseignements, composer le 1 800 544-6986.
FRANÇIAS
chainsaw booklet 1/19/00 1:45 PM Page 18

19
• Porter des lunettes de sécurité
Utiliser des chaussures de sécurité, des vêtements ajustés, des
gants de travail et une protection pour la tête et les oreilles.
• Transport de la tronçonneuse
Transporter la tronçonneuses par la poignée avant, l'outil à l'arrêt, le
doigt loin de la gâchette, le guide-chaîne et la chaîne vers l'arrière.
Mettre le fourreau pour le transport.
• Bien entretenir la tronçonneuse
Inspecter le cordon de la tronçonneuse périodiquement et, s'il est
endommagé, le faire réparer par un centre après-vente autorisé.
Garder toujours le cordon loin de la chaîne et de l'opérateur. Ne
jamais utiliser le cordon pour transporter la tronçonneuse ni le tirer
pour le débrancher de la prise. Garder le cordon loin de l'huile et des
arêtes vives. Vérifier les rallonges périodiquement et les remplacer si
elles sont abîmées. Garder les outils bien affûtés et propres pour
assurer un fonctionnement plus efficace et plus sûr . Suivre les
instructions pour la lubrification et le changement des accessoires.
Garder les poignées sèches, propres et exemptes d'huile et de
graisse.
• Débrancher la tronçonneuse
Débrancher la tronçonneuse quand elle n'est pas utilisée, avant
l'entretien, pour retendre la chaîne et changer les accessoires
comme la chaîne et le protège-main.
• Utiliser des rallonges pour l'extérieur .
N'utiliser que des rallonges destinées à l'usage à l'extérieur et
marquées à cet effet.
• Rester prudent
Surveiller son travail. Utiliser son bon sens. Ne pas faire fonctionner
un outil lorsqu’on est fatigué. Garder toutes les parties du corps loin
de la tronçonneuse quand le moteur fonctionne. Avant de faire
démarrer la tronçonneuse, s'assurer qu'elle ne touche rien. Quand
on coupe du bois, il ne faut pas oublier que la tronçonneuse coupe
vite et continue sa course vers le bas ou vers le haut. Attention de ne
Pour obtenir de plus amples renseignements, composer le 1 800 544-69
pas rester sur son passage.
• Vérifier les pièces endommagées
Avant d’utiliser davantage la tronçonneuse, vérifier l’état d’un
dispositif protecteur ou d’un autre élément endommagé afin de
déterminer s’il fonctionnera adéquatement et remplira la fonction po
laquelle il a été conçu. Vérifier l’alignement, la liberté des pièces
mobiles, l’état des pièces, le montage et toute autre condition qui
peut influer sur le fonctionnement. Un dispositif de sécurité ou tout
autre pièce endommagés devraient être réparés de manière
appropriée ou remplacés par un centre après-vente autorisé, à moi
d’indication contraire ailleurs dans le présent manuel. Faire
remplacer les interrupteurs défectueux par un centre après-vente
autorisé. Ne pas utiliser la tronçonneuse si l’interrupteur n’assure
pas la mise en marche ou l’arrêt. Ne pas faire fonctionner la
tronçonneuse si elle est endommagée, mal réglée, mal ou
incomplètement montée. S'assurer que la chaîne s'immobilise qua
la gâchette est relâchée.
• Protège-main contre le rebond
AVERTISSEMENT :La tronçonneuse peut REBONDIR quand
l'extrémité du guide-chaîne touche un objet ou que le bois se resse
et pince la chaîne dans la fente. Le contact de l'extrémité peut, dan
certains cas, causer une réaction fulgurante vers l'arrière qui relève
guide-chaîne brutalement et le repousse vers l'utilisateur. Le
pincement de la chaîne sur le dessus du guide-chaîne peut aussi
pousser cette dernière rapidement vers l'utilisateur. L'une ou l'autre
de ces réactions peut faire perdre le contrôle de la tronçonneuse et
causer des blessures graves à l'utilisateur
Il faut prendre les précautions suivantes pour minimiser le
rebond :
(1.) Empoigner la tronçonneuse fermement.
Bien tenir la tronçonneuse des deux mains quand le moteur tourne
en gardant bien les pouces et les doigts autour des poignées.
(2.) Ne pas se tenir trop loin.
chainsaw booklet 1/19/00 1:45 PM Page 19

• Alimentation électrique
Brancher la tronçonneuse à une bonne source de courant et
s’assurer que la tension est bien la même que celle indiquée sur la
fiche signalétique.
Caractéristiques de sécurité contre le rebond
AVERTISSEMENT :La tronçonneuse comporte les
caractéristiques suivantes qui réduisent le danger que présente le
rebond sans toutefois l’éliminer totalement. L'utilisateur ne doit don
pas se fier entièrement à ces dispositifs de sécurité et doit respecte
toutes les instructions de sécurité et d'entretien du présent manuel
pour essayer d'éviter le rebond et les autres forces qui peuvent
causer des blessures graves.
• Un guide-chaîne pour réduire le rebond comporte une extrémit
à petit rayon qui réduit la zone de danger du rebond du guide à
l'extrémité. Ce guide-chaîne a montré, au cours d’essais effectués
selon les exigences concernant la sécurité des tronçonneuses
électriques, qu'elle réduisait considérablement le nombre des
rebonds et leur gravité.
• La chaîne à faible rebond comprend une jauge de profondeur
profilée et un maillon de garde qui font dévier la force de rebond et
permettent au bois de passer graduellement dans les dents de
coupe. Ce type de chaîne répond aux exigences en matière de
rebond de l'ANSI B175.1-1991.
• Le protège-main réduit le risque de toucher la chaîne avec la ma
gauche si celle-ci glisse de la poignée.
• La position des poignées avant et arrière assure un bon
écartement qui améliore le contrôle, l'équilibre et la résistance e
cas de rebond brutal.
Règles supplémentaires de sécurité : Tronçonneuses
MISE EN GARDE : Certains types de bois contiennent des
préservatifs comme l’arséniate de chromate de cuivre qui peut être
toxique. Lors de la coupe du bois, bien prendre soin de pas inhaler
minimiser le contact avec la peau.
20
(3.) Se tenir bien d'aplomb sur ses jambes et conserver son équilibre
en tout temps.
(4.) Ne pas laisser l'extrémité du guide-chaîne toucher une bûche,
une branche, le sol ou toute autre obstacle.
(5.) Ne pas couper au-dessus de la hauteur de l'épaule.
(6.) Utiliser des dispositifs comme une chaîne à faible rebond, des
gardes d'extrémité du guide-chaîne, un système de freinage de
chaîne et des guides spéciaux pour réduire les risques qui
accompagnent le rebond.
(7.) N'utiliser que les guides et les chaînes de rechange prescrits par
le fabricant ou un équivalent.
(8.) Ne pas laisser la chaîne en mouvement toucher un objet à
l'extrémité du guide-chaîne.
(9.) Garder la zone de travail dégagée (enlever les arbres, les
branches, les roches, les clôtures, les souches, etc.). Éliminer ou
éviter les obstructions que la chaîne pourrait rencontrer pendant la
coupe d'une bûche ou d'une branche.
(10.) Garder la chaîne bien affûtée et tendue. Une chaîne
desserrée ou émoussée risque d'augmenter le rebond. Vérifier la
tension à intervalle régulier , le moteur étant arrêté et jamais quand il
tourne.
(11.) Commencer et continuer la coupe seulement quand la chaîne
fonctionne à pleine vitesse. Si la chaîne tourne à faible vitesse, le
rebond est plus susceptible de se produire.
(12.) Ne couper qu'une bûche à la fois.
(13.) Faire bien attention quand on remet la lame dans une coupe
existante. Engager le butoir à crocs dans le bois et laisser la chaîne
atteindre sa pleine vitesse avant de faire la coupe.
(14.) Ne pas faire de coupes plongeantes ou cylindriques.
(15.) Attention aux bûches mal immobilisées ou aux forces qui
pourraient refermer une fente, pincer la chaîne ou faire tomber un
objet sur celle-ci.
Pour obtenir de plus amples renseignements, composer le 1 800 544-6986.
FRANÇIAS
chainsaw booklet 1/19/00 1:45 PM Page 20

21
AVERTISSEMENT :L'utilisation de cet outil peut produire de la
poussière contenant des produits chimiques susceptibles de causer
le cancer, des malformations congénitales ou des dangers pour la
reproduction. Il faut donc utiliser un appareil de protection
respiratoire approprié.
• Ne pas utiliser une tronçonneuse endommagée, mal réglée, mal ou
incomplètement montée. S'assurer que la chaîne s'arrête quand la
gâchette est relâchée.
• Ne pas effectuer d'opérations qui dépassent la compétence ou
l'expérience.
• Ne pas faire fonctionner la tronçonneuse d'une seule main car ceci
pourrait causer des blessures à l'utilisateur, aux aides ou aux
spectateurs. Utiliser les deux mains.
• Pour réduire le risque d'électrocution, ne pas utiliser la
tronçonneuse sur une surface mouillée ou glissante, pendant les
tempêtes de neige, les averses de pluie ou toute autre condition
atmosphérique contraire.
• Garder les poignées sèches, propres et exemptes d’huile et de
graisse.
• Ne pas laisser les saletés, les débris ou la sciure de bois
s'accumuler sur le moteur ou les orifices de ventilation extérieurs.
CONSERVER CES MESURES.
Préparation de la tronçonneuse avant l'usage
Huilage de la chaîne
• Il est recommandé d’huiler toute chaîne neuve la première fois
qu'on l'utilise. Tremper la chaîne neuve dans l’huile pendant au
moins une heure avant de l'utiliser.
• L'huilage pendant le fonctionnement est automatique et ne se règle
pas.
• Il est recommandé d'utiliser une seule marque d'huile pendant toute
Pour obtenir de plus amples renseignements, composer le 1 800 544-69
la durée de vie de la tronçonneuse parce que le mélange d'huiles
différentes pourrait altérer la qualité du lubrifiant et réduire
considérablement la durée de vie de l'outil.
• Ne jamais utiliser de l'huile de vidange, de l'huile épaisse ou de
l'huile fine de machine à coudre car elles peuvent endommager la
tronçonneuse.
Montage du guide-chaîne et de la chaîne (Fig. C)
AVERTISSEMENT :T oujours débrancher la source
d'alimentation de la tronçonneuse avant de poser une guidechaîne ou une chaîne.
ATTENTION :T oujours porter des gants de protection quand
on travaille avec une tronçonneuse. La chaîne est tranchante et
peut couper même à l’arrêt.
• (Fig. C1) Installer la chaîne (1) sur le guide-chaîne (2), en
s’assurant que les dents de coupe sont orientées dans le bon sens
que le tendeur (16) est orienté vers l’utilisateur.
• (Fig. C2) Retirer le bouton du tendeur de chaîne (4) et la vis
d’obturation située juste en-dessous. La tronçonneuse reposant su
une surface horizontale stable, poser le guide et la chaîne sur les
goujons de montage (12), en s’assurant que la chaîne repose bien
sur le pignon d’entraînement (13). Vérifier que les dents de coupe
sont toutes orientées dans la même direction que le graphique gau
et (13a) au-dessus et au-dessous du pignon d’entraînement (13).
• (Fig. C3) Avant de remettre le couvre-chaîne, vérifier que la came
(17) est dans la bonne position. La partie plate de la came métalliq
doit être visible par l’ouverture du couvre-chaîne. Au besoin, appuy
sur le bouton de commande (4) et le tourner dans le sens horaire
pour faire tourner la came et la mettre à la bonne position.
• (Fig. C4) Installer le couvre-chaîne en repérant le boulon et en
utilisant le bouton de commande (4) pour serrer le couvre-chaîne à
main. Pour tendre la chaîne, desserrer le bouton de commande (4
d’un tour complet, appuyer fermement et tourner dans le sens
horaire. À mesure que le guide se déplace vers l’avant, vérifier que
chainsaw booklet 1/19/00 1:45 PM Page 21

système avant chaque usage.
Réglage du protège-main à arrêt automatique
•S’assurer que la tronçonneuse est débranchée de l’alimentation
électrique.
• (Fig. E1) Tirer le carter avant (9) vers l’arrière à la position. La
tronçonneuse est maintenant prête à fonctionner .
Fonctionnement du système de frein antirebond de la chaîne.
En cas de rebond, la main gauche touche le protège-main avant et
pousse vers l’avant et arrête la chaîne en une fraction de seconde.
Fonctionnement du système de freinage à inertie de la chaîne
Le frein est actionné quand le protège-main avant est poussé vers
l’avant soit manuellement par le dos de la main de l’utilisateur, soit
sous l’effet de son propre poids. L ’avantage du frein à inertie est qu
actionné par un fort rebond, par exemple, quand la chaîne touche d
métal même si la main de l’utilisateur ne touche pas le protège-mai
c’est-à-dire quand la scie est dans la position d’abattage.
Vérification du système de frein antirebond de la chaîne
• Bien tenir la tronçonneuse des deux mains sur une surface ferme
s’assurer que la chaîne ne touche pas le sol et que l’interrupteur es
en position de marche (voir )
• (Fig. E2) Faire tourner la main gauche vers l’avant de façon à ce
que le dos touche le protège-main avant et le pousse vers l’avant.
chaîne doit s’arrêter en une fraction de seconde.
Remise en service du système de freinage antirebond de la
chaîne
Suivre les instructions pour le réglage du système de freinage de la
chaîne.
Notes :
• Il n’est pas possible d’allumer l’interrupteur si le protège-main
avant/frein de chaîne n’est pas en position .
• Ne pas remettre la tronçonneuse en marche tant qu’on n’entend
22
les maillons de la chaîne passent bien dans le guide-chaîne. Quand
le bouton de commande s’arrête de tourner, appuyer encore dessus
légèrement. Ne pas trop tendre. Laisser le bouton revenir à sa
position sortie sous l’effet du ressort et le faire tourner de nouveau
dans le sens horaire pour serrer le guide-chaîne. Appuyer
légèrement pour serrer . Remplacer la vis d’obturation
• (Fig. C5/C6) Vérifier la tension de la chaîne en plaçant la
tronçonneuse sur une surface ferme. La tension est bonne quand la
chaîne revient en place quand on la soulève de 1/8 po (3 mm) du
guide-chaîne avec le majeur et le pouce. La chaîne ne doit pas
pendre du guide-chaîne comme le montre la Figure C5. La Figure
C6 montre une chaîne mal tendue qui pend.
Note : Ne pas trop tendre la chaîne car ceci causerait une usure
excessive et réduirait la durée de vie du guide et de la chaîne.
Note : Quand la chaîne est neuve, vérifier la tension fréquemment
(après avoir débranché l’alimentation électrique) au cours des deux
premières heures d’utilisation, car elle a tendance à s’étirer
légèrement.
Huilage (Fig. D)
• (Fig. D) Remplir le réservoir par le col de remplissage d’huile (8)
avec de l’huile normale pour tronçonneuse. Si on ne dispose pas
d’huile pour tronçonneuse, on peut utiliser de l’huile à moteur SAE
30. Note : Pour les températures inférieures à 30 °F, utiliser de l’huile
SAE 10. Pour les températures supérieures à 75 °F, utiliser de l’huile
SAE 40. Vérifier le niveau d’huile par la fente de l’indicateur (7).
• Éteindre la tronçonneuse de temps à autre et vérifier l’huile dans
l’indicateur. S’il y a moins d’un quart d’huile, débrancher
l’alimentation électrique et remplir d’huile appropriée.
Système de frein à arrêt automatique (Fig. E)
La tronçonneuse est équipée d’une gâchette à arrêt automatique qui
arrête la chaîne en une fraction de seconde chaque fois qu’on
relâche la gâchette arrière ou en cas de rebond. Il faut essayer ce
Pour obtenir de plus amples renseignements, composer le 1 800 544-6986.
FRANÇIAS
chainsaw booklet 1/19/00 1:45 PM Page 22

23
pas le moteur s’arrêter complètement.
• Si la chaîne ne s’immobilise pas complètement en une fraction de
seconde, cela indique qu’il faut tendre la chaîne (voir la Figure C).
Utilisation de la tronçonneuse (Fig. F)
Fixation d’une rallonge à la tronçonneuse
Une retenue de rallonge est incorporée à la poignée de l’interrupteur
et empêche la rallonge d’être détachée de la poignée. Pour utiliser
cette caractéristique, il suffit de doubler la rallonge (Figure F1), sur un
pied de longueur environ de l’extrémité de la poignée. Accrocher la
boucle ainsi formée sur la patte comme le montre la Figure F2. Tirer
légèrement sur la rallonge pour vérifier qu’elle est bien retenue dans
la poignée. Brancher l’extrémité prise de la rallonge à la fiche
d’alimentation de la tronçonneuse. La Figure F3 montre une autre
méthode pour fixer la rallonge au cordon de l’Outil. Garder le cordon
loin de la chaîne pendant l’usage.
Interrupteur
• (Fig. G1) Toujours s’assurer qu’on est bien d’aplomb sur ses
jambes et qu’on tient bien la tronçonneuse des deux mains de sorte
que le pouce et les doigts entourent la poignée. Pousser le bouton
de verrouillage (10) vers l’avant et appuyer sur la gâchette (1 1) pour
mettre la tronçonneuse en marche tel qu’illustré à la Figure G2.
• Quand le moteur tourne, enlever le pouce du bouton de verrouillage
et empoigner la poignée fermement
Ne pas forcer la tronçonneuse mais la laisser faire le travail.
L’outil ef fectuera mieux le travail et de façon plus sûre à la vitesse
pour laquelle il a été conçu. Une force excessive risque d’étirer la
chaîne.
Si la tronçonneuse ou le guide-chaîne se bloque :
• Mettre l’interrupteur en position d’arrêt.
• Débrancher l’alimentation électrique.
• Ouvrir la coupe avec des coins pour relâcher l’effort sur le guide-
Pour obtenir de plus amples renseignements, composer le 1 800 544-69
chaîne. Ne pas essayer de dégager la tronçonneuse en forçant.
Commencer une nouvelle coupe.
Techniques de coupe courantes
Abattage (Fig. H)
• L’abattage est le processus qui consiste à couper un arbre. Le
tronçonnage consiste à découper une bûche en tronçons. Quand
deux personnes ou plus travaillent ensemble à des opérations
d’abattage et de tronçonnage, l’abattage doit se faire séparément d
tronçonnage à une distance au moins égale à deux fois la hauteur d
l’arbre à abattre. Il ne faut pas abattre les arbres s’ils présentent un
danger pour une personne, s’ils risquent de heurter une ligne de
service public ou d’endommager la propriété. Si un arbre touche u
ligne de service public, il faut aviser la compagnie en cause
immédiatement. Vérifier le haut de l’arbre pour voir s’il y a des
branches mortes ou brisées qui peuvent tomber pendant l’abattage
L’utilisateur de la tronçonneuse doit rester en amont de la pente ca
l’arbre roule ou glisse normalement vers le bas une fois abattu.
• (Fig. H1) Avant de commencer les coupes, il faut prévoir, au
besoin, un chemin de retraite dégagé qui aille en diagonale vers
l’arrière par rapport à la ligne de chute prévue.
• Avant de commencer l’abattage, il faut étudier l’inclinaison nature
de l’arbre, la position des grosses branches et la direction du vent
pour juger de l’endroit où l’arbre doit tomber. Préparer des coins (e
bois, en plastique ou en aluminium) et un gros maillet.
Enlever la saleté, les pierres, l’écorce détachée, les clous, les agraf
et les fils de fer de l’arbre là où les coupes doivent être faites.
• (Fig. H2) Entaille de direction - Faire l’entaille de direction à un 1/3
du diamètre de l’arbre, perpendiculairement à la direction de la chu
de l’arbre. Faire l’entaille horizontale inférieure d’abord afin d’évite
de pincer la tronçonneuse ou le guide-chaîne quand la seconde
entaille est effectuée.
• (Fig. H3) Trait d’abattage - Faire le trait d’abattage environ 2 pouc
chainsaw booklet 1/19/00 1:45 PM Page 23

Couper d’abord 1/3 du diamètre par dessous et couper ensuite par
dessus pour rejoindre la coupe du dessous.
(Fig. J4) Le bois est soutenu aux deux extrémités.
Tout d’abord, couper sur 1/3 à partir du dessus puis finir la coupe p
dessous sur les 2/3 restants pour rejoindre la première coupe.
Continuer de couper pour atteindre la première coupe.
(Fig. K1) Sur une pente.
Il faut toujours se tenir en amont de la bûche. Si on coupe d’un seu
trait, il faut relâcher la pression de coupe pour garder le contrôle
quand on approche de la fin de la coupe, tout en continuant à bien
tenir la tronçonneuse. Ne pas laisser la chaîne toucher le sol. Une
fois la coupe terminée, attendre que la chaîne soit immobilisée pou
enlever la tronçonneuse. Toujours couper le moteur avant de pass
à un autre arbre.
(Fig. K2) Utilisation d’un chevalet.
Il est fortement recommandé d’utiliser un chevalet autant que
possible. Bien stabiliser la bûche et couper à l’extérieur du chevale
Soin et entretien
L’entretien régulier assure une durée de vie longue et efficace de la
tronçonneuse. Il est recommandé de faire les vérifications suivante
à intervalles réguliers :
Niveau d’huile
Le niveau d’huile ne doit pas descendre au-dessous du quart du
réservoir.
Chaîne et guide-chaîne
Toutes les quelques heures d’utilisation, enlever le guide-chaîne et
chaîne et bien nettoyer.
(Fig. L2) S’assurer que le trou entre le trou de tension et d’huile (18
et le guide-chaîne ainsi que la rainure de ce dernier sont bien
dégagés.
(Fig. L1) Pour le remontage, tourner le guide-chaîne de 180° et hu
24
plus haut que l’entaille horizontale. Laisser suffisamment de bois
pour servir de charnière et empêcher l’arbre de pivoter et de tomber
dans la mauvaise direction. Ne pas couper la charnière.
• (Fig. H3) À mesure que la coupe approche de la charnière, l’arbre
doit commencer à tomber. Si l’arbre semble ne pas vouloir tomber
dans la direction désirée ou qu’il risque de pivoter vers l’arrière et
bloquer la tronçonneuse, arrêter la coupe avant de terminer le trait
d’abattage et utiliser les coins pour ouvrir l’entaille et faire tomber
l’arbre dans l’axe voulu.
Quand l’arbre commence à tomber, enlever la tronçonneuse de la
coupe, arrêter le moteur, déposer la tronçonneuse et prendre le
chemin de retraite prévu. Faire attention aux chutes de branches et à
l’endroit où on met les pieds.
Ébranchage (Fig.J1)
L’ébranchageconsiste à enlever les branches de l’arbre abattu.
Pendant cette opération, laisser les grosses branches du bas pour
soutenir le fût au sol. Enlever les petites branches d’une seule
coupe. Les branches soumises à une force doivent être coupées
par dessous pour éviter de pincer la tronçonneuse. Couper les
branches du côté opposé en gardant le tronc de l’arbre entre soi et
la tronçonneuse. Ne jamais placer la tronçonneuse entre ses
jambes pour couper et éviter d’enfourcher la branche à couper.
Tronçonnage
Le tronçonnage consiste à couper le tronc en billots. La façon de
couper dépend de la manière dont le tronçon est soutenu. Utiliser un
chevalet dans la mesure du possible. Toujours commencer la coupe
avec la chaîne tournant à pleine vitesse et en appuyant le butoir à
crocs (15) sur le bois. Pour finir la coupe, utiliser le butoir à crocs
pour faire pivoter la tronçonneuse dans le bois.
(Fig. J2) Le bois est soutenu sur toute sa longueur.
Faire la coupe sur le dessus en évitant de couper dans le sol pour ne
pas émousser la chaîne trop rapidement.
(Fig. J3) Le bois est supporté à une seule extrémité.
Pour obtenir de plus amples renseignements, composer le 1 800 544-6986.
FRANÇIAS
chainsaw booklet 1/19/00 1:45 PM Page 24

25
l’extrémité du pignon par le trou d’huilage (6). Ceci assure une
distribution de l’usure sur la rainure du guide.
(Fig. L2) Pour tourner le guide-chaîne de 180°, enlever la petite vis
du coulisseau et fixer de l’autre côté du guide-chaîne.
Affûtage de la chaîne
Pour obtenir le meilleur rendement possible de la tronçonneuse, il est
important de garder les dents bien affûtées en appliquant les conseils
suivants :
1.) Pour obtenir les meilleurs résultats, utiliser un porte-lime ou un
guide de limage pour affûter la chaîne afin de toujours garder le bon
angle.
2.) Placer le porte-lime à plat sur la plaque supérieure et la jauge de
profondeur des dents.
3.) (Fig. M1) Garder l’axe de l’angle de limage approprié de la plaque
supérieure à 30°sur le guide de la lime parallèle à la chaîne (limer à
60° de la chaîne vue du dessus).
4.) (Fig. M2) Affûter les dents de coupe sur un côté de la chaîne
d’abord. Limer du côté intérieur de chaque dent vers l’extérieur.
Retourner ensuite la tronçonneuse et répéter les processus (2, 3, 4)
pour les dents de l’autre côté de la chaîne. Utiliser une lime plate
pour limer le dessus des racleurs (partie du maillon qui se trouve
devant la dent de coupe) de sorte qu’ils soient à 0,025 po. audessous du sommet des dents.
5.) (Fig. M3) Garder toutes les dents à la même longueur.
6.) Si la surface chromée des plaques supérieures ou latérale est
endommagée, limer pour faire disparaître les dommages.
MISE EN GARDE : Après le limage, les dents seront affûtées et il
faut faire plus attention pendant ce processus.
Pour obtenir de plus amples renseignements, composer le 1 800 544-69
Recherche des pannes
Si la tronçonneuse ne fonctionne pas bien, vérifier les éléments
suivants :
Panne Cause possible Mesure
La tronçonneuse Fusible brûlé. Remplacer le fusible.
ne démarre pas. GFCI déclenché.Vérifier le GFCI.
Alimentation Vérifier l’alimentation.
non branchée.
La tronçonneuse Protège-main/ Réengager protège-main/
ne démarre pas - frein de chaîne frein de chaîne
le bouton de en position ON. (voir rubrique
verrouillage ne à arrêt automatique»).
glisse pas.
La tronçonneuse La chaîne est Vérifier la tension
ne s’arrête pas trop lâche. (voir rubrique ).
assez vite quand
la scie est hors
tension.
Le guide-chaîne et Le réservoir d’huile Vérifier le niveau de l’huile
la chaîne chauffent est vide. (voir rubrique ).
ou fument. La chaîne est trop Vérifier la tension de la chaîne
tendue. (voir rubrique ).
Le pignon du
guide-chaîne doit
être graissé.
Affûtage de la chaîne
Les dents de coupe s’émousseront immédiatement si elles touchen
le sol ou un clou lors de la coupe.
Tension de la chaîne
La chaîne doit être tendue régulièrement.
chainsaw booklet 1/19/00 1:45 PM Page 25

26
Niveau de l’huile
Remplir au besoin.
Entretien
Utiliser seulement un savon doux et un linge mouillé pour nettoyer la
tronçonneuse. Ne laisser aucun liquide pénétrer dans l’outil. Ne
jamais immerger aucune partie de l’outil dans l’eau. Vidanger l’huile
quand la tronçonneuse n’est pas utilisée pendant un certain temps.
IMPORTANT :Pour assurer la SÉCURITÉ D’EMPLOI et la
FIABILITÉ de l’appareil, n’en confier la réparation, l’entretien et le
réglage qu’à un centre après-vente ou à un atelier d’entretien qualifié
n’utilisant que des pièces de rechange identiques.
Accessoires
Les accessoires recommandés pour l’outil sont vendus séparément
chez les détaillants et dans les centres après-vente autorisés.
Les chaînes et guide-chaîne de rechange sont disponibles au
centre après-vente Black & Decker le plus proche.
Chaîne de rechange, numéro 323175-00
Guide-chaîne de rechange, numéro 570580-00
L’utilisation d’accessoires non recommandés dans le présent
manuel peut être dangereuse.
RENSEIGNEMENTS CONCERNANT LE SERVICE
Black & Decker a un réseau complet de centres après-vente
autorisés ou appartenant à la compagnie dans toute l’Amérique du
Nord. Tous les centres après-vente Black & Decker ont un personnel
bien formé qui assure aux clients un service d’entretien efficace et
fiable aux clients Si vous avez besoin de conseils techniques, de
réparation ou de pièces de rechange d’origine, communiquez avec le
centre Black & Decker le plus proche.
Pour trouver l’adresse du centre après-vente locale, consulter la
rubrique dans les Pages Jaunes ou appeler: 1 800 544-6986
Pour obtenir de plus amples renseignements, composer le 1 800 544-6986.
FRANÇIAS
GARANTIE COMPLÈTE DE DEUX ANS POUR L’USAGE
DOMESTIQUE
Black & Decker (U.S.) Inc. garantit ce produit pour deux ans pour
tous les défauts de matériel ou de fabrication. Tout produit défectue
sera remplacé ou réparé gratuitement, selon le cas.
La première option, qui se traduit seulement par un échange,
consiste à retourner le produit au détaillant chez qui l’outil a été
acheté (si le détaillant est un participant reconnu). Tous les retours
doivent se faire durant la période de retour prévue dans la politique
du détaillant pour les échanges (normalement 30 à 90 jours après l
vente). Une preuve d'achat peut être requise. Vérifiez la politique d
détaillant concernant les retours après les limites de temps prévues
La seconde option consiste à apporter ou envoyer le produit (port
payé) à un centre après-vente autorisé ou appartenant à Black &
Decker pour la réparation ou le remplacement, à notre choix. Une
preuve d'achat peut être requise. Les centres après-vente autorisé
ou appartenant à Black & Decker sont indiqués dans les pages
jaunes sous la rubrique .
Cette garantie ne s’applique pas aux accessoires. L’utilisateur peu
également se prévaloir d’autres droits selon l’état ou la province qu
habite. Pour tout renseignement, communiquez avec le gérant du
centre après-vente Black & Decker le plus proche.
Ce produit n’est pas destiné à un usage commercial
.
Imported by / Importé par
Black & Decker Canada Inc.
100 Central Ave.
Brockville (Ontario) K6V 5W6
Voir la rubrique “Outils électriques”
des Pages Jaunes
pour le service et les ventes.
chainsaw booklet 1/19/00 1:45 PM Page 26

27
LH1600 SIERRA DE CADENA ELÉCTRICA
INFORMACION CLAVE QUE DEBE SABER:
• La guarda de la mano debe estar en la posición “set” (listo) o la
sierra no funcionará. Consulte la sección “SISTEMA DE FRENO
AUTOMA TICO DE LA CADENA” en la página 32.
• NO TENSE LA CADENA EXCESIVAMENTE. Consulte en la
sección “ENSAMBLAJE DE LA BARRA GUIA Y LA CADENA” en
la página 33 el método apropiado para tensar la cadena.
• Reapriete la cadena con frecuencia durante las primeras dos
horas de uso.
NOMBRES Y TERMINOS PARA LA SIERRA DE CADENA
• Aserrado - El proceso de cortar un árbol o tronco
longitudinalmente.
• Freno de la cadena - Un dispositivo que se usa para detener la
cadena.
• Cabeza de la sierra de cadena - Una sierra de cadena sin la
cadena y la barra guía.
• Dientes de engranaje o dientes - La parte dentada que hace
moverse a la cadena de la sierra.
• Talar - El proceso de cortar un árbol.
• Corte opuesto de talado - El corte final en una operación de
talado hecho en el lado opuesto del árbol al corte origina.
• Mango frontal - El mango de soporte que se encuentra hacia el
frente de la sierra de cadena.
• Guarda del mango frontal - Una barrera estructural entre el
mango frontal de la sierra de cadena y la barra guía, localizado
típicamente muy cercano a la posición de la mano en el mango
frontal y algunas veces empleado como palanca activadora para
un freno de cadena.
Si tiene cualquier pregunta, llame al 326-710
• Barra guía - Una estructura sólida que soporta y guía la sierra
de cadena.
• Funda de la barra guía - Cubierta para la barra guía a fin de
evitar el contacto con los dientes cuando la sierra no está en
uso.
• Contragolpe - Movimiento hacia atrás o hacia arriba, o ambos
de la barra guía que ocurre cuando la parte de la cadena de la
sierra que se encuentra cerca de la nariz de la punta de la bar
hace contacto con cualquier objeto, como un tronco o una ram
o cuando la madera se cierra y aprisiona la cadena en el corte
• Contragolpe, aprisionamiento - El movimiento repentino de
sierra hacia atrás que ocurre cuando la madera se cierra en e
corte y aprisiona la cadena de la sierra en movimiento en la
zona de la punta de la barra guía.
• Contragolpe rotacional - El movimiento rápido de la sierra
hacia arriba y hacia atrás que ocurre cuando la cadena de la
sierra hace contacto con algún objeto en la zona cercana a la
punta de la barra guía.
• Cadena de bajo contragolpe - Una cadena que cumple con
requerimientos de rendimiento de contragolpe de ANSI B175.
1991 (probada entre una muestra representativa de sierras de
cadena).
• Posición normal de corte - Aquéllas posiciones asumidas pa
el talado y aserrado.
• Muesca inferior - Una muesca que se corta en un árbol para
dirigir su caída.
• Control de aceitera - Un sistema para aceitar la barra guía y
cadena de la sierra.
• Mango trasero - El mango de soporte que se encuentra hacia
la parte posterior de la sierra.
• Barra guía de contragolpe reducido - Una barra guía que ha
demostrado reducir el contragolpe significativamente.
• Cadena de repuesto - Una cadena que cumple con los
requerimientos de rendimiento de contragolpe de ANSI B175.
1991 probada entre una muestra representativa de sierras de
chainsaw booklet 1/19/00 1:45 PM Page 27

28
cadena. Puede no cumplir los requerimientos de ANSI al
emplearse en otras sierras.
• Púa – Diente o dientes puntiagudos que se utilizan al aserrar o
talar para girar la sierra y conservar la posición al cortar.
• Interruptor - Un dispositivo que al operarse completa o
interrumpe el circuito eléctrico hacia el motor de la sierra de
cadena.
• Conexión del interruptor - El mecanismo que transite el
movimiento del gatillo al interruptor.
• Seguro del interruptor - Un tope móvil que evita la operación
no intencional del interruptor hasta que se active manualmente.
DESCRIPCION DE LAS P AR TE (FIGS. A, B Y J)
FIG. A 1. Cadena de la sierra
2. Barra guía
3. Cubierta de la cadena
4. Botón para tensiónar la cadena y la tapa tornillo
4a. Funda de la barra guía
5. Nariz de engranes
6. Orificio de lubricación de engranes
7. Indicador de nivel de aceite
8. Tapa de aceitera
9. Guarda frontal / Freno de la cadena
10. Botón de seguro de apagado
11 . Gatillo
FIG.B1 12. Pernos de montaje de la barra
13. Engrane de mando
14. Receptor de la cadena
15. Tope con púas
FIG. B2 16. Tensor del deslizador
FIG. B3 17. Leva
FIG. L2 18. Orificio para aceite
Instrucciones importantes de seguridad
ADVERTENCIA: Cuando use una sierra eléctrica de cadena,
debe seguir ciertas precauciones básicas de seguridad a fin de
reducir los riesgos de incendio, choque eléctrico y lesiones
personales, entre las que se encuentran las siguientes:
LEA TODAS LAS INSTRUCCIONES
Advertencias de seguridad: Doble aislamiento
Las herramientas con doble aislamiento se han elaborado de mane
integral con dos capas separadas, o una de doble espesor, de
aislamiento eléctrico entre usted y el sistema eléctrico que contiene
Las herramientas elaboradas con este sistema de aislamiento no
requieren conectarse a tierra. Como resultado, su unidad está
equipada con una clavija de dos patas que le permite emplear
cordones de extensión sin preocuparse por tener una conexión a
tierra.
NOTA:el doble aislamiento no substituye a las precauciones
normales de seguridad cuando se opera esta herramienta. La
finalidad de este sistema de aislamiento es ofrecer a usted
protección añadida contra la lesión resultante de fallas en el
aislamiento eléctrico interno de la unidad.
REFACCIONES: UTILICE SOLAMENTE REFACCIONES
IDENTICAS cuando se haga servicio a cualquier herramienta.
Repare o reemplace los cables dañados.
Advertencias de seguridad: Clavija polarizada
Se emplean clavijas polarizadas (con una pata más ancha que la
otra) en los equipos para reducir los riesgos de choque eléctrico.
Este equipo debe usarse con una cable de extensión adecuado de
o 3 hilos. Las conexiones polarizadas ajustan de una sola manera.
Asegúrese que el extremo del contacto tenga una ranura pequeña
una grande. Si la clavija no se ajusta perfectamente a la extensión,
inviértala. Si aún así no se ajusta, busque una extensión adecuada
Si la extensión no entra perfectamente en la toma de corriente, hag
Si tiene cualquier pregunta, llame al 326-7100.
E SPAÑOL
chainsaw booklet 1/19/00 1:45 PM Page 28

29
que un electricista calificado le instale un contacto apropiado. No
haga modificaciones a la clavija de la herramienta ni a la extensión
por ningún motivo.
ADVERTENCIA: Para reducir el riesgo de choque eléctrico utilice
únicamente una extensión para uso a la intemperie, como los
siguientes tipos: SW-A, S0W-A, STW-A, STOW -A, SJW -A, SJOW-A,
SJTW-A o SJTOW-A.
CABLE DE EXTENSIÓN
Asegúrese que su extensión esté en buenas condiciones. Cuando
utilice una extensión, asegúrese que tenga el calibre suficiente para
conducir la corriente que su herramienta necesita. Una extensión con
calibre menor al necesario causará una caída en el voltaje de la
línea, resultando en pérdida de potencia y sobrecalentamiento. La
tabla siguiente muestra el calibre correcto para usarse, de acuerdo
con la longitud de la extensión y el amperaje en la placa de
identificación. Si tiene dudas, utilice el calibre siguiente. Mientras
menor sea el número del calibre, mayor será la capacidad del cable.
Instrucciones y advertencias de seguridad para sierras de
cadena
• Conserve limpia el área de trabajo
Las áreas con objetos acumulados en desorden propician los
accidentes. No empiece a cortar hasta después de haber limpiado el
Si tiene cualquier pregunta, llame al 326-710
Calibre mínimo para cordones de extensión
Volts Longitud total del cordón en metros
120V 0-7,6 7,9-15,2 15,5-30,4 30,7-45,7
240V 0-15,2 15,5-30,4 30,7-60,9 61,2-27,8
AMPERAJE
Más No más CALIBRE AWG
de de
0-6 18 16 16 14
6 - 10 18 16 14 12
10 - 12 16 16 14 12
12 - 16 14 12 No se recomienda
área, plantarse firmemente y haber planeado un camino de salida
para dejar caer el árbol.
• Dele prioridad al ambiente de trabajo
Tenga precaución extrema cuando corte matorrales pequeños, ya
que el material delgado puede atorar la cadena de la sierra y puede
salir despedido hacia usted o sacarlo de balance. No opere una
sierra de cadena con un árbol a menos que esté entrenado para
hacerlo. Cuando corte una rama bajo tensión, esté alerta para no s
golpeado al liberar la tensión de las fibras de la madera. No expong
la sierra de cadena a la lluvia. No utilice la sierra en lugares húmed
o mojados.
No utilice la sierra en presencia de líquidos o gases inflamables, ni
sitios con concentraciones altas de polvo.
• Protéjase del choque eléctrico
Evite el contacto corporal con superficies aterrizadas, por ejemplo:
tubería metálica, cercas, etc.
• Conserve apartados a los niños
No permita que los visitantes toquen la sierra de cadena o la
extensión. Todos los visitantes deben apartarse del área de trabajo
• Guarde la sierra de cadena cuando no la use
Cuando no se usen, las sierras de cadena deben guardarse en un
lugar seco y elevado o bajo llave –fuera del alcance de los niños.
Cuando guarde la sierra, utilice una funda o un estuche.
• No fuerce la sierra de cadena
Ésta hará mejor el trabajo y de manera más segura trabajando bajo
las especificaciones para las que se diseñó.
• Utilice la herramienta adecuada
Únicamente corte madera. No utilice la sierra para algo para lo que
no está diseñada –por ejemplo– no utilice la sierra para cortar
plástico, metal, materiales de albañilería, ni materiales de
construcción que no sean de madera.
chainsaw booklet 1/19/00 1:45 PM Page 29

30
• Vístase de manera apropiada
No utilice prendas de vestir flojas ni artículos de joyería. Pueden
quedar atrapados por las piezas móviles. Se recomienda el empleo
de zapatos de goma y calzado antiderrapante cuando trabaje a la
intemperie. Cúbrase el cabello si lo tiene largo.
• Use gafas de seguridad
Utilice también calzado de seguridad, ropa ajustada, guantes y
protección para la cabeza y los oídos.
• T ransporte de la sierra
Lleve la sierra de cadena por el mango frontal una vez que esté
apagada, con el dedo fuera del interruptor de gatillo, y apuntando la
barra guía y la sierra hacia atrás. Utilice una funda para transportar la
sierra.
• Cuide su sierra de cadena
Revise los cables de la sierra periódicamente, y si están dañados,
hágalos reparar por un centro de servicio autorizado. Conserve
siempre el cable alejado de la cadena y del operador. Nunca cargue
la sierra tomándola por el cable, ni tire de éste para desconectarla.
Conserve el cable alejado de aceite, grasa y bordes afilados. Revise
los cables periódicamente y cámbieles si están dañados. Conserve
sus herramientas afiladas y limpias para obtener un rendimiento
mejor y más seguro. Siga las instrucciones de lubricación y cambio
de accesorios. Conserve los mangos secos, limpios y libres de aceite
y grasa.
• Desconecte la sierra de cadena
Desconecte la sierra de cadena cuando no la use, antes de darle
servicio, cuando tense la cadena y cuando cambie accesorios o
dispositivos, como la cadena o la guarda.
• Uso de extensiones para intemperie
Utilice únicamente extensiones fabricadas y marcadas para usarse
a la intemperie.
• Esté alerta
Concéntrese en lo que hace. Utilice el sentido común. No opere la
sierra de cadena si está cansado. Conserve todas las partes del
cuerpo alejadas de la cadena de la sierra cuando el motor esté en
funcionamiento. Antes de encender la sierra, asegúrese de que la
cadena no esté en contacto con nada. Cuando corte madera,
recuerde que la sierra de cadena corta rápidamente y continuará c
su camino hacia abajo o hacia arriba. Quédese fuera de este camin
• Revise las partes dañadas
Antes de continuar con el uso de la sierra de cadena, cualquier par
que esté dañada deberá revisarse cuidadosamente para determina
si funcionará apropiadamente y realizar la función para la que está
destinada. Revise la alineación de las partes móviles, sus uniones,
ruptura de piezas, montajes y cualesquiera otras condiciones que
puedan afectar su operación. Una guarda u otra parte que esté
dañada debe repararse apropiadamente o cambiarse en un centro
de servicio autorizado a menos que se indique lo contrario en este
manual. Haga cambiar los interruptores defectuosos en un centro d
servicio autorizado. No utilice la sierra si el interruptor no funciona.
No opere una sierra de cadena dañada, mal ajustada o que no esté
ensamblada completamente y con seguridad. Asegúrese de que la
cadena de la sierra deja de moverse al soltar el gatillo.
• Protéjase del contragolpe
ADVERTENCIA: EL CONTRAGOLPE puede ocurrir cuando la
nariz o la punta de la barra guía toca un objeto, o cuando la madera
se cierra y aprisiona la cadena en el corte. El contacto con la punta
puede ocasionar en algunos casos una reacción instantánea hacia
atrás, arrojando la barra guía hacia el operador. Prensar la cadena
de la sierra con la punta de la barra guía puede enviar ésta última
rápidamente hacia el operador. Cualquiera de estas reacciones
pueden ocasionarle la pérdida de control de la sierra con el
consiguiente peligro de una lesión de gravedad al usuario.
Si tiene cualquier pregunta, llame al 326-7100.
E
SPAÑOL
chainsaw booklet 1/19/00 1:45 PM Page 30

31
Las siguientes precauciones deben seguirse para minimizar el
contragolpe:
(1.) Sujete la sierra con firmeza.
Sujete la sierra de cadena firmemente con ambas manos cuando el
motor esté en funcionamiento. Coloque los dedos alrededor de los
mangos de la sierra.
(2.) No se sobreextienda.
(3.) Conserve siempre los pies bien apoyados, al igual que el
equilibrio.
(4.) No deje que la nariz de la barra guía haga contacto con un
tronco, una rama, la tierra u otras obstrucciones.
(5.) No corte más arriba de la altura del hombro.
(6.) Use dispositivos como cadenas de bajo contragolpe, guardas
para la nariz de la barra guía, sistema de freno para la cadena y
barras guía especiales que reduzcan los riesgos asociados con el
contragolpe.
(7.) Únicamente utilice barras y cadenas de repuesto especificadas
por el fabricante o sus equivalentes.
(8.) Nunca permita que la cadena en movimiento haga contacto con
ningún objeto en la punta de la barra guía.
(9.) Conserve el área de trabajo libre de obstrucciones como otros
árboles, ramas, rocas, cercas, tocones, etc. Elimine o evite cualquier
obstrucción con la que su sierra pueda hacer contacto mientras corta
un tronco o una rama en particular.
(10.) Conserve la cadena de su sierra afilada y con la tensión
apropiada. Una cadena floja o sin filo puede incrementar el peligro de
un contragolpe. Revise la tensión a intervalos regulares con el motor
apagado, nunca en funcionamiento.
(11.) Comience a cortar y continúe únicamente con la cadena
moviéndose a la máxima velocidad. Si la cadena se mueve más
lentamente, habrá una gran posibilidad de que ocurra un
contragolpe.
Si tiene cualquier pregunta, llame al 326-710
(12.) Corte un tronco a la vez.
(13.) Tenga precaución extrema cuando re-entre en un corte previo
Entierre las púas en la madera y permita que la cadena alcance la
velocidad máxima antes de proceder con el corte.
(14.) No intente hacer cortes para ahuecar o hacer ranuras.
(15.) Cuídese de troncos que se muevan u otras fuerzas que
pudiesen cerrar el corte y aprisionar o caer en la cadena.
• Alimentación de corriente
Conecte la sierra de cadena al voltaje correcto, es decir, asegúrese
que el voltaje de su fuente de alimentación sea el mismo que el que
está especificado en la placa de identificación de la herramienta.
Características de seguridad para contragolpe
Advertencia: Las siguientes características están incluidas en s
sierra para ayudar a reducir el peligro de contragolpe; sin embargo
tales características no eliminan por completo la posibilidad de esta
peligrosa reacción. Como usuario de una sierra de cadena no debe
confiar únicamente en los dispositivos de seguridad. Debe seguir
todas las precauciones, instrucciones y los procedimientos de
mantenimiento señalados en este manual para ayudarse a evitar
contragolpes y otras fuerzas que puedan resultar en lesiones de
gravedad.
• Barra guía de contragolpe reducido, diseñada con punta de rad
pequeño que reduce el tamaño de la zona de riesgo de contragolpe
la punta de la barra. Una barra guía de contragolpe reducido es
aquella que ha demostrado una reducción significativa en el númer
y gravedad de contragolpes de acuerdo con los requerimientos de
seguridad para sierras de cadena eléctricas.
• Cadena de bajo contragolpe, diseñada con una cavidad y
protector de eslabón que difieren la fuerza del contragolpe y permit
que el cortador avance gradualmente en la madera. Una cadena de
bajo contragolpe es aquella que ha cumplido los requerimientos de
rendimiento de contragolpe de ANSI B175.1-1991.
chainsaw booklet 1/19/00 1:45 PM Page 31

32
• Guarda para la mano, diseñada para reducir la posibilidad de que
su mano izquierda haga contacto con la cadena si se desliza de la
barra frontal.
• Posición de las barras para las manos delantera y trasera,
diseñadas con cierta distancia entre los mangos, lo que proporciona
mejor control, balance y resistencia en caso de contragolpe.
Reglas de seguridad adicionales: Sierras de cadena
PRECAUCION: Algunos tipos de madera contienen
conservadores como el arsenato cúprico de plomo (CCA) que
pueden ser tóxicos. Cuando corte estos materiales, debe tener
mucho cuidad para evitar la inhalación y minimizar el contacto de
estas sustancias con la piel.
ADVERTENCIA: El uso de esta herramienta puede generar polvo
con contenido de productos químicos que se sabe que causan
cáncer, defectos congénitos u otros daños reproductivos. Utilice la
protección respiratoria adecuada.
• No opere la sierra de cadena si está dañada, mal ajustada o
ensamblada de manera incompleta e insegura. Asegúrese de que la
cadena de ja de moverse al soltar el interruptor de gatillo.
• No intente hacer operaciones más allá de su capacidad o
experiencia.
• ¡No opere la sierra de cadena con una sola mano! Pueden resultar
lesiones graves al operador, ayudantes y observadores como
resultado de la operación con una mano. Las sierras de cadena está
diseñadas para usarse solamente con las dos manos.
• Para reducir la probabilidad de que ocurra un choque eléctrico, no
opere la sierra sobre superficies mojadas o resbalosas, ni durante
tormentas de nieve, de lluvia, ni bajo otras condiciones ambientales
adversas.
• Conserve los mangos secos, limpios y libres de aceite y grasa.
• No permita que se acumulen en el motor y en las tomas de aire
exteriores polvo ni otros desechos.
CONSERVE ESTAS INSTRUCCIONES
Prepare su sierra de cadena para usarla
Aceitado de la cadena
• Se recomienda aceitar la cadena siempre que use una nueva por
primera vez. Tome la cadena nueva y sumérjala en aceita para
cadena por lo menos durante una hora antes de usarla.
• El aceitado durante el uso es automático y no es ajustable.
• Le recomendamos que utilice solamente una marca durante la vid
útil de su cadena, debido a que la mezcla de aceites diferentes
pueden llevar que se degraden, lo que puede acortar drásticament
la vida útil de la cadena.
• Nunca utilice aceite de desperdicio, aceite muy denso o muy
delgado para máquinas de coser. Estos pueden dañar la cadena d
su sierra.
Ensamblaje de la barra guía y la cadena (Fig. C)
Advertencia: Desconecte siempre la sierra de la toma de
corriente antes de instalar una barra y (o) una cadena.
Precaución: Utilice siempre guantes de protección cuando
trabaje en su sierra de cadena. La cadena está afilada y puede
cortarlo aún cuando no esté en funcionamiento.
•(Fig. C1) Ajuste la cadena (1) sobre la barra guía (2), asegurándo
que las cuchillas apunten hacia el lado derecho y que el tensor del
deslizador (16) apunte hacia usted.
•(Fig. C2) Remueva el botón para tensionar la cadena (4) y la tapa
tornillo localizada abajo del botón. Con su sierra en posición
horizontal, sobre una superficie estable, ponga la barra y la cadena
en los pernos de montaje de la barra (12), asegurándose que la
cadena quede alrededor del engrane de mando (13). Asegúrese de
que las cuchillas apunten en la misma dirección que el gráfico
grabado (13a) arriba y abajo del engrane de mando.
•(Fig. C3) Antes de colocar la cubierta de la cadena verifique que la
Si tiene cualquier pregunta, llame al 326-7100.
E SPAÑOL
chainsaw booklet 1/19/00 1:45 PM Page 32

33
leva (17) esté en la posición correcta. La sección plana de la leva de
metal debe quedar visible a través de la abertura de la cubierta de la
cadena. En caso necesario, oprima y gire la perilla de control (4) en
el sentido de las manecillas del reloj para girar la leva a la posición
correcta.
• (Fig. C4) Coloque la tapa de la cadena localizando el perno y
usando la perilla de control (4) para apretar la cubierta de la cadena
con los dedos. Para tensar la cadena, afloje la perilla de control (4)
una vuelta completa, presione con firmeza y gire en el sentido de las
manecillas del reloj. Al moverse la barra hacia adelante, asegura que
los eslabones de la cadena queden sobre la barra guía. Cuando la
perilla de control deje de girar, siga aplicando presión ligera. No
tense excesivamente. Permita que la perilla de control se retraiga a
la posición “de fuera” y siga girando en el sentido de las manecillas
del reloj para apretar la barra guía. Aplique presión moderada para
apretar. Ponga de nuevo la tapa tornillo.
• (Fig. C5/C6) Verifique la tensión de la cadena colocando la sierra
sobre una superficie firme. La tensión es correcta cuando la cadena
resortes después de tirar de ella aproximadamente 3 mm (1/8") hacia
el lado opuesto a la barra guía con un poco de fuerza en el dedo
medio y el pulgar. No debe haber “hundimiento” entre la barra guía y
la cadena por la parte inferior, como se muestra en la Fig. C5. La
Figura C6 ilustra una cadena tensada de manera incorrecta que se
cuelga.
Nota: No tense la cadena excesivamente ya que esto producirá
desgaste excesivo y reducirá la vida útil de la cadena y de la barra.
Nota: Cuando la cadena sea nueva verifique la tensión con
frecuencia (después de desconectar la unidad de la toma de
corriente) durante las primeras 2 horas de uso, ya que la cadena se
estira ligeramente.
Aceitado (Fig. D)
• (Fig. D) Llene el depósito por medio de la tapa de la aceitera (8)
con aceite para sierras de cadena estándar. Si no tiene a su
Si tiene cualquier pregunta, llame al 326-710
disposición aceite para sierra de cadena, la puede sustituir con ace
SAE#30. Nota: Para temperaturas inferiores a 0˚C (30˚F), utilice
aceite SAE#10. Para temperaturas por arriba de 23˚C (75˚F) utilice
aceite SAE#40. El nivel de aceite se revisa por medio de la ranura
indicadora del nivel de aceite (7).
• Apague la unidad periódicamente y revise el aceite en el indicado
si le queda menos de un cuarto, desconecte la sierra de la toma de
corriente y rellene con el aceite apropiado.
Sistema de freno automático de la cadena (Fig. E)
Su sierra de cadena cuenta con un gatillo de paro automático que
detendrá la cadena en una fracción de segundo cada vez que suelt
el gatillo trasero, o en caso que ocurra un contragolpe. Este sistem
debe probarse cada vez que se use la sierra.
Cómo usar la guarda de paro automático para la mano
• Asegúrese de que la sierra de cadena esté desconectada de la
toma de corriente.
•(Fig. E1) Tire de la guarda frontal (9) hacia la posición “set”
(preparado). Su sierra de cadena está lista para usarse ahora.
Cómo funciona el sistema de freno automático para
contragolpes
En el caso de un contragolpe, su mano izquierda hará contacto con
la guarda frontal, empujándola hacia adelante y parando la sierra d
cadena en unas fracciones de segundo.
Cómo funciona el sistema de frenado de la cadena activado po
inercia
El freno se activa cuando la guarda frontal se empuja hacia adelan
ya sea manualmente, con el dorso de la mano del operador, o por s
propio peso. La ventaja del freno de inercia es que se activa con un
contragolpe severo, pe. cuando la cadena hace contacto con meta
aún cuando la mano del operador no haga contacto con la guarda
frontal, como cuando la sierra está en posición de talado.
chainsaw booklet 1/19/00 1:45 PM Page 33

34
Cómo probar el sistema de freno automático para contragolpes
• Sujete la sierra de cadena firmemente con ambas manos en una
superficie sólida – asegúrese que la cadena no haga contacto con el
suelo y encienda el interruptor (consulte “Usando su sierra de
cadena”).
• (Fig. E2) Gire su mano izquierda hacia adelante alrededor del
mango frontal de manera que el dorso de la mano haga contacto con
la guarda frontal y la empuje hacia adelante. La cadena deberá
detenerse en unas fracciones de segundo.
Para reiniciar después de la operación de sistema de freno de la
cadena
Siga las instrucciones para preparar el sistema de freno de la
cadena.
Notas:
• No será posible encender la sierra si la guarda frontal/freno de la
cadena no está en la posición “set” (preparado) .
• Evite encender de nuevo la sierra hasta que escuche que el motor
se haya detenido completamente.
• Si la cadena no se detiene en fracciones de segundo es un
indicativo de que necesita tensión (consulte la Fig. C - “Ensamblaje
de la barra guía y la cadena”).
Usando su sierra de cadena (Fig. F)
INSTALACION DEL CABLE DE EXTENSION EN LA SIERRA DE
CADENA
El mango del interruptor cuenta con un retén para el cable de
extensión que evita que éste se salga del mango. Para utilizar este
dispositivo, simplemente doble el cable como se observa en la
Figura F1, aproximadamente a 30 cm del extremo, e insértelo por el
extremo del mango. Enganche el aro que se forma pasando el
cable alrededor de la lengüeta, como se muestra en la Figura F2.
Tire del cable suavemente para asegurarse que está retenido con
seguridad en el mango de la sierra. Conecte el extremo de la
extensión correspondiente a la toma al cable de alimentación de la
herramienta. La Figura F3 ilustra un método alternativo para
asegurar el cable de extensión al cable de alimentación de la sierra
Conserve el cable alejado de la cadena.
Interruptor
• (Fig. G1) Asegure siempre la posición de sus pies y empuñe la
sierra con ambas manos con el pulgar y los demás dedos alrededo
del mango. Empuje el botón del seguro de apagado (10) hacia
adelante y a continuación tire del gatillo (1 1) para encender como s
muestra en la Figura G2.
• Cuando el motor esté encendido retire el pulgar del botón del
seguro y sujete el mango con firmeza.
No fuerce la sierra de cadena - permita que ella haga el trabajo.
Hará un trabajo mejor y más seguro a la velocidad para la que está
diseñada. Aplicar fuerza excesiva estirará la cadena.
Si la cadena o la barra se atascan:
• Apague el interruptor
• Desconecte la unidad de la toma de corriente.
• Abra el corte con cuñas para aliviar la tensión sobre la barra guía
No trate de torcer la sierra para liberarla. Inicie un corte nuevo.
TECNICAS COMUNES DE CORTE
Talado (Fig. H)
•T aladoes el proceso de cortar un árbol para derribarlo. Aserrado
es el proceso de cortar un tronco longitudinalmente. Cuando las
operaciones de talado y aserrado se efectúan por dos o más
personas, al mismo tiempo, la operación de talado deberá estar
separada de la de aserrado por una distancia por lo menos igual al
doble de la altura del árbol que se va a derribar. Los árboles no
deben talarse de manera que se ponga en peligro a cualquier
persona, golpear líneas de servicio o causar daños a la propiedad
alguien. Si el árbol hace contacto con una línea de servicio, la
Si tiene cualquier pregunta, llame al 326-7100.
E SPAÑOL
chainsaw booklet 1/19/00 1:45 PM Page 34

35
compañía que presta el servicio deberá ser notificada
inmediatamente. Busque en los alrededores troncos o ramas rotos
que pudiesen caer durante el proceso de talado.
El operador de la sierra de cadena deberá permanecer en la parte
del terreno que va hacia arriba, ya que el árbol probablemente rodará
o se deslizará hacia abajo después de ser talado.
• (Fig. H1) Se debe planear y limpiar una ruta de salida antes de
iniciar los cortes. La ruta de salida deberá extenderse hacia atrás y
en diagonal a la parte trasera de la línea esperada de caída.
• Antes de iniciar el talado, considere la inclinación natural del árbol,
la posición de las ramas más grandes y la dirección del viento para
calcular el sitio en donde el árbol va a caer. Tenga a la mano cuñas
(madera, plástico o aluminio) y una marro pesado.
Retire objetos, piedras, trozos de corteza, clavos, grapas y cables del
árbol en que se hará el talado.
• (Fig. H2) Corte de muescas inferiores - Haga la muesca de 1/3 del
diámetro del árbol, perpendicular a la dirección de la caída. Haga el
corte de muesca inferior horizontal primero. Esto ayudará a evitar
que la cadena o la barra queden aprisionadas al hacer el corte de la
segunda muesca.
• (Fig. H3) Corte posterior de talado - haga el corte posterior por lo
menos 2 pulgadas (5 cm) más alto que el corte de la muesca
horizontal. Haga el corte posterior paralelo al de la muesca
horizontal. Haga el corte de manera que la madera que quede actúe
como bisagra. Esta bisagra evita que el árbol gire y caiga en la
dirección equivocada. No corte a través de la bisagra.
• (Fig. H3) Cuando el corte de talado llegue cerca de la bisagra, el
árbol empezará a caer. Si hay cualquier riesgo de que el árbol no
caiga en la dirección correcta, o de que pueda balancearse y
aprisionar la cadena de la sierra, deje de cortar y utilice las cuñas
para abrir el corte y dirigir el árbol hacia donde debe de caer.
Retire la sierra del corte cuando el árbol empiece a caer, detenga el
motor, coloque la sierra abajo y utilice el camino de salida. Tenga
Si tiene cualquier pregunta, llame al 326-710
cuidado con troncos altos y mire en dónde pisa.
Podado (Fig. J1)
El podado consiste en quitar las ramas a un árbol caído. Al podar,
deje las ramas inferiores y grandes para que levanten al tronco de
tierra. Retire las ramas pequeñas con un corte. Las ramas bajo
tensión deben cortarse desde la parte inferior para evitar que la
cadena quede aprisionada. Recorte las ramas desde el lado opues
conservando el tronco del árbol entre usted y la sierra. Nunca haga
cortes con la sierra entre sus piernas, ni se siente en la rama que
vaya a cortar.
Aserrado
El aserrado consiste en cortar un tronco longitudinalmente. La
manera en que deberá cortar dependerá del modo en que el tronco
esté apoyado. Utilice caballetes siempre que sea posible. Empiece
siempre a cortar cuando la cadena haya alcanzado la velocidad
máxima y las púas (15) estén en contacto con la madera. Para
completar el corte, utilice la acción de giro que origina el tope con
púas contra la madera.
(Fig. J2) Cuando el tronco esté apoyado en todas su longitud
Haga el corte desde la parte superior, pero evite hacer contacto co
la tierra que esto le quitará el filo a las cuchillas rápidamente.
(Fig. J3) Cuando esté apoyado en un extremo
Primero, corte una tercera parte del diámetro desde la parte inferio
A continuación, haga el corte final iniciando desde arriba para
encontrarse con el primer corte.
(Fig. J4) Cuando esté apoyado en ambos extremos
primero corte un tercio hacia abajo desde la parte superior, a
continuación haga el corte de los 2/3 finales desde abajo hasta
encontrar el primer corte.
(Fig. K1) Cuando corte en declive
Colóquese siempre en la parte más alta. Cuando corte “a través”, a
fin de conservar el control completo, libere la presión de corte cerca
chainsaw booklet 1/19/00 1:45 PM Page 35

36
de la parte final sin aflojar su empuñadura en los mangos. No permita
que la cadena toque tierra. Después de completar el corte, espere a
que la cadena se detenga por completo antes de mover la sierra.
Apague siempre el motor antes de cambiarse a otro árbol.
(Fig. K2) Cuando utilice un caballete
Esto es ampliamente recomendado siempre que sea posible.
Coloque el tronco en una posición estable. Corte siempre por fuera
de los brazos del caballete.
Cuidados y mantenimiento
El mantenimiento regular asegura una larga vida útil para su sierra
de cadena. Le recomendamos verificar los siguientes puntos
regularmente:
Nivel de aceite
El nivel en el depósito no debe bajar más allá de un cuarto.
Cadena y barra
Después de algunas horas de uso, retire la barra guía y la cadena y
límpielas a conciencia.
(Fig. L2) Asegúrese que el orificio que queda entre el tensor/aceitera
(18) y el canal de la barra esté libre.
(Fig. L1) Al ensamblar, la barra guía debe girarse 180˚ y la nariz del
engrane debe aceitarse por medio del orificio de lubricación (6). Esto
asegura la distribución uniforme del desgaste alrededor de los rieles
de la barra guía.
(Fig. L2) Para girar la barra guía 180˚, quite el tornillo pequeño del
deslizador y apriételo de nuevo del lado opuesto de la barra.
Afilado de la cadena
Para obtener el mayor rendimiento de su sierra de cadena es
importante conservar los dientes de la cadena afilados. Siga estas
útiles recomendaciones para afilar apropiadamente la cadena:
1.) Para mejores resultados utilice un sujetador de limas o una guía
para afilar la cadena. Esto le asegurará obtener siempre los ángulo
correctos.
2.) Coloque el sujetador de limas plano en la placa superior y en la
parte inferior del hueco de la cuchilla.
3.) (Fig. M1) Conserve el ángulo de afilado superior correcto de 30
en la guía paralelo a su cadena (la lima a 60˚ en relación con la
cadena vista desde arriba).
4.) (Fig. M2) Afila las cuchillas primero por un lado de la cadena. A
desde el interior hacia la parte externa de las cuchillas. A
continuación voltee la sierra y repita los procedimientos (2, 3 y 4)
para las cuchillas que se encuentran del otro lado de la cadena.
Utilice una lima plana para afilar los puntales (porción del eslabón
que se encuentra al frente de la cuchilla) de manera que queden
0.025" (0,6 mm) por debajo de las puntas de las cuchillas.
5.) (Fig. M3) Conserve igual la longitud de todas las cuchillas.
6.) Si se presentan daños en la superficie de cromo de las placas
superiores o laterales, afile hasta eliminar tal daño.
PRECAUCION: después de limar, la cuchilla estará afilada, teng
mucho cuidad con este proceso.
Búsqueda de fallas
Falla
Posible causa Acción
La sierra de Fusible quemado.Cambie el fusible.
cadena no Sistema GFCI Revise el GFCI
enciende. dañado.
La alimentación Revise la toma
de corriente no de corriente
está conectada
La sierra no Guarda frontal/ Restablezca la
enciende - freno de cadena guarda frontal/
el botón del en posición de freno de cadena
seguro no se encendido (consulte la sección
Si tiene cualquier pregunta, llame al 326-7100.
E SPAÑOL
chainsaw booklet 1/19/00 1:45 PM Page 36

37
desliza. del freno automático
de la cadena)
La cadena no Le falta tensión Verifique la
se detiene en a la cadena. tensión de la
una fracción de cadena (consulte
segundo al la sección sobre
apagar la sierra. ensamblaje).
La barra/cadena Tanque de Revise el nivel
aparecen aceite vacío. del tanque de aceite
calientes/con Revise que no (consulte la sección
humo haya tensión “Nivel de aceite”).
excesiva. Revise la tensión de
La nariz del la cadena (consulte
engrane de la la sección
barra guía “Ensamblaje”).
necesita grasa
Filo de la cadena
La cuchillas perderán el filo inmediatamente si tocan la tierra o un
clavo al cortar.
Tensión de la cadena
Debe revisarse regularmente.
Nivel de aceite
Llene el depósito si el nivel es bajo.
Mantenimiento
Utilice únicamente jabón suave y un trapo húmedo para limpiar la
sierra. Nunca permita que se introduzca un líquido en la herramienta;
nunca sumerja ninguna parte de la herramienta en un líquido.
Drene el aceite de la sierra de cadena cuando no vaya a usarla por
un periodo largo.
IMPORTANTE:Para garantizar la SEGURIDAD y la
Si tiene cualquier pregunta, llame al 326-710
CONFIABILIDAD del producto, las reparaciones, el mantenimiento
los ajustes deberán ser efectuados en centros de servicio
autorizados u otras organizaciones de servicio calificado que utilice
siempre refacciones idénticas.
Accesorios
La cadena y la barra guía de repuesto están a su disposición en el
centro de servicio Black & Decker más cercano a usted.
Cadena de repuesto #323175-00
Barra de repuesto #570580-00
El uso de accesorios no recomendados en este manual puede ser
peligroso.
Información de servicio
Black & Decker ofrece una red completa de centros de servicio
propiedad de la compañía y franquiciados a través de toda
Norteamérica. Todos los centros de servicio Black & Decker cuenta
con personal capacitado para proporcionar el servicio a herramient
más eficiente y confiable.
Siempre que necesite consejo técnico, reparaciones o partes de
repuesto genuinas, comuníquese con el centro Black & Decker má
cercano a usted.
Para encontrar su centro de servicio local, consulte la sección
amarilla bajo "Herramientas eléctricas", o llame al: 326-7100
PARA REPARACION Y SERVICIO DE SUS HERRAMIENTAS
ELECTRICAS FAVOR DE DIRIGIRSE AL CENTRO DE SERVICIO MAS
CERCANO
CULIACAN
Av . Nicolas Bravo #1063 Sur (91 671) 242 10
GAUDALAJARA
Av . La Paz #1779 (91 3) 826 69 78.
MEXICO
Eje Lázaro Cárdenas No. 18 Local D, Col. Obrera 588-9377
chainsaw booklet 1/19/00 1:45 PM Page 37

38
MERIDA
Calle 63 #459-A (91 99) 23 54 90
MONTERREY
Av . Francisco I. Madero Pte. 1820-A (91 83) 72 11 25
PUEBLA
17 Norte #205 (91 22) 46 37 14
QUERETARO
Av . Madero 139 Pte. (91 42) 14 16 60
SAN LOUIS POTOSI
Pedro Moreno #100 Centro (91 48) 14 25 67
TORREON
Blvd. Independencia, 96 pte. (91 17) 16 52 65
VERACRUZ
Prolongación Diaz Miron #4280 (91 29) 21 70 16
VILLAHERMOSA
Constitucion 516-A (91 93) 12 53 17
PARA OTRAS LOCALIDADES LLAME AL: 326 7100
GARANTIA P ARA USO DOMÉSTICO POR DOS AÑOS COMPLETOS
Black & Decker (U.S.) garantiza este producto por dos años completos contra
cualquier falla originada por materiales o mano de obra defectuosos. El
producto defectuoso será reemplazado o reparado sin cargo alguno en
cualquiera de las siguientes dos maneras:
La primera, que resulta únicamente en cambios, es regresar el producto al
vendedor al que se compró (en la suposición que es un distribuidor
participante). Las devoluciones deberán hacerse dentro del tiempo estipulado
por la política de cambios del distribuidor (usualmente de 30 a 90 días
después de la venta). Se puede requerir prueba de compra. Por favor verifique
con el vendedor las políticas específicas de devolución relacionadas a las
devoluciones en tiempo posterior al estipulado para cambios.
La segunda opción es llevar o enviar el producto (con porte pagado) a los
centros de servicio Black & Decker propios o autorizados, para que la
reparemos o reemplacemos a nuestra opción. Se puede requerir prueba de
compra. Los centros de servicio Black & Decker propios y autorizados están
enlistados bajo “Herramientas eléctricas” en la sección amarilla del directorio
telefónico.
Esta garantía no se aplica a los accesorios. Esta garantía le otorga derechos
legales específicos, y usted puede tener otros que varíen de estado a estado. S
tiene usted cualquier pregunta, comuníquese con el gerente del centro de
servicio Black & Decker más cercano.
Este producto no está destinado a uso comercial.
POLIZA DE GARANTIA
IDENTIFICACION DEL PRODUCTO:
Sello firma del Distribuidor .
Nombre del producto:_____________ Mod/Cat.: ____________________
Marca: _________________________ Núm. de serie:_________________
(Datos para ser llenados por el distribuidor)
Fecha de compra y/o entrega del producto: ___________________________
Nombre y domicilio del distribuidor donde se adquirió el producto:
________________________________________________________________
Este producto esta garantizado por dos años a partir de la fecha de entrega,
contra cualquier defecto en su funcionamento, así como en materiales y mano
obra empleados para su fabricación. Nuestra garantía incluye la reparación o
reposición del producto y/o componentes sin cargo alguno para el cliente,
incluyendo mano de obra, así como los gastos de transportación razonableme
erogados derivados del cumplimiento de este certificado.
Para hacer efectiva esta garantía deberá presentar su herramienta y esta póliz
sellada por el establecimiento comercial donde se adquirió el producto, de no
contar con ésta, bastará la factura de compra.
EXCEPCIONES.
Esta garantía no será válida en los siguientes casos:
• Cuando el producto se hubiese utilizado en condiciones distintas a las
normales;
• Cuando el producto no hubiese sido operado de acuerdo con el instructivo
de uso que se acompaña;
• Cuando el producto hubiese sido alterado o reparado por personas distint
a las enlistadas al final de este certificado.
Anexo encontrará una relación de sucursales de servicio de fábrica, centros de
servicio autorizados y franquiciados en la República Mexicana, donde podrá
hacer efectiva su garantía y adquirir partes, refaciones y accesorios originales
Este producto no ha sido diseñado para uso comercial.
T odas las herramientas Black & Decker son de la mejor calidad.
Si tiene cualquier pregunta, llame al 326-7100.
E SPAÑOL
chainsaw booklet 1/19/00 1:45 PM Page 38

39
BLACK & DECKER S.A. DE C.V.
BOSQUES DE CIDROS ACCESO RADIATAS NO. 42
COL. BOSQUES DE LAS LOMAS.
05120 MÉXICO, D.F
TEL. 3-26-71-00
SECCI N
AMARILLA
Si funciona…
y funciona muy bien.
Para servicio y ventas consulte
“HERRAMIENTAS ELECTRICAS”
en la sección amarilla.
ESPECIFICACIONES
120V~ 1395W 60Hz 12,5A
chainsaw booklet 1/19/00 1:45 PM Page 39

40
Cat.No. LH1600 Form No. 374860-05 (JAN 99-2) Copyright
© 1998 Black & Decker Printed in Engla
chainsaw booklet 1/19/00 1:45 PM Page 40
 Loading...