

Page 1
ICL500
LIGHT 'N GO CORDLESS IRON
LUZ Y LISTA PLANCHA SIN CABLE
FER À REPASSER SANS FIL PRÊT À L’EMPLOI
use and care manual
manual de uso y cuidado
guide d’utilisation et d’entretien
Page 2
2
Should you have any questions or concerns with your new product,
please call our Customer Service Line at 1-800-465-6070 (US and
Canada). Please do not return to the store.
Si usted tiene alguna inquietud o pregunta con su producto, por
favor llame a nuestra línea de servicio al cliente una atención
inmediata 1-800-465-6070 (EE.UU/Canadá) 01-800-714-2503
(México). No devuela a la tienda.
Si vous avez des questions ou des préoccupations à propos de
votre nouveau produit, veuillez communiquer avec notre Service à
la clientèle au 1 800 465-6070 (États-Unis et Canada). Veuillez ne
pas rapporter le produit au magasin.
Thank you for your purchase!
Gracias por su compra!
Merci de votre achat!
www.prodprotect.com/blackanddecker
Page 3

3
• READ ALL INSTRUCTIONS BEFORE USING.
• Only use iron for intended use.
• To avoid the risk of electric shock, do not
immerse the iron in water or other liquids.
• Always turn the iron to MIN setting before
plugging in or unplugging from the outlet.
Never pull on the cord to disconnect from
the electrical outlet; instead grasp plug and
pull to disconnect.
• Do not allow cord to touch hot surfaces. Let
iron cool completely before putting away.
• When storing, gather the cord into even
ovals. Then gently cinch with the strip of
hook and loop.
• Always disconnect the base from electric
outlet when: filling the reservoir with water,
emptying water, cleaning the appliance, and
the appliance is not in use.
• Do not operate the iron if it has been
dropped, if there are visible signs of
damage to the iron or its cord, or if it’s
leaking. To avoid the risk of electric shock,
do not dissemble the iron; take it to a
qualified service person for examination
and repair, or call the appropriate tollfree number on the cover of this manual.
Incorrect reassembly can cause risk of
electric shock when the iron is used.
• Close supervision is necessary for any
appliance being used by or near children.
Do not leave iron unattended when
plugged in or on an ironing board.
• Burns can occur from touching hot metal
parts, hot water, or steam. Use caution
when you turn the iron upside down - there
may be hot water in the reservoir. Avoid
rapid movement of iron to minimize hot
water spillage.
• The iron must be used and rested on a
stable surface.
• The iron must only be used with the base
provided.
• When placing the iron on its base, ensure
that the surface on which the base is
placed is stable.
• This appliance is not intended for use by
persons (including children) with reduced
physical, sensory, or mental capabilities,
or lack of experience and knowledge,
unless they have been given supervision or
instruction concerning use of the appliance
by a person responsible for their safety.
• Children should be supervised to ensure
that they do not play with the appliance.
SPECIAL INSTRUCTIONS
• To avoid circuit overload, do not operate
another high wattage appliance on the
same circuit.
• If an extension cord is absolutely
necessary, a minimum 13-ampere cord
should be used. Cords rated for less
amperage can result in a risk of fire or
electrical shock due to overheating. Care
should be taken to arrange the cord so that
it cannot be pulled or tripped over.
IMPORTANT SAFETY INSTRUCTIONS
When using your iron, basic safety precautions should
always be followed, including the following:
SAVE THESE INSTRUCTIONS.
This product is for household use only.
POLARIZED PLUG
This appliance has a polarized plug (one blade
is wider than the other). To reduce the risk of
electric shock, this plug is intended to fit into
a polarized outlet only one way. If the plug
does not fit fully into the outlet, reverse the
plug. If it still does not fit, contact a qualified
electrician. Do not attempt to modify the plug
in any way.
TAMPE R-RESISTA NT SCRE W
Warning: This appliance is equipped with a
tamper-resistant screw to prevent removal
of the outer cover. To reduce the risk of fire
or electrical shock, do not attempt to remove
the outer cover. There are no user-serviceable
parts inside. Repair should be done only by
authorized service personnel.
Note: If the power supply cord is damaged, in
order to avoid a hazard, it should be replaced
by qualified personnel or in Latin America by
an authorized service center.
Page 4
4
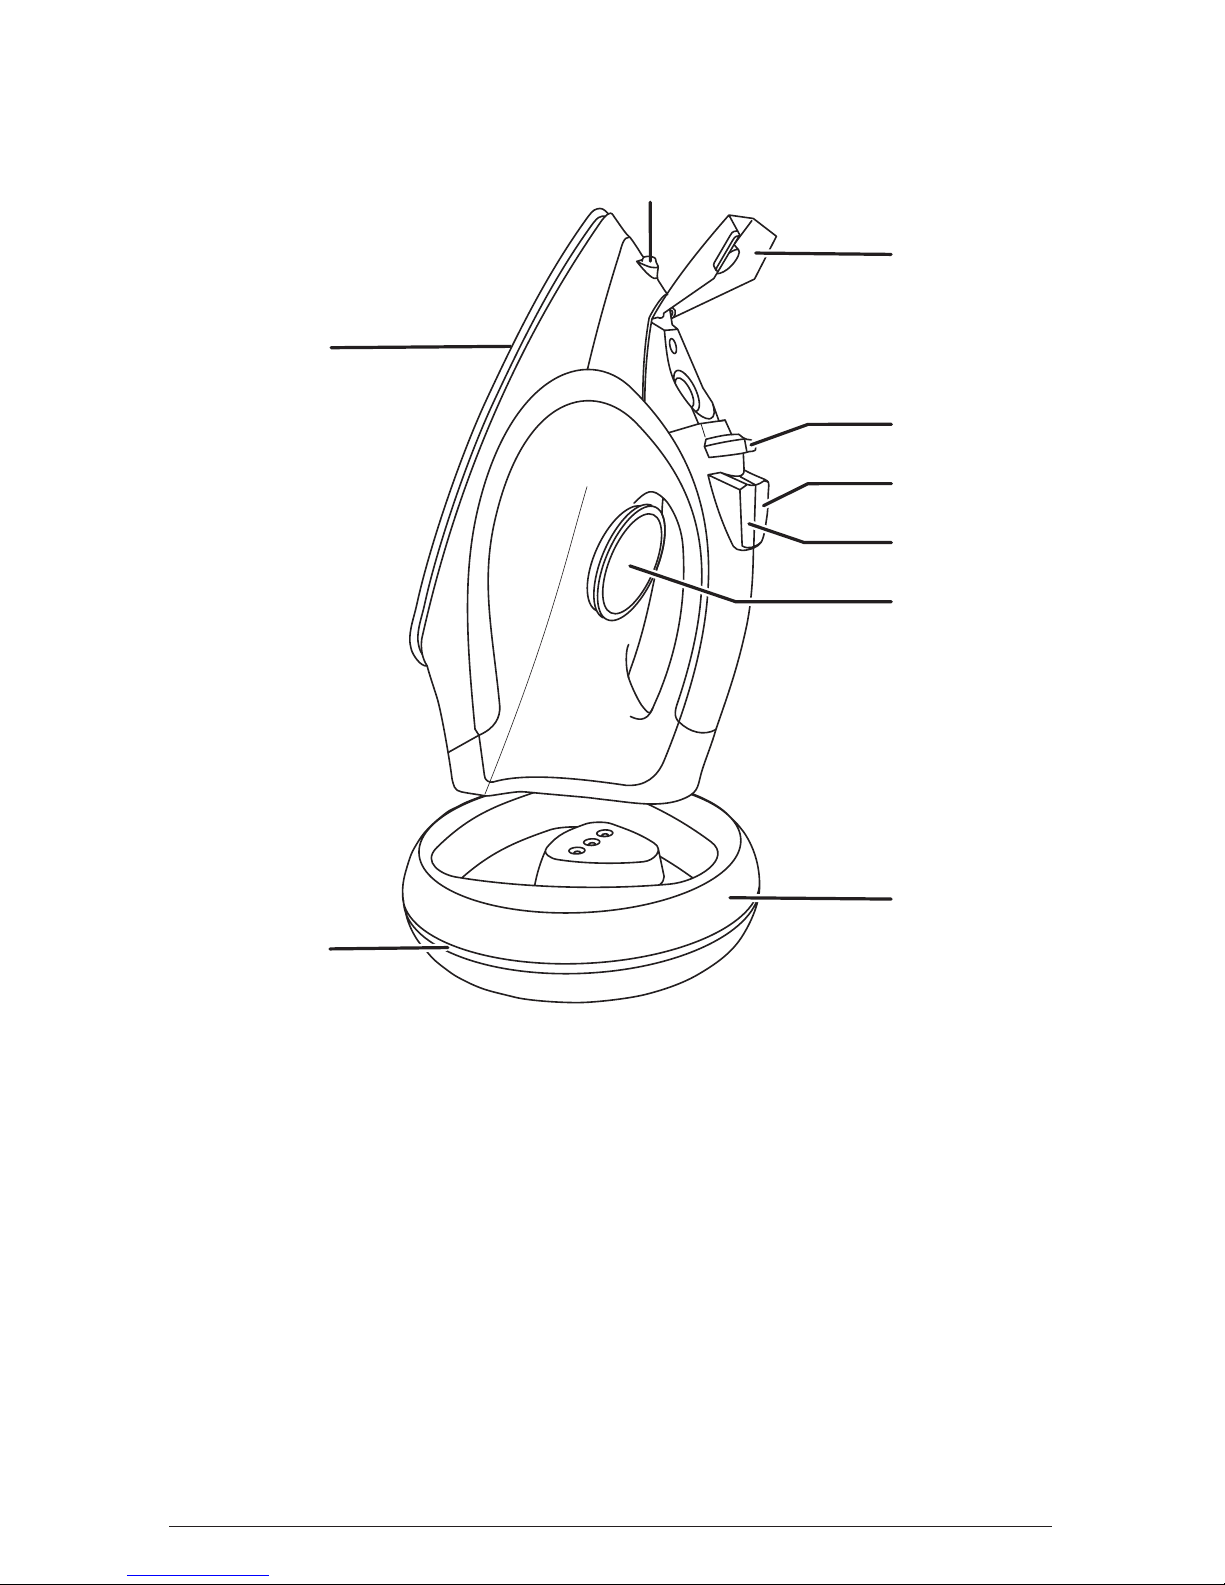
GETTING TO KNOW YOUR CORDLESS IRON
1. Soleplate
2. Spray nozzle
3. Water-fill cover
4. Steam control lever
5. Steam burst button
6. Spray mist button
7. Temperature control
8. Base
9. Smart status light
10. Hook-and-loop cord wrap
(not shown)
Product may vary slightly from what is illustrated.
2
3
4
5
6
7
8
1
9
Page 5
5
HOW TO USE
This product is for household use only.
GETTING STARTED
• Remove all labels, tags and stickers attached to the body, cord, or
soleplate of the iron and the plastic band around the power plug.
• Remove and save literature.
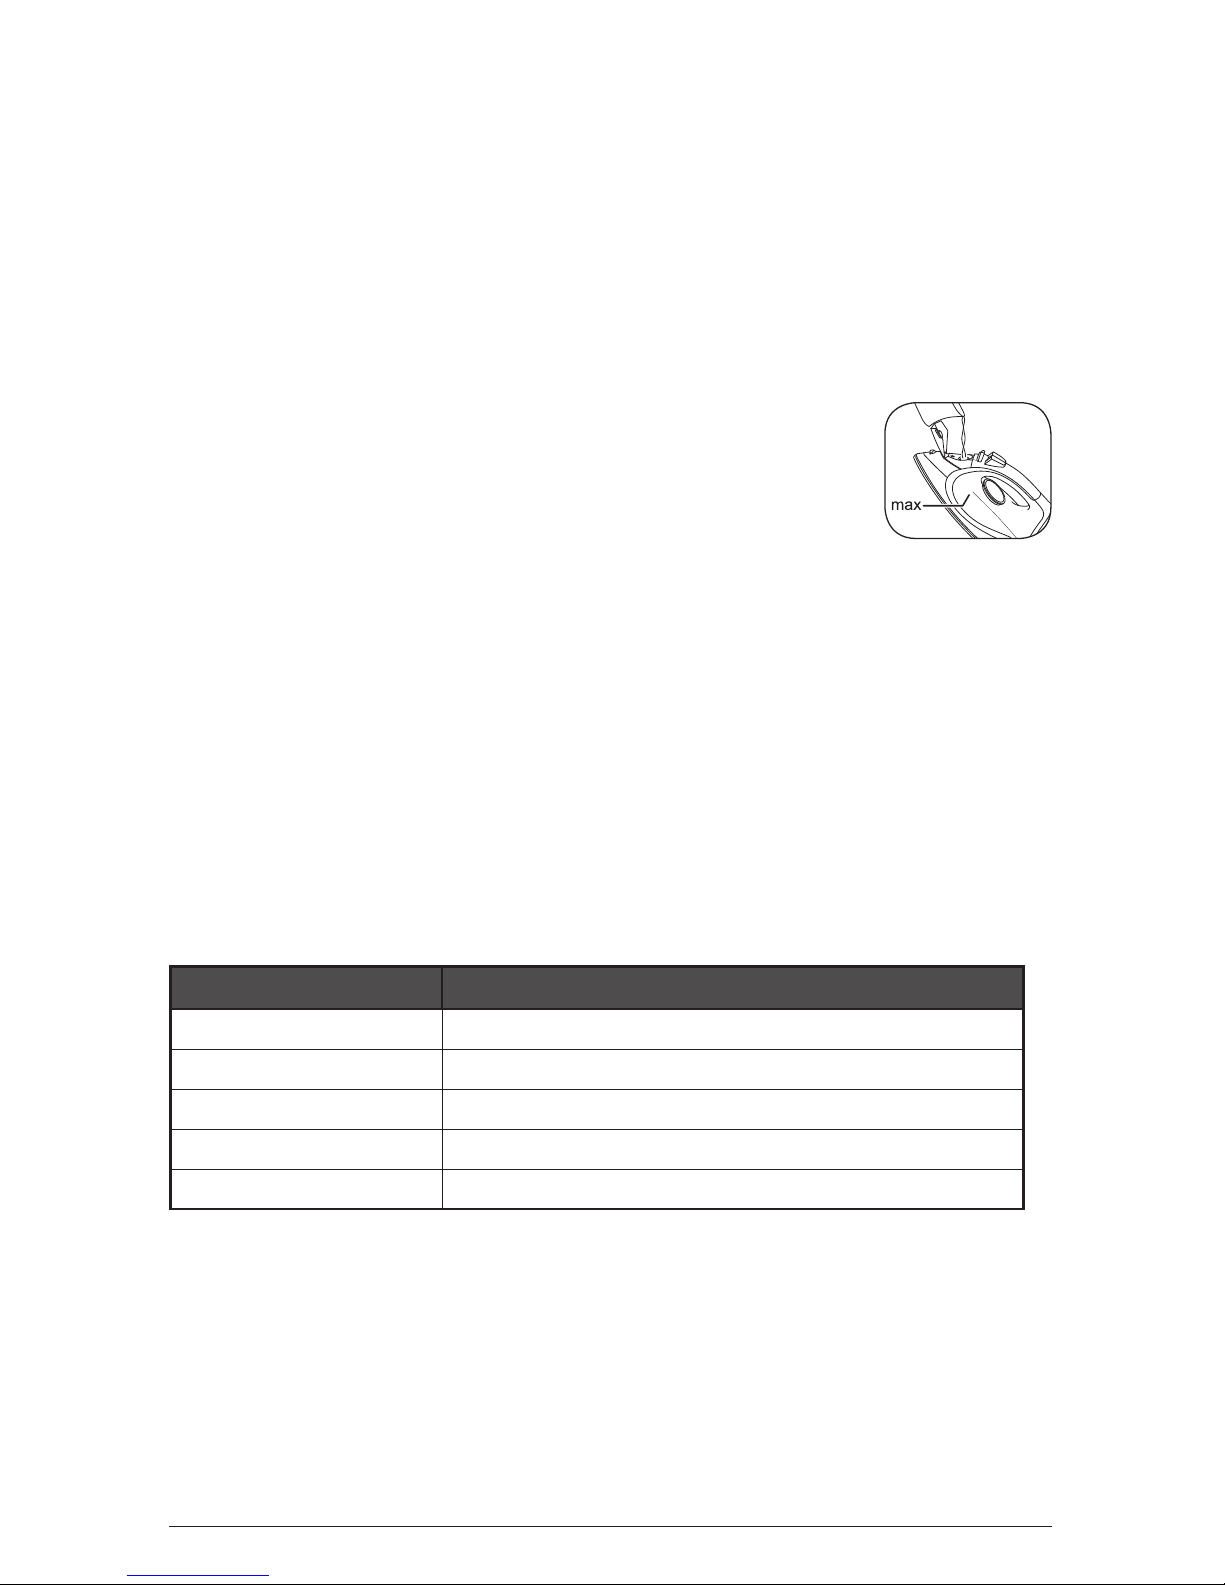
FILLING THE WATER TANK
1. Remove iron from the base. Take the iron far enough
from the base so that water won't spill onto the base
when filling tank.
2. With the soleplate tilted at a 45° angle, open the
water-fill cover. (A)
3. Using a clean measuring cup, pour water slowly into opening until
water reaches the “MAX” level mark on the side of the water tank.
Do not overfill. Close the water-fill cover securely.
Tip: You may use the iron with tap water. If your water is hard you
should use distilled water (not chemically descaled or softened water).
Do not use water with perfumes or scented additives.
HEATING YOUR IRON
Your iron is heated by placing it onto the stand. The smart status light will
show you when you need to reheat your iron and when it is ready to use.
The smart status light operates as follows:
Smart Status Light Iron mode
Steady red Heating up
Flashing green Ready to use
Flashing red Recharge warning
Flashing red, 3 beeps Recharge needed
Slowly pulsing red Auto shut-off activated
Important Note:
Between ironing tasks always put the iron back onto the base. This ensures
the most efficient heating and gives you the best performance from your iron.
1. Plug the base into an outlet.
2 Place the iron onto the base to preheat and to recharge as
needed. Smart status light will be a steady red.
3. Follow fabric care instructions on garments to determine the
appropriate temperature setting.
A
Page 6
6
4. Turn the dial to the desired setting.
5. Move the steam control lever to the desired setting.
Recommended settings:
SETTING GUIDE
For best results, it’s recommended to use the manufacturer’s garment tags
for heat and steam instructions. When in doubt, always start at the low
heat setting.
Setting name and Icon Fabrics
No steam
synthetics, nylon, silk, polyester
Low steam
blends
High steam
wool, cotton, linen
ADDITIONAL FEATURES
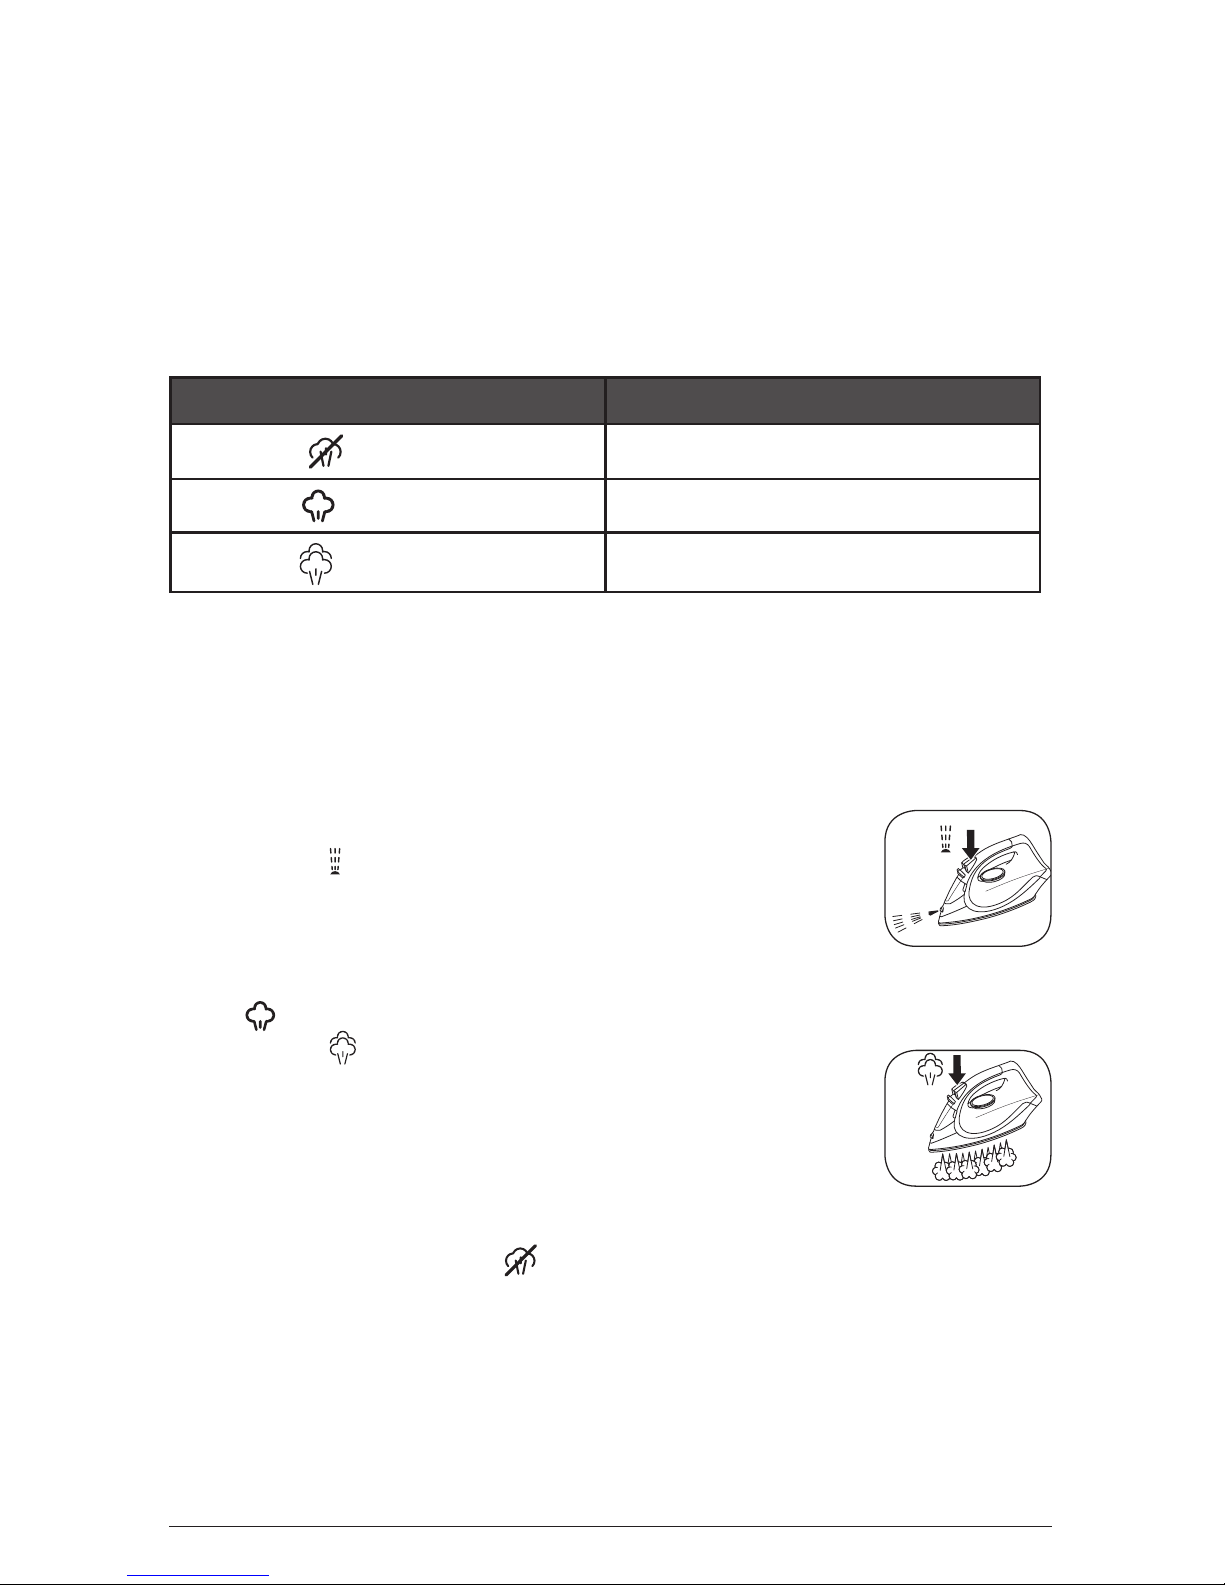
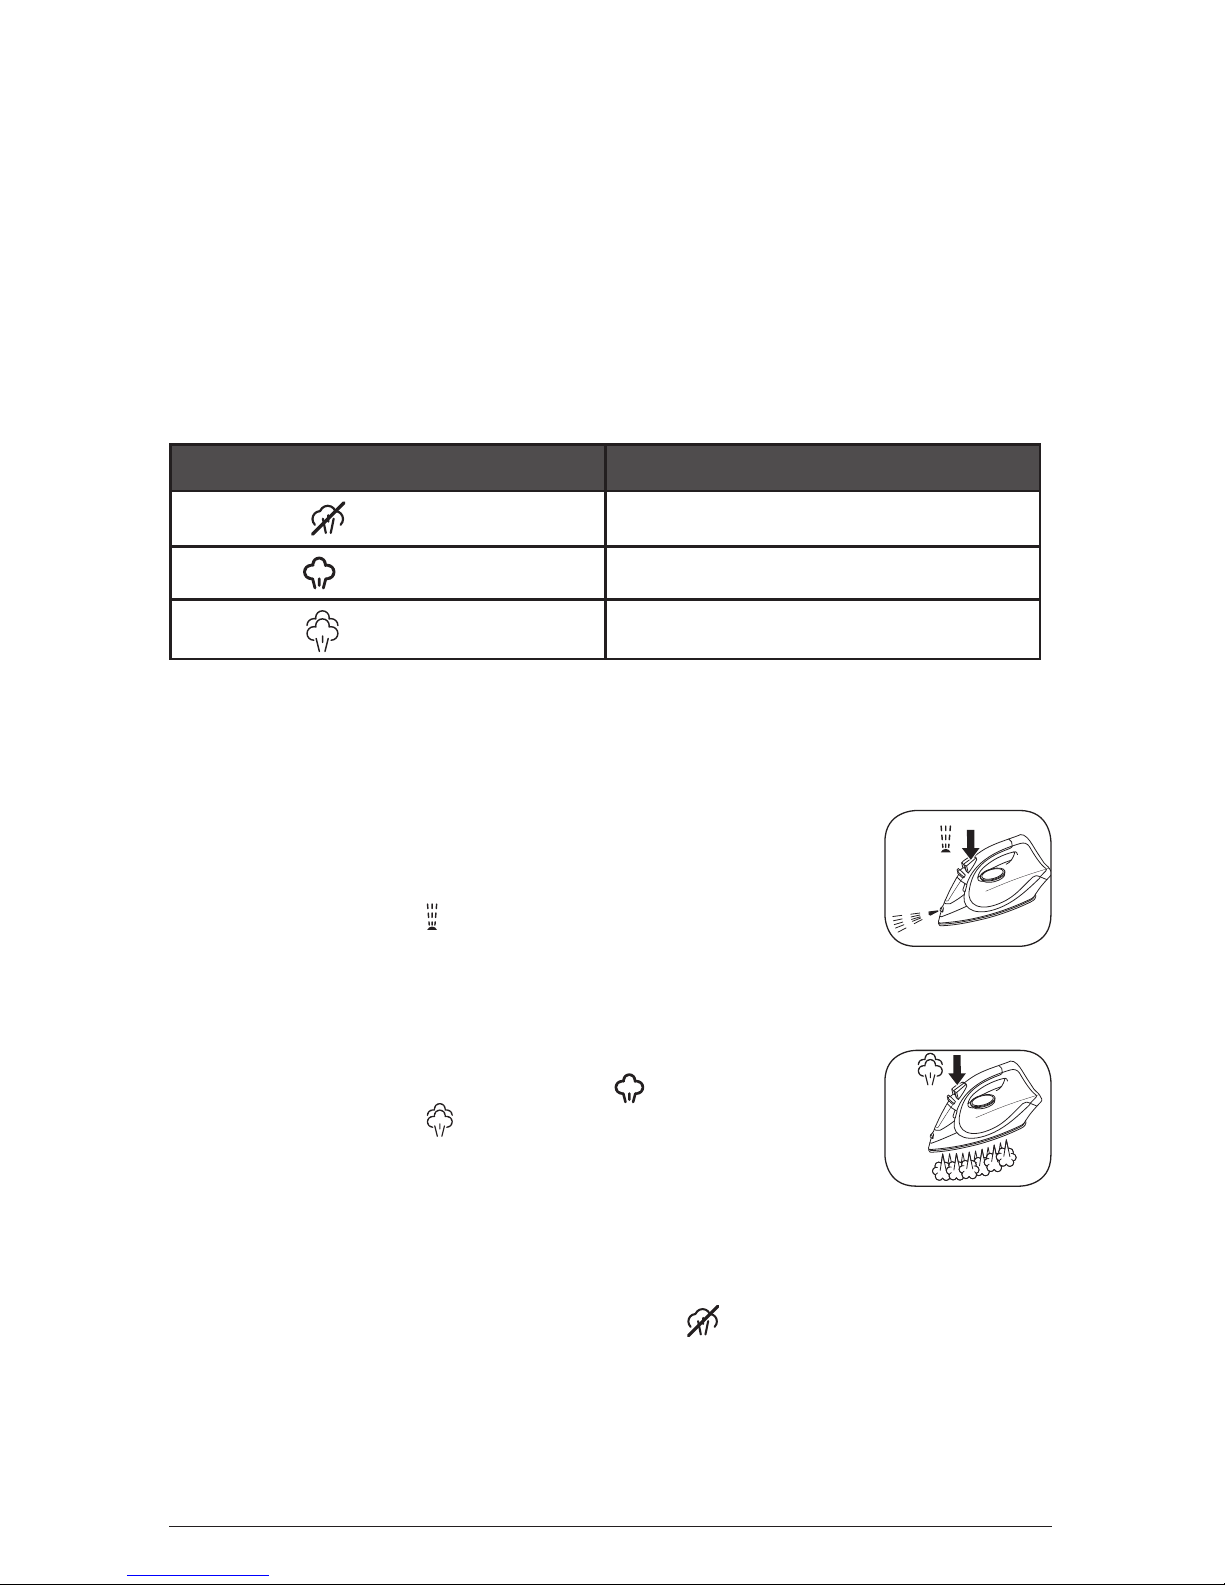
SPRAY MIST BUTTON
Water spotting affects some fabrics. Test this out first on
a hidden part of the fabric.
1. Lift the iron off the fabric.
2. Aim the spray nozzle at the fabric.
3. Press the
button – you may have to press it 2 or 3
times to pump water through the system. (B)
STEAM BURST BUTTON
1. Steam is available when the temperature control is
at
or above.
2. Press the
button. (C)
3. Leave 4 seconds between shots, to let the temperature
build up.
DRY IRONING (IRONING WITHOUT STEAM)
1. If you’re going to be dry ironing for 20 minutes or more,
empty the reservoir first to avoid spontaneous bursts of steam.
2. Set the steam control to
.
3. Set the desired temperature.
4. When the smart status light flashes green, your iron is ready to use.
C
B
Page 7

7
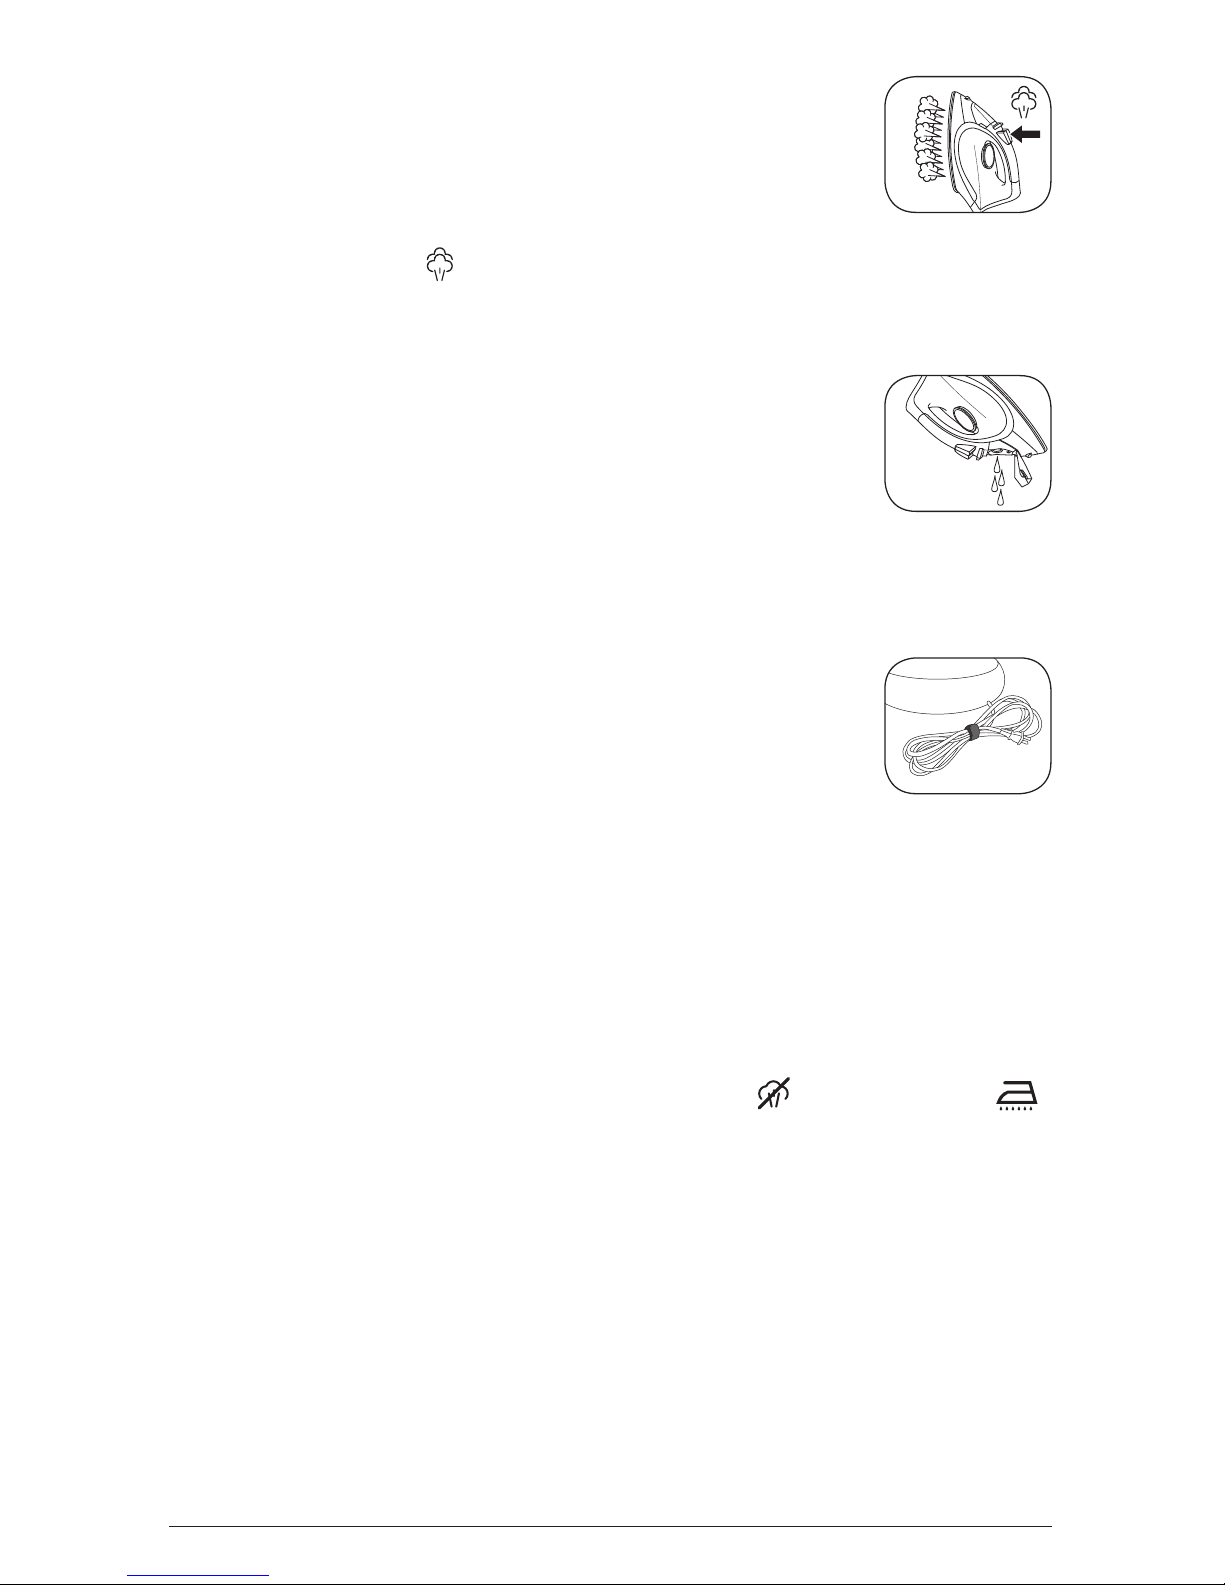
VERTICAL STEAMING
Steam wrinkles from hanging clothes, hanging curtains, and
upholstery.
1. Set the temperature control to max.
2. Hold the iron vertically, close to (but not touching) the
fabric.
3. Press the
button. (D)
4. Leave 4 seconds between shots, to let the temperature build up.
AFTER USE
1. Set the temperature control to min.
2. Unplug the base.
3. Open the water inlet cover.
4. Hold the iron over a sink, turn it upside down, and drain
the water from the water tank. (E)
5. Place the iron on the base and leave it to cool down
completely.
6. When cold, wipe off any moisture, and close the water
inlet cover.
7. Wipe outer surfaces with a damp cloth.
8. Remove spots from the soleplate with a little vinegar.
Take care not to scratch it.
9. Wrap and secure cord with hook-and-loop cord wrap. (F)
SELF CLEAN
To avoid scale build-up, use the self clean function monthly in normal water
areas, more often in hard water areas.
1. Fill the water tank to the max mark.
2. Set the temperature control to max.
3. Sit the iron on the base.
4. Plug in the base and wait until the smart status light flashes green.
5. Hold the iron over a sink with the soleplate down.
6. Move the steam control past
to and hold it there.
7. Gently move the iron back and forth, over the sink.
8. When water and steam stop coming from the soleplate, release the
steam control lever.
9. Follow the steps under AFTER USE.
AUTO SHUT-OFF
1. If the iron is motionless for about 8 minutes it will switch off.
2. The smart status light will slowly pulse red.
3. To switch on again, lift it off the base then return it to allow it to heat
up again. Iron is heated once the smart status light flashes green.
D
E
F
Page 8

8
NEED HELP?
For service, repair or any questions regarding your appliance, please call
our Customer Service Line at 1-800-465-6070. Please DO NOT return the
product to the place of purchase. Also, please DO NOT mail product back to
manufacturer, nor bring it to a service center. You may also want to consult
the website listed on the cover of this pamphlet.
Warranty Information
(Applies only in the United States and Canada)
What does it cover?
• Any defect in material or workmanship provided; however, Spectrum
Brands’ liability will not exceed the purchase price of product.
For how long?
• Two years from the date of original purchase with proof of such purchase.
What will we do to help you?
• Provide you with a reasonably similar replacement product that is either
new or factory refurbished.
How do you get service?
• Save your receipt as proof of date of sale.
• Visit the online service website at www.prodprotect.com/blackanddecker,
or call toll-free 1-800-465-6070, for general warranty service.
• If you need parts or accessories, please call 1-800-738-0245.
What does your warranty not cover?
• Damage from commercial use
• Damage from misuse, abuse or neglect
• Products that have been modified in any way
• Products used or serviced outside the country of purchase
• Glass parts and other accessory items that are packed with the unit
• Shipping and handling costs associated with the replacement of the unit
• Consequential or incidental damages (Please note, however, that some
states do not allow the exclusion or limitation of consequential or
incidental damages, so this limitation may not apply to you.)
How does state law relate to this warranty?
• This warranty gives you specific legal rights. You may also have other
rights that vary from state to state or province to province.
Page 9

9
• LEA TODAS LAS INSTRUCCIONES ANTES DE
USAR El APARATO.
• Utilice solamente con el propósito para el que
ha sido diseñado.
• A fin de evitar el riesgo de una descarga
eléctrica, no sumerja la plancha en agua ni en
ningún otro líquido.
• La plancha siempre debe estar en la posición de
temperatura mínima (MIN) antes de enchufar o
desenchufarla del tomacorriente. Nunca tire del
cable para desenchufar la plancha del tomacorriente;
sujete el enchufe y hale con cuidado.
• No permita que el cable entre en contacto con
superficies calientes. Espere a que la plancha se
enfríe por completo antes de almacenarla.
• Para guardar, recoja el cable formando ovales
uniformes. Luego, asegúrelo con la cinta del
gancho y enróllelo.
• Siempre desconecte la base del tomacorriente
cuando: vaya a llenar el tanque de agua, para
vaciar el agua, limpiar el aparato y cuando el
aparato no esté en uso.
• No opere la plancha si se ha dejado caer, si
muestra señales de otros daños a la plancha o a
su cable o si está goteando. Para evitar el riesgo
de una descarga eléctrica, no desensamble
ni trate de reparar la plancha; acuda a un
representante de servicio calificado para que
la examinen, reparen o ajusten, o llame gratis
al número correspondiente en la cubierta de
este manual. El reensamblaje incorrecto podría
ocasionar un riesgo de descarga eléctrica
cuando el aparato sea utilizado.
• Todo aparato eléctrico utilizado en la presencia de
los niños o por ellos mismos requiere la supervisión
de un adulto. No desatienda la plancha cuando esté
enchufada o sobre la tabla de planchar.
• Las partes metálicas calientes de este aparato,
al igual que el agua caliente o el vapor pueden
ocasionar quemaduras. En vista de que puede
haber agua caliente en el tanque, tenga cuidado
al invertir una plancha de vapor o al bombear el
botón de vapor. Evite los movimientos rápidos de la
plancha para disminuir el goteo de agua caliente.
• La plancha siempre debe ser utilizada y
descansar sobre una superficie estable.
• La
plancha solo debe ser utilizada con la base
provista.
• Cuando coloque la plancha en su base,
asegúrese de que la superficie en la cual la base
esté colocada sea estable.
• Cuando coloque la plancha sobre su talón de
descanso, asegúrese de la superficie en la cual
esté colocada sea estable.
• Este aparato no está diseñado para ser usado
por personas (incluído niños) con capacidad
limitada física, mental o sensoriales disminuidas
y falta de experiencia o conocimiento que les
impida utilizar el aparato con toda seguridad sin
supervisión o instrucción.
• Los ninos deben ser supervisados para asegurar
que no jueguen con el aparato.
INSTRUCCIONES ESPECIALES
• Para evitar la posibilidad de una sobrecarga
eléctrica, no opere otro aparato de alta potencia
eléctrica en el mismo circuito.
• Si es indispensable el uso de un cable de
extensión, se debe utilizar uno con régimen
nominal mínimo de 13 amperios. Los cables de
menor amperaje pueden ocasionar un riesgo
de incendio o descarga eléctrica debido a
sobrecalentamiento. Se debe tener cuidado de
acomodar el cable de manera que no pueda ser
halado o que nadie se tropiece.
INSTRUCCIONES IMPORTANTES DE SEGURIDAD
Cuando se usan aparatos eléctricos, siempre se deben respetar las sigui-
entes medidas básicas de seguridad:
CONSERVE ESTAS INSTRUCCIONES.
Este aparato eléctrico es para uso doméstico solamente.
ENCHUFE POLARIZADO
Este aparato cuenta con un enchufe polarizado (un contacto es
más ancho que el otro). A fin de reducir el riesgo de un choque
eléctrico, este enchufe encaja en un tomacorriente polarizada
en un solo sentido. Si el enchufe no entra en el tomacorriente,
inviértalo y si aun así no encaja, consulte con un electricista.
Por favor no trate de alterar esta medida de seguridad.
TORNILLO DE SEGURIDAD
Advertencia: Este aparato cuenta con un tornillo de seguridad
para evitar la remoción de la cubierta exterior del mismo. A fin de
reducir el riesgo de incendio o de choque eléctrico, por favor no
trate de remover la cubierta exterior. Este producto no contiene
piezas reparables por el consumidor. Toda reparación se debe
llevar a cabo únicamente por personal de servicio autorizado.
Nota: Si el cordón de alimentación está dañado, con el
propósito de evitar un daño, debe ser sustituido por personal
calificado; en América Latina debe sustituirse por un centro de
servicio autorizado.
Page 10

10
CONOZCA SU PLANCHA
El producto puede variar ligeramente del que aparece ilustrado.
1. Suela
2. Boquilla de rocío
3. Tapa del orificio de llenado
4. Palanca de control de vapor
5. Botón de golpe de vapor
6. Botón de rocío fino
7. Dial de control de temperatura
8. Base
9. Luz inteligente indicadora del
estado de la plancha
10. Enrollado de cable (no mostrado)
2
3
4
5
6
7
8
1
9
Page 11

11
COMO USAR
Este producto es para uso doméstico solamente.
PRIMEROS PASOS
• Retire todas las etiquetas y calcomanías adheridas al cuerpo, cable o
suela de la plancha y la tira plástica alrededor del enchufe.
• Retire y conserve la literatura.
LLENADO DEL TANQUE DE AGUA
1. Retire la plancha de la base. Lleve la plancha los suficientemente lejos
de la base para evitar que el agua se derrame sobre la
base al llenar el tanque.
2. Con la suela inclinada a un ángulo de 45°, abra la tapa
del orificio de llenado. (A)
3. Utilizando una taza de medir limpia, vierta el agua
lentamente dentro del orificio hasta que el agua alcance
el nivel marcado “MAX”, situado a un lado del tanque de agua. No
sobrellene. Cierre la tapa del orificio de llenado
Consejo: La plancha puede ser utilizada con agua de la llave. Si su agua es
dura, debe utilizar agua destilada (no utilice agua descalcificada con
químicos ni suavizada). No utilice agua con perfumes ni aromas aditivos.
CALENTAMIENTO DE SU PLANCHA
Su plancha se calienta cuando se coloca sobre la base. La luz inteligente
indicadora del estado de la plancha mostrará cuando es necesario
recalentar su plancha y cuando está lista para ser utilizada. La luz inteligente
indicadora del estado de la plancha funciona de la siguiente manera:
Luz inteligente indicadora
del estado de la plancha
Modo de la plancha
Roja sólida Calentando
Verde parpadeando Lista para utilizar
Roja parpadeando Advertencia de recarga
Roja parpadeando, 3
sonidos de bip
Necesita recarga
Roja parpadeando
lentamente
Función de autoapagado activada
Nota importante:
Siempre coloque la plancha en la base entre cada tarea de planchado.
Esto asegura el calentamiento más eficaz y le brinda el mejor rendimiento
de su plancha.
1. Enchufe la base a un tomacorriente.
2. Coloque la plancha en la base para recalentar y recargarla según sea
necesario. La luz inteligente indicadora del estado de la plancha se
mantenrá sólida roja.
A
Page 12
12
3. Siga las instrucciones de cuidado del tejido en la prenda para
determinar el ajuste de temperatura adecuado.
4. Gire el dial de control de temperatura hasta el ajuste de temperatura
deseado.
5. Mueva la palanca de control de vapor hasta el ajuste deseado. Consulte
los ajustes de vapor recomendados a continuación:
GUÍA DE AJUSTES
Para obtener los mejores resultados, es recomendado utilizar la etiqueta
del fabricante de la prenda para las instrucciones de temperatura y vapor.
Cuando tenga dudas, siempre comience el planchado en el ajuste de
temperatura baja.
Icono y nombre del ajuste Tejidos
sin vapor
sintéticos, nylon, seda, poliéster
vapor bajo
mezclados
vapor alto
lana, algodón, lino
FUNCIONES ADICIONALES
BOTÓN DE ROCÍO FINO
Las manchas de agua afectan algunos tejidos. Pruebe
primero sobre un área escondida del tejido.
1. Alce la plancha del tejido.
2. Apunte la boquilla de rocío hacia el tejido.
3. Presione el botón
) – es posible que tenga que
presionar el botón 2 ó 3 veces para bombear el agua a
través del sistema. (B)
BOTÓN DE GOLPE DE VAPOR
1. La función de vapor se activa cuando la palanca de
vapor se encuentra en la posición
o pasada de ésta.
2. Presione el botón
. (C)
3. Deje pasar 4 segundos entre cada golpe de vapor para
permitir que la temperatura alcance el nivel adecuado.
PLANCHADO EN SECO (SIN VAPOR)
1. Si va a planchar en seco por 20 minutos o más, primero vacíe el tanque
de agua para evitar golpes de vapor espontáneos.
2. Mueva la palanca de vapor a la posición
.
3. Seleccione la temperatura deseada.
4. Cuando la luz inteligente indicadora del estado de la plancha parpadee
verde, su plancha está lista para utiizar
C
B
Page 13
13
VAPOR VERTICAL
Aplique vapor a las arrugas de prendas colgadas en
perchas, cortinas colgadas y tapicería.
1. Gire el dial de control de temperatura al ajuste max.
2. Sujete verticalmente la plancha, cerca del tejido (pero
no tocándolo).
3. Presione el botón
. (D)
4. Deje pasar 4 segundos entre cada golpe de vapor para permitir que la
temperatura alcance el nivel adecuado.
DESPUÉS DE USAR
1. Gire el dial de control de temperatura hasta la posición min.
2. Desenchufe la base.
3. Abra la tapa del orificio de llenado.
4. Sujete la plancha sobre un fregadero, voltee la parte de
arriba hacia abajo y drene el agua del tanque de agua.
(E)
5. Coloque la plancha en la base y deje que se enfríe completamente.
6. Cuando se haya enfriado, seque cualquier condensación que haya
quedado y cierre la tapa.
7. Limpie las superficies exteriores con un paño húmedo.
8. Elimine las manchas de la suela con un poco de vinagre.
Tenga cuidado de no rayar la suela.
9. Enrolle y asegure el cable en el enrollador de cable siturado
debajo de la base. (F)
AUTOLIMPIEZA
Para evitar la acumulación de sarro, utilice la función de autolimpieza una vez al
mes en áreas con agua normal, más frecuentemente en áreas con agua dura.
1. Llene el tanque de agua hasta la marca 'max'.
2. Gire el dial de control de temperatura hasta la posición max.
3. Coloque la plancha en la base.
4. Enchufe la base y espere hasta que la luz inteligente indicadora del
estado de la plancha parpadee verde.
5. Sujete la plancha sobre un fregadero con la suela hacia abajo.
6. Mueva la palanca de vapor pasada la posición
hasta la posición
y sosténgala en esa posición.
7. Mueva suavemente la plancha hacia adelante y hacia atrás sobre el fregadero.
8. Cuando el agua y el vapor ya no salgan de la suela, suelte la palanca de
control de vapor.
9. Siga los pasos en la sección “Después de usar”.
AUTOAPAGADO
1. Si la plancha está inactiva por 8 minutos, ésta se apagará.
2. La luz inteligente indicadora del estado de la plancha parpadeará
lentamente roja.
3. Para activar de nuevo la plancha, levántela de la base y luego
colóquela de nuevo en la base para permitir que se vuelva a calentar.
La plancha está calentada cuando la luz inteligente indicadora del
estado de la plancha parpadea verde.
D
E
F
Page 14

14
¿NECESITA AYUDA?
Para servicio, reparaciones o preguntas relacionadas al producto, por favor
llame al número del centro de servicio que se indica para el país donde
usted compró su producto. NO devuélva el producto al fabricante. Llame o
lleve el producto a un centro de servicio autorizado. Usted también puede
consultar a nuestro Centro de Protección del Producto en
www.prodprotect.com/blackanddecker.
Garantía limitada de dos años
(Solamente aplica en los Estados Unidos y el Canadá).
¿Qué cubre mi garantía?
• Su garantía cubre cualquier defecto de material o de mano de obra, siempre y
cuando la responsabilidad de Spectrum Brands, Inc. no exceda el precio de
compra del producto.
¿Por cuánto tiempo es valida la garantía?
• Su garantía se extiende por dos años a partir de la fecha original de compra
mientras que tenga una prueba de la compra.
¿Qué tipo de asistencia provee mi garantía?
• Su garantía le brinda un producto de reemplazo similar que sea nuevo o que ha
sido restaurado de fábrica.
¿Cómo se puede obtener asistencia?
• Conserve el recibo original de compra.
• Para servicio al cliente y para registrar su garantía, visite www.prodprotect.com/
blackanddecker, o llame al número 1-800-465-6070, para servicio al cliente
• Por favor llame al número del centro de servicio autorizado. 1-800-738-0245.
¿Qué no cubre mi garantía?
• Los productos que han sido utilizados en condiciones distintas a las normales.
• Los daños ocasionados por el mal uso, el abuso o negligencia.
• Los productos que han sido alterados de alguna manera.
• Los daños ocasionados por el uso comercial del producto.
• Los productos utilizados o reparados fuera del país original de compra.
• Las piezas de vidrio y demás accesorios empacados con el aparato.
• Los gastos de tramitación y embarque asociados al reemplazo del producto.
• Los daños y perjuicios indirectos o incidentales.
¿Cómo afecta a mi garantía la ley estatal?
• Esta garantía le otorga derechos legales específicos y el consumidor podría
tener otros derechos que varían de una región a otra.
Page 15

15
PÓLIZA DE GARANTÍA
(Válida sólo para México)
DURACIÓN
Spectrum Brands de México, SA de CV garantiza este producto por 2
años a partir de la fecha original de compra.
¿Qué cubre esta garantía?
• Esta Garantía cubre cualquier defecto que presenten las piezas,
componentes y la mano de obra contenidas en este producto.
• Requisitos para hacer válida la garantía
• Para reclamar su Garantía deberá presentar al Centro de Servicio
Autorizado la póliza sellada por el establecimiento en donde adquirió
el producto. Si no la tiene, podrá presentar el comprobante de compra
original.
¿Donde hago válida la garantía?
• Llame sin costo al teléfono 01 800 714 2503, para ubicar el Centro de
Servicio Autorizado más cercano a su domicilio en donde usted podrá
encontrar partes, componentes, consumibles y accesorios.
Procedimiento para hacer válida la garantía
Acuda al Centro de Servicio Autorizado con el producto con la póliza
de Garantía sellada o el comprobante de compra original, ahí se
reemplazará cualquier pieza o componente defectuoso sin cargo alguno
para el usuario final. Esta Garantía incluye los gastos de transportación
que se deriven de su cumplimiento.
Excepciones
Esta Garantía no será válida cuando el producto:
A) Se hubiese utilizado en condiciones distintas a las normales.
B) No hubiese sido operado de acuerdo con el instructivo de uso
que le acompaña.
C) Cuando el producto hubiese sido alterado o reparado por personas
no autorizadas por Spectrum Brands de México, SA de CV.
Nota: Usted podra encontrar partes, componentes, consumibles y
accesorios en los centros de servicios autorizados. Esta garantía
incluyen los gastos de transportación que se deriven de sus
cumplimiento dentro de sus red de servicio.
Page 16

16
¿NECESITA AYUDA?
Para servicio, reparaciones o preguntas relacionadas al producto, por favor
llame al número del centro de servicio que se indica para el país donde
usted compró su producto. NO devuélva el producto al fabricante. Llame o
lleve el producto a un centro de servicio autorizado.
DOS AÑOS DE GARANTÍA LIMITADA
(No aplica en México, Estados Unidos y Canada)
¿Qué cubre la garantía?
• La garantía cubre cualquier defecto de materiales o de mano de obra que no haya
sido generado por el uso incorrecto del producto.
¿Por cuánto tiempo es válida la garantía?
• Por dos años a partir de la fecha original de compra mientras que tenga una prueba
de la compra.
¿Cómo se obtiene el servicio necesario?
• Conserve el recibo original como comprobante de la fecha de compra,
comuníquese con el centro de servicio de su país y haga efectiva su garantía si
cumple lo indicado en el manual de instrucciones.
¿Cómo se puede obtener servicio?
• Conserve el recibo original de compra.
• Por favor llame al número del centro de servicio autorizado.
¿Qué aspectos no cubre esta garantía?
• Los productos que han sido utilizados en condiciones distintas a las normales.
• Los daños ocasionados por el mal uso, el abuso o negligencia.
• Los productos que han sido alterados de alguna manera.
• Los daños ocasionados por el uso comercial del producto.
• Los productos utilizados o reparados fuera del país original de compra.
• Las piezas de vidrio y demás accesorios empacados con el aparato.
• Los gastos de tramitación y embarque asociados al reemplazo del producto.
• Los daños y perjuicios indirectos o incidentales.
¿Qué relación tiene la ley estatal con esta garantía?
• Esta garantía le otorga derechos legales específicos y el consumidor podría
tener otros derechos que varían de una región a otra.
Page 17

17
Por favor llame al número correspondiente que aparece en la lista a continuación
para solicitar que se haga efectiva la garantía y donde Ud. puede solicitar servicio,
reparaciones o partes en el país donde el producto fué comprado.
Argentina
Atención al consumidor
0800 444 7296
Horario de atención:
Lunes a viernes de 9 a 13 hs
y de 14.30 a 17 hs.
email: servicios@spectrumbrands.com
Humboldt 2495 piso 3
C.A.B.A. – Argentina
Chile
SERVICIO DE MAQUINAS Y
HERRAMIENTAS LTDA.
Portugal Nº 644
Santiago – Chile
Fonos: 02-6355208 / 02-6341169
Email: servicio@spectrumbrands.cl
Call center: 800-171-051
Colombia
Rayovac Varta S.A
Carrera 17 Número 89-40
Línea gratuita nacional
018000510012
Costa Rica
Aplicaciones Electromecanicas
Calle 22 y 24 en Avenida 3 BLV de la torre
Mercedes Benz
200 mts norte y 50 mts este
San José, Costa Rica
Tel. (506) 2257-5716
Ecuador
Servicio Master
Dirección: Capitán Rafael
Ramos OE 1-85 y Galo plaza lasso.
Tel (593) 2281-3882 / 2240-9870
El Salvador
Sedeblack
Calle San Antonio Abad, Colonia Lisboa
No 2936
San Salvador, Depto. de San Salvador
Tel. (503) 2284-8374
Guatemala
Kinal
17 avenida 26-75, zona 11 Centro
comercial Novicentro,
Local 37 - Ciudad
Guatemala
Tel. (502)-2476-7367
Honduras
Serviteca
San Pedro Sula, B Los Andes, 2 calle-entre
11-12 Avenida
Honduras
Tel. (504) 2550-1074
México
Articulo 123 # 95 Local 109 y 112
Col. Centro, Cuauhtemoc,
México, D.F.
Tel. 01 800 714 2503
Nicaragua
LRM ELECTRONICA
Managua - Sinsa Altamira 1.5
kilómetros al norte
Nicaragua
Tel. (505) 2270-2684
Panamá
Supermarcas
Centro comercial El dorado, Plaza
Dorado, Local 2.
Panama
Tel. (507) 392-6231
Perú
Servicio Central Fast Service
Av. Angamos Este 2431
San Borja, Lima Perú
Tel. (511) 2251 388
Puerto Rico
Buckeye Service
Jesús P. Piñero #1013
Puerto Nuevo, SJ PR 00920
Tel.: (787) 782-6175
Republica Dominicana
Prolongación Av. Rómulo
Betancourt
Zona Industrial de Herrera
Santo Domingo, República
Dominicana
Tel.: (809) 530-5409
Venezuela
Inversiones BDR CA
Av. Casanova C.C.
City Market Nivel Plaza Local 153
Diagonal Hotel Melia,
Caracas.
Tel. (582) 324-0969
Page 18

18
• LIRE TOUTES LES INSTRUCTIONS AVANT
D'UTILISER L'APPAREIL.
• N’utiliser le fer que pour les applications
pour lesquelles il a été conçu.
• Afin d'éviter les risques de choc électrique,
ne pas immerger le fer dans l'eau ou dans
d'autres liquides.
• Le fer à repasser doit toujours être réglé à la
position minimale (MIN) avant d'être branché
ou débranché. Ne jamais tirer sur le cordon
pour débrancher le fer à repasser; saisir
plutôt la fiche pour débrancher l’appareil.
• Éviter de laisser le cordon entrer en contact avec
des surfaces chaudes. Laisser le fer à repasser
refroidir complètement avant de le ranger.
• Lors du rangement, enrouler le cordon de
manière à former des ovales de taille égale.
Puis, attacher le tout au moyen du ruban
autoagrippant.
• Toujours débrancher la base de la prise de
courant pour remplir et vider le réservoir
d’eau, lors du nettoyage de l’appareil et
lorsque l’appareil n’est pas utilisé.
• Ne pas utiliser le fer à repasser s'il a été
échappé, si le fer ou son cordon sont
visiblement endommagés ou si le fer fuit.
Afin d'éviter les risques de choc électrique,
ne pas démonter le fer. En confier l'inspection
et la réparation au personnel d'un centre
d'entretien autorisé. Ou composer le numéro
sans frais approprié qui figure sur la page
couverture du présent guide. Un assemblage
incorrect peut provoquer un choc électrique
au moment de l’utilisation.
• Exercer une étroite surveillance lorsque
l'appareil est utilisé par un enfant ou à
proximité d'un enfant. Ne pas laisser le fer à
repasser sans surveillance s’il est branché ou
sur une planche à repasser.
• Le contact avec des pièces métalliques, l’eau
chaude ou la vapeur peut occasionner des
brûlures. Retourner le fer avec précaution –
il pourrait y avoir de l’eau brûlante dans le
réservoir. Éviter tout mouvement brusque
lors du repassage afin de réduire les risques
de déversement accidentel d’eau brûlante.
• Le fer à repasser doit être utilisé et déposé
sur une surface stable.
• Le fer à repasser ne doit être utilisé qu’avec
le support fourni.
• Avant de déposer le fer à repasser sur
son support, s’assurer que la surface sur
laquelle se trouve le support est stable.
• Avant de déposer le fer à repasser sur son
support, s'assurer que la surface sur laquelle
se trouve le support est stable.
• Cet appareil n’est pas conçu pour être utilisé
par des personnes (notamment des enfants)
dont les capacités physiques, sensorielles
ou mentales sont réduites ou qui manquent
d’expérience ou de connaissances, à moins
que ces personnes ne soient supervisées ou
dirigées par une personne responsable de
leur sécurité pendant l’utilisation.
• Les enfants doivent être supervisés pour
éviter qu’ils jouent avec l’appareil.
INSTRUCTIONS SPÉCIALES
• Pour éviter une surcharge du circuit, ne pas
brancher le fer à repasser et un autre appareil
haute puissance sur le même circuit.
• Si l’utilisation d'une rallonge est absolument
nécessaire, utiliser un cordon d'au moins
13 ampères. Les cordons prévus pour une
intensité inférieure risquent de provoquer
un incendie ou un choc électrique en raison
d'une surchauffe. Faire preuve de prudence en
veillant à ce que le cordon ne puisse pas être
tiré ou faire trébucher.
RÈGLES DE SÉCURITÉ IMPORTANTES
Lorsqu’on utilise le fer à repasser, il faut toujours respecter certaines
règles de sécurité fondamentales, notamment les suivantes :
CONSERVER CES INSTRUCTIONS.
Cet appareil est conçu pour un usage domestique seulement.
FICHE POLARISÉE
Cet appareil est doté d’une fiche polarisée
(l’une des broches est plus large que l’autre).
Afin de réduire les risques de choc électrique,
la fiche se branche dans une prise polarisée
dans un sens seulement. Si la fiche n’entre pas
complètement dans la prise, tourner la fiche.
Si la fiche n’entre toujours pas, communiquer
avec un électricien qualifié. Ne pas tenter de
modifier la fiche.
VIS INVIOLABLE
Avertissement : Cet appareil comporte une
vis inviolable prévenant le retrait du boîtier
externe. Pour réduire les risques d’incendie
ou de choc électrique, ne pas tenter de retirer
le boîtier externe. L’appareil ne contient
aucune pièce réparable par l’utilisateur. Les
réparations doivent être effectuées par un
technicien autorisé seulement.
Remarque : Si le cordon est endommagé, pour
éviter les risques, le faire remplacer par un
technicien qualifié ou, en Amérique latine, par
un centre de service autorisé.
Page 19

19
Le produit peut différer légèrement de celui qui est illustré.
1. Semelle
2. Bec de pulvérisation
3. Couvercle du réservoir à eau
4. Levier de réglage de la vapeur
5. Bouton de jet de vapeur
6. Bouton de jet de fines gouttelettes
7. Sélecteur de température
8. Support
9. Témoin d’état intelligent
10. Range-cordon à l'intérieur du
support (non illustré)
2
3
4
5
6
7
8
1
9
FAMILIARISATION AVEC VOTRE FER
Page 20

20
UTILISATION
Cet appareil est conçu pour un usage domestique seulement.
POUR COMMENCER
• Retirer toutes les étiquettes et tous les autocollants apposés sur
l'appareil, le cordon ou la semelle toute étiquette et la bande de
plastique entourant la fiche.
• Retirer et conserver la documentation.
REMPLISSAGE DU RÉSERVOIR À EAU
1. Retirer le fer à repasser du support. Éloigner le fer du
support suffisamment pour éviter que l’eau ne déborde
sur le support pendant le remplissage du réservoir.
2. La semelle inclinée à un angle de 45°, ouvrir le
couvercle du réservoir à eau (A).
3. À l’aide d’une tasse à mesurer propre, verser délicatement de l’eau
dans l’orifice de remplissage jusqu’à ce qu’elle atteigne la marque «
MAX » sur le côté du réservoir à eau. Ne pas trop remplir. Bien refermer
le couvercle du réservoir à eau.
Conseil : Vous pouvez utiliser le fer à repasser avec l’eau du robinet. Si l’eau
du robinet est dure, vous devez utiliser de l’eau distillée (non chimiquement
détartrée ou adoucie). Ne pas utiliser d’eau parfumée ou d’agents aromatiques.
PRÉCHAUFFAGE DU FER À REPASSER
Le fer est chauffé en le plaçant sur le support. Le témoin d’état intelligent
indique le moment où il faut réchauffer le fer et lorsqu’il est prêt à l’emploi.
Le témoin d’état intelligent fonctionne comme suit :
Témoin d’état intelligent Mode de repassage
Rouge fixe Réchauffage
Vert clignotant Prêt à l’emploi
Rouge clignotant Avertissement de recharge
Rouge clignotant, 3 bips Recharge requise
Rouge à impulsions lentes Arrêt automatique activé
Remarque importante :
Entre les tâches de repassage, toujours remettre le fer sur le support. Cela
permet d’assurer que le fer offre la plus grande efficacité de chauffage et
la meilleure performance possible.
1. Brancher le support dans une prise de courant.
2. Déposer le fer sur le support pour le préchauffer et le recharger au
besoin. Le témoin d’état intelligent sera rouge fixe.
3. Suivre les recommandations d’entretien des vêtements pour
déterminer le réglage de température approprié.
A
Page 21

21
4. Régler le sélecteur à la position appropriée.
5. Déplacer le levier de réglage de la vapeur à la position désirée.
Réglages recommandés :
GUIDE DES RÉGLAGES
Pour obtenir des résultats optimaux, il est recommandé de consulter
les étiquettes d’entretien du vêtement du fabricant en ce qui a trait aux
réglages de chaleur et de vapeur. Dans le doute, toujours choisir le réglage
de température le plus bas.
Nom et icône du réglage Tissus
Aucune vapeur
Tissus synthétiques, nylon, soie,
polyester
Vapeur basse
Mélanges
Vapeur élevée
Laine, coton, lin
CARACTÉRISTIQUES SUPPLÉMENTAIRES
BOUTON DE JET DE FINES GOUTTELETTES
Les taches d’eau nuisent à certains tissus. Tester d’abord la
fonction sur une surface dissimulée du tissu.
1. Retirer le fer du tissu.
2. Diriger le bec de pulvérisation sur le tissu.
3. Appuyer sur le bouton
– vous devrez peut-être appuyer
2 ou 3 fois pour pomper l’eau dans le système (B).
BOUTON DE JET DE VAPEUR
1. La vapeur est disponible lorsque la température est
réglée à
ou au-dessus.
2. Appuyer sur le bouton
(C).
3. Attendre 4 secondes entre chaque jet pour permettre à
la température de s’élever.
REPASSAGE À SEC (SANS VAPEUR)
1. Si vous devez repasser à sec pendant 20 minutes ou plus, vider
d’abord le réservoir pour éviter des jets de vapeur involontaires.
2. Régler la vapeur à la position
.
3. Régler la température voulue.
4. Lorsque le témoin d’état intelligent clignote en vert, le fer à repasser
est prêt à l’emploi.
JET DE VAPEUR VERTICAL
Vaporiser les plis sur des vêtements, des rideaux et des tissus
d’ameublement suspendus.
C
B
Page 22

22
1. Régler le sélecteur de température à la position
maximale (max).
2. Tenir le fer à la verticale à proximité du tissu (mais sans
le toucher).
3. Appuyer sur le bouton
(D).
4. Attendre 4 secondes entre chaque jet pour permettre à
la température de s’élever.
APRÈS L’UTILISATION
1. Régler le sélecteur de température à la position
minimale (min).
2. Débrancher le support.
3. Ouvrir le couvercle du réservoir.
4. Tenir le fer au-dessus d’un évier, le renverser et vider le réservoir à eau (E).
5. Déposer le fer sur le support et le laisser refroidir complètement.
6. Lorsqu’il a refroidi, essuyer l’humidité et fermer le couvercle du
réservoir à eau.
7. Essuyer les surfaces extérieures à l’aide d’un linge humide.
8. Éliminer les taches sur la semelle avec un peu de
vinaigre. Veiller à ne pas l’égratigner.
9. Ranger le cordon à l’aide de l’enrouleur à l'intérieur du
support. (F)
NETTOYAGE AUTOMATIQUE
Pour éviter l’accumulation de tartre, utiliser la fonction d’auto-nettoyage
tous les mois dans les régions où l’eau est normale, et plus souvent dans les
régions où l’eau est dure.
1. Remplir le réservoir à eau jusqu’à la marque max.
2. Régler le sélecteur de température à la position maximale.
3. Déposer le fer sur le support.
4. Brancher la base et attendre que le témoin d’état intelligent clignote en
vert.
5. Tenir le fer à repasser au-dessus d’un évier, la semelle vers le bas.
6. Déplacer le levier de réglage de vapeur au-delà de la position
jusqu’à la position
et le maintenir en place.
7. Effectuer délicatement des mouvements de va-et-vient avec le fer
au-dessus de l’évier.
8. Lorsque l’eau et la vapeur cessent de s’échapper de la semelle, relâcher
le levier de réglage de la vapeur.
9. Suivre les étapes de la section APRÈS L’UTILISATION.
ARRÊT AUTOMATIQUE
1. Lorsque le fer est immobile pendant environ 8 minutes, il s’éteint
automatiquement.
2. Le témoin d’état intelligent émet de lentes impulsions en rouge.
3. Pour rallumer le fer, le retirer du support, puis le remettre en place
pour qu’il chauffe de nouveau. Le fer est chauffé une fois que le
témoin d’état intelligent clignote en vert.
D
E
F
Page 23

23
BESOIN D’AIDE?
Pour communiquer avec les services d’entretien ou de réparation, ou pour
adresser toute question relative au produit, composer le numéro sans frais
approprié indiqué sur la page couverture. Ne pas retourner le produit où il a
été acheté. Ne pas poster le produit au fabricant ni le porter dans un centre
de service. On peut également consulter le site web indiqué sur la page
couverture.
Garantie Limitée De Deux Ans
(Valable seulement aux États-Unis et au Canada)
Quelle est la couverture?
• Tout défaut de main-d’oeuvre ou de matériau; toutefois, la responsabilité de la
société. Spectrum Brands, Inc. se limite au prix d’achat du produit.
Quelle est la durée?
• Deux années à compter de la date d’achat initiale, avec une preuve d’achat.
Quelle aide offrons nous?
• Remplacement par un produit raisonnablement semblable nouveau ou réusiné.
Comment se prévaut-on du service?
• Conserver son reçu de caisse comme preuve de la date d’achat.
• Visiter notre site web au www.prodprotect.com/blackanddecker, ou composer
sans frais le 1-800 465-6070, pour obtenir des renseignements généraux relatifs
à la garantie.
• On peut également communiquer avec le service des pièces et des accessoires au
1-800 738-0245.
Qu’est-ce que la garantie ne couvre pas?
• Des dommages dus à une utilisation commerciale.
• Des dommages causés par une mauvaise utilisation ou de la négligence.
• Des produits qui ont été modifiés.
• Des produits utilisés ou entretenus hors du pays où ils ont été achetés.
• Des pièces en verre et tout autre accessoire emballés avec le produit.
• Les frais de transport et de manutention reliés au remplacement du produit.
• Des dommages indirects (il faut toutefois prendre note que certains états ne
permettent pas l’exclusion ni la limitation des dommages indirects).
Quelles lois régissent la garantie?
• Les modalités de la présente garantie donnent des droits légaux spécifiques.
L’utilisateur peut également se prévaloir d’autres droits selon l’état ou la province
qu’il habite.
Page 24

24
Comercializado por:
Spectrum Brands de México, SA de C.V
Autopista México Querétaro No 3069C Oficina 004 Col. Centro Industrial
Tlalnepantla CP 54030 Tlalnepantla,
Estado de MéxicoTelefono:
01-800-714-2503
Servicio y Reparación
Art. 123 No. 95
Col. Centro, C.P. 06050
Deleg. Cuauhtemoc
Servicio al Consumidor,
Venta de Refacciones
y Accesorios
01 800 714 2503
Importado y Distribuido por: :
RAYOVAC ARGENTINA S.R.L. Humboldt
2495 Piso# 3 C1425FUG) C.A.B.A.
Argentina C.U.I.T NO. 30-70706168-1
Importado por / Imported by:
Spectrum Brands de México, SA de C.V
Autopista México Querétaro No 3069C Oficina 004 Col. Centro Industrial
Tlalnepantla CP 54030 Tlalnepantla,
Estado de México
Para atención de garantía marque:
01 (800) 714 2503
Importado por / Imported by:
Spectrum Brands En Chile,
Household Products Chile Ltda
Av. Del Valle 570, Ofic. 704
Ciudad Empresarial, Huechuraba
Santiago - Chile
Fono: (562) 2571 3700
Importado por / Imported by:
Spectrum Brands Colombia S.A.
Carrera 17 No.89-40
Bogotá, Colombia
Línea de atención al cliente:
018000510012
Made in China.
Fabricado en China.
Fabriqué en Chine.
BLACK+DECKER and the BLACK+DECKER logos and product names are trademarks of
The Black & Decker Corporation, used under license. All rights reserved.
BLACK+DECKER y los logos y nombres de productos de BLACK+DECKER son marcas registradas
de The Black & Decker Corporation, usados bajo licencia. Todos los derechos reservados.
BLACK+DECKER et les logos et noms de produits BLACK+DECKER sont des marques de
commerce de The Black & Decker Corporation, utilisées sous licence. Tous droits réservés.
© 2018 The Black & Decker Corporation and Spectrum Brands, Inc., Middleton, WI 53562
1200 W 120 V ~ 60 Hz
Sello del Distribuidor:
Fecha de compra:
Modelo:
Código de fecha / Date Code / Le code de date:
T22-5004122-B
21270
 Loading...