

Black & Decker CHV1410L32, HHVI315JO, HHVI325JR, HHVI320JR, HHVI320JRS Instruction Manual
...Page 1
INSTRUCTION MANUAL
CORDLESS HAND VAC
CATALOG NUMBERS
CHV1410L
CHV1410L32
Thank you for choosing BLACK+DECKER!
PLEASE READ BEFORE RETURNING THIS PRODUCT FOR
ANY REASON.
If you have a question or experience a problem with your BLACK+DECKER
purchase, go to http://www.blackanddecker.com/instantanswers
If you can’t find the answer or do not have access to the Internet, call
1-800-544-6986 from 8 a.m. to 5 p.m. EST Mon. - Fri. to speak with an agent.
Please have the catalog number available when you call.
SAVE THIS MANUAL FOR FUTURE REFERENCE.
VEA EL ESPANOL EN LA CONTRAPORTADA.
INSTRUCTIVO DE OPERACIÓN, CENTROS DE SERVICIO Y PÓLIZA DE GARANTÍA.
ADVERTENCIA: LÉASE ESTE INSTRUCTIVO ANTES DE USAR EL PRODUCTO.
To register your new product, visit
www.BlackandDecker.com/NewOwner
Page 2
2
SAFETY GUIDELINES - DEFINITIONS
It is important for you to read and understand this manual. The information it contains
relates to protecting YOUR SAFETY and PREVENTING PROBLEMS. The symbols
below are used to help you recognize this information.
DANGER: Indicates an imminently hazardous situation which, if not avoided, will
result in death or serious injury.
WARNING: Indicates a potentially hazardous situation which, if not avoided, could
result in death or serious injury.
CAUTION: Indicates a potentially haz ard ous situation which, if not avoided, may
result in minor or mod er ate injury.
NOTICE: Used without the safety alert symbol indicates potentially hazardous
situation which, if not avoided, may result in property damage.
IMPORTANT SAFETY
INSTRUCTIONS
When using an electrical appliances, basic
precautions should always be followed,
including the following:
READ ALL INSTRUCTIONS
BEFORE USING THIS
APPLIANCE.
WARNING: Read all safety
warnings and all instructions. Failure to
follow the warnings and instructions listed
below may result in electric shock, fire and/
or serious injury.
WARNING: Some household dust
contains chemicals known to the State of
California to cause cancer, birth defects or
other reproductive harm such as asbestos
and lead in lead based paint.
WARNING: To reduce the risk of
fire, electrical shock or injury:
• WARNING: To reduce the risk of
electric shock – Do not use outdoors or
on wet surfaces.
• Do not allow to be used as a toy. Close
attention is necessary when used by or
near children.
• Use only as described in this manual. Use only
manufacturer’s recommended attachments.
• Do not use with damaged cord or plug. If
appliance is not working as it should, has been
dropped, damaged, left outdoors, or dropped
into water, return it to a service center.
• Do not pull or carry by cord, use cord as
a handle, close a door on cord, or pull
cord around sharp edges or corners. Do
not run appliance over cord. Keep cord
away from heated surfaces.
• Do not unplug by pulling on cord. To
unplug, grasp the plug, not the cord.
• Do not handle charger, including charger
plug, and charger terminals with wet hands.
• Do not put any object into openings. Do
not use with any opening blocked; keep
free of dust,lint, hair, and anything that
may reduce air flow.
• Keep hair, loose clothing, fingers, and all
parts of body away from openings and
moving parts.
• Use extra care when cleaning on stairs.
• Do not use to pick up flammable or
combustible liquids, such as gasoline, or
use in areas where they may be present.
• Do not pick up anything that is burning or
smoking, such as cigarettes, matches, or
hot ashes.
• Do not use without dust bag and/or filters
in place.
• Do not charge the unit outdoors.
• Use only the charger supplied by the
manufacturer to recharge.
• Do not incinerate the appliance even if it
is severely damaged. The batteries can
explode in a fire.
• This appliance is intended for household
use only and not for commercial or
industrial use.
• Shock Hazard. To protect against risk
of electrical shock, do not put unit or
charging base in water or other liquid.
• Do not allow the cord to hang over the edge
of a table or counter or touch hot surfaces.
The unit should be placed or mounted
away from sinks and hot surfaces.
• Plug the charger directly into an electrical
outlet.
• Use the charger only in a standard
electrical outlet (120V/60Hz).
• Unplug the charger from outlet before any
routine cleaning or maintenance.
• This product includes rechargeable nickel
cadmium batteries. Do not incinerate batteries
as they will explode at high temperatures.
• Leaks from battery cells can occur
under extreme conditions. If the liquid,
which is a 20-35% solution of potassium
hydroxide, gets on the skin (1) wash
quickly with soap and water or (2)
neutralize with a mild acid such as lemon
juice or vinegar. If the liquid gets into the
eyes, flush them immediately with clean
Page 3

3
water for a minimum of 10 minutes. Seek
medical attention.
• Do not look into the air vents when the
unit is switched on, as sometimes
there is a possibility of small debris being
discharged from the air vents, especially
after cleaning / replacement of the filters
as debris inside the unit can be disturbed.
ADDITIONAL SAFETY
WARNINGS
a) Prevent unintentional starting. Ensure
the switch is in the off-position before
connecting to battery pack, picking up
or carrying the appliance. Carrying the
appliance with your finger on the switch
or energizing appliance that have the
switch on invites accidents.
b) Recharge only with the charger
specified by the manufacturer. A
charger that is suitable for one type of
battery pack may create a risk of fire
when used with another battery pack.
c) Do not use a battery pack or appliance
that is damaged or modified. Damaged
or modified batteries may exhibit
unpredictable behavior resulting in fire,
explosion or risk of injury.
d) Do not expose a battery pack or
appliance to fire or excessive
temperature. Exposure to fire or
temperature above 266°F (130°C) may
cause explosion.
e) H
ave servicing performed by a qualified
repair person using only identical
replacement parts. This will ensure that
the safety of the product is maintained.
WARNING: Do not
attempt to modify or repair the appliance
SAVE THESE INSTRUCTIONS
Symbols
• The label on your tool may include the
following symbols. The symbols and their
definitions are as follows:
V ..................volts
A ..................amperes
Hz ................ hertz
W .................watts
min ..............minutes
or AC ...... alternating current
or DC ..direct current
n
o ................ no load speed
................Class I Construction
(grounded)
................earthing terminal
...............safety alert symbol
................Class II Construction
(double insulated)
.../min or rpm...revolutions or reciprocation
per minute
FUCTIONAL DESCRIPTION
1. On/off switch
2. Bowl release button
3. Charging indicator
4. Dust bowl
5. Nozzle
6. Nozzle release button
7. Nozzle rotating button
8. Extendable crevice tool
9. Flip-up Brush
10. Cloth filter
11. Wall mount bracket
CHV1410L ONLY
12. Plastic prefilter
13. Charger base
7
11
1
2
3
6
5
4
10
8
9
CHV1410L ONLY
13
12
Assembly
WARNING: Do not
attempt to modify or repair the appliance
Wall Mounting (
CHV1410L32
)
The product can be wall mounted, if desired,
using the wall mount bracket, screws and
anchors supplied. To wall mount the vac,
refer to gures A, B, C and D.
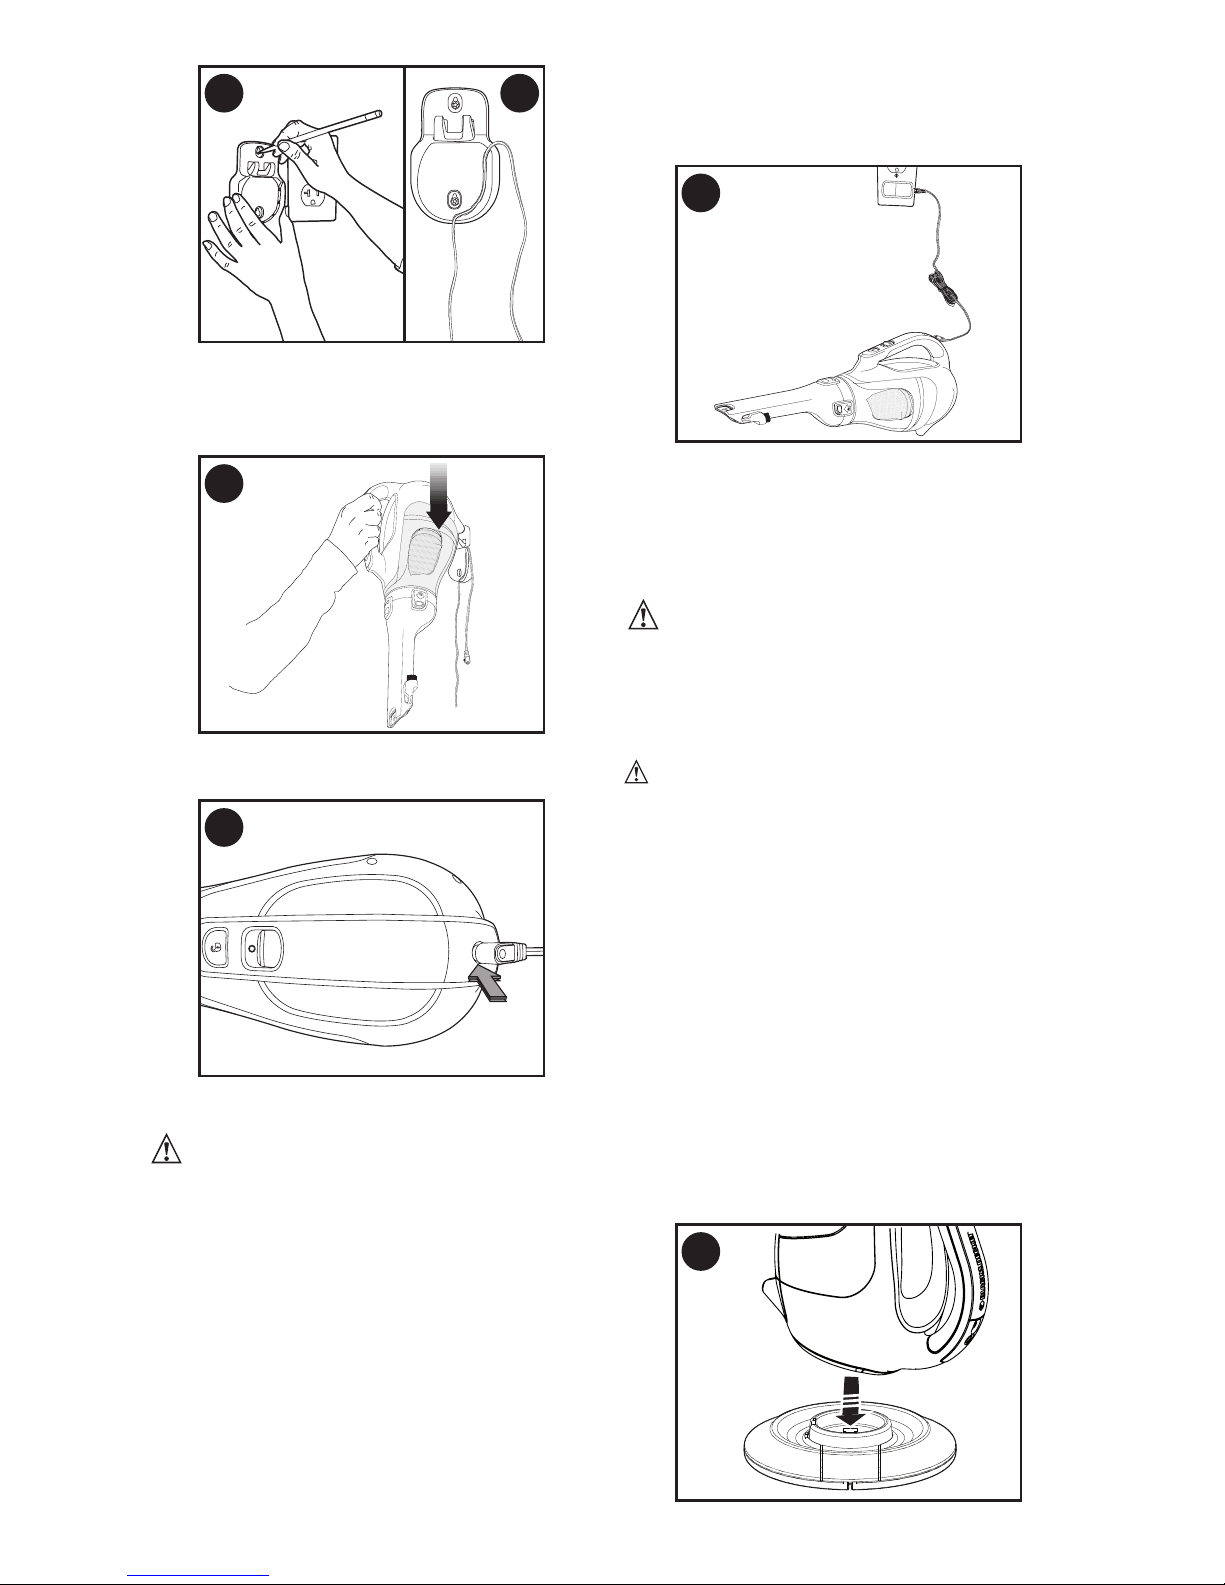
• Figure A - Mark the location of the screw
holes (within reach of an electrical outlet
for chargeing the vac while it is on the wall
bracket).
• Figure B - Insert the charger cord into
the curved slot in the wall mount bracket
leaving approximately 8-9 inches (203mm
- 227mm) excess as shown.
Page 4
4
A B
• Figure C - Hang the vac on the wall by
placing the opening on the base of the vac
over the hooks in the wall mount bracket
as shown in gure C.
C
• Figure D - Insert the jack plug into the
charging socket.
D
Charging the battery (CHV1410L32)
WARNING: For use
only with the supplied charger.
From new, the rechargeable cells of the
product need a minimum charge time of 9
hours to ensure full power.
The charge is complete when the charging
indicator lights continuously. The charger and
the battery can be left connected indefinitely
with the LED illuminated. The LED will
change to flashing (charging) state as the
charger occasionally tops off the battery
charge.
• The switch must be in the off (“O”)
position, the product will not charge if it is
in any other position.
• Figure E - Plug the jack plug of the
charger into the charging socket of the
tool. Plug the charger into any standard
120 Volt 60 Hz electrical outlet.
E
While charging, the charger may get
warm, this is perfectly normal and safe. It
is safe to leave the appliance connected
to the charger indefinitely. The charger
automatically reduces power consumption
when charging is complete.
WARNING: Do not
charge the battery at ambient temperatures
below 39°F (4°C) or above 104°F (40°C).
Charging the battery (CHV1410)
WARNING: Do not
charge the battery at ambient temperatures
below 39°F (4°C) or above 104°F (40°C).
The charge is complete when the charging
indicator lights continuously. The charger
and the battery can be left connected
indefinitely with the LED illuminated. The
LED will change to flashing (charging) state
as the charger occasionally tops off the
battery charge.
• Charge discharged batteries within
1 week. Battery life will be greatly
diminished if stored in a discharged state.
• Place the appliance on the charging base
as shown.
• Plug in the charger. The charging indicator
will flash continuously (slowly).
• Leave the appliance to charge.
F
Page 5

5
While charging, the charger may get warm,
this is perfectly normal and safe. The charging
indicator will be lit as long as the appliance is
connected to the plugged-in charger. It can
remain on charge indefinitely without damage
or danger. It is not possible to “overcharge”
the battery cells with the charger provided.
Battery diagnostics
If the appliance detects a weak battery, the
charging indicator will flash at a fast rate.
Proceed as follows:
• Place the appliance on the charging base.
• Plug in the charger.
• Leave the appliance to charge.
If the appliance detects a damaged battery,
the charging indicator will flash at a fast rate
when the appliance is on the charger base.
Proceed as follows:
• Take the appliance and the charger to be
tested at an authorized service facility.
Note: It may take as long as 60 minutes
to determine that the battery is defective.
If the battery is too hot or too cold, the
LED will alternately blink, fast and slow,
one flash at each speed and repeat.
Use
Switching on and off
• Figure G - To start, slide the On/Off switch
forward (i.e. “O”= Off, “I” = On).
• To stop, slide the switch back.
• Return the product to the charger
immediately after use so that it will be
ready and fully charged for the next use.
Ensure that the product is fully engaged
with the charger base.
G
Cleaning and emptying the
product
WARNING: Projectile/
Respiratory Hazard: Never use the vac
without its filter.
NOTE: The filter is re-usable, do not confuse
it with a disposable dust bag, and do not throw
it away when the product is emptied. We
recommend that you replace the filter every
6-9 months depending on frequency of use.
There are two methods of cleaning the bowl,
a quick empty method and a thorough clean
method.
For a quick empty (figures H, I)
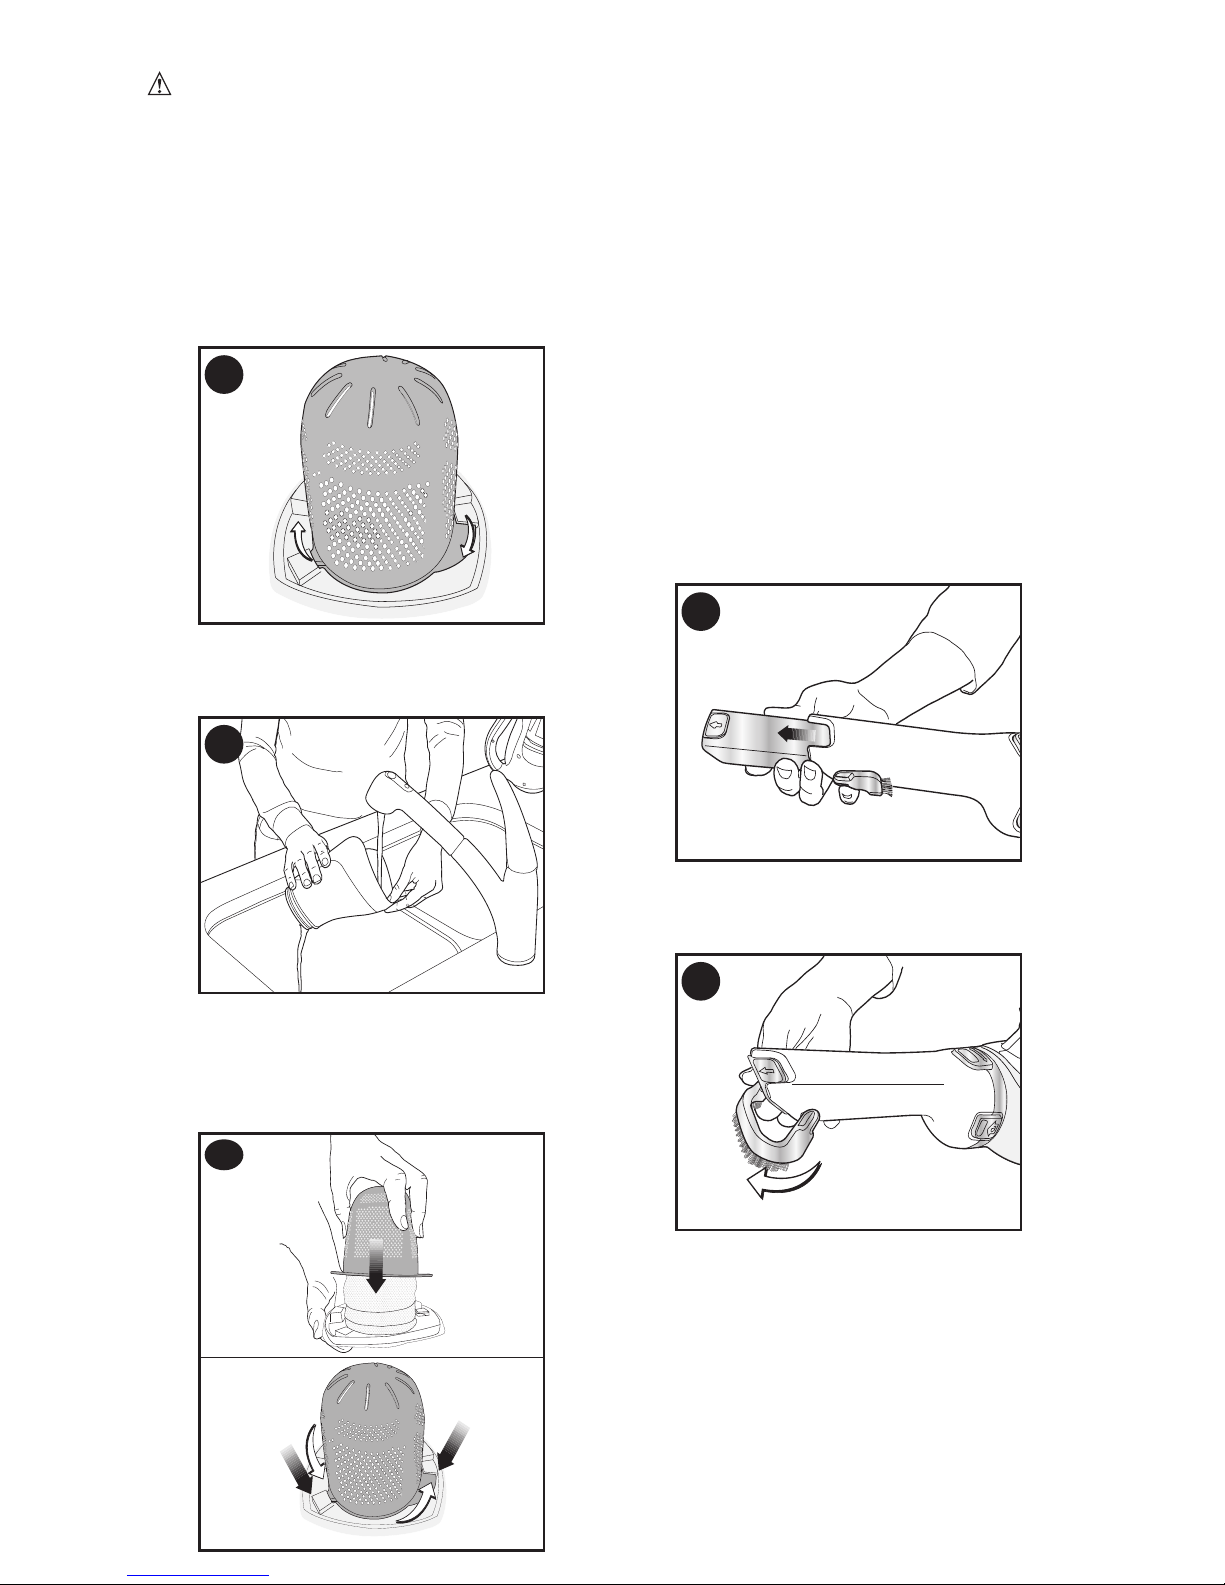
• Figure H - Press in on both nozzle release
buttons on the sides of the nozzle and
remove the nozzle by pulling straight off.
• Figure I - Empty the dust from the bowl.
• For a more thorough cleaning, remove
bowl as described in figures J - M.
H
I
Removing the dust bowl and filters
(figures J - M)
WARNING: The filter is
reusable and should be cleaned regularly.
• Figure J - Press the release latch and pull
the dust bowl straight off.
J
• While holding the dust bowl over a bin
or sink, pull out the filter to empty the
contents of the bowl.
• To replace the dust bowl, place it back
onto the handle until it “clicks” firmly into
position.
Page 6
6
WARNING: Never use
the appliance without the filter. Optimum
dust collection will only be achieved with
clean filter.
• Figure K (CHV1410L ONLY) - This
vacuum has a plastic pre-filter and an
inner cloth filter. To separate the cloth
filter from the plastic filter, twist the plastic
filter in a clockwise direction.
• Remove the inner cloth filter and shake or
lightly
brush any loose dust off both filters.
K
• Figure L - The dust bowl and filter can be
washed in warm soapy water. Allow to
dry before placing back into the vac.
L
• Figure M - To replace the filters, slide the
outer plastic filter over
the cloth filter.
• Align the wings of the plastic filter with
the slots in the cloth filter and twist in a
counterclockwise direction.
M
• Place filters back into the bowl pressing
firmly to ensure a secure fit.
• To replace dust bowl, place it back onto the
handle until it “clicks” firmly into position.
IMPORTANT: Maximum dust collection will
only be obtained with a clean filter and an empty
dust bowl. If dust begins to fall back out of the
product after it is switched off, this indicates that
the bowl is full and requires emptying.
• Wash the filter regularly using warm,
soapy water and ensure that they are
completely dry before using again. The
cleaner the filter is, the better the product
will perform.
• It is very important that the filter is
correctly in position before use.
Nozzle / Accessories
• Figure N - A crevice tool is built into the
nozzle and can be extended as shown
in figure N by pulling the extension piece
until it locks into position.
N
• Figure O - A brush accessory is built into
the nozzle and can be flipped upwards for
use.
O
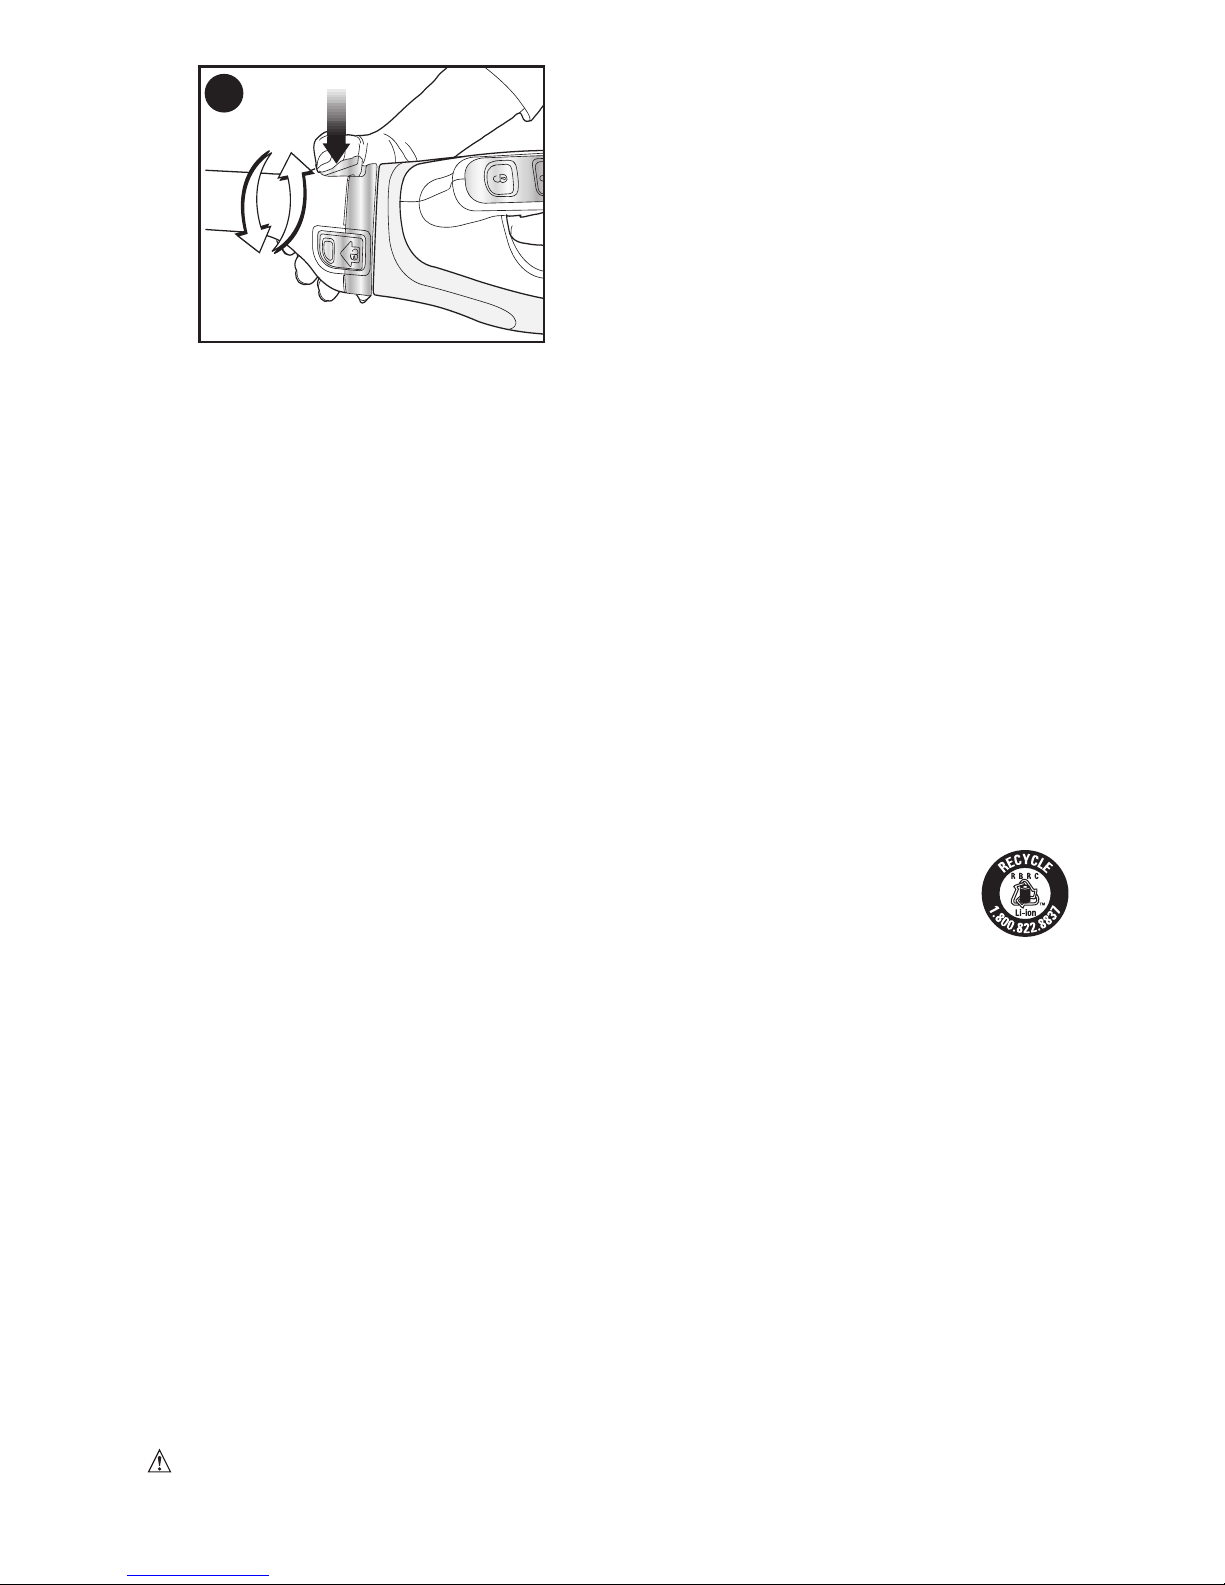
• Figure P - The nozzle can be rotated for
better access in tight spots. To rotate the
nozzle, press the button shown in Figure
P and rotate the nozzle to the left or right
until it clicks into place.
Page 7
7
P
Replacing the filter
The filter should be replaced every 6 to 9
months and whenever worn or damaged.
Replacement filters are available from your
BLACK+DECKER
dealer.
Visit www.blackanddecker.com to locate
dealers.
• Remove the old filters as described above.
• Fit the new filters as described above.
Maintenance
Bowls and filters can be washed thoroughly;
however, use only mild soap and a damp
cloth to clean the main part of the vacuum.
IMPORTANT: To assure product SAFETY
and RELIABILITY, repairs, maintenance
and adjustment (other than those listed
in this manual) should be performed by
authorized service centers or other qualified
service personnel, always using identical
replacement parts.
Troubleshooting
If the product does not work, check the
following:
• The charge indicator light is flashing when
unit is connected to charger.
• The charger was correctly plugged in for
recharge. (It feels slightly warm to the touch.)
• The charger cord is not damaged and is
correctly attached.
• The charger is plugged into a working
electrical outlet.
• The switch is in the “OFF” position when
charging.
For assistance with your product, visit our
website www.blackanddecker.com for the
location of the service center nearest you
or call the
BLACK+DECKER
help line at
1-800-544-6986.
Accessories
Recommended accessories for use with your
product are available from your local dealer
or authorized service center. If you need
assistance regarding accessories, please
call: 1-800-544-6986.
• Filter accessory number VF110.
WARNING: The use of
any accessory not recommended for use
with this product could be hazardous.
Battery Removal and Disposal
This product uses Lithium Ion rechargeable
and recyclable batteries. When the
batteries no longer hold a charge, they
should be removed from the Vac and
recycled. They must not be incinerated or
composted.
The batteries can be taken for disposal to
a BLACK+DECKER, Company-Owned or
Authorized Service Center. Some local
retailers are also participating in a national
recycling program (see “RBRC™ Seal”).
Call your local retailer for details. If you
bring the batteries to a BLACK+DECKER
Company-Owned or Authorized Service
Center, the Center will arrange to recycle
old batteries. Or, contact your local
municipality for proper disposal instructions
in your city/town.
To remove the battery pack for disposal:
1.) First, before attempting to disassemble
the product, turn it on and leave it on
until the motor completely stops insuring
a complete discharge of the batteries.
2.) Using a phillips screwdriver, remove the
seven screws securing the two housing
halves.
3.) Lift the housing cover away from the
assembly.
4.) Detach all lead connections from battery
pack.
5.) Remove battery pack and dispose of as
per recommended guidelines.
The RBRC™ Seal
The RBRC® (Rechargeable
Battery Recycling Corp oration)
Seal on the lithium-ion batteries
(or battery packs) indicates
that the costs to recycle these batteries
(or battery packs) at the end of their
useful life have already been paid by
BLACK+DECKER. In some areas, it is
illegal to place spent lithium-ion batteries in
the trash or municipal solid waste stream
and the Call 2 Recycle® program provides
an environmentally conscious alternative.
Call 2 Recycle, Inc., in cooperation with
BLACK+DECKER and other battery
users, has established the program in the
United States and Canada to facilitate the
collection of spent lithium-ion batteries.
Help protect our environment and conserve
natural resources by returning the spent
nickel cadmium, nickel metal hydride
or lithium-ion batteries to an authorized
BLACK+DECKER service center or to
your local retailer for recycling. You may
also contact your local recycling center for
information on where to drop off the spent
battery. RBRC® is a registered trademark
of Call 2 Recycle, Inc.
Page 8

8
Service Information
All BLACK+DECKER Service Centers
are staffed with trained personnel to
provide customers with efficient and
reliable power tool service. Whether you
need technical advice, repair, or genuine
factory replacement parts, contact the
BLACK+DECKER location nearest you. To
find your local service location, call: 1-800-
544-6986 or visit
www.blackanddecker.com
TWO-YEAR LIMITED
WARRANTY
Black & Decker (U.S.) Inc. warranties this
product to be free from defects in material
or workmanship for a period of two (2) years
following the date of purchase, provided that
the product is used in a home environment.
This limited warranty does not cover failures
due to abuse, accidental damage or when
repairs have been made or attempted by
anyone other than BLACK+DECKER and
its Authorized Service Centers. A defective
product meeting the warranty conditions set
forth herein will be replaced or repaired at
no charge in either of two ways:
The first, which will result in exchanges
only, is to return the product to the retailer
from whom it was purchased (provided
that the store is a participating retailer).
Returns should be made within the
time period of the retailer’s policy for
exchanges. Proof of purchase may be
required. Please check with the retailer
for its specific return policy regarding
time limits for returns or exchanges. The
second option is to take or send the product
(prepaid) to a BLACK+DECKER owned
or authorized Service Center for repair
or replacement at BLACK+DECKER’s
option. Proof of purchase may be required.
BLACK+DECKER owned and authorized
service centers are listed online at www.
blackanddecker.com.
This warranty does not apply to
accessories. This warranty gives you
specific legal rights and you may have
other rights which vary from state to state.
Should you have any questions, contact the
manager of your nearest BLACK+DECKER
Service Center. This product is not intended
for commercial use, and accordingly, such
commercial use of this product will void this
warranty. All other guarantees, express or
implied, are hereby disclaimed.
LATIN AMERICA:This warranty does not
apply to products sold in Latin America.
For products sold in Latin America, check
country specific warranty information
contained in the packaging, call the local
company or see the website for such
information.
FREE WARNING LABEL
REPLACEMENT: If your warning labels
become illegible or are missing, call 1-800544-6986 for a free replacement.
Imported by
Black & Decker (U.S.) Inc.,
701 E. Joppa Rd.
Towson, MD 21286 U.S.A.
Page 9
9
Consulter le site Web www.BlackandDecker.com/NewOwner
pour enregistrer votre nouveau produit.
LIGNES DIRECTRICES EN MATIÈRE DE SÉCURITÉ - DÉFINITIONS
Il est important que vous lisiez et compreniez ce mode d’emploi. Les informations qu’il
contient concernent VOTRE SÉCURITÉ et visent à ÉVITER TOUT PROBLÈME. Les
symboles ci-dessous servent à vous aider à reconnaître cette information.
DANGER : Indique une situation dangereuse imminente qui, si elle n’est pas
évitée, causera la mort ou des graves blessures.
AVERTISSEMENT : Indique une situation potentiellement
dangereuse qui, si elle n’est pas évitée, pourrait causer la mort ou de graves blessures.
MISE EN GARDE : Indique une situation potentiellement
dangereuse qui, si elle n’est pas évitée, pourrait causer des blessures mineures ou modérées.
AVIS : Utilisé sans le symbole d’alerte à la sécurité, indique une situation
potentiellement dangereuse qui, si elle n’est pas évitée, peut résulter en des dommages à
la propriété.
MODE D’EMPLOI
ASPIRATEUR PORTATIF SANS FIL
N° DE CATALOGUE
CHV1410L, CHV1410L32
Merci d’avoir choisi BLACK+DECKER! Consulter le site Web
www.BlackandDecker.com/NewOwner pour enregistrer votre nouveau produit.
ÀLIRE AVANT DE RETOURNER CE PRODUIT POUR QUELQUE
RAISON QUE CE SOIT :
Si des questions ou des problèmes surgissent après l’achat d’un produit
BLACK+DECKER, consulter le site Web www.blackanddecker.com/instantanswers
pour obtenir des réponses instantanément 24 heures par jour. Si la réponse est
introuvable ou en l’absence d’accès à l’Internet, composer le 1 800 544-6986 de 8 h à
17 h HNE, du lundi au vendredi, pour parler avec un agent. Prière d’avoir le numéro de
catalogue sous la main lors de l’appel.
Pour l´achat d´un filtre de rechange composer le 1-888-678-7278
CONSERVER CE MODE D’EMPLOI POUR UN USAGE ULTÉRIEUR.
Page 10

10
CONSIGNES DE SÉCURITÉ
IMPO
RTANTES
Lors de l’utilisation d’appareils électriques,
toujours observer des précautions de
base, notamment les suivantes :
LIRE TOUTES LES CONSIGNES AVANT
D’UTILISER L’APPAREIL ÉLECTRIQUE.
AVERTISSEMENT :
Lire tous les avertissements de sécurité et
toutes les consignes. Le non-respect des
avertissements et des directives ci-dessous
peut entraîner des risques de choc électrique,
d’incendie ou de blessures graves.
AVERTISSEMENT :
Certaines poussières domestiques
contiennent des produits chimiques
identifiés par l’État de Californie comme
pouvant causer le cancer, des anomalies
congénitales et d’autres dangers pour la
reproduction, tels que l’amiante et le plomb
contenu dans les peintures au plomb.
AVERTISSEMENT :
Pour réduire les risques d’incendie, de
choc électrique ou de blessures :
AVERTISSEMENT :
Afin de réduire le risque de choc électrique,
ne pas utiliser à l’extérieur ou sur une
surface mouillée.
• Ne pas permettre l’utilisation de l’appareil
comme jouet. Une étroite surveillance est
nécessaire si l’appareil est utilisé par des
enfants ou près de ceux-ci.
• Utiliser l’appareil uniquement selon les
indications données dans le présent
manuel. Utiliser uniquement les
accessoires recommandés par le fabricant.
• Ne pas utiliser l’appareil si sa fiche
ou son cordon est endommagé. Si un
appareil ne fonctionne pas comme il
devrait, s’il est tombé au sol ou dans
l’eau, s’il est endommagé ou s’il a été
laissé à l’extérieur, l’envoyer à un centre
de réparation.
• Ne pas tirer sur le cordon, ni transporter
l’outil par le cordon, ne pas utiliser le
cordon comme poignée, ni fermer une
porte dessus, ni tirer le cordon contre des
bords tranchants ou des coins. Ne pas
passer l’appareil sur le cordon. Tenir le
cordon éloigné des surfaces chauffées.
• Ne pas débrancher l’appareil en tirant sur
son cordon. Pour le débrancher, saisir la
fiche et non le cordon.
• Ne pas manipuler la fiche si vous avez
les mains mouillées.
• Ne pas insérer d’objet dans les ouvertures
de l’appareil. Ne pas utiliser l’appareil si
ses ouvertures sont bouchées; les tenir
exemptes de poussière, de peluche,
de cheveux et de toute chose pouvant
réduire la circulation d’air.
• Tenir les cheveux, les vêtements, les doigts
et toutes les parties du corps à distance
des ouvertures et des pièces mobiles.
• Être très prudent lors du nettoyage des
escaliers.
• Ne pas utiliser cet appareil pour
ramasser des liquides inflammables ou
des combustibles comme de l’essence et
ne pas l’utiliser dans les endroits où ces
substances sont présentes.
• Ne pas ramasser de matières brûlantes
ou fumantes comme des cigarettes, des
allumettes ou des cendres chaudes.
• Utiliser uniquement l’appareil si le sac à
poussière, les filtres ou les deux sont en place.
• Ne pas charger l’appareil à l’extérieur.
• L’appareil est conçu pour une utilisation
domestique seulement et non industrielle
ou commerciale.
• Risque de décharge électrique. Afin
de se protéger contre les risques de
décharge électrique, ne pas immerger
l’appareil dans l’eau ou tout autre liquide.
• Ne pas laisser le cordon pendre sur le
bord d’une table ou d’un comptoir, ni
toucher des surfaces chaudes. L’appareil
doit être placé ou fixé loin de tout évier et
de toute surface chaude.
• Brancher l’appareil directement dans une
prise électrique.
• Brancher uniquement l’appareil dans une
prise électrique d’automobile standard.
• Débrancher l’appareil avant tout
nettoyage ou entretien de routine.
• Ne pas regarder dans les évents
lorsque l’appareil est en marche, car il
arrive parfois que de petits débris s’en
échappent, surtout après un nettoyage
ou un remplacement de filtre qui aurait
tendance à les libérer.
CONSIGNES DE SÉCURITÉ
ADDITIONNELLES
a) Prévenir tout démarrage accidentel.
S’assurer que l’interrupteur est en
position d’arrêt avant de connecter
l’appareil à un bloc-piles, et avant de le
saisir ou de le transporter. Transporter
un appareil le doigt sur l’interrupteur, ou
l’alimenter alors que l’interrupteur est en
position de marche, invite les accidents.
b) Le recharger seulement avec le
chargeur spécifié par le fabricant.
Un chargeur propre à un type de bloc-
piles peut créer des risques d’incendie
lorsqu’utilisé avec d’autres blocs-piles.
c) Ne pas utiliser un bloc-piles ou un
appareil endommagé ou modifié. Un
Page 11

11
bloc-piles endommagé ou modifié pourrait
se comporter de façon imprévisible et
poser des risques d’incendie, d’explosion
ou de dommages corporels.
d) Ne pas exposer un bloc-piles ou un
appareil au feu, ou à des températures
excessives. Toute exposition au feu ou
à des températures supérieures à 130 °C
(266 °F) pose des risques d’explosion.
e) Faire entretenir cet appareil par un
réparateur qualifié qui n’utilisera que
des pièces de rechange identiques.
Cela permettra d’assurer l’intégrité du
produit et la sécurité de l’utilisateur.
CONSERVER CES
DIRECTIVES
Symboles
• L’étiquette apposée sur votre outil pourrait
comprendre les symboles suivants. Les
symboles et leurs définitions sont indiqués
ci-après :
V ................. volts
A ................. ampères
Hz ............... hertz
W ................ watts
min ..............minutes
ou AC ....courant alternatif
ou DC ..courant continu
n
o ...............sous vide
................Construction de classe I
................borne de mise à la minute
(mis à la terre)
...............
Construction de classe II
.............. symbole d´avertissement
.../min ..........tours à la minute
DESCRIPTION
FONCTIONNELLE
1. Interrupteur marche/arrêt
2. Bouton de dégagement du réservoir
3. Indicateur de charge
4. Réservoir à poussière
5. Buse
6. Bouton de dégagement de la buse
7. Bouton de rotation de la buse
8. Suceur plat extensible
9. Brosse escamotable
10. Filtre de tissu
11. Support pour montage mural
CHV1410L
12. Préfiltre de plastique
13. Base de charge
7
11
1
2
3
6
5
4
10
8
9
CHV1410L
13
12
Assemblage
AVERTISSEMENT :
ne pas tenter de modifier ou réparer
l’appareil.
Montage mural
Si nécessaire, ce produit peut être monté au
mur à l’aide du support pour montage mural,
des vis et des dispositifs d’ancrage (fournis).
Pour le montage mural de l’aspirateur,
consulter les gures A, B, C et D.
• Figure A - Marquer l’emplacement des
trous pour les vis (à proximité d’une prise
électrique pour permettre la charge de
l’aspirateur lorsqu’il est sur le support mural).
• Figure B - Insérer le cordon du chargeur
dans la fente courbe du support de montage
mural, en laissant dépasser environ 203 à
227 mm (8 à 9 pouces) comme indiqué.
A B
• Figure C - Suspendre l’aspirateur au mur en
plaçant l’ouverture à la base de l’aspirateur
sur les crochets du support de montage
mural, comme indiqué sur la gure C.
Page 12

12
C
• Figure D - Insérer le connecteur mâle
dans la prise femelle.
D
Charge de la pile (CHV1410L32)
AVERTISSEMENT :
à n’utiliser qu’avec le chargeur fourni avec
l’appareil.
Les piles rechargeables neuves de ce
dispositif doivent être chargées pendant au
moins 9 heures afin d’assurer une puissance
maximale. On recommande de décharger
complètement le dispositif lorsqu’on l’utilise
pour la première fois pour permettre aux
piles de se recharger plus rapidement.
La charge est complète lorsque l’indicateur
de charge s’allume et reste allumé. Le
chargeur et la pile peuvent être laissés
branchés indéfiniment avec le voyant DEL
allumé. Le voyant DEL pourra retourner
à l’état de clignotement (charge), car le
chargeur va occasionnellement compléter
la charge de la pile.
• L’interrupteur doit être en position d’arrêt
(« O »), sinon le produit ne se chargera
pas.
• Figure E - Brancher le connecteur mâle
du chargeur dans la prise femelle de
l’appareil. Brancher le chargeur dans une
prise électrique standard de 120 volts, 60
Hz. L’indicateur de charge s’allume.
E
Durant le chargement, le chargeur peut
devenir chaud; ceci est tout à fait normal
et ne présente aucun danger. Il est
sécuritaire de laisser l’appareil branché
au chargeur indéfiniment. Le chargeur
réduit automatiquement la consommation
électrique lorsque la charge est complète.
AVERTISSEMENT :
Ne pas charger la batterie à des
températures ambiantes inférieures à 4 °C
(39 °F) ou supérieures à 40 °C (104 °F).
Charge de la pile (CHV1410L)
AVERTISSEMENT :
Ne pas charger la pile à des températures
ambiante
s inférieures à 4 °C (39 °F) ou
supérieures à 40 °C (104 °F).
La charge est complète lorsque l’indicateur
de charge s’allume et reste allumé. Le
chargeur et la pile peuvent être laissés
branchés indéfiniment avec le voyant DEL
allumé. Le voyant DEL pourra retourner
à l’état de clignotement (charge), car le
chargeur va occasionnellement compléter
la charge de la pile.
• Recharger les piles déchargées dans un
délai d’une semaine. La durée de vie utile
de la pile sera considérablement réduite
si elle est entreposée déchargée.
• Placer l’appareil sur la base de charge
comme dans l’illustration.
• Brancher le chargeur. L’indicateur
de charge clignotera continuellement
(lentement).
• Laisser l’appareil se charger.
F
Page 13

13
Durant la charge, le chargeur peut devenir
chaud; ceci est tout à fait normal et ne
présente aucun danger. L’indicateur de
charge reste allumé aussi longtemps que
l’appareil est relié au chargeur branché. Il
peut être chargé indéfiniment sans danger
ni risque de dommages. Il est impossible de
« surcharger » les cellules de la pile avec le
chargeur fourni.
Diagnostic de la pile
Si l’appareil détecte une pile faible,
l’indicateur de charge clignote rapidement
dès qu’on enfonce le bouton d’alimentation
(1). Procéder comme suit :
• Placer l’appareil sur la base de charge.
• Brancher le chargeur.
• Laisser l’appareil se charger.
Si l’appareil détecte une pile endommagée,
l’indicateur de charge clignote rapidement
dès que l’appareil est inséré sur la base de
charge. Procéder comme suit :
• Confier l’appareil et le chargeur à un
centre de service autorisé pour effectuer
un test.
Remarque : Il faudra au plus 60 minutes pour
découvrir si la pile est défectueuse. Si la
pile est trop chaude ou trop froide, le voyant
DEL clignote rapidement et lentement, en
alternance, de manière répétée.
Utiliser
Mise en marche et arrêt
• Figure G - Pour démarrer l’appareil, faire
glisser l’interrupteur à glissière marche/
arrêt vers l’avant (c.-à-d., « O » = arrêt,
« I » = marche).
• Pour l’arrêter, faire glisser l’interrupteur
vers l’arrière.
• Remettre l’appareil sur le chargeur
immédiatement après son utilisation
afin de le maintenir complètement
chargé pour la prochaine utilisation.
S’assurer que la fiche du chargeur est
complètement enfoncée dans la prise de
l’appareil.
G
Nettoyage et vidage de l’appareil
AVERTISSEMENT :
Danger de projectiles/Danger pour les
voiesrespiratoires : Ne jamais utiliser
l’appareil sans filtre.
REMARQUE : Le filtre est réutilisable (ne
pas confondre avec un sac à poussière
jetable). Ne pas le jeter en vidant l’appareil.
Il est recommandé de remplacer le filtre tous
les 6 à 9 mois selon la fréquence d’utilisation.
Il existe deux méthodes de nettoyage du
réservoir, à savoir une méthode de vidage rapide
et une méthode de nettoyage en profondeur.
Pour un vidage rapide (gures H, I)
• Figure H - Enfoncer les deux boutons
de dégagement de la buse situés sur les
côtés de la buse et tirer sur la buse pour la
dégager.
• Figure I - Vider la poussière du réservoir.
• Pour un nettoyage en profondeur, retirer
le réservoir comme le décrivent les
figures J - M.
H
I
Pour un nettoyage approfondi
(gures J - M)
AVERTISSEMENT :
Les filtres sont réutilisables et doivent être
nettoyés régulièrement.
• Figure J - Enfoncer le loquet d’ouverture,
puis retirer le
réservoir en ligne droite.
Page 14

14
J
• Tenir le réservoir à poussière au-dessus
d’une poubelle ou d’un évier, puis retirer le
filtre pour vider le contenu du réservoir.
• Pour réinstaller le réservoir à poussière, le
remettre sur la poignée de manière à ce
qu’il s’enclenche en position.
AVERTISSEMENT :
Ne jamais utiliser l’appareil sans les filtres.
Une aspiration optimale des poussières ne
sera obtenue qu’avec des filtres propres.
• Figure K - (CHV1410L) Ce vide sont
équipés d’un préfiltre en plastique et d’un
filtre intérieur en tissu. Pour séparer le
filtre en tissu du filtre en plastique, tourner
ce dernier dans le sens horaire.
• Retirer le filtre intérieur en tissu, puis
secouer ou brosser légèrement les
deux filtres pour enlever la poussière en
surface.
K
• Figure L - Il est possible de laver les
réservoirs à poussière et les filtres à l’eau
savonneuse tiède. Les laisser sécher
avant de les remettre dans l’aspirateur.
L
• Figure M - Pour remplacer les filtres, faire
glisser le filtre extérieur en plastique sur le
filtre en tissu.
• Aligner les volets du filtre en plastique sur
les fentes du filtre en tissu, puis tourner
dans le sens antihoraire.
M
• Remettre les filtres dans le réservoir en
appuyant fermement pour s’assurer qu’ils
sont solidement fixés.
• Pour réinsérer le réservoir à poussière,
le déposer sur la poignée et l’enclencher
fermement en position jusqu’à ce qu’un
déclic se fasse entendre.
IMPORTANT: Le rendement optimum de
l’appareil ne sera obtenu qu’avec un filtre
propre et un réservoir à poussière vide. Si
la poussière commence à sortir de l’appareil
lorsqu’on l’éteint, ceci indique que le
réservoir est plein et qu’il faut le vider.
• Laver les filtres régulièrement à l’eau
savonneuse tiède. S’assurer qu’ils sont
complètement secs avant de les réutiliser.
Tenir le filtre propre pour optimiser le
rendement du produit.
• Il est très important que le filtre soit mis
correctement en place avant d’utiliser
l’appareil.
Buse/Accessoires
• Figure N - La buse de l’appareil comporte
un suceur plat intégré qu’il est possible de
déployer, comme indiqué à la gure N.
Tirer sur la rallonge jusqu’à ce qu’elle se
bloque en position.
Page 15

15
N
• Figure O - Une brosse est intégrée dans
la buse et peut être utilisée simplement
en la relevant.
O
• Figure P - Il est possible de faire pivoter
la buse pour accéder plus aisément aux
endroits difficiles d’accès. Pour cela,
appuyer sur le bouton indiqué sur la
figure P et faire pivoter la buse vers la
gauche ou vers la droite jusqu’à ce qu’elle
s’enclenche en émettant un déclic.
P
Remplacement des ltres
Les filtres doivent être remplacés tous
les 6 à 9 mois et chaque fois qu’ils sont
usés ou endommagés. Des filtres de
rechange sont offerts auprès du détaillant
BLACK+DECKER local.
• Retirer les anciens filtres selon les
indications ci-dessus.
• Installer les filtres neufs selon les
indications ci-dessus.
ENTRETIEN
N’utiliser qu’un détergent doux et un
chiffon humide pour nettoyer l’aspirateur.
Ne jamais laisser de liquide pénétrer dans
l’aspirateur et n’immerger aucune partie de
l’aspirateur dans un liquide.
IMPORTANT : Pour garantir la SÉCURITÉ
et la FIABILITÉ du produit, les réparations,
l’entretien et le réglage (autre que ceux
énumérés dans ce manuel) doivent être
réalisés par un centre de réparation
agréé ou tout autre centre de réparation
professionnel, et des pièces de rechange
identiques doivent être utilisées.
Dépannage
Si le produit ne fonctionne pas, vérifier les
éléments suivants :
• L’indicateur de charge est allumé lorsque
l’appareil est relié au chargeur.
• Le chargeur était correctement branché
lors de la charge (il est légèrement chaud
au toucher).
• Le cordon d’alimentation du chargeur
n’est pas endommagé et il est bien fixé.
• Le chargeur est branché dans une prise
électrique qui fonctionne.
• L’interrupteur est en position « Arrêt »
lorsqu’il est en charge.
Pour de l’aide avec l’outil, consulter notre
site Web www.blackanddecker.com pour
l’emplacement du centre de réparation le
plus près ou communiquer avec l’assistance
BLACK+DECKER au 1-800-544-6986.
ACCESSOIRES
Les accessoires recommandés pouvant
être utilisés avec l’appareil sont disponibles
auprès du détaillant local ou du centre de
réparation autorisé. Pour obtenir de l’aide
concernant les accessoires, composer le :
1 800 544-6986.
• Numéro du filtre : VF110.
AVERTISSEMENT :
L’utilisation de tout accessoire non
recommandé avec cet appareil pourrait
s’avérer dangereuse.
RETRAIT ET ÉLIMINATION
DES PILES
Ce produit utilise des piles Lithium Ion
rechargeables et recyclables.
Quand les piles ne tiennent plus la charge,
elles doivent être retirées de l’aspirateur
et recyclées. Elles ne doivent jamais être
incinérées ni compostées.
On peut apporter la pile à un centre de
réparation
BLACK+DECKER
ou un centre
autorisé. Certains détaillants locaux
participent également à un programme
national de recyclage. Communiquer avec
le détaillant de votre région pour les détails.
Le centre de réparation de
BLACK+DECKER
ou un centre autorisé prendront les
dispositions nécessaires pour recycler la
Page 16

16
pile épuisée si on la rapporte à un tel centre.
On peut aussi contacter la municipalité
pour obtenir des directives de mise au rebut
appropriées selon la ville.
Enlever le bloc-piles pour élimination :
1.) D’abord, avant d’essayer de démonter
le produit, l’allumer et le laisser allumé
jusqu’à ce que le moteur s’arrête
complètement, ce qui assure une
décharge complète des piles.
2.) Avec un tournevis à pointe cruciforme,
retirer les sept vis fixant les deux moitiés
du boîtier.
3.) Déposer le couvercle du boîtier de
l’ensemble.
4.) Débrancher tous les fils et retirer les
piles de leur boîtier.
5.) Éliminer le bloc-piles conformément aux
lignes directrices recommandées.
Le SCEAU SRPRC™
Le sceau SRPRC® (Société de
recyclage des piles rechargeables
du Canada) apposé sur une pile au
lithium-ion (ou un bloc-piles) indique
que les coûts de recyclage de ces derniers
en n d’utilisation ont déjà été réglés par
BLACK+DECKER. Dans certaines régions, la
mise au rebut ou aux ordures municipales des
piles au lithium-ion, est illégale ; le programme
de l’Appel à Recycler® constitue donc une
solution pratique et écologique.
Appel à Recycler Canada, Inc., en
collaboration avec BLACK+DECKER et
d’autres utilisateurs de piles, a mis sur
pied de programme aux États-Unis et au
Canada pour faciliter la collecte des piles au
lithium-ion usagées. Aidez-nous à protéger
l’environnement et à conserver nos ressources
naturelles en renvoyant les piles au lithium-ion
usagées à un centre de réparation autorisé
BLACK+DECKER ou chez votre détaillant an
qu’elles y soient recyclées. On peut en outre
se renseigner auprès d’un centre de recyclage
local pour connaître d’autres sites les
acceptant. SRPRC® est une marque déposée
de l’Appel à Recycler Canada, Inc.
INFORMATION SUR LES
RÉPARATIONS
Tous les centres de réparation
BLACK+DECKER sont dotés de personnel
qualifié en matière d’outillage électrique; ils
sont donc en mesure d’offrir à leur clientèle
un service efficace et fiable. Que ce soit pour
un avis technique, une réparation ou des
pièces de rechange authentiques installées
en usine, communiquer avec l’établissement
BLACK+DECKER le plus près de chez vous.
Pour trouver l’établissement de réparation de
votre région, composer le numéro suivant :
1 800 544-6986 ou consulter le site
www.blackanddecker.com
GARANTIE LIMITÉE DE DEUX
ANS
Black & Decker (É.-U.) Inc. garantit que le
produit est exempt de défauts de matériau
et de fabrication pendant deux(2) ans à
partir de la date d’achat, à condition que
le produit soit utilisé en milieu domestique.
La présente garantie limitée ne couvre pas
les défaillances provoquées par un abus,
un dommage accidentel ou des réparations
ou tentatives de réparations effectuées
par toute autre personne que le personnel
de BLACK+DECKER et de ses centres de
réparation agréés. Un produit défectueux
qui remplit les conditions stipulées par
la présente garantie sera remplacé ou
réparé sans frais d’une des deux façons
suivantes : La première façon consiste en
un échange chez le détaillant où le produit
a été acheté (à la condition que le magasin
soit un détaillant participant).Tout retour doit
se faire durant la période correspondant à
la politique d’échange du détaillant. Une
preuve d’achat peut être requise. Prière de
vérifier la politique de retour du détaillant
au sujet des délais impartis pour les retours
ou les échanges. La deuxième option est
d’apporter ou d’envoyer le produit (en port
payé) à un centre de réparation agréé ou à
un centre de réparation BLACK+DECKER
pour faire réparer ou échanger le produit,
à la discrétion de BLACK+DECKER. Une
preuve d’achat peut être requise. Les
centres de réparation de BLACK+DECKER
et les centres de réparation ou en ligne sur
www.blackanddecker.com. Cette garantie
ne s’applique pas aux accessoires. Cette
garantie accorde des droits légaux propres
au propriétaire de l’outil. Ce dernier pourrait
avoir d’autres droits selon l’État ou la
province qu’il habite. Pour toute question,
communiquer avec le directeur du centre
de réparation BLACK+DECKER le plus
près. Ce produit n’est pas destiné à un
usage commercial. L’usage commercial
de ce produit annule par conséquent
cette garantie. Toutes autres garanties,
expresses ou implicites, sont déclinées par
la présente.
REMPLACEMENT GRATUIT DES
ÉTIQUETTES D’AVERTISSEMENT : si
les étiquettes d’avertissement deviennent
illisibles ou sont manquantes, composer le
1 800 544-6986 pour en obtenir le
remplacement gratuit.
Imported by / Importé par
Black & Decker Canada Inc.
100 Central Ave.
Brockville (Ontario) K6V 5W6
Page 17

Visite www.BlackandDecker.com/NewOwner
para registrar su nuevo producto.
17
MANUAL DE
INSTRUCCIONSES
ASPIRADORA DE MANO INALÁMBRICA
CATÁLOGO N°
CHV1410L, CHV1410L32
Gracias por elegir BLACK+DECKER!
Visite www.BlackandDecker.com/NewOwner para registrar su nuevo producto.
LEA EL MANUAL ANTES DE DEVOLVER ESTE PRODUCTO POR
CUALQUIER MOTIVO:
Si tiene una consulta o algún inconveniente con su producto BLACK+DECKER,
visite http://www.blackanddecker.com/instantanswers
para obtener respuestas instantáneas las 24 horas del día.
Si no encuentra la respuesta o no tiene acceso a Internet, llame al 1-800-544-6986
de lunes a viernes de 8 a. m. a 5 p. m. hora del Este para hablar con un agente.
Cuando llame, tenga a mano el número de catálogo.
Para comprar un filtro de repuesto llame al 1-888-678-7278.
CONSERVE ESTE MANUAL PARA FUTURAS CONSULTAS.
SÓLO PARA USO DOMÉSTICO.
PAUTAS DE SEGURIDAD/DEFINICIONES
Es importante que lea y comprenda este manual. La información que contiene se
relaciona con la protección de SU SEGURIDAD y la PREVENCIÓN DE PROBLEMAS.
Los símbolos que siguen se utilizan para ayudarlo a reconocer esta información.
PELIGRO: indica una situación de peligro inminente que, si no se evita,
provocará la muerte o lesiones graves.
ADVERTENCIA: indica una situación de peligro potencial que, si no se evita,
provocará la muerte o lesiones graves.
PRECAUCIÓN: indica una situación de peligro potencial que, si no se evita,
provocará lesiones leves o moderadas.
PRECAUCIÓN:
utilizado sin el símbolo de alerta de seguridad indica una situación de
peligro potencial que, si no se evita, puede provocar daños en la propiedad.
Page 18

18
INSTRUCCIONES DE
SEGURIDAD IMPORTANTES
Al utilizar aparatos eléctricos, siempre
deben seguirse algunas precauciones
básicas, entre las que se incluyen:
LEA TODAS LAS INSTRUCCIONES
ANTES DE UTILIZAR ESTE
APARATO.
ADVERTENCIA: ea
todas las advertencias de seguridad y todas las
instrucciones. El incumplimiento de cualquiera de
las advertencias e instrucciones indicadas a
continuación puede provocar una descarga
eléctrica, un incendio y/o lesiones graves.
ADVERTENCIA:
Algunos tipos de polvo doméstico contienen
sustancias químicas, como el asbesto y el
plomo de las pinturas a base plomo,
reconocidas por el Estado de California
como causantes de cáncer, defectos de
nacimiento u otros problemas reproductivos.
ADVERTENCIA:
ara disminuir el riesgo de incendio,
descarga eléctrica o lesiones:
ADVERTENCIA:
Para reducir el riesgo de descarga
eléctrica, no utilice la unidad al aire libre ni
sobre superficies mojadas.
• No permita que se utilice como juguete.
Debe prestar especial atención cuando los
niños la utilicen o al utilizarla cerca de ellos.
• Utilícela únicamente como se describe en
este manual. Utilice únicamente aditamentos
recomendados por el fabricante.
• No utilice la unidad con el cable o el
enchufe dañados. Si el aparato no funciona
como corresponde, se ha caído, dañado,
dejado al aire libre o sumergido en agua,
devuélvalo a un centro de mantenimiento.
• No arrastre ni transporte la unidad por
el cable, no utilice el cable como un
mango, no cierre una puerta sobre el
cable ni tire de este cerca de bordes o
esquinas filosos. No pase sobre el cable
con el aparato funcionando. Mantenga el
cable alejado de superficies calientes.
• No desenchufe la unidad tirando del
cable. Para desenchufarla, sujete el
enchufe, no el cable.
• No manipule el enchufe con las manos
mojadas.
• No inserte ningún objeto en los orificios
de la unidad. No la utilice si alguno de
los orificios está bloqueado, manténgala
libre de polvo, pelusas, pelos y cualquier
cosa que pueda reducir el flujo de aire.
• Mantenga el cabello, las ropas holgadas,
los dedos y todas las partes del cuerpo
alejados de los orificios y de las piezas
en movimiento.
• Tenga mucho cuidado al limpiar en escaleras.
• No utilice la unidad para recoger líquidos
inflamables o combustibles, como
gasolina, ni la utilice en áreas en las que
estas sustancias puedan estar presentes.
• No recoja ninguna cosa que esté
quemándose o humeante, como
cigarrillos, fósforos o cenizas calientes.
• No utilice la unidad sin la bolsa para
polvo y/o los filtros en su lugar.
• Este aparato está diseñado para uso
doméstico solamente y no para uso
comercial o industrial.
• Peligro de descarga eléctrica. Para protegerse
contra el riesgo de descarga eléctrica, no
ponga la unidad en agua u otro líquido.
• No permita que el cable cuelgue sobre el
borde de una mesa o mostrador, o toque
superficies calientes. La unidad debe
colocarse o montarse lejos de fregaderos
y superficies calientes.
• Enchufe la unidad directamente en un
tomacorriente.
• Enchufe la unidad solo en un
tomacorriente estándar de automóvil.
• Desenchufe la unidad del tomacorriente
antes de realizar una limpieza o
mantenimiento de rutina.
• No mire por los orificios de ventilación
mientras la unidad esté encendida, ya
que a veces existe la posibilidad de que
pequeños residuos salgan disparados
por dichos orificios, especialmente
después de limpiar/reemplazar los filtros,
ya que los residuos dentro de la unidad
pueden desplazarse.
ADVERTENCIAS DE
SEGURIDAD ADICIONALES
a) Evite la puesta en marcha involuntaria.
Asegúrese de que el interruptor esté en
posición de apagado antes de conectar
con la batería, de levantar o transportar
el aparato. El transportar el aparato con
el dedo puesto en el interruptor o enchufar
el aparato con el interruptor encendido
puede provocar accidentes.
b) Recárguese sólo con el cargador
especificado por el fabricante. Un
cargador que sea adecuado para un tipo
de batería puede ocasionar un riesgo de
incendio si se utiliza con otra batería.
c) No utilice una batería o aparato que
esté dañado o modificado. Las baterías
dañadas o modificadas pueden funcionar
de forma imprevisible y ocasionar un
incendio, explosión o riesgo de lesión.
d) No exponga una batería o aparato
al fuego ni a una temperatura
excesiva. La exposición al fuego o a una
Page 19

19
temperatura superior a los 130°C (266°F)
puede ocasionar una explosión.
e) La reparación debe realizarse por
una persona calificada para realizar
reparaciones que use solamente
repuestos idénticos. Así se asegurará que
se mantenga la seguridad del producto.
ADVERTENCIA:
No intente modificar o reparar el aparato.
CONSERVE ESTE MANUAL
Símbolos
• La etiqueta de su herramienta puede incluir
los siguientes símbolos. Los símbolos y
sus definiciones son los siguientes:
V ................. voltios
A ................. amperios
Hz ............... hertz
W ................ vatios
min ..............minutos
o AC ......corriente alterna
o DC ....corriente directa
n
o ...............no velocidad sin carga
................Construcción Clase I
................
terminal a tierra
(mis à la terre)
...............
Construcción de clase II
.............. simbolo de alerta
.../min ..........revoluciones o minuto
seguridad
DESCRIPCIÓN DE LAS
FUNCIONES
1. Interruptor de encendido/apagado
2. Botón de liberación del depósito
3. Indicador de carga
4. Depósito para polvo
5. Boquilla
6. Botón de liberación de la boquilla
7. Botón para girar la boquilla
8. Herramienta extensible para ranuras
9. Cepillo desplegable
10. Filtro de tela
11. Soporte para montaje en la pared
CHV1410L
12. Prefiltro de plástico
13. Base del cargador
7
11
1
2
3
6
5
4
10
8
9
CHV1410L
13
12
Ensamblaje
ADVERTENCIA:
No intente modificar o reparar el aparato.
Montaje en la pared
Si lo desea, puede montar el producto en
la pared utilizando el soporte para montaje
en la pared, los tornillos y los anclajes
provistos. Para montar la aspiradora en la
pared, consulte las Figuras A, B, C y D.
• Figura A - Marque la ubicación de los
orificios para los tornillos (dentro del
alcance de un tomacorriente para cargar
la aspiradora mientras está en el soporte
de la pared).
• Figura B - Inserte el cable del cargador
dentro de la ranura curva del soporte
para montaje en la pared dejando
aproximadamente 203 a 227 mm (8 a 9
pulgadas) de excedente de cable como
se muestra.
A B
• Figura C - Cuelgue la aspiradora en la
pared colocando la abertura de la base de
ésta sobre los ganchos del soporte para
Page 20

20
montaje en la pared como se muestra en
la Figura C.
C
• Figura D - Inserte la clavija en el enchufe
de carga.
D
Carga de la batería (CHV1410L32)
ADVERTENCIA:
Para ser utilizado únicamente con el
cargador suministrado.
Cuando nuevas, las celdas recargables del
producto necesitan un tiempo mínimo de
carga de 9 horas para asegurar la potencia
completa.
Le sugerimos descargar el producto
completamente cuando se utilice por
primera vez ya que esto ayudará a que las
celdas carguen más rápidamente.
La carga está completa cuando
el indicador de carga se mantiene
encendido constantemente. El cargador
y la batería pueden dejarse conectados
indefinidamente con el LED encendido.
El LED cambiará a un estado intermitente
(cargando) cuando el cargador
ocasionalmente vuelve a completar la
carga de la batería.
• El interruptor debe estar en la posición de
apagado (“O”); el producto no se cargará
si éste está en alguna otra posición.
• Figura E - Inserte la clavija del cargador
en el enchufe de carga de la herramienta.
Enchufe el cargador en cualquier
tomacorriente estándar de 120 voltios, 60
Hz. El indicador de carga se encenderá.
E
Durante la carga, el cargador puede
calentarse; esto es perfectamente normal y
seguro. Es seguro dejar el aparato conectado
al cargador indefinidamente. El cargador
reduce automáticamente el consumo de
energía cuando la carga está completa.
ADVERTENCIA:
No cargue la batería a temperaturas
ambientes inferiores 4°C (39°F) o superiores
a 40°C (104°F).
Carga de la batería (CHV1410L)
ADVERTENCIA:
No cargue la batería a temperaturas
ambientales inferiores a 4 °C (39 °F) o
superiores a 40 °C (104 °F).
La carga está completa cuando
el indicador de carga se mantiene
encendido constantemente. El cargador
y la batería pueden dejarse conectados
indefinidamente con el LED encendido.
El LED cambiará a un estado intermitente
(cargando) cuando el cargador
ocasionalmente vuelve a completar la
carga de la batería.
• Cargue las baterías descargadas en
el lapso de 1 semana. La vida útil de la
batería se acortará enormemente si ésta
se guarda descargada.
• Coloque el aparato en la base de carga
como se muestra.
• Enchufe el cargador. El indicador de
carga destellará de manera continua
(lentamente).
• Deje que el aparato se cargue.
F
Page 21

21
Durante la carga, el cargador puede
calentarse; esto es perfectamente normal y
seguro. El indicador de carga permanecerá
encendido mientras el aparato esté
conectado al cargador enchufado. Puede
mantenerse en carga indefinidamente sin
ocasionar daños ni peligro. No es posible
“sobrecargar” las celdas de la batería con el
cargador provisto.
Diagnóstico de la batería
Si el aparato detecta una batería débil,
el indicador de carga destellará en forma
rápida al oprimir el botón de encendido/
apagado (1). Haga lo siguiente:
• Coloque el aparato en la base de carga.
• Enchufe el cargador.
• Deje que el aparato se cargue.
Si el aparato detecta una batería dañada,
el indicador de carga destellará en forma
rápida cuando el aparato se encuentre en la
base del cargador. Haga lo siguiente:
• Lleve el aparato y el cargador a una
instalación de mantenimiento autorizada
para que los sometan a pruebas.
Nota: Puede tardar hasta 60 minutos para
determinar que la batería está defectuosa.
Si la batería está muy caliente o muy fría,
el LED emitirá destellos rápidos y lentos,
con un destello en cada velocidad, de
manera repetida.
Uso
Encendido y apagado
• Figura G - Para encender, deslice el
interruptor de encendido/apagado hacia
adelante (es decir, “O”= apagado, “I” =
encendido).
• Para apagar, deslice el interruptor hacia
atrás.
• Vuelva a colocar el producto en el
cargador inmediatamente después
de utilizarlo para que esté totalmente
cargado y listo para el próximo uso.
Asegúrese de que el producto esté bien
conectado con el enchufe del cargador.
G
Limpieza y vaciado del producto
ADVERTENCIA:
Peligro de eyección/para las vías
respiratorias: Nunca utilice la aspiradora
sin su filtro.
NOTA: El filtro es reutilizable, no lo
confunda con una bolsa recolectora de
polvo desechable y no lo tire al vaciar el
producto. Le recomendamos reemplazar el
filtro cada 6 a 9 meses según la frecuencia
de uso.
Existen dos métodos de limpieza para el
depósito, un método de vaciado rápido y un
método de limpieza minuciosa.
Para un vaciado rápido (Figuras H e I)
• Figura H - Oprima ambos botones
de liberación de la boquilla que se
encuentran en los costados de ésta y
retírela tirando de ella en forma recta.
• Figura I - Vacíe el polvo del depósito.
• Para una limpieza más minuciosa, quite
el depósito como se describe en las
Figuras J - M.
H
I
Extracción del depósito para
polvo y los filtros (Figuras J-M)
ADVERTENCIA:
Los filtros son reutilizables y deben
limpiarse periódicamente.
•
Figura J -
Presione el cerrojo de
liberación y extraiga el depósito para
polvo halándolo en línea recta.
Page 22

22
J
• Mientras sostiene el depósito para polvo
sobre una papelera o fregadero, extraiga
el filtro para vaciar el contenido del
depósito.
• Para reinstalar el depósito para polvo,
vuelva a colocarlo sobre el mango hasta
que haga “clic” y encaje firmemente en su
posición.
ADVERTENCIA:
Nunca utilice el aparato sin los filtros. Sólo
se logrará una recolección de polvo óptima
con filtros limpios.
• Figura K
(CHV1410L)
- Este vacío tiene
un prefiltro de plástico y un filtro interior de
tela. Para separar el filtro de tela del filtro
de plástico, gire el filtro de plástico hacia la
derecha.
• Retire el filtro interior de tela y sacuda o
cepille suavemente todo polvo suelto de
ambos filtros.
K
• Figura L - Los depósitos para polvo y los
filtros se pueden lavar en agua jabonosa
tibia. Permita que se sequen antes de
volver a colocarlos en la aspiradora.
L
• Figura M - Para reemplazar los filtros,
deslice el filtro exterior de plástico sobre
el filtro de tela.
• Alinee las aletas del filtro de plástico con
las ranuras del filtro de tela y gírelo hacia
la izquierda.
M
• Vuelva a colocar los filtros en el depósito
empujando firmemente para asegurar un
ajuste seguro.
• Para reinstalar el depósito para polvo,
vuelva a colocarlo sobre el mango hasta
que haga “clic” y encaja firmemente en su
posición.
IMPORTANTE: Sólo se obtendrá una
máxima recolección de polvo con un filtro
limpio y un depósito para polvo vacío. Si
el polvo comienza a caer del producto
después de apagado, esto indica que el
depósito está lleno y debe vaciarse.
• Lave los filtros periódicamente utilizando
agua jabonosa tibia y asegúrese de que
estén completamente secos antes de
volver a utilizarlos. Mientras más limpio
esté el filtro, mejor funcionará el producto.
• Es muy importante que el filtro se
encuentre en la posición correcta antes
del uso.
Boquilla/Accesorios
• Figura N - La boquilla tiene incorporada
una herramienta para ranuras que se
puede extender como se muestra en la
Figura N, jalando de la pieza extensible
hasta que se bloquee en su lugar.
Page 23

23
N
• Figura O - La boquilla tiene incorporado
un accesorio de cepillo y se puede voltear
hacia arriba para el uso.
O
• Figura P - La boquilla se puede girar para
tener mejor acceso en lugares estrechos.
Para girar la boquilla, oprima el botón
que se muestra en la Figura P y gire la
boquilla hacia la izquierda o la derecha
hasta que encaja en su lugar.
P
Reemplazo de los ltros
Los filtros se deben reemplazar cada
6 a 9 meses y cuando estén gastados
o dañados. Los filtros de repuesto
pueden encontrarse en su distribuidor
BLACK+DECKER :
• Retire los filtros viejos como se describió
anteriormente.
• Coloque los filtros nuevos como se
describió anteriormente.
MANTENIMIENTO
Para limpiar la aspiradora, utilice solo
jabón suave y un paño húmedo. Nunca
permita que penetre líquido dentro de la
aspiradora; nunca sumerja ninguna pieza
de la aspiradora en un líquido.
IMPORTANTE: Para garantizar la
SEGURIDAD y CONFIABILIDAD
del producto, las reparaciones, el
mantenimiento y el ajuste (que no sean
aquellos indicados en este manual)
deben ser realizados por los centros
de mantenimiento autorizados u otras
organizaciones de mantenimiento
calicadas, siempre utilizando piezas de
repuesto idénticas.
Detección de problemas
Si el producto no funciona, verifique lo
siguiente:
• La luz indicadora de carga está encendida
cuando la unidad se conecta al cargador.
• El cargador se enchufó correctamente
para la recarga. (Se siente ligeramente
tibio al tacto).
• El cable del cargador no está dañado y
está conectado correctamente.
• El cargador está enchufado en un
tomacorriente eléctrico que funciona.
• El interruptor está en la posición “OFF”
(Apagado) al cargar.
Solamente para Propósitos de México
Para conocer la ubicación del centro de
servicio más cercano a fin de recibir ayuda
con su producto, visite nuestro sitio Web
www.blackanddecker.com.mx o llame a
la línea de ayuda BLACK & DECKER al
01 800 847 2309/01 800 847 2312.
ACCESORIOS
Los accesorios recomendados para uso
con el artefacto están disponibles en su
distribuidor o centro de mantenimiento
autorizado local. Si necesita ayuda con
respecto a los accesorios, llame al:
1-800-544-6986.
• Número de accesorio de filtro VF110.
ADVERTENCIA:
El empleo de cualquier accesorio no
recomendado para uso con este artefacto
puede ser peligroso
Page 24

24
REMOCIÓN Y ELIMINACIÓN
DE LA BATERÍA
Este producto utiliza baterías de iones
de litio recargables y reciclables. Cuando
las baterías ya no mantengan la carga,
es necesario retirarlas de la aspiradora y
reciclarlas. No se deben incinerar ni someter
a un proceso de compostaje.
Para eliminar la batería, puede llevarla a un
Centro de mantenimiento
BLACK+DECKER
propio o autorizado. Algunos comercios
minoristas locales participan de un
programa nacional de reciclado (ver “Sello
RBRCTM”). Llame a su comercio minorista
local para obtener más información. Si trae
las baterías a un Centro de mantenimiento
BLACK+DECKER
propio o autorizado, el
Centro se ocupará de reciclarlas. O bien,
consulte en la municipalidad de su localidad
para conocer las instrucciones de desecho
adecuadas de su ciudad o localidad.
Remoción y desecho de baterías:
1.) Primero, antes de intentar desarmar
el producto, enciéndalo y póngalo en
funcionamiento hasta que el motor
se haya detenido completamente,
asegurándose de que las baterías se
descarguen completamente.
2.) Con un destornillador Phillips, retire los
siete tornillos que fijan las dos mitades
de la caja.
3.) Levante la cubierta de la batería del
montaje.
4.) Retire todas las conexiones de los
conductores y quite las baterías de la
cubierta.
5.) Retire el paquete de baterías y deséchelo
según las pautas recomendadas.
EL SELLO RBRC™
El sello RBRC® (Rechargeable
Battery Recycling Corporation)
en las baterías (ounidades de
batería) de litio indica que el costo
de reciclaje de estas baterías (o unidades de
batería) al llegar al nal de su vida de servicio
ya ha sido pagado por BLACK+DECKER. En
algunas áreas, es ilegal depositar baterías
de iones de litio gastadas en la basura o la
corriente de residuos sólidos urbanos; el
programa Call 2 Recycle® proporciona una
alternativa ecológica.
Call 2 Recycle, Inc., en cooperación con
BLACK+DECKER y otros usuarios de
baterías, han establecido programas en
los Estados Unidos y Canadá para facilitar
la recolección de baterías de iones de litio
gastadas. Al llevar sus baterías de iones
de litio gastadas a un centro de servicio
autorizado por BLACK+DECKER o al
minorista local para que sean recicladas,
ayuda a proteger el medio ambiente y a
conservar recursos naturales. También
puede comunicarse con el centro de
reciclaje de su localidad para mayor
información sobre dónde llevar sus baterías
gastadas. RBRC® es una marca comercial
registrada de Call 2 Recycle, Inc.
INFORMACIÓN DE
MANTENIMIENT
Todos los Centros de servicio de
BLACK+DECKERcuentan con personal
altamente capacitado dispuesto a brindar
a todos los clientes un servicio eficiente y
confiable en la reparación de herramientas
eléctricas. Si necesita consejo técnico,
reparaciones o piezas de repuesto originales
de fábrica, póngase en contacto con el centro
de servicio de BLACK+DECKER más cercano
a su domicilio. Para ubicar su centro de
servicio local, llame al 1-800-544-6986 o visite
nuestro sitio www.blackanddecker.com.
Page 25

25
GARANTÍA LIMITADA DE DOS
AÑOS
Black & Decker (U.S.) Inc. garantiza que
este producto está libre de defectos de
material o mano de obra durante un período
de dos (2) años desde la fecha de compra,
siempre y cuando el producto se utilice en
un entorno doméstico. Esta garantía limitada
no cubre contra fallas debidas a mal uso,
daño accidental o cuando se han realizado o
intentado reparaciones por parte de cualquier
otra persona ajena a BLACK+DECKER y
sus centros de mantenimiento autorizados.
Un producto defectuoso que cumple con
las condiciones de la garantía establecidas
en el presente documento será remplazado
o reparado sin costo de una dos maneras:
La primera, que únicamente dará lugar
a intercambios, consiste en devolver el
producto al comerciante minorista donde
fue comprado (siempre y cuando la tienda
sea un comerciante minorista participante).
Las devoluciones deben realizarse dentro
del período establecido en la política para
intercambios del comerciante minorista.
Es posible que se requiera el comprobante
de compra. Consulte al comerciante
minorista sobre su política específica de
devoluciones con respecto a los límites de
tiempo para devoluciones o intercambios.
La segunda opción es llevar o enviar
(pagado por adelantado) el producto a un
centro de mantenimiento de propiedad
o con autorización de BLACK+DECKER
para su reparación o remplazo a discreción
de BLACK+DECKER. Es posible que se
requiera un comprobante de compra. Los
centros de mantenimiento de propiedad o con
autorización de BLACK+DECKER en línea
en www.blackanddecker.com. Esta garantía
no se aplica a los accesorios. Esta garantía
le otorga derechos legales específicos y
es posible que tenga otros derechos que
varían de un estado a otro. En caso de que
tenga alguna pregunta, comuníquese con
el gerente del centro de mantenimiento de
BLACK+DECKER más cercano a usted.
Este producto no está diseñado para uso
comercial y, en consecuencia, dicho uso
comercial de este producto anulará la
garantía. Por medio del presente documento,
se declina la responsabilidad de todas las
demás garantías, explícitas o implícitas.
AMÉRICA LATINA: Esta garantía no se
aplica a productos vendidos en América
Latina. Para los productos que se venden en
América Latina, consulte la información de
garantía específica del país contenida en el
empaque, llame a la compañía local o visite
el sitio web para obtener dicha información.
Page 26

2626
· GARANTÍA BLACK+DECKER · BLACK+DECKER WARRANTY
. SOLAMENTE PARA PROPOSITOS DE MEXICO
Distributor Name · Sello firma del distribuidor
Date of purchase · Fecha de compra Invoice No. · No. de factura
PRODUCT INFOMATION · IDENTIFICACIÓN DEL PRODUCTO
Cat. No. · Catalogo ó Modelo Serial Number · No. de serie
Name · Nombre Last Name · Apellido
Address · Dirección
City · Ciudad State · Estado
Postal Code · Código Postal Country · País
Telephone · No. Teléfono
2 AÑOS DE GARANTIA
Este producto cuenta con dos años de garantía a partir de la fecha de compra contra
cualquier defecto de su funcionamiento, así como cualquier falla debido a materiales
empleados para su fabricación ó mano de obra defectuosa.
Nuestra garantía incluye la reparación o reposición del producto y/o componentes sin
cargo alguno para el cliente incluyendo la mano de obra, esta incluye los gastos de
trasportación erogados para lograr cumplimiento de esta garantía en los domicilios
diversos señalados.
Para hacer efectiva esta garantía deberá presentar su herramienta y esta póliza sellada
por el establecimiento comercial donde se adquirió el producto.
Nos comprometemos a entregar el producto en un lapso no mayor a 30 días hábiles
contados a partir de la fecha de recepción del mismo en nuestros talleres de servicio
autorizados.
ESTA GARANTIA NO APLICA CUANDO:
El producto se hubiese utilizado en condiciones distintas a las normales.
El producto no hubiese sido operado de acuerdo con el instructivo de uso que se
acompaña.
El producto hubiese sido alterado o reparado por personas no autorizadas por
nosotros.
Importador: Black & Decker S.A. de .C.V
Bosque de Cidros Acceso Radiatas No.42
3ra.Seccion de Bosques de las lomas
C.P.05120, Mexico, D.F. Tel: (01 55) 5326 7100
Page 27

2727
BLACK & DECKER S.A. DE C.V.
BOSQUES DE CIDROS ACCESO RADIATAS NO. 42
COL. BOSQUES DE LAS LOMAS.
05120 MÉXICO, D.F
TEL. (01 55) 5326 7100
01 800 847 2309/01 800 847 2312
Grupo Realsa en herramientas,
S.A. de C.V.
Súper Manzana 69 MZ.01 Lote 30
(Av. Torcasita)
Col. Puerto Juárez
Cancún, Quintana Roo
Tel. 01 998 884 72 27
Ferre Pat de Puebla, S.A. de C.V.
16 de Septiembre No. 6149
Col. El Cerrito
Puebla, Puebla
Tel. 01 222 264 12 12
Ferre Pat de Puebla, S.A. de C.V.
Ejército Mexicano No. 15
Col. Ejido 1ro. de Mayo
Boca del Rio, Veracruz
Tel. 01 229 167 89 89
Servicio de Fabrica BLACK+DECKER,
S.A. de C.V.
Lázaro Cardenas No. 18
Col. Obrera
Distrito Federal
Tel. 55 88 95 02
Representaciones Industriales Robles,
S.A. de C.V.
Tezozomoc No. 89
Col. La Preciosa
Distrito Federal
Tel. 55 61 86 82
Gpo. Comercial de Htas. y Refacciones
de Occidente, S.A. de C.V.
Av. La Paz No. 1779
Col. Americana, S. Juaréz
Guadalajara, Jalisco
Tel. 01 33 38 25 69 78
Herramientas y Equipos Profesionales
Av. Colón 2915 Ote.
Col. Francisco I. Madero
Monterrey, Nvo. León
Tel. 01 81 83 54 60 06
Htas. Portátiles de Chihuahua,
S.A. de C.V.
Av. Universidad No. 2903
Col. Fracc. Universidad
Chihuahua, Chihuahua
Tel. 01 614 413 64 04
Fernando González Armenta
Bolivia No. 605
Col. Felipe Carrillo Puerto
Cd. Madero, Tamaulipas
Tel. 01 833 221 34 50
Perfiles y Herramientas de Morelia
Gertrudis Bocanegra No. 898
Col. Ventura Puente
Morelia, Michoacán
Tel. 01 443 313 85 50
Enrique Robles
Av. de la Solidaridad No. 12713
Col. La Pradera
Irapuato, Guanajuato
Tel. 01 462 626 67 39
Hernández Martinez Jeanette
Prolongación Corregidora Nte. No. 1104
Col. Arboledas
Queretaro, Qro.
Tel. 01 442 245 25 80
SOLAMENTE PARA PROPOSITOS DE MEXICO
PARA OTRAS LOCALIDADES LLAME AL 01 800 847 2309 o 01 800 847 2312.
Page 28

2828
Cat. No. CHV1410L, CHV1410L32
Form No. 90632668 December 2015
Copyright© 2015 BLACK+DECKER Printed in
China
 Loading...