

Page 1

FP550/600
1
Page 2

English 7
Italiano 12
EППЛУИО· 18
Türkçe 24
Copyright Black & Decker
2
Page 3
4
3
5
2
1
3
0
P
A
U
T
O
C
L
E
1
2
A
N
8
11
4
9
5
10
6
7
BA
14
C
15
12
13
D
3
Page 4
16
17
18
19
20
FE
21
22
G
4
23
H
Page 5
I
J
5
Page 6
K
M
6
L
Page 7
FOOD PROCESSOR FP550/FP600
Thank you for choosing Black & Decker. We hope
that you will enjoy using this product for many years.
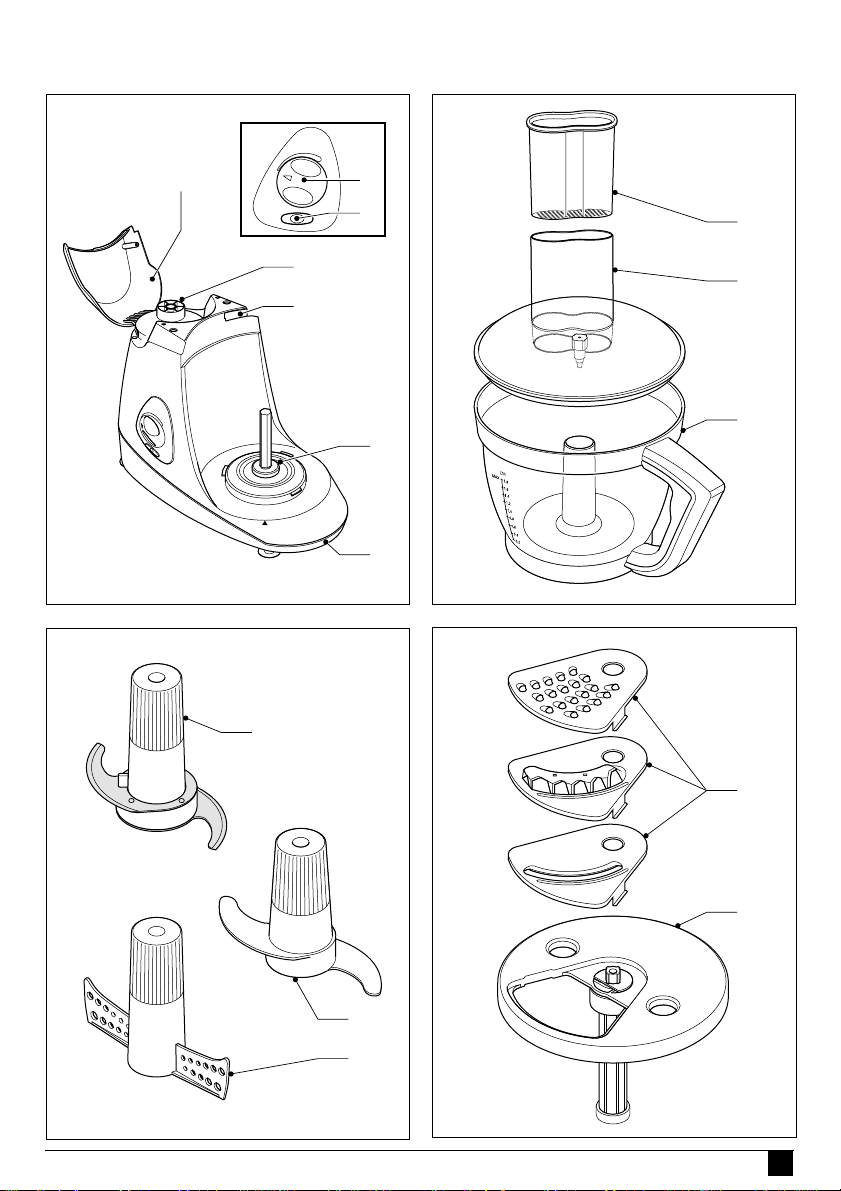
OVERVIEW (fig. A-G)
1. Electronic speed selector
2. Auto clean button
3. Upper power outlet hood
4. Upper power outlet
5. Lid locking slot
6. Lower power outlet
7. Motor unit
8. Food pusher with measuring section
9. Lid with feeder tube
10.Processor bowl
11.Metal blade
12.Plastic mixing blade
13.Whisk attachment
14.Grating/slicing discs
15.Disc holder
16.Large juicing cone
17.Small juicing cone
18.Juicer filter basket
19.Lid (FP600 only)
20.Grinding mill (FP600 only)
21.Lid stopper (FP600 only)
22.Lid (FP600 only)
23.Blender attachment (FP600 only)
EC DECLARATION OF CONFORMITY
FP550/FP600
Black & Decker declares that these
products conform to:
98/37/EC, 89/336/EEC, 73/23/EEC,
EN 55014, EN 60335, EN 61000
LpA(sound pressure) dB(A) 77
Hand/arm weighted vibration value m/s2< 2.5
Director of Consumer Engineering
Spennymoor, County Durham DL16 6JG,
INTENDED USE
Your Black & Decker food processor has been
designed for preparing food and beverage
ingredients as described in this manual.
This product is intended for household use only.
WARNING SYMBOLS
The following symbols are used in this manual:
Denotes risk of personal injury or damage
to the product in case of non-observance
of the instructions in this manual.
Denotes risk of electric shock.
IMPORTANT SAFEGUARDS
◆ Warning! When using mains-powered
appliances, basic safety precautions, including
the following, should always be followed to
reduce the risk of fire, electric shock and
personal injury.
◆ Read this entire manual carefully before using
the appliance.
◆ The intended use is described in this manual.
The use of any accessory or attachment or the
performance of any operation with this
appliance other than those recommended in
this instruction manual may present a risk of
personal injury.
◆ Retain this manual for future reference.
Kevin Hewitt
United Kingdom
ENGLISH
7
Page 8

ENGLISH
Using your appliance
◆ Do not touch moving parts.
◆ Make sure that the appliance is switched off
before connecting to or disconnecting from
the power supply.
◆ Handle the blades carefully; they are extremely
sharp.
◆ Remove the blades before emptying the bowl
of its contents.
◆ Always use the pusher to push food down the
feeder tube; never use your fingers, a fork,
a spoon, a knife or any other utensil.
◆ Never operate the appliance while empty.
◆ Always take care when using the appliance.
◆ Never pull the power supply cord to
disconnect the plug from the socket. Keep the
power supply cord away from heat, oil and
sharp edges. Do not allow the power supply
cord to hang over the edge of your work top
or table.
◆ Do not place the appliance on or near heat
sources or in a heated oven.
◆ Do not use the appliance near flammable or
explosive materials.
◆ Do not use the appliance outdoors.
◆ Always protect the motor unit from water or
excessive humidity.
◆ Operate the appliance only with dry hands.
◆ If the power supply cord is damaged during
use, disconnect the appliance from the power
supply immediately. Do not touch the power
supply cord before disconnecting from the
power supply.
◆ Disconnect the appliance from the power
supply when not in use, before fitting or
removing parts and before cleaning.
◆ Always place the appliance on a level surface
with adequate free space on all sides.
Safety of others
◆ Do not allow children or any person unfamiliar
with these instructions to use the appliance.
◆ Do not allow children or animals to come near
the work area or to touch the appliance or
power supply cord. Close supervision is
necessary when the appliance is used near
children.
8
After use
◆ Switch the appliance off and remove the plug
from the socket before leaving it unattended
and before changing, cleaning or inspecting
any parts of the appliance.
◆ When not in use, the appliance should be stored
in a dry place. Children should not have access
to stored appliances.
Inspection and repairs
◆ Before use, check the appliance for damaged
or defective parts. Check for breakage of parts
and any other conditions that may affect its
operation.
◆ Do not use the appliance if any part is damaged
or defective.
◆ Have any damaged or defective parts repaired
or replaced by an authorised repair agent.
◆ Before use, check the power supply cord for
signs of damage, ageing and wear.
◆ Do not use the appliance if the power supply
cord or mains plug is damaged or defective.
◆ If the power supply cord or mains plug is
damaged or defective it must be repaired by
an authorised repair agent in order to avoid a
hazard. Do not cut the power supply cord and
do not attempt to repair it yourself.
◆ Never attempt to remove or replace any parts
other than those specified in this manual.
ELECTRICAL SAFETY
◆ Before use, check that the mains voltage
corresponds to the voltage on the rating plate.
This appliance is double insulated in
accordance with EN 60335; therefore no
earth wire is required.
To avoid the risk of electric shock, do not
immerse the cord, plug or motor unit in
water or other liquid.
ASSEMBLY
Processor bowl (fig. H)
The processor bowl can be used to mix, blend,
chop or knead large quantities of food.
◆ Close the upper power outlet hood.
Page 9
ENGLISH
◆ Place the bowl onto the lower power outlet so
that the unlocked padlock symbol aligns with
the arrow. Rotate the handle to the right until
the bowl is locked into position and the locked
padlock symbol aligns with the arrow.
◆ Slide the required accessory onto the spindle.
◆ Place the ingredients into the bowl.
◆ Place the lid onto the bowl with the feeder
tube to the right of the lid locking slot.
◆ Rotate the lid counter-clockwise, while holding
down the upper power outlet hood, until the
lid locks into the lid locking slot.
The food processor will not operate if the lid is not
correctly locked into position.
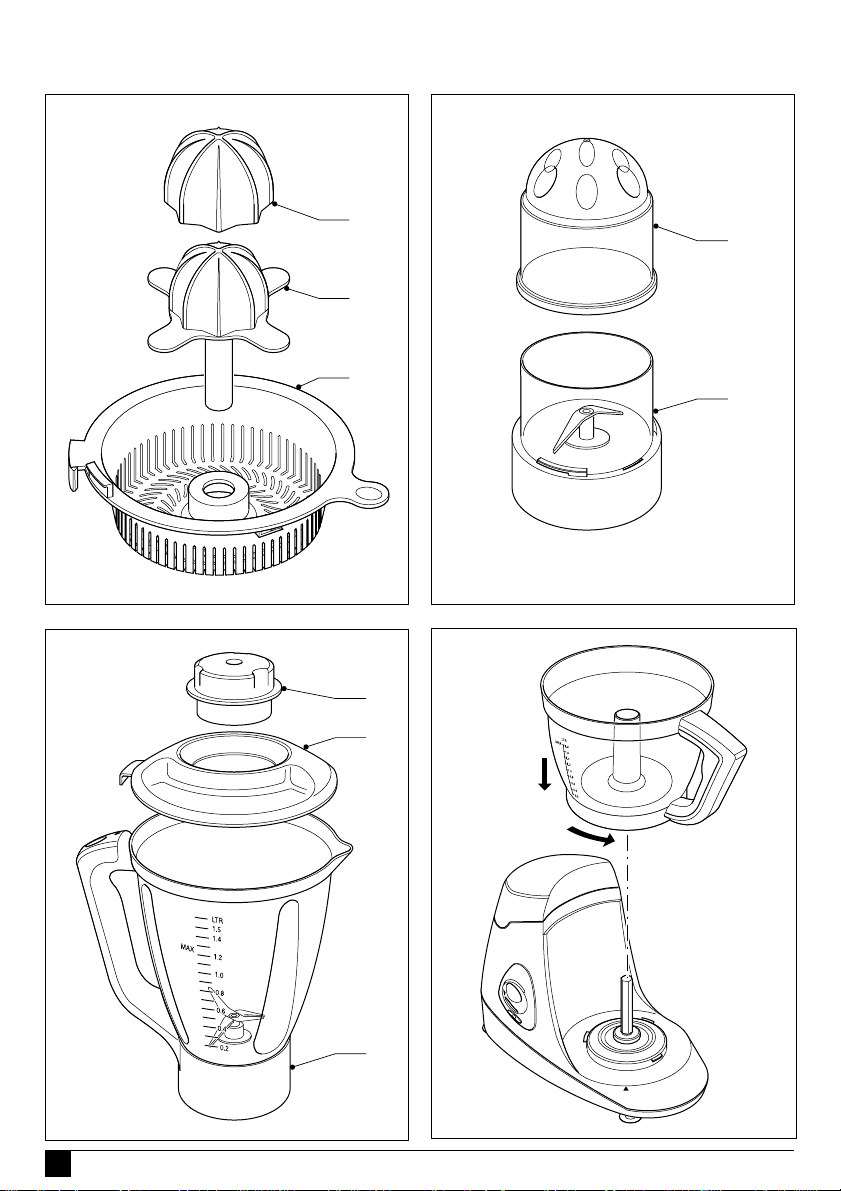
Citrus juicer (fig. I)
◆ Check that the upper power outlet hood is
closed.
◆ Place the bowl onto the lower power outlet so
that the unlocked padlock symbol aligns with
the arrow. Rotate the handle to the right until
the bowl is locked into position and the locked
padlock symbol aligns with the arrow.
◆ Place the filter basket onto the bowl with the
locking spur on the basket to the right of lid
locking slot.
◆ Rotate the basket counter-clockwise until the
spur locks into the locking slot.
◆ Fit the cone into the hole in the filter basket.
◆ For large pieces of fruit, place the large cone
over the smaller cone.
Blender attachment (fig. J) (FP600 only)
Use the blender attachment for fine blending of
raw ingredients and blending of cooked
ingredients to a very smooth consistency.
◆ Raise the upper power outlet hood.
◆ Place the ingredients into the blender jug.
◆ Lock the lid by aligning the locked padlock
symbol with the arrow. The spur on the lid
must be fit into the locking slot on the top of
the jug’s handle.
◆ If the lid is not properly positioned, the appliance
will not operate.
◆ Once the blender jug and lid are locked into
place on the motor unit, the lid cannot be
removed.
◆ Place the blender onto the upper power outlet
with the unlocked padlock symbol aligned with
the arrow. Rotate the jug counterclockwise so
that the locked padlock symbol and the arrow
are aligned. The jug is now in the proper
position.
◆ To remove the jug, rotate clockwise.
Grinding attachment (fig. K) (FP600 only)
Use the grinding mill for fine chopping or grinding
of small pieces. The grinding mill is ideal for nuts,
coffee, herbs and spices.
◆ Raise the upper power outlet hood.
◆ Place the ingredients in the mill and lock the
lid into position.
◆ Place the grinding mill onto the upper power
outlet with the unlocked padlock symbol aligned
with the arrow.
◆ Turn the mill counter-clockwise until the locked
padlock symbol is aligned with the arrow.
The mill is now in position.
◆ To remove, turn the mill clockwise
USE
Do not run the appliance for periods in
excess of 3 minutes (whisk, citrus juicer) or
2 minutes (other attachments).
Operating the appliance
◆ Fit the desired attachment.
◆ Plug the appliance in.
◆ Switch the appliance on: Rotate the dial to
select the desired speed setting (1- 5).
The setting can be varied during processing.
For greater control, rotate the dial to the P position
for pulse control, which will permit intermittent
bursts of power.
◆ Switch the appliance off: Rotate the dial to the
‘0’ position.
Please be aware of the following safety
features when operating the appliance:
◆ When using the lower power outlet: The upper
power outlet hood must be locked into place
and the processor lid must be locked into the
lid locking slot.
9
Page 10

ENGLISH
◆ When using the upper power outlet (FP600 only):
The processor bowl must be in place with the
lid locked while using the blender or the
grinding mill.
Processor bowl
The processor bowl can be used with the
following accessories:
◆ Chopping blade
◆ Grating/slicing discs
◆ Whisk attachment
◆ Mixing blade
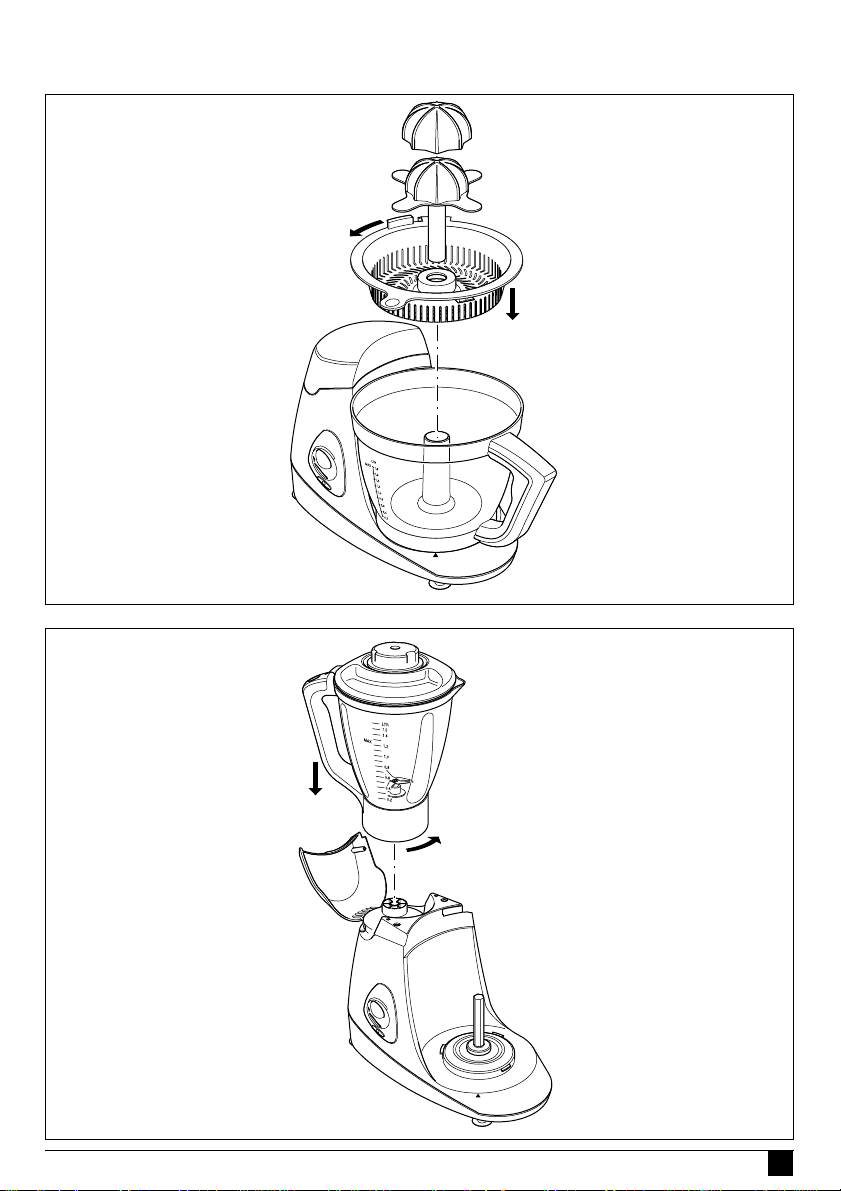
Chopping (fig. L)
◆ Use the metal chopping blade.
◆ Set the speed to 5. For greater control, use the
pulse button.
◆ You can chop up to 500 g of raw or cooked
meat, fish, vegetables, etc.
Blending (fig. L)
◆ Use the metal chopping blade.
◆ Select a speed between 3 and 5.
◆ You can blend up to 1 litre of soup,
stewed fruit, etc.
Mixing/kneading (fig. L)
◆ Use the plastic mixing blade.
◆ Set the speed to 5.
◆ You can mix up to 1 kg of pastry, dough,
cake mixture, batter, biscuit mix, etc.
Beating & whisking (fig. L)
◆ Use the whisk attachment.
◆ Select a speed between 1 and 5 depending on
the consistency of the food.
◆ Never use the whisk attachment to knead
dough or to mix cake mixtures.
◆ You can use the whisk attachment to prepare
up to 0.5 litres of mayonnaise, sauce, whipped
cream, etc.
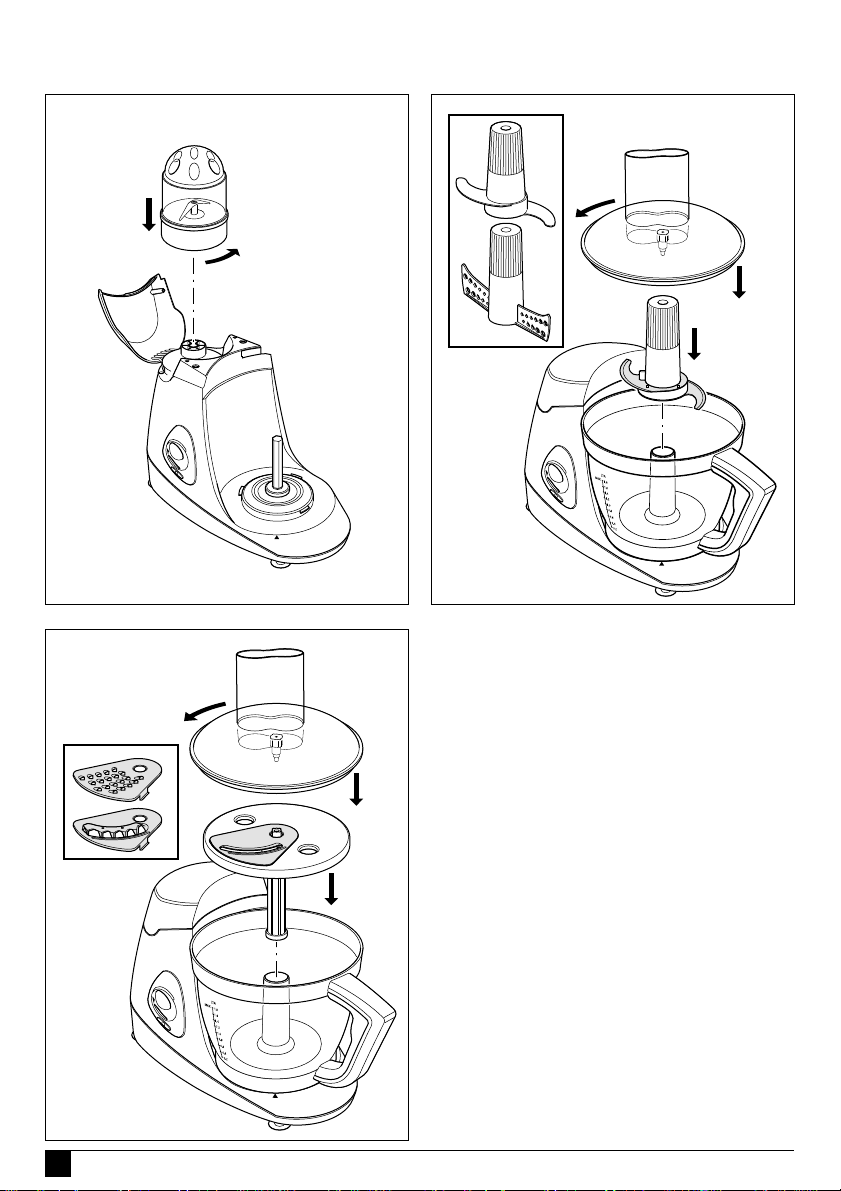
Grating & slicing (fig. M)
◆ Select the required slicing disc.
◆ Fit the slicing disc into the disc holder.
◆ Use the pusher to feed food into the feeder
tube.
◆ Select a speed between 2 and 5 to start.
10
◆ The slicing/grating discs can slice and grate
vegetables up to 500 g.
Citrus juicer
◆ Cut the citrus fruit in half across the middle
(not end to end).
◆ Place one half of a citrus fruit onto the cone.
◆ Set the speed to 1 to start the machine.
You can press up to 1 litre of juice before emptying
the bowl.
Blender attachment (FP600 only)
◆ Select a speed between 1 and 5 to start
blending. For greater control, use the pulse
button.
◆ During blending, ingredients can be added
using the slot in the lid stopper.
◆ Never fill the blender jug with boiling liquid.
You can blend up to 1.2 litres of extra smooth
soup, sauce, cream, fruit purée, milkshake,
cocktail, or batter.
Grinding attachment (FP600 only)
◆ Set the speed to 5 to start the appliance.
◆ For greater control use the pulse button.
◆ You can chop or grind up to 100 g of
ingredients.
Autoclean function
◆ Pour warm, soapy water into the blender jug,
grinding mill or processor bowl.
◆ Secure the lid and locate the jug, mill or bowl
onto the correct power outlet.
◆ Press the Autoclean button several times.
◆ Once the unit is clean, pour out the soapy
water and rinse thoroughly.
CLEANING AND MAINTENANCE
Before cleaning and maintenance, switch
the appliance off and remove the plug
from the socket.
◆ Remove the bowl by turning it clockwise.
◆ Wash and dry the accessories (they are all
dishwasher proof except for the whisk).
Page 11

ENGLISH
◆ If the accessories have become discoloured by
food (carrots, oranges, etc.) rub gently with a
cloth dipped in cooking oil and then wash as
normal.
Do not place the motor unit in or near
running water. Wipe with a damp cloth.
TROUBLESHOOTING
◆ Check that the appliance is properly plugged in.
◆ Check that the accessories are properly locked
onto the motor unit.
◆ Check that the lids are secured properly.
◆ When using the processor bowl, check that the
upper power outlet hood is properly closed.
◆ When using the upper power outlet (FP600
only), check that the processor bowl and lid are
correctly locked into position.
PROTECTING THE ENVIRONMENT
Black & Decker provides a facility for
recycling Black & Decker products once
they have reached the end of their
working life. This service is provided free
of charge. To take advantage of this
service please return your product to any
authorised repair agent who will collect
them on our behalf.
If a Black & Decker product becomes defective
due to faulty materials, workmanship or lack of
conformity, within 24 months from the date of
purchase, Black & Decker guarantees to replace
defective parts, repair products subjected to fair
wear and tear or replace such products to ensure
minimum inconvenience to the customer unless:
◆ The product has been used for trade,
professional or hire purposes;
◆ The product has been subjected to misuse or
neglect;
◆ The product has sustained damage through
foreign objects, substances or accidents;
◆ Repairs have been attempted by persons other
than authorised repair agents or Black & Decker
service staff.
To claim on the guarantee, you will need to submit
proof of purchase to the seller or an authorised
repair agent. You can check the location of your
nearest authorised repair agent by contacting your
local Black & Decker office at the address
indicated in this manual. Alternatively, a list of
authorised Black & Decker repair agents and full
details of our after-sales service and contacts are
available on the Internet at: www.2helpU.com.
You can check the location of your nearest
authorised repair agent by contacting your local
Black & Decker office at the address indicated in
this manual. Alternatively, a list of authorised
Black & Decker repair agents and full details of our
after-sales service and contacts are available on
the Internet at: www.2helpU.com.
GUARANTEE
Black & Decker is confident of the quality of its
products and offers an outstanding guarantee.
This guarantee statement is in addition to and in no
way prejudices your statutory rights. The guarantee
is valid within the territories of the Member States
of the European Union and the European Free
Trade Area.
11
Page 12

ITALIANO
ITALIANO
ROBOT PER ALIMENTI FP550/FP600
Grazie per aver scelto Black & Decker. Ci auguriamo
che usi questo prodotto per molti anni.
PROSPETTO (fig. A-G)
1. Selettore elettronico di velocità
2. Pulsante di autopulitura
3. Cappuccio della presa di corrente superiore
4. Presa di alimentazione superiore
5. Fessura di blocco coperchio
6. Presa di alimentazione inferiore
7. Unità motore
8. Spingicibo con sezione misuratrice
9. Coperchio con tubo di distribuzione
10.Contenitore del robot
11.Lama metallica
12.Lama miscelatrice in plastica
13.Frusta
14.Dischi per affettare/grattugiare
15.Supporto disco
16.Cono grande di spremitura
17.Cono piccolo di spremitura
18.Cestello filtrante dello spremiagrumi
19.Coperchio (solo HP600)
20.Macinatore (solo FP600)
21.Tappo del coperchio (solo HP600)
22.Coperchio (solo HP600)
23.Accessorio frullatore (solo FP600)
Direttore di Ricerca e Sviluppo
Spennymoor, County Durham DL16 6JG,
USO PROGETTATO
Il robot per alimenti Black & Decker è stato
concepito per preparare ingredienti liquidi e solidi
in base alle istruzioni riportate nel presente
manuale ed è ideato esclusivamente per uso
domestico.
SIMBOLI DI SICUREZZA
Nel presente manuale si fa uso dei seguenti simboli:
Indica il rischio di infortuni alle persone o
danni all’elettrodomestico in caso di
mancata osservazione delle istruzioni
contenute nel manuale.
Indica il rischio di scosse elettriche.
Kevin Hewitt
United Kingdom
DICHIARAZIONE CE DI CONFORMITÀ
FP550/FP600
Black & Decker dichiara che questi
prodotti sono stati costruiti in conformità
a: 98/37/CEE, 89/336/CEE, 73/23/CEE,
EN 55014, EN 60335, EN 61000
LpA(rumorosità) dB(A) 77
Valore medio quadratico ponderato
dell’accelerazione m/s
12
2
< 2.5
IMPORTANTI NORME DI SICUREZZA
◆ Attenzione! Quando s’impiegano utensili
alimentati elettricamente, per ridurre il rischio
di incendio, scosse elettriche e infortuni
occorre seguire sempre delle precauzioni di
sicurezza di base, fra cui le seguenti:
◆ Prima di adoperare l’elettrodomestico, leggere
attentamente le istruzioni del presente manuale.
◆ L’uso previsto è quello descritto in questo
manuale. L’uso di accessori o attrezzature
diversi o l’uso dell’elettrodomestico per scopi
diversi da quelli indicati nel manuale
comportano il rischio di infortuni.
◆ Conservare questo manuale di istruzioni per
successive consultazioni.
Page 13

ITALIANO
Uso dell’utensile
◆ Non toccare le parti mobili.
◆ Accertare che l’elettrodomestico sia spento
prima di collegarlo o scollegarlo
dall’alimentazione.
◆ Le lame sono estremamente affilate:
maneggiarle con cautela.
◆ Rimuovere le lame prima di svuotare il
contenitore.
◆ Utilizzare sempre lo spingicibo per spingere il
cibo lungo il tubo di distribuzione;
non adoperare mai le dita, una forchetta,
un coltello o altro utensile.
◆ Non mettere mai in funzione
l’elettrodomestico a vuoto.
◆ Fare sempre attenzione quando si usa
l’elettrodomestico.
◆ Non tirare mai il cavo di alimentazione per
disinserire la spina dalla presa. Mantenere il
cavo lontano da fonti di calore, da olio e
spigoli taglienti. Non lasciare che il cavo di
alimentazione penda dal bordo del piano di
lavoro o della tavola.
◆ Non collocare l’elettrodomestico in prossimità
di fonti di calore o in un forno caldo.
◆ Non utilizzare l’elettrodomestico in prossimità
di materiali infiammabili o esplosivi.
◆ Evitare di utilizzare l’elettrodomestico all’esterno.
◆ Tenere sempre l’unità motore al riparo
dall’acqua o dall’umidità eccessiva.
◆ L’elettrodomestico va adoperato con le mani
asciutte.
◆ Se il cavo di alimentazione si danneggia
durante l’uso, disinserire immediatamente la
spina dell’apparecchio dalla presa di corrente.
Non toccare il cavo di alimentazione se non
dopo aver disinserito la spina dalla presa di
corrente.
◆ Scollegare l’elettrodomestico
dall’alimentazione quando non è in uso, prima
di installare o rimuovere dei componenti e
prima di pulirlo.
◆ Mettere sempre l’elettrodomestico su una
superficie orizzontale, lasciando spazio
sufficiente su entrambi i lati.
Sicurezza altrui
◆ Vietare l’uso dell’apparecchio a bambini e ad
adulti che non abbiano letto il presente
manuale d’istruzioni.
◆ Vietare a bambini o ad animali di avvicinarsi
all’area di lavoro, di toccare l’apparecchio o il
cavo di alimentazione. Fare estrema attenzione
quando si usa l’apparecchio in presenza di
bambini.
Dopo l’uso
◆ Prima di lasciare incustodito l’elettrodomestico,
e prima di cambiarne, pulirne o ispezionarne
qualsiasi parte, spegnerlo ed estrarre la spina
dalla presa.
◆ Quando non è in funzione, l’elettrodomestico
deve essere conservato in un luogo asciutto
e non accessibile ai bambini.
Ispezione e riparazioni
◆ Prima dell’uso, verificare che non vi siano
componenti danneggiati o difettosi.
Verificare anche che non vi siano parti rotte e
che nulla comprometta il funzionamento
dell’elettrodomestico.
◆ Non usare l’elettrodomestico se alcuni suoi
componenti sono danneggiati o difettosi.
◆ Eventuali elementi difettosi o danneggiati
devono essere sostituiti o riparati da un
tecnico autorizzato.
◆ Prima dell’uso, controllare che il cavo di
alimentazione non presenti segni di danni,
invecchiamento e usura.
◆ Non usare l’elettrodomestico se il cavo di
alimentazione o la spina sono danneggiati o
difettosi.
◆ Se il cavo di alimentazione o la spina sono
danneggiati o difettosi devono essere riparati
da un tecnico autorizzato, onde evitare
situazioni pericolose. Non tagliare il cavo di
alimentazione e non tentare di ripararlo
personalmente.
◆ Non tentare mai di smontare o sostituire
componenti diversi da quelli indicati nel
presente manuale.
13
Page 14

ITALIANO
NORME DI SICUREZZA ELETTRICA
◆ Prima dell’uso, controllare che la tensione di
alimentazione corrisponda a quella indicata
sulla targhetta con i dati caratteristici.
In ottemperanza alla norma EN 60335,
l’elettrodomestico è dotato di doppio
isolamento per cui non è necessaria messa
a terra.
Per evitare il rischio di scosse elettriche,
non immergere il cavo di alimentazione, la
spina o l’unità di base in acqua o altri
liquidi.
MONTAGGIO
Contenitore del robot (fig. H)
Il contenitore del robot può essere usato per
mischiare, miscelare, tagliare o impastare grandi
quantità di cibo.
◆ Chiudere il cappuccio della presa di
alimentazione superiore.
◆ Collocare il contenitore sulla presa di
alimentazione inferiore, in modo da allineare
alla freccia il simbolo del lucchetto aperto.
Ruotare il manico a destra, finché il contenitore
non si blocca in posizione e il simbolo del
lucchetto chiuso è allineato con la freccia.
◆ Far scivolare sull’alberino l’accessorio necessario.
◆ Collocare gli ingredienti nel contenitore.
◆ Mettere il coperchio sul contenitore, con il
tubo di distribuzione a destra della fessura di
blocco del coperchio.
◆ Ruotare in senso antiorario il coperchio,
tenendo fermo il cappuccio della presa di
alimentazione superiore, finché il coperchio
non si blocca nell’apposita fessura.
Il robot alimentare entrerà in funzione solo se il
coperchio è bloccato correttamente in posizione.
Spremiagrumi (fig. I)
◆ Controllare che il cappuccio della presa di
alimentazione superiore sia chiuso.
◆ Collocare il contenitore sulla presa di
alimentazione inferiore, in modo da allineare
alla freccia il simbolo del lucchetto aperto.
Ruotare il manico a destra, finché il contenitore
non si blocca in posizione e il simbolo del
lucchetto chiuso è allineato con la freccia.
◆ Collocare il cestello filtrante sul contenitore,
con la sporgenza di bloccaggio del cestino a
destra della fessura di blocco del coperchio.
◆ Ruotare in senso antiorario il cestino, finché la
sporgenza non si blocca nell’apposita fessura.
◆ Inserire il cono nel foro del cestello filtrante.
◆ Per pezzi di frutta più grandi, collocare il cono
grande sopra quello piccolo.
Accessorio frullatore (fig. J) (solo FP600)
Il frullatore va adoperato per miscelare finemente
ingredienti crudi e mescolare ingredienti cotti fino
ad ottenere una consistenza molto cremosa.
◆ Sollevare il cappuccio della presa di
alimentazione superiore.
◆ Collocare gli ingredienti nel bricco del frullatore.
◆ Bloccare il coperchio allineando alla freccia il
simbolo del lucchetto chiuso. La sporgenza sul
coperchio va inserita nella fessura di blocco in
cima al manico del bricco.
◆ Se il coperchio non è in posizione,
l’elettrodomestico non funziona.
◆ Quando il coperchio ed bricco del frullatore
sono in posizione sull’unità motore, il coperchio
risulterà inamovibile.
◆ Collocare il frullatore sulla presa di alimentazione
superiore, in modo da allineare alla freccia il
simbolo del lucchetto aperto. Ruotare il bricco
in senso antiorario in modo da allineare la
freccia al simbolo del lucchetto chiuso. Ora il
bricco è nella posizione corretta.
◆ Per togliere il bricco, ruotarlo in senso orario.
Accessorio macinatore (fig. J) (solo FP600)
Il macinatore va adoperato per tagliare finemente
o in piccoli pezzi. Il macinatore è ideale per noci,
caffè, erbe e spezie.
◆ Sollevare il cappuccio della presa di
alimentazione superiore.
◆ Mettere gli ingredienti nel macinatore e
bloccare in posizione il coperchio.
◆ Collocare il macinatore sulla presa di
alimentazione superiore, in modo da allineare
alla freccia il simbolo del lucchetto aperto.
14
Page 15

ITALIANO
◆ Girare il macinatore in senso antiorario
allineando alla freccia il simbolo del lucchetto
chiuso. Ora il macinatore è nella posizione
corretta.
◆ Per togliere il macinatore, ruotarlo in senso
orario.
USO
Non adoperare l’elettrodomestico per
oltre 3 minuti (frusta, spremiagrumi)
o 2 minuti (altri accessori).
Funzionamento dell’elettrodomestico.
◆ Montare l’accessorio desiderato.
◆ Inserire la spina.
◆ Accendere l’elettrodomestico. Ruotare il
quadrante per impostarlo sulla velocità
desiderata (1-5).
La velocità può essere modificata durante il lavoro.
Per maggiore controllo, ruotare il quadrante in
posizione P per impostare il controllo degli impulsi,
ovvero consentire raffiche intermittenti di energia.
◆ Spegnere l’elettrodomestico. Ruotare il
quadrante sulla posizione “0”.
Chi utilizza l’elettrodomestico, deve
conoscere le seguenti funzioni di sicurezza:
◆ Quando si utilizza la presa di alimentazione
inferiore: il cappuccio della presa di
alimentazione superiore deve essere bloccato
in posizione e il coperchio del robot deve
essere bloccato nella relativa fessura di blocco.
◆ Quando si utilizza la presa di alimentazione
superiore (solo FP600): Mentre si usano il
frullatore o il macinatore, il contenitore del robot
deve essere in posizione, con il coperchio
bloccato.
Contenitore del robot
Il contenitore del robot può essere adoperato con
i seguenti accessori:
◆ Lama di triturazione
◆ Dischi per affettare/grattugiare
◆ Frusta
◆ Lama miscelatrice
Triturazione (fig. L)
◆ Usare la lama metallica di triturazione.
◆ Impostare la velocità su 5. Per maggiore
controllo, utilizzare il pulsante della funzione
impulsiva.
◆ È possibile triturare fino a 500 g di carne,
pesce, verdure (cotti o crudi) ecc.
Miscelazione (fig. L)
◆ Usare la lama metallica di triturazione.
◆ Selezionare una velocità tra 3 e 5.
◆ È possibile miscelare fino a 1 litro di brodo,
frutta cotta ecc.
Mescolatura / Impastatura (fig. L)
◆ Usare la lama di mescolatura in plastica.
◆ Impostare la velocità su 5.
◆ È possibile impastare fino a 1 kg di pasta per
dolci, pane, preparato per torte, pastella,
preparato per biscotti ecc.
Sbattitura (fig. L)
◆ Usare la frusta.
◆ Selezionare una velocità tra 1 e 5, in base alla
consistenza degli ingredienti.
◆ Non adoperare mai la frusta per impastare
o mescolare preparati per torte.
◆ La frusta può essere utilizzata per preparare
fino a 0,5 litri di maionese, salsa,
creme montate ecc.
Affettatura & grattatura (fig. M)
◆ Selezionare il disco adatto.
◆ Inserire il disco prescelto nel relativo supporto.
◆ Adoperare lo spingicibo per inserire il cibo nel
tubo di distribuzione.
◆ Per iniziare, selezionare una velocità tra 2 e 5.
◆ I dischi per affettare/grattugiare possono
affettare e frantumare fino a 500 g di verdure.
Spremiagrumi
◆ Tagliare a metà l’agrume trasversalmente
(non da un’estremità all’altra).
◆ Collocare una metà del frutto su un cono.
◆ Per avviare l’elettrodomestico, impostare la
velocità su 1.
Prima di svuotare il contenitore è possibile
premere fino a 1 litro di succo.
15
Page 16

ITALIANO
Accessorio frullatore (solo FP600)
◆ Per iniziare la miscelatura, selezionare una
velocità tra 1 e 5. Per un maggiore controllo,
adoperare il pulsante della funzione impulsiva.
◆ Mentre è in atto la miscelatura, è possibile
aggiungere altri ingredienti attraverso
l’apertura nel tappo del coperchio.
◆ Non riempire mai il bricco del frullatore con
liquidi bollenti.
È possibile frullare fino a 1,2 litri di brodo, salsa,
crema, purea di frutta, frullati, cocktail o pastelle
molto sottili.
Macinatore (solo FP600)
◆ Per avviare l’elettrodomestico, impostare la
velocità su 5.
◆ Per un maggiore controllo, adoperare il pulsante
della funzione impulsiva.
◆ È possibile frantumare o macinare fino a 100 g
di ingredienti.
Funzione di autopulitura
◆ Versare acqua tiepida e sapone nel bricco del
frullatore, nel macinatore o nel contenitore del
robot.
◆ Bloccare il coperchio ed inserire il bricco,
il macinatore o il contenitore nella presa di
alimentazione corretta.
◆ Premere più volte il pulsante di autopulitura.
◆ Quando l’unità è pulita, svuotarla dell’acqua e
sciacquarla a fondo.
PULIZIA E MANUTENZIONE
Prima di eseguire qualsiasi procedura di
pulizia o manutenzione, spegnere
l’elettrodomestico e disinserirne la spina
dalla presa.
◆ Rimuovere il contenitore, ruotandolo in senso
orario.
◆ Lavare ed asciugare gli accessori (sono tutti
lavabili in lavastoviglie, eccetto la frusta).
◆ Se il cibo (carote, arance ecc.) ha scolorato gli
accessori, strofinarli delicatamente con un
panno imbevuto in olio da cucina e poi lavarli
normalmente.
Non immergere l’unità motore in acqua né
collocarla vicino ad acqua corrente.
Pulirla con un panno umido.
RISOLUZIONE DI PROBLEMI
◆ Controllare che l’elettrodomestico sia ben
collegato all’alimentazione.
◆ Controllare che gli accessori siano bloccati
correttamente nell’unità motore.
◆ Controllare che i coperchi siano bloccati
correttamente.
◆ Quando si adopera il contenitore del robot,
controllare che il cappuccio della presa di
alimentazione superiore sia chiuso.
◆ Quando si usa la presa di alimentazione
superiore (solo FP600), controllare che il
contenitore ed il coperchio del robot siano
bloccati in posizione correttamente.
PROTEZIONE DELL’AMBIENTE
Black & Decker offre ai suoi clienti
la possibilità di riciclare i prodotti
Black & Decker che hanno esaurito la loro
vita di servizio. Il servizio viene offerto
gratuitamente. Per utilizzarlo, è sufficiente
restituire il prodotto a qualsiasi tecnico
autorizzato, incaricato della raccolta per
conto dell’azienda.
Per individuare il tecnico autorizzato più vicino,
rivolgersi alla sede Black & Decker locale, presso il
recapito indicato nel presente manuale.
Altrimenti un elenco completo di tutti i tecnici
autorizzati Black & Decker e i dettagli completi sui
contatti e i servizi post-vendita sono disponibili su
Internet presso: www.2helpU.com.
GARANZIA
Certa della qualità dei suoi prodotti, Black & Decker
offre una garanzia eccezionale. Il presente certificato
di garanzia è complementare ai diritti statutari e non
li pregiudica in alcun modo. La garanzia è valida
entro il territorio degli Stati membri dell’Unione
Europea e dell’EFTA (European Free Trade Area).
16
Page 17

Se un prodotto Black & Decker risulta difettoso
per qualità del materiale, della costruzione o per
mancata conformità entro 24 mesi dalla data di
acquisto, Black & Decker garantisce la sostituzione
delle parti difettose, provvede alla riparazione dei
prodotti se ragionevolmente usurati oppure alla
loro sostituzione, in modo da ridurre al minimo il
disagio del cliente a meno che:
◆ Il prodotto non sia stato destinato ad usi
commerciali, professionali o al noleggio;
◆ Il prodotto non sia stato usato in modo
improprio o scorretto;
◆ Il prodotto non abbia subito danni causati da
oggetti o sostanze estranee oppure incidenti;
◆ Il prodotto non abbia subito tentativi di
riparazione non effettuati da tecnici autorizzati
né dall’assistenza Black & Decker.
Per attivare la garanzia è necessario esibire la
prova comprovante l’acquisto al venditore o al
tecnico autorizzato. Per individuare il tecnico
autorizzato più vicino, rivolgersi alla sede
Black & Decker locale, presso il recapito indicato
nel presente manuale. Altrimenti un elenco
completo di tutti i tecnici autorizzati
Black & Decker e i dettagli completi sui contatti
e i servizi post-vendita sono disponibili su Internet
presso: www.2helpU.com.
ITALIANO
17
Page 18

∂§§∏¡π∫∞
¶√§Àªπ•Eƒ FP550/FP600
E˘¯·ЪИЫЩФ‡МВ БИ· ЩЛУ ВМИЫЩФЫ‡УЛ Ы·˜ ЫЩЛ
Black & Decker. EП›˙Ф˘МВ У· ·ФП·‡ЫВЩВ ЩЛ
¯Ъ‹ЫЛ ·˘ЩФ‡ ЩФ˘ ЪФ˚fiУЩФ˜ БИ· ФПП¿ ¯ЪfiУИ·.
°E¡π∫∏ ¶Eƒπ°ƒ∞º∏ (ÂÈÎ. A-G)
1. ∏ПВОЩЪФУИОfi˜ ‰И·ОfiЩЛ˜ ВИПФБ‹˜ Щ·¯‡ЩЛЩ·˜
2. ¢И·ОfiЩЛ˜ ·˘ЩФО·ı·ЪИЫМФ‡
3. ∫¿П˘ММ· ¿Уˆ ˘Ф‰Ф¯‹˜ ЩЪФКФ‰ФЫ›·˜
4. ∞Уˆ ˘Ф‰Ф¯‹ ЩЪФКФ‰ФЫ›·˜
5. EÁÎÔ‹ ·ÛÊ¿ÏÈÛ˘ η·ÎÈÔ‡
6. ∫¿Щˆ ˘Ф‰Ф¯‹ ЩЪФКФ‰ФЫ›·˜
7. ªÔÓ¿‰· ÌÔÙ¤Ú
8. EН¿ЪЩЛМ· ТıЛЫЛ˜ МВ МВЩЪЛЩ‹
9. ∫·¿ОИ МВ ЫˆП‹У· ЩЪФКФ‰ФЫ›·˜
10. ∫¿‰Ô˜ ÔÏ˘Ì›ÍÂÚ
11. ªÂÙ·ÏÏÈ΋ Ï›‰·
12. ¶П·ЫЩИО‹ ПВ›‰· ·У¿МВИНЛ˜
13. EÍ¿ÚÙËÌ· ¯Ù˘‹Ì·ÙÔ˜
14. ¢›ÛÎÔÈ ÙÚÈ‚‹˜ / ÙÂÌ·¯ÈÛÌÔ‡
15. ÀÔ‰Ô¯‹ ο‰Ô˘
16. ªÂÁ¿ÏÔ˜ ÎÒÓÔ˜ ÛÙ˘„›Ì·ÙÔ˜
17. ªÈÎÚfi˜ ÎÒÓÔ˜ ÛÙ˘„›Ì·ÙÔ˜
18. ∫·Ï¿ıÈ Ê›ÏÙÚÔ˘ ·Ô¯˘ÌˆÙ‹
19. ∫·¿ÎÈ (ÌfiÓÔ ÛÙÔ FP600)
20. ª‡ÏÔ˜ ¿ÏÂÛ˘ (ÌfiÓÔ ÛÙÔ FP600)
21. ¶ÒÌ· η·ÎÈÔ‡ (ÌfiÓÔ ÛÙÔ FP600)
22. ∫·¿ÎÈ (ÌfiÓÔ ÛÙÔ FP600)
23. EÍ¿ÚÙËÌ· ÌϤÓÙÂÚ (ÌfiÓÔ ÛÙÔ FP600)
¢∏§ø™∏ ™Àªª√ƒºø™∏™ E∫
FP550/FP600
Black & Decker ‰ЛПТУВИ fiЩИ ·˘Щ¿ Щ·
ЪФ˚fiУЩ· Ы¯В‰И¿ЫЩЛО·У Ы‡МКˆУ· МВ:
98/37/E√∫, 89/336/E√∫, 73/23/E√∫,
EN 55014, EN 60335, EN 61000
LpA(˯ËÙÈ΋ ›ÂÛË) dB(A) 77
√ ÛÙ·ıÌÈṲ̂ÓÔ˜ ÙÂÙÚ·ÁˆÓÈÎfi˜ ̤ÛÔ˜
fiÚÔ˜ ÂÈÙ¿¯˘ÓÛ˘ m/s
2
< 2.5
Spennymoor, County Durham DL16 6JG,
∆Ф ФП˘М›НВЪ ЩЛ˜ Black & Decker ¤¯ВИ Ы¯В‰И·ЫЩВ›
БИ· ЩЛУ ЪФВЩФИМ·Ы›· Ы˘ЫЩ·ЩИОТУ К·БЛЩТУ О·И
ФЩТУ Ы‡МКˆУ· МВ ЩЛУ ВЪИБЪ·К‹ ЩФ˘ ВБ¯ВИЪИ‰›Ф˘.
∞˘Щfi ЩФ ЪФ˚fiУ ЪФФЪ›˙ВЩ·И БИ· ФИОИ·О‹ ¯Ъ‹ЫЛ МfiУФ.
™В ·˘Щfi ЩФ ВБ¯ВИЪ›‰ИФ ¯ЪЛЫИМФФИФ‡УЩ·И Щ·
Ы‡М‚ФП· Ф˘ ·ОФПФ˘ıФ‡У:
◆ ¶ÚÔÛÔ¯‹! ∫·Ù¿ ÙË ¯Ú‹ÛË Û˘Û΢ÒÓ Ô˘
ЩЪФКФ‰ФЩФ‡УЩ·И МВ ЛПВОЩЪИОfi ЪВ‡М·, ı·
Ъ¤ВИ ¿УЩ· У· П·М‚¿УФУЩ·И ФИ ‚·ЫИО¤˜
ЪФК˘П¿НВИ˜ ·ЫК·ПВ›·˜, БИ· ЩФУ ВЪИФЪИЫМfi
ЩФ˘ ОИУ‰‡УФ˘ ˘ЪО·БИ¿˜, ЛПВОЩЪФПЛН›·˜ О·И
ЫˆМ·ЩИОТУ ‚П·‚ТУ.
◆ ¶ЪИУ ¯ЪЛЫИМФФИ‹ЫВЩВ ЩЛ Ы˘ЫОВ˘‹ ‰И·‚¿ЫЩВ
ЪФЫВ¯ЩИО¿ ФПfiОПЛЪФ ЩФ ВБ¯ВИЪ›‰ИФ.
◆ ∏ ÂӉ‰ÂÈÁ̤ÓË ¯Ú‹ÛË ·Ó·Ê¤ÚÂÙ·È Û ·˘Ùfi ÙÔ
ВБ¯ВИЪ›‰ИФ. ∆fiЫФ Л ¯Ъ‹ЫЛ ВН·ЪЩЛМ¿ЩˆУ ‹
ЪФЫıЛОТУ fiЫФ О·И Л Ъ·БМ·ЩФФ›ЛЫЛ
ВЪБ·ЫИТУ МВ ЩЛ Ы˘ЫОВ˘‹ Ф˘ ‰ВУ Ы˘УИЫЩТУЩ·И
ЫВ ·˘Щfi ЩФ ВБ¯ВИЪ›‰ИФ Ф‰ЛБИТУ ВБО˘МФУВ›
О›У‰˘УФ ЩЪ·˘М·ЩИЫМФ‡.
◆ º˘П¿НЩВ ЩФ ВБ¯ВИЪ›‰ИФ ·˘Щfi БИ· МВППФУЩИО‹
·Ó·ÊÔÚ¿.
Kevin Hewitt
¢ИВ˘ı˘УЩ‹˜ МЛ¯·УФПФБ›·˜
United Kingdom
E¡¢E¢Eπ°ªE¡∏ Ã∏™∏
¶ƒ√Eπ¢√¶√π∏∆π∫∞ ™Àªµ√§∞
EИЫЛМ·›УВИ О›У‰˘УФ ЫˆМ·ЩИО‹˜ ‚П¿‚Л˜ ‹
‚П¿‚Л˜ ЩФ˘ ЪФ˚fiУЩФ˜, ЫВ ВЪ›ЩˆЫЛ МЛ
Щ‹ЪЛЫЛ˜ ЩˆУ Ф‰ЛБИТУ ЩФ˘ ВБ¯ВИЪИ‰›Ф˘.
EИЫЛМ·›УВИ О›У‰˘УФ ЛПВОЩЪФПЛН›·˜.
™∏ª∞¡∆π∫∞ ªE∆ƒ∞ ¶ƒ√™∆∞™π∞™
18
Page 19

∂§§∏¡π∫∞
ÃÚ‹ÛË Ù˘ Û˘Û΢‹˜ Û·˜
◆ ªËÓ ·ÁÁ›˙ÂÙ ٷ ÎÈÓÔ‡ÌÂÓ· ̤ÚË.
◆ µÂ‚·Èˆı›Ù fiÙÈ Ë Û˘Û΢‹ Â›Ó·È ÂÎÙfi˜
ПВИЩФ˘ЪБ›·˜ ЪИУ ЩЛ Ы˘У‰¤ЫВЩВ ‹ ЩЛУ
·ФЫ˘У‰¤ЫВЩВ ·fi ЩЛУ ˘Ф‰Ф¯‹ ЛПВОЩЪИОФ‡
ЪВ‡М·ЩФ˜.
◆ ¡· ¯ВИЪ›˙ВЫЩВ ЪФЫВОЩИО¿ ЩИ˜ ПВ›‰В˜. E›У·И
ВН·ИЪВЩИО¿ ОФКЩВЪ¤˜.
◆ ∞Ê·ÈÚ›Ù ÙȘ Ï›‰Â˜ ÚÔÙÔ‡ ·‰ÂÈ¿ÛÙ ٷ
ÂÚȯfiÌÂÓ· ÙÔ˘ ο‰Ô˘.
◆ ¡· ¯ЪЛЫИМФФИВ›ЩВ ¿УЩ· ЩФ ВН¿ЪЩЛМ· ТıЛЫЛ˜
БИ· У· ЫЪТНЩВ ЩФ К·БЛЩfi М¤Ы· ЫЩФУ ЫˆП‹У·
ЩЪФКФ‰ФЫ›·˜. ¶ФЩ¤ МЛУ ¯ЪЛЫИМФФИВ›ЩВ Щ·
‰¿¯Щ˘П¿ Ы·˜, ИЪФ‡УИ, ОФ˘Щ¿ПИ, М·¯·›ЪИ ‹ ¿ППФ
ЫОВ‡Ф˜.
◆ ¶ФЩ¤ МЛУ ПВИЩФ˘ЪБВ›ЩВ ЩЛУ Ы˘ЫОВ˘‹ fiЩ·У В›У·И
¿‰ÂÈ·.
◆ ¶ЪФЫ¤¯ВЩВ ¿УЩ· fiЩ·У ¯ЪЛЫИМФФИВ›ЩВ ЩЛ
Û˘Û΢‹.
◆ ¶ÔÙ¤ ÌËÓ ·ÔÛ˘Ó‰¤ÂÙ ÙË Û˘Û΢‹ ·fi ÙËÓ
Ъ›˙· ЩЪ·‚ТУЩ·˜ ЩФ О·ПТ‰Иfi ЩЛ˜. ¢И·ЩЛЪВ›ЩВ
ЩФ О·ПТ‰ИФ ЩЪФКФ‰ФЫ›·˜ ЫВ ·fiЫЩ·ЫЛ ·fi
ЛБ¤˜ ıВЪМfiЩЛЩ·˜, П¿‰И· О·И ·fi ·И¯МЛЪ¤˜
·ОМ¤˜. ªЛУ ВИЩЪ¤ВЩВ ЩФ О·ПТ‰ИФ
ЩЪФКФ‰ФЫ›·˜ У· ОЪ¤МВЩ·И ·fi ЩЛУ ¿ОЪЛ ЩЛ˜
ВИК¿УВИ·˜ ВЪБ·Ы›·˜ ‹ ЩФ˘ ЩЪ·В˙ИФ‡.
◆ ªËÓ ÙÔÔıÂÙ›Ù ÙË Û˘Û΢‹ ¿Óˆ ‹ ÎÔÓÙ¿
Û ËÁ¤˜ ıÂÚÌfiÙËÙ·˜ ‹ Û ˙ÂÛÙfi ÊÔ‡ÚÓÔ.
◆ ªЛУ ¯ЪЛЫИМФФИВ›ЩВ ЩЛ Ы˘ЫОВ˘‹ ОФУЩ¿ ЫВ
В‡КПВОЩ· ‹ ВОЪЛОЩИО¿ ˘ПИО¿.
◆ ªЛУ ¯ЪЛЫИМФФИВ›ЩВ ЩЛ Ы˘ЫОВ˘‹ ЫЩФ ‡·ИıЪФ.
◆ ¡· К˘П¿ЫЫВЩВ ¿УЩ· ЩЛ МФУ¿‰· МФЩ¤Ъ М·ОЪИ¿
·fi ÙÔ ÓÂÚfi ‹ ÙËÓ ˘ÂÚ‚ÔÏÈ΋ ˘ÁÚ·Û›·.
◆ ¡· ПВИЩФ˘ЪБВ›ЩВ ЩЛУ Ы˘ЫОВ˘‹ МfiУФ МВ ЫЩВБУ¿
¯¤ÚÈ·.
◆ E¿У ЩФ О·ПТ‰ИФ ЩЪФКФ‰ФЫ›·˜ О·Щ·ЫЩЪ·КВ›
ηٿ ÙË ¯Ú‹ÛË, ·ÔÛ˘Ó‰¤ÛÙ ÙË Û˘Û΢‹
·М¤Ыˆ˜ ·fi ЩЛУ Ъ›˙·. ªЛУ ·ББ›˙ВЩВ ЩФ
О·ПТ‰ИФ ЩЪФКФ‰ФЫ›·˜ ЪИУ ·К·ИЪ¤ЫВЩВ ЩФ КИ˜
·fi ÙËÓ Ú›˙·.
◆ ¡· ·ÔÛ˘Ó‰¤ÂÙ ÙË Û˘Û΢‹ ·fi ÙËÓ Ú›˙·
fiЩ·У ‰ВУ ¯ЪЛЫИМФФИВ›Щ·И, ЪИУ ЩФФıВЩ‹ЫВЩВ
‹ ·К·ИЪ¤ЫВЩВ ВН·ЪЩ‹М·Щ· О·И ЪИУ ЩЛУ
О·ı·Ъ›ЫВЩВ.
◆ ¡· ÙÔÔıÂÙ›Ù ÙËÓ Û˘Û΢‹ ¿ÓÙ· ÛÂ
Â›Â‰Ë ÂÈÊ¿ÓÂÈ· Ì ·Ú΋ ÂχıÂÚÔ ¯ÒÚÔ
·fi fiϘ ÙȘ Ï¢ڤ˜.
∞ÛÊ¿ÏÂÈ· ÙÚ›ÙˆÓ
◆ ªËÓ ÂÈÙÚ¤ÂÙ Û ÌÈÎÚ¿ ·È‰È¿ ‹ Û ¿ÙÔÌ·
Ф˘ ‰ВУ ¤¯Ф˘У ‰И·‚¿ЫВИ ЩФ ВБ¯ВИЪ›‰ИФ Ф‰ЛБИТУ
‹ Ф˘ ‰ВУ ¤¯Ф˘У ВНФИОВИˆıВ› МВ ЩЛ Ы˘ЫОВ˘‹ У·
ЩЛ ¯ЪЛЫИМФФИ‹ЫФ˘У.
◆ ªËÓ ÂÈÙÚ¤ÂÙ Û ·È‰È¿ ‹ ˙Ò· Ó·
ПЛЫИ¿˙Ф˘У ЫЩФ ¯ТЪФ ВЪБ·Ы›·˜ ‹ У· ·ББ›˙Ф˘У
ЩЛ Ы˘ЫОВ˘‹ ‹ ЩФ О·ПТ‰ИФ ЩЪФКФ‰ФЫ›·˜ ЩЛ˜.
√Щ·У Л Ы˘ЫОВ˘‹ ¯ЪЛЫИМФФИВ›Щ·И ОФУЩ¿ ЫВ
·И‰И¿ В›У·И ··Ъ·›ЩЛЩЛ Л ЫЩВУ‹ ВИЩ‹ЪЛЫЛ.
ªÂÙ¿ ÙË ¯Ú‹ÛË
◆ £¤ЫЩВ ЩЛ Ы˘ЫОВ˘‹ ВОЩfi˜ ПВИЩФ˘ЪБ›·˜ О·И
·ÔÛ˘Ó‰¤ÛÂÙ ÙÔ ÊȘ ·fi ÙËÓ Ú›˙· ÚÈÓ ÙËÓ
·Ê‹ÛÂÙ ¯ˆÚ›˜ ÂÈÙ‹ÚËÛË Î·È ÚÈÓ ·ÏÏ¿ÍÂÙÂ,
ηı·Ú›ÛÂÙ ‹ ÂÈıˆڋÛÂÙ ÔÔÈ·‰‹ÔÙÂ
ÙÌ‹Ì·Ù¿ Ù˘.
◆ √Щ·У ‰ВУ ¯ЪЛЫИМФФИВ›Щ·И, Л Ы˘ЫОВ˘‹ Ъ¤ВИ
Ó· Ê˘Ï¿ÛÛÂÙ·È Û ÍËÚfi ¯ÒÚÔ. ∆· ·È‰È¿ ‰ÂÓ
Ú¤ÂÈ Ó· ¤¯Ô˘Ó ÚfiÛ‚·ÛË Û ·ÔıËÎÂ˘Ì¤Ó˜
Û˘Û΢¤˜.
EИıВТЪЛЫЛ О·И ВИЫОВ˘¤˜
◆ ¶ЪИУ ·fi ЩЛ ¯Ъ‹ЫЛ, ВП¤БНЩВ ЪФЫВОЩИО¿ ЩЛ
Ы˘ЫОВ˘‹ БИ· О·ЩВЫЩЪ·ММ¤У· ‹ ВП·ЩЩˆМ·ЩИО¿
М¤ЪЛ. EП¤БНЩВ БИ· М¤ЪЛ Ф˘ ¤¯Ф˘У Ы¿ЫВИ О·И
БИ· О¿ıВ В›‰Ф˘˜ Ы˘Уı‹ОВ˜ ФИ ФФ›В˜ ВУ‰¤¯ВЩ·И
У· ВЛЪВ¿ЫФ˘У ЩЛ ПВИЩФ˘ЪБ›· ЩЛ˜ Ы˘ЫОВ˘‹˜.
◆ ªЛ ¯ЪЛЫИМФФИВ›ЩВ ЩЛ Ы˘ЫОВ˘‹ ·У О¿ФИФ
ÂÍ¿ÚÙËÌ¿ Ù˘ ·ÚÔ˘ÛÈ¿˙ÂÈ ÂÏ¿Ùو̷.
◆ ºÚÔÓÙ›ÛÙ ӷ Á›ÓÂÈ Ë ÂÈÛ΢‹ ‹ Ë
·УЩИО·Щ¿ЫЩ·ЫЛ ЩˆУ Щ˘¯fiУ ВП·ЩЩˆМ·ЩИОТУ
ВН·ЪЩЛМ¿ЩˆУ ·fi ВНФ˘ЫИФ‰ФЩЛМ¤УФ О¤УЩЪФ
ВИЫОВ˘ТУ.
◆ ¶ЪИУ ·fi ЩЛ ¯Ъ‹ЫЛ, ВП¤БНЩВ ЪФЫВОЩИО¿ ЩФ
О·ПТ‰ИФ ЩЪФКФ‰ФЫ›·˜ БИ· ЫЛМ¿‰И· ˙ЛМИ¿˜,
·П·›ˆЫЛ˜ О·И КıФЪ¿˜.
◆ ªЛ ¯ЪЛЫИМФФИВ›ЩВ ЩЛ Ы˘ЫОВ˘‹ ·У ЩФ О·ПТ‰ИФ
ЩЪФКФ‰ФЫ›·˜ ЩЛ˜ ‹ ЩФ КИ˜ ¤¯ВИ ¿ıВИ ˙ЛМИ¿ ‹
·ЪФ˘ЫИ¿˙ВИ ВП¿ЩЩˆМ·.
◆ E¿У ЩФ О·ПТ‰ИФ ЩЪФКФ‰ФЫ›·˜ ‹ ЩФ КИ˜ В›У·И
О·ЩВЫЩЪ·ММ¤УФ ‹ ВП·ЩЩˆМ·ЩИОfi, Ъ¤ВИ У·
ВИЫОВ˘·ЫЩВ› ·fi ВНФ˘ЫИФ‰ФЩЛМ¤УФ
·УЩИЪfiЫˆФ ВИЫОВ˘‹˜, ТЫЩВ У· МЛУ
ЪФО‡„ВИ О›У‰˘УФ˜. ªЛУ Оfi‚ВЩВ ЩФ О·ПТ‰ИФ
ЩЪФКФ‰ФЫ›·˜ О·И МЛУ ЪФЫ·ıВ›ЩВ У· ЩФ
ВИЫОВ˘¿ЫВЩВ МfiУФИ Ы·˜.
19
Page 20

∂§§∏¡π∫∞
◆ ¶ÔÙ¤ ÌËÓ ÂȯÂÈÚ›Ù ӷ ·Ê·ÈÚ¤ÛÂÙ ‹ Ó·
·ÓÙÈηٷÛÙ‹ÛÂÙ ÂÍ·ÚÙ‹Ì·Ù· ¿ÏÏ· ·fi ·˘Ù¿
Ô˘ ÚÔÛ‰ÈÔÚ›˙ÔÓÙ·È Û ·˘Ùfi ÙÔ ÂÁ¯ÂÈÚ›‰ÈÔ.
∏§E∫∆ƒπ∫∏ ∞™º∞§Eπ∞
◆ ¶ÚÈÓ ·fi ÙË ¯Ú‹ÛË, ÂϤÁÍÙ ·Ó Ë Ù¿ÛË
ЩЪФКФ‰ФЫ›·˜ ·УЩИЫЩФИ¯В› ЫВ ·˘Щ‹У Ф˘
·У·БЪ¿КВЩ·И ЫЩЛУ ИУ·О›‰· ¯·Ъ·ОЩЛЪИЫЩИОТУ.
∏ Û˘Û΢‹ ʤÚÂÈ ‰ÈÏ‹ ÌfiÓˆÛË Î·Ù¿
EN 60335. ∫·Ù¿ Û˘Ó¤ÂÈ· ‰Â ¯ÚÂÈ¿˙ÂÙ·È
ηÏÒ‰ÈÔ Á›ˆÛ˘.
°И· У· ·ФК‡БВЩВ ЩФУ О›У‰˘УФ
ЛПВОЩЪФПЛН›·˜, МЛ ‚˘ı›˙ВЩВ ЩФ О·ПТ‰ИФ,
ЩФ КИ˜ ‹ ЩЛ МФУ¿‰· ЩФ˘ МФЩ¤Ъ ЫВ УВЪfi ‹
¿ППФ ˘БЪfi.
™À¡∞ƒª√§√°∏™∏
∫¿‰Ô˜ ÔÏ˘Ì›ÍÂÚ (ÂÈÎ. ∏)
√ О¿‰Ф˜ ЩФ˘ ФП˘М›НВЪ МФЪВ› У· ¯ЪЛЫИМФФИЛıВ›
БИ· ЩЛУ ·У¿МИНЛ, ЩФ ·У·О¿ЩВМ·, ЩЛУ ОФ‹ ‹ ЩЛУ
˙‡МˆЫЛ МВБ¿ПˆУ ФЫФЩ‹ЩˆУ ЩЪФК›МˆУ.
◆ ∫Ï›ÛÙ ÙÔ Î¿Ï˘ÌÌ· Ù˘ ¿Óˆ ˘Ô‰Ô¯‹˜
ЩЪФКФ‰ФЫ›·˜.
◆ ∆ÔÔıÂÙ‹ÛÙ ÙÔÓ Î¿‰Ô ÛÙËÓ Î¿Ùˆ ˘Ô‰Ô¯‹
ЩЪФКФ‰ФЫ›·˜ ¤ЩЫИ ТЫЩВ ЩФ Ы‡М‚ФПФ МВ ЩФ
·УФИОЩfi ПФ˘О¤ЩФ У· В˘ı˘БЪ·ММИЫЩВ› МВ ЩФ
‚¤ПФ˜. ¶ВЪИЫЩЪ¤„ЩВ ЩЛУ П·‚‹ ЪФ˜ Щ· ‰ВНИ¿
М¤¯ЪИ Ф О¿‰Ф˜ У· ·ЫК·П›ЫВИ ЫЩЛУ ı¤ЫЛ ЩФ˘ О·И
ЩФ Ы‡М‚ФПФ МВ ЩФ ОПВИЫЩfi ПФ˘О¤ЩФ У·
В˘ı˘БЪ·ММИЫЩВ› МВ ЩФ ‚¤ПФ˜.
◆ ™‡ЪВЩВ ЩФ О·Щ¿ППЛПФ ВН¿ЪЩЛМ· ЫЩЛУ ¿ЩЪ·ОЩФ.
◆ ∆ÔÔıÂÙ‹ÛÙ ٷ ˘ÏÈο ÛÙÔÓ Î¿‰Ô.
◆ ∆ÔÔıÂÙ‹ÛÙ ÙÔ Î·¿ÎÈ ÛÙÔÓ Î¿‰Ô Ì ÙÔÓ
ЫˆП‹У· ЩЪФКФ‰ФЫ›·˜ У· ‚Ъ›ЫОВЩ·И ‰ВНИ¿ ·fi
ЩЛУ ВБОФ‹ ·ЫК¿ПИЫЛ˜ ЩФ˘ О··ОИФ‡.
◆ ¶ВЪИЫЩЪ¤„ЩВ ЩФ О·¿ОИ ЪФ˜ Щ· ·ЪИЫЩВЪ¿,
ВУТ И¤˙ВЩВ ЪФ˜ Щ· О¿Щˆ ЩЛУ ¿Уˆ ˘Ф‰Ф¯‹
ЩЪФКФ‰ФЫ›·˜, ¤ˆ˜ fiЩФ˘ ЩФ О·¿ОИ ·ЫК·П›ЫВИ
ЫЩЛУ ВБОФ‹ ·ЫК¿ПИЫЛ˜ О··ОИФ‡.
∆Ф ФП˘М›НВЪ ‰ВУ ПВИЩФ˘ЪБВ› ·У ЩФ О·¿ОИ ‰ВУ
¤¯ВИ ·ЫК·П›ЫВИ ЫˆЫЩ¿ ЫЩЛУ ı¤ЫЛ ЩФ˘.
◆ ∆ÔÔıÂÙ‹ÛÙ ÙÔÓ Î¿‰Ô ÛÙËÓ Î¿Ùˆ ˘Ô‰Ô¯‹
ЩЪФКФ‰ФЫ›·˜ ¤ЩЫИ ТЫЩВ ЩФ Ы‡М‚ФПФ МВ ЩФ
·УФИОЩfi ПФ˘О¤ЩФ У· В˘ı˘БЪ·ММИЫЩВ› МВ ЩФ
‚¤ПФ˜. ¶ВЪИЫЩЪ¤„ЩВ ЩЛУ П·‚‹ ЪФ˜ Щ· ‰ВНИ¿
М¤¯ЪИ Ф О¿‰Ф˜ У· ·ЫК·П›ЫВИ ЫЩЛУ ı¤ЫЛ ЩФ˘ О·И
ЩФ Ы‡М‚ФПФ МВ ЩФ ОПВИЫЩfi ПФ˘О¤ЩФ У·
В˘ı˘БЪ·ММИЫЩВ› МВ ЩФ ‚¤ПФ˜.
◆ ∆ÔÔıÂÙ‹ÛÙ ÙÔ Î·Ï¿ıÈ Ê›ÏÙÚÔ˘ ÛÙÔÓ Î¿‰Ô ÌÂ
ÙËÓ ·Î›‰· ·ÛÊ¿ÏÈÛ˘ ÙÔ˘ ηϷıÈÔ‡ ÛÙ· ‰ÂÍÈ¿
Ù˘ ÂÁÎÔ‹˜ ·ÛÊ¿ÏÈÛ˘ ÙÔ˘ η·ÎÈÔ‡.
◆ ¶ВЪИЫЩЪ¤„ЩВ ЩФ О·П¿ıИ ЪФ˜ Щ· ·ЪИЫЩВЪ¿ М¤¯ЪИ
Ë ·Î›‰· Ó· ·ÛÊ·Ï›ÛÂÈ ÛÙËÓ ÂÁÎÔ‹ ·ÛÊ¿ÏÈÛ˘.
◆ ∆ÔÔıÂÙ‹ÛÙ ÙÔÓ ÎÒÓÔ ÛÙËÓ Ô‹ ÙÔ˘ ηϷıÈÔ‡
Ê›ÏÙÚÔ˘.
◆ °È· ÌÂÁ¿Ï· ÎÔÌÌ¿ÙÈ· ÊÚÔ‡ÙˆÓ, ÙÔÔıÂÙ‹ÛÙÂ
ÙÔÓ ÌÂÁ¿ÏÔ ÎÒÓÔ ¿Óˆ ÛÙÔ ÌÈÎÚfi ÎÒÓÔ.
EÍ¿ÚÙËÌ· ÌϤÓÙÂÚ (ÂÈÎ. J) (ÌfiÓÔ ÛÙÔ FP600)
ГЪЛЫИМФФИ‹ЫЩВ ЩФ ВН¿ЪЩЛМ· ЩФ˘ МП¤УЩВЪ БИ·
ЩЛУ ·У¿МВИНЛ ˆМТУ Ы˘ЫЩ·ЩИОТУ О·И М·БВИЪВМ¤УˆУ
˘ПИОТУ ЫВ МИ· ФП‡ ПВ›· ˘К‹.
◆ ™ЛОТЫЩВ ЩФ О¿П˘ММ· ЩЛ˜ ¿Уˆ ˘Ф‰Ф¯‹˜
ЩЪФКФ‰ФЫ›·˜.
◆ ∆ÔÔıÂÙ‹ÛÙ ٷ ˘ÏÈο ÛÙËÓ Î·Ó¿Ù· ÙÔ˘
ÌϤÓÙÂÚ.
◆ ∞ÛÊ·Ï›ÛÙ ÙÔ Î·¿ÎÈ Â˘ı˘ÁÚ·ÌÌ›˙ÔÓÙ·˜ ÙÔ
Ы‡М‚ФПФ МВ ЩФ ·УФИОЩfi ПФ˘О¤ЩФ МВ ЩФ ‚¤ПФ˜.
∏ ·О›‰· ЫЩФ О·¿ОИ Ъ¤ВИ У· МВИ ЫЩЛУ ВБОФ‹
·ÛÊ¿ÏÈÛ˘ ÛÙÔ ¿Óˆ ̤ÚÔ˜ Ù˘ Ï·‚‹˜ Ù˘
ηӿٷ˜.
◆ ∞Ó ÙÔ Î·¿ÎÈ ‰ÂÓ ‚Ú›ÛÎÂÙ·È ÛÙË ÛˆÛÙ‹ ı¤ÛË, Ë
Ы˘ЫОВ˘‹ ‰ВУ ı· ПВИЩФ˘ЪБ‹ЫВИ.
◆ ªfiÏȘ Ë Î·Ó¿Ù· ÙÔ˘ ÌϤÓÙÂÚ Î·È ÙÔ Î·¿ÎÈ
·ЫК·ПИЫЩФ‡У ЫЩЛУ ı¤ЫЛ ЩФ˘˜ ЫЩЛУ МФУ¿‰· ЩФ˘
МФЩ¤Ъ, ЩФ О·¿ОИ ‰ВУ МФЪВ› У· ·К·ИЪВıВ›.
◆ ∆ÔÔıÂÙ‹ÛÙ ÙÔ ÌϤÓÙÂÚ ÛÙËÓ ¿Óˆ ˘Ô‰Ô¯‹
ЩЪФКФ‰ФЫ›·˜ ¤ЩЫИ ТЫЩВ ЩФ Ы‡М‚ФПФ МВ ЩФ
·УФИОЩfi ПФ˘О¤ЩФ У· В˘ı˘БЪ·ММИЫЩВ› МВ ЩФ
‚¤ПФ˜. ™ЩЪ¤„ЩВ ЩЛУ О·У¿Щ· ‰ВНИfiЫЩЪФК· ¤ЩЫИ
ТЫЩВ ЩФ Ы‡М‚ФПФ МВ ЩФ ОПВИЫЩfi ПФ˘О¤ЩФ У·
В˘ı˘БЪ·ММИЫЩВ› МВ ЩФ ‚¤ПФ˜. ∏ О·У¿Щ·
‚Ъ›ЫОВЩ·И ЩТЪ· ЫЩЛУ ЫˆЫЩ‹ ı¤ЫЛ.
◆ °И· У· ·К·ИЪ¤ЫВЩВ ЩЛУ О·У¿Щ·, ВЪИЫЩЪ¤„ЩВ
ÙËÓ ÚÔ˜ Ù· ‰ÂÍÈ¿:
™Ù›ÊÙ˘ ÂÛÂÚȉÔÂȉÒÓ (ÂÈÎ. I)
◆ EϤÁÍÙ ˆ˜ ÙÔ Î¿Ï˘ÌÌ· Ù˘ ¿Óˆ ˘Ô‰Ô¯‹˜
ЩЪФКФ‰ФЫ›·˜ В›У·И ОПВИЫЩfi.
20
EÍ¿ÚÙËÌ· ¿ÏÂÛ˘ (ÂÈÎ. ∫) (ÌfiÓÔ ÛÙÔ FP600)
ГЪЛЫИМФФИ‹ЫЩВ ЩФУ М‡ПФ ¿ПВЫЛ˜ БИ· „ИПfi
Оfi„ИМФ ‹ ¿ПВЫМ· МИОЪТУ ОФММ·ЩИТУ.
Page 21

∂§§∏¡π∫∞
√ ̇ÏÔ˜ ¿ÏÂÛ˘ Â›Ó·È È‰·ÓÈÎfi˜ ÁÈ· ÍËÚÔ‡˜
ηÚÔ‡˜, ηʤ, ‚fiÙ·Ó· Î·È Ì·¯·ÚÈο.
◆ ™ЛОТЫЩВ ЩФ О¿П˘ММ· ЩЛ˜ ¿Уˆ ˘Ф‰Ф¯‹˜
ЩЪФКФ‰ФЫ›·˜.
◆ ∆ÔÔıÂÙ‹ÛÙ ٷ ˘ÏÈο ÛÙÔÓ Ì‡ÏÔ Î·È
·ÛÊ·Ï›ÛÙ ÙÔ Î·¿ÎÈ ÛÙË ı¤ÛË ÙÔ˘.
◆ ∆ÔÔıÂÙ‹ÛÙ ÙÔÓ Ì‡ÏÔ ¿ÏÂÛ˘ ÛÙËÓ ¿Óˆ
˘Ф‰Ф¯‹ ЩЪФКФ‰ФЫ›·˜ ¤ЩЫИ ТЫЩВ ЩФ Ы‡М‚ФПФ
МВ ЩФ ·УФИОЩfi ПФ˘О¤ЩФ У· В˘ı˘БЪ·ММИЫЩВ› МВ
ÙÔ ‚¤ÏÔ˜.
◆ ™ЩЪ¤„ЩВ ЩФУ М‡ПФ ·ЪИЫЩВЪfiЫЩЪФК· М¤¯ЪИ ЩФ
Ы‡М‚ФПФ МВ ЩФ ОПВИЫЩfi ПФ˘О¤ЩФ У·
В˘ı˘БЪ·ММИЫЩВ› МВ ЩФ ‚¤ПФ˜. √ М‡ПФ˜
‚Ú›ÛÎÂÙ·È ÙÒÚ· ÛÙËÓ ÛˆÛÙ‹ ı¤ÛË.
◆ °И· У· ЩФУ ·К·ИЪ¤ЫВЩВ, ВЪИЫЩЪ¤„ЩВ ЩФУ М‡ПФ
ÚÔ˜ Ù· ‰ÂÍÈ¿.
Ã∏™∏
ªЛУ ПВИЩФ˘ЪБВ›ЩВ ЩЛУ Ы˘ЫОВ˘‹ БИ·
ВЪИfi‰Ф˘˜ МВБ·П‡ЩВЪВ˜ ЩˆУ 3 ПВЩТУ
(ВН¿ЪЩЛМ· ¯Щ˘‹М·ЩФ˜, ЫЩ›КЩЛ˜
ВЫВЪИ‰ФВИ‰ТУ) ‹ 2 ПВЩТУ (¿ПП·
ВН·ЪЩЛМ¿Щ·).
§ÂÈÙÔ˘ÚÁ›· Ù˘ Û˘Û΢‹˜.
◆ ∆ÔÔıÂÙ‹ÛÙ ÙÔ ÂÍ¿ÚÙËÌ· Ô˘ ÂÈı˘Ì›ÙÂ.
◆ ™˘Ó‰¤ÛÙ ÙËÓ Û˘Û΢‹ Ì ÙËÓ Ú›˙·.
◆ £¤ЫЩВ ЫВ ПВИЩФ˘ЪБ›· ЩЛУ Ы˘ЫОВ˘‹.
¶ВЪИЫЩЪ¤„ЩВ ЩФУ ‰И·ОfiЩЛ БИ· У· ВИП¤НВЩВ
ЩЛУ ВИı˘МЛЩ‹ Ъ‡ıМИЫЛ Щ·¯‡ЩЛЩ·˜ (1-5).
∏ Ъ‡ıМИЫЛ МФЪВ› У· ФИО›ППВИ О·Щ¿ ЩЛУ ‰И¿ЪОВИ·
ЩЛ˜ ВВНВЪБ·Ы›·˜. °И· МВБ·П‡ЩВЪФ ¤ПВБ¯Ф,
ВЪИЫЩЪ¤„ЩВ ЩФУ ‰И·ОfiЩЛ ЫЩЛУ ı¤ЫЛ ƒ БИ·
·ПМИОfi ¤ПВБ¯Ф, Ф˘ ‰›УВИ ВЪИФ‰ИО¤˜ ‰fiЫВИ˜
ВУ¤ЪБВИ·˜.
◆ £¤ЫЩВ ВОЩfi˜ ПВИЩФ˘ЪБ›·˜ ЩЛУ Ы˘ЫОВ˘‹.
¶ВЪИЫЩЪ¤„ЩВ ЩФУ ‰И·ОfiЩЛ ЫЩЛУ ı¤ЫЛ 0.
¡· Ï·Ì‚¿ÓÂÙ ˘fi„Ë Û·˜ Ù· ·Ú·Î¿Ùˆ
̤ÙÚ· ·ÛÊ·Ï›·˜ fiÙ·Ó ¯ÂÈÚ›˙ÂÛÙ ÙËÓ
Û˘Û΢‹:
◆ √Щ·У ¯ЪЛЫИМФФИВ›ЩВ ЩЛУ О¿Щˆ ˘Ф‰Ф¯‹
ЩЪФКФ‰ФЫ›·˜: ∆Ф О¿П˘ММ· ЩЛ˜ ¿Уˆ ˘Ф‰Ф¯‹˜
ЩЪФКФ‰ФЫ›·˜ Ъ¤ВИ У· В›У·И ·ЫК·ПИЫМ¤УФ
ÛÙËÓ ı¤ÛË ÙÔ˘ Î·È ÙÔ Î·¿ÎÈ ÙÔ˘ ÔÏ˘Ì›ÍÂÚ
Ú¤ÂÈ Ó· Â›Ó·È ·ÛÊ·ÏÈṲ̂ÓÔ ÛÙËÓ ÂÁÎÔ‹
·ÛÊ¿ÏÈÛ˘ η·ÎÈÔ‡.
◆ √Щ·У ¯ЪЛЫИМФФИВ›ЩВ ЩЛУ ¿Уˆ ˘Ф‰Ф¯‹
ЩЪФКФ‰ФЫ›·˜ (МfiУФ ЫЩФ FP600): √ О¿‰Ф˜ ЩФ˘
ФП˘М›НВЪ Ъ¤ВИ У· В›У·И ЫЩЛ ı¤ЫЛ ЩФ˘ О·И ЩФ
О·¿ОИ У· В›У·И ·ЫК·ПИЫМ¤УФ О·Щ¿ ЩЛ ¯Ъ‹ЫЛ
ЩФ˘ МП¤УЩВЪ ‹ ЩФ˘ М‡ПФ˘ ¿ПВЫЛ˜.
∫¿‰Ô˜ ÔÏ˘Ì›ÍÂÚ
√ О¿‰Ф˜ ЩФ˘ ФП˘М›НВЪ МФЪВ› У· ¯ЪЛЫИМФФИЛıВ›
МВ Щ· ·ОfiПФ˘ı· ВН·ЪЩ‹М·Щ·:
◆ §Â›‰· ÎÔ‹˜
◆ ¢›ÛÎÔÈ ÙÚÈ‚‹˜ / ÙÂÌ·¯ÈÛÌÔ‡
◆ EÍ¿ÚÙËÌ· ¯Ù˘‹Ì·ÙÔ˜
◆ §В›‰· ·У¿МВИНЛ˜
∫Ô‹ (ÂÈÎ. L)
◆ ÃÚ‹ÛË Ù˘ ÌÂÙ·ÏÏÈ΋˜ Ï›‰·˜ ÎÔ‹˜.
◆ ƒ˘ıÌ›ÛÙ ÙËÓ Ù·¯‡ÙËÙ· ÛÙÔ 5. °È· ÌÂÁ·Ï‡ÙÂÚÔ
¤ПВБ¯Ф, ¯ЪЛЫИМФФИ‹ЫЩВ ЩФУ ·ПМИОfi ‰И·ОfiЩЛ.
◆ ªÔÚ›Ù ӷ Îfi„ÂÙ ̤¯ÚÈ 500 ÁÚ·ÌÌ¿ÚÈ·
ˆМФ‡ ‹ М·БВИЪВМ¤УФ˘ ОЪ¤·ЩФ˜, „·ЪИФ‡,
П·¯·УИОТУ, ОЩП.
∞У¿МВИНЛ (ВИО. L)
◆ ÃÚ‹ÛË Ù˘ ÌÂÙ·ÏÏÈ΋˜ Ï›‰·˜ ÎÔ‹˜.
◆ EÈϤÍÙ ÌÈ· Ù·¯‡ÙËÙ· ÌÂٷ͇ 3 Î·È 5.
◆ ªÔÚ›Ù ӷ ·Ó·Ì›ÍÂÙ ̤¯ÚÈ 1 Ï›ÙÚÔ
ÛÔ‡·˜, ‚Ú·ÛÌ¤ÓˆÓ ÊÚÔ‡ÙˆÓ, ÎÙÏ.
∞ӷοÙÂÌ·/˙‡ÌˆÛË (ÂÈÎ. L)
◆ ÃÚ‹ÛË Ù˘ Ï·ÛÙÈ΋˜ Ï›‰·˜ ·Ó·Î·Ù¤Ì·ÙÔ˜.
◆ ƒ˘ıÌ›ÛÙ ÙËÓ Ù·¯‡ÙËÙ· ÛÙÔ 5.
◆ ªÔÚ›Ù ӷ ·Ó·Ì›ÍÂÙ ̤¯ÚÈ 1 ÎÈÏfi ˙‡Ì˘,
Ì›ÁÌ·ÙÔ˜ ÁÈ· ΤÈÎ, ·Ï¢ÚÈ¿˜, Ì›ÁÌ·ÙÔ˜ ÁÈ·
ÌÈÛÎfiÙ·, ÎÙÏ.
ГЩ‡ЛМ· О·И ·У¿МВИНЛ (ВИО. L)
◆ ГЪЛЫИМФФИ‹ЫЩВ ЩФ ВН¿ЪЩЛМ· ¯Щ˘‹М·ЩФ˜.
◆ EÈϤÍÙ ÌÈ· Ù·¯‡ÙËÙ· ÌÂٷ͇ 1 Î·È 5
·Ó¿ÏÔÁ· Ì ÙËÓ ˘ÎÓfiÙËÙ· ÙÔ˘ ÙÚÔÊ›ÌÔ˘.
◆ ¶ФЩ¤ МЛУ ¯ЪЛЫИМФФИВ›ЫЩВ ЩФ ВН¿ЪЩЛМ·
¯Щ˘‹М·ЩФ˜ БИ· У· ˙˘МТЫВЩВ ˙‡МЛ ‹ БИ· У·
·Ó·Ì›ÍÂÙ ̛ÁÌ·Ù· ÁÈ· ΤÈÎ.
◆ ªФЪВ›ЩВ У· ¯ЪЛЫИМФФИ‹ЫЩВ ЩФ ВН¿ЪЩЛМ·
¯Ù˘‹Ì·ÙÔ˜ ÁÈ· Ó· ÊÙÈ¿ÍÙ ̤¯ÚÈ 0,5 Ï›ÙÚ·
Ì·ÁÈÔÓ¤˙·˜, Û¿ÏÙÛ·˜, Û·ÓÙÈÁ›, ÎÙÏ.
∆ÚÈ‚‹ & ÙÂÌ¿¯ÈÛÌ· (ÂÈÎ. ª)
◆ EИП¤НЩВ ЩФУ О·Щ¿ППЛПФ ‰›ЫОФ ЩВМ·¯›ЫМ·ЩФ˜.
21
Page 22

∂§§∏¡π∫∞
◆ ∆ÔÔıÂÙ‹ÛÙ ÙÔÓ ‰›ÛÎÔ ÙÂÌ·¯›ÛÌ·ÙÔ˜ ÛÙËÓ
˘Ô‰Ô¯‹ ÙÔ˘ ‰›ÛÎÔ˘.
◆ ГЪЛЫИМФФИ‹ЫЩВ ЩФ ВН¿ЪЩЛМ· ТıЛЫЛ˜ БИ· У·
ЩЪФКФ‰ФЩ‹ЫЩВ МВ К·БЛЩfi ЩФУ ЫˆП‹У·
ЩЪФКФ‰ФЫ›·˜.
◆ EÈϤÍÙ ÌÈ· Ù·¯‡ÙËÙ· ÌÂٷ͇ 2 Î·È 5 ÁÈ· ÙËÓ
·Ú¯‹.
◆ √È ‰›ÛÎÔÈ ÙÂÌ·¯ÈÛÌÔ‡ / ÙÚÈ‚‹˜ ÌÔÚÔ‡Ó Ó·
ÙÂÌ·¯›ÛÔ˘Ó Î·È Ó· ÙÚ›„Ô˘Ó Ï·¯·ÓÈο ̤¯ÚÈ
500 ÁÚ·Ì.
™Ù›ÊÙ˘ ÂÛÂÚȉÔÂȉÒÓ
◆ ∫fi„Ù ÙÔ ÂÛÂÚȉÔÂȉ¤˜ ÊÚÔ‡ÙÔ ÛÙË Ì¤ÛË
(fi¯È ·fi ¿ÎÚË Û ¿ÎÚË).
◆ ∆ÔÔıÂÙ‹ÛÙ ÙÔ ¤Ó· ÌÈÛfi ÙÔ˘ ÂÛÂÚȉÔÂȉԇ˜
ÊÚÔ‡ÙÔ˘ ¿Óˆ ÛÙÔÓ ÎÒÓÔ.
◆ ƒ˘ıМ›ЫЩВ ЩЛУ Щ·¯‡ЩЛЩ· ЫЩФ 1 БИ· У· НВОИУ‹ЫВИ
ÙÔ Ì˯¿ÓËÌ·.
ªÔÚ›Ù ӷ ÛÙ‡„Ù ̤¯ÚÈ 1 Ï›ÙÚÔ ¯˘ÌÔ‡ ÚÔÙÔ‡
¯ÚÂÈ·ÛÙ› Ó· ·‰ÂÈ¿ÛÙ ÙÔÓ Î¿‰Ô
EÍ¿ÚÙËÌ· ÌϤÓÙÂÚ (ÌfiÓÔ ÛÙÔ FP600)
◆ EÈϤÍÙ ÌÈ· Ù·¯‡ÙËÙ· ÌÂٷ͇ 1 Î·È 5 ÁÈ· Ó·
·Ъ¯›ЫВЩВ ЩЛУ ·У¿МВИНЛ.. °И· МВБ·П‡ЩВЪФ ¤ПВБ¯Ф,
¯ЪЛЫИМФФИ‹ЫЩВ ЩФУ ·ПМИОfi ‰И·ОfiЩЛ.
◆ ∫·Щ¿ ЩЛУ ‰И¿ЪОВИ· ЩЛ˜ ·У¿МВИНЛ˜ МФЪФ‡У У·
ЪФЫЩВıФ‡У ˘ПИО¿ ¯ЪЛЫИМФФИТУЩ·˜ ЩЛУ
ÂÁÎÔ‹ ÛÙÔ ÒÌ· ÙÔ˘ η·ÎÈÔ‡.
◆ ¶ÔÙ¤ ÌËÓ ÁÂÌ›ÛÂÙ ÙËÓ Î·Ó¿Ù· ÙÔ˘ ÌϤÓÙÂÚ
Ì ‚Ú·ÛÙfi ˘ÁÚfi.
ªÔÚ›Ù ӷ ·Ó·Ì›ÍÂÙ ̤¯ÚÈ 1,2 Ï›ÙÚ· ·fi
··П‹ ЫФ‡·, Ы¿ПЩЫ·, ОЪ¤М·, Ф˘Ъ¤ КЪФ‡ЩˆУ,
М›ПОЫВИО, ОФОЩ¤ИП ‹ ·ПВ˘ЪИ.
EÍ¿ÚÙËÌ· ¿ÏÂÛ˘ (ÌfiÓÔ ÛÙÔ FP600)
◆ ƒ˘ıМ›ЫЩВ ЩЛУ Щ·¯‡ЩЛЩ· ЫЩФ 5 БИ· У· НВОИУ‹ЫВИ
Ë Û˘Û΢‹.
◆ °И· МВБ·П‡ЩВЪФ ¤ПВБ¯Ф, ¯ЪЛЫИМФФИ‹ЫЩВ ЩФУ
·ÏÌÈÎfi ‰È·ÎfiÙË.
◆ ªÔÚ›Ù ӷ Îfi„ÂÙ ‹ Ó· ·Ï¤ÛÂÙ ̤¯ÚÈ
100 БЪ·ММ¿ЪИ· ˘ПИОТУ.
§ВИЩФ˘ЪБ›· ·˘ЩФО·ı·ЪИЫМФ‡
◆ ƒ›ÍÙ ˙ÂÛÙ‹ Û·Ô˘Ó¿‰· ÛÙËÓ Î·Ó¿Ù· ÙÔ˘
ÌϤÓÙÂÚ, ÙÔÓ Ì‡ÏÔ ¿ÏÂÛ˘ ‹ ÙÔÓ Î¿‰Ô ÙÔ˘
ÔÏ˘Ì›ÍÂÚ.
◆ ∞ÛÊ·Ï›ÛÙ ÙÔ Î·¿ÎÈ Î·È ÙÔÔıÂÙ‹ÛÙ ÙËÓ
О·У¿Щ·, ЩФУ М‡ПФ ‹ ЩФУ О¿‰Ф ЫЩЛ ЫˆЫЩ‹
˘Ф‰Ф¯‹ ЩЪФКФ‰ФЫ›·˜.
◆ ¶·Щ‹ЫЩВ ЩФ ОФ˘М› ·˘ЩФО·ı·ЪИЫМФ‡ ·ЪОВЩ¤˜
ÊÔÚ¤˜.
◆ √Ù·Ó Ë ÌÔÓ¿‰· ηı·Ú›ÛÂÈ, ·‰ÂÈ¿ÛÙ ÙË
Û·Ô˘Ó¿‰· Î·È ÍÂχÓÂÙ ηϿ.
∫∞£∞ƒπ™ª√™ ∫∞π ™À¡∆∏ƒ∏™∏
¶ЪИУ ·fi ЩФУ О·ı·ЪИЫМfi О·И ЩЛ Ы˘УЩ‹ЪЛЫЛ,
ı¤ЫЩВ ЩЛ Ы˘ЫОВ˘‹ ВОЩfi˜ ПВИЩФ˘ЪБ›·˜ О·И
‚Б¿ПЩВ ЩФ КИ˜ ·fi ЩЛУ Ъ›˙·.
◆ ∞К·ИЪ¤ЫЩВ ЩФУ О¿‰Ф ВЪИЫЩЪ¤КФУЩ¿˜ ЩФУ
ÚÔ˜ Ù· ‰ÂÍÈ¿.
◆ ¶П‡УВЩВ О·И ЫЩВБУТЫЩВ Щ· ВН·ЪЩ‹М·Щ· (fiП·
Ì·›ÓÔ˘Ó ÛÙÔ Ï˘ÓÙ‹ÚÈÔ È¿ÙˆÓ ÂÎÙfi˜ ·fi ÙÔ
ÂÍ¿ÚÙËÌ· ¯Ù˘‹Ì·ÙÔ˜).
◆ ∞Ó ¤¯ÂÈ ·ÏÏÔȈı› ÙÔ ¯ÚÒÌ· ÙˆÓ ÂÍ·ÚÙËÌ¿ÙˆÓ
·fi ЩФ К·БЛЩfi (О·ЪfiЩ·, ФЪЩФО¿ПИ·, ОЩП.)
ЩЪ›„ЩВ Щ· ··П¿ МВ ¤У· ·У› ‚Ф˘ЩЛБМ¤УФ ЫВ
П¿‰И М·БВИЪ¤М·ЩФ˜ О·И МВЩ¿ П‡УВЩВ Щ·
О·УФУИО¿.
ªËÓ ÙÔÔıÂÙ›Ù ÙËÓ ÌÔÓ¿‰· ÌÔÙ¤Ú ÛÂ
ÓÂÚfi ‹ ÎÔÓÙ¿ Û ÙÚ¯ԇÌÂÓÔ ÓÂÚfi.
™ÎÔ˘›ÛÙ Ì ¤Ó· ˘ÁÚfi ·Ó›.
E¡∆√¶π™ª√™ ∫∞π ∞¶√∫∞∆∞™∆∞™∏
¶ƒ√µ§∏ª∞∆ø¡
◆ µÂ‚·Èˆı›Ù fiÙÈ Ë Û˘Û΢‹ Â›Ó·È ÛˆÛÙ¿
ÙÔÔıÂÙË̤ÓË ÛÙËÓ Ú›˙·.
◆ µÂ‚·Èˆı›Ù fiÙÈ Ù· ÂÍ·ÚÙ‹Ì·Ù· Â›Ó·È ÛˆÛÙ¿
·ÛÊ·ÏÈṲ̂ӷ ÛÙËÓ ÌÔÓ¿‰· ÙÔ˘ ÌÔÙ¤Ú.
◆ µÂ‚·Èˆı›Ù fiÙÈ Ù· η¿ÎÈ· ¤¯Ô˘Ó ·ÛÊ·Ï›ÛÂÈ
О·УФУИО¿.
◆ √Щ·У ¯ЪЛЫИМФФИВ›ЩВ ЩФУ О¿‰Ф ЩФ˘ ФП˘М›НВЪ,
‚В‚·ИˆıВ›ЩВ fiЩИ ЩФ О¿П˘ММ· ЩЛ˜ ¿Уˆ ˘Ф‰Ф¯‹˜
ЩЪФКФ‰ФЫ›·˜ В›У·И ОПВИЫЩfi О·УФУИО¿.
◆ √Щ·У ¯ЪЛЫИМФФИВ›ЩВ ЩЛУ ¿Уˆ ˘Ф‰Ф¯‹
ЩЪФКФ‰ФЫ›·˜ (МfiУФ ЫЩФ FP600), ‚В‚·ИˆıВ›ЩВ
fiЩИ Ф О¿‰Ф˜ ЩФ˘ ФП˘М›НВЪ О·И ЩФ О·¿ОИ В›У·И
ЫˆЫЩ¿ ·ЫК·ПИЫМ¤У· ЫЩЛ ı¤ЫЛ ЩФ˘˜.
22
Page 23

∂§§∏¡π∫∞
¶ƒ√™∆∞™π∞ ∆√À ¶Eƒπµ∞§§√¡∆√™
∏ Black & Decker ‰›ÓÂÈ ÙË ‰˘Ó·ÙfiÙËÙ·
·У·О‡ОПˆЫЛ˜ ЩˆУ ЪФ˚fiУЩˆУ ЩЛ˜ Ф˘
¤¯Ф˘У Ы˘МПЛЪТЫВИ ЩЛ ‰И¿ЪОВИ· ˙ˆ‹˜
ЩФ˘˜. ∏ ˘ЛЪВЫ›· ·˘Щ‹ В›У·И ‰ˆЪВ¿У.
∞У ı¤ПВЩВ У· ¯ЪЛЫИМФФИ‹ЫВЩВ ЩЛУ ВУ
ПfiБˆ ˘ЛЪВЫ›·, ВИЫЩЪ¤„ЩВ ЩФ ЪФ˚fiУ
Ы·˜ ЫВ ФФИФ‰‹ФЩВ ВНФ˘ЫИФ‰ФЩЛМ¤УФ
О¤УЩЪФ ВИЫОВ˘ТУ, fiФ˘ ı· ЩФ
·Ъ·П¿‚Ф˘У ВО М¤ЪФ˘˜ Ы·˜.
EУЛМВЪˆıВ›ЩВ БИ· ЩФ ПЛЫИ¤ЫЩВЪФ О¤УЩЪФ
ВИЫОВ˘ТУ ЩЛ˜ ВЪИФ¯‹˜ Ы·˜, ВИОФИУˆУТУЩ·˜ МВ
Щ· БЪ·КВ›· ЩЛ˜ Black & Decker ЫЩЛ ‰ИВ‡ı˘УЫЛ
Ф˘ ·У·БЪ¿КВЩ·И ЫЩФ ВБ¯ВИЪ›‰ИФ. E›ЫЛ˜, БИ· У·
ПЛЪФКФЪЛıВ›ЩВ БИ· Щ· ВНФ˘ЫИФ‰ФЩЛМ¤У· О¤УЩЪ·
ВИЫОВ˘ТУ ЩЛ˜ Black & Decker, ЩИ˜ ПВЩФМ¤ЪВИВ˜
О·И ЩФ˘˜ ·ЪМfi‰ИФ˘˜ ЩˆУ ˘ЛЪВЫИТУ Ф˘
·Ъ¤¯ФУЩ·И МВЩ¿ ЩЛУ ТПЛЫЛ, МФЪВ›ЩВ У·
·Ó·ÙÚ¤ÍÙ ÛÙÔ ¢È·‰›ÎÙ˘Ô ÛÙË ‰È‡ı˘ÓÛË:
www.2helpU.com
◆ E¯ÂÈ Á›ÓÂÈ ÂÛÊ·Ï̤ÓË ¯Ú‹ÛË ÙÔ˘ ÚÔ˚fiÓÙÔ˜ ‹
·Ó ¤¯ÂÈ ·Ú·ÌÂÏËı›
◆ ∆Ô ÚÔ˚fiÓ ¤¯ÂÈ ˘ÔÛÙ› ‚Ï¿‚Ë ·fi ¿ÏÏ·
·УЩИОВ›МВУ·, ·fi Ф˘Ы›В˜ ‹ ПfiБˆ ·Щ˘¯‹М·ЩФ˜
◆ E¯ÂÈ Á›ÓÂÈ ÚÔÛ¿ıÂÈ· ÂÈÛ΢‹˜ ·fi ÌË
ÂÍÔ˘ÛÈÔ‰ÔÙË̤ӷ ΤÓÙÚ· ÂÈÛ΢ÒÓ ‹ ·fi
ÚÔÛˆÈÎfi Ô˘ ‰ÂÓ ·Ó‹ÎÂÈ ÛÙÔ ÚÔÛˆÈÎfi
Ù˘ Black & Decker
°È· Ó· ÈÛ¯‡ÛÂÈ Ë ÂÁÁ‡ËÛË, Ú¤ÂÈ Ó· ˘Ô‚¿ÏÂÙÂ
·fi‰ВИНЛ ·БФЪ¿˜ ЫЩФУ ˆПЛЩ‹ ‹ ЩФ
ВНФ˘ЫИФ‰ФЩЛМ¤УФ О¤УЩЪФ ВИЫОВ˘ТУ.
EУЛМВЪˆıВ›ЩВ БИ· ЩФ ПЛЫИ¤ЫЩВЪФ О¤УЩЪФ
ВИЫОВ˘ТУ ЩЛ˜ ВЪИФ¯‹˜ Ы·˜, ВИОФИУˆУТУЩ·˜ МВ
Щ· БЪ·КВ›· ЩЛ˜ Black & Decker ЫЩЛ ‰ИВ‡ı˘УЫЛ
Ф˘ ·У·БЪ¿КВЩ·И ЫЩФ ВБ¯ВИЪ›‰ИФ. E›ЫЛ˜, БИ· У·
ПЛЪФКФЪЛıВ›ЩВ Щ· ВНФ˘ЫИФ‰ФЩЛМ¤У· О¤УЩЪ·
ВИЫОВ˘ТУ ЩЛ˜ Black & Decker О·И ЩИ˜
ПВЩФМ¤ЪВИВ˜ О·И ЩФ˘˜ ·ЪМfi‰ИФ˘˜ ЩˆУ ˘ЛЪВЫИТУ
Ф˘ ·Ъ¤¯ФУЩ·И МВЩ¿ ЩЛУ ТПЛЫЛ, МФЪВ›ЩВ У·
·Ó·ÙÚ¤ÍÙ ÛÙÔ ¢È·‰›ÎÙ˘Ô ÛÙË ‰È‡ı˘ÓÛË:
www.2helpU.com.
E°°À∏™∏
∏ Black & Decker В›У·И Ы›БФ˘ЪЛ БИ· ЩЛУ ФИfiЩЛЩ·
ЩˆУ ЪФ˚fiУЩˆУ ЩЛ˜ О·И ·Ъ¤¯ВИ ЫЛМ·УЩИО‹
ВББ‡ЛЫЛ. ∏ ·ЪФ‡Ы· БЪ·Щ‹ ВББ‡ЛЫЛ ·ФЩВПВ›
ЪfiЫıВЩФ ‰ИО·›ˆМ¿ Ы·˜ О·И ‰ВУ ˙ЛМИТУВИ Щ·
Ы˘УЩ·БМ·ЩИО¿ Ы·˜ ‰ИО·ИТМ·Щ·. ∏ ВББ‡ЛЫЛ ИЫ¯‡ВИ
ВУЩfi˜ ЩЛ˜ ВИОЪ¿ЩВИ·˜ ЩˆУ ∫Ъ·ЩТУ ªВПТУ ЩЛ˜
E˘Ъˆ·˚О‹˜ EУˆЫЛ˜ О·И ЩЛ˜ E˘Ъˆ·˚О‹˜ ∑ТУЛ˜
EПВ˘ı¤ЪˆУ ™˘У·ПП·БТУ.
™В ВЪ›ЩˆЫЛ Ф˘ О¿ФИФ ЪФ˚fiУ ЩЛ˜
Black & Decker ·ЪФ˘ЫИ¿ЫВИ ‚П¿‚Л ВН·ИЩ›·˜
ВП·ЩЩˆМ·ЩИОТУ ˘ПИОТУ, ФИfiЩЛЩ·˜ ВЪБ·Ы›·˜ ‹
¤ППВИ„Л˜ Ы˘МКˆУ›·˜ МВ ЩИ˜ ЪФ‰И·БЪ·К¤˜ ВУЩfi˜
24 МЛУТУ ·fi ЩЛУ ЛМВЪФМЛУ›· ·БФЪ¿˜,
Л Black & Decker ВББ˘¿Щ·И ЩЛУ ·УЩИО·Щ¿ЫЩ·ЫЛ
ЩˆУ ВП·ЩЩˆМ·ЩИОТУ ЩМЛМ¿ЩˆУ, ЩЛУ ВИЫОВ˘‹
ЪФ˚fiУЩˆУ Ф˘ ¤¯Ф˘У ˘ФЫЩВ› В‡ПФБЛ КıФЪ¿
ПfiБˆ ¯Ъ‹ЫЛ˜ ‹ ЩЛУ ·УЩИО·Щ¿ЫЩ·ЫЛ ЩˆУ
ЪФ˚fiУЩˆУ ЪФОВИМ¤УФ˘ У· ВН·ЫК·П›ЫВИ ЩЛУ
ВП¿¯ИЫЩЛ ВУfi¯ПЛЫЛ ЫЩФ˘˜ ВП¿ЩВ˜ ЩЛ˜, ВОЩfi˜ ·У:
◆ ∆Ф ЪФ˚fiУ ¤¯ВИ ¯ЪЛЫИМФФИЛıВ› ЫВ ВЪБ·ЫИ·Оfi,
В·ББВПМ·ЩИОfi ВЪИ‚¿ППФУ ‹ ·У ¤¯ВИ
ВУФИОИ·ЫЩВ›
23
Page 24

TÜRKÇE
BESİN İŞLEYİCİ FP550/FP600
Black & Decker firması ürününü seçtiğiniz için size
teşekkür ederiz. Bu ürünün size uzun yıllar
boyunca mutluluk getireceğini ümit ediyoruz.
GENEL BAKIŞ (şek. A-G)
1. Elektronik hız seçici
2. Otomatik temizleme düğmesi
3. Üst güç çıkışı başlığı
4. Üst güç çıkışı
5. Kapak kilit yuvası
6. Alt güç çıkışı
7. Motor ünitesi
8. Ölçme bölümlü besin itici
9. Besleme kanallı kapak
10. İşleyici kasesi
11. Metal bıçak
12. Plastik karıştırma bıçağı
13. Çırpma eklentisi
14. Rendeleme/dilimleme diskleri
15. Disk tutucu
16. Geniş sıkma konisi
17. Küçük sıkma konisi
18. Sıkma filtre sepeti
19. Kapak (sadece FP600)
20. Öğütme değirmeni (sadece FP600)
21. Kapak engeli (sadece FP600)
22. Kapak (sadece FP600)
23. Karıştırıcı eklentisi (sadece FP600)
EC’YE UYGUNLUK BEYANI
FP550/FP600
Black & Decker firması ürünlerinin
98/37/EC, 89/336/EEC, 73/23/EEC,
EN 55014, EN 60335, EN 61000
normuna uyduğunu beyan eder.
LpA(ses şiddeti) dB(A) 77
İvme karesinin ortalama ağırlıklı m/s
2
< 2.5
Sahip olduğunuz Black & Decker besin işleyici,
bu kılavuzda belirtilen şekilde çeşitli besinler ve
içecekler hazırlamak için tasarlanmıştır. Bu ürün
sadece ev işlerinde kullanım içindir.
Bu kullanım kılavuzunda aşağıdaki semboller
kullanılmıştır:
◆ Uyarı! Elektrikli aletleri kullanırken yangın,
◆ Cihazı kullanmadan önce tüm kullanım
◆ Bu ürünün kullanım amacı bu kullanım
◆ Bu kullanım kılavuzunu gelecekteki kullanımlar
Director of Consumer Engineering
Spennymoor, County Durham DL16 6JG,
ÖNGÖRÜLEN KULLANIMI
UYARI SEMBOLLERİ
Bu kullanım kılavuzunda belirtilen kurallara
uyulmadığında kişisel yaralanma riskinin
bulunduğunu veya ürünün zarar göreceğini
belirtir.
Elektrik çarpması tehlikesini belirtir.
ÖNEMLİ GÜVENLİK TALİMATLARI
elektrik çarpması ve kişisel yaralanmaların
önüne geçmek için, aşağıdakileri de içeren
temel güvenlik önlemlerine daima uymak
gerekir.
kılavuzunu dikkatlice okuyunuz.
kılavuzunda anlatılmıştır. Bu kullanım
kılavuzunda belirtilen aksesuarların ya da
yardımcı aletlerin kullanılmaması veya aletle
tavsiye edilenin dışındaki işlemlerin yapılması
yaralanma riskinin doğmasına yol açabilir.
için saklayınız.
Kevin Hewitt
İngiltere
24
Page 25

TÜRKÇE
Cihazınızın kullanımı
◆ Hareket eden parçalara dokunmayın.
◆ Güç kaynağına bağlamadan veya bağlantıyı
kesmeden önce cihazın kapalı olduğundan
emin olun.
◆ Bıçaklara dikkat ediniz; bunlar son derece
keskindir.
◆ Kasenin içindekileri boşaltmadan önce bıçakları
çıkartın.
◆ Besleme kanalından besinleri itmek için daima
iticiyi kullanın. Asla parmaklarınızla, çatalla,
bıçakla veya herhangi bir diğer aletle bunu
yapmaya kalkmayın.
◆ Cihazı asla boşken çalıştırmayın.
◆ Cihazı kullanırken dikkatli olunuz.
◆ Fişi prizden çekerken hiç bir zaman kablodan
çekmeyiniz. Elektrik kablosunun sıcaklık
kaynakları, yağ ve keskin kenarlı maddelerle
temasa geçmesini engelleyiniz. Güç kaynağı
kablosunun, masanın veya çalışma yerinizin
kenarından sarkmasına izin vermeyin.
◆ Cihazı, ısı kaynaklarının yakınına veya ısıtılmış
fırının içine yerleştirmeyiniz.
◆ Cihazı yanıcı veya patlayıcı malzemelerin
yakınında kullanmayınız.
◆ Cihazı açık havada kullanmayınız.
◆ Motor ünitesini daima sudan veya aşırı nemden
koruyunuz.
◆ Cihazı sadece elleriniz kuruyken kullanınız.
◆ Eğer elektrik kablosu kulanım sırasında zarar
görmüşse cihazı hemen prizden çekiniz.
Güç kaynağıyla bağlantısını kesmeden güç
kaynağı kablosuna dokunmayınız.
◆ Kullanımda olmadığında, parça takıp çıkarırken
ve temizlik öncesinde cihazı güç kaynağından
çekiniz.
◆ Cihazı etrafında yeterli boşluk olan, düzgün bir
yüzeye yerleştirin.
Diğer şahısların güvenliği
◆ Çocukların ve bu kullanım talimatlarını bilmeyen
kişilerin cihazı kullanmasına engel olunuz.
◆ Çocukların veya hayvanların çalışma alanına
girmesine ve elektrik kablosuna dokunmasına
izin vermeyiniz. Eğer bu cihaz çocukların
bulunduğu yerin yakınlarında kullanılacaksa
yakın gözetim gereklidir.
Kullanımdan sonra
◆ Cihazı kullanmadığınızda ve cihazın çeşitli
parçalarının değiştirilmesinden, temizliğinden
veya bakımından önce cihazı kapatınız ve fişini
prizden çekiniz.
◆ Cihaz kullanılmadığı zaman kuru bir yerde
muhafaza edilmelidir. Bu muhafaza alanına
çocuklar girmemelidir.
Cihazın kontrolü ve tamiri
◆ Kullanmadan önce cihazın veya herhangi bir
parçasının arızalı olup olmadığını kontrol ediniz.
Parçaların çatlak olup olmadığını ve çalışmayı
etkileyecek diğer şartların kontrolünü yapınız.
◆ Cihazın herhangi bir parçası arızalıysa veya
hatalıysa kullanmayınız.
◆ Arızalı parçaları yetkili servislerde tamir ettiriniz
veya değiştiriniz.
◆ Kullanmadan önce elektrik kablosunun arızalı
veya eski gibi görünüp görünmediğinin
kontrolünü yapınız.
◆ Elektrik kablosu veya priz arızalı ya da bozuksa
cihazı kullanmayınız.
◆ Elektrik kablosu veya elektrik fişi arızalı ya da
kusurluysa, olası tehlikeleri engellemek için
bunların değişimini yetkili servis yapmalıdır.
Elektrik kablosunu kesmeyiniz ve bunu
kendiniz tamir etmeye çalışmayınız.
◆ Bu kullanma kılavuzunda belirtilmeyen
parçaların dışındaki hiç bir parçanın
değiştirilmesine veya tamirine çalışmayınız.
ELEKTRİK GÜVENLİĞİ
◆ Kullanmadan önce şebeke geriliminin model
etiketindekiyle aynı olup olmadığını kontrol ediniz.
Cihaz EN 60335’e uygun olarak çift
izolelidir; bu nedenle toprak kablosuna
ihtiyaç yoktur.
Elektrik çarpması riskinden kaçınmak için
kabloyu, fişi veya motor ünitesini suya
veya diğer herhangi bir sıvıya sokmayın.
25
Page 26

TÜRKÇE
BİRLEŞTİRME
İşleyici kasesi (şek. H)
İşleyici kasesi büyük miktarlardaki besinleri
karıştırmak, doğramak veya yoğurmak için
kullanılabilir.
◆ Üst güç çıkışı başlığını kapatın.
◆ Kaseyi, açık kilit işareti okla hizalanacak şekilde
alt güç çıkışının üstüne yerleştirin. Kase yerine
oturana ve kapalı kilit işareti okla hizalanana
kadar tutacağı sağa çevirin.
◆ Mil üzerine istenilen aksesuarı geçirin.
◆ Malzemeyi kasenin içine yerleştirin.
◆ Besleme kanalı, kapak kilitleme yuvasının
sağındayken kapağı kasenin üzerine yerleştirin.
◆ Bir yandan üst güç çıkışı başlığını bastırırken,
kapak, kapak kilitleme yuvasına geçene kadar
kapağı saat yönünün tersine çevirin.
Kapak doğru konuma geçmediği sürece besin
işleyici çalışmayacaktır.
Narenciye sıkacağı (şek. I)
◆ Üst güç çıkışının kapalı olduğunu kontrol edin.
◆ Kaseyi, açık kilit işareti okla hizalanacak şekilde
alt güç çıkışının üstüne yerleştirin. Kase yerine
oturana ve kapalı kilit işareti okla hizalanana
kadar tutacağı sağa çevirin.
◆ Filtre sepetini kasenin üzerine yerleştirin.
Sepetin üzerindeki kilit çıkıntısı kapak kilitleme
yuvasının sağında bulunmalıdır.
◆ Çıkıntı, kilitleme yuvasına geçinceye kadar
sepeti saat yönünün tersine döndürün.
◆ Koniyi sepetin içindeki deliğe yerleştirin.
◆ Büyük meyveler için geniş koniyi küçük olanın
üzerine yerleştirin.
Karıştırıcı eklentisi (şek. J) (sadece FP600)
Karıştırıcı eklentisini, çiğ besinlerin ince olarak
karıştırılması ve pişmiş besinlerin oldukça sıvı ve
pürüzsüz bir hale getirilmesi için kullanın.
◆ Üst güç çıkışı başlığını kaldırın.
◆ Malzemeyi karıştırıcı kabının içine yerleştirin.
◆ Kapalı kilit işaretini okla hizalayarak kapağı
kilitleyin. Kapağın üzerindeki çıkıntı, kap sapının
üzerindeki kilitleme yuvasına geçmiş olmalıdır.
◆ Kapak doğru konumda değilse cihaz
çalışmayacaktır.
◆ Karıştırıcı kabı ve kapak motor ünitesi üzerinde
yerleştikten sonra kapağın çıkartılması mümkün
değildir.
◆ Açık kilit işareti okla hizalanmış olacak şekilde
karıştırıcıyı üst güç çıkışının üzerine yerleştirin.
Kabı saat yönünün tersine çevirerek kapalı kilit
işareti ve oku birbirine hizalayın. Kap şimdi
doğru konumdadır.
◆ Kabı sökmek için saat yönüne çevirin.
Öğütme eklentisi (şek. K) (sadece FP600)
Öğütme değirmenini küçük parçaların ince
doğranması veya öğütülmesinde kullanın.
Öğütme değirmeni kuruyemiş, kahve ve
baharatların işlenmesi için idealdir.
◆ Üst güç çıkışı başlığını kaldırın.
◆ Malzemeyi değirmene yerleştirin ve kapağı
doğru konuma kilitleyin.
◆ Açık kilit işareti okla hizalanmış olacak şekilde
değirmeni üst güç çıkışının üzerine yerleştirin.
◆ Kapalı kilit işareti okla hizalanana kadar
değirmeni saat yönünün tersine çevirin.
Artık değirmen doğru konumdadır.
◆ Çıkartmak için değirmeni saat yönüne doğru
çevirin.
KULLANIM
Cihazı 3 dakikadan (çırpma aleti, narenciye
sıkacağı) veya 2 dakikadan
(diğer aksesuarlar) uzun süre çalıştırmayın.
Cihazın çalıştırılması
◆ İstediğiniz eklentiyi takın.
◆ Cihazı prize takın.
◆ Cihazı şu şekilde çalıştırın: Düğmeyi çevirerek
istediğiniz hız ayarına getirin (1-5).
Bu ayar çalışma sırasında değiştirilebilir.
Daha hassas kontrol için, düğmeyi titreşimi sağlayan
P konumuna getirin. Bu konumda aralıklı olarak
güç verilecektir.
◆ Cihazı şu şekilde kapatın: Düğmeyi ‘0’ konumuna
getirin.
Cihazı çalıştırırken lütfen şu güvenlik
özelliklerine dikkat edin:
26
Page 27

TÜRKÇE
◆ Alt güç çıkışını kullanırken: Üst güç başlığı
yerine oturmuş ve işleyici kapağı,
kapak kilitleme yuvasına geçmiş olmalıdır.
◆ Üst güç çıkışını kullanırken ise (sadece FP600):
Karıştırıcı veya öğütme değirmeni kullanılırken,
kapağı kapalı olacak şekilde işleyici kasesi
yerinde bulunmalıdır.
İşleyici kasesi
İşleyici kasesi şu aksesuarlarla birlikte kullanılabilir:
◆ Doğrama bıçağı
◆ Rendeleme/dilimleme diskleri
◆ Çırpma eklentisi
◆ Karıştırma bıçağı
Doğrama (şek. L)
◆ Metal doğrama bıçağını kullanın.
◆ Hızı 5’e getirin. Daha fazla kontrol sağlamak
için, titreşim düğmesini seçin.
◆ 500 grama kadar olan pişmiş et, balık, sebze
vs. doğrayabilirsiniz.
Karıştırma (şek. L)
◆ Metal doğrama bıçağını kullanın.
◆ 3 ile 5 arası bir hız seçin.
◆ 1 litreye kadar olan çorba, haşlanmış meyve vs.
karıştırabilirsiniz.
Rendeleme ve dilimleme (şek. M)
◆ İstediğiniz dilimleme diskini seçin.
◆ Dilimleme diskini disk yuvasına yerleştirin.
◆ Besinleri besleme kanalına itmek için iticiyi
kullanın.
◆ Başlangıç için 2 ile 5 arası bir hız seçin.
◆ Dilimleme/rendeleme diskleri 500 grama kadar
olan sebzeleri dilimleyebilir veya rendeleyebilir.
Narenciye sıkacağı
◆ Narenciyeyi ortasından ikiye bölün
(uçtan uca değil).
◆ Koninin üzerine yarım meyveyi yerleştirin.
◆ Makineyi çalıştırmak için hızı 1’e ayarlayın.
Kasenin içinde 1 litreye kadar meyve suyu
depolayabilirsiniz.
Karıştırıcı eklentisi (sadece FP600)
◆ Karıştırmaya başlamak için 1 ile 5 arası bir hız
seçin. Daha fazla kontrol için titreşim düğmesini
seçin.
◆ Karıştırma sırasında kapak engelindeki delik
kullanılarak malzeme eklenebilir.
◆ Asla karıştırıcı kabına kaynar sıvıları doldurmayın.
1.2 litreye kadar olan pürüzsüz çorbaları, sosları,
kremaları, elma pürelerini, milk şeykleri, kokteylleri
veya sulandırılmış hamurları hazırlayabilirsiniz.
Karıştırma/yoğurma (şek. L)
◆ Plastik karıştırma bıçağını kullanın.
◆ Hızı 5’e getirin.
◆ 1 kg’ye kadar olan hamur işi, hamurlu karışım,
kek karışımı, sulandırılmış hamur, bisküvi
karışımı vs. karıştırabilirsiniz.
Kabartma ve çırpma (şek. L)
◆ Çırpma eklentisini kullanın.
◆ Besinin katılığına göre 1 ile 5 arasında bir hız
seçin.
◆ Çırpma aletini hiçbir zaman hamur yoğurmak
veya kek karışımlarını karıştırmak için
kullanmayın.
◆ Çırpma aletini 0.5 litreye kadar olan mayonez,
sos, krema vs. gibi şeyleri hazırlamak için
kullanabilirsiniz.
Öğütme eklentisi (sadece FP600)
◆ Cihazı çalıştırmak için hızı 5’e ayarlayın.
◆ Daha fazla kontrol için titreşim düğmesini
kullanın.
◆ 100 grama kadar olan bileşimleri doğrayabilir
veya öğütebilirsiniz.
Otomatik temizleme işlevi
◆ Karıştırıcı kabına, öğütme değirmenine veya
işleyici kasesine ılık ve sabunlu su koyun.
◆ Kapağını kapatın ve kabı, değirmeni veya
kaseyi doğru güç çıkışına yerleştirin.
◆ Birkaç kez otomatik temizleme (Autoclean)
düğmesine basın.
◆ Temizlik bittikten sona sabunlu suyu dökün ve
temiz suyla iyice çalkalayın.
27
Page 28

TÜRKÇE
TEMİZLEME VE BAKIM
Temizlik ve bakımdan önce cihazı kapatın
ve fişini prizden çekin.
◆ Saat yönüne doğru döndürerek kaseyi sökün.
◆ Aksesuarları yıkayın ve kurutun
(çırpıcı dışındakilerin tümü bulaşık makinesinde
yıkanabilir).
◆ Aksesuarların rengi, renk veren besinler
tarafından değiştirilirse (havuç, portakal vs.)
yemek yağına batırılmış bir bezle hafifçe silin ve
daha sonra normal şekilde yıkayın.
Motor ünitesini akan suyun içine veya
yakınına koymayın. Nemli bir bezle silin.
ARIZA BULMA
◆ Cihazın prize düzgün olarak takılı olduğundan
emin olun.
◆ Aksesuarların motor ünitesine düzgün
geçtiğinden emin olun.
◆ Kapakların tam kapalı olduğundan emin olun.
◆ İşleyici kasesini kullanırken, üst güç çıkışı
başlığının tam kapalı olduğundan emin olun.
◆ Üst güç çıkışını kullanırken (sadece FP600)
işleyici kasesinin ve kapağın yerine düzgün bir
şekilde geçtiğinden emin olun.
YAŞAM ALANLARINI KORUMA
Black & Decker ürünleri çalışma ömürlerini
tamamladıklarında, Black & Decker
bunların geri kazandırılması imkanını
sağlar. Bu hizmet ücretsiz sağlanır.
Bu hizmetten yararlanmak için elinizdeki
ürünü, bizim yerimize ürünleri toplayan
yetkili bir tamir servisine götürün.
GARANTİ
Black & Decker, ürünün kalitesinden emindir ve
ürün için üstün bir garanti sunar. Ayrıca bu garanti
belgesi, hiçbir şekilde kanuni haklarınızın olmasını
gerektirmez.
Eğer bir Black & Decker ürünü, hatalı malzeme ve
işçilik nedeniyle bozulursa, satın alma tarihinden
12 ay içinde müşteriye mümkün olabilecek en az
sorunu yaşatabilmek için Black & Decker hatalı
kısımları değiştirmeyi, belirgin bir şekilde yıpranmış
veya hasar görmüş kısımları onarmayı veya
değiştirmeyi kabul eder; ancak bu belirtilenler şu
durumlar dışında geçerlidir:
◆ Ürün ticari veya profesyonel amaçlarla
kullanılmışsa veya kiraya verilmişse;
◆ Ürün yanlış veya amaç dışı kullanılmışsa;
◆ Ürün yabancı nesnelerden, maddelerden veya
kaza sırasında zarar görmüşse;
◆ Yetkili tamir servisleri veya Black & Decker
servis ekibinden başkası tarafından tamir
yapılmaya kalkışılmışsa.
Garanti talebinde bulunmak için, satıcıya veya
yetkili tamir servisine satın aldığınıza dair ispat
sunmalısınız. Bu kılavuzda belirtilen adresteki yerel
Black & Decker ofisine başvurarak size en yakın
yetkili tamir servisinin yerini öğrenebilirsiniz. Ya da,
Internet’te Black & Decker yetkili tamir servislerinin
listesini ve satış sonrası hizmet veren yetkililerin
tam detaylarını öğrenebilirsiniz. Bu site:
www.2helpU.com adresindedir.
Bu kılavuzda belirtilen adresteki yerel Black & Decker
ofisine başvurarak size en yakın yetkili tamir
servisinin yerini öğrenebilirsiniz. Ya da, Internet’te
www.2helpU.com adresinden, Black & Decker
yetkili tamir servislerinin listesini ve satış sonrası
hizmet veren yetkililerin tam detaylarını
öğrenebilirsiniz.
28
Page 29

293031
Page 30

Page 31

Page 32

Australia DEWALT Industrial Power Tool Company Tel. 03 9895 9200
7 Clarice Road, Box Hill, Victoria 3128 Fax 03 9899 7465
Belgique/België Black & Decker (Belgium) N.V. Tel. 02/719.07.11
Weihoek 1, 1930 Zaventem Fax 02/719.08.10
Danmark Black & Decker Tel. 70 20 15 10
Hejrevang 26B, 3450 Allerød Fax 48 14 13 99
Internet: www.blackdecker.dk
Deutschland Black & Decker GmbH Tel. 06126/21 24 83
Black & Decker Str. 40, D - 65510 Idstein Fax 06126/21 26 01
EÏÏ¿˜ Black & Decker (EÏÏ¿˜) ∞.E. ∆ËÏ. (01) 8981-616
™ÙÚ¿‚ˆÓÔ˜ 7 & µÔ˘ÏÈ·Á̤Ó˘ 159 º·Í (01) 8983-570
°Ï˘Ê¿‰· 16674, EÏÏ¿‰· Service (01) 8982-630
España Black & Decker Spain Tel. 934 797 400
Parque de Negocios “Mas Blau” Fax 934 797 419
Edificio Muntadas, c/Bergadá, 1, Of. A6
08820 El Prat de Llobregat (Barcelona)
France Black & Decker (France) S.A.S. Tel. 04 72 20 39 20
B.P. 21, 69571 Dardilly Cédex Fax 04 72 20 39 00
Helvetia Eduard Luggen Tel. 01/854 01 01
Black & Decker-Service Schweiz Fax 01/854 02 02
Industriestrasse 1 / Postfach 323
8157 Dielsdorf
Italia Black & Decker Italia SpA Tel. 039-23871
Viale Elvezia 2 Fax 039-2387592/2387594
20052 Monza (MI) Numero verde 800-213935
Nederland Black & Decker (Nederland) BV Tel. 076-5082000
Florijnstraat 10, 4879 AH Etten-Leur Fax 076-5038184
New Zealand Black & Decker Tel. 09 579 7600
81 Hugo Johnson Drive Fax 09 579 8200
Penrose, Auckland, New Zealand
Norge Black & Decker (Norge) A/S Tlf. 22 90 99 00
Postboks 248, Leirdal, 1011 Oslo Fax 22 90 99 01
Internet: www.blackdecker.no
Österreich Black & Decker Vertriebsges.m.b.H Tel. 01 66116-0
Erlaaerstraße 165, 1231 Wien Fax 01 66116-14
Portugal Black & Decker Tel. 214667500
Rua Egas Moniz 173, Fax 214667575
2766-651 S. João do Estoril
South Africa Black & Decker South Africa (Pty) Ltd Tel. (011) 653-1400
Physical address: Fax (011) 653-1499
39 Commerce Crescent
Eastgate, ext. 12, Sandton, Kramerville 2148
Postal address:
Postnet Suite 107, Private Bag X65
Halfway House 1685
Suomi Black & Decker Oy Puh: (09) 825 4540
Palotie 3, 01610 Vantaa Fax: (09) 825 45 444
Black & Decker Oy, Tel: (09) 825 4540
Brandvägen 3, 01610 Vanda Fax: (09) 825 45 444
Sverige Black & Decker AB Tel: 031-68 60 00
Box 603, 421 26 Västra Frölunda, Fax: 031-68 60 08
Besöksadr. Ekonomivägen 11
Türkiye Black & Decker Merkez Servis Tel. 0216 455 89 73
Dudullu Cad. Kerembey Sok. No. 1 Faks 0216 455 20 52
Küçükbakkalköy/Istanbul
United Kingdom Black & Decker Tel. 01753 511234
210 Bath Road Fax 01753 551155
Slough, Berkshire SL1 3YD Helpline 01753 574277
32
580699-00
 Loading...